

Datasheet AD7730LEB, AD7730EB, AD7730LBRU, AD7730LBR, AD7730BRU Datasheet (Analog Devices)
...Page 1
a
Bridge Transducer ADC
AD7730/AD7730L
KEY FEATURES
Resolution of 230,000 Counts (Peak-to-Peak)
Offset Drift: 5 nV/8C
Gain Drift: 2 ppm/8C
Line Frequency Rejection: >150 dB
Buffered Differential Inputs
Programmable Filter Cutoffs
Specified for Drift Over Time
Operates with Reference Voltages of 1 V to 5 V
ADDITIONAL FEATURES
Two-Channel Programmable Gain Front End
On-Chip DAC for Offset/TARE Removal
FAST
Step™ Mode
AC or DC Excitation
Single Supply Operation
APPLICATIONS
Weigh Scales
Pressure Measurement
GENERAL DESCRIPTION
The AD7730 is a complete analog front end for weigh-scale and
pressure measurement applications. The device accepts lowlevel signals directly from a transducer and outputs a serial
digital word. The input signal is applied to a proprietary programmable gain front end based around an analog modulator.
The modulator output is processed by a low pass programmable
digital filter, allowing adjustment of filter cutoff, output rate and
settling time.
The part features two buffered differential programmable gain
analog inputs as well as a differential reference input. The part
operates from a single +5 V supply. It accepts four unipolar
analog input ranges: 0 mV to +10 mV, +20 mV, +40 mV and
+80 mV and four bipolar ranges: ±10 mV, ±20 mV, ±40 mV
and ±80 mV. The peak-to-peak resolution achievable directly
from the part is 1 in 230,000 counts. An on-chip 6-bit DAC
allows the removal of TARE voltages. Clock signals for synchronizing ac excitation of the bridge are also provided.
The serial interface on the part can be configured for three-wire
operation and is compatible with microcontrollers and digital
signal processors. The AD7730 contains self-calibration and
system calibration options, and features an offset drift of less
than 5 nV/°C and a gain drift of less than 2 ppm/°C.
The AD7730 is available in a 24-pin plastic DIP, a 24-lead
SOIC and 24-lead TSSOP package. The AD7730L is available
in a 24-lead SOIC and 24-lead TSSOP package.
NOTE
The description of the functions and operation given in this data
sheet apply to both the AD7730 and AD7730L. Specifications
and performance parameters differ for the parts. Specifications
for the AD7730L are outlined in Appendix A.
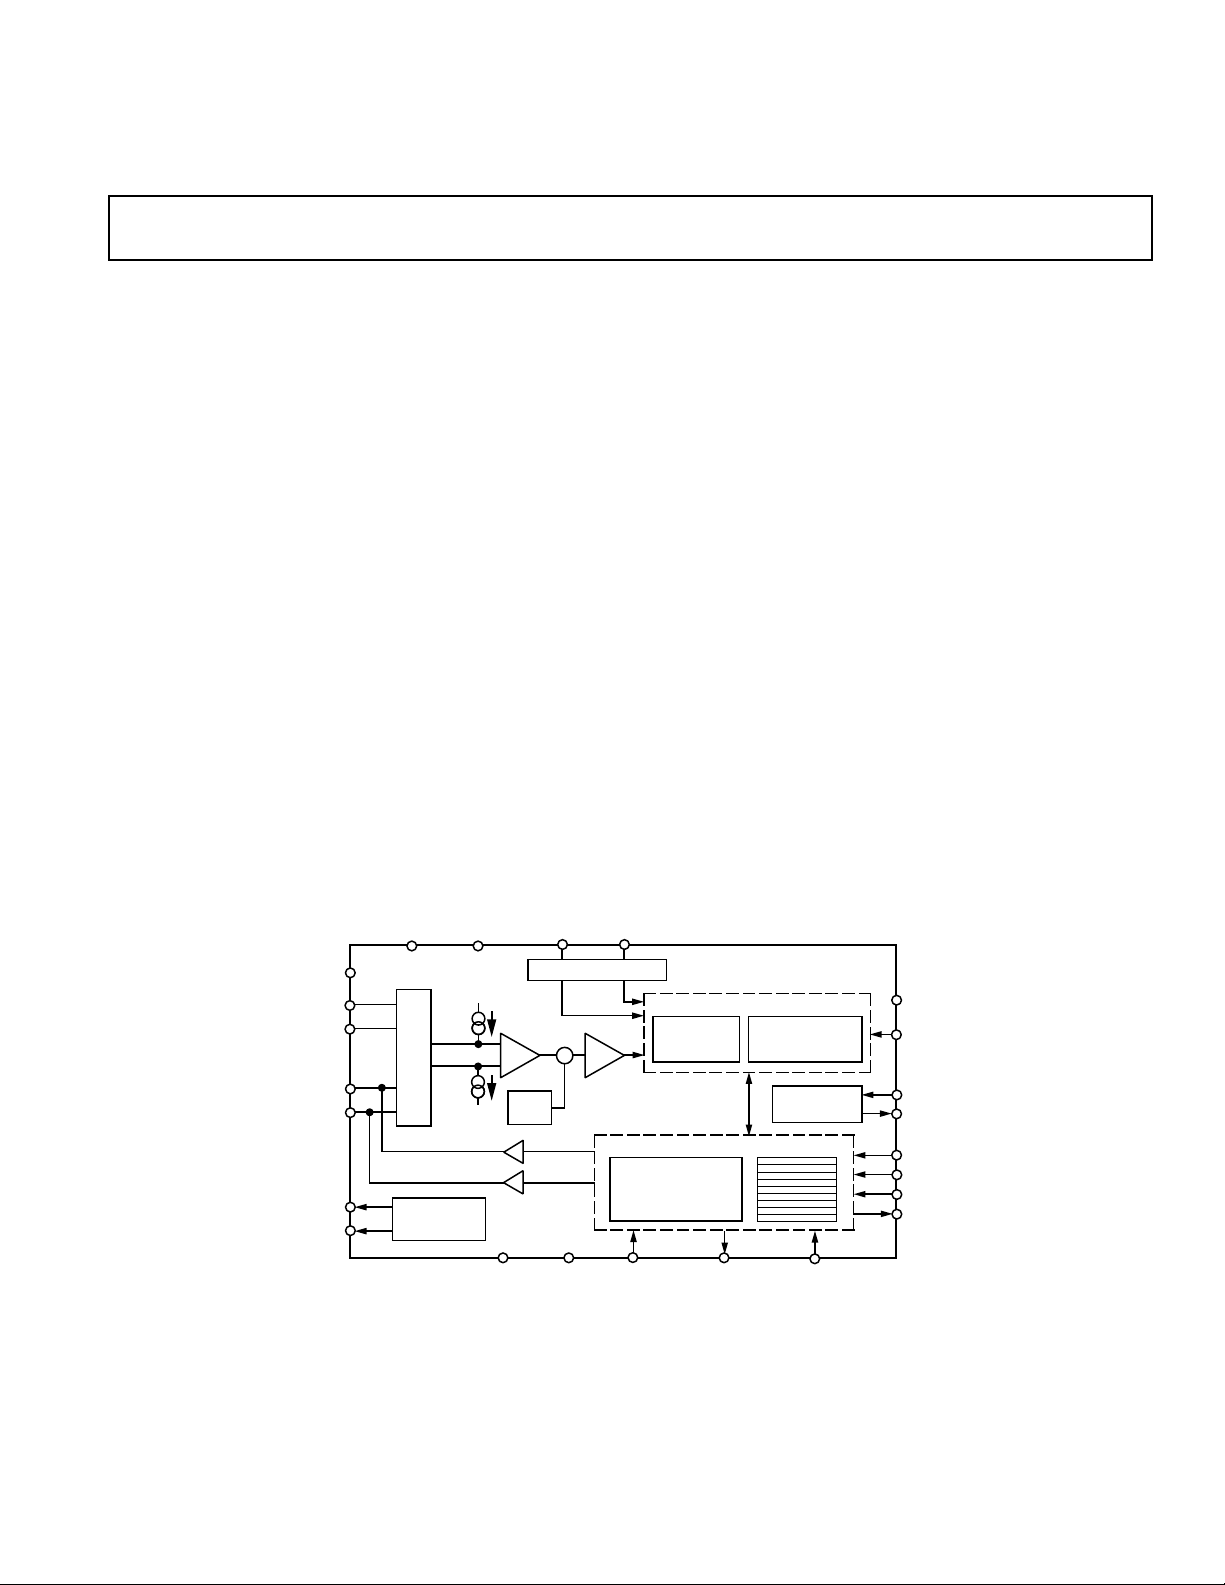
FUNCTIONAL BLOCK DIAGRAM
AV
VBIAS
AIN1(+)
AIN1(–)
MUX
AIN2(+)/D1
AIN2(–)/D0
ACX
ACX
FASTStep is a trademark of Analog Devices, Inc.
EXCITATION
CLOCK
DD
DV
AV
100nA
100nA
AGND
AC
DD
DD
BUFFER
6-BIT
DAC
REF IN(–)
REFERENCE DETECT
+
PGA
+/–
DGNDAGND
REV. A
Information furnished by Analog Devices is believed to be accurate and
reliable. However, no responsibility is assumed by Analog Devices for its
use, nor for any infringements of patents or other rights of third parties
which may result from its use. No license is granted by implication or
otherwise under any patent or patent rights of Analog Devices.
REF IN(+)
AD7730
SIGMA-DELTA A/D CONVERTER
SIGMA-
DELTA
MODULATOR
SERIAL INTERFACE
AND CONTROL LOGIC
CALIBRATION
MICROCONTROLLER
POL
One Technology Way, P.O. Box 9106, Norwood, MA 02062-9106, U.S.A.
Tel: 781/329-4700 World Wide Web Site: http://www.analog.com
Fax: 781/326-8703 © Analog Devices, Inc., 1998
PROGRAMMABLE
REGISTER BANK
RDY
DIGITAL
FILTER
CLOCK
GENERATION
RESET
STANDBY
SYNC
MCLK IN
MCLK OUT
SCLK
CS
DIN
DOUT
Page 2

(AVDD = +5 V, DVDD = +3 V or +5 V; REF IN(+) = AVDD; REF IN(–) = AGND = DGND =
AD7730–SPECIFICATIONS
Parameter B Version
STATIC PERFORMANCE (CHP = 1)
No Missing Codes
Output Noise and Update Rates
Integral Nonlinearity 18 ppm of FSR max
Offset Error
Offset Drift vs. Temperature
Offset Drift vs. Time
Positive Full-Scale Error
Positive Full-Scale Drift vs Temp
Positive Full-Scale Drift vs Time
Gain Error
Gain Drift vs. Temperature
Gain Drift vs. Time
Bipolar Negative Full-Scale Error
Negative Full-Scale Drift vs. Temp
2, 8
2
2
2
2
4
2, 5
2, 6, 7
4
2, 6, 9
4
2
24 Bits min
See Tables I & II
See Note 3 Offset Error and Offset Drift Refer to Both
5 nV/°C typ Unipolar Offset and Bipolar Zero Errors
25 nV/1000 Hours typ
See Note 3
2 ppm of FS/°C max
10 ppm of FS/1000 Hours typ
See Note 3
2 ppm/°C max
10 ppm/1000 Hours typ
See Note 3
2, 6
2 ppm of FS/°C max
0 V; f
1
Power Supply Rejection 120 dB typ Measured with Zero Differential Voltage
Common-Mode Rejection (CMR) 120 dB min At DC. Measured with Zero Differential Voltage
Analog Input DC Bias Current
Analog Input DC Bias Current Drift
Analog Input DC Offset Current
2
2
50 nA max
2
100 pA/°C typ
10 nA max
Analog Input DC Offset Current Drift250 pA/°C typ
STATIC PERFORMANCE (CHP = 0)
2
No Missing Codes 24 Bits min SKIP = 0
Output Noise and Update Rates See Tables III & IV
Integral Nonlinearity 18 ppm of FSR max
Offset Error See Note 3 Offset Error and Offset Drift Refer to Both
Offset Drift vs. Temperature
Offset Drift vs. Time
Positive Full-Scale Error
Positive Full-Scale Drift vs. Temp
Positive Full-Scale Drift vs. Time
Gain Error
Gain Drift vs. Temperature
Gain Drift vs. Time
8
4
6
4
5
6, 7
4
6, 9
0.5 µV/°C typ Unipolar Offset and Bipolar Zero Errors
2.5 µV/1000 Hours typ
See Note 3
0.6 µV/°C typ
3 µV/1000 Hours typ
See Note 3
2 ppm/°C typ
10 ppm/1000 Hours typ
Bipolar Negative Full-Scale Error See Note 3
Negative Full-Scale Drift vs. Temp 0.6 µV/°C typ
Power Supply Rejection 90 dB typ Measured with Zero Differential Voltage
Common-Mode Rejection (CMR) on AIN 100 dB typ At DC. Measured with Zero Differential Voltage
CMR on REF IN 120 dB typ At DC. Measured with Zero Differential Voltage
Analog Input DC Bias Current 60 nA max
Analog Input DC Bias Current Drift 150 pA/°C typ
Analog Input DC Offset Current 30 nA max
Analog Input DC Offset Current Drift 100 pA/°C typ
ANALOG INPUTS/REFERENCE INPUTS
Normal-Mode 50 Hz Rejection
Normal-Mode 60 Hz Rejection
Common-Mode 50 Hz Rejection
Common-Mode 60 Hz Rejection
Analog Inputs
Differential Input Voltage Ranges
2
2
2
2
88 dB min From 49 Hz to 51 Hz
88 dB min From 59 Hz to 61 Hz
120 dB min From 49 Hz to 51 Hz
120 dB min From 59 Hz to 61 Hz
11
0 to +10 or ±10 mV nom Gain = 250
0 to +20 or ±20 mV nom Gain = 125
0 to +40 or ±40 mV nom Gain = 62.5
0 to +80 or ±80 mV nom Gain = 31.25
12
Absolute/Common-Mode Voltage
AGND + 1.2 V V min
– 0.95 V V max
AV
DD
Reference Input
REF IN(+) – REF IN(–) Voltage +2.5 V nom HIREF Bit of Mode Register = 0
REF IN(+) – REF IN(–) Voltage +5 V nom HIREF Bit of Mode Register = 1
Absolute/Common-Mode Voltage
13
AGND – 30 mV V min
+ 30 mV V max
AV
DD
NO REF Trigger Voltage 0.3 V min NO REF Bit Active If V
0.65 V max NO REF Bit Inactive If V
= 4.9152 MHz. All specifications T
CLK IN
MIN
to T
MAX
Units Conditions/Comments
10
Assuming 2.5 V or 5 V Reference with
HIREF Bit Set Appropriately
unless otherwise noted.)
Below This Voltage
REF
Above This Voltage
REF
–2–
REV. A
Page 3

AD7730/AD7730L
Parameter B Version
1
Units Conditions/Comments
LOGIC INPUTS
Input Current ±10 µA max
All Inputs Except SCLK and MCLK IN
, Input Low Voltage 0.8 V max DVDD = +5 V
V
INL
, Input Low Voltage 0.4 V max DVDD = +3 V
V
INL
, Input High Voltage 2.0 V min
V
INH
SCLK Only (Schmitt Triggered Input)
V
T+
V
T+
V
T–
V
T–
– V
V
T+
T–
– V
V
T+
T–
1.4/3 V min to V max DVDD = +5 V
1/2.5 V min to V max DVDD = +3 V
0.8/1.4 V min to V max DVDD = +5 V
0.4/1.1 V min to V max DVDD = +3 V
0.4/0.8 V min to V max DVDD = +5 V
0.4/0.8 V min to V max DVDD = +3 V
MCLK IN Only
, Input Low Voltage 0.8 V max DVDD = +5 V
V
INL
, Input Low Voltage 0.4 V max DVDD = +3 V
V
INL
, Input High Voltage 3.5 V min DVDD = +5 V
V
INH
V
, Input High Voltage 2.5 V min DVDD = +3 V
INH
LOGIC OUTPUTS (Including MCLK OUT)
V
, Output Low Voltage I
OL
0.4 V max V
, Output Low Voltage I
V
OL
0.4 V max V
, Output High Voltage I
V
OH
4.0 V min V
, Output High Voltage I
V
OH
Floating State Leakage Current ±10 µA max
Floating State Output Capacitance
2
– 0.6 V V min V
V
DD
6 pF typ
= 800 µA Except for MCLK OUT14;
SINK
15
= +5 V
DD
= 100 µA Except for MCLK OUT14;
SINK
15
= +3 V
DD
= 200 µA Except for MCLK OUT14;
SOURCE
15
= +5 V
DD
= 100 µA Except for MCLK OUT14;
SOURCE
15
= +3 V
DD
TRANSDUCER BURNOUT
AIN1(+) Current –100 nA nom
AIN1(–) Current 100 nA nom
Initial Tolerance @ 25°C ±10 % typ
2
Drift
0.1 %/°C typ
OFFSET (TARE) DAC
Resolution 6 Bit
LSB Size 2.3/2.6 mV min/mV max 2.5 mV Nominal with 5 V Reference (REF IN/2000)
DAC Drift
DAC Drift vs. Time
16
4, 16
2.5 ppm/°C max
25 ppm/1000 Hours typ
Differential Linearity –0.25/+0.75 LSB max Guaranteed Monotonic
SYSTEM CALIBRATION
Positive Full-Scale Calibration Limit
Negative Full-Scale Calibration Limit
Offset Calibration Limit
Input Span
17
18
17
17
1.05 × FS V max FS Is the Nominal Full-Scale Voltage
(10 mV, 20 mV, 40 mV or 80 mV)
–1.05 × FS V max
–1.05 × FS V max
0.8 × FS V min
2.1 × FS V max
POWER REQUIREMENTS
Power Supply Voltages
– AGND Voltage +4.75 to +5.25 V min to V max
AV
DD
Voltage +2.7 to +5.25 V min to V max With AGND = 0 V
DV
DD
Power Supply Currents External MCLK. Digital I/Ps = 0 V or DV
DD
AVDD Current (Normal Mode) 10.3 mA max All Input Ranges Except 0 mV to +10 mV and ± 10 mV
Current (Normal Mode) 22.3 mA max Input Ranges of 0 mV to +10 mV and ± 10 mV Only
AV
DD
Current (Normal Mode) 1.3 mA max DVDD of 2.7 V to 3.3 V
DV
DD
Current (Normal Mode) 2.7 mA max DVDD of 4.75 V to 5.25 V
DV
DD
+ DVDD Current (Standby Mode) 25 µA max Typically 10 µA. External MCLK IN = 0 V or DV
AV
DD
Power Dissipation AV
DD
= DV
= +5 V. Digital I/Ps = 0 V or DV
DD
DD
Normal Mode 65 mW max All Input Ranges Except 0 mV to +10 mV and ±10 mV
125 mW max Input Ranges of 0 mV to +10 mV and ±10 mV Only
Standby Mode 125 µW max Typically 50 µW. External MCLK IN = 0 V or DV
DD
DD
REV. A
–3–
Page 4

AD7730/AD7730L
NOTES
11
Temperature range: –40°C to +85°C.
12
Sample tested during initial release.
13
The offset (or zero) numbers with CHP = 1 are typically 3 µV precalibration. Internal zero-scale calibration reduces this by about 1 µV. Offset numbers with CHP = 0 can be up to
1 mV precalibration. Internal zero-scale calibration reduces this to 2 µV typical. System zero-scale calibration reduces offset numbers with CHP = 1 and CHP = 0 to the order of the
noise. Gain errors can be up to 3000 ppm precalibration with CHP = 0 and CHP = 1. Performing internal full-scale calibrations on the 80 mV range reduces the gain error to less than
100 ppm for the 80 mV and 40 mV ranges, to about 250 ppm for the 20 mV range and to about 500 ppm on the 10 mV range. System full-scale calibration reduces this to the order of
the noise. Positive and negative full-scale errors can be calculated from the offset and gain errors.
14
These numbers are generated during life testing of the part.
15
Positive Full-Scale Error includes Offset Errors (Unipolar Offset Error or Bipolar Zero Error) and applies to both unipolar and bipolar input ranges. See Terminology.
16
Recalibration at any temperature will remove these errors.
17
Full-Scale Drift includes Offset Drift (Unipolar Offset Drift or Bipolar Zero Drift) and applies to both unipolar and bipolar input ranges.
18
Gain Error is a measure of the difference between the measured and the ideal span between any two points in the transfer function. The two points used to calculate the gain
error are positive full scale and negative full scale. See Terminology.
19
Gain Error Drift is a span drift and is effectively the drift of the part if zero-scale calibrations only were performed.
10
No Missing Codes performance with CHP = 0 and SKIP = 1 is reduced below 24 bits for SF words lower than 180 decimal.
11
The analog input voltage range on the AIN1(+) and AIN2(+) inputs is given here with respect to the voltage on the AIN1(–) and AIN2(–) inputs respectively.
12
The common-mode voltage range on the input pairs applies provided the absolute input voltage specification is obeyed.
13
The common-mode voltage range on the reference input pair (REF IN(+) and REF IN(–)) applies provided the absolute input voltage specification is obeyed.
14
These logic output levels apply to the MCLK OUT output only when it is loaded with a single CMOS load.
15
VDD refers to DVDD for all logic outputs expect D0, D1, ACX and ACX where it refers to AVDD. In other words, the output logic high for these four outputs is determined by AVDD.
16
This number represents the total drift of the channel with a zero input and the DAC output near full scale.
17
After calibration, if the input voltage exceeds positive full scale, the converter will output all 1s. If the input is less than negative full scale, the device outputs all 0s.
18
These calibration and span limits apply provided the absolute input voltage specification is obeyed. The offset calibration limit applies to both the unipolar zero point and the
bipolar zero point.
Specifications subject to change without notice.
TIMING CHARACTERISTICS
Limit at T
MIN
(AVDD = +4.75 V to +5.25 V; DVDD = +2.7 V to +5.25 V; AGND = DGND = 0 V; f
1, 2
Input Logic 0 = 0 V, Logic 1 = DVDD unless otherwise noted).
to T
MAX
= 4.9152 MHz;
CLK IN
Parameter (B Version) Units Conditions/Comments
Master Clock Range 1 MHz min For Specified Performance
5 MHz max
t
1
t
2
50 ns min SYNC Pulsewidth
50 ns min RESET Pulsewidth
Read Operation
t
3
t
4
4
t
5
0 ns min RDY to CS Setup Time
0 ns min CS Falling Edge to SCLK Active Edge Setup Time
0 ns min SCLK Active Edge to Data Valid Delay
3
3
60 ns max DVDD = +4.75 V to +5.25 V
4, 5
t
5A
80 ns max DV
0 ns min CS Falling Edge to Data Valid Delay
60 ns max DV
80 ns max DV
t
6
t
7
t
8
6
t
9
100 ns min SCLK High Pulsewidth
100 ns min SCLK Low Pulsewidth
0 ns min CS Rising Edge to SCLK Inactive Edge Hold Time
10 ns min Bus Relinquish Time after SCLK Inactive Edge
80 ns max
t
10
100 ns max SCLK Active Edge to RDY High
Write Operation
t
11
t
12
t
13
t
14
t
15
t
16
NOTES
1
Sample tested during initial release to ensure compliance. All input signals are specified with tr = tf = 5 ns (10% to 90% of DVDD) and timed from a voltage level of 1.6 V.
2
See Figures 18 and 19.
3
SCLK active edge is falling edge of SCLK with POL = 1; SCLK active edge is rising edge of SCLK with POL = 0.
4
These numbers are measured with the load circuit of Figure 1 and defined as the time required for the output to cross the VOL or VOH limits.
5
This specification only comes into play if CS goes low while SCLK is low (POL = 1) or if CS goes low while SCLK is high (POL = 0). It is primarily required for
interfacing to DSP machines.
6
These numbers are derived from the measured time taken by the data output to change 0.5 V when loaded with the circuit of Figure 1. The measured number is then
extrapolated back to remove effects of charging or discharging the 50 pF capacitor. This means that the times quoted in the timing characteristics are the true bus
relinquish times of the part and as such are independent of external bus loading capacitances.
7
RDY returns high after the first read from the device after an output update. The same data can be read again, if required, while RDY is high, although care should
be taken that subsequent reads do not occur close to the next output update.
0 ns min CS Falling Edge to SCLK Active Edge Setup Time
30 ns min Data Valid to SCLK Edge Setup Time
25 ns min Data Valid to SCLK Edge Hold Time
100 ns min SCLK High Pulsewidth
100 ns min SCLK Low Pulsewidth
0 ns min CS Rising Edge to SCLK Edge Hold Time
= +2.75 V to +3.3 V
DD
= +4.75 V to +5.25 V
DD
= +2.7 V to +3.3 V
DD
3
3
3, 7
3
–4–
REV. A
Page 5
AD7730/AD7730L
WARNING!
ESD SENSITIVE DEVICE
ABSOLUTE MAXIMUM RATINGS*
(TA = +25°C unless otherwise noted)
AVDD to AGND . . . . . . . . . . . . . . . . . . . . . . . –0.3 V to +7 V
AV
to DGND . . . . . . . . . . . . . . . . . . . . . . . –0.3 V to +7 V
DD
DV
to AGND . . . . . . . . . . . . . . . . . . . . . . . –0.3 V to +7 V
DD
DV
to DGND . . . . . . . . . . . . . . . . . . . . . . . –0.3 V to +7 V
DD
AGND to DGND . . . . . . . . . . . . . . . . . . . . . . –5 V to +0.3 V
AV
to DVDD . . . . . . . . . . . . . . . . . . . . . . . . . –2 V to +5 V
DD
Analog Input Voltage to AGND . . . . –0.3 V to AV
Reference Input Voltage to AGND . . –0.3 V to AV
DD
DD
+ 0.3 V
+ 0.3 V
AIN/REF IN Current (Indefinite) . . . . . . . . . . . . . . . . 30 mA
Digital Input Voltage to DGND . . . . –0.3 V to DV
Digital Output Voltage to DGND . . . –0.3 V to DV
+ 0.3 V
DD
+ 0.3 V
DD
Output Voltage (ACX, ACX, D0, D1) to DGND
. . . . . . . . . . . . . . . . . . . . . . . . . . . . –0.3 V to AV
+ 0.3 V
DD
Operating Temperature Range
Industrial (B Version) . . . . . . . . . . . . . . . –40°C to +85°C
Storage Temperature Range . . . . . . . . . . . –65°C to +150°C
Junction Temperature . . . . . . . . . . . . . . . . . . . . . . . . +150°C
ORDERING GUIDE
Temperature Package Package
Model Range Description Options
AD7730BN –40°C to +85°C Plastic DIP N-24
AD7730BR –40°C to +85°C Small Outline R-24
AD7730BRU –40°C to +85°C Thin Shrink Small Outline RU-24
EVAL-AD7730EB Evaluation Board
AD7730LBR –40°C to +85°C Small Outline R-24
AD7730LBRU –40°C to +85°C Thin Shrink Small Outline RU-24
EVAL-AD7730LEB Evaluation Board
Plastic DIP Package, Power Dissipation . . . . . . . 450 mW
θ
Thermal Impedance . . . . . . . . . . . . . . . . . 105°C/W
JA
Lead Temperature (Soldering, 10 sec) . . . . . . . +260°C
TSSOP Package, Power Dissipation . . . . . . . . . . 450 mW
θ
Thermal Impedance . . . . . . . . . . . . . . . . . 128°C/W
JA
Lead Temperature, Soldering
Vapor Phase (60 sec) . . . . . . . . . . . . . . . . . . +215°C
Infrared (15 sec) . . . . . . . . . . . . . . . . . . . . . . +220°C
SOIC Package, Power Dissipation . . . . . . . . . . . . 450 mW
θ
Thermal Impedance . . . . . . . . . . . . . . . . . . 75°C/W
JA
Lead Temperature, Soldering
Vapor Phase (60 sec) . . . . . . . . . . . . . . . . . . +215°C
Infrared (15 sec) . . . . . . . . . . . . . . . . . . . . . . +220°C
*Stresses above those listed under Absolute Maximum Ratings may cause
permanent damage to the device. This is a stress rating only; functional
operation of the device at these or any other conditions above those listed in
the operational sections of this specification is not implied. Exposure to
absolute maximum rating conditions for extended periods may affect device
reliability.
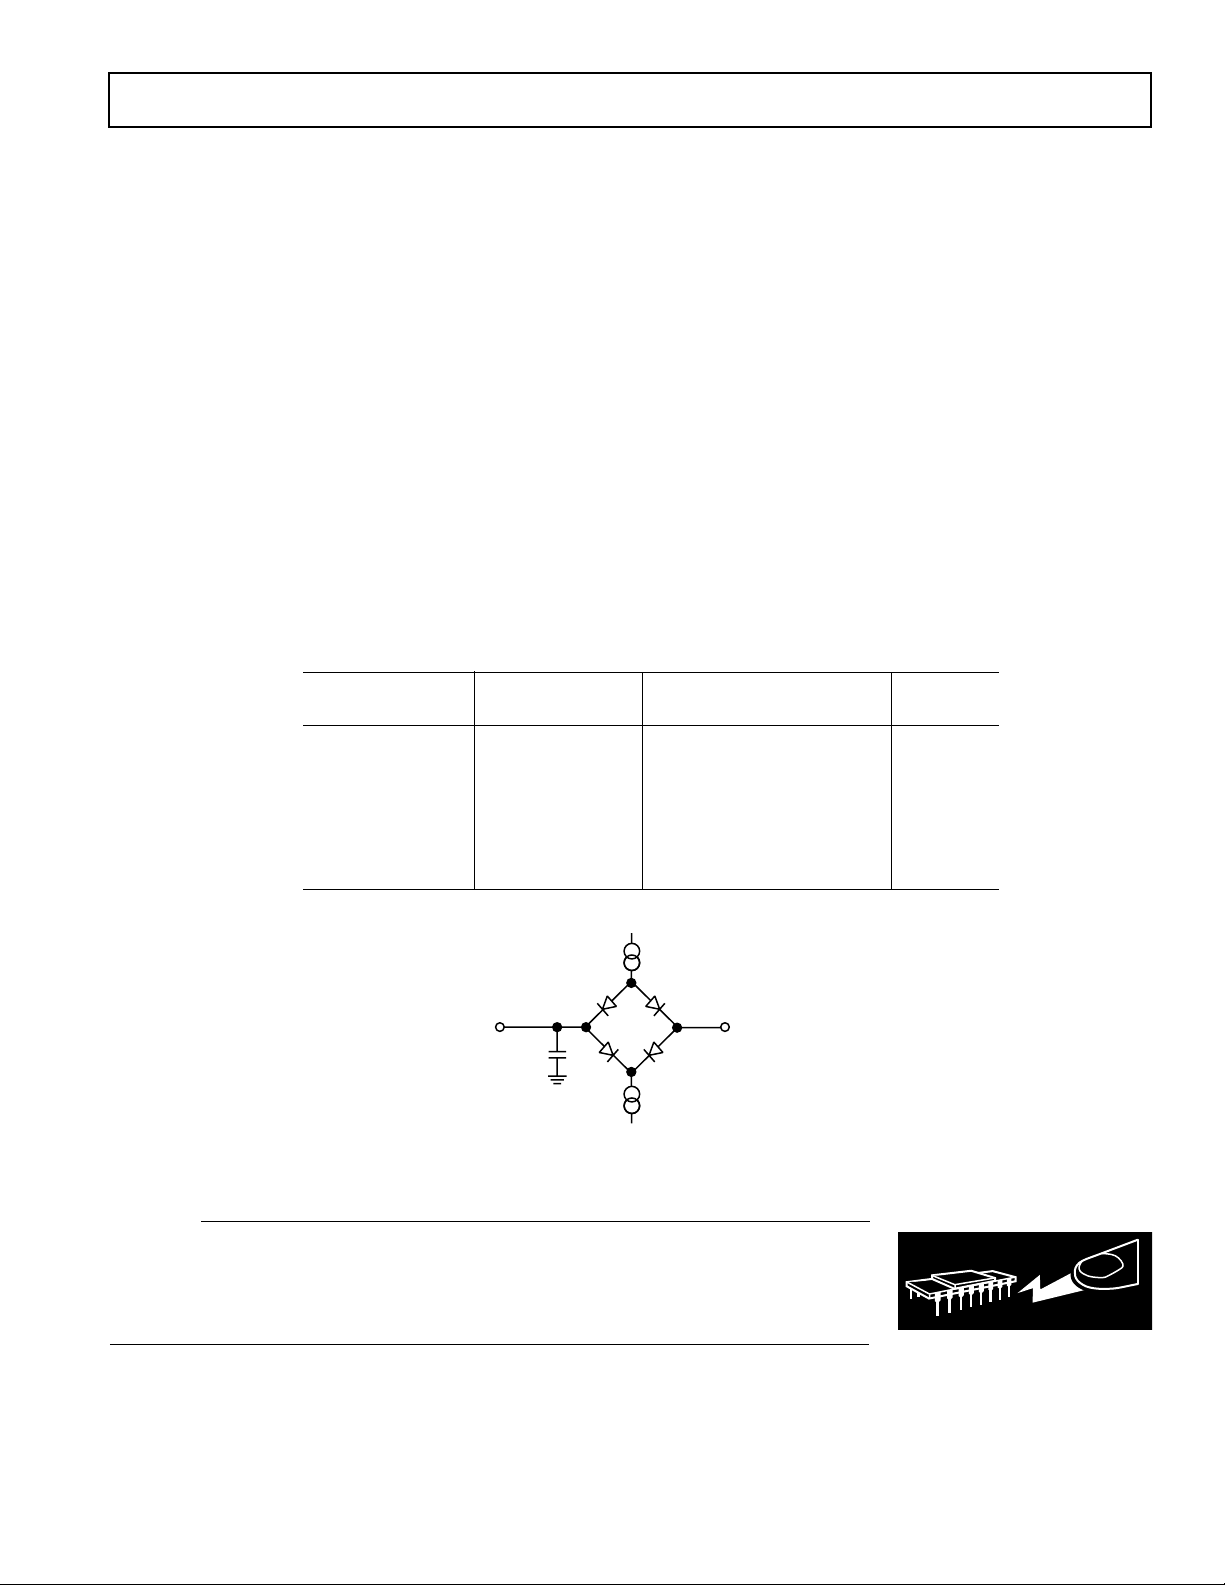
I
TO OUTPUT
PIN
50pF
(800mA AT DV
SINK
100mA AT DV
(200mA AT DVDD = +5V
I
SOURCE
100mA AT DV
+1.6V
DD
DD
= +5V
= +3V)
= +3V)
DD
Figure 1. Load Circuit for Access Time and Bus Relinquish Time
CAUTION
ESD (electrostatic discharge) sensitive device. Electrostatic charges as high as 4000 V readily
accumulate on the human body and test equipment and can discharge without detection.
Although the AD7730 features proprietary ESD protection circuitry, permanent damage may
occur on devices subjected to high energy electrostatic discharges. Therefore, proper ESD
precautions are recommended to avoid performance degradation or loss of functionality.
REV. A
–5–
Page 6
AD7730/AD7730L
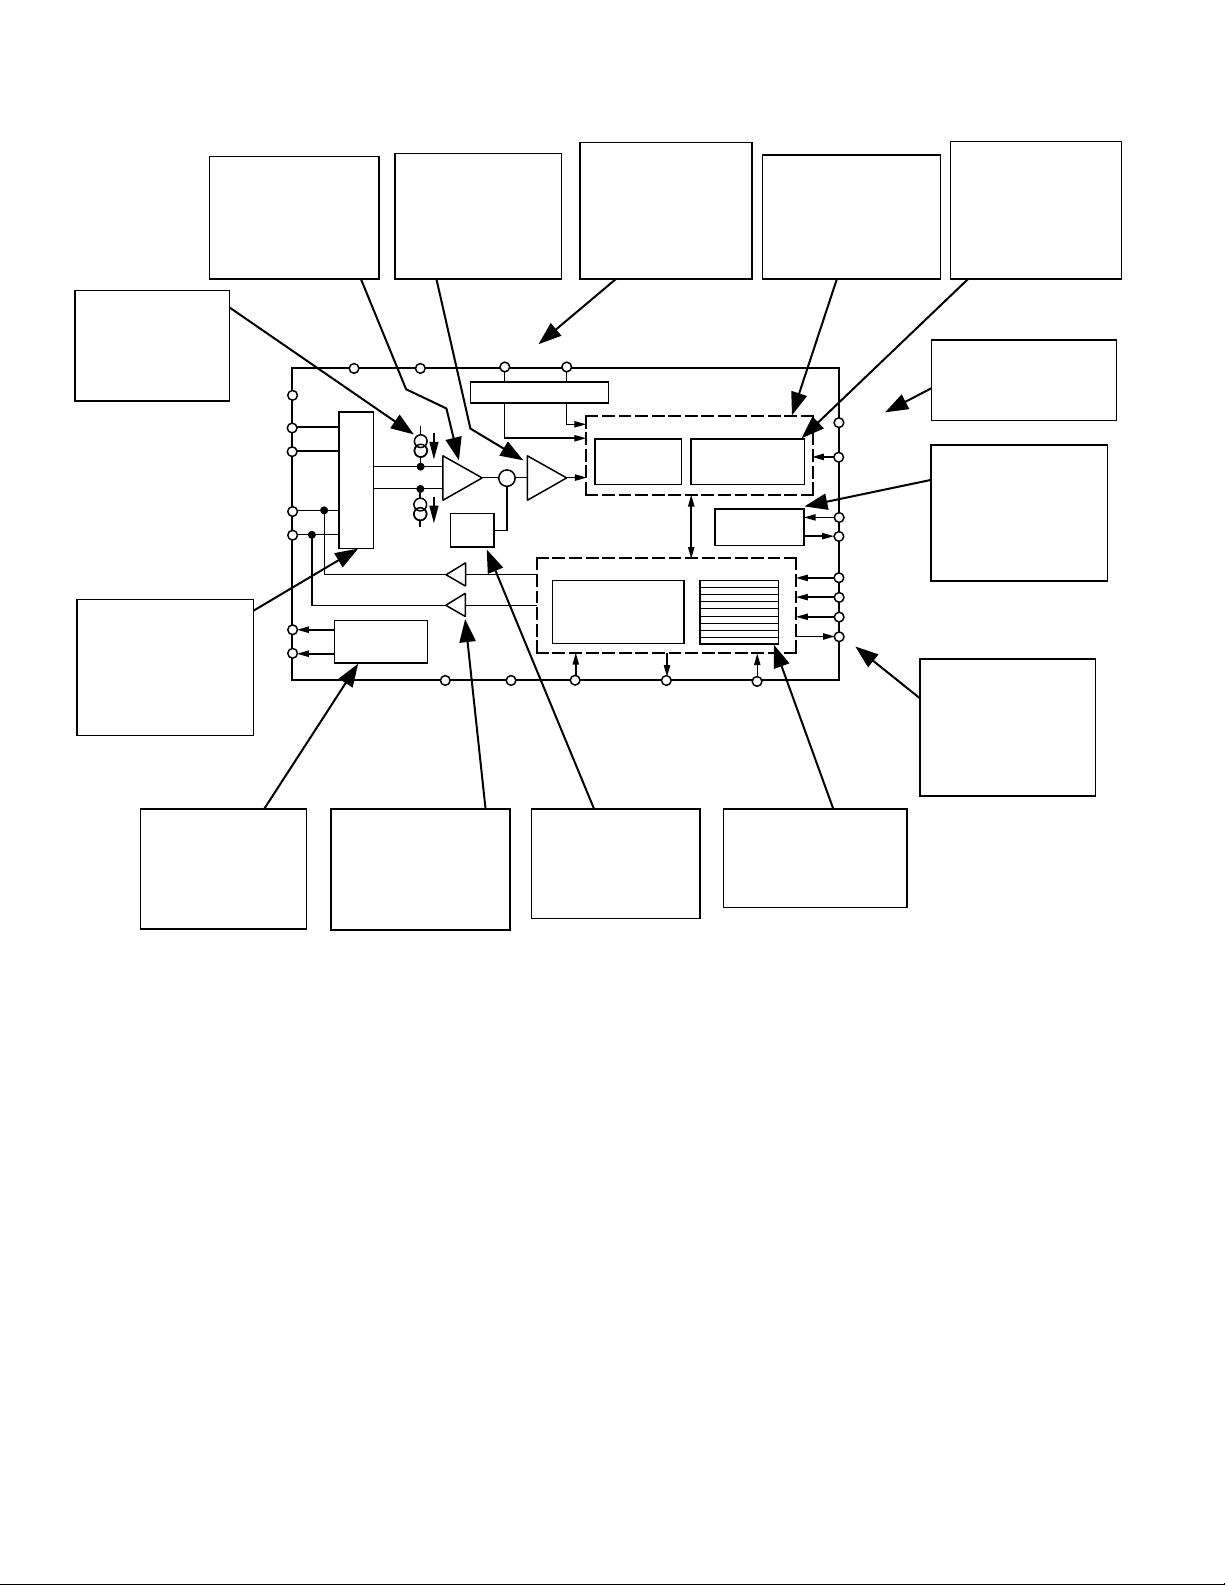
,
PRESENTS A HIGH IMPEDANCE
INPUT STAGE FOR THE ANALOG
INPUTS ALLOWING SIGNIFICANT
BURNOUT CURRENTS
TWO 100nA BURNOUT
CURRENTS ALLOW THE USER
TO EASILY DETECT IF A
TRANSDUCER HAS BURNT
OUT OR GONE OPEN-CIRCUIT
SEE PAGE 25
AIN2(+)/D1
AIN2(–)/D0
ANALOG MULTIPLEXER
A TWO-CHANNEL DIFFERENTIAL
MULTIPLEXER SWITCHES ONE OF
THE TWO DIFFERENTIAL INPUT
CHANNELS TO THE BUFFER
AMPLIFIER. THE MULTIPLEXER IS
CONTROLLED VIA THE SERIAL
INTERFACE
SEE PAGE 24
AC EXCITATION
FOR AC-EXCITED BRIDGE
APPLICATIONS, THE ACX
OUTPUTS PROVIDE SIGNALS
THAT CAN BE USED TO SWITCH
THE POLARITY OF THE BRIDGE
EXCITATION VOLTAGE
SEE PAGE 41
BUFFER AMPLIFIER
THE BUFFER AMPLIFIER
EXTERNAL SOURCE
IMPEDANCES
SEE PAGE 24
VBIAS
AIN1(+)
AIN1(–)
ACX
ACX
RECONFIGURED TO BECOME TWO
PROGRAMMABLE GAIN
AMPLIFIER
THE PROGRAMMABLE GAIN
AMPLIFIER ALLOWS FOUR
UNIPOLAR AND FOUR BIPOLAR
INPUT RANGES FROM
+10mV TO +80mV
SEE PAGE 24
AV
DV
AV
DD
DD
DD
MUX
BUFFER
6-BIT
AGND
DAC
AC
EXCITATION
CLOCK
OUTPUT DRIVERS
THE SECOND ANALOG INPUT
CHANNEL CAN BE
OUTPUT DIGITAL PORT LINES
WHICH CAN BE PROGRAMMED
OVER THE SERIAL INTERFACE
SEE PAGE 33
THE REFERENCE INPUT TO THE
VOLTAGE CAN BE SELECTED TO
REF IN(–)
REF IN(+)
REFERENCE DETECT
+
PGA
+/–
SERIAL INTERFACE
AND CONTROL LOGIC
CALIBRATION
MICROCONTROLLER
DGNDAGND
POL
OFFSET/TARE DAC
ALLOWS A PROGRAMMED
VOLTAGE TO BE EITHER ADDED
OR SUBTRACTED FROM THE
ANALOG INPUT SIGNAL BEFORE
IT IS APPLIED TO THE PGA
SEE PAGE 24
DIFFERENTIAL
REFERENCE
PART IS DIFFERENTIAL AND
FACILITATES RATIOMETRIC
OPERATION. THE REFERENCE
BE NOMINALLY +2.5V OR +5V
SEE PAGE 25
AD7730
SIGMA-DELTA A/D CONVERTER
SIGMADELTA
MODULATOR
PROGRAMMABLE
REGISTER BANK
RDY
DIGITAL
FILTER
GENERATION
THIRTEEN REGISTERS CONTROL
ALL FUNCTIONS ON THE PART AND
PROVIDE STATUS INFORMATION
SIGMA-DELTA ADC
SIGMA DELTA ADC
THE SIGMA-DELTA
THE SIGMA DELTA
ARCHITECTURE ENSURES 24 BITS
ARCHITECTURE ENSURES 24 BITS
NO MISSING CODES. THE
NO MISSING CODES. THE
ENTIRE SIGMA-DELTA ADC CAN
ENTIRE SIGMA DELTA. ADC CAN
BE CHOPPED TO REMOVE DRIFT
BE CHOPPED TO REMOVE DRIFT
ERRORS
ERRORS
SEE PAGE 26
SEE PAGE
STANDBY
SYNC
CLOCK
MCLK IN
MCLK OUT
SCLK
CS
DIN
DOUT
RESET
REGISTER BANK
AND CONVERSION RESULTS
SEE PAGE 11
*SPI IS A TRADEMARK OF MOTOROLA
PROGRAMMABLE
DIGITAL FILTER
TWO STAGE FILTER THAT
ALLOWS PROGRAMMING OF
OUTPUT UPDATE RATE AND
SETTLING TIME AND WHICH HAS
A FAST STEP MODE
(SEE FIGURE 3)
SEE PAGE 26
STANDBY MODE
THE STANDBY MODE REDUCES
POWER CONSUMPTION TO 5mA
SEE PAGE 33
CLOCK OSCILLATOR
CIRCUIT
THE CLOCK SOURCE FOR THE
PART CAN BE PROVIDED BY AN
EXTERNALLY-APPLIED CLOCK OR
BY CONNECTING A CRYSTAL OR
CERAMIC RESONATOR ACROSS
THE CLOCK PINS
SEE PAGE 32
SERIAL INTERFACE
SPI*-COMPATIBLE OR DSPCOMPATIBLE SERIAL INTERFACE
WHICH CAN BE OPERATED FROM
JUST THREE WIRES. ALL
FUNCTIONS ON THE PART
CAN BE ACCESSED VIA
THE SERIAL INTERFACE
SEE PAGE 35
INC.
Figure 2. Detailed Functional Block Diagram
–6–
REV. A
Page 7
AD7730/AD7730L
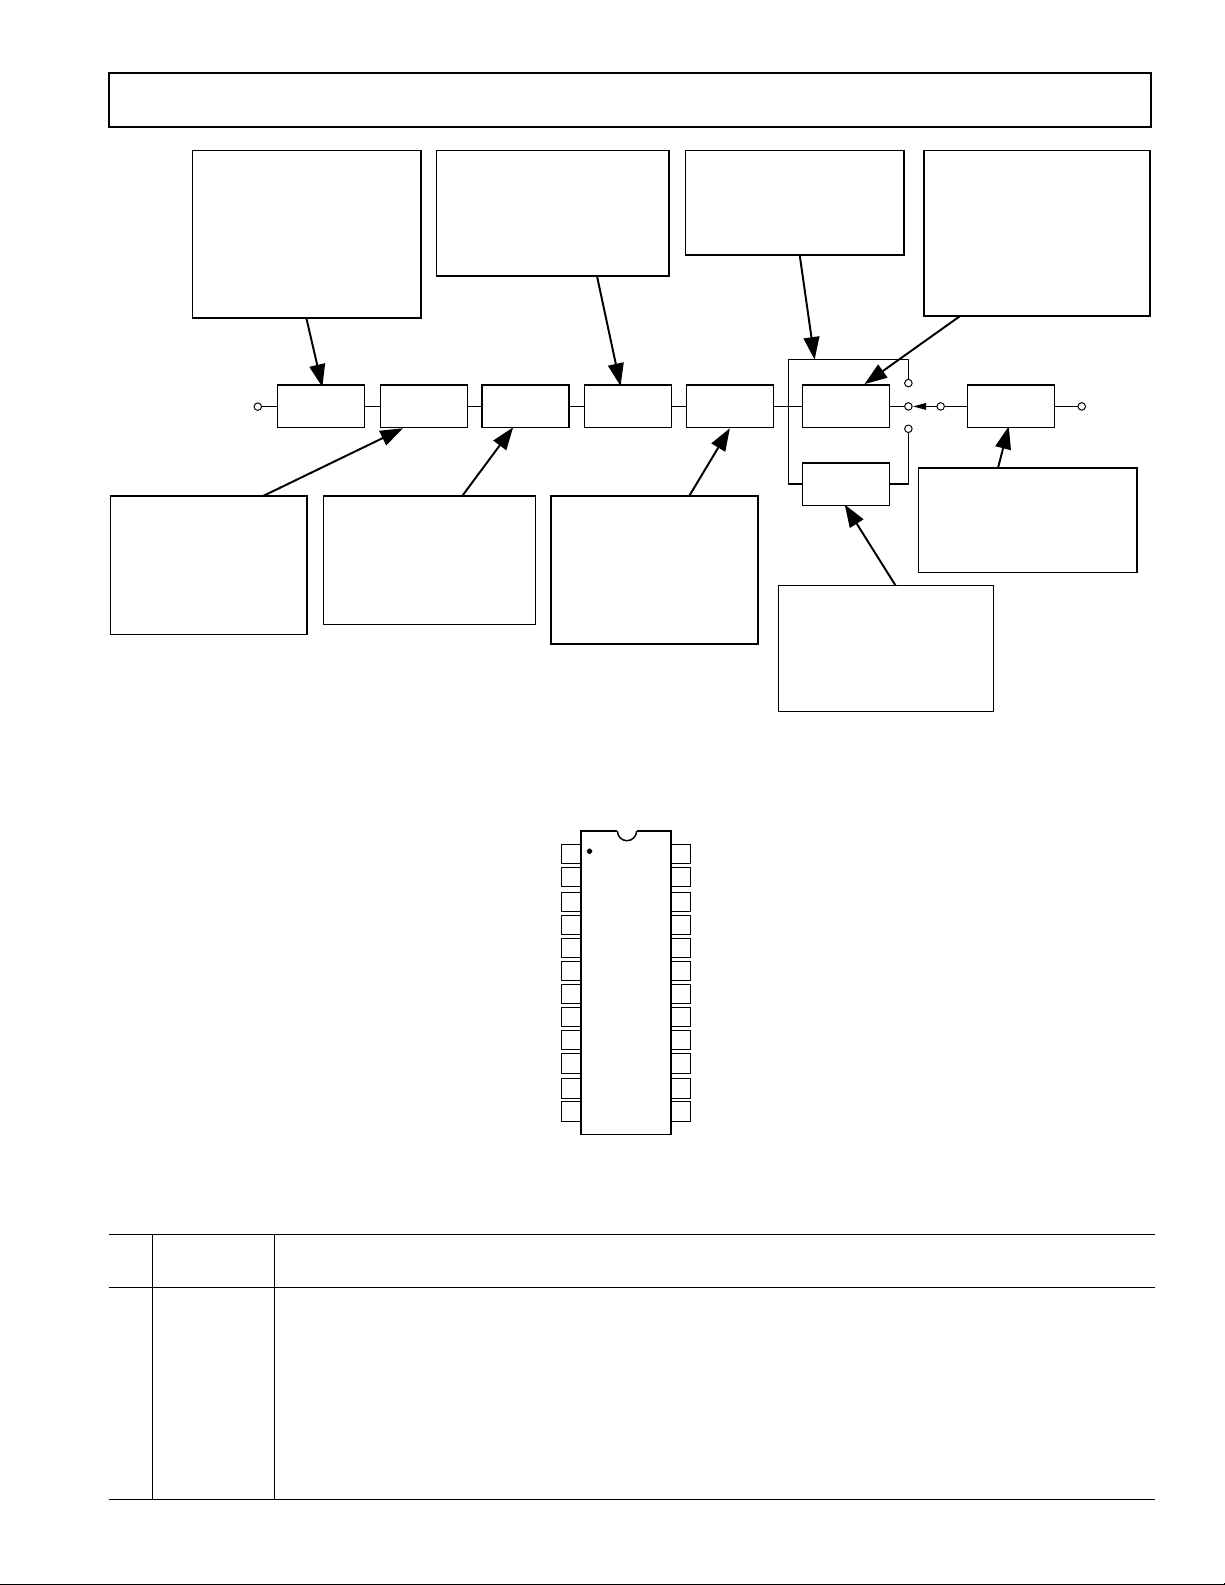
INPUT CHOPPING
THE ANALOG INPUT TO THE PART CAN BE
CHOPPED. IN CHOPPING MODE, WITH
AC EXCITATION DISABLED, THE INPUT
CHOPPING IS INTERNALTO THE DEVICE. IN
CHOPPING MODE, WITH AC EXCITATION
ENABLED, THE CHOPPING IS ASSUMED
TO BE PERFORMED EXTERNAL TO THE PART
AND NO INTERNAL INPUT CHOPPING IS
PERFORMED. THE INPUT CHOPPING CAN
BE DISABLED, IF DESIRED.
SEE PAGE 26
ANALOG
INPUT
BUFFER
THE INPUT SIGNAL IS BUFFERED
ON-CHIP BEFORE BEING APPLIED TO
THE SAMPLING CAPACITOR OF THE
SIGMA-DELTA MODULATOR. THIS
ISOLATES THE SAMPLING CAPACITOR
CHARGING CURRENTS FROM THE
ANALOG INPUT PINS.
SEE PAGE 24
THE FIRST STAGE OF THE DIGITAL FILTERING
ON THE PART IS THE SINC
OUTPUT UPDATE RATE AND BANDWIDTH
OF THIS FILTER CAN BE PROGRAMMED. IN
SKIP MODE, THE SINC
ONLY FILTERING PERFORMED ON THE PART.
CHOP
BUFFER
PGA + SIGMA-DELTA MODULATOR
THE PROGRAMMABLE GAIN CAPABILITY
OF THE PART IS INCORPORATED
AROUND THE SIGMA-DELTA MODULATOR.
THE MODULATOR PROVIDES A HIGH-
FREQUENCY 1-BIT DATA STREAM
TO THE DIGITAL FILTER.
SEE PAGE 26
SINC3 FILTER
IN SKIP MODE, THERE IS NO SECOND
STAGE OF FILTERING ON THE PART. THE
3
SINC
FILTER IS THE ONLY FILTERING
PERFORMED ON THE PART.
CHOP
SEE PAGE 26
PGA +
SIGMA-DELTA
MODULATOR
3
FILTER. THE
3
FILTER IS THE
SINC3 FILTER
OUTPUT CHOPPING
THE OUTPUT OF THE FIRST STAGE
OF FILTERING ON THE PART CAN
BE CHOPPED. IN CHOPPING MODE,
REGARDLESS OF WHETHER AC
EXCITATION IS ENABLED OR DISABLED,
THE OUTPUT CHOPPING IS
PERFORMED. THE CHOPPING CAN
BE DISABLED, IF DESIRED.
SEE PAGE 26
Figure 3. Signal Processing Chain
SKIP MODE
SECOND STAGE OF THE DIGITAL FILTERING
FILTER. IN SKIP MODE, THIS FIR FILTER IS
SEE PAGE 29
DETECTED, THE SECOND STAGE FILTERING
SKIP
22-TAP
FIR FILTER
FASTSTEP
FILTER
THE OUTPUT WORD FROM THE DIGITAL
FILTER IS SCALED BY THE CALIBRATION
COEFFICIENTS BEFORE BEING PROVIDED
FASTSTEP FILTER
WHEN FASTSTEP MODE IS ENABLED
AND A STEP CHANGE ON THE INPUT
HAS BEEN DETECTED, THE SECOND
STAGE FILTERING IS PERFORMED BY THE
FASTSTEP FILTER UNTIL THE FIR
FILTER HAS FULLY SETTLED.
SEE PAGE 29
22-TAP FIR FILTER
IN NORMAL OPERATING MODE, THE
ON THE PART IS A FIXED 22-TAP FIR
BYPASSED. WHEN FASTSTEP™
ENABLED AND A STEP INPUT IS
IS PERFORMED BY THE FILTER
UNTIL THE OUTPUT OF THIS FILTER
HAS FULLY SETTLED.
SEE PAGE 27
OUTPUT
SCALING
OUTPUT SCALING
AS THE CONVERSION RESULT.
SEE PAGE 29
MODE IS
DIGITAL
OUTPUT
PIN CONFIGURATION
1
SCLK
MCLK IN
MCLK OUT
POL
SYNC
RESET
V
BIAS
AGND
AV
AIN1(+)
AIN1(–)
AIN2(+)/D1
2
3
4
5
AD7730
6
TOP VIEW
7
(Not to Scale)
8
9
DD
10
11
12 13
DGND
24
DV
23
22
DIN
21
DOUT
20
RDY
19
CS
18
STANDBY
17
ACX
ACX
16
REF IN(–)
15
14
REF IN(+)
AIN2(–)/D0
DD
PIN FUNCTION DESCRIPTIONS
Pin
No. Mnemonic Function
1 SCLK Serial Clock. Schmitt-Triggered Logic Input. An external serial clock is applied to this input to transfer serial
data to or from the AD7730. This serial clock can be a continuous clock with all data transmitted in a continuous train of pulses. Alternatively, it can be a noncontinuous clock with the information being transmitted
to or from the AD7730 in smaller batches of data.
2 MCLK IN Master Clock signal for the device. This can be provided in the form of a crystal/resonator or external clock. A
crystal/resonator can be tied across the MCLK IN and MCLK OUT pins. Alternatively, the MCLK IN pin
can be driven with a CMOS-compatible clock and MCLK OUT left unconnected. The AD7730 is specified
with a clock input frequency of 4.9152 MHz while the AD7730L is specified with a clock input frequency of
2.4576 MHz.
REV. A
–7–
Page 8

AD7730/AD7730L
Pin
No. Mnemonic Function
3 MCLK OUT When the master clock for the device is a crystal/resonator, the crystal/resonator is connected between MCLK IN
and MCLK OUT. If an external clock is applied to the MCLK IN, MCLK OUT provides an inverted clock signal. This clock can be used to provide a clock source for external circuits and MCLK OUT is capable of driving
one CMOS load. If the user does not require it, MCLK OUT can be turned off with the CLKDIS bit of the Mode
Register. This ensures that the part is not burning unnecessary power driving capacitance on the MCLK OUT pin.
4 POL Clock Polarity. Logic Input. This determines the polarity of the serial clock. If the active edge for the proces-
sor is a high-to-low SCLK transition, this input should be low. In this mode, the AD7730 puts out data on the
DATA OUT line in a read operation on a low-to-high transition of SCLK and clocks in data from the DATA
IN line in a write operation on a high-to-low transition of SCLK. In applications with a noncontinuous serial
clock (such as most microcontroller applications), this means that the serial clock should idle low between
data transfers. If the active edge for the processor is a low-to-high SCLK transition, this input should be high.
In this mode, the AD7730 puts out data on the DATA OUT line in a read operation on a high-to-low transition of SCLK and clocks in data from the DATA IN line in a write operation on a low-to-high transition of
SCLK. In applications with a noncontinuous serial clock (such as most microcontroller applications), this
means that the serial clock should idle high between data transfers.
5 SYNC Logic Input that allows for synchronization of the digital filters and analog modulators when using a number
of AD7730s. While SYNC is low, the nodes of the digital filter, the filter control logic and the calibration
control logic are reset and the analog modulator is also held in its reset state. SYNC does not affect the digital
interface but does reset RDY to a high state if it is low. While SYNC is asserted, the Mode Bits may be set up
for a subsequent operation which will commence when the SYNC pin is deasserted.
6 RESET Logic Input. Active low input that resets the control logic, interface logic, digital filter, analog modulator and
all on-chip registers of the part to power-on status. Effectively, everything on the part except for the clock
oscillator is reset when the RESET pin is exercised.
7V
BIAS
8 AGND Ground reference point for analog circuitry.
9AV
DD
10 AIN1(+) Analog Input Channel 1. Positive input of the differential, programmable-gain primary analog input pair. The
11 AIN1(–) Analog Input Channel 1. Negative input of the differential, programmable gain primary analog input pair.
12 AIN2(+)/D1 Analog Input Channel 2 or Digital Output 1. This pin can be used either as part of a second analog input
13 AIN2(–)/D0 Analog Input Channel 2 or Digital Output 0. This pin can be used either as part of a second analog input channel
14 REF IN(+) Reference Input. Positive terminal of the differential reference input to the AD7730. REF IN(+) can lie
15 REF IN(–) Reference Input. Negative terminal of the differential reference input to the AD7730. The REF IN(–) poten-
16 ACX Digital Output. Provides a signal that can be used to control the reversing of the bridge excitation in ac-
17 ACX Digital Output. Provides a signal that can be used to control the reversing of the bridge excitation in ac-
Analog Output. This analog output is an internally-generated voltage used as an internal operating bias point.
This output is not for use external to the AD7730 and it is recommended that the user does not connect anything to this pin.
Analog Positive Supply Voltage. The AVDD to AGND differential is 5 V nominal.
differential analog input ranges are 0 mV to +10 mV, 0 mV to +20 mV, 0 mV to +40 mV and 0 mV to +80 mV
in unipolar mode, and ±10 mV, ± 20 mV, ±40 mV and ±80 mV in bipolar mode.
channel or as a digital output bit as determined by the DEN bit of the Mode Register. When selected as an
analog input, it is the positive input of the differential, programmable-gain secondary analog input pair. The
analog input ranges are 0 mV to +10 mV, 0 mV to +20 mV, 0 mV to +40 mV and 0 mV to +80 mV in unipolar mode and ±10 mV, ±20 mV, ± 40 mV and ±80 mV in bipolar mode. When selected as a digital output,
this output can programmed over the serial interface using bit D1 of the Mode Register.
or as a digital output bit as determined by the DEN bit of the Mode Register. When selected as an analog input, it
is the negative input of the differential, programmable-gain secondary analog input pair. When selected as a digital
output, this output can programmed over the serial interface using bit D0 of the Mode Register.
anywhere between AV
and AGND. The nominal reference voltage (the differential voltage between REF
DD
IN(+) and REF IN(–)) should be +5 V when the HIREF bit of the Mode Register is 1 and +2.5 V when the
HIREF bit of the Mode Register is 0.
tial can lie anywhere between AV
and AGND.
DD
excited bridge applications. When ACX is high, the bridge excitation is taken as normal and when ACX is
low, the bridge excitation is reversed (chopped). If AC = 0 (ac mode turned off) or CHP = 0 (chop mode
turned off), the ACX output remains high.
excited bridge applications. This output is the complement of ACX. In ac mode, this means that it toggles in
anti-phase with ACX . If AC = 0 (ac mode turned off) or CHP = 0 (chop mode turned off), the ACX output
remains low. When toggling, it is guaranteed to be nonoverlapping with ACX. The non-overlap interval, when
both ACX and ACX are low, is one master clock cycle.
–8–
REV. A
Page 9

AD7730/AD7730L
Pin
No. Mnemonic Function
18 STANDBY Logic Input. Taking this pin low shuts down the analog and digital circuitry, reducing current consumption to
the 5 µA range. The on-chip registers retain all their values when the part is in standby mode.
19 CS Chip Select. Active low Logic Input used to select the AD7730. With this input hardwired low, the AD7730
can operate in its three-wire interface mode with SCLK, DIN and DOUT used to interface to the device. CS
can be used to select the device in systems with more than one device on the serial bus or as a frame synchronization signal in communicating with the AD7730.
20 RDY Logic Output. Used as a status output in both conversion mode and calibration mode. In conversion mode, a
logic low on this output indicates that a new output word is available from the AD7730 data register. The
RDY pin will return high upon completion of a read operation of a full output word. If no data read has taken
place after an output update, the RDY line will return high prior to the next output update, remain high while
the update is taking place and return low again. This gives an indication of when a read operation should not
be initiated to avoid initiating a read from the data register as it is being updated. In calibration mode, RDY
goes high when calibration is initiated and it returns low to indicate that calibration is complete. A number of
different events on the AD7730 set the RDY high and these are outlined in Table XVIII.
21 DOUT Serial Data Output with serial data being read from the output shift register on the part. This output shift
register can contain information from the calibration registers, mode register, status register, filter register,
DAC register or data register, depending on the register selection bits of the Communications Register.
22 DIN Serial Data Input with serial data being written to the input shift register on the part. Data from this input
shift register is transferred to the calibration registers, mode register, communications register, DAC register
or filter registers depending on the register selection bits of the Communications Register.
23 DV
DD
24 DGND Ground reference point for digital circuitry.
Digital Supply Voltage, +3 V or +5 V nominal.
TERMINOLOGY
INTEGRAL NONLINEARITY
This is the maximum deviation of any code from a straight line
passing through the endpoints of the transfer function. The endpoints of the transfer function are zero scale (not to be confused
with bipolar zero), a point 0.5 LSB below the first code transition (000 . . . 000 to 000 . . . 001) and full scale, a point 0.5 LSB
above the last code transition (111 . . . 110 to 111 . . . 111). The
error is expressed as a percentage of full scale.
POSITIVE FULL-SCALE ERROR
Positive Full-Scale Error is the deviation of the last code transition
(111 . . . 110 to 111 . . . 111) from the ideal AIN(+) voltage
(AIN(–) + V
/GAIN – 3/2 LSBs). It applies to both unipolar
REF
and bipolar analog input ranges. Positive full-scale error is a
summation of offset error and gain error.
UNIPOLAR OFFSET ERROR
Unipolar Offset Error is the deviation of the first code transition
from the ideal AIN(+) voltage (AIN(–) + 0.5 LSB) when operating in the unipolar mode.
BIPOLAR ZERO ERROR
This is the deviation of the midscale transition (0111 . . . 111 to
1000 . . . 000) from the ideal AIN(+) voltage (AIN(–) – 0.5 LSB)
when operating in the bipolar mode.
GAIN ERROR
This is a measure of the span error of the ADC. It is a measure
of the difference between the measured and the ideal span between any two points in the transfer function. The two points
used to calculate the gain error are full scale and zero scale.
REV. A
–9–
BIPOLAR NEGATIVE FULL-SCALE ERROR
This is the deviation of the first code transition from the ideal
AIN(+) voltage (AIN(–) – V
/GAIN + 0.5 LSB) when operat-
REF
ing in the bipolar mode. Negative full-scale error is a summation
of zero error and gain error.
POSITIVE FULL-SCALE OVERRANGE
Positive Full-Scale Overrange is the amount of overhead available to handle input voltages on AIN(+) input greater than
AIN(–) + V
/GAIN (for example, noise peaks or excess volt-
REF
ages due to system gain errors in system calibration routines) without introducing errors due to overloading the analog modulator
or overflowing the digital filter.
NEGATIVE FULL-SCALE OVERRANGE
This is the amount of overhead available to handle voltages on
AIN(+) below AIN(–) – V
/GAIN without overloading the
REF
analog modulator or overflowing the digital filter.
OFFSET CALIBRATION RANGE
In the system calibration modes, the AD7730 calibrates its
offset with respect to the analog input. The Offset Calibration
Range specification defines the range of voltages the AD7730
can accept and still accurately calibrate offset.
FULL-SCALE CALIBRATION RANGE
This is the range of voltages that the AD7730 can accept in the
system calibration mode and still calibrate full scale correctly.
INPUT SPAN
In system calibration schemes, two voltages applied in sequence
to the AD7730’s analog input define the analog input range.
The input span specification defines the minimum and maximum input voltages, from zero to full scale, the AD7730 can
accept and still accurately calibrate gain.
Page 10

AD7730/AD7730L
OUTPUT NOISE AND RESOLUTION SPECIFICATION
The AD7730 can be programmed to operate in either chop mode or nonchop mode. The chop mode can be enabled in ac-excited or
dc-excited applications; it is optional in dc-excited applications, but chop mode must be enabled in ac-excited applications. These
options are discussed in more detail in later sections. The chop mode has the advantage of lower drift numbers and better noise immunity, but the noise is approximately 20% higher for a given –3 dB frequency and output data rate. It is envisaged that the majority
of weigh-scale users of the AD7730 will operate the part in chop mode to avail themselves of the excellent drift performance and
noise immunity when chopping is enabled. The following tables outline the noise performance of the part in both chop and nonchop
modes over all input ranges for a selection of output rates. Settling time refers to the time taken to get an output that is 100% settled
to new value.
Output Noise (CHP = 1)
This mode is the primary mode of operation of the device. Table I shows the output rms noise for some typical output update rates
and –3 dB frequencies for the AD7730 when used in chopping mode (CHP of Filter Register = 1) with a master clock frequency of
4.9152 MHz. These numbers are typical and are generated at a differential analog input voltage of 0 V. The output update rate is
selected via the SF0 to SF11 bits of the Filter Register. Table II, meanwhile, shows the output peak-to-peak resolution in counts for
the same output update rates. The numbers in brackets are the effective peak-to-peak resolution in bits (rounded to the nearest 0.5
LSB). It is important to note that the numbers in Table II represent the resolution for which there will be no code flicker within a
six-sigma limit. They are not calculated based on rms noise, but on peak-to-peak noise.
The numbers are generated for the bipolar input ranges. When the part is operated in unipolar mode, the output noise will be the
same as the equivalent bipolar input range. As a result, the numbers in Table I will remain the same for unipolar ranges while the
numbers in Table II will change. To calculate the numbers for Table II for unipolar input ranges simply divide the peak-to-peak
resolution number in counts by two or subtract one from the peak-to-peak resolution number in bits.
Table I. Output Noise vs. Input Range and Update Rate (CHP = 1)
Typical Output RMS Noise in nV
Output –3 dB SF Settling Time Settling Time Input Range Input Range Input Range Input Range
Data Rate Frequency Word Normal Mode Fast Mode = 680 mV = 640 mV = 620 mV = 610 mV
50 Hz 1.97 Hz 2048 460 ms 60 ms 115 75 55 40
100 Hz 3.95 Hz 1024 230 ms 30 ms 155 105 75 60
150 Hz 5.92 Hz 683 153 ms 20 ms 200 135 95 70
200 Hz* 7.9 Hz 512 115 ms 15 ms 225 145 100 80
400 Hz 15.8 Hz 256 57.5 ms 7.5 ms 335 225 160 110
*Power-On Default
Table II. Peak-to-Peak Resolution vs. Input Range and Update Rate (CHP = 1)
Peak-to-Peak Resolution in Counts (Bits)
Output –3 dB SF Settling Time Settling Time Input Range Input Range Input Range Input Range
Data Rate Frequency Word Normal Mode Fast Mode = 680 mV = 640 mV = 620 mV = 610 mV
50 Hz 1.97 Hz 2048 460 ms 60 ms 230k (18) 175k (17.5) 120k (17) 80k (16.5)
100 Hz 3.95 Hz 1024 230 ms 30 ms 170k (17.5) 125k (17) 90k (16.5) 55k (16)
150 Hz 5.92 Hz 683 153 ms 20 ms 130k (17) 100k (16.5) 70k (16) 45k (15.5)
200 Hz* 7.9 Hz 512 115 ms 15 ms 120k (17) 90k (16.5) 65k (16) 40k (15.5)
400 Hz 15.8 Hz 256 57.5 ms 7.5 ms 80k (16.5) 55k (16) 40k (15.5) 30k (15)
*Power-On Default
Output Noise (CHP = 0)
Table III shows the output rms noise for some typical output update rates and –3 dB frequencies for the AD7730 when used in nonchopping mode (CHP of Filter Register = 0) with a master clock frequency of 4.9152 MHz. These numbers are typical and are generated at a differential analog input voltage of 0 V. The output update rate is selected via the SF0 to SF11 bits of the Filter Register.
Table IV, meanwhile, shows the output peak-to-peak resolution in counts for the same output update rates. The numbers in brackets
are the effective peak-to-peak resolution in bits (rounded to the nearest 0.5 LSB). It is important to note that the numbers in Table
IV represent the resolution for which there will be no code flicker within a six-sigma limit. They are not calculated based on rms
noise, but on peak-to-peak noise.
The numbers are generated for the bipolar input ranges. When the part is operated in unipolar mode, the output noise will be the
same as the equivalent bipolar input range. As a result, the numbers in Table III will remain the same for unipolar ranges while the
numbers in Table IV will change. To calculate the number for Table IV for unipolar input ranges simply divide the peak-to-peak
resolution number in counts by two or subtract one from the peak-to-peak resolution number in bits.
–10–
REV. A
Page 11
AD7730/AD7730L
Table III. Output Noise vs. Input Range and Update Rate (CHP = 0)
Typical Output RMS Noise in nV
Output –3 dB SF Settling Time Settling Time Input Range Input Range Input Range Input Range
Data Rate Frequency Word Normal Mode Fast Mode = 680 mV = 640 mV = 620 mV = 610 mV
150 Hz 5.85 Hz 2048 166 ms 26.6 ms 160 110 80 60
200 Hz 7.8 Hz 1536 125 ms 20 ms 190 130 95 75
300 Hz 11.7 Hz 1024 83.3 ms 13.3 ms 235 145 100 80
600 Hz 23.4 Hz 512 41.6 ms 6.6 ms 300 225 135 110
1200 Hz 46.8 Hz 256 20.8 ms 3.3 ms 435 315 210 150
Table IV. Peak-to-Peak Resolution vs. Input Range and Update Rate (CHP = 0)
Peak-to-Peak Resolution in Counts (Bits)
Output –3 dB SF Settling Time Settling Time Input Range Input Range Input Range Input Range
Data Rate Frequency Word Normal Mode Fast Mode = 680 mV = 640 mV = 620 mV = 610 mV
150 Hz 5.85 Hz 2048 166 ms 26.6 ms 165k (17.5) 120k (17) 80k (16.5) 55k (16)
200 Hz 7.8 Hz 1536 125 ms 20 ms 140k (17) 100k (16.5) 70k (16) 45k (15.5)
300 Hz 11.7 Hz 1024 83.3 ms 13.3 ms 115k (17) 90k (16.5) 65k (16) 40k (15.5)
600 Hz 23.4 Hz 512 41.6 ms 6.6 ms 90k (16.5) 60k (16) 50k (15.5) 30k (15)
1200 Hz 46.8 Hz 256 20.8 ms 3.3 ms 60k (16) 43k (15.5) 32k (15) 20k (14.5)
ON-CHIP REGISTERS
The AD7730 contains thirteen on-chip registers which can be accessed via the serial port of the part. These registers are summarized
in Figure 4 and in Table V and described in detail in the following sections.
DIN
DOUT
DOUT
DOUT
DOUT
DOUT
DOUT
DOUT
DOUT
DOUT
DIN
DIN
DIN
DIN
DIN
DIN
DIN
COMMUNICATIONS REGISTER
RS2 RS1 RS0
STATUS REGISTER
DATA REGISTER
MODE REGISTER
FILTER REGISTER
DAC REGISTER
OFFSET REGISTER (x3)
GAIN REGISTER (x3)
TEST REGISTER
REGISTER
SELECT
DECODER
REV. A
Figure 4. Register Overview
–11–
Page 12

AD7730/AD7730L
Table V. Summary of On-Chip Registers
Power-On/Reset
Register Name Type Size Default Value Function
Communications Write Only 8 Bits Not Applicable All operations to other registers are initiated through
Register the Communications Register. This controls whether
WEN ZERO RW1 RW0 ZERO RS2 RS1 RS0
Status Register Read Only 8 Bits CX Hex Provides status information on conversions, calibra-
RDY STDY STBY NOREF MS3 MS2 MS1 MS0
Data Register Read Only 16 Bits or 24 Bits 000000 Hex Provides the most up-to-date conversion result from
Mode Register Read/Write 16 Bits 01B0 Hex Controls functions such as mode of operation, uni-
MD2 MD1 MD0 B/U DEN D1 D0 WL
HIREF ZERO RN1 RN0 CLKDIS BO CH1 CH0
subsequent operations are read or write operations
and also selects the register for that subsequent
operation. Most subsequent operations return control to the Communications Register except for the
continuous read mode of operation.
tions, settling to step inputs, standby operation and
the validity of the reference voltage.
the part. Register length can be programmed to be
16 bits or 24 bits.
polar/bipolar operation, controlling the function of
AIN2(+)/D1 and AIN2(-)/D0, burnout current,
Data Register word length and disabling of MCLK
OUT. It also contains the reference selection bit, the
range selection bits and the channel selection bits.
Filter Register Read/Write 24 Bits 200010 Hex Controls the amount of averaging in the first stage
filter, selects the fast step and skip modes and con-
SF11 SF10 SF9 SF8 SF7 SF6 SF5 SF4
SF3 SF2 SF1 SF0 ZERO ZERO SKIP FAST
ZERO ZERO AC CHP DL3 DL2 DL1 DL0
trols the ac excitation and chopping modes on the
part.
DAC Register Read/Write 8 Bits 20 Hex Provides control of the amount of correction per-
formed by the Offset/TARE DAC.
ZERO ZERO DAC5 DAC4 DAC3 DAC2 DAC1 DAC0
Offset Register Read/Write 24 Bits 800000 Hex Contains a 24-bit word which is the offset calibration
coefficient for the part. The contents of this register
are used to provide offset correction on the output
from the digital filter. There are three Offset Registers on the part and these are associated with the
input channels as outlined in Table XIII.
Gain Register Read/Write 24 Bits 59AEE7 Hex Contains a 24-bit word which is the gain calibration
coefficient for the part. The contents of this register
are used to provide gain correction on the output
from the digital filter. There are three Gain Registers
on the part and these are associated with the input
channels as outlined in Table XIII.
Test Register Read/Write 24 Bits 000000 Hex Controls the test modes of the part which are used
when testing the part. The user is advised not to
change the contents of this register.
–12–
REV. A
Page 13
AD7730/AD7730L
Communications Register (RS2–RS0 = 0, 0, 0)
The Communications Register is an 8-bit write-only register. All communications to the part must start with a write operation to the
Communications Register. The data written to the Communications Register determines whether the next operation is a read or
write operation, the type of read operation, and to which register this operation takes place. For single-shot read or write operations,
once the subsequent read or write operation to the selected register is complete, the interface returns to where it expects a write operation to the Communications Register. This is the default state of the interface, and on power-up or after a RESET, the AD7730
is in this default state waiting for a write operation to the Communications Register. In situations where the interface sequence is
lost, a write operation of at least 32 serial clock cycles with DIN high, returns the AD7730 to this default state by resetting the
part. Table VI outlines the bit designations for the Communications Register. CR0 through CR7 indicate the bit location, CR denoting the bits are in the Communications Register. CR7 denotes the first bit of the data stream.
Table VI. Communications Register
CR7 CR6 CR5 CR4 CR3 CR2 CR1 CR0
WEN ZERO RW1 RW0 ZERO RS2 RS1 RS0
Bit Bit
Location Mnemonic Description
CR7 WEN Write Enable Bit. A 0 must be written to this bit so the write operation to the Communications
Register actually takes place. If a 1 is written to this bit, the part will not clock on to subsequent
bits in the register. It will stay at this bit location until a 0 is written to this bit. Once a 0 is writ-
ten to the WEN bit, the next seven bits will be loaded to the Communications Register.
CR6 ZERO A zero must be written to this bit to ensure correct operation of the AD7730.
CR5, CR4 RW1, RW0 Read/Write Mode Bits. These two bits determine the nature of the subsequent read/write opera-
tion. Table VII outlines the four options.
Table VII. Read/Write Mode
RW1 RW0 Read/Write Mode
0 0 Single Write to Specified Register
0 1 Single Read of Specified Register
1 0 Start Continuous Read of Specified Register
1 1 Stop Continuous Read Mode
With 0, 0 written to these two bits, the next operation is a write operation to the register specified by
bits RS2, RS1, RS0. Once the subsequent write operation to the specified register has been com-
pleted, the part returns to where it is expecting a write operation to the Communications Register.
With 0,1 written to these two bits, the next operation is a read operation of the register specified
by bits RS2, RS1, RS0. Once the subsequent read operation to the specified register has been
completed, the part returns to where it is expecting a write operation to the Communications
Register.
Writing 1,0 to these bits, sets the part into a mode of continuous reads from the register speci-
fied by bits RS2, RS1, RS0. The most likely registers with which the user will want to use this
function are the Data Register and the Status Register. Subsequent operations to the part will
consist of read operations to the specified register without any intermediate writes to the Com-
munications Register. This means that once the next read operation to the specified register has
taken place, the part will be in a mode where it is expecting another read from that specified
register. The part will remain in this continuous read mode until 30 Hex has been written to the
Communications Register.
When 1,1 is written to these bits (and 0 written to bits CR3 through CR0), the continuous read
mode is stopped and the part returns to where it is expecting a write operation to the Communi-
cations Register. Note, the part continues to look at the DIN line on each SCLK edge during
continuous read mode to determine when to stop the continuous read mode. Therefore, the user
must be careful not to inadvertently exit the continuous read mode or reset the AD7730 by
writing a series of 1s to the part. The easiest way to avoid this is to place a logic 0 on the DIN
line while the part is in continuous read mode. Once the part is in continuous read mode, the
user should ensure that an integer multiple of 8 serial clocks should have taken place before
attempting to take the part out of continuous read mode.
REV. A
–13–
Page 14
AD7730/AD7730L
Bit Bit
Location Mnemonic Description
CR3 ZERO A zero must be written to this bit to ensure correct operation of the AD7730.
CR2–CR0 RS2–RS0 Register Selection Bits. RS2 is the MSB of the three selection bits. The three bits select
which register type the next read or write operation operates upon as shown in Table VIII.
Table VIII. Register Selection
RS2 RS1 RS0 Register
0 0 0 Communications Register (Write Operation)
0 0 0 Status Register (Read Operation)
0 0 1 Data Register
0 1 0 Mode Register
0 1 1 Filter Register
1 0 0 DAC Register
1 0 1 Offset Register
1 1 0 Gain Register
1 1 1 Test Register
Status Register (RS2–RS0 = 0, 0, 0); Power-On/Reset Status: CX Hex
The Status Register is an 8-bit read-only register. To access the Status Register, the user must write to the Communications Register
selecting either a single-shot read or continuous read mode and load bits RS2, RS1, RS0 with 0, 0, 0. Table IX outlines the bit designations for the Status Register. SR0 through SR7 indicate the bit location, SR denoting the bits are in the Status Register. SR7
denotes the first bit of the data stream. Figure 5 shows a flowchart for reading from the registers on the AD7730. The number
in brackets indicates the power-on/reset default status of that bit.
Table IX. Status Register
SR7 SR6 SR5 SR4 SR3 SR2 SR1 SR0
RDY (1) STDY (1) STBY (0) NOREF (0) MS3 (X) MS2 (X) MS1 (X) MS0 (X)
Bit Bit
Location Mnemonic Description
SR7 RDY Ready Bit. This bit provides the status of the RDY flag from the part. The status and function of
this bit is the same as the RDY output pin. A number of events set the RDY bit high as indicated in Table XVIII.
SR6 STDY Steady Bit. This bit is updated when the filter writes a result to the Data Register. If the filter is
in
FASTStep
remains high as the initial conversion results become available. The RDY output and bit are set
low on these initial conversions to indicate that a result is available. If the STDY is high, however,
it indicates that the result being provided is not from a fully settled second-stage FIR filter. When the
FIR filter has fully settled, the STDY bit will go low coincident with RDY. If the part is never placed
into its
not cleared by subsequent Data Register reads.
A number of events set the STDY bit high as indicated in Table XVIII. STDY is set high along
with RDY by all events in the table except a Data Register read.
SR5 STBY Standby Bit. This bit indicates whether the AD7730 is in its Standby Mode or normal mode of
operation. The part can be placed in its standby mode using the STANDBY input pin or by
writing 011 to the MD2 to MD0 bits of the Mode Register. The power-on/reset status of this bit
is 0 assuming the STANDBY pin is high.
SR4 NOREF No Reference Bit. If the voltage between the REF IN(+) and REF IN(–) pins is below 0.3 V, or
either of these inputs is open-circuit, the NOREF bit goes to 1. If NOREF is active on completion of a conversion, the Data Register is loaded with all 1s. If NOREF is active on completion
of a calibration, updating of the calibration registers is inhibited.
SR3–SR0 MS3–MS0 These bits are for factory use. The power-on/reset status of these bits vary, depending on the
factory-assigned number.
mode (see Filter Register section) and responding to a step input, the STDY bit
FASTStep
mode, the STDY bit will go low at the first Data Register read and it is
–14–
REV. A
Page 15

AD7730/AD7730L
Data Register (RS2–RS0 = 0, 0, 1); Power On/Reset Status: 000000 Hex
The Data Register on the part is a read-only register which contains the most up-to-date conversion result from the AD7730. Figure 5 shows a flowchart for reading from the registers on the AD7730. The register can be programmed to be either 16 bits or 24bits
wide, determined by the status of the WL bit of the Mode Register. The RDY output and RDY bit of the Status Register are set low
when the Data Register is updated. The RDY pin and RDY bit will return high once the full contents of the register (either 16bits or
24 bits) have been read. If the Data Register has not been read by the time the next output update occurs, the RDY pin and RDY bit
will go high for at least 100 × t
the Data Register as it is being updated. Once the updating of the Data Register has taken place, RDY returns low.
If the Communications Register data sets up the part for a write operation to this register, a write operation must actually take place
in order to return the part to where it is expecting a write operation to the Communications Register (the default state of the interface). However, the 16 or 24 bits of data written to the part will be ignored by the AD7730.
Mode Register (RS2–RS0 = 0, 1, 0); Power On/Reset Status: 01B0 Hex
The Mode Register is a 16-bit register from which data can be read or to which data can be written. This register configures
the operating modes of the AD7730, the input range selection, the channel selection and the word length of the Data Register.
Table X outlines the bit designations for the Mode Register. MR0 through MR15 indicate the bit location, MR denoting the bits are
in the Mode Register. MR15 denotes the first bit of the data stream. The number in brackets indicates the power-on/reset default
status of that bit. Figure 5 shows a flowchart for reading from the registers on the AD7730 and Figure 6 shows a flowchart for writing to the registers on the part.
MR15 MR14 MR13 MR12 MR11 MR10 MR9 MR8
MD2 (0) MD1 (0) MD0 (0) B/U (0) DEN (0) D1 (0) D0 (0) WL (1)
, indicating when a read from the Data Register should not be initiated to avoid a transfer from
CLK IN
Table X. Mode Register
MR7 MR6 MR5 MR4 MR3 MR2 MR1 MR0
HIREF (1) ZERO (0) RN1 (1) RN0 (1) CLKDIS (0) BO (0) CH1 (0) CH0 (0)
Bit Bit
Location Mnemonic Description
MR15–MR13 MD2–MD0 Mode Bits. These three bits determine the mode of operation of the AD7730 as outlined in
Table XI. The modes are independent, such that writing new mode bits to the Mode Register
will exit the part from the mode in which it is operating and place it in the new requested mode
immediately after the Mode Register write. The function of the mode bits is described in more
detail below.
Table XI. Operating Modes
MD2 MD1 MD0 Mode of Operation
0 0 0 Sync (Idle) Mode Power-On/Reset Default
0 0 1 Continuous Conversion Mode
0 1 0 Single Conversion Mode
0 1 1 Power-Down (Standby) Mode
1 0 0 Internal Zero-Scale Calibration
1 0 1 Internal Full-Scale Calibration
1 1 0 System Zero-Scale Calibration
1 1 1 System Full-Scale Calibration
REV. A
–15–
Page 16

AD7730/AD7730L
MD2 MD1 MD0 Operating Mode
0 0 0 Sync (Idle) Mode. In this mode, the modulator and filter are held in reset mode and the AD7730 is not
processing any new samples or data. Placing the part in this mode is equivalent to exerting the SYNC
input pin. However, exerting the SYNC pin does not actually force these mode bits to 0, 0, 0. The part
returns to this mode after a calibration or after a conversion in Single Conversion Mode. This is the
default condition of these bits after Power-On/Reset.
0 0 1 Continuous Conversion Mode. In this mode, the AD7730 is continuously processing data and providing
conversion results to the Data Register at the programmed output update rate (as determined by the
Filter Register). For most applications, this would be the normal operating mode of the AD7730.
0 1 0 Single Conversion Mode. In this mode, the AD7730 performs a single conversion, updates the Data
Register, returns to the Sync Mode and resets the mode bits to 0, 0, 0. The result of the single conversion
on the AD7730 in this mode will not be provided until the full settling time of the filter has elapsed.
0 1 1 Power-Down (Standby) Mode. In this mode, the AD7730 goes into its power-down or standby state.
Placing the part in this mode is equivalent to exerting the STANDBY input pin. However, exerting
STANDBY does not actually force these mode bits to 0, 1, 1.
1 0 0 Zero-Scale Self-Calibration Mode. This activates zero-scale self-calibration on the channel selected by
CH1 and CH0 of the Mode Register. This zero-scale self-calibration is performed at the selected gain on
internally shorted (zeroed) inputs. When this zero-scale self-calibration is complete, the part updates the
contents of the appropriate Offset Calibration Register and returns to Sync Mode with MD2, MD1 and
MD0 returning to 0, 0, 0. The RDY output and bit go high when calibration is initiated and return low
when this zero-scale self-calibration is complete to indicate that the part is back in Sync Mode and ready
for further operations.
1 0 1 Full-Scale Self-Calibration Mode. This activates full-scale self-calibration on the channel selected by
CH1 and CH0 of the Mode Register. This full-scale self-calibration is performed at the selected gain on
an internally-generated full-scale signal. When this full-scale self-calibration is complete, the part updates
the contents of the appropriate Gain Calibration Register and Offset Calibration Register and returns to
Sync Mode with MD2, MD1 and MD0 returning to 0, 0, 0. The RDY output and bit go high when
calibration is initiated and return low when this full-scale self-calibration is complete to indicate that the
part is back in Sync Mode and ready for further operations.
1 1 0 Zero-Scale System Calibration Mode. This activates zero scale system calibration on the channel selected
by CH1 and CH0 of the Mode Register. Calibration is performed at the selected gain on the input voltage provided at the analog input during this calibration sequence. This input voltage should remain
stable for the duration of the calibration. When this zero-scale system calibration is complete, the part
updates the contents of the appropriate Offset Calibration Register and returns to Sync Mode with MD2,
MD1 and MD0 returning to 0, 0, 0. The RDY output and bit go high when calibration is initiated and
return low when this zero-scale calibration is complete to indicate that the part is back in Sync Mode and
ready for further operations.
1 1 1 Full-Scale System Calibration Mode. This activates full-scale system calibration on the selected input
channel. Calibration is performed at the selected gain on the input voltage provided at the analog input
during this calibration sequence. This input voltage should remain stable for the duration of the calibration. When this full-scale system calibration is complete, the part updates the contents of the appropriate
Gain Calibration Register and returns to Sync Mode with MD2, MD1 and MD0 returning to 0, 0, 0.
The RDY output and bit go high when calibration is initiated and return low when this full-scale calibration is complete to indicate that the part is back in Sync Mode and ready for further operations.
–16–
REV. A
Page 17

AD7730/AD7730L
Bit Bit
Location Mnemonic Description
MR12 B/U Bipolar/Unipolar Bit. A 0 in this bit selects bipolar operation and the output coding is 00. . . 000 for
negative full-scale input, 10 . . . 000 for zero input, and 11. . . 111 for positive full-scale input. A 1 in
this bit selects unipolar operation and the output coding is 00.. .000 for zero input and 11.. . 111 for
positive full-scale input.
MR11 DEN Digital Output Enable Bit. With this bit at 1, the AIN2(+)/D1 and AIN2(–)/D0 pins assume their
digital output functions and the output drivers connected to these pins are enabled. In this mode, the
user effectively has two port bits which can be programmed over the serial interface.
MR10–MR9 D1–D0 Digital Output Bits. These bits determine the digital outputs on the AIN2(+)/D1 and AIN2(–)/D0 pins,
respectively, when the DEN bit is a 1. For example, a 1 written to the D1 bit of the Mode Register
(with the DEN bit also a 1) will put a logic 1 on the AIN2(+)/D1 pin. This logic 1 will remain on this
pin until a 0 is written to the D1 bit (in which case the AIN2(+)/D1 pin goes to a logic 0) or the digital
output function is disabled by writing a 0 to the DEN bit.
MR8 WL Data Word Length Bit. This bit determines the word length of the Data Register. A 0 in this bit selects
16-bit word length when reading from the data register (i.e., RDY returns high after 16 serial clock
cycles in the read operation). A 1 in this bit selects 24-bit word length for the Data Register.
MR7 HIREF High Reference Bit. This bit should be set in accordance with the reference voltage which is being used
on the part. If the reference voltage is 5 V, the HIREF bit should be set to 1. If the reference voltage is
2.5 V, the HIREF bit should be set to a 0. With the HIREF bit set correctly for the appropriate applied
reference voltage, the input ranges are 0 mV to +10 mV, +20 mV, +40 mV and +80 mV for unipolar
operation and ±10 mV, ±20 mV, ±40 mV and ±80 mV for bipolar operation.
It is possible for a user with a 2.5 V reference to set the HIREF bit to a 1. In this case, the part is operating with a 2.5 V reference but assumes it has a 5 V reference. As a result, the input ranges on the part
become 0 to +5 mV, +10 mV, +20 mV and +40 mV for unipolar operation and ±5 mV, ±10 mV,
±20 mV and ±40 mV for bipolar operation. However, the output noise from the part (in nV) will re-
main unchanged so the resolution of the part (in counts) will halve.
MR6 ZERO A zero must be written to this bit to ensure correct operation of the AD7730.
MR5–MR4 RN1–RN0 Input Range Bits. These bits determine the analog input range for the selected analog input. The dif-
ferent input ranges are outlined in Table XII. The table is valid for a reference voltage of 5 V with the
HIREF bit at 1, or for a reference voltage of 2.5 V with the HIREF bit at a logic 0.
Table XII. Input Range Selection
Input Range
RN1 RN0 B/U Bit = 0 B/U Bit = 1
0 0 –10 mV to +10 mV 0 mV to +10 mV
0 1 –20 mV to +20 mV 0 mV to +20 mV
1 0 –40 mV to +40 mV 0 mV to +40 mV
1 1 –80 mV to +80 mV 0 mV to +80 mV Power-On/Reset Default
Note that the input range given in the above table is the range that appears at the input of the PGA
after the DAC offset value has been applied. If the DAC adjusts out no offset (DAC Register is 0010
0000), then this is also the input voltage range at the analog input pins. If, for example, the DAC sub-
tracts out 50 mV of offset and the part is being operated in bipolar mode with RN1 and RN0 at 0, 0,
the actual input voltage range at the analog input is +40 mV to +60 mV.
MR3 CLKDIS Master Clock Disable Bit. A 1 in the bit disables the master clock from appearing at the MCLK OUT
pin. When disabled, the MCLK OUT pin is forced low. It allows the user the flexibility of using the
MCLK OUT as a clock source for other devices in the system or of turning off the MCLK OUT as a
power saving feature. When using an external master clock at the MCLK IN pin, the AD7730 contin-
ues to have internal clocks and will convert normally with the CLKDIS bit active. When using a crystal
oscillator or ceramic resonator across the MCLK IN and MCLK OUT pins, the AD7730 clock is
stopped and no conversions take place when the CLKDIS bit is active.
REV. A
–17–
Page 18

AD7730/AD7730L
Bit Bit
Location Mnemonic Description
MR2 BO Burnout Current Bit. A 1 in this bit activates the burnout currents. When active, the burnout currents
connect to the selected analog input pair, one source current to the AIN(+) input and one sink current to
the AIN(–) input. A 0 in this bit turns off the on-chip burnout currents.
MR1–MR0 CH1–CH0 Channel Selection Bits. These bits select the analog input channel to be converted or calibrated as
outlined in Table XIII. With CH1 at 1 and CH0 at 0, the part looks at the AIN1(–) input internally
shorted to itself. This can be used as a test method to evaluate the noise performance of the part with
no external noise sources. In this mode, the AIN1(–) input should be connected to an external voltage
within the allowable common-mode range of the part. The Offset and Gain Calibration Registers on
the part are paired. There are three pairs of calibration registers labelled Register Pair 0 through Register Pair 2. These are assigned to the input channel pairs as outlined in Table XIII.
Table XIII. Channel Selection
Input Channel Pair
CH1 CH0 Positive Input Negative Input Calibration Register Pair
0 0 AIN1(+) AIN1(–) Register Pair 0
0 1 AIN2(+) AIN2(–) Register Pair 1
1 0 AIN1(–) AIN1(–) Register Pair 0
1 1 AIN1(–) AIN2(–) Register Pair 2
Filter Register (RS2-RS0 = 0, 1, 1); Power-On/Reset Status: 200010 Hex
The Filter Register is a 24-bit register from which data can be read or to which data can be written. This register determines the
amount of averaging performed by the filter and the mode of operation of the filter. It also sets the chopping mode and the delay
associated with chopping the inputs. Table XIV outlines the bit designations for the Filter Register. FR0 through FR23 indicate the
bit location, FR denoting the bits are in the Filter Register. FR23 denotes the first bit of the data stream. The number in brackets
indicates the power-on/reset default status of that bit. Figure 5 shows a flowchart for reading from the registers on the AD7730 and
Figure 6 shows a flowchart for writing to the registers on the part.
Table XIV. Filter Register
FR23 FR22 FR21 FR20 FR19 FR18 FR17 FR16
SF11 (0) SF10 (0) SF9 (1) SF8 (0) SF7 (0) SF6 (0) SF5 (0) SF4 (0)
FR15 FR14 FR13 FR12 FR11 FR10 FR9 FR8
SF3 (0) SF2 (0) SF1 (0) SF0 (0) ZERO (0) ZERO (0) SKIP (0) FAST (0)
FR7 FR6 FR5 FR4 FR3 FR2 FR1 FR0
ZERO (0) ZERO (0) AC (0) CHP (1) DL3 (0) DL2 (0) DL1 (0) DL0 (0)
Bit Bit
Location Mnemonic Description
3
FR23–FR12 SF11–SF0 Sinc
Filter Selection Bits. The AD7730 contains two filters: a sinc3 filter and an FIR filter. The 12 bits
programmed to SF11 through SF0 set the amount of averaging the sinc
3
filter performs. As a result,
the number programmed to these 12 bits affects the –3 dB frequency and output update rate from the
part (see Filter Architecture section). The allowable range for SF words depends on whether the part
is operated with CHOP on or off and SKIP on or off. Table XV outlines the SF ranges for different
setups. All output update rates will be one-half those quoted in Table XV for the AD7730L operating
with a 2.4576 MHz clock.
–18–
REV. A
Page 19

AD7730/AD7730L
Table XV. SF Ranges
CHOP SKIP SF Range Output Update Rate Range (Assuming 4.9152 MHz Clock)
0 0 2048 to 150 150 Hz to 2.048 kHz
1 0 2048 to 75 50 Hz to 1.365 kHz
0 1 2048 to 40 150 Hz to 7.6 kHz
1 1 2048 to 20 50 Hz to 5.12 kHz
Bit Bit
Location Mnemonic Description
FR11–FR10 ZERO A zero must be written to these bits to ensure correct operation of the AD7730.
FR9 SKIP FIR Filter Skip Bit. With a 0 in this bit, the AD7730 performs two stages of filtering before
shipping a result out of the filter. The first is a sinc
1 in this bit, the FIR filter on the part is bypassed and the output of the sinc
as the output result of the AD7730’s filter (see Filter Architecture for more details on the filter
implementation).
FR8 FAST FASTStep Mode Enable Bit. A 1 in this bit enables the FASTStep mode on the AD7730. In
this mode, if a step change on the input is detected, the FIR calculation portion of the filter is
suspended and replaced by a simple moving average on the output of the sinc
two outputs from the sinc
3
filter are used to calculate an AD7730 output. The number of sinc
outputs used to calculate the moving average output is increased (from 2 to 4 to 8 to 16) until
the STDY bit goes low. When the FIR filter has fully settled after a step, the STDY bit will
become active and the FIR filter is switched back into the processing loop (see Filter Architecture section for more details on the FASTStep mode).
FR7–FR6 ZERO A zero must be written to these bits to ensure correct operation of the AD7730.
FR5 AC AC Excitation Bit. If the signal source to the AD7730 is ac-excited, a 1 must be placed in this
bit. For dc-excited inputs, this bit must be 0. The ac bit has no effect if CHP is 0. With the ac
bit at 1, the AD7730 assumes that the voltage at the AIN(+)/AIN(–) and REF IN(+)/REF IN(–)
input terminals are reversed on alternate input sampling cycles (i.e. chopped). Note that when
the AD7730 is performing internal zero-scale or full-scale calibrations, the ac bit is treated as a
0, i.e., the device performs these self-calibrations with dc excitation.
FR4 CHP Chop Enable Bit. This bit determines if the chopping mode on the part is enabled. A 1 in this
bit location enables chopping on the part. When the chop mode is enabled, the part is effectively
chopped at its input and output to remove all offset and offset drift errors on the part. If offset
performance with time and temperature are important parameters in the design, it is recommended that the user enable chopping on the part. If the input signal is dc-excited, the user has
the option of operating the part in either chop or nonchop mode. If the input signal is ac-excited,
both the ac bit and the CHP bit must be set to 1. The chop rate on the ACX and ACX signals is
one half of the programmed output rate of the part and thus the chopping frequency varies with
the programmed output rate.
FR3–FR0 DL3–DL0 Delay Selection Bits. These four bits program the delay (in modulator cycles) to be inserted after
each chop edge when the CHP bit is 1. One modulator cycle is MCLK IN/16 and is 3.25 µs at
MCLK IN = 4.9152 MHz. A delay should only be required when in ac mode. Its purpose is to
cater for external delays between the switching signals (ACX and ACX) and when the analog
inputs are actually switched and settled. During the specified number of cycles (between 0 and
15), the modulator is held in reset and the filter does not accept any inputs. If CHP = 1, the
output rate is (MCLK IN/ 16 × (DL + 3 × SF) where DL is the value loaded to bits DL0–DL3.
The chop rate is always one half of the output rate. This chop period takes into account the
programmed delay and the fact that the sinc
the output rate is 1/SF.
3
filter followed by a 22-tap FIR filter. With a
3
filter must settle every chop cycle. With CHP = 0,
3
is fed directly
3
filter. Initially,
3
REV. A
–19–
Page 20

AD7730/AD7730L
DAC Register (RS2–RS0 = 1, 0, 0); Power On/Reset Status: 20 Hex
The DAC Register is an 8-bit register from which data can either be read or to which data can be written. This register provides
the code for the offset-compensation DAC on the part. Table XVI outlines the bit designations for the DAC Register. DR0
through DR7 indicate the bit location, DR denoting the bits are in the DAC Register. DR7 denotes the first bit of the data
stream. The number in brackets indicates the power-on/reset default status of that bit. Figure 5 shows a flowchart for reading
from the registers on the AD7730 and Figure 6 shows a flowchart for writing to the registers on the part.
Table XVI. DAC Register
DR7 DR6 DR5 DR4 DR3 DR2 DR1 DR0
ZERO (0) ZERO (0) DAC5 (1) DAC4 (0) DAC3 (0) DAC2 (0) DAC1 (0) DAC0 (0)
Bit Bit
Location Mnemonic Description
DR7–DR6 ZERO A zero must be written to these bits to ensure correct operation of the AD7730.
DR5–DR0 DAC5–DAC0 DAC Selection Bits. These bits program the output of the offset DAC. The DAC is effectively
6 bits with one sign bit (DAC5) and five magnitude bits. With DAC5 at 1, the DAC output
subtracts from the analog input before it is applied to the PGA. With DAC5 at 0, the DAC
output adds to the analog input before it is applied to the PGA. The DAC output is given by
(V
/62.5) × (D/32) = (V
REF
DAC0. Thus, for a 5 V reference applied across the REF IN pins, the DAC resolution is 2.5 mV
and offsets in the range –77.5 mV to +77.5 mV can be removed from the analog input signal
before it is applied to the PGA. Note, that the HIREF bit has no effect on the DAC range or
resolution, it controls the ADC range only.
/2000) × D where D is the decimal equivalent of bits DAC4 to
REF
Offset Calibration Register (RS2–RS0 = 1, 0, 1); Power-On/Reset Status: 800000 Hex
The AD7730 contains three 24-bit Offset Calibration Registers, labelled Offset Calibration Register 0 to Offset Calibration Register 2, to which data can be written and from which data can be read. The three registers are totally independent of each other.
The Offset Calibration Register is used in conjunction with the associated Gain Calibration Register to form a register pair. The
calibration register pair used to scale the output is as outlined in Table XIII. The Offset Calibration Register is updated after an
offset calibration routine (1, 0, 0 or 1, 1, 0 loaded to the MD2, MD1, MD0 bits of the Mode Register). During subsequent
conversions, the contents of this register are subtracted from the filter output prior to gain scaling being performed on the word.
Figure 5 shows a flowchart for reading from the registers on the AD7730 and Figure 6 shows a flowchart for writing to the registers on the part.
Gain Calibration Register (RS2–RS0 = 1, 1, 0); Power-On/Reset Status: 593CEA
The AD7730 contains three 24-bit Gain Calibration Registers, labelled Gain Calibration Register 0 to Gain Calibration Register
2, to which data can be written and from which data can be read. The three registers are totally independent of each other. The
Gain Calibration Register is used in conjunction with the associated Offset Calibration Register to form a register pair. The
calibration register pair used to scale the output is as outlined in Table XIII. The Gain Calibration Register is updated after a
gain calibration routine (1, 0, 1 or 1, 1, 1 loaded to the MD2, MD1, MD0 bits of the Mode Register). During subsequent conversions, the contents of this register are used to scale the number which has already been offset corrected with the Offset Calibration Register contents. Figure 5 shows a flowchart for reading from the registers on the AD7730 and Figure 6 shows a
flowchart for writing to the registers on the part.
Test Register (RS2–RS0 = 1, 1, 1); Power-On/Reset Status: 000000Hex
The AD7730 contains a 24-bit Test Register to which data can be written and from which data can be read. The contents of this
Test Register are used in testing the device. The user is advised not to change the status of any of the bits in this register from the
default (Power-On or RESET) status of all 0s as the part will be placed in one of its test modes and will not operate correctly. If the
part enters one of its test modes, exercising RESET or writing 32 successive 1s to the part will exit the AD7730 from the mode and
return all register contents to their power-on/reset status. Note, if the part is placed in one of its test modes, it may not be possible to
read back the contents of the Test Register depending on the test mode in which the part has been placed.
–20–
REV. A
Page 21

AD7730/AD7730L
READING FROM AND WRITING TO THE ON-CHIP REGISTERS
The AD7730 contains a total of thirteen on-chip registers. These registers are all accessed over a three-wire interface. As a result,
addressing of registers is via a write operation to the topmost register on the part, the Communications Register. Figure 5 shows a
flowchart for reading from the different registers on the part summarizing the sequence and the words to be written to access each of
the registers. Figure 6 gives a flowchart for writing to the different registers on the part, again summarizing the sequence and words
to be written to the AD7730.
START
Byte W Byte Y Byte Z
Register (Hex) (Hex) (Hex)
CONTINUOUS
READS OF
REGISTER
REQUIRED?
NO
WRITE
BYTE W
COMMUNICATIONS REGISTER
(SEE ACCOMPANYING TABLE)
READ REGISTER
TO
YES
WRITE
BYTE Y
COMMUNICATIONS REGISTER
(SEE ACCOMPANYING TABLE)
TO
Status Register 10 20 30
Data Register 11 21 30
Mode Register 12 22 30
Filter Register 13 N/A* N/A*
DAC Register 14 N/A* N/A*
Offset Register 15 N/A* N/A*
Gain Register 16 N/A* N/A*
Test Register 17 N/A* N/A*
*N/A= Not Applicable. Continuous reads of these registers does not make sense
as the register contents would remain the same since they are only changed by a
write operation.
NO
COMMUNICATIONS REGISTER
(SEE ACCOMPANYING TABLE)
Figure 5. Flowchart for Reading from the AD7730 Registers
START
WRITE
BYTE Y
COMMUNICATIONS REGISTER
(SEE ACCOMPANYING TABLE)
WRITE TO REGISTER
TO
END
READ REGISTER
STOP
CONTINUOUS
READ
OPERATION?
BYTE Z
WRITE
YES
TO
Register Byte Y (Hex)
Communications Register 00
Data Register Read Only Register
Mode Register 02
Filter Register 03
DAC Register 04
Offset Register 05
Gain Register 06
Test Register User is advised not to change
contents of Test Register.
REV. A
Figure 6. Flowchart for Writing to the AD7730 Registers
–21–
Page 22

AD7730/AD7730L
CALIBRATION OPERATION SUMMARY
The AD7730 contains a number of calibration options as outlined previously. Table XVII summarizes the calibration types, the
operations involved and the duration of the operations. There are two methods of determining the end of calibration. The first is to
monitor the hardware RDY pin using either interrupt-driven or polling routines. The second method is to do a software poll of the
RDY bit in the Status Register. This can be achieved by setting up the part for continuous reads of the Status Register once a calibration has been initiated. The RDY pin and RDY bit go high on initiating a calibration and return low at the end of the calibration
routine. At this time, the MD2, MD1, MD0 bits of the Mode Register have returned to 0, 0, 0. The FAST and SKIP bits are treated
as 0 for the calibration sequence so the full filter is always used for the calibration routines. See Calibration section for full detail.
Table XVII. Calibration Operations
MD2, MD1, Duration to RDY Duration to RDY
Calibration Type MD0 Low (CHP = 1) Low (CHP = 0) Calibration Sequence
Internal Zero-Scale 1, 0, 0 22 × 1/Output Rate 24 × 1/Output Rate Calibration on internal shorted input with PGA set for
selected input range. The ac bit is ignored for this calibration sequence. The sequence is performed with dc excitation.
The Offset Calibration Register for the selected channel is
updated at the end of this calibration sequence. For full selfcalibration, this calibration should be preceded by an Internal
Full-Scale calibration. For applications which require an
Internal Zero-Scale and System Full-Scale calibration, this
Internal Zero-Scale calibration should be performed first.
Internal Full-Scale 1, 0, 1 44 × 1/Output Rate 48 × 1/Output Rate Calibration on internally-generated input full-scale with
PGA set for selected input range. The ac bit is ignored for
this calibration sequence. The sequence is performed with
dc excitation. The Gain Calibration Register for the
selected channel is updated at the end of this calibration
sequence. It is recommended that internal full-scale
calibrations are performed on the 80 mV range, regardless
of the subsequent operating range, to optimize the postcalibration gain error. This calibration should be followed
by either an Internal Zero-Scale or System Zero-Scale
calibration. This zero-scale calibration should be
performed at the operating input range.
System Zero-Scale 1, 1, 0 22 × 1/Output Rate 24 × 1/Output Rate Calibration on externally applied input voltage with PGA
set for selected input range. The input applied is assumed
to be the zero scale of the system. If ac = 1, the system
continues to use ac excitation for the duration of the
calibration. For full system calibration, this System ZeroScale calibration should be performed first. For applications
which require a System Zero-Scale and Internal Full-Scale
calibration, this calibration should be preceded by the
Internal Full-Scale calibration. The Offset Calibration
Register for the selected channel is updated at the end of
this calibration sequence.
System Full-Scale 1, 1, 1 22 × 1/Output Rate 24 × 1/Output Rate Calibration on externally-applied input voltage with PGA
set for selected input range. The input applied is assumed
to be the full-scale of the system. If ac = 1, the system
continues to use ac excitation for the duration of the
calibration. This calibration should be preceded by a
System Zero-Scale or Internal Zero-Scale calibration. The
Gain Calibration Register for the selected channel is
updated at the end of this calibration sequence.
–22–
REV. A
Page 23

AD7730/AD7730L
CIRCUIT DESCRIPTION
The AD7730 is a sigma-delta A/D converter with on-chip digital
filtering, intended for the measurement of wide dynamic range,
low-frequency signals such as those in weigh-scale, strain-gage,
pressure transducer or temperature measurement applications.
It contains a sigma-delta (or charge-balancing) ADC, a calibration microcontroller with on-chip static RAM, a clock oscillator,
a digital filter and a bidirectional serial communications port.
The part consumes 13 mA of power supply current with a standby
mode which consumes only 25 µA. The part operates from a single
+5 V supply. The clock source for the part can be provided via an
external clock or by connecting a crystal oscillator or ceramic
resonator across the MCLK IN and MCLK OUT pins.
The part contains two programmable-gain fully differential analog
input channels. The part handles a total of eight different input
ranges which are programmed via the on-chip registers. There are
four differential unipolar ranges: 0 mV to +10 mV, 0 mV to
+20 mV, 0 mV to +40 mV and 0 mV to +80 mV and four differential bipolar ranges: ±10 mV, ±20 mV, ±40 mV and ±80 mV.
The AD7730 employs a sigma-delta conversion technique to
realize up to 24 bits of no missing codes performance. The
sigma-delta modulator converts the sampled input signal into a
digital pulse train whose duty cycle contains the digital information. A digital low-pass filter processes the output of the sigmadelta modulator and updates the data register at a rate that can
be programmed over the serial interface. The output data from
the part is accessed over this serial interface. The cutoff frequency
and output rate of this filter can be programmed via on-chip
registers. The output noise performance and peak-to-peak resolution of the part varies with gain and with the output rate as
shown in Tables I to IV.
The analog inputs are buffered on-chip allowing the part to
handle significant source impedances on the analog input. This
means that external R, C filtering (for noise rejection or RFI
reduction) can be placed on the analog inputs if required. Both
analog channels are differential, with a common-mode voltage
range that comes within 1.2 V of AGND and 0.95 V of AV
The reference input is also differential and the common-mode
range here is from AGND to AV
The part contains a 6-bit DAC that is controlled via on-chip
registers. This DAC can be used to remove TARE values of up
to ±80 mV from the analog input signal range. The resolution
on this TARE function is 1.25 mV for a +2.5 V reference and
2.5 mV with a +5 V reference.
The AD7730 can accept input signals from a dc-excited bridge.
It can also handle input signals from an ac-excited bridge by
using the ac excitation clock signals (ACX and ACX) to switch
the supplies to the bridge. ACX and ACX are nonoverlapping
clock signals used to synchronize the external ac supplies that
drive the transducer bridge. These ACX clocks are demodulated
on the AD7730 input.
The AD7730 contains a number of hardware and software
events that set or reset status flags and bits in registers. Table
XVIII summarizes which blocks and flags are affected by the
different events.
DD
.
DD
.
Table XVIII. Reset Events
Set Registers Mode Filter Analog Reset Serial Set RDY Set STDY
Event to Default Bits Reset Power-Down Interface Pin/Bit Bit
Power-On Reset Yes 000 Yes Yes Yes Yes Yes
RESET Pin Yes 000 Yes No Yes Yes Yes
STANDBY Pin No As Is Yes Yes No Yes Yes
Mode 011 Write No 011 Yes Yes No Yes Yes
SYNC Pin No As Is Yes No No Yes Yes
Mode 000 Write No 000 Yes No No Yes Yes
Conversion or No New Initial No No Yes Yes
Cal Mode Write Value Reset
Clock 32 1s Yes 000 Yes No Yes Yes Yes
Data Register Read No As Is No No No Yes No
REV. A
–23–
Page 24

AD7730/AD7730L
ANALOG INPUT
Analog Input Channels
The AD7730 contains two differential analog input channels, a
primary input channel, AIN1, and a secondary input channel,
AIN2. The input pairs provide programmable gain, differential
channels which can handle either unipolar or bipolar input
signals. It should be noted that the bipolar input signals are
referenced to the respective AIN(–) input of the input pair. The
secondary input channel can also be reconfigured as two digital
output port bits.
A two-channel differential multiplexer switches one of the two
input channels to the on-chip buffer amplifier. This multiplexer
is controlled by the CH0 and CH1 bits of the Mode Register.
When the analog input channel is switched, the RDY output
goes high and the settling time of the part must elapse before a
valid word from the new channel is available in the Data Register (indicated by RDY going low).
Buffered Inputs
The output of the multiplexer feeds into a high impedance input
stage of the buffer amplifier. As a result, the analog inputs can
handle significant source impedances. This buffer amplifier has
an input bias current of 50nA (CHP = 1) and 60 nA (CHP = 0).
This current flows in each leg of the analog input pair. The
offset current on the part is the difference between the input
bias on the legs of the input pair. This offset current is less than
10 nA (CHP = 1) and 30 nA (CHP = 0). Large source resistances result in a dc offset voltage developed across the source
resistance on each leg, but matched impedances on the analog
input legs will reduce the offset voltage to that generated by the
input offset current.
Analog Input Ranges
The absolute input voltage range is restricted to between
AGND + 1.2 V to AV
– 0.95 V, which also places restrictions
DD
on the common-mode range. Care must be taken in setting up
the common-mode voltage and input voltage range so these
limits are not exceeded, otherwise there will be a degradation in
linearity performance.
In some applications, the analog input range may be biased
either around system ground or slightly below system ground. In
such cases, the AGND of the AD7730 must be biased negative
with respect to system ground so the analog input voltage does
not go within 1.2 V of AGND. Care should taken to ensure that
the differential between either AV
or DVDD and this biased
DD
AGND does not exceed 5.5 V. This is discussed in more detail
in the Applications section.
Programmable Gain Amplifier
The output from the buffer amplifier is summed with the output
of the 6-bit Offset DAC before it is applied to the input of the
on-chip programmable gain amplifier (PGA). The PGA can
handle four different unipolar input ranges and four bipolar
ranges. With the HIREF bit of the Mode Register at 0 and a
+2.5 V reference (or the HIREF bit at 1 and a +5 V reference),
the unipolar ranges are 0 mV to +10 mV, 0 mV to +20 mV,
0 mV to +40 mV, and 0 mV to +80 mV, while the bipolar ranges
are ±10 mV, ±20 mV, ±40 mV and ±80 mV. These are the
nominal ranges that should appear at the input to the on-chip
PGA.
Offset DAC
The purpose of the Offset DAC is to either add or subtract an
offset so the input range at the input to the PGA is as close as
possible to the nominal. If the output of the 6-bit Offset DAC is
0 V, the differential voltage ranges that appear at the analog
input to the part will also appear at the input to the PGA. If,
however, the Offset DAC has an output voltage other than 0 V,
the input range to the analog inputs will differ from that applied
to the input of the PGA.
The Offset DAC has five magnitude bits and one sign bit. The
sign bit determines whether the value loaded to the five magnitude bits is added to or subtracted from the voltage at the analog input pins. Control of the Offset DAC is via the DAC
Register which is discussed previously in the On-Chip Registers
section. With a 5 V reference applied between the REF IN pins,
the resolution of the Offset DAC is 2.5 mV with a range that
allows addition or subtraction of 77.5 mV. With a 2.5 V reference applied between the REF IN pins, the resolution of the
Offset DAC is 1.25 mV with a range that allows addition or
subtraction of 38.75 mV.
Following is an example of how the Offset DAC works. If the
differential input voltage range the user had at the analog input
pins was +20 mV to +30 mV, the Offset DAC should be programmed to subtract 20 mV of offset so the input range to the
PGA is 0 mV to +10 mV. If the differential input voltage range
the user had at the analog input pins was –60 mV to +20mV,
the Offset DAC should be programmed to add 20 mV of offset so
the input range to the PGA is ±40 mV.
Bipolar/Unipolar Inputs
The analog inputs on the AD7730 can accept either unipolar or
bipolar input voltage ranges. Bipolar input ranges do not imply
that the part can handle negative voltages with respect to system
ground on its analog inputs unless the AGND of the part is also
biased below system ground. Unipolar and bipolar signals on
the AIN(+) input are referenced to the voltage on the respective
AIN(–) input. For example, if AIN(–) is +2.5 V and the AD7730 is
configured for an analog input range of 0 to +10 mV with no
DAC offset correction, the input voltage range on the AIN(+)
input is +2.5 V to +2.51 V. Similarly, if AIN(–) is +2.5 V and the
AD7730 is configured for an analog input range of ±80 mV
with no DAC offset correction, the analog input range on the
AIN(+) input is +2.42 V to +2.58 V (i.e., 2.5 V ± 80 mV).
Bipolar or unipolar options are chosen by programming the B/U
bit of the Mode Register. This programs the selected channel
for either unipolar or bipolar operation. Programming the channel for either unipolar or bipolar operation does not change any
of the input signal conditioning; it simply changes the data
output coding and the points on the transfer function where
calibrations occur. When the AD7730 is configured for unipolar
operation, the output coding is natural (straight) binary with a
zero differential voltage resulting in a code of 000... 000, a
midscale voltage resulting in a code of 100 . .. 000 and a fullscale input voltage resulting in a code of 111.. . 111. When the
AD7730 is configured for bipolar operation, the coding is offset
binary with a negative full scale voltage resulting in a code of
000 . . . 000, a zero differential voltage resulting in a code of
100 . . . 000 and a positive full scale voltage resulting in a code
of 111 . . . 111.
–24–
REV. A
Page 25

AD7730/AD7730L
Burnout Currents
The AD7730 contains two 100 nA constant current generators,
one source current from AV
to AIN(+) and one sink current
DD
from AIN(–) to AGND. The currents are switched to the selected analog input pair. Both currents are either on or off,
depending on the BO bit of the Mode Register. These currents
can be used in checking that a transducer is still operational
before attempting to take measurements on that channel. If the
currents are turned on, allowed flow in the transducer, a measurement of the input voltage on the analog input taken and the
voltage measured is full scale, it indicates that the transducer
has gone open-circuit. If the voltage measured is 0 V, it indicates
that the transducer has gone short circuit. For normal operation,
these burnout currents are turned off by writing a 0 to the BO
bit. The current sources work over the normal absolute input
voltage range specifications.
REFERENCE INPUT
The AD7730’s reference inputs, REF IN(+) and REF IN(–),
provide a differential reference input capability. The commonmode range for these differential inputs is from AGND to
AV
. The nominal reference voltage, V
DD
(REF IN(+)—
REF
REF IN(–)), for specified operation is +2.5 V with the HIREF
bit at 0 V and +5 V with the HIREF bit at 1. The part is also
functional with V
of +2.5 V with the HIREF bit at 1. This
REF
results in a halving of all input ranges. The resolution in nV will
be unaltered but will appear halved in terms of counts.
Both reference inputs provide a high impedance, dynamic load.
The typical average dc input leakage current over temperature
is 8.5µA with HIREF= 1 and V
HIREF = 0 and V
= +2.5 V. Because the input impedance of
REF
= +5 V, and 2.5 µA with
REF
each reference input is dynamic, external resistance/capacitance
combinations on these inputs may result in gain errors on the
part.
The AD7730 can be operated in either ac or dc mode. If the
bridge excitation is fixed dc, the AD7730 should be operated in
dc mode. If the analog input and the reference inputs are externally
chopped before being applied to the part the AD7730 should be
operated in ac mode and not dc mode. In ac mode, it is assumed
that both the analog inputs and reference inputs are chopped
and as a result change phase every alternate chopping cycle. If
the chopping is synchronized by the AD7730 (using the ACX
signals to control the chopping) the part then takes into account
the reversal of the analog input and reference input signals.
The output noise performance outlined in Tables I through IV
is for an analog input of 0 V and is unaffected by noise on the
reference. To obtain the same noise performance as shown in
the noise tables over the full input range requires a low noise
reference source for the AD7730. If the reference noise in the
bandwidth of interest is excessive, it will degrade the performance
of the AD7730. In applications where the excitation voltage for
the bridge transducer on the analog input also drives the reference voltage for the part, the effect of the noise in the excitation voltage will be removed as the application is ratiometric.
Figure 7 shows how the reference voltage can be connected in a
ratiometric fashion in a dc-excited bridge application. In this
case, the excitation voltage for the AD7730 and the transducer
is a dc voltage. The HIREF bit of the Mode Register should be
set to 1. Figure 8 meanwhile shows how the reference can be
connected in a ratiometric fashion in an ac-excited bridge
EXCITATION
VOLTAGE = +5V
OUT+
IN+
IN–
AVDDDV
REF IN(+)
REF IN(–)
AIN1(+)
AIN1(–)
OUT–
AGND DGND
DD
AD7730
Figure 7. Ratiometric Generation of Reference in DCExcited Bridge Application
AVDDDV
DD
AD7730
AC
EXCITATION
CLOCK
EXCITATION
VOLTAGE = +5V
OUT+
REF IN(+)
REF IN(–)
IN+
OUT–
IN–
AIN1(+)
AIN1(–)
ACX
ACX
AGND DGND
Figure 8. Ratiometric Generation of Reference in ACExcited Bridge Application
application. In this case, both the reference voltage for the part
and the excitation voltage for the transducer are chopped. Once
again, the HIREF bit should be set to 1.
If the AD7730 is not used in a ratiometric application, a low
noise reference should be used. Recommended 2.5 V reference
voltage sources for the AD7730 include the AD780, REF43
and REF192. If any of these references are used as the reference
source for the AD7730, the HIREF bit should be set to 0. It is
generally recommended to decouple the output of these references
to further reduce the noise level.
Reference Detect
The AD7730 includes on-chip circuitry to detect if the part
has a valid reference for conversions or calibrations. If the voltage between the REF IN(+) and REF IN(–) pins goes below
0.3 V or either the REF IN(+) or REF IN(–) inputs is open
circuit, the AD7730 detects that it no longer has a valid reference.
In this case, the NO REF bit of the Status Register is set to a 1.
If the AD7730 is performing normal conversions and the NO
REF bit becomes active, the part places all ones in the Data
Register. Therefore, it is not necessary to continuously monitor
the status of the NO REF bit when performing conversions. It is
only necessary to verify its status if the conversion result read
from the Data Register is all 1s.
REV. A
–25–
Page 26

AD7730/AD7730L
If the AD7730 is performing either an offset or gain calibration
and the NOREF bit becomes active, the updating of the respective calibration register is inhibited to avoid loading incorrect
coefficients to this register. If the user is concerned about verifying that a valid reference is in place every time a calibration is
performed, then the status of the NOREF bit should be checked
at the end of the calibration cycle.
SIGMA-DELTA MODULATOR
A sigma-delta ADC generally consists of two main blocks, an
analog modulator and a digital filter. In the case of the AD7730,
the analog modulator consists of a difference amplifier, an integrator block, a comparator and a feedback DAC as illustrated in
Figure 9. In operation, the analog signal sample is fed to the
difference amplifier along with the output of the feedback DAC.
The difference between these two signals is integrated and fed to
the comparator. The output of the comparator provides the
input to the feedback DAC so that the system functions as a
negative feedback loop that tries to minimize the difference
signal. The digital data that represents the analog input voltage
is contained in the duty cycle of the pulse train appearing at the
output of the comparator. This duty cycle data can be recovered
as a data word using the digital filter. The sampling frequency of
the modulator loop is many times higher than the bandwidth of
the input signal. The integrator in the modulator shapes the
quantization noise (which results from the analog-to-digital
conversion) so that the noise is pushed toward one half of the
modulator frequency. The digital filter then bandlimits the response to a frequency significantly lower than one half of the
modulator frequency. In this manner, the 1-bit output of the
comparator is translated into a bandlimited, low noise output
from the AD7730.
ANALOG
INPUT
DIFFERENCE
AMP
INTEGRATOR
DAC
COMPARATOR
DIGITAL
FILTER
DIGITAL DATA
Figure 9. Sigma-Delta Modulator Block Diagram
DIGITAL FILTERING
Filter Architecture
The output of the modulator feeds directly into the digital filter.
This digital filter consists of two portions, a first stage filter and
a second stage filter. The first stage filter is a sinc
3
, low-pass
filter. The cutoff frequency and output rate of this first stage
filter is programmable. The second stage filter has three distinct
modes of operation. In its normal mode, it provides a low-pass
FIR filter that processes the output of the first stage filter. When
a step change is detected on the analog input, this second stage
filter enters a second mode where it performs a variable number
of averages for some time after the step change and then the
second stage filter switches back to the FIR filter. The third
option for the second stage filter is that it is completely bypassed
so the only filtering provided on the AD7730 is the first stage.
The various filter stages and options are discussed in the following sections.
First Stage Filter
The first stage filter is a low-pass, sinc3 or (sinx/x)3 filter whose
primary function is to remove the quantization noise introduced
at the modulator. The cutoff frequency and output rate of this
filter is programmed via the SF0 to SF11 bits of the Filter Register. The frequency response for this first stage filter is shown in
Figure 10. The response of this first stage filter is similar to that
of an averaging filter but with a sharper roll-off. The output rate
for the filter corresponds with the positioning of the first notch
of the filter’s frequency response. Thus, for the plot of Figure 10,
where the output rate is 600 Hz (f
SF = 512), the first notch of the filter is at 600 Hz. The notches
of this sinc
3
filter are repeated at multiples of the first notch. The
= 4.9152 MHz and
CLK IN
filter provides attenuation of better than 100 dB at these notches.
Programming a different cutoff frequency via SF0 – SF11 does
not alter the profile of the filter response; it changes the frequency of the notches as outlined in the Filter Registers section.
This response is repeated at either side of the input sampling
frequency (307 kHz) and at either side of multiples of the input
sampling frequency.
0
–10
–20
–30
–40
–50
–60
–70
GAIN – dB
–80
–90
–100
–110
–120
200 400 600 800 1000 1200 1400 1600
0 1800
FREQUENCY – Hz
Figure 10. Frequency Response of First Stage Filter
The first stage filter has two basic modes of operation. The
primary mode of operation for weigh-scale applications is chop
mode, which is achieved by placing a 1 in the CHP bit of the
Filter Register. The part should be operated in this mode when
drift and noise rejection are important criteria in the application.
The alternative mode of operation is the nonchop mode, with
CHP at 0, which would be used when higher throughput rates
are a concern or in applications where the reduced rejection at
the chopping frequency in chop mode is an issue.
Nonchop Mode
With chop mode disabled on the AD7730, the first stage filter
continuously processes input data and produces a result at an
output rate determined by the SF word. Operating in nonchop
mode can result in a 20% reduction in noise for a given bandwidth, but without the excellent drift and noise rejection benefits which accrue from chopping the part. The output update
and first notch of this first stage filter correspond and are determined by the relationship:
Output Rate =
f
CLK IN
16
1
×
SF
where SF is the decimal equivalent of the data loaded to the SF
bits of the Filter Register and f
is the master clock frequency.
CLK IN
–26–
REV. A
Page 27

Chop Mode
FREQUENCY – Hz
0
–60
–100
090
GAIN – dB
10 20 30 40 50 60 70 80
–10
–50
–70
–90
–30
–40
–80
–20
–120
–110
100
With chop mode enabled on the AD7730, the signal processing
chain is synchronously chopped at the analog input and at the
output of the first stage filter. This means that for each output
of the first stage filter to be computed, the full settling time of
the filter has to elapse. This results in an output rate from the
filter that is three times lower than for a given SF word than for
nonchop mode. The output update and first notch of this first
stage filter correspond and are determined by the relationship:
AD7730/AD7730L
Output Rate =
f
CLK IN
16
×
3×SF
1
where SF is the decimal equivalent of the data loaded to the SF
bits of the Filter Register and f
is the master clock frequency.
CLK IN
Second Stage Filter
As stated earlier, the second stage filter has three distinct modes
of operation which result in a different overall filter profile for
the part. The modes of operation of the second stage filter are
discussed in the following sections along with the different filter
profiles which result.
Normal FIR Operation
The normal mode of operation of the second stage filter is as a
22-tap low-pass FIR filter. This second stage filter processes the
output of the first stage filter and the net frequency response of
the filter is simply a product of the filter response of both filters.
The overall filter response of the AD7730 is guaranteed to have
no overshoot.
Figure 11 shows the full frequency response of the AD7730 when
the second stage filter is set for normal FIR operation. This
response is for chop mode enabled with the decimal equivalent
of the word in the SF bits set to 512 and a master clock frequency
of 4.9152 MHz. The response will scale proportionately with
master clock frequency. The response is shown from dc to
100 Hz. The rejection at 50 Hz ± 1 Hz and 60 Hz ± 1 Hz is
better than 88 dB.
The –3 dB frequency for the frequency response of the AD7730
with the second stage filter set for normal FIR operation and
chop mode enabled is determined by the following relationship:
In this case, f
f
f
=0.0395 ×
3dB
= 7.9 Hz and the stopband, where the attenua-
3 dB
CLK IN
16
×
3×SF
1
tion is greater than 64.5 dB, is determined by:
f
STOP
=0.14 ×
f
CLK IN
16
×
3×SF
1
Figure 11. Detailed Full Frequency Response of AD7730
(Second Stage Filter as Normal FIR, Chop Enabled)
Figure 12 shows the frequency response for the same set of
conditions as for Figure 11, but in this case the response is
shown out to 600 Hz. This response shows that the attenuation
of input frequencies close to 200 Hz and 400 Hz is significantly
less than at other input frequencies. These “peaks” in the frequency response are a by-product of the chopping of the input.
The plot of Figure 12 is the amplitude for different input frequencies. Note that because the output rate is 200 Hz for the
conditions under which Figure 12 is plotted, if something existed in the input frequency domain at 200 Hz, it would be
aliased and appear in the output frequency domain at dc.
0
–10
–20
–30
–40
–50
–60
–70
GAIN – dB
–80
–90
–100
–110
–120
50 100 150 200 250 300 350 400
0 450
FREQUENCY – Hz
500 550 600
Figure 12. Expanded Full Frequency Response of AD7730
(Second Stage Filter as Normal FIR, Chop Enabled)
In this case, f
REV. A
STOP
= 28 Hz.
–27–
Page 28

AD7730/AD7730L
Because of this effect, care should be taken in choosing an output rate that is close to the line frequency in the application. If
the line frequency is 50 Hz, an output update rate of 50 Hz
should not be chosen as it will significantly reduce the AD7730’s
line frequency rejection (the 50 Hz will appear as a dc effect
with only 6 dB attenuation). Choosing an output rate of 55 Hz
will result in a 6 dB—attenuated aliased frequency of 5 Hz with
only a further 25 dB attenuation based on the filter profile. This
number is based on the filter roll-off and Figure 11 can be used
as a reference by dividing the frequency scale by a factor of 4.
Choosing 57 Hz as the output rate will give better than 90 dB
attenuation of the aliased line frequency which appears as a
7 Hz signal. Similarly, multiples of the line frequency should be
avoided as the output rate because harmonics of the line frequency will not be fully attenuated. The programmability of the
AD7730’s output rate should allow the user to readily choose an
output rate that overcomes this issue. An alternative is to use
the part in nonchop mode.
Figure 13 shows the frequency response for the AD7730 with
the second stage filter set for normal FIR operation, chop mode
disabled, the decimal equivalent of the word in the SF bits set to
1536 and a master clock frequency of 4.9152 MHz. The response
is analogous to that of Figure 11, with the three-times-larger SF
word producing the same 200 Hz output rate. Once again, the
response will scale proportionally with master clock frequency.
The response is shown from dc to 100 Hz. The rejection at
50 Hz ± 1 Hz, and 60 Hz ± 1 Hz is better than 88 dB.
0
–10
–20
–30
–40
–50
–60
–70
GAIN – dB
–80
–90
–100
–110
–120
10 20 30 40 50 60 70 80
090
FREQUENCY – Hz
100
Figure 13. Detailed Full Frequency Response of AD7730
(Second Stage Filter as Normal FIR, Chop Disabled)
The –3 dB frequency for the frequency response of the AD7730
with the second stage filter set for normal FIR operation and
chop mode enabled, is determined by the following relationship:
In this case, f
f
f
=0.039 ×
3dB
= 7.8 Hz and the stop band, where the attentua-
3 dB
CLK IN
16
1
×
SF
tion is greater than 64.5 dB, is determined by:
In this case, f
= 28 Hz.
3 dB
f
STOP
=0.14 ×
f
CLK IN
16
1
×
SF
Figure 14 shows the frequency response for the same set of
conditions as for Figure 13, but in this case the response is
shown out to 600 Hz. This plot is comparable to that of Figure
12. The most notable difference is the absence of the peaks in
the response at 200 Hz and 400 Hz. As a result, interference at
these frequencies will be effectively eliminated before being
aliased back to dc.
0
–10
–20
–30
–40
–50
–60
–70
GAIN – dB
–80
–90
–100
–110
–120
50 100 150 200 250 300 350 400
0 450
FREQUENCY – Hz
500 550 600
Figure 14. Expanded Full Frequency Response of AD7730
(Second Stage Filter as Normal FIR, Chop Disabled)
–28–
REV. A
Page 29

AD7730/AD7730L
FASTStep Mode
The second mode of operation of the second stage filter is in
FASTStep
inputs. This
mode which enables it to respond rapidly to step
FASTStep
mode is enabled by placing a 1 in the
FAST bit of the Filter Register. If the FAST bit is 0, the part
continues to process step inputs with the normal FIR filter as
the second stage filter. With
FASTStep
mode enabled, the
second stage filter will continue to process steady state inputs
with the filter in its normal FIR mode of operation. However,
the part is continuously monitoring the output of the first stage
filter and comparing it with the second previous output. If the
difference between these two outputs is greater than a predetermined threshold (1% of full scale), the second stage filter switches
to a simple moving average computation. When the step change
is detected, the STDY bit of the Status Register goes to 1 and
will not return to 0 until the FIR filter is back in the processing
loop.
The initial number of averages in the moving average computation is either 2 (chop enabled) or 1 (chop disabled). The number of averages will be held at this value as long as the threshold
is exceeded. Once the threshold is no longer exceeded (the step
on the analog input has settled), the number of outputs used to
compute the moving average output is increased. The first and
second outputs from the first stage filter where the threshold is
no longer exceeded is computed as an average by two, then four
outputs with an average of four, eight outputs with an average of
eight, and six outputs with an average of 16. At this time, the
second stage filter reverts back to its normal FIR mode of operation. When the second stage filter reverts back to the normal FIR,
the STDY bit of the Status Register goes to 0.
Figure 15 shows the different responses to a step input with
FASTStep
mode enabled and disabled. The vertical axis shows
the code value returned by the AD7730 and indicates the settling of the output to the input step change. The horizontal axis
shows the number of outputs it takes for that settling to occur.
The positive input step change occurs at the fifth output. In
FASTStep
mode, the output has settled to the final value by the
eighth output. In normal mode, the output has not reached
close to its final value until after the 25th output.
20000000
15000000
10000000
CODE
5000000
0
0255
Figure 15. Step Response for FAST
Operation
10 15 20
NUMBER OF OUTPUTS
Step
and Normal
In
FASTStep
faster. With chopping enabled, the
mode, the part has settled to the new value much
FASTStep
mode settles to
its value in two outputs, while the normal mode settling takes
23 outputs. Between the second and 23rd output, the
FASTStep
mode produces a settled result, but with additional noise compared to the specified noise level for its operating conditions. It
starts at a noise level that is comparable to SKIP mode and as
the averaging increases ends up at the specified noise level. The
complete settling time to where the part is back within the
specified noise number is the same for
normal mode. As can be seen from Figure 13, the
FASTStep
FASTStep
mode and
mode gives a much earlier indication of where the output channel is going and its new value. This feature is very useful in
weighing applications to give a much earlier indication of the
weight, or in an application scanning multiple channels where
the user does not have to wait the full settling time to see if a
channel has changed value.
SKIP Mode
The final method for operating the second stage filter is where it
is bypassed completely. This is achieved by placing a 1 in the
SKIP bit of the Filter Register. When SKIP mode is enabled, it
means that the only filtering on the part is the first stage, sinc
3
,
filter. As a result, the complete filter profile is as described earlier for the first stage filter and illustrated in Figure 10.
In SKIP mode, because there is much less processing of the data
to derive each individual output, the normal mode settling time
for the part is shorter. As a consequence of the lesser filtering,
however, the output noise from the part will be significantly
higher for a given SF word. For example with a 20 mV, an SF
word of 1536 and CHP = 0, the output rms noise increases
from 80 nV to 200 nV. With a 10 mV input range, an SF word
of 1024 and CHP = 1, the output rms noise goes from 60 nV to
200 nV.
With chopping disabled and SKIP mode enabled, each output
from the AD7730 is a valid result in itself. However, with chopping enabled and SKIP mode enabled, the outputs from the
AD7730 must be handled in pairs as each successive output is
from reverse chopping polarities.
CALIBRATION
The AD7730 provides a number of calibration options which
can be programmed via the MD2, MD1 and MD0 bits of the
Mode Register. The different calibration options are outlined in
the Mode Register and Calibration Operations sections. A calibration cycle may be initiated at any time by writing to these
bits of the Mode Register. Calibration on the AD7730 removes
offset and gain errors from the device.
The AD7730 gives the user access to the on-chip calibration
registers allowing the microprocessor to read the device’s calibration coefficients and also to write its own calibration coefficients to the part from prestored values in E
2
PROM. This gives
the microprocessor much greater control over the AD7730’s
calibration procedure. It also means that the user can verify that
the device has performed its calibration correctly by comparing
the coefficients after calibration with prestored values in
2
E
PROM. The values in these calibration registers are 24 bits
wide. In addition, the span and offset for the part can be adjusted
by the user.
REV. A
–29–
Page 30

AD7730/AD7730L
Internally in the AD7730, the coefficients are normalized before
being used to scale the words coming out of the digital filter.
The offset calibration register contains a value which, when
normalized, is subtracted from all conversion results. The gain
calibration register contains a value which, when normalized, is
multiplied by all conversion results. The offset calibration coefficient is subtracted from the result prior to the multiplication by
the gain coefficient.
The AD7730 offers self-calibration or system calibration facilities. For full calibration to occur on the selected channel, the onchip microcontroller must record the modulator output for two
different input conditions. These are “zero-scale” and “fullscale” points. These points are derived by performing a conversion on the different input voltages provided to the input of the
modulator during calibration. The result of the “zero-scale”
calibration conversion is stored in the Offset Calibration Register for the appropriate channel. The result of the “full-scale”
calibration conversion is stored in the Gain Calibration Register
for the appropriate channel. With these readings, the microcontroller can calculate the offset and the gain slope for the input to
output transfer function of the converter. Internally, the part
works with 33 bits of resolution to determine its conversion
result of either 16 bits or 24 bits.
The sequence in which the zero-scale and full-scale calibration
occurs depends upon the type of full-scale calibration being
performed. The internal full-scale calibration is a two-step calibration that alters the value of the Offset Calibration Register.
Thus, the user must perform a zero-scale calibration (either
internal or system) after an internal full-scale calibration to correct
the Offset Calibration Register contents. When using system
full-scale calibration, it is recommended that the zero-scale
calibration (either internal or system) is performed first.
Since the calibration coefficients are derived by performing a
conversion on the input voltage provided, the accuracy of the
calibration can only be as good as the noise level the part provides in normal mode. To optimize the calibration accuracy, it
is recommended to calibrate the part at its lowest output rate
where the noise level is lowest. The coefficients generated at any
output update rate will be valid for all selected output update
rates. This scheme of calibrating at the lowest output update
rate does mean that the duration of calibration is longer.
Internal Zero-Scale Calibration
An internal zero-scale calibration is initiated on the AD7730 by
writing the appropriate values (1, 0, 0) to the MD2, MD1 and
MD0 bits of the Mode Register. In this calibration mode with a
unipolar input range, the zero-scale point used in determining
the calibration coefficients is with the inputs of the differential
pair internally shorted on the part (i.e., AIN(+) = AIN(–) =
Externally-Applied AIN(–) voltage). The PGA is set for the
selected gain (as per the RN1, RN0 bits in the Mode Register)
for this internal zero-scale calibration conversion.
The calibration is performed with dc excitation regardless of the
status of the ac bit. The duration time of the calibration depends upon the CHP bit of the Filter Register. With CHP = 1,
the duration is 22 × 1/Output Rate; with CHP = 0, the duration
is 24 × 1/Output Rate. At this time the MD2, MD1 and MD0
bits in the Mode Register return to 0, 0, 0 (Sync or Idle Mode
for the AD7730). The RDY line goes high when calibration is
initiated and returns low when calibration is complete. Note
that the part has not performed a conversion at this time; it has
simply performed a zero-scale calibration and updated the Offset Calibration Register for the selected channel. The user must
write either 0, 0, 1 or 0, 1, 0 to the MD2, MD1, MD0 bits of the
Mode Register to initiate a conversion. If RDY is low before (or
goes low during) the calibration command write to the Mode
Register, it may take up to one modulator cycle (MCLK IN/32)
before RDY goes high to indicate that calibration is in progress.
Therefore, RDY should be ignored for up to one modulator
cycle after the last bit of the calibration command is written to
the Mode Register.
For bipolar input ranges in the internal zero-scale calibrating
mode, the sequence is very similar to that just outlined. In this
case, the zero-scale point is exactly the same as above but since
the part is configured for bipolar operation, the output code for
zero differential input is 800000 Hex in 24-bit mode.
The internal zero-scale calibration needs to be performed as
one part of a two part full calibration. However, once a full
calibration has been performed, additional internal zero-scale
calibrations can be performed by themselves to adjust the
part’s zero-scale point only. When performing a two step full
calibration care should be taken as to the sequence in which the
two steps are performed. If the internal zero-scale calibration is
one part of a full self-calibration, then it should take place after
an internal full-scale calibration. If it takes place in association
with a system full-scale calibration, then this internal zero-scale
calibration should be performed first.
Internal Full-Scale Calibration
An internal full-scale calibration is initiated on the AD7730 by
writing the appropriate values (1, 0, 1) to the MD2, MD1 and
MD0 bits of the Mode Register. In this calibration mode, the
full-scale point used in determining the calibration coefficients is
with an internally-generated full-scale voltage. This full-scale
voltage is derived from the reference voltage for the AD7730
and the PGA is set for the selected gain (as per the RN1, RN0
bits in the Mode Register) for this internal full-scale calibration
conversion.
In order to meet the post-calibration numbers quoted in the
specifications, it is recommended that internal full-scale calibrations be performed on the 80 mV range. This applies even if the
subsequent operating mode is on the 10 mV, 20mV or 40mV
input ranges.
The internal full-scale calibration is a two-step sequence that
runs when an internal full-scale calibration command is written
to the AD7730. One part of the calibration is a zero-scale calibration and as a result, the contents of the Offset Calibration
Register are altered during this Internal Full-Scale Calibration.
The user must therefore perform a zero-scale calibration (either
internal or system) AFTER the internal full-scale calibration.
This zero-scale calibration should be performed at the operating input
This means that internal full-scale calibrations cannot be
range.
performed in isolation.
The calibration is performed with dc excitation regardless of the
status of the ac bit. The duration time of the calibration depends upon the CHP bit of the Filter Register. With CHP = 1,
the duration is 44 × 1/Output Rate; with CHP = 0, the duration
is 48 × 1/Output Rate. At this time the MD2, MD1 and MD0
bits in the Mode Register return to 0, 0, 0 (Sync or Idle Mode
for the AD7730). The RDY line goes high when calibration is
initiated and returns low when calibration is complete. Note
that the part has not performed a conversion at this time. The
–30–
REV. A
Page 31

AD7730/AD7730L
user must write either 0, 0, 1 or 0, 1, 0 to the MD2, MD1,
MD0 bits of the Mode Register to initiate a conversion. If
RDY is low before (or goes low during) the calibration command write to the Mode Register, it may take up to one modulator
cycle (MCLK IN/32) before RDY goes high to indicate that
calibration is in progress. Therefore, RDY should be ignored for
up to one modulator cycle after the last bit of the calibration
command is written to the Mode Register.
System Zero-Scale Calibration
System calibration allows the AD7730 to compensate for system
gain and offset errors as well as its own internal errors. System
calibration performs the same slope factor calculations as selfcalibration, but uses voltage values presented by the system to
the AIN inputs for the zero- and full-scale points.
A system zero-scale calibration is initiated on the AD7730 by
writing the appropriate values (1, 1, 0) to the MD2, MD1 and
MD0 bits of the Mode Register. In this calibration mode, with a
unipolar input range, the zero-scale point used in determining the calibration coefficients is the bottom end of the transfer function. The system’s zero-scale point is applied to the
AD7730’s AIN input before the calibration step and this voltage
must remain stable for the duration of the system zero-scale
calibration. The PGA is set for the selected gain (as per the
RN1, RN0 bits in the Mode Register) for this system zero-scale
calibration conversion. The allowable range for the system zeroscale voltage is discussed in the Span and Offsets Section.
The calibration is performed with either ac or dc excitation,
depending on the status of the AC bit. The duration time of the
calibration depends upon the CHP bit of the Filter Register.
With CHP = 1, the duration is 22 × 1/Output Rate; with
CHP = 0, the duration is 24 × 1/Output Rate. At this time the
MD2, MD1 and MD0 bits in the Mode Register return to
0, 0, 0 (Sync or Idle Mode for the AD7730). The RDY line
goes high when calibration is initiated and returns low when
calibration is complete. Note that the part has not performed a
conversion at this time; it has simply performed a zero-scale
calibration and updated the Offset Calibration Register for the
selected channel. The user must write either 0, 0, 1 or 0, 1, 0 to
the MD2, MD1, MD0 bits of the Mode Register to initiate a
conversion. If RDY is low before (or goes low during) the calibration command write to the Mode Register, it may take up to
one modulator cycle (MCLK IN/32) before RDY goes high to
indicate that calibration is in progress. Therefore, RDY should
be ignored for up to one modulator cycle after the last bit of the
calibration command is written to the Mode Register.
For bipolar input ranges in the system zero-scale calibrating
mode, the sequence is very similar to that just outlined. In this
case, the zero-scale point is the midpoint of the AD7730’s
transfer function.
The system zero-scale calibration needs to be performed as one
part of a two part full calibration. However, once a full calibration has been performed, additional system zero-scale calibrations can be performed by themselves to adjust the part’s
zero-scale point only. When performing a two-step full calibration care should be taken as to the sequence in which the two
steps are performed. If the system zero-scale calibration is one
part of a full system calibration, then it should take place before
a system full-scale calibration. If it takes place in association
with an internal full-scale calibration, then this system zero-scale
calibration should be performed after the full-scale calibration.
System Full-Scale Calibration
A system full-scale calibration is initiated on the AD7730 by
writing the appropriate values (1, 1, 1) to the MD2, MD1 and
MD0 bits of the Mode Register. System full-scale calibration is
performed using the system's positive full-scale voltage. This
full-scale voltage must be set up before the calibration is initiated, and it must remain stable throughout the calibration step.
The system full-scale calibration is performed at the selected
gain (as per the RN1, RN0 bits in the Mode Register).
The calibration is performed with either ac or dc excitation,
depending on the status of the ac bit. The duration time of the
calibration depends upon the CHP bit of the Filter Register.
With CHP = 1, the duration is 22 × 1/Output Rate; with CHP =
0, the duration is 24 × 1/Output Rate. At this time the MD2,
MD1 and MD0 bits in the Mode Register return to 0, 0, 0
(Sync or Idle Mode for the AD7730). The RDY line goes high
when calibration is initiated, and returns low when calibration is
complete. Note that the part has not performed a conversion at
this time; it has simply performed a full-scale calibration and
updated the Gain Calibration Register for the selected channel.
The user must write either 0, 0, 1 or 0, 1, 0 to the MD2, MD1,
MD0 bits of the Mode Register to initiate a conversion. If RDY
is low before (or goes low during) the calibration command
write to the Mode Register, it may take up to one modulator
cycle (MCLK IN/32) before RDY goes high to indicate that
calibration is in progress. Therefore, RDY should be ignored for
up to one modulator cycle after the last bit of the calibration
command is written to the Mode Register.
The system full-scale calibration needs to be performed as one
part of a two part full calibration. Once a full calibration has
been performed, however, additional system full-scale calibrations can be performed by themselves to adjust the part's gain
calibration point only. When performing a two-step full calibration care should be taken as to the sequence in which the two
steps are performed. A system full-scale calibration should not
be carried out unless the part contains valid zero-scale coefficients. Therefore, an internal zero-scale calibration or a system
zero-scale calibration must be performed before the system fullscale calibration when a full two-step calibration operation is
being performed.
Span and Offset Limits
Whenever a system calibration mode is used, there are limits
on the amount of offset and span which can be accommodated.
The overriding requirement in determining the amount of offset
and gain which can be accommodated by the part is the requirement that the positive full-scale calibration limit is
where FS is 10 mV, 20 mV, 40 mV or 80 mV depending on the
RN1, RN0 bits in the Mode Register. This allows the input
range to go 5% above the nominal range. The built-in headroom in the AD7730’s analog modulator ensures that the part
will still operate correctly with a positive full-scale voltage that is
5% beyond the nominal.
≤
1.05 × FS,
REV. A
–31–
Page 32

AD7730/AD7730L
The range of input span in both the unipolar and bipolar modes
has a minimum value of 0.8 × FS and a maximum value of
2.1 × FS. However, the span (which is the difference between
the bottom of the AD7730’s input range and the top of its input
range) has to take into account the limitation on the positive
full-scale voltage. The amount of offset which can be accommodated depends on whether the unipolar or bipolar mode is being
used. Once again, the offset has to take into account the limitation on the positive full-scale voltage. In unipolar mode, there is
considerable flexibility in handling negative (with respect to
AIN(–)) offsets. In both unipolar and bipolar modes, the range
of positive offsets that can be handled by the part depends on
the selected span. Therefore, in determining the limits for system zero-scale and full-scale calibrations, the user has to ensure
that the offset range plus the span range does exceed 1.05×FS.
This is best illustrated by looking at a few examples.
If the part is used in unipolar mode with a required span of
0.8 × FS, the offset range the system calibration can handle is
from –1.05 × FS to +0.25 × FS. If the part is used in unipolar
mode with a required span of FS, the offset range the system calibration can handle is from –1.05 × FS to +0.05 × FS. Similarly, if
the part is used in unipolar mode and required to remove an
offset of 0.2 × FS, the span range the system calibration can
handle is 0.85 × FS.
If the part is used in bipolar mode with a required span of
± 0.4 × FS, the offset range the system calibration can handle is
from –0.65 × FS to +0.65 × FS. If the part is used in bipolar
mode with a required span of ±FS, the offset range the system
calibration can handle is from –0.05 × FS to +0.05 × FS. Similarly, if the part is used in bipolar mode and required to remove
an offset of ±0.2 × FS, the span range the system calibration can
handle is ±0.85 × FS. Figure 16 summarizes the span and offset
ranges.
AD7730
INPUT RANGE
(0.8 3 FS TO
2.1 3 FS)
1.05 3 FS.
0V DIFFERENTIAL
–1.05 3 FS.
UPPER LIMIT. AD7730’s INPUT
VOLTAGE CANNOT EXCEED THIS
GAIN CALIBRATIONS EXPAND OR
CONTRACT THE AD7730’s INPUT
RANGE
NOMINAL ZERO-SCALE POINT
ZERO-SCALE CALIBRATIONS
MOVE INPUT RANGE UP OR DOWN
LOWER LIMIT. AD7730’s INPUT
VOLTAGE CANNOT EXCEED THIS
Figure 16. Span and Offset Limits
Power-Up and Calibration
On power-up, the AD7730 performs an internal reset which sets
the contents of the internal registers to a known state. There are
default values loaded to all registers after a power-on or reset.
The default values contain nominal calibration coefficients for
the calibration registers. To ensure correct calibration for the
device, a calibration routine should be performed after power-up.
The power dissipation and temperature drift of the AD7730 are
low and no warm-up time is required before the initial calibration is performed. If, however, an external reference is being
used, this reference must have stabilized before calibration is
initiated. Similarly, if the clock source for the part is generated
from a crystal or resonator across the MCLK pins, the start-up
time for the oscillator circuit should elapse before a calibration
is initiated on the part (see below).
Drift Considerations
The AD7730 uses chopper stabilization techniques to minimize
input offset drift. Charge injection in the analog multiplexer and
dc leakage currents at the analog input are the primary sources
of offset voltage drift in the part. The dc input leakage current is
essentially independent of the selected gain. Gain drift within
the converter depends primarily upon the temperature tracking
of the internal capacitors. It is not affected by leakage currents.
When operating the part in CHOP mode (CHP = 1), the signal
chain including the first-stage filter is chopped. This chopping
reduces the overall offset drift to 5 nV/°C. Integral and differential linearity errors are not significantly affected by temperature
changes.
Care must also be taken with external drift effects in order to
achieve optimum drift performance. The user has to be especially careful to avoid, as much as possible, thermocouple effects
from junctions of different materials. Devices should not be
placed in sockets when evaluating temperature drift, there
should be no links in series with the analog inputs and care
must be taken as to how the input voltage is applied to the input
pins. The true offset drift of the AD7730 itself can be evaluated
by performing temperature drift testing of the part with the
AIN(–)/AIN(–) input channel arrangement (i.e., internal shorted
input, test mode).
USING THE AD7730
Clocking and Oscillator Circuit
The AD7730 requires a master clock input, which may be an
external CMOS compatible clock signal applied to the MCLK IN
pin with the MCLK OUT pin left unconnected. Alternatively, a
crystal or ceramic resonator of the correct frequency can be
connected between MCLK IN and MCLK OUT in which case
the clock circuit will function as an oscillator, providing the
clock source for the part. The input sampling frequency, the
modulator sampling frequency, the –3 dB frequency, output
update rate and calibration time are all directly related to the
master clock frequency, f
. Reducing the master clock
CLK IN
frequency by a factor of two will halve the above frequencies and
update rate and double the calibration time.
The crystal or ceramic resonator is connected across the MCLK
IN and MCLK OUT pins, as per Figure 17. Capacitors C1 and
C2 may or may not be required and may vary in value depending on the crystal/resonator manufacturer's recommendations.
The AD7730 has a capacitance of 5 pF on MCLK IN and 13 pF
on MCLK OUT so, in most cases, capacitors C1 and C2 will
not be required to get the crystal/resonator operating at its correct frequency.
–32–
REV. A
Page 33

AD7730/AD7730L
MCLK IN
C1
C2
Figure 17. Crystal/Resonator Connections
CRYSTAL OR
CERAMIC
RESONATOR
MCLK OUT
AD7730
The on-chip oscillator circuit also has a start-up time associated
with it before it has attained its correct frequency and correct
voltage levels. The typical start-up time for the circuit is 6 ms,
with a DV
of +5 V and 8 ms with a DVDD of +3 V.
DD
The AD7730’s master clock appears on the MCLK OUT pin of
the device. The maximum recommended load on this pin is one
CMOS load. When using a crystal or ceramic resonator to generate the AD7730’s clock, it may be desirable to then use this
clock as the clock source for the system. In this case, it is recommended that the MCLK OUT signal is buffered with a CMOS
buffer before being applied to the rest of the circuit.
System Synchronization
The SYNC input allows the user to reset the modulator and
digital filter without affecting any of the setup conditions on the
part. This allows the user to start gathering samples of the analog input from a known point in time, i.e., the rising edge of
SYNC.
If multiple AD7730s are operated from a common master clock,
they can be synchronized to update their output registers simultaneously. A falling edge on the SYNC input resets the digital
filter and analog modulator and places the AD7730 into a consistent, known state. While the SYNC input is low, the AD7730
will be maintained in this state. On the rising edge of SYNC,
the modulator and filter are taken out of this reset state and on
the next clock edge the part starts to gather input samples again.
In a system using multiple AD7730s, a common signal to their
SYNC inputs will synchronize their operation. This would normally be done after each AD7730 has performed its own calibration or has had calibration coefficients loaded to it. The
output updates will then be synchronized with the maximum
possible difference between the output updates of the individual
AD7730s being one MCLK IN cycle.
Single-Shot Conversions
The SYNC input can also be used as a start convert command
allowing the AD7730 to be operated in a conventional converter
fashion. In this mode, the rising edge of SYNC starts conversion
and the falling edge of RDY indicates when conversion is complete. The disadvantage of this scheme is that the settling time
of the filter has to be taken into account for every data register
update.
Writing 0, 1, 0 to the MD2, MD1, MD0 bits of the Mode register has the same effect. This initiates a single conversion on the
AD7730 with the part returning to idle mode at the end of
conversion. Once again, the full settling-time of the filter has to
elapse before the Data Register is updated.
Reset Input
The RESET input on the AD7730 resets all the logic, the digital
filter and the analog modulator while all on-chip registers are
reset to their default state. RDY is driven high and the AD7730
ignores all communications to any of its registers while the
RESET input is low. When the RESET input returns high, the
AD7730 starts to process data and RDY will return low after
the filter has settled indicating a valid new word in the data
register. However, the AD7730 operates with its default setup
conditions after a RESET and it is generally necessary to set up all
registers and carry out a calibration after a RESET command.
The AD7730’s on-chip oscillator circuit continues to function
even when the RESET input is low. The master clock signal
continues to be available on the MCLK OUT pin. Therefore, in
applications where the system clock is provided by the AD7730’s
clock, the AD7730 produces an uninterrupted master clock
during RESET commands.
Standby Mode
The STANDBY input on the AD7730 allows the user to place
the part in a power-down mode when it is not required to provide conversion results. The part can also be placed in its
standby mode by writing 0, 1, 1 to the MD2, MD1, MD0 bits
of the Mode Register. The AD7730 retains the contents of all its
on-chip registers (including the Data Register) while in standby
mode. Data can still be read from the part in Standby Mode.
The STBY bit of the Status Register indicates whether the part
is in standby or normal operating mode. When the STANDBY
pin is taken high, the part returns to operating as it had been
prior to the STANDBY pin going low.
The STANDBY input (or 0, 1, 1 in the MD2, MD1, MD0 bits)
does not affect the digital interface. It does, however, set the
RDY bit and pin high and also sets the STDY bit high. When
STANDBY goes high again, RDY and STDY remain high until
set low by a conversion or calibration.
Placing the part in standby mode, reduces the total current to
10 µA typical when the part is operated from an external master
clock provided this master clock is stopped. If the external clock
continues to run in standby mode, the standby current increases
to 400 µA typical. If a crystal or ceramic resonator is used as the
clock source, then the total current in standby mode is 400 µA
typical. This is because the on-chip oscillator circuit continues
to run when the part is in its standby mode. This is important in
applications where the system clock is provided by the AD7730’s
clock, so that the AD7730 produces an uninterrupted master
clock even when it is in its standby mode.
Digital Outputs
The AD7730 has two digital output pins, D0 and D1. When the
DEN bit of the Mode Register is set to 1, these digital outputs
assume the logic status of bits D0 and D1 of the Mode Register.
It gives the user access to two digital port pins which can be
programmed over the normal serial interface of the AD7730.
The two outputs obtain their supply voltage from AV
DD
,
thus the outputs operate to 5 V levels even in cases where
DV
= +3 V.
DD
REV. A
–33–
Page 34

AD7730/AD7730L
POWER SUPPLIES
There is no specific power sequence required for the AD7730,
either the AV
or the DVDD supply can come up first. While
DD
the latch-up performance of the AD7730 is very good, it is
important that power is applied to the AD7730 before signals at
REF IN, AIN or the logic input pins in order to avoid latch-up
caused by excessive current. If this is not possible, the current
that flows in any of these pins should be limited to less than 30
mA per pin and less than 100 mA cumulative. If separate supplies are used for the AD7730 and the system digital circuitry,
the AD7730 should be powered up first. If it is not possible to
guarantee this, current limiting resistors should be placed in
series with the logic inputs to again limit the current to less than
30 mA per pin and less than 100 mA total.
Grounding and Layout
Since the analog inputs and reference input are differential,
most of the voltages in the analog modulator are common-mode
voltages. The excellent common-mode rejection of the part will
remove common-mode noise on these inputs. The analog and
digital supplies to the AD7730 are independent and separately
pinned out to minimize coupling between the analog and digital
sections of the device. The digital filter will provide rejection of
broadband noise on the power supplies, except at integer multiples of the modulator sampling frequency or multiples of the
chop frequency in chop mode. The digital filter also removes
noise from the analog and reference inputs provided those noise
sources do not saturate the analog modulator. As a result, the
AD7730 is more immune to noise interference than a conventional high resolution converter. However, because the resolution of the AD7730 is so high and the noise levels from the
AD7730 so low, care must be taken with regard to grounding
and layout.
The printed circuit board that houses the AD7730 should be
designed so the analog and digital sections are separated and
confined to certain areas of the board. This facilitates the use of
ground planes that can be easily separated. A minimum etch
technique is generally best for ground planes as it gives the best
shielding. Digital and analog ground planes should only be
joined in one place. If the AD7730 is the only device requiring
an AGND to DGND connection, the ground planes should
be connected at the AGND and DGND pins of the AD7730. If
the AD7730 is in a system where multiple devices require AGND
to DGND connections, the connection should still be made at
one point only, a star ground point that should be established as
closely as possible to the AD7730.
Avoid running digital lines under the device as these will couple
noise onto the die. The analog ground plane should be allowed
to run under the AD7730 to avoid noise coupling. The power
supply lines to the AD7730 should use as large a trace as possible to provide low impedance paths and reduce the effects of
glitches on the power supply line. Fast switching signals such as
clocks should be shielded with digital ground to avoid radiating
noise to other sections of the board and clock signals should
never be run near the analog inputs. Avoid crossover of digital
and analog signals. Traces on opposite sides of the board should
run at right angles to each other. This will reduce the effects of
feedthrough through the board. A microstrip technique is by far
the best but is not always possible with a double-sided board. In
this technique, the component side of the board is dedicated to
ground planes while signals are placed on the solder side.
Good decoupling is important when using high resolution
ADCs. All analog supplies should be decoupled with 10 µF
tantalum in parallel with 0.1 µF ceramic capacitors to AGND.
To achieve the best from these decoupling components, they
have to be placed as close as possible to the device, ideally right
up against the device. All logic chips should be decoupled with
0.1 µF disc ceramic capacitors to DGND. In systems where a
common supply voltage is used to drive both the AV
DV
of the AD7730, it is recommended that the system’s
DD
AV
supply is used. This supply should have the recom-
DD
mended analog supply decoupling capacitors between the AV
DD
and
DD
pin of the AD7730 and AGND and the recommended digital
supply decoupling capacitor between the DV
pin of the
DD
AD7730 and DGND.
Evaluating the AD7730 Performance
A recommended layout for the AD7730 is outlined in the evaluation board for the AD7730. The evaluation board package
includes a fully assembled and tested evaluation board, documentation, software for controlling the board over the printer
port of a PC and software for analyzing the AD7730’s performance on the PC. The evaluation board order number is
EVAL-AD7730EB.
Noise levels in the signals applied to the AD7730 may also
affect performance of the part. The AD7730 allows two techniques for evaluating the true performance of the part, independent of the analog input signal. These schemes should be used
after a calibration has been performed on the part.
The first method is to select the AIN1(–)/AIN1(–) input channel arrangement. In this case, the differential inputs to the
AD7730 are internally shorted together to provide a zero differential voltage for the analog modulator. External to the device,
the AIN1(–) input should be connected to a voltage which is
within the allowable common-mode range of the part.
The second scheme is to evaluate the part with a voltage near
input full scale. This can be achieved by again using input pair
AIN1(–), but by adding a differential voltage via the TARE
DAC. This allows the user to evaluate noise performance with a
near full-scale voltage.
The software in the evaluation board package allows the user to
look at the noise performance in terms of counts, bits and nV.
Once the user has established that the noise performance of the
part is satisfactory in this mode, an external input voltage can
then be applied to the device incorporating more of the signal
chain.
–34–
REV. A
Page 35

AD7730/AD7730L
SERIAL INTERFACE
The AD7730’s programmable functions are controlled via a set
of on-chip registers. Access to these registers is via the part’s
serial interface. After power-on or RESET, the device expects a
write to its Communications Register. The data written to this
register determines whether the next operation to the part is a
read or a write operation and also determines to which register
this read or write operation occurs. Therefore, write access to
one of the control registers on the part starts with a write operation to the Communications Register followed by a write to the
selected register. Reading from the part’s on-chip registers can
take the form of either a single or continuous read. A single read
from a register consists of a write to the Communications Register (with RW1 = 0 and RW0 = 1) followed by the read from the
specified register. To perform continuous reads from a register,
write to the Communications Register (with RW1 = 1 and
RW0 = 0) to place the part in continuous read mode. The specified register can then be read from continuously until a write
operation to the Communications Register (with RW1 = 1 and
RW0 = 1) which takes the part out of continuous read mode.
When operating in continuous read mode, the part is continuously monitoring its DIN line. The DIN line should therefore
be permanently low to allow the part to stay in continuous read
mode. Figure 5 and Figure 6, shown previously, indicate the
correct flow diagrams when reading and writing from the
AD7730’s registers.
The AD7730’s serial interface consists of five signals, CS,
SCLK, DIN, DOUT and RDY. The DIN line is used for
transferring data into the on-chip registers while the DOUT line
is used for accessing data from the on-chip registers. SCLK is
the serial clock input for the device and all data transfers (either
on DIN or DOUT) take place with respect to this SCLK signal.
Write Operation
The transfer of data into the part is to an input shift register. On
completion of a write operation, data is transferred to the specified register. This internal transfer will not take place until the
correct number of bits for the specified register have been
loaded to the input shift register. For example, the transfer of
data from the input shift register takes place after eight serial
clock cycles for a DAC Register write, while the transfer of data
from the input shift register takes place after 24 serial clock
cycles when writing to the Filter Register. Figure 18 shows a
timing diagram for a write operation to the input shift register of
the AD7730. With the POL input at a logic high, the data is
latched into the input shift register on the rising edge of SCLK.
With the POL input at a logic low, the data is latched into the
input shift register on the falling edge of SCLK.
Figure 18 also shows the CS input being used to decode the
write operation to the AD7730. However, this CS input can be
used in a number of different ways. It is possible to operate the
part in three-wire mode where the CS input is tied low permanently. In this case, the SCLK line should idle high between
data transfer when the POL input is high and should idle low
between data transfers when the POL input is low. For POL = 1,
the first falling edge of SCLK clocks data from the microcontroller onto the DIN line of the AD7730. It is then clocked into the
input shift register on the next rising edge of SCLK. For POL = 0,
the first clock edge that clocks data from the microcontroller
onto the DIN line of the AD7730 is a rising edge. It is then
clocked into the input shift register on the next falling edge of
SCLK.
In other microcontroller applications which require a decoding
of the AD7730, CS can be generated from a port line. In this
case, CS would go low well in advance of the first falling edge of
SCLK (POL = 1) or the first rising edge of SCLK (POL = 0).
Clocking of each bit of data is as just described.
In DSP applications, the SCLK is generally a continuous clock.
In these applications, the CS input for the AD7730 is generated
from a frame synchronization signal from the DSP. For processors with the rising edge of SCLK as the active edge, the POL
input should be tied high. For processors with the falling edge of
SCLK as the active edge, the POL input should be tied low. In
these applications, the first edge after CS goes low is the active
edge. The MSB of the data to be shifted into the AD7730 must
be set up prior to this first active edge.
Read Operation
The reading of data from the part is from an output shift register. On initiation of a read operation, data is transferred from
the specified register to the output shift register. This is a parallel shift and is transparent to the user. Figure 19 shows a timing
diagram for a read operation from the output shift register of the
AD7730. With the POL input at a logic high, the data is clocked
out of the output shift register on the falling edge of SCLK.
With the POL input at a logic low, the data is clocked out of the
output shift register on the rising edge of SCLK.
Figure 19 also shows the CS input being used to decode the
read operation to the AD7730. However, this CS input can be
used in a number of different ways. It is possible to operate the
part in three-wire mode where the CS input is permanently tied
low. In this case, the SCLK line should idle high between data
transfer when the POL input is high, and should idle low between data transfers when the POL input is low. For POL = 1,
the first falling edge of SCLK clocks data from the output shift
register onto the DOUT line of the AD7730. It is then clocked
into the microcontroller on the next rising edge of SCLK. For
POL = 0, the first clock edge that clocks data from the AD7730
onto the DOUT line is a rising edge. It is then clocked into the
microcontroller on the next falling edge of SCLK.
In other microcontroller applications which require a decoding
of the AD7730, CS can be generated from a port line. In this
case, CS would go low well in advance of the first falling edge of
SCLK (POL = 1) or the first rising edge of SCLK (POL = 0).
Clocking of each bit of data is as just described.
REV. A
–35–
Page 36

AD7730/AD7730L
In DSP applications, the SCLK is generally a continuous clock.
In these applications, the CS input for the AD7730 is generated
from a frame synchronization signal from the DSP. In these
applications, the first edge after CS goes low is the active edge.
The MSB of the data to be shifted into the DSP must be set up
prior to this first active edge. Unlike microcontroller applications, the DSP does not provide a clock edge to clock the MSB
from the AD7730. In this case, the CS of the AD7730 places
the MSB on the DOUT line. For processors with the rising edge
of SCLK as the active edge, the POL input should be tied high.
In this case, the DSP takes data on the rising edge. If CS goes
low while SCLK is low, the MSB is clocked out on the DOUT
line from the CS. Subsequent data bits are clocked from the
falling edge of SCLK. For processors with the falling edge of
SCLK as the active edge, the POL input should be tied low. In
this case, the DSP takes data on the falling edge. If CS goes low
while SCLK is high, the MSB is clocked out on the DOUT line
from the CS. Subsequent data bits are clocked from the rising
edge of SCLK.
RDY
t
3
CS
SCLK
(POL = 1)
SCLK
(POL = 0)
DOUT
t
4
t
5
t
5A
MSB
t
6
t
7
The RDY line is used as a status signal to indicate when data is
ready to be read from the AD7730’s data register. RDY goes
low when a new data word is available in the data register. It is
reset high when a read operation from the data register is complete. It also goes high prior to the updating of the data register
to indicate when a read from the data register should not be
initiated. This is to ensure that the transfer of data from the data
register to the output shift register does not occur while the data
register is being updated. It is possible to read the same data
twice from the output register even though the RDY line returns
high after the first read operation. Care must be taken, however,
to ensure that the read operations are not initiated as the next
output update is about to take place.
For systems with a single data line, the DIN and DOUT lines
on the AD7730 can be connected together, but care must be
taken in this case not to place the part in continuous read mode
as the part monitors DIN while supplying data on DOUT and
as a result, it may not be possible to take the part out of its
continuous read mode.
t
10
t
8
t
6
t
7
t
9
LSB
CS
SCLK
(POL = 1)
SCLK
(POL = 0)
DIN
Figure 18. Read Cycle Timing Diagram
t
11
t
12
t
MSB
t
14
t
15
13
Figure 19. Write Cycle Timing Diagram
t
16
t
14
t
15
LSB
–36–
REV. A
Page 37

AD7730/AD7730L
CONFIGURING THE AD7730
The AD7730 contains twelve on-chip registers that can be accessed via the serial interface. Figure 5 and Figure 6 have outlined a
flowchart for the reading and writing of these registers. Table XIX and Table XX outline sample pseudo-code for some commonly
used routines. The required operating conditions will dictate the values loaded to the Mode, Filter and DAC Registers. The values
given here are for example purposes only.
Table XIX. Pseudo-Code for Initiating a Self-Calibration after Power-On/Reset
Write 03 Hex to Serial Port
1
/* Writes to Communications Register Setting Next Operation as Write to
Filter Register*/
Write 800010 Hex to Serial Port
Write 04 Hex to Serial Port
1
1
/* Writes to Filter Register Setting a 50 Hz Output Rate in CHOP Mode*/
/* Writes to Communications Register Setting Next Operation as Write to
DAC Register*/
Write 23 Hex to Serial Port
1
/* Writes to DAC Register Setting a Subtraction Value of 7.5 mV (5 V Refer-
ence) on the TARE DAC*/
Write 02 Hex to Serial Port /* Writes to Communications Register Setting Next Operation as Write to
Mode Register*/
Write B180 Hex to Serial Port /* Writes to Mode Register Initiating Internal Full-Scale Calibration for 0 mV
to +10 mV Input Range*/
Wait for RDY Low /* Wait for RDY pin to go low to indicate end of calibration cycle*/
Write 02 Hex to Serial Port /* Writes to Communications Register Setting Next Operation as Write to
Mode Register*/
Write 9180 Hex to Serial Port /* Writes to Mode Register Initiating Internal Zero-Scale Calibration for
0 mV to +10 mV Input Range*/
Wait for RDY Low /* Wait for RDY pin to go low to indicate end of calibration cycle*/
/* The part has now completed self-calibration and is in idle mode*/
1
This operation is not necessary if the default values of the Filter Register or the DAC Register are the values used in the application.
Table XX. Pseudo-Code for Setting Up AD7730 for Continuous Conversion and Continuous Read Operation
Write 02 Hex to Serial Port /* Writes to Communications Register Setting Next Operation as Write to
Mode Register*/
Write 2180 Hex to Serial Port /* Writes to Mode Register Starting Continuous Conversions for 0 mV to
+10 mV Input Range*/
Write 21 Hex to Serial Port /* Writes to Communications Register Setting Next Operation as Continuous
Read From Data Register*/
Set DIN Line of AD7730 Low /* Ensures Part is not Reset While in Continuous Read Mode*/
READ_DATA: Wait for RDY Low /* Wait for RDY pin to go low to Indicate Output Update*/
Read 24-Bit Data From Serial Port /* Read Conversion Result from AD7730's Data Register*/
Loop to READ_DATA Until All Data Gathered
Write 30 Hex to Serial Port /* Ends Continuous Read Operation and Places Part in Mode Where It
Expects Write to Communications Register*/
REV. A
–37–
Page 38

AD7730/AD7730L
MICROCOMPUTER/MICROPROCESSOR INTERFACING
The AD7730’s flexible serial interface allows for easy interface
to most microcomputers and microprocessors. The pseudo-code
of Table XIX and Table XX outline typical sequences for interfacing a microcontroller or microprocessor to the AD7730.
Figures 20, 21 and 22 show some typical interface circuits.
The serial interface on the AD7730 has the capability of operating from just three wires and is compatible with SPI interface
protocols. The three-wire operation makes the part ideal for
isolated systems where minimizing the number of interface lines
minimizes the number of opto-isolators required in the system.
Register lengths on the AD7730 vary from 8 to 16 to 24 bits.
The 8-bit serial ports of most microcontrollers can handle
communication with these registers as either one, two or three
8-bit transfers. DSP processors and microprocessors generally
transfer 16 bits of data in a serial data operation. Some of these
processors, such as the ADSP-2105, have the facility to program
the amount of cycles in a serial transfer. This allows the user to
tailor the number of bits in any transfer to match the register
length of the required register in the AD7730. In any case,
writing 32 bits of data to a 24-bit register is not an issue provided
the final eight bits of the word are all 1s. This is because the
part returns to the Communications Register following a write
operation.
Even though some of the registers on the AD7730 are only eight
bits in length, communicating with two of these registers in
successive write operations can be handled as a single 16-bit
data transfer if required. For example, if the DAC Register is to
be updated, the processor must first write to the Communications Register (saying that the next operation is a write to the
Mode Register) and then write eight bits to the DAC Register.
This can all be done in a single 16-bit transfer, if required, because once the eight serial clocks of the write operation to the
Communications Register have been completed, the part immediately sets itself up for a write operation to the DAC Register.
AD7730 to 68HC11 Interface
Figure 20 shows an interface between the AD7730 and the
68HC11 microcontroller. The diagram shows the minimum
(three-wire) interface with CS on the AD7730 hardwired low.
In this scheme, the RDY bit of the Status Register is monitored
to determine when the Data Register is updated. An alternative
scheme, which increases the number of interface lines to four, is
to monitor the RDY output line from the AD7730. The monitoring of the RDY line can be done in two ways. First, RDY can
be connected to one of the 68HC11’s port bits (such as PC0),
which is configured as an input. This port bit is then polled to
determine the status of RDY. The second scheme is to use an
interrupt driven system, in which case the RDY output is connected to the IRQ input of the 68HC11. For interfaces which
require control of the CS input on the AD7730, one of the port
bits of the 68HC11 (such as PC1), which is configured as an
output, can be used to drive the CS input.
The 68HC11 is configured in the master mode with its CPOL
bit set to a logic zero and its CPHA bit set to a logic one. When
the 68HC11 is configured like this, its SCLK line idles low
between data transfers. Therefore, the POL input of the AD7730
should be hardwired low. For systems where it is preferable that
the SCLK idle high, the CPOL bit of the 68HC11 should be set
to a Logic 1 and the POL input of the AD7730 should be hardwired to a logic high.
The AD7730 is not capable of full duplex operation. If the
AD7730 is configured for a write operation, no data appears on
the DATA OUT lines even when the SCLK input is active.
When the AD7730 is configured for continuous read operation,
data presented to the part on the DATA IN line is monitored to
determine when to exit the continuous read mode.
DV
DDDVDD
SS
68HC11
SCK
MISO
MOSI
SYNC
RESET
SCLK
DATA OUT
DATA IN
CS
POL
AD7730
Figure 20. AD7730 to 68HC11 Interface
AD7730 to 8051 Interface
An interface circuit between the AD7730 and the 8XC51 microcontroller is shown in Figure 21. The diagram shows the
minimum number of interface connections with CS on the
AD7730 hardwired low. In the case of the 8XC51 interface, the
minimum number of interconnects is just two. In this scheme,
the RDY bit of the Status Register is monitored to determine
when the Data Register is updated. The alternative scheme,
which increases the number of interface lines to three, is to
monitor the RDY output line from the AD7730. The monitoring of the RDY line can be done in two ways. First, RDY can be
connected to one of the 8XC51’s port bits (such as P1.0), which
is configured as an input. This port bit is then polled to determine the status of RDY. The second scheme is to use an interrupt driven system, in which case the RDY output is connected
to the INT1 input of the 8XC51. For interfaces that require
control of the CS input on the AD7730, one of the port bits of
the 8XC51 (such as P1.1), which is configured as an output,
can be used to drive the CS input.
The 8XC51 is configured in its Mode 0 serial interface mode.
Its serial interface contains a single data line. As a result, the
DATA OUT and DATA IN pins of the AD7730 should be
connected together. This means that the AD7730 must not be
–38–
REV. A
Page 39

AD7730/AD7730L
SYNC
RESET
AD7730
DATA OUT
DATA IN
SCLK
CS
DR
SCLK
ADSP-2105
DV
DD
RFS
TFS
DT
POL
configured for continuous read operation when interfacing to
the 8XC51. The serial clock on the 8XC51 idles high between data
transfers and therefore the POL input of the AD7730 should be
hardwired to a logic high. The 8XC51 outputs the LSB first in a
write operation while the AD7730 expects the MSB first so the
data to be transmitted has to be rearranged before being written
to the output serial register. Similarly, the AD7730 outputs the
MSB first during a read operation while the 8XC51 expects the
LSB first. Therefore, the data read into the serial buffer needs to
be rearranged before the correct data word from the AD7730 is
available in the accumulator.
DV
DD
SYNC
8XC51
P3.0
P3.1
RESET
POL
DATA OUT
DATA IN
SCLK
CS
AD7730
Figure 21. AD7730 to 8XC51 Interface
AD7730 to ADSP-2103/ADSP-2105 Interface
Figure 22 shows an interface between the AD7730 and the
ADSP-2105 DSP processor. In the interface shown, the RDY
bit of the Status Register is again monitored to determine when
the Data Register is updated. The alternative scheme is to use
an interrupt driven system, in which case the RDY output is
connected to the IRQ2 input of the ADSP-2105. The RFS and
TFS pins of the ADSP-2105 are configured as active low outputs and the ADSP-2105 serial clock line, SCLK, is also configured as an output. The POL pin of the AD7730 is hardwired
low. Because the SCLK from the ADSP-2105 is a continuous
clock, the CS of the AD7730 must be used to gate off the clock
once the transfer is complete. The CS for the AD7730 is active
when either the RFS or TFS outputs from the ADSP-2105 are
active. The serial clock rate on the ADSP-2105 should be limited to 3 MHz to ensure correct operation with the AD7730.
Figure 22. AD7730 to ADSP-2105 Interface
REV. A
–39–
Page 40

AD7730/AD7730L
APPLICATIONS
The on-chip PGA allows the AD7730 to handle analog input
voltage ranges as low as 10 mV full scale. This allows the user to
connect a transducer directly to the input of the AD7730. The
AD7730 is primarily targeted for weigh-scale and load-cell
applications. The majority of the applications have a straingage transducer whose resistance changes when subjected to
mechanical stress. Normally, the gages are configured in a
Wheatstone bridge arrangement. The strain gage is a passive
device and requires an excitation voltage (or in some cases a
current) to derive a voltage output. Two types of voltage excitation can be provided for the bridge: dc excitation or ac excitation. These are discussed in the following sections. While the
desire in most applications is to provide a single supply solution
(something that is aided by the AD7730’s single supply capability), some applications provide a bipolar excitation voltage in
order to increase the output voltage from the bridge. In such
cases, the input voltage applied to the AD7730 can be slightly
negative with respect to ground. Figure 23 shows how to configure the AD7730 to handle this type of input signal.
DC Excitation of Bridge
In dc-excitation applications, the excitation voltage provided for
the bridge is a fixed dc voltage. Connections between the AD7730
and the bridge are very straightforward in this type of application as illustrated in Figure 23. The bridge configuration shown
is a six-lead configuration with separate return leads for the
reference lines. This allows a force/sense effect on the load cell
excitation voltage, eliminating voltage drops caused by the excitation current flowing through the lead resistances. In applications where the lead lengths are short, a four-wire configuration
can be used with the excitation voltage and analog ground connected local to the AD7730’s REF IN(+) and REF IN(–) terminals. Illustrating a major advantage of the AD7730, the 5 V
excitation voltage for the bridge can be used directly as the reference voltage for the AD7730, eliminating the need for precision
matched resistors in generating a scaled-down reference.
The application is a ratiometric one with variations in the excitation voltage being reflected in variations in the analog input
voltage and reference voltage of the AD7730. Because the
AD7730 is a truly ratiometric part, with the reference voltage
and excitation voltages equal, it is possible to evaluate its total
excitation voltage rejection. This is unlike other converters
which give a separate indication of the rejection of reference,
analog inputs and power supply. The combined (total) rejection
for the AD7730 when moving the excitation voltage (which was
also the power supply voltage) was better than 115 dB when
evaluated with a load cell simulator.
Drift considerations are a primary concern for load cell applications. It is recommended for these applications that the AD7730
is operated in CHOP mode to accrue the benefits of the excellent drift performance of the part in CHOP mode. A common
source of unwanted drift effects are parasitic thermocouples.
Thermocouple effects are generated every time there is a junction of two dissimilar metals. All components in the signal path
should be chosen to minimize thermocouple effects. IC sockets
and link options should be avoided as much as possible. While
it is impossible to remove all thermocouple effects, attempts should
be made to equalize the thermocouples on each leg of the differential input to minimize the differential voltage generated.
OUT+
EXCITATION VOLTAGE = +5V
REF IN(+)
REF IN(–)
IN+
OUT–
IN–
AIN1(+)
AIN1(–)
AIN2(+)/D1
AIN2(–)/D0
Figure 23. Typical Connections for DC-Excited Bridge Application
ACX
ACX
AV
DD
MUX
EXCITATION
DV
AC
CLOCK
DD
BUFFER
6-BIT
DAC
+/–
AD7730
SIGMA-DELTA A/D CONVERTER
SIGMA-
+
PGA
SERIAL INTERFACE
AND CONTROL LOGIC
MICROCONTROLLER
DGNDAGND
DELTA
MODULATOR
CALIBRATION
POL
PROGRAMMABLE
REGISTER BANK
RDY
DIGITAL
FILTER
CLOCK
GENERATION
RESET
STANDBY
SYNC
MCLK IN
MCLK OUT
SCLK
CS
DIN
DOUT
–40–
REV. A
Page 41

AD7730/AD7730L
Long lead lengths from the bridge to the AD7730 facilitate the
pickup of mains frequency on the analog input, the reference
input and the power supply. The analog inputs to the AD7730
are buffered, which allows the user to connect whatever noise
reduction capacitors are necessary in the application. The AD7730
boasts excellent common-mode and normal- mode rejection of
mains frequency on both the analog and reference inputs. In
CHOP mode, care must be taken in choosing the output update
rate so it does not result in reducing line frequency rejection
(see DIGITAL FILTERING section). The input offset current
on the AD7730 is 10 nA maximum which results in a maximum, dc offset voltage of 1.75 mV in a 350 Ω bridge application. Care should taken with inserting large source impedances
on the reference input pins as these inputs are not buffered and
the source impedances can result in gain errors.
In many load-cell applications, a portion of the dynamic range
of the bridge output is consumed by a pan weight or tare weight.
In such applications, the 6-bit TARE DAC of the AD7730 can
be used to adjust out this tare weight as outlined previously.
AC Excitation of Bridge
AC excitation of the bridge addresses many of the concerns with
thermocouple, offset and drift effects encountered in dc-excited
applications. In ac-excitation, the polarity of the excitation voltage to the bridge is reversed on alternate cycles. The result is the
elimination of dc errors at the expense of a more complex system design. Figure 24 outlines the connections for an ac-excited
bridge application based on the AD7730.
The excitation voltage to the bridge must be switched on
alternate cycles. Transistors T1 to T4 in Figure 24 perform
the switching of the excitation voltage. These transistors can be
discrete matched bipolar or MOS transistors, or a dedicated
bridge driver chip such as the 4427 from Micrel can be used to
perform the task.
Since the analog input voltage and the reference voltage are
reversed on alternate cycles, the AD7730 must be synchronized
with this reversing of the excitation voltage. To allow the
AD7730 to synchronize itself with this switching, it provides the
logic control signals for the switching of the excitation voltage.
These signals are the nonoverlapping CMOS outputs ACX
and ACX.
One of the problems encountered with ac-excitation is the settling time associated with the analog input signals after the
excitation voltage is switched. This is particularly true in applications where there are long lead lengths from the bridge to the
AD7730. It means that the converter could encounter errors
because it is processing signals which are not fully settled. The
AD7730 addresses this problem by allowing the user to program
a delay of up to 48.75 µs between the switching of the ACX
signals and the processing of data at the analog inputs. This is
achieved using the DL bits of the Filter Register.
The AD7730 also scales the ACX switching frequency in accordance with the output update rate. This avoids situations where
the bridge is switched at an unnecessarily faster rate than the
system requires.
The fact that the AD7730 can handle reference voltages which
are the same as the excitation voltages is particularly useful in
ac-excitation where resistor divider arrangements on the
reference input add to the settling time associated with the
switching.
OUT+
IN+
IN–
EXCITATION VOLTAGE = +5V
DD
MUX
AC
EXCITATION
CLOCK
DV
DD
BUFFER
6-BIT
DAC
+/–
SIGMA-DELTA A/D CONVERTER
+
PGA
DGNDAGND
MODULATOR
SERIAL INTERFACE
AND CONTROL LOGIC
CALIBRATION
MICROCONTROLLER
POL
OUT–
T2T1
REF IN(+)
REF IN(–)
AIN1(+)
AIN1(–)
AIN2(+)/D1
AIN2(–)/D0
T4T3
AV
ACX
ACX
Figure 24. Typical Connections for AC-Excited Bridge Application
SIGMA-
DELTA
PROGRAMMABLE
REGISTER BANK
RDY
AD7730
DIGITAL
FILTER
CLOCK
GENERATION
RESET
STANDBY
SYNC
MCLK IN
MCLK OUT
SCLK
CS
DIN
DOUT
REV. A
–41–
Page 42

AD7730/AD7730L
Bipolar Excitation of the Bridge
As mentioned previously, some applications will require that the
AD7730 handle inputs from a bridge that is excited by a bipolar
voltage. The number of applications requiring this are limited,
but with the addition of some external components the AD7730
is capable of handling such signals. Figure 25 outlines one approach to the problem.
The example shown is a dc-excited bridge that is driven from
±5 V supplies. In such a circuit, two issues must be addressed.
The first is how to get the AD7730 to handle input voltages
near or below ground and the second is how to take the 10 V
excitation voltage which appears across the bridge and generate
a suitable reference voltage for the AD7730. The circuit of Figure
25 attempts to address these two issues simultaneously.
The AD7730’s analog and digital supplies can be split such that
AV
and DVDD can be at separate potentials and AGND and
DD
DGND can also be at separate potentials. The only stipulation
is that AV
In Figure 25, the DV
or DVDD must not exceed the AGND by 5.5 V.
DD
is operated at +3 V, which allows the
DD
AGND to go down to –2.5 V with respect to system ground.
This means that all logic signals to the part must not exceed 3 V
with respect to system ground. The AV
is operated at +2.5 V
DD
with respect to system ground.
The bridge is excited with 10 V across its inputs. The output of
the bridge is biased around the midpoint of the excitation voltages which in this case is system ground or 0 V. In order for the
common-mode voltage of the analog inputs to sit correctly, the
AGND of the AD7730 must be biased below system ground by
a minimum of 1.2 V. The 10 V excitation voltage must be reduced to 5 V before being applied as the reference voltage for
the AD7730.
The resistor string R1, R2 and R3, takes the 10 V excitation
voltage and generates differential voltage of nominally 5 V.
Amplifiers A1 and A2 buffer the resistor string voltages and
provide the AV
and AGND voltages as well as the REF IN(+)
DD
and REF IN(–) voltages for the AD7730. The differential
reference voltage for the part is +5 V. The AD7730 retains its
ratiometric operation with this reference voltage varying in sympathy with the analog input voltage.
The values of the resistors in the resistor string can be changed
to allow a larger DV
R2 = 10 kΩ and R3 = 7 kΩ, the AV
voltage. For example, if R1 = 3 kΩ,
DD
and AGND voltages
DD
become +3.5 V and –1.5 V respectively. This allows the AD7730
to be used with a +3.6 V DV
voltage while still allowing the
DD
analog input range to be within the specified common-mode
range.
An alternate scheme to this is to generate the AV
and AGND
DD
voltages from regulators or Zener diodes driven from the +5 V
and –5 V supplies respectively. The reference voltage for the
part would be generated in the same manner as just outlined but
amplifiers A1 and A2 would not be required to buffer the voltages as they are now only driving the reference pins of the
AD7730. However, care must be taken in this scheme to ensure
that the REF IN(+) voltage does not exceed AV
and that the
DD
REF IN(–) voltage does not go below AGND.
+5V
R1
5k
IN+
R2
OUT–
5k
10k
R3
OUT+
IN–
–5V
ALL VOLTAGE VALUES ARE WITH
RESPECT TO SYSTEM GROUND.
1/2 OP284
OR 1/2 OP213
+5V
A1
–5V
+5V
A2
–5V
1/2 OP284
OR 1/2 OP213
+3V
DV
AV
DD
REF IN(+)
AIN1(+)
AIN1(–)
REF IN(–)
AGND
MUX
BUFFER
6-BIT
DAC
SYSTEM
GROUND
+/–
SIGMA-DELTA A/D CONVERTER
SIGMA-
+
PGA
SERIAL INTERFACE
AND CONTROL LOGIC
MICROCONTROLLER
DGND
MODULATOR
CALIBRATION
POL
DELTA
DD
AD7730
PROGRAMMABLE
GENERATION
REGISTER BANK
RDY
Figure 25. AD7730 with Bipolar Excitation of the Bridge
DIGITAL
FILTER
CLOCK
RESET
STANDBY
SYNC
MCLK IN
MCLK OUT
SCLK
CS
DIN
DOUT
–42–
REV. A
Page 43

APPENDIX A
AD7730L SPECIFICATIONS
–43–
Page 44

a
APPENDIX–AD7730L*
LOW POWER
BRIDGE TRANSDUCER ADC
KEY FEATURES
Resolution of 110,000 Counts (Peak-to-Peak)
Power Consumption: 15 mW typ
Offset Drift: < 1 ppm/8C
Gain Drift: 3 ppm/8C
Line Frequency Rejection: >150 dB
Buffered Differential Inputs
Programmable Filter Cutoffs
Specified for Drift Over Time
Operates with Reference Voltages of 1 V to 5 V
ADDITIONAL FEATURES
Two-Channel Programmable Gain Front End
On-Chip DAC for Offset/TARE Removal
FAST
Step Mode
AC or DC Excitation
Single Supply Operation
APPLICATIONS
Portable Weigh Scales
GENERAL DESCRIPTION
The AD7730L is a complete low power analog front-end for
weigh-scale and pressure measurement applications. The device
accepts low level signals directly from a transducer and outputs
a serial digital word. The input signal is applied to a proprietary
programmable gain front end based around an analog modulator. The modulator output is processed by a low pass programmable digital filter, allowing adjustment of filter cutoff, output
rate and settling-time.
The part features two buffered differential programmable gain
analog inputs as well as a differential reference input. The part
operates from a single +5 V supply and typically consumes less
than 3 mA. It accepts four unipolar analog input ranges: 0 mV
to +10 mV, +20 mV, +40 mV and +80 mV and four bipolar
ranges ±10 mV, ±20 mV, ±40 mV and ±80 mV. The peak-topeak resolution achievable directly from the part is 1 in 110,000
counts. An on-chip 6-bit DAC allows the removal of TARE
voltages. Clock signals for synchronizing ac excitation of the
bridge are also provided.
The serial interface on the part can be configured for three-wire
operation and is compatible with microcontrollers and digital
signal processors. The AD7730L contains self-calibration and
system calibration options and features an offset drift of less
than 5 nV/°C and a gain drift of less than 3 ppm/°C.
The part is available in a 24-lead SOIC and 24-lead TSSOP
package.
VBIAS
AIN1(+)
AIN1(–)
AIN2(+)/D1
AIN2(–)/D0
ACX
ACX
AV
DD
100nA
MUX
100nA
AC
EXCITATION
CLOCK
FUNCTIONAL BLOCK DIAGRAM
DD
DD
BUFFER
6-BIT
DAC
REF IN(–)
REFERENCE DETECT
REF IN(+)
+
PGA
–
AND CONTROL LOGIC
DGNDAGND
SERIAL INTERFACE
POL
SIGMA-DELTA A/D CONVERTER
SIGMA-
DELTA
MODULATOR
REGISTER BANK
RDY
DV
AV
AGND
AD7730L
PROGRAMMABLE
DIGITAL
FILTER
CLOCK
GENERATION
RESET
STANDBY
SYNC
MCLK IN
MCLK OUT
SCLK
CS
DIN
DOUT
*Protected by U.S. Patent No: 5, 134, 401. Other Patent Applications Filed.
–44–
REV. A
Page 45

AD7730L–SPECIFICATIONS
AVDD; REF IN(–) = AGND = DGND = 0 V; f
Parameter B Version
STATIC PERFORMANCE (CHP = 1)
No Missing Codes
Output Noise and Update Rates
Integral Nonlinearity 22 ppm of FSR max
Offset Error
Offset Drift vs. Temperature
Offset Drift vs. Time
Positive Full-Scale Error
Positive Full-Scale Drift vs Temp
Positive Full-Scale Drift vs Time
Gain Error
Gain Drift vs. Temperature
Gain Drift vs. Time
Bipolar Negative Full-Scale Error
Negative Full-Scale Drift vs. Temp
2
2
2
2
4
2, 5
2, 6, 7
4
2, 8
2, 6, 9
4
2
= 2.4576 MHz. All specifications T
CLK IN
24 Bits min
See Tables XXI & XXII
See Note 3 Offset Error and Offset Drift Refer to Both
5 nV/°C typ Unipolar Offset and Bipolar Zero Errors
25 nV/1000 Hours typ
See Note 3
3 ppm of FS/°C max
10 ppm of FS/1000 Hours typ
See Note 3
3 ppm/°C max
10 ppm/1000 Hours typ
See Note 3
2, 6
3 ppm of FS/°C max
(AVDD = +5 V, DVDD = +3 V or +5 V; REF IN(+) =
1
Units Conditions/Comments
MIN
to T
unless otherwise noted.)
MAX
AD7730/AD7730L
Power Supply Rejection 120 dB typ Measured with Zero Differential Voltage
Common-Mode Rejection (CMR) 118 dB min
Analog Input DC Bias Current
Analog Input DC Bias Current Drift2100 pA/°C typ
Analog Input DC Offset Current
2
2
40 nA max
10 nA max
At DC.
Measured with Zero Differential Voltage
Analog Input DC Offset Current Drift250 pA/°C typ
STATIC PERFORMANCE (CHP = 0)
No Missing Codes 24 Bits min SKIP = 0
2
10
Output Noise and Update Rates See Tables XXIII & XXIV
Integral Nonlinearity 22 ppm of FSR max
Offset Error See Note 3 Offset Error and Offset Drift Refer to Both
Offset Drift vs. Temperature
Offset Drift vs. Time
Positive Full-Scale Error
Positive Full-Scale Drift vs. Temp
Positive Full-Scale Drift vs. Time
Gain Error
8
Gain Drift vs. Temperature
Gain Drift vs. Time
6
4
5
6, 7
4
6, 9
4
0.5 µV/°C typ Unipolar Offset and Bipolar Zero Errors
2.5 µV/1000 Hours typ
See Note 3
0.6 µV/°C typ
3 µV/1000 Hours typ
See Note 3
2 ppm/°C typ
10 ppm/1000 Hours typ
Bipolar Negative Full-Scale Error See Note 3
Negative Full-Scale Drift vs. Temp 0.6 µV/°C typ
Power Supply Rejection 90 dB typ Measured with Zero Differential Voltage
Common-Mode Rejection (CMR) on AIN 105 dB typ
CMR on REF IN 100 dB typ
At DC.
Measured with Zero Differential Voltage
At DC.
Measured with Zero Differential Voltage
Analog Input DC Bias Current 50 nA max
Analog Input DC Bias Current Drift 150 pA/°C typ
Analog Input DC Offset Current 25 nA max
Analog Input DC Offset Current Drift 75 pA/°C typ
ANALOG INPUTS/REFERENCE INPUTS
Normal-Mode 50 Hz Rejection
Normal-Mode 60 Hz Rejection
Common-Mode 50 Hz Rejection
Common-Mode 60 Hz Rejection
Analog Inputs
Differential Input Voltage Ranges
2
2
2
2
88 dB min From 49 Hz to 51 Hz
88 dB min From 59 Hz to 61 Hz
120 dB min From 49 Hz to 51 Hz
120 dB min From 59 Hz to 61 Hz
11
Assuming 2.5 V or 5 V Reference with
HIREF Bit Set Appropriately
0 to +10 or ±10 mV nom Gain = 250
0 to +20 or ±20 mV nom Gain = 125
0 to +40 or ±40 mV nom Gain = 62.5
0 to +80 or ±80 mV nom Gain = 31.25
Absolute/Common-Mode Voltage
12
AGND + 1.2 V V min
AV
– 0.95 V V max
DD
Reference Input
REF IN(+) – REF IN(–) Voltage +2.5 V nom HIREF Bit of Mode Register = 0
REF IN(+) – REF IN(–) Voltage +5 V nom HIREF Bit of Mode Register = 1
Absolute/Common-Mode Voltage
13
AGND – 30 mV V min
AVDD + 30 mV V max
NO REF Trigger Voltage 0.3 V min NO REF Bit Active If V
0.65 V max NO REF Bit Inactive If V
Below This Voltage
REF
Above This Voltage
REF
REV. A
–45–
Page 46

AD7730/AD7730L
Parameter B Version
LOGIC INPUTS
Input Current ±10 µA max
All Inputs Except SCLK and MCLK IN
V
, Input Low Voltage 0.8 V max DVDD = +5 V
INL
V
, Input Low Voltage 0.4 V max DVDD = +3 V
INL
V
, Input High Voltage 2.0 V min
INH
SCLK Only (Schmitt Trigerred Input)
V
T+
V
T+
V
T–
V
T–
V
– V
T+
VT+ – V
T–
T–
1.4/3 V min to V max DVDD = +5 V
1/2.5 V min to V max DVDD = +3 V
0.8/1.4 V min to V max DVDD = +5 V
0.4/1.1 V min to V max DVDD = +3 V
0.4/0.8 V min to V max DVDD = +5 V
0.4/0.8 V min to V max DVDD = +3 V
MCLK IN Only
V
, Input Low Voltage 0.8 V max DVDD = +5 V
INL
V
, Input Low Voltage 0.4 V max DVDD = +3 V
INL
V
, Input High Voltage 3.5 V min DVDD = +5 V
INH
V
, Input High Voltage 2.5 V min DVDD = +3 V
INH
LOGIC OUTPUTS (Including MCLK OUT)
, Output Low Voltage I
V
OL
0.4 V max V
V
, Output Low Voltage I
OL
0.4 V max V
VOH, Output High Voltage I
4.0 V min V
VOH, Output High Voltage I
VDD – 0.6 V V min V
Floating State Leakage Current ±10 µA max
Floating State Output Capacitance
2
9 pF typ
TRANSDUCER BURNOUT
AIN1(+) Current –100 nA nom
AIN1(–) Current 100 nA nom
Initial Tolerance @ 25°C ±10 % typ
2
Drift
0.1 %/ °C typ
OFFSET (TARE) DAC
Resolution 6 Bit
LSB Size 2.3/2.6 mV min/mV max 2.5 mV Nominal with 5 V Reference (REF IN/2000)
DAC Drift
DAC Drift vs. Time
16
4, 16
3.5 ppm/ °C max
25 ppm/1000 Hours typ
Differential Linearity –0.25/+0.75 LSB max Guaranteed Monotonic
SYSTEM CALIBRATION
Positive Full-Scale Calibration Limit
Negative Full-Scale Calibration Limit
Offset Calibration Limit
Input Span
17
18
17
17
1.05 × FS V max FS Is the Nominal Full-Scale Voltage
–1.05 × FS V max
–1.05 × FS V max
0.8 × FS V min
2.1 × FS V max
POWER REQUIREMENTS
Power Supply Voltages
AV
– AGND Voltage +4.75 to +5.25 V min to V max
DD
DV
Voltage +2.7 to +5.25 V min to V max With AGND = 0 V
DD
Power Supply Currents External MCLK. Digital I/Ps = 0 V or DV
AVDD Current (Normal Mode) 3.7 mA max All Input Ranges Except 0 mV to +10 mV and ±10 mV,
AV
Current (Normal Mode) 5.5 mA max Input Ranges of 0 mV to +10 mV and ±10 mV Only,
DD
DV
Current (Normal Mode) 0.45 mA max DVDD of 2.7 V to 3.3 V, Typically 0.3 mA
DD
DVDD Current (Normal Mode) 1 mA max DVDD of 4.75 V to 5.25 V, Typically 0.75 mA
AVDD + DVDD Current (Standby Mode) 21 µA max Typically 13 µA. External MCLK IN = 0 V or DV
Power Dissipation AV
Normal Mode 23.5 mW max All Input Ranges Except 0 mV to +10 mV and ±10 mV,
32.5 mW max Input Ranges of 0 mV to +10 mV and ±10 mV Only,
Standby Mode 105 µW max Typically 65 µW. External MCLK IN = 0 V or DV
1
Units Conditions/Comments
= 800 µA Except for MCLK OUT14;
SINK
15
= +5 V
DD
= 100 µA Except for MCLK OUT14;
SINK
15
= +3 V
DD
= 200 µA Except for MCLK OUT14;
SOURCE
15
= +5 V
DD
= 100 µA Except for MCLK OUT14;
SOURCE
15
= +3 V
DD
(10 mV, 20 mV, 40 mV or 80 mV)
Typically 2.7 mA
Typically 4 mA
= DV
DD
Typically 15 mW
Typically 23.75 mW
–46–
= +5 V. Digital I/Ps = 0 V or DV
DD
DD
DD
REV. A
DD
DD
Page 47

AD7730/AD7730L
NOTES
11
Temperature range: –40°C to +85°C.
12
Sample tested during initial release.
13
The offset (or zero) numbers with CHP = 1 are typically 3 µV precalibration. Internal zero-scale calibration reduces this by about 1 µV. Offset numbers with CHP = 0 can be up to
1 mV precalibration. Internal zero-scale calibration reduces this to 2 µV typical. System zero-scale calibration reduces offset numbers with CHP = 1 and CHP = 0 to the order of the
noise. Gain errors can be up to 3000 ppm precalibration with CHP = 0 and CHP = 1. Performing internal full-scale calibrations on the 80 mV range reduces the gain error to less than
100 ppm for the 80 mV and 40 mV ranges, to about 250 ppm for the 20 mV range and to about 500 ppm on the 10 mV range. System full-scale calibration reduces this to the order of
the noise. Positive and negative full-scale errors can be calculated from the offset and gain errors.
14
These numbers are generated during life testing of the part.
15
Positive Full-Scale Error includes Offset Errors (Unipolar Offset Error or Bipolar Zero Error) and applies to both unipolar and bipolar input ranges.
16
Recalibration at any temperature will remove these errors.
17
Full-Scale Drift includes Offset Drift (Unipolar Offset Drift or Bipolar Zero Drift) and applies to both unipolar and bipolar input ranges.
18
Gain Error is a measure of the difference between the measured and the ideal span between any two points in the transfer function. The two points used to calculate the gain
error are positive full scale and negative full scale. See Terminology.
19
Gain Error Drift is a span drift and is effectively the drift of the part if zero-scale calibrations only were performed.
10
No Missing Codes performance with CHP = 0 and SKIP = 1 is reduced below 24 bits for SF words lower than 180 decimal.
11
The analog input voltage range on the AIN1(+) and AIN2(+) inputs is given here with respect to the voltage on the AIN1(–) and AIN2(–) inputs respectively.
12
The common-mode voltage range on the input pairs applies provided the absolute input voltage specification is obeyed.
13
The common-mode voltage range on the reference input pair (REF IN(+) and REF IN(–)) applies provided the absolute input voltage specification is obeyed.
14
These logic output levels apply to the MCLK OUT output only when it is loaded with a single CMOS load.
15
VDD refers to DVDD for all logic outputs expect D0, D1, ACX and ACX where it refers to AVDD. In other words, the output logic high for these four outputs is determined by AVDD.
16
This number represents the total drift of the channel with a zero input and the DAC output near full scale.
17
After calibration, if the input voltage exceeds positive full scale, the converter will output all 1s. If the input is less than negative full scale, the device outputs all 0s.
18
These calibration and span limits apply provided the absolute input voltage specification is obeyed. The offset calibration limit applies to both the unipolar zero point and the
bipolar zero point.
Specifications subject to change without notice.
TIMING CHARACTERISTICS
Limit at T
MIN
(AVDD = +4.75 V to +5.25 V; DVDD = +3 V to +5.25 V; AGND = DGND = 0 V; f
1, 2
Input Logic 0 = 0 V, Logic 1 = DVDD unless otherwise noted).
to T
MAX
= 2.4576 MHz;
CLK IN
Parameter (B Version) Units Conditions/Comments
Master Clock Range 1 MHz min For Specified Performance
5 MHz max
t
1
t
2
50 ns min SYNC Pulsewidth
50 ns min RESET Pulsewidth
Read Operation
t
3
t
4
4
t
5
0 ns min RDY to CS Setup Time
0 ns min CS Falling Edge to SCLK Active Edge Setup Time
0 ns min SCLK Active Edge to Data Valid Delay
3
3
60 ns max DVDD = +4.75 V to +5.25 V
4, 5
t
5A
80 ns max DV
0 ns min CS Falling Edge to Data Valid Delay
60 ns max DV
80 ns max DV
t
6
t
7
t
8
6
t
9
100 ns min SCLK High Pulsewidth
100 ns min SCLK Low Pulsewidth
0 ns min CS Rising Edge to SCLK Inactive Edge Hold Time
10 ns min Bus Relinquish Time after SCLK Inactive Edge
80 ns max
t
10
100 ns max SCLK Active Edge to RDY High
Write Operation
t
11
t
12
t
13
t
14
t
15
t
16
NOTES
1
Sample tested during initial release to ensure compliance. All input signals are specified with tr = tf = 5 ns (10% to 90% of DVDD) and timed from a voltage level of 1.6 V.
2
See Figures 18 and 19.
3
SCLK active edge is falling edge of SCLK with POL = 1; SCLK active edge is rising edge of SCLK with POL = 0.
4
These numbers are measured with the load circuit of Figure 1 and defined as the time required for the output to cross the VOL or VOH limits.
5
This specification only comes into play if CS goes low while SCLK is low (POL = 1) or if CS goes low while SCLK is high (POL = 0). It is primarily required for
interfacing to DSP machines.
6
These numbers are derived from the measured time taken by the data output to change 0.5 V when loaded with the circuit of Figure 1. The measured number is then
extrapolated back to remove effects of charging or discharging the 50 pF capacitor. This means that the times quoted in the timing characteristics are the true bus
relinquish times of the part and as such are independent of external bus loading capacitances.
7
RDY returns high after the first read from the device after an output update. The same data can be read again, if required, while RDY is high, although care should
be taken that subsequent reads do not occur close to the next output update.
0 ns min CS Falling Edge to SCLK Active Edge Setup Time
30 ns min Data Valid to SCLK Edge Setup Time
25 ns min Data Valid to SCLK Edge Hold Time
100 ns min SCLK High Pulsewidth
100 ns min SCLK Low Pulsewidth
0 ns min CS Rising Edge to SCLK Edge Hold Time
= +2.75 V to +3.3 V
DD
= +4.75 V to +5.25 V
DD
= +2.7 V to +3.3 V
DD
3
3
3, 7
3
REV. A
–47–
Page 48

AD7730/AD7730L
OUTPUT NOISE AND RESOLUTION SPECIFICATION
The AD7730L can be programmed to operate in either chop mode or nonchop mode. The chop mode can be enabled in ac-excited
or dc-excited applications; it is optional in dc-excited applications, but chop mode must be enabled in ac-excited applications. These
options are discussed in more detail in earlier sections. The chop mode has the advantage of lower drift numbers and better noise
immunity, but the noise is approximately 20% higher for a given –3 dB frequency and output data rate. It is envisaged that the majority of weigh-scale users of the AD7730L will operate the part in chop mode to avail themselves of the excellent drift performance and
noise immunity when chopping is enabled. The following tables outline the noise performance of the part in both chop and nonchop
modes over all input ranges for a selection of output rates.
Output Noise (CHP = 1)
This mode is the primary mode of operation of the device. Table XXI shows the output rms noise for some typical output update
rates and –3 dB frequencies for the AD7730 when used in chopping mode (CHP of Filter Register = 1) with a master clock
frequency of 2.4576 MHz. These numbers are typical and are generated at a differential analog input voltage of 0 V. The output
update rate is selected via the SF0 to SF11 bits of the Filter Register. Table XXII, meanwhile, shows the output peak-to-peak resolution in counts for the same output update rates. The numbers in brackets are the effective peak-to-peak resolution in bits (rounded to
the nearest 0.5 LSB). It is important to note that the numbers in Table XXII represent the resolution for which there will be no code
flicker within a six-sigma limit. They are not calculated based on rms noise, but on peak-to-peak noise.
The numbers are generated for the bipolar input ranges. When the part is operated in unipolar mode, the output noise will be the
same as the equivalent bipolar input range. As a result, the numbers in Table XXI will remain the same for unipolar ranges while the
numbers in Table II will change. To calculate the numbers for Table XXII for unipolar input ranges simply divide the peak-to-peak
resolution number in counts by two or subtract one from the peak-to-peak resolution number in bits.
Table XXI. Output Noise vs. Input Range and Update Rate (CHP = 1)
Typical Output RMS Noise in nV
Output –3 dB SF Settling Time Settling Time Input Range Input Range Input Range Input Range
Data Rate Frequency Word Normal Mode Fast Mode = 680 mV = 640 mV = 620 mV = 610 mV
25 Hz 0.98 Hz 2048 920 ms 120 ms 245 140 105 70
50 Hz 1.97 Hz 1024 460 ms 60 ms 340 220 160 100
75 Hz 2.96 Hz 683 306 ms 40 ms 420 270 170 110
100 Hz* 3.95 Hz 512 230 ms 30 ms 500 290 180 130
200 Hz 7.9 Hz 256 115 ms 15 ms 650 490 280 165
*Power-On Default
Table XXII. Peak-to-Peak Resolution vs. Input Range and Update Rate (CHP = 1)
Peak-to-Peak Resolution in Counts (Bits)
Output –3 dB SF Settling Time Settling Time Input Range Input Range Input Range Input Range
Data Rate Frequency Word Normal Mode Fast Mode = 680 mV = 640 mV = 620 mV = 610 mV
25 Hz 0.98 Hz 2048 920 ms 120 ms 110k (17) 94k (16.5) 64k (16) 46k (15.5)
50 Hz 1.97 Hz 1024 460 ms 60 ms 80k (16.5) 60k (16) 42k (15.5) 33k (15)
75 Hz 2.96 Hz 683 306 ms 40 ms 62k (16) 50k (15.5) 39k (15) 31k (15)
100 Hz* 3.95 Hz 512 230 ms 30 ms 53k (15.5) 46k (15.5) 36k (15) 25k (14.5)
200 Hz 7.9 Hz 256 115 ms 15 ms 44k (15.5) 27k (15) 24k (14.5) 20k (14.5)
*Power-On Default
Output Noise (CHP = 0)
Table XXIII shows the output rms noise for some typical output update rates and –3 dB frequencies for the AD7730L when used in
nonchopping mode (CHP of Filter Register = 0) with a master clock frequency of 2.4576 MHz. These numbers are typical and are
generated at a differential analog input voltage of 0 V. The output update rate is selected via the SF0 to SF11 bits of the Filter Register. Table XXIV, meanwhile, shows the output peak-to-peak resolution in counts for the same output update rates. The numbers in
brackets are the effective peak-to-peak resolution in bits (rounded to the nearest 0.5 LSB). It is important to note that the numbers in
Table XXIV represent the resolution for which there will be no code flicker within a six-sigma limit. They are not calculated based on
rms noise, but on peak-to-peak noise.
The numbers are generated for the bipolar input ranges. When the part is operated in unipolar mode, the output noise will be the
same as the equivalent bipolar input range. As a result, the numbers in Table XXIII will remain the same for unipolar ranges while
the numbers in Table XXIV will change. To calculate the number for Table XXIV for unipolar input ranges simply divide the peakto-peak resolution number in counts by two or subtract one from the peak-to-peak resolution number in bits.
–48–
REV. A
Page 49

AD7730/AD7730L
Table XXIII. Output Noise vs. Input Range and Update Rate (CHP = 0)
Typical Output RMS Noise in nV
Output –3 dB SF Settling Time Settling Time Input Range Input Range Input Range Input Range
Data Rate Frequency Word Normal Mode Fast Mode = 680 mV = 640 mV = 620 mV = 610 mV
75 Hz 2.9 Hz 2048 332 ms 53.2 ms 320 215 135 100
100 Hz 3.9 Hz 1536 250 ms 40 ms 325 245 160 110
150 Hz 5.85 Hz 1024 166 ms 26.6 ms 410 275 180 130
300 Hz 11.7 Hz 512 83 ms 13.3 ms 590 370 265 180
600 Hz 23.4 Hz 256 41.6 ms 6.6 ms 910 580 350 220
Table XXIV. Peak-to-Peak Resolution vs. Input Range and Update Rate (CHP = 0)
Peak-to-Peak Resolution in Counts (Bits)
Output –3 dB SF Settling Time Settling Time Input Range Input Range Input Range Input Range
Data Rate Frequency Word Normal Mode Fast Mode = 680 mV = 640 mV = 620 mV = 610 mV
75 Hz 2.9 Hz 2048 332 ms 53.2 ms 85k (16.5) 62k (16) 49k (15.5) 33k (15)
100 Hz 3.9 Hz 1536 250 ms 40 ms 82k (16.5) 55k (15.5) 42k (15.5) 30k (15)
150 Hz 5.85 Hz 1024 166 ms 26.6 ms 65k (16) 48k (15.5) 36k (15) 25k (14.5)
300 Hz 11.7 Hz 512 83 ms 13.3 ms 45k (15.5) 36k (15) 25k (14.5) 18k (14)
600 Hz 23.4 Hz 256 41.6 ms 6.63 ms 30k (15) 23k (14.5) 19k (14) 15k (14)
REV. A
–49–
Page 50

AD7730/AD7730L
PAGE INDEX
Topic . . . . . . . . . . . . . . . . . . . . . . . . . . . . . . . . . . . . . . Page
FEATURES . . . . . . . . . . . . . . . . . . . . . . . . . . . . . . . . . . . . . 1
GENERAL DESCRIPTION . . . . . . . . . . . . . . . . . . . . . . . . . 1
AD7730 SPECIFICATIONS . . . . . . . . . . . . . . . . . . . . . . . . 2
TIMING CHARACTERISTICS . . . . . . . . . . . . . . . . . . . . . 4
ABSOLUTE MAXIMUM RATINGS . . . . . . . . . . . . . . . . . 5
ORDERING GUIDE . . . . . . . . . . . . . . . . . . . . . . . . . . . . . . 5
DETAILED FUNCTIONAL BLOCK DIAGRAM . . . . . . . 6
SIGNAL PROCESSING CHAIN . . . . . . . . . . . . . . . . . . . . . 7
PIN CONFIGURATION . . . . . . . . . . . . . . . . . . . . . . . . . . .7
PIN FUNCTION DESCRIPTION . . . . . . . . . . . . . . . . . . .7
TERMINOLOGY . . . . . . . . . . . . . . . . . . . . . . . . . . . . . . . . . 9
OUTPUT NOISE AND RESOLUTION
SPECIFICATION . . . . . . . . . . . . . . . . . . . . . . . . . . . . . . 10
ON-CHIP REGISTERS . . . . . . . . . . . . . . . . . . . . . . . . . . . 11
Summary Of On-Chip Registers . . . . . . . . . . . . . . . . . . . .12
Communications Register . . . . . . . . . . . . . . . . . . . . . . . . 13
Status Register . . . . . . . . . . . . . . . . . . . . . . . . . . . . . . . . .14
Data Register . . . . . . . . . . . . . . . . . . . . . . . . . . . . . . . . . .15
Mode Register . . . . . . . . . . . . . . . . . . . . . . . . . . . . . . . . .15
Filter Register . . . . . . . . . . . . . . . . . . . . . . . . . . . . . . . . . 18
DAC Register . . . . . . . . . . . . . . . . . . . . . . . . . . . . . . . . . .20
Offset Calibration Register . . . . . . . . . . . . . . . . . . . . . . . . 20
Gain Calibration Register . . . . . . . . . . . . . . . . . . . . . . . . . 20
Test Register . . . . . . . . . . . . . . . . . . . . . . . . . . . . . . . . . . 20
READING FROM AND WRITING TO THE
ON-CHIP REGISTERS. . . . . . . . . . . . . . . . . . . . . . . . . . 21
CALIBRATION OPERATION SUMMARY . . . . . . . . . . .22
CIRCUIT DESCRIPTION . . . . . . . . . . . . . . . . . . . . . . . .23
ANALOG INPUT . . . . . . . . . . . . . . . . . . . . . . . . . . . . . . . . 24
Analog Input Channels . . . . . . . . . . . . . . . . . . . . . . . . . .24
Analog Input Ranges . . . . . . . . . . . . . . . . . . . . . . . . . . . . 24
Bipolar/Unipolar Inputs . . . . . . . . . . . . . . . . . . . . . . . . . . 24
Burnout Currents . . . . . . . . . . . . . . . . . . . . . . . . . . . . . . .25
REFERENCE INPUT . . . . . . . . . . . . . . . . . . . . . . . . . . . .25
Reference Detect . . . . . . . . . . . . . . . . . . . . . . . . . . . . . . . 25
SIGMA-DELTA MODULATOR . . . . . . . . . . . . . . . . . . . .26
DIGITAL FILTERING . . . . . . . . . . . . . . . . . . . . . . . . . . . 26
Filter Architecture . . . . . . . . . . . . . . . . . . . . . . . . . . . . . . 26
First Stage Filter. . . . . . . . . . . . . . . . . . . . . . . . . . . . . . . .26
Second Stage Filter . . . . . . . . . . . . . . . . . . . . . . . . . . . . . 27
CALIBRATION . . . . . . . . . . . . . . . . . . . . . . . . . . . . . . . . . 29
Internal Zero-Scale Calibration . . . . . . . . . . . . . . . . . . . . 30
Internal Full-Scale Calibration . . . . . . . . . . . . . . . . . . . . . 30
System Zero-Scale Calibration . . . . . . . . . . . . . . . . . . . . .31
System Full-Scale Calibration . . . . . . . . . . . . . . . . . . . . . 31
Span and Offset Limits . . . . . . . . . . . . . . . . . . . . . . . . . . 31
Power-Up and Calibration . . . . . . . . . . . . . . . . . . . . . . . .32
Drift Considerations . . . . . . . . . . . . . . . . . . . . . . . . . . . .32
USING THE AD7730 . . . . . . . . . . . . . . . . . . . . . . . . . . . . 32
Clocking and Oscillator Circuit . . . . . . . . . . . . . . . . . . . .32
System Synchronization . . . . . . . . . . . . . . . . . . . . . . . . . .33
Single-Shot Conversions . . . . . . . . . . . . . . . . . . . . . . . . . 33
Reset Input . . . . . . . . . . . . . . . . . . . . . . . . . . . . . . . . . . . 33
Standby Mode . . . . . . . . . . . . . . . . . . . . . . . . . . . . . . . . . 33
Digital Outputs . . . . . . . . . . . . . . . . . . . . . . . . . . . . . . . . 33
POWER SUPPLIES . . . . . . . . . . . . . . . . . . . . . . . . . . . . . .34
Grounding and Layout . . . . . . . . . . . . . . . . . . . . . . . . . . . 34
Evaluating the AD7730 Performance . . . . . . . . . . . . . . . . 34
SERIAL INTERFACE . . . . . . . . . . . . . . . . . . . . . . . . . . . . 35
Write Operation . . . . . . . . . . . . . . . . . . . . . . . . . . . . . . . .35
Read Operation . . . . . . . . . . . . . . . . . . . . . . . . . . . . . . . .35
CONFIGURING THE AD7730 . . . . . . . . . . . . . . . . . . . . . 37
MICROCOMPUTER/MICROPROCESSOR
INTERFACING . . . . . . . . . . . . . . . . . . . . . . . . . . . . . . . 38
AD7730 to 68HC11 Interface . . . . . . . . . . . . . . . . . . . . . 38
AD7730 to 8051 Interface . . . . . . . . . . . . . . . . . . . . . . . .38
AD7730 to ADSP-2105 Interface . . . . . . . . . . . . . . . . . . 39
APPLICATIONS . . . . . . . . . . . . . . . . . . . . . . . . . . . . . . . . 40
DC Excitation of Bridge . . . . . . . . . . . . . . . . . . . . . . . . . . 40
AC Excitation of Bridge . . . . . . . . . . . . . . . . . . . . . . . . . . 41
Bipolar Excitation of Bridge . . . . . . . . . . . . . . . . . . . . . . .42
APPENDIX A–AD7730L SPECIFICATIONS . . . . . . . . . . 43
SPECIFICATIONS . . . . . . . . . . . . . . . . . . . . . . . . . . . . . . 45
INDEX . . . . . . . . . . . . . . . . . . . . . . . . . . . . . . . . . . . . . . . .50
OUTLINE DIMENSIONS . . . . . . . . . . . . . . . . . . . . . . . . . 51
TABLE INDEX
Table Title Page
Table I. Output Noise vs. Input Range and
Update Rate (CHP = 1) 10
Table II. Peak-to-Peak Resolution vs. Input Range
and Update Rate (CHP = 1) 10
Table III. Output Noise vs. Input Range and
Update Rate (CHP = 0) 11
Table IV. Peak-to-Peak Resolution vs. Input Range
and Update Rate (CHP = 0) 11
Table V. Summary of On-Chip Registers 12
Table VI. Communications Register 13
Table VII. Read/Write Mode 13
Table VIII. Register Selection 14
Table IX. Status Register 14
Table X. Mode Register 15
Table XI. Operating Modes 15
Table XII. Input Range Selection 17
Table XIII. Channel Selection 18
Table XIV. Filter Register 18
Table XV. SF Ranges 19
Table XVI. DAC Register 20
Table XVII. Calibration Operations 22
Table XVIII. Reset Events 23
Table XIX. Pseudo-Code for Initiating a
Self-Calibration after Power-On/Reset 37
Table XX. Pseudo-Code for Setting Up AD7730 for
Continuous Conversion and Continuous
Read Operation 37
Table XXI. Output Noise vs. Input Range and
Update Rate (CHP = 1) 48
Table XXII. Peak-to-Peak Resolution vs. Input Range
and Update Rate (CHP = 1) 48
Table XXIII. Output Noise vs. Input Range and
Update Rate (CHP = 0) 49
Table XXIV. Peak-to-Peak Resolution vs. Input Range
and Update Rate (CHP = 0) 49
–50–
REV. A
Page 51

24
112
0.210
(5.33)
MAX
0.200 (5.05)
0.125 (3.18)
PIN 1
0.022 (0.558)
0.014 (0.356)
24 13
OUTLINE DIMENSIONS
Dimensions shown in inches and (mm).
Plastic DIP
(N-24)
1.275 (32.30)
1.125 (28.60)
13
0.280 (7.11)
0.100 (2.54)
BSC
0.070 (1.77)
0.045 (1.15)
0.240 (6.10)
0.060 (1.52)
0.015 (0.38)
SEATING
PLANE
0.150
(3.81)
MIN
0.325 (8.25)
0.300 (7.62)
Small Outline
(R-24)
0.6141 (15.60)
0.5985 (15.20)
AD7730/AD7730L
0.195 (4.95)
0.115 (2.93)
0.015 (0.381)
0.008 (0.204)
0.0118 (0.30)
0.0040 (0.10)
0.256 (6.50)
0.246 (6.25)
0.006 (0.15)
0.002 (0.05)
SEATING
PLANE
PIN 1
0.0500
0.0192 (0.49)
(1.27)
0.0138 (0.35)
BSC
Thin Shrink Small Outline
0.311 (7.90)
0.303 (7.70)
24 13
1
PIN 1
0.0256 (0.65)
BSC
0.0118 (0.30)
0.0075 (0.19)
121
0.2992 (7.60)
0.1043 (2.65)
0.0926 (2.35)
SEATING
PLANE
(RU-24)
0.177 (4.50)
12
0.0433
(1.10)
MAX
0.2914 (7.40)
0.4193 (10.65)
0.3937 (10.00)
0.0125 (0.32)
0.0091 (0.23)
0.169 (4.30)
0.0079 (0.20)
0.0035 (0.090)
0.0291 (0.74)
0.0098 (0.25)
0.0500 (1.27)
8°
0°
0.0157 (0.40)
8°
0°
x 45°
0.028 (0.70)
0.020 (0.50)
REV. A
–51–
Page 52

C3269–8–1/98
–52–
PRINTED IN U.S.A.
 Loading...