

Page 1
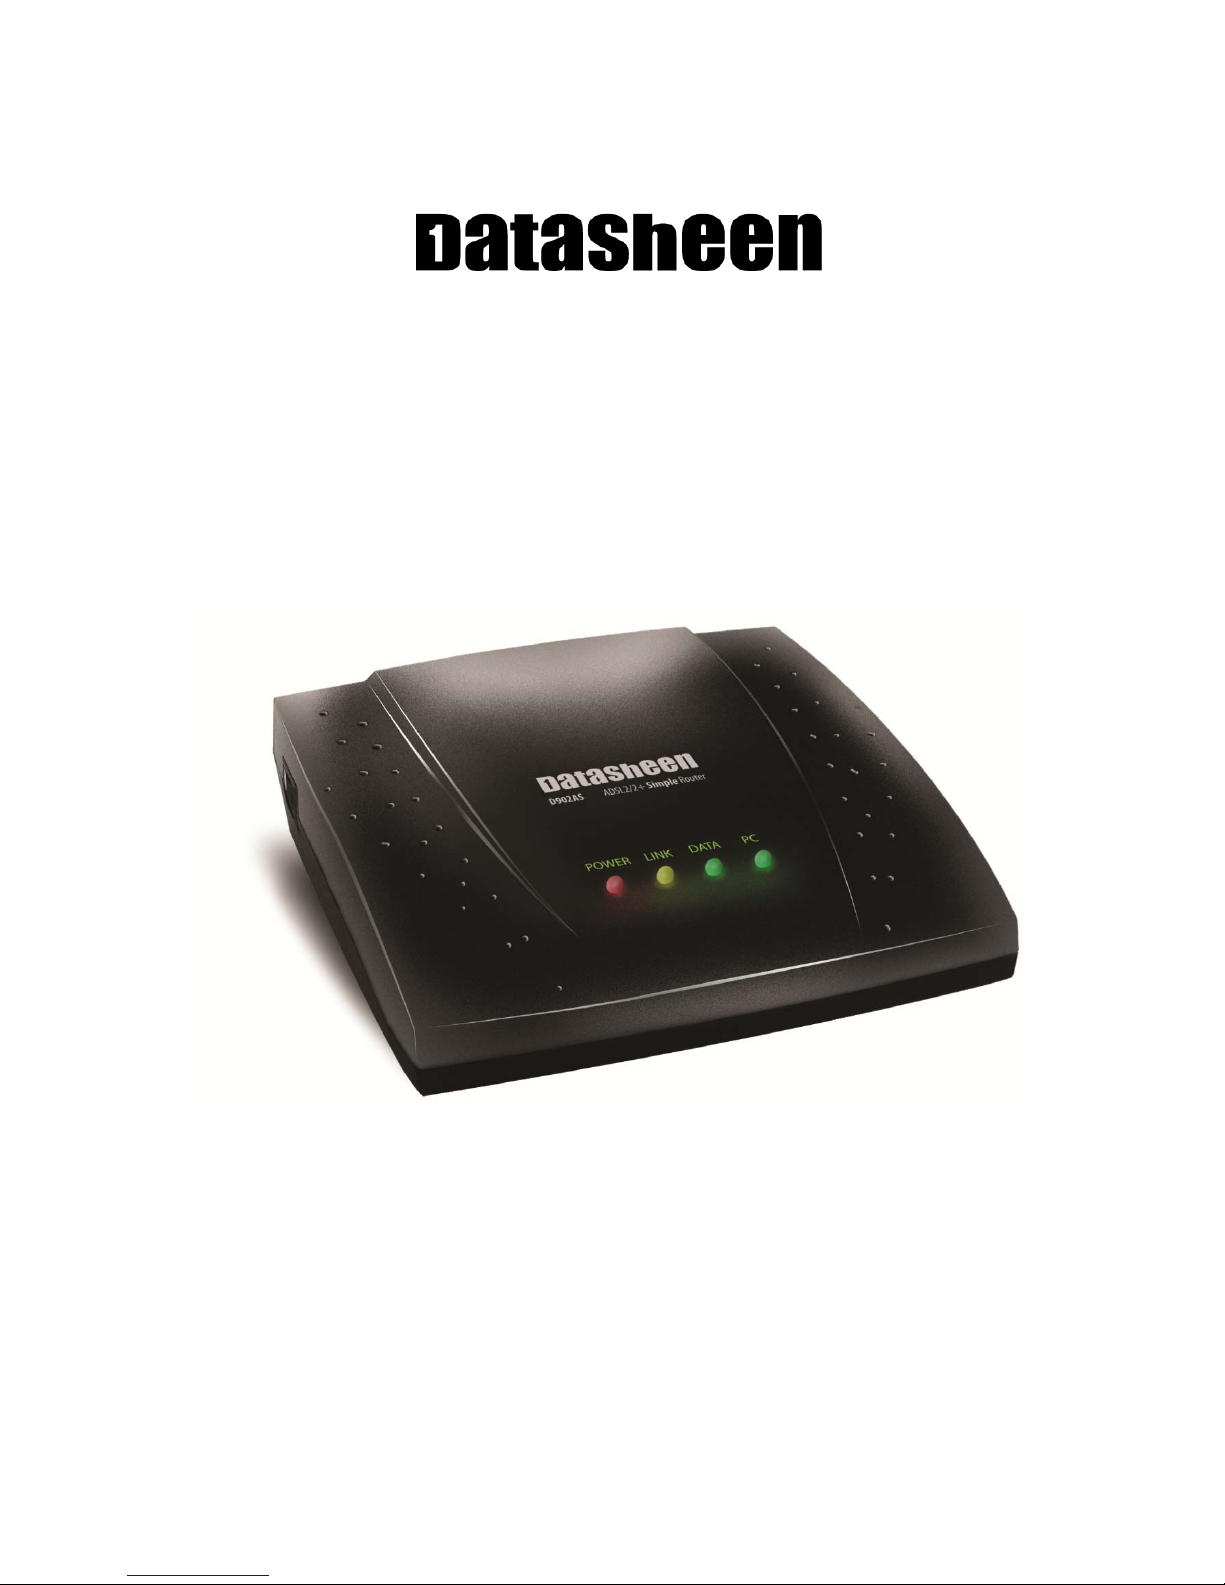
D902AS ADSL2/2+ Simple Router
User Manual
V1.0
Page 2

Datasheen D902AS User Manual
CONTENTS
1.OVERVIEW ....................................................................................................................................................... 3
ABOUT ADSL ...................................................................................................................................... 3
1.1
1.2
ABOUT ADSL2/2+ ............................................................................................................................... 3
FEATURES ........................................................................................................................................... 3
1.3
2 SPECIFICATION .............................................................................................................................................. 4
INTERFACE INTRODUCTION .......................................................................................................... 4
2.1
2.1.1 INDICATOR AND INTERFACE .................................................................................................. 4
2.1.2 SPLITTER SPEC ........................................................................................................................... 4
HARDWARE CONNECTION ............................................................................................................. 4
2.2
LED STATUS INDICATION ................................................................................................................ 5
2.3
3.CONFIGURATION ........................................................................................................................................... 6
DEFAULT CONFIGURATION ............................................................................................................ 6
3.1
COMPUTER CONFIGURATION ........................................................................................................ 6
3.2
ADSL MODEM CONFIGURA TION ................................................................................................... 6
3.3
3.3.1 LOG IN .......................................................................................................................................... 6
3.3.2 SAVE SETTING ............................................................................................................................ 7
3.4
WAN CONFIGURA TION .................................................................................................................... 7
3.4.1 CONFIGURATION GUIDE .......................................................................................................... 7
3.4.2 RFC1483 BRIDGE CONFIGURATION ....................................................................................... 9
PPPoE CONFIGURATION ................................................................................................... 11
3.4.3
3.4.4 STATIC ADDRESS ..................................................................................................................... 12
4 OTHER CONFIGURATION ......................................................................................................................... 13
LAN CONFIGURA TION ................................................................................................................... 13
4.1
4.1.1 CONFIGURATION OF MODEM’S IP ADDRESS .................................................................... 13
4.1.2 DHCP CONFIGURATION ......................................................................................................... 13
4.2 PASSWORD CONFIGURATION .................................................................................................. 14
5. TROUBLESHOOTING ................................................................................................................................. 15
UNABLE TO ACCESS INTERNET .................................................................................................. 15
5.1
5.1.1 CHECK THE LINE AND THE DEVICE ................................................................................... 15
5.1.2 CHECK YOUR CONFIGURATION .......................................................................................... 15
ANNEX:SHIPPING LIST ...................................................................................................... 16
Page 2 Total 16 Pages
Page 3

Datasheen D902AS User Manual
1.OVERVIEW
1.1 ABOUT ADSL
An ADSL MODEM is a broadband Internet access device,which utilizes the high frequency segment of
the phone line to transmit high-speed data without affecting the voice transmission. Th e frequ ency of the ADSL
signal is higher than that of voice, so voice and ADSL signal can coexist in one line by using a splitter to
insulate each from the other. ADSL data transfer adapts the asymmetry model. It supports upload transmission
speed up to 1Mbps and download speed up to 8 Mbps (24Mbps for ADSL2+). ADSL is an ideal device for
broadband access.
1.2 ABOUT ADSL2/2+
Transmission performance of ADSL2 is improved comparing with the first generation of ADSL. These
improvements are mainly concerned with long distance, anti-line-loss, anti-noise, etc. By doubling the
transmission bandwidth, ADSL2+ has implemented a downlink rate as high as 24 Mbps. Therefore, Internet
applications such as synchronous transmission of multi video stream, online games and huge capacity of
downloading files are made possible.
1.3 FEATURES
1、 Support ANSI T1.413 ISSUE 2、 ITU G.992.1 (G.DMT)、ITU G.992.2 (G.LITE).
2、 Web-based configuration and monitoring.
3、 Support up to 4 PVCs.
4、 Routing function.
5、 NAPT、DH CP function.
6、 Maximum downstream transmission rates of 8 Mbps(24Mbps for ADSL2+)。
7、 Maximum upstream transmission rates of 1Mbps
8、 Transmission distance up to 5.5 km.
Page 3 Total 16 Pages
Page 4
2 SPECIFICATION
2.1 INTERFACE INTRODUCTION
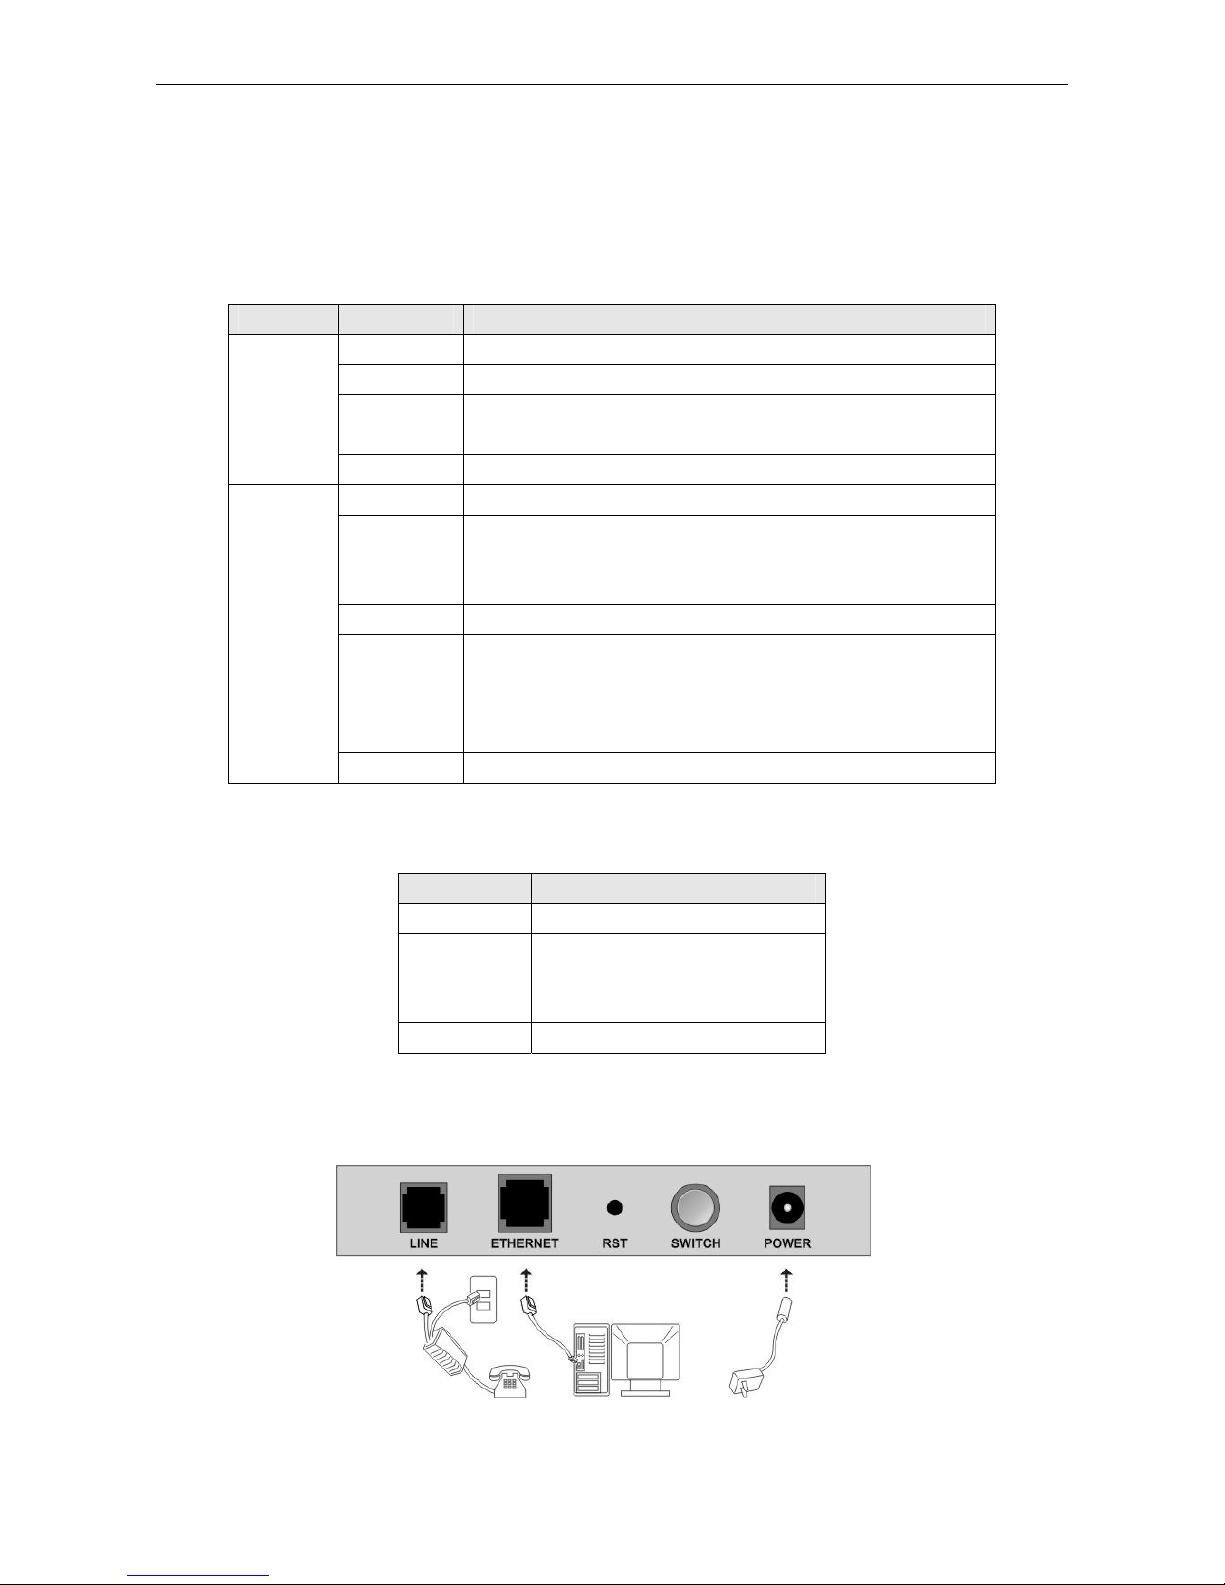
2.1.1 INDICATOR AND INTERFACE
Table 2.1
ITEM Name State introduction
POWER A steady red light means the power connection works properly
LINK Yellow, shows DSL line status.
Indicator
Interface
DATA
PC Green, Indicates status of connection to the PC network card
LINE
ETHERNET
POWER Power interface, Connect with power adapter.
RST
SWITCH To turn on / off the power.
2.1.2 SPLITTER SPEC
Interface Introduction
LINE Connected with telephone line
ADSL
PHONE Connect with telephone
Green, Flashing means the Modem is transmitting or receiving
data
Connected with phone line or “ADSL” port of the splitter。
To be connected to a PC network card by a straight-through
network cable, also can use a crossover cable to connect to Hub,
Switch or Router.
Reset to default setting.
Put a pin into the eyelet, and press the button hidden in the
modem, then you can reset the modem with the default value.
Table 2.2
Connect with the LINE port of the
ADSL Modem using telephone
line provided.
Datasheen D902AS User Manual
2.2 HARDWARE CONNECTION
Figure 2.1
Page 4 Total 16 Pages
Page 5

Datasheen D902AS User Manual
Introduction:
1、 Use a telephone cord to connect the LINE port of the splitter with the RJ-11 port (the phone jack) on
the wall.
2、 Use another telephone cord to connect the ADSL port of the splitter with the LINE port of the ADSL
Modem.
3、 Use another telephone cord to connect the telephone set with the PHONE port of the splitter.
4、 Connect Ethernet port of the ADSL MODEM with 10/100BASE-T port of the computer using the
network cable that comes wi th the modem.
5、 Pl ug in th e po wer cord, and turn on the power.
If you do not want Internet services and telephone voice services simultaneously, please just connect the
LINE port of the ADSL Modem with the RJ-11 port (the phone jack) on the wall using a telephone cord. In this
case, the splitter is not necessary.
2.3 LED STATUS INDICATION
Table 2.3
Status POWER (red) LINK (yellow) DATA (green) PC(green)
Steady light Power on The modem is in good
connection
Flashing / In handshaking status / /
Fast flashing / / Transmitting or
Off Power off Connection not set up Not connected with PC
Connected with PC Ethernet line is connected
Transforming data
receiving data
Ethernet line not
properly
connected properly
Page 5 Total 16 Pages
Page 6
Datasheen D902AS User Manual
3.CONFIGURATION
3.1 DEFAULT CONFIGURATION
ADSL MODEM has pre-configured with the following VCI/VPI. The default dial-up mode is bridge
encapsulation. For bridge mode, no need to configure any more parameter. However, the third party dial-up
software is needed for connection with the Internet
T abel 3.1
Link Name VCI VPI
pvc_0_32 0 32
pvc_8_35 8 35
pvc_0_35 0 35
pvc_8_81 8 81
3.2 COMPUTER CONFIGURATION
The default IP address for ADSL MODEM is: 192.168.1.1; The Subnet Mask is:255.255.255.0. Users can
configure ADSL MODEM through an Internet browser. ADSL MODEM can be used as gateway and DNS
server; users need to set the computer’s TCP/IP protocol as follow:
1、 Set the computer IP address at same segment of ADSL MODEM,such as set the IP address of the
network card to one of the “192.168.1.2”~ “192.168.1.254”.
2、 Set the computer’s gateway the same IP address as the ADSL Modem’s.
3、 Set computer’s DNS server the same as ADSL Modem’s IP address or that of an effective DNS server.
3.3 ADSL MODEM CONFIGURATION
3.3.1 LOG IN
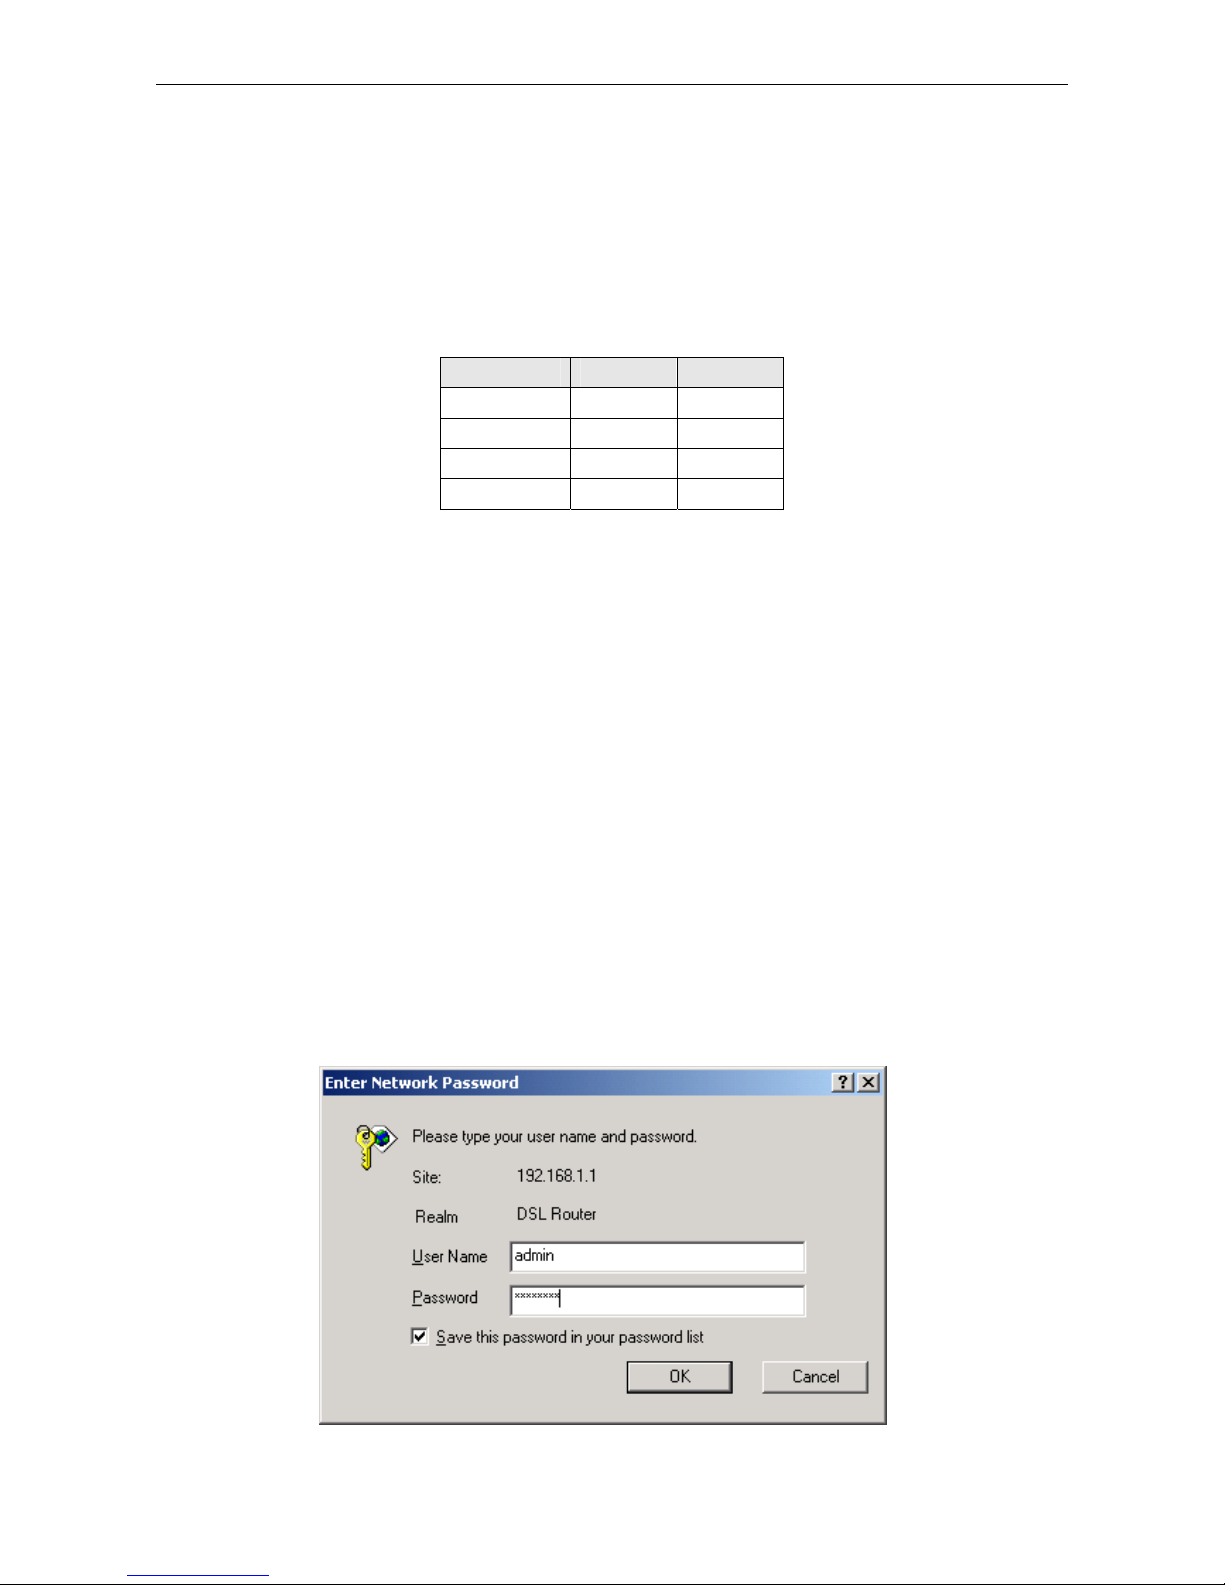
Open the browser; input http://192.168.1.1 at the address column. Press “Enter” key then the entry dialog
box will show up as Figure 3.1. Input “username” and “password” (capital sensitive), then press Enter.
Figure 3.1
Page 6 Total 16 Pages
Page 7
Datasheen D902AS User Manual
3.3.2 SAVE SETTING
After getting through each page for parameters setting, click “Save” or “Save apply” to store the value in
ADSL MODEM. Briefly, we named “Save”.
Note
:
,
When you save the settings
After you save the settings, it will take effect until next reboot.
Some settings only take effect after rebooting the router.
the web page will be refreshed slowly, please wait it finished.
3.4 WAN CONFIGURATION
If the configuration is bridge encapsulation, there is no need to configure any more parameters. Only need
to use the third party dial-up software to connect the Internet。
Totally, this router supports:PPPoA、PPPoE、MER、IpoA、Bridging. For detail configuration information,
please check the following configuration guide.
3.4.1 CONFIGURATION GUIDE
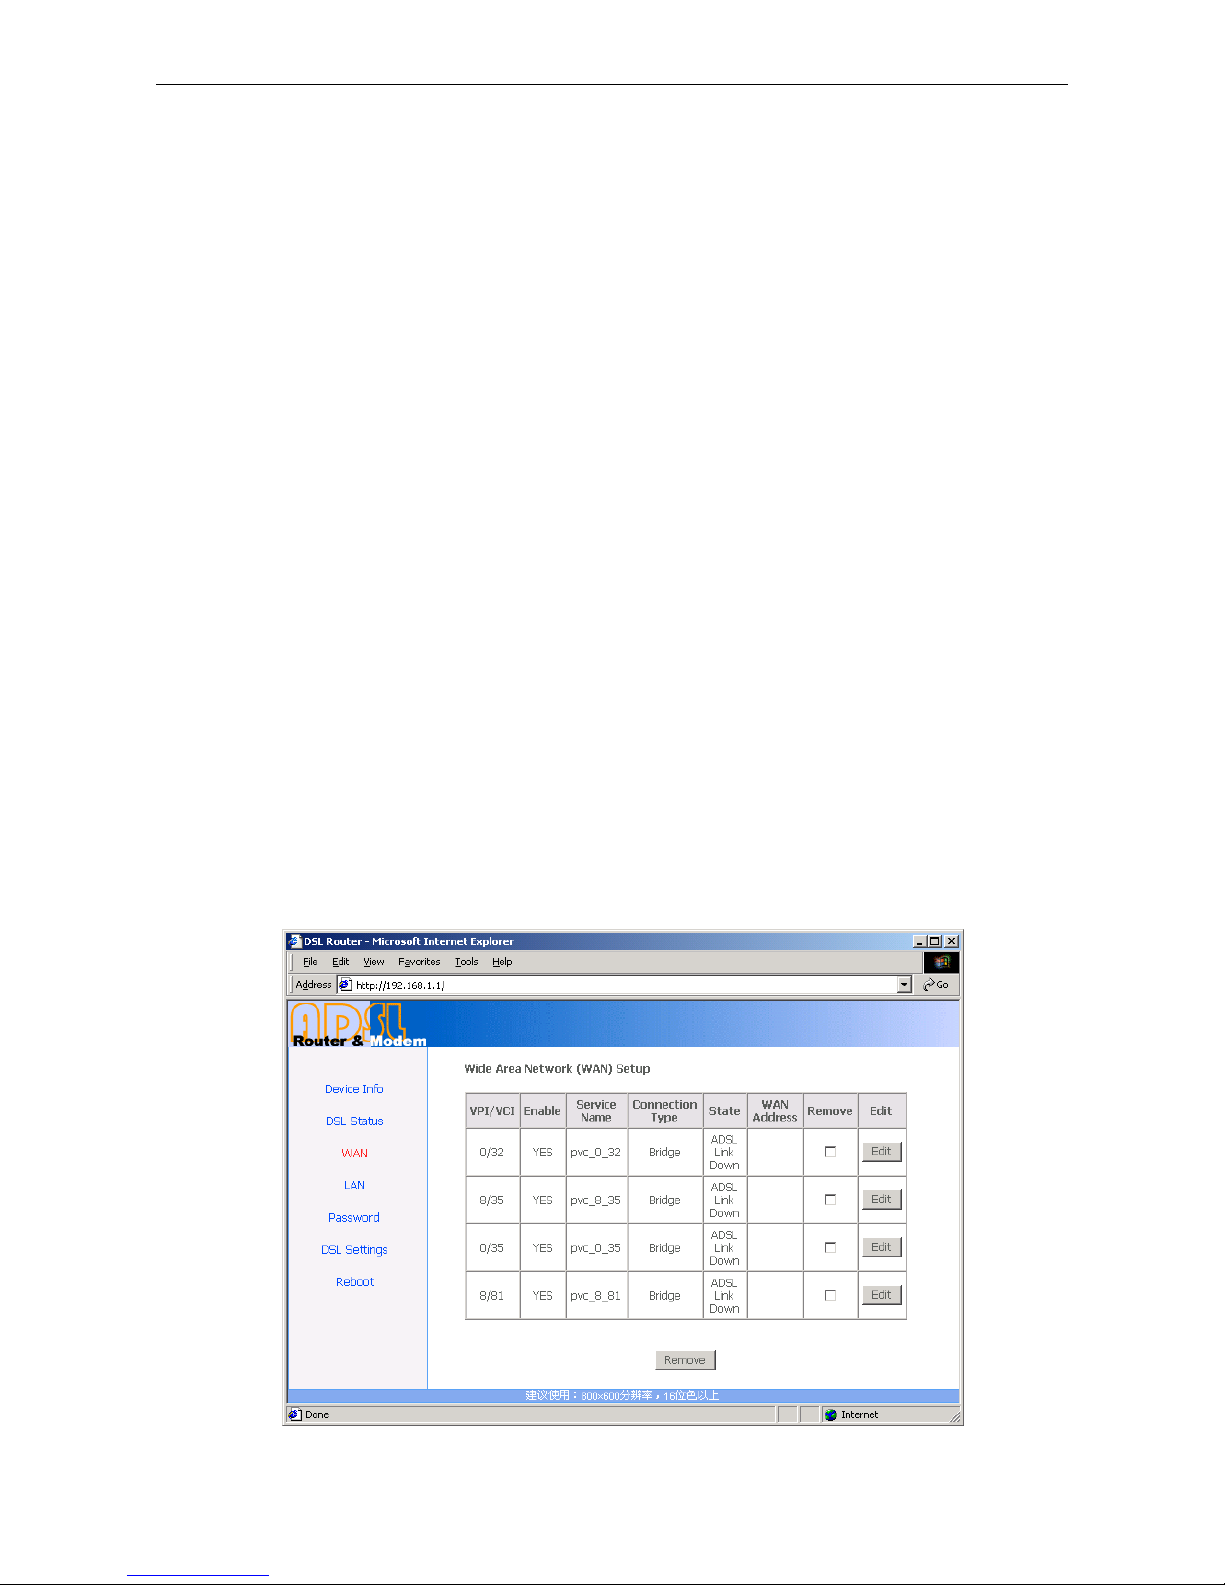
Click “WAN” on the left page, enter into “WAN” configuration page.
Note: At most we can have four connections. If you need to add a ne w conne ction, please delete or modify
an existing connection.
Figure 3.2
Page 7 Total 16 Pages
Page 8
Datasheen D902AS User Manual
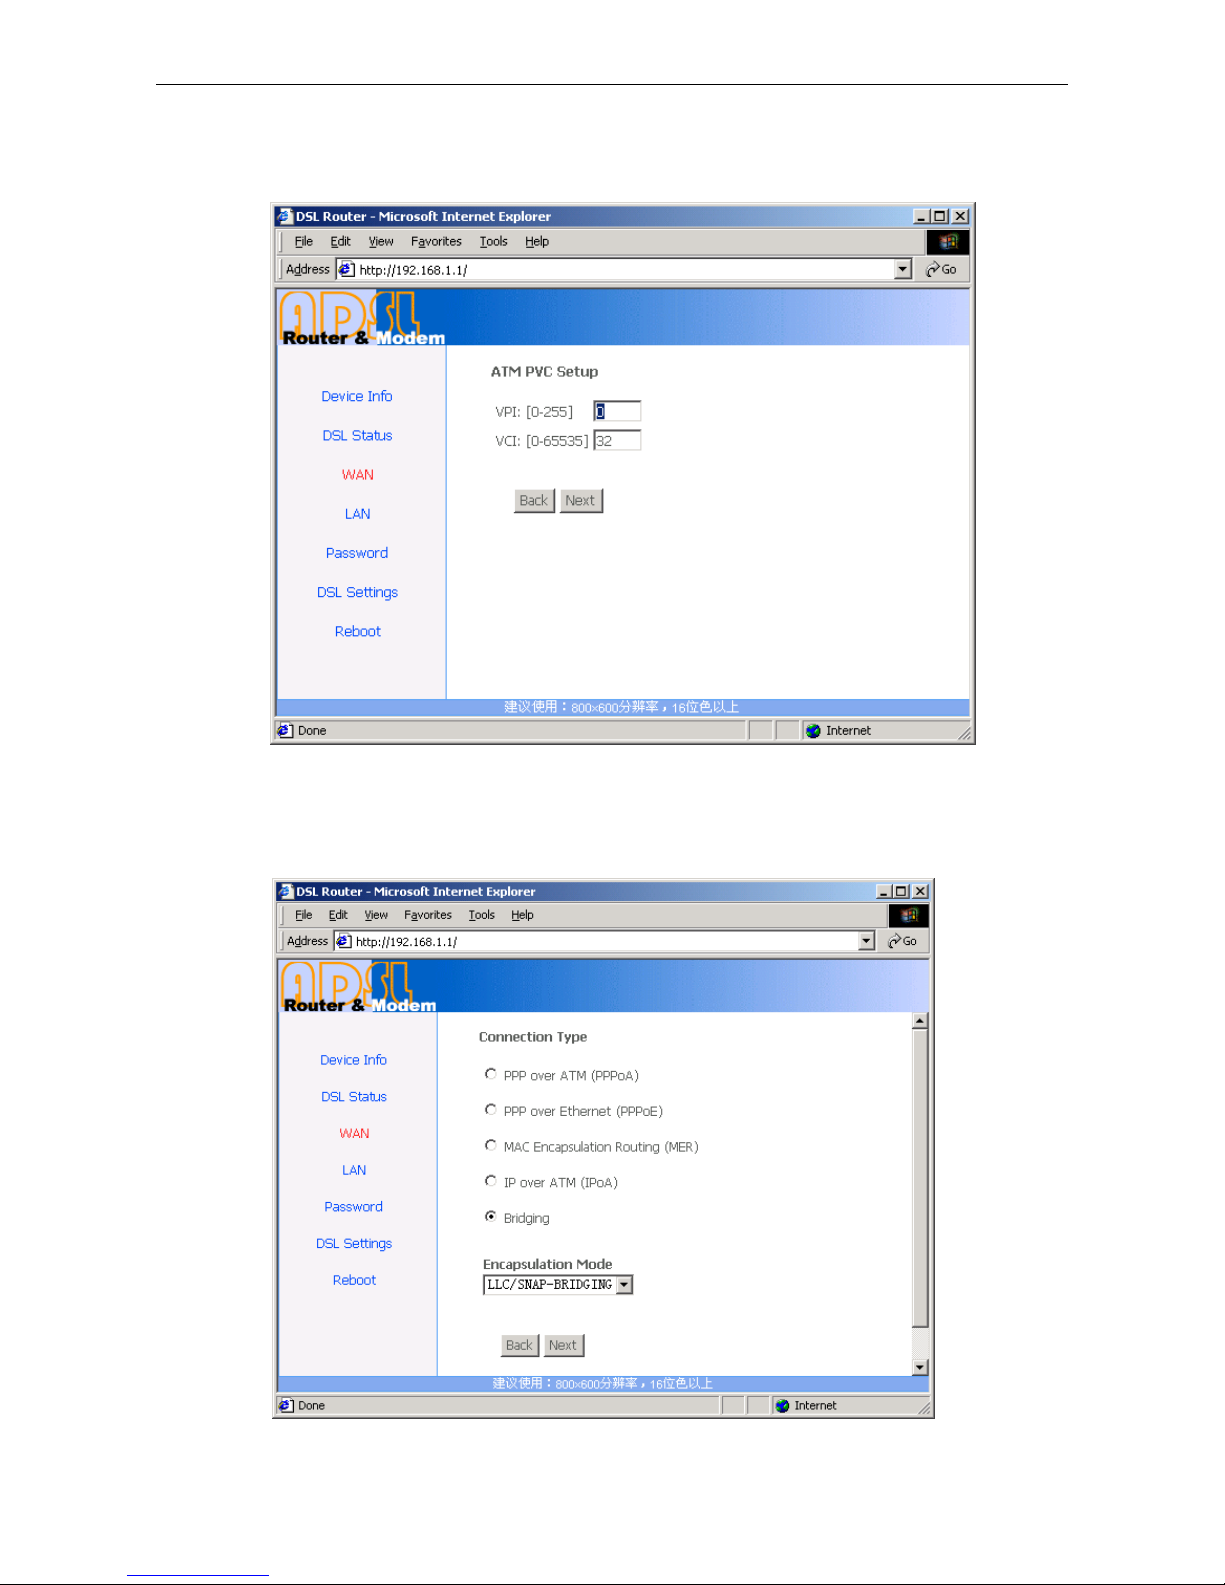
Click on the next connection which you want modify. Press “Edit” button, enter the configure guide, as
Figure 3.3
Figure 3.3
The value for VPI/VCI is assigned by your ISP. After inputting the PVC value, press “Next” into
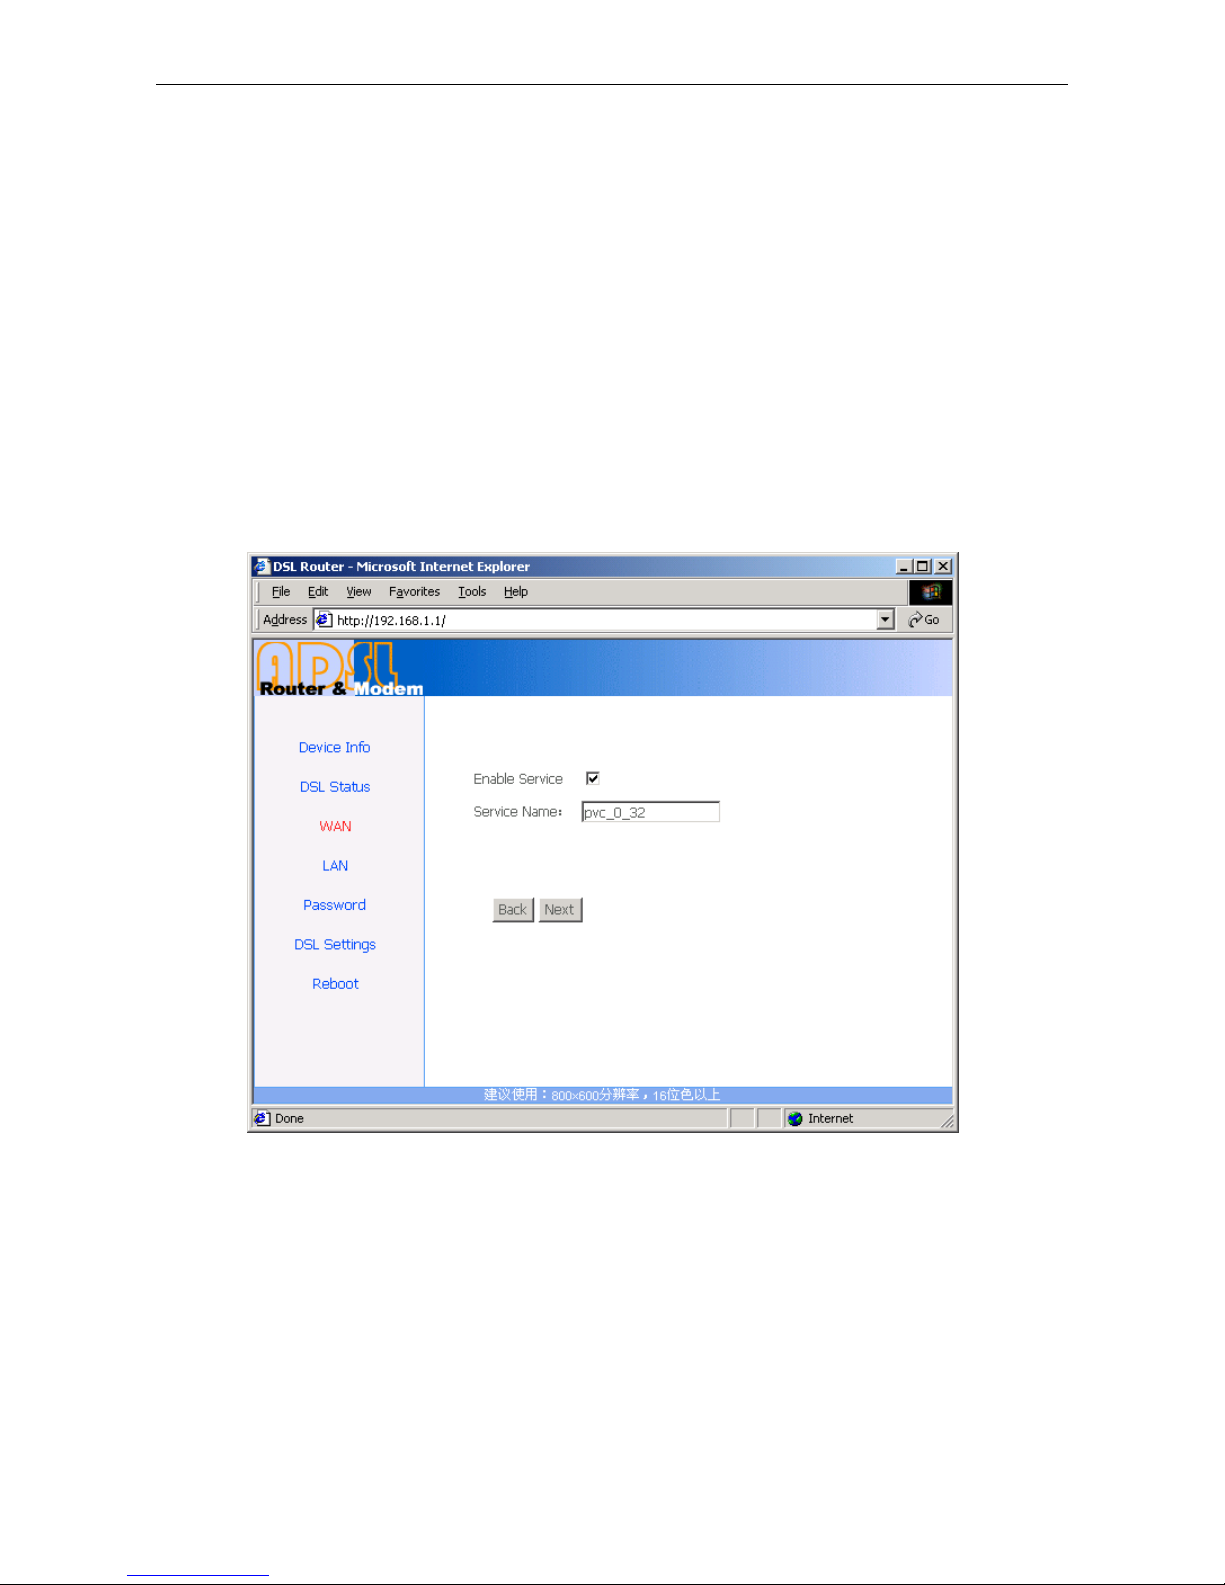
“connection type”. As Figure 3.4.
Figure 3.4
Page 8 Total 16 Pages
Page 9
Datasheen D902AS User Manual
The Modem supports five ADSL protocol modes. Choose the protocol which is appointed by ISP and PVC
encapsulation, click “Next” enter to the protocol configure. Below, we introduce the configuraion of the
five protocol modes.
• PPP over ATM (PPPoA) • PPP over Eth ernet (PPPoE)
• MAC Encapsulated Routing (MER) • IP over ATM (IPoA)
• Bridging
Some connection lines need to confirm the LLC or VC, if you can’t confirm, please don’t modify the
default value or ask your ISP.
3.4.2 RFC1483 BRIDGE CONFIGURATION
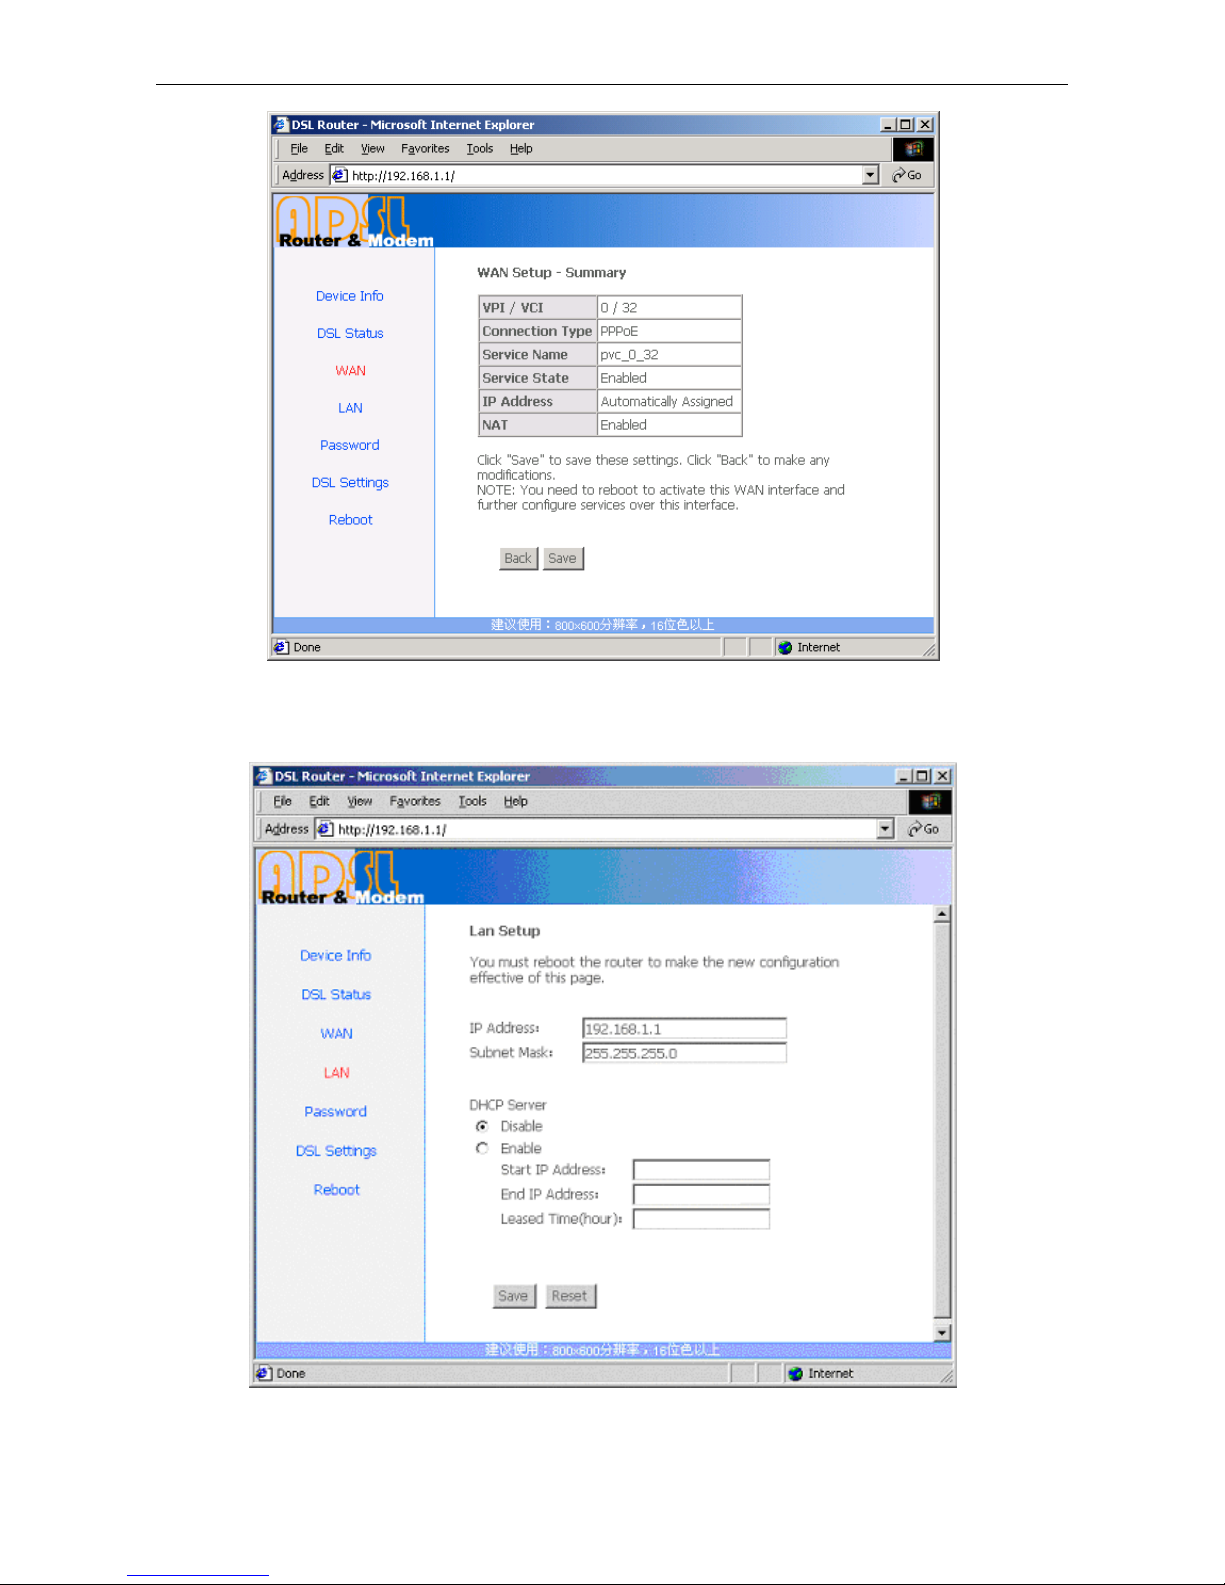
Select the Bridging mode. Then press “Next” to specify the Service Name,and select the “Enable Service” as
Figure 3.5.
Press “Next” to enter into “WAN configuration”, click “save” to save configuration, if you need to modify
the parameter, click “back” as Figure 3.6.
Figure 3.5
Page 9 Total 16 Pages
Page 10
Datasheen D902AS User Manual
Figure 3.6
:
When you use bridge mode, please close “DHCP SERVER”, the result as Figure 3.7
Note
Figure 3.7
Page 10 Total 16 Pages
Page 11
Datasheen D902AS User Manual
3.4.3 PPPOE CONFIGURATION
PPPoE is also known as RFC 2516. It is a m ethod of encapsulating PPP packets over Ethernet.
PPPoA is also known as RFC2364 and named as Peer to Peer Protocol over ATM . As PPPoE, it also has all
the features of PPP. Although it’s based on ATM protocol, the setting of all the other parameters is similar with
PPPoE. So we only introduce PPPoE in detail here.
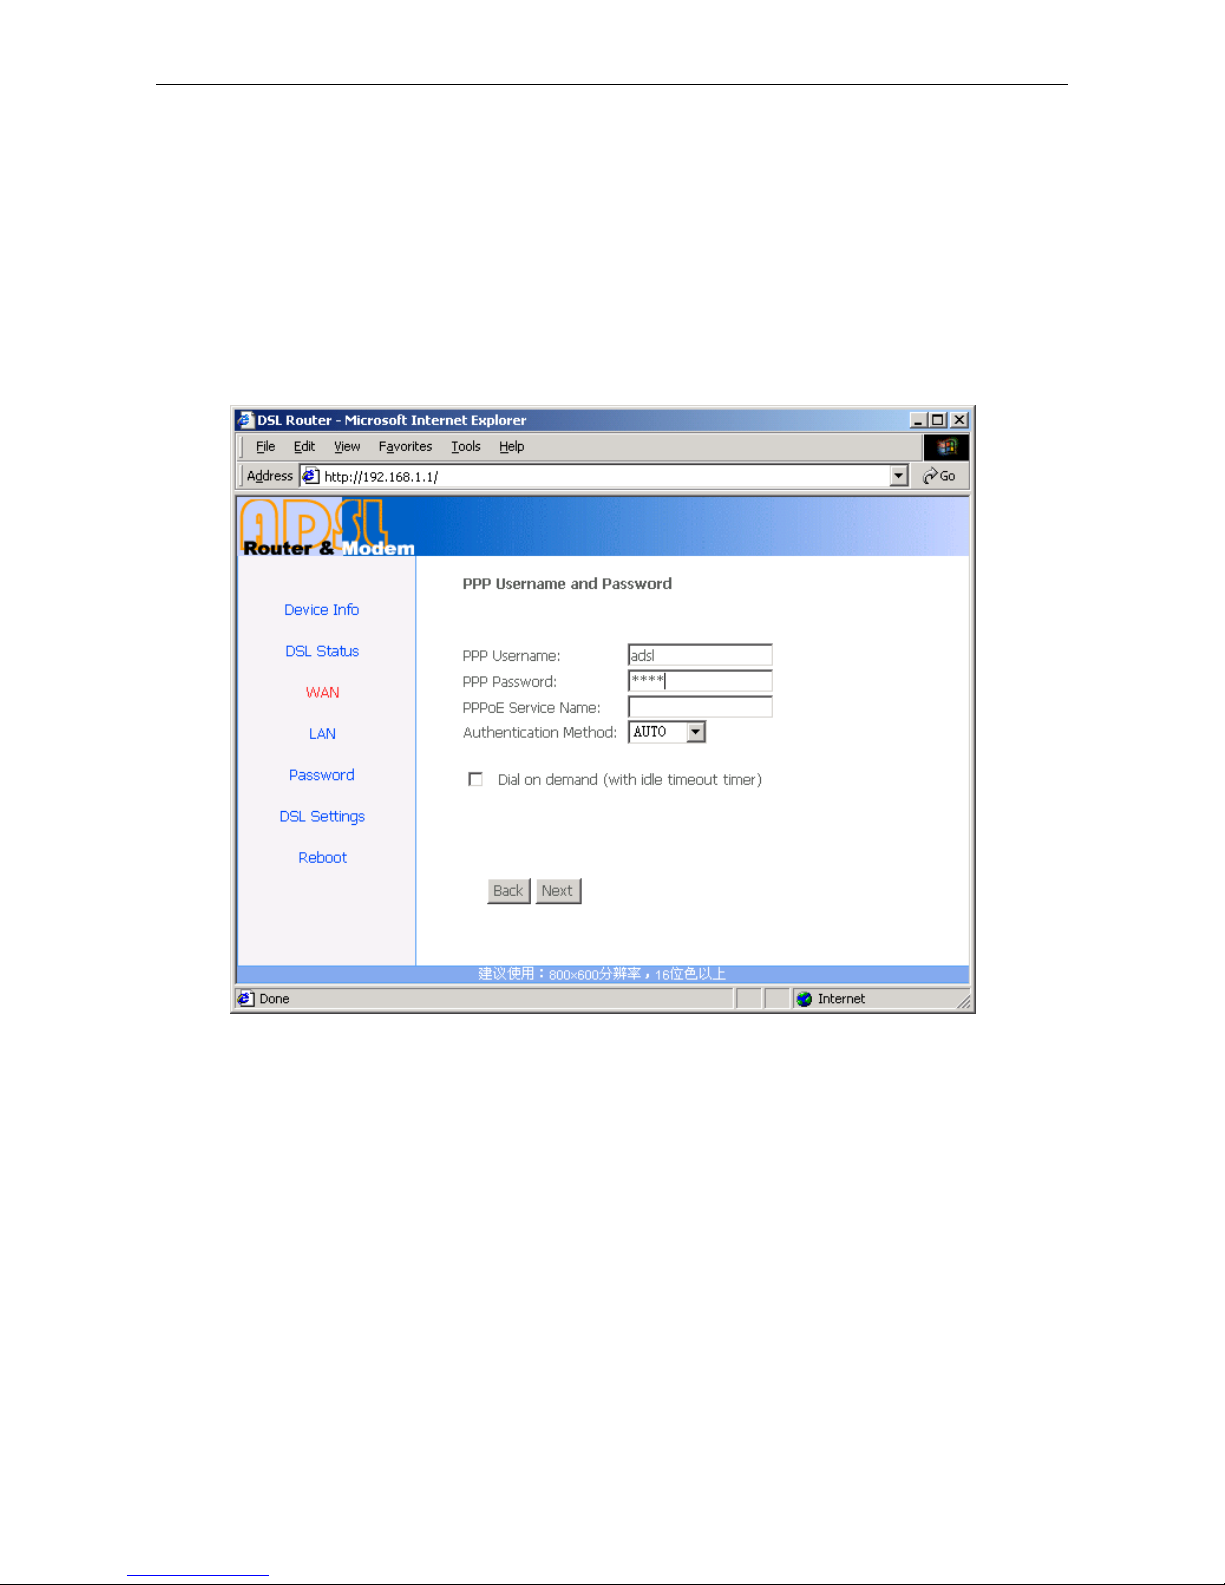
In Figure 3.4, select PPP over Ethernet (PPPoE), press “Next step” entering the configuring interface, as Figure
3.8.
PPP Account: Your account from ISP to access Internet.
Password: Input the password assigned by your ISP.
PPPoE server name: Server name of network ISP. No need to set.
Authentication Mode: Authentication mode of network ISP. Default is AUTO.
Connection on demand: When this mode is selected, the connection that has no traffic within assigned
disconnect timeout (e.g. 1 minute) will be automatically disconnected. The connection will be activated
again when traffic arrives. This function is advantageous for users who are charged with online time. It
should be noticed that some programs automatically link to Internet. Computer will send data to network
when infected by virus. Connection will not be disconnected under these data streams.
Disconnect timeout: When “Connection on demand” is selected, t his input box indicates that after how
long the connection will be disconnected in the absence of traffic. If the value is 0, connection will not be
disconnected.
Figure 3.8
Page 11 Total 16 Pages
Page 12
Datasheen D902AS User Manual
Press “Next step” when configuration is finished. The following operation is same with Figure 3.5. Notice that
PPPoE mode does not work until the modem is reset.
3.4.4 STATIC ADDRESS
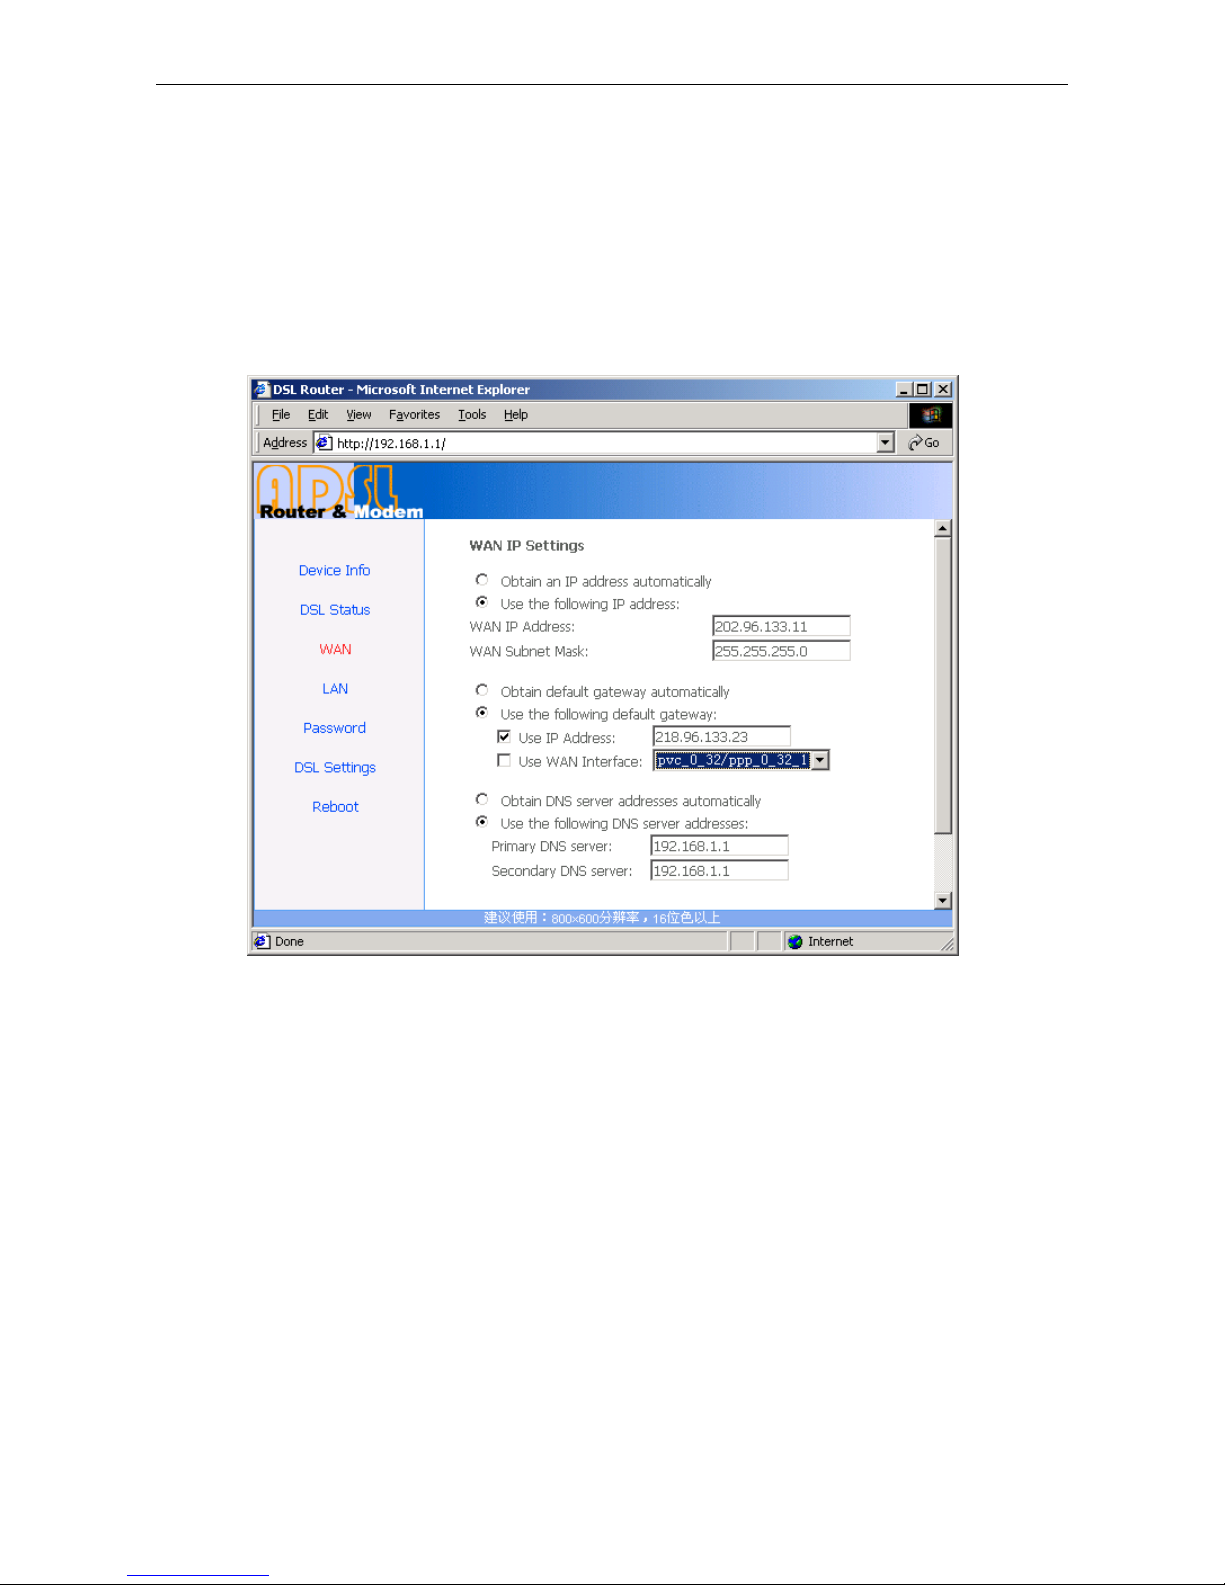
In Figure3.4, select MAC Encapsulation Routing (MER),press “Next”, and the configuration can be
queried from your ISP, the result as Figure3.9.
Figure 3.9
Page 12 Total 16 Pages
Page 13
Datasheen D902AS User Manual
4 OTHER CONFIGURATION
4.1 LAN CONFIGURATION
Configuration of Modem’s IP address and password
4.1.1 CONFIGURATION OF MODEM’S IP ADDRESS
As a network device, ADSL Modem has its own IP address and MAC address. The factory sets the
MODEM, at a default IP address of 192.168.1.1 and subnet mask of 255.255.255.0. Th e user can configure
these addresses through the “LAN” on “Configuration” like this:
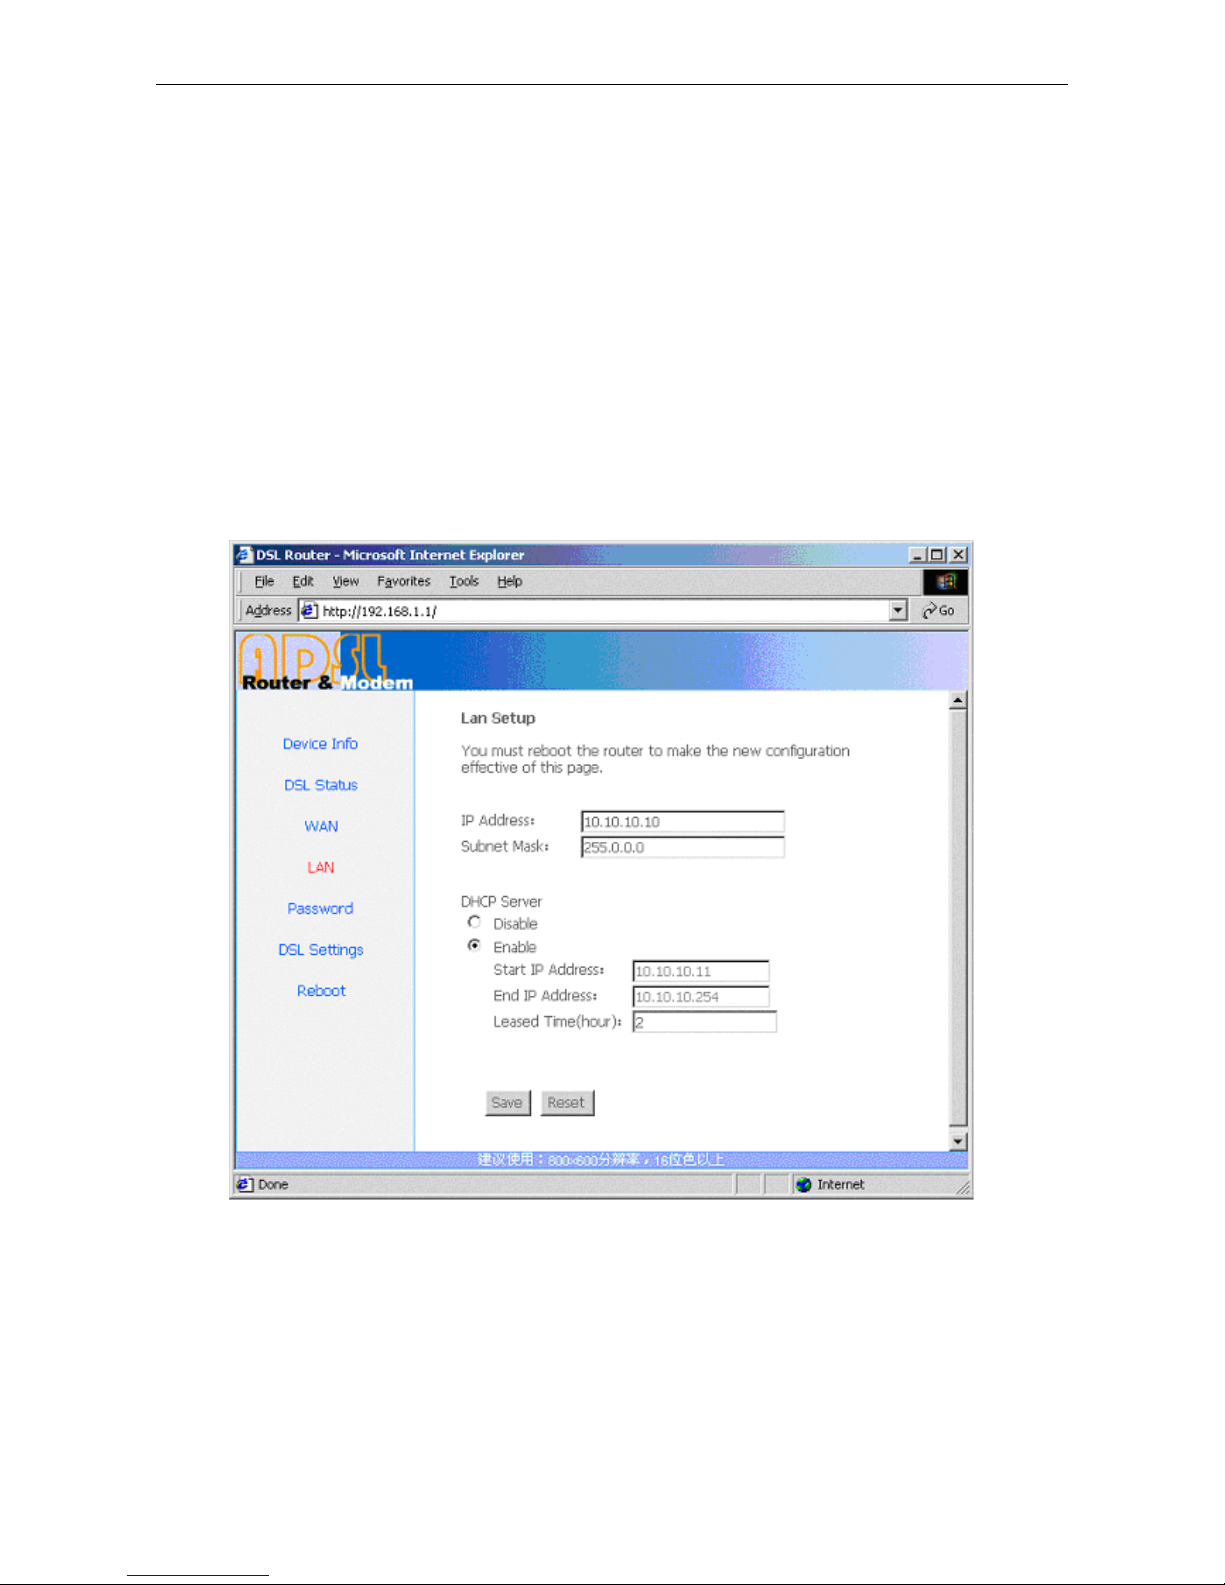
For example, change IP address to “10.10.10.10”. Click ”LAN”, input “IP address”: 10.10.10.10, then
“subnet mask”: 255.0.0.0, the result is as Figure4.1, press “save ”.
Note
:
If you change IP address,it will take effect immediately. You must use the new IP address to login.
4.1.2 DHCP CONFIGURATION
• click“LAN ”
• click“DHCP server”;
• Define the “Start IP address” and the “End IP address” of DHCP server (for example, from
Figure 4.1
Page 13 Total 16 Pages
Page 14
Datasheen D902AS User Manual
192.168.1.2 to 192.168.1.254).
• Input the value of lease (Measured by the second, 0 indicates permanently valid)。
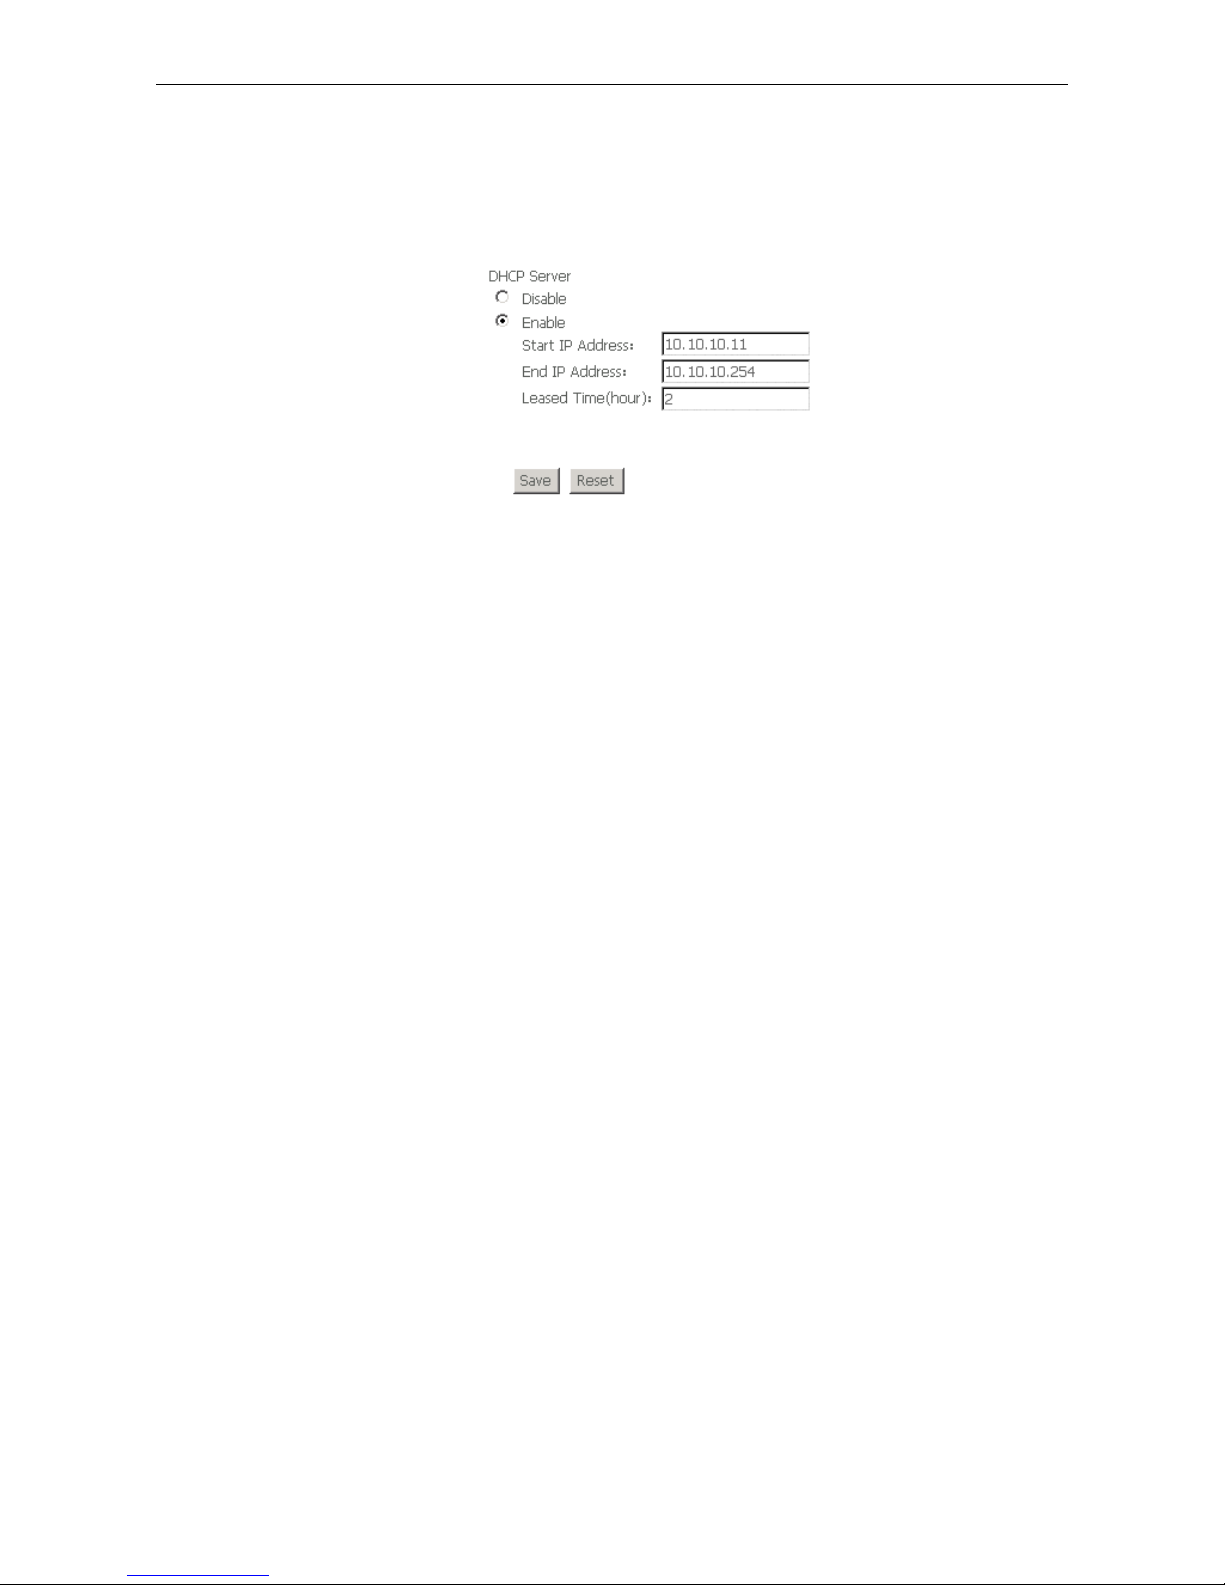
As Figure 4.2,open DHCP server,computer will set the IP Address of network card with one of the address
10.10.10.11 ~ 10.10.10.254.
Figure 4.2
Note
:
When you use the DHCP Server, please pay attention to having multi-DHCP Server in one LAN.
4.2 PASSWORD CONFIGURATION
When you configure ADSL MODEM through an Internet browser, the system requires user name and
password to validate access permission. The factory sets the modem at a default username of “admin” and the
password of “password”. The username is unchanged. You can enter the “password configuration” on
Configuration column to ch ange the password.
Attention: please remember the password after change, otherwise you will not be able to
change configuration after saving setting
Page 14 Total 16 Pages
Page 15

Datasheen D902AS User Manual
5. TROUBLESHOOTING
5.1 UNABLE TO ACCESS INTERNET
5.1.1 CHECK THE LINE AND THE DEVICE
1、 Chec k the indicator of power supply is on,if not,Make sure the connection of power supply is correct;
Make sure the output of power supply is correct; Make sure the switch of power supply is turned on;
2、 Chec k the indicator of PC is on,if not,Make sure the connection of cable and network adapter; Make
sure that the correct cable is used;
3、 Check the LINK LED to see if it is twinkling. If no fast twinkling is observed within 3 minutes, please
check whether phone line has been correctly placed; whether ADSL separator is correctly used. If
multiple extensions have been installed, make sure that the separator is installed prior to the junction
box of phone line. If the above items are confirmed and still no fast twinkling of WAN LED is
observed, call the ISP to query whether ADSL service has been provided on your line;
4、 Check the LINK LED to see whether it is unable to change status from fast twinkling to always light,
or whether it chang e s s tat us to fa st twi nkl in g af ter sometime of always light. If these phenomena occur
constantly, please contact your ISP with a demand to check lines and signal quality;
If there is no pro blem in the above items, th e line and the device shall be working. Problems may come
from your computer configuration or device co nfiguration.
5.1.2 CHECK YOUR CONFIGURATION
We explain here the configuration of PPPOE using Windows 2000 operation system as an example. For
other operation systems the process is similar.
1、 Enter the device manager to check if Ethernet adapter is correctly installed. If any problem exists,
please re-installed it;
2、 Check the configuration of Ethernet adapter in PC. Try to manually set IP address that is in band
192.168.1.x
3、 Try to run comma nd “ping 192. 168. 1.1”
please check Ethernet connection and IP settings;
4、 If this modem is reachable
ShangHai Online: “ping 202 .96.209.133”.
If ping is reachable, there shall be no problems in the modem. Please see step 5;
If ping is not reachable, see step 6 and check if the configuration is correct.
5、 Please try to ping a certain outer URL, e.g. “ping www.google.com”.
If ping is reachable, there shall be no problems in the network settings. Please check the settings
If ping is not reachable, check the DNS setting of Ethernet adapter. See 3.2.
Note 1:The precondition is that LAN settings in the modem has not been modified.
Note 2:We usually start command line mode in Windows 2000 as follows: click on the “RUN” item of
Windows Start Menu, input characters “cmd” in the input box popped up with an “Enter”. The window
注
1
without conflict. See 3.2;
注
3
, try to run ping with a known outer IP, e.g. the DNS server IP of
注
2
on command line mode. If the response returns “time out”,
of the PC terminal, e.g. whether the security level is too high, or whether anti-virus firewall is
installed;
Page 15 Total 16 Pages
Page 16
Datasheen D902AS User Manual
subsequently popped up is the command line window.
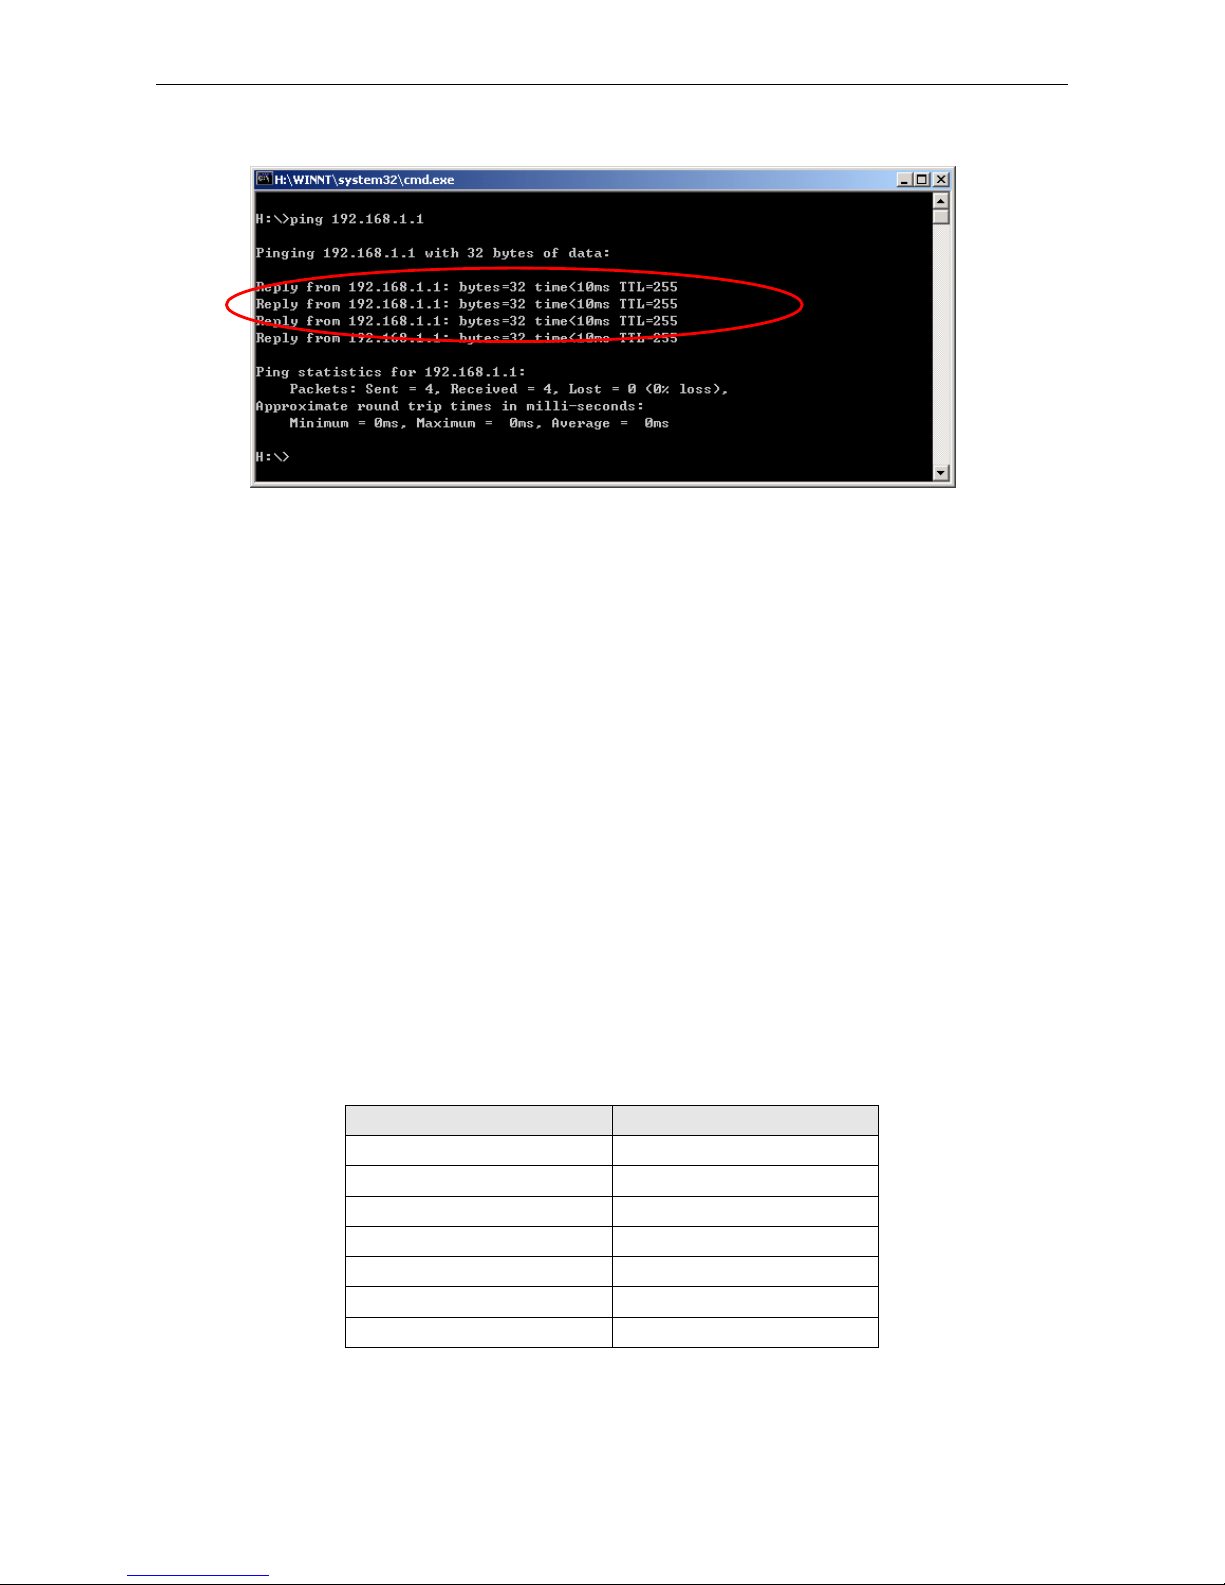
Note 3:The returned values of ping command in the following format show the standard of “reachable”
图 5.1
6、 If ping of the modem is reachable but ping of the outer fixed IP is unreachable, attention should be
concentrated upon device settings. Please enter the configuring interface following the instructions in
this manual.
(1) Check first the number of connections. If more than one connection exists, for trou bleshooting ,
delete unused connections and rema in the one connection you are using.
(2) Check the connection to see whether correct “ type” is selected. It’s normal to choose login type of
PPPoE. When you use PPPoE to login, the following information should be provided: VPI and
VCI, which can be queried from your ISP, user name and password.
(3) Then make sure that “using NAT” and “default gateway” have been selected with a tick. Check
whether “connect on demand” has been selected with a tick. If it is selected, the connection is
activated only when traffic to outer networks arrives. If not selected, check “keep connection”,
which should be set to 0 if you demand to keep connection
Make sure that the above parameters are saved after configuration. Internet is now available since the
configuration is properly done.
ANNEX:SHIPPING LIST
Name Number
ADSL MODEM 1
Splitter 1
User Manual 1
Power Supply 1
Cable Cat5 RJ45 1
Telephone Line 2
Warranty Certificate 1
© Datasheen Corporation. 2009. Taiwan
Page 16 Total 16 Pages
 Loading...