


Regulatory Notices
This device complies with part 15 of the FCC Rules.
Operation is subject to the following conditions:
This device may not cause harmful interference, and
This device must accept any interference received,
including interference that may cause undesired operati on.
Pursuant to part 15.21 of the FCC Rules, any changes or modifications to this
equipment not expressly approved by Data Protection Solutions may cause
harmful interference and void your authority to operate this equipment. Use of a
shielded data cable is required to comply with the Class B limits of part 15 of the
FCC Rules.
For further information, contact Data Protection Solutions.
Note
This equipment has been tested and found to comply with the limits for a Class B
digital device, pursuant to part 15 of the FCC rules. These limits are designed to
provide reasonable protection against harmful interference in a residential
installation. This equipment generates, uses, and can radiate radio frequency
energy and, if not installed and used in accordance with instructions, can cause
harmful interference to radio communications. However, there is no guarantee
that interference will not occur in a particular installation. If this equipment does
cause harmful interference to radio or television reception, which can be
determined by turning the equipment off and on, the user is encouraged to try to
correct the interference by one or more of the following measures:
Reorient or rel ocate the receiving antenna.
Increase the separation between the equipment and the receiver.
Consult the dealer or an experienced radio/TV technician for help.
Acknowledgements
EzBackup™sa is a registered trademark of Data Protection Solutions.
No part of this publication may be reproduced in whole or in part,
or transmitted in any form or by any means, electronic, mechanical,
photocopying, recording, or otherwise, without written permission
from the publisher. For information regarding permission, write to
Data Protection Solutions, 3100 North 29
th
Court,
Hollywood, Florida 33020 USA
Text and images copyright © 2005 by Data Protection Solutions.
All rights reserved. Published by Data Protection Solutions,
3100 North 29
th
Court, Hollywood, Florida 33020 USA
While every precaution has been taken in the preparation of this manual,
we assume no responsibility for errors or omissions. Neither, is any liability
assumed for damages resulting from the use of the information contained herein.
Windows® is a registered trademark of the Microsoft Corporation.
.NET Framework® is a registered trademark of the Microsoft Corporation.
All other trademarks used in this text are registered trademarks of their respective
owners.
Rev. 1.0.2
Printed in the USA.

Quick Start Guide
Follow this Quick Start Guide to get up and running quickly. This guide is for Windows®
installs only, please refer to the manual, included on the installation CD, for Linux®
installations. This guide is not intended to replace the complete manual. It is highly
recommended that you take the time to review the entire manual in order to maximize
the investment you have made in this superior Data Protection Solutions product. There
are many features of the EzBackup™sa that are not explained in this section.
1. Turn your computer on to install the EzBackup™sa application. If your computer is
already on, close down all applications.
2. Connect your new EzBackup™sa to your computer. Connect the USB cable to the unit
and to an available USB port on your computer. Connect the power supply connector to the
12V socket on the unit and plug the wall mounted power supply into a wall outlet. Turn on
the EzBackup™sa and also turn on the internal fan of the EzBackup™sa, as well.
3. Insert the EzBackup™sa Installation, Backup & Restore CD that came with your unit
into the CD-ROM drive. The install screen should appear. Click on Install Now to start the
installation. Upon completion of the software installation, leave the EzBackup™sa
Installation CD in the CD-ROM drive.
Note: Select Yes to the “Microsoft .NET Framework®” question if message appears. Step
through the installation screens and make the appropriate selections based on your
preferences.
4. Exit all applications. It is now necessary to re-boot your computer from the CD with the CD
still in the CD-ROM drive. In most cases this will require you to alter the boot sequence from
within the BIOS settings after restarting. For information on accessing the BIOS settings see
Appendix A. Once you have restarted and entered the setup menu look for a menu option
called “Boot” or “Boot Sequence”. If it is not listed, check the other screens of the BIOS
setup, it is often part of an advanced setup page.
5. The computer will boot from the CD-ROM drive and the EzBackup™sa install splash
screen will appear. Choose Backup from the screen and follow the onscreen instructions to
create the first image backup of your hard drive and prepare the EzBackup™sa for use.
Note: If your computer does not boot from the CD (e.g. Windows® Operating System
starts to load), please refer to your computer documentation to learn how to configure
your computer’s BIOS to allow for a boot from the CD-ROM drive.
6. Upon completion of the image backup, follow the onscreen instructions. The CD-ROM
drive will open. Remove the Installation CD from the CD-ROM drive and click OK to shut
down your computer.
7. Turn your computer back on. Your EzBackup™sa is now set up and ready for normal
use. Continue to familiarize yourself with your new EzBackup™sa by reading the complete
manual.

Table of Contents
1. INTRODUCTION......................................................................... ………..6
1.1 Minimum System Requirements................................................................................6
1.2 Box Contents............................................................................................................. 6
2. SETTING UP YOUR EZBACKUP™SA...................................................8
2.1 Connecting the EzBackup™sa...............................................................................................8
2.2 How to Install the EzBackup™sa Software – Windows® .......................................................9
2.3 How to Install the EzBackup™sa Software – Linux® ...........................................................10
2.4 How to Install the EzBackup™sa Software - Mac®……………………...……………..…..10
3. CREATING A FULL IMAGE BACKUP .................................................11
3.1 Default Backup........................................................................................................ 12
4. USING YOUR EZBACKUP™SA – BACKUP .......................................13
4.1 Performing a Backup............................................................................................... 14
4.1.1 All Files Backup .............................................................................................................14
4.1.2 New/Modified Files Backup............................................................................................15
4.1.3 Selected Files Backup ...................................................................................................16
4.2 Maintaining Your Backup Data................................................................................ 18
4.2.1 Scheduled Backups.......................................................................................................18
4.2.2 How To Create a Scheduled Backup Program
4.2.3 Selected Files Option................................................................................................................21
4.2.4 How to Modify a Scheduled Backup Program.......................................................................21
4.3 Additional Features .................................................................................................22
4.3.1 EzBackup™sa E-Mail Notification..................................................................................22
4.3.2 Hardware Properties......................................................................................................23
4.3.3 EzBackup™Task Monitor...............................................................................................23
.....................................................................18
4

5. USING YOUR EZBACKUP™SA - RESTORE ......................................24
5.1 Restoring Your Data Files....................................................................................... 24
5.2 How to Initiate a Restore.........................................................................................24
5.3 Total System Recovery........................................................................................... 26
6. Appendix A…………………………………………………………………………………...28
7. TROUBLESHOOTING...........................................................................28
7.1 Problems/Solutions .................................................................................................29
7.2 Tips/Guidelines........................................................................................................ 30
7.3 How to Get Help...................................................................................................... 31
5

1. Introduction
Disaster recovery is now easier than ever. EzBackup™sa is a comprehensive data
protection solution that provides a complete D2D (disk-to-disk) backup and restore
solution – to go!
EzBackup™sa will perform a complete mirror image of your computer’s internal hard
drive, including the operating system, applications, preferences, settings and all other
data.
Leveraging Data Protection Solutions’ proven DupliDisk mirror technology, you can
create an image copy of your computer’s hard drive that includes all data, program, and
system files. This provides you with a portable, bootable backup drive that is 100%
consistent with your main or primary drive. By using the Installation, Backup & Restore
CD that is included, restoring your data is easy. All of the functions and features of
EzBackup™sa are controlled with the friendly EzBackup™sa software for Windows®
and Linux®.
Installation is simple. A quick USB connection with the provided cable is all you need to
be on your way to performing easy backups and having the piece of mind you deserve.
First Time User?
We recommend reading through this manual
at least once, starting with the Introduction.
1.1 Minimum System Requirements
PC with an available USB 1.1/2.0 port
4X CD-ROM Drive or better
32MB of hard drive space
128 MB of RAM
800 x 600 Minimum Screen Resolution
Windows®:
o Windows® 2000/XP Home or Professional
Linux®:
o Kernel 2.4 or Above
o X Window
Macintosh®:
o Mac OS X (Panther/Tiger)
6
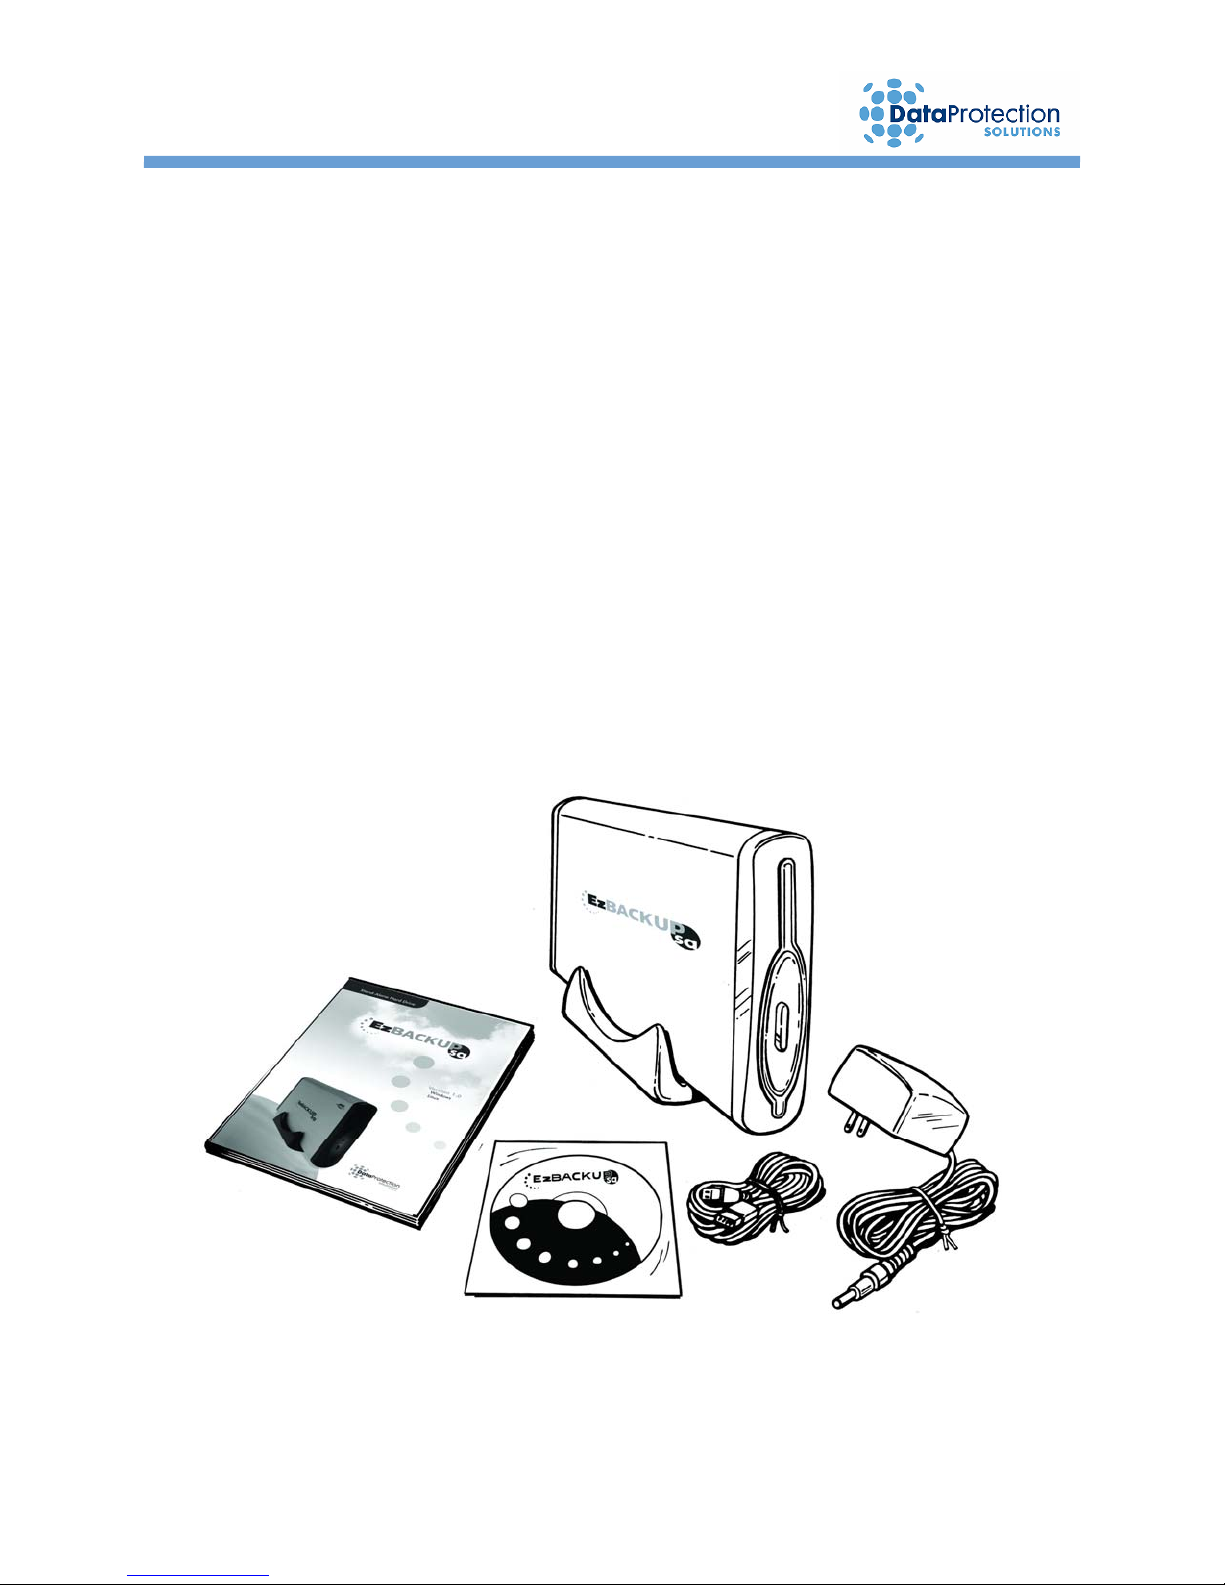
1.2 Box Contents
1 EzBackup™sa External Drive Unit
1 EzBackup™sa Quick Start Guide
1 EzBackup™sa Installation, Backup & Restore CD
1 External Drive Unit Stand
1 USB Cable
1 Wall Mount Power Supply
1 Warranty Card
7
2. Setting up Your EzBackup™sa
Please close ALL applications before
2.1 Connecting the EzBackup™sa
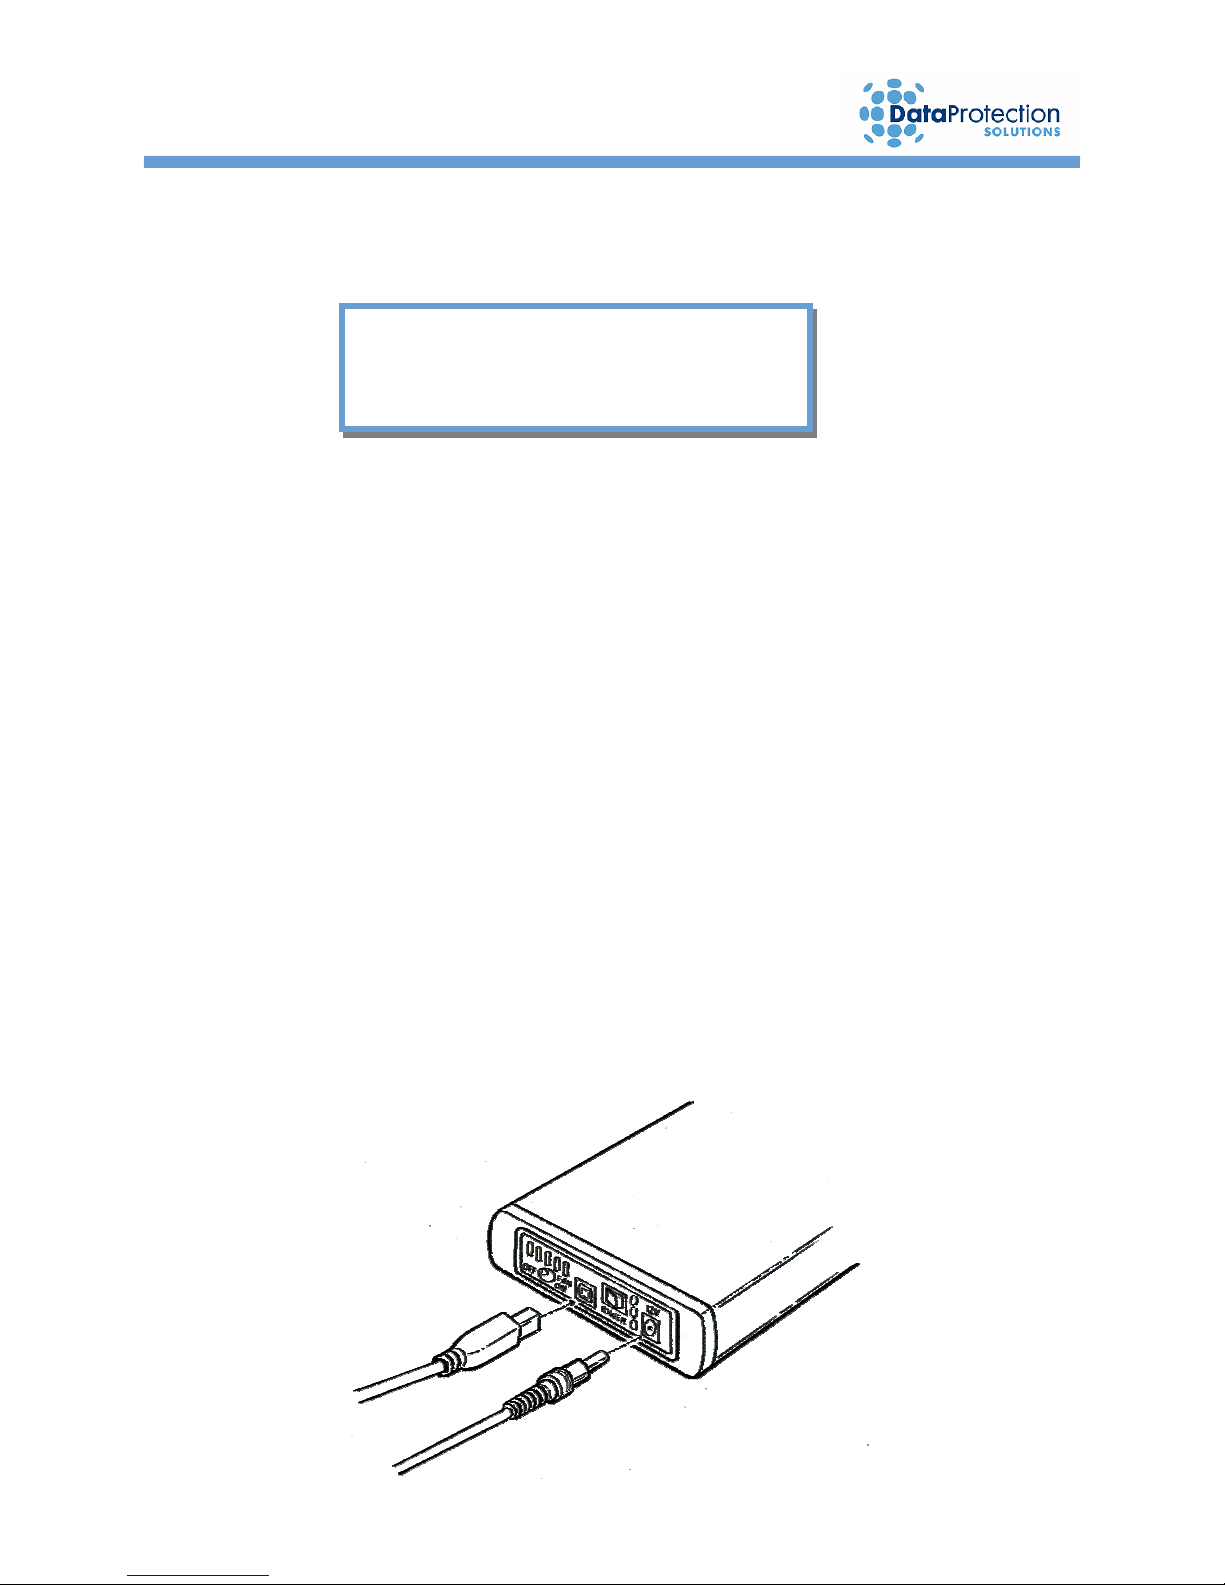
Connecting your EzBackup™sa is easy. By following the simple steps below, you will
be on your way to backing up your data in just a few minutes.
1. Connect the smaller, rounded end of the included USB cable to your EzBackup™sa as
shown in the illustration below.
Important:
starting.
2. Connect the other end of the USB cable to an available USB port on your computer.
3. Locate the included wall mounted power supply. Insert the small, round power supply
connector into the 12V power socket on the EzBackup™sa as shown in the illustration.
Plug the power supply into an available outlet on your wall or power strip.
4. Turn on your EzBackup™sa by pressing the power switch so that the white dot is in the
down position. Turn the internal fan on by sliding the fan power switch to the on position.
5. The EzBackup™sa setup is complete. Important: Your new EzBackup™sa will not
function effectively unless a Full Image Backup is done. Please continue on to the next
section to install the application and to complete your first Image Backup.
8

y
2.2 How to Install the EzBackup™sa Software – Windows®
1. Close all applications that may be running. If you have a previous version of the
EzBackup™sa, you do not need to uninstall it. The newest version will uninstall it
automatically.
2. Insert the EzBackup™sa Installation, Backup & Restore CD that came with your unit into
the CD-ROM drive. The install screen should appear. If it does not appear, use Windows®
Explorer to navigate to your CD-ROM drive. Locate and open the Windows® folder and
double-click on the file EzBackupInstall.exe.
What is .NET Framework® and why do I
3. Click on Install Now to start the installation.
Note: Select Yes to the “Microsoft .NET
Framework®” question if message appears.
4. Select Yes to the “Install EzBackup™sa”
question.
5. Step through the installation screens and make the appropriate selections based on your
preferences.
6. Upon completion of the install, select Exit Install from the bottom right-hand portion of the
window.
7. The EzBackup™sa software is now installed.
8. Leave the CD in the CD-ROM drive.
9. Follow Steps 2–7 from section 3 to perform the Full Image Backup and to complete the
installation.
Dot Net Framework® provides operating
system support for the EzBackup™sa
application. EzBackup™sa will not function
without it. This will in no way impact your
need to install it?
s
stem.
9

2.3 How to Install the EzBackup™sa Software – Linux®
1. Insert the EzBackup™sa Installation, Backup & Restore CD that came with your unit into
the CD-ROM drive. Go to the directory where the CD is mounted. Navigate to the Linux®
directory of the CD and run the file InstallEzBackup. The install screen should appear.
2. Click on Install Now to start the installation.
3. Select Yes to the “Install EzBackup™sa” question.
4. Step through the installation screens and make the appropriate selections based on your
preferences.
5. Upon completion of the install, select Exit Install from the bottom right-hand portion of the
window.
6. The EzBackup™sa software is now installed.
7. Leave the CD in the CD-ROM drive.
8. Follow Steps 2–7 from section 3 to perform the Full Image Backup and to complete the
installation.
2.4 How to Install the EzBackup-sa Software – Mac
1. Turn your computer on to install the EzBackup™sa application. If your computer is
already on, close down all applications.
2. Connect your new EzBackup™sa to your computer. Connect the USB or Firewire cable
to the unit and to an available USB or Firewire port on your computer. Connect the power
supply connector to the 12V socket on the unit and plug the wall mounted power supply into
a wall outlet. Turn on the EzBackup™sa and also turn on the internal fan of the
EzBackup™sa, as well. If an error message pops up reading “The disk you inserted was
not readable”, click on ignore.
3. Insert the EzBackup™sa Installation, Backup & Restore CD that came with your unit
into the CD-ROM drive. Browse CD inside Mac OS X directory, and double click on install
package. Be sure to install onto your primary internal drive. Upon completion of the
software installation, leave the EzBackup™sa Installation CD in the CD-ROM drive.
4. Exit all applications and restart your computer with the CD still in the CD-ROM drive.
5. Press and hold “C” button to boot from CD, as the system begins to boot.
10
3. Creating a Full Image Backup
An image backup is a block-by-block copy of the source or primary drive, including all
system, formatting, preferences, settings and program data. An image on a USB 2.0
connection will take approximately 1 minute for each GB of recorded data on the primary
drive (to see how much of your internal drive you have used, go to “My Computer”, rightclick on Local Disk, go to Properties and you will find the used size under General
Information). Backup times can vary based on whether your USB port is 1.1 or 2.0.
Your EzBackup™sa utilizes the included Installation, Backup & Restore CD to create an
Image Backup.
Your new EzBackup™sa will not function effectively
unless an Image Backup is performed first. Please
ensure this step is completed before proceeding.
Important:
1. Insert the included Installation, Backup & Restore CD into your CD-ROM drive. Click on Exit
if the auto start screen appears.
2. Restart your computer. Your system will boot from the CD. If it does not, please refer
to your computer’s documentation to learn how to configure your computer’s BIOS to
allow for a boot from the CD-ROM drive.
3. You should see the EzBackup™sa install splash screen after the computer is done booting
from the CD-ROM drive.
11
4. Select Backup. Select Yes both times, when prompted, to confirm the creation of the Image
Backup. The Image Backup begins and displays a progress window.
12

5. Upon completion of the Image Backup, a dialog box will appear indicating that the Image
Backup has completed successfully. The CD-ROM drive will then open. Remove the
Installation CD from the CD-ROM drive.
6. Click OK to shut down your computer. The EzBackup™sa application screen will close and
the computer will shut down.
7. You can now restart your computer and set or schedule your backup.
It is highly recommended that you perform regular Image backups – e.g. once a
month – to insure that protected operating system files have been successfully
backed up. Please follow steps 1 to 7 from this section to create future image backups.
To find out when was the last time that you performed an image backup, open the
EzBackup™sa application. You will see the date of the last image backup performed
at the bottom – left of the screen.
Please be sure to perform scheduled virus and SPAM
protection before any backup. In addition, consider
coordinating your backup schedule and other protection
applications to assure the integrity of your computer system.
3.1 Default Backup
A Default backup (New/Modified files backup everyday at 4pm) has been set up for
you. EzBackup™sa will ask you if you wish to accept it when you open the application
for the first time after installation has been successfully completed. Click Yes if you wish
to accept it. This default backup will then become Job #1 on the schedule table.
You can always modify this setup through the Schedule section by selecting View or
Modify Default Backup option. You can also initiate this backup by selecting Default
Schedule on the Backup section.
For your convenience, Upon Detection, or Ez-Touch
Pressed has already been enabled. This feature will work properly even if you do not
accept the Default backup (Windows® OS only). For more information about EzTouch
, please refer to How to Create a Schedule Backup Program on section 4.
sm
Important:
, backup through Button
sm
13

4. Using your EzBackup™sa – Backup
4.1 Performing a Backup
4.1.1 All Files Backup
An All Files backup includes all files on your computer’s internal hard drive except for
some files that are restricted by the operating system.
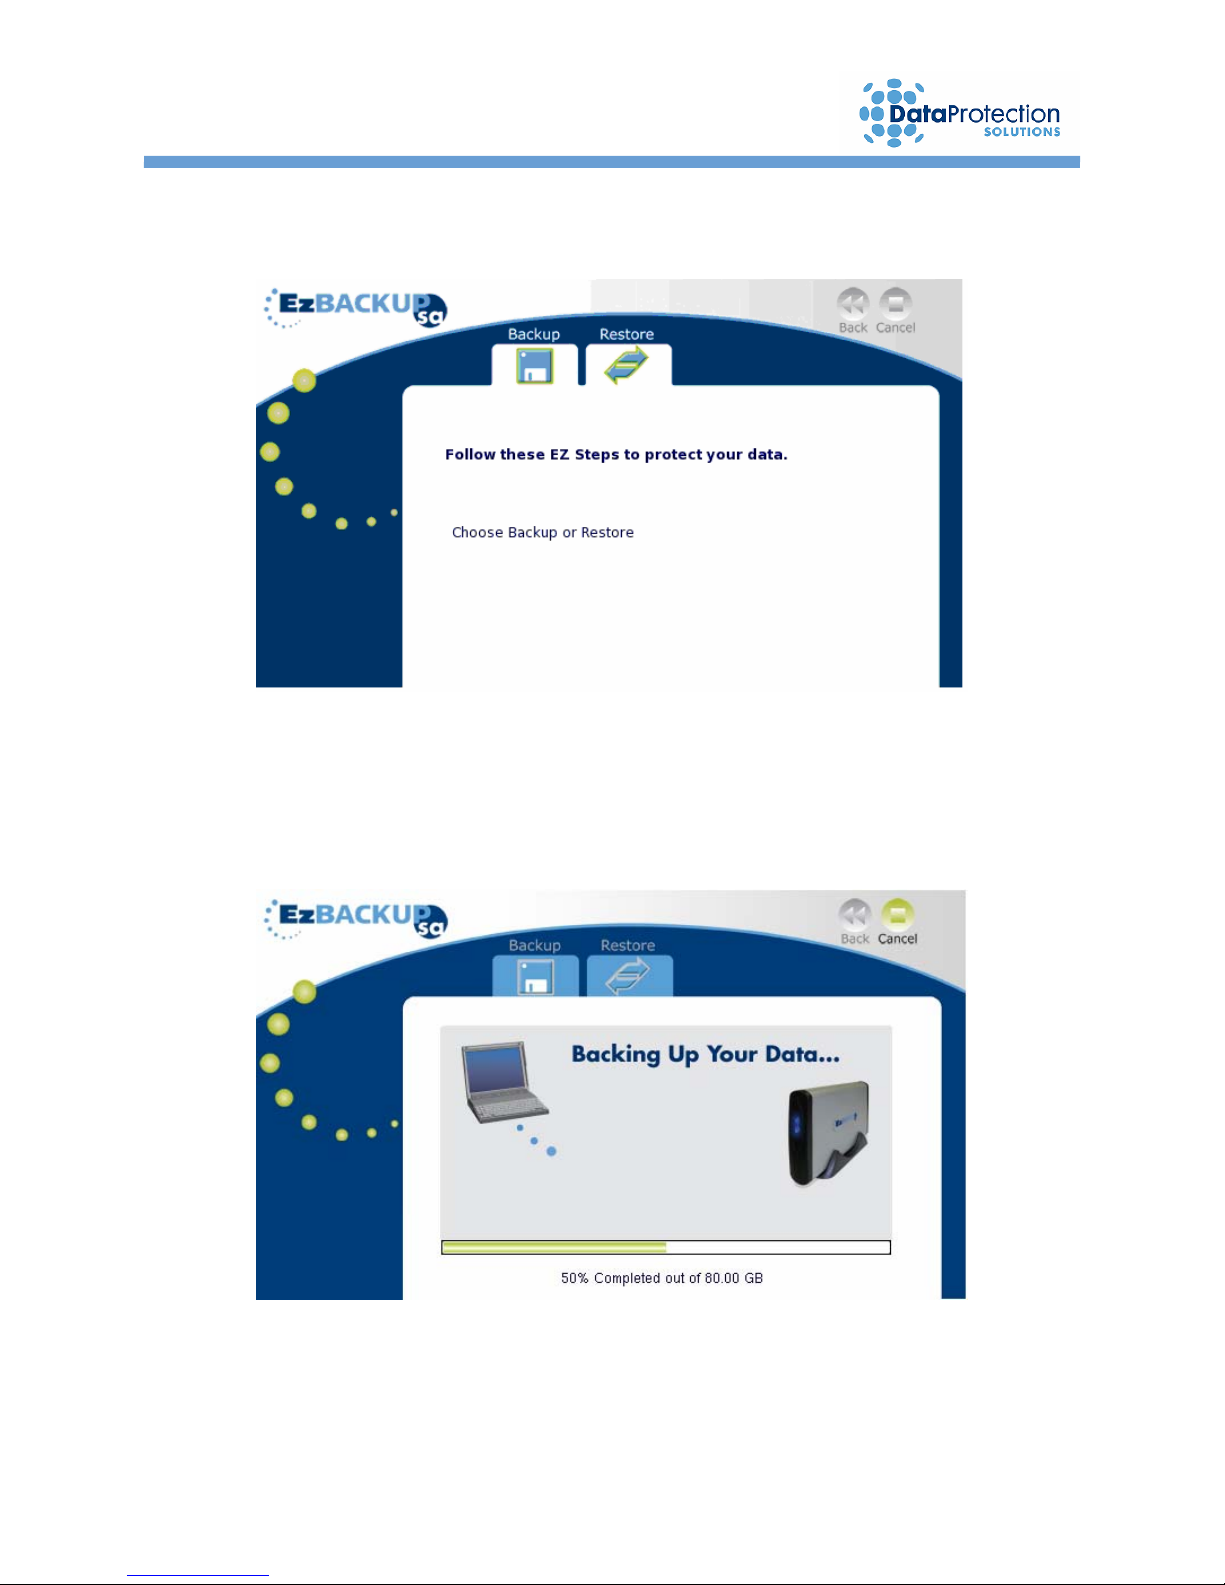
1. Click on the Backup tab. The screen changes to a list of four backup types.
2. Click on the first type – All Files. Click on the Next arrow.
3. A dialog box opens asking if you want to back up data. Select Yes. This begins the backup.
4. The screen will automatically change to display a bar graph indicating the progress of the
backup.
14

4.1.2 New/Modified Files Backup
A New/Modified Files backup searches all of the files on your hard drive and will only
backup New files or files that have been modified since your last backup. These include
new applications as well as data files.
1. Click on the Backup tab. The screen changes to a list of four backup types.
2. Click on the second type – New/Modified Files. Click on the Next arrow.
3. A dialog box opens asking if you want to back up data. Select Yes. This begins the backup.
4. The screen will automatically change to display the progress of the backup.
15

4.1.3 Selected Files Backup
A Selected Files backup allows you to backup a select set of files that you specify.
Files are selected from an Explorer-type window to create a job list, which can be saved
and used in future backups. The saved job lists can be viewed, modified, and saved
repeatedly to best suit your backup needs. In addition, EzBackup™sa also allows you
to backup files by file type such as, My Documents, Images, Music Files, etc.
To create or modify a job list, continue with the following steps.
1. Click on the Backup tab. The screen changes to a list of four backup types.
2. Click on the third type – Selected Files. Click on the Next arrow.
3. The screen changes to a divided window, much like an explorer window, where drives or
folders will be displayed in the first pane and folders and files will be displayed in the second
pane.
4. Before any folders or files can be displayed, the Local Disk (C:) drive or File Types must
be expanded. Click on the plus (+) signs on pane #1 to expand the drives, folders and file
types. Continue to click on plus (+) signs to further expand folders.
16

5. Click the Add>> button after each folder, file, or file type that is desired for backup has been
selected. This will place each of them on pane #2, where they are now part of the list of files
to be backed up.
6. If some files or folders inadvertently got added to your list in the pane #2 or if they are no
longer desired for backup, you can select them and choose the Remove button. They will
be removed from the list.
7. Once you are done creating your list on pane #2, you can select the Save button
to save your list for future use. A dialog box will open allowing you to name the list
and save.
8. Your saved list will appear on pane #3 entitled Existing Lists and is available for use in
future backups. Items on pane #3 can also be selected for viewing or editing purposes
where files or folders can be added or removed. The list can then be saved again by clicking
the save button as done in step 7.
9. Click on the Next arrow to begin the backup of the selected files. A dialog box opens asking
if you want to backup data. Select Yes. This begins the backup.
10. The screen will automatically change to display the bar graph indicating the progress of the
backup.
17
4.2 Maintaining Your Backup Data
4.2.1 Scheduled Backups
EzBackup™sa gives you the option of planning and scheduling your backups. You can
pre-schedule up to eight unique backup programs. These can be an All Files Backup,
a New/Modified Files Backup, and/or a Selected Files Backup, and they can be
scheduled daily, weekly, monthly, or even just a single time.
EzBackup ™sa also features Ez-Touch
to automatically start when your EzBackup™sa is plugged into the computer’s USB port
and turned on, or when the blue button is pressed on the front of the unit (Ez-Touch
by Button Pressed does not apply to Linux® OS). You can enable Ez-Touch
selecting Upon Detection Backup.
EzBackup™sa also gives you the option to enable a default schedule when the
application is opened for the first time after installation has been completed. This default
backup has been scheduled to backup New/Modified files everyday at 4 p.m. Whether
you have or have not accepted the default backup, please follow the steps below to
create or modify a backup program.
, which allows New/Modified Files Backup
sm
by
sm
sm
4.2.2 How to Create a Scheduled Backup Program
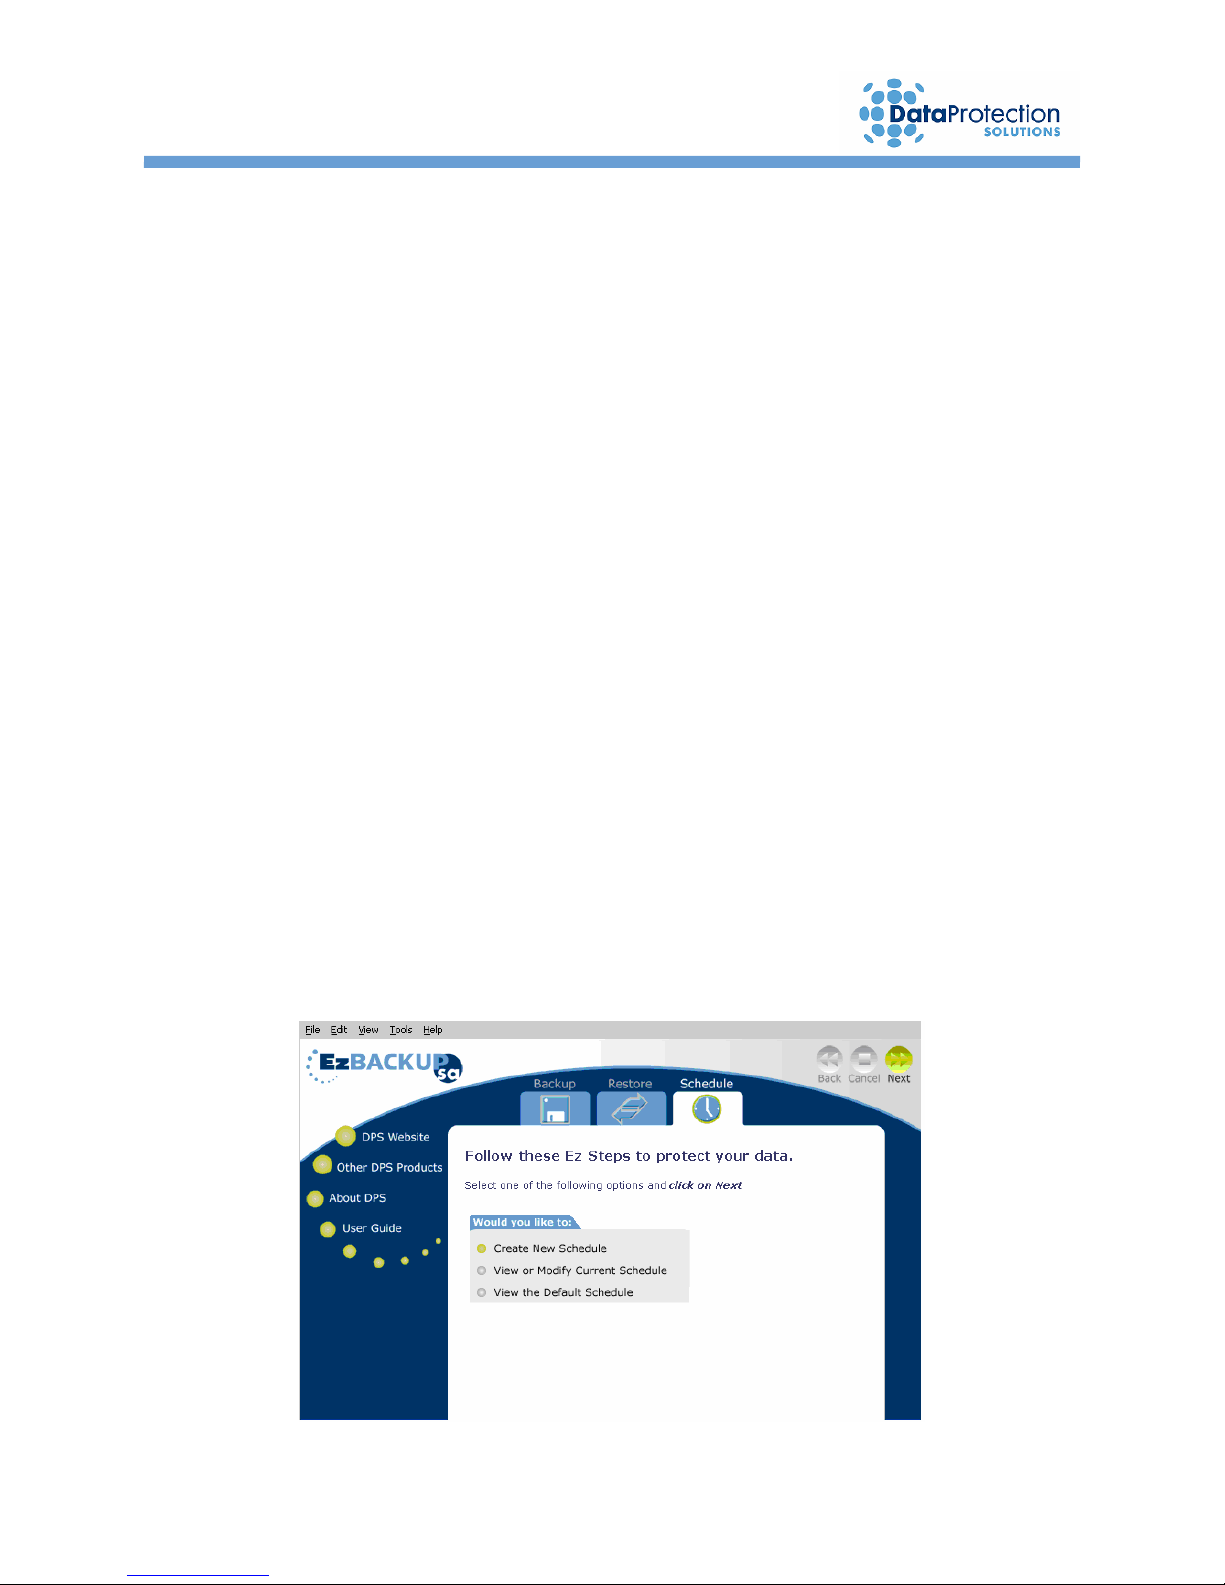
1. Click on the Schedule tab. A new screen will prompt asking you to select from a list of
options. Select Create new Schedule and click on Next.
18
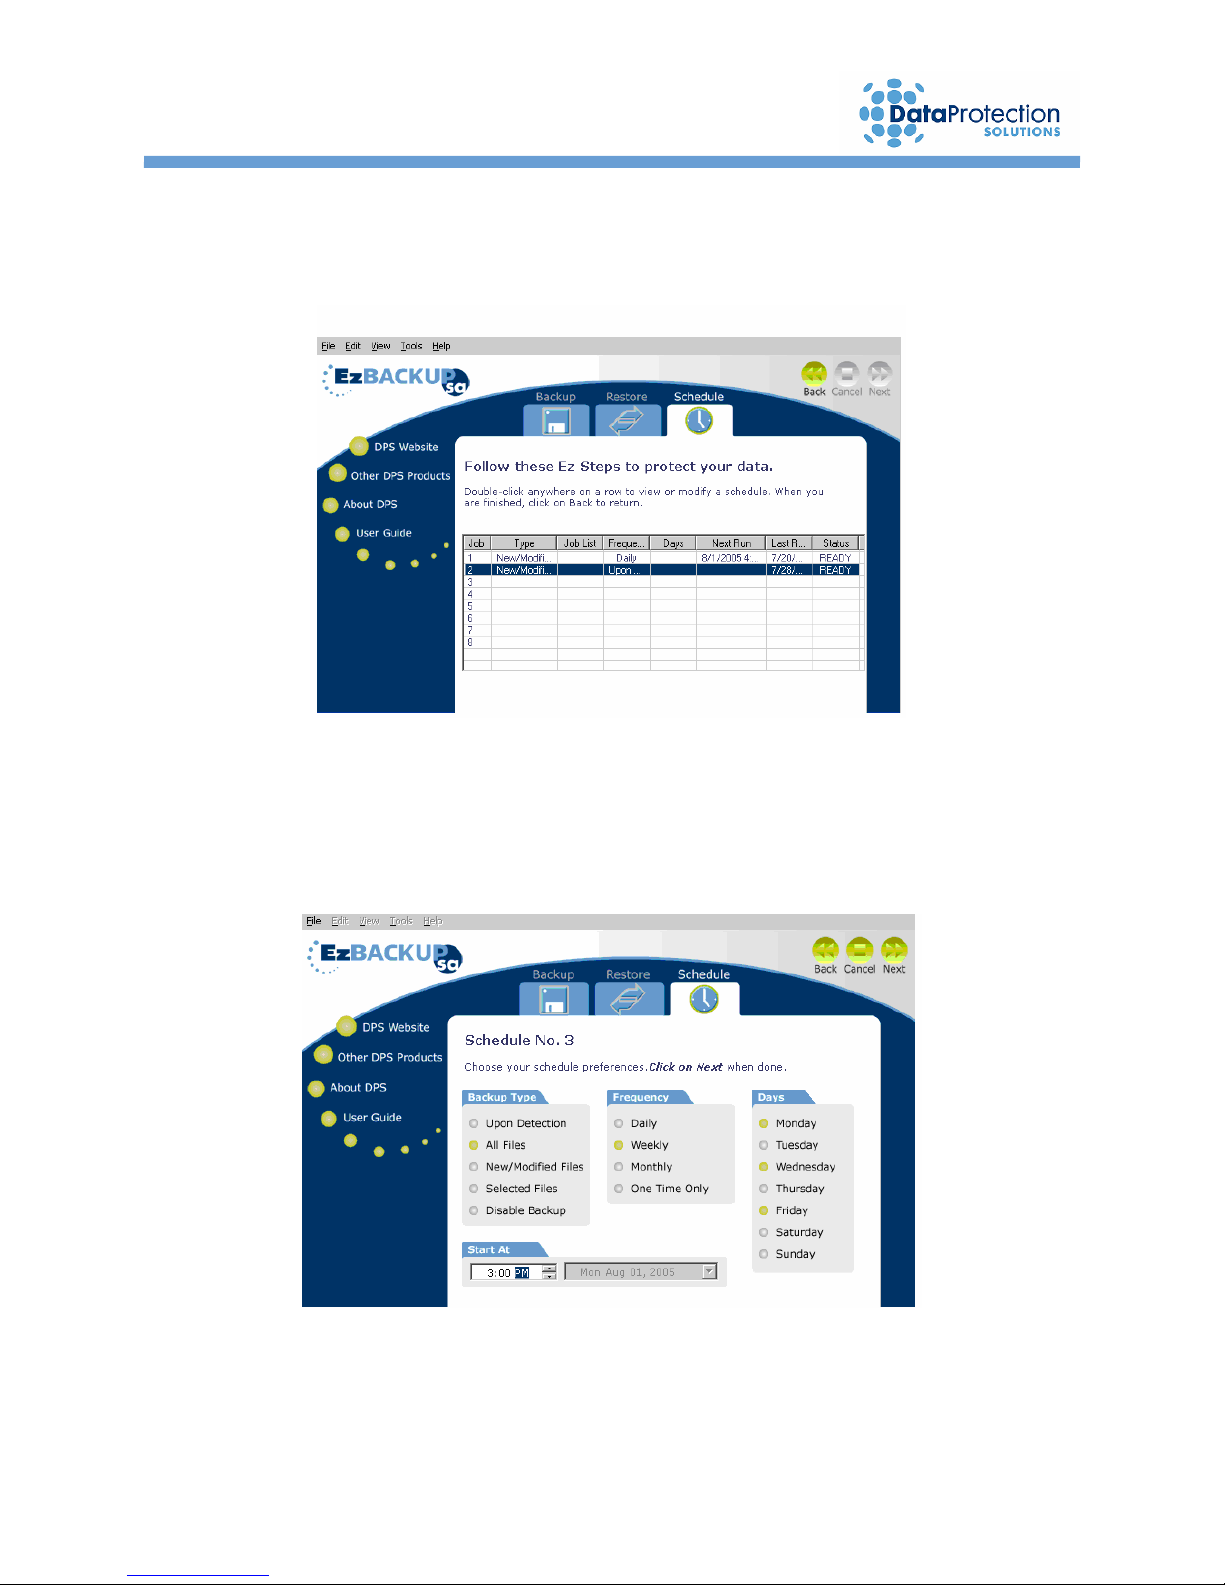
2. A view of a table showing the current backup schedule displays. Choose an empty row and
double-click anywhere in the row to create a backup program in the chosen row.
3. The screen changes to reveal numerous options to select for the creation of a scheduled
backup program. Select the Backup Type, Frequency, and the Start Date/Time.
19

4. Ez-Touch
: The Upon Detection Backup Schedule offers two additional options: Drive
sm
Connected and Button Pressed. Upon Detection only allows New/Modified Files
backup. This is indicated by the words “New/Modified Files” being displayed in green.
Drive Connected
The Drive Connected backup type causes the respective backup program to start as
soon as the EzBackup™sa is plugged into the computer’s USB port and turned on.
This option invokes only a New/Modified Files backup.
Button Pressed
When the blue button is pressed on the front of the EzBackup™sa, the EzBackup™sa
software loads, displays on the screen, and a New/Modified Files backup starts
automatically. This is very convenient for spur-of-the-moment backups and can be done
at any time. For your convenience, this feature has already been enabled and it can be
used anytime after an image backup has been completed (Windows® OS only).
The button on the front of the EzBackup™sa unit does not
function in the Mac® and Linux® operating system
environment. However, it will eventually be available to
registered users via www.EzD2D.com/service.
Note:
5. Select the Next arrow to save the program and return to the Scheduled Backup Table
seen previously in step 1.
20
4.2.3 Selected Files Option
The Selected Files option works almost identical to the way it works in the Selected
Files Backup function explained earlier in this chapter. To use this option, follow the
steps below.
1. Choose the Selected Files option from within the Schedule tab. Select the options required
to program the schedule. Click the Next arrow. The Selected Files Explorer-type window
appears.
2. Select a predefined job list from the Existing Lists pane. Please see the Selected Files
Backup section found earlier in this chapter for instructions on how to create or modify a job
list.
3. Click the Next arrow.
4. The job list selected in step 2 has now been selected for use in the scheduled backup
program you are creating.
4.2.4 How to Modify a Scheduled Backup Program
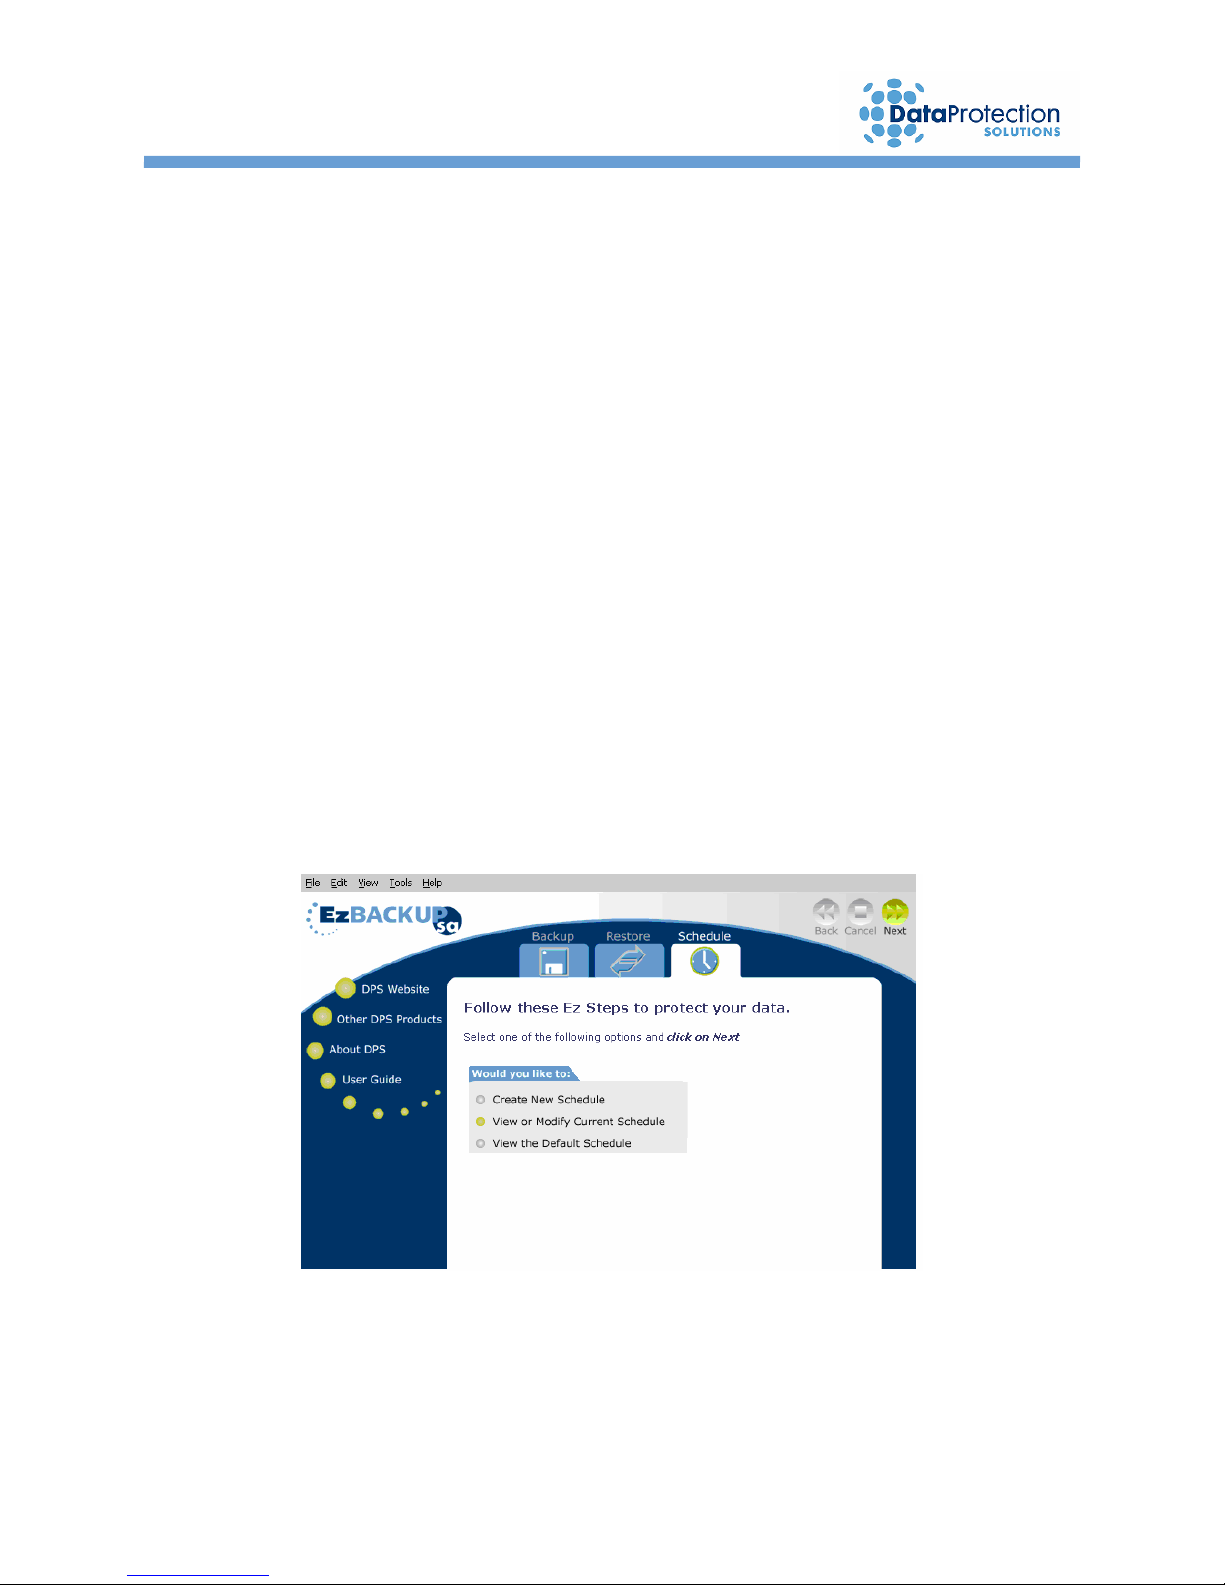
1. Click on the Schedule tab. Select View or Modify Current Schedule and click Next.
21

2. A view of the Scheduled Backup Table showing the current backup schedule displays.
3. Choose an existing program in the list and double-click anywhere in the respective row to
modify the backup program. The screen changes to reveal a number of options that are
available to modify the schedule preferences.
4. Make selections and settings accordingly to modify the schedule
program and click on Next.
5. If you would like to delete the chosen program, select the Disable
Backup option on the Schedule section. You can also delete a job
by right-clicking on the row that you would like to remove from
the table of scheduled backups.
4.3 Additional Features
4.3.1 EzBackup™sa E-Mail Notification
EzBackup™sa has an e-mail notification feature that can inform you the results of the
backups. You can select to be notified only when a backup fails, when the backup was
scheduled but was skipped by the user, or after each single backup. This feature is
recommended for businesses or corporate environments that have access to an SMTP
server.
To enable this feature, go to the Tools menu and select E-Mail Notification. A new
window will prompt requesting for the following information:
To: E-mail address of recipient.
From: E-mail address of sender. This address can be the same as the recipient’s
address.
SMTP: Address of outgoing mail server. If you do not have the SMTP address
information, please consult your IT administrator.
Subject: you can designate a subject line for your backup notification, especially if you
want to be notified of backups on more than one computer.
Once you have completed the information required, simply select the Notification
Settings and click OK.
22

4.3.2 Hardware Properties
To check the size and properties of your EzBackup™sa hard drive and of your
computer’s internal hard drive, go to the View menu and select Hardware Properties.
4.3.3 EzBackup™sa Task Monitor
EzBackup™sa has a monitoring program that runs automatically when you start your
computer. The monitor’s function is to detect when the EzBackup™sa has been
plugged in, when the blue button on the unit has been pressed, and also to execute any
scheduled backups.
In Windows® OS, the application places a small icon in the
system tray at the bottom right-hand corner of your computer
screen. Double-clicking on this icon runs the EzBackup™sa
application.
This icon also changes in appearance to alert you of a backup
that is currently in progress (Windows® OS only).
23
5. Using Your EzBackup™sa - Restore
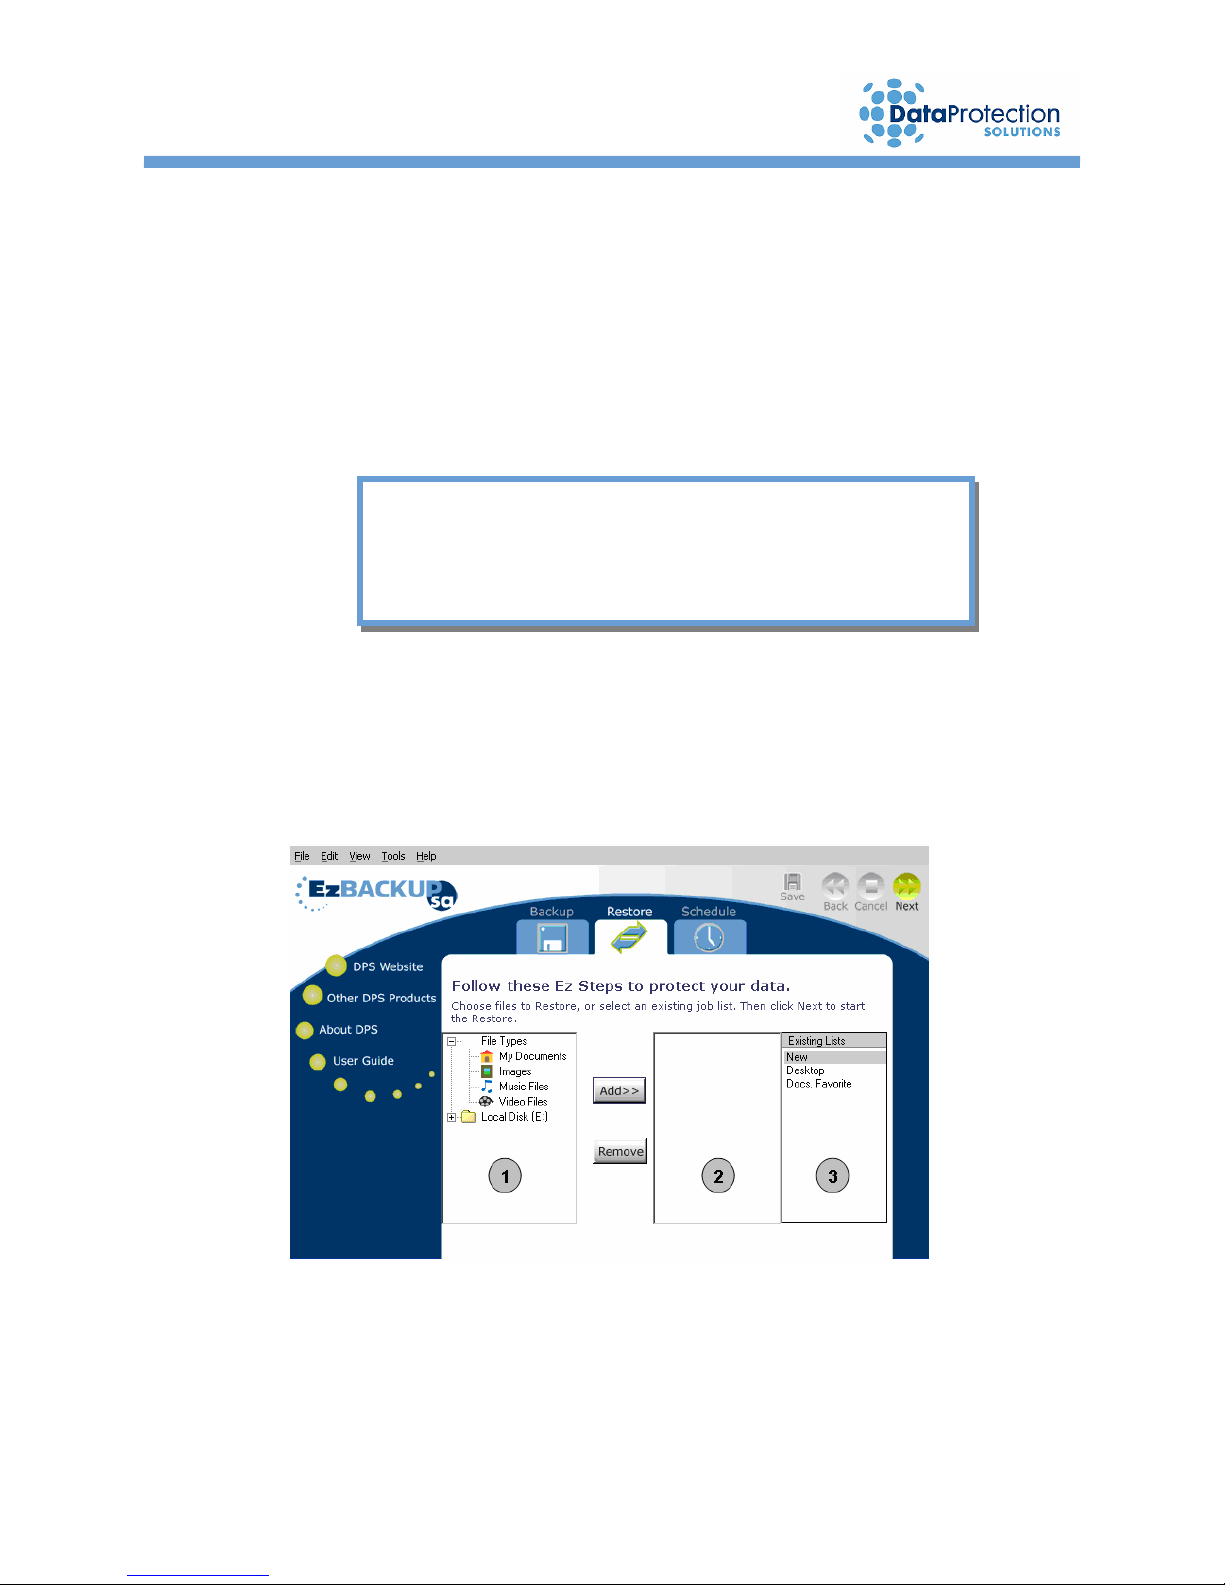
5.1 Restoring Your Data Files
EzBackup™sa allows you to quickly and easily restore selected files or your entire
system at any time. To restore Selected Files, the Restore function works in a manner
very similar to the Selected Files Backup function.
EzBackup™sa allows you to restore not only from its
Restore function, but also from Windows® Explorer.
5.2 How to Initiate a Restore
Note:
1. Click on the Restore tab. The screen changes to a divided window much like an explorer
window where drives or folders will be displayed on pane #1 and folders and files will be
displayed on pane #2 (In most cases, and depending on what other devices are connected
to your computer, the backup drive will be the E: drive).
2. Before any folders or files can be displayed, the backup drive must be expanded. Click on
the plus (+) sign next to the backup drive on pane #1 to expand the drive. Continue to click
on plus (+) signs to further expand folders.
24

3. Click the Add>> button after each folder, file, or file type desired for restoration has been
selected. This will place each of them on pane #2 where they are now part of the list of files
to be restored.
4. If some files or folders inadvertently got added to your list on pane #2, or if they are no
longer desired for restoration, you can select them and choose the Remove button. They
will be removed from the list.
5. Once you are done creating your list on pane #2, you can select the Save button to save
your list for future use. A dialog box will open allowing you to name the list and save.
6. Your saved list will appear on pane #3 entitled Existing Lists and is available for
use in future restores. Items on pane #3 can also be selected for viewing or editing
purposes where files or folders can be added or removed. The list can then be saved
again by clicking the Save button as done in step 5.
7. Click on the Next arrow to begin the restore of the selected files.
8. Throughout the Restore process you will be prompted in regards to overwriting or replacing
files. Select Yes to All to allow all files to be restored, Yes to be allowed to choose with
each file individually, No to skip over a particular file being restored or No to All to abort the
entire restore process.
25

5.3 Total System Recovery
EzBackup™sa gives you the ability to perform a total system image recovery from the
backup drive. An image recovery is a block-by-block restoration of the backup drive,
including all system, formatting, and program data. An image recovery on a USB 2.0
connection will take approximately 1 minute for each GB of recorded data on the
secondary drive (to see how much of your secondary drive you have used, go to “My
Computer”, right-click on the EzBackup™sa drive, go to Properties and you will find the
used size under General Information). Restore times can vary based on whether your
USB port is 1.1 or 2.0.
Your EzBackup™sa utilizes the included Installation, Backup & Restore CD to perform
an Image Recovery.
Total System Recovery should be performed only to the hard drive that the image
backup was created from or to a new replacement drive. Attempting to restore to a
different computer may result in system instability and will create an invalid restore.
Please remember that when performing a Total System Recovery, or Full Image
Restore, all the data on your computer’s internal hard drive will be overwritten with
all the data on the EzBackup™sa drive.
Replacement drive must have a larger capacity than drive
Important:
that is being replaced.
1. Insert the included Installation, Backup & Restore CD into your CD-ROM drive. Click on Exit
if the auto start screen appears.
2. Restart your computer. Your system will boot from the CD. If it does not, please refer to
your computer documentation to learn how to configure your computer’s BIOS to
allow for a boot from the CD-ROM drive.
3. You should see the EzBackup™sa install splash screen after the computer is done booting
from the CD-ROM drive.
4. Select Restore. Select Yes when prompted if you are sure that you want to perform a Full
Image Restore.
26
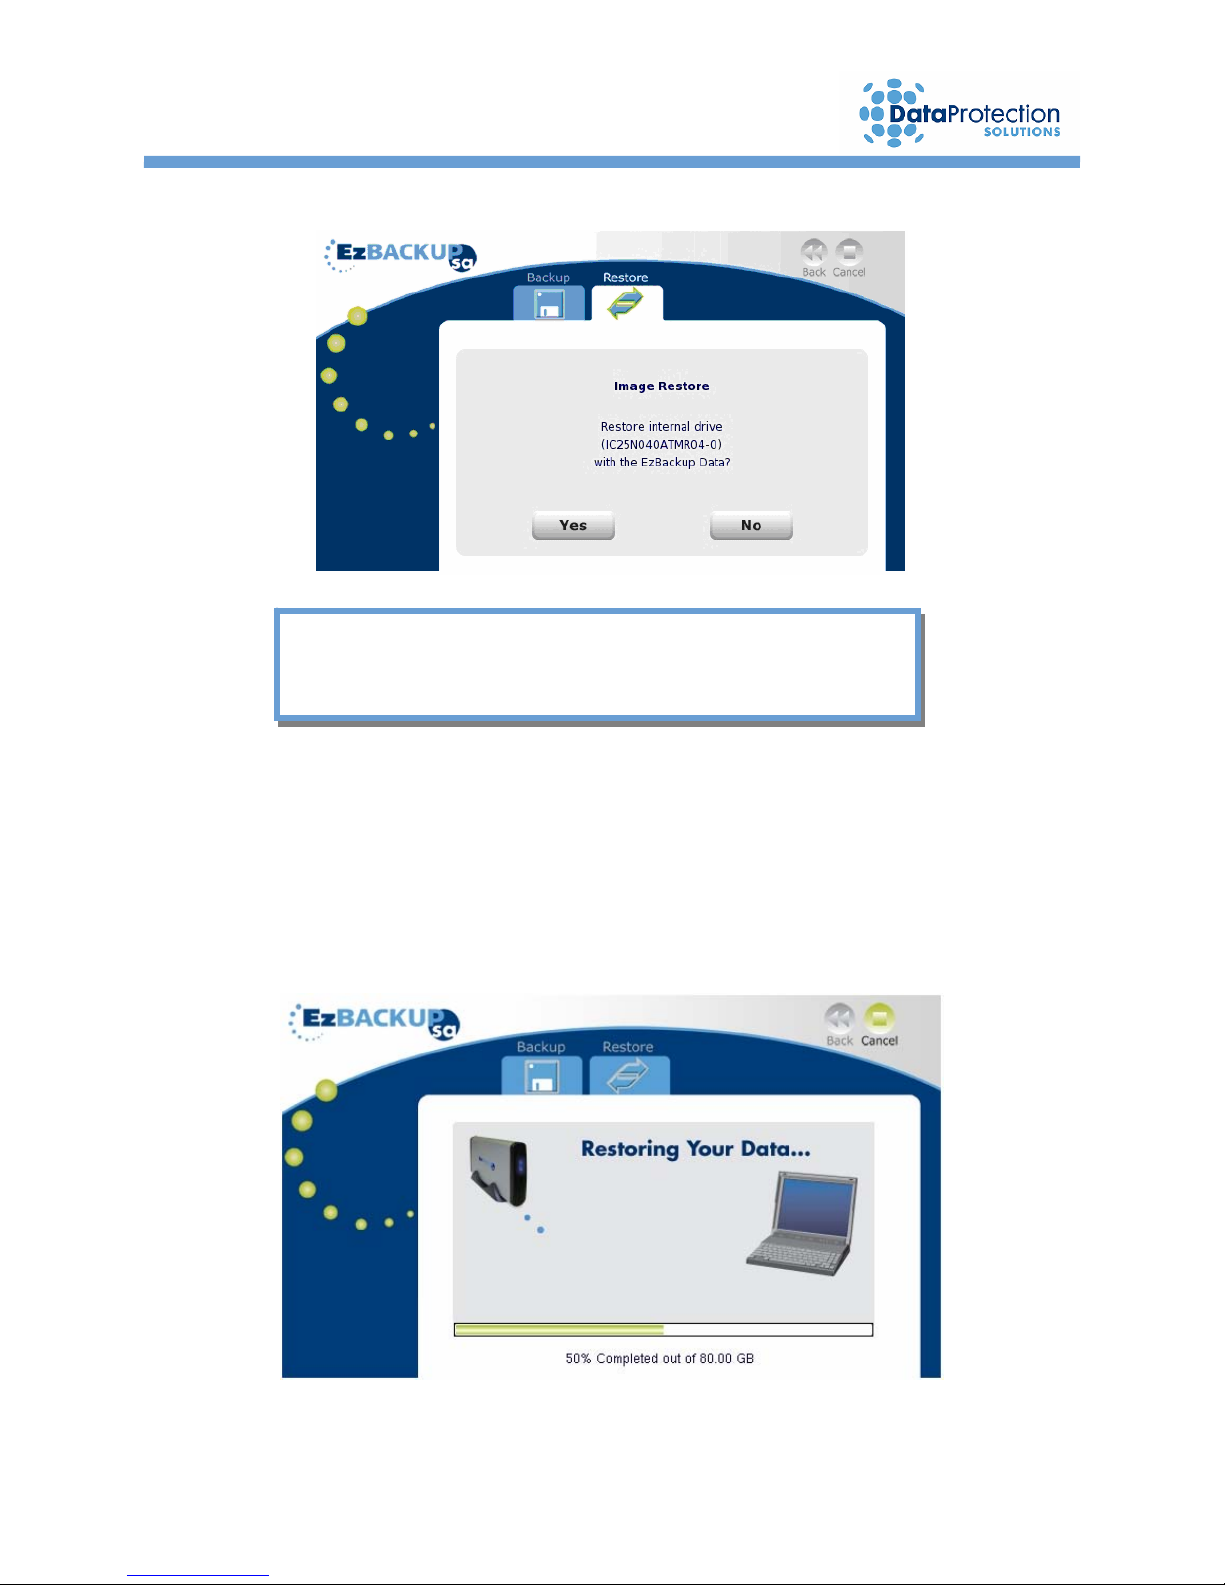
Attention!
A Full System Restore or Total System Recovery replaces
5. EzBackup™sa will ask you a second time if an Image Restore is what you want to do and
it will warn you that all internal data will be replaced with EzBackup™sa data (see
message above). Select Yes if you are sure.
6. The restore process starts and a screen indicating progress is shown.
27

6. Appendix A
How do I access my computer BIOS settings?
Many computers display BIOS access instructions while the computer boots.
Pressing a key or a combination of keys before the Operating System begins to load
will access the BIOS. In most cases you will simply press the ‘del’ key after the first
visable text on your screen. Some other common keys are ESC, F1, F2, F10, CtrlDel. For more information, check the documentation that came with your computer
or refer to the list below. If you are still experiencing difficulty please contact our
tech support at: 954-925-2889 from 9:00 to 5:00 EST.
Computer Key Command(s)
Acer® F1, F2, CTRL+ALT+ESC
AST® CTRL+ALT+ESC, CTRL+ALT+DEL
Compaq
CompUSA® DEL
Cybermax
Dell® 400 F3
Dell 400 F1
Dell Dimension® F2 or DEL
Dell Inspiron® F2
Dell Latitude Fn+F1 (while booted)
Dell Latitude F2 (on boot)
Dell Optiplex DEL
Dell Optiplex F2
Dell Precision™
eMachine
Gateway
Gateway 2000 Solo™ F2
HP
IBM
IBM E-pro Laptop F2
IBM PS/2® CTRL+ALT+INS after CTRL+ALT+DEL
IBM Thinkpad® (newer) Windows: Programs-Thinkpad CFG.
Intel
Micron
Packard Bell
Sony
Sony VIAO F3
Tiger DEL
Toshiba
Toshiba Protege ESC
Toshiba Satellite 205 CDS F1
Toshiba Tecra F1 or ESC
® 8700 F10
® ESC
F2
™ DEL
® 2000 1440 F1
® (Hewlett-Packard) F1, F2
® F1
® Tangent DEL
™ F1, F2, or DEL
® F1, F2, Del
® VIAO F2
® 335 CDS ESC
28

7. Troubleshooting
This chapter provides solutions to common problems that may arise during or after
installation or through normal operation of the system. Additionally, you will also find a
section dedicated to providing specific tips or guidelines that will ensure a positive
experience throughout the use of your backup solution. If you find that the solutions and
guidelines presented here do not satisfy your specific needs, please refer to the How to
Get Help section at the end of this chapter.
7.1 Problems/Solutions
1. The blue light is not lit on the EzBackup™sa. The EzBackup™sa appears
unresponsive.
The wall mounted power supply might not be plugged in all the way. Ensure the power
supply is well seated in the power outlet it’s plugged in to.
The EzBackup™sa might be turned off. Make sure that the unit and the fan are on.
2. The EzBackup™sa unit keeps getting unusually hot.
Check to ensure the Fan switch, on the back of unit, is turned on.
Ensure that the EzBackup™sa unit is placed in a location where it can get adequate
ventilation.
3. The error “Invalid Source and/or Backup Directories. Internal Error” is displayed.
EzBackup™sa has lost connection with the external drive unit. Check power to the
drive, check the USB connection on the back of the drive, and check the USB
connection to the computer.
Close down the EzBackup™sa application, restart your computer and try again.
The EzBackup™sa software cannot connect to the EzBackup™sa drive. Please call
Data Protection Solutions for technical support.
29

4. The error “E:\ is not accessible” is displayed when attempting a backup or restore, or
when trying to access the drive with Windows® Explorer.
The data on the EzBackup™sa drive has become corrupted. Please call Data
Protection Solutions for technical support.
5. Screen goes blank and the system appears to lock up.
If the CD does not boot all the way up to the image backup application (the program with
the "Backup" and "Restore" tabs on the upper-middle area), freezes near the end of boot
time, or simply boots up and shuts down immediately after boot, run console mode. To
do this, power up your computer and boot from the EzBackup CD. Right at the
beginning, you will get a black screen with the word "EzBackup" on the top left corner
and a blinking cursor below it. Within 5 seconds of seeing it, type "con" and press enter.
The system will boot up normally, but rather than a graphical application, you will get a
black screen with a text based application. Follow the instructions on the screen (type
the number that corresponds to the option you want and press enter).
6. Problems with Dynamic Disks, Raid 0, and Raid 1.
Dynamic Disks is not supported by the EzBackup™sa, because the backup created
under it is unreadable under Windows. Raid 0 & Raid 1 are also not supported by the
EzBackup™sa.
7.2 Tips/Guidelines
Do… perform regular system maintenance to keep your computer in good condition,
such as running antivirus scans and updating security patches for your OS and
applications.
Do… keep your antivirus and anti-spy ware software up-to-date.
Do not… unplug EzBackup™sa while a backup or restore is in progress. Doing so may
cause damage or loss to data.
Do… maintain your hard drive data by backing up regularly. Utilize the benefits of the
Scheduled Backup feature.
30

Do... perform regular image backups of your hard drive to insure that all files restricted
by the OS are properly backed up.
Do… perform an image backup after you make any major changes to the system, such
as installing a new application or new hardware.
Do not… use your EzBackup™sa to copy applications from one computer to another.
Do not… Perform a total system recovery to a different computer than the one you
created an image from. System instability could result.
Do not… drop or jar the EzBackup™sa unit while it is turned on. Damage to data or the
drive itself may result.
Do not… reformat the EzBackup™sa drive as this will delete all the data on it, including
critical information required for operation with the EzBackup™sa software.
7.3 How to Get Help
If you should find that you need help beyond what is offered in this manual or if your
EzBackup™sa is in need of repair or warranty service, please contact DPS Technical
Support by using the methods below.
By telephone
By facsimile
By electronic mail
By mail
Hours of Support
In the unlikely event your EzBackup™sa is in need of repair, you will need to obtain a
Return Merchandise Authorization (RMA) number. An RMA number is required before
returning the product to DPS. To obtain an RMA number, please have your product
serial number handy and call DPS at the telephone number above. Ship the product
back to us in its original carton or equivalent with the RMA number, your name, and
address on the shipping label.
954.925.7347
954.925.2889
technicalsupport@EzD2D.com
th
3100 North 29
Hollywood, Florida 33020
USA
Monday – Friday
9AM – 5PM ET.
Court
31

Index
.NET Framework, 3, 9
All Files Backup, 14
Backup
All Files, 14
image, 11
New/Modified Files, 15
Scheduled, 18
Selected Files, 16
backup/restore time, 8, 26
BIOS, 3, 11
boot disk, 3, 11, 26
box contents, 7
copyright, 2
Dot NET Framework. See .NET
Framework, See .NET Framework
Existing Lists, 17, 21, 25
FCC, 2
image, 6
image recovery. See total system
recovery
Installation
hardware, 8
software, 10
job list, 16, 21
saving, 25
Linux, 10
management utility CD, 6, 7, 9, 10,
11, 26
booting from, 11
Microsoft .NET Framework. See .NET
Framework, See .NET Framework
minimum system requirements, 6
New/Modified Files Backup, 15
operating system, 6
RAM, 6
regulatory information, 2
Restore, 24
selected files, 24
restore/backup time, 11, 26
save. See job list
Scheduled Backup, 18
creation of, 18
modifying, 21
Modifying, 21
selected files, 21
upon detection, 20, See also
Task Monitor, See also Task
Monitor
Selected Files Backup, 16
software installation, 9
system BIOS. See BIOS, See BIOS
system files, 6
Task Monitor, 23
total system recovery, 26, See also
image backup
trademark, 2
troubleshooting, 29
32

 Loading...