

Page 1
ELECTRONIC SCALE
DSP 500
USER MANUAL - v. 4.0
UV119UE
Doc-a-Ware 960510
Page 2

Page 3
UV119UE - DSP 500 : USER MANUAL - v. 4.0 PAGE i
WARNING
This manual makes reference to scale model ASR (type approval no. I95-004), manufactured by
DATAPROCESS S.P.A. and commercialised as DSP500 Scale.
All the information and instructions that must be observed in order to obtain the functionality
declared by the Manufacturer are included in this manual.
The scale hereby described complies with the current security rules.
The direct access to its inner parts and/or the insertion of any object or liquid into the scale is
forbidden.
Any action on the scale which is not within those expressly described in this manual must be
performed by our authorised agents.
The installation must be performed following the safety regulations in force as well as any further
procedures reported by this manual.
The manufacturer declines all responsibilities for:
• damages caused by improper installation, use and maintenance
• income loss due to possible failure
• incorrect use of the equipment
• damages caused by non-authorised technical service and/or by the use of non original
replacement parts
The information contained in this manual is subject to change without notice, and it represents no
commitment by the Manufacturer.
Page 4

PAGE ii UV119UE - DSP 500 : USER MANUAL - v. 4.0
Page 5
UV119UE - DSP 500 : USER MANUAL - v. 4.0 PAGE iii
TABLE OF CONTENTS
?
SECTION INDEX ..................................................... page 1
FEATURES.............................................................. page 2
SPECIFICATIONS ................................................... page 3
DISPLAY.................................................................. page 4
KEYBOARD............................................................. page 5
PRESENTATION
SECTION INDEX ..................................................... page 7
SWITCHING ON ...................................................... page 8
DISTINCTIVE FEATURES....................................... page 9
OPERATIONAL SEQUENCE.................................. page 10
TARE ....................................................................... page 11
RESET TO ZERO .................................................... page 11
PLU RECALL........................................................... page 12
PRICE VIA KEYBOARD ......................................... page 13
PRINT LABEL ......................................................... page 14
LABEL LAYOUT...................................................... page 15
RECEIPT TRANSACTIONS .................................... page 16
VOID ........................................................................ page 16
RETURNS................................................................ page 17
SUB-TOTAL AND DISCOUNTS.............................. page 17
PRINT RECEIPT...................................................... page 18
CORRECTING RECEIPTS ...................................... page 18
RECEIPT LAYOUT.................................................. page 19
PAPER REPLACEMENT......................................... page 20
PAPER-CASSETTE PREPARATION ..................... page 21
DAILY USE
SECTION INDEX ..................................................... page 23
CLEANING............................................................... page 24
ERROR MESSAGES ............................................... page 25
PROBLEM SOLVING .............................................. page 26
MAINTENANCE AND
PROBLEM SOLVING
SECTION INDEX ..................................................... page 27
CONFIGURATIONS, PAPER ROLLS ..................... page 28
INSTALLATION....................................................... page 29
NETWORK INSTALLATION, START, ACTIVITY ... page 30
CONNECTING TO PC ............................................. page 31
CONFIGURATIONS
AND
INSTALLATION
SECTION INDEX ..................................................... page 33
INTRODUCTION TO PROGRAMMING................... page 35
ACCESS BY KEY-CODE......................................... page 36
LEVELS AND GROUPS .......................................... page 37
SELECTION AND EDITING .................................... page 38
FUNCTION CODES................................................. page 39
GROUP 0: GENERAL PROGRAMMING ................ page 41
GROUP 1: PLU PROGRAMMING........................... page 53
GROUP 2: SETTINGS............................................. page 61
GROUP 3: RECEIPT PROGRAMMING .................. page 69
GROUP 4: LABEL PROGRAMMING...................... page 75
GROUP 5: NETWORKING AND INTERFACES ..... page 83
GROUP 7: REPORTS.............................................. page 91
GROUP 8 & 9: TOTALS & GRAND TOTALS......... page 95
PROGRAMMING
Page 6

PAGE iv UV119UE - DSP 500 : USER MANUAL - v. 4.0
Page 7

UV119UE - DSP 500 : USER MANUAL - v. 4.0 PAGE 1
PRESENTATION
FEATURES ..............................................................page 2
SPECIFICATIONS.................................................... page 3
DISPLAY .................................................................. page 4
KEYBOARD ............................................................. page 5
PRESENTATION
?
Page 8

PAGE 2 UV119UE - DSP 500 : USER MANUAL - v. 4.0
?
FEATURES
The scale Model DSP500 is a high performance cell-load type machine.
Complete in-built printer (for labels or receipts) with removable paper cassette, it answers a wide
range of different requirements - used as a stand-along unit or connected on -line with others
scales.
• programmable use for:
10 sales departments
20 operators, programmable: ON SERVICE
IN TRAINING
• 2 selectable price modes:
PLU (programmed), with temporary price revision option
(special price SP)
Random price without code (RP Random Price)
• 3 price basis available:
Liras/kg
Liras/100g
non weighted
• 4 printout options:
automatic or manual label
pre-pack label
receipt
single-item receipt
• 20 label layouts:
10 pre-set layouts
10 user-programmable layouts
• 2 load capacities and
divisions:
6 kg load capacity / 2 g per division
15 kg load capacity / 5 g per division
• 2 tare settings:
pre-set tare in PLU (only for pre-packed items)
weighed tare (fixed tare selectable)
• 5 types of sales totals:
per operator
per department
per item (PLU)
per hour
per scale
• 3 grand totals:
X totals
Z totals
ZZ totals
(daily grand totals)
(longer time period totals)
(test totals, for technical service only)
• advertising text on display:
scrolling, at programmable speed rate
by overwriting
• 4 levels of key access to
programming
Level 4 only for technical service
• external connections:
connection to PC via RS232c serial interface port
scale network, for max. no. 10 scales on-line (optional)
connection to remote PC (via optional RS422 interface)
Page 9

UV119UE - DSP 500 : USER MANUAL - v. 4.0 PAGE 3
?
SPECIFICATIONS
The DSP 500 Scale can be supplied for two different load capacities and divisions:
6kg/2g (11 lb - 1/16 oz)
15kg/5g (22 lb - 1/8 oz)
It is supplied equipped with:
- no. 1 RS232 serial interface, 256 kB Eprom, 256 kB RAM already
installed
- 1 paper cassette, inserted
- User Kit including: - User Manual, 1 copy
- 1 thermal paper roll
- 1 sheet of labels for cassette customisation
- 1 power cable (for Italian version only)
- 1 pin for small-size core paper roller
OPTIONS available on customer request:
- Extension Card for DPnet local network + 1 line RS422
Serial Interface
- additional paper cassettes
- PCMCIA memory card adapter (for use only with
optional extension card)
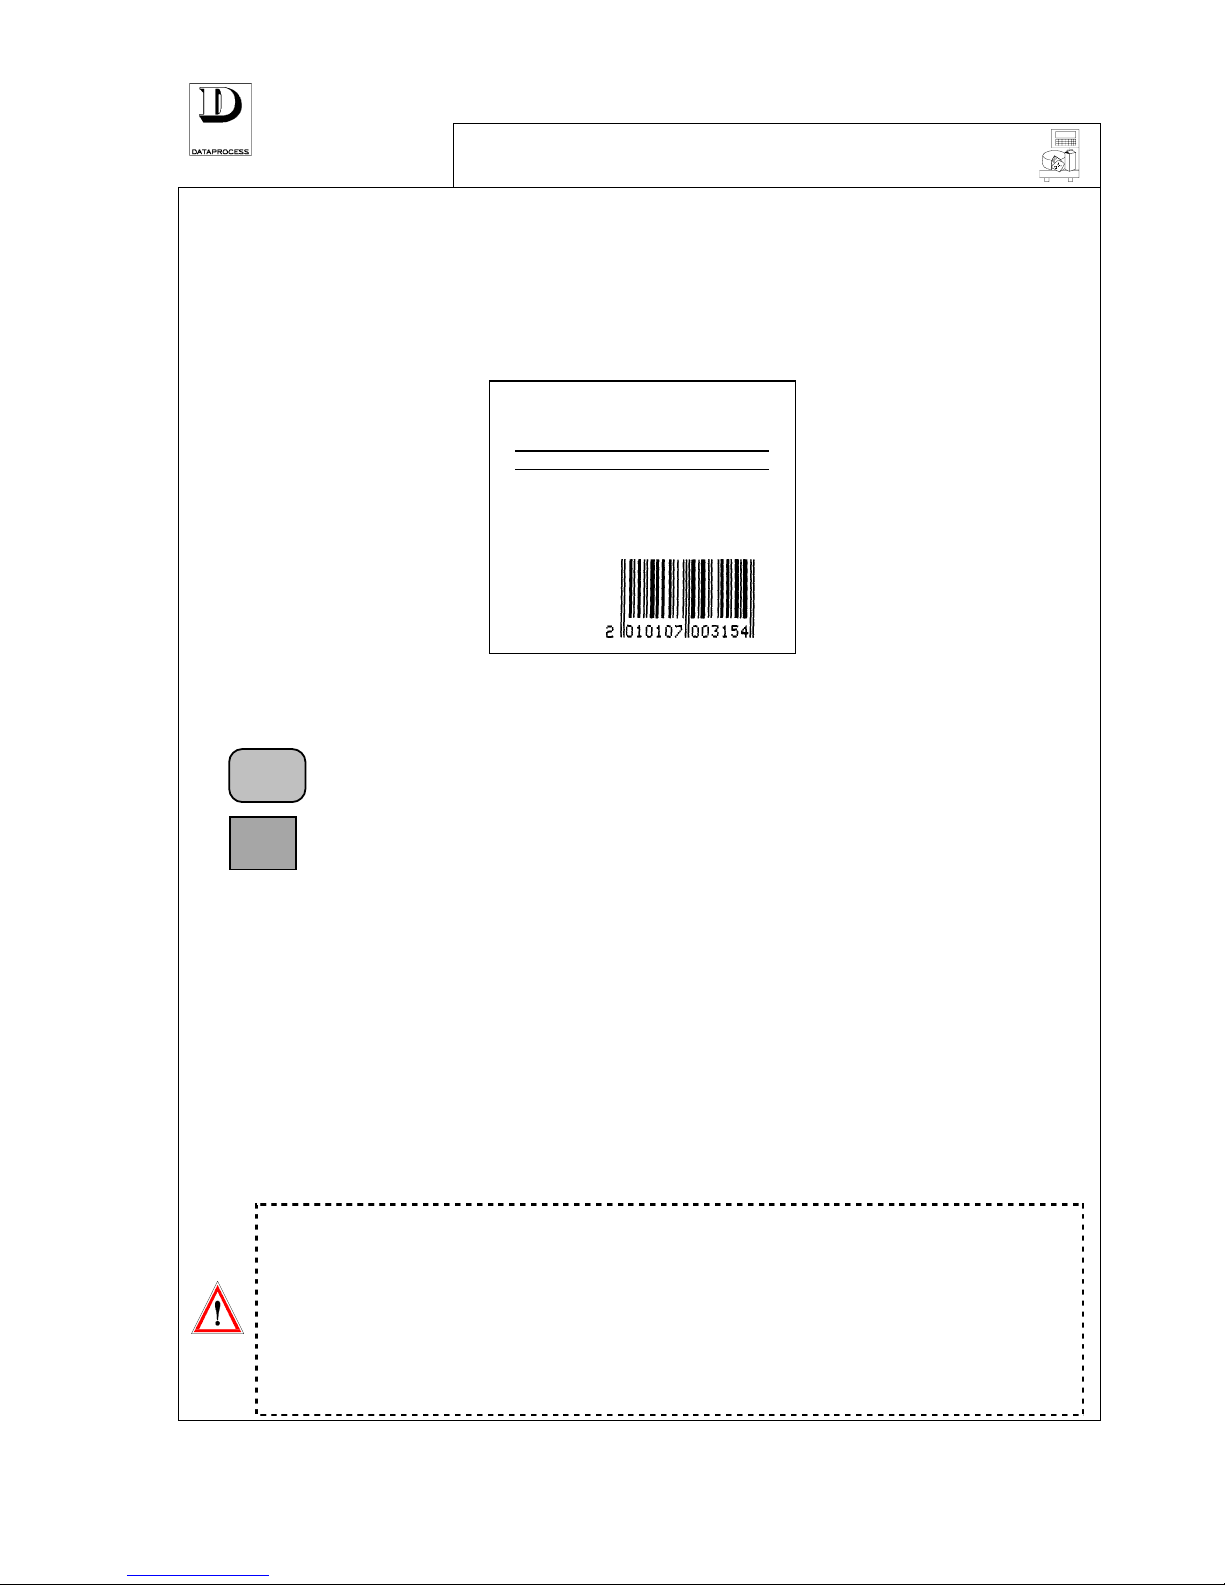
• Printing: labels or continuous paper rolls (self-adhesive or plain) with automatic detection
of paper cassette and printed paper counter, by km.
Print speed: 90 mm/sec - 1,5 sec/label.
Paper roll cassette easily accessible and removable for a quick paper replacement;
programmable for receipts, labels or continuous self-adhesive paper rolls.
• Label layouts: programmable for each PLU to be selected within 20 label layouts (10 label layouts
pre-set by manufacturer + other 10 layouts, user-programmable for size, type, data position).
• Receipts: 6 line programmable message to be freely positioned as header or at receipt end.
Enable print of: date and time, product description, bar-code, change, coupon.
Voids on one or more transactions on current receipt.
• PLU dynamic storage. Storage capacity: max. 3250 PLU without text or over 450 PLU of
350 characters each.
20 characters available for item description of each PLU plus 375 character for ingredients.
7-digits code and programmable number of digits to enter for PLU recall.
• Extended keyboard layout base configuration including: 99 PLU direct keys, 13 function
keys and 10 numerical keys, fully programmable.
Software key with 4 levels programming access (4th level for technical service only) , to
ensure data security and easy programming.
• Wide screen display: 2 lines of 20 alpha-numeric digits each (readable from two-sides).
Advertising text of 200 characters to be programmed: by scrolling or overlapping on display.
• Optional scale connection to DPNet network: up to 10 scales can be linked in one
a single
network.
Connection to PC: uploading/downloading of PLU and sales totals reading, scale
programming. 2 or more networks connectable to one single PC.
Connector for opening cash-drawer.
Page 10
PAGE 4 UV119UE - DSP 500 : USER MANUAL - v. 4.0
?
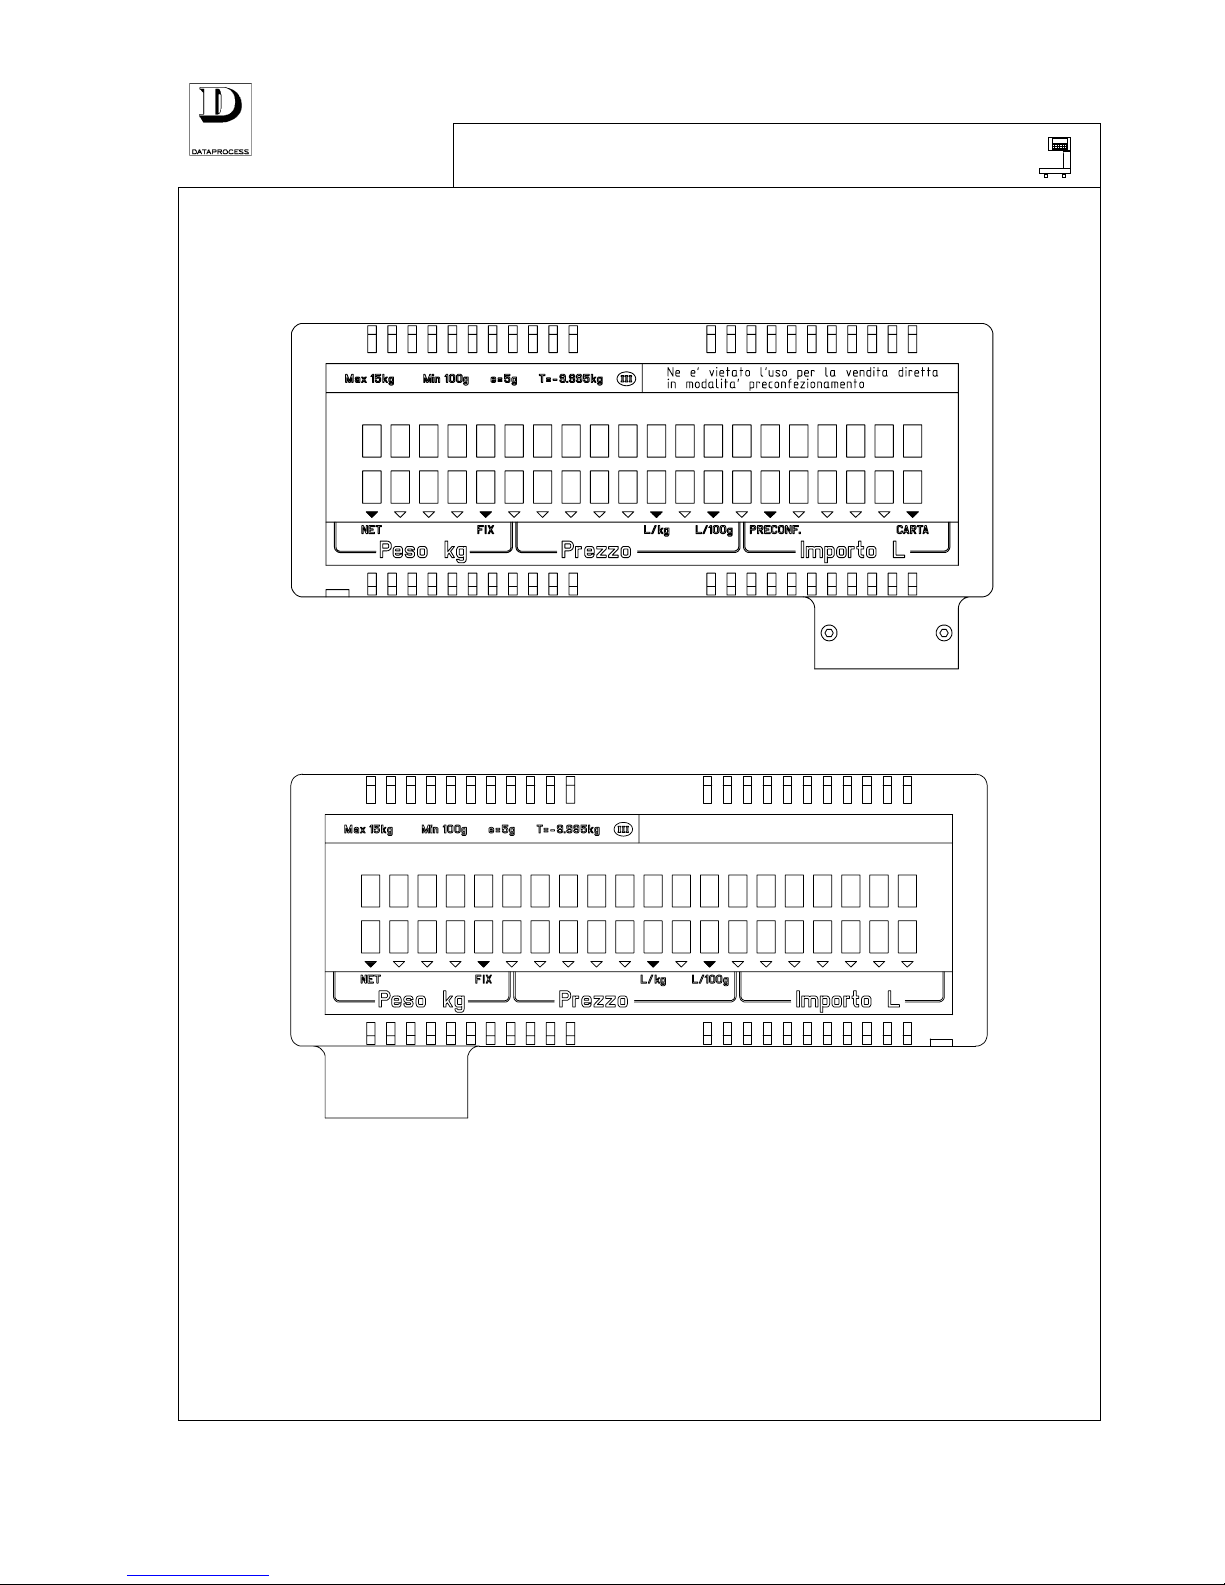
DISPLAY
The scale display is a 2-side type (for customer and for operator), each side with 2 lines of 20
characters each and one set of LED lamps.
Display: operator side
AREA DESTINATA AL LOGO COMMERCIALE
Display: customer side
On the first line the item description or scale messages are visualised, whilst the second one is for
prices and weight values.
The LED signalling lights indicate the price calculation and other values, as reported hereunder
NET
: net weight
FIX
: fixed tare
L/kg
: price per kg
L/100g
: price per 100g
PRE-PACK
: pre-packed label
PAPER
: label roll nearly out
Page 11

UV119UE - DSP 500 : USER MANUAL - v. 4.0 PAGE 5
?
KEYBOARD
The keyboard has a rubber transparent cover with contoured relieves. The key functions are shown
on a pre-printed card placed under the keyboard cover. Further notes can be hand-written by the
operator (e.g.: PLU description). The key function card can be easily replaced.
1 10 19 28 37 46 55 64 73 82 91
F
ZER
↑↑↑↑
2 11 20 29 38 47 56 65 74 83 92
R S P
3 12 21 30 39 48 57 66 75 84 93
FIX VOI
C
4 13 22 31 40 49 58 67 76 85 94
T X
PLU
5 14 23 32 41 50 59 68 77 86 95
6 15 24 33 42 51 60 69 78 87 96
7 8 9
7 16 25 34 43 52 61 70 79 88 97
4 5 6
8 17 26 35 44 53 62 71 80 89 98
1 2 3
9 18 27 36 45 54 63 72 81 90 99
0
PRINT
1 ÷ 99
PLU / operator
direct recalling PLU or operators
F
function
<F> + key code
for accessing programming mode
ZERO
zero-setting
direct loaded weight is considered as 0
paper feed
direct feeds paper; positions label
RP
random price
<RP> + nnn
selects item price without PLU
SP
special price
PLU + <SP> + nnn
modifies PLU programmed price
PB
price basis
<RP> + <PB> + nnn
select random price into L/kg or L/100g
FIX
fixed tare
<T> + <FIX>
fix value of weighed tare
VOID
void
<VOID> + op + <> +
PRINT>
<VOID> + <PRINT>
enter void on one or more receipt items
enter void for last label (subtracted from
totals)
C
cancel
direct delete the last entered data
T
weighed tare
direct current weight is considered as tare
X
multiply
price + <X> + nnn
input the no. of items after price
PLU
PLU code
nnn + <PLU>
closes PLU code entry
0 ÷ 9
numerical keys
nnn
enter a number, of meaning according to
above mentioned keys
PRINT
print and total
direct
<
PRINT> + operator
print label, or
print receipt
Page 12

PAGE 6 UV119UE - DSP 500 : USER MANUAL - v. 4.0
Page 13

PAGE 6 UV119UE - DSP 500 : USER MANUAL- v. 4.0
DISCARD THIS PAGE
(USED ONLY FOR PAGE NUMBERING ALIGNMENT)
Page 14

UV119UE - DSP 500 : USER MANUAL- v. 4.0 PAGE 7
DAILY USE
SWITCHING ON....................................................... page 8
DISTINCTIVE FEATURES....................................... page 9
OPERATIONAL SEQUENCE...................................page 10
TARE........................................................................page 11
RESET TO ZERO..................................................... page 11
PLU RECALL...........................................................page 12
PRICE VIA KEYBOARD ...................................page 13
PRINT LABEL..........................................................page 14
LABEL LAYOUT......................................................page 15
RECEIPT TRANSACTIONS..................................... page 16
VOID.........................................................................page 16
RETURNS ................................................................ page 17
SUBTOTAL AND DISCOUNTS ...............................page 17
PRINT RECEIPT ......................................................page 18
CORRECTING RECEIPTS.......................................page 18
RECEIPT LAYOUT ..................................................page 19
PAPER REPLACEMENT.................................... page 20
PAPER-CASSETTES.............................................page 21
DAILY USE
Page 15
PAGE 8 UV119UE - DSP 500 : USER MANUAL- v. 4.0
SWITCHING ON
For switching-on the scale, put to on position the switch which is placed at the scale left side,
under the bottom plate.
After switching on, the scale carries out an automatic routine test cycle; the digits from 0 to 9, with
comma and LED lights are represented on the display, then the display switches off for a few
seconds.
After the test cycle is over (in 15 seconds approx.) if the scale detects no anomalies, the weight is
reset to “0” and then the scale is ready to be used.
The zeros, corresponding to weight, price and total can be visualised on the display as follows:
0, 0 0 0 0 0
Networked scales
If the scale is to be used on-line with other scales, a test of network connection is carried out as it
is switched-on, after the routine test cycle. The message LOOKING FOR SCALES is represented
on the display. If all the scales pre-programmed to work on-line turn out to be actually linked, the
scale exits the search condition and can work regularly.
Contrarily, the message continues being displayed and the addresses of the scales which, although
programmed in network configuration, result to be disconnected, are visualised by pressing <C>:
S C A L E S M I S S I N G
n n n n n n n n n n n
where:
n = network address of absent scales
By pressing <PRINT> the current network configuration is accepted and the scale is enabled to
normal work. The pressure of any other key reactivates the search of the network-linked scales.
Weight different from zero
If, during the test cycle, the scale detects a floating weight (for example caused by an accidental
bump into the platter) the message CHECK CONVERTER is displayed. When the weight
stabilises, then the scale returns to its original condition. If the weight cannot stabilise call for
technical service.
If during the test cycle a weight lower than “0” is found, the message ZERO SETTING will be
displayed and the scale remains on a standby state until reset to zero is carried out. The occurrence
may be caused by the weighing platter badly positioned, or missing.
When the weight automatic reset procedure is completed, and the scale is ready to start working,
the zeros for weight, price and total are visualised on the display. Now, weight is correctly
indicated as any item is put on the platter.
Page 16

UV119UE - DSP 500 : USER MANUAL- v. 4.0 PAGE 9
DISTINCTIVE FEATURES
The DSP500 scale has a set of 3 special features which the user should be immediately aware of:
MAPPING OPERATOR KEYS (and other “optional” keys)
Only the standard set of keys have a pre-defined lay-out on the keyboard, although modifiable. The
operator keys are, for instance, not mapped into any default position. So one or more operator keys
(up to 20) must be mapped onto the keyboard to be able to work (unless working with labels or
single-item receipts and only a single pre-set operator id.).
Programming function 07 KEYBOARD FUNCTIONS (see chapter on PROGRAMMING)
accomplishes this task. To any of the available key-functions a function-code is associated (e.g.
<OP. KEY 1> = code 131, <OP. KEY 2> = code 132. etc.) and this code is mappable to any of the
actual keyboard keys. The same mechanism is used to map to the keyboard a set of “optional”
keys, as <RETURNS>, <DISCOUNT>, <RECEIPT CORRECTION>, and payment mode keys <CASH>, <CHEQUE>, etc.-.
Operator and “optional” keys are normally mapped to any of 99 generic white keys available. The
same applies for the PLU hot-shot keys. However there is no constraint on key mapping, and also
the pre-set coloured keys can be re-mapped.
PRINTING MODES
There are a number of print modes available (receipt, labels, etc.). Some functions may be
enabled/disabled according to the current mode selected and also the way to accomplish some
tasks may vary accordingly. Here is a list of the print modes available:
1. RECEIPT: a receipt lists all the items sold (possibly returned) to a customer. In this mode a set
of functions are enabled: sub-total, change computation, free rate discount, payment mode
(cash, credit card, cheque, coupon, etc.) and receipt correction after issuing.
2. SINGLE-ITEM RECEIPT: every single-item receipt carries a single item sold. It is very much
like a label in scope, but prints on the same paper-roll used for receipts.
3. LABEL: again single item sales but printed in the typical sticky label paper. In addition the
graphical lay-out is completely programmable: text, bars and boxes positionable and
dimensionable at will.
4. AUTOMATIC LABEL: just like a normal label but printing is obtained simply by putting items
on the print plate, non need to press any key.
5. PRE-PACK LABEL: pre-pack labels are automatic labels to which pre-set tares can be applied
(for pre-packing purposes).
The DSP500 scale can switch between the print modes automatically, recognising up to 3 pre-set
printing modes/paper formats according to a set of identifier marks on the paper cartridges.
“PREFERRED” PRICE SOURCE
The DSP500 scale may operate in “PLU-prone” mode, i.e. optimised for PLU entering (and only
spare use of random-price entries), or in “Random Price prone” mode, i.e. optimised for hand
entering of unit prices (and only spare use of PLU entries).
In “PLU-prone” mode any digit entered on the numeric keypad is by default interpreted as part of a
PLU code. To type in a “random price” the <RP> key must be hit before.
In “Random Price prone” mode any digit entered on the numeric keypad is by default interpreted
as part of a unit price. To type in a PLU code the <PLU> key must be hit before.
The choice between the 2 modes can be set in programming mode to fit the user needs. Hot-shot PLU
keys, if programmed, can be used in both modes.
Page 17
PAGE 10 UV119UE - DSP 500 : USER MANUAL- v. 4.0
OPERATIONAL SEQUENCE
The operational sequences are different for the scale being set for working with labels or with
receipts as shown hereunder:
SEQUENCE FOR
Refer to the bracketed pages:
LABELS
RECEIPTS
TARE (page 11)
ZERO SETTING (page 11)
tare or zero reset
(when required)
tare or zero reset
(when required)
position product
on scale platter
position product
on scale platter
PLU RECALL (page 12)
PRICE VIA KEYBOARD (page 13)
price selection
by entering PLU recall code
or random price
price selection
by entering PLU recall code
or random price
total computed
by weighing,
or by entering no. of items
total computed
by weighing,
or by entering no. of items
RECEIPT TRANSACTIONS (page 16)
RETURNS (page 17)
record transaction
(assigning it to operator)
VOID ON RECEIPT (page 16)
void (if required)
SUB-TOTAL AND DISCOUNT (page 17)
sub-total and discount
(if required)
PRINT LABEL (page 14)
PRINT RECEIPT (page 18)
transaction closing
with label printout
transaction closing
with receipt printout
PRINT RECEIPT (page 18)
change computed and
printed on receipt
(if required)
VOID ON LABEL (page 16)
void (if required)
CORRECTING RECEIPTS (page 18)
corrections to receipt
(if required)
Page 18
UV119UE - DSP 500 : USER MANUAL- v. 4.0 PAGE 11
TARE
T
Tare
Put the container or paper sheet on the scale platter and then press <T> to
subtract tare weight.
The subtracted value is transferred to tare and is no longer displayed. The LED
light NET on signals that the tare is activated.
With automatic weighed tare activated, when the scale platter is unloaded, the
tare weight, preceded by a minus (-) is visualised by the weight display.
FIX
Fixed tare
To store or ‘fix’ the same tare for a number of weighings, press the key <FIX>
that fixes the entered tare. By pressing <FIX> once again, the stored tare is
cleared.
The LED light FIX on signals that the fixed tare is activated.
Clearing tare:
An entered tare value can be cleared by one of the following ways:
• By unloading the goods from platter after the transaction has been printed.
• By loading the platter and then unloading it after that the weight stabilises.
• By pressing the key <T> with gross weight set to zero.
PRE-SET TARE (on Pre-pack only)
A pre-set tare can be assigned to the PLU ,either by entering the tare value through the keyboard
numerical keys (see progr. function 04 MANUAL TARE) or automatically, by weighing the
container (see progr. function 05 WEIGHED TARE).
When the scale is on pre-pack mode, if a PLU with its assigned tare is entered, PT followed by the
tare value expressed in kg. (i.e.: 0.938 kg) is visualised on the display. After a few seconds the
PLU description and the net weight will also be displayed, and the label is printed.
RESET TO ZERO
ZERO
By pressing <ZERO> with the empty platter, the weight is set to zero - provided
that the difference in positive as compared with the weight resulting at switchingon is less that 2 % of the scale max. load capacity (it will be 120 g for the scale
supplied for 6 kg., and 300 g for the scale supplied for 15 kg.). If higher
differences result, switch-off the scale and then switch-on again.
HALF-AUTOMATIC RESET
If the scale detects a weight lower than zero ( initially set, or set later on) , on the display the
weight signalling lights off and just one zero for price remains alighted. If the negative weight is
stable, after some seconds the scale proceeds to automatic weight reset. Even in this case, the
difference compared with the weight resulting at switching-on must be less that 2 % of the scale
max. load capacity (that is:
120 g for the scale supplied for 6 kg., and 300 g for the scale supplied
for
15 kg.). If higher differences result, recalibrate the scale by switching it off and then switching
it on again.
Page 19
PAGE 12 UV119UE - DSP 500 : USER MANUAL- v. 4.0
PLU RECALL
The daily use of the DSP 500 Scale is based on the PLU, that is on pre-programmed prices.
Each PLU is marked by a numeric code, 1 up to 7 digits long (see function 23 PLU CODE LENGTH).
Up to 3045 PLU can be stored without text (see progr. function 10 PLU EDIT ). If some text for
product description and, where needed, for ingredients is to be added, then the maximum number
of programmable PLU decreases. For example: using 350 characters for item description and
ingredients, the max. number of PLU lower to approximately 450.
Some of these PLU can be associated to the 99 direct recall keys available on the keyboard (see
progr. function 00 DIRECT PLU ).
Attention:
the code number and the dedicated key number are NOT the same (Code
no. 59238 may correspond to key no. 27).
Note that codes 1 and 2 are used by the Random Price functions, and
therefore they cannot be used for PLU.
PLU can be recalled by the two ways reported hereunder:
• directly, by pressing one of the 99 hot-shot keys (fast PLU recall) on the keyboard, if
programmed (see prog. funct. 00 HOT-SHOT KEYS).
• by using the numerical keys + the key <PLU> to confirm the entry. In PLU RECALL
priority the confirmation may also be given without <PLU> key on time-out basis (see
progr. function 22 PLU TIME LIMIT). Remember that codes 1 and 2 cannot be used.
With non-weighed item PLUs just enter the quantity by the numerical keys (if quantity is greater than
1).
When trying a recall for a non-programmed PLU, the message NON AVAILABLE is displayed.
Abort the request and press <C> to continue.
VARIATION OF PLU PRICE
Although making use of all the pre-set codes, the DSP 500 scale offers the possibility to enter a
temporary price variation and keep the PLU description and information at the same time.
SP
SPECIAL PRICE
To change a price associated to a PLU press <SP> (Special Price). The new
price must be higher or equal to the minimum price programmed for that PLU.
Attention! The above function can be selected provided that the
following conditions are present:
• It has been enabled by progr. function 25 OPERATION SETTINGS
• The function “price revision” was enabled when programming the
recalled PLU (see progr. funct. 10 PLU EDIT).
DISCOUNTS
pre-set by quantity
pre-set on single PLUs
free on total amounts
In addition to Special Prices, a PLU unit price can be set to 3 different
amounts, with each amount being automatically used if weight of
quantity is above one of the two thresholds, thus providing
“weight/quantity-based” discount capabilities. The thresholds for
automatic discounts can be specified for each PLU (see funct. 10 PLU
EDIT
).
Discounts can also be provided on a fixed base for each PLU (see funct.
10 PLU EDIT) or freely on the total amount of a receipt (see SUBTOTAL AND DISCOUNTS
).
Page 20
UV119UE - DSP 500 : USER MANUAL- v. 4.0 PAGE 13
PRICE VIA KEYBOARD
By this function, the DSP 500 scale offer the possibility to enter non-programmed prices.
The procedures to be followed are slightly different according to the priority that was pre-set
during programming: PLU RECALL or SELECT PRICE (see progr. function 27 OPERATION
MODE
).
SCALE PRE-SET WITH
PLU RECALL PRIORITY SELECT PRICE PRIORITY
RP
(Random Price)
The message
WEIGHED RANDOM
PRICE
is displayed as
key <RP> is pressed.
ENTER PRICE
If the scale was pre-set to work
on SELECT PRICE priority,
enter directly the price you need
by the numerical keys. The
message WEIGHED RANDOM
PRICE
.
Attention: For using this function with
the scale set with PLU RECALL priority, the
possibility to select random prices must have
been expressly programmed (see progr.
function 25 OPERATION SETTINGS). If
after having pressed the key <RP> the
message NOT AVAILABLE is displayed, that
means that the option above was not enabled.
Press <C> to cancel the request.
TIME LIMIT !
A time limit can be programmed between one
entered digit and the successive one (see progr.
function 21 NUMERICAL KEY TIME LIMIT).
Once elapsed that time limit, the entered digit shall
be considered as the beginning of a new price.
HOW TO SELECT PRICE
WEIGHED
RANDOM PRICE
If the item being considered is priced by weight, now enter it.
You can choose the price basis, before entering it, by pressing <PB> to
select between price per kg. or per 100 g., as signalled by the LED lights on
the display (L/kg or L/100g).
Note:
PB
The <PB> is activated only when selecting a random price
(RP), and it must be pressed before entering the price. If you
try setting a price per 100g. after the price has already been
entered, the error signalling SEQUENCE ERROR is
displayed. Press <C> to cancel and then repeat again the
procedure in the correct sequential order, as follows:
<RP> key + <PB> key + price.
NON-WEIGHED
RANDOM PRICE
X
If the item is non-weighed, press<X> after entering the price. The message
NONWEIGH. RAN. PRICE is represented on the display. At the weight
position on the display, the symbol @ lights up, followed by the number 1.
If the quantity of items is more than 1, type in the requested quantity.
Page 21
PAGE 14 UV119UE - DSP 500 : USER MANUAL- v. 4.0
PRINT LABEL
Three different printing modes are available for labels: “Label” mode, “Automatic Label” mode
and “Pre-pack Label” mode.
The selection of the label printing mode is made during the scale programming phase (see progr:
function 20 RECEIPT / LABEL).
Each PLU includes information on the graphic format of its label (see at the next page). The preset format no. 5 is reported in the example shown herebelow:
ITEM DESCRIPTION →→→→
Smoked Ham
PACKING DATE →→→→
PACKED ON 13-09-95 EAT W ITHIN 18-09-95
←←←← EXPIRY DATE
NET W. PRICE TOTAL
Kg L/Kg Liras
NET WEIGHT AND PRICE →→→→
0,152 21500 3270
←←←← TOTAL PRICE
TARE VALUE →→→→
TARE
Kg
0,020
←←←← BAR CODE
For label printing, follow the instructions given in the following lines:
LABEL
PRINT
If the scale is set on “Label” printing mode: press the key <PRINT> after having
recalled the PLU you need or having selected Random Price.
The total price is also summed (in the general totals) to the sales attributed to the
operator which has been associated to the paper-cassette in use (see function 20
RECEIPT/LABEL
).
By hitting instead <OP 1> key (up to <OP 20> key, if all 20 operators have been
mapped to some keys in the keyboard) the sale is attributed to the specified operator.
AUTOMATIC
LABEL
In the “Automatic Label” printing mode: labels are printed automatically (without
pressing any key) at each weight variation. No pre-set tare can be used in this
case.
PRE-PACK
LABEL
Also in the “
Pre-pack label” mode labels are printed automatically at each weight
variation.
If a tare value is associated to a recalled PLU, it will replace the existing one and
is visualised for approx. 4 seconds on the display top screen.
The recalled PLU for label issue is deleted each time the scale platter is unloaded ( at each weight
re-zeroing), or by pressing <C>.
Attention:
The label prints only provided that all the following conditions are met:
1. the scale is neither below zero weight nor beyond full scale
2. the computed amount is different from zero and not exceeding the max.
pre-set limit (999.999)
3. the weight is stable and net weight is higher than 0 (for weighed prices)
4. if after the previous printed label there has been a weight variation, or
the scale platter has been unloaded (for weighed prices)
OP 1
Page 22
UV119UE - DSP 500 : USER MANUAL- v. 4.0 PAGE 15
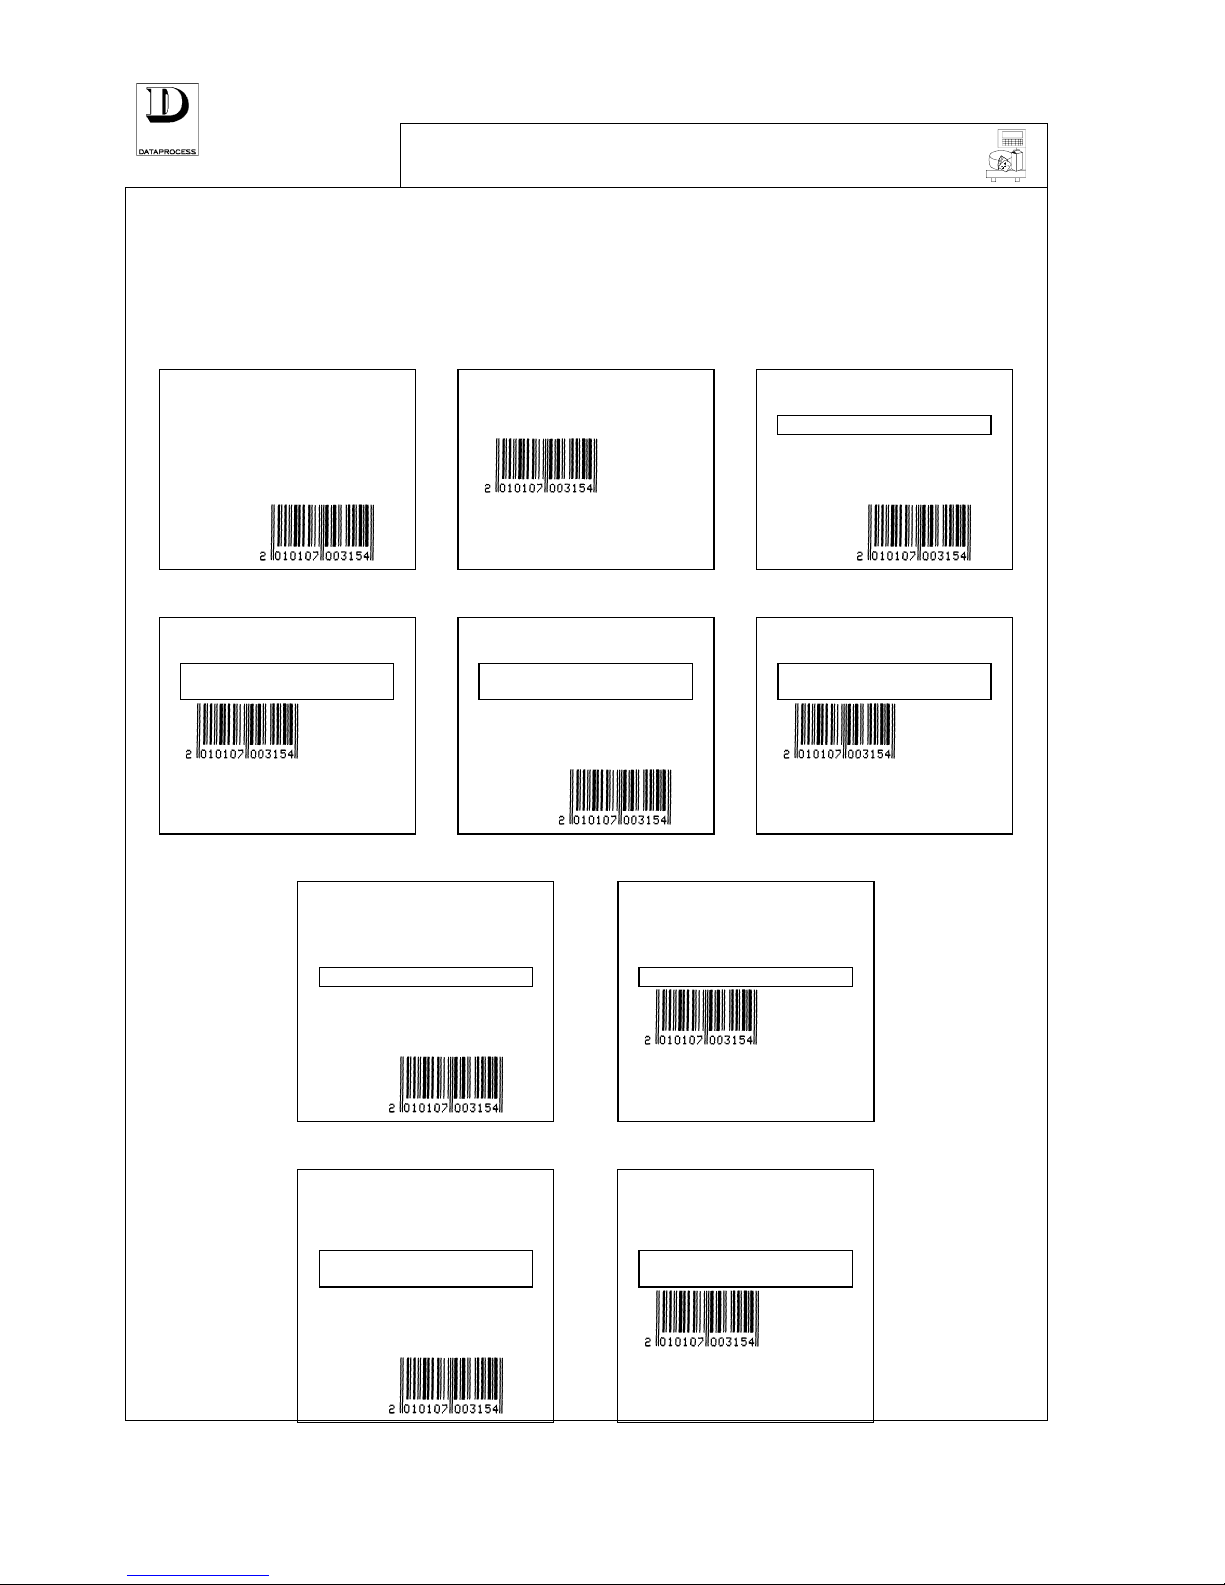
LABEL LAYOUT
The choice of label format is effected by each PLU when programming it (see funct. 10 PLU
EDIT
).
20 Label layouts are available: 10 pre-set layouts, shown on this page, and other 10 userprogrammable layouts. The even layouts shown are for non-weighted items, whilst the odd ones are for
weighted items.
Layout n° 1 Layout n° 2 Layout n° 3
Smoked Ham
Smoked Ham
Smoked Ham
EAT WITHIN 27-09-96
NET W.
Kg
0,152
PRICE
L/Kg
21500
TOTAL
Liras
3270
TOTAL
Liras
3270
NET W.
Kg
0,152
PRICE
L/Kg
21500
TOTAL
Liras
3270
TARE
Kg
0,020
TARE
Kg
0,020
Layout n° 4 Layout n° 5 Layout n° 6
Smoked Ham
Smoked Ham
Smoked Ham
EAT WITHIN 27-09-96 PACKED 17-09-96 EAT W. 27-09-
96
PACKED 17-09-96 EAT W. 27-09-
96
TOTAL
Liras
3270
NET W.
Kg
0,152
PRICE
L/Kg
21500
TOTAL
Liras
3270
TOTAL
Liras
3270
TARE
Kg
0,020
Layout n° 7 Layout n° 8
Smoked Ham
Smoked Ham
Fresh quality from the country Fresh quality from the country
EAT WITHIN 27-09-96 EAT WITHIN 27-09-96
NET W.
Kg
0,152
PRICE
L/Kg
21500
TOTAL
Liras
3270
TOTAL
Liras
3270
TARE
Kg
0,020
Layout n° 9 Layout n° 10
Smoked Ham
Smoked Ham
Fresh quality from the country Fresh quality from the country
PACKED 17-09-96 EAT W. 27-09-
96
PACKED 17-09-96 EAT W. 27-09-
96
NET W.
Kg
0,152
PRICE
L/Kg
21500
TOTAL
Liras
3270
TOTAL
Liras
3270
TARE
Kg
0,020
Page 23
PAGE 16 UV119UE - DSP 500 : USER MANUAL- v. 4.0
RECEIPT TRANSACTIONS
In “Receipt” mode each amount computed by the scale (transaction) must be
stored and assigned to a specific operator.
In case of scales working in network, an amount computed on one scale can be
assigned to any of the link-connected operators.
With the amount displayed on the scale display, press the <OP 1> key, or any
other appropriate operator key (up to <OP 20> key, if all 20 possible operators
have been mapped into the keyboard - see Attention note on operator keys).
The scale confirms by two “beeps” (in addition to the key ‘beep’ signal given out if the function 26
KEYBOARD BUZZER
is enabled) and by briefly showing the message * STORING * on the display.
Attention:
The DSP500 Scale, for printing receipts, requires at least one operator has
been enabled. To enable one or more operators (up to 20 max. ) just assign
the operator identifier to one of the 99 direct keys during programming
(see progr. function 07 KEYBOARD FUNCTIONS).
SUB TOTALS
By pressing the direct key assigned to an operator with no transaction on course, the sub-total of
the current receipt can be visualised on the display. If no receipt is being issued, zero is displayed.
VOID
If the function VOID was enabled during programming (see progr. function 25 OPERATION
SETTINGS
), a sub-total can be subtracted from a receipt on course, or the amount of the last label been
issued can be subtracted.
VOID FOR RECEIPT ON ISSUE
VOID
...
PRINT
VOID
As the key <VOID> is pressed the message ENTER OPERATOR is displayed.
Press the operator key, and the latest transaction is displayed, or the message
NO
TRANSACTION
if no receipt results on issue.
For scrolling through all the transactions of the receipt, press the key <↑↑↑↑> and,
once reached the sale to be subtracted, enter the void by pressing <PRINT>. The
message
ENTERED VOID will be visualised on the display. Press <↑
↑↑
↑> to scroll
throughout the remaining transaction if additional voids must be entered.
Press <VOID> again to confirm the entry and return to normal working condition.
VOID FOR LAST LABEL
VOID
PRINT
VOID
By pressing <VOID>,the total of the last issued label can be subtracted from total
counters. The weight, price and amount of the last label will be represented on the
display (or: price, no. of items and total for non-weighed sales).
The void can be entered by pressing <PRINT>, and a minus (“-”) sign will be
visualised on the display before the weigh and total values. The void is annulled
by pressing <PRINT> once again (figures return positive, on the display).
Confirm the void by pressing <VOID> again to return to normal working
condition.
OP 1
Page 24
UV119UE - DSP 500 : USER MANUAL- v. 4.0 PAGE 17
RETURNS
RP
-
To enter negative amounts on receipts, for instance to take into account returns,
the RETURNS function key can be used.
The return key is not mapped in the pre-set keyboard layout, so check that this
operation has been performed in order to use it (see progr. function 07
KEYBOARD FUNCTIONS
).
Press the <RP> key, followed by unit price for the item returned and by the <->
key (the RETURNS function key).
To specify quantities of equal-priced items returned just type in the quantity after
the <-> key.
End the sequence by the appropriate operator key <OP n> (n being the operator
involved), thus specifying to which operator receipt the returns must be applied
to.
SUBTOTAL AND DISCOUNTS
SUB TOTALS
By pressing the direct key assigned to an operator with no transaction on course,
the sub-total of the current receipt can be visualised on the display.
A message OPERATOR TOTAL n (n being the operator involved) is issued on
display and the line below shows the no. of item recorded in the operator receipt,
followed by the corresponding total amount.
If no receipt is being issued, zero is displayed.
DISCOUNTS
DISCOUNT
DISCOUNT %
PRINT
Free percentage discounts can be applied by pressing the DISCOUNT function key
just after a sub-total is invoked.
The discount key is not mapped in the pre-set keyboard layout, so check that this
operation has been performed in order to use it (see progr. function
07
KEYBOARD FUNCTIONS
).
Press the desired operator key <OP n> with no transaction on course to obtain a
sub-total, then press the <DISCOUNT> key followed by the % discount wanted.
The display shows the message DISCOUNT % followed by the percentage
entered.
Then close the sale (by pressing <PRINT> or other possibly enabled receiptclosing keys - e.g. <CHEQUE>, <CASH>, ...-, see PRINT RECEIPT on next page
for details).
Discounts can also be provided either on a fixed % base for each PLU (see funct. 10 PLU EDIT), or
using Special Prices (see
PLU RECALL) or even on a 3-range weight/quantity base for each PLU
(see funct.
10 PLU EDIT).
OP 1
OP 1
OP 1
Page 25
PAGE 18 UV119UE - DSP 500 : USER MANUAL- v. 4.0
PRINT RECEIPT
PRINT
After transactions are completed, the receipt can be outprinted. Press <PRINT> and
the message ENTER OPERATOR is visualised on the display. After pressing the
operator key, the display visualises the message OPERATOR TOTAL followed by
the corresponding sale total, and the receipt is immediately printed. (If no receipt
is on issue, the display visualises the message NO TRANSACTION).
The total is displayed until a subsequent operation is started, either
loading/unloading the plate or touching the keyboard. Alternatively the scale can
be programmed so to exit the total-display status on subsequent keyboard
operation only (see progr. 34 EXIT FROM TOTAL).
CASH
CHEQUE
CREDIT CARD
COUPON
To better qualify the payment mode, for accounting purposes, a set of
function keys can be used instead of the generic <PRINT> key.
These keys are <CASH>, <CHEQUE> , <CREDIT CARD>, <COUPON>, and
by using them the amounts are totalised separately and thus can be
separately reported in total reports.
None of these keys is mapped in the pre-set keyboard layout, so check
that this operation has been performed in order to use them (see progr.
function 07 KEYBOARD FUNCTIONS).
Use these keys just as the <PRINT> key. A specific payment mode
message will be issued on the display and will be printed on the receipt.
CHANGE CALCULATION
At the end of the printed receipt, before entering any other operation, the change calculation can be added.
F
As the key <F> is pressed, the query CASH is visualised on the display. Now, type
in the amount by the numerical keys and then, when pressing <PRINT> the
computed change is displayed and then printed at the very end of the receipt (if
the “change print” function was enabled during programming as explained in the
progr. function 31 RECEIPT OPTIONS).
RECEIPT REPRINT
PRINT
Pressing <PRINT> once again prints another copy of the receipt.
A second short summarised receipt for accounting can be automatically printed , only with date,
time, amount ,operator and scale id., receipt number (see progr. 33 ACCOUNT RECEIPT).
CORRECTING RECEIPTS
RE-OPEN
Each of the operator can, if needed, re-open its last issued receipt to correct it.
Press the <RE-OPEN> key followed by the appropriate operator key <OP n>,
as queried by the message ENTER OPERATOR displayed.
The total amount of the re-opened receipt is shown on display, together with
the items sold. Now any operation on a open receipt can be performed
(adding new transactions, voiding previous transactions, etc.).
The <RE-OPEN> key is not mapped in the pre-set keyboard layout. This operation
must be performed to use it (see progr. function 07 KEYBOARD FUNCTIONS).
OP n
Page 26

UV119UE - DSP 500 : USER MANUAL- v. 4.0 PAGE 19
RECEIPT LAYOUT
Here is the layout of a typical receipt issued by the DSP500 scale.
Refer to the programming functions specified in brackets in the comment area for details.
PROGRAMMABLE →→→→
COMMERCIAL
MESSAGE
(30)
McPherson Butcher’s Shop
77, Redford Street
Newport, UK - EU
DATE AND TIME (31, 01) →→→→
13-09-95 14:03
kg £
PLU DESCRIPTION (31) →→→→
Smoked ham
0.152 21.50 £/kg 3.27+
←←←← WEIGHED PLU ITEM
NON-WEIGHED RANDOM PRICE
2 NP 1.75 3.50+
←←←← NON-WEIGHED RANDOM PRICE
WEIGHED RANDOM PRICE
0.255 18.00 £/kg 4.59+
←←←← WEIGHED RANDOM PRICE
NO. OF ITEMS SOLD →→→→
item 4 TOTAL 11.36
←←←← TOTAL PRICE
PAYMENT MODE (if any) →→→→
CHEQUE
OPERATOR AND →→→→
SCALE IDENTIFIER
V. 3
J. MOORE
SCA. 1 N.R. 2
←←←← RECEIPT NO.
Thanks for calling in !
←←←← PROGRAMMABLE
BAR-CODE (32) →→→→
COMMERCIAL
MESSAGE (30)
CASH
20000+
TOTAL
11360+
CHANGE
8640+
←←←← CHANGE DUE (31)
The information reported on this example can be included on the receipt printout or not, according
to the parameters entered on the programming phase (see progr. function
30 to 33).
Other receipt options, i.e. VAT printing and second short-account receipt print, have not been
included in the example to help in readability. Refer to progr. function 31 and 33, respectively, for
details.
Page 27
PAGE 20 UV119UE - DSP 500 : USER MANUAL- v. 4.0
PAPER REPLACEMENT
The paper cassette has to be replaced when one of the following messages is represented by the
display:
PAPER OUT ERROR
It is displayed when the paper is completely out. Before this occurs,
the LED signal PAPER lights up on the display.
REPLACE CASSETTE
This message is displayed when the paper cassette is not compliant
with the operational mode on use.(For example: the scale is on
“Receipt” mode, and the paper cassette is that for labels).
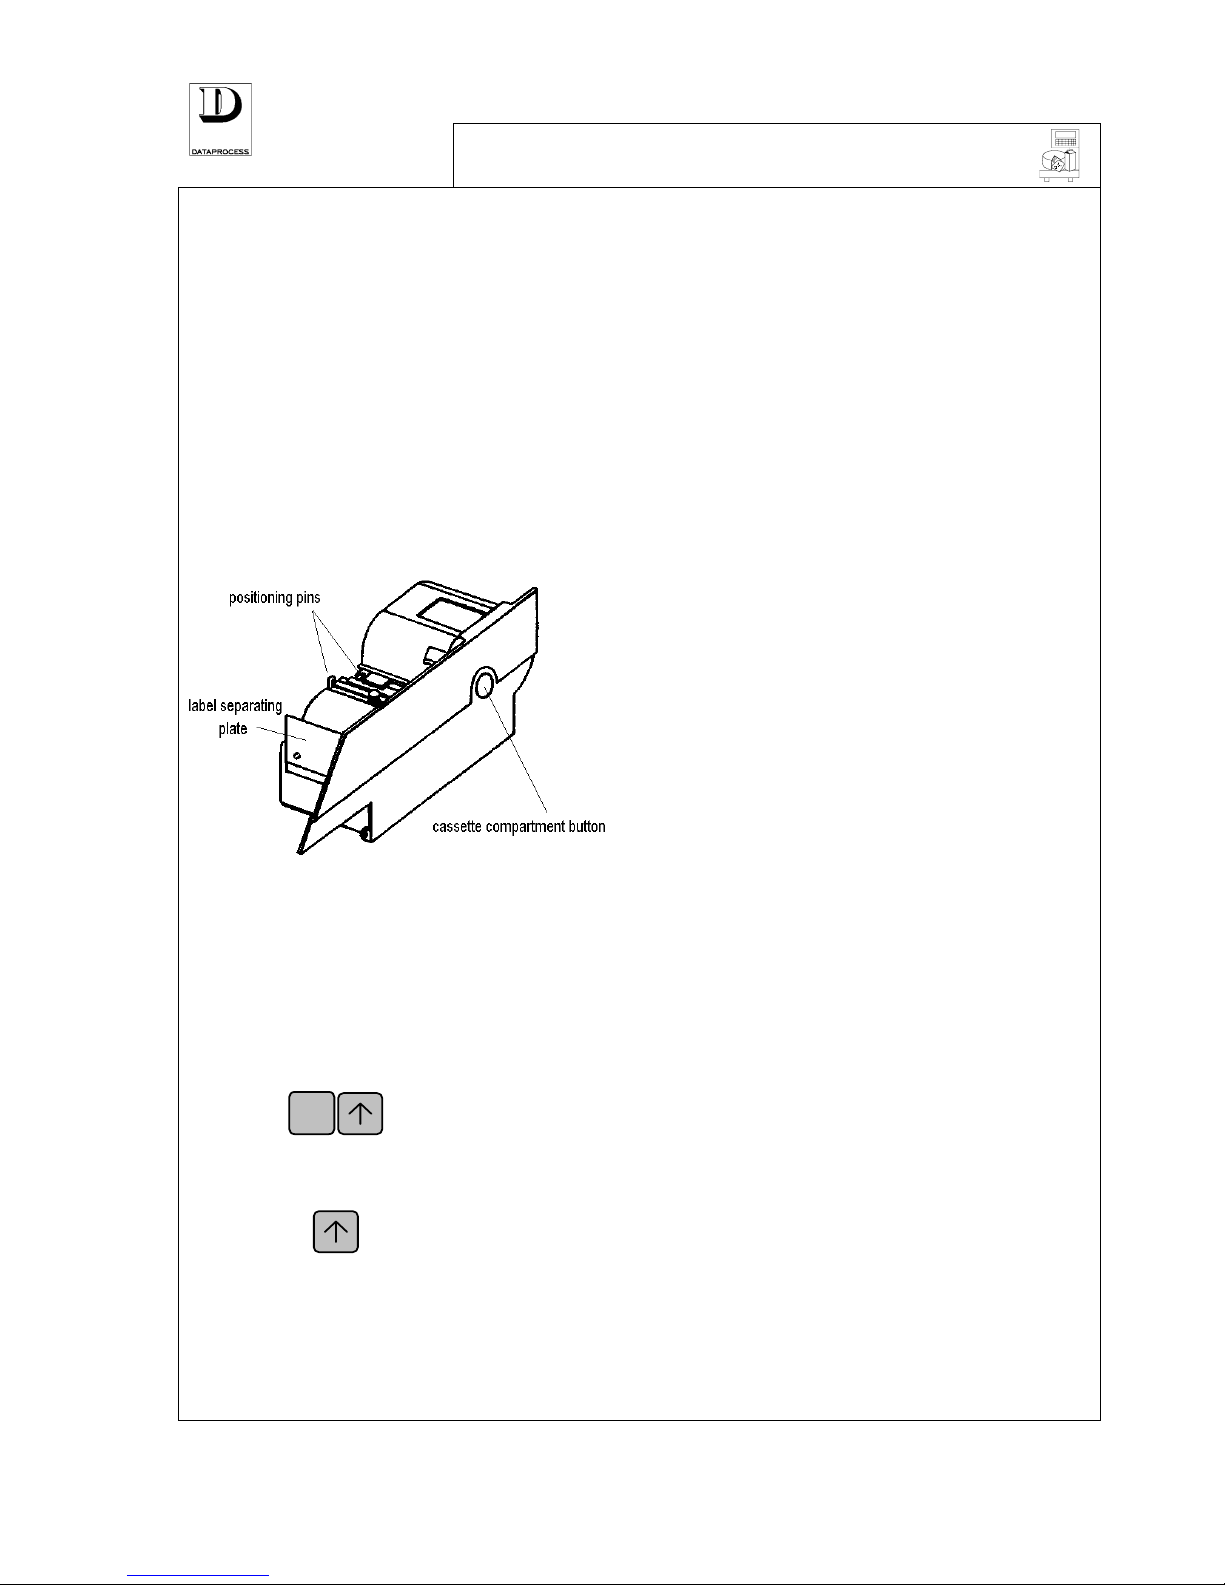
To replace the paper cassette, push the button placed on the right side of the scale (as shown by the
following figure). The cassette is pulled out for some mm. and the message
NO PAPER CASSETTE can be visualised on the display. Now the cassette can be completely
taken out.
Check that the paper is placed between the two
positioning pins, at the new paper cassette.
If it is a cassette for labels, just check that paper
is positioned correctly.
If it is a cassette for receipts then open the paper
slot on the scale front and check that 1 cm. paper
end comes out from the label separating plate.
When mounting the cassette, keep the paper end
attached to the separating plate, so that it can
slide below the printer head.
Slip in the cassette (until it clinks), re-close the paper slot so the paper can come out freely.
PAPER POSITIONING AND FEED
Position the labels correctly before restarting to use the scale. During the paper replacement or
during the scale regular use, it may be useful to have the receipt paper fed out.
F
label positioning
For positioning correctly labels, press the key <F> and then the
key <↑↑↑↑>. The printer advances the paper roll and the first label is
ejected, ready for print.
paper / label feed
If only key <↑↑↑↑> is pressed, the paper (or label) advances as long
as it is being pressed.
Page 28
UV119UE - DSP 500 : USER MANUAL- v. 4.0 PAGE 21
PAPER-CASSETTES
The DSP 500 scale is designed to identify no. 3 different paper cassette versions for continuous
paper (receipts and single-items) and for labels. Only two label formats (with different label
lengths) can be used for the scale to automatically detects the selected type of paper and label
format. Each cassette can be associated with a specific print mode and with a default operator id.
(that can be in any case overridden by specifying any other operator when assigning each amount
in a receipt of label). See (see progr. function 20 PAPER CASSETTES).
To obtain a correct handling of the label formats A and B, enter the suitable calibrations for the
two label formats to be used on programming mode (see progr. function 50 CALIBRATION).
Attention:
When passing to a new label format (paper label of new size, spacing, etc.)
remember to re-calibrate the scale. In fact the scale does not detect the paper
directly but the cassette version to be used (see progr. function 50
CALIBRATION).
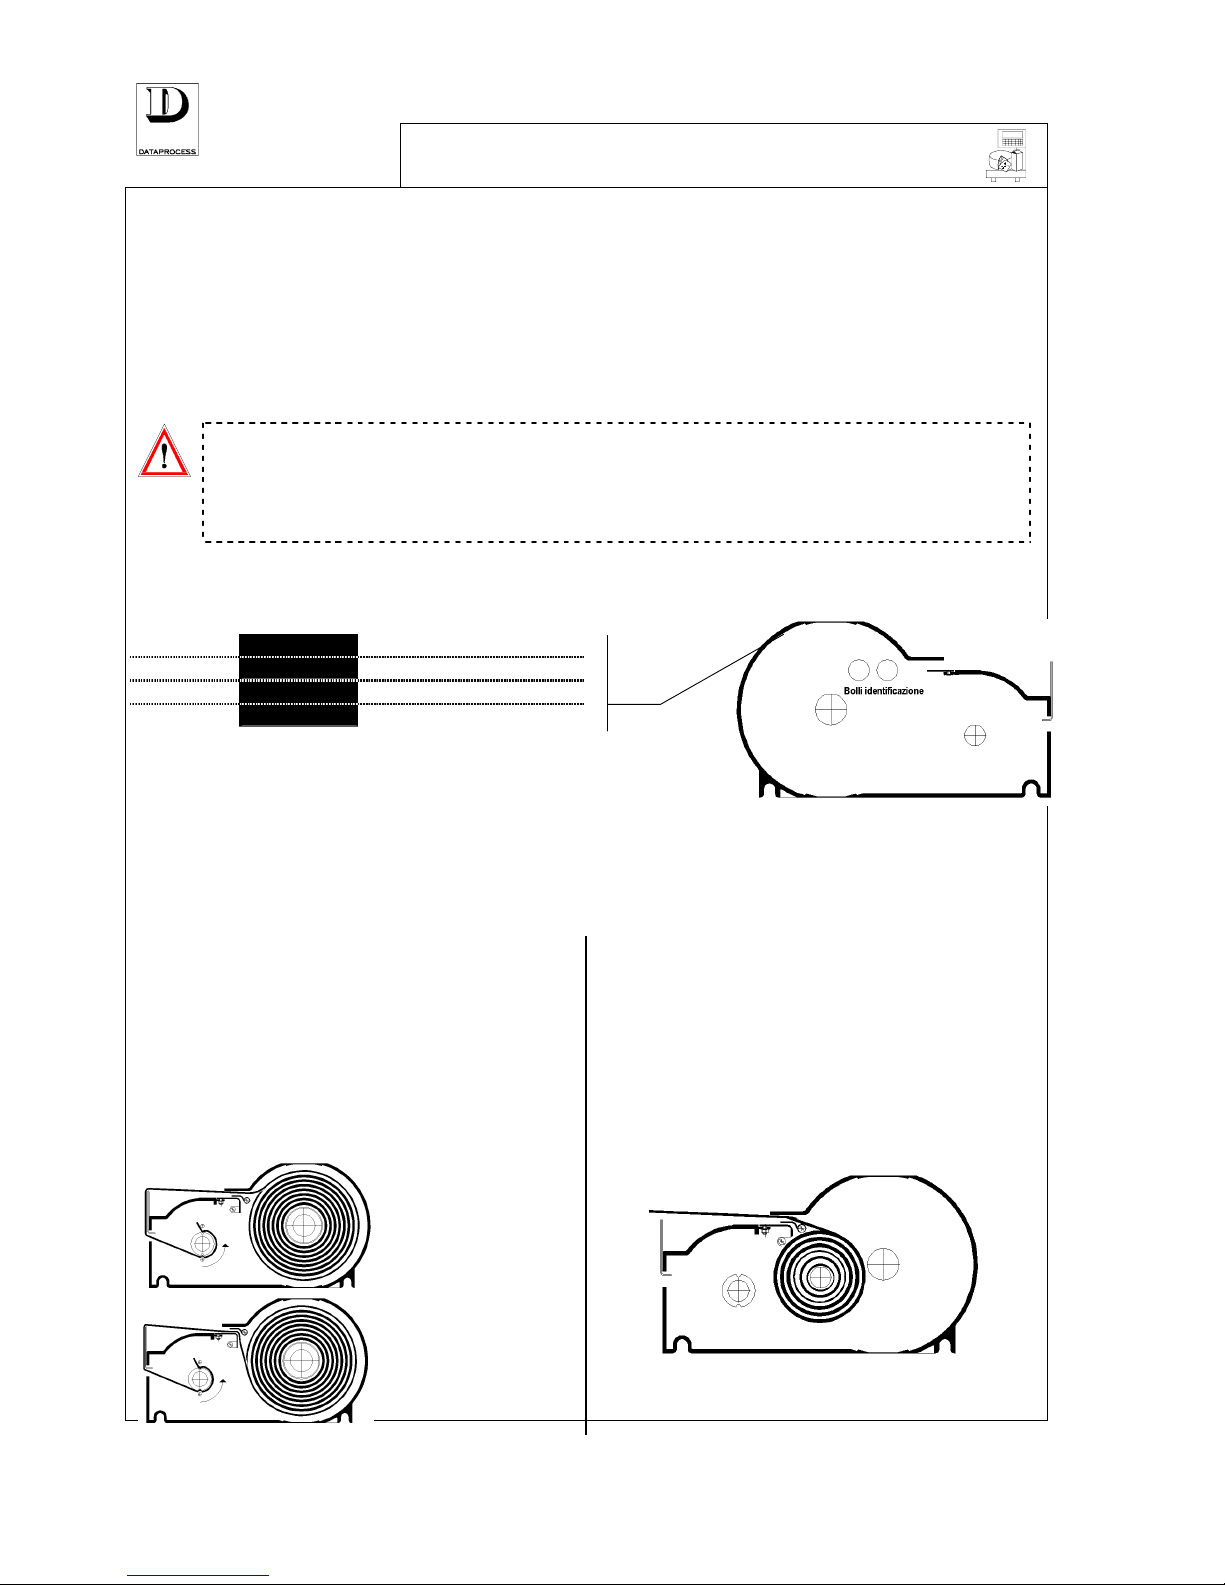
The scale detects the paper cassette thanks to an optical reader, which read the white stamps placed
inside the cassette according to the diagram reported
herebelow:
= no cassette
= cassette 1
= cassette 2
= cassette 3
After the cassette is taken out, by pressing the cassette
compartment button, lift up the cassette cover hook (on top
side) to access the cassette inside.
Inside the cassette there are two side pins and one centre pin (in the continuous paper cassette
only). This centre pin is the only difference existing between the two types of cassette. Therefore,
just remove this centre pin if you want to use the continuous paper cassette as cassette labels (and
change the white stamps positioning).
LOADING LABEL PAPER ROLLER
The roller for labels has to be inserted on the
cassette right-side pin. The strip, with labels
top side upwards must be fixed to the left-side
pin. The figure hereunder clearly shows how to
slip in the label strip, with a roller clockwise or
anti-clockwise oriented.
LOADING CONTINUOUS PAPER ROLLER
The continuous paper roller has to be inserted on
the cassette centre pin. If the centre pin is not
already mounted, screw it in.
The paper is passed over the centre metal strip
and then advances freely on the label separating
plate.
Page 29

PAGE 22 UV119UE - DSP 500 : USER MANUAL- v. 4.0
Page 30

PAGE 38 UV119UE - DSP 500 : USER MANUAL - v. 4.0
DISCARD THIS PAGE
(USED ONLY FOR PAGE NUMBERING ALIGNMENT)
Page 31

UV119UE - DSP 500 : USER MANUAL - v. 4.0 PAGE 23
MAINTENANCE AND
PROBLEM SOLVING
CLEANING...............................................................page 24
ERROR SIGNALLING..............................................page 25
PROBLEM SOLVING...............................................page 26
MAINTENANCE
AND
PROBLEM SOLVING
Page 32

PAGE 24 UV119UE - DSP 500 : USER MANUAL - v. 4.0
CLEANING
ALCOOL
ALCOHOL
ALCOOL
ALCOHOL
Switch off and disconnect the scale from mains before cleaning.
A periodical cleaning of the scale surfaces may be scheduled once per week.
For cleaning the keyboard and the display area avoid the use of alcoholic
solutions or other solvents, that may damage key labelling.
Make use of a static resistant liquid to reduce the dust.
Clean all the other external surfaces of scale using a cloth moistened with
alcohol. Remove the weighing platter for a better cleaning.
11.200
TOT.
The printer thermal head can be cleaned in two ways: by printing on
special abrasive-free forms or, with the scale switched off, by wiping the
printing head area (the dark line at the printer top edge) by means of a
stick soaked with alcohol and then drying it by a dry stick.
Clean the printer rubber pressing roller by a clean cloth. Avoid to use
tools for cleaning this roller, as rubber is soft and can easily be cut or
damaged.
Do no use detergents, solvents and clothes soaked in water.
Spray products must not be used directly on the scale. Spray on the cloth
used for cleaning instead.
Page 33

UV119UE - DSP 500 : USER MANUAL - v. 4.0 PAGE 25
ERROR SIGNALLING
ERROR MESSAGE MEANING
CALIBRATION ERROR
Error made on calibration------------ - CALL FOR TECHNICAL SERVICE -
CHANGE CASSETTE
Incorrect paper cassette selected
CLOSE RECEIPT
No more memory available for transactions
COLLECT LABEL
Draw printed label
CONVERTER CHECK
Problem with weight converter ------ - CALL FOR TECHNICAL SERVICE -
DATE ERROR
Incorrect data entry
EAROM WEIGHT ERROR
Earom weight writing error---------- - CALL FOR TECHNICAL SERVICE -
EXCEEDING WEIGHT
Weight exceeding the max. programmed value
EXISTING DATA
Data already stored
INCONSISTENT TARE
Tare value inconsistent with weight
INPUT ENABLE
Overwrite attempt on end text character
INVALID AMOUNT
Transaction with invalid amount
KEY ERROR
Incorrect key in a given function
LIMIT EXCEEDED
Signalling that pre-set limits have been exceeded
NETWORK ERROR
Signalling network error
NETWORK ERROR
Error during network transmission/reception
NO CASSETTE
Paper cassette is out of its position
NO JUMPER
Jumper not placed when calibrating scale- CALL FOR TECHNICAL SERVICE
NO TRANSACTION
No transaction recorded by selected operator
NO WEIGHT VARIATION
Transaction performed without changing weight
NOT ALLOWED
Tempted procedure not allowed
NOT ALLOWED NOW
Tempted procedure currently not allowed
NOT AVAILABLE
Procedure or data not available
NOT ENABLED
Programming enabled at higher level
OPERATOR ACTIVE
Programming not allowed with operator on service
OUT OF MEMORY
No more memory available
PAPER OUT ERROR
Signalling that paper is out
PRINT HEAD ERROR
Printer head error---------------------- - CALL FOR TECHNICAL SERVICE -
RAM WEIGHT ERROR
RAM weight error -------------------- - CALL FOR TECHNICAL SERVICE -
ROM WEIGHT ERROR
ROM weight error -------------------- - CALL FOR TECHNICAL SERVICE -
SEARCH ZERO WEIGHT
Weight reset to zero in progress
SEQUENCE ERROR
Incorrect operational sequence
TEMPERATURE ERROR
Printer head overheated beyond specified limits
TOO LOW PRICE
Price lower to the pre-set minimum value
TOO LOW WEIGHT
Weight below the minimum programmed value
UNKNOWN DATA
When selecting non-existing data (e.g.: a PLU not programmed)
VALUE ERROR
Incorrect value entered
VALUE EXCEEDED
Signalling that pre-set values have been exceeded
WEIGHT REC. ERROR
Weight received incorrectly
Page 34

PAGE 26 UV119UE - DSP 500 : USER MANUAL - v. 4.0
PROBLEM SOLVING
PROBLEM POSSIBLE CAUSE REMEDY
After switching on the
External fuse blown Replace the faulty fuse with new of
same type
scale both displays
remain OFF
Failure of display card Call for technical service
The scale switches on
but then it blocks and
the message
There is a weight on
scale platter
Take off the weight. Switch off and
then on again.
SEARCH ZERO
WEIGHT
is displayed
Problem with load cell
or with AC/DC
converter
Call for technical service
The scale switches on
but then it blocks and
the message
Platter is not placed on
scale
Place the platter on the scale. Switch
off and then on again
TOO LOW WEIGHT is
displayed
Problem with load cell
or with AC/DC
converter
Call for technical service
The scale switches on
but then it blocks and
the message
FIND SCALES is
displayed
Defective connection
with one or more scales
Press key <C> and check if the message
SCALE ABSENT is displayed. Switch
on and/or connect the scales resulting
absent. Press <PRINT>
The scale cannot detect
the paper
White stamps missing
on paper-cassette
Remove the paper cassette and check
that white stamps are present
Photocell sensor failure Call for technical service
The scale cannot detect
correctly different paper
cassettes types
White stamps
positioned incorrectly
on the paper-cassette
Remove cassette and check stamps
position. If needed, put stamps
correctly.
Photocell sensor failure Call for technical service
Page 35

PAGE 66 UV119UE - DSP 500 : USER MANUAL- v. 4.0
DISCARD THIS PAGE
(USED ONLY FOR PAGE NUMBERING ALIGNMENT)
Page 36

UV119UE - DSP 500 : USER MANUAL- v. 4.0 PAGE 27
CONFIGURATIONS AND
INSTALLATION
CONFIGURATIONS................................................. page 28
PAPER ROLLS ........................................................ page 28
INSTALLATION .......................................................page 29
NETWORK: INSTALLATION. ....................page 30
NETWORK: ACTIVATION....................................... page 30
NETWORK: COMMUNICATIONS..........page 31
CONNECTING TO A PC.......................................... page 32
CONFIGURATIONS AND
INSTALLATION
Page 37

PAGE 28 UV119UE - DSP 500 : USER MANUAL- v. 4.0
CONFIGURATIONS
Scale available for 2 capacity and divisions: 6kg/2g
15kg/5g
equipped with no. 1 RS232 serial interface,
256 kB Eprom, 256 kB RAM
DSP500 Scale is supplied packed and complete with:
- 1 paper roll cassette, mounted
- sheet for keyboard customisation
- User kit consisting of: - User Manual, 1 copy
- 1 thermal paper roll
- 1 set of stamps for paper-cassette
marking
- 1 power cable
- 1 pin for small-size core paper roller
OPTIONS available on customer request: - Extension Card for local network + 1 line RS422
Serial Interface
- memory card adapter (for use only with optional
extension card)
- additional paper cassettes
PAPER ROLLS
The following types of paper and label rolls can be used with the DSP500 Scale:
1) self-adhesive Label Roll - thermal paper. Dimensions:
• roll ext. diameter: 130 mm max.
• roll int. diameter: 38 / 41 mm
• label width: 42.5 ÷ 62.5 mm
• label length: 30 ÷ 85 mm
2) self-adhesive, thermal paper roll. Dimensions:
• roll ext. diameter: 130 mm max.
• roll int. diameter: 38 / 41 mm
• label width: 42.5 ÷ 62.5 mm
3) non-adhesive, thermal paper roll. Dimensions:
• roll ext. diameter: 130 mm max.
• roll int. diameter: 38 / 41 mm
• label width: 42.5 ÷ 62.5 mm
or
• roll ext. diameter: 75 mm max.
• roll int. diameter: 11 mm
• label width: 42.5 ÷ 62.5 mm
Page 38

UV119UE - DSP 500 : USER MANUAL- v. 4.0 PAGE 29
INSTALLATION
NO YES
The scale must be installed on a perfectly level, stable surface for proper
operation.
It is equipped with a spirit-level to assist levelling.
Adjust the 4 threaded feet of the scale until the bubble in centred in the
reference circle of the spirit level. Fasten the legs using the safety locks.
The scale must be connected to a 220 V., 50 Hz single-phase power
supply in compliance with the rules in force. The electric plant to which
the scale has to be connected should also follow the current safety
standards. The socket chosen for connecting the scale shall:
• be suitable for use with the scale plug
• ensure good grounding; the ground connection shall not have
adaptors or extensions
• be on a dedicated line. In cases where it is not possible, be sure that
the scale is not connected to lines powering other high input devices
(such as: refrigerators, motor-driven equipment)
Attention:
it is most important that the connection of the scale to the electric mains be
made correctly, for ensuring the scale good operation and for safety
reasons. The manufacturer disclaims all responsibilities for scales installed
without observing the instructions and the rules into force.
Page 39

PAGE 30 UV119UE - DSP 500 : USER MANUAL- v. 4.0
NETWORK:
INSTALLATION
Check the following before connecting scales in a network configuration:
a) each scale to be link-connected must be equipped with a serial Interface Module (supplied as an
optional item, see section CONFIGURATION)
b) when installing the scales, they must be connected by a special network cable, normally
supplied with the network module
Once that all the scales have been connected for network operation, proceed with programming
each scale as described herebelow:
c) use the function
54 NETWORK ADDRESS to set for each scale its unique network address. ( 1
through 10, a different address to be used for each scale)
d) by the function
55 LOCAL/NETWORK, enable network operation on each connected scale
Once that scales have duly been set, the network connection must be activated as follows:
e) use the function 57 FIND SCALES on one of the linked scales. This function allows to
automatically start network configuration and to check that all scales are present.
When the above procedure is completed, the network is activated. Exit from programming and
proceed with the scales normal operation.
NETWORK: ACTIVATION
When switching on any of the link-connected scales, an automatic search of the scales currently
connected is performed and the following message is represented on the display:
F I N D I N G S C A L E S
If all the scales pre-set for network operation result to be duly linked, the scale goes out of the
“search” status and return to its regular operation.
Contrarily, the message remains displayed. By pressing <C> the addresses of the scales that,
although programmed to work on network, result disconnected.
M I S S I N G S C A L E S
n n n n n n n n n n n
where:
n = network address of the absent scales
The current network configuration is accepted by pressing the key <PRINT> and the scale is set to
normal operation. The pressure of any other key reactivates the search of the link-connected scales.
In a network system already activated, the switching on of a scale which was pre-programmed for
network operation, causes the network automatic reconfiguration with addition of the scale just
been switched on.
Page 40

UV119UE - DSP 500 : USER MANUAL- v. 4.0 PAGE 31
NETWORK:
COMMUNICATIONS
DIALOGUE BETWEEN SCALES
If, during a dialogue one scale does not answer as it is disconnected or switched off, the following
message is represented on the calling scale:
S C A L E n n N O R E S P O N S E
C = O K , P R I N T = R E T R Y
where:
nn = address of the scale not responding
By pressing <C> the current network configuration, excluding the scales not responding, will be
accepted and the scale will resume normal operation.
Press <PRINT> to try dialoguing again with the non-answering scale.
NETWORK BROADCAST PROGRAMMING
The programming functions that, when carried out by any network linked scale, automatically
update the data on all the other linked scales are listed herebelow:
01 DATE AND TIME date and time setting
10 PLU EDIT PLU information (item description, price, label, etc.)
11 PLU COPY copy PLU with a new code
12 PLU DELETE delete PLU
NETWORK TOTALS REPORTS
The totals shown on the printed reports listed hereunder are the sum of the transactions effected by
each link-connected scale:
80 OPERATOR TOTALS printout of sales totals subdivided by operator
81 DEPARTMENT TOTALS printout of sales totals subdivided by department
82 TOTALS BY VAT printout of sales totals subdivided by VAT rate
83 PLU TOTALS printout of sales totals subdivided by PLU
84 TOTALS BY HOUR printout of sales totals subdivided by hour
85 SCALE TOTALS printout of sales totals subdivided by scale
86 X GRAND TOTAL printout of sales grand totals on daily basis (1st level)
87 X GR. TOTAL RESET printout and reset of daily grand totals (1st level)
88 BEST PLUs best sold PLUs, in sale-descending order
89 BEST OPERATORS best operators, in descending sale-amount order
90 Z GRAND TOTAL printout of longer time period totals (2nd level)
91 Z GR. TOTAL RESET printout and reset of daily and longer time period totals (2nd
level)
Page 41

PAGE 32 UV119UE - DSP 500 : USER MANUAL- v. 4.0
CONNECTING TO A PC
PLU
DSP500 Scale can be connected to a personal computer through RS232c serial interface; it can
also be prepared to deliver an output signal for controlling the opening of a cash-register (where
allowed by regulations), by means of another connector.
All programming (with the exception of label formats programming) can be handled by the PC,
and be then downloaded to the scale.
In the same way, all programming entered by a scale can be uploaded from the scale into the PC.
All connectors are placed at the scale base plate. The RS232c serial connector to PC is a DB9 (9
pole) socket. The connector for drawer control is mini-jack type. Contact your dealer for correct
cables supply. Fasten the plugs securely by their screws, where needed.
Contact your dealer for getting the documentation on cables and connectors, on the functions
selectable by PC and on software supporting communication.
Page 42

UV119UE - DSP 500 : USER MANUAL- v. 4.0 PAGE 33
PROGRAMMING
SECTION INDEX.........................................................................page 35
ACCESS BY KEY-CODE............................................................page 36
LEVELS AND GROUPS..............................................................page 37
SELECTION AND EDITING........................................................page 38
FUNCTION CODES ....................................................................page 39
INTRODUCTION TO
PROGRAMMING
0
GENERAL PROGRAMMING .....................................................page 41
(direct PLU, date and time, advertising text, operators, manual
tare, weighed tare, access key codes, keyboard functions,
departments and VAT rates)
GENERAL PROGR. GROUP
1
PLU PROGRAMMING ................................................................page 53
(PLU edit, copy, delete and test)
PLU PROGR. GROUP
2
SETTINGS...................................................................................page 61
(receipt/label, num. key time-out, auto PLU time-out, PLU preset digits, label bar-code, enable/disable random price, special
price, void, returns, discount on subtotal, keyboard buzzer,
operational mode)
SETTINGS GROUP
3
RECEIPT PROGRAMMING........................................................page 69
(shop name, print date, time, PLU description, change, print
bar-code & customisation, print double total, exit from totals)
RECEIPT PROG. GROUP
4
LABEL PROGRAMMING............................................................page 75
(label layout, layout copy and delete, fixed text, pre-set labels)
LABEL PROG. GROUP
5
NETWORKING AND INTERFACES ...........................................page 83
(label calibration, printer setting, serial channels A and B
programming, network enabling and addressing, TX communication
programming, find scales, Memory Card handling)
NETWORKING AND INTERFACES
GROUP
7
REPORTS ...................................................................................page 91
(hot-shot report, PLU report, PLU bar-code report, general
report, random prices used)
REPORTS GROUP
8 / 9
SUB-TOTAL AND TOTAL REPORTS - 1st LEVEL ...................page 95
(totals by operator, by department, by PLU, by hour, by scale,
by VAT rates, list of best PLUs and operators,and 1st level
printed reports and reset)
TOTAL REPORTS - 2nd LEVEL ................................................page 102
(2nd level printed total reports and reset)
1st-2nd-LEVEL TOTALS GROUP
Page 43

UV119UE - DSP 500 : USER MANUAL- v. 4.0 PAGE 1
INTRODUCTION TO
PROGRAMMING
ACCESS BY KEY-CODE.......................page 2
LEVELS AND GROUPS...........................................page 3
SELECTION AND EDITING............................ page 4
FUNCTION CODES .................................................page 5
INTRODUCTION TO
PROGRAMMING
Page 44

PAGE 2 UV119UE - DSP 500 : USER MANUAL- v. 4.0
ACCESS BY KEY-
CODE
F
As key <F> is pressed, the display shows the query KEY CODE. Enter the right
access code, so that the programming possibilities of the operator can be identified.
There are 4 different codes corresponding to 4 access “levels” (as detailed on next page).
After that a code has been entered, the scale passes to the “Programming” mode.
The keyboard control keys change their functions, as shown herebelow.
C
EXIT
F
5x7 5x12 5x18 7x18 7x23
SEL
CLEA
CENT
MESS
START
MESS
PAGE CHARCHARPAGE
END
MESS INS CANC
! + “ - £ . $ , % : / ; ( ‘ ) * = > ?
<
7 8 9
Q W E R T Y U I O P
4 5 6
A S D F G H J K L
1 2 3
SPACE
Z X C V B N M
CR SHIFT
0
ENTER
Remove the rubber protective cover from the keyboard and turn the pre-printed sheet to the rear
side, where the key functions in “Programming” mode are given.
EXIT
To exit “Programming” and get the scale back to weighing (scale status), just press
<EXIT> key (which is in the same position as <ZERO> in keyboard normal operation).
Page 45

UV119UE - DSP 500 : USER MANUAL- v. 4.0 PAGE 3
LEVELS AND GROUPS
ACCESS LEVELS
No. 4 access levels to programming are available, each of them having a specific key code, as
follows:
LEVEL 1
LEVEL 2
LEVEL 3
LEVEL 4
(operator Level)
(department foreman Level)
(Shop manager Level)
(for technical service)
pre-set key code:......................1111
pre-set key code:......................2222
pre-set key code:......................3333
Each level has different programming possibilities, more extended for higher levels.
All functions are always shown. When you try, however, to access a function which is assigned to
higher levels only, the message
NOT ENABLED shall be displayed, and the system shall not allow
it. Then press key <C> to release.
GROUPS OF PROGRAMMING FUNCTIONS
In “Programming” mode up to 10 groups of functions, numbered from 0 through 9 are available.
Each group of functions can be assigned with up to 10 functions max., for no. 100 functions as a
total numbered from 0 up to 99:
0123456789-
general programming
PLU programming
settings
receipt programming
label programming
interface programming
printer settings
reports
X totals
Z totals
When entering the “
Programming” mode, the system automatically positions to group “0”.
DESCRIPTION OF FUNCTIONS
A detailed description of the main programming functions is given in the next sections, subdivided
by function groups.
Page 46

PAGE 4 UV119UE - DSP 500 : USER MANUAL- v. 4.0
SELECTION AND EDITING
HOW TO SELECT A FUNCTION
Use the following procedure to move within the main function groups, from 0 to 9:
<> and <> Shifts from one group to another.
<ENTER>
Selects the specific group to be accessed and positions at the first function.
After the desired group has been accessed, follow the procedure indicated hereunder for selecting
the proper function you want:
<> and <> For scrolling through the available group functions.
<ENTER>
Selects the required function.
F
+ ...
Any of the no. 100 functions can be selected directly by pressing key <F> followed by
the numerical code identifying the function (of no. 2 figures).
HOW TO MOVE WITHIN A FUNCTION
Use the same procedure as detailed hereunder to move within a function:
<> and <> For scrolling through function fields.
<SEL>
To select the required option.
<ENTER>
To acknowledge the selected option and go to the next field.
EXIT
After programming a function, press <EXIT> to return to function selection.
By pressing <EXIT> sequentially, you return to the previous situations until exiting the
“Programming” mode.
HOW TO INPUT TEXT MESSAGES
<CLEAR MESS>
<CLEAR MESS> Clears a text. When pressed, the message ENTER TO
CONFIRM
is displayed, then press the key <ENTER> to delete. By
pressing any other key the deletion is aborted.
<CENT MESS>
Centres the entered text, with no confirmation.
<START MESS>
Moves the cursor to the beginning of the entered text.
<
PAGE> < PAGE>
Moves the cursor to the next/last page (20 characters page).
<
CHAR> < CHAR>
Moves the cursor to the next/last character.
<END MESS>
Moves the cursor to the end of the entered text.
<INS>
Switches from edit (EDIT) to overwrite (OVW) mode and viceversa. The active
mode is signalled at the bottom right side of the display, by the corresponding
abbreviation.
<CANC>
Deletes the character where the cursor is positioned.
<SPACE>
Inserts a blank space.
<CR>
To go to a new line.
<SHIFT>
Changes from capital letters, set as default, to lowercase letters and from the
punctuation marks put on the bottom line to the upper line. The abbreviation ins (or
scc) identifies the lowercase letter mode, and INS (or SCC) the capital letter mode.
Page 47

UV119UE - DSP 500 : USER MANUAL- v. 4.0 PAGE 5
FUNCTION CODES
Function Name Description ACCESS FROM LEVELS:
1 2 3 4
00 HOT-SHOT PLU KEYS assigning PLU codes to direct keys o o o o
01 DATE AND TIME setting date and time o o o
02 ADVERTISING TEXT advertising text to be displayed o o o
03 OPERATORS setting operator qualification o o o
04 MANUAL TARE manual tare (for pre-pack labels only) o o o
05 WEIGHED TARE pre-set tare (for pre-pack labels only) o o o
06 ACCESS KEY CODE setting access keys for level 1, 2 and 3 o o
07 KEYBOARD FUNCTIONS setting key functions (operator keys, direct keys, etc.) o o
08 VAT / DEPARTMENTS associating VAT rates to departments o o o
09 VAT RATES setting the VAT rates o o o
10 PLU EDIT setting PLU(description, unit price, label format, etc.) o o o
11 PLU COPY copy PLU with a new code o o o
12 PLU DELETE deleting PLU o o o
13 PLU TEST testing the number of stored PLU and the available PLU o o o
20 PAPER CASSETTE selecting type of print for each cassette and association labels/ default operator o o o
21 NUM. KEY TIME-OUT setting time limit for num. key entry o o o
22 PLU TIME-OUT setting time limit for PLU entry o o o
23 PLU PRE-SET DIGITS setting pre-set of digits for PLU code o o o
24 LABEL BAR-CODE setting composition of bar-code on labels and single-item receipts o o o
25 OPERATION SETTINGS enable/disable a set of scale operation options o o o
26 KEYBOARD BUZZER enable/disable keyboard buzzer o o o
27 OPERATIONAL MODE select operational mode (PLU recall/random price) o o o
30 SHOP NAME selecting shop name (and commercial text) to be printed on receipt o o o
31 RECEIPT OPTIONS enable/disable a set of optional fields to printed on the receipt o o o
32 PRINT BAR-CODE enable/disable bar-code printout on receipt o o o
33 PRINT DOUBLE TOTAL enable/disable double print of total, date end time o o o
34 EXIT FROM TOTALS selecting exit mode from totals o o o
40 LABEL LAYOUT setting user-programmable label layouts (11 up to 20) o o o
41 LAYOUT COPY copying label layout o o o
42 LAYOUT DELETE deleting label layout o o o
43 FIXED TEXTS programming fixed texts for labels o o o
50 CALIBRATION printer automatic detection of label formats o o o
51 PRINTER SETTING setting printer parameters (label feed, printing intensity) o o o
52 SERIAL CHANNEL A setting serial channel A parameters (baud rate, parity bit, etc.) o o o
53 SERIAL CHANNEL B setting serial channel B parameters (baud rate, parity bit, etc.) o o o
54 NETWORK ADDRESS addressing scale to network o o o
55 LOCAL/NETWORK selecting local/network mode o o o
56 TX PROGRAMMING programming TX communication o o o
57 FIND SCALES checking the network linked scales o o
58 MEMORY CARD PLU read/write on memory card o o o
70 HOT-SHOT REPORT printing list of direct keys and corresponding PLU codes o o o
71 PLU REPORT printing list of stored PLU o o o
72 PLU/BAR-CODE REPORT printing list of stored PLU and bar-codes o o o
73 GENERAL REPORT printer test (available type-characters, no. of stored PLU, printed paper km.) o o
74 RANDOM PRICES printing list of random prices entered by operators o o o
80 OPERATOR TOTALS print operator totals report o o o
81 DEPARTMENT TOTALS. print department totals o o o
82 VAT TOTALS print totals with VAT, by VAT rates o o o
83 PLU TOTALS print sales totals by PLU o o o
84 TOTALS BY HOUR print sales totals by time hour o o o
85 SCALE TOTALS print sales totals by scale o o o
86 X GRAND TOTAL print daily grand totals (1st level) o o o
87 X GR. TOTAL RESET print and reset daily grand totals (1st level) o o o
88 BEST PLUs print best sold PLUs, in sale-descending order o o o
89 BEST OPERATORS print best operators, in descending sale-amount order o o o
90 Z GRAND TOTAL print weekly grand totals (2nd level) o o
91 Z GR. TOTAL RESET print and reset weekly grand totals (2nd level) o o
Page 48

PAGE 2 UV119UE - DSP 500 : USER MANUAL- v. 4.0
GROUP 0: GENERAL
PROGRAMMING
00 - HOT-SHOT PLU KEYS ....................... page 3
01 - DATE AND TIME.............................................. page 4
02 - ADVERTISING TEXT .......................... page 4
03 - OPERATORS ................................................... page 6
04 - MANUAL TARE................................................ page 7
05 - WEIGHED TARE .............................................. page 8
06 - KEY CODES..................................................... page 9
07 - KEYB. FUNCTIONS ............................... page 10
08 - VAT & DEPARTMENTS..................... page 11
09 - VAT RATES...................................................... page 12
GROUP 0: GENERAL PROGRAMMING
0 -
Page 49

UV119UE - DSP 500 : USER MANUAL- v. 4.0 PAGE iii
00 - HOT-SHOT PLU KEYS
F + 0 + 0
ACCESS FROM LEVEL:
assigning PLU codes to direct keys
By this function, PLU codes can be assigned to direct “hot-shot” keys. In DSP500 keyboard
standard layout the direct keys are white and are numbered 1 to 99.
By using 07 KEYBOARD FUNCTIONS, additional keys for direct PLU recall can be programmed,
up to 110 maximum.
The function 10 PLU EDIT allows to program up to 3,045 different PLU ( programmable PLU may
vary, however, according to item description length and to other parameters). Each direct PLU is
identified by a numerical code, consisting of no. 1 up to 7 digits max.
Attention: Code number and hot shot key number DO NOT correspond; for example:
code no. 59238 might be assigned to hot key 27.
When entering the function, the following message is displayed:
0 0 D I R E C T P L U
Then press <ENTER> to access programming, and the following request is visualised:
0 0 P R E S S P L U K E Y
As one of the direct PLU keys is pressed, its corresponding PLU code shall be displayed as
follows:
0 0 T A S T O C O D I C E
n n c c c c c
where:
nn = direct PLU key no.
cccccc = assigned PLU code (code length may vary from 1 up to 7 digits as pre-set (see at
Programming code 23). If a fixed part of code has been defined you will have to
specify the variable part of it only.
For changing a code number digit the new PLU number through keyboard, and then confirm it by
pressing key <ENTER>.
KEY ERROR
If the message KEY ERROR is displayed, that means that the key just
pressed has been already assigned a function different from that of direct
PLU (see at Programming code 07 - KEYBOARD FUNCTION).
Attention: Codes “1” and “2” CANNOT be assigned to direct PLU keys since they
are reserved to WEIGHED ITEM RANDOM PRICE and to NON-
WEIGHED ITEM RANDOM PRICE
.
Page 50

PAGE 4 UV119UE - DSP 500 : USER MANUAL- v. 4.0
01 - DATE AND TIME
F + 0 + 1
ACCESS FROM LEVEL:
setting date and time
This function is used for setting the current time and date. Usually no further adjustment is
requested after the initial setting of date and time values, thanks to an internal clock/calendar
which automatically updates them. If the scale is networked with other scales the date and time
entered are propagated to all the scales in the network.
When entering the function, the following message is displayed:
0 1 D A T E A N D T I M E
Then press <ENTER> to access calendar date programming:
0 1 D A T E D D / M M / Y Y Y Y
d d / m m / y y y y
where:
dd = day
mm = month
yyyy = year
For making date modifications, just type in the new date through keyboard and confirm it by
pressing <ENTER>. Then proceed to time programming as follows:
0 1 T I M E H H / M M
h h : m m
where:
hh = hours
mm = minutes
For making time modifications, just type in the new time hour through keyboard and confirm it by
pressing <ENTER>, to return to calendar date programming.
Attention:
Also arrow keys < ↑↑↑↑> and <↓↓↓↓ > can be used for moving from one field to
the other. In that case however entered variations shall not be stored.
All date and/or time variations must be confirmed by pressing the key
<ENTER>.
Page 51

UV119UE - DSP 500 : USER MANUAL- v. 4.0 PAGE v
02 - ADVERTISING TEXT
F + 0 + 2
ACCESS FROM LEVEL:
advertising text to be displayed
This function is used for setting an advertising text that shall be represented on the display when
no operations are on course.
When entering the function, the following message is displayed:
0 2 A D V E R T I S I N G
Then press <ENTER> to access programming of the advertising message:
t t t t t t t t t t t t t t t t t t t t
N C n n n P C c c c I N S
where:
tttttt = the current advertising message; the line is empty if no advertising has been entered yet
nnn = number of characters entered
ccc = position of cursor, i.e. the character no. on which the cursor is positioned
INS = it signals that “insert mode”, with capital letters, is activated
If the key <INS> is pressed you enter the Overwrite mode, and SCC replaces the previous INS
signalling on the display. By pressing the key <SHIFT> you can change from capital to lower-case
characters ; as a consequence, ins (or scc) replaces the previous INS (or SCC) signal on the
display.
The advertising text can be input by using the numerical keys as well as the keys for letters and symbols.
The max. programmable length of text is 200 characters. For text input and variation please refer to the
page
SELECTION AND EDITING, at the section INTRODUCTION TO PROGRAMMING of this
manual.
Then, by pressing <ENTER> or <↓↓↓↓>, proceed to program the scrolling time for the advertising text,
as follows:
0 2 S C R O L L T I M E
E X P R E S S E D I N 1 / 10 s s
where:
ss = second tenths
The required scrolling can be programmed by pressing <ENTER> or <↓↓↓↓> again:
0 2 A D V E R T I S I N G M O D E
L E F T S C R O L L I N G
Press the key <SEL> to set RIGHT/LEFT SCROLLING or OVERLAP.
In OVERLAP mode, the advertising message is displayed in 20 characters per time, then you have
to enter sentences 20 characters long for getting reliable messages.
Page 52

PAGE 6 UV119UE - DSP 500 : USER MANUAL- v. 4.0
03 - OPERATORS
F + 0 + 3
ACCESS FROM LEVEL:
setting operator qualification and name
This function allows to define name and qualification required for each of the no. 20 operators. Any
operator can be enabled for “ON TRADING” or alternatively he can be considered “ON TRAINING”.
The calculations for the transactions effected by operators on training shall be accumulated by separate
totals (“training” totals) which are then reported into separate sections, queued after the other printed
reports (see at function programming codes 80, 86, 87, 90 and 91). The operator name is printed on the
receipt and on all the reports related to operators.
Attention:
When working in one of the “Receipt” modes, every operator must be
assigned to a direct key by the function 07 - KEYBOARD FUNCTIONS to
be effectively able to operate, regardless to the qualification given him by
the function being described.
When entering the function, the following message is displayed:
0 3 O P E R A T O R S
When entering the function, the following message is displayed:
0 3 O P E R A T O R I D C O D E
< 1 ÷ 2 0 > n n
where:
nn = operator identification code no. (1 to 20)
Then select the operator no., 1 to 20, and enter it through the keyboard or select it by the arrow
keys <←←←←> and <→→→→> (for increasing/decreasing the operator no. ). Confirm by pressing <ENTER>.
Then enter the operator name (up to 16 characters long), if desired, using the text editing functions
(see SELECTION AND EDITING, in section INTRODUCTION TO PROGRAMMING of this manual).
P C c c I N S
where:
cc = position of cursor, i.e. the character no. on which the cursor is positioned
INS = it signals that “insert mode”, with capital letters, is activated
Confirm the name by pressing <ENTER> and then select the operator qualification as follows:
0 3 O P E R A T O R n n
O N T R A D I N G
By the key <SEL> you can toggle between actual trading and training options.
Page 53

UV119UE - DSP 500 : USER MANUAL- v. 4.0 PAGE vii
04 - MANUAL TARE
F + 0 + 4
ACCESS FROM LEVEL:
manual tare
(applicable to pre-pack labels only)
The DSP500 Scale allows programming up to no. 20 tare values to be assigned to corresponding
PLU for preparing pre-pack labels. By this function, tare values can be entered under the form of
numerical values.
Attention:
Up to maximum 20 tare values can be set by scale programming. Each tare can
either be manually key-selected or weighed, as an alternative (therefore there are
NOT 20 manual + 20 weighed tares!). When a new values is entered for a tare
code already stored for a previous type of tare, the new value replaces the stored
one.
When entering the function, the following message is displayed:
0 4 M A N U A L T A R E I
Then press <ENTER> to access programming:
0 4 T A R E C O D E
< 1 ÷ 2 0 > n n
where:
nn = tare code (1 to 20)
Then select the code number for the tare and type it in through the digital keyboard, or by using the
arrow keys <←←←←> and <→→→→> to increase or decrease. Press the key <ENTER> and store the tare value
as follows:
0 4 T A R E C O D E n n
G R A M S t t t t
where:
nn = code number for tare identification ( 1 to 20 )
tttt = tare
Now the tare value can be typed in by keyboard.
Tare values must be multiple of DSP500 Scale metric division (i.e.: it shall be in a multiple of 2 g.
for 6 KGs. load capacity scales, and in a multiple of 5 g. for 15 KGs. load capacity scales).
If the entered tare value is not a multiple of the scale division a VALUE ERROR signalling shall be
displayed.
Page 54

PAGE 8 UV119UE - DSP 500 : USER MANUAL- v. 4.0
05 - WEIGHED TARE
F + 0 + 5
ACCESS FROM LEVEL:
pre-set tare
(applicable to pre-pack labels only)
The DSP500 Scale allows setting up to no. 20 tare values to be assigned to PLU for preparing prepack labels. The tare values to be assigned can be weighed by the function described on this page.
Attention:
Settable tare values are totally 20. Each tare can either be manual or
weighed., as an alternative (therefore there are NOT 20 manual + 20
weighed tares!). When a new values is entered for a tare code already
stored for a previous type of tare, the new value replaces the stored one.
Then press <ENTER> to access programming:
0 5 W E I G H E D T A R E
Then press <ENTER> to access programming:
0 5 T A R E C O D E
< 1 ÷ 2 0 > n n
where:
nn = code number for tare identification (1 to 20)
Then select the code number for the tare and type it in through the digital keyboard, or by using the
arrow keys <←←←←> and <→→→→> to increase or decrease. Press the key <ENTER> and store the tare value
as follows:
0 5 T A R E C O D E n n
G R A M S t t t t w w w w
where:
nn = code number for tare identification (1 to 20)
tttt = actual tare
wwww = weight on platter
Place the container representing the tare on the scale platter. As the key <ENTER> is pressed, its
weight shall be stored as tare value.
Page 55

UV119UE - DSP 500 : USER MANUAL- v. 4.0 PAGE ix
06 - KEY CODES
F +
+0 6
ACCESS FROM LEVEL:
setting access keys for levels 1,2,3
Codes enabled to programming can be set by the function described here. Its use is restricted to the
owners of keys codes 3 or 4, who can modify codes for levels 1, 2 and 3. For security reasons, the
key code for level 4 can never be modified.
When entering the function, the following message is displayed:
0 6 K E Y C O D E S
Then press <ENTER> to access programming:
0 6 K E Y C O D E S
K E Y n C O D E S c c c c
where:
n = key level no.
cccc = code number assigned to key (4 digits)
To change a selected key code, type the new 4 digit code through the digital keyboard and then
confirm it by pressing <ENTER>.
Attention:
Enter a code formed by less than 4 digits
ONLY if you want to disable that
access level. The system accepts 2 or 3 digit codes, but it does not allow
access to that programming level.
If you want to enable it again, replace the key code with a 4 digit code.
Use the arrow keys <←←←←> and <→→→→> for scrolling throughout the 3 keys and their assigned codes.
Page 56

PAGE 10 UV119UE - DSP 500 : USER MANUAL- v. 4.0
07 - KEYB. FUNCTIONS
F +
+0 7
ACCESS FROM LEVEL:
setting key functions
(operator codes, direct keys, numerical keypad, etc.)
The use assigned to the various keys on the scale keyboard can be redefined by this function. For
security reasons the keys of the programming keyboard cannot be reset. A numerical code is
associated to each key function as shown herebelow on the table:
code no. function key name
0 ÷ 9
NUMERIC KEYPAD
0 ÷ 9
10
hundreds key
00
11
thousands key
000
12
print key
PRINT
13
delete key
C
14
key for multiplying price per items
X
15
cancellation key
VOID
16
PLU code key
PLU
17
tare key
T
18
key to access programming
F
19
paper feed key
20
weight reset key
ZERO
21 ÷ 130
direct PLU keys
PLU 1 ÷ PLU 110
131 ÷ 150
operator keys
OP. 1 ÷ OP. 20
151
special price key
SP
152
random price key
RP
153
key for change to weight-based price
PB
154
fixed tare key
FIX
155
cash payment
CASH
156
cheque payment
CHEQUE
157
credit card payment
CREDIT CARD
158
coupon payment
COUPON
159
receipt re-open key
RE-OPEN
160
returns key
-
161
discount key (on sub-total)
DISCOUNT
999
blank key
Attention:
Operators can be enabled to service by this function only, by assigning one
code to each operator (from 131 to 150).
After entering the function press <ENTER> to access programming:
0 7 K E Y B O A R D F U N C T I O N
P R E S S A K E Y
Press the key for which you want to change the function, as follows:
0 7 K E Y B O A R D F U N C T I O N
F U N C T I O N C O D E c c c
where:
ccc = function code
To modify the key code enter the new function code and then confirm by pressing <ENTER>.
Page 57

UV119UE - DSP 500 : USER MANUAL- v. 4.0 PAGE xi
08 - VAT & DEPARTMENTS
F +
+0 8
ACCESS FROM LEVEL:
associating VAT rates to departments
This function allows to associate to each of the possible 10 departments a VAT rate identifier (1
out of 5 possible). See funct. 09 VAT RATES for rate programming.
Each PLU defined (see funct. 10 PLU EDIT) can then be associated to a department and, if defined,
consequently to a specific VAT rate.
All receipts can have VAT rates printed on (upon explicit enabling of the function, see funct.
31 RECEIPT OPTIONS).
In addition there is a specific total report by VAT rate (see funct.
82 VAT TOTALS).
When entering the function, the following message is displayed:
0 8 V A T / D E P A R T M E N T S
Then press <ENTER> to access programming:
0 8 D E P A R T M E N T I D .
< 1
÷÷÷÷
1 0 > n n
where:
nn = department id. (1 to 10)
Enter a department id. number (1 to 10) and then confirm it by pressing <ENTER>.
0 8 D E P A R T M E N T I D . n n
V A T < 1
÷÷÷÷
5 > p p % r
where:
nn = department id. chosen
r = VAT rate id. (1 to 5) to be associated
pp = corresponding VAT rate (programmed with funct.
09 VAT RATE)
Enter a VAT id. number (1 to 5) to be associated and then confirm it by pressing <ENTER>.
You may now exit (by the <EXIT> key) or go on programming department/VAT rate id.
associations.
Actual VAT rates associated to each VAT rate id. are programmed in funct. 09 - VAT RATES.
Page 58

PAGE 12 UV119UE - DSP 500 : USER MANUAL- v. 4.0
09 - VAT RATES
F +
+0
+
9
ACCESS FROM LEVEL:
associating VAT rates to departments
This function allows to associate to each of the possible 5 VAT rate identifier an actual VAT rate.
VAT rates id. can then be associated to specific departments with funct. 08 VAT/DEPARTMENTS.
Each PLU defined (see funct. 10 PLU EDIT) can then be associated to a department and, if defined,
consequently to a specific VAT rate.
All receipts can have VAT rates printed on (upon explicit enabling of the function, see funct.
31 RECEIPT OPTIONS).
In addition there is a specific total report by VAT rate (see funct.
82 VAT TOTALS).
When entering the function, the following message is displayed:
0 9 V A T R A T E S
Then press <ENTER> to access programming:
0 9 R A T E I D .
< 1
÷÷÷÷
5 > n
where:
n = VAT rate id. (1 to 5)
Enter a VAT rate id. number (1 to 5) and then confirm it by pressing <ENTER>.
0 9 V A T R A T E I D . n
R A T E < 1
÷÷÷÷
9 9 > r r
where:
n = VAT rate id. chosen
r = VAT rate (1 to 99 %)
Enter a VAT id. number (1 to 5) and then confirm it by pressing <ENTER>.
You may now exit (by the <EXIT> key) or go on programming VAT rates.
Page 59

UV119UE - DSP 500 : USER MANUAL- v. 4.0 PAGE 13
GROUP 1: PLU
PROGRAMMING
10 - PLU EDIT .......................................................... page 14
10 - PLU EDIT (description, price) ........... page 14
10 - PLU EDIT (label and
bar-code)
page 15
10 - PLU EDIT (description and
tare)
page 16
10 - PLU EDIT (dates)................................. page 17
10- PLU EDIT (sp.
price/discounts)
page 18
11 - PLU COPY ........................................................ page 19
12 - PLU DELETE .................................................... page 19
13 - PLU TEST ........................................................ page 20
GROUP 1:
PLU PROGRAMMING
1 -
Page 60

PAGE 14 UV119UE - DSP 500 : USER MANUAL- v. 4.0
1 -
10 - PLU EDIT
F +
+1 0
ACCESS FROM LEVEL:
setting PLU
(PLU description, unit price, label format, etc.)
All the information referring to a PLU can be set by this function including: PLU code, item
description and unit price, enabling to price revision, label format, etc. If the scale is networked
with other scales the data entered is propagated to all the scales in the network.
Selection of PLU code and setting unit price
After entering the function press <ENTER> to access programming:
1 0 P L U C O D E
< 0 ÷ 9 9 9 9 9 9 9 > c c c c c c c
where:
ccccccc = PLU code ( 7 digits max.)
The PLU code to be set must be entered, as a first step.
Codes “1” and “2” are special codes that cannot be utilised since they are reserved to “
WEIGHED
RANDOM PRICE
” items and to “NON-WEIGHED RANDOM PRICE” items, respectively.
In PLU recall, when operating the scale, there is also the possibility to use shortened PLU codes
(by defining a fixed and a variable part of the PLU code, see funct. 23 - PLU LENGTH).
Attention:
If a fixed part of PLU code was set, remember that, when in PLU EDIT ,
the whole PLU code is to be specified. In PLU recall instead only the
variable part of it is used (see programming function 23 - PLU LENGTH).
Enter the requested code through keyboard and confirm it by pressing <ENTER>. Then you can
proceed to setting the unit price for the selected PLU, as follows:
1 0 P L U c c c c c c c
P R I C E p p p p p p
where:
ccccccc = PLU code (7 digits max.)
pppppp = unit price
Attention:
Starting from now, the arrow keys <←←←←> and <→→→→> can be used to skip to
the previous/next PLU already been stored.
Once the PLU unit price has been entered, confirm it by <ENTER> and proceed to select the
required price basis. Unit price can be intended for 1 kg. or 100 g. or for non-weighed item:
1 0 P L U c c c c c c c
P R I C E x 1 K G
Select PRICE X 100G., NONWEIGHED PRICE and again PRICE X 1 KG by pressing <SEL>
sequentially as required. Press <ENTER> to confirm your selection and to proceed with
programming label format.
Page 61

UV119UE - DSP 500 : USER MANUAL- v. 4.0 PAGE 15
1 -
10 - PLU EDIT (label and
bar-code)
Selection of label format
Twenty different label formats are available for selection. The first 10 label formats are pre-set (see
progr. function code 46 PRE-SET LABELS), whereas label formats 11 to 20 are userprogrammable by means of progr. function 40 LABEL LAYOUT.
1 0 P L U c c c c c c c
L A Y O U T < 1 ÷ 2 0 > f f
where:
ff = selected label layout no.
If a different layout is wanted, type it through the numeric keypad and confirm it by pressing
<ENTER>.
Setting bar-code
Now, bar-codes are to be programmed as shown herebelow:
1 0 P L U c c c c c c c
B A R - C O D E E A N - 1 3
By the key <SEL> you can select between the two types of bar-code available: EAN-13 and EAN-8.
EAN-13 bar-code consists of 13 digits: the 7 leading digits are programmable by the function described
hereunder and, normally, the following 5 digit carry the price, and the last digit is a check code.
EAN-8 bar-code consists of just 7 programmable digits +1 final check code and is absolutely
unsuitable for products to be weighed.
The actual composition of the code may be completely customised (digit by digit) using funct.
24 - LABEL BAR-CODE and funct. 32 - RECEIPT BAR-CODE.
Enter the first 7 digits of bar-code by pressing <ENTER>. For instance the PLU code itself can be
entered.
1 0 P L U c c c c c c c
B A R - C O D E b b b b b b b
where:
bbbbbbb = bar-code value
Then press <ENTER> to program the involved department, as follows:
1 0 P L U c c c c c c c
D E P A R T M E N T < 1 ÷ 1 0 > r r
where:
rr = department no.
Select the required department no. through keyboard and then press <ENTER> to proceed with PLU
description and its ingredients, if requested.
Page 62

PAGE 16 UV119UE - DSP 500 : USER MANUAL- v. 4.0
1 -
10 - PLU EDIT
(description and tare)
Selection of additional text (i.e.: ingredients, etc.)
When starting programming the additional descriptive text for a PLU (such as: ingredients, etc.),
the first line of the scale display will represent the text already stored. If a new PLU is being set,
the first line will obviously result blank.
t t t t t t t t t t t t t t t t t t t t
N C n n n P C c c c I N S
where:
ttttt = detailed description of the item
nnn = number of entered characters
ccc = cursor position
INS = signalling that capital character input mode is currently on use
Press <INS> to pass from the pre-set input mode to overwriting mode. The abbreviation INS on the
scale display shall be replaced by SCC. Use the digital keys and the keys assigned to symbols and
letters for typing the text “tttt..” ( 350 characters long as a maximum).
Refer to the sheet SELECTION AND EDITING included in the INTRODUCTION Section to this
Manual, for more information of text selection and modification.
Selection of PLU description
Press the key <ENTER> to proceed with typing the PLU description. This is the text that shall be
shown by the display each time the PLU product is recalled (with the receipt totals printed aside, if
the option is enabled):
t t t t t t t t t t t t t t t t t t t t
P C c c c I N S
where:
ttttt = text describing the item
ccc = cursor position
INS = signalling that capital character input mode is currently on use
The displayed text is programmed by the same programming procedure as the PLU text previously
described. Use the key <CENT MESS> to centre the text.
Assignment of pre-set tare
By pressing <ENTER> programming enters the assignment of a pre-set tare, which is to be used for
printing pre-pack labels only (see progr. functions 04 MANUAL TARE and 05 WEIGHED TARE).
1 0 P L U c c c c c c c
T A R E < 0 ÷ 2 0 > n n
where:
nn = tare identification code (20 characters max.)
By using the numeric keypad keys enter the tare identification code to be assigned to the PLU and
then confirm by pressing <ENTER>.
Page 63

UV119UE - DSP 500 : USER MANUAL- v. 4.0 PAGE 17
1 -
10 - PLU EDIT (dates)
Setting ageing and due dates
For each PLU, DSP 500 scale allows setting two different dates:
• DATE 1, used as date following TO BE SOLD WITHIN.., in the pre-set label layouts 1 to 10
• DATE 2, used in user-programmable label layouts 11 to 20, as date following EAT WITHIN...,
or specifying product ageing, or any other required date. Obviously, DATE 1 can be used in
user-programmable layouts too.
Both the above dates are expressed by number of days to be summed to the current date and can
also be given negative values, if needed.
Start by programming date 1, as follows:
1 0 P L U c c c c c c c
D A T E 1 < 0 ÷ 9 9 9 9 > d d d d
where:
dddd = days to be counted for date 1 (starting from the date of label issue)
Type in the number of days for date 1. The <SEL> key allows to toggle between positive and
negative date values. Confirm by pressing <ENTER>.
Then program date 2, as follows:
1 0 P L U c c c c c c c
D A T E 2 < 0 ÷ 9 9 9 9 > d d d d
where:
dddd = days to be counted for date 2 (starting from the date of label issue)
Type in the number of days for date 2. The <SEL> key allows to toggle between positive and
negative date values.
Confirm by pressing <ENTER>.
Page 64

PAGE 18 UV119UE - DSP 500 : USER MANUAL- v. 4.0
1 -
10- PLU EDIT (sp.
price/discounts)
Setting price revision - special price
If the programming function 25 SPECIAL PRICE is enabled, the DSP500 Scale offers the
possibility to use the PLU, keeping the stored information but modifying price when the label is to
be printed, or adding a new price to the receipt.
The price revision must be enabled for each PLU, and the minimum allowed price must be set. In
normal scale operation the special price option can be invoked with <SP> key
Now proceed to enable PLU price revision as follows:
1 0 P L U c c c c c c c
N O P L U P R I C E R E V .
By key <SEL>, you can select NO PLU PRICE REVISION or YES PLU PRICE REVISION then
press <ENTER>. Then enter the minimum allowed price for a special price on this PLU.
1 0 P L U c c c c c c c
M I N . P R I C E p p p p p p
where:
pppppp = minimum price allowed for a special price choice
Setting discounts
It is also possible to set a fixed discount percentage on the PLU price. The discount message and
the percentage will be printed on the receipt as well.
1 0 P L U
D I S C O U N T % p p
where:
pp = discount percentage
Beyond this, a PLU unit price can be set to 3 different amounts, with each amount being
automatically used if weight of quantity is above one of two thresholds, thus providing
“weight/quantity-based” discount capabilities. The thresholds can be specified for each PLU now.
1 0 P L U c c c c c c c
1 s t T H R E S H O L D l l l l l
where:
lllll = 1st weight or quantity threshold (respectively for weighed and non-weighed PLUs)
1 0 P L U c c c c c c c
1 s t P R I C E p p p p p p
dove:
pppppp = unit price applied for weight or quantity above the 1st threshold
After this the second weight or quantity threshold (respectively for weighed and non-weighed
PLUs) can be set, followed by the unit price applied for weight or quantity above the 2nd
threshold. The normal price is instead applied for weights or quantities below the 1st threshold.
Page 65

UV119UE - DSP 500 : USER MANUAL- v. 4.0 PAGE 19
1 -
11 - PLU COPY
F +
+1 1
ACCESS FROM LEVEL:
copy PLU with a new code
This function can be used to copy a PLU with all its settings and store it with a new code. It is a
useful feature for entering similar products by modifying only a few data for them, without having
to reprogram them entirely. If the scale is networked with other scales the new PLU created with
the copy operation is propagated to all the scales in the network.
When entering this function press <ENTER> to access PLU copying as follows:
1 1 S O U R C E P L U C O D E
c c c c c c c
where:
ccccccc = PLU code to be copied
By using the numeric keypad keys, enter the PLU code to be copied and then confirm by <ENTER>:
1 1 D E S T I N A T I O N
P L U C O D E c c c c c c c
where:
ccccccc = destination PLU code
Type in through the numeric keypad the new PLU code on which the recalled PLU must be copied
and then confirm by <ENTER>.
12 - PLU DELETE 1 -
F +
+1
2
ACCESS FROM LEVEL:
Deleting PLU
This function is to be used for deleting a PLU and all its setting. By this function, PLU code is
cancelled from the PLU list. If the scale is networked with other scales the PLU deleted is also
removed from all the scales in the network.
After selecting this function, press <ENTER> to access PLU delete:
1 2 P L U T O B E D E L E T E D
c c c c c c c
where:
ccccccc = PLU code to be deleted
Select the required code and press <ENTER>. A delete confirmation query is displayed:
1 2 D E L E T E P L U
E N T E R T O C O N F I R M
Press <ENTER> to confirm deletion. If the selected PLU code does not correspond to a programmed
PLU, the message UNKNOWN DATA shall be displayed.
Page 66

PAGE 20 UV119UE - DSP 500 : USER MANUAL- v. 4.0
1 -
13 - PLU TEST
F +
+1 3
ACCESS FROM LEVEL:
testing the number of stored PLU and the available PLU
This function can be used to quickly check the number of PLU already been programmed and these
still available for programming, by displaying these two figures on the display without printing
them.
If a printout of all the programmed PLU is needed, then see at progr. functions 71 PLU LIST and
72 PLU BAR-CODE LIST, to obtain a printout of PLU complete with their codes, description and
unit price.
When selecting this function the following message is displayed:
1 3 P L U T E S T
Then press <ENTER> to visualise the no. of PLU already programmed so far, and the space still
available for further PLU programming as follows:
1 3 P L U S T O R E D x x x x
P L U L E F T z z z z
where:
xxxx = no. of stored PLU (including PLU 1 and 2, scale pre-set)
zzzz = no. of PLU available for programming
Use the keys <EXIT> or <ENTER> to exit the function.
Page 67

PAGE 21 UV119UE - DSP 500 : USER MANUAL- v. 4.0
Page 68

PAGE 61 UV119UE - DSP 500 : USER MANUAL - v. 4.0
GROUP 2: SETTINGS
20 - RECEIPT / LABEL............................................page 62
21 - NUM. KEY TIME-OUT...............................page 63
22 - AUTO PLU TIME-OUT...................................... page 63
23 - PLU PRE-SET DIGITS........................ page 64
24 - LABEL BAR-CODE .....................................page 66
25 - OPERATION SETTINGS .................. page 67
26 - KEYBOARD BUZZER ............................page 68
27 - OPERATIONAL MODE.....................................page 68
GROUP 2 :
SETTINGS
2 -
Page 69

PAGE 62 UV119UE - DSP 500 : USER MANUAL - v. 4.0
2 -
20 - RECEIPT / LABEL
F +
+2 0
ACCESS FROM LEVEL:
selecting the type of print (receipts or labels)
The DSP500 scale can detect the insertion of a specific type of paper-cassette (up to 3 different
types) and change printing mode accordingly (label, receipt, single-item, etc.). Obviously, the
paper cassette shall be prepared with the proper paper to operate according with the print mode
associated to each cassette. See PAPER-CASSETTE PREPARATION in the DAILY USE section of
the manual for details on how to mark the 3 types of cassettes for automatic detection.
Besides, when on “Label” issue mode, it is possible to set an operator code no. to which the
transactions for the issued labels shall be assigned to by default (i.e. if no specific operator is
entered on a sale).
The following message is displayed when accessing this function:
2 0 R E C E I P T / L A B E L
Then press <ENTER> to enter programming, as follows:
2 0 C A S S E T T E N O . 1
P R I N T L A B E L
Use the key <SEL> to toggle between other formats available: LABEL, AUTOMATIC LABEL,
PRE-PACK LABEL, RECEIPT, SINGLE-ITEM RECEIPT. For details on specific printing modes
and on paper-cassette marking refer to the DAILY USE section of this manual.
Press <ENTER> to select the desired paper-cassette/print-mode association. Next choice is the
default operator associated to the cassette, in label-print mode:
2 0 C A S S E T T E N O . 1
< 1 ÷ 2 0 > p p
where:
pp = operator code number (1 to 20)
Enter the operator code desired (1 to 20) and press <ENTER> to confirm.
All the procedure seen is than repeated for paper-cassettes 2 and 3.
Page 70

UV119UE - DSP 500 : USER MANUAL - v. 4.0 PAGE 63
2 -
21 - NUM. KEY TIME-
OUT
F +
+2 1
ACCESS FROM LEVEL:
setting time limit for numeric key entry
This function allows to pre-set a time-out for numeric key entry - that is a programmed timing
between entering one figure and the following one. That time due, the scale shall consider the first
figure been selected as the beginning of a new price. Value “0” indicates that no time limit was set.
Enter the function and then press <ENTER> to access programming as follows:
2 1 N U M . K E Y T I M E - O U T
E X P R E S S E D I N s e c . s s
where:
ss = time-out value expressed into seconds
Input the new value through the numerical keypad for changing a pre-set time limit. Press
<ENTER> to confirm the entered data and restore the previous condition.
22 - AUTO PLU TIME-OUT 2 -
F +
+2 2
ACCESS FROM LEVEL:
setting a time-out for automatic end of PLU code entering
A time-out for PLU code entries through numerical keypad can be set by this function - that is a
programmed timing between entering one PLU code and the following one. That time due, the
scale shall consider the first figure been selected as completed, even if <PLU> key was not pressed.
Value “0” indicates that no time limit was set.
Enter the function and then press <ENTER> to access programming, as follows:
2 2 A U T O P L U T I M E - O U T
E X P R E S S E D I N 1 / 10 s s
where:
ss = time-out value expressed into tenths of second
Input the new value through the numerical keypad for changing a pre-set time limit, and then
confirm by <ENTER> and restore the previous condition.
Page 71

PAGE 64 UV119UE - DSP 500 : USER MANUAL - v. 4.0
2 -
23 - PLU PRE-SET
DIGITS
F +
+2 3
ACCESS FROM LEVEL:
setting pre-set digits for PLU code
This function is used for setting the required length of PLU coding that operators have to select,
that is the trailing digits of a PLU code, and the fixed leading digits.
For shop requirements, PLU codes assigned to a specific department may be programmed to start
all by a certain sequence of leading digits. To avoid the need for the operators to type in this
sequence of digits each time, the scale can be programmed to automatically add it, so the operators
will only type in the trailing digits. Enter the function and then press <ENTER> to access
programming, as follows:
2 3 P L U D I G I T S
Then press <ENTER> again:
2 3 P L U D I G I T S
< 2 ÷ 7 > D I G I T S d
where:
d = number of trailing digits of PLU code (i.e. the length of the variable part of PLU code)
Use the key <SEL> for selecting the required value, and then <ENTER> to confirm it. If the code
length is 7 digits return at the function initial display, if it is shorter than 7, then the leading fixed
part of PLU code will automatically be displayed, as follows:
2 3 F I X E D P A R T O F
P L U C O D E f f f f f
where:
fffff = fixed leading digits of PLU code
Now enter the fixed leading digits of PLU; of course, the no. of digits available can vary on the
length pre-set for the training digits, considering that a PLU code (fixed leading + variable trailing
digits) can be formed by 7 digits max. Confirm by <ENTER> to return to the initial function
display. Using a composite PLU code (fixed + variable part) can be interesting when different
scales are located in areas of the shop selling different items (e.g. an area with vegetables, another
with bakery, etc.). A fixed leading part of PLU code can then be used to identify a specific shop
area. For instance items in the vegetable area can be identified by PLU starting with 15, whilst
bakery can be identified by PLUs starting with 12.
This arrangement can be convenient when the items sold in each shop area served by a scale is so
high that the number of “hot-shot” keys available in the scale is not sufficient. So for a number of
item the PLU code must be entered digit by digit. By setting a leading fixed part, the operator can
then enter the variable part only, thus saving time and effort.
To sum up, in this hypotheses to PLU is composed by:
A. a fixed part, common to all PLUs in a shop area
B. a variable part, uniquely identifying the PLU in that given area
Page 72

UV119UE - DSP 500 : USER MANUAL - v. 4.0 PAGE 65
2 -
23 - PLU PRE-SET
DIGITS (note)
The use of composite PLU codes (fixed + variable part) is possible in any of the scale operating
modes.
Follows these instructions to set up a proper programming environment before actually entering
PLUs:
1. use function 23 PLU PRE-SET DIGITS, to specify:
- the number of digits in the variable part of the PLU. This corresponds to the digits that
the operator need to enter to specify a single PLU.
Suggestion: if there are hundreds of PLU to be sold, then choose 3 digits. If they are
thousands then choose 4 digits, and so on.
- digits in the fixed part of the PLU. These corresponds to the digits that will be
automatically prepended to the variable part.
Since the overall PLU code length is 7 digits, the number of digits for the variable part is
7 - no.fixed-digits
example:
to set up a composite PLU code with 15 as fixed part and a variable part suited to accommodate up to 500 item choose
the following settings:
no. digits variable part: 3
fixed part: 15
Note: the fixed part could be as long as 7-3=4 digits
2.
use function 11 PLU COPY to copy the 2 “internally set PLU codes”, i.e. PLU 1 = weighed
random price “template” and PLU 2 = non weighed random price “template” respectively in PLO
no.:
f f f.....00..1 & f f f.....00..2
└─┬─┘└─┬─┘ └─┬─┘└─┬─┘
fixed variable fixed variable
part part part part
in the previous example , for instance:
copy PLU 1 to PLU 15001,
copy PLU 2 to PLU 15002.
PLUs 15001 and 15002 should then never be touched again (overwritten, deleted or modified), in order to be able to use
random prices.
Attention: this operation is FUNDAMENTAL to assure proper operation of the
scale. It is mandatory to perform it before operating the scale.
3. now start programming PLUs (funct. 10 EDIT PLU), remembering that their codes must be
specified completely (fixed + variable part) and are composed by:
first part = fixed digits
last part = variable part, with leading zeroes to provide a code with all digits wanted for the
variable part
using again the previous example, the PLU that the operator can specify with 24 must be programmed as PLU 15024.
4. to program hot-shot keys for PLU (funz. 00 HOT-SHOT KEYS) use only the variable part of the
code.
Page 73

PAGE 66 UV119UE - DSP 500 : USER MANUAL - v. 4.0
2 -
24 - LABEL BAR-CODE
F +
+2 4
ACCESS FROM LEVEL:
customise the composition of bar-code used per labels and
single-item receipts
This function allows to customise the bar-code composition used for labels and single-item
receipts. The customisation is made on digit-by-digit base and is specified separately for both
EAN-8 and EAN-13 bar-codes of weighed and non-weighed items.
2 4 L A B E L B A R- C O D E
Press <ENTER> to start programming:
2 4 E A N 1 3 B C R W E I G H E D
c c c c c c k i i i i i
where:
c...k...i = digit by digit specification of the bar-code composition (see below)
Each digit in the bar-code can be specified using the DATA-CODE table here shown. For instance,
the default setting for EAN-13 bar-codes for weighed items is cccccchiiiii, i.e. the first 6 digits
(code cccccc) will contain the “barcode code” associated to that specific
PLU (see 10 EDIT PLU), followed by
a single intermediate checksum digit
(code k), and finally 5 digits
containing the total amount of the
sale (code iiiii).
To enter codes use the same keys
used for entering and editing texts
(see SELECTION AND EDITING in section INTRODUCTION TO PROGRAMMING).
The number of digits allocated for hosting data must be large enough to actually accommodate it.
If not (for instance less than 5 digits reserved for total sale amount) the bar-code will not be
printed.
When the composition of EAN-13 code for weighed items has been specified, press <ENTER> to
confirm.
The user will then be asked to specify the composition of EAN-8 code for weighed items
(EAN8 BCR WEIGHED), followed by EAN-13 code for non-weighed items
(EAN13 BCR NON-WEIGH.) and, finally, by EAN-8 code for non-weighed items
(EAN8 BCR NON-WEIGH.).
DATA CODE
bar-code associated to each PLU C
intermediate checksum K
total amount of sale I
scale identifier B
PLU code P
label/receipt no. S
operator identifier O
weight/item-number Q
department R
Page 74

UV119UE - DSP 500 : USER MANUAL - v. 4.0 PAGE 67
2 -
25 - OPERATION
SETTINGS
F +
+2 5
ACCESS FROM LEVEL:
enable/disable scale operation settings
This function allows enable/disable a set of operation settings on the scale, i.e.: RANDOM PRICE,
SPECIAL PRICE, VOID, RETURNS, SUBTOTAL DISCOUNT.
When entering this function press <ENTER> to access programming, as follows:
2 5 O P E R A T I O N S E T T I N G
For each of the specific options to be selected the message YES OPTION or NO OPTION (e.g.
YES SPECIAL PRICE) will be displayed, respectively for option enabled or disabled.
RANDOM PRICES
This option allows to use random-based prices even when the scale is provided for operation by
“PLU Recall” (see progr. function 27 OPERATIONAL MODE). If the scale is currently working on
“PLU Recall” and RANDOM PRICE option is disabled, PLU shall always have to be assigned to
the item being priced. Use <SEL> to enable/disable this option and press <ENTER> to move to the
next option.
SPECIAL PRICE
This option allows to enter a temporary price for a given PLU during weighing - if the PLU is set with
the price revision option enabled (see progr. function 10 PLU EDIT).
VOIDS
With the scale on “Receipt” mode, this function allows to subtract one or more transactions being
made from the receipt being serviced (not printed yet). If the scale is operating on “Label” mode,
the amount of the latest label been issued can be subtracted. Use <SEL> to enable/disable this
option and press <ENTER> to move to the next option.
RETURNS
With the scale in “Receipt” mode, this function allows to subtract one or more returns operations
for non-weighed items (introducing negative amounts in receipts). Use <SEL> to enable/disable
this option and press <ENTER> to move to the next option.
SUBTOTAL DISCOUNT
With the scale in “Receipt” mode, this function allows to enter free percentage discounts on the
subtotal. Use <SEL> to enable/disable this option and press <ENTER> to move to the next option.
Press <EXIT> to return to the initial display for exiting the operation setting programming.
Page 75

PAGE 68 UV119UE - DSP 500 : USER MANUAL - v. 4.0
2 -
26 - KEYBOARD
BUZZER
F +
+2 6
ACCESS FROM LEVEL:
enable/disable keyboard buzzer
By this function, the “beep” signal emitted as any key is pressed can be disabled. If this option is
disabled, the keyboard operates silently, with just one beep signalling erroneous toggle or two
beeps when pressing the operator key, with a transaction is being registered on receipt.
Enter the function and then press <ENTER> to access programming, as follows:
2 6 K E Y B O A R D B U Z Z E R
D I S A L E D
Press <SEL> to enable/disable this option. Press <ENTER> or <EXIT> to return to the initial display.
27 - OPERATIONAL MODE 2 -
F +
+2 7
ACCESS FROM LEVEL:
select operational mode
(PLU recall/random price)
By this function, selection has to be given for priority between PLU recall and prices entered
through keyboard, for the scale day-by-day service.
If priority is given to “PLU Recall”, any number entered through the keyboard shall be recognised
as a PLU code.
Contrarily, if priority is given to “Random Price”, any number entered through keyboard shall be
considered a random-based price per kg. By pressing the key <PB>, price shall be interpreted as
price per 100g. By pressing the key <X> price shall be interpreted as a price for non-weighed items.
Press <ENTER> to enter programming after accessing the function:
2 7 O P E R A T I O N A L M O D E
P L U R E C A L L
Then, press <SEL> to select priority to Random price mode, so that the scale shall detect numerical
entries as random prices, as follows:
2 7 O P E R A T I O N A L M O D E
R A N D O M P R I C E
Press <ENTER> or <EXIT> to return to the initial display.
Page 76

UV119UE - DSP 500 : USER MANUAL - v. 4.0 PAGE 69
GROUP 3 :
RECEIPT
PROGRAMMING
30 - SHOP NAME..................................................... page 70
31 - RECEIPT OPTIONS................................... page 71
32 - RECEIPT BAR-CODE............................. page 72
33 - PRINT DOUBLE TOT. ..........................page 74
34 - EXIT FROM TOTAL..........................................page 74
GROUP 3:
RECEIPT PROGRAMMING
3 -
Page 77

PAGE 70 UV119UE - DSP 500 : USER MANUAL - v. 4.0
3 -
30 - SHOP NAME
F +
+3 0
ACCESS FROM LEVEL:
shop name (and commercial text)
to be printed on receipt
By this function the user can program a 6 line message to be positioned at receipt heading (store
name, usually) or the receipt end (closing courtesy message), as required. It is possible to decide if,
where and how to print each line.
Enter the function and press <ENTER> to proceed with programming the store name, starting by
line 1 as follows:
t t t t t t t t t t t t t t t t t t t t
R O W n C U R . c c I N S
where:
tttttt = text entered on current line
n = line no. (1 to 6)
cc = cursor position
INS = signalling that capital character mode is currently on use
Attention:
Use keys <←←←←> and <→→→→> for moving from one line to the next. You can
decide to complete the procedure line by line (that is to type text, select
character-type and select positioning for one line) and then pass to the next
one, or to type in all the text, then choose character-types, etc.
Press <INS> for passing from pre-set Insert selection mode to Overwrite with lower-case
characters. The abbreviation SCC shall be shown on the display, instead than INS. Type in the text
by using the keys corresponding to letters, symbols or numbers, as required, for a max. length of
27 characters/line. Use key <CENT MESS> to centre. For more details on how to input and modify
texts, refer to sheet SELECTION AND EDITING, in the INTRODUCTION section of this manual.
Proceed to programming the character-type to be printed by pressing <ENTER> or <↓↓↓↓>, as follows:
3 0 S H O P N A M E C H A R .
L I N E n F O R M A T 5 x 7
where:
n = line no.
Use <SEL> for selecting the available
formats of character:
5x7 regular height
5x12 2x height
5x18 3x height
7x18 extra width, 3x height
7x23 extra width, 4x height
By pressing <ENTER> or <↓↓↓↓>, get to programming the position of the line of text (not printed, at
the receipt header or at its very end):
3 0 S H O P N A M E P O S I T .
L I N E n N O P R I N T I N G
Now you can select the other options (ON TOP/ON BOTTOM) by pressing <SEL>.
Page 78

UV119UE - DSP 500 : USER MANUAL - v. 4.0 PAGE 71
3 -
31 - RECEIPT OPTIONS
F +
+3 1
ACCESS FROM LEVEL:
enable/disable optional printouts on receipt
By this function you can enable or disable a number of optional print-items on the receipt printout,
i.e.: DATE; TIME, PLU DESCRIPTION, CHANGE.
After entering the function press <ENTER> to access programming as follows:
3 1 R E C E I P T O P T I O N S
For each of the specific options to be selected the message YES OPTION or NO OPTION (e.g.
YES PRINT DATE) will be displayed, respectively for option enabled or disabled.
PRINT DATE
This option controls whether the current date printed on receipts or not. This option is enabled by
pressing <SEL>,so the current date shall be printed on receipt, next to time. Then press <ENTER> to
move to the next option.
PRINT TIME
By this function you can select to have the current time printed on receipts or not. This option is
enabled by pressing <SEL> so the current time hour shall be printed next to the date on receipt.
Then press <ENTER> to move to the next option.
PRINT PLU DESCRIPTION
This function can be used to select if the PLU description has to be printed on receipt. This option
can be enabled by pressing <SEL>, so that item description is printed for each transactions made. If
it is disabled, the receipt carries only item weight (or quantity), its unit and total price and no other
information useful for identifying it. Then press <ENTER> to move to the next option.
PRINT CHANGE
This function can be use for selecting the printing of change on receipt. Use <SEL> to enable this
option. Once that a receipt is printed, the amount given by the customer and the change to be
returned to him shall be printed.
Press <EXIT> to end receipt options programming.
Page 79

PAGE 72 UV119UE - DSP 500 : USER MANUAL - v. 4.0
3 -
32 - RECEIPT BAR-
CODE
F +
+3 2
ACCESS FROM LEVEL:
receipt bar-code customisation
This function can be used to select if a bar-code has to be outprinted at the end of a receipt and to
customise its composition both for EAN-8 and EAN-13 coding.
3 2 R E C E I P T B A R - C O D E
Y E S P R I N T I N G
Use <SEL> to enable/disable this option, confirm with <ENTER> and then choose the type of barcode to be printed:
3 2 R E C E I P T B A R - C O D E
B A R - C O D E E A N - 1 3
Two types of bar-code are available: EAN-13 and EAN-8. EAN-13 bar-code consists of 13 digits,
the first 7 programmable digits, a successive 5 digits sequence for price and one final control digit.
EAN-8 bar-code has a first 2 fixed digits (00) sequence, 5 digits for price and one final control
digit.
The DSP500 scale also allows to customise completely the composition of the bar-code, on digitby-digit basis (see below).
By pressing <ENTER> you can start typing in the first 7 digits of bar-code (fixed part of the barcode, same for all receipts). These figures shall normally be printed if
EAN-13 bar-code is selected,
otherwise they will have no effects, unless the bar-code is customised differently (see below).
3 2 R E C E I P T B A R - C O D E
L E A D I N G P A R T b b b b b b b
Now select, by using the numeric keys, the fixed bar-code digits (7 digits max.).
Press <ENTER> to move to the next option.
Page 80

UV119UE - DSP 500 : USER MANUAL - v. 4.0 PAGE 73
3 -
32- RECEIPT BAR-
CODE (2)
The next step is the specification of bar-code composition to be used for receipts. The
customisation is made on digit-by-digit base and is specified separately for both EAN-8 and EAN13 bar-codes.
3 2 B C R E A N 1 3 R E C E I P T
c c c c c c k i i i i i
where:
c...k...i = digit by digit specification of the bar-code composition (see below)
DATA CODE
bar-code programmed for receipts C
intermediate checksum K
total amount of sale I
scale identifier B
receipt no. S
operator identifier O
weight/item-number Q
Each digit in the bar-code can be specified using the DATA-CODE table here shown. For instance,
the default setting for EAN-13 bar-codes for weighed items is cccccchiiiii, i.e. the first 6 digits
(code cccccc) will contain the “bar-code code” associated to all receipts (the leading 7 digits
programmed just before this step), followed by a single intermediate checksum digit (code k), and
finally 5 digits containing the total amount of the sale (code iiiii).
To enter codes use the same keys used for entering and editing texts (see SELECTION AND
EDITING
in section INTRODUCTION TO PROGRAMMING).
The number of digits allocated for hosting data must be large enough to actually accommodate it.
If not (for instance less than 5 digits reserved for total sale amount) the bar-code will not be
printed.
When the composition of EAN-13 code for weighed items has been specified, press <ENTER> to
confirm and move to EAN-8 bar-code composition, using the same method just seen.
3 2 B C R E A N 8 R E C E I P T
c c i i i i i
where:
c...k...i = digit by digit specification of the bar-code composition (see table)
Press <ENTER> at the end of EAN-8 bar-code customisation and <EXIT> to return to the initial
visualisation.
Page 81

PAGE 74 UV119UE - DSP 500 : USER MANUAL - v. 4.0
3 -
33 - PRINT DOUBLE
TOT.
F +
+3
3
ACCESS FROM LEVEL:
enable/disable double print of total, date and time
This function can be used for selecting if the two lines of receipts, where the receipt total amount
and, if enabled, date and time are reported, are to be printed at the end of each receipt. After
entering this function press <ENTER> to access programming:
3 3 P R I N T D O U B L E T O T .
D I S A B L E D
Use <SEL> to enable this option. For a each receipt, a printed copy summarising the no. of items
sold, the total amount, operator no., scale code, receipt registration no. and the date and time of
receipt issue (if enabled) can be obtained by this option. Press <ENTER> to move to the next
option.
3 3 P R I N T D O U B L E T O T .
T I M E - O U T ( 1 / 1 0 s ) s s
where:
ss = time-out after which the short second copy of the receipt is printed (in 10th of
seconds).
Enter the delay time (in 10th of seconds) in which the abridged second copy of the receipt will be
printed after the complete receipt printout. Confirm with <ENTER>.
Press <EXIT> to return to the initial visualisation.
34 - EXIT FROM TOTAL 3 -
F +
+3 4
ACCESS FROM LEVEL:
selecting exit mode from totals
This function can be used for selecting if the scale can exit from totals by a weight variation or by
pressing a key only.
After entering this function press <ENTER> to access programming:
3 7 E X I T F R O M T O T A L S
B Y W E I G H T O R K E Y
Use <SEL> to change the default option for exiting from totals BY WEIGHT OR KEY with the
alternative options ONLY BY KEY.
Press <ENTER> or <EXIT> to return to the initial visualisation.
Page 82

UV119UE - DSP 500 : USER MANUAL - v. 4.0 PAGE 75
GROUP 4 : LABEL
PROGRAMMING
40 - LABEL LAYOUT............................................... page 76
PARAMETERS AND FIELDS...................... page 77
PARAMETERS OF GRAPHIC FIELDS ....... page 78
PROGRAMMING LABEL FIELDS ..............page 79
41 - LAYOUT COPY.................................................page 80
42 - LAYOUT DELETE.............................................page 80
43 - FIXED TEXTS ...................................................page 81
PRE-SET LABELS...................................... page 82
GROUP 4:
LABEL PROGRAMMING
4 -
Page 83

PAGE 76 UV119UE - DSP 500 : USER MANUAL - v. 4.0
4 -
40 - LABEL LAYOUT
F +
+4 0
ACCESS FROM LEVEL:
setting user-programmable label layouts (11 up to 20)
This function can be used for setting the user- programmable layouts of labels. Also 10 label
layouts are available, pre-programmed by the manufacturer ( see PRE-SET LABEL on page 46).
Every label is formed by a variable number of fields, programmable in dimensions and positioning
as required. Each field is set to contain one datum that may be a fixed text, a pre-set or scale
computed value, a graphic element, etc. The programming of one label format includes therefore
setting the label main parameters and fields.
After entering this function press <ENTER> to access programming, as follows:
4 0 L A Y O U T N U M B E R
< 1 1 ÷ 2 0 > f f
where:
ff = no. of label layout, starting from no. 11 up to 20 (as the first 10 layouts are EPROM
pre-set and cannot be modified)
Press the numerical keys or, alternatively, use the keys <←←←←> and <→→→→> to select the label layout no.
you want to program. By pressing <ENTER> the label variable details can be visualised as follows:
4 0 L A Y O . f f F I E L D 0
F L D . N n n X x x x Y y y y
where:
ff = label layout identification no.
0 = field identifier. 0 indicates the whole label
nn = number of programmed fields
xxx e yyy = vertical and horizontal coordinates of label position
= orientation of overall label
By the keys <↓↓↓↓> and <↑↑↑↑>, the various fields can be scrolled through, with a summary of parameters
settings being displayed.
Considering that parameters are different for the various label fields, the display will show
different data according with the type of field. For example, a message as that shown hereunder
can be displayed for a programmed field includes characters:
4 0 L A Y O . f f F I E L D c c
t t t t t t t t X x x x Y y y y
where:
ff = label layout identification no.
cc = field identifier
tttttt = type of field
xxx e yyy = vertical and horizontal position of field
= layout of field character
= type of field rotation
Page 84

UV119UE - DSP 500 : USER MANUAL - v. 4.0 PAGE 77
4 -
40 - PARAMETERS AND FIELDS
No. 17 different types of fields are available. The first no. 13 are fields that contain characters, i.e.
a numeric value or text and are listed hereunder:
< 1> WEIGHT
< 2> PRICE
< 3> TOTAL
< 4> TARE
< 5> ITEMS NO.
< 7> PLU NAME
< 8> PLU DESCRIPTION
< 9> DATE
<10> DUE DATE 1
<11> DUE DATE 2
<13> TEXT LINE
<14> PLU CODE
<16> SHOP NAME
and the remaining fields are for graphic elements: < 6> BAR-CODE
<12> GRAPHIC LINE
<15> RECTANGLE
Then a special type to be used for setting new fields: < 0> BLANK
The first group fields containing characters have the following parameters:
• X POSITION distance expressed in typogr. dots between beginning of field and label left edge
• Y POSITION distance expressed in typogr. dots between beginning of field and label top edge
Above setting are to be entered by the numerical keys.
• FORMAT this is the character size, into typographic points. Choose using key
<SEL>:
• 5 x 7 (shown on the display list by a small 3x3 square)
• 5 x 12
(shown on the display list by a small 3x5 rectangle)
• 5 x 18
(shown on the display list by a small 3x7 rectangle)
• 7 x 18
(shown on the display list by a small 4x5 rectangle)
• 7 x 23
(shown on the display list by a small 4x7 rectangle)
• ROTATION the direction of label text, in degrees relative to vertical position.
Choose using key <SEL> between:
• 0 horizontal text with upper part on top (shown on display by )
• 90
vertical text with upper part on right side (shown on display by )
• 180
horizontal text upside down (shown on display by )
• 270
vertical text with upper part on left side (shown on display by )
The field 13 TEXT LINE indicates the text it contains (besides to the previously listed parameters):
• TEXT NUMBER use the keys <←←←←> and <→→→→> to select between:
• 1
kg
• 8
TARE
• 15
EAT WITHIN (DATE)
• 2
L / kg
• 9
NO. OF ITEMS
• 16
L
• 3
Lire
• 10
PACKED ON (DATE)
• 17
PREPARED ON (DATE)
• 4
L / 100g
• 11
DUE DATE
• 18
KEEP INTO
REFRIGERATOR
• 5
WEIGHT
• 12
PRODUCED ON (DATE)
• 19
NET WEIGHT
• 6
PRICE
• 13
TARE
• 20
KEEP AT TEMP. 0 TO 4 C.
• 7
TOTAL
• 14
CODE
• 21 ÷ 40
User keys to be programmed by the function 43 FIXED TEXT
Page 85

PAGE 78 UV119UE - DSP 500 : USER MANUAL - v. 4.0
4 -
40 - PARAMETERS OF GRAPHIC
FIELDS
The parameters reported hereunder are provided for field no. 6 BAR-CODE:
• X POSITION the distance from the beginning of bar-code to the left edge of label.
To be typed in by the numerical keys
• Y POSITION the distance from the beginning of bar-code to the upper edge of label.
To be typed in by the numerical keys
• HEIGHT that means the printed bars height expressed in printing dots.
To be typed in by the numerical keys
•
ROTATION the direction of code rotation, in degrees as related to vertical.
To be selected by the key <SEL> between the following options:
• 0 horizontal code with upper side upwards (displayed as )
• 180
horizontal code with upper side downwards (displayed as ).
The parameters reported hereunder are provided for field no. 12 GRAPHIC LINE:
• X POSITION the distance between the beginning of line and the label left edge.
To be typed in by the numerical keys
• Y POSITION the distance between the beginning of line and the label top edge.
To be typed in by the numerical keys
• THICKNESS that is the line required thickness, in dots
To be typed in by the numerical keys
• LENGTH that is the line required length, in dots.
To be typed in by the numerical keys
• ROTATION intended as line direction, to be selected by pressing <SEL> between:
• 0 horizontal line starting on top (displayed as )
• 90 vertical line starting on the right side (displayed as )
• 180
horizontal line starting from bottom (displayed as )
• 270
vertical line starting on the left side (displayed as )
The parameters reported hereunder are provided for field no. 15 RECTANGLE:
• ANGLE 1 POS. X the distance between left upper angle and label left edge.
To be typed in by the numerical keys.
• ANGLE 1 POS. Y the distance between left upper angle and label top edge.
To be typed in by the numerical keys.
• ANGLE 2 POS. X the distance between right lower angle and label left edge.
To be typed in by the numerical keys.
• ANGLE 2 POS. Y the distance between the right lower angle and label top edge.
To be typed in by the numerical keys.
• LINE THICKNESS that is the line required thickness, expressed in dots.
To be typed in by the numerical keys.
Scroll through the selected field parameters by using <↓↓↓↓> and <↑↑↑↑>. For examining the parameters
of another field, go out of the current field by pressing <EXIT>, select the new field by the keys <↓↓↓↓>
and <↑↑↑↑> and then press <ENTER> to access it.
Page 86

UV119UE - DSP 500 : USER MANUAL - v. 4.0 PAGE 79
4 -
40 - PROGRAMMING LABEL
FIELDS
Each field is identified by a sequential number which is automatically assigned to it when creating
it. In case that one field is deleted, the successive ones will automatically be updated so that no
field identification number is left empty.
Attention:
The field identification no. (which is always shown on the display right top
side) should not be confused with the type no. of field. The field
identification number is assigned automatically with no reference to field
position or contents, and cannot be changed whereas the number
corresponding to the type of field is to be selected and it signals the type of
data included in the same field.
If a new field has to be added to one label, position the cursor on the field which follows the last
programmed one and change the type of field from
BLANK to a new one.
To delete a field position the cursor on it and then change the type of field into BLANK. All the
successive fields will automatically be renumbered, and the successive field (which has taken the
same identification no. of the deleted field) is visualised.
When one field is modified - even by changing the type of field, its identification no. is kept.
After selecting one field (regardless to the fact that it is a new one or not), by pressing <ENTER>
you can access programming of its parameters. For moving from one parameter to the next one use
<ENTER> or the keys <↓↓↓↓> and <↑↑↑↑>. For setting a field parameter, make use of the specific keys as
required but never forget to confirm your entered data by the key <ENTER>.
To end the programming of a specific field and move to another one, use the <EXIT> key after
confirming the last modification introduced.
As entering the programming mode of any field, the first selection to be made is that concerning
the type of field as displayed hereunder:
4 0 L A Y O . f f F I E L D c c
< n n > t t t t t t t t t t t t t t t
where:
ff = label layout identification no.
cc = field identification no.
nn = type of field no. (
0 for a blank field)
tttttt = description of field (BLANK if it is empty)
Now you can select if a new type of field is required by using the keys <↓↓↓↓> and <↑↑↑↑>, as detailed on
the previous page. Confirm you selection by the key <ENTER> and then proceed with setting the
field position as well as the other parameters specified for the field being selected. The key <EXIT>
can be used at any time for leaving programming of the current field and skip to another field.
Page 87

PAGE 80 UV119UE - DSP 500 : USER MANUAL - v. 4.0
4 -
41 - LAYOUT COPY
F +
+4 1
ACCESS FROM LEVEL:
copying label layout
This function allows to copy one pre-set or user-programmable layout into another label layout.
When this function is entered, pressing <ENTER> the request of the layout identification no. to be
copied will be visualised as follows:
4 1 L A Y O U T C O P Y
S O U R C E L A Y O U T I D . n n
where:
nn = label layout to be copied (1 up to 20)
Enter the required layout no. by the numerical keys and then confirm by <ENTER>. Now, the
destination layout on which the layout is to be copied is queried:
4 1 L A Y O U T C O P Y
D E S T . L A Y O U T I D . n n
where:
nn = label layout on which the previously selected one is to be copied
Type in the corresponding layout no. by the numerical keys and then confirm by <ENTER>.
42 - LAYOUT DELETE 4 -
F +
+4 2
ACCESS FROM LEVEL:
deleting label layout
User-programmable label layouts can be deleted by this function.
When entering this function press <ENTER> to access programming as follows:
4 2 L A B E L L A Y O U T I D .
T O D E L E T E n n
where:
nn = layout no. to be deleted (11 up to 20)
Enter the required layout identifying no. When pressing <ENTER> to confirm you will be queried to
confirm the deletion by pressing <ENTER> again.
Page 88

UV119UE - DSP 500 : USER MANUAL - v. 4.0 PAGE 81
4 -
43 - FIXED TEXTS
F +
+4 3
ACCESS FROM LEVEL:
programming fixed texts for labels
This function can be used for setting lines of text to be then utilised for label programmable
layouts. Each programmable line of text can be identified by a sequential number, from 21 up to 40
whereas the numbers 1 up to 20 are reserved to the pre-set text lines as detailed on the table
reported hereunder:
• 1
kg
• 8
TARE
• 15
EAT WITHIN (DATE)
• 2
L / kg
• 9
NO. OF ITEMS
• 16
L
• 3
Lire
• 10
PACKED ON (DATE)
• 17
PREPARED ON (DATE)
• 4
L / 100g
• 11
DUE DATE
• 18
KEEP INTO
REFRIGERATOR
• 5
WEIGHT
• 12
PRODUCED ON (DATE)
• 19
NET WEIGHT
• 6
PRICE
• 13
TARE
• 20
KEEP AT TEMP. 0 TO 4 C.
• 7
TOTAL
• 14
CODE
When entering this function press <ENTER> to access programming as follows:
4 3 F I X E D T E X T I D .
< 2 1 ÷ 4 0 > n n
where:
nn = identification number of the line of fixed text
Then press <ENTER> to insert the text as follows:
t t t t t t t t t t t t t t t t t t t t
T E X T n n C U R S . c c I N S
where:
tttttt = text already stored. The line is blank if no text exists
nn = no. of the line of fixed text
cc = signalling the position of cursor, that is the no. of character the cursor is currently on
INS = signalling that the insertion mode with capital characters is active
Press <INS> to select the Overwrite mode; the abbreviation INS shall be replaced by SCC on the
display. If you want to change from capital characters, as pre-set by default, to lower-case
characters press <SHIFT>. Now the abbreviation INS, or SCC shall be displayed by ins (or scc).
Select the required fixed text by means of the numerical keys and the other keys assigned to
symbols and letters. The fixed text maximum length is 20 characters. For more details on text
selection and modification refer to the sheet SELECTION AND EDITING reported at
INTRODUCTION Section of this manual.
Page 89

PAGE 82 UV119UE - DSP 500 : USER MANUAL - v. 4.0
4 -
PRE-SET LABELS
In addition to the no. 10 user-programmable label layouts, the DSP500 Scale is supplied with other no. 10
label layouts pre-programmed by the manufacturer. The set of pre-programmed layouts is reported
herebelow. The even layouts are for non-weighted items and the odd ones are for weighted items.
Layout n° 1 Layout n° 2 Layout n° 3
Smoked Ham
Smoked Ham
Smoked Ham
EAT WITHIN 27-09-96
NET W.
Kg
0,152
PRICE
L/Kg
21500
TOTAL
Liras
3270
TOTAL
Liras
3270
NET W.
Kg
0,152
PRICE
L/Kg
21500
TOTAL
Liras
3270
TARE
Kg
0,020
TARE
Kg
0,020
Layout n° 4 Layout n° 5 Layout n° 6
Smoked Ham
Smoked Ham
Smoked Ham
EAT WITHIN 27-09-96 PACKED 17-09-96 EAT W. 27-09-
96
PACKED 17-09-96 EAT W. 27-09-
96
TOTAL
Liras
3270
NET W.
Kg
0,152
PRICE
L/Kg
21500
TOTAL
Liras
3270
TOTAL
Liras
3270
TARE
Kg
0,020
Layout n° 7 Layout n° 8
Smoked Ham
Smoked Ham
Fresh quality from the country Fresh quality from the country
EAT WITHIN 27-09-96 EAT WITHIN 27-09-96
NET W.
Kg
0,152
PRICE
L/Kg
21500
TOTAL
Liras
3270
TOTAL
Liras
3270
TARE
Kg
0,020
Layout n° 9 Layout n° 10
Smoked Ham
Smoked Ham
Fresh quality from the country Fresh quality from the country
PACKED 17-09-96 EAT W. 27-09-
96
PACKED 17-09-96 EAT W. 27-09-
96
NET W.
Kg
0,152
PRICE
L/Kg
21500
TOTAL
Liras
3270
TOTAL
Liras
3270
TARE
Kg
0,020
Page 90

UV119UE - DSP 500 : USER MANUAL - v. 4.0 PAGE 83
Page 91

PAGE 84 UV119UE - DSP 500 : USER MANUAL - v. 4.0
GROUP 5 : NETWORKING
AND INTERFACES
PROGRAMMING
50 - LABEL CALIBRATION ....................... page 85
51 - PRINTER SETTING.......................................... page 85
52 - SERIAL CHANNEL A............................... page 86
53 - SERIAL CHANNEL B............................ page 87
54 - NETWORK ADDRESS ......................... page 89
55 - NETWORK/LOCAL MODE .............................. page 89
56 - TX PROGRAMMING ............................ page 90
57 - FIND SCALES .................................................. page 90
58 - MEMORY CARD............................................... page 91
GROUP 5:
NETWORKING AND
INTERFACES
PROGRAMMING
5 -
Page 92

UV119UE - DSP 500 : USER MANUAL - v. 4.0 PAGE 85
5 -
50 - LABEL
CALIBRATION
F +
+5 0
ACCESS FROM LEVEL:
printer automatic detection of label format
This function is used for calibrating the printer for the label sizes. The paper-feed cassette can be
recognised by the scale according to the position of the white stamps placed inside the cassette
compartment. Two versions of cassette are available for label printing (for more details, refer to
the sheet PAPER-CASSETTE PREPARATION in section DAILY USE ). The label format and
cassettes are stored when calibrating the printer. When changing the paper cassette, the scale
detects which cassette has been selected, and sets the printer for the label format stored with it.
After entering the function press <ENTER> to access programming:
5 0 L A B E L C A L I B R A T I O N
P R E S S E N T E R T O S T A R T
By pressing <ENTER> again, the calibration control is delivered to the printer and four blank labels
are printed.
51 - PRINTER SETTING 5 -
F +
+5 1
ACCESS FROM LEVEL:
setting printer parameters
(label feed step, printing intensity, etc.)
This function allows a fine regulation of the scale printer, for variations of label output and
printing intensity.
Attention: this function is recommended for use only by either service personnel
or fully experienced users.
When entering this function press <ENTER> to access programming as follows:
5 1 L A B E L S T E P S
< 1 ÷ 9 9 9 9 > p p p p
where:
pppp = no. of motor steps required for label output (default pre-set value: 670)
Type in a new value by the numerical keys. Press <ENTER> to confirm the entered data and
proceed with the next programming, or the keys <↑↑↑↑> and <↓↓↓↓> to deny confirmation.
5 1 P R I N T I N T E N S I T Y
< 1 ÷ 9 9 > i i
where:
ii = value for printing intensity (default value pre-set by the manufacturer: 65)
Type in a new value by the numerical keys and press <ENTER> to confirm.
Page 93

PAGE 86 UV119UE - DSP 500 : USER MANUAL - v. 4.0
9 -
52 - SERIAL CHANNEL
A
F +
+5 2
ACCESS FROM LEVEL:
setting serial channel A parameters
(i.e.: baud rate, parity bits, etc.)
This function is to be used for setting the RS232c Serial Interface (channel A), in order to allow
communication with a PC.
Attention:
the data transmission parameters set must match those on the PC connected.
After entering this function, press <ENTER> for programming the baud rate to be used for data
transmission as follows:
5 2 S E R I A L C H A N N E L A
S P E E D b b b b B A U D S
where:
bbbb = number of transmitted bits per second (baud)
By the key <SEL> choose one of the following baud rates: 1200 - 2400 - 4800 - 9600.
Then press the key <ENTER> or <↓↓↓↓> to access programming of data parity, as follows:
5 2 S E R I A L C H A N N E L A
P A R I T Y p
where:
p = type of parity
ODD, EVEN or NO parity can be selected by using <SEL> key.
Press <ENTER> or <↓↓↓↓> for programming the no. of data bits.
5 2 S E R I A L C H A N N E L A
n D A T A B I T S
where:
n = number of data bits
The number of data bits can be selected between 7 and 8, by pressing <SEL>.
Press <ENTER> or <↓↓↓↓> for programming the number of stop bits, as follows:
5 2 S E R I A L C H A N N E L A
s S T O P B I T S
where:
s = number of stop bits
The number of stop bits can be set, by choosing 1 or 2 by the key <SEL>.
Page 94

UV119UE - DSP 500 : USER MANUAL - v. 4.0 PAGE 87
5 -
53 - SERIAL CHANNEL
B
F +
+5 3
ACCESS FROM LEVEL:
setting serial channel B parameters
(i.e.: baud rate, parity bits, etc.)
This function is to be used for setting the RS422 optional Serial Interface (channel B), in order to
allow communication with a PC. RS422 Standard allows long-distance interconnections and noisefree performance as compared with RS232c (channel A).
Attention:
the data transmission parameters set must match those on the PC
connected, which should also include one RS422 Interface.
After entering this function, press <ENTER> for programming the baud rate to be used for data
transmission as follows:
5 2 S E R I A L C H A N N E L B
S P E E D b b b b B A U D S
where:
bbbb = number of transmitted bits per second (baud)
By the key <SEL> choose one of the following baud rates: 1200 - 2400 - 4800 - 9600.
Then press the key <ENTER> or <↓↓↓↓> to access programming of data parity, as follows:
5 2 S E R I A L C H A N N E L B
P A R I T Y p
where:
p = type of parity
ODD, EVEN or NO parity can be selected by using <SEL> key.
Press <ENTER> or <↓↓↓↓> for programming the no. of data bits.
5 2 S E R I A L C H A N N E L B
n D A T A B I T S
where:
n = number of data bits
The number of data bits can be selected between 7 and 8, by pressing <SEL>.
Press <ENTER> or <↓↓↓↓> for programming the number of stop bits, as follows:
5 2 S E R I A L C H A N N E L B
s S T O P B I T S
where:
s = number of stop bits
Page 95

PAGE 88 UV119UE - DSP 500 : USER MANUAL - v. 4.0
9 -
The number of stop bits can be set, by choosing 1 or 2 by the key <SEL>.
Page 96

UV119UE - DSP 500 : USER MANUAL - v. 4.0 PAGE 89
5 -
54 - NETWORK
ADDRESS
F +
+5 4
ACCESS FROM LEVEL:
setting network address of the scale
For its use in network configuration, each scale should be given ad address consisting in a numeric
code different for each scale. This function can be used for inserting the scale network address.
After entering this function press <ENTER> to access programming as follows:
5 4 N E T W O R K A D D R E S S
< 1 ÷ 1 0 > n n
where:
nn = scale address for network (1 up to 10)
Key in the required address by using the numerical keys and then confirm by <ENTER>.
55 - NETWORK/LOCAL MODE 5 -
F +
+5 5
ACCESS FROM LEVEL:
selecting local/network mode
This function allows to program scale to work as a stand-alone unit (local mode) or linked with
other scales (network mode).
Attention:
in order to be used in network mode, an address must be assigned to each
scale to be linked (see progr. function 54 NETWORK mode for address
programming).
After entering this function press <ENTER> to access programming as follows:
5 5 L O C A L / N E T W O R K
S C A L E I N L O C A L
Now, the operational mode of a scale can be selected between SCALE IN LOCAL or SCALE IN
NETWORK
by pressing <SEL>. Use key <ENTER> or <EXIT> to return to the initial visualisation.
Page 97

PAGE 90 UV119UE - DSP 500 : USER MANUAL - v. 4.0
9 -
56 - TX
PROGRAMMING
F +
+5 6
ACCESS FROM LEVEL:
transmitting scale programming
This function allows to communicate PLU data and user-programmable label formats from one
scale to the other linked scales. Since the PLU have an updated memory allocation, i.e. just the
actually present PLU take memory space, only the PLU having the same code as the transmitted
PLU shall be overwritten at the addressed scales. As for label formats, all of them will be
overwritten since they are statistically stored.
Attention:
use the maximum care in transmitting programming, not to loose valuable
data. Remember that only the PLU having the same code shall be
overwritten to the addressed scale (but all the label formats).
After entering this function press <ENTER> to access programming as follows:
5 6 T X P R O G R A M M I N G
P R E S S E N T E R T O S T A R T
Press the key <ENTER> again to start the transmission of data to the other link-connected scales. The
message WAIT is displayed during the transmission, then the scale returns to the initial function display.
57 - FIND SCALES 5 -
F +
+5 7
ACCESS FROM LEVEL:
checking the network linked scales
This function can be used for checking which are the linked scales. Once the search is completed,
the network addresses of the linked scales are displayed by numerical order (including the scale
from which the FIND SCALE function has been selected). Scales resulting absent (as they may be
“off”, disconnected or set to local mode) are signalled on the display by a blank space put instead
of their address.
After entering the function press <ENTER> to start scale searching as follows:
5 7 S C A L E S I N N E T W O R K
n n n n n n n n n n n
where:
n = identifier (address) of scales found on the network
Press <ENTER> or <EXIT> to return to the initial visualisation.
Page 98

UV119UE - DSP 500 : USER MANUAL - v. 4.0 PAGE 91
5 -
58 - MEMORY CARD
F +
+5
8
ACCESS FROM LEVEL:
PLU read or write to/from Memory Card
This function allows to store all PLU programmed information on a Memory Card (optional) and
viceversa to transfer all the PLU stored on a Memory Card to a scale. All PLU are overwritten in
both reading and writing functions.
The following message is displayed when entering this function:
5 8 M E M O R Y C A R D
Press <ENTER> to access data reading from the Memory Card as follows:
5 8 P L U R E A D I N G
Press <ENTER> once again to continue data reading:
5 8 P L U R E A D I N G
P R E S S E N T E R T O S T A R T
The transmission of PLU data from the Memory Card to the scale is started as <ENTER> is pressed.
The message WAIT is displayed during the transmission, then the scale returns to the initial
function display.
To access data writing to the Memory Card as follows press <
> instead:
5 8 P L U W R I T I N G
Press <ENTER> to confirm data writing selection:
5 8 S C R I T T U R A P L U
P R E S S E N T E R T O S T A R T
The transmission of PLU data from the scale to the Memory Card is started as <ENTER> is pressed.
The message WAIT is displayed during the transmission, then the scale returns to the initial
function display.
Page 99

UV119UE - DSP 500 : USER MANUAL - v. 4.0 PAGE 91
GROUP 7 : REPORTS
70 - HOT-SHOT REPORT.............................. page 92
71 - PLU REPORT ..................................................page 92
72 - PLU / BAR-CODE REPORT............... page 93
73 - GENERAL REPORT.............................. page 94
74 - RANDOM PRICES............................................ page 94
GROUP 7:
REPORTS
7 -
Page 100

PAGE 92 UV119UE - DSP 500 : USER MANUAL - v. 4.0
7 -
70 - HOT-SHOT
REPORT
F +
+7 0
ACCESS FROM LEVEL:
print list of hot-shot keys and corresponding PLU codes
This function is used to get the printout of the complete list of all the hot-shot PLU keys and their
PLU codes, item description included. PLU 0 is printed for hot-shot keys having no PLU assigned
code. The message *UNPROGRAMMED* will be displayed instead than the item description in
case that a hot-shot key has been assigned a PLU code but that code was not programmed.
After entering this function press <ENTER>, and the query for confirmation will be displayed as
follows:
7 0 H O T - S H O T R E P O R T
P R E S S E N T E R T O S T A R T
Press <ENTER> again and the printing procedure is started. The message WAIT is displayed as
printing is on progress. At the end, the scale returns to the function initial display.
71 - PLU REPORT 7 -
F +
+7 1
ACCESS FROM LEVEL:
print list of stored PLU
This function is used to get the printout of the list of all programmed PLU, the ones assigned to a hotshot key (by the progr. function 00 DIRECT PLU) or not. Partial list printing can also be selected, by
specifying the start and the end code to be printed. In that case, only the PLU included within the
specified block shall be printed. The item description and price will be listed for each PLU code.
For getting the complete list of the programmed PLU just press <ENTER> twice. If a partial list is
required, press <ENTER> once and the query for entering the starting code will be displayed, as
shown herebelow. Code 0 corresponds to the first PLU been programmed:
7 1 P R I N T P L U L I S T
F R O M c c c c c c c
where:
cccc = starting PLU code for print
Type in the starting PLU code requested for print by the numerical keys and then press <ENTER> to
visualise the query for the end code to be printed. Code 0 stands for the latest PLU been programmed.
7 1 P R I N T P L U L I S T
U P T O c c c c c c c
where:
cccc = end PLU code for print
Type in the final PLU code to be included in the list. The message WAIT is displayed as printing is
on progress. When the requested list is printed, the scale returns to the function initial display.
 Loading...