

Zirrus, LLC ©2015 Version 20151101
6300-CX User’s Guide
©2015Zirrus, LLC. All rights reserved. Zirrus, LLC, the DataPro2Go
logo and all other Zirrus, LLC marks contained herein are trademarks of Zirrus, LLC
All other marks contained herein are the property of their respective owners.
Images are shown for illustrative purposes only; individual experience may vary.
DataPro2Go 6300-CX
Wireless Failover Router
User’s Guide
LTE
4G
Zirrus, LLC ©2015
6300-CX User’s Guide
DATA2GOWIRELESS.COM
Preface
Zirrus, LLC reserves the right to revise this publication and
to make changes in the content thereof without obligation to notify
any person or organization of any revisions or changes.
©2015 Zirrus, LLC. All rights reserved. Zirrus, LLC, the DataPro2Go
logo and all other Zirrus, LLC marks contained herein are trademarks of Zirrus, LLC
All other marks contained herein are the property of their respective owners.
Images are shown for illustrative purposes only; individual experience may vary.
Zirrus, LLC ©2015
6300-CX User’s Guide
DATA2GOWIRELESS.COM
WARNING CAUTION
WARNING
CAUTION
TO COMPLY WITH FCC/IC RF EXPOSURE LIMITS AT LEAST
20cm SEPARATION DISTANCE MUST BE MAINTAINED
BETWEEN ANY ANTENNA OF THE UNIT AND ANY PART OF
THE USER AT ALL TIMES.
DO NOT USE AN ANTENNA THAT WASN’T SUPPLIED BY THE
MANUFACTURER. IF A DIFFERENT ANTENNA IS REQUIRED,
FIRST CONSULT ZIRRUS, LLC FOR RECOMMENDATIONS
THAT SUIT YOUR CIRCUMSTANCES.
THE UNIT MUST BE POWERED OFF WHERE BLASTING IS IN
PROGRESS, WHERE EXPLOSIVE ATMOSPHERES ARE PRESENT,
OR NEAR MEDICAL OR LIFE SUPPORT EQUIPMENT. DO NOT
POWER ON THE UNIT IN ANY AIRCRAFT.
BY PRESSING THE ERASE BUTTON WHEN POWERED UP,
THE CONFIGURATION OF THE 6300-CX IS ERASED AND THE
UNIT IS REVERTED TO FACTORY DEFAULT SETTINGS.

Zirrus, LLC ©2015
6300-CX User’s Guide
Contents
What’s in the Box................................................................................ 4
Ports and Connectors.......................................................................... 5
Device Status...................................................................................... 6
Signal Strength................................................................................... 7
Initial Setup ........................................................................................ 8
Site Survey.......................................................................................... 9
Site Survey Troubleshooting.................................................. 10
Physical Installation............................................................................ 11
Local Power............................................................................ 11
Remote Power....................................................................... 12
Remote Power Trouble Shooting........................................... 13
Conguring Device.............................................................................. 14
Network Managed Conguration..........................................14
Local Conguration ............................................................... 14
Troubleshooting................................................................................... 15
Resetting Your Device........................................................... 15
Establishing Backup Connectivity via Ethernet Port .....15
Out of Band SMS Commands................................................ 16
Advanced Configuration Using DataProView ..........................17
Viewing & Editing Conguration........................................... 17
Upgrading Firmware ..............................................................17
Dening a Custom APN......................................................... 18
Using Remote Commands ..................................................... 18
Immediately Update Device................................................... 18
Establishing WAN connectivity via Ethernet Port.................. 19
Passthrough/Bridge Mode..................................................... 19
Router Mode.......................................................................... 20
Learning More........................................................................ 20
Managing Device Locally.................................................................... 21
Connecting to the Device....................................................... 21
Manually Conguring PC to Connect to Device................22-23
Logging into Device................................................................ 24
Advanced Local Conguration............................................... 25
Upgrading Firmware............................................................... 26
Dening a Custom APN......................................................... 26
FAQs..................................................................................................... 27
Regulatory Guide................................................................................. 28
DATA2GOWIRELESS.COM
Zirrus, LLC ©2015
6300-CX User’s Guide
4 of 28
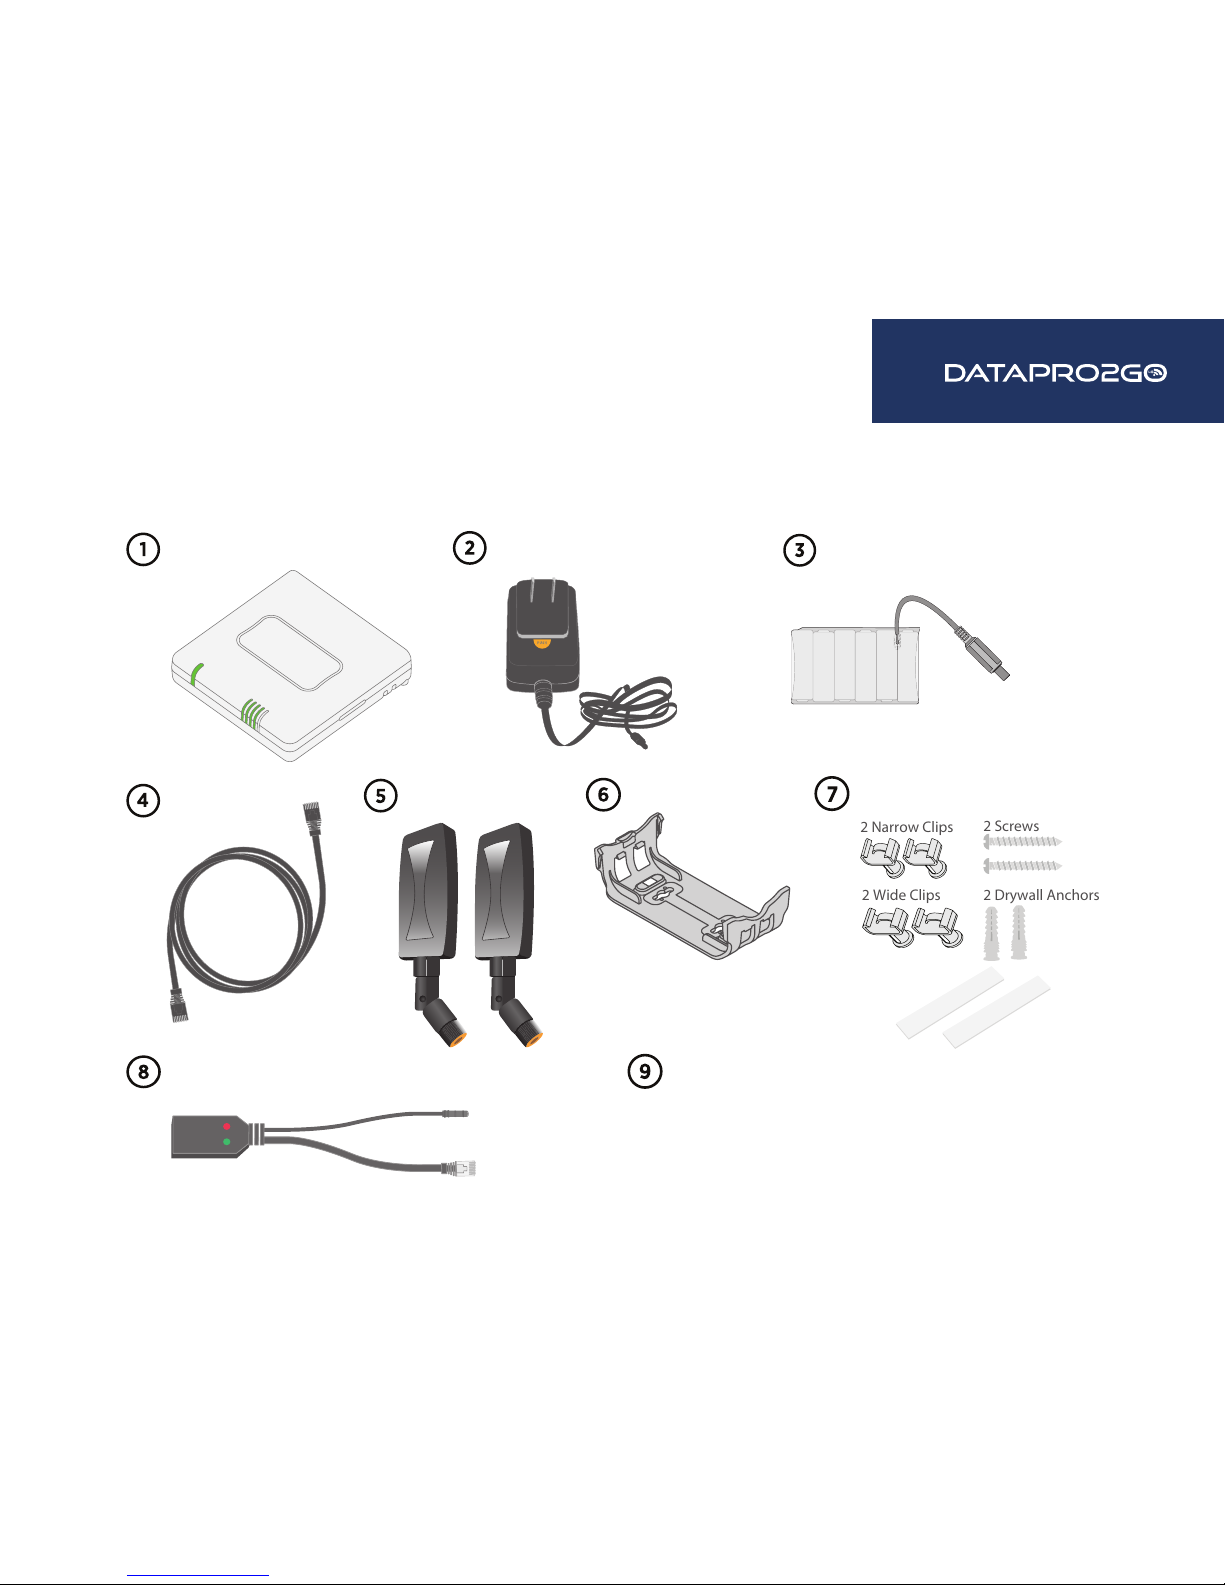
Model 6300-CX
Temporary Battery Pack
Ethernet Cable
2 Antennas
Passive Power over Ethernet (PoE)
Injector Cable
Mounting Bracket
6300-CX Welcome Card
Universal Power Supply Unit
Mounting Accessories
2 Wide Clips
2 Screws
2 Drywall Anchors
2 Narrow Clips
Velcro Strips
What’s in the Box
DATA2GOWIRELESS.COM
Zirrus, LLC ©2015
6300-CX User’s Guide
5 of 28
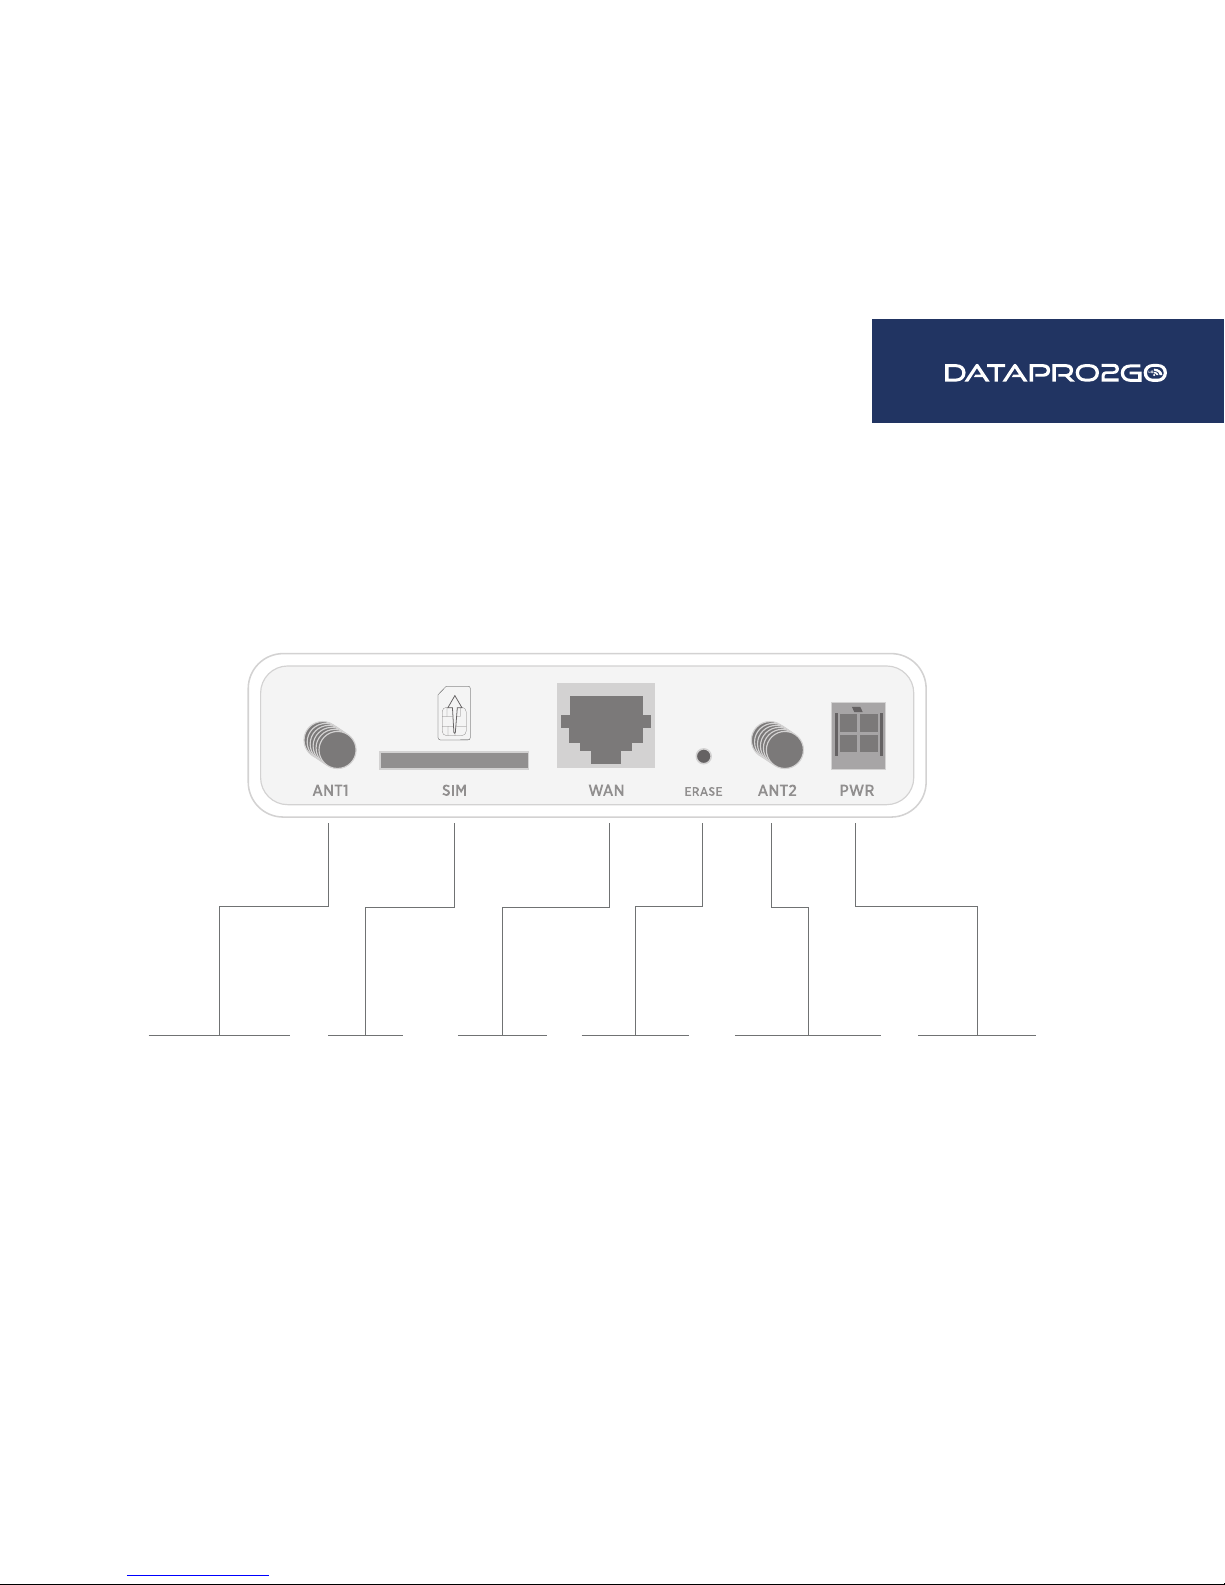
Ports and Connectors
Back of 6300-CX
Antenna
Connector 1
Attach both of the included antennas.
Antenna
Connector 2
SIM Slot WAN Port Erase Button Power Socket
DATA2GOWIRELESS.COM
Zirrus, LLC ©2015
6300-CX User’s Guide
6 of 28
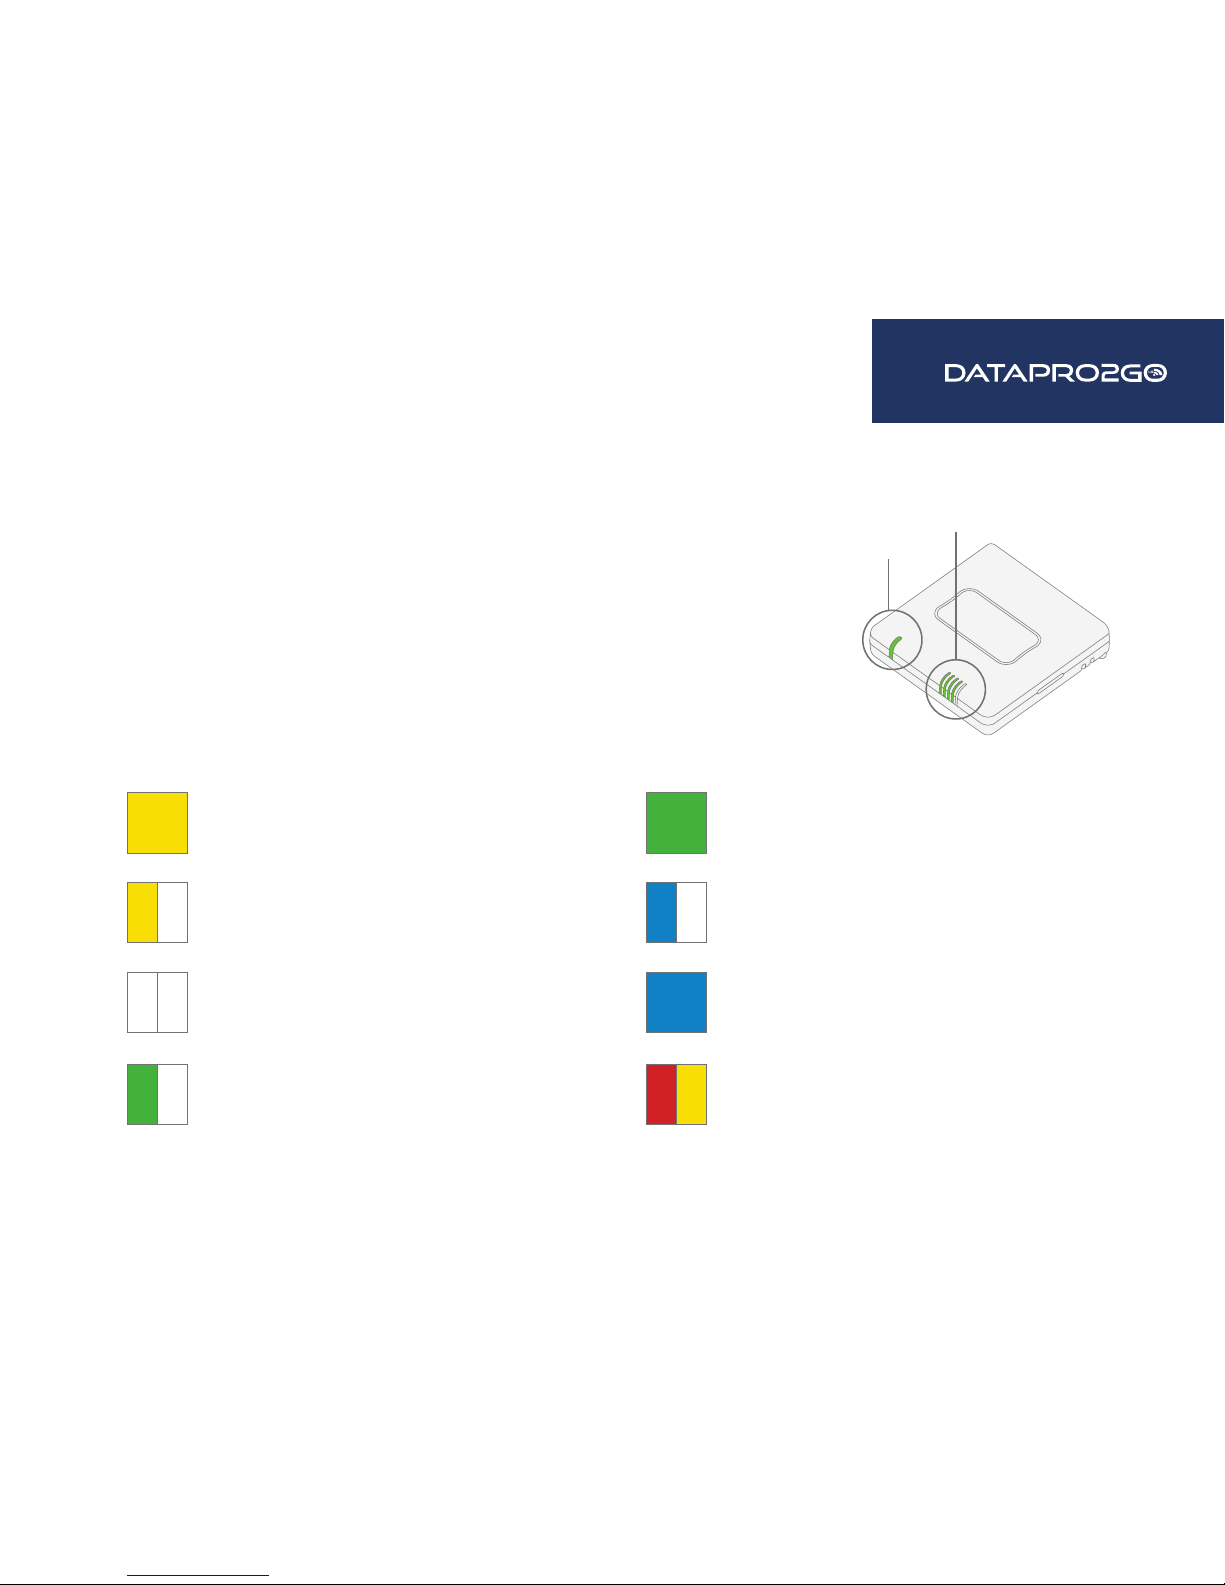
Initializing or starting up.
Solid Y ellow
In the process of connecting to the cellular
network and to a device on its Ethernet port.
Is connected to 2G or 3G and in the process
of connecting to a device on its Ethernet port
(or nothing is connected to its Ethernet port).
Has Ethernet connection and is in the process of
connecting to cellular network with its modem.
Is connected to 4G LTE and in the process of
connecting to a device on its Ethernet port.
Is connected to 4G LTE and also has
an Ethernet connection.
Is connected to 2G or 3G and also
has an Ethernet connection.
Flashing Yellow
Flashing Green
Flashing White
Flashing Blue
Solid Blue
Solid Green
Is upgrading rmware WARNING: DO NOT
POWER OFF DURING FIRMWARE UPGRADE.
Alternating Red/ Yellow
Device Status
Once power has been established, your device will initialize and attempt to
connect to the network. Device initialization may take 30-60 seconds. By
default your DataPro2Go 6300-CX will attempt to use DHCP to establish an
Internet connection through its cellular modem.
Indicator lights on the Wireless Strength Indicator show you the Cellular
Network Signal Strength.
Network Indicator Light on the front left of the device indicates network status.
Network Status
Wireless Strength
DATA2GOWIRELESS.COM
Zirrus, LLC ©2015
6300-CX User’s Guide
7 of 28
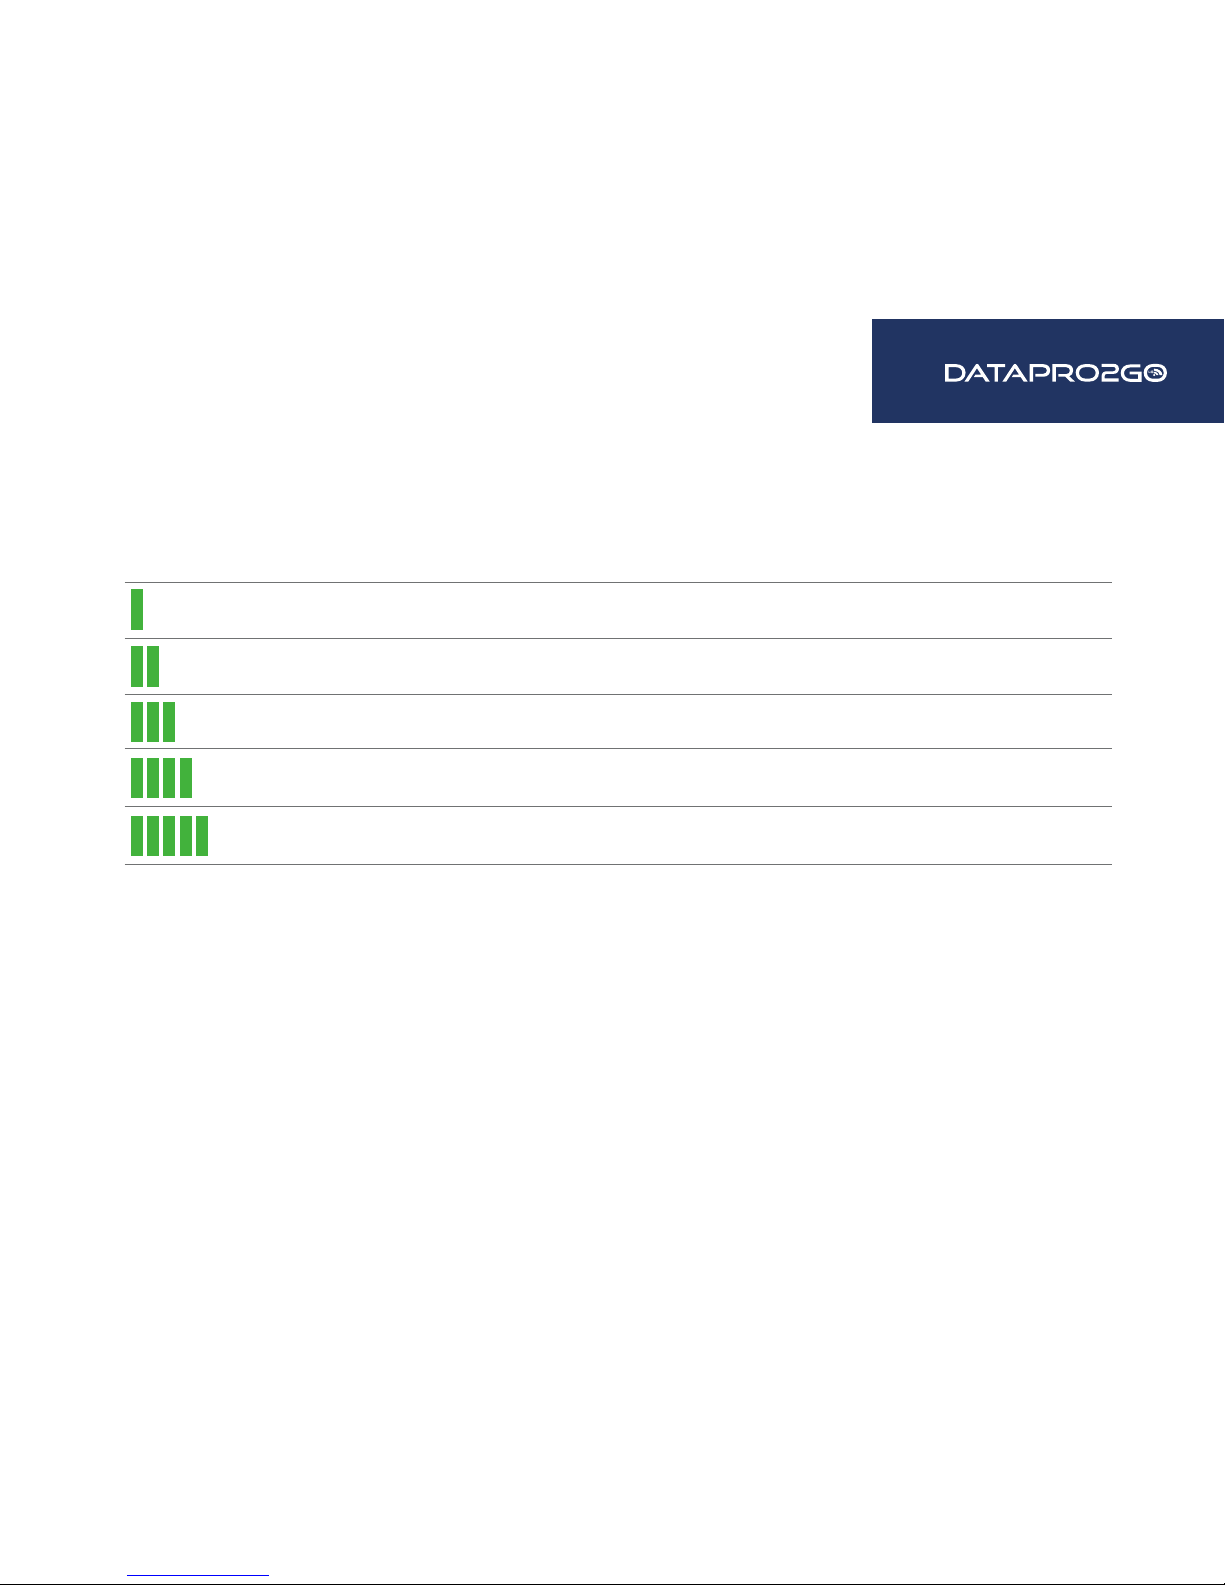
Signal Strength
Signal Bars dBm Signal Strength Percent Quality
-113 to -99 0-23% Bad
-98 to -87 24-42% Marginal
-86 to -76 43-61% OK
-75 to -64 62-80% Good
-63 to -51 81-100% Excellent
DATA2GOWIRELESS.COM
Zirrus, LLC ©2015
6300-CX User’s Guide
8 of 28
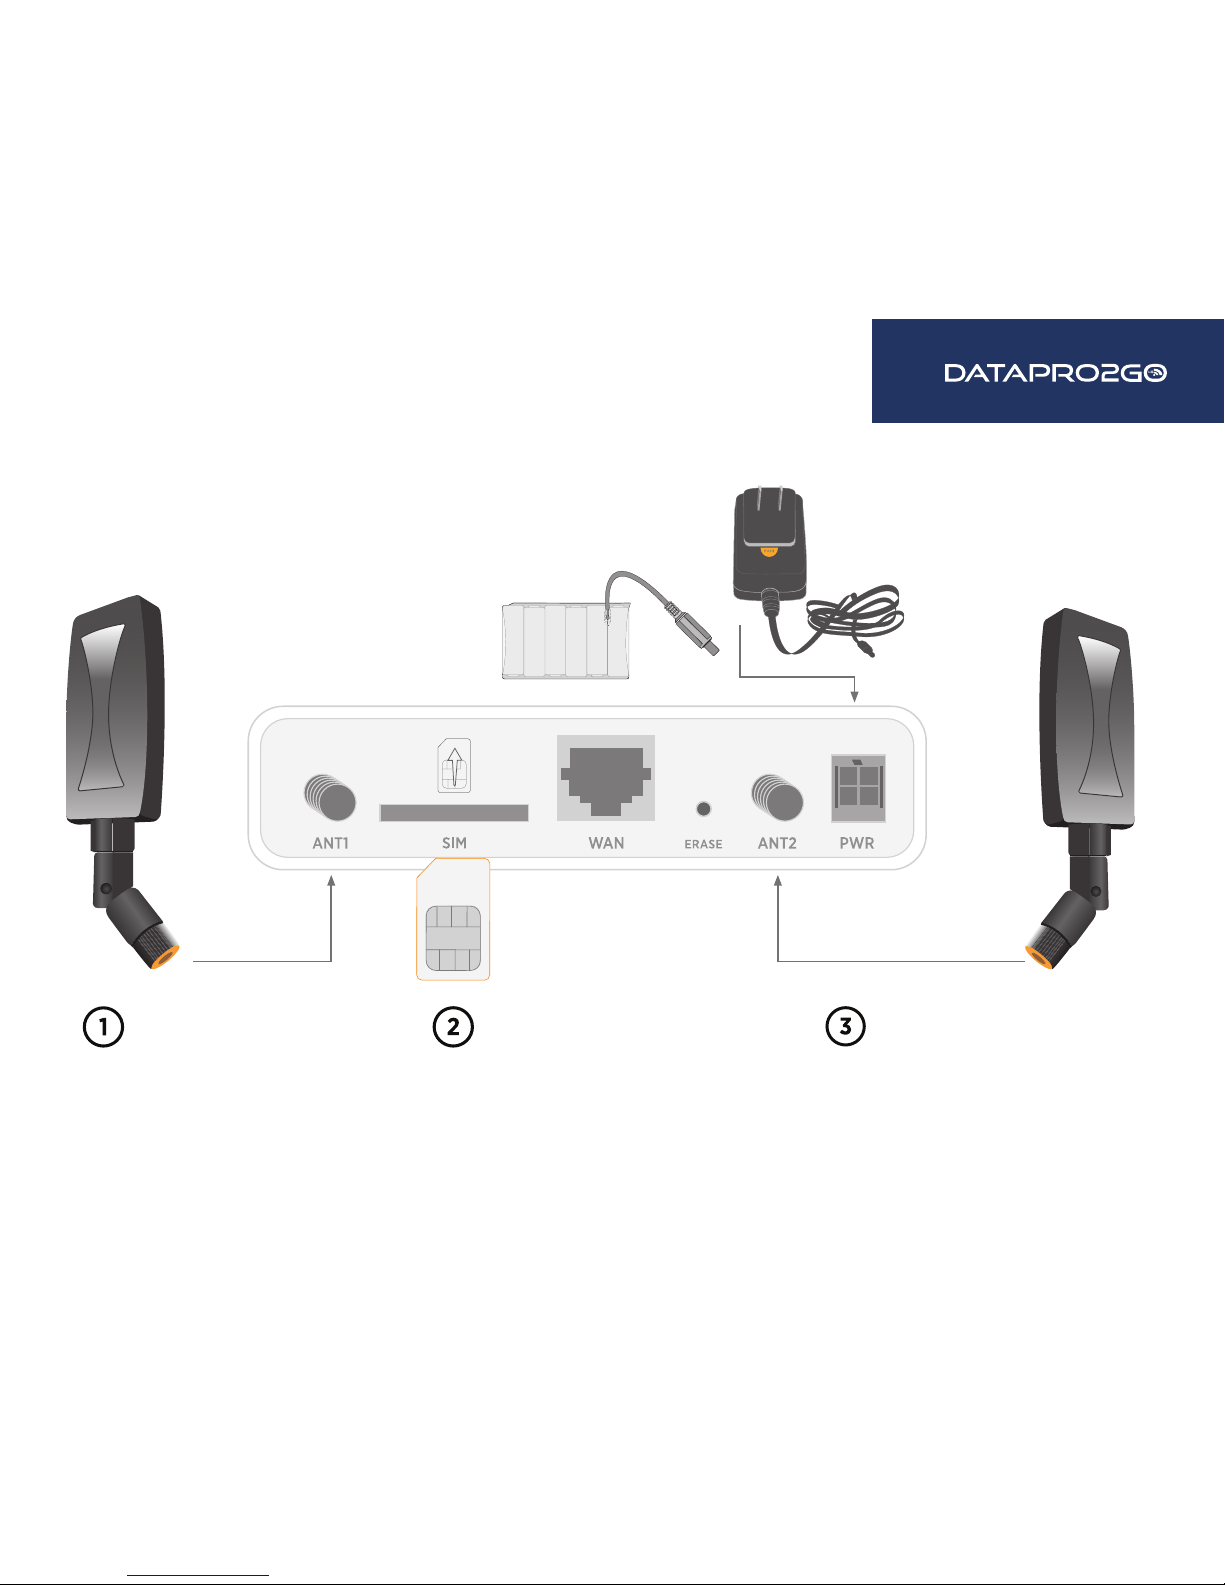
Initial Setup
Back of 6300-CX
Insert the activated SIM card
provided by your cellular
network operator. You should
hear a click sound once the
SIM is completely inserted.
Attach both of the included
antennas; both antennas must
be installed for proper operation.
While gripping the metal connector
section with your thumb and
forenger, and tighten until secure.
Do not tighten the antenna by
holding any part of the plastic
antenna housing.
Connect the power supply unit,
or if doing a site survey, attach
the temporary battery pack, and
follow the instructions in the
“ Site Survey ” section.
SIM Card
OR
DATA2GOWIRELESS.COM

Zirrus, LLC
©2015
6300-CX User’s Guide
9 of 28
Site Survey
A cellular site survey is not necessary if your anticipated installation location is known to have strong cellular signal
strength. If you are unsure of available cellular signal strength or are choosing between several installation locations,
follow the below instructions to perform a site survey to determine your best possible installation location.
After the optimal location has been determined, setup the 6300-CX with either the power supply unit or the POE injector cable.
Follow the steps in the “Initial Setup” section above. During a site survey it is useful to use the included battery
pack instead of the power supply unit to power the DataPro2Go
6300-CX. The battery pack will
power your device for approximately two hours while you perform your site survey
. The battery pack is not
rechargeable and should be properly disposed of after use.
Move the
DataPro2Go
6300-CX to different locations within your site to determine the best compromise
between signal strength and installation constraints. Since cellular signal strength may fluctuate, it is
important to wait at each location for 1 minute while observing the signal strength indicator
on the front of the
device. Minimum cellular signal strength for proper operation is 2 bars.
After the optimal location has been determined, remove the battery pack and connect either the main power
supply unit or POE injector cable (see section labeled Using Remote Power for more information).
Strong Signal Weak Signal
DATA2GOWIRELESS.COM

Zirrus, LLC
©2015
6300-CX User’s Guide
10 of 28
Site Survey Troubleshooting
If you are unable to verify a location with a strong cellular signal:
• Verify your SIM has been activated with your cellular operator.
• If cellular signal isn’t indicated on the DataPro2Go 6300-CX indoors, then take the device outdoors to verify that
your cellular network operator has coverage in your location.
• If the outdoor cellular signal strength is less than 2 bars, it may be necessary to connect using a different cellular
network operator. This requires an activated SIM from the alternate cellular network operator.
• Try the device/antennas in different orientations and away from other nearby electronic equipment at each test
location. Note:
LTE requires the use of both antennas & antennas will usually give better performance when vertical.
• Refer to the Device Status section to use DataPro2Go 6300-CX indicator lights to aid in diagnosis.
DATA2GOWIRELESS.COM

Zirrus, LLC
©2015
6300-CX User’s Guide
11 of 28
By
default a DHCP
Physical Installation
Connecting to the Site Network with Local Power
Using an Ethernet cable, connect the WAN port on the DataPro2Go 6300-CX to your site Gateway.
request will be sent to the WAN Ethernet network.
Plug the power supply unit into an AC power outlet and connect to the 12V DC lead
(4 pin connector) of the POE injector cable.
Using the include CAT5 cable or a customer provided CAT5 cable connect to your
site router or gateway and the WAN port of the 6300-CX.
CAT 5
Router 6300-CX Power supply unit
DATA2GOWIRELESS.COM

Zirrus, LLC ©2015
6300-CX User’s Guide
12 of 28
Connecting to the Site Network with Remote Power
If your device needs to be positioned some distance from either the nearest AC power outlet or site network
equipment/router using the included passive Power-Over-Ethernet (POE) injector cable will usually simplify the
installation cabling and allow for improved cellular signal strength. The POE injector cable allows the DC power and
Ethernet connection to be run to the DataPro2Go 6300-CX via the Ethernet connection only.
.
Plug the power supply unit into an AC power outlet and connect to the 12V DC lead
(4 pin connector) of
the POE injector cable.
Connect the male RJ45 connector plug of the POE injector cable to the site network equipment/router
Connect a standard Ethernet cable from the RJ45 socket/jack on the POE injector cable,
(marked ‘DC OUT’), to the Ethernet port of the device.
Wireless router
POE Injector
CAT 5
6300-CX
Power Supply
DATA2GOWIRELESS.COM

6300-CX User’s Guide
13 of 28
Remote Power Trouble Shooting
On the end of the POE injector cable (see diagram) there are two LEDs. The Red LED marked DC IN will be
illuminated if the 6300-CX Power Supply Unit (PSU) in plugged into an AC power outlet and plugged into the
POE Injector Cable. If the red LED is not illuminated check the following:
• Ensure that the PSU is plugged into an AC power outlet and is receiving power .
• Ensure that the PSU’s power plug is correctly connected to the POE injector cable power input socket. The proper
orientation is for the lock tab and clip to align. (See picture below)
The Red LED marked DC IN and the Green LED marked DC OUT will both be illuminated on the POE injector
cable (see diagram) if you have properly connected the PSU and you have connect a length of CAT5 cable
properly to the POE injector cable and the 6300-CX. If the red LED is illuminated and the Green LED not
illuminated check the following:
• Ensure that you have a good connection at both the ends of you CAT5 cable.
• Check your CAT5 cable.
If red illuminated,
power is active.
If green illuminated,
then CAT5 is connected
to 6300 with power.
Correct power supply connection
DATA2GOWIRELESS.COM
Zirrus, LLC ©2015

Zirrus, LLC
©2015
6300-CX User’s Guide
14 of 28
Conguring Device
Network Managed Configuration
Your DataPro2Go 6300-CX has the capability to automatically sync and receive all settings from a centralized
cloud management tool, DataProView.
The DataProView management portal provides the following capabilities for your DataPro2Go 6300-CX.
• Monitoring details including signal strength, network connectivity details (RSRP, CNTI, RSRQ, Ec/Io, etc.), SIM
card details (IMEI, IMSI, ESN, etc.), data transmitted/received, and more.
• Email notications based on connectivity, device rmware, and signal strength.
• Remote control.
• Out of band SMS recovery.
Devices using DataProView typically require no additional configuration or set-up.
Local Configuration
If your DataPro2Go 6300-CX
is not provisioned in DataProView, it will use a default local configuration profile
which will enable basic cellular connectivity (primary or backup) to your router. Your device will operate as a
transparent bridge and all traffic on all ports is passed directly to and from the client device connected to the
device’s Ethernet port.
To change any default settings for an DataPro2Go 6300-CX not provisioned in DataProView
refer to Managing Device Locally section.
DATA2GOWIRELESS.COM

Zirrus, LLC ©2015
6300-CX User’s Guide
15 of 28
Troubleshooting
Resetting Your Device
To reset the device to factory default settings, press the RESET/ERASE switch on the rear of the device. This will erase
all device specic settings and rmware updates and restore the device to its original rmware and settings.
Establishing Backup Connectivity via Ethernet Port
If the device cannot connect using a cellular connection, use the following steps to use the Ethernet WAN connection.
Restore the device to its factory default settings.
Connect the Ethernet port of the device to the site network equipment/router. This may be done either directly
with an Ethernet cable or via the POE injector cable (6). Refer to the section “Using the Passive POE Injector
Cable” above. Check for solid LINK and flashing ACTIVITY LEDs on the device WAN Ethernet port.
The device will accept an IP address from the site network via its DHCP client.
Observe the
Status Indication LEDs & Signal Strength sections to aid in diagnosis.
Note: Backup Connectivity via Ethernet Port and WAN connectivity via Ethernet Port features cannot be used at the
same time. If you use the steps listed here to set the device’s Ethernet port as a backup connection for itself,
the 6300-CX will not be able to provide WAN connectivity to client device(s).
DATA2GOWIRELESS.COM

Zirrus, LLC ©2015
6300-CX User’s Guide
16 of 28
Out of Band SMS Commands
A set of emergency remote commands can be sent via SMS to the device to provide out-of-band (OOB) recovery for
the device. These SMS commands allow you to perform actions such as factory resets, reboot the device, and restore
to the backup rmware partition, all without requiring the device to have an active cellular connection. Similar to the
standard remote commands, these can be used to provide control over the device without any onsite interaction. To
utilize this feature, SMS must be enabled for the SIM card used by the device. The complete list of SMS commands is
dened in the DataProView™ User’s Guide.
DATA2GOWIRELESS.COM

Zirrus, LLC ©2015
6300-CX User’s Guide
17 of 28
Advanced Configuration
Using DataProVie w
The following DataProView actions are typically only performed by your network administrator.
Using DataProView to centrally manage your device is re
commended. If you are not using DataProView, you must
manage and congure your device using the local interface. Refer to
Managing Devic
e Locally section for more information.
Viewing & Editing Conguration
To access the conguration for your device:
1. Login to DataProView and use the Search tool to search by MAC address.
2. Select the MAC address of your 6300-CX to bring up its Details page.
3. Select View Configuration in the Configuration section.
4. Select the Edit pencil icon at the top right of the page to make changes.
The 6300-CX will automatically support conguration updates after the next daily sync around 1AM UTC. To apply
changes sooner than the next scheduled sync refer to the Remote Commands section for details on how to send a
remote command
Upgrading Firmware
To upgrade the rmware on your device:
1. Login to DataProView and use the Search tool to find the device by searching for its MAC address.
2. Select the MAC address of the device to bring up its details page.
3. Select the View Configuration link in the Configuration section of the page.
4. Once viewing the configuration profile, select the Edit pencil icon at the top right of the page.
5. Select the appropriate firmware version from the Firmware drop-down list.
6. Click the Update button.
DATA2GOWIRELESS.COM

Zirrus, LLC ©2015
6300-CX User’s Guide
18 of 28
cannot establish a cellular connection
Defining a Custom APN
If your device is unable to sync with DataProView because the device
without a custom APN refer to Managing Device Locally section.
1. Login to DataProView and use the Search tool to find the 6300-CX by searching for its MAC address.
2. Select the MAC address of the 6300-CX to bring up its details page.
3. Select the View Configuration link in the Configuration section of the page.
4. Once viewing the configuration profile, select the Edit pencil icon at the top right of the page.
5. Type in the custom APN into the APN entry located in the Modem section of the configuration.
6. Optional: If the custom APN requires a specific username and password, please input those into the Username
and Password entries located in the Modem section of the configuration.
7. Click the Update button.
Using Remote Commands
The DataProView management portal allows you to send a specific set of remote commands to the device to provide
control over the device without requiring any onsite interaction. These remote commands allow you to perform actions
such as rebooting the device, triggering a configuration sync with DataProView, perform network speed tests,
immediately probing the device for a real-time status, and more.
To send a remote command to an DataPro2Go 6300-CX:
1. Login to DataProView and use the Search tool to find the device by searching for its MAC address.
2. Select the MAC address of the device to bring up its details page.
3. Select the Commands drop-down list at the top-right of the page.
Immediately Update Device
1. Select Remote Commands
2. Select Check Conguration option from the Commands drop-down.
DATA2GOWIRELESS.COM

Zirrus, LLC ©2015
6300-CX User’s Guide
19 of 28
Establishing WAN connectivity via Ethernet Port
In order to provide a cellular connection to client devices, the DataPro2Go 6300-CX can be congured either in the
default Passthrough (i.e. bridge) mode or DHCP Server/Router mode.
Passthrough/Bridge Mode
In this default mode, the device operates as a transparent bridge and all trac on all ports is passed directly to and
from the client device connected to the device’s Ethernet port. In Passthrough mode, a single IP address will be
available through the device’s Ethernet port. Only one client device can be connected to the DataPro2Go 6300-CX
through its Ethernet port at a time.
1. Login to DataProView and use the Search tool to nd the device by searching for its MAC address.
2. Select the MAC address of the device to bring up its details page.
3. Select the View Conguration link in the Conguration section of the page.
4. Once viewing the conguration prole, select the Edit pencil icon at the top right of the page.
5. Under the Modem section of the conguration, open the Passthrough section and set the
following options inside that section:
a. Check Enable
.
b. Change Device to LAN.
c. Change Zone to Internal.
6. Change the Interface Type under the LAN network section
from DHCP to Static IP Address .
7. In the Address , enter in the IP address you wish to assign
to the device for its LAN DHCP network (i.e. the
gateway IP for the DHCP network).
8. Open the DHCP Server section and select Disable .
9. Click Save to apply the conguration changes.
Internet
Cellular Gateway
Cellular IP
Sample Diagram showing Passthrough Mode
6300-CX
Client Router
or Gateway
Ethernet
DATA2GOWIRELESS.COM

Zirrus, LLC ©2015
6300-CX User’s Guide
20 of 28
Router Mode
In this mode, the device operates as a standard DHCP router. The device will be congured to hand out a range of
LAN IP addresses to client devices connected on its Ethernet port. Standard router options are available in the device’s
conguration, including DHCP lease options, DNS options, rewall options, and port forwarding rules.
The following list of steps details how to setup a simple DHCP server on the device in router mode.
1. Login to DataProView and use the Search tool to find the device by searching for its MAC address.
2. Select the MAC address of the device to bring up its details page.
3. Select the View Configuration link in the Configuration section of the page.
4. Once viewing the configuration profile, select the Edit pencil icon at the top right of the page.
5. Change the Interface Type under the LAN
network section from DHCP to Static IP Address.
6. In the Address , enter in the IP address you wish to assign to the device
for its LAN DHCP network (i.e. the gateway IP for the DHCP network).
7. Open the DHCP Server section and select Enable .
8. Click Save to apply the configuration changes.
Learning More
In depth details on using DataProView
can be found in the DataProView User’s Guide.
Internet
Cellular Gateway
Client IP Client IP Client IP
Sample Diagram showing Passthrough Mode
6300-CX
Client Laptop Client Workstation Client Register
Switch Hub
DATA2GOWIRELESS.COM

Zirrus, LLC
©2015
6300-CX User’s Guide
21 of 28
Managing Device Locally
The following DataProView actions are typically only performed by your network administrator. Note: Using
DataProView to centrally manage your device is recommended. If you are not using DataProView, you must manage
and configure your device using the local interface.
Connecting to the Device
Communication with the device is typically via its Ethernet port. By default, you can connect to the device via its
Ethernet port, at the IP address 192.168.210.1. You can access the device via this default IP address using a PC
connected to its Ethernet port.
When connected to your site network, your DataPro2Go 630
0-CX will attempt to use DHCP to establish a connection
and obtain an IP address. If a DHCP server is operating on the site network then the device will receive an IP address
conguration from the local network. You can also access the device using the IP address provided in the DHCP connection.
DATA2GOWIRELESS.COM

Zirrus, LLC ©2015
6300-CX User’s Guide
22 of 28
Manually Conguring PC to Connect to Device
To manually connect to the device, you must manually set an IP address on your PC to be able to communicate with
the DataPro2Go 6300-CX.
1. Select the Properties of the relevant network connection on the Windows PC.
DATA2GOWIRELESS.COM

Zirrus, LLC ©2015
6300-CX User’s Guide
23 of 28
Manually Conguring PC to Connect to Device
To manually connect to the device, you must manually set an IP address on your PC to be able to communicate with
the DataPro2Go 6300-CX.
2. Click the Internet Protocol Version 4 (TCP/IPv4) parameter and select Properties and congure with the following details.
DATA2GOWIRELESS.COM

Zirrus, LLC ©2015
6300-CX User’s Guide
24 of 28
DATA2GOWIRELESS.COM
Logging into Device
To manually connect to the device, you must manually set an IP address on your PC to be able to communicate with
the DataPro2Go 6300-CX.
1. Open the web browser on the PC and type in the address bar, the IP address of the DataPro2Go 6300-CX
(192.168.210.1) and hit Enter.
2. When prompted Enter - User Name: root Password: default
3. The DataPro2Go 6300-CX default web user interface will be shown.

Zirrus, LLC ©2015
6300-CX User’s Guide
DATA2GOWIRELESS.COM
25 of 28
Advanced Local Conguration
Once logged in via the local web interface you must enable local management of the device to modify settings for the
Cellular and Ethernet interfaces.
1. Uncheck box next to “Enable central management”
2. Click save.
After saving the prole, the device will no longer attempt to sync with DataProView and a full range of available
conguration options will be visible.
Hovering your mouse over the name for a conguration option will display a pop-up providing help details about that
option, including any default values.

Zirrus, LLC ©2015
6300-CX User’s Guide
26 of 28
Upgrading Firmware
1. Download the appropriate rmware le from Data2Go Wireless.
2. Connect to the device’s web UI by connecting your PC to the WAN Ethernet port
of the device and then going to http://192.168.210.1.
3. Select the System tab on the left side of the page.
4. Select the Browse button next to the Firmware image section.
5. Browse for and select the downloaded rmware le.
6. Click the Update Firmware button.
Do not turn o or unplug the device while it is upgrading its rmware.
The upgrade process should take less than one minute.
Dening a Custom APN
1. Connect to the device’s web UI by connecting your PC to the WAN Ethernet port
of the device and then going to http://192.168.210.1.
If the device does not give your PC an IP address via DHCP, you may need to congure your PC
with the following static IP settings.
IP address for PC: 192.168.210.2
Subnet: 255.255.255.0
Gateway: 192.168.210.1
2. Select the Conguration tab on the left side of the page.
3. Type in the custom APN into the APN entry located in the modem section of the conguration.
4. Optional: If the custom APN requires a specic username and password, please input those into the
Username and Password entries.
5. Click the Save button.
DATA2GOWIRELESS.COM

Zirrus, LLC ©2015
6300-CX User’s Guide
27 of 28
FAQs
How do I factory reset the DataPro2Go 6300-CX?
1. Ensure that the device has been powered on for at least 30 seconds.
2. Briey press the Erase button located on the back of the device.
What IP address does the DataPro2Go 6300-CX use?
By default, the DataPro2Go 6300-CX will use 192.168.210.1. You can access the device through
its WAN Ethernet port using this IP address.
What size SIM card does the DataPro2Go 6300-CX use?
The DataPro2Go 6300-CX supports standard mini-SIMs (2FF).
How do I insert a SIM into the DataPro2Go 6300-CX?
With the power disconnected, the SIM card should be inserted notch-end rst with the gold contacts face down. The
SIM slot is located on the back of the DataPro2go 6300-CX between the power connector and the USB port. The SIM
will click into place when fully inserted.
Does the DataPro2Go 6300-CX fail back to 3G?
Yes, if the DataPro2Go 6300-CX doesn’t recognize a 4G/LTE network available, the device will automatically fallback to the
highest available 3G network. Supported networks include DC-HSPA+, HSPA+, HSPA, EDGE, GPRS, GSM and CDMA.
Does the DataPro2Go 6300-CX support IPv6?
Yes. In passthrough mode, when the 6300-CX receives an IPv6 prex from the cellular network, it uses SLAAC to pass
the prex to the client device connected to its Ethernet port. The 6300-CX will also pass the IPv6 DNS server using the
SLAAC RDNSS option and stateless DHCPv6.
DATA2GOWIRELESS.COM

Zirrus, LLC ©2015
6300-CX User’s Guide
28 of 28
Regulatory
FCC
THIS EQUIPMENT HAS b
EEN TESTED AND f OUND TO COMPLY WITH THE LIMITS f OR A C LASS A DIGITAL DEVICE , PURSUANT TO PART 15 Of THE
f CC R ULES . T HESE LIMITS ARE DESIGNED TO PROVIDE REASONA bLE PROTECTION AGAINST HARM f UL INTER f ERENCE WHEN THE EQUIPMENT IS
OPERATED IN A COMMERCIAL ENVIRONMENT . T HIS EQUIPMENT GENERATES , USES , AND CAN RADIATE RADIO f REQUENCY ENERGY AND , If NOT
INSTALLED AND USED IN ACCORDANCE WITH THE INSTRUCTION MANUAL , MAY CAUSE HARMFUL INTERFERENCE TO RADIO COMMUNICATIONS.
OPERATION Of THIS EQUIPMENT IN A RESIDENTIAL AREA IS LI k ELY TO CAUSE HARM f UL INTER f ERENCE IN WHICH CASE THE USER WILL b E
REQUIRED TO CORRECT THE INTER f ERENCE AT HIS OWN EXPENSE .
INDUSTRY C ANADA - CAN ICES-3(A)/NM b-3(A)
THIS PRODUCT IS INTENDED FOR OPERATION IN A COMMERCIAL OR INDUSTRIAL ENVIRONMENT AND SHOULD NOT BE USED IN A RESIDENTIAL
ENVIRONMENT . T HIS PRODUCT HAS b EEN TESTED AND f OUND TO COMPLY WITH THE REQUIREMENTS Of: ICES-003 – I Nf ORMATION
TECHNOLOGY E QUIPMENT – L IMITS AND M ETHODS Of M EASUREMENT ISSUE 5, A UGUST 2012.
European Union
THIS PRODUCT MAY CAUSE INTERFERENCE IF USED IN RESIDENTIAL AREAS . S UCH USE MUST BE AVOIDED UNLESS THE USER TAKES SPECIAL
MEASURES TO REDUCE ELECTROMAGNETIC EMISSIONS TO PREVENT INTERFERENCE TO THE RECEPTION OF RADIO AND TELEVISION BROADCASTS .
DATA2GOWIRELESS.COM
 Loading...