

Page 1
RSN870
IP Renderstation
Quick Start Guide
Version: 1.0.2
Page 2

Safety Instructions
Safety Instructions (UK)
To prevent damage to your Datapath product or injury to personnel operating the equipment, please read the following safety precautions prior to operation. These instructions should be made available to all those who will use and operate Datapath products.
Power Supply
All Datapath products require a mains power supply. This power supply must be disconnected when equipment is being upgraded or
relocated.
Cables
Do not expose cables to any liquids; doing so may cause a short circuit which could damage the equipment. Do not place heavy
objects on top of any cables as this can cause damage and possibly lead to exposed live wires.
Ventilation
All computer equipment should be located in a well ventilated area. All ventilation holes on the computer casing must be kept clear of
any obstruction at all times. Failure to do so will result in the system over heating and damaging your equipment.
Working Environment
The equipment should be located in an environment free from dust, moisture and extreme changes in temperature and should be
placed on a stable and solid work surface. Liquids (hot/cold drinks etc) should not be placed near the equipment as spillage could
cause serious damage.
Gas/Flammable Liquids
Electronic equipment should never be used in the presence of gas or any ammable liquid, doing so could result in an explosion or
serious re.
Smoke/Unusual Smells
Should you notice smoke or unusual smells being emitted from your computer, turn o and unplug the system from the mains supply.
The system should then be passed to a qualied technician for inspection. Continued operation could result in personal injury and
damage to property.
Maintenance
Maintenance should only be carried out by competent technicians, any Datapath plug-in cards that are physically damaged should be
returned to Datapath for repair using Datapath RMA procedures.
Disposal
At the end of life all Datapath products should be disposed of as per local laws and regulations dictate. In UK contact Datapath to
arrange disposal. Our WEE registration number is WEEE/AA0005ZR.
Rack Mount Safety Instructions
Temperature
If RSN870 systems are to be installed in a closed or multi-unit rack assembly, the installation should be such that the amount of air
ow required for safe operation of the equipment is not compromised. The operating ambient temperature of the rack environment
should be maintained below 35 degrees centigrade under all conditions. Appropriate cooling arrangements should be built into the
cabinet to ensure that this specication is maintained.
Mechanical Loading
Mounting of the equipment in the rack should be such that a hazardous condition is not achieved due to uneven mechanical loading.
Circuit Overloading
Consideration should be given to the connection of the equipment to the mains supply circuit and the eect that overloading of the
supply might have on any overcurrent protection or supply wiring. Appropriate consideration of equipment nameplate ratings should
be used when addressing this concern.
Reliable Earthing
Reliable earthing of all rack-mounted equipment should be maintained. Particular attention should be given to supply connections
other than direct connections to the branch circuit (e.g. use of power strips).
Consignes de sécurité (Fr)
An de ne pas endommager votre produit Datapath et d’éviter tout risque de blessure du personnel exploitant le matériel, veuillez lire
les consignes de sécurité suivantes avant toute utilisation. Ces instructions doivent être mises à disposition de toute personne souhaitant
utiliser et exploiter les produits Datapath.
Alimentation électrique
Tous les produits Datapath requièrent une alimentation électrique principale. Cette alimentation électrique doit être interrompue en cas
de mise à jour ou de relocalisation du matériel.
Câbles
Ne pas exposer les câbles à un liquide quelconque car cela pourrait provoquer un court-circuit susceptible d’endommager le matériel.
Ne pas placer d’objets lourds sur les câbles car cela pourrait causer des dommages et conduire éventuellement à des ls électriques
dénudés.
Ventilation
Tout matériel informatique doit être disposé dans un endroit bien ventilé. Veiller à ne jamais obstruer les orices de ventilation du boîtier
de l’ordinateur ; sinon, il y a risque de surchaue du système et votre matériel peut être endommagé.
Environnement de travail
Le matériel doit être placé sur une surface de travail stable et solide, dans un environnement exempt de poussière et d’humidité et non
exposé à des variations extrêmes de températures. Ne pas placer de liquides (boissons chaudes/froides, etc.) près du matériel, car un
déversement accidentel pourrait causer de graves dommages.
Gaz/Liquides inammables
Le matériel électronique ne doit jamais être utilisé en présence de gaz ou de liquide inammable ; cela pourrait entraîner une explosion
ou un grave incendie.
Fumée/odeurs inhabituelles
Si vous constatez la présence de fumée ou d’odeurs inhabituelles émanant de votre ordinateur, éteignez-le et débranchez le système de
l’alimentation secteur. Dans ce cas, le système devra être coné à un technicien qualié pour inspection. Une poursuite de son utilisation
risquerait de provoquer des blessures corporelles et des dommages matériels.
Entretien
L’entretien doit impérativement être eectué par des techniciens compétents, toute carte enchable Datapath physiquement endommagée est à retourner à Datapath pour réparation via la procédure Datapath RMA.
Élimination
En n de vie, tous les produits Datapath seront éliminés conformément aux législations et réglementations locales. Au Royaume-Uni,
veuillez contacter Datapath pour organiser l’élimination. Notre numéro d’enregistrement de Déchets d’équipements électriques et
électroniques : WEEE/AA0005ZR.
Consignes de sécurité du montage sur bâti
Température
S’il est prévu d’installer les systèmes RSN870 dans une enceinte fermée ou dans un bâti comportant plusieurs unités, l’installation
devra être eectuée de telle manière que le débit d’air requis pour la sûreté de fonctionnement du matériel ne soit pas compromis. La
température ambiante de fonctionnement de l’environnement du bâti doit être maintenue en-dessous de 35 degrés centigrades dans
toutes les conditions. Des dispositifs de refroidissement appropriés doivent être intégrés dans l’armoire de façon à garantir le maintien
de cette spécication.
Charge mécanique
Le montage du matériel doit être eectué de manière à exclure toute situation dangereuse pouvant provenir d’une charge mécanique
irrégulière.
Surcharge du circuit
Il convient d’apporter une certaine importance au raccordement du matériel au circuit de l’alimentation secteur et aux eets qu’une
surcharge de l’alimentation pourrait avoir sur une protection contre les surintensités ou les câbles d’alimentation. Vériez pour cela les
valeurs nominales sur les plaques d’identication du matériel.
Fiabilité de la mise à la terre
Veiller à une mise à la terre able de tout matériel monté sur bâti. Une attention particulière devra être accordée aux raccordements
d’alimentation autres que les raccordements directs au circuit de dérivation (utilisation de multiprises par exemple).
Instrucciones de seguridad (Esp)
Rogamos leer las siguientes instrucciones de seguridad antes de poner en funcionamiento el equipo, a n de evitar daños en su producto
de Datapath o lesiones al personal encargado de su manejo. Poner estas instrucciones a disposición de todos aquellos que vayan a
utilizar y/o manejar los productos de Datapath.
Alimentación eléctrica
Todos los productos de Datapath requieren una fuente de alimentación eléctrica. Esta fuente de alimentación eléctrica debe ser
desconectada durante las tareas de renovación o traslado.
Cables
No exponer los cables a líquidos, ya que ello puede causar un cortocircuito y, por consiguiente, daños en el equipo. No colocar objetos
pesados sobre los cables, ya que esto puede ocasionar daños y poner al descubierto los cables vivos.
Ventilación
Todos los equipos informáticos deben estar situados en un área bien ventilada. Mantener todos los oricios de ventilación de la carcasa
del ordenador siempre libres de obstrucciones de cualquier tipo. En caso contrario, podría producirse un sobrecalentamiento del
sistema y daños en el equipo.
Entorno de trabajo
El equipo debe estar emplazado en un ambiente sin polvo, humedad ni cambios bruscos de temperatura y debe ser situado sobre una
supercie estable y sólida. No colocar líquidos (bebidas calientes/frías, etc.) cerca del equipo, ya que un derrame podría causar graves
daños.
Gas/líquidos inamables
El equipo electrónico nunca debe ser usado en presencia de gas o líquido inamable, ya que esto podría causar una explosión o un
incendio grave.
Humo/olores inusuales
En caso de percibir humo u olores inusuales provenientes de su ordenador, apagar y desenchufar el equipo de la red eléctrica. El sistema
debe ser conado entonces a un técnico cualicado para su
inspección. Si el equipo continuara funcionando, esto podría ocasionar lesiones personales y daños materiales.
Mantenimiento
El mantenimiento solo debe ser ejecutado por técnicos capacitados. Las tarjetas insertables (plug-in) de Datapath que estén físicamente
dañadas deben ser devueltas a Datapath para su reparación según los procedimientos RMA (Return Merchandise Agreement) de
Datapath.
Eliminación
Al nal de su vida útil, todos los productos de Datapath deben ser eliminados de acuerdo con las leyes y normativas locales. En el
Reino Unido, contactar a Datapath para organizar la eliminación. Nuestro número de registro WEE (Waste Electrical and Electronic
Equipment) es WEEE/AA0005ZR.
Instrucciones de seguridad para montaje en bastidor
Temperatura
Si los sistemas RSN870 se montan en un bastidor cerrado o en un bastidor de varias unidades, la instalación se deberá realizar evitando
que afecte al ujo de aire necesario para un funcionamiento seguro. Mantener la temperatura ambiente del entorno del bastidor por
debajo de los 35 grados centígrados bajo todo tipo de condiciones. Instalar en el armario los dispositivos adecuados de refrigeración a
n de asegurar que se cumpla esta especicación.
Carga mecánica
Efectuar el montaje del equipo en el bastidor de tal modo que se eviten situaciones de peligro debidas a una carga mecánica irregular.
Sobrecarga del circuito
Tener especial cuidado al realizar la conexión del equipo al circuito de la red eléctrica a n de evitar que una sobrecarga de ésta pueda
afectar a algún dispositivo de protección contra corriente de sobreintensidad o al cableado de alimentación. Tener en cuenta las capacidades especicadas en la placa indicadora del equipo al conectarlo a la red.
Puesta a tierra segura
Asegurar la puesta a tierra segura de todos los equipos montados en bastidor. Prestar especial atención a las conexiones de alimentación
que no sean conexiones directas al circuito en derivación (por ejemplo, mediante regletas).
Sicherheitsanweisungen (D)
Die folgenden Sicherheitsanweisungen dienen der Vermeidung von Schäden an Ihrem Datapath-Produkt und Verletzungen der Nutzer.
Bitte lesen Sie sie sorgfältig durch, bevor Sie Ihr Produkt in Betrieb nehmen. Diese Anweisungen sollten allen Personen zugänglich
gemacht werden, die mit der Nutzung und der Bedienung von Datapath-Produkten betraut sind.
Stromversorgung
Alle Datapath-Produkte müssen an die Hauptstromversorgung angeschlossen werden. Die Stromversorgung muss unterbrochen
werden, wenn Geräte ausgetauscht oder an einer anderen Stelle platziert werden sollen.
Kabel
Kabel dürfen nicht mit Flüssigkeiten in Berührung kommen, da dadurch ein Kurzschluss und somit ein Schaden an dem Gerät ausgelöst
werden könnte. Stellen Sie außerdem keine schweren Objekte auf die Kabel, um Schäden und oen liegende stromführende Leitungen
zu vermeiden.
Lüftung
Computerausrüstung sollte in einem gut gelüfteten Bereich aufgestellt werden. Die Lüftungslöcher am Computergehäuse müssen stets
freigehalten werden, um eine Überhitzung und somit einen Geräteschaden zu vermeiden.
Arbeitsumgebung
Die Geräte sollten in einer staubfreien und trockenen Umgebung, in der keine extremen Temperaturänderungen zu erwarten sind, auf
einer stabilen Arbeitsäche aufgestellt werden. In der Nähe der Geräte sollten keine Flüssigkeiten (heiße/kalte Getränke etc.) platziert
werden, die verschüttet werden und schwerwiegende Schäden anrichten könnten.
Gas/brennbare Flüssigkeiten
Elektronische Geräte sind nicht in Umgebungen zu verwenden, in denen Gas oder brennbare Flüssigkeiten vorhanden ist/sind und somit
Brand- und Explosionsgefahr besteht.
Rauch/ungewöhnliche Gerüche
Schalten Sie das System aus und trennen Sie es von der Hauptversorgung, wenn von Ihrem Computer Rauch ausgeht oder dieser ungewöhnliche Gerüche abgibt. Lassen Sie das System anschließend von einem qualizierten Techniker prüfen. Bei fortgeführtem Betrieb
besteht die Gefahr von Verletzungen und Sachschäden.
Wartung
Wartungsarbeiten sollten nur von qualizierten Technikern durchgeführt werden. Physisch beschädigte Plug-in-Karten von Datapath
sollten zur Reparatur unter Einsatz der RMA-Verfahren von Datapath an Datapath übergeben werden.
Entsorgung
Am Ende ihrer Nutzungsdauer sollten Datapath-Produkte gemäß den lokalen Gesetzen und Bestimmungen entsorgt werden. Für
Nutzer in Großbritannien: Bitte kontaktieren Sie Datapath, um Vorkehrungen zur Entsorgung von Datapath-Produkten zu treen.
Unsere WEE-Registrierungsnummer lautet WEEE/AA0005ZR.
Sicherheitsanweisungen zur Rack-Montage
Temperatur
Um einen sicheren Betrieb zu gewährleisten, muss ausreichend Luft zur Kühlung sichergestellt werden, wenn RSN870-Systeme in einem
geschlossenen Rack-Auau oder einem Auau für mehrere Geräte installiert werden. Die Umgebungstemperatur in dem Bereich, in
dem sich das Rack bendet, sollte stets unterhalb von 35° C liegen. Das Gehäuse sollte mit einer Vorrichtung zur angemessenen Kühlung
ausgestattet sein, sodass diese Spezikation erfüllt werden kann.
Mechanische Belastung
Um Gefahrensituationen zu vermeiden, muss bei der Platzierung der Geräte in das Rack auf eine gleichmäßige mechanische Belastung
geachtet werden.
Schaltkreisüberlastung
Beim Anschluss der Geräte an die Hauptstromversorgung sollten die Auswirkungen berücksichtigt werden, die eine Überlastung der
Stromversorgung auf einen eventuell vorhandenen Überstromschutz oder Versorgungsleitungen haben könnte. In diesem Zusammenhang sind die Typenschilder der Geräte zu beachten.
Zuverlässige Erdung
In Bezug auf in Racks montierte Geräte ist stets auf eine zuverlässige Erdung und insbesondere auf Versorgungsleitungen zu achten, die
nicht direkt an den jeweiligen Stromkreis angeschlossen sind (Nutzung von Steckerleisten etc.).
2
Page 3
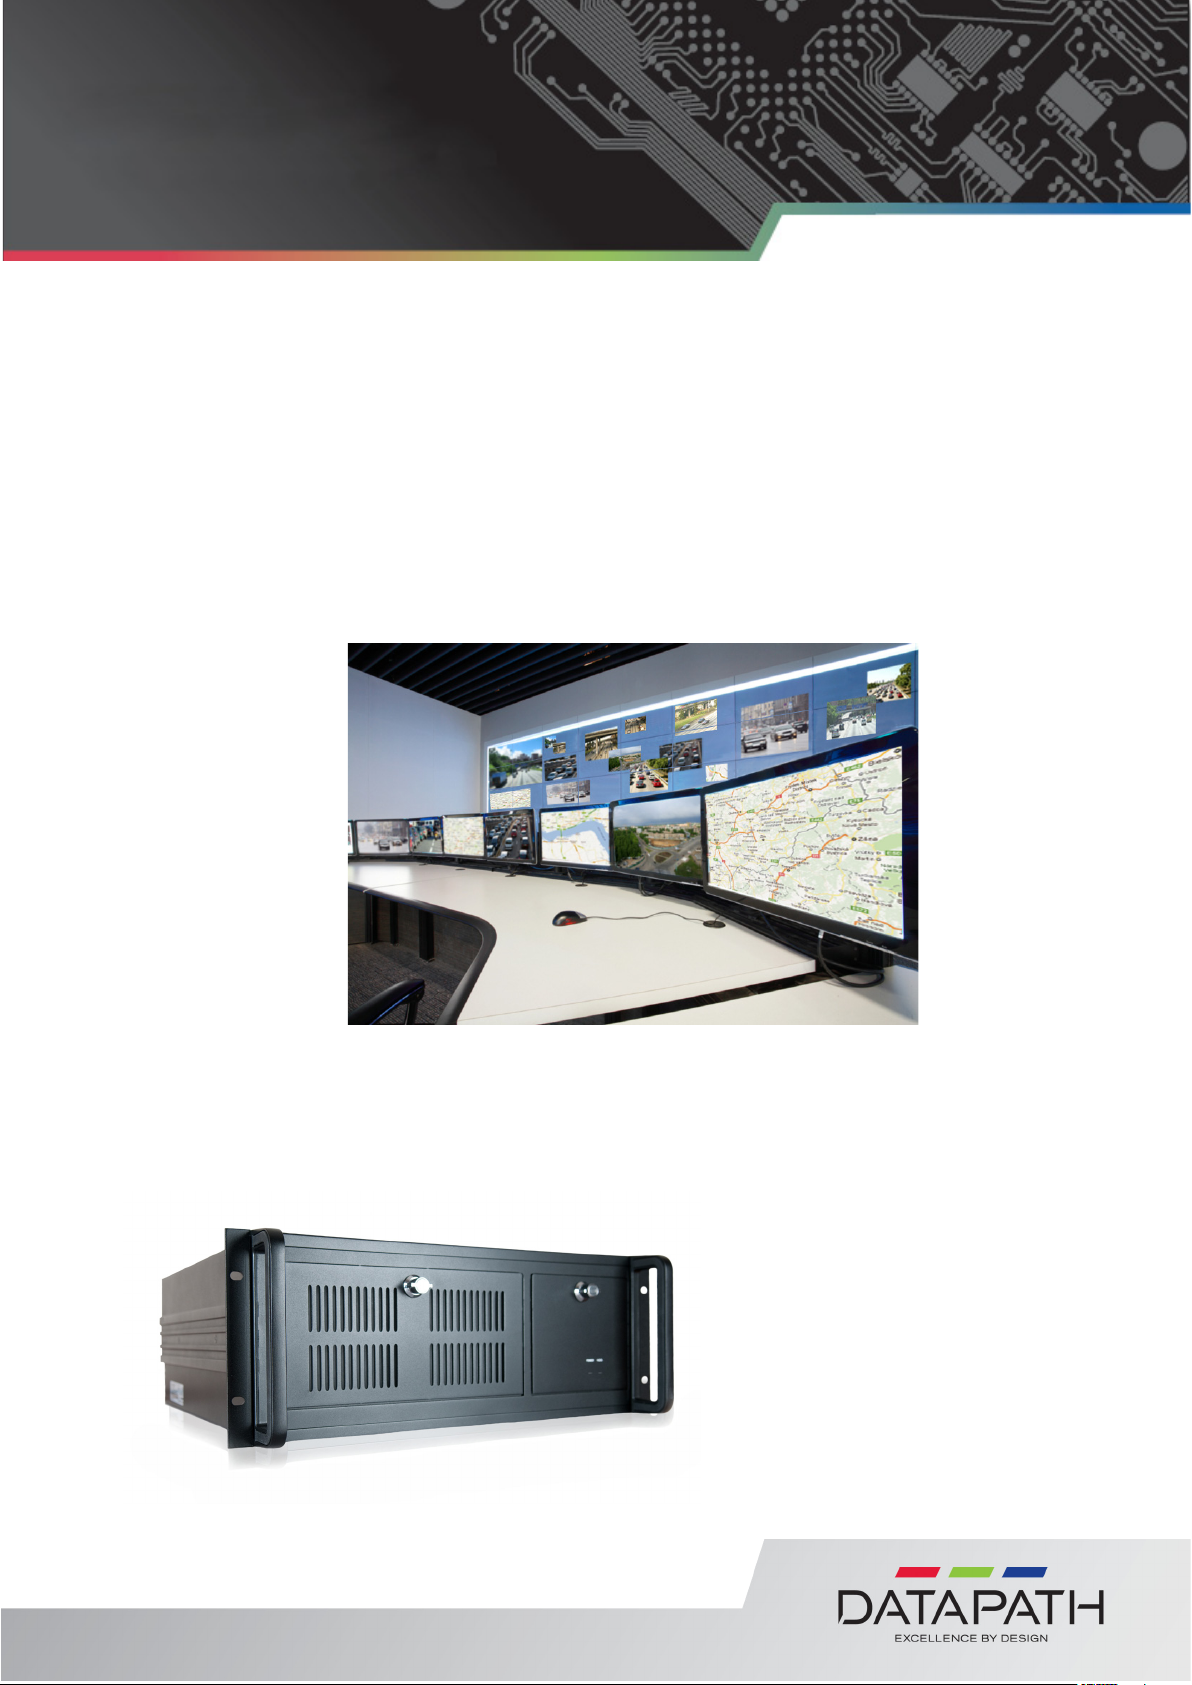
RSN870
Congratulations on your purchase. The RSN870 is a powerful, Intel Core i7 based Industrial PC providing
up to a maximum of 240 IP video camera streams (IPV3).
This Quick Start Guide is designed to aid quick installation and set up of your new RSN870, however
should you experience any problems not covered in this guide please refer to your Wall Control online help
system.
Step 1
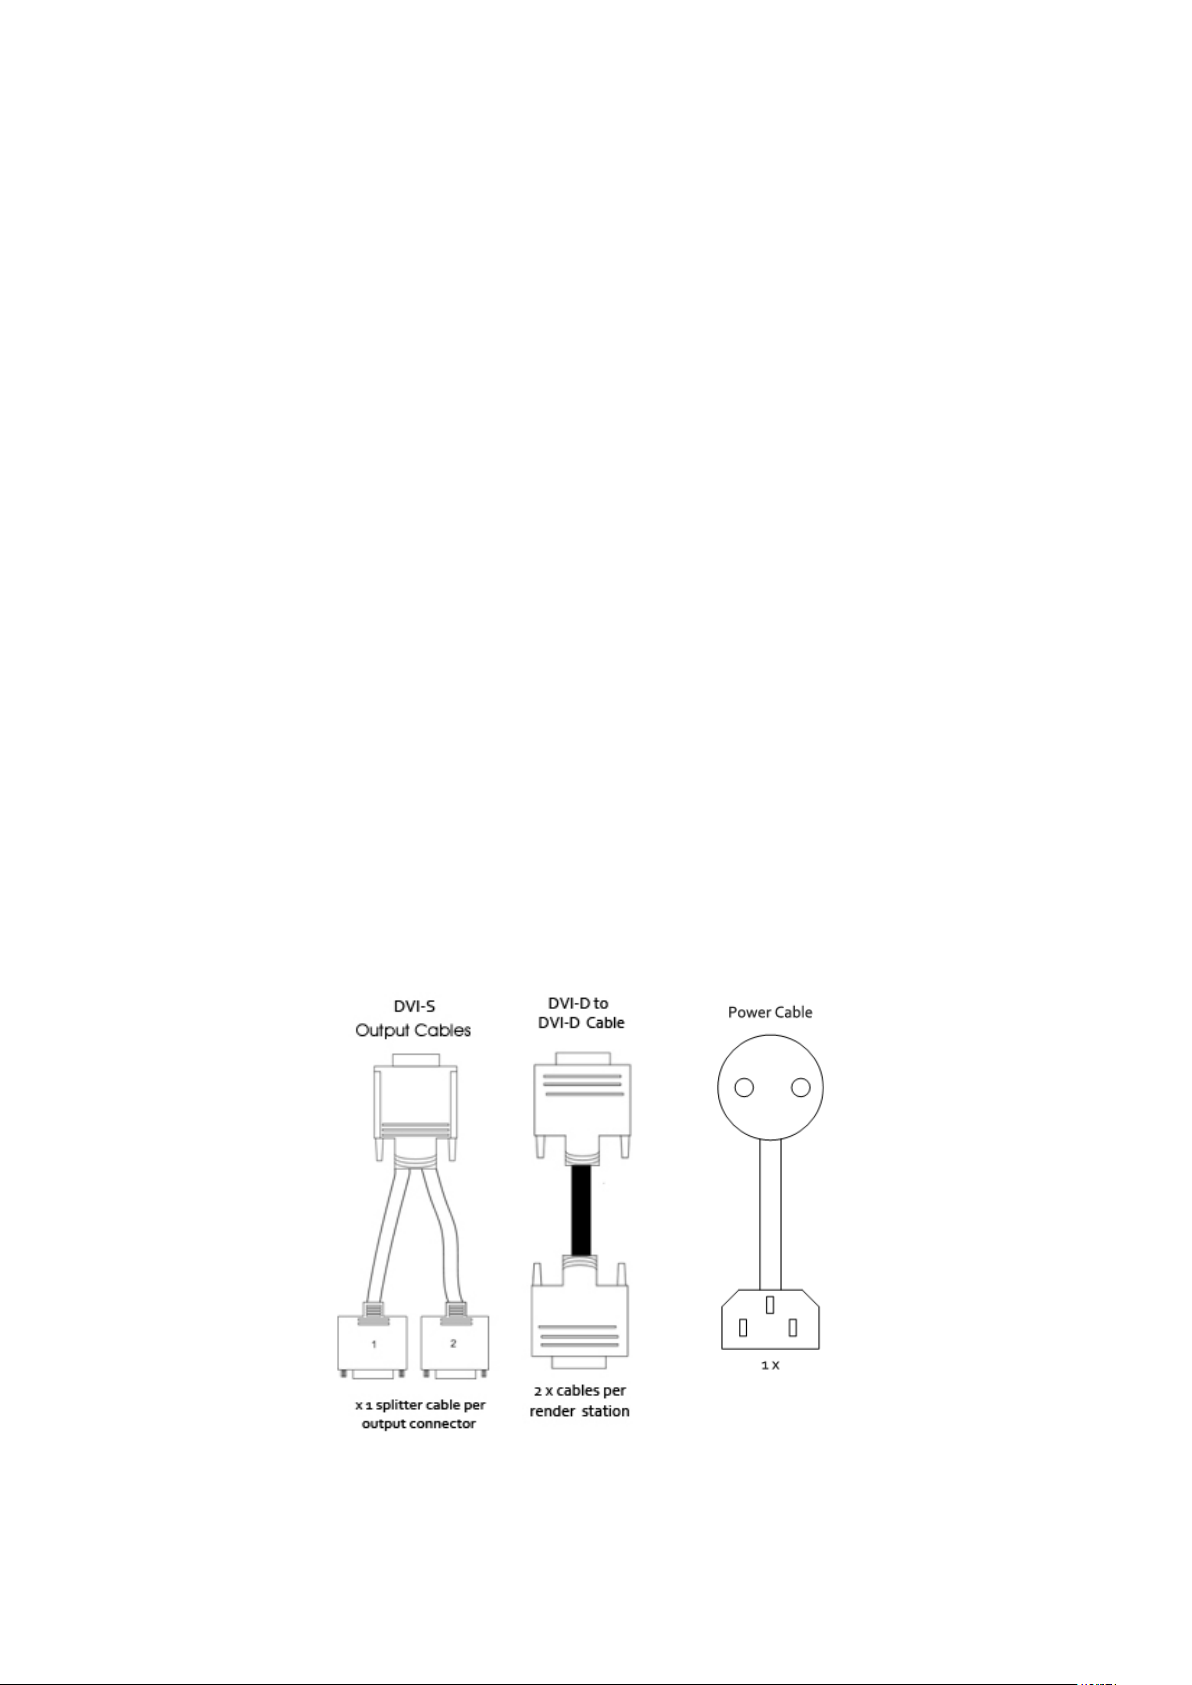
Packing List – Your box should contain:
RSN870
Cables (See quantity guide Fig.1)
Quick Start Guide
Software CD
Accessories Pack Containing:
Operating System CD including Product Key
(1 x CD per SBC)
SBC Driver CD
Chassis Door Key
Fig.1
3
Page 4
Step 2
Unpacking
The RSN870 chassis is heavy, lifting precautions should be taken.
Inspect items for damage. Should any items show any signs of damage, report it immediately to your
vendor.
Attention!
The RSN870 contains additional packaging inside the chassis. This MUST be removed prior to operation
by removing the chassis lid via the 4 screws, 2 located on each side of the case lid.
Retain packaging materials for future shipping requirements.
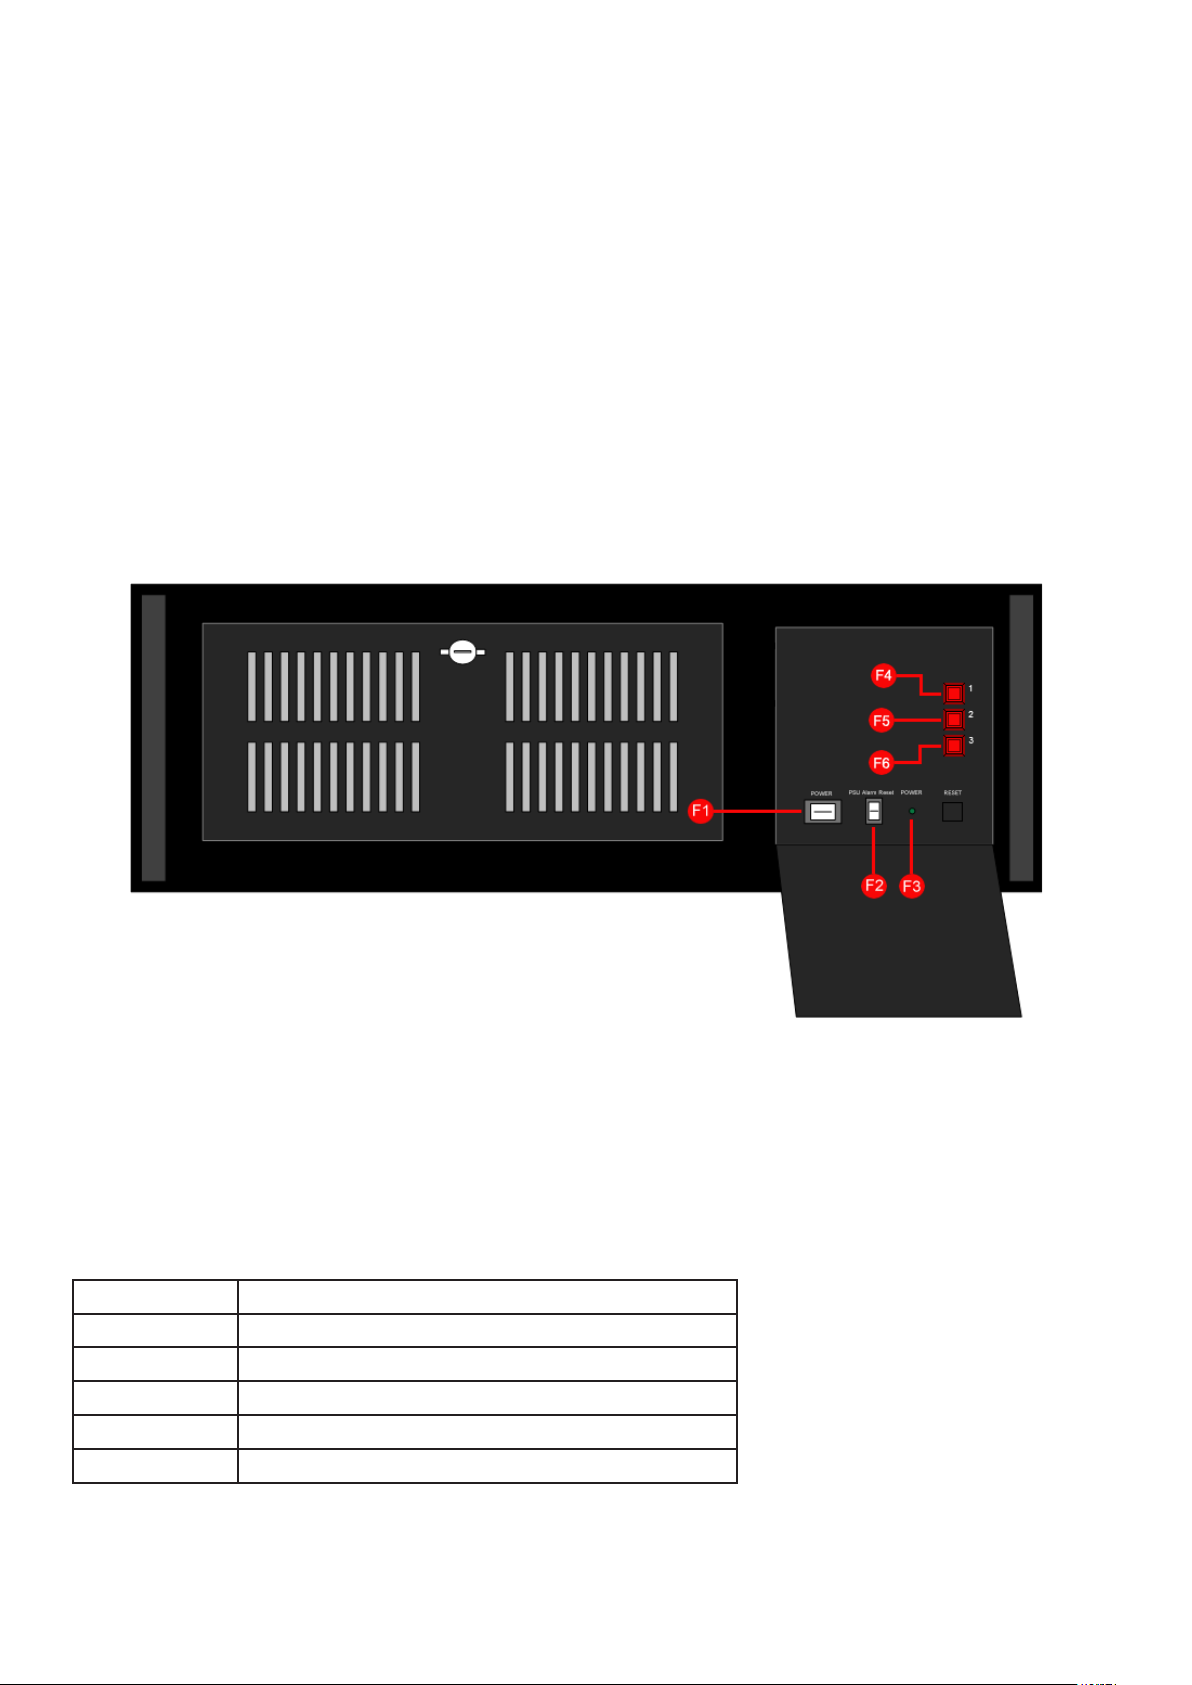
Front View
Key:
F1 Power switch.
F2 PSU Alarm Reset switch.
F3 Power LED.
F4 1st SBC2 Reset Switch
F5 2nd SBC2 Reset Switch
F6 3rd SBC2 Reset Switch
Fig.2
4
Page 5
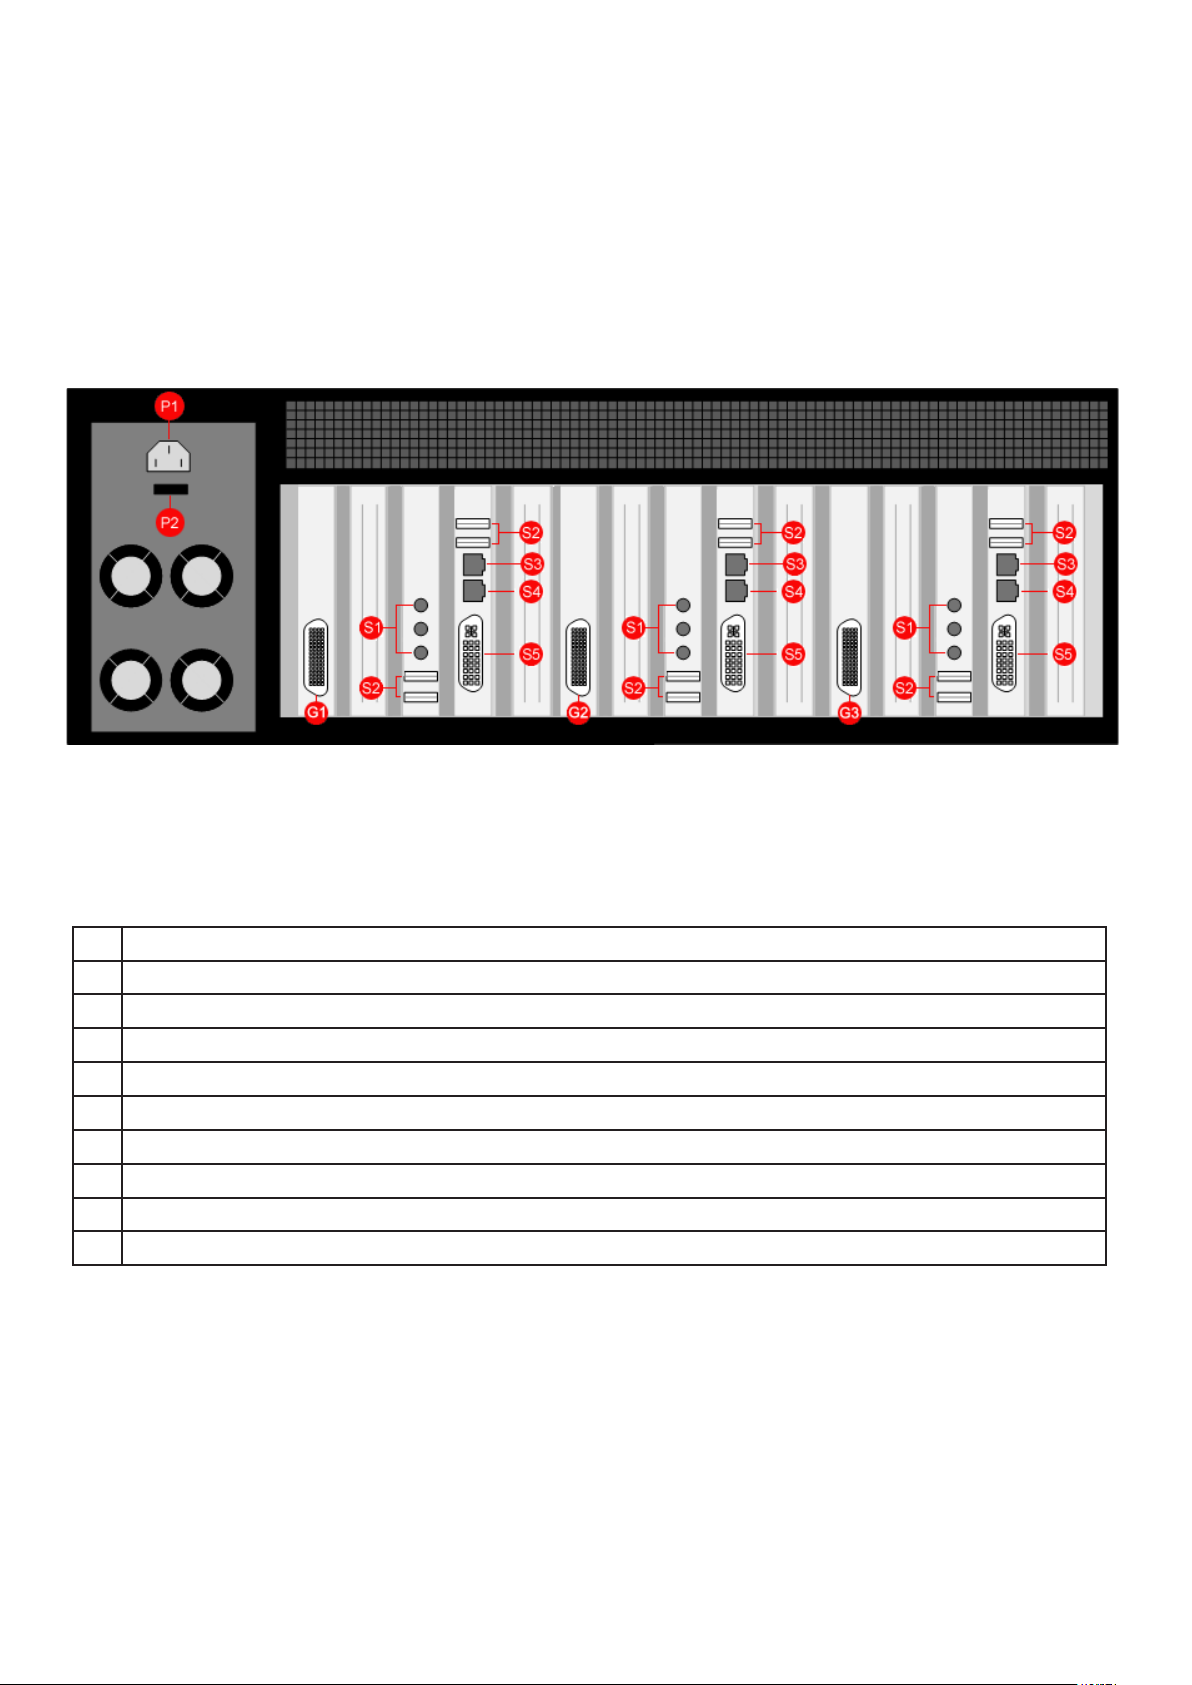
Rear View
Each RSN870 will dier depending on the model ordered. The illustration below (Fig.3) is an example of
the rear panel of the RSN870-3.
The RSN870-1 contains 1 x SBC2 (S1-S5) and 1 x nVidia graphics card (G1)
The RSN870-2 contains 2 x SBC2’s (S1-S5) and 2 x nVidia graphics cards (G1, G2)
The RSN870-3 contains 3 x SBC2’s (S1-S5) and 3 x nVidia graphics cards (G1, G2 and G3)
Fig.3 (Model shown - RSN870-3 Renderstation)
Key
P1 Power Connector.
P2 Main Power Switch.
G1 Dual DVI output connector
G2 Dual DVI output connector
G3 Dual DVI output connector
S1 Aux Inputs connectors.
S2 USB Input connectors.
S3 Network connectors.
S4 Network connectors.
S5 On Board Graphics Output (Not used)
5
Page 6

Step 3
Getting Started
Prior to shipment of the RSN870, the Operating System has been installed and fully updated on each of
the SBC’s, the nVidia graphics card drivers have been installed, the ‘Remote Desktop Connection’ has
been enabled and at least one user has been created with ‘Administrator’ status under which the
Renderstation Software has been installled.
How to Connect Outputs
You should exercise great care when connecting all cables to the connectors.
If the pins are oriented correctly and the connector is pushed on squarely, the use of force is not
required. Poor handling may cause some pins to bend within the plug on the cable and this, in turn will
cause damage to the output socket and in some instances will cause irreparable damage to the Printed
Circuit Board. Such damage is not covered under warranty
Connect the output splitter cable (Fig.1) to the Dual DVI output connector on the nVidia graphics card on
the RSN870 (Fig.3 -G1/G2/G3). Using DVI-D cables of no more than 3m in length connect the outputs of
the splitter cable to the inputs of the Vision capture card in the Vision Wall Controller (Fig. 4).
Fig.4
For the process of troubleshooting, the recommended ordering of connection is as follows:
• Connect the outputs from the rst nVidia graphics card (Fig.3 -G1) to the inputs on the rst VisionRGB-
E2S card in the Vision Controller.
• Connect the outputs from the second nVidia graphics card (Fig.3 -G2) to the inputs on the second
VisionRGB-E2S card in the Vision Controller.
• Connect the outputs from the third nVidia graphics card (Fig.3 -G3) to the inputs on the rst
VisionRGB-E2S card in the Vision Controller.
The software will not distinguish the connection ordering, therefore any prefered ordering is acceptable.
Network Connection
The upper network ports (Fig. 3 - S3) are pre-congured for communication with the Wall Control software
on the Vision Wall Controller. Using a network cable, connect the upper network ports to the same network as the Vision Wall Controller, this network can also be used to connect to IP cameras.
The lower network port (Fig. 3 - S4) is an optional second network port that can be used to provide the
RSN870 with access to a second network for communication with other IP cameras. Only use the second
network port if necessary.
6
Page 7

Step 4
Switching on the RSN870
It is not necessary to connect a keyboard and mouse to the RSN870 unless maintenance or
reinstallation of software is required. Should it be necessary, use the USB ports (Fig. 3 - S2).
Ensure that the Power Supply Unit(s) are switched on (Fig.3 - P2).
Press and release the main power switch (Fig.2- F3).
On power up, the RSN870 will boot into a minimal Windows® desktop and auto-login as the
precongured user and launch the Renderstation software. Once launched, the following dialog will be
displayed.
Fig.5
Reinstallation
To reinstall the Renderstation software or to reconguire the Windows Network Settings please refer to
the “Datapath Render Station Installation Guide” which is located on the CD supplied with your RSN870
The default user for Render Station software installation is: ipcam
The default password for the ipcam user is: ipcam
Should there be a requirement to reinstall the Renderstation software or an Operating System then an
external CD/DVD drive will be required.
7
Page 8

Step 5
Congure the RSN870 in Wall Control-red
The RSN870 is congured using Wall Control-red which should be installed on the Vision Wall
Controller.
Open Wall Control (Start/All Programs/Wall Control) and from the Wall Control-red Congure Menu
select IP- Camera.
The RSN870 must be successfully congured before any IP-Camera windows can be opened. The
outputs from render stations are captured using Vision inputs in the host machine. You must ensure that
there are enough Vision inputs available in your system for the number of licensed render stations.
Fig.6
To congure a RSN870, click on Add... and the following dialog is displayed:
Fig.7
Using the Vision Input drop down menu select an input to allocate as the input channel. This channel will
be removed from the list of available Vision sources in the Wall Control-red application toolbar.
The RSN870 will output two screens, A and B. Select the screen you wish to allocate to the selected Vision
input.
Insert the IP Address / Host Name into the edit box and click on OK.
The render station conguration dialog will now display details of the congured RSN870. Continue to add
more render stations as required.
8
Page 9

When the render stations are congured and OK is pressed on the Congure dialog, Wall Control-red will
connect to the render station. When the render stations are connected Vision inputs assigned to render
stationswill become unavailable to the Vision application.
A congured render stations screen can be deleted by selecting its entry from the list in the Congure
dialog and pressing the Remove button. To completely remove a render stations both Screen A and Screen
B must be removed.
The IP Address of a render station assigned to a Vision input can be changed by selecting the entry from
the list and clicking the Modify button. The Vision input cannot be changed from the Modify dialog, and a
new entry must be created instead.
RSN870 Status
Fig. 8
The status column indicates the connection status for each congured render station screen. The ve
possible states are as follows:
Testing
Wall Control-red is in the process of testing all connections.
Oine
The render station has not been connected. All stations are shown as oine until they can be connected. It
may take up to twenty seconds for the status to change to the connected state.
Flash Error
The render station was successfully connected but the Vision card’s EDID could not be ashed. This may
be caused by a hardware issue or the use of an incorrect driver. When in this state the capabilities may be
reduced.
Screen Error
The render station was successfully connected but an initialisation error occurred. This may be caused by
an incorrect software or hardware conguration on the render station. When in this state the capabilities
may be reduced.
Connected
The render station was successfully connected and is ready for use.
9
Page 10

Error
The render station was previously connected without any errors but is now not responding. It will revert to
a connected state once the connection is restored.
Reboot
The Reboot button allows the user to remotely reboot a connected render station. It can also be used to
reset the connection to a render station that is in an error state. This is intended as an administrative
tool and should only be used under the direction of support sta.
Conguring Cameras
By default Wall Control-red does not have any cameras congured. You may add cameras by clicking the
Add button on the right side of the dialog.
Fig.9
Adding New IP-Cameras
Click on the Add button and the following dialog is displayed.
Fig.10
10
Page 11

Camera Name
Type the camera name into the Camera Name edit box. The name can be up to 31 characters long with no
leading or trailing spaces and must be unique with respect to all other camera names.
Camera Model
Use the camera model drop down list to select the model of the camera that is being congured. This list
will contain a number of pre-congured models along with any additional user congured models that
have been added to the system.
Camera Authorisation
Use the camera authorisation controls to override the camera model’s default settings.
IP Address / Host Name
Use the IP address or host name edit box to set the camera’s network address. This eld may also contain
a port number separated by the ‘:’ character (ex. 10.0.0.2:7071). If this edit box is left blank then a warning
prompt will be displayed when the OK button is pressed.
Once the camera conguration is complete press the OK button to create the camera and close the dialog.
Further Reference
To gain full advantage of your new RSN870 it is recommended that you study the online help system that
can be found in the Wall Control-red application Help menu.
11
Page 12

Troubleshooting
1. If you see the following “Waiting for server” dialog it is an indication that either the computer has not
been rebooted after installation of the Render Station software or that part of the installation has failed.
Fig.11
In this situation, please re-install the software as per the “Datapath Render Station Installation Guide”
which can be found on the Datapath CD supplied with the system.
2. If you see the “Waiting for Displays” dialog, this is an indication that the displays connected to
the RSN870 when the render station software was installed are of a dierent type to those currently
connected.
Fig.12
This happens most commonly when the render station software was installed when connected to
monitors and has now been connected the the Vision capture cards (or vice-versa).
If the RSN870 is connected to monitors and the render station software is installed when the RSN870 was
connected to the Vision capture cards in the Vision wall controller, connect the DVI outputs of the nVidia
card to the Vision capture cards (Fig. 4) and follow the connectivity procedure detailed in Step 3 on page 6
of this Quick Start Guide.
If the render station software was installed when the RSN870 was connected to monitors and is now
connected to the Vision capture cards the render station software will need to be reinstalled with the
RSN870 in its current conguration. Please see the “Datapath Render Station Installation Guide” which is
located on the CD supplied with your RSN870.
12
Page 13

3. If you see the “Waiting for Network Interface” dialog this is an indication that the selected network port
when the render station software was installed is not being used. Please connect the network port and
follow the connectivity procedure detailed in Step 3 on page 6 of this Quick Start Guide.
Fig.13
13
Page 14

Quality Assurance
The RSN870 has been soak tested for a minimum of 12 hours running Wall Control and a commercial PC
stress testing application.
Date of QA Test: …………………………………. Authorised Signature……………………………….
MAIN SALES DEPARTMENT
Datapath Limited,
Bemrose House
Bemrose Park
Wayzgoose Drive
Derby, DE21 6XQ
England
Tel: (+44) (0) 1332 294441
Fax: (+44) (0) 1332 290667
email: sales@datapath.co.uk
Web: http://www.datapath.co.uk
 Loading...