

Page 1
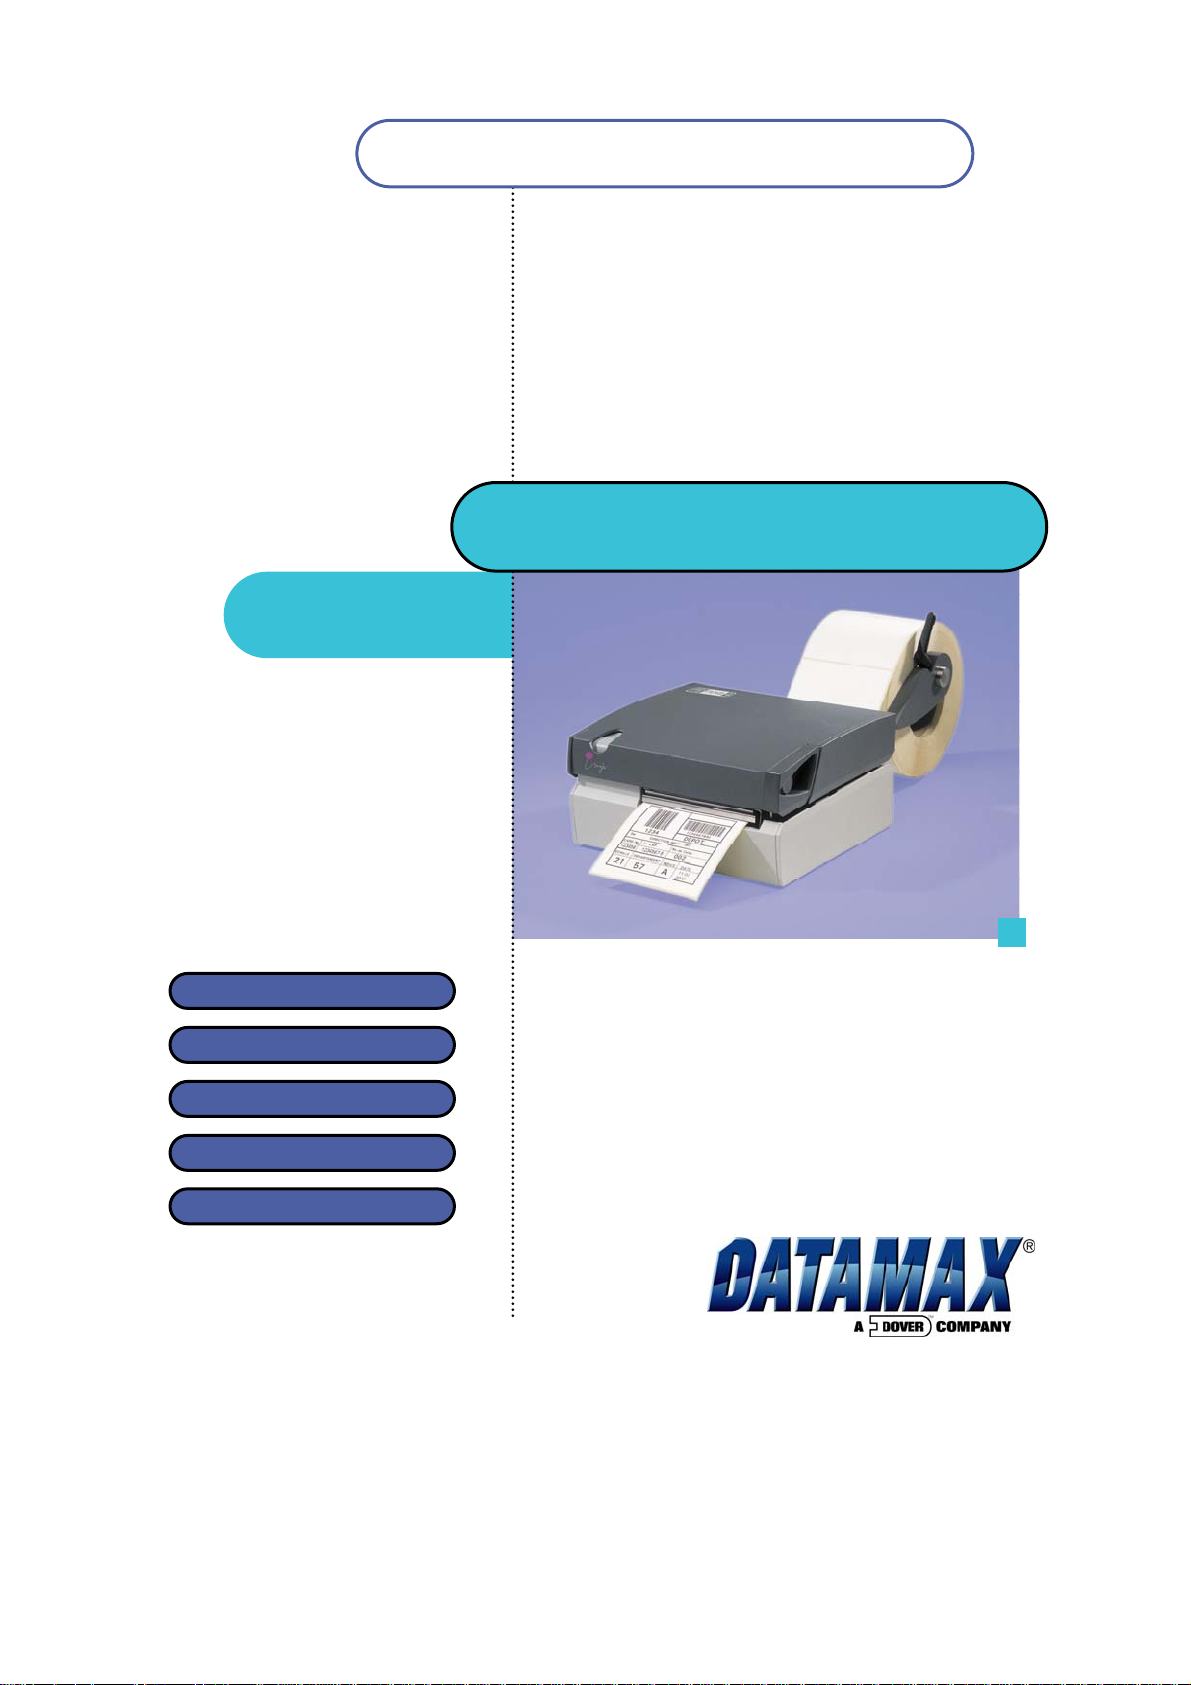
User Manual
MP Nova
Direct Thermal
Thermal Transfer
MP Nova4 DT
MP Nova4 TT
MP Nova6 DT
MP Nova6 TT
MP Nova8 DT
Page 2

Table of Contents
User Manual
1. Introduction
2. Safety
3. Product Presentation
4. Product Overview
5. Getting Started
4.1 In the Box
4.2 Printer Parts MP Nova4, 6 & 8 DT
4.3 Opening and Closing the Cover of MP Nova4, 6 & 8 DT
4.4 Printer Parts MP Nova4 & 6 TT
4.5 Opening and Closing the Cover of MP Nova4 & 6 TT
5.1 Overview
5.2 Overview Peel-Off
5.3.1 Inserting Media MP Nova4 & 6
5.3.2 Inserting Media MP Nova8
5.4 Inserting Media - Peel-Off Kit
5.5 Inserting Ink Ribbon
5.6 Connecting
5.7 Test Print & Sensor Auto Adjustment
6. Operation
7. Maintenance
8. Troubleshooting
9. Changeable Parts
10. Printer Options and Spare Parts
11. Consumables (Media General)
12. Technical Specification
6.1 Tearing the Media
6.2 Interpreting the Status Lamp – LED
6.3 Media Positioning Sensor Settings
6.4 Adjusting the Print Head
9.1 Replacing the Roller
9.2 Replacing the Print Head
10.1 Pell-Off Kit, LTS & 215 mm Kit
10.2 Consumables & Spare Parts
Page 3

1. Introduction
Conditions
© Copyright Datamax Corporation 2006
The MP Nova printers with their unique technology have
been developed to offer a range of different applications.
Thank you for choosing a
needs. The high quality, user-friendliness and simple
maintenance procedures of the MP Nova direct thermal
(DT) and thermal transfer (TT) printers make them the
perfect choice.
Datamax printer for your business
Manufacturer Address:
Datamax Corporation
4501 Parkway Commerce Boulevard
Orlando, Florida USA 32808
Phone (407) 578-8007
Fax (407) 578-8377
http://www.datamaxcorp.com
Conditions
Datamax reserves the right to change specifications in
both the text and illustrations without prior notice. The
contents of the publication may not be copied, either
wholly or in part, without permission from Datamax.
Datamax is not responsible for any direct, indirect,
specific, accidental or resultant injuries caused by a fault
with the machine system or software, or by an error in the
accompanying documentation. In particular, Datamax
cannot be held responsible for any program or data stored
or used with Datamax’s products, including the cost of
recovering such programs or data.
Item number: 540430
Page 4

2. Safety
Safety & Certification
Safety Requirements
Datamax disclaims all responsibility regarding the CE directive
if the printer is used, altered or installed in any way other than
described in this manual.
This symbol is used to indicate circumstances that may be
dangerous to the user or that cause damage to the equipment.
Please Note the Following Warnings:
• Never use sharp or pointed tools when cleaning or
replacing the print head.
• Remember to handle the print head with care.
• Don't use any sharp objects to remove labels from the
print roller.
• The MP Nova printers have double fuses. The fuses are
rated at 250 volt, 4.0 A, AT-type. Fuses must be ULapproved.
• The circuit board contains a battery. Used batteries
should be disposed of in accordance with the manufacturer’s instructions.
• Please read all instructions before using the printer for
the first time.
Page 5

2. Safety
Safety & Certification
• The printer should be connected to the power supply
indicated on the voltage plate. If you are unsure of the
type of power supply available, please contact Datamax
service personnel.
• The printer is equipped with a plug suitable for earthed
sockets. This is a safety measure. If the plug does not fit
the power socket, a qualified electrician must replace it.
• We do not recommend the use of extension cables.
The power cable must not be subjected to pressure. Ensure
that the printer is not placed anywhere where the cable can be
stood on.
• Check that the power switch is off (in the ‘0’ position)
before connecting the power cable.
• Do not use liquids or aerosols when cleaning this
printer. Always use Datamax’s special cleaning cloths.
• Do not attempt to open the electronic unit or other
sealed parts! The user cannot service these parts.
• Never use sharp or pointed tools when cleaning or
replacing the print head.
• Do not use cables that exceed 5 meters in length for
RS232-communication. Signals may be corrupted or
lost as a result. This is particularly important in
environments where there are high levels of electrical
interference.
• Disconnect the power to the printer and call in qualified
personnel under the following conditions:
The power cable or plug is damaged or worn.
Liquid has been spilled on the printer.
Rain or water has got into the printer.
The printer is not functioning correctly despite that
the user has followed the instructions for use.
You have dropped the printer or the casing has been
damaged.
The printer is not functioning correctly and requires
service.
Page 6
2. Safety
Safety & Certification
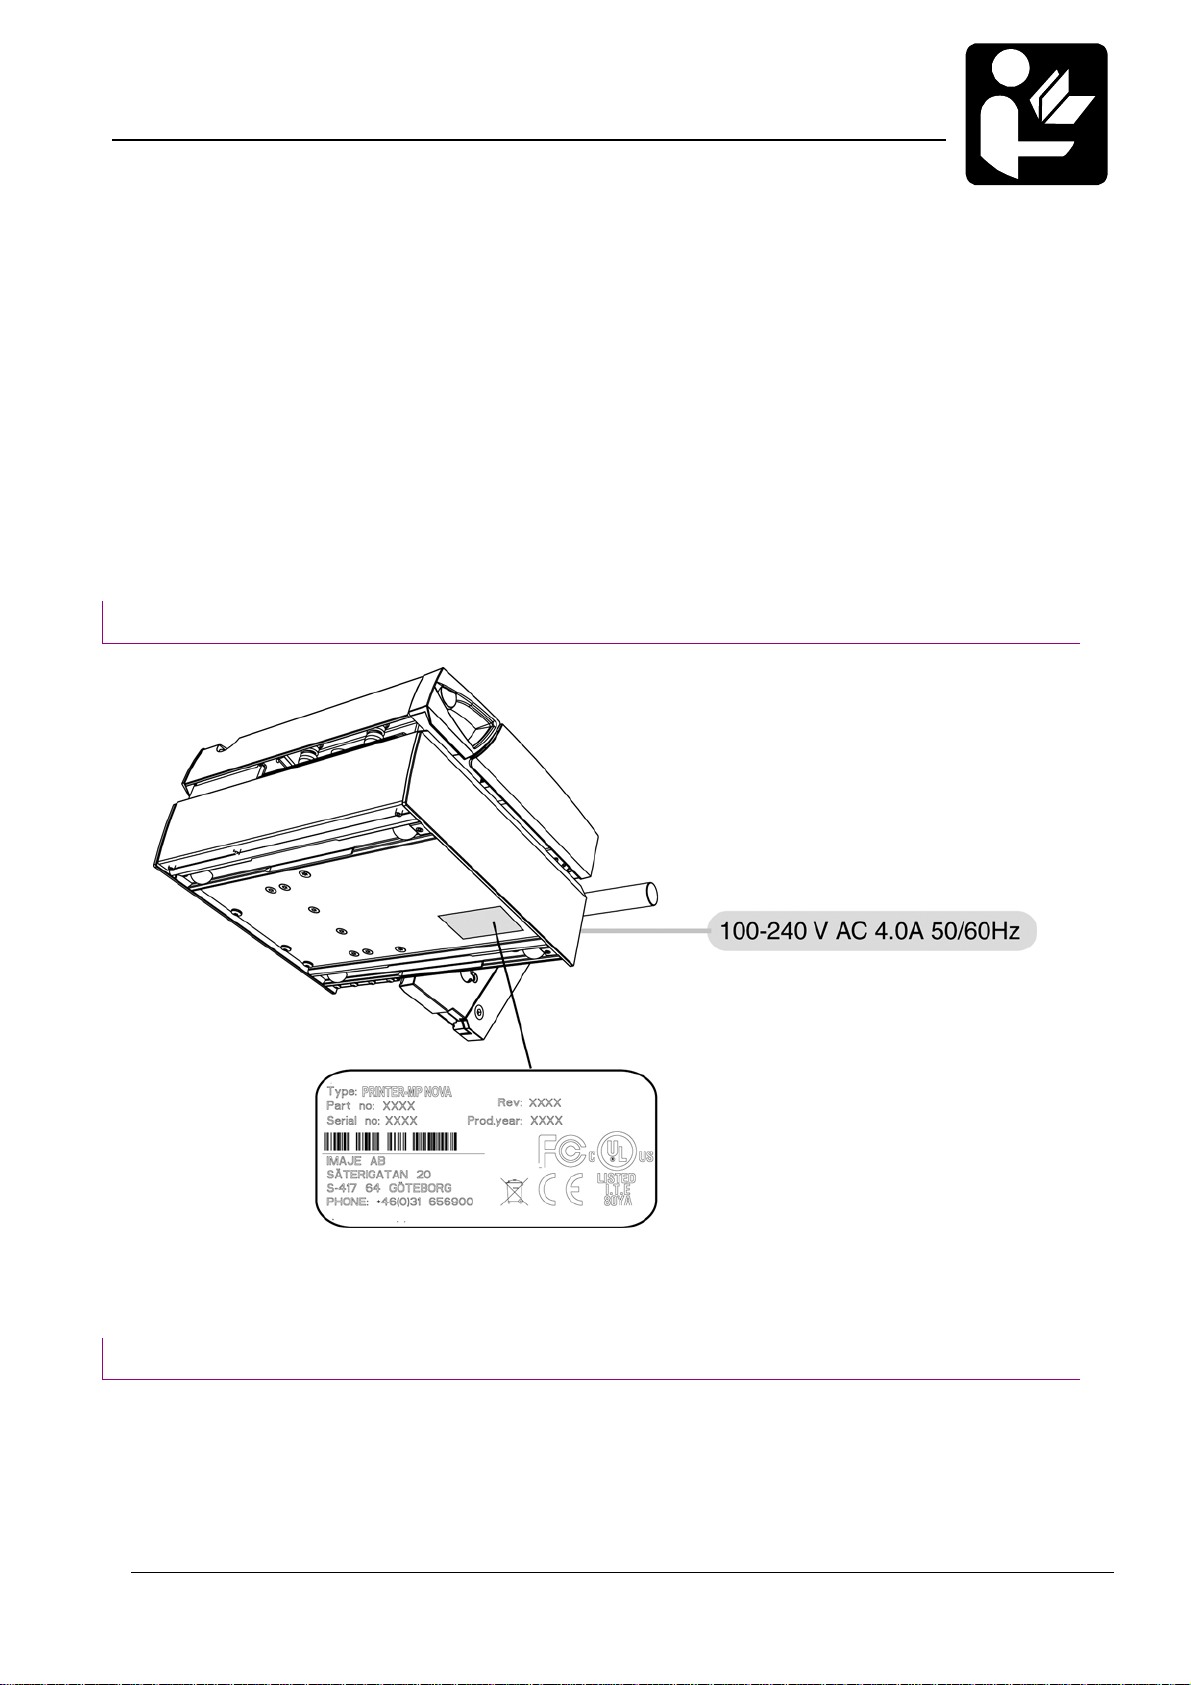
Machine Sign
Certification and Approvals
Page 7

2. Safety
Safety & Certification
CE Standards & Directives
The MP Nova printers are certified in accordance
with the requirements for CE marking.
CE = European Commission
The MP Nova printers are UL-approved.
UL = Underwriter Laboratories USA
MP Nova printers are subject to the following standards:
In accordance with European directives applicable to the
products, that is to say:
• With the electromagnetic compatibility directive
EMC Directive 89/336/CEE with the European
standards which are its technical answer.
• With the Low Voltage Directive 93/68/CEE and
with the European standards which are its
technical answer.
The above referenced product bears the CE mark.
Page 8
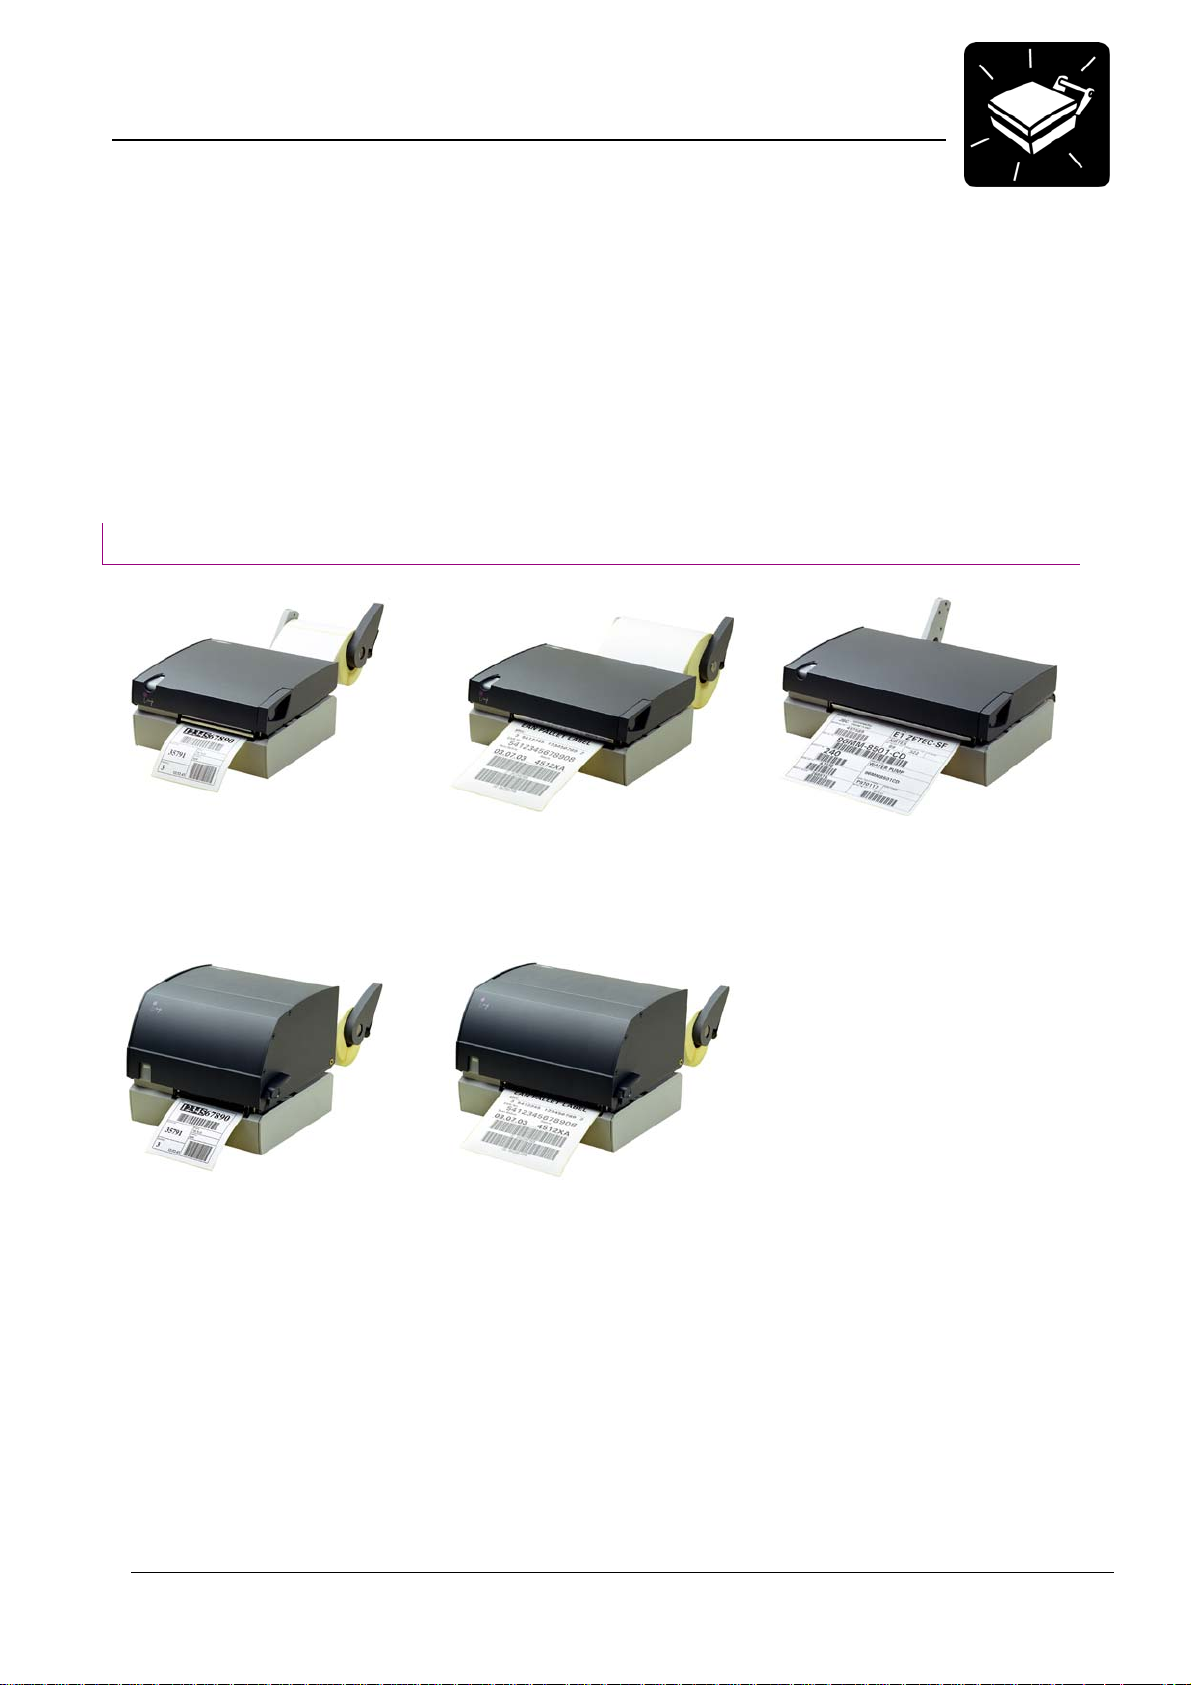
3. Product Presentation
The MP Nova Series
Datamax achieves diversity with its thermal printers, the MP
series. Powerful and intelligent with a multitude of functionality
you would not expect from one of the smallest printers on the
market.
They are built on a platform with advanced software, offering
wide possibilities from simple local solutions to integrated
solutions working over Internet.
Printer Models
Typical Applications:
Manufacturing
Warehousing
Healthcare
Transport
Ticketing
MP Nova4 DT, 200 dpi
Item number: 745130.
MP Nova4 DT, 300 dpi
Item number: 745160.
MP Nova4 TT, 200 dpi
Item number: 745140.
MP Nova4 TT, 300 dpi
Item number: 745165.
MP Nova6 DT, 200 dpi
Item number: 765130.
MP Nova6 TT, 200 dpi
Item number: 765140.
MP Nova8 DT, 200 dpi
Item number: 785130.
Page 9
4. Product Overview
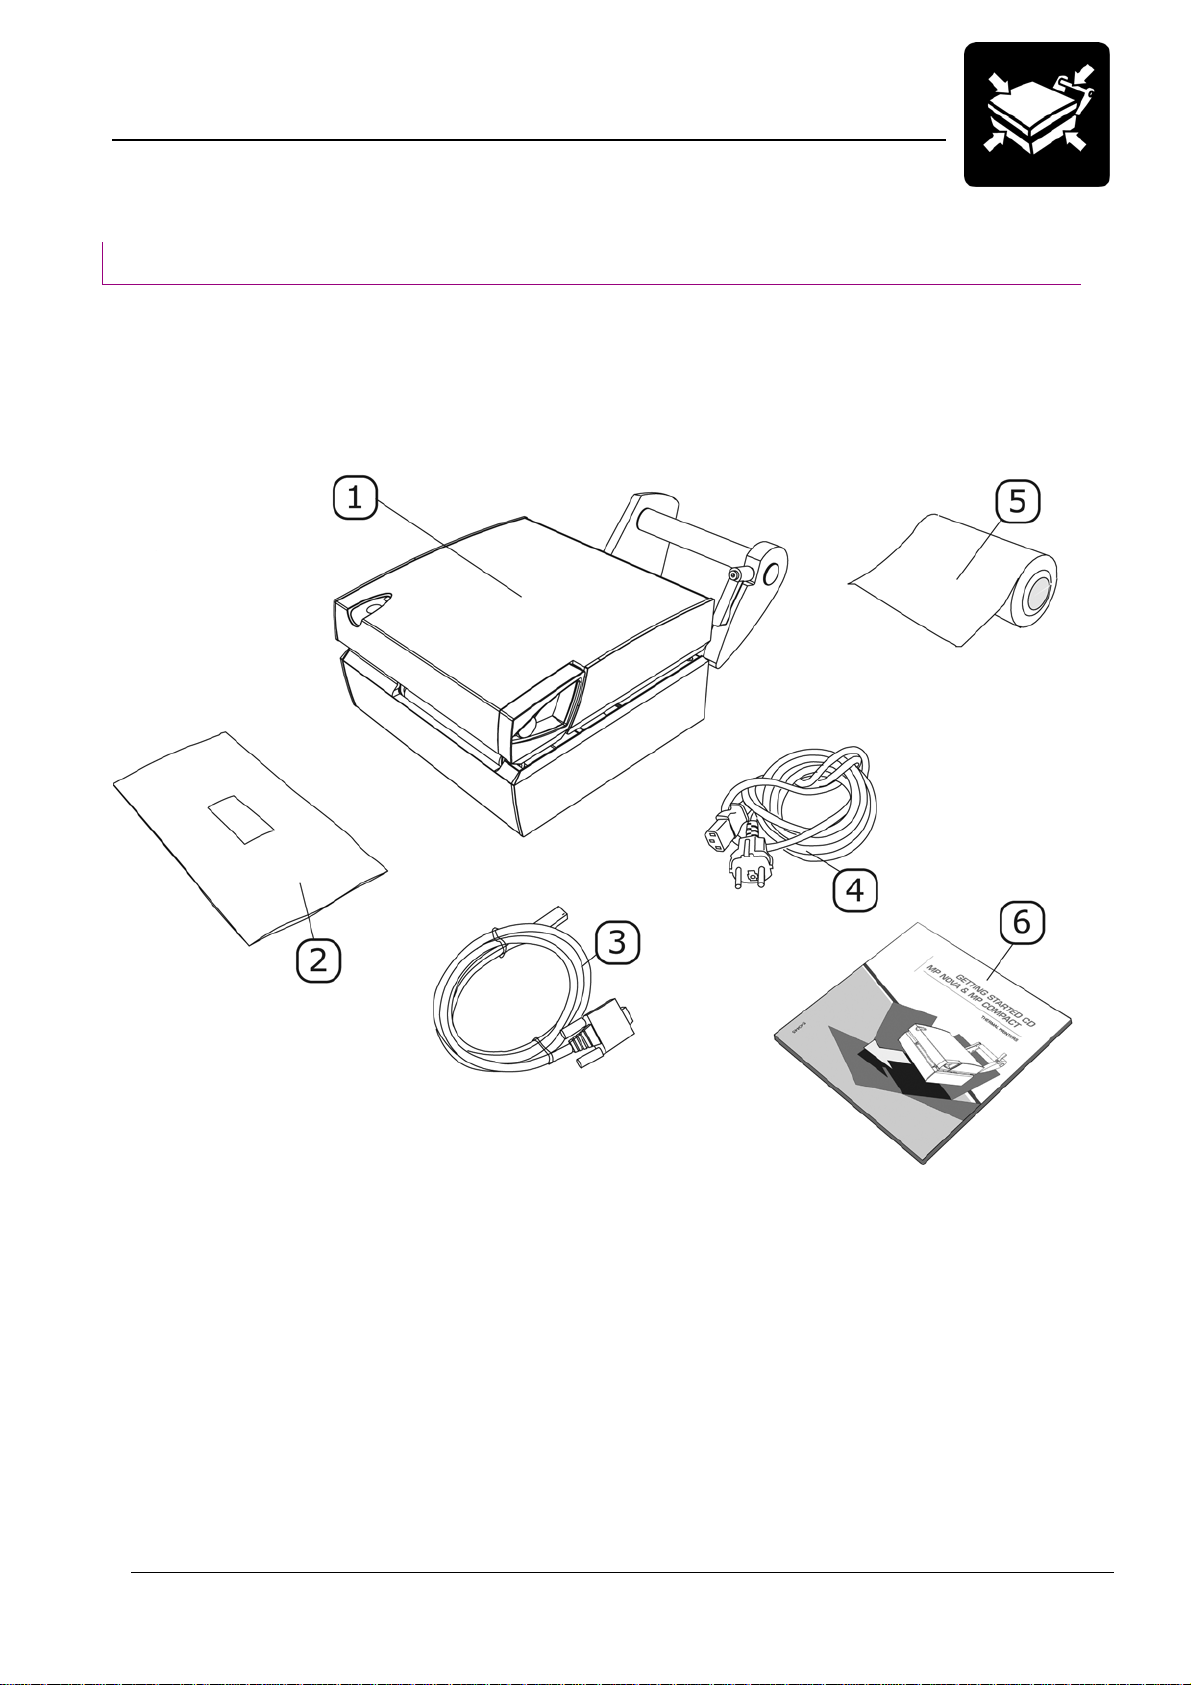
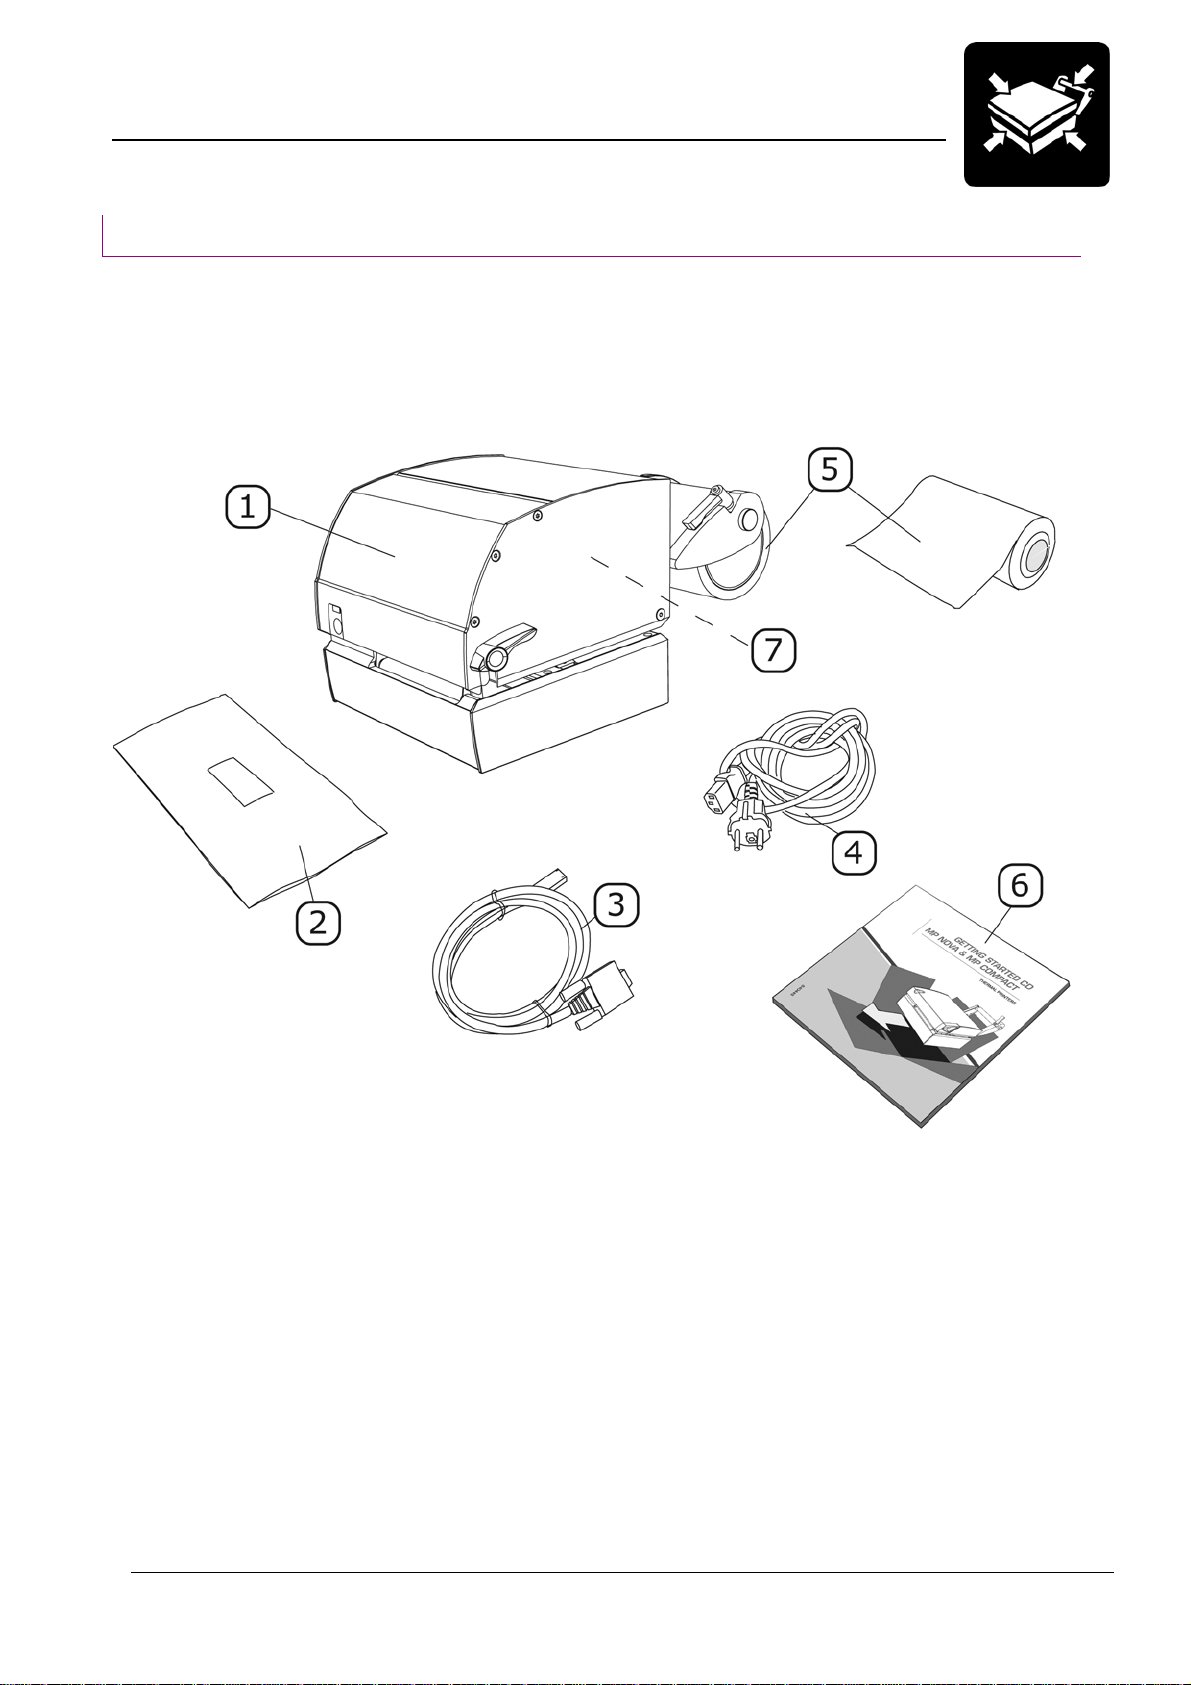
4.1 In the Box
MP Nova4 DT & MP Nova6 DT
The following items should be included in the box when you receive
your new MP Nova4 DT or MP Nova6 DT printer:
1. 1 x MP Nova4 DT or MP Nova6 DT
2. 1 x Cleaning cloth
3. 1 x Communication cable (Serial RS 232)
4. 1 x Power cable
5. 1 x Media roll
6. 1 x Getting Started CD
Page 10
4. Product Overview
4.1 In the Box
MP Nova4 TT & MP Nova6 TT
The following items should be included in the box when you receive
your new MP Nova4 TT or MP Nova6 TT printer:
1. 1 x MP Nova4 TT or MP Nova6 TT
2. 1 x Cleaning cloth
3. 1 x Communication cable (Serial RS 232)
4. 1 x Power cable
5. 1 x Media roll
6. 1 x Getting Started CD
7. 1 x Ink ribbon, loaded in the machine
Page 11
4. Product Overview
4.1 In the Box
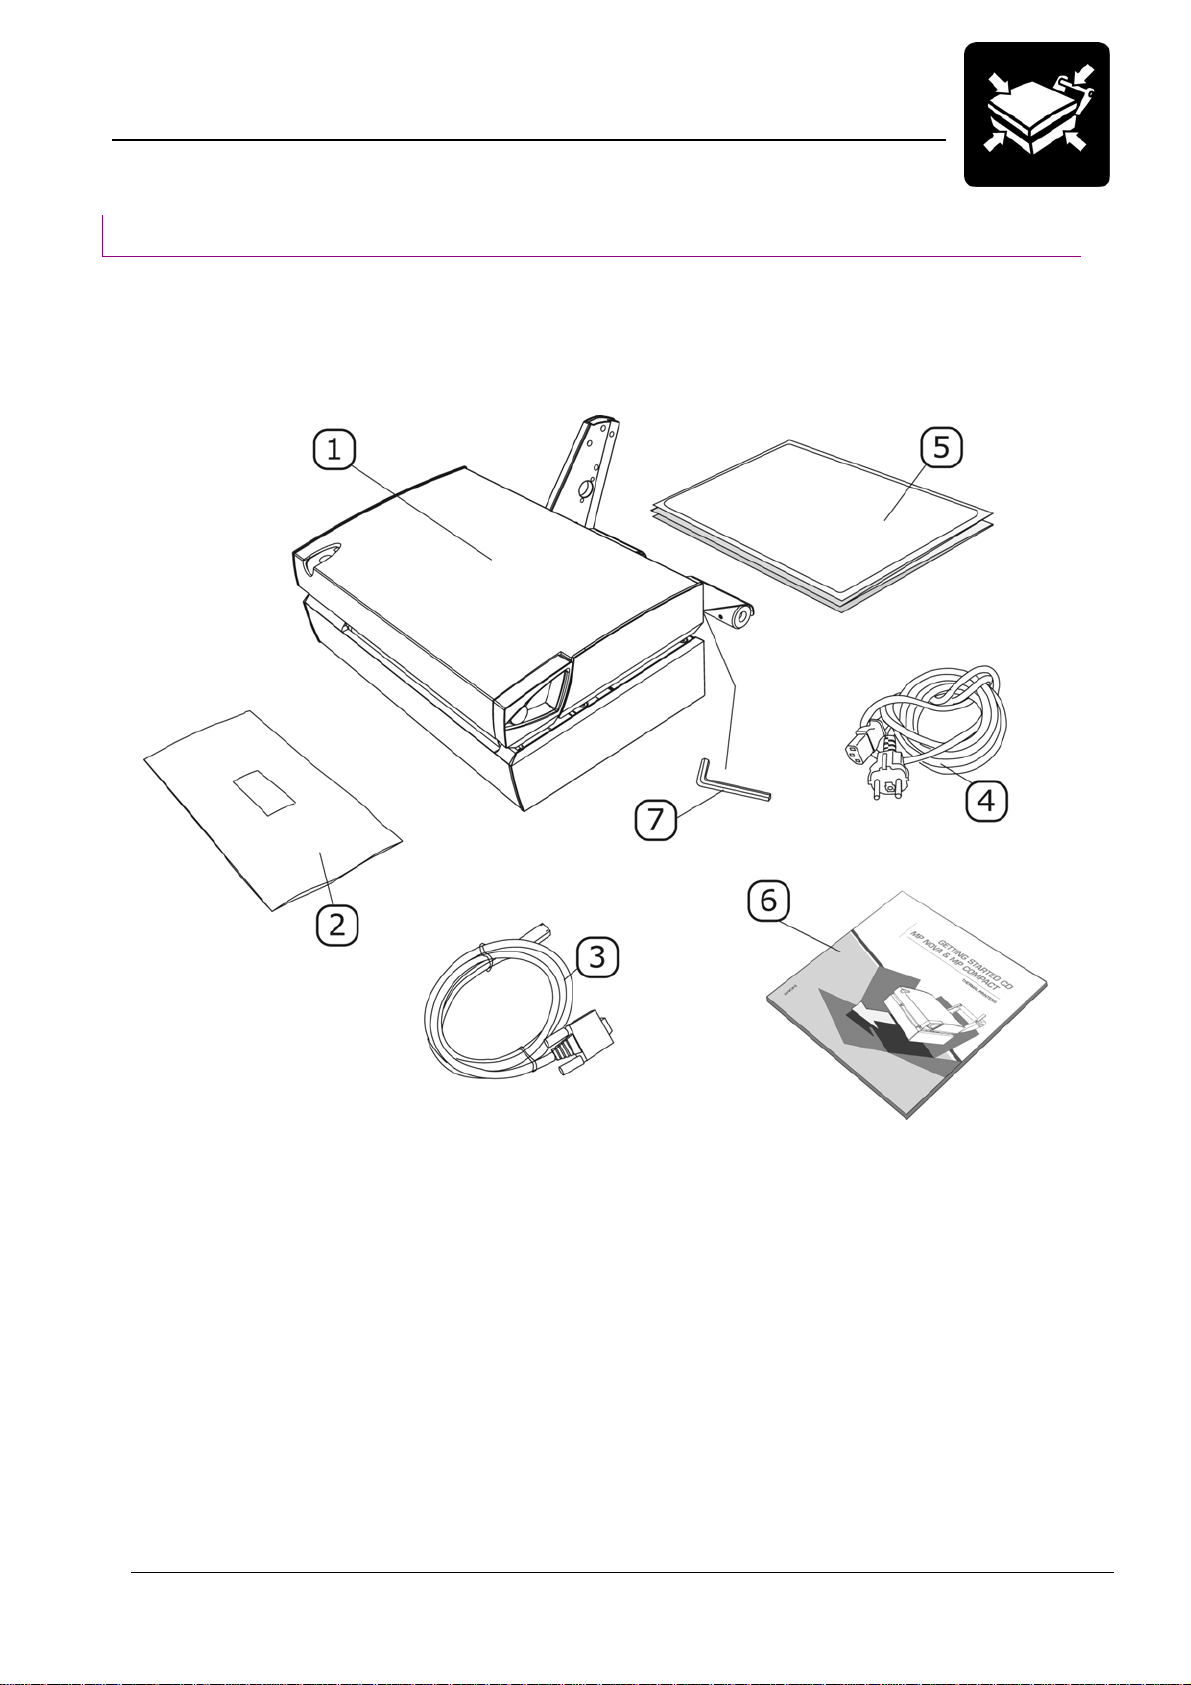
MP Nova8 DT
The following items should be included in the box when you receive
your new MP Nova8 DT printer:
1. 1 x MP Nova8 DT
2. 1 x Cleaning cloth
3. 1 x Communication cable (Serial RS 232)
4. 1 x Power cable
5. 1 x Fan-folded media
6. 1 x Getting Started CD
7. 1 x Allen key (2 mm) mounted underneath the fan-fold steering
Page 12
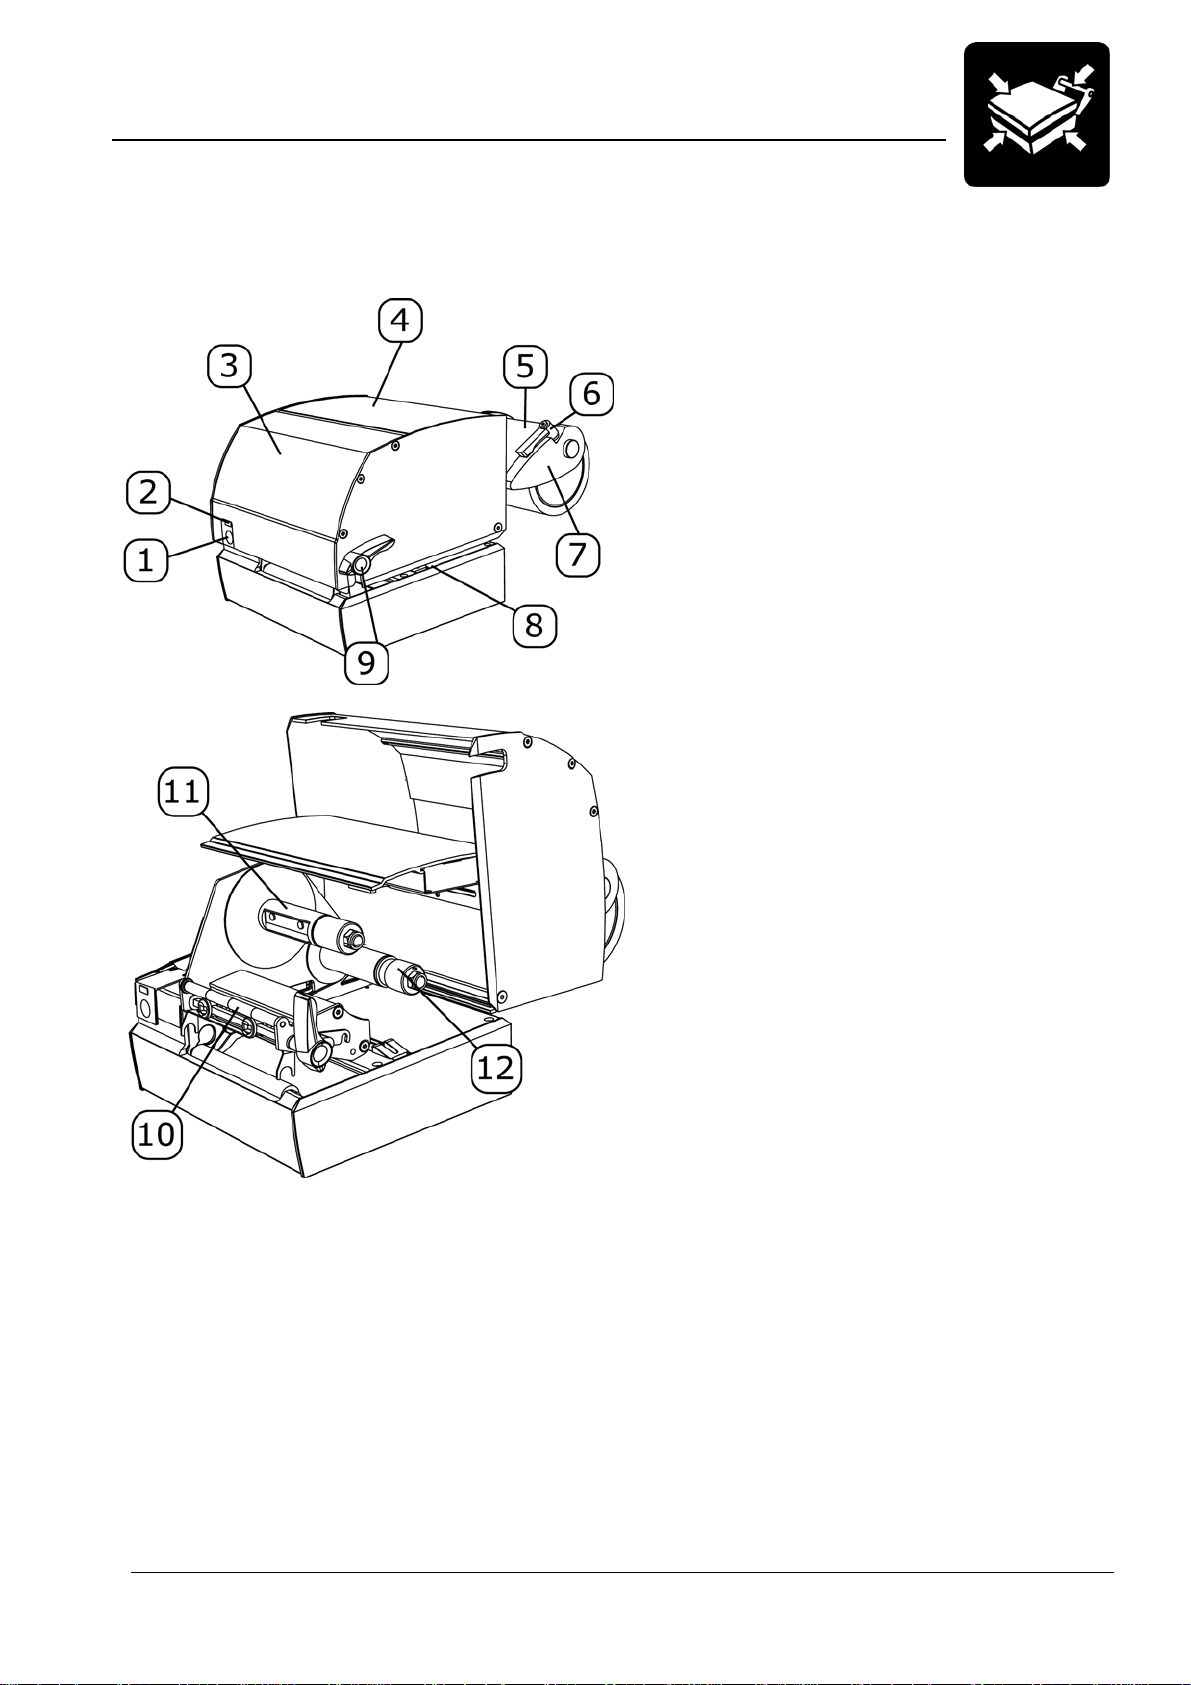
4. Product Overview
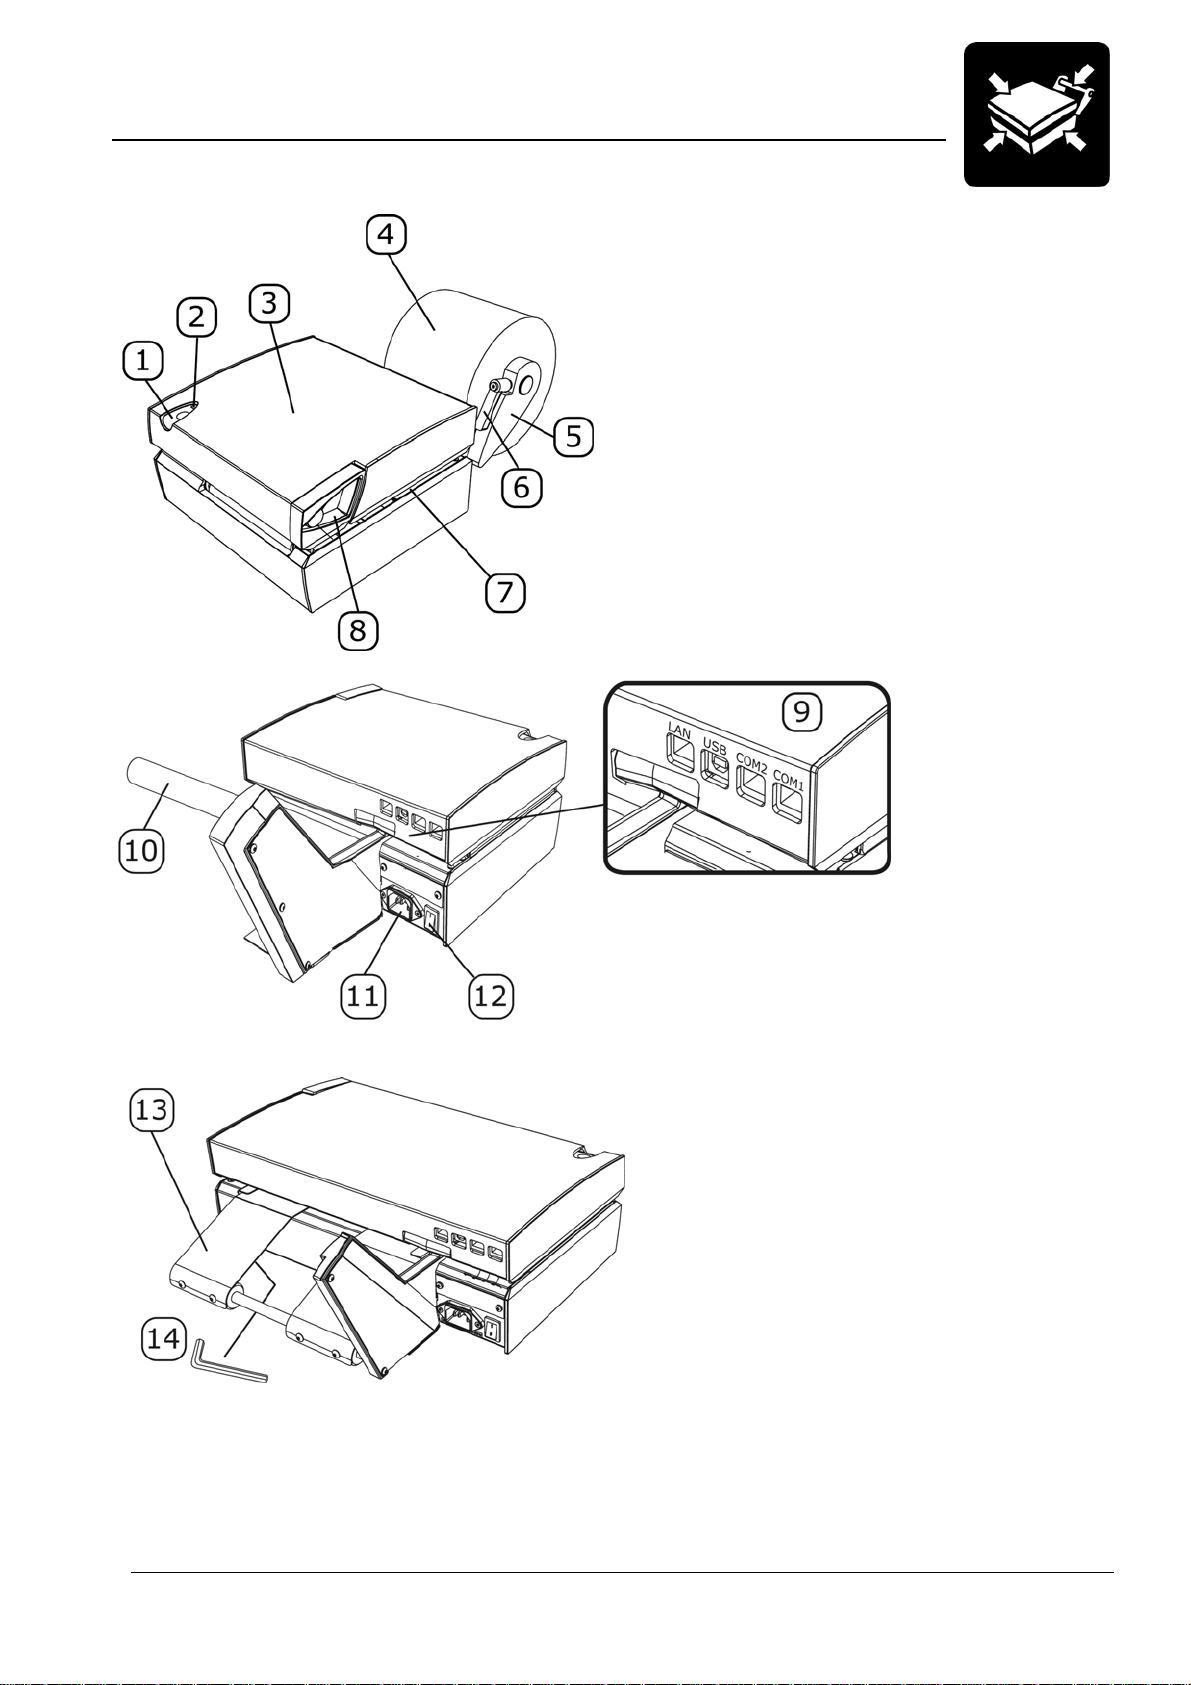
4.2 MP Nova4, 6 & 8 DT – Printer Parts
1. Print button
2. Status lamp (LED)
3. Cover
4. Media roll
5. Roll steering
6. Roll guide lock
7. Media track
8. Handle
9. Communication ports
10. Unroll shaft
11. Power connection
12. Power switch
13. Fan-fold steering (MPNova8)
14. Allen Key (2 mm), mounted
underneath the fan-fold
steering (MPNova8)
Page 13
4. Product Overview
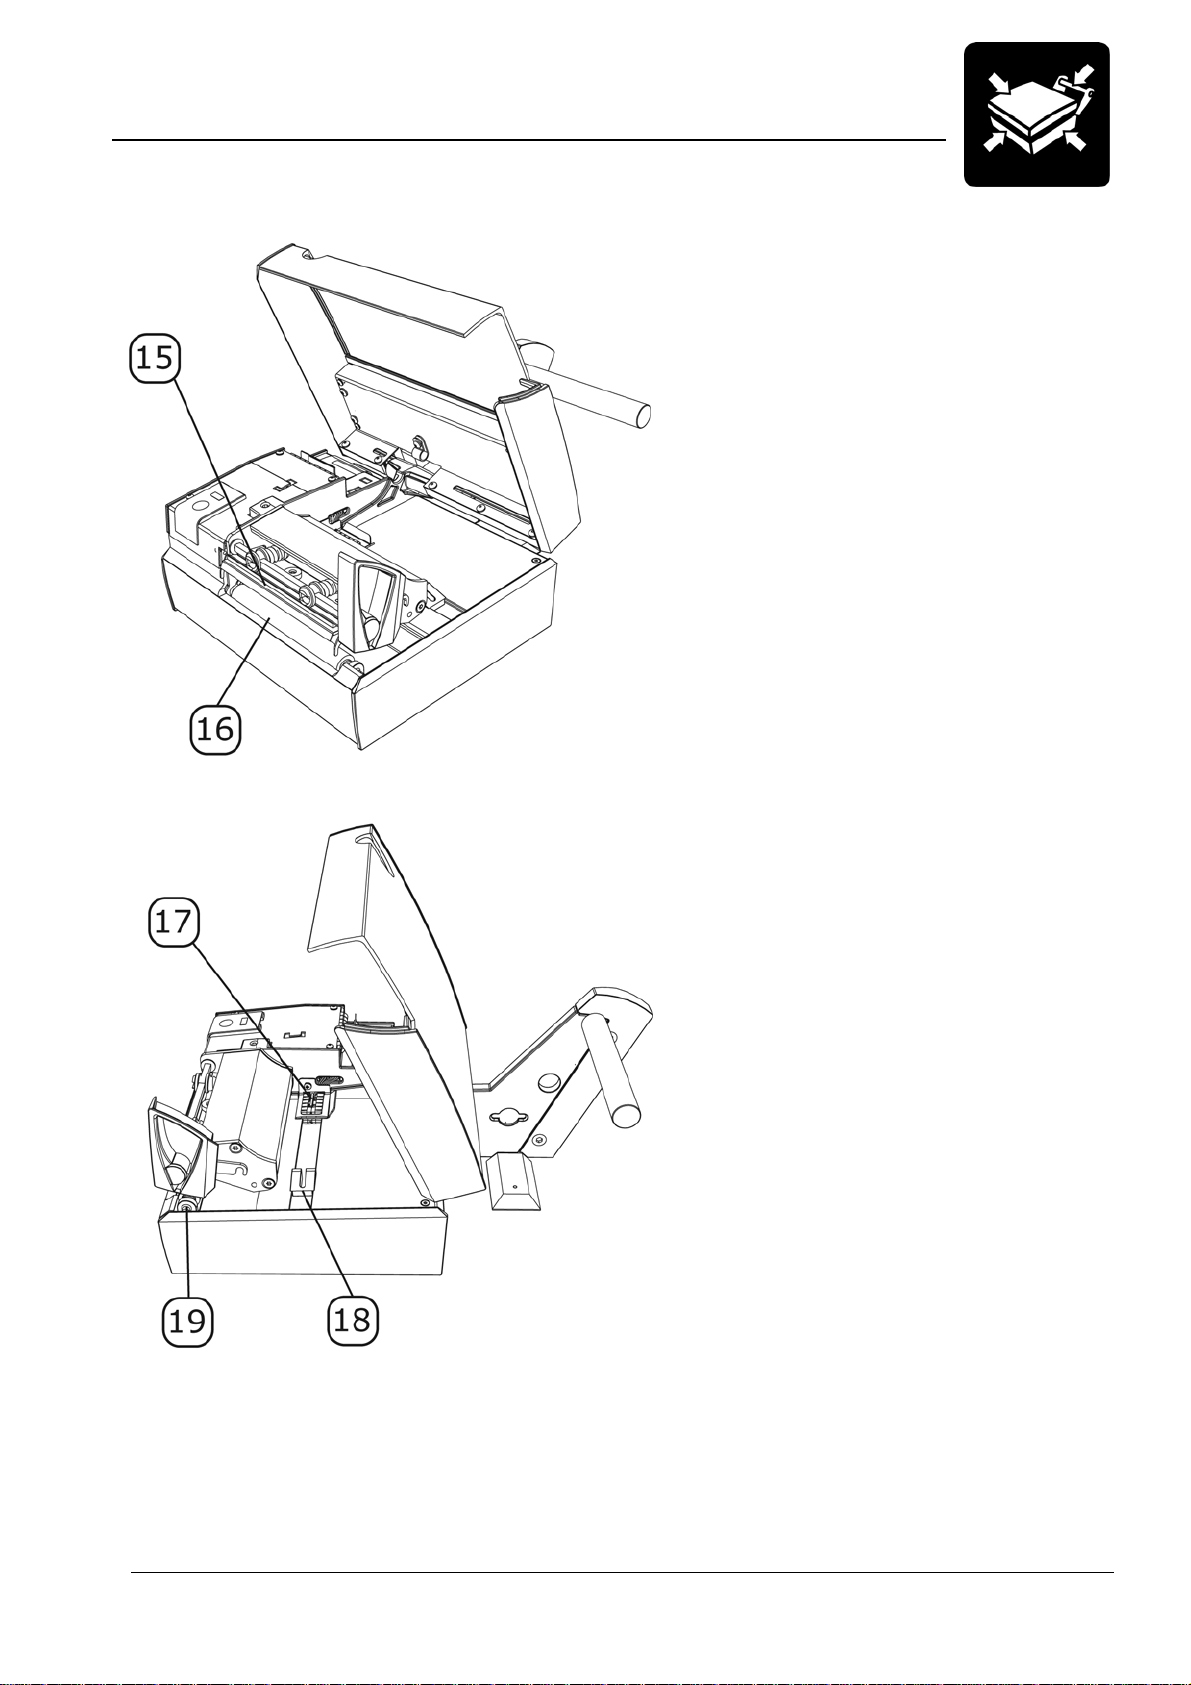
4.2 MP Nova4, 6 & 8 DT – Printer Parts
15. Print head
16. Print roll
17. Media Positioning Sensor
(MPS)
18. Paper guide
19. Outer plate holder
Page 14

4. Product Overview
4.3 Opening and Closing the Cover
Open MP Nova4, 6 & 8 DT
1. Pull handle.
2. Open cover.
Page 15
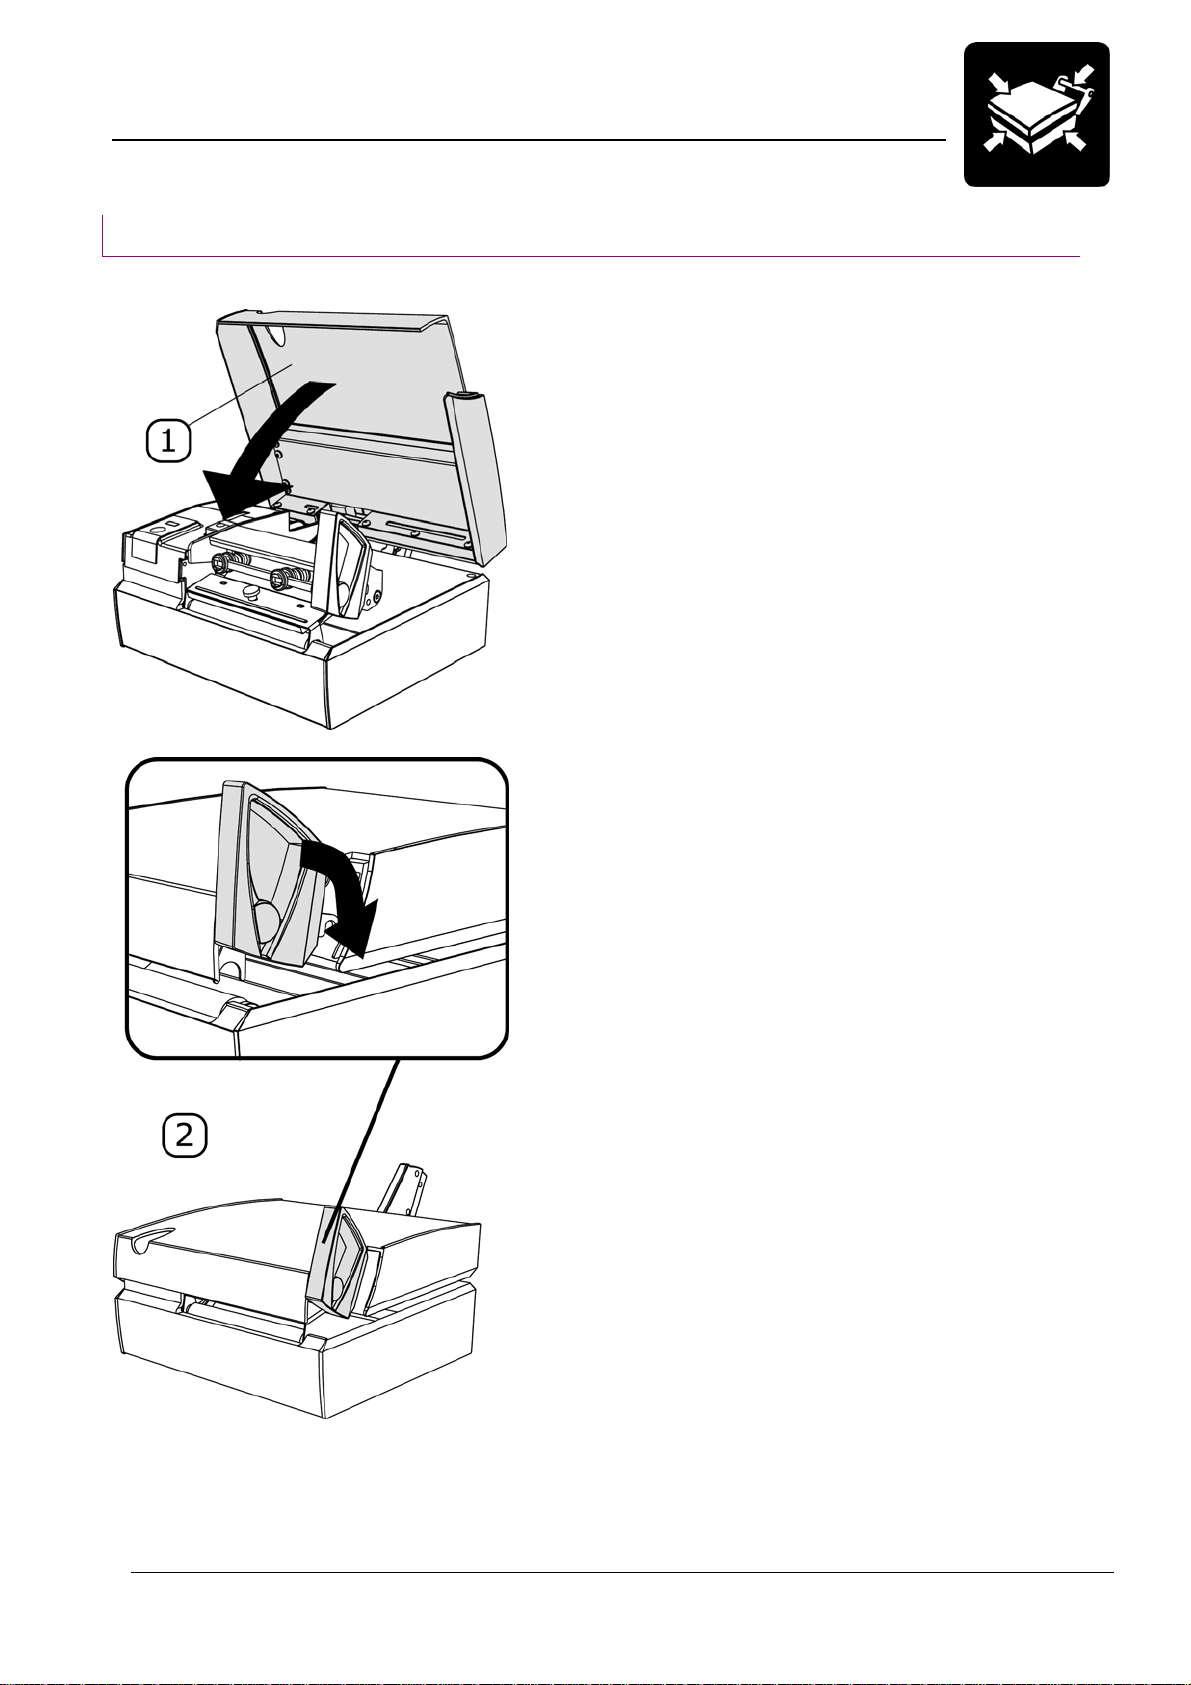
4. Product Overview
4.3 Opening and Closing the Cover
Close MP Nova4, 6 & 8 DT
1. Close cover.
2. Fold handle. (Print head will
be engaged.)
Note: Make sure the handle
is folded all the way down.
Page 16
4. Product Overview
4.4 MP Nova4 & 6 TT – Printer Parts
1. Print button
2. Status lamp (LED)
3. Front cover
4. Rear cover
5. Media roll
6. Roll guide lock
7. Roll steering
8. Media track
9. Handle
10. Ink ribbon guide
11. Rewind spool
12. Unwind spool
Page 17
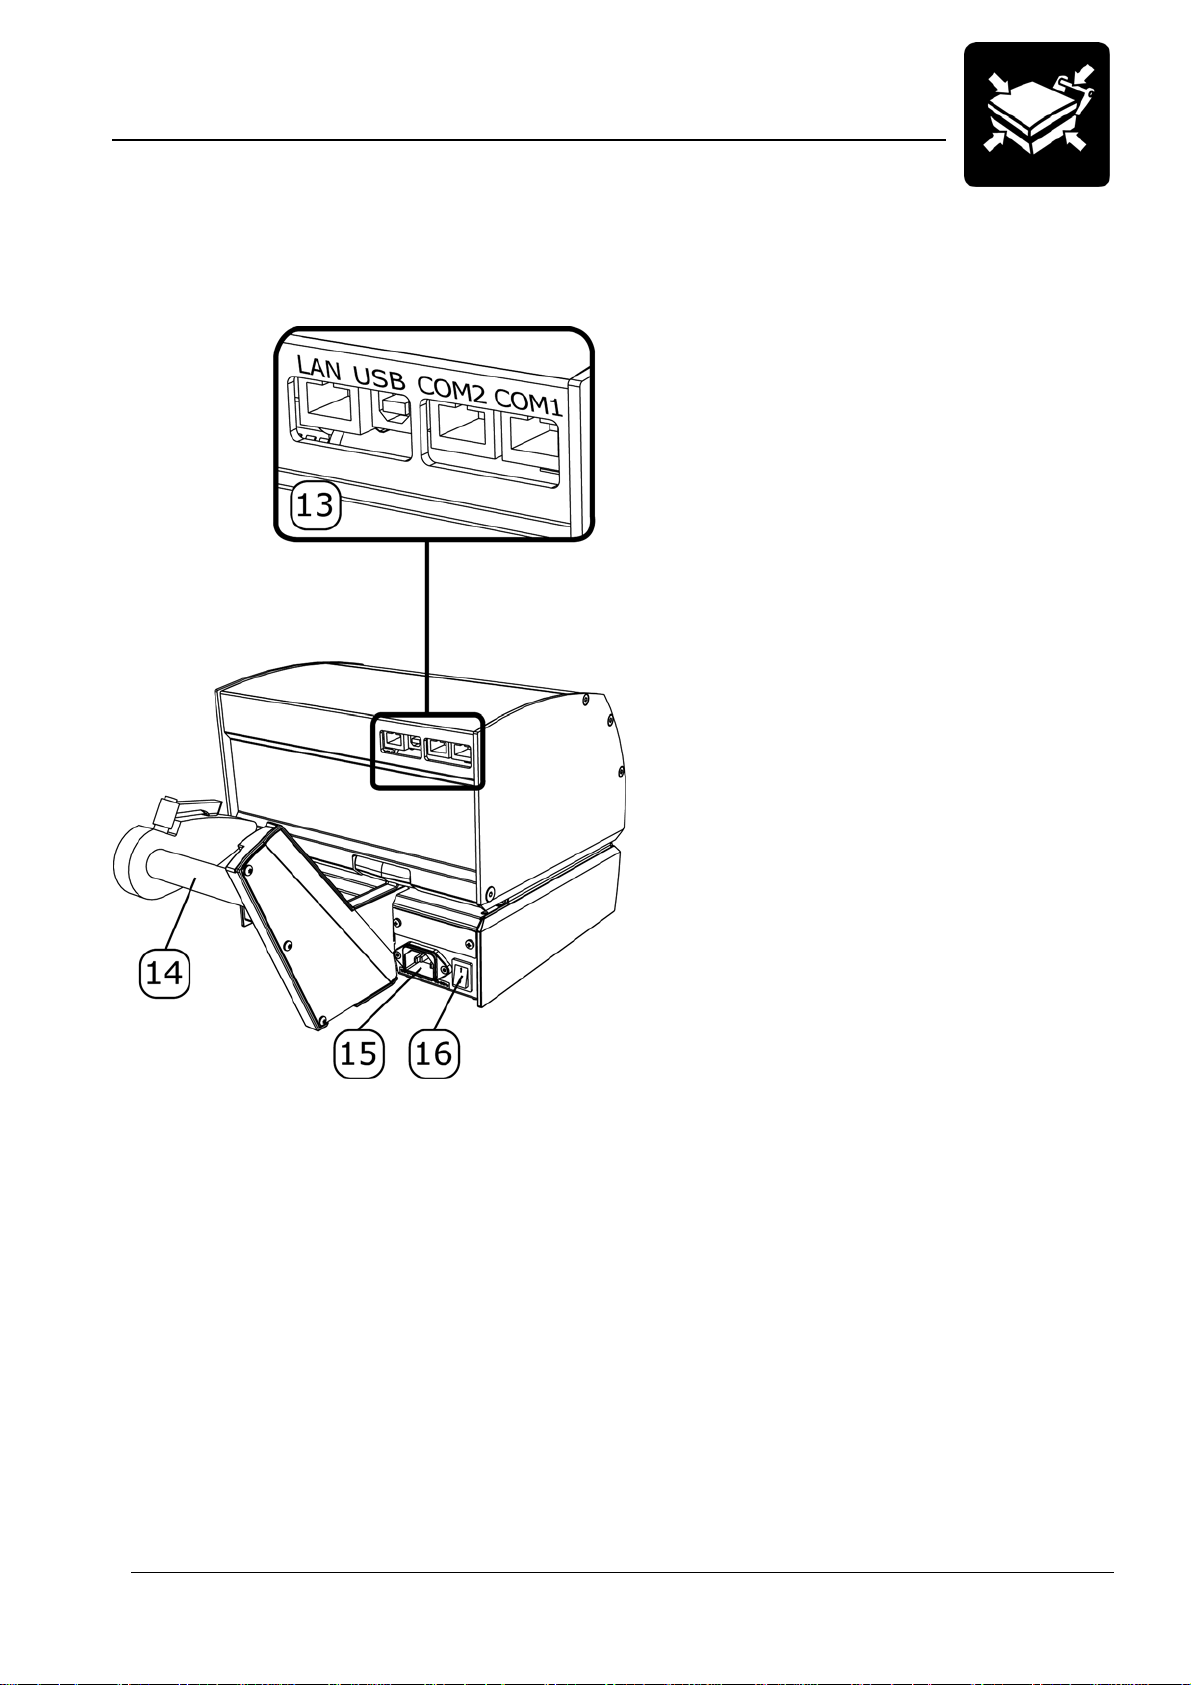
4. Product Overview
4.4 MP Nova4 & 6 TT – Printer Parts
13. Communication ports
14. Unroll shaft
15. Power connection
16. Power switch
Page 18
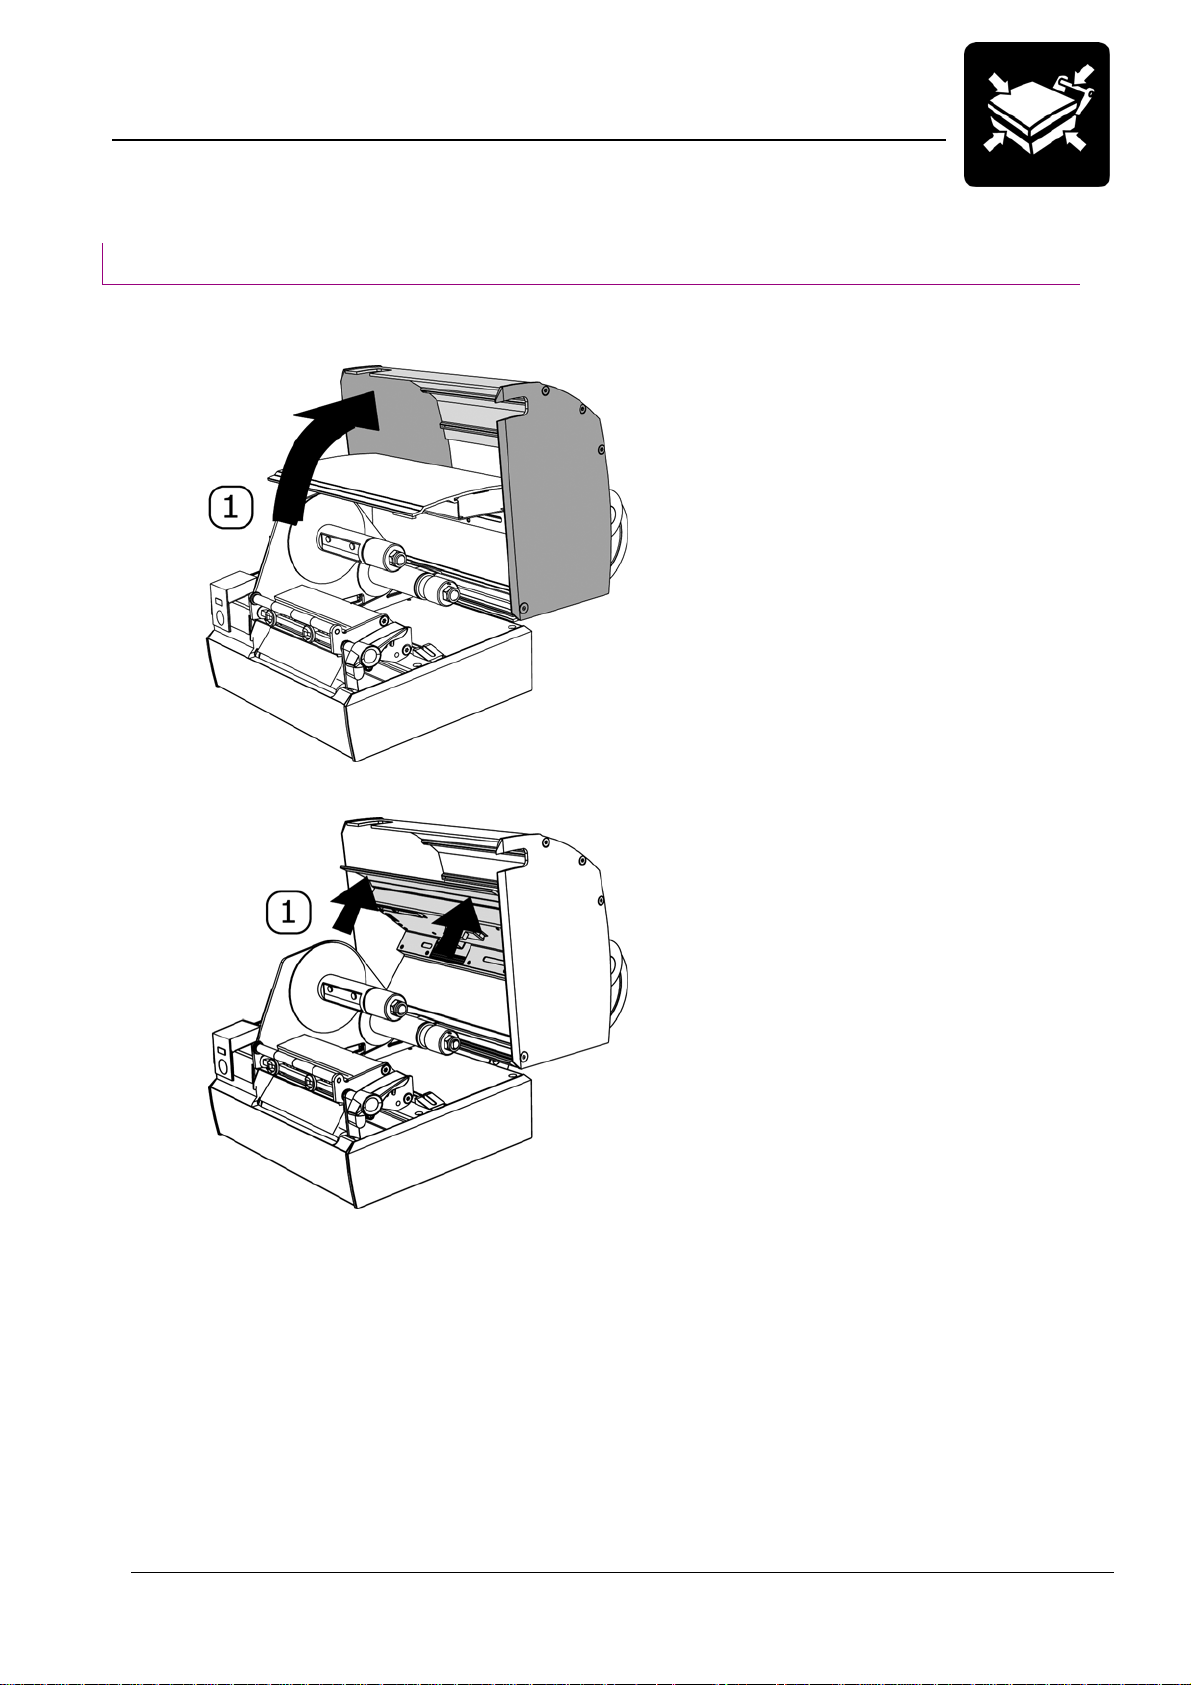
4. Product Overview
4.5 Opening and Closing the Cover
Open MP Nova4 & 6 TT
1. Open cover. The inner cover
slides automatically up
together with the cover.
Page 19

4. Product Overview
4.5 Opening and Closing the Cover
Close MP Nova4 & 6 TT
1. Close cover. The inner cover
slides automatically down
together with the cover.
Page 20

5. Getting Started
5.1 Overview
MP Nova4, 6 & 8 DT MP Nova4 & 6 TT
1. Insert media, MPNova4 & 6 DT,
see chapter 5.3.1
Insert media, MPNova8 DT, see
chapter 5.3.2
1. Insert media. See MP Nova4 & 6 DT
(no 1) in the left column.
2. Insert ink ribbon, see chapter 5.5.
2. Connecting, see chapter 5.6.
3. Run a test print, see chapter 5.7.
3. Connecting, see chapter 5.6.
4. Run a test print. See MP Nova4 & 6 DT
(no 3) in the left column.
Page 21

5. Getting Started
5.2 Overview Peel-Off
MP Nova4 & 6 DT Peel-Off MP Nova4 & 6 TT Peel-Off
1. Insert peel-off media, see chapter 5.4
1. Insert peel-off media. See MP Nova4
& 6 DT Peel-off (no 1) in the left
column.
2. Insert ink ribbon, see chapter 5.5.
2. Connecting, see chapter 5.6.
3. Connecting, see chapter 5.6.
3. Run a test print, see chapter 5.7.
4. Run a test print. See MP Nova4 & 6
DT Peel-off (no 3) in the left column.
Page 22

5. Getting Started
5.3.1 Inserting Media MP Nova4 & 6
Note:
The pictures shown describe an
MP Nova4 DT. The process
works just the same for MP
Nova6 DT and MP Nova4 & 6
TT.
1. Undo the roll guide lock.
2. Remove the roll guide from
the media shaft.
3. Pull handle to lift the print
head from the roller.
4. Position a new media roll
onto the spool and insert the
media from the side into the
printer’s media track.
5. Check that the media is
aligned with the internal
printer wall.
! Make sure the outer roll guide
suits the width of the media. If
necessary, open the cover and
adjust the outer roll guide. (Only
necessary when changing
media type.)
6. Put the roll guide on the
unroll shaft. Push it against
the roll for optimum control.
Page 23

5. Getting Started
5.3.1 Inserting Media MP Nova4 & 6
7. Lock the roll guide lock (turn
the handle clockwise). The
roll steering shall guide the
roll, but shall not be tight.
! Note:
If the roll guide lock cannot be
properly tightened (Note: not
too tight), lift the lock upwards,
rotate it back half a turn, lower it
and retighten.
8. Fold the handle (the print
head folds automatically
onto the roller).
9. Press the print button a few
times until the printer
automatically finds the
correct position of the media.
Note:
If necessary, make a test
printout and auto adjust the
media positioning sensor as
described in chapter 5.7.
10. If you have an:
MP Nova4 or 6 DT: go to
Test Print, chapter 5.7.
MP Nova4 or 6 DT Peel Off:
go to Inserting Media Peel-Off
Kit, chapter 5.4.
MP Nova4 or 6 TT: go to
Inserting Ink Ribbon, chapter
5.5.
MP Nova4 or 6 TT Peel Off:
go to Inserting Media Peel-Off
Kit, chapter 5.4.
Page 24

5. Getting Started
5.3.2 Inserting Media MP Nova8 DT
Adjusting the Fan-Fold Steering
Note:
It is only necessary to adjust the
fan-fold steering when changing
media type.
1. An Allen key (2 mm) is
mounted underneath the fanfold steering.
2. Loosen the Allen screw to
unlock the fan-fold steering.
3. Position the fan-fold steering
to fit the width of the media.
4. Tighten the Allen screw to lock
the fan-fold steering in its new
position.
5. Replace the Allen key.
.
Page 25

5. Getting Started
5.3.2 Inserting Media MP Nova8 DT
Inserting Media
1. Pull handle to lift the print
head from the roller.
2. Insert the media through the
fan-fold steering and through
the printer.
Note:
Make sure the fan-fold steering
suits the width of the media. To
adjust the steering se previous
page.
Make sure the media is placed
so that it will feed easily into the
printer.
Page 26

5. Getting Started
5.3.2 Inserting Media MP Nova8 DT
3. Pull out some of the media.
4. Fold the handle (the print
head folds automatically
onto the roller).
5. Press the print button a few
times until the printer
automatically finds the
correct position of the media.
Note:
If necessary, make a test
printout and auto adjust the
media positioning sensor as
described in chapter 5.7.
Page 27

5. Getting Started
5.4 Inserting Media – Peel-Off Kit
Note:
The pictures shown describe an
MP Nova4 DT Peel-Off. The
process works just the same for
MP Nova4 & 6 TT Peel-Off &
MP Nova6 DT Peel-Off.
First insert media. The peel-off
media inserts in the same way
as the media described in
chapter 5.3.1.
1. Lift the handle and then
pull, 40 cm of the label roll,
out of the printer.
2. Fold the handle.
3. Remove all the labels on
the exposed section.
4. Pull the backing paper
under the printer.
5. Fold 2 cm of the backing
paper to make it slide more
easily into the rewind unit
slot
Page 28

5. Getting Started
5.4 Inserting Media – Peel-Off Kit
6. Open the rewind unit slot by
turning the knob clockwise
while holding the cylinder
firmly.
7. Slide the backing paper into
the rewind unit slot.
Page 29

5. Getting Started
5.4 Inserting Media – Peel-Off Kit
8. Close the rewind unit slot by
turning the knob counterclockwise while holding the
cylinder and backing paper
firmly.
9. Roll the backing paper
around the rewind unit by
turning the knob counterclockwise. This increases
the tension of the backing
paper.
10. Press the print button a
few times until the printer
automatically finds the
correct position of the
media.
Note:
If necessary, make a test
printout and auto adjust the
media positioning sensor as
described in chapter 5.7.
Page 30

5. Getting Started
5.5 Inserting Ink Ribbon – MP Nova4 & 6 TT
1. Undo the handle and open
the cover.
2. Remove the old ink ribbon.
3. Slide the new ink ribbon on
to the spool.
4. Feed the ink ribbon under
the print head.
Note: Check that the inked side
of the ribbon is facing
downwards.
Page 31

5. Getting Started
5.5 Inserting Ink Ribbon – MP Nova4 & 6 TT
5. Note: The ink ribbon must
not pass under the MPS
(Media Positioning Sensor).
6. Move the empty roll, which
will collect the used ink
ribbon, up and around the
print head.
7. Slide the roll onto the take
up spool.
Page 32

5. Getting Started
5.5 Inserting Ink Ribbon – MP Nova4 & 6 TT
8. Fold the handle.
9. Press the print button. The
ink ribbon will automatically
wind around the rewind
spool, thus tensioning the
ink ribbon.
10. Close the cover.
Page 33

5. Getting Started
5.6 Connecting
Note: This process works for all
the MP Nova printers.
1. Make sure the printer is
switched off (the power
switch is set to ‘0’).
2. Connect the communication
cable from the PC to the
printer. The connection
cable enclosed is designed
for communication port
COM 1 and COM 2.
Note: Check that the cable is
connected to the correct
communication port (COM1,
COM2, USB or LAN).
3. Connect the printer to the
mains supply.
4. Switch on the printer.
5. Wait until the lamp has
turned green.
Page 34

5. Getting Started
5.7 Test Print & Sensor Auto Adjustment
To be sure the printer is
working, and to adjust the media
positioning sensor, MPS, to the
media, make a test printout:
1. Switch off the printer.
2. Press the print button.
Switch on the printer and
keep pressing the print
button until the whole
printout is printed and then
for another 7 seconds. This
will start the sensor auto
adjustment.
Release the print button
when auto adjustment starts.
3. Restart the printer to exit test
print mode. The new settings
are saved automatically.
Note: If the patterns at the
bottom of the test printout are
missing, you released the print
button too soon. Repeat the
process.
4. If the text and the patterns
look nice, the printout is ok.
5. To skip the test print, turn off
the printer and wait 15
seconds before switching it
on again.
In case of any trouble, go to
Troubleshooting, chapter 8, for
further information.
Page 35

6. Operation
6.2 Interpreting the Status Lamp - LED
Red
End of media roll, end of ink
ribbon or the handle is not
folded down.
Note: The handle has to be
folded all the way down.
Red (flashing)
System temperature too high,
printer has entered cool down
state
Yellow
Printer is starting up or is in test
print mode.
Note: Restart the printer to exit
test print mode.
Green
Ready to print
Page 36

6. Operation
6.3 Media Positioning Sensor Settings
The MP Nova printers are equipped
with media positioning sensors
(MPS). The MPS detects the media
and can be set to three different
modes depending on how and where
gaps and marks are positioned on the
media:
1. Outer sensor mode – detects label
gaps about 16 mm from the edge
of the media.
Note: This is the default setting.
2. Inner sensor mode – detects label
gaps about 5 mm from the edge of
the media.
3. Black mark sensor – detects black
marks on the reverse side of the
media, about 5 mm from the edge
Sensor mode Approximate sensor reading
point, from edge of media.
1. Outer (default) 16 mm
2. Inner 5 mm
3. Black mark 5 mm
of the media.
4. To change the settings, see the
Printer settings menu on the
Getting started CD.
Note: Changes in the printer
settings should be made by
qualified personnel.
For more information about ticket, tag
and label specifications, see the
Media specification sheet.
Page 37

6. Operation
6.4 Adjusting the Print Head
Adjusting Print Head Position
Note:
These adjustments are only
necessary when changing to media
with different thickness or width. The
pictures shown describe an MP
Nova4 DT. The process works the
same for all MP Nova printers.
Changing the position of the
adjustment screws can be necessary
if the labels are very narrow
1. Check that the printer is turned
off. Open the cover and fold the
handle.
2. Loosen the upper nut of the
adjustment screw you want to
move by turning it counterclockwise.
3. Slide the adjustment screw into a
new position and tighten the upper
nut. Pull the handle if sliding the
adjustment screw past the finger
nut.
4. Note: When tightening the upper
nut. Make sure it is pressing the
sliding rail against the bottom of
the notch and not against the
lower nut.
5. The adjustment screws should
make the print head press evenly
onto the media. Make test prints
to find the correct positions.
Page 38

6. Operation
6.4 Adjusting the Print Head
6. Note: MP Nova4 DT only.
On the MP Nova4 DT the
position of the print head itself
can be changed. As default there
is a 3 mm non-printable area on
the left side. To be able to print
all the way to the edge of the
label the margin has to be set to
0 mm.
Pull the handle. Loosen the
finger nut and slide the print
head into position. Tighten the
finger nut.
Adjusting Print Head Pressure
7. To increase the pressure on the
print head, turn the lower nuts
downwards (clockwise). This will
tighten the spring.
8. To decrease the pressure on the
print head, turn the lower nuts
upwards (counter-clockwise).
Note:
To much pressure might damage the
print head or make it wear out faster.
The pressure should be as light as
possible while maintaining high
quality printing. Make test prints to
find correct pressure.
Page 39

7. Maintenance
Cleaning the Print Head and Roller
Only use cleaning cloths from
Imaje. These are specially designed for
cleaning Imaje thermal printers. See
chapter 10.2 for correct type.
Note:
Frequent cleaning prevents print head
and roller damage, and is especially
important in demanding environments.
• Do not use liquids or aerosols when
cleaning this printer.
• Never use sharp or pointed tools
when cleaning or replacing the print
head.
• Don't use any sharp object to
remove labels from the print roller.
Remove all media before starting:
1. Tear the bag.
Pull out the cleaning cloth.
2.
Pull the handle and feed the cloth
3.
into the printer in the same way as
inserting the media (described in
chapter 5.3). Fold the handle and
press the printkey.
4. Keep the printkey pressed and let
the cloth pass through the printer.
(This cleans the print head.)
Note: If the roller is clogged with
labels it can easily be removed for
cleaning (see 9.1).
Page 40

8. Troubleshooting
To Begin With
When troubleshooting the Nova printer, it is necessary to
narrow down the various possible causes of faults: does the
printer, the media or the application software cause the fault? A
simple way of beginning your troubleshooting is to carry out a
test print, which provides valuable information about the printer,
for example if:
• The printer can feed the media
• The printer can print
• It shows which program version, typeface, etc. is
installed.
• It shows communication parameters and settings
• It shows the quality of printouts.
Test Print
The printer has two different test modes for test printouts. We
recommend you to use continuous paper (minimum width 100
mm) for the test printouts.
Preparations
Before you request a test printout, check that:
• The printer is loaded with paper
(preferably continuous paper)
• The printer has been turned off for at least
15 seconds.
Interpretation of the Test Labels
The values shown in the test printout are default values set at
delivery. It may be necessary to alter some values before final
installation. The procedures for changing values are found in
the Labelpoint manual.
Page 41

8. Troubleshooting
Test Method 1
A printout using test method 1 shows the
printer’s parameters and settings, for
example: date, time, program version,
communication settings and which
typefaces are available.
1. Switch off the printer.
2. Press the print button, but do not
release it.
3. Switch on the printer without releasing
the print button.
4. Keep the print button depressed until
the printer starts printing the test
pattern.
5. Then, release the print button.
Test Pattern
The method 1 test print produces a pattern
with three different fields. These fields
rovide information about:
p
• Whether all the dots on the print
head are functioning correctly.
If one or more dots are missing, a
distinct white line appears in the
test pattern.
• Whether the roller is perfectly
cylindrical and is in the correct
position.
• Whether the print head is
completely parallel with the roller.
The test pattern is lighter in those
areas where the roller is not
perfectly cylindrical or where the
print head is not completely parallel
with the roller.
Page 42

8. Troubleshooting
Test Method 2
Note: This method is only for advanced
troubleshooting by service technicians.
This shows all information sent to the
printer in hex-code and the function is
used to determine possible
communication faults, since it is possible
to see exactly what data the printer
receives.
1. Switch off the printer.
2. Press the print button, but do not
release it.
3. Switch on the printer without releasing
the print button.
4. Release the print button when the
printer starts printing.
The printer starts by printing information
as in test method 1. It then stops and will
continue printing once the data is sent to
the printer. By checking the received data,
you can determine whether character
received agree with the Label pointcommands and the transferred ASCIIcharacters.
Differences between the received signals
and the transferred characters may be due
to incorrect parameters (e.g. Baud rate) or
the presence of electrical inference during
the transfer. Check the communication
cable, the length of the cable and whether
or not the cable is close to power cables.
Cancelling Test Methods
To cancel the test methods, turn the
printer off and wait 15 seconds before
switching it on again.
Page 43

8. Troubleshooting
Troubleshooting Schedule
Status
No printout
Error
Ö
The print head is not in
position (status lamp is red)
Ö
Incorrect media
Ö
Incorrect or no data
Ö
TT- instead of DT- media
Ö
Ink ribbon is inserted with
inked side facing upwards
Measure
Ö
Check the level, fold down
the print head (DT, TT)
Ö
Check the media, replace
media (chapter 5.3)
Ö
Check all cables
Ö
Replace media (5.3 or 5.4)
Ö
Load the Ink ribbon correctly
(inked side facing
downwards) (chapter 5.5)
Status lamp is red
Status lamp is
flashing red
Smudged printout
Black or white lines
Faint printout
Uneven white lines
Printout too dark
Ö
End of media roll, end of
ink ribbon or the handle is
not folded down
Ö
System temperature too
high, printer has entered
cool down state
Ö
Damaged roller
Ö
Damaged print head
Ö
Dirty print head
Ö
Incorrect parameter
settings
Ö
Incorrect media
Ö
Incorrect head pressure
Ö
Ink ribbon is creased
Ö
Incorrect Ink ribbon
Ö
Incorrect parameter
settings
Ö
Check the media, the ink
ribbon and that the handle is
folded
Ö
Wait
Ö
Replace roller (chapter 9.1)
Ö
Replace print head (9.2)
Ö
Clean print head (chapter 7)
Ö
See ‘Printer settings’ on the
Getting Started CD
Ö
Replace media (5.3 or 5.4)
Ö
Adjust Print Head (6.4)
Ö
Have the printer serviced to
adjust the Ink ribbon
mechanism
Ö
Replace with correct type of
Ink ribbon (chapter 5.5)
Ö
See ‘Printer settings’ on the
Getting Started CD
Page 44

9. Changeable Parts
9.1 Replacing the Roller
Note:
The pictures shown describe an
MP Nova4 DT. The process
works just the same for all MP
Nova printers.
1. Check that the printer is
turned off and open the
cover (chapter 4.3 DT or
4.5 TT).
2. Pull the roller and the roller
bearing support to the right
(use the rubber surface
when pulling right).
3. Lift the left-hand end of the
roller towards the interior of
the printer.
4. Lift out the right-hand end of
the roller.
5. Remove the entire roller
from the printer.
Page 45

9. Changeable Parts
9.1 Replacing the Roller
6. Pay carefully attention to the
drive belt when removing
the left-hand end of the
roller from the printer.
7. Unpack the new roller.
Page 46

9. Changeable Parts
9.1 Replacing the Roller
8. Insert the left-hand end of
the roller (the end with the
cog wheel). Check that it fits
inside the drive belt.
Page 47

9. Changeable Parts
9.1 Replacing the Roller
9. Insert the right-hand end of
the roller into position.
10
. Push the left-hand end of
the roller downwards into
the notch until the roller is
parallel with the edge of the
printer.
Page 48

9. Changeable Parts
9.1 Replacing the Roller
11 and 12 Push the roller
slightly to the left so that the
left-hand end slots into the
groove.
13. Close the cover (chapter
4.3 DT or 4.5 TT).
14. Switch on the printer.
Page 49

9. Changeable Parts
9.2 Replacing the Print Head
Note:
The pictures shown describe
an MP Nova4 DT. The process
works just the same for all MP
Nova printers.
1. Make sure the printer is
turned off and open the
cover.
2. Check and remember the
current lateral position of
the print head. 3 mm is the
default position.
Note: Only adjustable on
MP Nova 4 DT.
3. Carefully push the print
head downwards until the
finger nut becomes visible.
Unscrew the finger nut.
Note: Take care not to
loose the finger nut.
Page 50

9. Changeable Parts
9.2 Replacing the Print Head
4. Carefully remove the print
head.
5. Carefully remove the
cables from the back of the
print head.
Note: There is a “button” on
top of the right cable. Push the
“button” before removing the
cable.
Page 51

9. Changeable Parts
9.2 Replacing the Print Head
6. Unpack the new print head
and attach the cables to
the new print head.
Remember to handle the print
head with care!
7. Carefully insert the print
head into position.
Page 52

9. Changeable Parts
9.2 Replacing the Print Head
8. Check that the lateral
position has not changed.
3 mm is the default
position.
Note: Only adjustable on
MP Nova 4 DT.
9. Hold the print head in
place and tighten the
finger nut.
10. Close the cover (chapter
4.3 DT or 4,5 TT).
1
1. Switch on the printer.
Page 53

10. Printer Options and Spare Parts
10.1 Printer Options
Peel-Off Kit
MP Nova4 & 6 DT, MP Nova4 & 6 TT
Item number: 533541 Nova4
533542 Nova6
The peel-off device separates
the labels from the backing
paper, which is rolled up behind
the printer.
LTS – Label Taken Sensor
MP Nova4 & 6 & 8 DT, MP Nova4 & 6 TT
Item number: 533625-01
The Label Taken Sensor (LTS)
is often used in association with
the Peel-Off Kit. Printing is
controlled by a photocell. A new
label is only printed once the
previous label has been
removed from the sensor.
Page 54

10. Printer Options and Spare Parts
10.1 Printer Options
215 mm Kit
MP Nova4 & 6 DT, MP Nova4 & 6 TT
Item number: 533615
The 215 mm Kit makes it
possible to use media rolls with
diameters up to 215 mm.
Page 55

10. Printer Options and Spare Parts
10.2 Spare Parts
Consumables
533616 MPS - Media Positioning Sensor
532089 Media guide – Lockable
Cables
502542 Cable – Serial - (RJ45)
000554 Power cable - Europe
001464 Power cable - UK
001463 Power cable – USA & Canada
502543 USB cable
Optional
533625-01 LTS Kit (Label Taken Sensor)
533541
533615 215mm Kit
Part number Description
501933
501934
501935
501936
501937
501938
1. 10 x Cleaning cloths (4")
1. 50 x Cleaning cloths (4")
1. 10 x Cleaning cloths (6")
1. 50 x Cleaning cloths (6")
10 x Cleaning cloths (8")
1.
1.
50 x Cleaning cloths (8")
533529
533667
533529
533667
533640
533640
531675
533530
533636
533607
533542
2. Print head – 200 dpi – MP Nova4 DT
2. Print head – 300 dpi – MP Nova4 DT
2. Print head – 200 dpi – MP Nova4 TT
2. Print head – 300 dpi – MP Nova4 TT
2. Print head – 200 dpi – MP Nova6 DT
2. Print head – 200 dpi – MP Nova6 TT
2. Print head – 200 dpi – MP Nova8 DT
3. Print roll – MP Nova4
3. Print roll – MP Nova6
3. Print roll – MP Nova8
Peel-Off Kit – Nova4
Peel-Off Kit – Nova6
Page 56

11. Consumables
Media General
Self-adhesive labels are backed with silicon-coated backing
paper, from which the label is removed. There are different
types of adhesive:
• Tickets are printed on non-adhesive paper, which means
there is no need for backing paper.
• Both labels and tickets are available as rolls or as fan-folded
continuous paper tracks. Fan-folded labels and tickets are
supplied in boxes, in which labels are stored before passing
through the printer.
• Perforations are used to divide labels and tickets. This
makes them easier to tear after printing.
• In order to start and stop the media during the print process,
the printer is equipped with a detector that senses any gaps
or black marks.
For more detailed information about media and consumables,
we recommend you read Datamax’s ‘CONSUMABLES’
document (currently only available in English).
MP Nova4 DT, Nova6 DT & Nova8 DT
The MP Nova DT printers use direct thermal media, such as
labels, paper and tickets.
Direct thermal media is made of special paper that reacts to
heat and printouts are often black. Different paper qualities are
available.
MP Nova4 TT, Nova6 TT
The MP Nova TT uses a special ink ribbon, which transfers ink
to media (receiver) when subjected to heat. Labels printed
using the thermal transfer method shows a greater resistance to
heat and UV-light.
Page 57

12. Technical Specifications
MP Nova4 DT & TT
Dimensions (H x W x L)
Weight DT: 5.8 kg (12 lbs), TT: 7.2 kg (15 lbs)
Power pack 100/240V AC 50-60 Hz, 325 VA
Printer technology Direct thermal and thermal transfer
Printing width 104 mm (4⅛”)
Printing speed DT: 80 – 250 mm/second, TT: 80 – 250 mm/second
Printing resolution 200 dpi / 300 dpi
Media specifications
Media types
Ink ribbon, TT
DT: 150 x 232 x 360 mm (6” x 9⅛” x 14⅛”)
TT: 210 x 250 x 360 mm (8¼” x 9½” x 14⅛”)
Width: 40 mm – 115 mm (1½” – 4½”)
Length: 10 mm (⅜”) – unlimited
Thickness: 58 μm – 180 μm
Roll or fan-folded paper
External diameter of roll: max 215 mm (8½”)
Inner core of roll: min 37 mm (1½”) in diameter
Max width of roll: 110 mm (4⅓”)
Inner core diameter of roll: 25 mm (1”)
Max length: 300 m (328 yards)
2 x RS232 ports (up to 115 kBps)
Connections
Typefaces
Barcodes
Graphics Supports several file types
Settings program Internal program using web browser, Telnet or hyperterminal
Counters 10 internal counters
Memory 2 Mb standard RAM
Time and date Internal clock, real-time
Print head diagnostic PHD (Print Head Diagnostic)
USB-port
Ethernet port (TCP/IP [LPD, R Telnet])
10 scalable typefaces
13 scalable, emulated typefaces
Supports true type typefaces
Most common barcodes including two-dimensional.
Examples: EAN128, Interleaved 2 of 5, Code 39 and PDF417
Page 58

12. Technical Specifications
MP Nova6 DT & TT
Dimensions (H x W x L)
Weight DT: 6.8 kg (15 lbs) TT: 8,2 kg (16,5 lbs)
Power pack 100/240V AC 50-60 Hz, 325 VA
Printer technology Direct thermal and thermal transfer
Printing width 168 mm (6⅝”)
Printing speed DT: 80 – 200 mm/second, TT: 80 – 200 mm/second
Printing resolution 200 dpi
Media specifications
Media types
DT: 150 x 292 x 360 mm (6” x 11½” x 14 ⅛”)
TT: 210 x 310 x 360 mm (8⅓” x 11⅞” x 14 ⅛”)
Width: 40 mm – 175 mm (1½” – 6⅞”)
Length: 10 mm (⅜”) – unlimited
Thickness: 58 μm – 180 μm
Roll or fan-folded paper
External diameter of roll: max 215 mm (8½“)
Inner core of roll: min 37 mm (1½”) in diameter
Max width of roll: 174 mm (6⅞”)
Ink ribbon, TT
Connections
Typefaces
Barcodes
Graphics Supports several file types
Settings program Internal program using web browser, Telnet or hyperterminal
Counters 10 internal counters
Memory 2 Mb standard RAM
Time and date Internal clock, real-time
Print head diagnostic PHD (Print Head Diagnostic)
Inner core diameter of roll: 25 mm (1”)
Max length: 300 m (328 yards)
2 x RS232 ports (up to 115 kBps)
USB-port
Ethernet port (TCP/IP [LPD, R Telnet])
10 scalable typefaces
13 scalable, emulated typefaces
Supports true type typefaces
Most common barcodes including two-dimensional.
Examples: EAN128, Interleaved 2 of 5, Code 39 and PDF417
Page 59

12. Technical Specifications
MP Nova8 DT
Dimensions (H x W x L) DT: 150 x 345 x 360 mm (6” x 13½” x 14⅛”)
Weight DT: 7.0 kg (15,5 lbs)
Power pack 100/240V AC 50-60 Hz, 325 VA
Printer technology Direct thermal
Printing width 216 mm (8½”)
Printing speed Up to 150 mm/second
Printing resolution 200 dpi
Width: 150 mm – 230 mm (5⅞” – 9”)
Media specifications
Media types Fan-folded paper
Length: 10 mm (⅜”) – unlimited
Thickness: 58 μm – 180 μm
2 x RS232 ports (up to 115 kBps)
Connections
Typefaces
Barcodes
Graphics Supports several file types
Settings program Internal program using web browser, Telnet or hyperterminal
Counters 10 internal counters
Memory 2 Mb standard RAM
Time and date Internal clock, real-time
Print head diagnostic PHD (Print Head Diagnostic)
USB-port
Ethernet port (TCP/IP [LPD, R Telnet])
10 scalable typefaces
13 scalable, emulated typefaces
Supports true type typefaces
Most common barcodes including two-dimensional.
Examples: EAN128, Interleaved 2 of 5, Code 39 and PDF417
 Loading...