

Page 1

AN-07
December 5, 2005
OVERVIEW OF THERMAL EASY PRINT PRINTING
If your print job is more than a succession of lines of text, you might want to consider Easy Print. This control language
alternative to Line Printer mode permits not only text but also bar codes, stored graphics, rotated images and rotated
fields within those images – plus a lot more. Easy print was designed to be minimally cryptic – once your job is encoded,
as a human you should be able to read the control codes in the job and know what the printed image will look like.
To send any command, including the print command, in Easy Print, you must first sen
(0x1b 0x45 0x5A). The printer will then remain in Easy Print until (1) it falls asleep, (2) it is reset, or (3) a command to
switch to another
All Easy Print commands begin with the opening curly brace “{“ (0x7B) and end with the closing curly brace “}” (0x7D).
Inside the b
follows the command. The general form of all Easy Print commands is:
{[COMMAND]<:DATA>}
To print using Easy Print, the command is PRINT a
be printed (whether the “thing” is text, bar code, or graphic). Optional global parameters affect the entire print job:
Each field, regardless of what is to be printed is virtual
@ROW,COL:NAME<FIELD PARAMETERS>
Each field can be modified by a set of “Field Parameters” that ca
rotate the field 90 degrees to the left or right, or rotate 180 degrees. And the field can be printed inverse (i.e. white on
black rather than black on white).
races is the command. If any data is required, a colon “:” (0x3A) separates command from data, and the data
nd the DATA is a succession of descriptors for each field, or “thing” to
{PRINT<,GLOBALPARAMETERS>:
[FIELD 1]
[FIELD 2]
•
•
•
[FIELD n]
}
ly identical. Each FIELD has the form:
|DATA|
Begins with an “@” (0x40)
Is followed by WHERE the data is to be printed (ROW,COL
colon “:” (0x3A)
That is followed by HOW is to be printed (NAME)
That is followed by WHAT is to be printed which is the
graphics). Data is always delimited by a vertical bar (0x7C) before and after the data. If no data is required,
as in the case of stored graphics and lines, then only a single vertical bar is required
Optionally, a comma “,” (0x2C) can follow HOW to be printed for m
FIELD
n increase the height and or the width of the field, can
). The row and column are always followed by a
DATA to be printed (except for the case of stored
d the three byte command ESC EZ
odifiers (or “field parameters”) for that
Page 2

FIELD PARAMETERS
GENERAL
INVERSE (I) Adding the word “INVERSE” or the letter “I” will cause whatever the field to be printed WHITE on
HMULT nn (HM nn) The “HMULT” or “HM” parameter will multiply the field nn times horizontally. If nn = 2, then the field
VMULT nn (VM nn) The “VMULT” or “VM” parameter will multiply the field nn times vertically. If nn = 2, then the field is
ROT90 Specifying “ROT90” will rotate just that field by 90 degrees counterclockwise. Fields are rotated
ROT180 Specifying “ROT180” will rotate just that field by 180 degrees. Fields are rotated about the point
ROT270 Specifying “ROT270” will rotate just that field by 90 degrees clockwise. Fields are rotated about the
BAR CODES
WIDE nn (W nn) The WIDE parameter is used to change the density of the bar code. By default and unless otherwise
HIGH nn (H nn) The HIGH parameter is used to change the height of the bar code. By default, bar codes are 5
PDF417 BAR CODE
COLUMNS Use this parameter to override the default fit of 2 columns for the PDF-417 bar code to specify the
SECURITY n Use this parameter to override the default security settings (defaults are 1-40 characters -> level 2;
XDIM n By default, the X dimension is 1 dot at .005” per dot. The value of n can be used to increase this to
YDIM n By default, the Y dimension is 1 dot at .005” per dot. The value of n can be used to increase this to
LINES
LENGTH nnn (L nnn) The length of the line is specified in units of one dot, or .005”. A line LENGTH of 100 is
THICK nnn (T nnn) The thickness of the line is specified in units of one dot, or .005”. A line THICKNESS of 1 is .005”, a
BLACK instead of the more conventional black on white
is printed double wide. If nn = 3 then the field is printed triple wide. The value for nn must be an
integer (1, 2, 3, 4, etc. up to 255)
printed double high. If nn = 3, then the field is printed triple high. The value for nn must be an
integer (1,2,3,4, etc. up to 255)
about the point given in the ROW,COL coordinates
given in the ROW.COL coordinates
point given in the ROW, COL coordinates.
specified, the narrow element is .005”. The WIDE parameter is similar to HMULT in that it can
multiply that width by nn times horizontally. If nn = 2, then all horizontal dimensions of the bar code
are increased by 2x and the narrow bar is .010”. If bb=3 all horizontal dimensions increase by a
factor of 3 etc.
dotlines or .025” high. The HIGH parameter is similar to VMULT in that it can multiply that height by
nn times vertically. If nn = 2, then the bar code is .050” high. If nn = 20, then the bar code is 0.5”
high. If nn = 40 the bar code is 1” high.
actual number of data columns being printed across any given line of the bar code. The number of
columns that will fit across a page is dependent upon the page width as well as the X and Y
dimensions of each block (see XDIM and YDIM)
40-160 characters -> level 3; 161-320 characters -> level 4 and 321-863 characters -> level 5. By
specifying the value of n, you can change the number of codewords used to protect the data:
n = 1 -> Level 1 adds 4 codewords
n = 2 -> Level 2 adds 8 codewords
n = 3 -> Level 3 adds 16 codewords
n = 4 -> Level 4 adds 32 codewords
n = 5 -> Level 5 adds 64 codewords
n = 6 -> Level 6 adds 128 codewords
n = 7 -> Level 7 adds 256 codewords
n = 8 -> Level 8 adds 512 codewords
.010” (n = 2), .015” (n = 3) etc. A commonly used value for the XDIM is 2, with the YDIM being 3
times that set for X
.010” (n = 2), .015” (n = 3) etc. A commonly used value for the YDIM is 6, with the XDIM being 1/3
that set for Y
approximately 1/2” long; a line LENGTH of 200 is approximately 1” long
line thickness of 2 is .010” etc.
Page 3
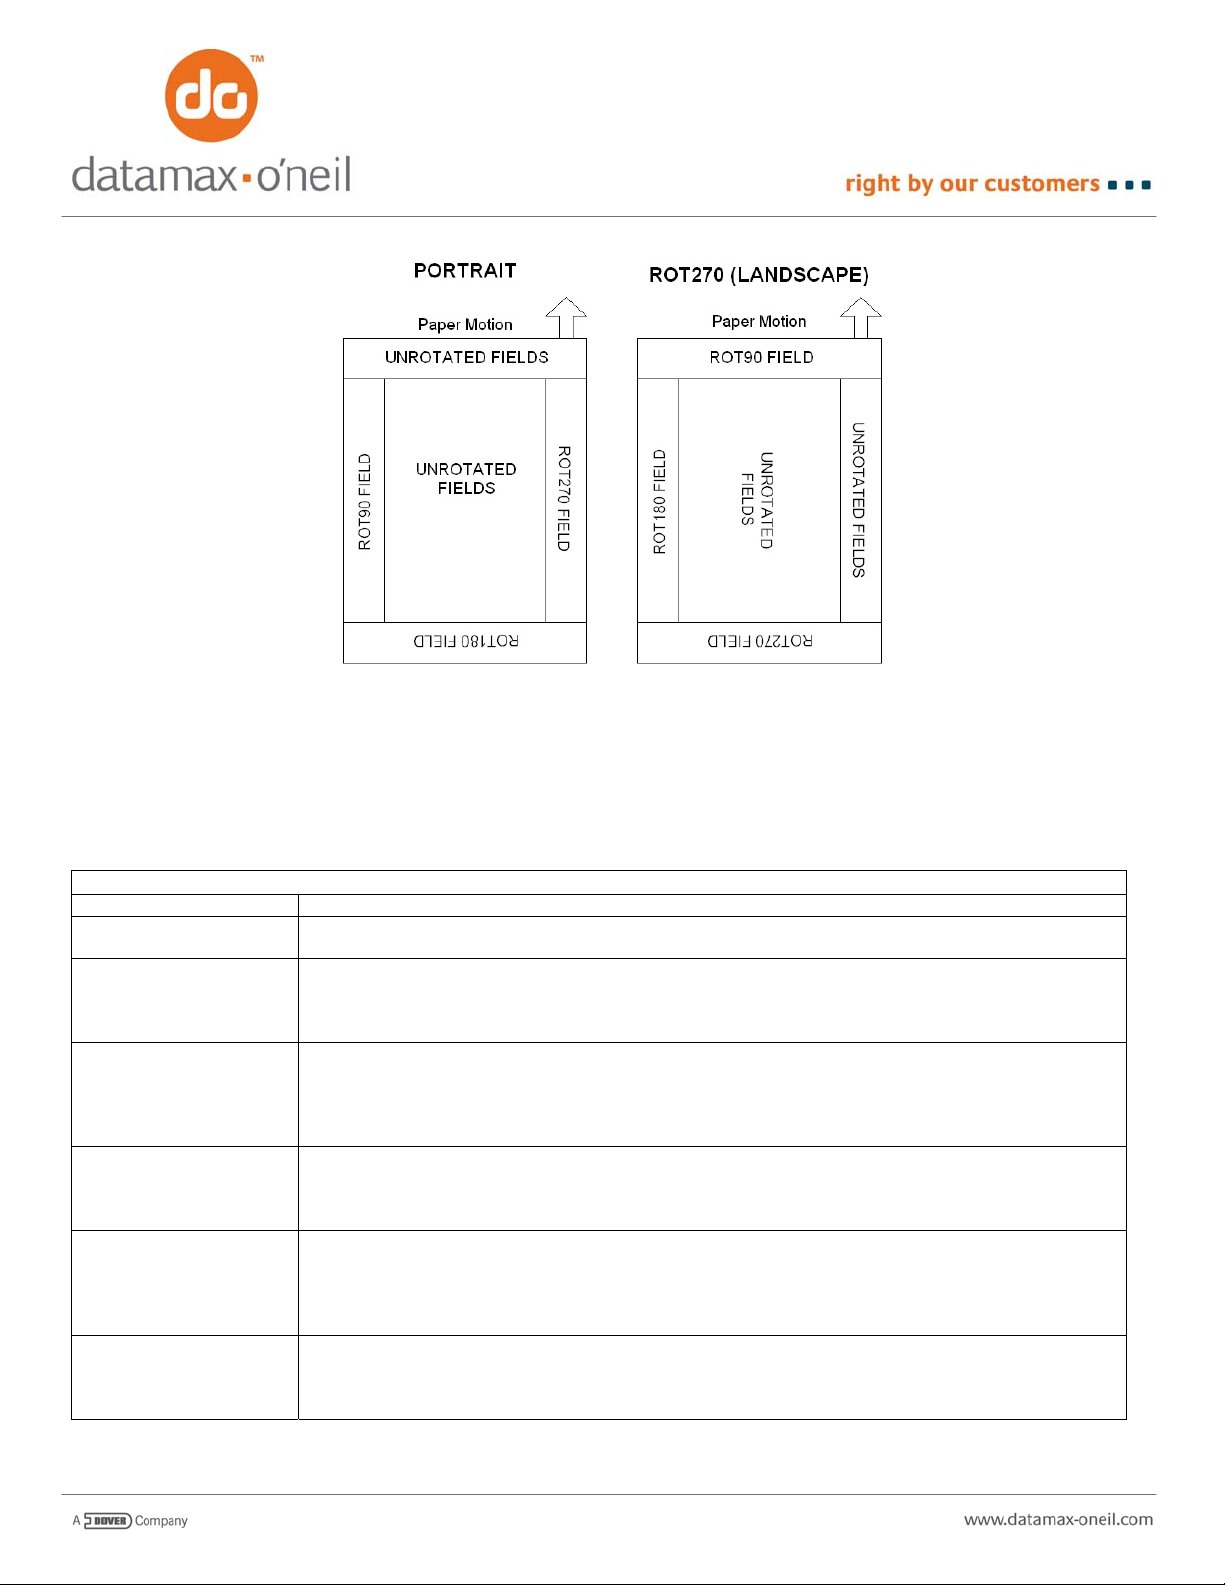
And just as the field can be modified, the entire image can b
e modified through “Global Parameters”. The image can be
rotated 90 degrees (landscape) so that the left hand edge of the image emerges from the printer first. And you can
specify that you are using media with QMARKs or Interlabel gap (depending upon the printer), so the printer will stop
properly and automatically align with each label printed.
GLOBAL PARAMETERS
BACK nnn Sets the printer to backup nnn dotlines before beginning to print
JOBSTATUS Turns Job Status Reporting ON for an Easy Print Job (see separate Job Status Reporting
document). Version 6.68 and later
QSTOP nnn Sets the printer to stop nnn dotlines after a QMARK is detected on the TOP of the media. This
parameter is for printers with a sensor for the TOP of the media (MF2, MF3, original 2t, 4t). If
specified as part of a print job, this will override the configured values. Each dotline is .005” and
typical value is around 95-125, but may be more or less depending upon the location of the QMARK.
QSTOPB nnn Sets the printer to stop nnn dotlines after a QMARK is detected on the BACK of the media. This
parameter is for printers with a sensor for the back of the media (LP3). If specified as part of a print
job, this will override the configured values. Each dotline is .005” and typical value is around 95-125,
but may be more or less depending upon the location of the QMARK. Each dotline is .005” and
typical value is around 95-125, but may be more or less depending upon the location of the QMARK.
QSTOPG nnn Sets the printer to stop nnn dotlines after an interlabel gap is detected. This parameter is for printers
with sensors for the TOP and BACK of the media (LP3). If specified as part a print job, this will
override the configured values. Each dotline is .005” and typical value is around 95-125, but may be
more or less.
Page 4

QSTOPN Cancel whatever QSTOP values were configured into Flash memory
QSTOPT nnn Sets the printer to stop nnn dotlines after a QMARK is detected on the TOP of the media. This
parameter is for printers with a sensor for the TOP of the media (LP3 and newer versions of firmware
for MF2, MF3, original 2t, 4t). Each dotline is .005” and typical value is around 95-125, but may be
more or less depending upon the location of the QMARK.
QUANTITY nnn Prints nnn copies of the image (Version 6.68 and laterf firmware for LP3). Will attempt to optimize
printing time by performing only one back (if specified) at the beginning of the job rather than on each
label
QUANTITYNOPT nnn Prints nnn copies of the image (Versions 6.68 and later firmware for LP3) without optimization. Print
jobs are treated as if they were sent as nnn individual print requests.
ROT270 nnn Rotates the entire print image so it is printed Landscape with the left hand edge of the print job
emerging from the printer first
STOP nnn Fixes the length of the printed image to nnn dotlines (The printer will STOP nnn dotlines from the
beginning of the image. Each dotline is .005”).
WHERE the data is to be printed
You specify WHERE data is to be printed as if the printed image
.005” on a side. Columns and Rows on the graph paper are numbered as if the 1
left hand corner. The 20 columns and 20 rows shown below represents only 1/10” by 1/10” on the printed image, yet you
can control your printing to start in any one of the squares shown. A 2” printer has 384 of these squares – or dots across
the width of the media, a 3” printer has 576 and a 4” printer has 832 of these squares – or dots across. The number of
squares down the media depends upon the height of the image you are printing – there are 200 locations fo r each lineal
inch.
COLUMNS
R
O
W
S
1 2 3 4 5 6 7 8 9 10 11 12 13 14 15 16 17 18 19 20
2
3
4
5
6
7
8
9
10
11
12
13
14
15
16
17
18
19
12
For example, if your FIELD began “@10,15:”, the upp
location 10,15 (row 10, column 15 indicated by the black square above).
were a sheet of graph paper, where each square is only
st
row and 1st column were in the upper
er left hand corner of whatever was to be printed would be at the
Page 5

HOW to print the data
Each Bar Code, Font, or Graphic has a five character name and
Print, the five character name is always unique and is much more descriptive. The name fully specifies how to print the
data – if the name refers to a font, then text will be printed. If the name refers to a bar code, then a bar code will be
printed. If the name refers to a stored graphic, then a stored graphic is printed. Note that the data field is EMPTY – only
the first vertical bar is necessary.
The following examples show carriage returns and line feeds
These CR/LF are optional and are most often used to facilitate reading by humans. Easy Print ignores everything after
the colon in the command line (with the PRINT command) until the first “@” symbol. And easy print ignores everything
after the final vertical bar indicating and of data until the next “@” symbol or closing “}”. You can place comments in this
area without affecting the printed image.
Example 1
To print a single line of data that contains the letters A-H ne
job with a single field. Note that to print using Easy Print, you must first send the ESC EZ (0x1B, 0x45, 0x5A). The
characters ABCDEFGH are printed using the MF185 font.
ESC EZ
{PRINT:
@10,10:MF185|ABCDEFGH|
}
Example 2
We can use exactly the same print job from above but add a com
same way – the comment is for humans to read only.
ESC EZ
{PRINT: This is an example of a comment and will not be printed
@10,10:MF185|ABCDEFGH| The letters A-H will be print
}
Example 3
To print a single line of data that contains the letters A-H ne
job with a single field. Note that to print using Easy Print, you must first send the ESC EZ (0x1B, 0x45, 0x5A). The
characters ABCDEFGH are printed using the MF185 font.
ESC EZ
{PRINT:
@10,10:MF185|ABCDEFGH|
}
Example 4
Bar codes are printed very similarly to fonts – just select the bar
data. The following example prints ABCDEFGH using 2:1 ratio Code 39 bar code rather than the MF185 font.
ESC EZ
{PRINT:
@10,10:BC39N|ABCDEFGH|
}
a one character name. While you can use either in Easy
separating the PRINT command as well as each field.
ar the top of the page, you would send the following Easy Print
ment. Example 1 and Example 2 will print exactly the
ed, but not this comment
ar the top of the page, you would send the following Easy Print
code using its 5 character name and send the appropriate
Page 6

Example 5
The bar code printed in example 4 was very dense and very sho
The following example uses field parameters to change the density of the bar code to ½ that in example 4 (narrow
element is now .010” wide) and the height is now one inch.
ESC EZ
{PRINT:
@10,10:BC39N, WIDE 2, HIGH 40|ABCDEFGH|
}
Example 6
PDF-417 bar code has more options than single dimension bar
fonts and single dimension bar codes. This example will print the letters A-H using the 2 dimensional PDF-417 bar co de.
Each element in the bar code will be .010” x .030”. It will be printed using 3 data columns across the page. In addition,
there will be 16 code words added for SECURITY instead of the default 8 (8 data characters by default use se curity level
2 which adds 16 codewords).
ESC EZ
PRINT:
@75,10:PD417,YDIM 6,XDIM 2,COLUMNS 3, SECURITY 3|ABCDEFGH|
}
Example 7
A previously downloaded graphic image is also printed in a very similar fashion
data required. In the following example, a graphics image has been previously downloaded to the printer (using the
MFLASH4 Windows Configuration Program or the OPDI suite of programs). When downloaded, the user assigned the 5
character name LOGO1 to the graphic image. This example prints this image near the top left edge of the paper.
ESC EZ
{PRINT:
@10,10:LOGO1|
}
Example 8
Vertical or horizontal lines can be printed just as easily.
beginning at the upper left edge of the paper. The line is 1” long (200 dots at .005” per dot) and .025” thick (5 x .005”).
ESC EZ
{PRINT:
@10,10:VLINE, LENGTH 200, THICK 5|
}
rt (narrow element was .005” and it was only .025” tall).
codes, but the basic structure remains the same as for
to fonts and bar codes, except there is no
In the following example, a single vertical line is printed,
Page 7

Example 9
So far, all of our examples have contained only one field. Most pri
fields. To include multiple fields in a single print job, simple add additional fields after the PRINT command and before the
closing brace. The fields can be listed in any row order, the printer will wait until it receives all data before forming the
image and printing. Before it begins, the printer will re-order the data so it is printed in proper sequence. For example,
the following print job will print a box with the word “HI!” inside. The line fields use both the long form of the LENGTH and
THICK as well as the short form. The HI! Is multiplied by 4 in both the horizontal and vertical direction to give large
characters. A global STOP parameter is used to stop printing at approximately 2” (400 dotlines). And the image is printed
in landscape mode (ROT270).
ESC EZ
{PRINT, STOP 400, ROT270:
@60,40:HLINE,L205,T3|
@60,40:VLINE,LENGTH 215,THICK3|
@60,245:VLINE,LENGTH 215,T3|
@274,40:HLINE,L205,THICK3|
@120,100:MF185,HMULT 4, VMULT 4|HI!|
}
Example 10_
As one final example, the following label shows how a moderately complex label
fonts as well as global and field rotation.
ESC EZ
{PRINT,ROT270:
@400,100:MF226|Me and My Company 123 MAIN STREET STE 100|
@412,200:MB113|0821|
@425,100:MF226|Pharmacy IRVINE, CA 92618|
@455,40:MF226|Fill Date: 01/26/05 Rx NO.. 28901 Dr. OnCall|
@485,40:MF204|Speedy Gonzalez|
@515,40:MF185|TAKE 4 TABLETS TWO TIMES A DAY.|
@570,40:MF185|CEFTIN 500MG TABLET BY HASBRO|
@600,40:MF226|Substitued for : CEFRINE 500MG TABLET|
@625,330:PT06H|000298-3137-01|
@660,40:MF204|Orig.|
@672,110:MF185|01/25/06|
@690,40:MF204|Date Refill 1 Qty.24 rph naj|
@720,40:MF204|Phone: (210) 490-2240|
@755,40:PT06H|CAUTION: FEDERAL LAW PROHIBITS THE TRANSFER OF
@775,40:PT06H|ANY PERSON OTHER THAN FOR WHOM IT WAS PRESCRI
@730,530:BC39N,WIDE 2, HIGH 13,ROT90|BARCODES|
}
nt jobs are much more complex and contain multiple
might be put together. This uses several
THIS DRUG TO|
BED.|
 Loading...