

Page 1
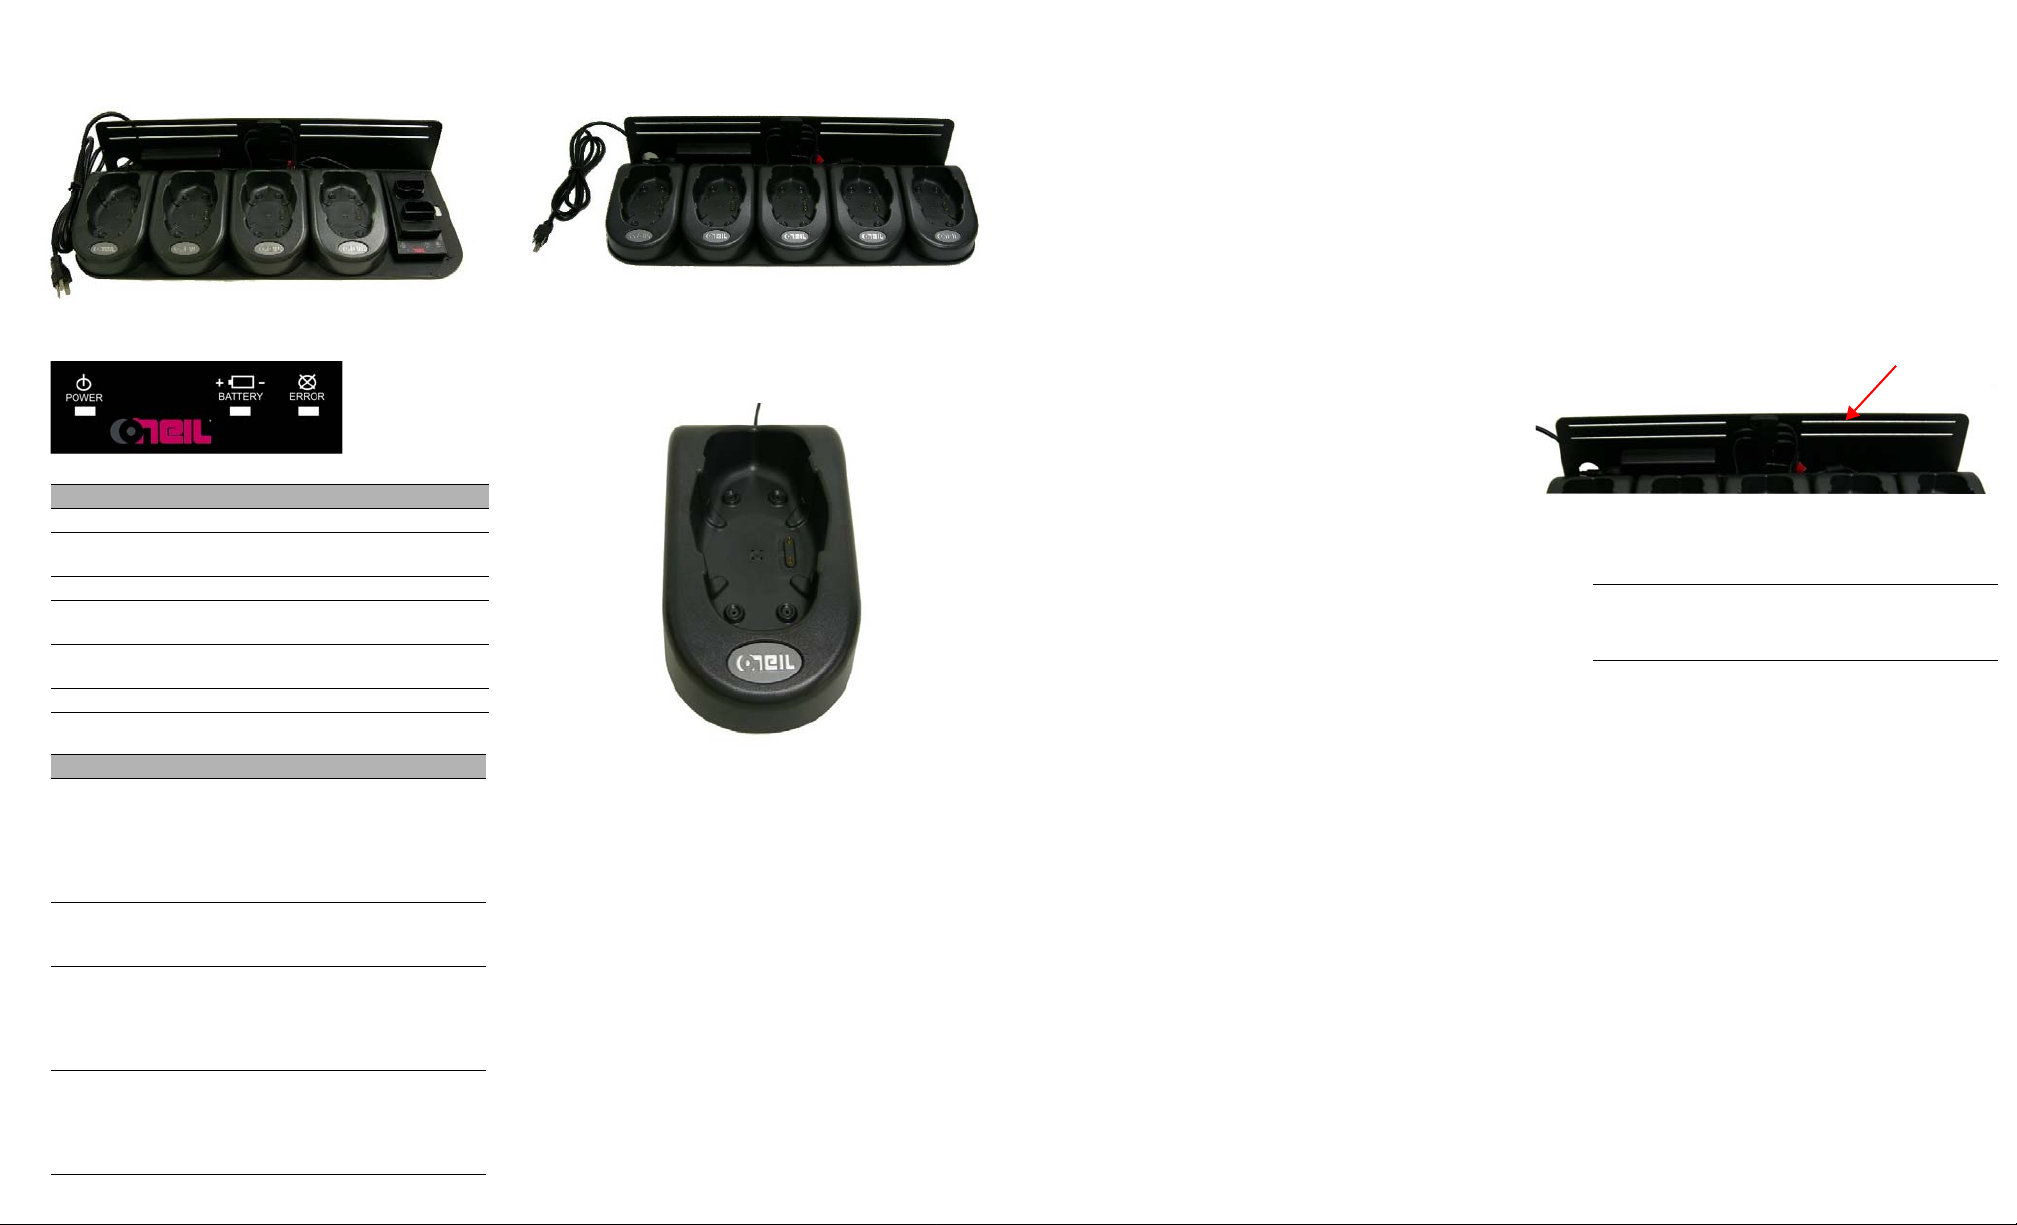
OC 4-Up Charging Bracket
(220237-000)
Battery Charger LED Indicators
Description Power LED Battery LED Error LED
Power off Off Off Off
Power on. No
battery inserted.
Battery is charging. Green Red Off
Battery is 100%
full.
Battery charger
error.
Battery error. Green Off Red blinking
Battery Charger Troubleshooting
Symptom Possible Cause Solution
Battery charger will
not charge the
battery.
Battery becomes
hot.
Battery Error LED
is displayed.
No LEDs are
displayed.
Green Off Off
Green Green Off
Green Off Red blinking
Defective battery.
Battery too hot or
cold.
Faulty LED.
Defective battery. Discontinue
Faulty condition
identified.
Defective battery.
Power supply cord
not connected.
Bad power supply.
Replace battery.
Allow to adjust to
room temp.
Send in for repair.
charging and
remove battery.
Remove battery
from charger and
re-insert.
Replace battery.
Check power supply
connections.
Replace power
supply.
OC 5-Up Charging Bracket
(220236-000)
OC Desktop Cradle Charger
(210259-000)
Guidelines
General Guidelines
• The Charging Brackets are designed to be
used on a desktop or as a wall-mounted unit. It
is not intended for vehicle mounting.
• Position the chargers so there is enough room
to properly remove the printer(s) and batteries.
• The desktop cradle charger and charging
brackets take approximately 3-4 hours to
charge each printer. If multiple printers are
attached, the charge time remains at
approximately 3-4 hours per printer; however,
charge times may vary.
• The battery charger takes approximately six
hours to charge two batteries sequentially.
Charge times may vary.
• When mounting the charging bracket(s), only
mount them to wall studs.
Safety Guidelines
• Position the chargers so they are protected
from environmental elements such as direct
sunlight, moisture, high temperature, tools, and
boxes. Position the chargers in a secure area
in normal traffic patterns.
• Do not use the chargers if they appear
damaged.
• To reduce risk of electric shock, unplug the
chargers before cleaning.
• Batteries become warm to the touch during
charging. If the battery becomes too hot to
touch, discontinue charging and contact
Datamax-O’Neil.
• Use of any charger or battery not ap pr ov ed by
Datamax-O’Neil for use with their printers could
cause damage to the batteries or printer and
will void the warranty.
• Do not insert foreign objects into the chargers.
• Do not disassemble, incinerate, or short circuit
batteries, the chargers, or related components.
• Use appropriate hardware when mounting the
charging bracket(s). Datamax-O’Neil does not
accept liability for improperly mounted charging
brackets. Datamax-O’Neil does not accept
liability for poorly placed printers and/or
chargers.
Mounting the 4-Up and 5-Up
Charging Brackets
If the charging brackets will be mounted on a
vertical surface or on a wall, use the following
procedure to mount them:
1. Locate the wall studs.
2. Use the charging bracket as a template to
mark the mounting holes on the mounting
surface. Use both the upper and lower slots to
mount the charging bracket to the mounting
surface. There should be a minimum of four
mounting points. For guidelines on mounting,
see the Guidelines in the previous section.
3. Drill the mounting holes at the marked
locations. When drilling the mounting holes,
verify that you drill the holes into the stud.
Warning: Use caution when drilling the
mounting holes and when mounting the
charging brackets onto a wall.
4. Attach the charging bracket to the mounting
surface as follows:
Wood Surface: Use four #10 pan head wood
screws with washers (not included). #10
wood screws should not be used on any
other type of surface.
Drywall Surface: Use four #10 pan head
toggle bolts (not included).
5. Verify the charging bracket is level and secure.
6. Thread the screws through the washers,
charging bracket, and into the mounting holes,
and tighten securely. Make sure the charging
bracket is flush to the wall and there are no
pinched cables.
Page 2
OC Family of Printers
110197-002
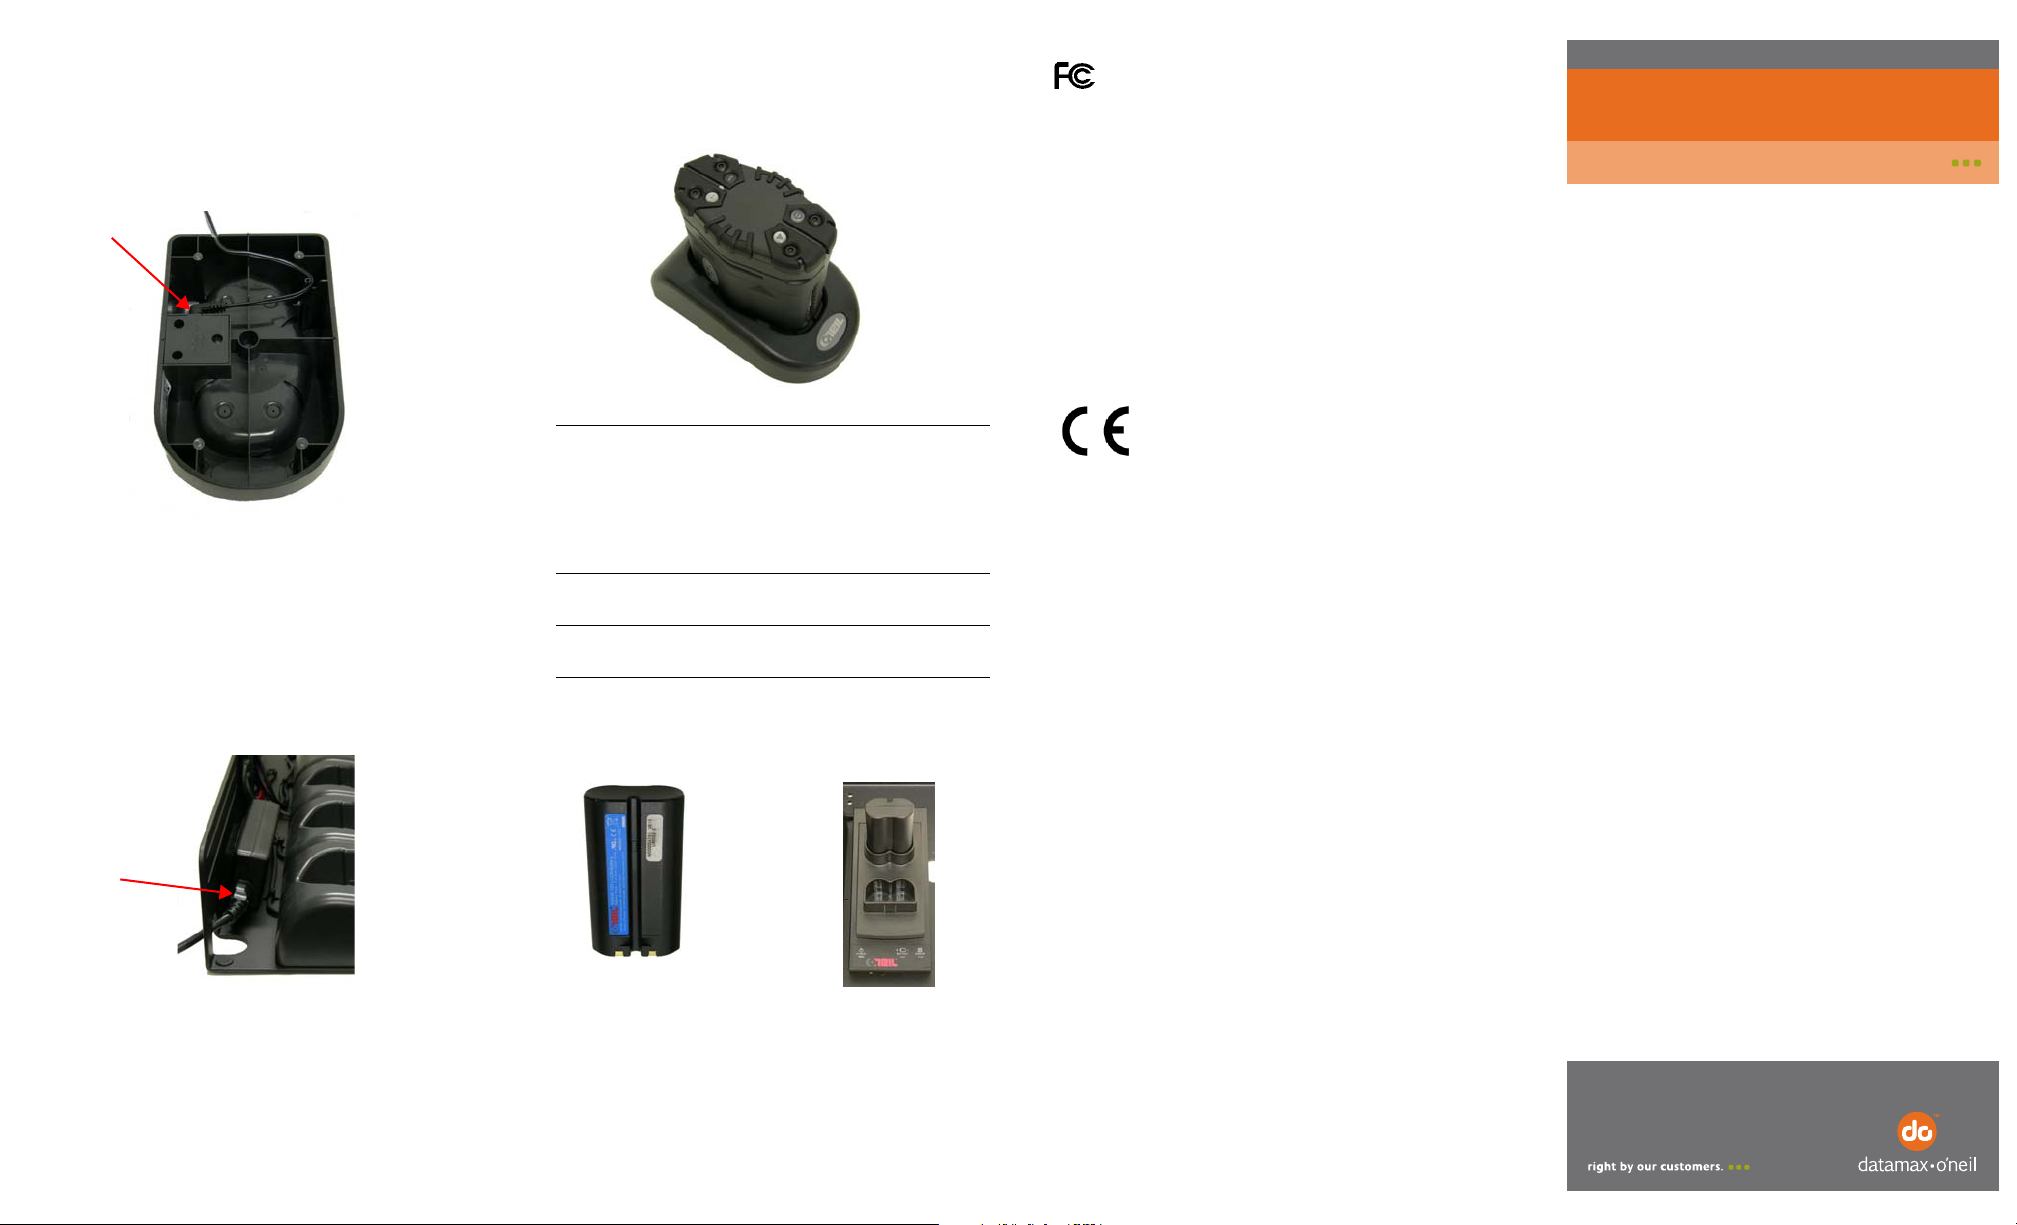
Depot Charger
Attaching the Power Supply
OC Desktop Cradle Charger
Use the following procedure to attach the power
supply to the desktop cradle charger.
1. Insert the p ower supply into the desktop crad le
charger.
2. Guide the p ower su pply cord th rough the slot s
to form a strain relief, as shown above.
OC 4-Up / 5-Up Charging Brackets
Use the following procedure to attach the power
supply to the charging brackets.
1. Insert the power supply cord into the power
supply socket. Make sure the three prongs are
inserted correctly.
Inserting the Printer(s)
To insert a printe r to a desktop cradle charge r or a
charging bracket, place the printer in the charger
so the LEDs are facing up.
Note: Make sure you regularly clean the
charging contact points on your printer's case
to ensure your printer's batteries are properly
charged, and to avoid damage to the printer or
the charger. To clean the charging co ntact
points, use alcohol and a clean rag.
Using the Battery Charger
Note: The battery charger is designed to
charge Lithium Ion (Li-ion) batteries only.
1. Position the battery above the charger so that
the contacts on the bottom of the battery align
with the contacts on the charger.
Agency Approvals
FCC Notice
This equipment has been tested and found to comply with the limit s
for a Class B digital device, pursuant to Part 15 of the FCC Rules.
These limits are designed to provide reasonabl e protecti on agai nst
harmful interference in a residential installation.
This equipment generates, uses and can radiate radio frequency
energy and, if not installed and used in accordance with the
instructions, it may cause harmful interference to radio
communications. However there is no guarantee that interference
will not occur in a particular installation. If this equipment does
cause harmful interference to radio or television reception, which
can be determined by turning the equipment off and on, the user is
encouraged to try to correct the interference by one or more of the
following measures:
Reorient or relocate the receiving antenna.
Increase the separation between the equipment and receiver.
Connect the equipment to an outlet on a circuit different from that
to which the receiver is connected.
Consult the dealer or an experienced radio/TV technician for help.
Applicable Directive
89/336/EEC, 73/23/EEC
Applicable Standards
EN55022 (1998)
EN55024 (1998)
EN60950 (1992)
Warranty
The Company warrants that Datamax-O’Neil products are f ree from
defects in manufacturing materials and workmansh i p for one (1)
year from date of original purchase to Buyer/Distributor (OEMs 90
days from the date of purchase). Batteries, cables, power supplies,
and other accessories will be warranted for ninety (90) days.
Datamax-O’Neil makes no other warranties, expressed or implied,
including implied warranties of merchantability and fitness of
purpose.
If you try to repair, disassemble, or change the product in any way,
or use parts not provided by Datamax-O’Neil without prior, written
authorization, all warranties are void.
For complete warranty and service information, see the Warranty
Card included in your printer's original packaging.
2. Plug the power supply into the correct outlet.
2. Place the battery in the charger. The charging
cycle begins. The battery LED turns green
when the charge is complete.
No Liability for Negligent Use
In no event shall Datamax-O’Neil be held liable for any damages
whatsoever (including, without limitations, damages for loss of
profits, business interruption, loss of information, or other
pecuniary loss) arising out of negligence in use and care of the
product.
COPYRIGHT © 2010, DATAMAX-ONEIL
 Loading...