

Page 1

110118-011
MICROFLASH 4T
User Guide
Page 2

Page 3

TABLE OF CONTENTS
microFlash 4t Printer: Top View ....................... 1
Using Batteries: General Guidelines ................. 2
Installing and/or Replacing Batteries ................. 2
Charging the Battery ......................................... 3
Determining Battery Condition ......................... 3
Installing Paper ................................................. 5
Printing a Self-Test ............................................ 7
Configuring the Printer ..................................... 7
Using Printer Data Cables ................................. 7
Using 802.11b/Bluetooth .................................. 8
802.11b Parameters ......................................... 8
Bluetooth Parameters .......................................8
Using Buttons, LEDs, and Audio Indicators ...... 9
Button Functions .............................................. 9
LED Indicators ................................................. 9
Blue RF Power LED Indicators ........................... 9
Charge LED Indicators .................................... 10
CardReader LED Indicators ............................. 10
Audio Indicators ............................................. 11
CardReader Audio Indicators ........................... 11
Using a CardReader ......................................... 12
General Guidelines ......................................... 12
Using External Charging .................................. 13
Overview ....................................................... 13
Supplies ............................................................ 17
Media Supplies ................................................. 17
Page 4
MICROFLASH 4T PRINTER USER'S GUIDE
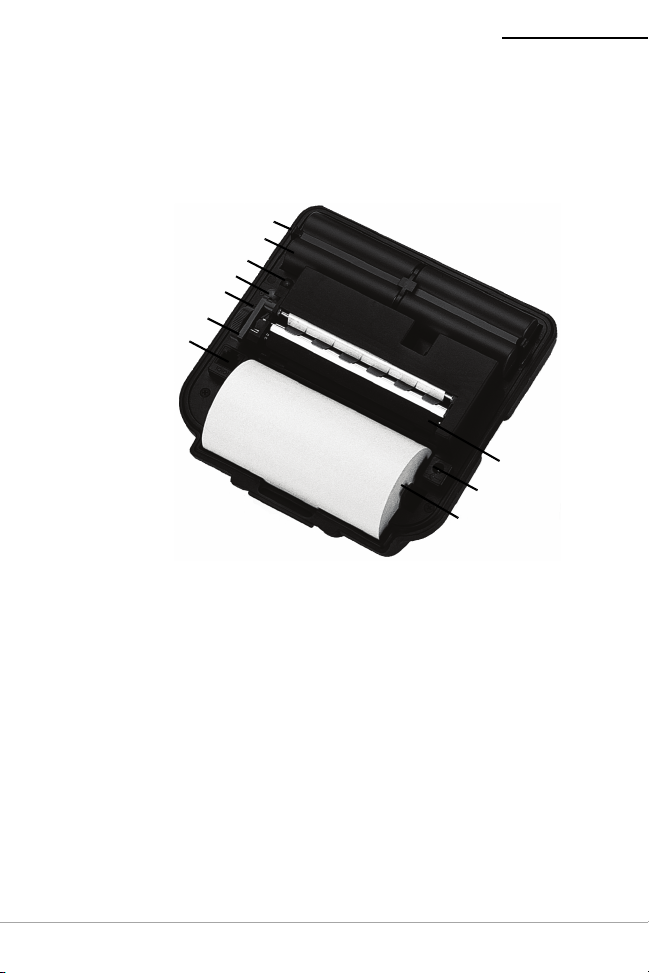
Roller
Paper/Paper
Cavity
Power Port
Battery Retaining Clip
Self-Test Button
RF/Power Button/LED
Charge LED
Print Head
Release Lever
Data Port
Battery/Battery Well
microFlash 4t Printer: Top View
Figure 1
1
Page 5
MICROFLASH 4T PRINTER USER'S GUIDE
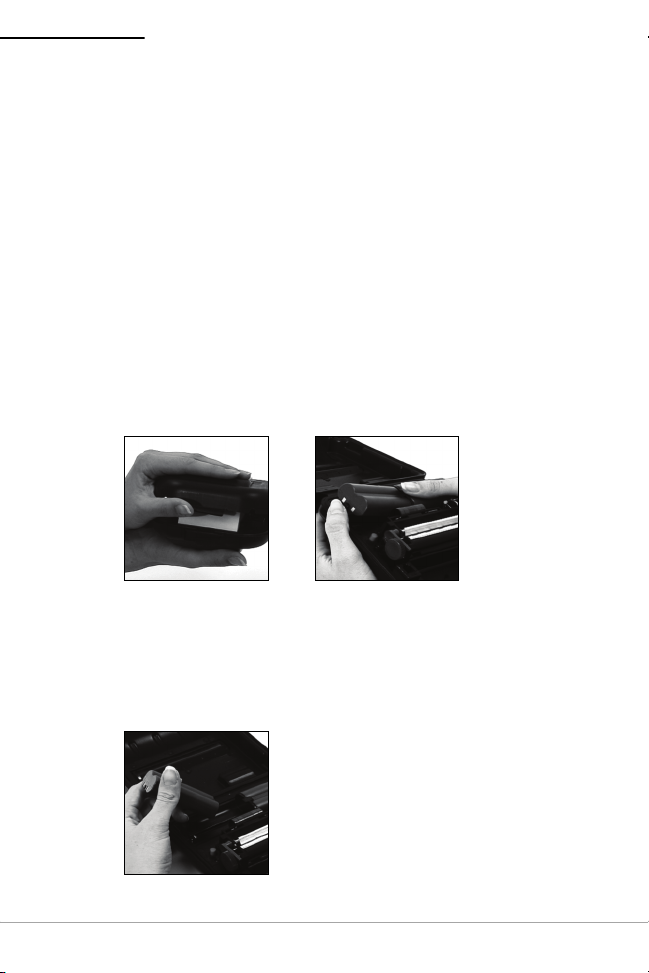
Figure 1 Figure 2
Figure 3
Using Batteries: General Guidelines
If your printer came with batteries already installed,
remove the red, battery isolator labels. If your
printer did not come with batteries installed, see
Installing and/or Replacing Batteries on this page
If you are storing your printer for a long period of
time, reinstall the battery isolator labels.
Both batteries must be installed for your printer to
operate properly.
Installing and/or Replacing Batteries
1. Open the printer's cover (Figure 1).
2. If applicable, remove the batteries by pressing the
retainer clip outward with your thumb (Figure 2).
.
3. While pressing the retainer clip, lift the outside end
of the battery past the retainer clip.
4. Insert or replace the new batteries. Verify the
battery contacts are facing down and are on the
outside edge of the printer (Figure 3).
2
Page 6

MICROFLASH 4T PRINTER USER'S GUIDE
Charging the Battery
To charge the battery, you must first remove the red,
battery isolator labels.
If the battery is low when the printer “wakes up,” the
printer sounds three short beeps. Plug the AC Adapter
into an appropriate power source. The Charge LED
turns red when charging and turns green when fully
charged. (For more information on the Charge LED, see
Using Buttons, LEDs, and Audio Indicators on page 9
A complete charge takes approximately 2 to 4 hours.
Caution: To obtain full battery capacity, a new battery
must cycle through two to three charges. To restart a
charge, unplug the power cord. Wait 30 seconds, then
replug the power cord.
If your printer is installed with external charge
capabilities, you can also charge your printer using
Datamax-O’Neil approved accessories. For more
information, see
Using External Charging on page 13
Determining Battery Condition
To determine the battery’s condition, print a self-test.
For more information, see
page 7
volts.
. The battery voltage varies between 6.2 and 8.4
Printing a Self-Test on
.)
.
Caution: There is a risk of explosion if the battery is
replaced by an incorrect type. Dispose of used
batteries according to the instructions.
3
Page 7

MICROFLASH 4T PRINTER USER'S GUIDE
Caution: The operating temperature of this portable
printer is 50° C. However, the operating temperature
when used with Datamax-O’Neil power supply for
charging the portable printer is limited to 40° C. Please
charge the printer in a suitable location that meets this
temperature requirement.
Caution: (For US/Canada) Please only use the
Datamax-O’Neil part number 220240-100 power
supply with this product.
4
Page 8

MICROFLASH 4T PRINTER USER'S GUIDE
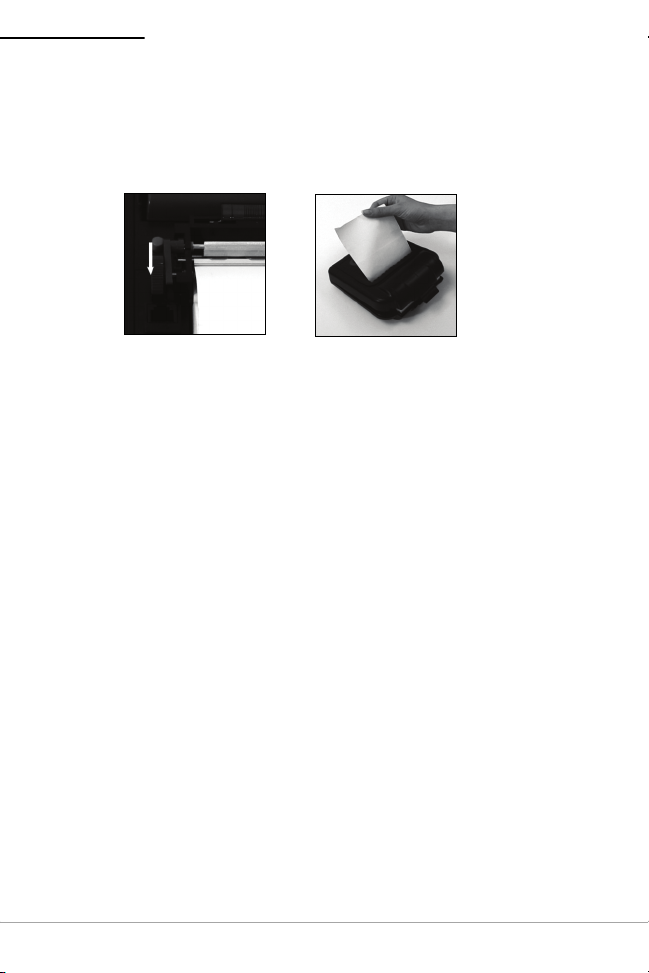
Figure 4
Figure 5
Figure 6
Figure 7
Installing Paper
1. Insert a roll of paper with the end of the roll exiting
from the bottom of the paper cavity (Figure 4).
2. Open the print head by raising the gray, print head
release lever until it is fully open. Do not stop at the
partial open position (Figure 5).
3. Wake up the printer by briefly pressing the red, selftest button (Figure 6).
4. Feed the end of the paper under the roller. The
paper automatically feeds under the roller and exits
the top of the print head. Verify the paper exits the
print head straight (Figure 7).
5
Page 9
MICROFLASH 4T PRINTER USER'S GUIDE
Figure 8
Figure 9
5. Lower the gray, print head release lever (Figure 8).
6. Feed the paper through the printer's cover
(Figure 9).
7. Close and latch the printer's cover.
6
Page 10

MICROFLASH 4T PRINTER USER'S GUIDE
Figure 10
Printing a Self-Test
1. After installing the paper, open the printer's cover.
Caution: If the red, battery isolator labels are
installed, remove them.
2. Press and hold the red, self-test button for
approximately five seconds until printing begins.
3. After printing begins, release the red, self- test
button.
Configuring the Printer
The printer has many configurable settings. To
configure or upgrade firmware, download the Windows
configuration program at www.datamax-oneil.com.
Using Printer Data Cables
1. Select the appropriate cable for use with the host
and/or device you are using.
2. Insert the plug into the printer's data port
(Figure 10).
3. Lead the cable through the notch on the outside of
the printer's cover.
4. With the cable exiting the front of the printer, close
and latch the printer's cover.
7
Page 11

MICROFLASH 4T PRINTER USER'S GUIDE
Using 802.11b/Bluetooth
Note: The following information applies to printers
with 802.11b/Bluetooth capabilities.
Radio printers are configured with default factory
settings. To determine your printer's radio
configuration, print a self-test. (For more information,
see
Printing a Self-Test on page 7
printers, configure them specifically for use in your
environment.
For proper system operation, set the following
parameters on your printer and host computer:
802.11b Parameters
ESS ID
IP Address (if not DHCP)
DHCP
Sub Net Mask
WEP Encryption
Port
Network Type
Bluetooth Parameters
Device Name
Authentication
Bondable
Discoverable
Connectable
Encryption
For information on setting parameters, see
the Printer on page 7
. Contact your network
administrator to verify the proper radio settings for your
environment.
.) If you have multiple
Configuring
8
Page 12

MICROFLASH 4T PRINTER USER'S GUIDE
Using Buttons, LEDs, and Audio Indicators
Button Functions
Red Self-Test Button
Short press If printer is asleep; printer wakes up.
If printer is awake; paper feeds.
Long press (press
and hold for five
seconds)
Blue RF (Radio-frequency) Power Button
Short press If printer is asleep and RF power is off;
Prints a self-test.
printer wakes up and RF power is turned
on.
If printer is asleep and RF power is on;
printer wakes up and RF power is turned
off.
If printer is awake and RF power is off; RF
power is turned on.
If printer is awake and RF power is on; RF
power is turned off.
LED Indicators
Blue RF Power LED Indicators
LED Description
Blue flash - fast RF power is on and printer is awake.
Blue flash - slow RF power is on and printer is asleep.
Off RF power is off.
9
Page 13

MICROFLASH 4T PRINTER USER'S GUIDE
Charge LED Indicators
LED State of Charge Action
Solid Red Charge in progress. Wait for the charge
LED to turn green.
Green Charge complete. None.
Red flash -
slow
Red flash -
fast
Red to
orange slow
Red to
orange
flash - fast
Orange
flash - slow
Orange
flash - fast
Battery is disconnected.
Battery is too cold.
High temperature. Change environment.
Battery voltage is very
low.
Battery voltage is too
high.
Charge timeout. Restart battery charge.
Internal error. Reset printer.
Connect battery.
Change environment.
Wait for solid red.
Restart charge.
Replace battery.
CardReader LED Indicators
Magnetic
LED Description
Green flash Good read.
Red flash Bad read.
10
Page 14

MICROFLASH 4T PRINTER USER'S GUIDE
Audio Indicators
Beep(s) Description Action
1Printer wakes up. None.
2 Out of paper. Install paper.
3 Low battery. Charge battery.
1 short RF power is on (when blue,
RF power button is pressed
and power was turned off).
2 short RF power is off (when blue,
RF power button is pressed
and power was turned on).
1 long Boot code is starting or
restarting (when
downloading new firmware).
8 short CRC error in firmware. Redownload
None.
None.
Redownload
firmware.
firmware.
CardReader Audio Indicators
Magnetic
Beep(s) Description Action
1 long Bad read. None.
2 short Good read. None.
11
Page 15

MICROFLASH 4T PRINTER USER'S GUIDE
CardReader
LED
CardReader
Slot
Figure 11
Using a CardReader
Note: The following information applies to printers
installed with the CardReader option.
General Guidelines
To wake up the CardReader, insert a card into the
CardReader slot. One short beep indicates the
CardReader/printer is awake.
If you are using a Magnetic CardReader, insert a
card with the stripe facing toward the printer, then
slowly remove the card from the CardReader slot.
For information on CardReader LED indicators and
audio indicators, see
Audio Indicators on page 9
Using Buttons, LEDs, and
.
12
Page 16

MICROFLASH 4T PRINTER USER'S GUIDE
Figure 12
(2) Charging contact points
Using External Charging
Note: The following information applies to printers
installed with external charge capabilities.
13
Page 17

MICROFLASH 4T PRINTER USER'S GUIDE
Overview
External charge-capable printers have two charging
contact points located on the back of the printer's case
(Figure 12). External charge-capable printers can be
used with various Datamax-O’Neil accessories such as
the swivel lock bracket and the external swivel lock
depot charger. When an external charge-capable
printer is mounted to one of these accessories, the
printer's batteries are automatically charged. For more
information, see the instruction sheet(s) included with
the accessories.
Warning: Use of any product not approved by
Datamax-O’Neil for use with their printers could cause
damage to the batteries and/or printer and will void
the warranty.
Failure to observe the instructions and/or warnings
specified in the documentation may result in damage
to your printer. Datamax-O’Neil does not accept liability
for resulting damages or injuries.
14
Page 18

MICROFLASH 4T PRINTER USER'S GUIDE
Agency Approvals
FCC Notice
This equipment has been tested and found to comply with the
limits for a Class B digital device, pursuant to Part 15 of the FCC
Rules. These limits are designed to provide reasonable protection
against harmful interference in a residential installation.
This equipment generates, uses and can radiate radio frequency
energy and, if not installed and used in accordance with the
instructions, it may cause harmful interference to radio
communications. However there is no guarantee that interference
will not occur in a particular installation. If this equipment does
cause harmful interference to radio or television reception, which
can be determined by turning the equipment off and on, the user
is encouraged to try to correct the interference by one or more of
the following measures:
• Reorient or relocate the receiving antenna.
• Increase the separation between the equipment and receiver.
• Connect the equipment to an outlet on a circuit different from
that to which the receiver is connected.
• Consult the dealer or an experienced radio/TV technician for
help.
Applicable Directive
• 89/336/EEC, 73/23/EEC
Applicable Standards
• EN55022 (1998)
• EN55024 (1998)
• EN60950 (1992)
14
Page 19

MICROFLASH 4T PRINTER USER'S GUIDE
Copyright
This manual and any examples contained herein are provided “as
is” and are subject to change without notice. Datamax-O’Neil
makes no warranty of any kind with regard to this manual,
including, but not limited to, the implied warranties of
merchantability and fitness for a particular purpose. DatamaxO’Neil shall not be liable for any errors or for incidental or
consequential damages in connection with the furnishing,
performance, or use of this manual or the examples
herein. This guide is copyrighted. All rights are reserved. This
guide may not, in whole or in part, be reproduced, translated,
stored in a retrieval system or transmitted in any form or by any
means, electronic, mechanical, photographic, or otherwise,
without the prior written consent of Datamax-O’Neil.
15
Page 20

MICROFLASH 4T PRINTER USER'S GUIDE
Supplies
Use only supplies certified by the Original Equipment
Manufacturer (OEM). For OEM supplies, please contact
Datamax-O’Neil at (949) 458-6400.
Media Supplies
Datamax-O’Neil offers seven certified grades of paper for
use in the printers. Our certified supplies are guaranteed
compatible — this important qualification means that
rigorous performance and image life testing have been
performed. Quality supplies are key to obtaining optimal
image quality and print performance. Quality supplies are
also the key to extending the life of the printer. DatamaxO’Neil strongly recommends usingDatamax-O’Neil Certified
Supplies only.
For more information, contact Datamax-O’Neil at (949)
458-6400.
Maintenance Supplies
We recommend that you follow a regular maintenance
schedule using our cleaning card (or cleaning kit when
using linerless labels). Datamax-O’Neil cleaning cards are
designed to effectively remove dirt and other
contaminants from the thermal printhead, rollers, and
paper path...resulting in a clean, crisp image output —
every time. Our cleaning kits remove any adhesive residue
(when using linerless labels) in addition to dirt and other
contaminants.
For more information, contact Datamax-O’Neil at (949)
458-6400.
For more information
For information about the printer, contact Datamax-O’Neil
at (949) 458-0500, or visit wsww.datamax-oneil.com.
16
Page 21

Page 22

COPYRIGHT © 2010, DATAMAX-O’NEIL
 Loading...