

Page 1

110200-002
Quick Reference Programming Guide
Page 2

Datamax-O’Neil
Tel: (949) 458-0500
www.datamax-oneil.com
COPYRIGHT © 2010
Datamax-O’Neil
All rights reserved.
This manual and any examples contained herein are provided ‘as is’ and are subject to
change without notice. Datamax-O’Neil makes no warranty of any kind with regard to this
manual, including, but not limited to, the implied warranties of merchantability and fitness
for a particular purpose. Datamax-O’Neil shall not be liable for any errors or for incidental
or consequential damages in connection with the furnishing, performance, or use of this
manual or the examples herein.
This guide is copyrighted. All rights are reserved. This guide may not, in whole or in part,
be reproduced, translated, stored in a retrieval system or transmitted in any form or by
any means, electronic, mechanical, photographic, or otherwise, without prior written
consent of Datamax-O’Neil.
microFlash is a trademark of Datamax-O’Neil. All other brand names and product
names shown in this manual are tradenames, trademarks, or registered trademarks of
the respective manufacturers or distributors of those products.
Page 3

Table of Contents
Introduction .........................................................................................1
Overview of Printing Modes..........................................................................1
Line Printer Mode....................................................................................1
Easy Print Mode......................................................................................1
Using Line Printer Mode...................................................................3
Overview...................................................................................................3
Line Printer Commands...............................................................................3
Using Easy Print Mode...................................................................10
Overview.................................................................................................10
Easy Print Commands: General Guidelines...................................................1 1
Sample Easy Print Job................ ................................................. ..............12
Easy Print Commands ...............................................................................13
Ahead Command ...............................................................................13
Back Command .................................................................................13
Line Printer Mode...............................................................................14
Self-Test Printout...............................................................................14
Status ..............................................................................................14
Initial Program Load........................................................................... 15
Easy Print: Using the Print Command..........................................................16
Print Command: Guidelines................................................... .................17
Print Command: Specifying Global Options...............................................17
Print Command: Customizing Fonts........................................ .................21
Font Names.......................................................................................21
Font Field Options..............................................................................21
Print Command: Customizing Bar Codes .................................... .............. 22
Bar Code Names................................................................................22
Bar Code Field Options........................................................................23
Using PDF-417 Symbols......................................................................23
Stored Formats ....................................................................................24
Print Command: Customizing Graphic Names ...........................................25
Graphic Names ..................................................................................25
Graphic Field Options................................................... .......................25
Print Command: Customizing Line Names ................................................25
Line Names.......................................................................................25
Easy Print: Using Configuration Commands................................. .................26
Creating Configuration Command Files .................................................... 26
Two-Letter Configuration Commands .............................................. ...... 26
Three-Letter Configuration Commands.................................................. 32
Page 4

Datamax-O’Neil Quick Reference Programming
Querying the Printer........................................................................41
Overview.................................................................................................41
Sending Queries ...................................................................................41
Interpreting Query Replies .....................................................................41
Query Formats .....................................................................................41
Query Commands.....................................................................................42
Status Query........................................................................................43
Status Reply Explanation.....................................................................44
Print Job Status Query...........................................................................45
Print Job Status Reply Explanation........................................................46
Configuration Query ..............................................................................47
Configuration Reply Explanation...........................................................48
Battery Query ......................................................................................49
Version Query ......................................................................................49
Version Reply Explanation ...................................................................50
Memory Query......................................................................................50
Memory Reply Explanation...................................................................50
Printhead Query....................................................................................51
Printhead Reply Explanation.................................................................51
Infrared Query......................................................................................52
Infrared Reply Explanation ..................................................................53
Font Query................................................................. ..........................55
Fonts Reply Explanation ......................................................................55
Graphics Query.....................................................................................56
Graphics Reply Explanation..................................................................56
Formats Query .................................... .................................................57
Formats Reply Explanation ..................................................................57
802.11b/TCP/IP Query...........................................................................57
802.11b/TCP/IP Reply Explanation ..........................................................58
Bluetooth Query ...................................................................................59
Bluetooth Reply Explanation ...................................................................60
Magnetic Card Configuration Query .........................................................61
Magnetic Card Configuration Reply Explanation .........................................61
Magnetic Card Read Query .....................................................................62
Magnetic Card Read Reply Explanation.....................................................62
Card Reader Status Query......................................................................63
Card Reader Status Reply Explanation .....................................................63
Label Configuration Query......................................................................64
Manufacturing Date Query: ESC{MD?} ....................................................64
Serial Number Query: ESC {SN?} ...........................................................65
Demand Quantity Query ........................................................................65
Cancel Query........................................................................................65
Reset Query.........................................................................................65
Index.....................................................................................................66
Page 5

Introduction
The Datamax-O’Neil Quick Reference Programming Guide is a reference guide for DatamaxO’Neil printers. This programming guide documents the functions and features of the
printer's programming language.
Note: The commands documented in this programming guide are available based
upon which version of firmware is installed on your printer and which printer you
are using. To determine which version of the firmware you are using, print a selftest. The self-test printout lists information about your printer's configuration,
options, and so on.
Overview of Printing Modes
Datamax-O’Neil thermal printers support several different printing protocols. The two native
protocols are Line Printer and Easy Print. Each of these protocols have their own unique
advantages depending upon what is to be printed. It is also possible to mix Line Printer and
Easy Print in a single printed imag e. In add i ti on to th es e two modes, there are also several
emulation modes. These emulation protocols are covered in separate documents.
Line Printer Mode
The Line Printer mode is the simplest method of printing. Each line to be printed is sent to
the printer as a sequence of single bytes (some Asian character sets require two bytes for
each character). The printer accepts characters and begins to print when a Carriage Return
(0x0D) or Line Feed (0x0A) is received. Then, al l characters received to that point are printed
on a single line. A series of ESCape code sequences can be sent to the printer to alter the
look of the characters (e.g. to make them double wide, or to change the font, or to change
other aspects of the appearance of the printout). Y ou can also have the printer re- align if you
are using stocks with a "Q" or alignment mark.
Easy Print Mode
The Easy Print mode is a much more powerful method of printing. Easy Print is actually a
printing protocol that lets you give commands to the printer (such as PRINT). Within that
protocol, you can tell the printer how to print that data (such as using a variety of fonts, or as
a bar code), exactly where to put the data (anywhere on the printed image down to .005"),
and how to modify the data (such as tall, wide, rotated). You can also store graphics images
such as logos or icons, to be used anywhere on the printed image. If you are printing on precut labels, you can use a pre-printed "Q" mark or the gap between labels to re-align after
each image is printed.
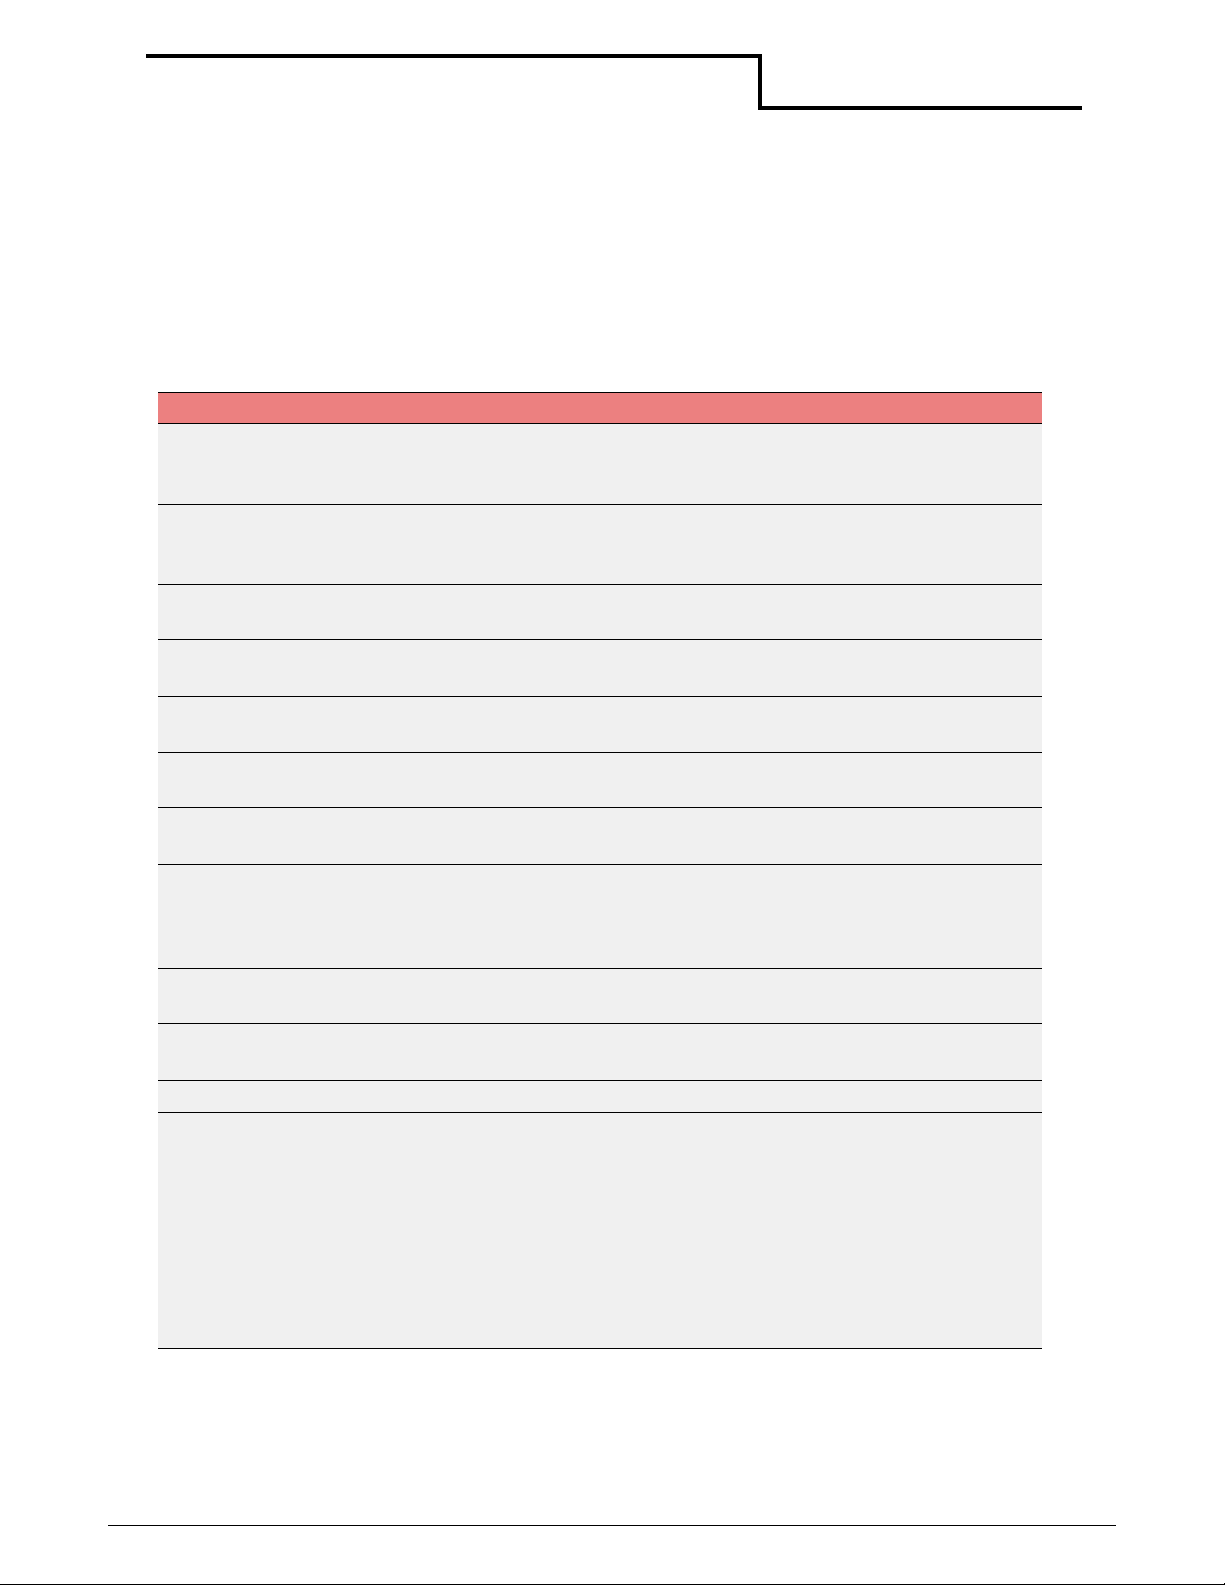
TO PRINT LINE PRINTER EASY PRINT EMULATION
Bar Codes X
Complex image (exact test/barcode/
graphic positioning important)
Line after line of text (receipts or
invoice)
Graphics (one time - not stored)
including captured signatures
Graphics (stored) X
X
X
X
1
Page 6

Datamax-O’Neil Quick Reference Programming
Introduction
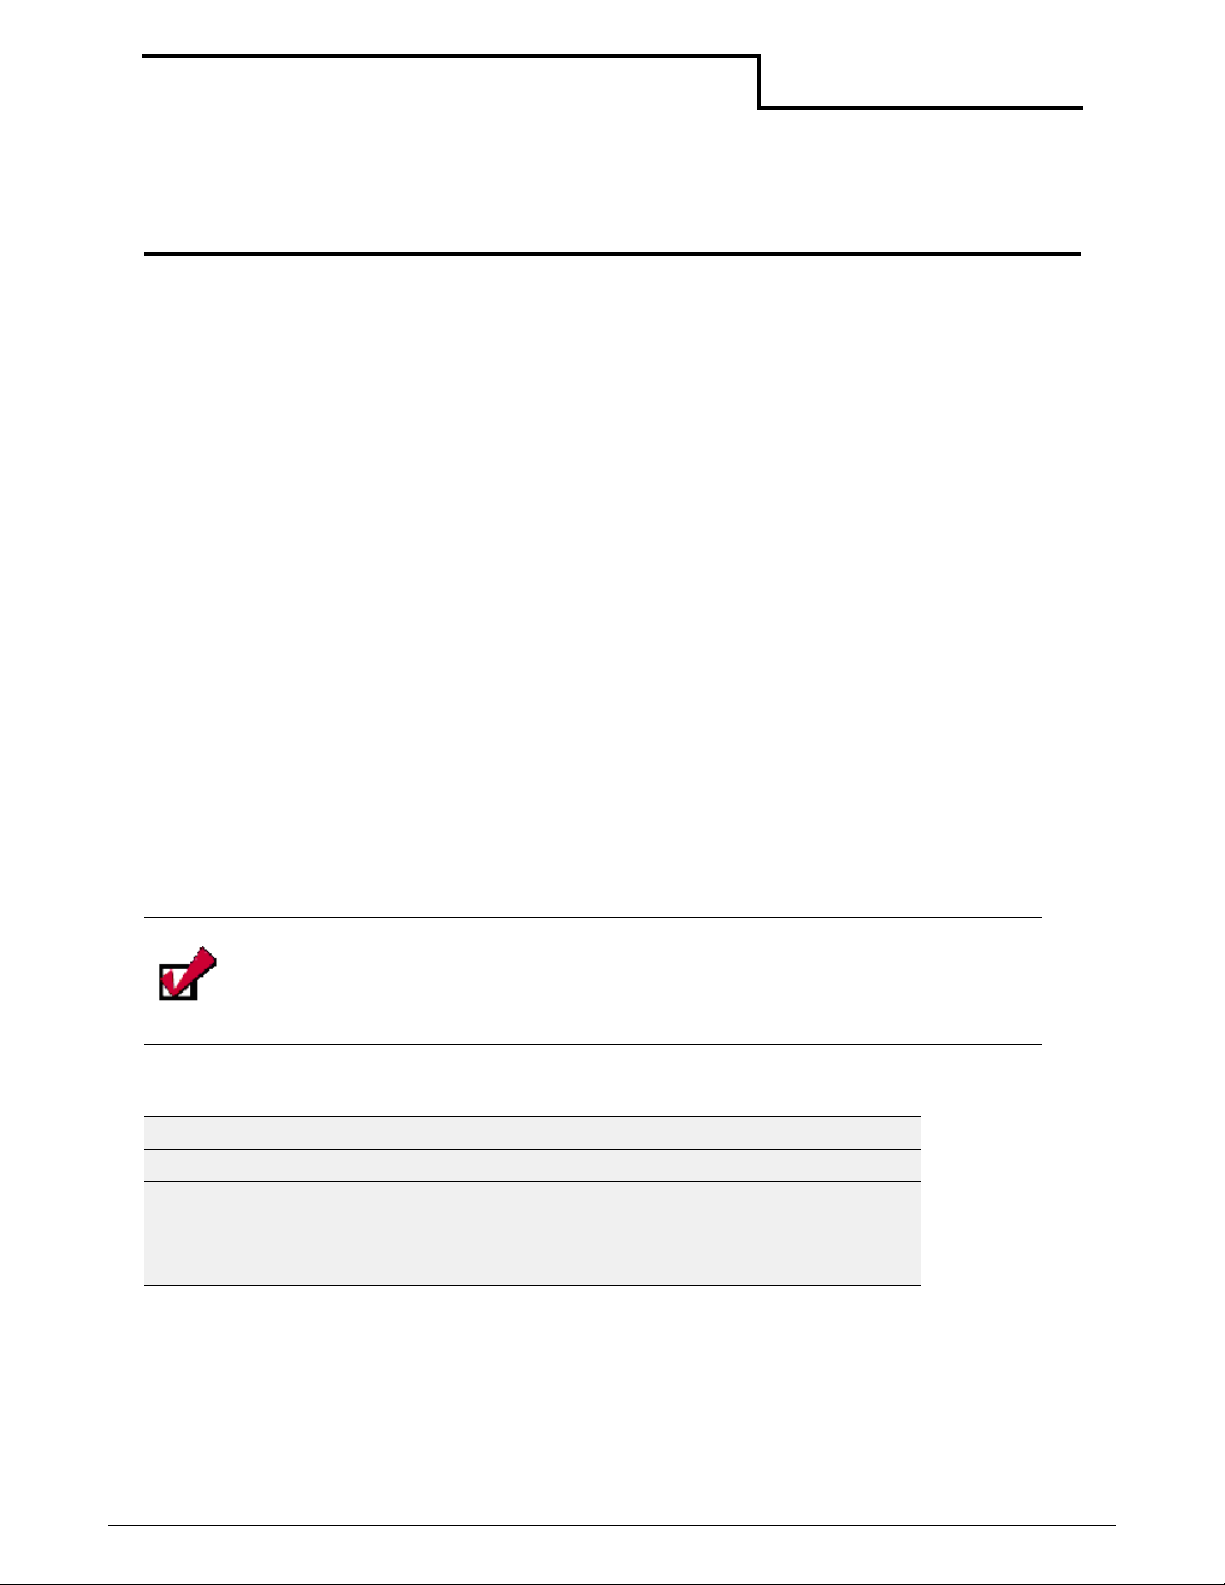
TO PRINT LINE PRINTER EASY PRINT EMULATION
Labels (Butt Cut or Die Cut) with
alignment “Q” mark or gap between
labels
Pre-Printed “fill in the blank” form X
Rotated image X
Rotated areas on image X
Use Datamax-O’Neil printer in system
meant for another make of printer
X (Text Only) X (Complex)
2
Page 7

Using Line Printer Mode
Overview
Line printer mode is the simplest protocol supported by the Datamax-O’Neil thermal printers.
Using Line Printer mode, you can send a line of text as a sequence of characters to the
printer followed by a carriage return (0x0D), and/or a line feed (0x 0A), or a form feed (0x0C)
and the printer prints that line of text. Commands can be used to change the way the
printout looks and to select different fonts (fonts are available as the common IBM PC Code
Page 437 mapping as well as many other mappings and international character sets).
Commands are usually either a single non-printable character, or a sequence of characters
beginning with a non printable characte r such as ESCape (0x1b). Although these commands
can be placed anywhere in the text, they will usually take effect exactly where they are
placed. Therefore, you must be careful to place them where you want the effect to take
place. For example, to change fonts you send ESC w n, where 'n' is the single character name
of the font (seen AN-3 or AN-12). If you do this at the beginning of the line, it will affect the
entire line. However, if you place this in the center of a line, it will a ff ec t o nl y t h os e
characters that come after. If you place this at the end of the line, it will have no effect on
that line at all, but will affect the next line.
Use Line Printer mode to print receipts and labels with text and simple, bitmap , graphics that
do not need to be stored. You can also use Line Printer mode to insert signatures.
Note: This chapter assumes a basic knowledge of computer programming and is
designed to be used by programmers, software engineers, and technicians.
Line Printer Commands
The following table contains the available Line Printer commands:
Command Description Page
ESC C n Sets form length. Range for n is 1-255. 4
ESC A n Sets interline spacing; n=0 (default). 4
CAN Cancels buffer line 4
ESC V n1 n2 Bit-mapped graphics mode select 5
ESC Q n1n2 Permits different height characters across a single
line.
ESC B Begins acceptance of compressed graphics 6
ESC E Ends acceptance of compressed graphics 6
SO Sets double wide print 6
SI Condensed print 6
FF Form feed 7
LF Line feed 7
CR Carriage return 7
ESC w n Font select. The range for n is 21-26 hex. 7
5
3
Page 8

Datamax-O’Neil Quick Reference Programming
Using Line Printer Mode
Command Description Page
ESC @ Resets the printer 7
ESC Hn Multiplies the height n times 8
ESC R n International font selection 8
ESC ! n Sets double wide and double high 8
ESC EZ Goes to Easy Print Mode 9
ESC D n Increases the darkness 9
ESC d n Decreases the darkness 9
ESC bn Back up 9
Note: Line Printer commands are case-sensitive. Make sure you use the correct
case when entering commands. An n indicates binary numbers, not ASCII
characters. For more information, see the individual command(s).
Esc C n Set Form Length
Format ESC C n
Dec 27 67 n
Hex 1B 43 n
Function Sets the page length in character lines. In the command
format, n represents the number of lines in the form and n is
a single byte. The default for n is 20 decimal, 14
hexadecimal. The range for n is 1-255.
Esc A n Set Interline Spacing
Format ESC A n
Dec 27 65 n
Hex 1B 41 n
Function Sets the number of blank dotlines that are fed between
character lines. The printer adds n (eight-bit binary number)
blank lines after completing the current line(s) and before
printing the next line.
The default value for n is zero where n equals the number of
inter-character blank dotlines in a single character. The range
for n is 1-155.
CAN Cancel Line Buffer
Format CAN
Dec 24
Hex 18
Function Cancels the character received on the currently forming, but
not yet printed, line.
4
Page 9

Datamax-O’Neil Quick Reference Programming
Using Line Printer Mode
Esc V n1 n2 Bit-Mapped Graphics
Format ESC V n1 n2
Dec 27 86 n1n2
Hex 1B 56 n1n2
Function Prints the next (n1*256 + n2) dotlines as bit-mapped
graphics. n1n2 form a 16-bit binary number set, the most
significant byte first. Used to print user-generated bitmap
graphics across the width of the printhead. After receipt of this
command, the printer dumps the binary data directly to the
printhead. As customary with bitmap data, a 1 bit indicates a
dot is on, 0 bit indicates the dot is off. Graphics printed using
this command must be the exact width of the head in bits. Bit
7 of the first byte of data received prints at the left-most dot
on the head as you view the printhead with the paper feeding
away from you. The printer remains in bit-mapped graphics
mode until the total amount of bytes necessary to fill n1n2
lines of print are received by the printer. Use the following
table for guidelines when adding a bit-mapped graphic.
Printer Ty pe Dots
Across
microFlash2 384 48 203
microFlash3 576 72 203
microFlash4t/4tCR 832 104 203
microFlash2t/2tCR 384 48 203
microFlash2i/2iCR 240 30 127 Horizontal
ESC Q n1n2 Advance n1n2 from Q mark
Format ESC Q n1n2
Function Permits different height characters across a single line.
Bytes Across Dots Per Inch
69 Vertical
5
Page 10

Datamax-O’Neil Quick Reference Programming
Using Line Printer Mode
Esc B, ESC E Accept Compressed Graphics
Format ESC B ESC E
Dec 27 66 27 69
Hex 1B 42 1B 45
Function Accepts compressed graphics. The printer decompresses and
prints the graphic.
Each compressed dotline (using a run-length encoding
scheme) is preceded by an uppercase G. Each uncompressed
dotline is preceded by an uppercase U. Vertical white space
(where several consecutive dotlines have not been printing)
is processed using an uppercase A followed by a single byte
count of the number of dotlines to advance.
Compressed dotlines use a single graphics byte, followed by
the number of times the byte is repe ated. After the
compressed graphics data command (ESC B) is received,
each dotline must be preceded by the G or U, or an A may be
sent followed by the number of lines to advance.
When all data is sent, the final bytes must be ESC E to exit
compressed graphics data.
Compressed graphics mode requires a graphic image the
same width as the printhead in use.
Note: The microFlash3 printer has 576 bits across a single
line; the microFlash2/2t has 384 bits and the microFlash2i
has 240 bits microFlash4t has 832 bits across a single line.
SO Set Double Wide Print
Format SO
Dec 14
Hex OE
Function Prints the current font in double wide width until an SI (Set
Single Wide Print) comma nd i s rec ei ved or a carriage return
is received.
SI Set Single Wide Print
Format SI
Dec 15
Hex OF
Function Prints the current font in single width.
6
Page 11

Datamax-O’Neil Quick Reference Programming
Using Line Printer Mode
FF Form Feed
Format FF
Dec 12
Hex 0C
Function Prints the current line, then advances the paper to top of
form (TOF).
LF Line Feed
Format LF
Dec 10
Hex 0A
Function Prints the current line and advances the paper.
CR Carriage Return
Format CR
Dec 13
Hex 0D
Function Prints the current line and advances the paper to top of form
(TOF). The CR command is similar to LF — both commands
are provided for your convenience.
Note: To print and advance n lines, use the number of CR
commands, or LF commands, or a combination of CR/LF and
LF/CR commands.
ESC w n Select Font
Format ESC w n
Dec 27 119 n
Hex 1B 77 A
Function Selects a Line Printer font given n, a binary, eight-bit number.
For more information, refer to Line Printer Fonts in the
Datamax-O’Neil Thermal Programming Guide.
ESC @ Reset Printer
Format ESC @
Dec 27 64
Hex 1B 40
Function Resets the printer to defaults.
7
Page 12

Datamax-O’Neil Quick Reference Programming
Using Line Printer Mode
Note: Use the following Easy Print command to return to Line Printer
mode while in Easy Print mode. {LP} is not a Line Printer command.
If you mistakenly use {LP} while in Line Printer mode, {LP} prints on
your receipt or label.
Format: {LP}
ESC Hn Heighten Font n Times
Format ESC Hn
Dec 27 72 n
Hex 1B 48 n
Function Multiplies the height of the font by n. Must apply to the entire
line.
ESC R n Select International Character Set
Format ESC R n
Dec 27 82 n
Hex 1B 52 n
Function Select international character sets.
Note: The common IBM Code page 437 with 224 characters
must be used.
0=USA4=Denmark
1= France5=Sweden
2=Germany6=Italy
3=UK 7=Spain
ESC !n Set Double Wide and Double High
Format ESC ! n
Dec 27 33 n
Hex 1B 21 n
Function Selects font height and width for one line. Must apply to
entire line.
n=10h 16d Double high
n=20h 32d Double wide
n=30h 48d Double high and double wide
8
Page 13

Datamax-O’Neil Quick Reference Programming
Using Line Printer Mode
ESC EZ Go to Easy Print Mode
Format ESC EZ
Dec 27 69 90
Hex 1B 45 5A
Function Puts the printer in Easy Print Mode. You must use uppercase
letters EZ.
T o turn ON MPCL, send the configuration request in Easy Print
{CL:EMM1} followed by {COMMIT}.
To turn ON this new exte nded CPCL, send the configuration
request in Easy Print {CL:EMZ4} followed by {COMMIT}.
ESC D n
Format ESC D n
Function Increases the darkness.
n = 0 0% n = 4 +20%
n = 1 +5% n = 5 +25%
n = 2 +10% n = 6 +30%
n = 3 +15%
ESC d n
Format ESC d n
Function Decreases the darkness.
n = 0 0% n = 3 -15%
n = 1 -5% n = 4 -20%
n = 2 -10% n = 5 -25%
ESC bn
Format ESC bn
Function Back up.
n = number of dotlines the printer s hould back up in dec
(A = 65 dot lines, d = 100 dot lines)
9
Page 14

Using Easy Print Mode
Overview
The Easy Print protocol is much more than just a printing protocol. In its most basic form,
Easy Print mode allows the user to send and execute commands. As part of the command
execution, the printer may return data to the host. In addition to printing, commands also
allow paper motion, configuring, and control of peripherals such as the magnetic and smart
card readers.
All commands begin with an opening "left curly bracket" or '{' (ASCII 0x7C) and end with a
closing "right curly bracket" or '}' (ASCII 0x7D). The commands immediately follows the
opening bracket '{'. A colon ':' separates the command from the data that follows. The
general format of any Easy Print command is: {[COMMAND] <:DATA>}.
Easy Print mode controls the printer down to a single dotline. At the printer's resolution of 8
dots per mm, or approximately 200 dots per inch, one dotline is approximately .005". Most
dimensions in Easy Print are in dotlines. For example, a simple command that allows paper to
advance or retract would be {AHEAD:200} or {BACK:50} (the command AHEAD or BACK is
followed by the number of dotlines to move paper).
COMMAND MEANING
PAPER MOVEMENT
AHEAD:nnn Advances paper by nnn dotlines X X
BACK:nnn Retracts paper bu nnn dotlines X X
S Status (returns a fixed status string) X X
SWITCH PROTOCOLS
DP Puts printer into configured default protocol X
LP Puts printer into Line Printer mode X X
ESC Synonym for LP X
EMZn Puts printer into emulation mode EMZn
(where n=1, 2, 3, etc.)
EMCn Puts printer into emulation mode EMCn
(where n=1, 2, 3, etc.)
EMPn Puts printer into emulation mode EMPn
(where n=1, 2, 3, etc.)
PRINTING
TP Prints a self-test printout (does not require
any data)
PRINT:data Prints the data received. Note that the data
must be in a particular format (see AN07
for Printing With Easy Print)
DOWNLOADING FONTS AND GRAPHICS
Easy print is used for downloading fonts and graphics. It is best to use the Windows Configuration
Program or the OPDI Suite for downloading, rather than attempt to write the code yourself. Other
application notes describe this process in detail.
CONFIGURATION
Easy Print is used to set configuration values into the printer. More detailed information is available in
other application notes.
ORIGINAL
MF2/MF3/3t/4t
XX
XX
Radio Ready
2t/3l/4t
X
X
10
Page 15

Datamax-O’Neil Quick Reference Programming
Using Easy Print Mode
You can use Easy Print mode to design custom receipts, tickets, or reports with borders,
lines, stored graphics, logos, bar codes, and text. For exampl e, you can create a receipt with
your company logo at the top, an identifying bar code in the middle, and a signature line at
the bottom. Easy Print mode also allows you to use stored graphics, thus increasing your
print speed.
You can also use Easy Print mode to create images that are missing variable data which can
be inserted when the image prints. For example, if a graphic is used multiple times on a
receipt, ticket, or report, use Easy Print mode to store the graphic in Flash memory,
minimizing the communication time between the printer and the host computer and
increasing your print speed. Depending on the size of the format and the amount of memory
available in your microFlash printer (1M or 4M), up to 100 different formats can be stored in
internal memory. Only variable data is then sent from the handheld computer to the printer.
Note: This chapter assumes a basic knowledge of computer programming and is
designed to be used by programmers, software engineers, and technicians.
To switch between Easy Print and Line Printer modes, enter ESC EZ to go to Easy
Print mode. To switch from Easy Print mode to Line Printer mode, enter {LP}.
Easy Print Commands: General Guidelines
Use the following guidelines when entering Easy Print commands:
• Easy Print commands appear as {Command:Information} where Information
indicates a set of instructions needed by the printer to carry out a command. Not all
Easy Print commands require a set of instructions to carry out a command. Some
commands, such as {LP}, contain only a few characters with no additional
instructions. T o determine if a command needs additional instructions, see the specific
Easy Print command on page 13.
• Some Easy Print commands, such as the Print command, require a complex set of
instructions to carry out a command. For more information about the Print command,
see “Easy Print: Using the Print Command” on page 16.
• If the printer is asleep, null characters must precede Easy Print or Line Printer
commands. If the printer is awake in either mode, do not precede a command with
null characters.
• Always use Easy Print mode for graphics that are used multiple times, such as a
company logo.
• Do not insert spaces in a command unless they are part of the data. For information
on the data, see “Easy Print: Using the Print Command” on page 16.
• All commands must be entered in uppercase.
11
Page 16

Datamax-O’Neil Quick Reference Programming
Using Easy Print Mode
Sample Easy Print Job
12
Page 17

Datamax-O’Neil Quick Reference Programming
Using Easy Print Mode
Easy Print Commands
Easy Print commands have a unique format and function. All but the Query class of
commands are documented on the following pages. For information on queries, refer to
Querying the Printer in the Datamax-O’Neil Thermal Programming Guide.
Note:
In this chapter, an n indicates ASCII numbers, not binary numbers. For more
information, see the specific comma nd li ste d in the following table.
The following table contains the available Easy Print commands:
Command Page
Ahead 13
Back 13
LP 13
Self-Test Printout 13
Status 13
Initial Program Load 15
Print Commands 16
Configuration 26
Ahead Command
Ahead Command Format {AHEAD:nnn}
{
AHEAD:nnn
}
A left bracket begins the command set.
AHEAD:nnn or Ahead:nnn or A:nnn advances the paper
by nnn dotlines. Use the Ahead command as an
alternative to manually advancing the paper. The range
for nnn is 1 to 65,000 dotlines.
A right bracket ends the command set.
Back Command
Back Command Format {BACK:nnn}
{
BACK:nnn
}
A left bracket begins the command set.
BACK:nnn or Back:nnn or B:nnn backs the paper by nnn
dotlines. Use the BACK command to reposition the edge of
the paper for minimum paper waste.
A right bracket ends the command set.
13
Page 18

Datamax-O’Neil Quick Reference Programming
Using Easy Print Mode
Line Printer Mode
Line Printer Mode {LP}
{
LP
}
Self-Test Printout
Self-test Printout {TP}
{
TP
}
A left bracket begins the command set.
LP puts the printer into Line Printer mode.
Note:
Do not send additional characters for 500ms (is this
the time period?) after sending this command (need more
info. Why not?)
A right bracket ends the command set.
A left bracket begins the command set.
TP commands a self-test printout.
A right bracket ends the command set.
Limited Self-test Printout {TP1}
{
TP1
}
Alternate Self-test Printout {TP:xxx}
{
xxx
}
A left bracket begins the command set.
TP1 commands a limited self-test printout.
A right bracket ends the command set.
A left bracket begins the command set.
xxx : (0 - 255)
xxx = 0 will print only the normal self-test
xxx = 001 will print the stored format named TP00 1
xxx = 002 will print the stored format named TP00 2
through xxx = 255
The type of self-test (value of xxx) is returned in the
configuration command {CF?}
A right bracket ends the command set.
Status
Status {S}
{
S
}
A left bracket begins the command set.
Returns an Easy Print status string.
A right bracket ends the command set.
14
Page 19

Datamax-O’Neil Quick Reference Programming
Using Easy Print Mode
Initial Program Load
Initial Program Load {IPL:0xAA55}
{
IPL:0xAA55
}
A left bracket begins the command set.
Erases the .BIN printer application file. This command is
used in preparation to reload a new file.
A right bracket ends the command set.
15
Page 20

Datamax-O’Neil Quick Reference Programming
Using Easy Print Mode
Easy Print: Using the Print Command
In Easy Print mode, the Print command includes all possible printer actions used to stop the
paper, rotate images, print images, and alter images. Use the following format for Print
commands:
{Print, Global Options:@row,col:Name,Field Options|data|}
{ A left bracket ({) begins the print command set.
Print, A comma (,) follows the Print command if there are additional global
options. If no additional set of instructions are specified, th e p r int
command is entered as {Print}.
Global Options: Use Global Options: to specify actions that apply to an entire receipt or
label. Follow global options with a colon (:). Do not enter spaces before
or after the colon (:). Global options may modify the entire Easy Print
command. For example, a global option can be used to stop the paper
after a specified number of dotlines or at a specified mark, to rotate an
image, or to print a specified number of copies simultaneously or on
demand. For more information, see “Print Command: Specifying Global
Options” on page 17.
@row, column: Use @row,column: to specify the row and column where each line of
text, graphics, bar codes and lines are to be printed. F ollow the row and
column information with a co l o n( :) . Do not enter spaces before or after
the colon. The range for each row is 1-65,000 dotlines. The column
range for the 2t printer and LP3 printer and microFl a sh 2 printer is
1 -384 dotlines. The column range for the microFlash 3 printer is
1 - 576 dotlines. The column range for the 4t printer is 832 dotlines.
A typical print request consists of the Print command and the number of
items to be printed, each at a different row and possibly a different
column. For text to line up correctly, the column numbers must be
identical, for example, @10,30 (Information)| and
@60,30 (Information)|. If the column numbers are too large for the
paper, or the print request skips to a row further down the paper, the
print request is rejected.
Note: In a typical print request, there may be five or more @row,col
commands for a single Print command.
Name Use Name to specify the name of the font, bar code, line, or file name of
the graphic. An example of a font name is MF102. Do not add spaces to
Name or the print request will be rejected. For more information, see
Font Names, Graphic Names, Line Names, or Bar Code Names.
Note: The Name can only be five characters long, even for user-created
graphics.
Field Options Use Field Options to increase the size of fonts, bar codes, lines, or
graphics. Each field option must be separ ated by a comma (,). For more
information, see Font Field Options, Bar Code Field Options, or Graphic
Field Options.
|Data| Use |Data| to specify the text printed on a receipt or label, or to specify
characters that can be read by a scanner. Vertical bars (|) surround the
data.
} A right bracket (}) ends the print request.
16
Page 21

Datamax-O’Neil Quick Reference Programming
Using Easy Print Mode
Print Command: Guidelines
• Use the correct terms for global and field options (for example, QSTOPn or WIDEn
where n indicates a number in the range). If a global or field option is entered
incorrectly, the print request is rejected.
global or field option on the following pages.
•
A single print command can be used for multiple print lines; therefore, you do not need to
enter Print each time another line of text is printed.
Print Command: Specifying Global Options
The following global options are available for the Print command:
BACKnnn Back Global Option
Format
Function
Example
BACKnnn (1<nnn<200)
Backs the paper up nnn dotlines before printing.
{PRINT,BACK50:@10,30:MF107 |Hi wor ld|}
For more information, see the appropriate
QSTOPnnn Qstop Global Option
Format
Function
Example
ROTxxx Rotate Global Option
Format
Function
Example
QSTOPnnn (1<nnn<65000) (microFlash 2/3/2t)
Stops nnn dotlines after sensing the Q mark. When the Q mark is found,
the paper advances by nnn dotlines and stops, even if the image is not yet
complete. If the Q mark is not found, the printer continues to advance;
therefore, use the STOP option when stop conditions are larger than the
desired image. The value of nnn ranges from 1 to 65,535 dotlines .
QSTOP Bnnn - QMark bottom
QSTOP Tnnn - QMark top
QSTOP Gnnn - QMark gap
QSTOP N - Ignore QMark
The commands notes above override label and sensor congiuration
settings in the printer.
Note:
positioned below the sensor. For more information, refer to Specifications
in the
{PRINT,QSTOP500:@10,30:MF107|Hi world|}
ROT270, ROT180 , R OT090
Rotates the image with the left edge of the image printing first either 270,
180, or 90 degrees.
{PRINT,ROT270:@10,30:MF107|Hi world|}
When the paper is properly aligned, the Q mark cannot be
Datamax-O’Neil Thermal Programming Guide
.
17
Page 22

Datamax-O’Neil Quick Reference Programming
Using Easy Print Mode
STOPnnn Stop Global Option
Format
Function
STOPnnn (1<nnn<65000)
Advances the paper to the proper point for tearing. This option stops the
paper nnn dotlines (.005”/dotline or 200 dotlines/inch) after the
beginning of the label or receipt. The data nnn is sent after the STOP
option specifies the total number of dotlines hig h for the image. For
example, for the microFlash series of printers (which have a 203dpi
mechanism), specifying STOP500 gives a 2.5" total height image from the
top of the paper to where it stops under the prin thead.
If the paper has advanced nnn dotlines and the printed part of the image
is not yet complete, the image is truncated. If the printed part of the
image is complete, white space is added to the bottom until nnn dotlines
have advanced. The value of nnn ranges from 1 to 65,535 dotlines.
Example
COLx y
Format
Function
Example
The STOP option can also be used with the QSTOP option. Specify the
STOP to stop the printing just after the stop using the QSTOP option. This
ensures the paper stops advancing whether paper with Q marks is loaded,
or regular paper is loaded.
{PRINT,STOP500,QSTOP125
:@10,30:MF107|Hi world|
}
In this example, the paper stops advancing when it has advanced 500
dotlines, or 125 dotlines after the Q mark is detected, whichever occurs
first.
COLx y
Creates a variable COLx (where 0<=x<=9) with the value of y (y may
have any legal value). Whenever COLx is specif ied in a field (e.g. @ROW,
COLx), the COLx is replaced with the value given in y.
18
Page 23

Datamax-O’Neil Quick Reference Programming
Using Easy Print Mode
COLOFFSET x
Format
Function
COLOFFSET x
Will shift the entire image to the right by x dots if x is posi tive or to the
left by x dots if x is negative (regardless of value, any given field cannot
shift left beyond zero and the resulting image is undefined). The default
value is zero.
LEFT — Will use the value specified in COL (@ROW,COL:...) as the left
hand edge of the field. This is the default value.
CENTER — Will center the field at the value given for the COl (e.g. 1/2 of
the image will be printed to the LEFT of the value given for COL and 1/2 of
the image will be printed to the RIGHT of the value given for COL. If the
resulting field will start to the left of the origi n, the results are undefined.
RIGHT — Will use the value specified in COL as the right hand edge of the
field. If the resulting field will start to the left of the origin, the results are
undefined.
Example
The column can be given an explicit dot column number:
++ — will cause the field to start at the next available dot column after
the previous field ends.
+x — will cause the field to start at x dot rows past the start of the
previous field.
COLx (0<=x<=9) — will use the value given for the variable name
COLx in the global parameter.
19
Page 24

Datamax-O’Neil Quick Reference Programming
Using Easy Print Mode
ROWOFFSET x
Format
Function
Example
ROWOFFSET x
Will shift the entire image down by x dots if x is positive or up by x dots if
x is negative (regardless of value, any given field cannot shift left beyond
zero and the resulting image is undefined). The def aul t value is zero.
The row can be given an explicit dot row number:
++ — will cause the field to start at the next avai lable dot row after the
previous field ends.
+x — will cause the field to start at x dotlines past the start of the
previous field.
20
Page 25

Datamax-O’Neil Quick Reference Programming
Using Easy Print Mode
Print Command: Customizing Fonts
Font Names
{Print, Global Options:@row,column:NAME,Field Options|data|}
Use the following options to customize fonts. Each font has a five-character name. The
following is a partial list of font names. For a list of all available fonts, call your Datamax-
O’Neil representative at (949) 458-0500.
Font
Name
MF055 5.5 96 characters, large block (26 characters for lowercase, 26
MF072 7.5 96 characters, large block
MF102 10.2 223 characters, medium block, bold
MF107 10.7 96 characters, block, bold
MF185 18.5 96 characters, block, normal
MF204 20.4 224 characters, block, normal (default font for microFlash 2/3/2t)
MF226 22.6 97 characters, small block
microFlash 2i Only
Font
Name
IM5X7 22.1 96 characters for impact 5x7
IM5X8 22.1 96 characters for impact 5x8
CPI Description
characters for uppercase, plus symbols, etc.)
CPI Description
Font Field Options
{Print, Global Options:@row,column:Name,FIELD OPTIONS|data|}
Use the following options to heighten or widen the font:
Field
Option
HMULTn HMn Widens text: 1<n<255
VMULTn Vn Heightens text: 1<n<255
Abbr. Description
Note:
To compare the available fonts, run the demo program and print the samples.
21
Page 26
Datamax-O’Neil Quick Reference Programming
Using Easy Print Mode
Print Command: Customizing Bar Codes
Bar Code Names
{Print, Global Options:@row,column:NAME,Field Options|data|}
Use the following options to customize a bar code:
Name Description Requirements for Data
BC39N Code 39
2:1 ratio
BC39W Code 39
3:1 ratio
COBAR Codabar 0-9 - $:/.a b c d. You must send leading and trailing guard b ar
I2of5 Int (?) 2 of 5
2.5:1 ratio
BCI25 Int. (?) 2 of 5
2:1 ratio
BC128 Code 128 Automatically selects codes A-C for the shortest bar code.
EN128 EAN-128 Uses codes C for the shortest bar code. Allows all ASCII
UPC-A UPC-A 0-9 (Must have 11 digits or error. Controller calculates check
EAN08 EAN-8 0-9 (Must have seven digits or error. Controller calculates
EAN13 EAN-13 0-9 (Must have 12 digits or error. Controller calculates check
PD417 PDF-417 For more information, see ___.
PLESY PLESY If the mod11 check digit evaluates to 10, no check digit is
Use the following characters in the data field:
Space $ % + . / 0-9 A-Z
Auto inserts leading and trailing asterisk (*).
Use the following characters in the data field:
Space $ % + . / 0-9 A-Z
Auto inserts leading and trailing asterisk (*).
a-d.
0-9 (Digits only, must be even. Controller inserts leading zero
to ensure an even number of digits.)
0-9 (Digits only, must be even. Controller inserts leading zero
to ensure an even number of digits.)
Allows all ASCII characters.
characters.
digit.) If HR is set as a field parameter, then the human
readable is embedded into the bar code at the bottom (similar
to commercial products bar codes).
check digit.)
digit.)
added.
MOD10 will add one Modulo 10 check digit (default if nothing
is specified).
MOD1010 will add two Modulo 10 check digits.
MOD1110 will add one Modulo 11 check digit, followed by one
Modulo 10 check digit.
22
Page 27

Datamax-O’Neil Quick Reference Programming
Using Easy Print Mode
Bar Code Field Options
{Print, Global Options:@row,column:Name,FIELD OPTIONS|data|}
Field
Option
HIGHn Hnn Changes the height of the bar code in five dot-inch intervals.
WIDEn Wnn Width multiplier of the bar code. Default is one; If W=2, W is
Abbreviation Description
The default is five dots; 1<
twice as wide (1/2 density) as W=1; 1<
n<255.
n<255.
Using PDF-417 Symbols
You can print any characters using Datamax-O’Neil PDF-417 symbols. PDF-417 symbols are
optimized for printing a mixture of numbers, text, and control characters.
To use PDF-417 as a standard bar code:
1
Enter Easy Print Mode using ESC+EZ.
2
Select the barcode using the name PD417.
3
Enter data between vertical bars (|). If the data is long, do not enter a carriage return
and/or line feed unless you want CR/LF to appear in the bar code
The following PDF-417 field parameters can be specified:
COLUMNS Specifies the number of columns of data printed in each row of the bar code.
If a column is not specified, the default value of 2 data columns is used . The
actual columns used is 4 greater than data columns. (2 for gard columns
and 2 for row indicator columns).
SECURITY Specifies the level of error detection and correction codes, from 1 through 8.
If not specified, the following default values for the number of data
characters to be printed is used:
1-40 characters
40-160 characters
161-320 characters
321-863 characters
YDIM Specifies the height of each element, in units of .005 inches. The default
height is 1.
WDIM Specifies the width of each element, in units of .005 inches. The default
width is 1.
Level 2
Level 3
Level 4
Level 5
Use the following guidelines when entering PDF-417 symbols:
• A maximum of 1848 text characters (fewer if mixed with arbitrary bytes)
• A minimum of 3 rows and a maximum of 30 rows
• A minimum of 1 column and a maximum of 30 columns
• Error detection and correction characters vary with different security levels:
Level 1 adds 4 codewords
Level 2 adds 8 codewords
Level 3 adds 16 codewords
Level 4 adds 32 codewords
23
Page 28

Datamax-O’Neil Quick Reference Programming
Using Easy Print Mode
Level 5 adds 64 codewords
Level 6 adds 128 codewords
Level 7 adds 256 codewords
Level 8 adds 512 codewords
Using PDF4-17 Example
{PRINT:
@75,10:PD417,YDIM 6,XDIM 2,COLUMNS 2, SECURITY 3|ABCDEFGHIJKL|}
Explanation: Prints a PDF-417 bar code containing ABCDEFGHIJKL with each element .010"
wide and .030" high; each row contains 2 data bytes and uses an error detection and
correction level of 3, which adds 16 error correction code words to the bar code.
Stored Formats
{PRINTFORMAT,FNAME[:LISTofVARIABLES]}
EXAMPLE: Begin with the following Easy Print job:
[ESC]EZ{PRINT,QUANTITY2:
@160,0:MF107,VMULT 3,HMULT 3|FORMAT TEST|
@260,0:MF107|09/03/03 01:52 PM |
@360,0:MF185|Ticket #:|
@360,0:MF107| TT-123456789|
@385,0:MF185|Permit:|
@385,0:MF107| AB-1234567|
}
1
CREATE THE FORMAT TO STORE: Replace the data in the fields that need to change to a
variable name beginning with "&":
[ESC]EZ{PRINT,QUANTITY2:
@160,0:MF107,VMULT 3,HMULT 3|&field1|
@260,0:MF107|&date time|
@360,0:MF185|Ticket #:|
@360,0:MF107|&ticket number|
@385,0:MF185|Permit:|
@385,0:MF107|&permit number|
}
2
STORE THE FORMAT using the Datamax-O’Neil tools, such as the Windows Configuration
Program MFLASH. In this example, we will use the format name FTEST.
3
PRINT THE FORMAT: Send the following string to the printer to print the for m at. The
resulting image should look the same as when the original format with data first shown in
the example was printed.
[ESC]EZ{PRINTFORMAT,FTEST:
&field1=|FORMAT TEST|
&date time =|09/03/03 01:52 PM|
&ticket number= | TT-123456789|
&permit number = | AB-1234567|
}
24
Page 29

Datamax-O’Neil Quick Reference Programming
Using Easy Print Mode
Print Command: Customizing Graphic Names
Graphic Names
{Print, Global Options:@row,column:NAME,Field Options|data|}
Function
Example 1
Example 2
Prints a stored graphic.
{PRINT:@10,30:ALOGO|}
Prints the logo stored under the five-character name (ALOGO), or a
single character name.
{PRINT:@10,30:ALOGO,HMULT2, VMULT2|}
Doubles the size of the logo.
Graphic Field Options
{Print, Global Options:@row,column:Name,FIELD OPTIONS|data|}
Use the following options to heighten or widen graphics:
Field
Option
HMULTn HMn Multiplies the width of the graphic by n.
VMULTn VMn Multiplies the height of the graphic by n.
Abbreviation Description
Print Command: Customizing Line Names
Line Names
{Print, Global Options:@row,column:NAME,Field Options|data|}
Format 1
Format 2
Function
Example 1
Example 2
Abbreviation Name Description
T HLINE Horizontal line.
V VLINE Vertical line.
L Lengthnnn Sets line length.
T Thicknnn Sets line thickness.
Hline, length nnn, thick n
Vline, length nnn, thick n
Horizontal and vertical lines can be drawn around text or graphics.
{PRINT: @60,30:HLINE, length 200, thick 2|}
Prints a horizontal line 200 dotlines long and 2 dotlines thick.
{PRINT:@60,30:VLINE, length 50, thick2|}
Prints a vertical line 50 dotlines long and 2 dotlines thick. There is
only one vertical bar (|) because there is no data to enclose.
25
Page 30

Datamax-O’Neil Quick Reference Programming
Using Easy Print Mode
Easy Print: Using Configuration Commands
Configuration commands are either in two-letter or three-letter formats. One or several two
letter commands can be sent to the printer but are not written to Flash memory and do not
take effect until a {COMMIT} command is sent. When the printer receives the {COMMIT}
command, the values received are written to Flash and the printer restarts. Each two-letter
command changes one parameter.
Most three-letter commands permit several parameters to be changed at once, although
some only accept data. If several parameters can be changed with one command, one or two
letters indicating the parameter are separated from the data for that parameter by a colon
":". Parameter and/or data pairs are separated with a semicolon. When the printer receives a
three letter command, it writes the values to Flash and restarts the printer. To prevent the
printer from resetting after each three letter configuration command, some printer families
allow you to send the NORESET command {NORESET} before sending configuration
commands. After issuing the NORESET command and configuring the printer, send the
COMMIT command {COMMIT} to write to Flash and res tart th e printer.
Note: Configuration data is stored separately from the main printer
application's binary program; therefore, all configuration data remains intact
after the firmware is updated.
In earlier versions of the software, the structure of the configuration data was modified;
therefore, if you are updating to those earlier versions, your configuration data will be lost.
Creating Configuration Command Files
You can create files that can be sent to the printer for the following commands using DOS
Edit or Notepad. Each of these commands are preceded by <ESC>EZ (1B455Ah). Two
character commands must be followed by {COMMIT}; three character commands are
immediate commands and do not need the {COMMIT}.
The commands on the following pages can be used to configure specific parameters.
Two-Letter Configuration Commands
Auto White Space Advance {CA:n} Original
MF2, MF3, 2t, 4t
{
CA:n
}
A left bracket begins the command set.
n=y or Y : Speed up over white space
n=n or N : Do not speed up over white
space.
Note: If there is nothing to print, the Auto
White Space Advance command speeds
the paper feed.
A right bracket ends the command set.
X
(Default N)
Radio Ready
2t, 3l, 4t
X
(Default Y)
26
Page 31

Datamax-O’Neil Quick Reference Programming
Using Easy Print Mode
Configure Baud Rate {CB:nn} Original
MF2, MF3, 2t, 4t
{
CB:nn
}
Configure Print Darkness {CD:nn} Original
{
CD:nn
A left bracket begins the command set.
Configures the baud rate. Use the
following values to specify the baud rate:
nn=00: 1200 BAUD
nn=01: 2400 BAUD
nn=02: 4800 BAUD
nn=03: 9600 BAUD (default)
nn=04: 19.2K BAUD
nn=05: 38.4 BAUD
nn=06: 57.6 BAUD
nn=07: 115.2K BAUD
nn=08: 230.4K BAUD
nn=09: 460.8K BAUD
nn=10: 921.6K BAUD (not guaranteed)
A right bracket ends the command set.
A left bracket begins the command set.
Configures print darkness (aka burn
adjust). The value of nn is normal plain
paper.
X (MF2/MF3)
X
X (MF2/MF3)
X
X (MF2/MF3)
X
MF2, MF3, 2t, 4t
Radio Ready
2t, 3l, 4t
X
X
X
X
X
X
X
X
Radio Ready
2t, 3l, 4t
nn=-25: -25% (for very sensitive stock)
nn=-20: -20%
nn=-15: -15%
nn =-10:-10%
nn =-05:-5%
nn = 00: 00 (default - for "regular" stock)
nn = 05:+5%
nn = 10: +10%
nn = 15:+15%
nn = 20: +20%
nn = 25: +25%
nn = 30: +30%
nn = 35: +35% (for high temp stock)
}
A right bracket ends the command set.
X X
27
Page 32

Datamax-O’Neil Quick Reference Programming
Using Easy Print Mode
Configure Battery Eliminator {CE:n} Original
MF2, MF3, 2t, 4t
{
CE:n
}
Form Feed Active {CF:n} Original
{
CF:n
}
Configure Charger Beep {CG:n} Original
{
CG:n
A left bracket begins the command set.
n = y or Y: Battery eliminator is present.
n = n or N: None (default)
Note: The battery eliminator can be used
to power the printer from a wall charger.
A right bracket ends the command set.
A left bracket begins the command set.
n= y or Y: Act on form feed.
n = n or N: Ignore from feed (default)
Note: The form feed character (12
decimal or 0C Hex) can be configured to
be ignored.
A right bracket ends the command set.
A left bracket begins the command set.
The printer can be configured to beep
when first connected.
X
(4t printers only)X(4t printers only)
MF2, MF3, 2t, 4t
X
Always On
MF2, MF3, 2t, 4t
Radio Ready
2t, 3l, 4t
Radio Ready
2t, 3l, 4t
X
Radio Ready
2t, 3l, 4t
N = y or Y: Beep
N = n or N: Do not beep (default)
}
Configure RS-232 Handshaking {CH:n} Original
{
CH:n
}
A right bracket ends the command set.
MF2, MF3, 2t, 4t
A left bracket begins the command set.
n = N : No handshaking
n = H : Hardware handshaking
n = S : Software handshaking
n = B : Both H/W and S/W (default)
A right bracket ends the command set.
X X
X X
Radio Ready
2t, 3l, 4t
28
Page 33

Datamax-O’Neil Quick Reference Programming
Using Easy Print Mode
Job Status Reporting in Easy Print Mode{CJ:n} Original
MF2, MF3, 2t, 4t
{
CJ:n
}
Configure Default Protocol {CL:nnn} Original
{
CL:nnn
}
A left bracket begins the command set.
n = y or Y : Job Status Report ON
n = n or N : Job Status Report OFF (def)
Note: The Job Status report issues a
message via whatever communications
medium was used to send the job can
show successful job completion or if
there was a problem such as paper out.
A right bracket ends the command set.
A left bracket begins the command set.
Changes the default protocol to one of
the following:
ESC :Line Printer Mode (default)
EZ : Easy Print Mode
EMC1 : Custom 1
EMC2 : Custom 2
EMC3 : Custom 3
EMP1 : PGL
EMZ1 : CPCL
EMZ2 : Cog
EMZ3 : ZPL
A right bracket ends the command set.
X X
MF2, MF3, 2t, 4t
X X
Radio Ready
2t, 3l, 4t
Radio Ready
2t, 3l, 4t
Emulation Mode <esc>CL{mode}{COMMIT} Original
MF2, MF3, 2t, 4t
{
mode
}
A left bracket begins the command set.
Changes the default protocol to one of
the following:
EMZ1 : CPCL
EMZ2 : Cognitive
EMZ3 : ZPL (Fastenal)
EMZ4 : CPCL_01 (shift 12 dots to left)
EMC1 : Vanguard (Alamo/National)
EMC2 : Target
EMC3 : Thrifty / Dollar
EMC4 : Place Holder
EMM1 : PCL (MPCL) (Monarch)
A right bracket ends the command set.
29
X X
Radio Ready
2t, 3l, 4t
Page 34

Datamax-O’Neil Quick Reference Programming
Using Easy Print Mode
Set Test Print {TP:n} Original
MF2, MF3, 2t, 4t
{
TP:n
}
Configure Paper Out Beep {CU:n} Original
{
CU:n
A left bracket begins the command set.
Sets test print.
n = 0 : Normal self test (default)
n = 1 : Special MAC address label
Note: When n is not zero, a special selftest label is printed. After a special label
is printed, performing another self-test
within 10 seconds prints the normal self
test.
A right bracket ends the command set.
MF2, MF3, 2t, 4t
A left bracket begins the command set.
Sets the printer to continuously remind
the user that the paper needs to be
changed. Beep repetitions stop when
printer goes to sleep. Configures the
paper out beep as follows:
Radio Ready
2t, 3l, 4t
X X
Radio Ready
2t, 3l, 4t
X X
n = 0 : One Beep (default)
n = 1 : Five Beeps
n = 2 : Five Beeps repeated every 15s
n = 3 : Five Beeps repeated every 30s
n = 4 : Five Beeps repeated every 60s
}
A right bracket ends the command set.
RF Radio Power Down Timeout {CR:nn} Original
MF2, MF3, 2t, 4t
{
CR:nn
A left bracket begins the command set.
This command turns off the radio if there
is no activity in nnn minutes; it requires
the user to turn the radio back on via
button push before communications can
X X
resume.
nnn in minutes
nnn = 65536: Never times out (default)
}
A right bracket ends the command set.
Radio Ready
2t, 3l, 4t
30
Page 35

Datamax-O’Neil Quick Reference Programming
Using Easy Print Mode
System Timeout (Printer Sleep Timer) {CT:nn} Original
MF2, MF3, 2t, 4t
{
CT:nn
}
Configure Number of Data Bits {CN:n}
{
CN:n
}
Configure Parity {CP:n}
{
CP:n
}
A left bracket begins the command set.
nnn in seconds (default 10s to 60s)
nnn = 9999: Never times out.
Note: If there is no activity
(communications or button pushes)
within the specified time, the printer wi ll
"go to sleep" to save power. A button
push or new communications will wake
up the printer.
A right bracket ends the command set.
A left bracket begins the command set.
Configures the number of data bits where n indicates seven or eight
data bits.
A right bracket ends the command set.
A left bracket begins the command set.
Configures the parity:
N = No parity
E = Even parity
O = Odd parity
A right bracket ends the command set.
X X
Radio Ready
2t, 3l, 4t
Configure Carriage Return {CC:n}
{
CC:n
}
Configure Beeper {CS:n} (version 5.21, 6.21, and later only)
{
CS:n
}
A left bracket begins the command set.
Configures the carriage return to automatically add LF (line feed) to
CR (carriage return) as follows:
CR - CR
Y - CR=CRLF (For PK printers only)
A right bracket ends the command set.
A left bracket begins the command set.
Configures the beeper on or off:
Y = Beeper on
N = Beeper off
A right bracket ends the command set.
31
Page 36

Datamax-O’Neil Quick Reference Programming
Using Easy Print Mode
Three-Letter Configuration Commands
TCP/IP 802.llb and Bluetooth Wireless configurations. Versions 5.13 and 6.13 and later only:
Configure Default Values {CDV}
{
CDV
}
Restore Default Values {RDV}
{
RDV
}
A left bracket begins the command set.
Reverts to non user-specific default v alues at time of manufacture for
configuration parameters.
A right bracket ends the command set.
A left bracket begins the command set.
Restores all configuration parameters to those stored by the SDV
command.
A right bracket ends the command set.
Stores Default Values {SDV}
{
SDV
}
A left bracket begins the command set.
Stores an image of the current parameter values in separate area of
Flash. See RDV to restore the parameters to those values stored by
SDV.
A right bracket ends the command set.
32
Page 37

Datamax-O’Neil Quick Reference Programming
Using Easy Print Mode
Configure 802.11b/TCP/IP {CTC:n}
{
CTC:n
A left bracket begins the command set.
Configures 802.11b/TCP/IP as follows:
I:<data>
nnn.nnn.nnn.nnn. For example, {CTC:I:192.168.2.99} configures the
printer's IP address to 192.168.2.99. The default IP Address is
192.168.2.99.
M:<data>
nnn.nnn.nnn.nnn. The default mask is 255.255.255.255.
G:<data>
enter up to 32 characters.
E:<data>
ASCII format. For example, {CTC:E:WirelessNetwork}. The default
gateway is Wireless Printer. You can enter up to 32 characters.
NA:n -
LH: Password.
P:<data>
515.
T:<data>
P = Infrastructure (access point).
S:<data>
bit; 13=128-bit.
K1:<data>
ten characters (0-9, A-F), five characters are sent, then the key is
used as a 40-bit encryption key. If 16 characters (0-9, A-F), 13
characters are sent, then the key is used as a 128-bit encryption key
(the other 24-bits are filled by the firmware). The default is no key.
K2:<data>
K3:<data>
K3:<data>
K:<data>
one.
W:n
Q:n
- IP Address. The IP Address is sent in ASCII format as
- Mask. The mask is sent in ASCII format as
- Gateway. The gateway is sent in ASCII format. You can
- ESSID (Extended Service Set ID). The ESSID is sent in
n:0 = No LEAP; n:1 = LEAP. If NA:1 the use LU: User_Name;
- Port. Specifies the port use for printing. The default is
- T ype of network. n = Network type; H = AdHoc (default);
- Security. n = Level; 0 = None (open), default; 5 = 40-
- Key 1. If the field is empty, then the key is erased. If
- Same as key one.
- Same as key one.
- Same as key one.
- Specify key one, two, three, or four. The default is key
- n=1 Full encryption; n=2 No encryption.
- Y=Signal quality on; N=Signal quality off .
Note:
TCP/IP and 802.11b wire less printing defaults must be changed
to match the final, installed, environment.
Example:
131415161718191A1B1C;K:1} sets the IP address, ESSID, and
network type. The security, key, and key usage are set in one
command.
}
A right bracket ends the command set.
{CTC:I:192.168.2.150;E:MyWireless;T:H;S:13;K1:101112
33
Page 38

Datamax-O’Neil Quick Reference Programming
Using Easy Print Mode
Configure Bluetooth {CBT:n} Original
MF2, MF3, 2t, 4t
{
CBT:n
}
A left bracket begins the command set.
Configures Bluetooth as follows:
A:<string>
n = Y: Required; n = N: Not required
B:n
- Bondable.
n = Y: Bondable; n = N: Not bonadable
C:n
- Connectable.
n = Y: Connectable; n = N: Not connectable
D:n
- Discoverable.
n = Y: Discoverble; n = N: Not discoverable
E:n
- Encryption turned on.
n = Y: Encrypt data; n = N: No encryption
F:n
- Friendly name where <data> indicates
the friendly/device name. For example,
{CBT:F:MyPrinter} configures the Bluetooth
friendly name to MyPrinter. You can enter up
to 32 ASCII characters.
I:nnn
disconnects if there is no Bluetooth traffic in
nnn seconds.
nnn in seconds
default = 180 seconds
minimum = 60 seconds
P:<string>
Note: Some devices with limited keyboard
require a numeric passkey.
Enter up to 16 ASCII characters. The default
passkey is passkey.
S:<string>
characters maximum. Default varies by
printer type.
W: nn
nn in seconds. Default is zero (no check).
Recommended value is 55 seconds. Legacy:
used with older modules only.
A right bracket ends the command set.
- Authentication required.
- Inactivity timeout. Bluetooth
- Specify the passkey.
- Service name. 32 ASCII
- Watchdog timer to check module.
Radio Ready
2t, 3l, 4t
X
X
X
X
X
X
X
X
X
X
34
Page 39

Datamax-O’Neil Quick Reference Programming
Using Easy Print Mode
Configure CardReader {CCR:nnn} Original
MF2, MF3, 2t, 4t
{
CCR:nnn
}
A left bracket begins the command set.
The CCR command requires data only to
configure the general way the card reader
uses the LED indicators when reading a card.
Use the following information:
nnn = HOST: The host needs to control the
LEDs be sending the appropriate commands
to turn the red and green LEDs off, on, or to
flashing.
nnn = AUTO: The printer controls the LEDs
and beeper. All tracks enabled must read
“good” to get the green LED and two beeps
indicating a good read.
nnn = AUTO1: The printer contr ols the LEDS
and beeper. Any one track must read “good”
to obtain the green LED and two beeps
indicating a good read.
A right bracket ends the command set.
X
Radio Ready
2t, 3l, 4t
35
Page 40

Datamax-O’Neil Quick Reference Programming
Using Easy Print Mode
Configure Infrared Protocol {CIP:nnn} Original
MF2, MF3, 2t, 4t
{
CIP:nnn
A left bracket begins the command set.
Overview: The CIP command selects which
protocol is to be used for Infrared
communications. IrDA is a bidirectional
communications protocol. All others are
unidirectional unless noted as 2W AY.
nnn selects which protocol is to be used for
infrared as follows:
OFF = No infrared communications
IRDA = IrDA protocol
ASK = ASK (Amplitude Shift Keying)
ASK-CRC = ASK with CRC protocol
ASK-CRC-2W = Bidirectional ASK with CRC
DIRECT = DIRECT (IR on/off to send)
DIRECT-CRC = Direct with CRC protocol
DIRECT-CRC-2W = bidirectional DIRECTCRC.
PULSE - PULSE (IR with IrDA modulation
only)
PULSE-CRC = Pulse with CRC protocol
PULSE-CRC-2W = bidirection PULSE-CRC
Note: The CRC protocol appends a HEADER
and TRAILER onto the DATA as follows:
X
Radio Ready
2t, 3l, 4t
HEADER FORMAT:
BYTE #1 = STX (0x02)
BYTE #2 = LSB of Byte Count
BYTE #3 = MSB of Byte Count
TRAILER FORMAT:
BYTE #1 = ETX (0x03)
BYTE #2 = LSB of CRC
BYTE #3 = MSB of CRC
The CRC is a CRC-16 calculation. First byte
in the calculation is the LSB of the Byte
Count and the last byte in the calculation is
the ETX. If the CRC calculated by the
printer does not match the one sent, or if
the printer does not receive the full
transmission after it receives the opening
STX, the printer will beep. If the
transmission is received completely and
the CRCs match, the printer will print the
data.
}
A right bracket ends the command set.
36
Page 41

Datamax-O’Neil Quick Reference Programming
Using Easy Print Mode
Configure IrDA Baud Name {CIN:string} Original
MF2, MF3, 2t, 4t
{
CIN:string
}
Configure IrDA Autovoid {CIV:n} Original
{
CIV:n
A left bracket begins the command set.
Overview: The CIN command requires data
only to configure the name given to the
printer when it connects to an IrDA host.
string: Can be a maximum of 19
characters.
A right bracket ends the command set.
A left bracket begins the command set.
Overview: The CIV command can be
used to turn autovoid on or off (default
is on). If an IrDA connection is made
and the printer times out before it
receives a disconnect from the host, it
assumes that all data has not been
transferred and will automatically print
VOID ** VOID ** VOID across the
printed page as a safeguard to assure
the proper document has printed
completely.
X
MF2, MF3, 2t, 4t
X
Radio Ready
2t, 3l, 4t
Radio Ready
2t, 3l, 4t
n is used to turn AutoVoid on or off:
n = Y : AutoVoid ON
n = N : AutoVoid OFF
}
A right bracket ends the command set.
37
Page 42

Datamax-O’Neil Quick Reference Programming
Using Easy Print Mode
Configure Label Parameters {CLP:nn} Values/
Format
{
CLP:nn
A left bracket begins the command set.
Use the following information to specify
the parameters:
B:nn - Back up distance at the
beginning of every Easy Print job.
D:nn - Distance to advance after the
QMark (or gap) is detected before
stopping at the end of the label.
Note: Setting this parameter enables
automatic QMark alignment when the
feed button is pressed.
M:nn - Maximum distance to advance
stock if QMark or gap is not detected
P:n - Presenter should be used (holds
off subsequent print jobs until printed
image is removed). Requires
re-threading of label stock.
S:n - Sensor used for paper out. T = Top or Front
T:n - Type of paper used by default.
Note: Default is P for Plain Paper. If B is
selected, the paper out sensor moves
to T. If T is selected, the paper out
sensor moves to B. This can be
overridden by including the S
parameter
CLP command.
U:nnn - Specifies how long the printer
remains awake if a printed image is left
in the presenter. This can be used to
extend the normal timeout - the printer
uses the longer of the system timeout
or the Under Presenter timeout
after
the T parameter in the
nn in dotlines
(.005 inches)
Deafult is 0 (off)
nn in dotlines
(.005 inches)
Default is 0 (off)
nn in dotlines
(.005 inches)
Default is 2400
or 12 inches
n=Y: Presenter
is on
n=N: Presenter
is off (default is
off)
sensor
B = Bottom or
back sensor
(default is back)
P
= Plain Paper
G
= Interlabel
Gap
T
= Top/Front
Qmark
B
= Bottom/
Back Qmark
nnn in seconds
(default is 0)
Original
MF2, MF3,
2t, 4t
Radio
Ready
2t, 3l, 4t
X
X
X
X
(LP3 only)
X
(LP3 only)
X
38
Page 43

Datamax-O’Neil Quick Reference Programming
Using Easy Print Mode
Configure Label Parameters {CLP:nn} Values/
Format
W:n - Use QMark stock with Windows
driver.
Note: If turned ON, the printer
automatically looks for the QMark at
end of Windows Driver (RLE) print job.
n = Y : On (Look
for QMark)
n = N : Off (Do
not look for
QMark)
Default is OFF
WB:Y - A backup automatically occurs
when the printer receives an RLE
Y = On
N = Off
image.
QW:n - Turns a white QMARK on. n = Y : On
n = N : Off
n = P : turns ON
the white QMark
and turns OFF
the paper out
detection
}
A right bracket ends the command set.
Configure Magnetic CardReader {CMR:m} Values/
Format
Original
MF2, MF3,
2t, 4t
Original 2t, 4t
Radio
Ready
2t, 3l, 4t
X
X
X
Radio
Ready
2t,4t
{
CMR:m
A left bracket begins the command
set.
D:m - Direction card is moving when
read.
P:m - Automatically prints data when
card is inserted
S:m - Automatically sends string of
data when card is inserted
T1:m - Enables or disables magnetic
card track 1.
m = IN : read
on insert
m = OUT : on
withdrawal
m = BOTH : in
and with.
m = ON : print
enabled
m = OFF : print
disabled
m = ON : send
data
m = OFF : send
data
m = ON :
enable track 1
m = OFF :
disable track 1
CR SCR
X
X X X
X X X
X X X
SCR
39
Page 44

Datamax-O’Neil Quick Reference Programming
Using Easy Print Mode
Configure Magnetic CardReader {CMR:m} Values/
Format
T2:m - Enables or disables magnetic
card track 2.
T3:m - Enables or disables magnetic
card track 3.
}
Commit {COMMIT}
{
COMMIT
}
A right bracket ends the command
set.
A left bracket begins the command set.
Use the commit command to send two-letter configuration
commands to the printer. When the commit command is sent, the
configuration commands are written to Flash memory and the
printer restarts. When the printer restar ts, it uses the default
configuration, (typically Line Printer mode). To pe rfor m ad di tional
configurations, enter Easy Print mode and enter additional
commands.
A right bracket ends the command set.
m = ON :
enable track 2
m = OFF :
disable track 2
m = ON :
enable track 3
m = OFF :
disable track 3
Original 2t, 4t
CR SCR
X X X
X X X
Radio
Ready
2t,4t
SCR
40
Page 45
Querying the Printer
Overview
The printer can return a lot of information to the host. It can give some status of its current
state as well as the current configuration. This is all done through a series of query
commands that can be issued to the printer. Not all queries are available in all printers, and
some queries are available in later versions of printer firmware; however, all queries are of
the same form and contain 6 bytes (0x1b, "{" or 0x7b, TWO LETTER QUERY, "?" or 0x3f, and
"}" or 0x7d):
ESC {<TWO LETTER QUERY>?}
Sending Queries
Queries can be sent to the printer using the infrared link or the RS-232 data link. The
printer's reply to a query returns information about the printer or the print request.
Interpreting Query Replies
Replies to queries are enclosed in left ({) and right (}) brack ets. The unique two-letter query
command is returned followed by an exclamation mark (!) and data. Data is returned as a list
of parameters. Each parameter contains identifiers, followed by a colon (:), followed by the
data. Each parameter is separated from the next by a semicolon (;). For download queries
such as the Fonts query and the Graphics query, information for each download contains a
series of parameters, each of those par ameters/data sets are separated by a comma (,) and
each download is separated by a semicolon (;).
Tip:
The order in which the query replies are returned changes. When interpreting
query replies, search a specific query char acter within the query reply. The tables on
the following pages document query commands and the query-specific replies. Use
the tables on the following pages as a guideline when entering and interpreting
queries.
Query Formats
Query Format: ESC {Query?}
Reply Format: {Query!Query1:Reply1;...QueryN:ReplyN}
Function: The word Query in the query format specified above is
replaced by a specific command. For example, {BT?} is
a query designed to return information about the
printer's battery.
All queries are based on the above format. For information on specific queries, see “Query
Commands” on page 42.
41
Page 46

Datamax-O’Neil Quick Reference Programming
Querying the Printer
Query Commands
Command Format Description Page
Status ESC{ST?} Returns information about the ability of
the printer to print the next im ag e and
reports any errors from the last print
request (for example, paper condition,
command errors, buffer size and battery
voltage).
Print Job
Status
Configuration ESC{CF?} Returns information about configuration
Battery ESC{BT?} Returns current battery voltage,
Version ESC{VR?} Returns version number for firmware,
Memory ESC{MY?} Returns the amount of memory
Printhead ESC{PH?} Returns the type of printhead used and
Infrared ESC{IR?} Returns infrared settings. 52
Font ESC{FN?} Returns a list of available fonts. 55
Graphics ESC{GR?} Returns a list of downloaded graphics. 56
Formats ESC{FM?} Returns a list of all formats. 57
802.11b/TCP/IPESC{TC?} Returns the current TCP/ IP and 802.11b
Bluetooth ESC{BL?} Returns the current Bluetooth
Magnetic Card
Configuration
Magnetic Card
Read
Card Reader
Status
Demand ESC{DQ?} Returns the remaining number of
Cancel ESC{CN!} Cancels all demand printing. 65
Reset ESC{RE!} Resets the printer. 65
Magnetic Card
Data Zero
ESC{Sn?} Verifies that the data delivered to the
printer was printed without any
mechanical errors such as a head jam or
an out of paper condition.
options such as baud rate, default
mode, and timeout.
temperature, and condition.
boot code, and download files.
available, the amount of memory used,
and the amount remaining.
the number of dots across.
configuration (if applicable).
configuration (if applicable).
ESC{MC?} Returns the magnetic card
configuration.
ESC{MR?} Returns the magnetic card reader
configuration.
ESC{RS?} Returns data read for a swiped magnetic
card.
images.
ESC{MR?} Flashes the magnetic card data buffer to
zero.
43
45
47
49
49
50
51
57
59
61
62
63
65
65
42
Page 47

Datamax-O’Neil Quick Reference Programming
Querying the Printer
Status Query
Status Query
Query Format ESC{ST?}
Reply Format {ST!E:x;S:x;L:x;P:x;J:x;R:x;B:x;H:x}
Function Returns information about the ability of the printer to print
the next image and reports any errors from the last print
request (for example, paper condition, command errors,
buffer size and battery voltage).
Note: If Job Status reporting is on, the printer automatically
generates the Status query reply and sends it to the host.
Reply Example {ST!E:N;S:I;L:D;P:P;J:N;R:62;B:O,H:O}
Reply Example
Explanation
ST! - Reply to a status query.
E:
N; - There are no errors.
S:I; - The printer is idle.
L:
D; - The paper release lever is down, ready to print.
P:
P; - Paper is present.
J:N; - There is no head jam.
R:
62; - 62K bytes remain in the input buffer.
B:
O; - Acceptable battery voltage and temperature.
H:
O; - Printhead temperature in acceptable range.
43
Page 48

Datamax-O’Neil Quick Reference Programming
Querying the Printer
Status Reply Explanation
Query Reply Definition
E N N = No error*. For radio ready 2t/3l/4t printers, fixed as “N.”
E c c = Command error/invalid command
E d d= Data error (for example, an alpha character in a numeric-
only bar code)
E f f = Font not available
E g g = Global parameter error
E o o = Overrun buffer*
E p p = Field parameter error
E q q = Qmark not found*
E r r = Row/column error
E s s = Syntax error
S C C = Complete
S I I = Idle
S K K = Key pressed to cancel print job (available in Job Status
only)
S O O = Printer was off during print out (available in Job Status
only)
S P P = Printing
S T T = Timeout (available in Job Status only)
L u,d Lever = Up or Down
P P,N Paper = Present or Not present
J J,N Head jam condition: N = No head jam; J = A head jam has
occurred and has not been cleared (press the feed button to
clear the head jam).
R nm RAM buffer size remaining (in K bytes). An empty input buffer
is 40K bytes.
B O,T ,V Battery condition: O = OK; T = out of temperature range;
V = out of voltage range. Fo r radio ready 2t/3l/4t printers, O/
V Only are available
H O,T Printhead temperature: O = OK; T = out of temperature
range
* Rows marked with an asterisk (*) indicate Easy Print and Line Printer modes. Rows without
an asterisk indicate Easy Print mode only.
44
Page 49

Datamax-O’Neil Quick Reference Programming
Querying the Printer
Print Job Status Query
Print Job Status Query
Query Format ESC{Sn?}
Reply Format {ST!E:x;N:x;S:x;L:x;P:x;J:x;R:x;B:x}
Function Verifies data delivered to the printer was printed without any
mechanical errors such as a head jam or an out of paper
condition. n indicates the level of error reporting. The end of
the print job is indicated by the Esc e command. n is defined
as follows:
bit 0 =Determines auto report status at the end of the job
(when last line/form feed before ESC e is complete).
bit 1 = Determines status if paper was out during printing.
bit 2 = Determines status if there was a printhead jam during
printing.
bit 3 = Determines status when paper is loaded after a paper
out condition and the red button is pressed during printing.
bit 4 = Determines if printer times out during printing.
bit 5 = Determines if forward/reverse buttons were pressed
during printing.
bit 6 = Cancels timeout. Printer always stays on (timeout s et
to 9999) but does not write to Flash.
bit 7 = Reserved.
Note 1: If all zeroes are specified for n, any active status
messages set by an ESC s n command without an ESC e
command are cancelled.
Note 2: Cancelled timeouts are not written to Flash;
therefore, the timeout returns to defaults if the printer is o ff
or if the power is disconnected.
Note 3: Timeouts can also be cancelled using the ESC t
command. ESC s 0 or ESC e will not reinstate a timeout
cancelled using the ESC t command.
Reply Example {ST!E:N;S:I;L:D;P:P;J:N;R:40;B:O}
Reply Example
ST! - Reply to a print job status query.
Explanation
E:
N; - There are no syntax/language errors.
S:I; - The printer is idle.
L:
D; - The paper release lever is down, ready to print.
P:
P; - Paper is present.
J:N; - There is no head jam.
R:
62; - 62K bytes remain in the input buffer.
B:
O; - Acceptable battery voltage and temperature.
45
Page 50

Datamax-O’Neil Quick Reference Programming
Querying the Printer
Print Job Status Reply Explanation
Query Reply Definition
E N N = No error*
E c c = Command error/invalid command
E d d= Data error (for example, an alpha character in a numeric-
only bar code)
E f f = Font not available
E g g = Global parameter error
E o o = Overrun buffer*
E p p = Field parameter error
E q q = Qmark not found*
E r r = Row/column error
E s s = Syntax error
S C c = Complete
S I I = Idle
S K K = Key pressed to cancel print job (available in Job Status
only)
S O O = Printer was off during print out (available in Job Status
only)
S P P = Printing
S T T = Timeout (available in Job Status only)
L u,d Lever = Up or Down
P P,N Paper = Present or Not present
J J,N Head jam condition: N = No head jam; J = A head jam has
occurred and has not been cleared (press the feed button to
clear the head jam).
R nm RAM buffer size remaining (in K bytes). An empty input buffer
is 40K bytes.
B O,T ,V Battery condition: O = OK; T = out of temperature range;
V = out of voltage range
* Rows marked with an asterisk (*) indicate Easy Print and Line Printer modes. Rows without
an asterisk indicate Easy Print mode only.
46
Page 51

Datamax-O’Neil Quick Reference Programming
Querying the Printer
Configuration Query
Configuration Query
Query Format ESC{CF?}
Reply Format {CF!L:x; B:x; P:x; N:x; H:x;D:x;Y:x;S:x;M:x;T:x;R:x}
Function Displays configurable options. A v ailable for all printers ex cept
as noted.
Reply Example {CF!L:LP;B:096;P:N;N:8;H:B;D:+10%;Y:1;S:Y;M:Y;T:0060;
R:65535}
Reply Example
Explanation
CF! - Reply to a configuration query.
L
:LP; - The default mode is Line Printer.
B
:096; - The baud rate is 9600.
P
: N; - No parity is set.
N
:8; - There are 8 data bits.
H
:B; - Hardware and software handshaking are enabled.
D
:+10%; - The darkness (burn time) is set to +10%.
Y
:1; - The paper is 1 ply.
S
:Y; - The sound is on.
M:Y; - The printhead centers during form feed.
T
:0060 - The timeout is set for 60 seconds.
R:65535; - The printer never time outs.
47
Page 52

Datamax-O’Neil Quick Reference Programming
Querying the Printer
Configuration Reply Explanation
Query Reply Definition
A Y,N Auto White Space Advance
L LP, EZ Default mode = Line Printer (ESC) or Easy Print (EZ),
The following are available for radio ready 2t/3l/4t printers:
EMC1 (Custom 1), EMC2 (Custom 2), EMC3 (Custom 3),
EMP1 (PGL), EMZ1 (CP CL), EMZ2 (Cog),EMZ3 (ZPL).
B 012 (mf2/3),
024,048 (mf2/3),
096,192 (mf2/3),
384,576,115
P N,E,O Parity = None, Even, or Odd
N 7,8 Number of data bits = seven or eight
H N,H,S,B Handshaking = None(N), Hardware (H), Software (S) , or
J Y/N EZ Print Job Status Report. Yes (Y) or No (No).
D -25%
...+35%
F Y/N Form feed (act on FF) only available on radio ready 2t/3l/4t
G Y/N Beep when charger connected. Yes (Y) or No (N).
Y 1,2 Paper ply = one or two
S Y,N Beeper sound = Y (beeper on) or N (beeper off)
M Y,N Centering of printhead on form feed: Y = Printhead centers
T nnnn Timeout value in seconds (9999 i ndicates printer never time
R nn/NEVER RF Power Timeout (only available on radio ready 2t/3l/4t
U 0 to 4 Paper out beep (only available on radio ready 2t/3l/4t
TP 0/not 0 Test print. 0=Normal;Not 0 -Special.
Baud rate = 1200,2400, 4800, 9600, 19.2K, 38.4K, 57.6K,
115.2 k baud
Both Software and Hardware (B)
Darkness = -25%, -20%, -15%, -10%, -05%, +10%,
+15%, +20%, +25%, or +35%
printers. Yes (Y) or No (N).
during form feeding; N = Printhead remains where it last
stopped during form feed.
outs)
printers). nn (minutes) or NEVER timeout.
printers). 0=1 beep (not 0=5 beeps);1=one time; 2=rep
every 15s;3=rep every 30s;4=rep every 60s.
48
Page 53

Datamax-O’Neil Quick Reference Programming
Querying the Printer
Battery Query
Battery Query Original
MF2/MF3/
2t/4t
Query Format ESC{BT?}
Reply Format {BT!V:x;T:x;CH:x}
Function Returns current battery voltage and
temperature.
Reply Example {BT!V:6.8;T:+25.8C,CH:C, PS:B}
Reply
V
:Voltage of single - n.n volts
X
Parameters
V1 and V2: Voltage of each of two
X
batteries- n.n volts (for V1); n.n volts (f or
V2)
VE: Voltage of battery eliminator - n.n
4t Only
volts
nn.nC
T
: Temperature of battery (depends on
battery type).
X
CH
:Charge - Y=Connected; N=Not
connected.
X
PS: Power Source - A=DC over
battery;B=Battery over DC; C=Battery
eliminator
Radio Ready
2t/3l/4t
X
X
4t Only
Always
returns NA
X
X
(A/B are
same in
Thermal)
Version Query
Version Query
Query Format ESC{VR?}
Reply Format {VR!F:x;B:x;D:x}
Function Returns the version levels of firmware, boot code, and
download file number.
Reply Example {VR!F:4.09;
Reply Example
VR! - Reply to a version query.
Explanation
F
:4:09; - The firmware (main program) version is 4.09.
C:5.25; - The communication controller version is 5.25.
B
:2.05; - The boot code version is 2.05.
D
:1.0; - The download file version is 1.0.
C:5.25;B
:2.05;D:1.0}
49
Page 54

Datamax-O’Neil Quick Reference Programming
Querying the Printer
Version Reply Explanation
Query Reply Definition
F n.nn Firmware version is n.nn.
B n.nn Boot code versio n is n.nn.
D n.n Download (fonts, graphics, formats) version is n.nn.
Memory Query
Memory Query
Query Format ESC{MY?}
Reply Format {MY!FS:x;FM:x;RS:x;DT:x;DR:x}
Function Returns the size of all memory available in the printer,
including the amounts used and the amount remaining.
Available for original MF2/MF3/2t/4t and radio ready 2t/3l/4t.
Reply Example {MY!FS:1M;FM:AMD;RS:1M;DT:049152;DR:000512}
Reply Example
Explanation
MY! - Reply to a memory query.
FS
:1M; - This printer contains a 1M bit Flash memory
FM
:AMD; - The Flash manufacturer is AMD.
RS
:1M; - RAM Size = 1M.
DT
:049152; - Total Flash area available for download is
49,152 bytes.
DR
:000512; - Download Flash memory Remaining. Out of
49,152 bytes, 512 bytes are available.
Memory Reply Explanation
Query Reply Definition
FS 1 Meg,
4 Meg
FM AMD Flash manufacturer = AMD
RS 1 Meg RAM size = 1 Meg (128K bytes)
DT nnnnnn Download total area = nnnnnn bytes. This is the size after
DR nnnnnn Download RAM remaining = nnnnnn bytes. Download total
Flash size = 1 Meg (128K bytes) or 4 Meg (512K bytes)
the application program is downloaded to Flash and after
the boot code size is deducted.
and download remaining are the same values only if no
fonts or graphics were downloaded.
50
Page 55

Datamax-O’Neil Quick Reference Programming
Querying the Printer
Printhead Query
Printhead Query
Query Format ESC{PH?}
Reply Format {PH!TD:x;DD:x;T:x;M:x}
Function Returns the printhead type used and the total number of dots
across. Available for original MF2/MF3/2t/4t and radio ready
2t/3l/4t printers.
Reply Example Thermal: {PH!TD:0384;DD:203;M:
Impact: {PH!IMPACT1;PINS:09;W:080}
Reply Example
Explanation
Thermal:
PH! - Reply to a printhead query.
TD:0384; - The printhead in this printer has 384 dots across.
LPT3245;T
:+25.6C;}
DD:203; - The dot density is 203 dots per mm).
M:LPT3245 - The printhead model number is LPT3245.
T:+25.6C; - The current printhead temperature is +25.6°
centigrade.
Impact:
PH!IMPACT1; - 1920 dots across at maximum density; 960
dots across at middle density; 480 dots across at lowest
density.
PINS:09; - 9 pin printhead.
W:080; - 80 columns wide.
Printhead Reply Explanation
Query Reply Definition
TD Nnnn Total number of dots across the printhead:
384 = two inch printhead on the 2t
832 = four inch printhead on the 4t
DD Nnn Dot density of the printhead (dot per mm).
M x...x
(variable
width)
T + nn.nC Printhead temperature.
D Nnn File version of downloaded fonts.
IMPACT1 IMPACT1 = 1920 dots across at maximum density; 960 dots
PINS Xx Numbers of pins on printhead.
W Xx Width of columns.
Printhead model number.
across at middle density; 480 dots across at lowest density.
51
Page 56

Datamax-O’Neil Quick Reference Programming
Querying the Printer
Infrared Query
Infrared Query
Query Format ESC{IR?}
Reply Format {IR!P:x;AV:x;DV:x;IV:x;IN:x;ID:x}
Function Returns information about the current infrared settings. Also
returns a unique name for the printer, communication
capabilities, and peripherals.
Although not all printers have infrared capabilities, the
ESC{IR?} query is present in all printers to allow the user to
determine uniquely which printer type is attached.
Reply Example {IR!P:IrDA;AV:00;DV:00;IV:1.02;IN:microFlash2;
ID:1234567890123456789}
Reply Example
Explanation
IR! - Reply to an infrared query.
P:IrDA; - The IrDA protocol is on.
AV:00; - The ASK version is 00.
DV:00; - The DIRECT version is 00.
IV:1.0-06; - The IrDA version specification supported is 1.0
and the firmware is version 06.
IN:microFlash2; - The device nickname is microFlash2.
ID: - The device name is 1234567890123456789.
52
Page 57
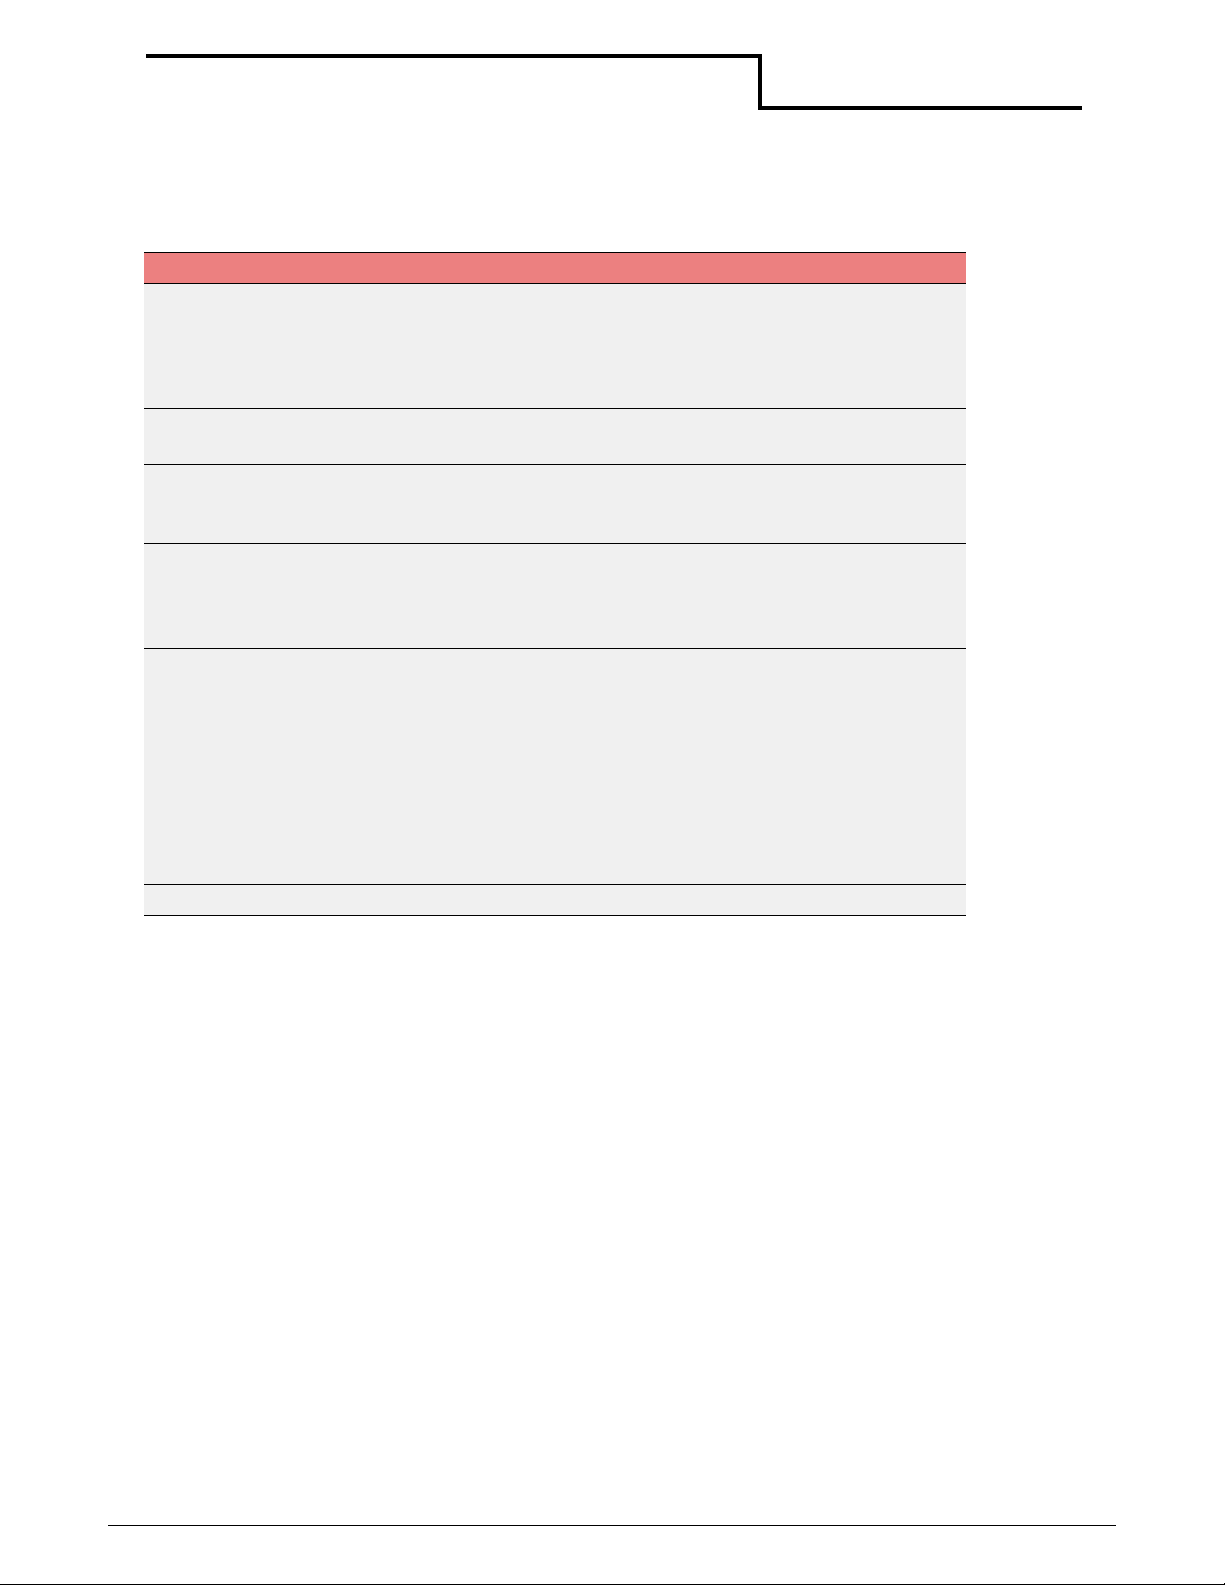
Datamax-O’Neil Quick Reference Programming
Querying the Printer
Infrared Reply Explanation
Query Reply Definition
P OFF,IrDA,AS
K, ASC-CRC,
DIRECT,
DIRECT-CRC
AV nn Original MF2/MF3/2t/4t Printers only: ASK software
DV nn Original MF2/MF3/2t/4t Printers: DIRECT software
IV n.n-mm Original MF2/MF3/2t/4t Printers: Version of IrDA
IN IrDA Name (unique across printers): The value returned
Original MF2/MF3/2t/4t Printers: Protocol selected is OFF,
IrDA, ASK, ASK with CRC, DIRECT or DIRECT with CRC
Radio Ready 2t/3l/4t Printers: Fix ed: N (None). Does not
support Infrared
version = nn (Current 01)
version = nn (Current 01)
Radio Ready 2t/3l/4t printers: Fixed:00
specifications supported is n.n; firmware version of IrDA
loaded into this printer is mm.
Radio Ready 2t/3l/4t printers: Fixed:0.00
for this parameter identify the printer type.
Original MF2/MF3/2t/4t Printers: microFlash2,
microFlash3, microFlash4, microFlash4CR, 2t, 2tCR
Radio Ready 2t/3l/4t printers: Pri nter Type - 2tR, 3LR, 4tr
Card Reader: Add S suffix
Radio: Add 802 or add BT suffix
ID IrDA Nickname.
53
Page 58

Datamax-O’Neil Quick Reference Programming
Querying the Printer
Query Reply Definition
IN x.x
microFlash2,
microFlash2,
2t, 2i
IrDA nickname, up to 19 characters. Uniquely identifies
the printer, its communication capabilities and its
peripherals.
Thermal:
• 2tR - 2t Radio firmware with RS-232 only
• 2tRBT - 2t Radio firmware with RS-232 and
Bluetooth
• 2tR802 - 2t Radio firmware with RS-232 and
802.11b
• 2tRS - 2t Radio firmware with RS-232 only with
SCard Reader
• 2tRSBT - 2t Radio firmware with RS-232 and
Bluetooth with SCard Reader
• 2tRS802 - 2t Radio firmware with RS-232 and
802.11b with SCard Reader
• 4tR - 4t Radio firmware with RS-232 only
• 4tRBT - 4t Radio firmware with RS-232 and
Bluetooth
• 4tR802 - 4t Radio firmware with RS-232 and
802.11b
• 4tRS - 4t Radio firmware with RS-232 only with
SCard Reader
• 4tRSBT - 4t Radio firmware with RS-232 and
Bluetooth SCard Reader
• 4tRS802 - 4t Radio firmware with RS-232 and
802.11b SCard Reader
Impact:
• RP2R - RP-2000 Radio firmware with RS-232 only
RP2RBT - RP-2000 Radio firmware with RS-232
and Bluetooth
• RP2R802 - RP-2000 Radio firmware with RS-232
and 802.11b
• VMP2R - VMP-2000 Radio firmware with RS-232
only
• VMP2RBT - VMP-2000 Radio firmw are with RS-232
and Bluetooth
• VMP2R802 - VMP-2000 Radio firmware with RS232 and 802.11b
ID x.x IrDA device name, up to 19 characters.
54
Page 59

Datamax-O’Neil Quick Reference Programming
Querying the Printer
Font Query
Font Query
Query Format ESC{FN?}
Reply Format {FN!N5:x,N1:x,L:x,UV:x, UD:x,US:x,
Function Lists fonts, both permanent and downloaded. Within a
complete font definition, each query character is separated
from the next with a comma (,). A semicolon, carriage return
and line feed (;.<CR>, <LF>) separate each font. Available
for original MF2/MF3/2t/4t and radio ready 2t/3l/4t printers.
Reply Example {FN!N5:MF107,N1:&(26),L:R,UV:1,UD:01/02/96,
US
Reply Example
Explanation
:96CHARS BLOCKBOLD,
N1
:!(21),L:D,UV:1,UD:01/02/96,US:224 CHR BLOCK
NORMAL,
FN! - Reply to a font query.
N5:MF107, - The first font name is MF107.
CPI
:20.4}
CPI
:10.7;N5:MF204,
CPI
:x}
N1:&(26), - The one-character name is &, or 26H.
L:R; - The first font is a resident font.
UV:1; - The user version is 1.
UD:01/02/96; - The user date is 01/02/96.
US:96chars blockbold, - The font is a 96 char acter block bol d
font.
CPI:10.7; - The font has 10.7 characters per inch.
N5:MF204, - The next font begins.
Fonts Reply Explanation
Query Reply Definition
N5 xxxxx Five character name = xxxxx
N1 x(nn) One character name - also in HEX
L R,D Location - Resident or Downloaded
UV x User version number = x
US x..x User descriptive summary of font, 20 characters
CPI nn.n Characters per inch - nn.nn
55
Page 60

Datamax-O’Neil Quick Reference Programming
Querying the Printer
Graphics Query
Graphics Query
Query Format ESC{GR?}
Reply Format {GR!N5:x,N1:x,L:D,UV:x,UD:x,US:x}
Function Lists graphics currently downloaded to the printer. The reply
is similar to the fonts query reply but without the font-related
information.
Each graphic present in the printer will return one complete
set of all parameters below . If there are no graphics present,
the response will be {GR!}. Availabl e for original MF2/MF3/2t/
4t and radio ready 2t/3l/4t printers.
Reply Example {GR!N5:LOGO1,N1:z(7A),L:D,UV:1,UD:05/29/96,
US:Big Logo}
Reply Example
Explanation
GR! - Reply to a graphics query.
N5:LOGO1, - The graphic has a five-character name, LOGO1.
N1:z(7A), - The graphic has a one-character name of z, or
7AH.
L:D, - This is a downloaded graphic.
UV:1, - The user version is 1.
UD:05/29/96, - The user date is 5/29/96.
US:Big Logo - The user descriptive summary is Big Logo.
CPI: 22.1
Graphics Reply Explanation
Query Reply Definition
N5 xxxxx Five character name = xxxxx
N1 x(nn) One character name - also in HEX
L R,D Location - Resident or download
UV x User version number = x
UD xx/xx/xx User date
US x..x User descriptive summary of font, 20 characters
CPI nn.n Characters per inch. 1/CPI is the approximate width of
the graphic.
56
Page 61
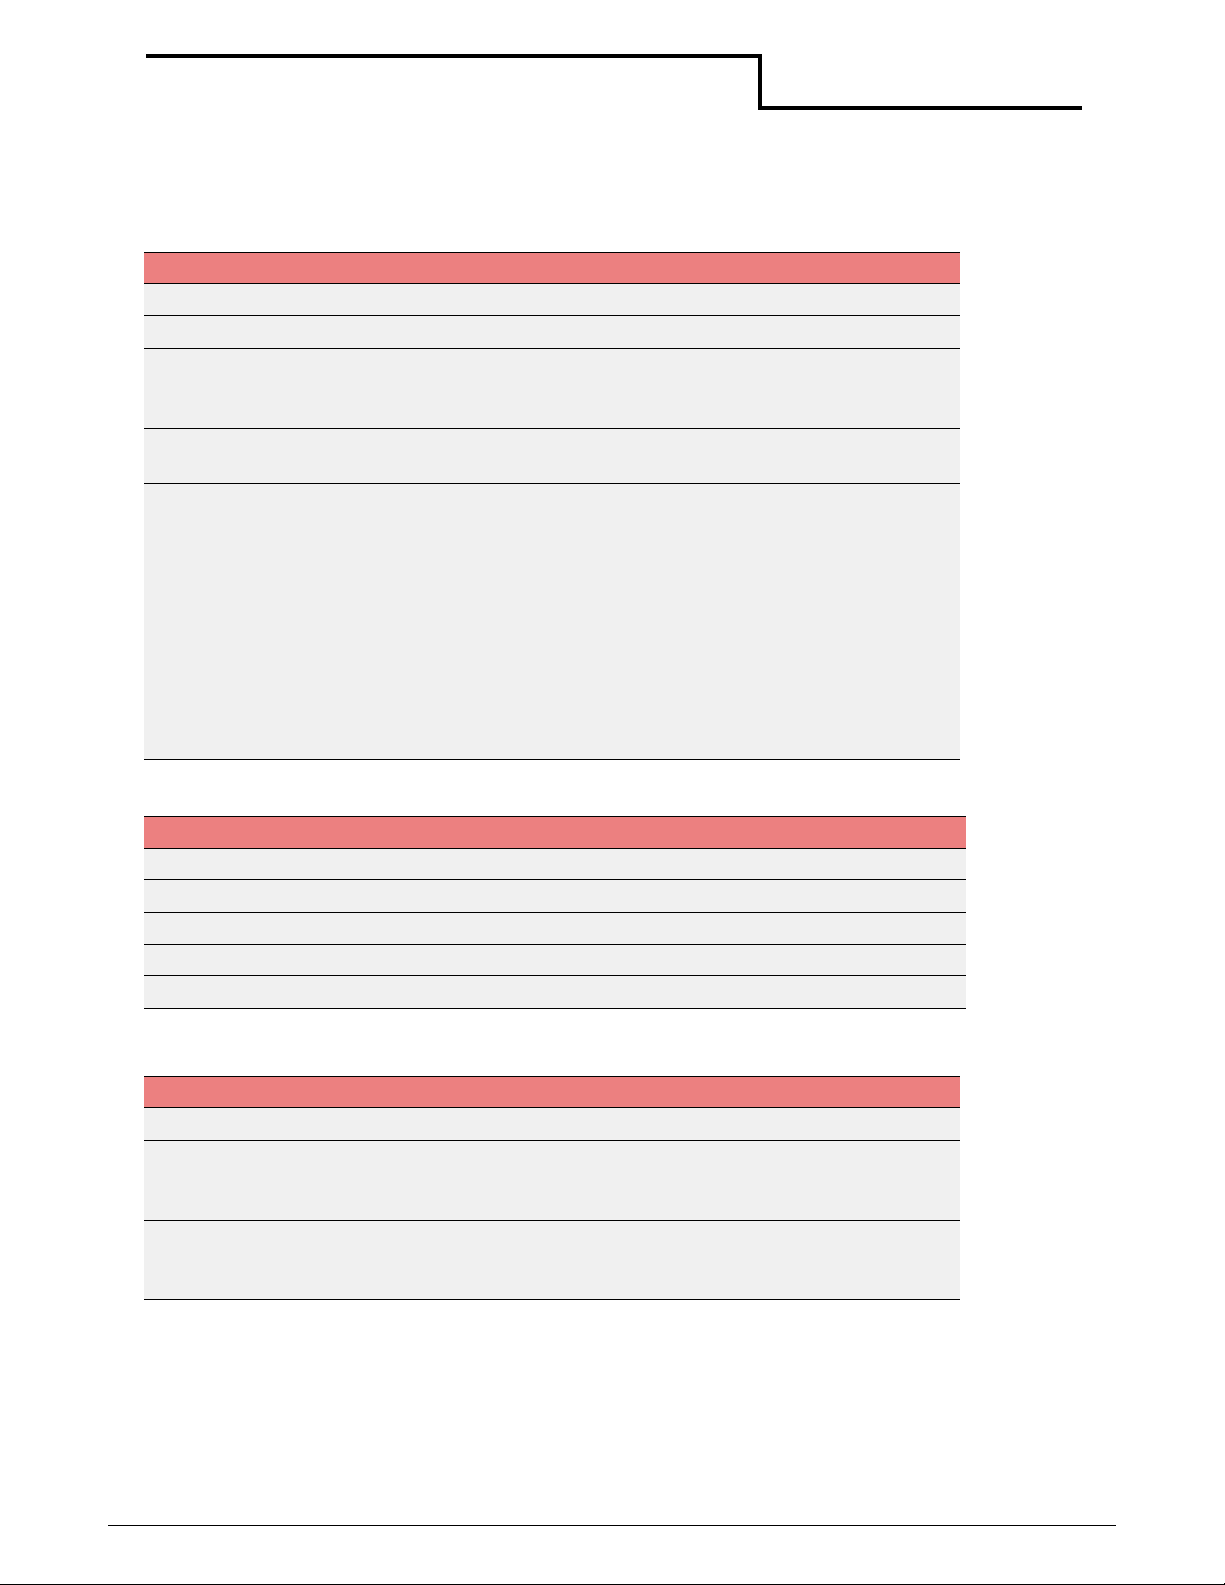
Datamax-O’Neil Quick Reference Programming
Querying the Printer
Formats Query
Formats Query
Query Format ESC{FM?}
Reply Format {FM!N5:x,L:x,UV:x,UD:x,US:x}
Function Lists formats downloaded to the printer. The reply is similar to
the fonts query reply, but without the font-related
information.
Reply Example {FM!N5:LABEL,L:D,UV:1,UD:05/29/96,US:PROPERTY ID
LABEL-BC}
Reply Example
Explanation
FM! - Reply to a formats query.
N5:LABEL, - The format has a five-character name of LABEL.
L:D, - The format is a downloaded format.
UV:1, - The user version is 1.
UD:05/29/96, - The user date is 05/29/96.
US:PROPERTY - The user descriptive summary is PROPERTY
ID LABEL-BC.
Formats Reply Explanation
Query Reply Definition
N5 xxxxx Five character name = xxxxx
L R,D Location - Resident or download
UV x User version number = x
UD xx/xx/xx User date
US x..x User descriptive summary of font, 20 characters
802.11b/TCP/IP Query
802.11b/TCP/IP Query
Query Format ESC{TC?}
Reply Format {TC!E:x;N:x;T:x;D:x;I:x;M:x;G:x;P:x;NA:x;S:x;W:x;K:x;
K1:x;K2:x;K3:x;K4:x;MAC:x;80211b
Info:x;P2:x;PWR:x;Q:x}
Function Returns current TCP/IP and 802.11b configuration (if
applicable). This query is available on radio ready 2t/3l/4t
printers only.
57
Page 62

Datamax-O’Neil Quick Reference Programming
Querying the Printer
802.11b/TCP/IP Reply Explanation
Query Reply Definition
E xxxxx Returns a variable length string specifying the ESSID
(Extended Service Set Identi fi cation) configured in the
printer.
N xxxxx Returns a string name specifying the station name.
T H,P Connection - H=AdHoc mode; P=Print point mode.
D N,Y Dynamic Host Configuration Protocol (DHCP) status -
N=DHCP is off; Y=DHCP is on.
I x.x.x.x IP address - The IP address is returned in the form
x.x.x.x where x can be one to three digits. If DHCP is off,
the IP address is manually configured. If DHCP is on, the
IP address is assigned by the server. If an IP address
cannot be found, the address is set to zeroes.
M x.x.x.x Indicates the mask used on the IP address to determine
how much must match.
G x.x.x.x Gateway to use.
P xxx Por t to use.
NA 0 to 3 Network authentication. 0=None; 1=LEAP (Cisco);
2=WPA-PSK (Symbol); 3=WPA (future-Symbol).
S 0,5,13 Authentication algorithm. 0=No security; 5=40-bit
algorithm (5 byte key); 13=128-bit algorithm (13 byte
key - last three bytes are filled in by stack)
W 1,2 Enable encryption. 1=WEP encryption; 2=Allow
unencrypted.
K xx Specifies which key is currently in use (keys 1 to 4). This
is applicable only if encryption and/or security is on.
K1
K2
K3
K4
MAC nn-nn-nn-
802/
11B
Info
P2 Y/N Power saving mode (CAM on or off). Y=CAM off; N=CAM
PWR ON,OFF ON=PCMCIA power is on , OFF=PC MCIA power is off.
Q Y/N Signal quality indicator. Y=On; N=Off.
0,5,14 Displays the security of keys 1 to 4. 0=No security;
5=40-bit algorithm (5 byte key); 13=128-bit algorithm
(13 byte key - the last three bytes are filled in by stack).
The default values are as follows:
K1:101112131415161718191A1B1C
K2: 20212223242526278292A2B2C
K3: 303132333435363738393A3B3C
K4: 404142434445464748494A4B4C
MAC address on card.
nn-nn-nn
Card type,
card
firmware
version
Information about 802.11b card in the printer.
on.
58
Page 63

Datamax-O’Neil Quick Reference Programming
Querying the Printer
Bluetooth Query
Bluetooth Query
Query Format ESC{BL?}
Reply Format {BL!AD:x;F:x;SN:x;PR:x;CL:x;D:x;C:x;B:x;E:x;A:x;P:x;I:
x;PWR:x;W:x}
Function Returns the current Bluetooth configuration (if applicable).
Reply Example {BL!AD:00:80:37:1A:0F:F7;F:Wireless Printer;SN:2t
Bluetooth;PR:SPP;CL:040680;D:Y;C:Y;B:Y;E:N;A:N;P:Y;
S:0;PWR:ON}
Reply Example
Explanation
BL! - Reply to a Bluetooth query.
AD:00:80:37:1A:0F:F7; - The Bluetooth device address is
00:80:37:1A:0F:F7.
F:Wireless Printer; - The bluetooth friendly device name is
Wireless Printer.
SN:2t Bluetooth; - The service name is 2t Bluetooth.
PR:SPP; - The profile support is Serial Port Profile (SPP).
CL:040680; - The device class is 040680, a rendering,
imaging printer.
D:Y; - The device is discoverable.
C:Y; - The device is connectable.
B:Y; - The device is bondable.
E:N; - Encryption is off.
A:N; - Authentication is on.
P:Y; - A passkey is stored on this device.
I:nn; - Inactivity timeout
S:0; - Security is open.
PWR:ON; - RF module power is on.
W:nn; Watchdog period.
59
Page 64

Datamax-O’Neil Quick Reference Programming
Querying the Printer
Bluetooth Reply Explanation
Query Reply Definition
AD xx:xx:xx:xx:
xx:xx
F xxxxx Returns the Bluetooth device name string.
SN xxxxx Returns the service name string.
PR SPP The supported profile is Serial Port Profile (fixed).
CL 040680 The device class is 040680, a rendering, imaging, printer.
D Y,N Y=The device is discoverable; N=The device is not
C Y,N Y=The device is connectable; N=The device is not
B Y,N Y=The device is bondable; N=The device is not bondable.
E Y,N Y=Encryption is on; N=Encryption is off.
A Y,N Y=Authentication is on; N=Authentication is off.
P Y,N Y=A passkey is stored on this device (default);N=A
S 0,1 0=Open;1=Secure.
PWR ON,OFF ON=RF module power is on; OFF=RF module power is
Returns the Bluetooth module's address.
Note: In most printers, the device name is configured to
the printer's serial number.
discoverable.
connectable.
passkey is not stored on this device.
off.
60
Page 65

Datamax-O’Neil Quick Reference Programming
Querying the Printer
Magnetic Card Configuration Query
Magnetic Card Configuration Query
Query Format ESC{MC?}
Reply Format {MC!EN:x;DIR:x;T1:x;T2:x;T3}
Function Displays the magnetic card reader configuration.
Reply Example {MC!EN:ON;DIR:WITH;T1:ON;T2:ON;T3:ON}
Reply
Explanation
MC! - Reply to a magnetic card configuration query.
EN:ON; - The magnetic card reader is enabled (default).
DIR:WITH; - The card is read when withdrawn from the
reader.
T1:ON; - Track one is enabled and will try to read from the
card.
T2:ON; - Track two is enabled and will try to read from the
card.
T3:ON; - Track three is enabled and will try to read from the
card.
Magnetic Card Configuration Reply Explanation
Query Reply Definition
EN ON The magnetic card reader is enabled (default).
DIR WITH
(more?)
T1 ON,OFF ON=Track is enabled and attempts to read from card;
T2 ON,OFF ON=Track is enabled and attempts to read from card;
T3 ON,OFF ON=Track is enabled and attempts to read from card;
WITH=The card is read when withdrawn from the reader.
OFF=Track is disabled and any data is ignored.
OFF=Track is disabled and any data is ignored.
OFF=Track is disabled and any data is ignored.
61
Page 66

Datamax-O’Neil Quick Reference Programming
Querying the Printer
Magnetic Card Read Query
Magnetic Card Read Query
Query Format ESC{MR?}
Reply Format {MR!T1:x|T2:x|T3:x|}
Function Displays the magnetic card reader configuration.
Reply Example No card read:
{MR!T1:N|T2:N|T3:N}
Card read:
{MR!T1:%B9900 888888 89789^PUBLIC/JOHN Q
^9901960805542?|T2:;373027766473005=9901960805542
?|T3:;1234567890=1234567890=1234567890=
1234567890?}
Reply
Explanation
MR! - Reply to a magnetic card read query.
T1:;%B9900 888888 89789^PUBLIC/JOHN Q
^9901960805542?| - Returns data read from track one of
magnetic card.
T2:;373027766473005=9901960805542?| - Returns data
read from track two of magnetic card.
T3:;1234567890=1234567890=1234567890=
1234567890? - Returns data read from track three of
magnetic card.
Magnetic Card Read Reply Explanation
Query Reply Definition
T1 N,xxxxx N=No data read; xxxxx=Returns the data read from
track one of the magnetic card.
Note: Most encodings (banking specifications), data
begin an percentage mark (%) and end with an question
mark (?).
T2 N,xxxxx N=No data read; xxxxx=Returns the data read from
track two of the magnetic card.
Note: Most encodings (banking specifications), data
begin an percentage mark (%) and end with an question
mark (?).
T3 N,xxxxx N=No data read; xxxxx=Returns the data read from
track three of the magnetic card.
Note: Most encodings (banking specifications), data
begin an percentage mark (%) and end with an question
mark (?).
62
Page 67

Datamax-O’Neil Quick Reference Programming
Querying the Printer
Card Reader Status Query
Card Reader Status Query
Query Format ESC{RS?}
Reply Format {RS!P:n;S:n;G:n;R:n}
Function Returns data read for a swiped magnetic card. The reply to
the card reader status query can be automatically generated
if the AutoSend option is on.
Reply Example {RS!P:0;S:0;G:0;R:0}
Reply
Explanation
RS! - Reply to a card reader status query.
P:0; - SmartCard power is off.
S:0; - A card is not seated in the reader.
G:0; - The green LED is off.
R:0; - The red LED is off.
Card Reader Status Reply Explanation
Query Reply Definition
P 0,1 0=SmartCard power is off; 1=SmartCard power is on.
S 0,1 0=A card is not seated in reader; 1=A card is seated in
reader.
G 0,1,F 0=Green LED is off; 1=Green LED is on; F=Green LED is
flashing.
R 0,1,F 0=Red LED is off; 1=Red LED is on; F=Red LED is
flashing.
63
Page 68

Datamax-O’Neil Quick Reference Programming
Querying the Printer
Label Configuration Query
Label Configuration Query Original
MF2/MF3/
2t/4t
Query
Format
Reply
Format
Reply
Example
Reply
Explanation
ESC{CL?}
{CL!T:n;D:n;M:n;S:n;P:n;U:n;B:n;W:n}
{CL!T:P;D:1;M:1;S:T;P:Y;U:3;B:2;W:N}
CL! - Reply to a label configuration query.
T: Type of stock used P=Plain paper
T=Top QMark
B=Bottom QMark
D: Distance to advance after QMark is
sensed before stop - Distance given in
dotlines (.005 inches)
M: Maximum distance to advance if QMark
is not sensed - Distance given in dotlines
(.005 inches)
S: Sensor to use for paper out T=Top sensor
B=Bottom sensor
P: Presenter Y=Yes (use)
N=N (do not use)
U: Label under presenter timeout - Time in
seconds to not go to sleep if label is left
under the presenter sensor.
B: Backup distance - Distance given in
dotlines (.005 inches)
W: Windows driver QMark (automatically
advance to find QMark after print job from
Windows driver) Y=Yes (assume stock is QMarked)
N=No (assume stock is plain paper)
Radio Ready
2t/3t/4t
X
X
X
LP3 only
LP3 only
LP3 only
X
X
Manufacturing Date Query: ESC{MD?}
The manufacturing date of the printer is returned, if the manufacturing date has been written
to the printer, otherwise the data field returned is None. Since the manufacturing date is
actually the parameter returned, there is no need for the Parameter:Data after the MD! in
the response (MD!<date string>. The date is a string that can be entered in any format.
Ty pically, the format is MM/DD/YY.
Query: ESC{MD?}
Response (note that the date string can have different formats): {MD!12/10/2005}
64
Page 69

Datamax-O’Neil Quick Reference Programming
Querying the Printer
Serial Number Query: ESC {SN?}
The serial number of the printer is returned, if the serial number has been written to the
printer, otherwise the data field returned is None. Since the serial number is actually the
parameter returned, there is no need for the Parameter:Data after the SN! in the response
(SN!<serial number string>. The serial number is a string that can be entered in any format.
Typically, it is the serial numb er printed on the label on the printer.
Query: ESC{SN?}
Response (note that the serial number string can have different formats): {SN!MH00035}
Demand Quantity Query
Demand Query
Query Format ESC{DQ?}
Reply Format nnn
Function Returns remaining quantity of images.
Cancel Query
Cancel Query
Query Format ESC{CN!}
Reply Format ESC{CN!}
Function Cancels demand printing.
Reset Query
Reset Query
Query Format ESC{RE!}
Reply Format ESC{RE!}
Function Resets the printer. All data, transient states, and connections
are lost. The printer restarts as if power was disconnected
and reconnected.
Magnetic Card Data Zero Command
Magnetic Card Data Zero Command
Query Format ESC{MZ!}
Reply Format ESC{MZ!}
Function Flashes the magnetic card data buffer to zero.
65
Page 70

Index
Numerics
802.11b/TCP/IP Query, 57
A
Ahead command, 13
Auto White Space Advance
, 26
B
Back command, 13
Back Global Option
battery query
overview
Bluetooth
, 59
, 17
, 49
C
cancel query
overview
Card Reader Status Query
commands
Commit
Line Printer
Line Printer Mode
Commit command
Configuration command
creating files
Configuration Commands
3 letter
Configuration commands
2 letter
configuration query
overview
replies
Configure 802.11b/TCP/IP
Configure Battery Eliminator
Configure Baud Rate
Configure Beeper
Configure Bluetooth
Configure Carriage Return
Configure Charger Beep
Configure Default Protocol
Configure Default Values
Configure Infrared Protocol
Configure IrDA Autovoid
Configure IrDA Baud Name
Configure Magnetic CardReader
Configure Number of Data Bits
Configure Paper Out Beep
Configure Parity
Configure Print Darkness
Configure RS-232 Handshaking
, 65
, 63
, 40
, 13
, 3
, 40
, 26
, 32
, 26
, 47
, 48
, 33
, 28
, 27
, 31
, 34
, 31
, 28
, 29
, 32
, 36
, 37
, 37
, 30
, 31
, 27
, 39
, 31
, 28
D
demand query
overview
, 65
E
Easy Print
Ahead command
auto white space advance
Back command
Commands
guidelines
commands
configuration commands
overview
configure 802.11b/TCP/IP
configure battery eliminator
configure baud rate
configure beeper
configure Bluetooth
Configure CardReader
Configure CardReader
configure carriage return
configure charger beep
configure default protocol
configure default values
configure infrared protocol
configure IrDA autovoid
configure IrDA baud name
configure label parameters
configure magnetic cardreader
configure number of data bits
configure paper out beep
configure parity
configure print darkness
configure RS-232 handshaking
form feed active
Initial Program Load command
job status reporting
Line Printer Mode command
overview
restore default values
RF radio power down timeout
sample job
self test print
Self-Test Printout command
Status command
stores default values
system timeout
escape sequences
accept compressed graphic
advance Q mark
, 10, 11
, 13
, 13
, 11
, 13
, 26
, 27
, 31
, 34
, 31
, 28
, 29
, 12
, 30
, 14
, 32
, 31
, 5
, 28
, 37
, 32
, 31
, 29
, 32
, 30
, 27
, 26
, 33
, 28
, 35
, 36
, 37
, 38
, 14
, 6
, 31
, 14
, 30
, 39
, 28
, 15
A
B
C
D
E
F
G
H
I
J
K
L
M
N
O
P
Q
R
S
T
U
V
W
X
Y
Z
66
Page 71

Datamax-O’Neil Quick Reference Programming
bit-mapped graphics, 5
cancel buffer line
carriage return
EZ Print mode
form feed
line feed
reset printer
select font
select international character set
set double wide and high
set double wide print
set form length
set interline spacing
set single wide print
, 7
, 7
, 4
, 7
, 9
, 7
, 7
, 8
, 8
, 6
, 4
, 4
, 6
F
fonts query
overview
Form Feed Active
formats query
overview
replies
, 55
, 28
, 57
, 57
G
graphics query
overview
replies
, 56
, 56
I
infrared query
overview
replies
Initial Program Load command
, 52
, 53
, 15
J
Job Status Reporting, 29
L
Label Configuration Query
overview
Line Printer
commands
line printer commands
set form length
set interline spacing
Line Printer Mode
escape sequences
Line Printer Mode Command
, 64
, 3, 13
, 4
, 4
, 4
, 14
M
Magnetic Card Configuration Query, 61
Magnetic Card Read Query
, 62
memory query
overview
replies
modes
Easy Print
, 50
, 50
, 11
P
PDF-417 symbols, 23
Print Command
Guidelines
Print command
back global option
bar code field options
bar code names
font field options
font names
graphic field options
graphic names
line names
PDF-417 symbols
Qstop global option
rotate global option
Stop Global Option
print head query
overview
replies
Print Job Status Query
, 17
, 17
, 22
, 21
, 21
, 25
, 25
, 23
, 51
, 51
Q
Qstop Global Option, 17
queries
802.11b/TCP/IP
battery
Bluetooth
cancel
card reader status
configuration
demand quantity
font
fonts
format
formats
graphics
infrared
label configuration
magnetic card configuration
magnetic card read
manufacturing date
memory
print head
print job status
, 49
, 65
, 55
, 55
, 41
, 57
, 56
, 52
, 50
, 57
, 59
, 63
, 47
, 65
, 64
, 51
, 45
, 25
, 17
, 17
, 18
, 45
, 62
, 64
, 23
, 61
A
B
C
D
E
F
G
H
I
J
K
L
M
N
O
P
Q
R
S
T
U
V
W
X
Y
67
Page 72

Datamax-O’Neil Quick Reference Programming
read magnetic card, 65
reset
, 65
sending
status
table of
version
, 41
, 43
, 42
, 49
R
read magnetic card query
overview
reset query
overview
Restore Default Values
RF Radio Power Down Timeout
Rotate Global Option
, 65
, 65
, 32
, 17
S
Self Test Print, 30
Self-Test Printout command
sending
queries
Status command
status query
overview
replies
Stop Global Option
Stores Default Values
System Timeout
, 41
, 14
, 43
, 44
, 18
, 31
, 14
, 32
, 30
A
B
C
D
E
F
G
H
I
J
K
L
M
N
V
version query
overview
replies
, 50
, 49
O
P
Q
R
S
T
U
V
W
X
Y
68
 Loading...