

Page 1

MICROFLASH 8I 270
MICROFLASH 8I 270
110139-005
User Guide
Page 2

Page 3

TABLE OF CONTENTS
microFlash 8i 270 Printer .............................. 1
Open View................................................... 1
Closed View................................................. 1
Installing the Printer ..................................... 2
Using the Battery........................................... 2
Installing and/or Replacing Batteries ............. 2
Charging the Battery .................................... 3
Using the Ribbon ........................................... 4
Ribbon Guidelines ........................................ 4
Installing the Ribbon .................................... 4
Removing the Ribbon ................................... 4
Installing Paper ............................................. 5
Paper Guidelines .......................................... 6
Printing a Self-Test........................................ 7
Setting Top of Form....................................... 7
Tearing the Paper .......................................... 7
Using Buttons and Indicators ....................... 8
Control Panel ............................................... 8
LED Indicators ............................................. 8
Button Functions.......................................... 9
Audio Indicators......................................... 10
Using Power Options ................................... 11
Attaching Cables ........................................ 12
Configuring the Printer ............................... 12
Supplies........................................................ 16
Page 4
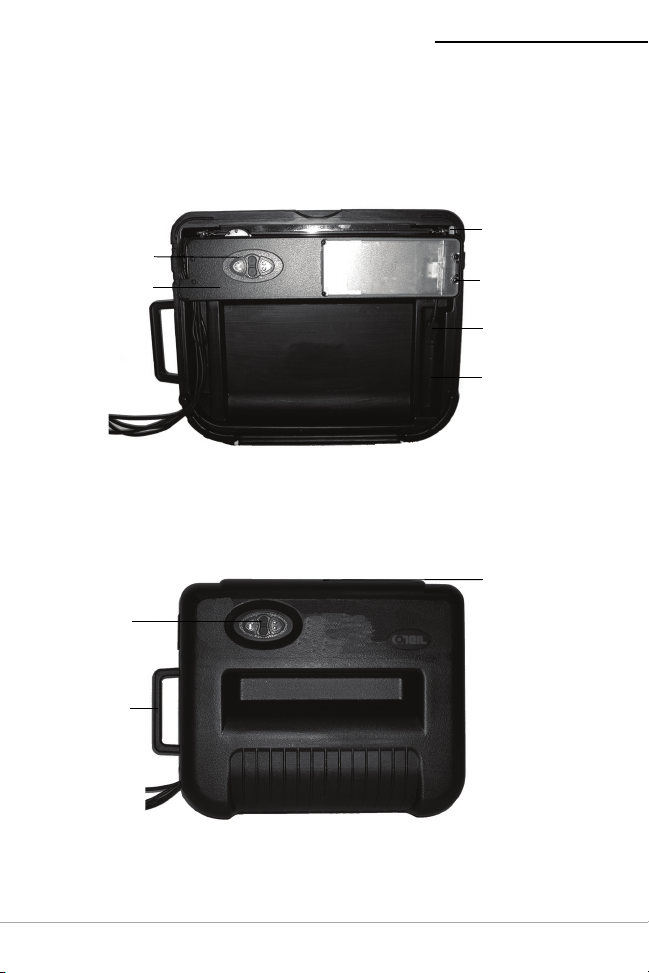
MF8i 270 PRINTER USER'S GUIDE
Battery well
Battery
cable
Access
cover
Locking
lever (green
knob)
Control
panel
Printer
assembly
Figure 1
Paper Exit
Handle
Control
panel
Figure 2
microFlash 8i 270 Printer
Open View
Closed View
1
Page 5
MF8i 270 PRINTER USER'S GUIDE
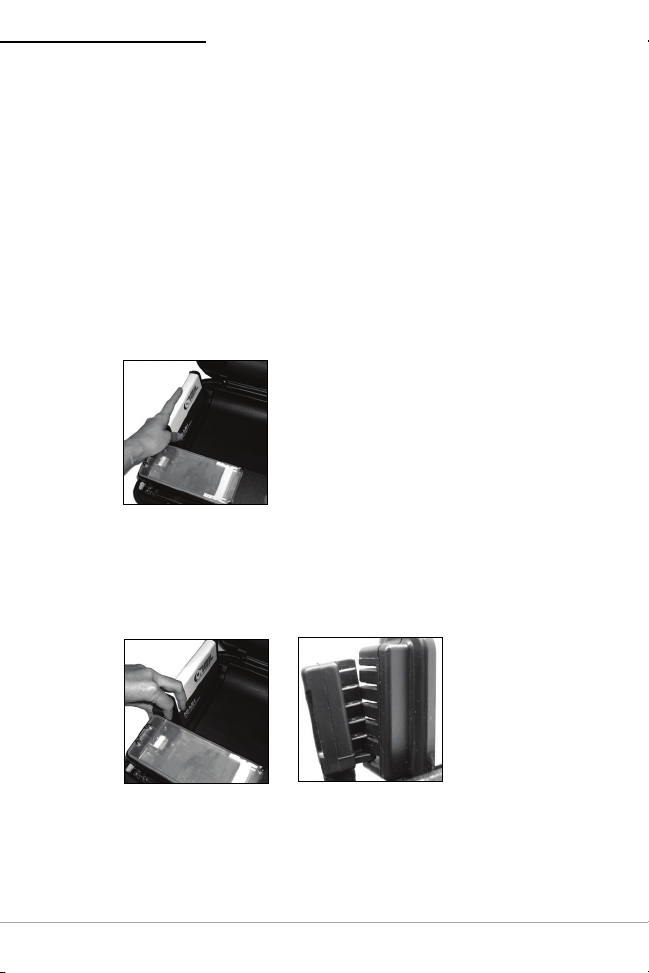
Figure 3
Figure 4a
Figure 4b
Installing the Printer
For information on installing the printer, see the
270 Installation Guide
, which is accessible from
www.datamax-oneil.com.
MF8i
Using the Battery
Installing and/or Replacing Batteries
1. Open the printer’s cover.
2. Place the battery in the battery well (Figure 3).
3. Align and connect the cable connector to the battery
(Figure 4a). Do not force the cable connector to fit to
the battery, the parts easily connect when properly
aligned (Figure 4b).
4. Close the printer’s cover.
5. Charge the battery. For more information, see
Charging the Battery on page 3
2
.
Page 6

MF8i 270 PRINTER USER'S GUIDE
Charging the Battery
Note: The battery must be fully charged before
operating the printer to prevent errors.
Plug the AC power cord into a wall outlet. The battery
charges in approximately 4 to 5 hours with a handheld
computer (HHC) installed.
Caution: There is a risk of explosion if the battery is
replaced by an incorrect type. Dispose of used
batteries according to the instructions.
Caution: The operating temperature of this portable
printer is 50° C. However, the operating temperature
when used with Datamax-O’Neil power supply for
charging the portable printer is limited to 35° C. Please
charge the printer in a suitable location that meets this
temperature requirement.
Caution: (For US/Canada) Please only use the
Datamax-O’Neil part number 220180-100 power
supply with this product.
3
Page 7

MF8i 270 PRINTER USER'S GUIDE
Figure 5
Using the Ribbon
Ribbon Guidelines
In the event of a jam to or under the ribbon, replace the
ribbon immediately. If the jam continues, do not remove
the smear guards.
Installing the Ribbon
The printer ships without a ribbon installed. To install a
ribbon, perform the following:
1. Open the printer’s cover.
2. Depress the locking lever (green knob) to open the
print mechanism.
3. Remove the ribbon from its packaging.
4. Hold the ribbon by the flat handle.
5. Install the ribbon on the printhead (Figure 5).
6. Turn the knob counter-clockwise several times to
fully seat the ribbon.
Removing the Ribbon
1. Grasp the flat handle.
2. Pull the ribbon out of the brackets.
4
Page 8

MF8i 270 PRINTER USER'S GUIDE
Figure 6
Figure 7
Figure 8
Installing Paper
1. Open the two latches on the side of the printer’s
cover and lift the printer’s cover to the fully open
position.
Note: Remove the orange label from the locking lever
(green knob).
2. Depress the locking lever (green knob) to open the
print mechanism (Figure 6).
3. Flip open the print mechanism and verify the center
guide is centered.
4. Lift the two tractor feed clips.
5. Fold the stack of paper in half with the short sides
together and with the top of the form coming out
from the inside fold (Figure 7).
6. Place the paper into the paper cavity with the
bottom edges under the paper lip in the bottom of
the cavity (Figure 8).
5
Page 9
MF8i 270 PRINTER USER'S GUIDE
Figure 9
Figure 10
7. Feed the top of the form from the inside of the fold
through the tractor feed pins and to the outside edge
of the printer.
8. Align the holes in the paper with the studs in the
tractor feed wheel (Figure 9).
9. The left tractor feed is adjustable. Lift the locking
lever (green knob) to release the tractor feed.
10. Verify that the paper is taut and the paper feeds
correctly.
11. Close the tractor feed clips, the print mechanism,
and the printer’s cover (Figure 10).
12. Set top of form. For more information, see
Top of Form on page 7
.
Paper Guidelines
Form Parts Maximum Number of Sheets
1 200
2 90
360
4 50
6
Setting
Page 10

MF8i 270 PRINTER USER'S GUIDE
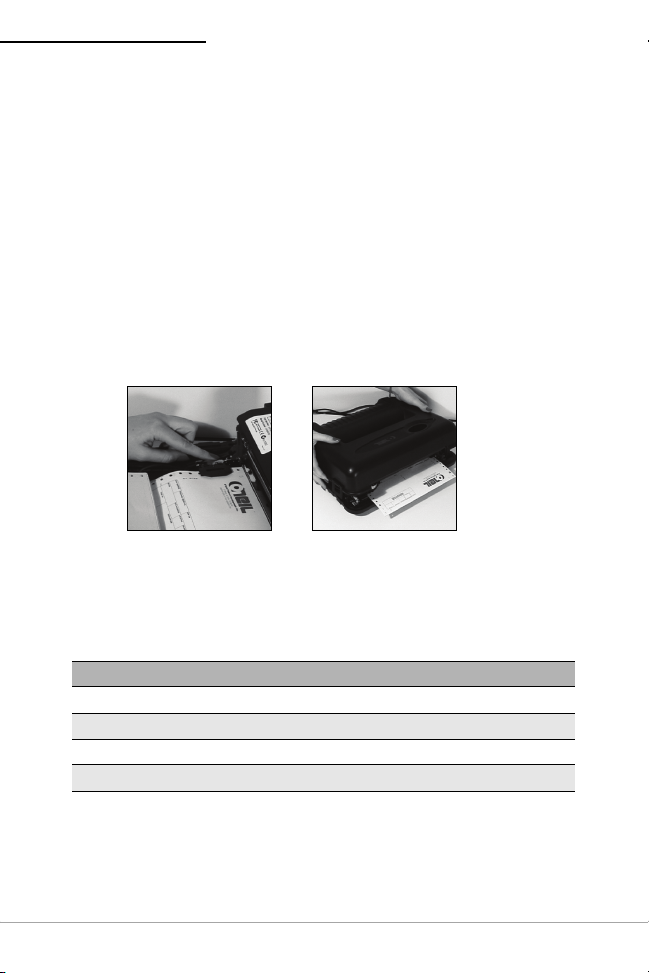
Figure 11
Printing a Self-Test
1. Turn the printer off by pressing Button 1 and Button
2 simultaneously.
2. Press and hold Button 1. After printing begins,
release Button 1.
Setting Top of Form
1. Press Button 1 to turn on the printer.
2. Position the paper by pressing Button 1 until the end
of the paper is at the edge of the case, for easy tear
up or tear down. If necessary, press Button 2 to
back feed the paper.
3. Turn the printer off by pressing buttons 1 and 2
simultaneously (Figure 11).
4. Press Button 1 to turn on the printer. The top of form
is automatically set.
Tearing the Paper
1. Set the paper to top of form. For more information,
see
Setting Top of Form on page 7
2. Grab one side of the paper at a leading edge and
pull up. Once the paper has started tearing at the
perforation, finish with a swift pull upward and
away.
7
.
Page 11

MF8i 270 PRINTER USER'S GUIDE
IrDA
window
Button 1
Power LED
Charge LED
Button 2
Figure 12
Using Buttons and Indicators
Control Panel
LED Indicators
Charge LED
LED Description Action
Solid red Charging in progress. None.
Red flash -
slow
Red flash - fast High temperature. Change environment.
Red to orange -
slow
Red to orange -
fast
Orange flash -
slow
Orange flash -
fast
Green Charge completed. None.
Battery disconnected.
Low temperature.
Connect battery.
Change environment.
Low voltage. Restart charge.
High voltage. Replace battery.
Charge timeout. Restart battery
charge.
Internal error. Reset printer
8
Page 12

MF8i 270 PRINTER USER'S GUIDE
Power LED
LED Description Action
Green Power on. None.
Green flash -
fast
Green to orange
alternating flash
- fast
Orange flash -
fast
Paper out, head jam. Install paper, check
for paper jam.
If a radio card is
installed, indicates radio
and printer are on.
If a radio card is
installed, indicates radio
is on and printer is off.
None.
None.
Button Functions
Charge LED
Function Description
1 line feed Press Button 1 once.
5 line feeds Press and hold Button 1.
Form feed Press and hold Button 1, then release.
Self-test Press and hold Button 1 until printing starts.
Clear out of
paper or
head up
Back feed Press Button 2.
Power on/
off/TOF
Press Button 1.
Press Button 1 and 2 simultaneously.
9
Page 13

MF8i 270 PRINTER USER'S GUIDE
Audio Indicators
LED Description Action
Long series
of short
beeps
1 short RF power is on (when
1 long Boot code is starting or
2 short RF power is off (when
3 midlength
4 short Charge is starting when
5 double Out of paper. Install paper.
8 CRC firmware error. Redownload firmware.
10 Error writing to
Infinite
beeps/
toggle LEDs
Head jam. Check for paper jam.
None.
RF power button is
pressed and RF power
was off).
None.
restarting (occurs more
than once when
downloading new
firmware).
None.
RF power button is
pressed and was on).
Low battery voltage. Charge battery.
None.
external power is
applied to printer.
Redownload firmware.
communication
controller firmware.
Comm controller failure. Redownload firmware.
Note: Pressing Button 1 during a form feed or during
printing cancels the action.
10
Page 14

MF8i 270 PRINTER USER'S GUIDE
Figure 13
Using Power Options
Use the following options to power the printer:
• AC — AC/DC Power Supply
• DC — Cigarette Adapter
•Batteries — NiMH
The red-tagged cable attached to the printer connects
to the AC adapter cable. The white-tagged cable
connects to the cigarette lighter adapter for use in
vehicles. If neither the red nor the white cable is in use,
the printer is running off the battery.
The third cable (RJ11 telephone style) is the data cable
(see Attaching Cables on page 12). The fourth cable,
blue-tagged, is a third cradle connection used to
connect to external cradle, either in a truck or a bag
solution.
11
Page 15

MF8i 270 PRINTER USER'S GUIDE
Figure 14
Attaching Cables
The RJ11 (telephone style) connector attached to the
printer connects to your notebook and/or computer or
handheld (HHC) using an optional data cable or
handheld cradle.
Configuring the Printer
The printer has many configurable settings. To configure
or upgrade firmware, download the Windows
configuration programs at www.datamax-oneil.com.
12
Page 16
MF8i 270 PRINTER USER'S GUIDE
Agency Approvals
FCC Notice
This equipment has been tested and found to comply with the
limits for a Class B digital device, pursuant to Part 15 of the FCC
Rules. These limits are designed to provide reasonable protection
against harmful interference in a residential installation.
This equipment generates, uses and can radiate radio frequency
energy and, if not installed and used in accordance with the
instructions, it may cause harmful interference to radio
communications. However there is no guarantee that interference
will not occur in a particular installation. If this equipment does
cause harmful interference to radio or television reception, which
can be determined by turning the equipment off and on, the user
is encouraged to try to correct the interference by one or more of
the following measures:
• Reorient or relocate the receiving antenna.
• Increase the separation between the equipment and receiver.
• Connect the equipment to an outlet on a circuit different from
that to which the receiver is connected.
• Consult the dealer or an experienced radio/TV technician for
help.
Applicable Directive
• 89/336/EEC, 73/23/EEC
Applicable Standards
• EN55022 (1998)
• EN55024 (1998)
• EN60950 (1992)
13
Page 17

MF8i 270 PRINTER USER'S GUIDE
14
Page 18

MF8i 270 PRINTER USER'S GUIDE
Warranty
The Company warrants that Datamax-O’Neil products are free
from defects in manufacturing materials and workmanship for one
(1) year from date of original purchase to Buyer/Distributor
(OEMs 90 days from the date of purchase). Batteries, cables,
power supplies, and other accessories will be warranted for ninety
(90) days. Datamax-O’Neil makes no other warranties, expressed
or implied, including implied warranties of merchantability and
fitness of purpose.
If you try to repair, disassemble, or change the product in any
way, or use parts not provided by Datamax-O’Neil without prior,
written authorization, all warranties are void.
For complete warranty and repair information, see the Warranty
Card included in your original packaging.
Warranty Disclaimer
Customers are not required to purchase Datamax-O’Neil supplies.
However, for a warranty claim, if Datamax-O’Neil determines that
damage to the printhead or printer mechanism was directly
caused by the use of non-certified or non-approved supplies,
Datamax-O’Neil reserves the right to hold the user responsible for
all labor and material charges required for the repair.
Copyright
This manual and any examples contained herein are provided “as
is” and are subject to change without notice. Datamax-O’Neil
makes no warranty of any kind with regard to this manual,
including, but not limited to, the implied warranties of
merchantability and fitness for a particular purpose. DatamaxO’Neil shall not be liable for any errors or for incidental or
consequential damages in connection with the furnishing,
performance, or use of this manual or the examples
herein. This guide is copyrighted. All rights are reserved. This
guide may not, in whole or in part, be reproduced, translated,
stored in a retrieval system or transmitted in any form or by any
means, electronic, mechanical, photographic, or otherwise,
without the prior written consent of Datamax-O’Neil.
15
Page 19

MF8i 270 PRINTER USER'S GUIDE
Supplies
Use only supplies certified by the Original Equipment
Manufacturer (OEM). For OEM supplies, please contact
Datamax-O’Neil at (949) 458-6400.
For more information
For more information about using the printer, contact
Datamax-O’Neil at (949) 458-0500, or visit
www.datamax-oneil.com.
16
Page 20

COPYRIGHT © 2010, DATAMAX-O’NEIL
 Loading...