

Page 1
XTend Max Scanner
User Manual
Version 0.2
Page 2

Contents:
1 DESCRIPTION ................................................................................................................................ 4
1.1 A DESCRIPTION OF THE XTEND MAX UNIVERSAL STICK SCANNER ................................................... 4
1.2 SWITCH ON THE SCANNER ........................................................................................................... 4
1.3 SWITCH OFF THE SCANNER .......................................................................................................... 4
1.4 SCANNING A MICROCHIP .............................................................................................................. 5
1.5 EFFECTIVE SCANNING.................................................................................................................. 5
1.6 WHICH MICROCHIPS IS XTEND MAX ABLE TO READ........................................................................ 5
2 USER INTERFACE .......................................................................................................................... 5
2.1 KEYPAD ...................................................................................................................................... 5
2.2 STICK ANTENNA .......................................................................................................................... 5
2.3 ON BUTTON ................................................................................................................................ 6
2.4 SELECT LEFT BUTTON .............................................................................................................. 6
2.5 SELECT RIGHT BUTTON ........................................................................................................... 6
2.6 STICK BUTTON ........................................................................................................................... 6
3 MENU MANAGEMENT .................................................................................................................... 7
3.1 SETTINGS ................................................................................................................................... 7
3.1.1 Auto shutdown .................................................................................................................. 7
3.1.2 Reading timeout ................................................................................................................ 7
3.2 INFORMATION .............................................................................................................................. 7
3.3 DATE AND TIME ........................................................................................................................... 8
3.3.1 Available Formats .............................................................................................................. 8
3.3.2 Setting The Date ................................................................................................................ 8
3.3.3 Setting The Time ............................................................................................................... 8
3.4 DISPLAY ..................................................................................................................................... 8
3.4.1 Backlight Timeout.............................................................................................................. 9
3.4.2 Brightness ......................................................................................................................... 9
3.4.3 Start-Up Image .................................................................................................................. 9
3.5 AUDIO ........................................................................................................................................ 9
3.5.1 Audio Level ........................................................................................................................ 9
3.5.2 Keyboard Sound ............................................................................................................... 9
3.5.3 Start-Up Sound ............................................................................................................... 10
3.5.4 Shut-Down Sound ........................................................................................................... 10
3.5.5 Reading Sound ................................................................................................................ 10
4 CONNECT YOUR XTEND MAX TO A PC .................................................................................... 11
4.1 BASIC MODE ............................................................................................................................. 11
4.2 ADVANCED MODE ..................................................................................................................... 11
4.2.1 USB Mass Storage .......................................................................................................... 11
4.2.2 USB Virtual Com Port ...................................................................................................... 11
4.2.3 USB Keyboard Wedge .................................................................................................... 11
4.2.4 Bluetooth ......................................................................................................................... 11
5 BATTERY MANAGEMENT ............................................................................................................ 12
5.1 BATTERY DISCHARGED / POWER LOW ........................................................................................ 12
5.2 BATTERY CHARGING ................................................................................................................. 12
5.3 FULL POWER ............................................................................................................................ 12
6 TAKE CARE OF YOUR SCANNER .............................................................................................. 14
7 SPECIFICATIONS ......................................................................................................................... 15
8 SOFTMAX ...................................................................................................................................... 16
9 INFORMATION TO USER ............................................................................................................. 17
9.1 FCC PART 15 ........................................................................................................................... 17
10 DO YOU HAVE A PROBLEM IDENTIFYING AN ANIMAL? ......................................................... 18
XTend Max Reader User Manual – v. 0.2 December 2012 2
Page 3

10.1 THE READING DISTANCE IS TOO SHORT ................................................................................... 18
10.2 THE SCANNER DOES NOT READ THE TRANSPONDER ................................................................. 18
10.3 THE SCANNER DOES NOT WORK ............................................................................................. 18
11 ADVANCED MODE PACK ............................................................................................................ 19
12 BLUETOOTH ................................................................................................................................. 20
12.1 TURN ON BLUETOOTH MODULE ............................................................................................. 20
12.2 CONNECTION CONDITION ....................................................................................................... 20
12.3 PC BLUETOOTH MODULE CONFIGURATION .............................................................................. 20
12.4 BLUETOOTH PAIRING WIZARD ................................................................................................ 21
12.5 BLUETOOTH COM PORT ........................................................................................................ 23
13 CERTIFICATIONS ......................................................................................................................... 24
13.1 EUROPEAN DIRECTIVES ......................................................................................................... 24
13.2 AMERICAN DIRECTIVES .......................................................................................................... 24
14 END OF LIFE ................................................................................................................................. 25
14.1 DISASSEMBLY INSTRUCTIONS FOR XTEND MAX SCANNER ........................................................ 25
14.2 TOOLS REQUIRED ................................................................................................................. 25
14.3 PRODUCT DISASSEMBLY PROCESS ........................................................................................ 25
XTend Max Reader User Manual – v. 0.2 December 2012 3
Page 4
1 Description
1.1 A description of the XTend Max universal stick scanner
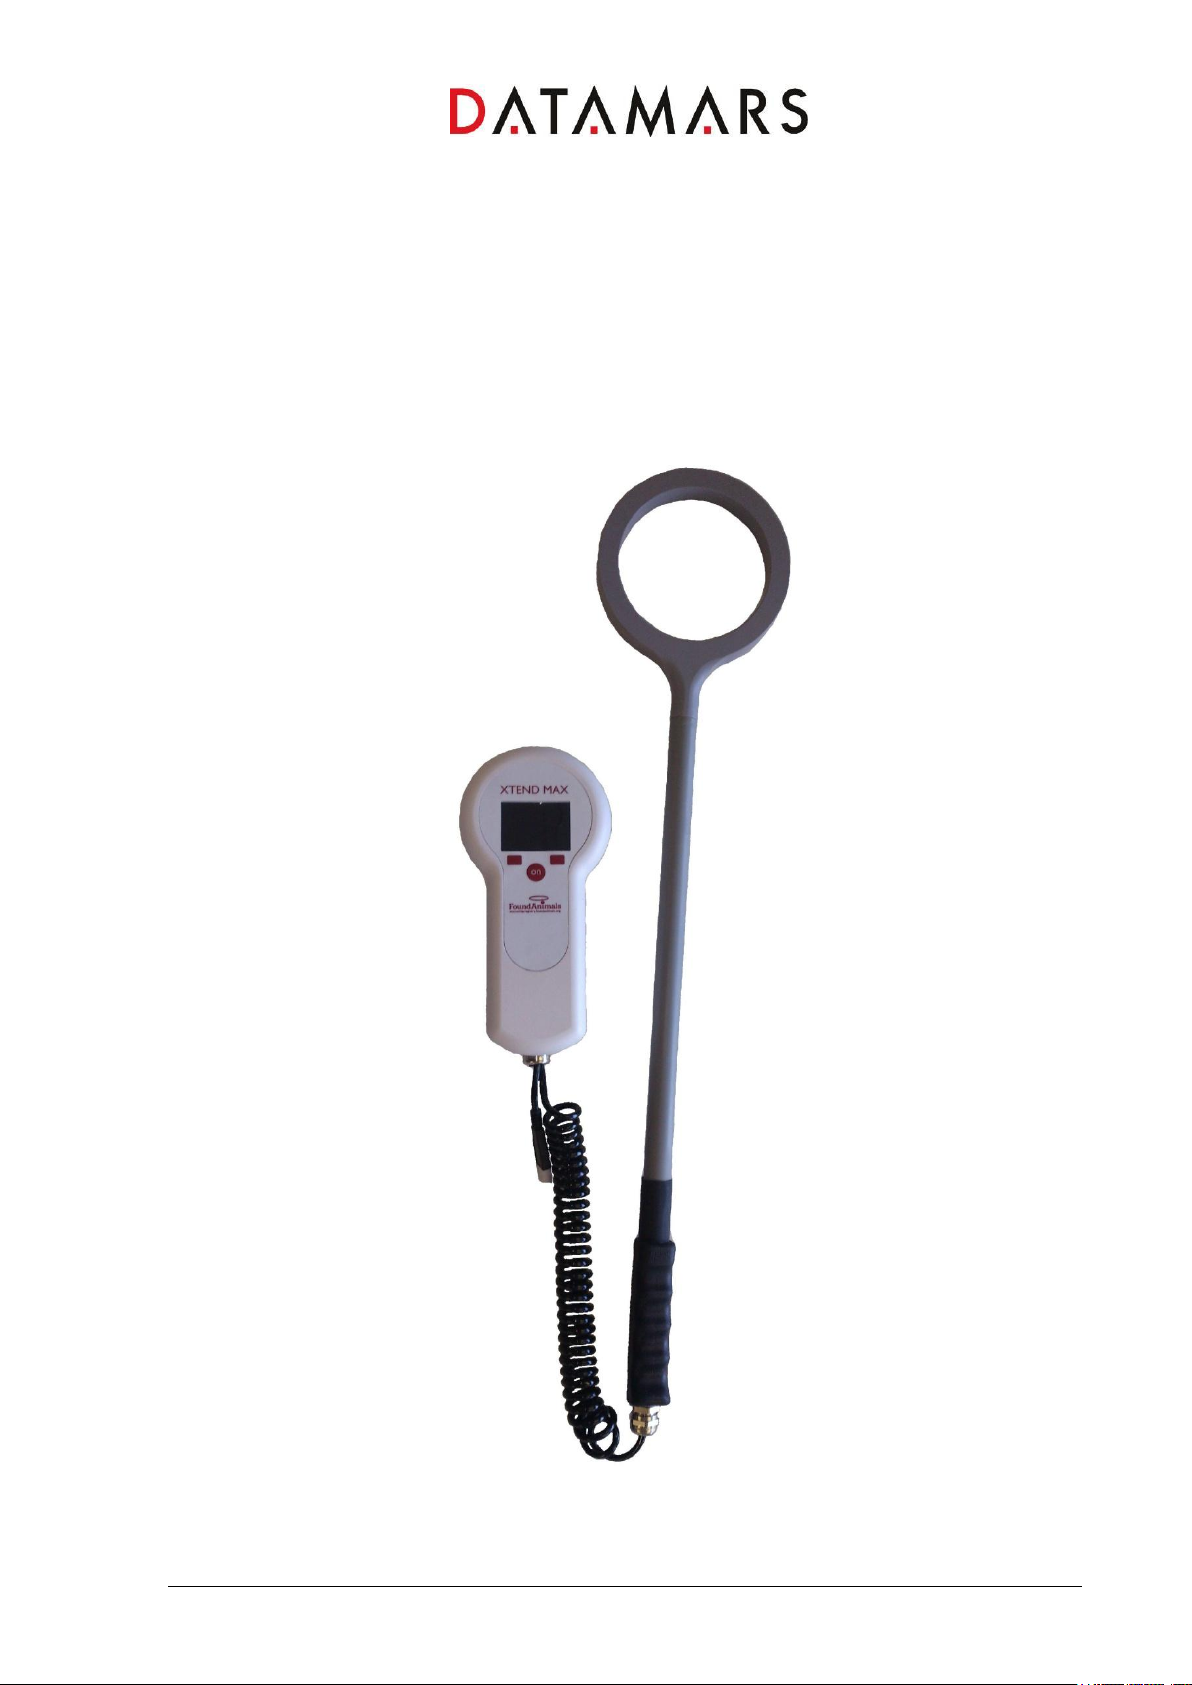
Datamars’ XTend Max is a portable, universal stick scanner used for scanning companion animal
microchips.
It reads all prevalent microchips available in North America. It is ideal for scanning aggressive,
stressed or feral animals without direct contact by placing added distance between you and the
animal for added safety.
XTend Max is one piece, not an extension – so you do not have to keep track of any extras or figure
out how to attach it to another device. XTend Max is bite proof, so it can also take a bit of abuse! It is
ideal for field use, especially for animal shelters, rescues and animal control agencies.
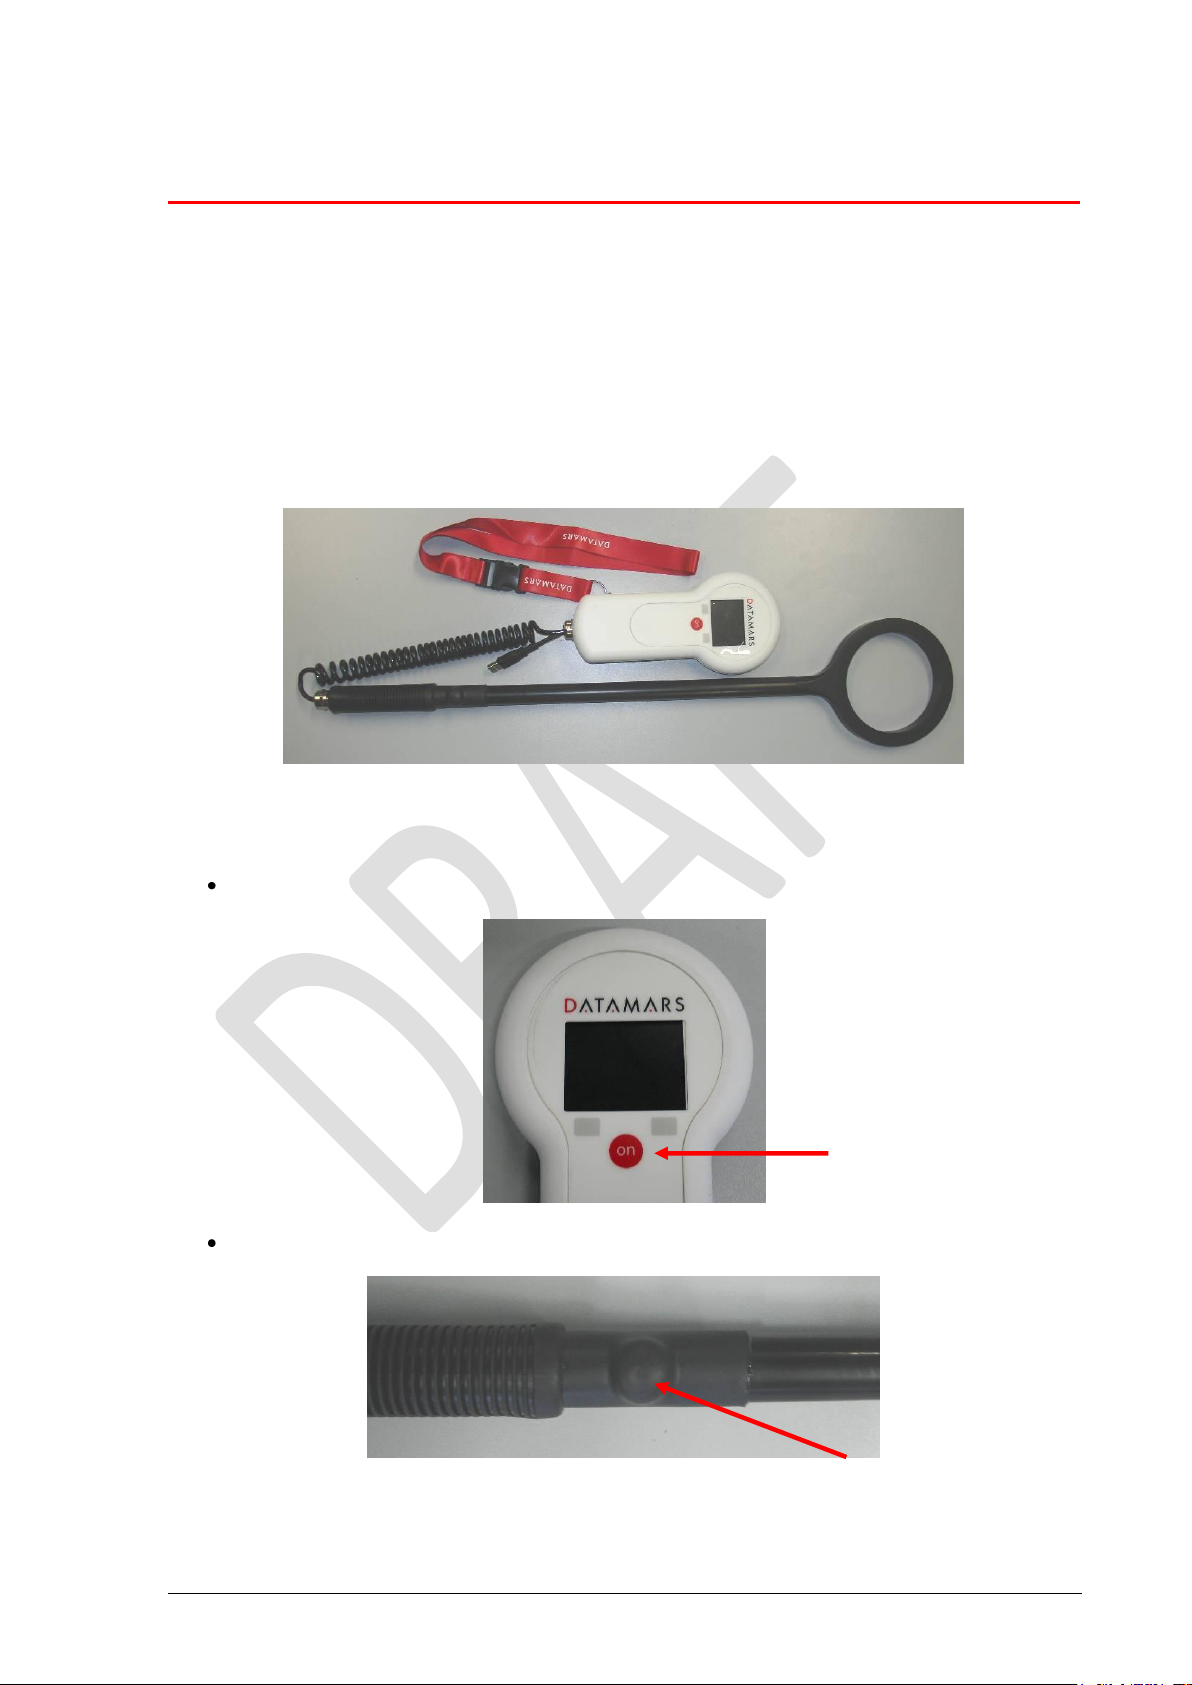
1.2 Switch on the scanner
There are two ways to turn on the XTend Max scanner:
Press the red “On” button which is located in the center of the control panel:
Alternatively, you can press the black button at the base of the stick portion of the scanner:
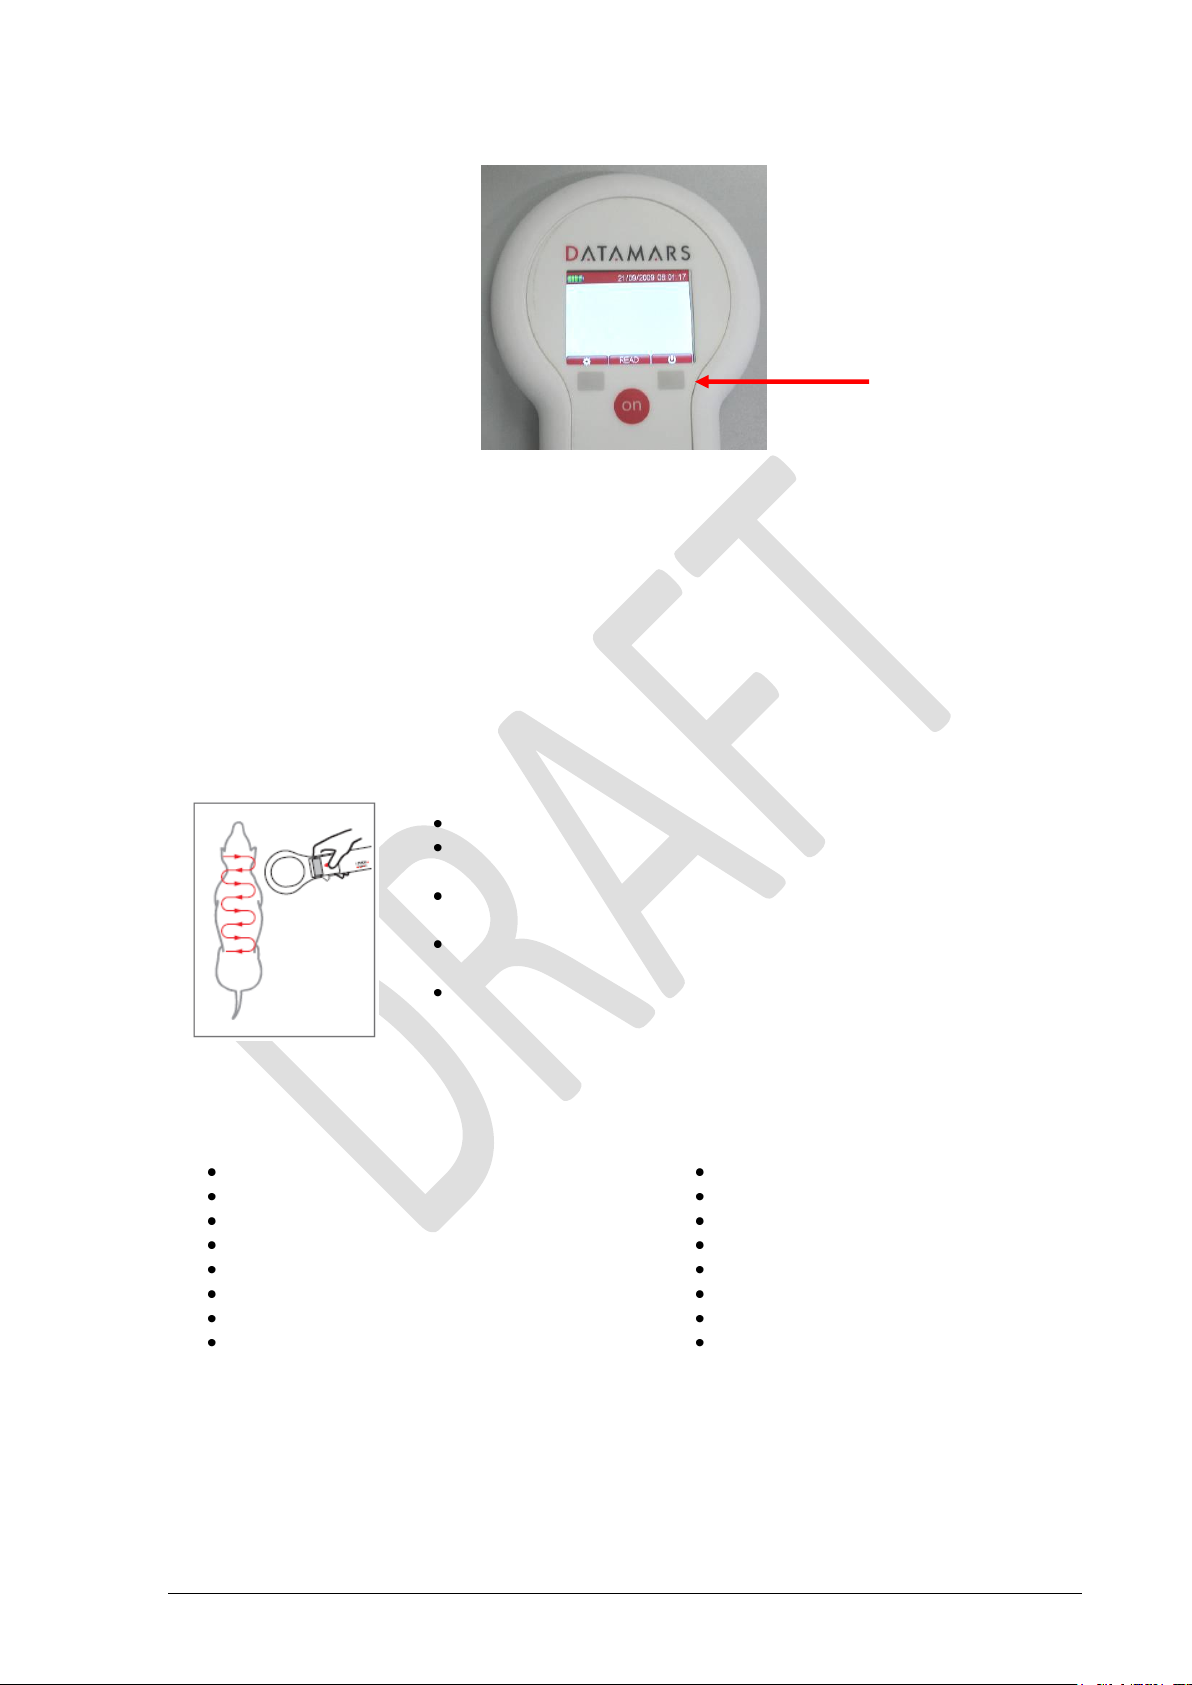
1.3 Switch off the scanner
Press the right navigation button located on the control panel until the unit powers down:
XTend Max Reader User Manual – v. 0.2 December 2012 4
Page 5
1.4 Scanning a microchip
Hold the XTend Max in close proximity to the animal to be scanned, and then press the red “On”
button located on the control panel in order to start scanning. You can also press the grey button at
the base of the stick to begin scanning.
XTend Max will give an audible sound and you will hear a “beep* when the scanner successfully
detects a microchip.
To cancel or stop scanning, press the red “On” button located on the control panel, or the grey
button at the base of the stick
1.5 Effective scanning
Hold the scanner close to, or touching the animal
Scan slowly and repeatedly over the entire body to ensure whether
or not a microchip present
Wave the scanner back and forth lightly while scanning, because
microchips can be in various orientations within the animal
Scan first in a horizontal, then a vertical “S” pattern down the
animal’s body, as shown in the diagram below
Consider scanning each animal more than once to ensure any
present microchip can be localized by the scanner
1.6 Which microchips is XTend Max able to read
The XTend Max universal stick scanner can detect the following microchips:
Microfinder Microchip
PetLink™ Microchip
24 Pet Watch™ Microchip
Allflex® Microchip
Banfield® Microchip
Destron Fearing™ Microchip
HomeAgain® Microchip
Schering Plough™ Microchip
Datamars™ Microchip
Bayer resQ® Microchip
AKC CAR/EID™ Microchip
Avid™ Microchip
Crystal Tag Microchip
Digital Angel® Microchip
Lifechip® Microchip
Trovan® Microchip
XTend Max Reader User Manual – v. 0.2 December 2012 5
Page 6
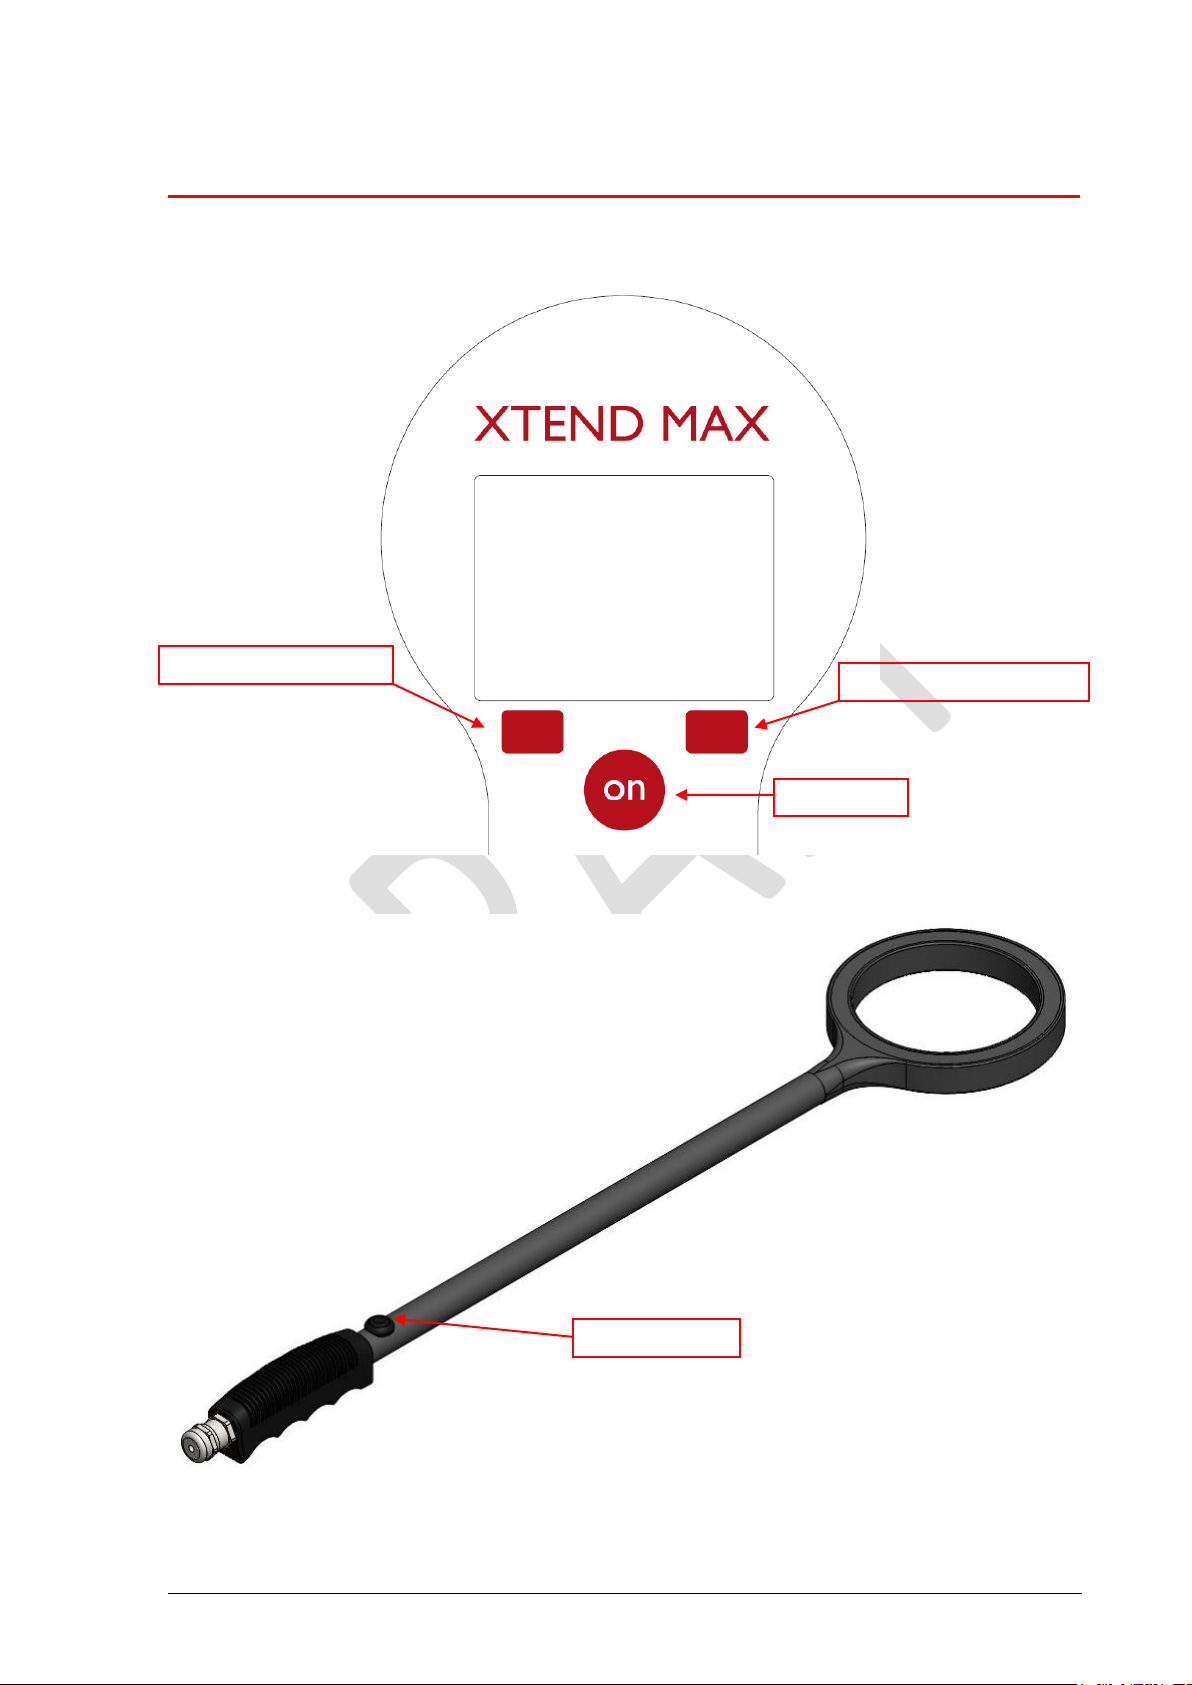
SELECT LEFT button
SELECT RIGHT button
ON button
STICK button
2 User interface
2.1 Keypad
2.2 Stick antenna
XTend Max Reader User Manual – v. 0.2 December 2012 5
Page 7

2.3 ON button
There is more than one possibility to use the ON button, in fact with him you are able to turn on the
XTend Max scanner, and when the scanner is turned on you have the possibility to start and stop a
reading session. Moreover when you are surfing in the menu the ON button is used to select and
confirm the various available settings, the settings are described in later chapters of this manual.
2.4 SELECT LEFT button
For enter in the settings menu you have to be pressed the SELECT LEFT button. Another
functionality of this button is the navigation into menu.
2.5 SELECT RIGHT button
In order to turn off the scanner you have to pressed the SELECT RIGHT button, but attention this
function can be accessed only when the scanner has displayed the initial screen, and it don’t is in the
reading mode. In the settings menu you can also use this button only for two modes. The first is in
order to change the value of a setting, and the second is for exit from menu.
2.6 STICK button
The STICK button has only two functions, you have to be pressed this button in order to turn on the
scanner, or for start a reading session.
XTend Max Reader User Manual – v. 0.2 December 2012 6
Page 8

3 Menu management
A number of different settings can be customized to the user’s preference.
Press the SELECT LEFT button from the scanner’s control panel in order to open the settings menu.
Press the SELECT RIGHT button from the scanner’s control panel in order to exit the settings menu.
3.1 Settings
Setup Icon
Continue to press SELECT LEFT button until the green selection is on the setup icon, and
then press the ON button in the center of the control panel to confirm your selection.
You can continue to scroll using the directional navigation arrows; the blue highlight indicates
a given selection; confirm you selections by pressing the ON button in the center of the
control panel.
Continue to follow the instructions below for more information on the available settings.
Once you are done, press the SELECT RIGHT button from scanner’s control panel to exit the
setup menu.
3.1.1 Auto shutdown
The auto shutdown setting defines the maximum amount time that the scanner remains powered on
while inactive before automatically switching off. This helps to conserve the battery life. The following
values are available:
Default: 60 sec. (1 min)
Maximum: 240 sec. (4 min)
Minimum: 10 sec.
3.1.2 Reading timeout
The reading timeout setting defines the maximum amount of time that the scanner will stay in reading
mode to try detect a microchip once a scan has been initiated. The following values are available:
Default: 30 sec.
Maximum: 60 sec. (1 min)
Minimum: 1 sec.
3.2 Information
Info Icon
The user can determine which version of Xtend Max they are using, which firmware version is loaded
and other important information as follows:
Press the left navigation button from scanner’s control panel to open the menu.
Continue to press the left navigation button until the green selection is on the Information
icon, and then press the red “On” button in the center of the control panel to confirm your
selection.
XTend Max Reader User Manual – v. 0.2 December 2012 7
Page 9

3.3 Date and Time
Date & Time Icon
The Date & Time setting allows you to adjust the date and the time, as well as the date format.
Press the left navigation button from scanner’s control panel to open the menu.
Continue to press the left navigation button until the green selection is on the Date & Time
icon, and then press the red “On” button in the center of the control panel to confirm your
selection.
You can continue to scroll using the directional navigation arrows; the blue highlight indicates
a given selection; confirm your selections by pressing the red “On” button in the center of the
control panel.
Once you are done, press the right navigation button from scanner’s control panel to exit the
Date & Time menu.
3.3.1 Available Formats
The available formats are:
Europe & Canada: Day before the month.
USA: Month before the day.
3.3.2 Setting The Date
Pressing the right navigation button will allow you to increase or decrease the value; you m ust press
the right button for an additional second in order to change the input method, then, once you are
done press the left navigation button and pass forward to modify the day and year using the same
procedure, once you are done press the red “On” button in the center of the control panel to save
your changes and exit this menu.
3.3.3 Setting The Time
Pressing the right navigation button will allow you to increase or decrease the time value (four digits
in total, e.g. 14:53). The system is a 24-hour clock. By pressing the left navigation button, you pass
from one digit to the other to set hours and minutes. Continue in this fashion, then once you are done
press the red “On” button in the center of the control panel to save your changes and exit this menu.
3.4 Display
Display Icon
The Display setting allows you to adjust the display. Access the Display menu as follows:
Press the left navigation button from scanner’s control panel to open the menu.
Continue to press the left navigation button until the green selection is on the Display icon,
and then press the red “On” button in the center of the control panel to confirm your
selection.
You can continue to scroll using the directional navigation arrows; the blue highlight indicates
a given selection; confirm your selections by pressing the red “On” button in the center of the
control panel.
Once you are done, press the right navigation button from scanner’s control panel to exit the
Display menu.
XTend Max Reader User Manual – v. 0.2 December 2012 8
Page 10

3.4.1 Backlight Timeout
The Backlight Timeout defines the maximum amount of time that the display remains on while the
unit is inactive. The following values are available:
Default: 40 sec.
Maximum: 60 sec. (1 min.)
Minimum: 1 sec.
3.4.2 Brightness
Brightness defines the level of the brightness of the display. The following values are available:
LOW – this will be the dimmest setting
MID – this is a medium setting and is suitable for most environments
HIGH – this is the brightest setting, and should be used in environments with low amounts of
available light
3.4.3 Start-Up Image
The Start-Up Image defines whether or not to display the FoundAnimals logo while the scanner is
switching on. When the feature is OFF, the image is disabled and will not display. When ON, the
image is enabled and will display.
3.5 Audio
Audio Icon
The Audio setting allows you to adjust the sounds made by Xtend Max.
Access the Audio menu as follows:
Press the left navigation button from scanner’s control panel to open the menu.
Continue to press the left navigation button until the green selection is on the Audio icon, and
then press the red “On” button in the center of the control panel to confirm your selection.
You can continue to scroll using the directional navigation arrows; the blue highlight indicates
a given selection; confirm your selections by pressing the red “On” button in the center of the
control panel.
Once you are done, press the right navigation button from scanner’s control panel to exit the
Audio menu.
3.5.1 Audio Level
The audio level sets the volume of Xtend Max’s audio signals. The following values are available:
OFF – the sound is completely disabled for all audio settings
LOW – this setting should be used in quiet environments or where animals are often scared
by ambient sounds
MID – this is a medium setting and is suitable for most environments
HIGH – this setting should be used in very noisy environments
3.5.2 Keyboard Sound
Keyboard sound will enable or disable the audio signal given when a button is pressed. When the
feature is set to OFF, the sound is disabled and will not be heard. When it is ON, the sound is
enabled and will be heard.
XTend Max Reader User Manual – v. 0.2 December 2012 9
Page 11

3.5.3 Start-Up Sound
Start-up sound enables or disables the audio signal given when the scanner is powered on. When
the feature is set to OFF, the sound is disabled and will not be heard. When it is ON, the sound is
enabled and will be heard.
3.5.4 Shut-Down Sound
Shut-down sound enables or disables the audio signal given when the scanner is powered down.
When the feature is set to OFF, the sound is disabled and will not be heard. When it is ON, the sound
is enabled and will be heard.
3.5.5 Reading Sound
Reading sound enables or disables the audio signal given when the scanner detects a microchip
after a successful reading. When the feature is set to OFF, the sound is disabled and will not be
heard. When it is ON, the sound is enabled and will be heard. Datamars recommends leaving this set
to ON so that users are alerted to successful or unsuccessful microchips readings.
XTend Max Reader User Manual – v. 0.2 December 2012 10
Page 12

4 Connect your XTend Max to a PC
4.1 Basic Mode
When the scanner is configured as basic mode you are able to use the PC for three functionality, the
first is for recharge the battery from the scanner; and with the second you are able t o connect it to
the Softmax in order to have the possibility to update the version of the firmware, or for upgrade the
level of the reader with charging new functionality.
The last possibility is to use the USB of the scanner as a Mass Storage, this way you have the
possibility to use the scanner same as a USB storage pen.
4.2 Advanced Mode
When your scanner is configured as advanced mode and you have the USB pack, you have
possibility to communicate with the PC as following:
All functionality from the basic mode (USB MS)
Additional you have also the USB Virtual Com Port (USB VCP)
Additional you have also the USB Keyboard Wedge (USB KW)
When you have also the Bluetooth pack you can also communicate with the PC with a serial protocol
means the Bluetooth module of your scanner. If you do not have a BT module on your scanner, you
have to be sent the scanner by our repair center. For more info you can contact our Service &
Support team at animal-id@datamars.com.
4.2.1 USB Mass Storage
With this function you are able to connect the scanner to the PC in order to have it same as a USB
storage pen.
Although with using the Softmax you have the possibility to update the scanner with new
functionality or update the official firmware. In dependence of the advanced pack in your possess
you can benefit other functionality with using Softmax.
Always when you connect the scanner to the PC, the battery will be go in charging mode, but in this
state you cannot use the scanner for reading sessions.
4.2.2 USB Virtual Com Port
This function allows communicating with the PC as with a serial cable, but you do not need a RS232
serial cable.
Also with this functionality when connected to the PC will be charging the battery of the scanner, with
the difference respect the USB Mass Storage you can use the scanner also for reading sessions.
4.2.3 USB Keyboard Wedge
This function allows using the scanner as a keyboard, in order to print in your database the UI just
read.
Also with this functionality when connected to the PC will be charging the battery of the scanner, with
the difference respect the USB Mass Storage you can use the scanner also for reading sessions.
4.2.4 Bluetooth
This function allows communicating with the PC as with a serial cable, but you do not need a RS232
serial cable. But you need a PC with a BT module.
XTend Max Reader User Manual – v. 0.2 December 2012 11
Page 13

5 Battery management
Xtend Max can be charged in two ways. You can connect the USB cable to the wall-mounted
adapter or you can connect the USB cable to a USB port on your Windows PC.
When the Xtend Max Scanner is in charging mode, the scanner functions are disabled.
5.1 Battery Discharged / Power Low
If you try to initiate a scan when the unit’s battery has almost fully discharged, the unit will
automatically shut off and the following image will appear:
Please connect Xtend Max to a power source for charging.
5.2 Battery Charging
The following image will appear when the battery power is low but the unit is plugged in and the
battery is charging.
Indicates unit is plugged into the wall Indicates unit is plugged in via USB
5.3 Full Power
While still plugged into a power source, Xtend Max will display one of the following images when fully
charged.
XTend Max Reader User Manual – v. 0.2 December 2012 12
Page 14

Indicates unit is plugged into the wall Indicates unit is plugged in via USB
XTend Max Reader User Manual – v. 0.2 December 2012 13
Page 15

6 Take care of your scanner
Ensure that the scanner does not get damaged. Do not drop it onto a hard surface or subject it to
wet conditions.
If the outer casing of the scanner becomes soiled, it can be cleaned with a damp cloth. First ensure
that it is not connected to the charger.
If for any reason the scanner is not working, please do not attempt to repair it, but return it for repair
to your local dealer.
The display of the scanner Xtend Max may change color if exposed to temperatures higher than
50°C. It will return to its original color as soon as the temperature gets below 50°C.
At very low temperatures the display may lose its contrast, but at normal temperatures it will return to
its normal contrast.
XTend Max Reader User Manual – v. 0.2 December 2012 14
Page 16

7 Specifications
7.1 Customer benefits
100% water-proof
Good reading performance for all types of Animal ID tags
Highly versatile and easy to handle in outdoor as indoor conditions
Possibility to transfer data on the fly through Bluetooth wireless connection and USB wire
connection
User memory available up to 2GB
User-friendly TFT LCD color display with backlight and high-quality integrated loudspeaker
Highly flexible dedicated application software “SoftMax” (MS Windows compatible)
Easy battery recharging through USB cable connected to PC or wall mount
adapter
7.2 Product description
Datamars’ XTend Max is a portable, universal stick scanner used for scanning companion animal
microchips.
It reads all prevalent microchips available in North America. It is ideal for scanning aggressive,
stressed or feral animals without direct contact by placing added distance between you and the
animal for added safety.
XTend Max is one piece, not an extension – so you do not have to keep track of any extras or figure
out how to attach it to another device. XTend Max is bite proof, so it can also take a bit of abuse! It is
ideal for field use, especially for animal shelters, rescues and animal control agencies.
7.3 Technical data
Dimensions: 223 x 108 x 41 mm
Weight: 326 g
Operating temperature: -5°C to +55°C, 85% RH, non-condensing
Storage temperature: -20°C to +65°, 85% RH, non-condensing
Power supply: Rechargeable battery (Li-Polymer) : 3.7V / 2500mAh
USB cable included for communication and battery
charging
Battery charger adapter AC power source US
Interface: USB (Basic Mode); USB, Bluetooth (Advanced Mode)
Transmission frequency: 134.2 kHz
Memory: 2 GByte (≥ 2 million of records)
Typical reading distance: FDX-B Up to xx cm
FDX-A Up to xx cm
TVN Up to xx cm
Destron Up to xx cm
Approved by: CE, FCC (more details)
Environment protection: IP67 (EN 60529)
XTend Max Reader User Manual – v. 0.2 December 2012 15
Page 17

8 Softmax
XTend Max Reader User Manual – v. 0.2 December 2012 16
Page 18

9 Information to user
9.1 FCC Part 15
This device complies with Part 15 of the FCC Rules. Operation is subject to the following two
conditions: (1) This device may not cause harmful interference, and (2) This device must accept any
interference received, including interference that may cause undesired operation.
This equipment has been tested and found to comply with the limits for Class B Digital Device,
pursuant to Part 15 of the FCC Rules. These limits are designed to provide reasonable protection
against harmful interference in a residential installation. This equipment generates and can radiate
radio frequency energy and, if not installed and used in accordance with the instructions, may cause
harmful interference to radio communications. However, there is no guarantee that interference will
not occur in a particular installation. If this equipment does cause harmful interference to radio or
television reception, which can be determined by turning the equipment off and on, the user is
encouraged to try to correct the interference by one or more of the following measures.
Reorient or relocate the receiving antenna
Increase the separation between the equipment and receiver
Connect the equipment into an outlet on a circuit different from that to which the receiver is
connected
Consult the dealer or an experienced radio/TV technician for help
Any changes or modifications not expressly approved by the party responsible for compliance could
void the user’s authority to operate the equipment.
Attention: The final product must have the ferrite fixed permanently to the power supply cable.
9.2 IC RSS 210
This device complies with Industry Canada license-exempt RSS standard(s). Operation is subject to
the following two conditions:
(1) This device may not cause interference, and (2) this device must accept any interference,
including interference that may cause undesired operation of the device.
Le présent appareil est conforme aux CNR d’Industrie Canada applicables aux appareils radio
exempts de licence. L’exploitation est autorisée aux deux conditions suivantes:
(1) l’appareil ne doit pas produire de brouillage, et (2) l’utilisateur de l’appareil doit accepter tout
brouillage radioélectrique subi, même si le brouillage est susceptible d’e n compromettre le
fonctionnement.
XTend Max Reader User Manual – v. 0.2 December 2012 17
Page 19

Do you have a problem identifying an animal?
9.3 The reading distance is too short
The maximum reading distance is obtained with the transponder (tag) perpendicular to the antenna
and aimed at the center of the antenna coil. If the tag is implanted into an animal its orientation may
not be optimal and therefore the reading distance may be reduced.
You might be close to a source of electromagnetic disturbances like video or TV. Move a few meters
away and try again.
Do not use the scanner on a steel table. The metal will reduce the performance of the antenna.
The reading distance is reduced if the transponder is still in the needle.
9.4 The scanner does not read the transponder
Change the angle of the scanner and try again.
Some types of transponders from other manufacturers are disturbed if placed in the center of the
scanner-antenna. It is possible that some tags will not function if placed in parallel and at the cent er
of the antenna. Change the direction of the tag or of the antenna.
9.5 The scanner does not work
Check the ambient temperature: it has to be between -5ºC and +45º C.
If you’re still having problems, please contact your dealer.
The Xtend Max scanner is a product developed and produced by DATAMARS, Switzerland.
Should you have any suggestions or require information regarding this or other DATAMARS
products, please contact your dealer.
XTend Max Reader User Manual – v. 0.2 December 2012 18
Page 20

10 Advanced Mode Pack
XTend Max Reader User Manual – v. 0.2 December 2012 19
Page 21

11 Bluetooth
In order to use the functionality explained below you have to be sure that your scanner has the
Bluetooth pack. The pack is composed about a physical Bluetooth module into the scanner and
equipped with a dedicated firmware.
11.1 Turn ON Bluetooth module
Press the right Select button in order to open the action menu, move the left Select button as long as
you are with the cursor over the Bluetooth icon. Then On button has to be pressed in order to
activate the Bluetooth module on the scanner. In the bar on top of the reader will be appear the
symbol of the Bluetooth. When the On button are pressed again you turn off the Bluetooth module,
and the icon over the bar disappear.
11.2 Connection condition
At first your PC must to be having a Bluetooth connection, generally all laptops or notepads are
equipped with an internal Bluetooth module. For the workstations, that normally not have a Bluetooth
device, are available USB Bluetooth module, that can you find in all electronic device shop.
Then it is important that the Xtend Max Scanner is ON and the BT module is activated.
11.3 PC Bluetooth module configuration
In this chapter is explained the how you can pair your scanner with a PC in order to establish a
wireless connection between the scanner and the PC.
At first from the control panel choose
appears:
At next select the
following picture:
Option
tab, and then check the feature
Bluetooth Device
. The following dialog windows will be
Turn discovery on
, as shown in the
XTend Max Reader User Manual – v. 0.2 December 2012 20
Page 22

Return to the start page of the dialog window with pressing the
Device
tap, as shown in the following
picture:
Double check that the Xtend Max Scanner is switched ON and the Bluetooth enabled, and then
press the
Add…
button on the bottom of the dialog window.
11.4 Bluetooth Pairing Wizard
The welcome window for the configuration guide of the new Bluetooth peripheral appears, as shown
in the following picture:
Press the
Next >
button on the bottom of the window, in order to start the search procedure, it will be
appearing following dialog window:
The result of the search procedure shows all Bluetooth device which are nearby, you have to be
search and select the device that are named as
If you do not find the device you have to be pressed the
XtendMax_Sxxx
Search Again
.
button, because it is possible
that the PC module do not find the device at the first attempt.
XTend Max Reader User Manual – v. 0.2 December 2012 21
Page 23

After the selection of the device you have to be pressed the
picture:
Select the option:
scanners the same, just one 0 characters, and then press the
the following picture:
Let me choose my own passkey
and the password is 0. This is for all Datamars
Next >
button, as shown in the following
Next >
button to continue, as shown in
The connecting window will be appear, sometimes is it possible that this operation do not go at the
first attempt. This is related of the compatibility of the two Bluetooth module, scanner and PC, but
after a second or third try it will be working correctly. In order to start again the pairing press the
Again
button on the bottom of the windows.
When the procedure is finished your device is recognized and installed in your PC as a Bluetooth
device. In order to end the installation of the Bluetooth device press the
of the window.
Finish
button on the bottom
Start
XTend Max Reader User Manual – v. 0.2 December 2012 22
Page 24

11.5 Bluetooth COM Port
The installation of the Bluetooth module will be creating on the PC two new COM Ports, in order to
see this new ports you have to be selected the
COM Ports
tab.
You find listed all port for your new Bluetooth device, one is an outgoing and the other is an incoming
port, as shown in the following picture:
You have to be selected the outgoing COM when you will use the Xtend Max in the server mode.
With the server mode you have a faster first connection to the PC Bluetooth application, but when
you turn off the Bluetooth from the scanner or you lost the connection. You have to be restarting the
Bluetooth application on your PC in order to reconnect the scanner.
You have to be selected the incoming COM when you will use the Xtend Max in the client mode.
The connection to the PC Bluetooth application is slower, but when you lost the connection and you
reconnect the scanner to the PC you do not have problems and you do not do restart the application.
XTend Max Reader User Manual – v. 0.2 December 2012 23
Page 25

ETSI EN 300 330-1 /
ETSI EN 300 330-2
Electromagnetic compatibility and Radio spectrum matters
(ERM) - Short Range Devices.
ETSI EN 301 489-1 /
ETSI EN 301 489-3
Electromagnetic compatibility (EMC) standard for radio
equipment and services.
IEC/EN 61000-4-2 /
IEC/EN 61000-4-3/
IEC/EN 61000-4-4/
IEC/EN 61000-4-6
Electrostatic discharge, electromagnetic field, electrical fast
transient/burst, radio-frequency fields’ immunity.
FCC Part 15B
Part 15 Class B Computing Device Perioheral
FCC Part 15C
Part 15 Low Power Transmitter Below 1705 kHz
12 Certifications
12.1 European directives
Datamars SA, Via ai Prati, CH-6930 Bedano declares, under its own responsibility, that the product
Xtend Max is in accordance with the following standards:
Xtend Max satisfies the essential requirements of directives 99/5/EC.
12.2 American directives
Datamars SA, Via ai Prati, CH-6930 Bedano declares, under its own responsibility, that the product
Xtend Max is in accordance with the following standards:
XTend Max Reader User Manual – v. 0.2 December 2012 24
Page 26

Product Name / Model
Description
Extend Max / Any models
Universal portable scanner
Tool Description
Tool Size (if applicable)
Nipper
Medium
Philips screwdriver (0)
Small
Cutter pliers
Medium
Hot Air Gun
Big
1
All external plastics have to be removed from
the scanner (use Philips screwdriver to remove
all screws).
The Keypad has to be removed from the top
cover casing (use the Hot Air Gun with the
cutter pliers in order to easily remove the
keypad).
2
Dispose plastic parts of the scanner in
accordance with local recycling laws.
3
Dispose electronics parts of the scanner in
accordance with local recycling laws.
4
Dispose cables of the scanner in accordance with
local recycling laws.
13 End of life
13.1 Disassembly Instructions for Xtend Max scanner
Only authorized recyclers are permitted to use these disassembly instructions. Any attempted
disassembly by a user or unauthorized party will void the product warranty and may irreparably
damage the product.
13.2 Tools Required
13.3 Product Disassembly Process
XTend Max Reader User Manual – v. 0.2 December 2012 25
 Loading...