

Datamars XRS21 User Manual

QUICKSTART GUIDE
XRS2 Stick Reader
This quickstart guide provides basic instructions for setting up and using your XRS2 Stick Reader.
XRS2 Stick Reader Quickstart Guide
Contents
Unpacking the box ................................................. 1
Charging the battery .............................................. 2
Getting around ...................................................... 2
Recording EID tags ................................................. 3
Bluetooth
Viewing sessions .................................................... 4
Getting information off .......................................... 5
Making the most of your stick reader ...................... 6
Modifying settings ................................................. 7
Maintenance and servicing ..................................... 8
Compliance ............................................................ 9
® connection .......................................... 4
For further information, view the reference information
on the supplied USB flash drive or visit
www.tru-test.com.
1
Check that you have all of these items. If anything is missing, contact your supplier.
contains Data Link software and
Unpacking the box
USB flash drive
reference information
for charging. It also connects the
XRS2 stick reader (the stick reader)
USB cable
and power plugs for different countries.
stick reader to a PC.
Mains power adaptor
1
XRS2 Stick Reader Quickstart Guide
2
Caution!
- Use only the power adaptor and cables supplied.
- Do not charge the battery if the temperature is less than 5 °C (41 °F), or greater than 40 °C (104 °F).
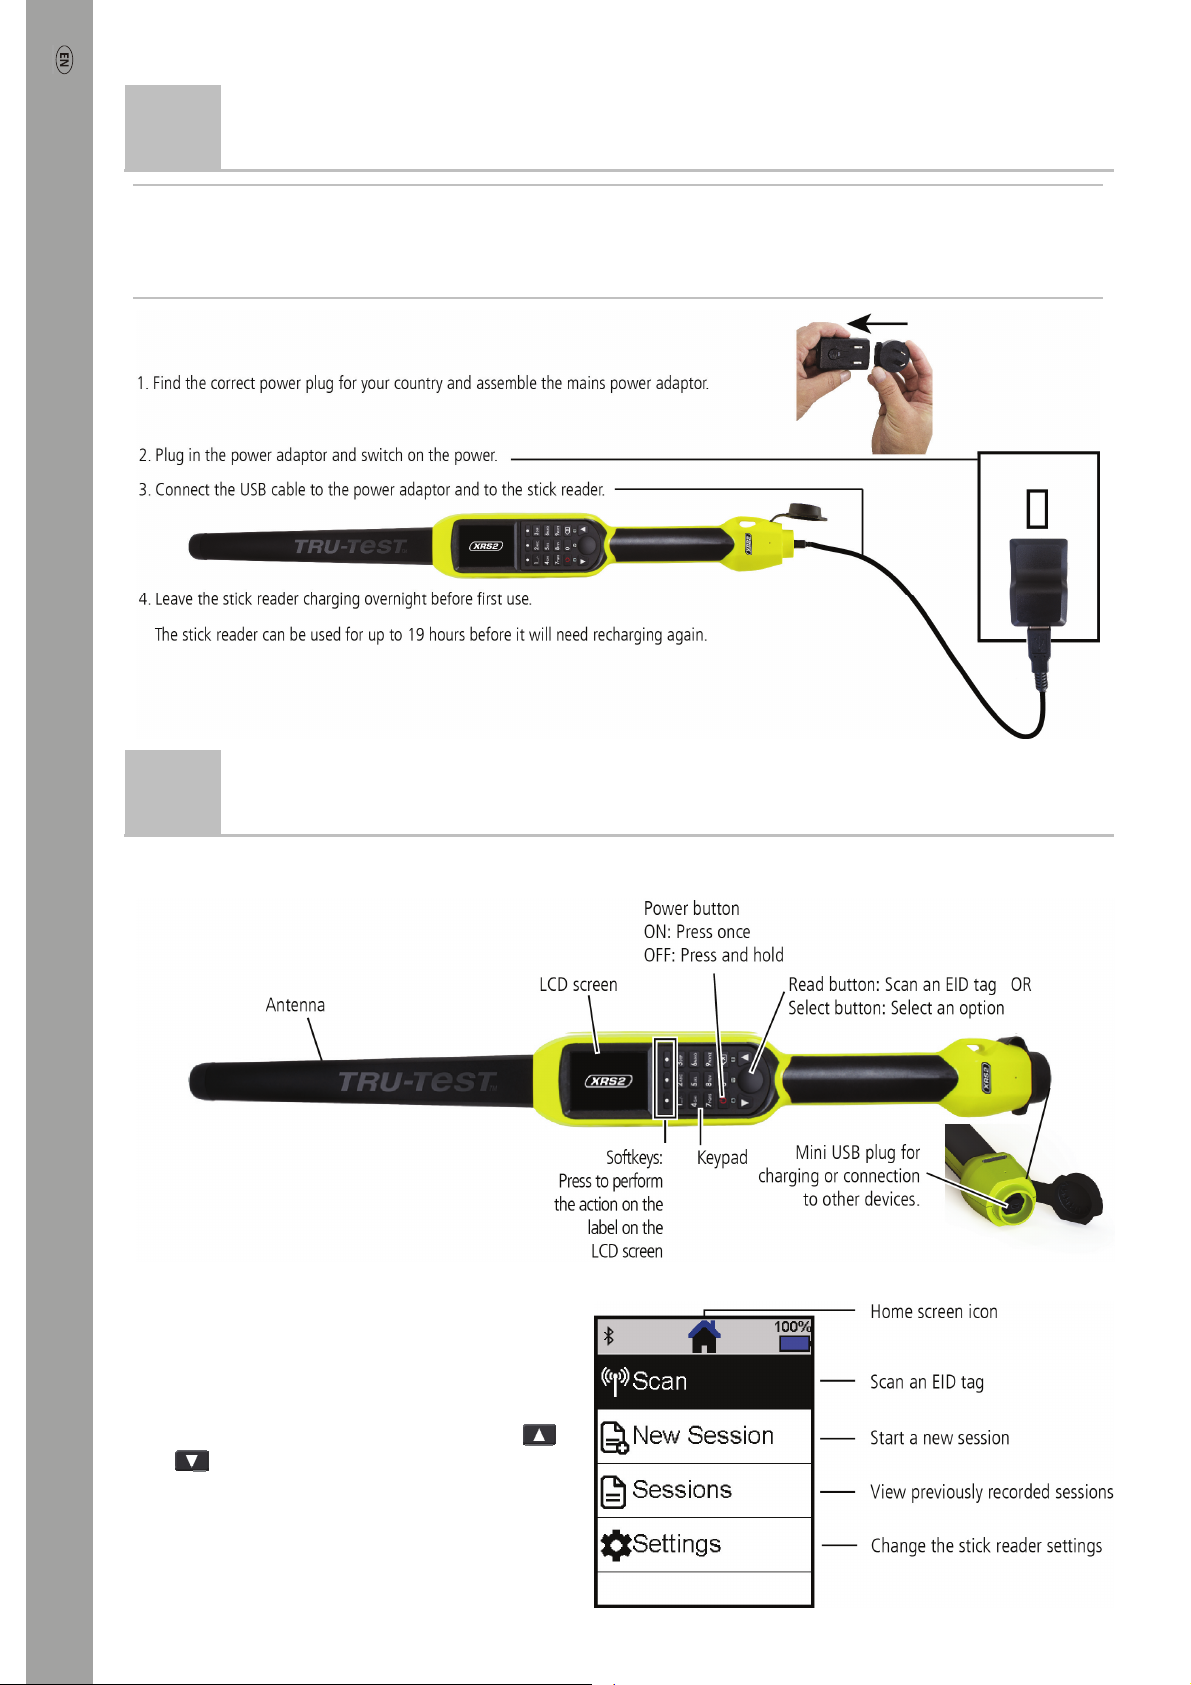
Charging the battery
3
Getting around
Parts of the stick reader
The Home screen
When you first switch on the stick reader, the Home
screen is displayed:
Scroll through the options using the arrow keys
and
button.
2
and choose an option using the Select
XRS2 Stick Reader Quickstart Guide
4
Recording EID tags
Ways of using the stick reader
The stick reader can be used in two ways:
1. Standalone - the stick reader saves each scanned tag in its internal memory. These records can be transferred
afterwards, as described in
2. Connected – the EID reader immediately transmits every scanned tag to a connected device, such as a weigh scale
indicator.
Section 7 – Getting information off
.
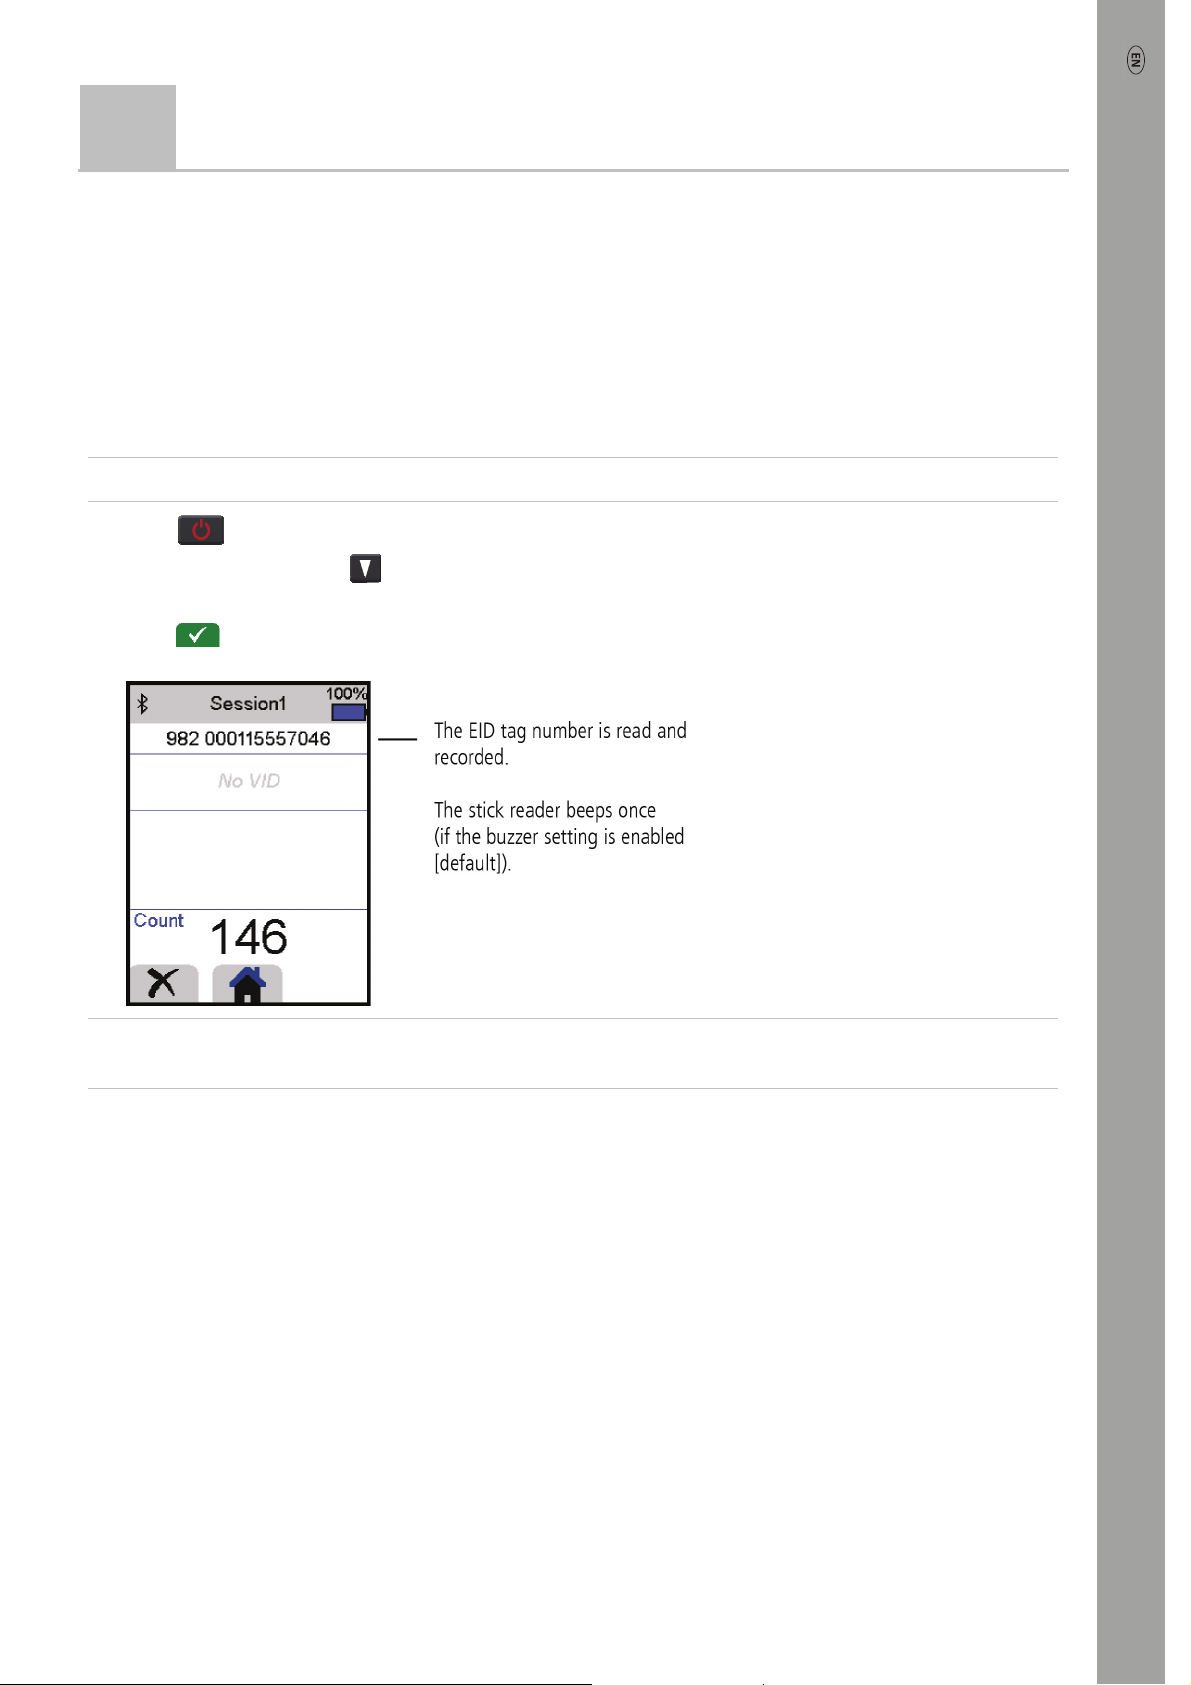
Recording EID tags (standalone)
Note:
You should start a new session file each time you begin a new scanning session.
1. Press to switch on the stick reader.
2. On the Home screen, press
3. If desired, change the session name using the keypad.
4. Press
5. Press the Read button while holding the stick reader near to an EID tag.
.
and select New Session.
Tip:
When scanning EID tags, if animals are moving quickly through a race or into a pen, you can hold down the Read
button continuously. Scanning will stop when the Read button is released.
Entering other information
During scanning, other information can be recorded at the same time. You can enter:
• The VID (visual ID)
• Details about the animal, such as a condition score or animal breed.
• Any other details you like, using your own additional animal data field.
See
Section 8 - Making the most of your stick reader
Displaying other information
Some information can also be pre-loaded for viewing during scanning:
• Alerts – so that you are notified when a particular EID tag is scanned
• Animal lifetime information – this may include EID/VID pairs so that the animal’s VID appears automatically when an
EID tag is scanned.
for details.
See
Section 8 - Making the most of your stick reader
3
for details.
XRS2 Stick Reader Quickstart Guide
5
The stick reader will automatically connect to any Tru-Test
with which it has previously been paired (when in BT Auto mode - default).
In order to manually establish a
are having trouble establishing a
Bluetooth
1. With both devices off, position the stick reader close to the other device.
2. Switch on the device and, if necessary, check that its
3. Switch on the stick reader.
4. Select Settings, then Bluetooth to display the Bluetooth settings screen.
5. Select Search for devices.
A list of available devices will be displayed.
6. Select a device.
Wait for up to one minute until the two devices are paired. When pairing is complete, the
indicator light above the Read/Select button will illuminate blue.
7. Use the stick reader to scan an EID tag in order to test the connection.
Note:
Always turn on the device you are trying to pair with first, BEFORE the stick reader.
® connection
Bluetooth
Bluetooth
Bluetooth
wireless connection (if you are using a non-Tru-Test weigh scale indicator, or you
wireless connection):
enabled weigh scale indicator, or any other device,
Bluetooth
setting is enabled.
Bluetooth
6
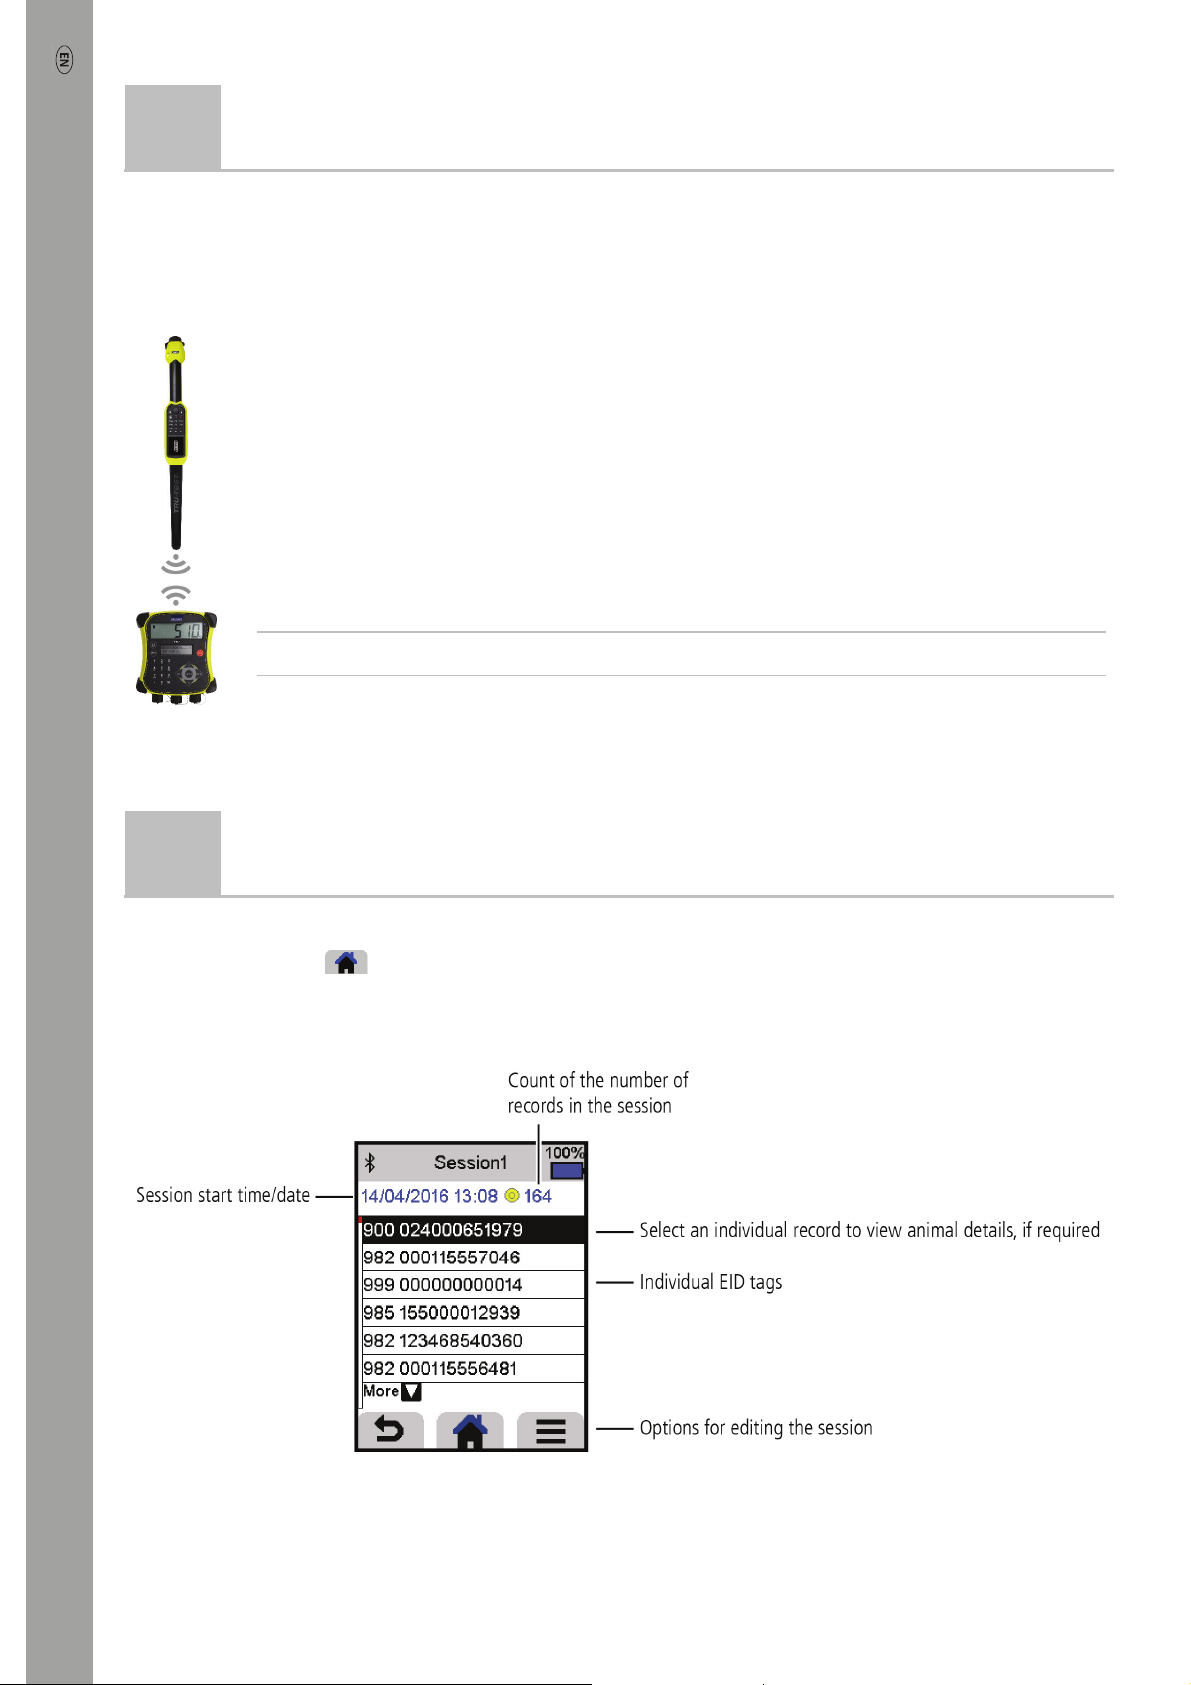
You can view information collected during a session in the Sessions screen.
1. If necessary, press
2. Select Sessions.
A list of sessions is displayed.
3. Select a session to view:
Viewing sessions
to go to the Home screen.
4
 Loading...