


GES3S User Manual
Version 1.5
1

Contents:
1 DESCRIPTION ................................................................................................................................ 4
2 OPERATION .................................................................................................................................... 5
2.1 SWITCH ON/OFF THE GES3S ....................................................................................................... 5
2.2 READ A TRANSPONDER ................................................................................................................ 6
3 MANAGING THE MENU .................................................................................................................. 7
3.1 FIND YOUR WAY IN THE MENU ....................................................................................................... 7
3.2 LANGUAGE.................................................................................................................................. 8
3.3 CONFIGURATION ......................................................................................................................... 8
3.3.1 Reading Timeout ............................................................................................................... 8
3.3.2 ISO 24631-2 ...................................................................................................................... 8
3.3.3 EIC/CIC Format ................................................................................................................. 9
3.3.3.1 EIC format ................................................................................................................. 9
3.3.3.2 Use retagging counter ........................................................................................... 10
3.3.3.3 Ask CIC .................................................................................................................... 10
3.3.3.4 Duplicate CIC allowed ............................................................................................ 10
3.3.3.5 Buzzer duplicate CIC ............................................................................................. 11
3.3.4 Procedure ........................................................................................................................ 11
3.3.5 Session ............................................................................................................................ 11
3.3.5.1 Continue .................................................................................................................. 12
3.3.5.2 New .......................................................................................................................... 12
3.3.5.3 Open ........................................................................................................................ 13
3.3.5.4 Delete ....................................................................................................................... 13
3.3.5.5 Send/Print ............................................................................................................... 13
3.3.5.6 Modify/Erase ........................................................................................................... 13
3.3.5.7 Auto start new ........................................................................................................ 16
3.3.5.8 Blank EIC allowed .................................................................................................. 16
3.3.5.9 Duplicate Visual Tag/EIC allowed ......................................................................... 16
3.3.5.10 Blank repetition ...................................................................................................... 17
3.3.5.11 Send Session .......................................................................................................... 17
3.3.5.12 Send field name ...................................................................................................... 18
3.3.6 Equivalence ..................................................................................................................... 18
3.3.6.1 Show EIC/CIC .......................................................................................................... 19
3.3.6.2 Browse .................................................................................................................... 19
3.3.6.3 Search CIC .............................................................................................................. 20
3.3.7 Reading Sound ................................................................................................................ 20
3.3.8 Send version .................................................................................................................... 20
3.3.9 Send reading ................................................................................................................... 20
3.4 SET UP ..................................................................................................................................... 20
3.4.1 Timeout backlight ............................................................................................................ 21
3.4.2 Auto Shutdown ................................................................................................................ 21
3.4.3 Audio level ....................................................................................................................... 21
3.4.4 Display brightness ........................................................................................................... 22
3.4.5 Keyboard sound .............................................................................................................. 22
3.4.6 Start-up sound ................................................................................................................. 22
3.4.7 Shutdown sound .............................................................................................................. 23
3.4.8 Start-up image ................................................................................................................. 23
3.4.9 Decimal Separator ........................................................................................................... 23
3.4.10 Test Unit .......................................................................................................................... 24
3.4.10.1 Autotuning RFID (For Datamars support only) ...................................................... 24
3.4.10.2 Cyclic Delay (For Datamars support only) .............................................................. 24
3.4.10.3 Cyclic Reading (For Datamars support only) ......................................................... 24
3.4.10.4 CNT Reading (For Datamars support only) ............................................................ 24
3.4.10.5 Save RF (For Datamars support only) ..................................................................... 24
3.4.10.6 Save HDX (For Datamars support only) .................................................................. 25
3.4.10.7 Save FDX-B (For Datamars support only) ............................................................... 25
3.4.10.8 Test Keyboard (For Datamars support only) .......................................................... 25
GES3S Manual – v. 1.5 June 2013 2

3.5 DATE & TIME ............................................................................................................................ 25
3.5.1 Format ............................................................................................................................. 25
3.5.2 Set date ........................................................................................................................... 25
To set the date, select Set date and insert the current date. ......................................................... 25
3.5.3 Set time ........................................................................................................................... 25
3.6 SHUTDOWN .............................................................................................................................. 26
4 GES3S CONNECTIVITY ............................................................................................................... 27
4.1 USB ......................................................................................................................................... 27
4.2 BLUETOOTH .............................................................................................................................. 27
4.2.1 Bluetooth Slave. .............................................................................................................. 27
4.2.2 Bluetooth Master. ............................................................................................................ 28
5 BATTERY MANAGEMENT ............................................................................................................ 31
5.1 BATTERY LEVEL INDICATOR ........................................................................................................ 31
5.2 HOW TO RECHARGE THE BATTERY .............................................................................................. 31
6 TAKE CARE OF YOUR READER ................................................................................................. 32
7 SPECIFICATIONS ......................................................................................................................... 33
8 SOFTWARE RUMISOFT ............................................................................................................... 34
8.1 INTRODUCTION .......................................................................................................................... 34
8.2 HOW TO INSTALL RUMISOFT ....................................................................................................... 34
8.3 CONFIGURATION OF GES3S ..................................................................................................... 34
9 DO YOU HAVE ANY PROBLEM BY IDENTIFYING AN ANIMAL? ............................................... 35
9.1 THE READING DISTANCE IS TOO SHORT ....................................................................................... 35
9.2 THE READER DOES NOT READ THE TRANSPONDER ...................................................................... 35
9.3 THE READER DOES NOT WORK ................................................................................................... 35
10 CERTIFICATIONS ......................................................................................................................... 36
11 INFORMATION TO USER ............................................................................................................. 37
FCC PART 15 ...................................................................................................................................... 37
IC RSS 210 ........................................................................................................................................ 37
12 END OF LIFE ................................................................................................................................. 38
GES3S Manual – v. 1.5 June 2013 3
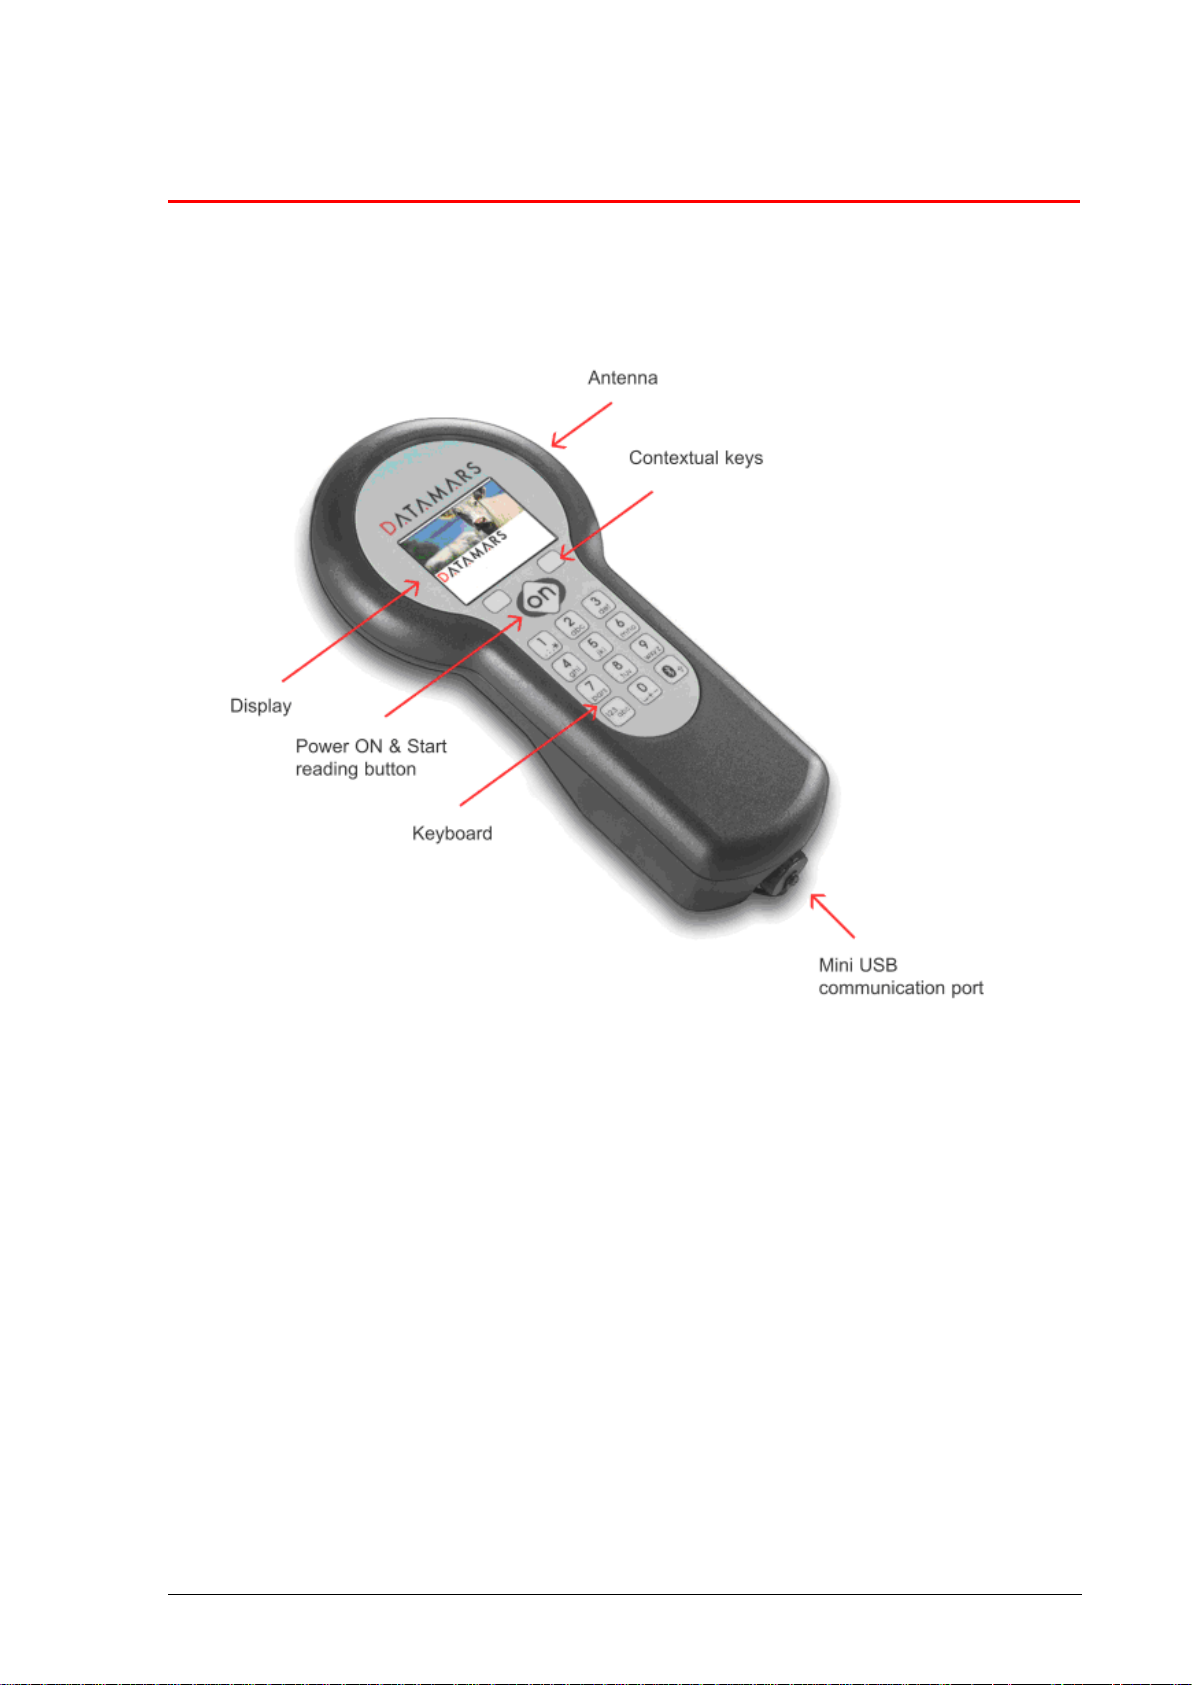
1 Description
GES3S Manual – v. 1.5 June 2013 4

6. Clock
5. Date
7. Menu
1. Battery level
2. Bluetooth indicator
3. Stick antenna indicator
8. Read
9. Reading Session
MENU READ SESSION
4. Wireless sync indicator
W
2 Operation
2.1 Switch on/off the GES3S
Use your thumb to press the ON button, which is located on the upper center of the panel.
The display shows the following start-up figure:
Under Datamars logo, the bootloader version is displayed on the left, the firmware version on
the right.
After a few seconds the main screen shot appears:
1. Check the battery level before using the device.
2. Bluetooth indicator: white = Bluetooth module on, green = Bluetooth connection
established and ready to use. Hold the button for more than 1 second to enable the
Bluetooth module.
3. Stick antenna indicator: when “S” is showed on the display header, a Stick antenna is
connected and ready to use.
4. The “W” is displayed when the CONFIGURATION/ISO 24631-2 variable is set to ON and
when another reader is detected by the GES3S in the surrounding. If the ‘W’ is displayed
and no reader is nearby that means that the surrounding noise is too high to permit
reliable readings.
5. Date format can be selected between EU/US/TIMESTAMP.
6. Clock time is in 24 hour mode.
7. Press Menu to enter the Menu features.
8. Press Read to start a single read.
9. Press Session to enter the Control menu.
After a period of non-use the device turns automatically in “pause mode”, which means the
backlight of the display turns down, the screen is “frozen” and the keyboard is disabled. In order
to “unlock” your reader, please press the ON button. In order to manually switch off the reader,
keep pushing the ON button for about 2 seconds or select the Shutdown function in the main
menu. The reader has also an automatic shutdown function activated after a period of non-use.
GES3S Manual – v. 1.5 June 2013 5

2. Country Code
1. Transponder type + Field bit info
4. Crotal ID Code
3. ID Code
CIC-7
#0002
RESET
5. EIC Counter
2.2 Read a transponder
Place the GES3S near the animal, then press the ON button
To stop the reading mode press the ON button again. The following figure shows the result of a
successful read:
1. There are two types of transponder: FDX-B and HDX, which are the ISO standard
11784/5.
2. The Alpha country code is according to ISO 3166, ISO 11784/5.
3. The Identity Code number is according to ISO 11784/5.
4. Crotal ID Code. It’s usually the lasered number that’s on the tag. It’s useful when the
electronic identification code and the lasered number are different.
5. EIC counter. It’s incremented each time a new EIC is read. It’s reset whether by pressing
the ‘RESET’ button or by starting a new procedure.
The following figure shows the result of an unsuccessful read:
All the EID tags read with the GES3S are stored in session files by default to make sure that no
data is lost. A session file is created once a day and the saved information are composed as
follows:
[TAG/EID|DATE|TIME]
The session files are organized in the SD card file “session” and are organized by year and
month.
GES3S Manual – v. 1.5 June 2013 6
3 Managing the menu
3.1 Find your way in the menu
Switch on the reader by pressing the ON button .
Press the MENU button which is the upper left button on the keypad.
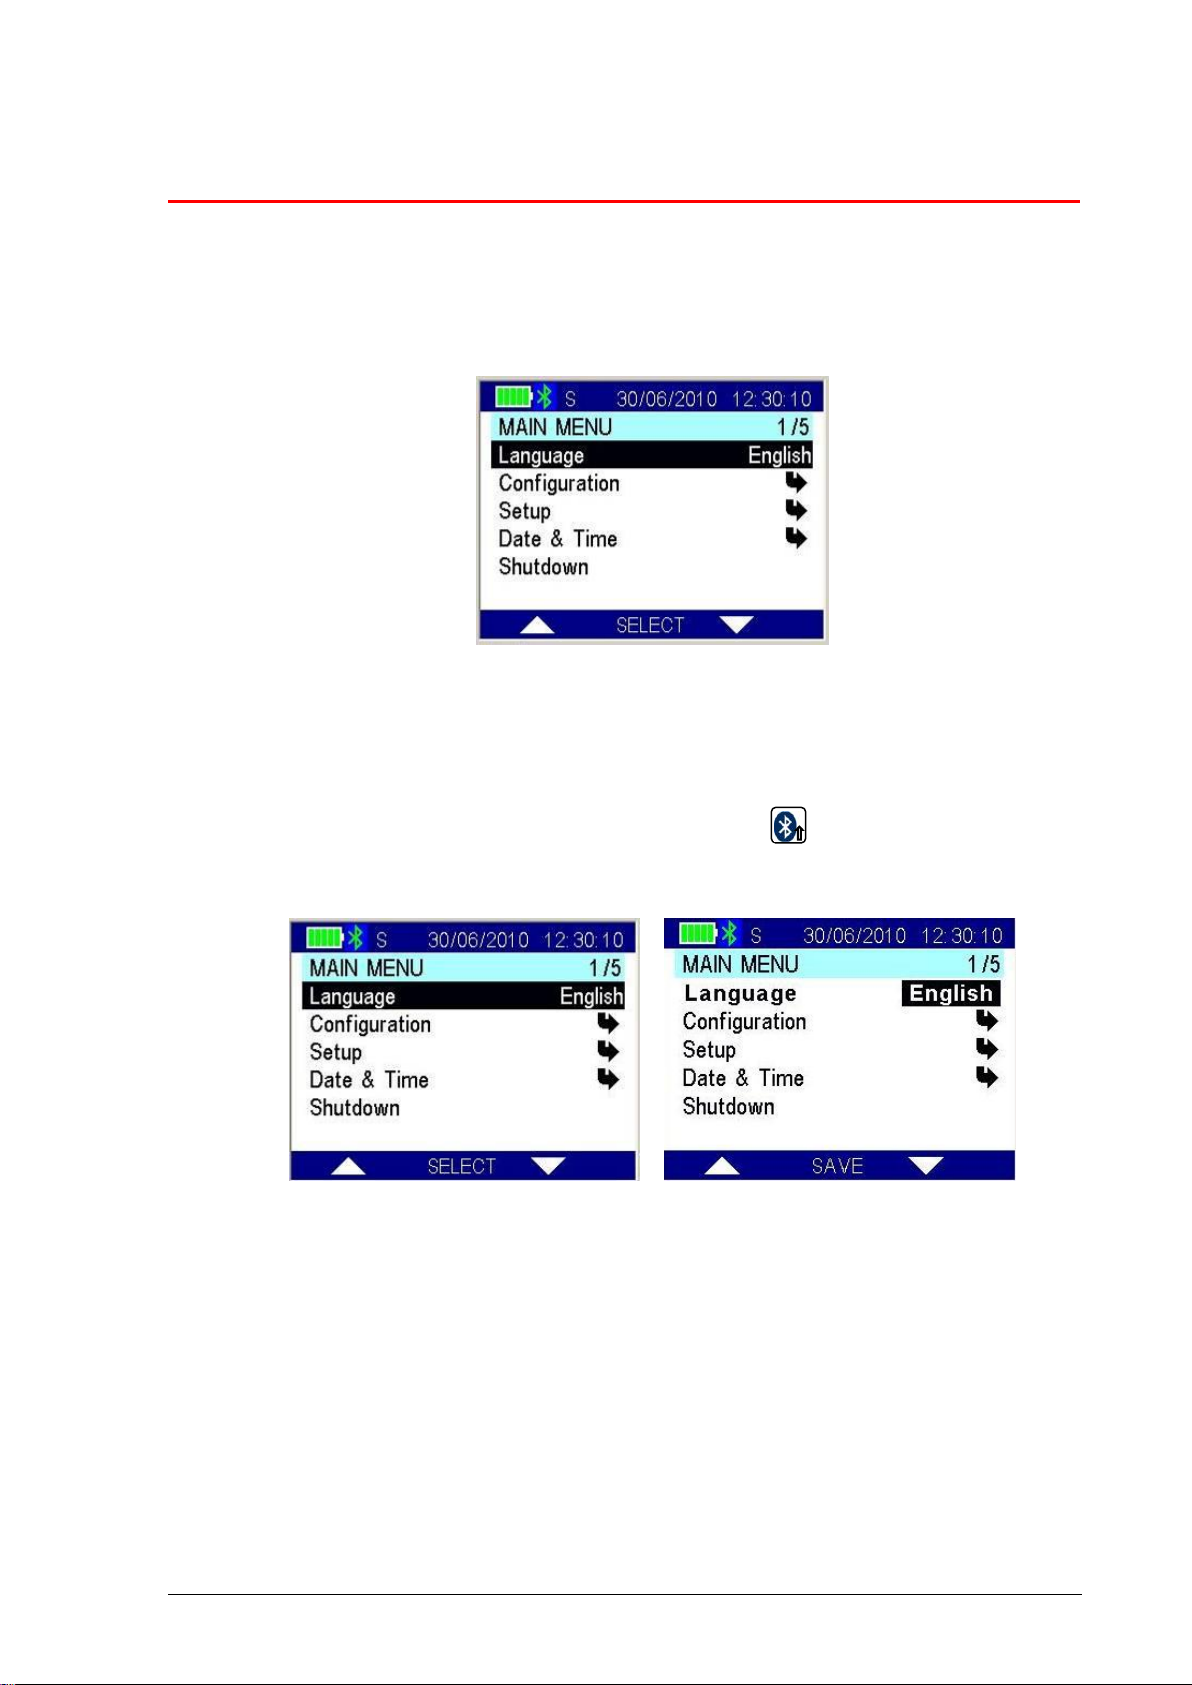
The display shows the following figure:
You can scroll through the menu by pressing the UP or DOWN which are the contextual keys
on the right and on the left of the ON button. The arrows located on the right of the display
means that this menu contains a sub menu. In order to enter a sub menu, you have to press the
ON button while it is highlighted.
Generally the ON button is used to select and confirm the changes made through the
parameters of the menu. While the menu is selected, the button is used to cancel the
changes and go back to a previous menu level to exit the main menu.
Input via multiple-choice: highlight the configuration field to be edited (left picture above) and
press SELECT. The chosen field becomes bold (right picture above). At this point, press
UP/DOWN to scroll along the predefined allowed values. Confirm the new value by pressing
SAVE.
GES3S Manual – v. 1.5 June 2013 7
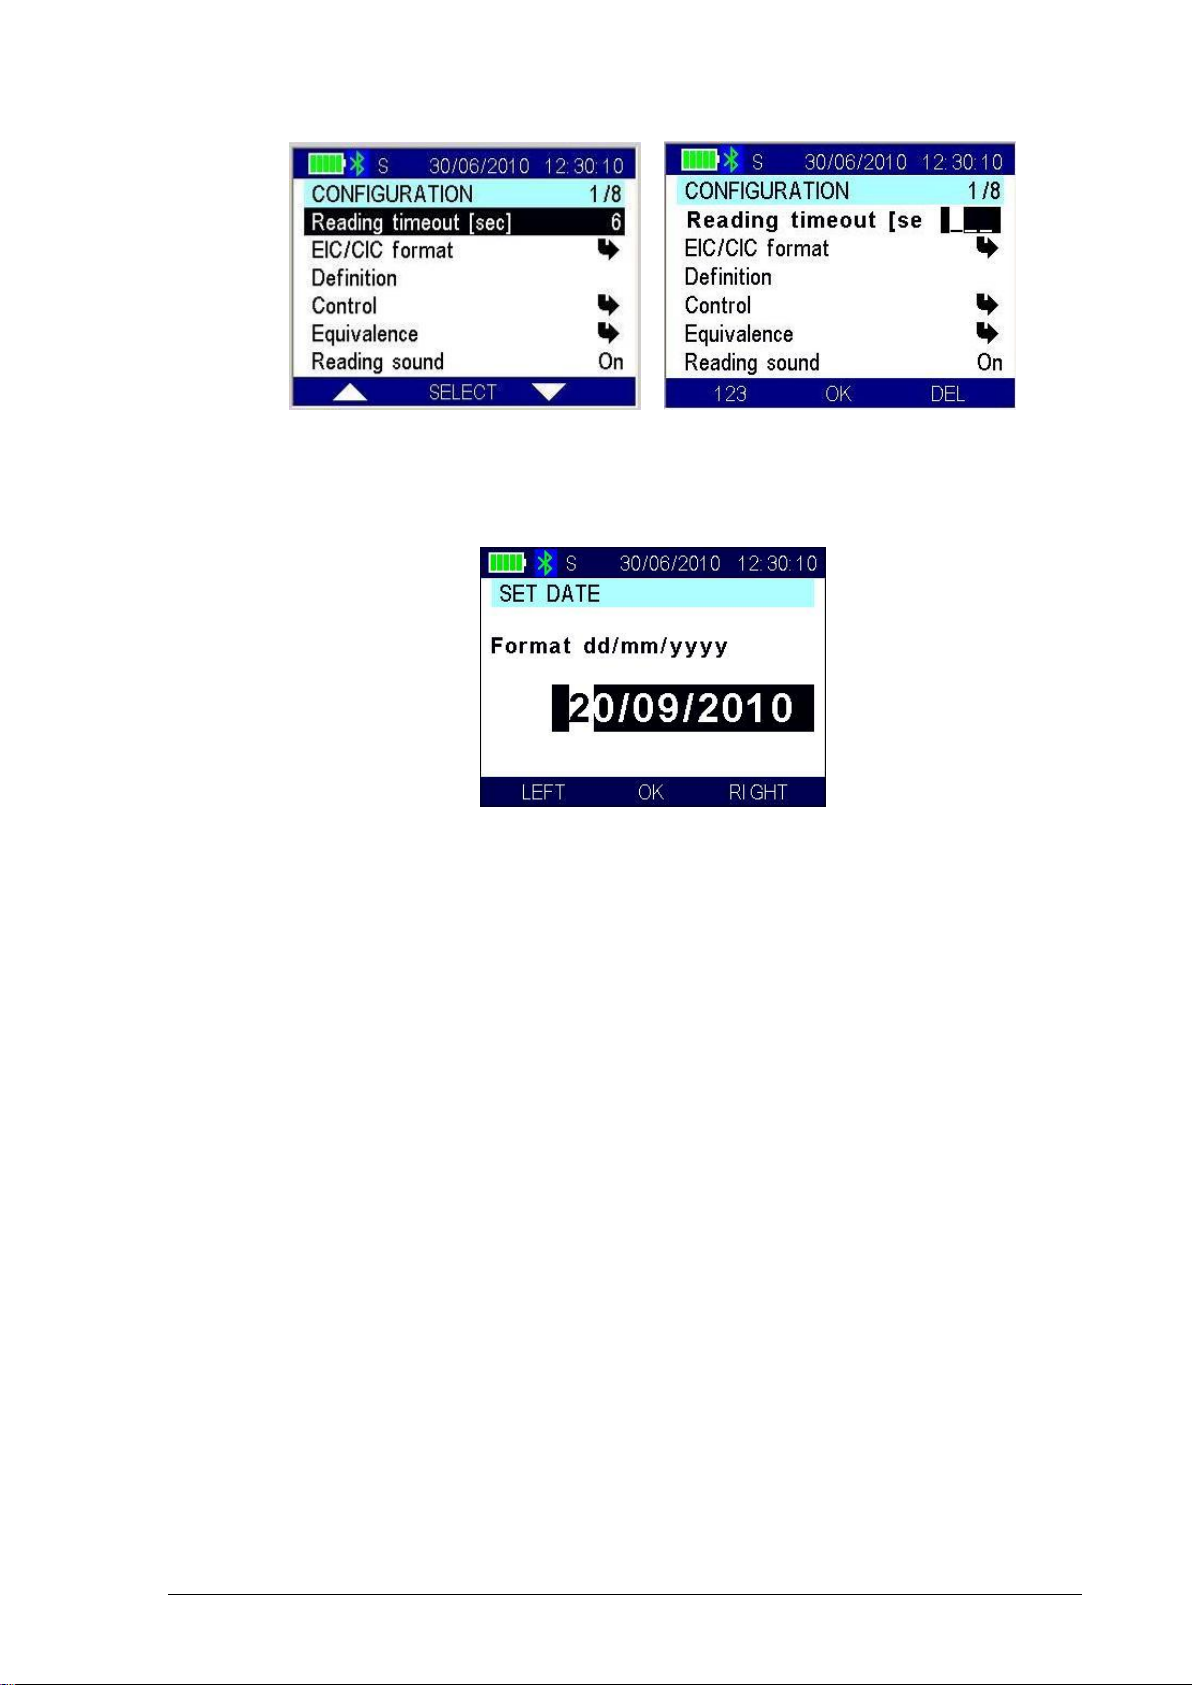
Free-Input: highlight the configuration field to be edited (left picture above) and press SELECT.
The chosen field becomes bold (right picture above). At this point, press the keys on the
keyboard to write the new value. If the new input value is not allowed, the device refuses it and
prompts an error message with some hints.
Preformatted-Input: the example shows the preformatted input-method. The value to be edited
is made of more components (ex.: the first part is DAY, the second is MONTH and the third is
YEAR) separated the one from the others by fixed special characters (ex.: the slash). Press
LEFT/RIGHT to position the cursor and use keys of the keyboard to edit the value. Confirm the
new value by pressing OK. If the new input value is not allowed, the device refuses it and
prompts an error message with some hints.
3.2 Language
This menu allows you to select the language on your device.
3.3 Configuration
The Configuration menu allows you to manage all the Livestock-related options.
There are various features in the Configuration menu.
3.3.1 Reading Timeout
The Reading timeout feature defines the maximum period while the reader has to stay in
reading mode.
3.3.2 ISO 24631-2
The ISO 24631-2 feature allows enabling a standard ISO or a customized reading session
(timing).
GES3S Manual – v. 1.5 June 2013 8
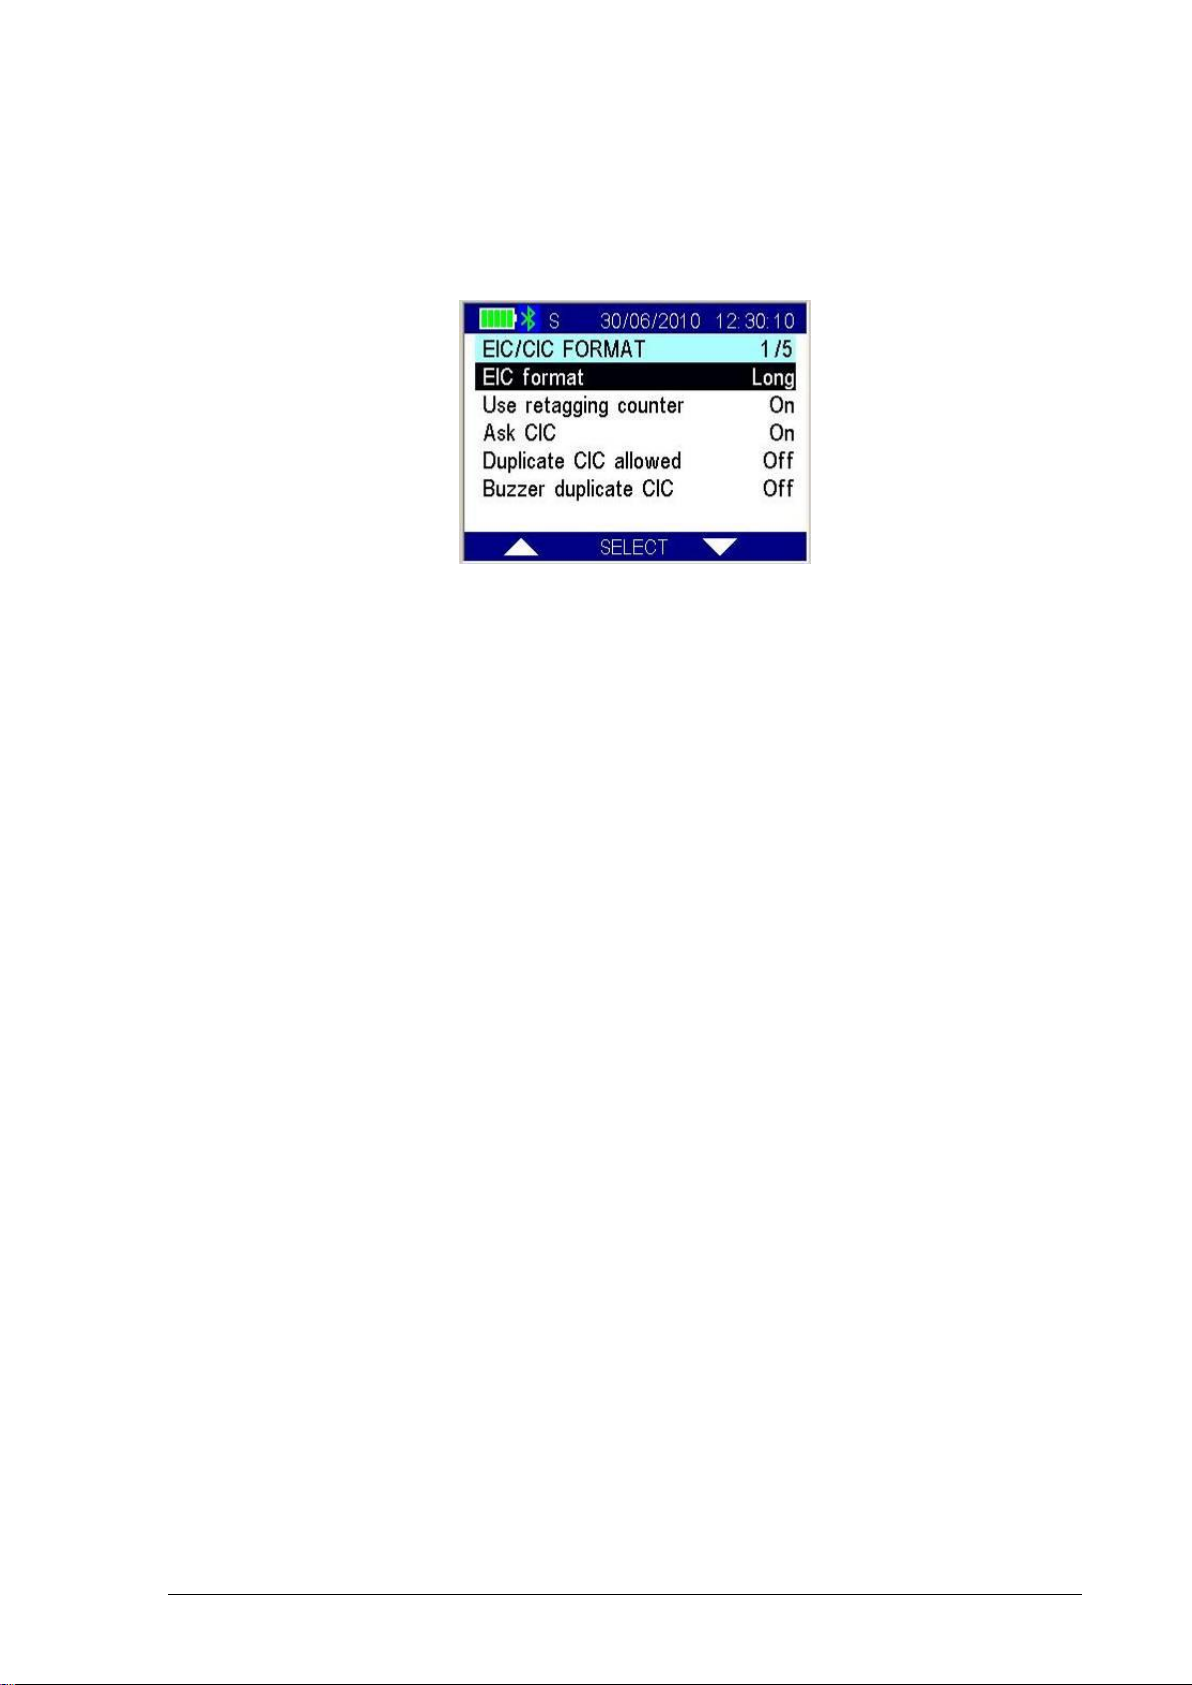
3.3.3 EIC/CIC Format
The EIC/CIC format menu defines how the transponder number is saved in memory or sent
over Bluetooth. It has no impact on the way the EIC is displayed in the reader screen.
3.3.3.1 EIC format
Allows five different EIC download formats to be defined:
• ISO Long (default):
- Animal: "A0000000964000000123456" (23 char)
- Industrial = "R00060000000000123456" (21 char)
• ISO Short:
- Animal: "964 000000123456" (16 char)
- Industrial: "0006 0000000000123456" (21 char)
• ISO Tiris (Texas Instruments):
- Animal: "A 00000 0 964 000000123456" (26 char)
- Industrial: "R 0006 0000000000123456" (23 char)
• F-210:
- Animal: "A 00000 0 0999 000000123456" (27 char)
- Industrial: "R 0006 0000000000123456" (23 char)
• BDN-Ita:
- Animal: "10000000964000000123456" (23 char)
- Industrial: "R00060000000000123456" (21 char)
• ISO Short South America (SA):
- Animal: "964000000123456" (15 char)
- Industrial: "0006 0000000000123456" (21 char)
GES3S Manual – v. 1.5 June 2013 9

3.3.3.2 Use retagging counter
The Use retagging counter feature enables the possibility to discriminate two identical EIC but
with different retagging counter. When this feature is off the retagging counter is not considered.
3.3.3.3 Ask CIC
The Ask CIC feature allows the reader to input a CIC when a new EIC is read.
3.3.3.4 Duplicate CIC allowed
The Duplicate CIC allowed feature allows you to insert several equivalences with the same CIC
in a single equivalence file.
GES3S Manual – v. 1.5 June 2013 10
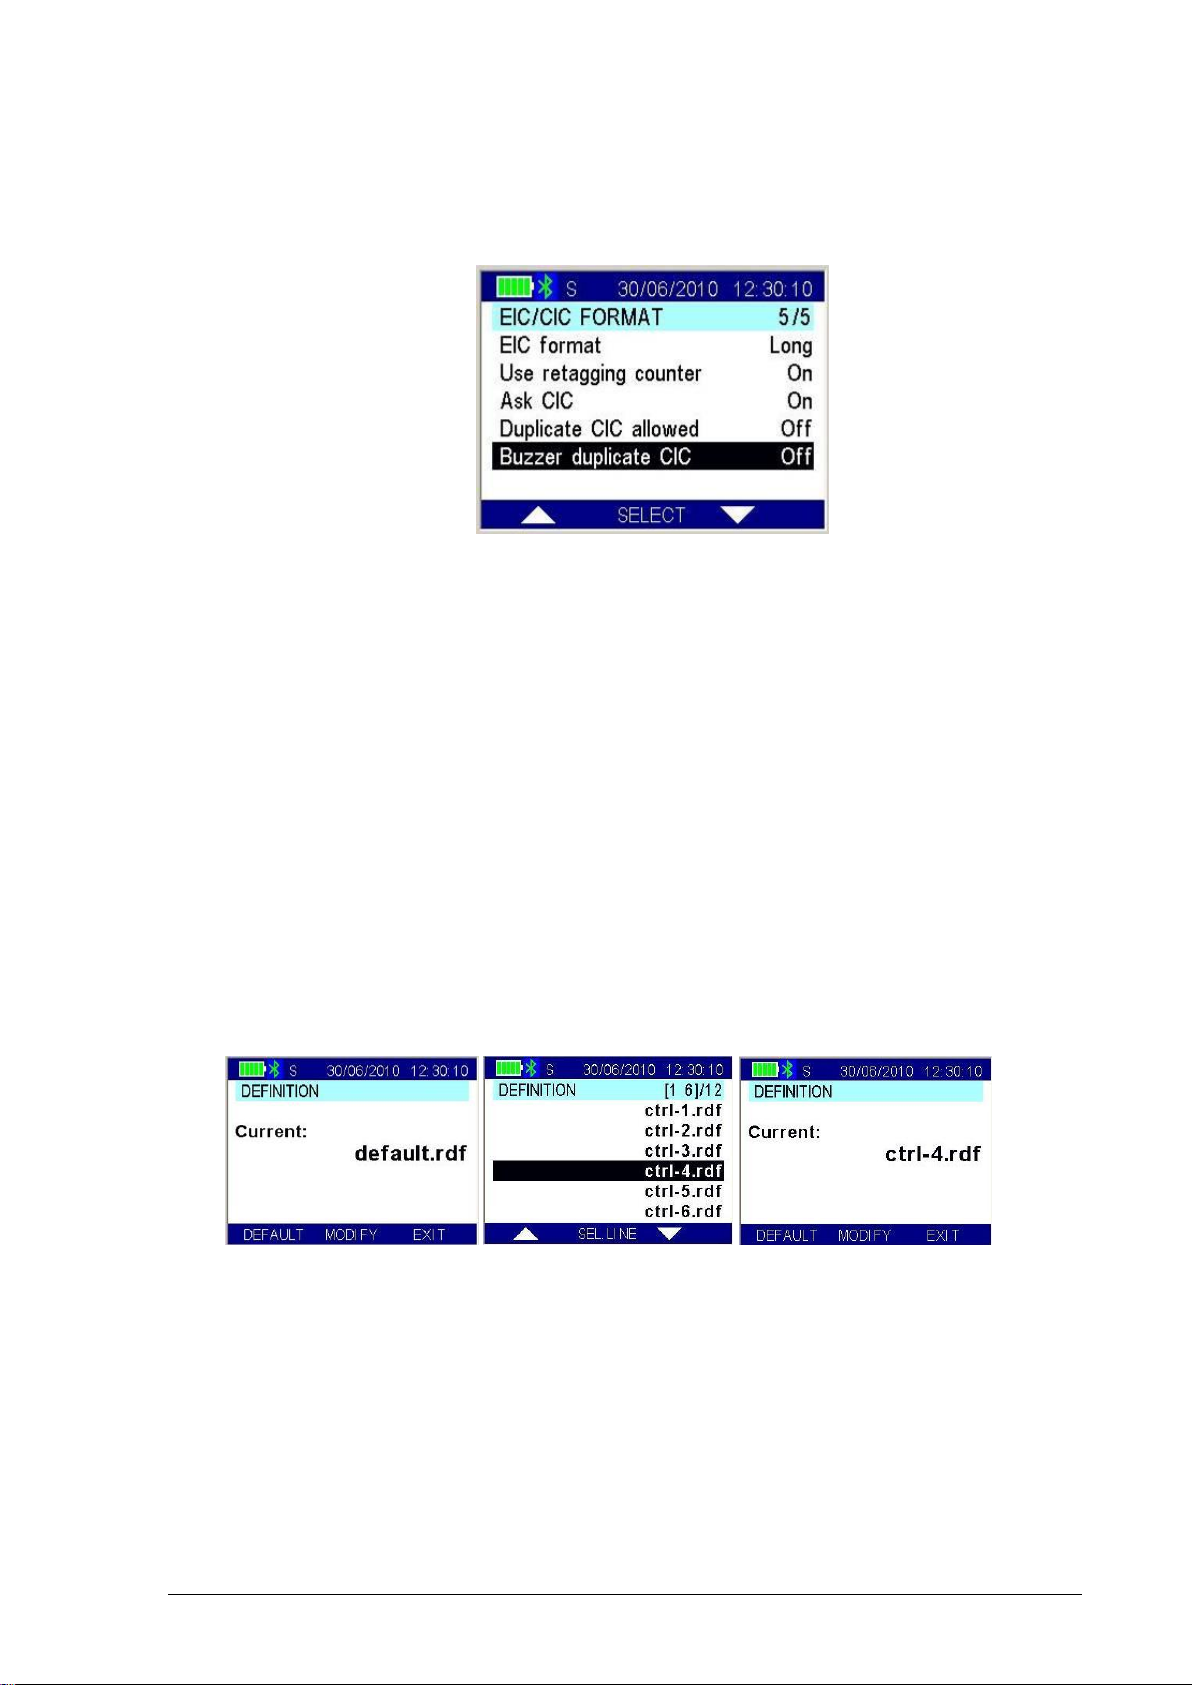
3.3.3.5 Buzzer duplicate CIC
The Buzzer duplicate CIC feature makes an alert sound when an already recorded CIC is
inserted as new equivalence.
3.3.4 Procedure
The Procedure menu allows you to select the definition file which is going to be used with the
reader. The procedure file selected defines which kind of job you intend to do (e.g.: milking,
parturition, etc.).
A procedure is a file stored in the SD card containing a set of pre-defined questions.
Different procedure-files contain different sets of questions.
The reader can have several procedure-files but only one is active at a given time (current
procedure-file). The current procedure-file is selected by the user.
To select the current procedure file, select Procedure in the Configuration menu, the device
displays the name of the current procedure-file.
1. To change the procedure file, press MODIFY.
2. Chose the your procedure file from the list, than press SEL.LINE.
3. Press Exit to go back to menu.
1. 2. 3.
3.3.5 Session
The Session menu allows you to manage the reading session files. A Reading Session is a file
stored in the SD card containing the answers to the related procedure file (questions).
The name of a reading session file is composed by the name of its procedure-file and the
creation-timestamp appended at the end.
GES3S Manual – v. 1.5 June 2013 11
After having selected the current procedure-file, the user can create a new reading session file
or can select an existing one. When a new reading session is created, it becomes automatically
the current reading session file.
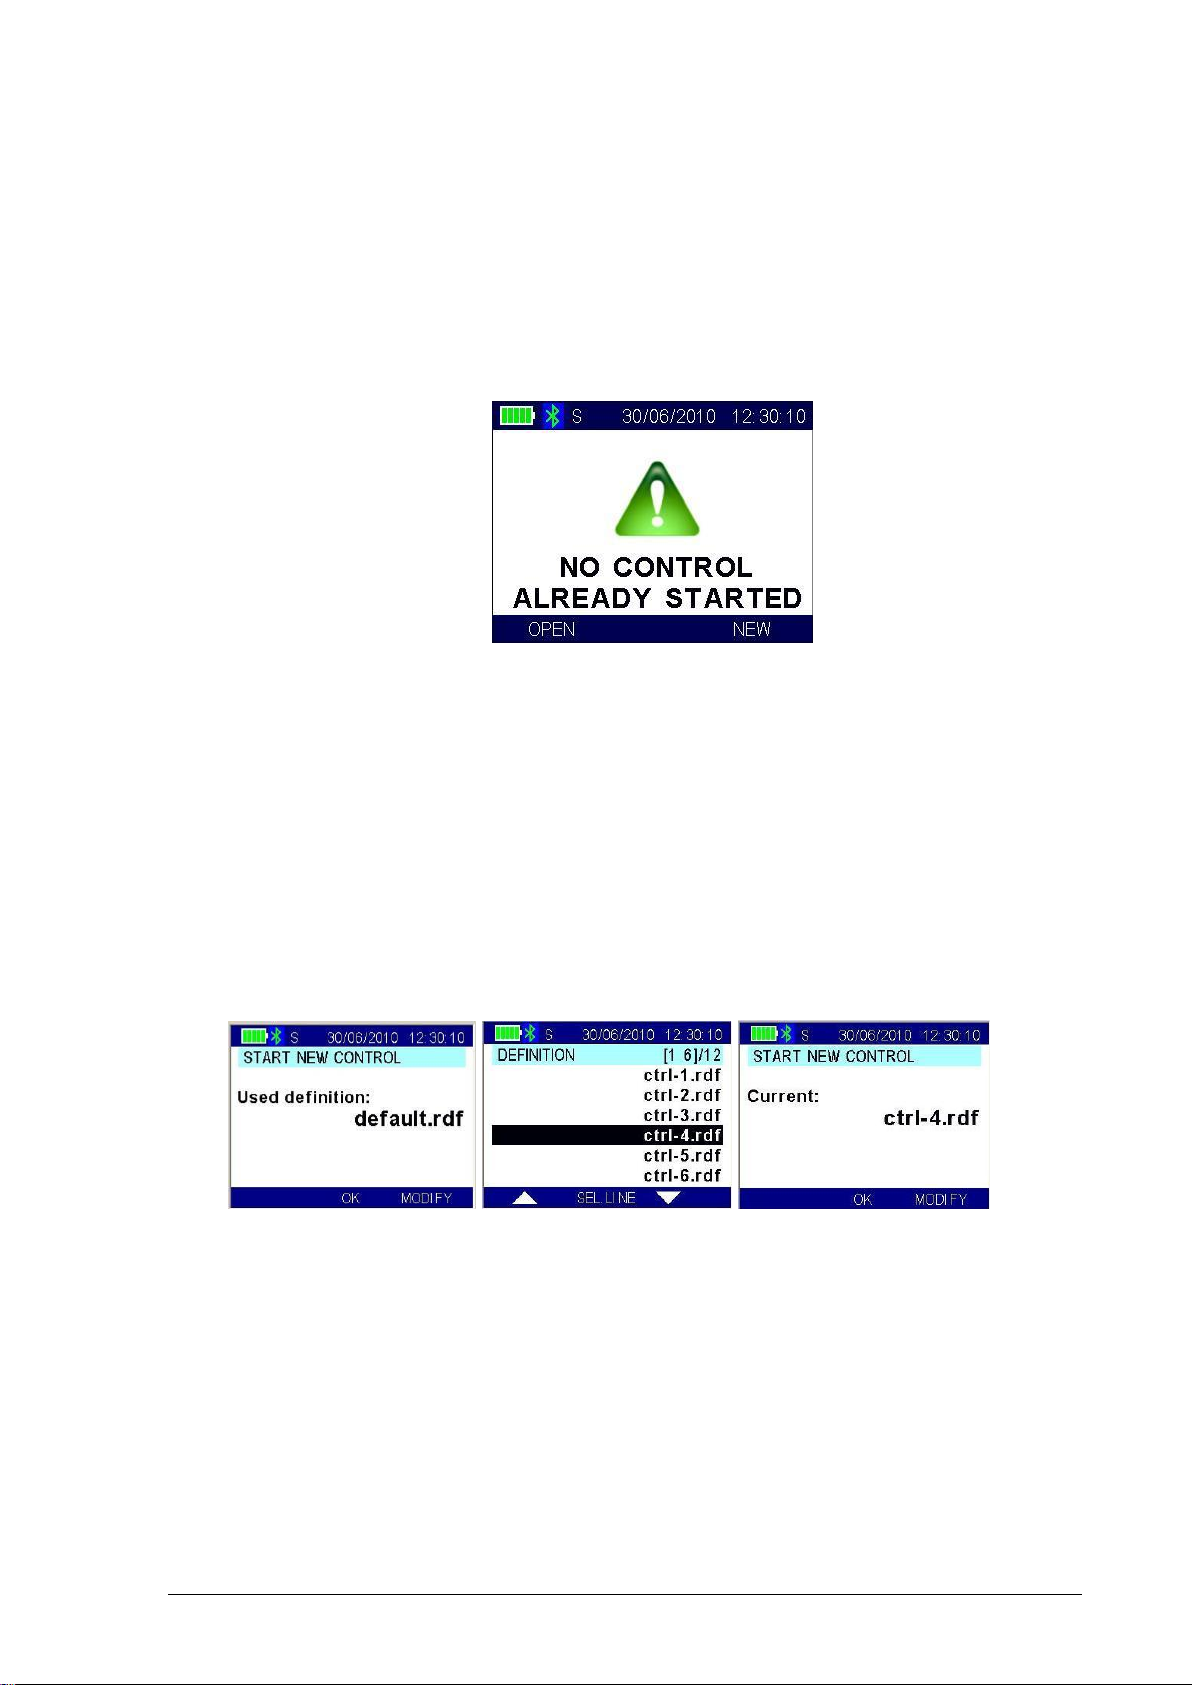
3.3.5.1 Continue
The Continue feature is used to continue working with the current reading session file.
If no reading session file has been selected (i.e. when the reader has just been turned on), the
device prompts the following screen:
To create a new control file, please refer to instructions in the following chapter.
3.3.5.2 New
To select the current reading session file, select Reading Session in the Configuration menu,
then select New, the device displays the name of the current procedure file.
If the current file is the right one, press OK, otherwise:
1. To change the procedure file, press MODIFY.
2. Chose the desired procedure file from the list, than press SEL.LINE.
3. Press OK to confirm the selected procedure.
1. 2. 3.
GES3S Manual – v. 1.5 June 2013 12

3.3.5.3 Open
When Open menu is selected, the device displays the list of the reading session files.
Move through the list using the UP/DOWN buttons and press SEL.LINE to choose the desired
file.
If no reading session files are present, the device alerts with an acoustic signal (beep).
3.3.5.4 Delete
When Delete menu option is selected, the device displays the list of the reading session files.
Move through the list using UP/DOWN buttons to choose the file you want to delete.
3.3.5.5 Send/Print
Use this function to send or print a full session to a pc or a printer using the Bluetooth
connection.
3.3.5.6 Modify/Erase
The Modify/Erase feature allows you to edit or delete a line in a reading session file. Since the
LCD is too small to show all fields defined in a control, an identity field that it is the
representative of each like can be defined in the procedure file.
The identity filed of each reading session line is shown in the LCD:
Use the UP/DOWN buttons to scroll page-wise the list of the data-sets, once reached the
desired data-set page, press SEL.PAGE, select the desired data-set and press SEL.LINE.
GES3S Manual – v. 1.5 June 2013 13

When the identity field is either an EIC field or CIC, another searching mode has been
implemented along with the control file browsing. The following images show an EIC procedure.
Use LIST to browse page by the reading session file in the standard mode. Use READ to start
the GES3S RFID reader. If a tag is read, the EIC is searched in the reading session file. If the
EIC is already stored in the reading session file, the EIC data-set is selected.
In both searching modes, to delete the data-set, press ERASE, the device asks for confirmation
(YES or NO).
GES3S Manual – v. 1.5 June 2013 14

If the Erase function is confirmed, the device removes the selected data-set from the current
control-file.
To edit the data-set, press MODIFY, the device asks for confirmation (YES or NO).
If the Modify function is confirmed, the device prompts all the pre-defined questions specified in
the current reading session file. The newly given responses replace the contents of the selected
data-set.
Note: all the proceedings in chapters 3.3.5.1 - 3.3.5.6 can be cancelled anytime pressing the
button
In a CIC case the procedure is slightly different and instead of reading the TAG, the CIC code
has to be manually inserted.
GES3S Manual – v. 1.5 June 2013 15

3.3.5.7 Auto start new
When the Auto start new function is on, automatically, a new record begins immediately after
you finish the previous record.
3.3.5.8 Blank EIC allowed
The Blank EIC allowed feature enables the possibility to skip an EIC input request by leaving
the field blank.
3.3.5.9 Duplicate Visual Tag/EIC allowed
The Duplicate EIC allowed feature allows you to insert several records with the same EIC in a
single reading session file.
GES3S Manual – v. 1.5 June 2013 16

3.3.5.10 Blank repetition
The Blank repetition feature permits to skip part of the reading session (e.g. if only a part of the
livestock has to be controlled instead of the entire number of animals).
In the case the field repetition number is greater than needed, press SKIP to finish the field.
In the case the blank EIC is allowed, the CONTINUE option appears.
3.3.5.11 Send Session
When the Send Session parameter is on, the information of the reading session is sent through
Bluetooth (Bluetooth has to be enabled and connected) to a PC or a printer while
processing/reading the animals. This is a significant difference compared to the Send/Print
command presented earlier in this manual as the Send/Print command print in one shot a
complete session (potentially including hundreds of animals) once the session has been
finished.
GES3S Manual – v. 1.5 June 2013 17

3.3.5.12 Send field name
When the Send field name feature is on, the information of the reading session is sent via
Bluetooth (Bluetooth has to be enabled and connected).
Example of Reading session
In the simple example below, for each animal the GES3 will record:
The EIC (read by the GES3)
The Weight (entered by the operator through the keyboard)
The Breed (entered by the operator through the keyboard)
Start READ Press CONTINUE Do input and press OK
Select an input and press SAVE Press SAVE
After having answered all the questions, press SAVE to write the input data into the current
reading session file or press MODIFY to re-edit and correct the input data.
3.3.6 Equivalence
The Equivalence file represents the animal population: it matches the CIC with the Visual
Tag/EIC.
The Equivalence menu allows you to browse and search a particular equivalence in the
equivalence file.
GES3S Manual – v. 1.5 June 2013 18

3.3.6.1 Show EIC/CIC
The Show EIC/CIC feature allows you to decide what to show in the Browse feature, if EIC or
CIC.
3.3.6.2 Browse
The Browse feature permits to select a specific record and see the details.
Select the desired CIC or EIC code (depending on the Show EIC/CIC setting), and then confirm
by pressing SEL. LINE in order to see the equivalence (see image below).
GES3S Manual – v. 1.5 June 2013 19

3.3.6.3 Search CIC
The Search CIC feature allows you to find a specific CIC code searching by name. Simply insert
the name of the CIC desired and press OK.
Important: the Search CIC feature is CASE SENSITIVE!
3.3.7 Reading Sound
The Reading sound feature enables or disables the acoustic signal when a tag is found/not
found. When the key feature is OFF, the sound is disabled. When it is ON, the sound is
enabled.
3.3.8 Send version
As a confirmation that the Bluetooth is enabled and connected, when the Send version feature
is on, the version of the firmware will be read in the window of the communication program
(i.e.: HyperTerminal).
3.3.9 Send reading
The Send reading feature, depending on settings, permits to display the EIC, the CIC or nothing
in the window of the communication program of the PC (i.e.: HyperTerminal) during every
reading.
3.4 Set Up
The Setup menu allows managing all the configuration options of the reader. There are various
features in the Setup menu, as shown in the following figure:
GES3S Manual – v. 1.5 June 2013 20

You can scroll through the Setup features by pressing the UP or DOWN button.
3.4.1 Timeout backlight
The Timeout backlight feature allows you to decide how many seconds the display has to stay
on (maximum 40 seconds).
3.4.2 Auto Shutdown
The Auto Shutdown feature defines the maximum period (1 to 5 minutes) that the reader stays
on while no buttons are pressed. After this period the reader automatically switches off.
3.4.3 Audio level
The Audio Level feature defines the volume of the sounds of the device and allows you to
disable the audio.
GES3S Manual – v. 1.5 June 2013 21

3.4.4 Display brightness
The Display brightness feature defines the level of the brightness of the display.
3.4.5 Keyboard sound
The Keyboard sound feature enables or disables the acoustic signal when a button is pressed.
When the key feature is OFF, the sound is disabled. When it is ON, the sound is enabled.
3.4.6 Start-up sound
The Start-up sound feature enables or disables the acoustic signal when the reader is switched
on. When the feature is OFF, the sound is disabled. When it is ON, the sound is enabled.
GES3S Manual – v. 1.5 June 2013 22

3.4.7 Shutdown sound
The Shutdown sound feature enables or disables the acoustic signal when the device is turned
off. When the feature is OFF, the sound is disabled. When it is ON, the sound is enabled.
3.4.8 Start-up image
The Start-up image feature defines whether or not to display the image while the reader is
switching on. When the feature is OFF, the image is disabled. When it is ON, the image is
enabled.
3.4.9 Decimal Separator
The Decimal Separator feature allows you to decide between dot (.) or comma (,) as a decimal
separator for the decimal numbers.
GES3S Manual – v. 1.5 June 2013 23

3.4.10 Test Unit
The Test unit feature allows you to test your device. It’s intended to be used mainly for
Datamars support team.
3.4.10.1 Autotuning RFID (For Datamars support only)
The Autotuning RFID test shows the values of tuning position and power
3.4.10.2 Cyclic Delay (For Datamars support only)
This feature allows changing the time duration of one reading cycle. The Cyclic Delay has to
take longer than the Reading Timeout.
3.4.10.3 Cyclic Reading (For Datamars support only)
This feature starts the reading cyclic test, that is based on:
- Reading time
- Pause
3.4.10.4 CNT Reading (For Datamars support only)
This feature starts a reading test and indicates the percentage of the readings done.
3.4.10.5 Save RF (For Datamars support only)
This feature allows saving information about RF analogic signal.
GES3S Manual – v. 1.5 June 2013 24

3.4.10.6 Save HDX (For Datamars support only)
This feature allows saving info HDX about analogic signal.
3.4.10.7 Save FDX-B (For Datamars support only)
This feature allows saving info FDX-B about analogical signal.
3.4.10.8 Test Keyboard (For Datamars support only)
This feature allows testing the correct functioning of the reader keyboard
3.5 Date & Time
3.5.1 Format
This menu allows you to adjust the date and time including the date format (EU format if you
prefer to have the day before the month, US format if you prefer to have the month before the
day, and the TIMESTAMP format).
3.5.2 Set date
To set the date, select Set date and insert the current date.
3.5.3 Set time
To set the clock, select Set time and insert the current time.
GES3S Manual – v. 1.5 June 2013 25

3.6 Shutdown
In order to switch off your reader, select the Shutdown menu.
GES3S Manual – v. 1.5 June 2013 26

4 GES3S connectivity
The GES3S supports 2 connectivity interfaces: USB and Bluetooth.
USB is used in Mass Storage configuration, meaning that when connected to a computer thru USB,
the GES3S is seen as an extra disk space. USB connection is used to interface the reader with
Rumisoft and can only be used when the reader is not operating.
On the contrary, the Bluetooth connection should be used when the GES3S needs to send data
towards another device (computer, weighing-scale, printer…) while the reader is operating.
4.1 USB
This is the connectivity that shall be used to interface the GES3 with Rumisoft. A USB cable is
provided so you can connect your reader to a computer. Insert the mini USB plug of the USB
cable into the connector of the GES3S reader; insert the other cable’s plug into the computer’s
USB port.
The GES3S reader will automatically switch on in Mass Storage Device mode, the connection
between the reader and the PC is now established, and a pop-up window will appear on your
computer monitor, showing the contents of the GES3S embedded Memory Card.
4.2 Bluetooth
As with many advanced Bluetooth devices, there are 2 ways to use the GES3 Bluetooth
connectivity. These are commonly named Bluetooth Master and Bluetooth Slave.
When the GES3 is used as a Bluetooth Slave, the GES3S is put in ‘discoverable mode’ and can
thus be discovered/found by other Bluetooth devices.
On the contrary, when the GES3 is used as Bluetooth Master, the reader itself looks for other
Bluetooth devices in its surrounding.
The GES3S supports only one Bluetooth connection at a time. For example, it can’t be
connected simultaneously to a printer and a PC.
When Bluetooth is enabled, the auto shutdown feature of the GES3S is disabled.
IMPORTANT NOTE: independently if configured in Slave or Master, the Bluetooth connection
is always a one way transmission from the GES3S to the paired device. Indeed the GES3S
always sends data to the paired device and never receive any data. The type of data that is
sent via Bluetooth by the GES3S is defined by 4 parameters in the CONFIGURATION submenu
(Send version and Send reading parameters) and in the CONFIGURATION/SESSION
submenu (Send session and Send field name parameters) as described earlier in this manual
4.2.1 Bluetooth Slave.
That’s the mode we recommend to use when you wish to connect the GES3 to a computer.
Turn-on your reader and press the Bluetooth key for 2 sec (on the bottom left-hand corner of
the keypad).
GES3S Manual – v. 1.5 June 2013 27

Once pairing has been done you need to
pick-up the right COM port on your
computer and set the Baud rate to 115'200
bps to establish a data connection
This snapshot shows which data is sent via Bluetooth with the 2 parameters
CONFIGURATION/Send Version and CONFIGURATION/Send Reading at ON
12/06/2013 12.30.10
DISABLE SEARCH ENABLE
Choose ‘ENABLE’. Your GES3S is now discoverable and will be found if you launch a Bluetooth
scan from your computer. For more information regarding how to perform a Bluetooth scan and
pairing from your computer, please refer to Operating System manual.
IMPORTANT NOTE: GES3S Bluetooth passkey or pairing code is 0 (zero)
Once your GES3S and your computer have been successfully paired, you can use a tool like
Hyperterminal to visualize the data sent by the GES3S to the computer. Alternatively you can
also use the dashboard functionality of Rumisoft as displayed below:
4.2.2 Bluetooth Master.
We recommend using this mode when the GES3S needs to be connected to a printer, to a
weighing scale or to any device that can be connected as a Bluetooth SPP slave device.
GES3S Manual – v. 1.5 June 2013 28

12/06/2013 12.30.10
SCAN CONNECT
TIII Bluetooth Printer
001b3501fdc4
XR3000
00a0963644eb
12/06/2013 12.30.10
DISABLE SEARCH ENABLE
IMPORTANT NOTE: the list of printers and weighing scales supported by the GES3S increases
continuously. To know if your specific device is supported, please contact your Datamars sales
representative.
Turn-on your reader and press the Bluetooth key for 2 sec (on the bottom left-hand corner of
the keypad).
Choose SEARCH to start looking for Bluetooth devices in the surrounding. This may take up to
a few minutes.
Please note that early version of the Bluetooth module present on the GES3S was not
supporting Bluetooth Master mode and pressing the SEARCH button will display the following
message:
Warning: This function is not supported by the bluetooth module!!
In case such a message is displayed and you are interested in the Bluetooth Master
functionality please contact your Datamars Sales representative.
After a successful scan, the devices that are found are displayed as on the below screenshot.
As an example the following screenshot features a mobile printer and a TruTest XR3000
weighing scale.
Use the right arrow to choose which device you want to pair. Validate your choice with the
CONNECT button.
A successful pairing will display the following scree and the inside of the Bluetooth logo on the
top left hand corner will turn green, indicating that Bluetooth is ON and connected.
GES3S Manual – v. 1.5 June 2013 29

MENU READ SESSION
12/06/2013 12.30.10
You are now ready to start reading animals or initiate a new session. The selected data (EIC,
CIC, Session,…) will be sent to the paired device via the GES3S Bluetooth connection each
time they are validated.
GES3S Manual – v. 1.5 June 2013 30

Battery logo
5 Battery Management
The GES3S is equipped with high quality Li-Ion cells battery.
5.1 Battery level indicator
The battery level is shown by five bars on the battery logo. Please note that when one red bar is
left, the battery level is less than 20% of the full charge.
5.2 How to recharge the battery
In order to recharge the battery simply plug the USB cable into the corresponding connector on
the bottom of the reader and connect it to a PC or a wall mount adapter with USB plug.
Once the cable has been plugged in, the GES3S charges the battery in a few hours.
GES3S Manual – v. 1.5 June 2013 31

6 Take care of your reader
If the outer casing of the reader becomes soiled, it can be cleaned with a damp cloth. First
ensure that it is not connected to the charger.
If for any reason the reader is not working, please do not attempt to repair it, but return it for
repair to your local dealer. Any attempt to open the reader yourself will void the IP67
certification.
The GES3S reader is equipped with Li-Ion type battery. This battery lasts longer and does not
contain Cadmium or lead, which makes it much safer for the environment. If the reader has to
be destroyed, please return it to a battery specialist for battery recycling.
The display of the reader GES3S may change color if exposed to temperatures higher than
50°C. It will return to its original color as soon as the temperature gets below 50°C.
At very low temperatures the display may lose its contrast, but at normal temperatures it will
return to its normal contrast.
Caution: if the reader has to be transported by air, the USB connector cap has to be open
during the flight.
GES3S Manual – v. 1.5 June 2013 32

7 Specifications
1. Storage temperature: -20 to +65 °C, 85% RH, non-condensing
2. Normal operating temperature: -5 to +55 °C, 85% RH non-condensing
3. Charging temperature: +5°C to +40°C, 85% RH, non-condensing
4. Standards: ISO11784/5, ISO11784-AMD1 and ISO24631-2
5. External power supply: USB cable
6. Dimensions: 223 x 108 x 41 mm
7. TAG compatibility: FDX-B, HDX
8. Transmission frequency: 134.2 kHz
9. Battery life: >500 cycles
10. Weight: 326 g
11. Environment protection: IP67 (EN 60529)
12. Interfaces to host PC: USB and Bluetooth
GES3S Manual – v. 1.5 June 2013 33

8 Software Rumisoft
8.1 Introduction
Rumisoft is a software tool that can be used to manage equivalences, definitions and controls
files for your device. It also allows the user to configure the reader in a user friendly graphic
environment.
8.2 How to install Rumisoft
Rumisoft application can be found on the SD Memory card embedded in the reader.
To install it, connect the GES3S to the PC (see chapter 4.1) and when the pop-up window
appears, select “SD Memory Card”. Click on the Doc folder and then select “setup.exe”.
After that operation, follow the instructions on the screen to complete the installation of the
Rumisoft.
For more information please refer to the “Rumisoft User Manual”.
8.3 Configuration of GES3S
GES3S configurations can be changed through the SW RumiSoft. For details refer to the
Rumisoft User Manual.
GES3S Manual – v. 1.5 June 2013 34

9 Do you have any problem by identifying an animal?
9.1 The reading distance is too short
The maximum reading distance is obtained with the transponder (tag) perpendicular to the
antenna and aimed at the centre of the antenna coil. If the tag is implanted into an animal its
orientation may not be optimal and therefore the reading distance may be reduced.
You might be close to a source of electromagnetic disturbances like video or TV. Move a few
meters away and try again.
Do not use the reader on a steel table. The metal will reduce the performance of the antenna.
The reading distance is reduced if the transponder is still in the needle.
9.2 The reader does not read the transponder
Change the angle of the reader and try again.
Some types of transponders from other manufacturers are disturbed if placed in the centre of
the reader-antenna. It is possible that some tags will not function if placed in parallel and at the
centre of the antenna. Change the direction of the tag or of the antenna.
9.3 The reader does not work
Charge the reader for at least 30 minutes and try again (recommended time for full battery
recharge = 2 hours).
Check the ambient temperature: it has to be between -5ºC and +45º C.
If you’re still having problems, please contact your dealer.
The GES3S reader is a product developed and produced by DATAMARS, Switzerland.
Should you have any suggestions or require information regarding this or other DATAMARS
products, please contact your dealer.
GES3S Manual – v. 1.5 June 2013 35

ETSI EN 300 330-1 /
ETSI EN 300 330-2
Electromagnetic compatibility and Radio spectrum matters
(ERM) - Short Range Devices.
ETSI EN 301 489-1 /
ETSI EN 301 489-3
Electromagnetic compatibility (EMC) standard for radio
equipment and services.
IEC/EN 61000-4-2 /
IEC/EN 61000-4-3/
IEC/EN 61000-4-4/
IEC/EN 61000-4-6
Electrostatic discharge, electromagnetic field, electrical fast
transient/burst, radio-frequency fields’ immunity.
FCC Part 15B
Part 15 Class B Computing Device Perioheral
FCC Part 15C
Part 15 Low Power Transmitter Below 1705 kHz
10 Certifications
European directives
Datamars, Via ai Prati, CH-6930 Bedano declares, under its own responsibility, that the product
GES3S is in accordance with the following standards:
GES3S satisfies the essential requirements of directives 99/5/EC.
American directives
Datamars SA, Via ai Prati, CH-6930 Bedano declares, under its own responsibility, that the product
Ges3S is in accordance with the following standards:
GES3S Manual – v. 1.5 June 2013 36

11 Information to user
FCC Part 15
This device complies with Part 15 of the FCC Rules. Operation is subject to the following two
conditions: (1) This device may not cause harmful interference, and (2) This device must accept any
interference received, including interference that may cause undesired operation.
This equipment has been tested and found to comply with the limits for Class B Digital Device,
pursuant to Part 15 of the FCC Rules. These limits are designed to provide reasonable protection
against harmful interference in a residential installation. This equipment generates and can radiate
radio frequency energy and, if not installed and used in accordance with the instructions, may cause
harmful interference to radio communications. However, there is no guarantee that interference will
not occur in a particular installation. If this equipment does cause harmful interference to radio or
television reception, which can be determined by turning the equipment off and on, the user is
encouraged to try to correct the interference by one or more of the following measures.
Reorient or relocate the receiving antenna
Increase the separation between the equipment and receiver
Connect the equipment into an outlet on a circuit different from that to which the receiver is
connected
Consult the dealer or an experienced radio/TV technician for help
Any changes or modifications not expressly approved by the party responsible for compliance could
void the user’s authority to operate the equipment.
Attention: The final product must have the ferrite fixed permanently to the power supply cable.
IC RSS 210
This device complies with Industry Canada license-exempt RSS standard(s). Operation is subject to
the following two conditions:
(1) This device may not cause interference, and (2) this device must accept any interference, including
interference that may cause undesired operation of the device.
Le présent appareil est conforme aux CNR d’Industrie Canada applicables aux appareils radio
exempts de licence. L’exploitation est autorisée aux deux conditions suivantes:
(1) l’appareil ne doit pas produire de brouillage, et (2) l’utilisateur de l’appareil doit
accepter tout brouillage radioélectrique subi, même si le brouillage est susceptible d’en
compromettre le fonctionnement.
GES3S Manual – v. 1.5 June 2013 37

Product Name / Model
Description
GES3S / Any models
Universal portable reader
Tool Description
Tool Size (if applicable)
Nipper
Medium
Philips screwdriver (0)
Small
Cutter pliers
Medium
Hot Air Gun
Big
1
All external plastics have to be removed from
the reader (use Philips screwdriver to remove
all screws).
The Keypad has to be removed from the top
cover casing (use the Hot Air Gun with the
cutter pliers in order to easily remove the
keypad).
The Speaker has to be removed from the
bottom cover casing (use the Hot Air Gun with
the cutter pliers in order to easily remove the
speaker).
The Mini USB cable and the battery have to be
removed from the bottom cover casing.
2
Dispose plastic parts of the reader in
accordance with local recycling laws.
3
Dispose electronics parts of the reader in
accordance with local recycling laws.
12 End of life
Disassembly Instructions for GES3S reader
Only authorized recyclers are permitted to use these disassembly instructions. Any attempted
disassembly by a user or unauthorized party will void the product warranty and may irreparably
damage the product.
Tools Required
Product Disassembly Process
GES3S Manual – v. 1.5 June 2013 38

4
Remove cables from batteries (use the nipper
to do this operation).
Dispose batteries of the reader in accordance
with local recycling laws.
5
Remove cables form the speaker (use the
nipper to do this operation).
Dispose the speaker of the reader in
accordance with local recycling laws.
6
Dispose cables of the reader in accordance
with local recycling laws.
GES3S Manual – v. 1.5 June 2013 39
 Loading...