

Page 1
© 2018 DATAMARS
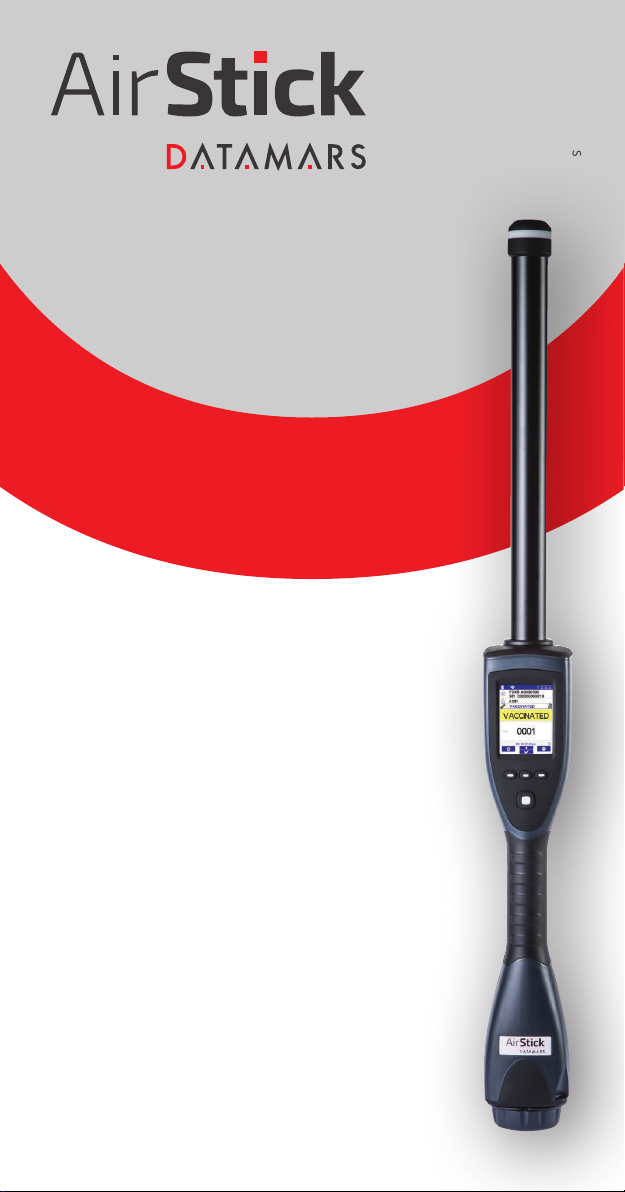
Portable EID Tag Reader
Quick Start Guide
Canllaw Cychwyn Cyym
Guía de inicio rápido
Guide de démarrage rapide
Kurzanleitung
Guida rapida
V. 1.1
Page 2

Before you start
Basic instructions on how to use your AirSck are
provided in this guide.
For updated information on AirStick’s functionalities,
technical documentation and AirStick S-ID software,
please visit: www.datamars.com/id-readers.
We recommend using S-ID software (contained in
the supplied USB memory stick), which will allow you
to manage your data, check for newer versions of the
rmware or modify default settings.
You might need to congure your AirStick, prior using it for
the rst time.
Note: Please ensure that the battery is fully charged before
using the device for the rst time. This will guarantee a
longer operating lifetime of the batteries.
Glossary
EID: Electronic IDentier.
VID: Visual IDentier. Alphanumeric code that can be associated with
an EID on the AirStick reader or by S-ID software.*
Alert: Alphanumeric code that can be associated with an EID to notify
a specic condition met by an animal (grouping, pregnancy, vaccination...).*
Magnier: Highlights the information you consider the most important
(EID, VID or alert) with a bigger font size.
Reading session: Memory le that stores reading information every time
an EID is read. Default session name: RS dd-mm-yy.csv.*
Counter: Number of EIDs stored in the current session.
* Customizable funconalies on S-ID soware
2
Page 3
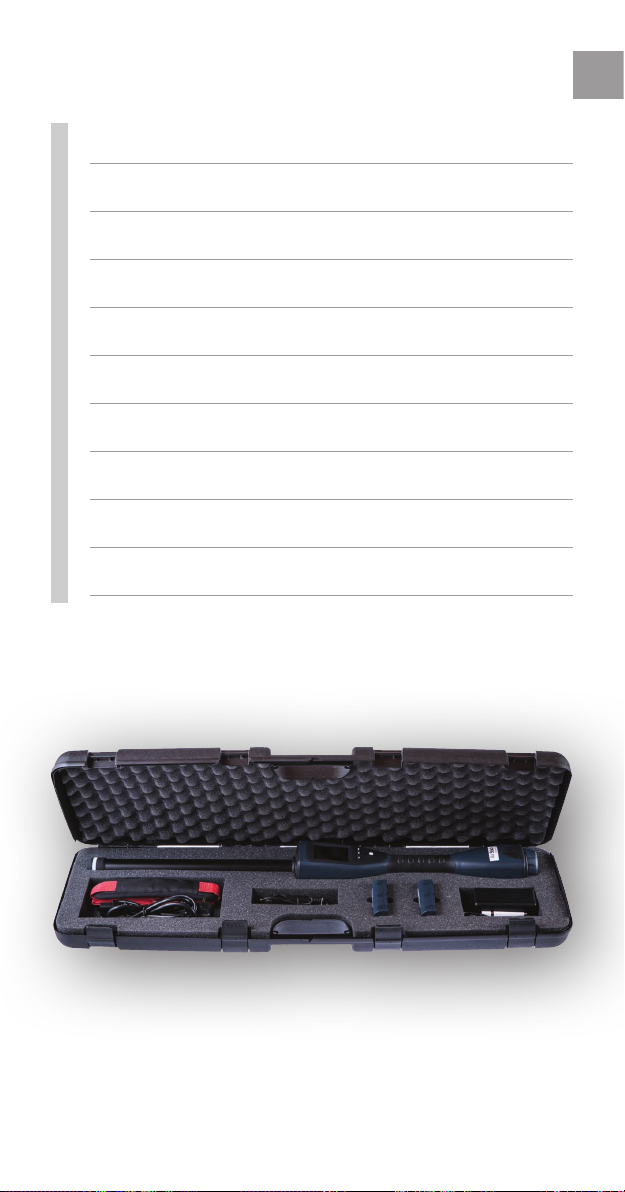
Package contents
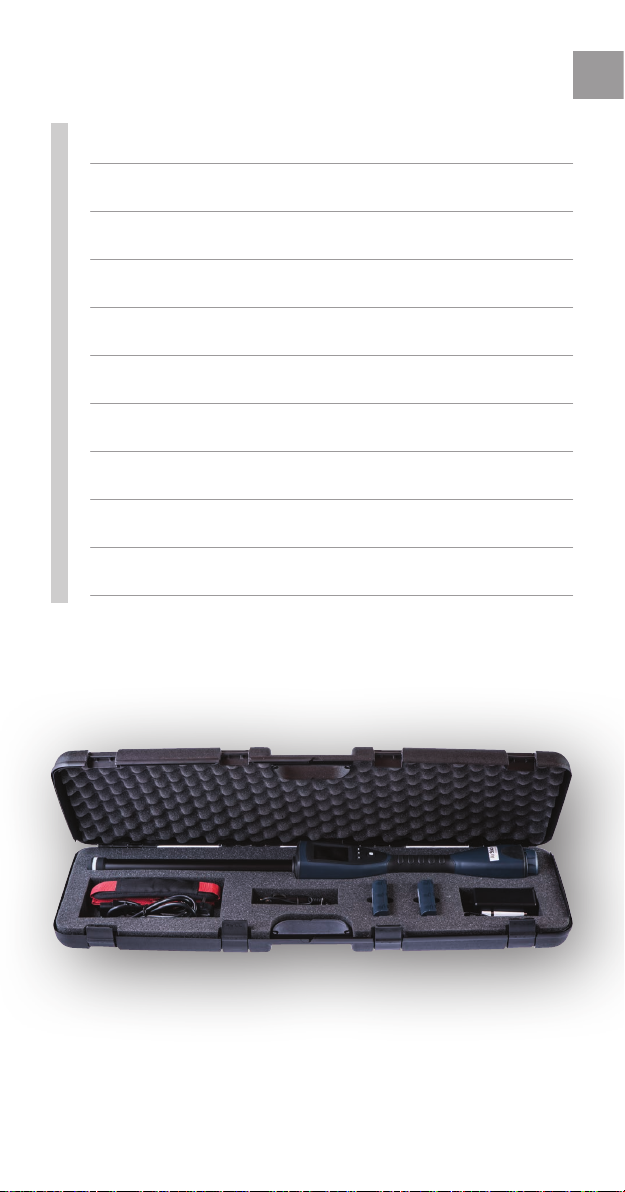
● AirSck reader
● 2 baeries
● AC/DC baery charger
● Charger cable
● Car charger
● USB cable
● USB memory sck
● Documentaon and warranty card
● Shoulder belt
● Suitcase
ENG
3
Page 4
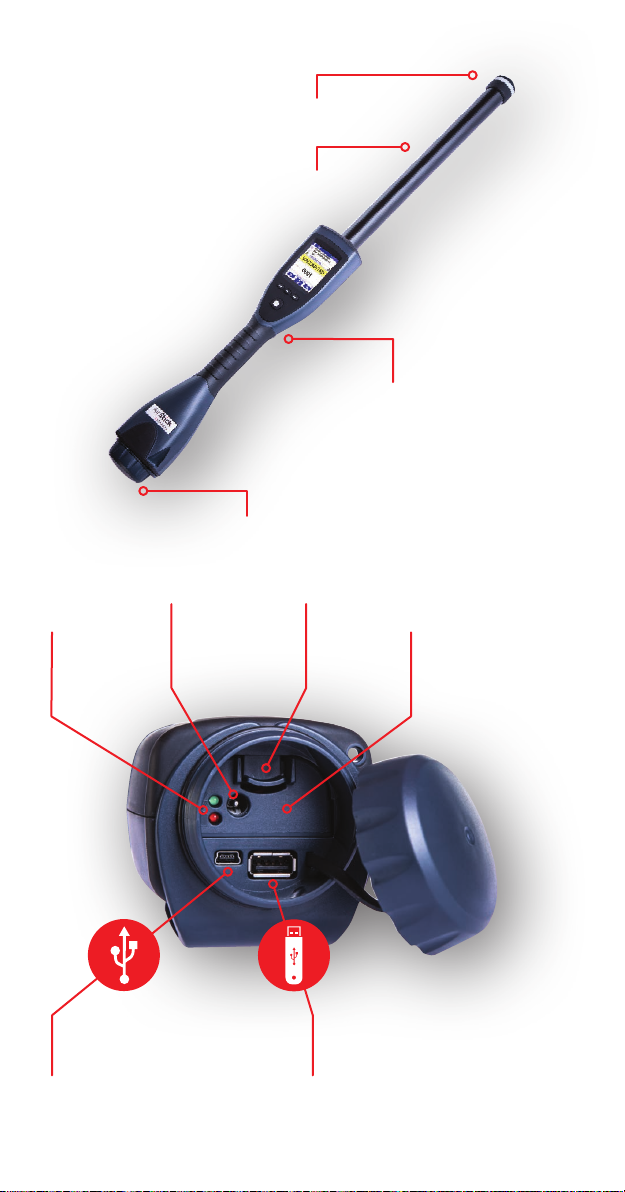
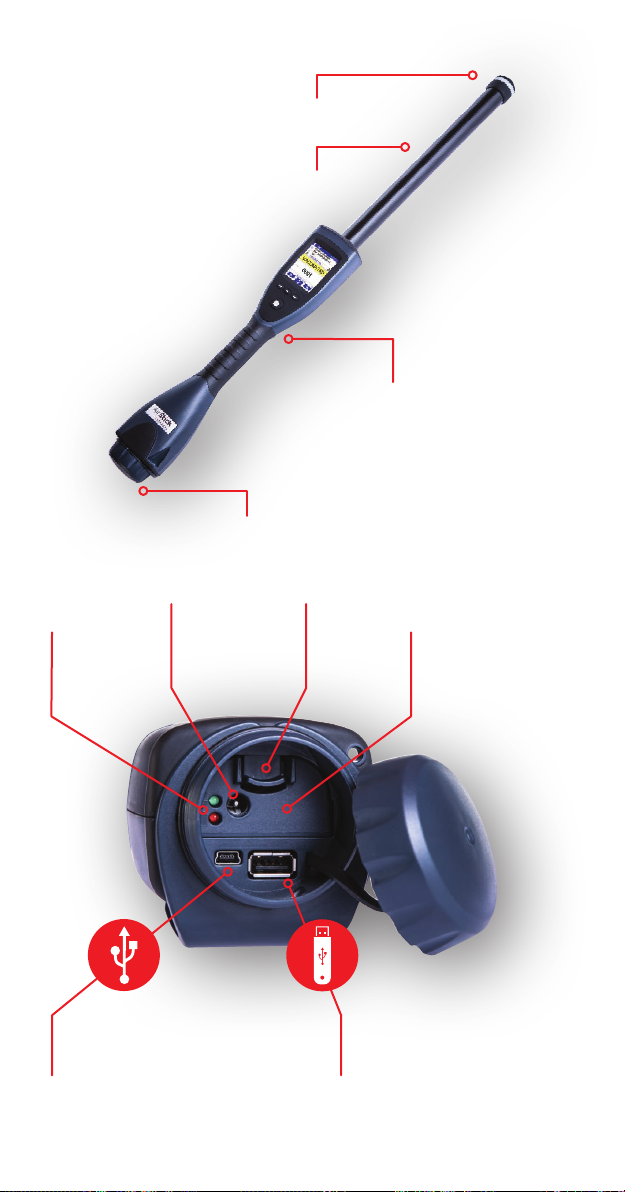
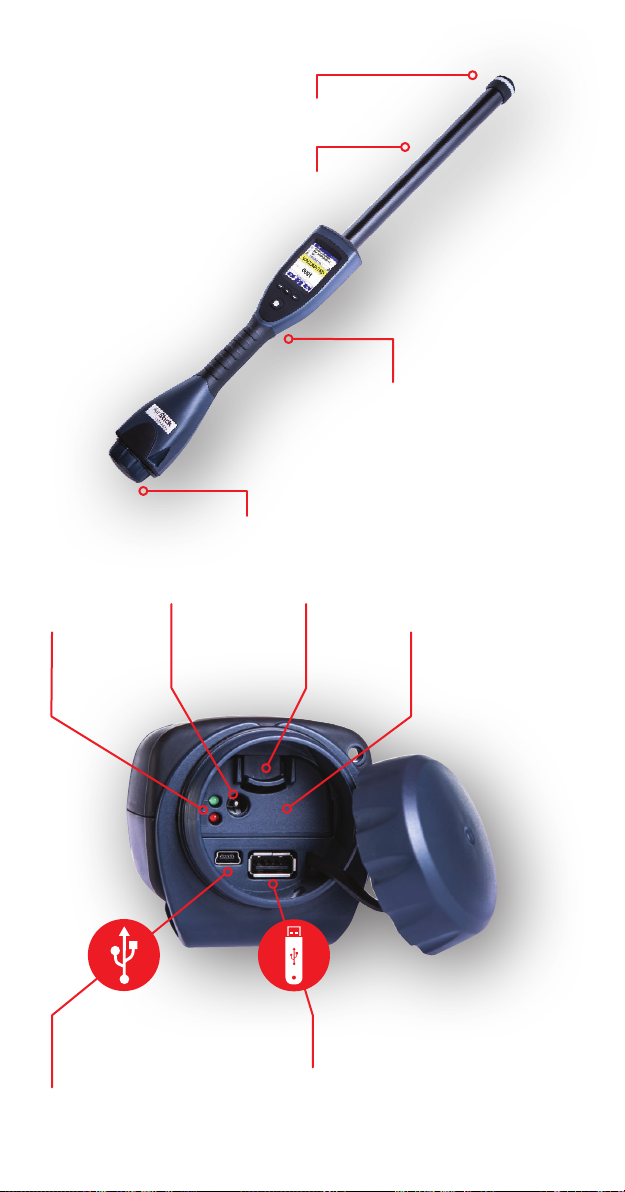
LED
Antenna
Rear screw cap
Read buon
(on the back)
DC plug
Baery LED
indicators
(charger
connector)
Mini-USB port
(to connect the reader to a PC)
Baery
removal
buon
Replaceable
baery
Standard USB port
(to connect a USB memory stick)
4
Page 5
Recharge your AirSck
The reader’s battery can be charged using the AC/DC
battery charger or the car charger, while tted in the reader
or on its own.
● AC/DC baery charger
Connect the AC/DC adapter to the plug jack on the
battery, then plug the adapter into a 220 VAC outlet
with the power cord.
● Car charger
Plug one end of the car charger into the plug jack
on the battery, then plug the other end into
the accessory socket of a car.
While the battery is
charging, the red and
green LED indicator will
light and will be steadily
lit. When the battery is
fully charged, the red LED
indicator will turn off and
the green LED indicator
will be steadily lit.
ENG
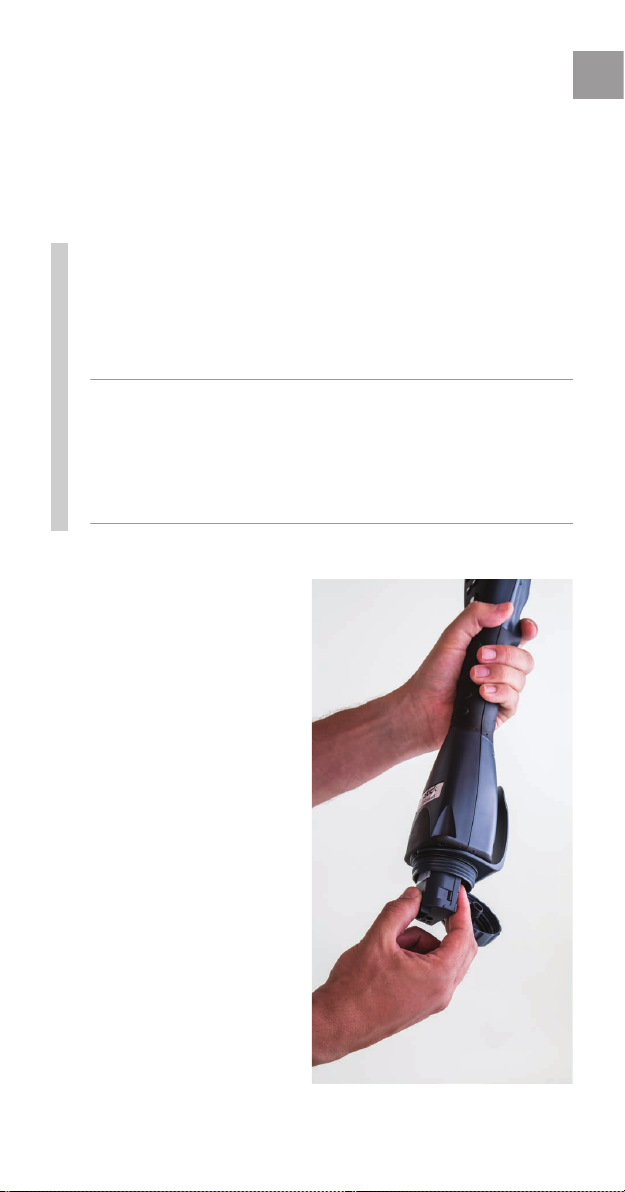
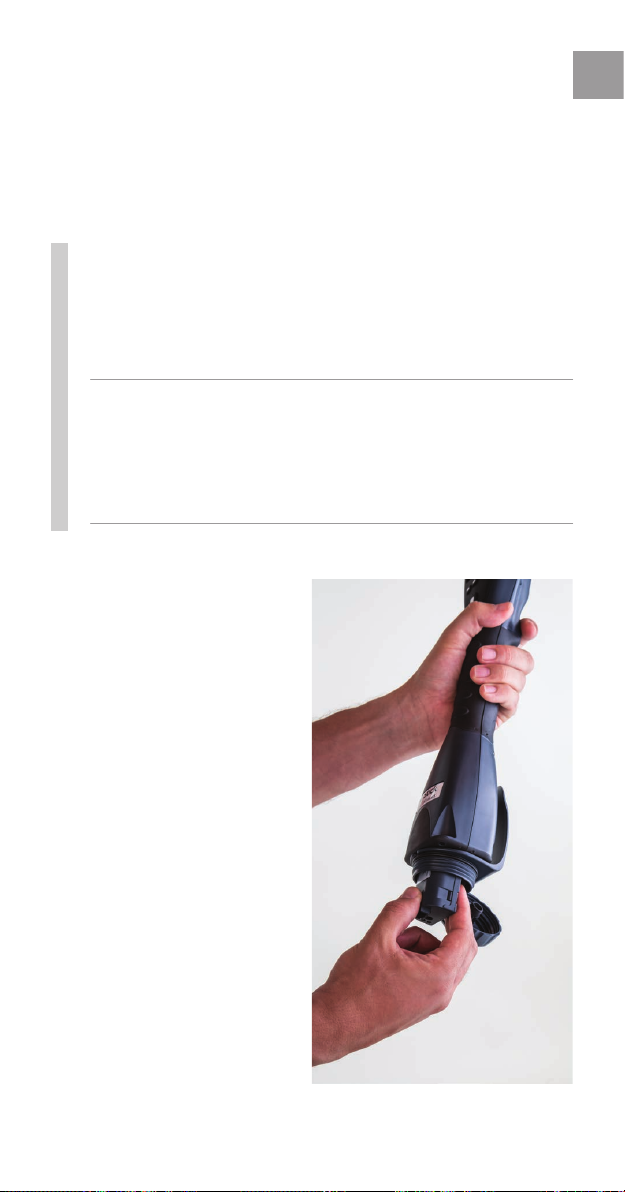
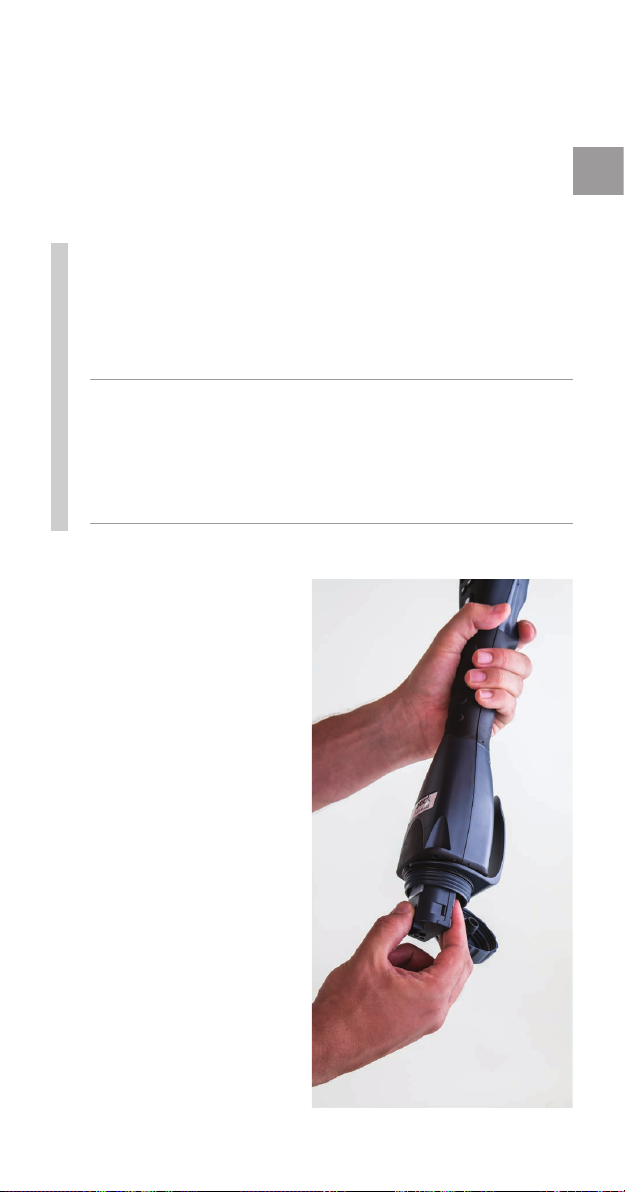
To remove the battery
from the AirStick, push the
battery removal button
and pull out the battery.
To insert the battery into
the AirStick, push it into
the battery housing; an
audible click conrms the
battery has been placed
correctly.
5
Page 6
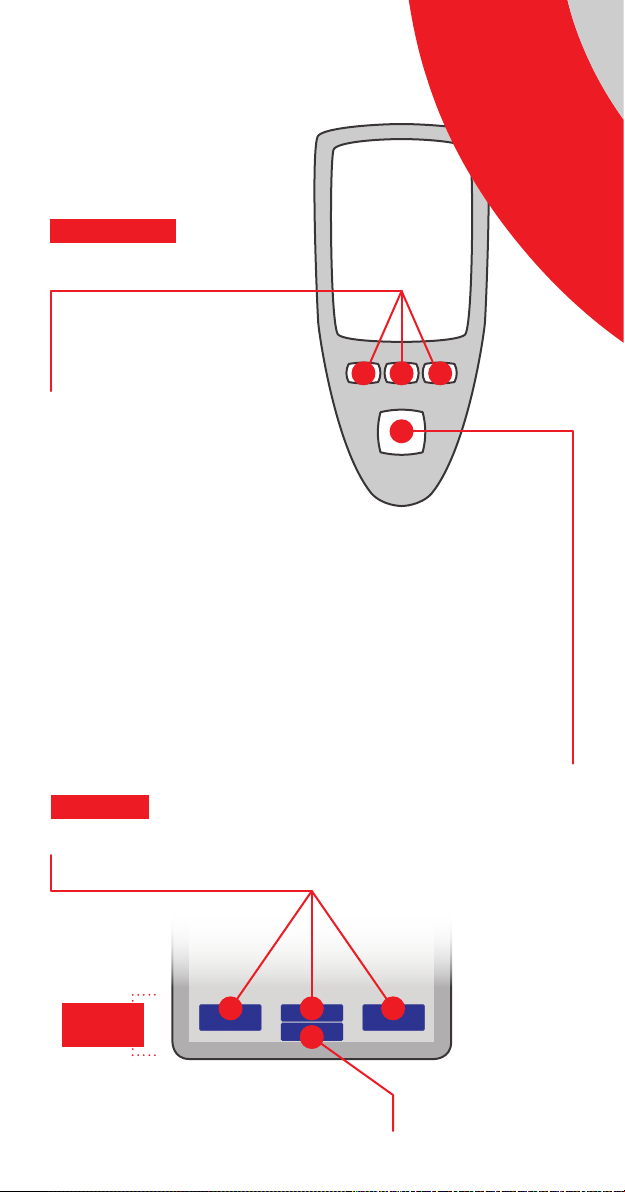
AirSck keyboard
On KEYBOARD
Contextual buons
Press a contextual button to
select the command displayed
in the action toolbar
1
ON–OFF / Selecon buon
then press again to conrm
3
2
4
Switch ON
Press for about 3 seconds
Switch OFF
Press for 2 seconds and
On SCREEN
Contextual buons
Acon
Toolbar
Select
Press to select the command
displayed in the action toolbar
1
2
4
6
3
ON–OFF /
Selecon buon
Page 7

Read
buon
Reading an EID
Press the read button on the back of the reader to start
reading. When the AirSck detects an EID, reading data
is displayed on the screen and recorded in the reading
session. The counter on the screen shows the number
of EIDs stored in the current session. At the rst usage,
a reading session is already available when you turn the
AirStick on, without the needing of creating a new one.
ENG
The AirStick indicates that a successful reading has been
made with a vibration, an audio notication and a green
light on the antenna (the light ashes red during reading).
In continuous mode, press the read button to stop reading.
If duplicates are not allowed, a duplicate message will be
displayed on the AirStick’s screen when an EID is read
twice.
While connected to an external device, each EID read is
sent on the y. Scroll down to select the shortcut to print
the session content.
7
Page 8
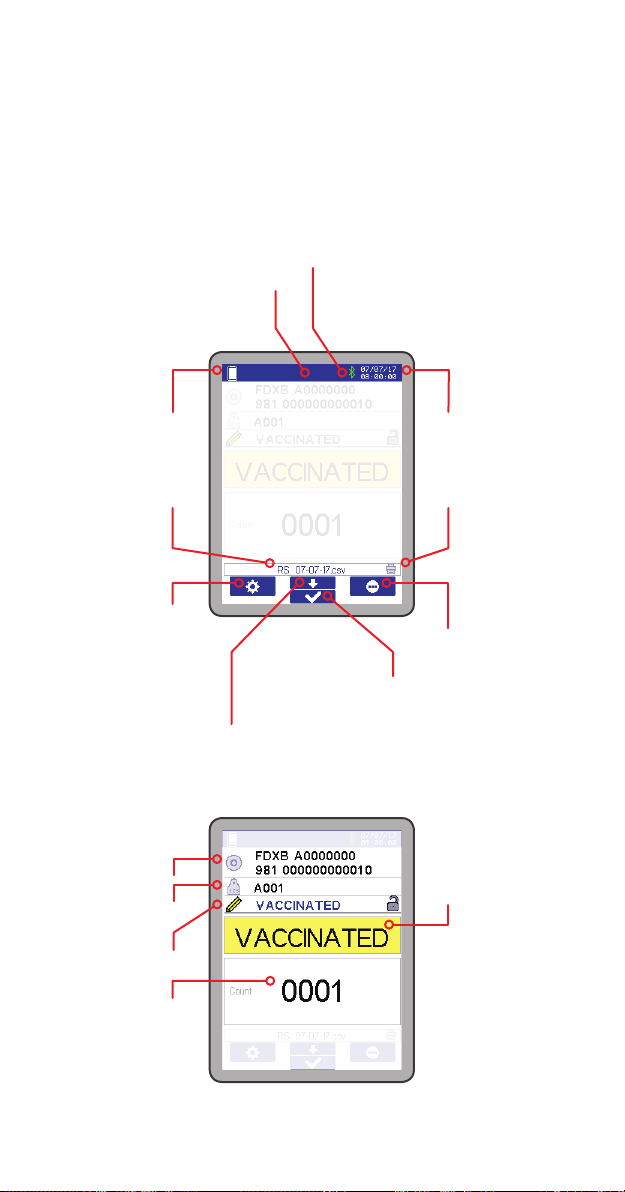
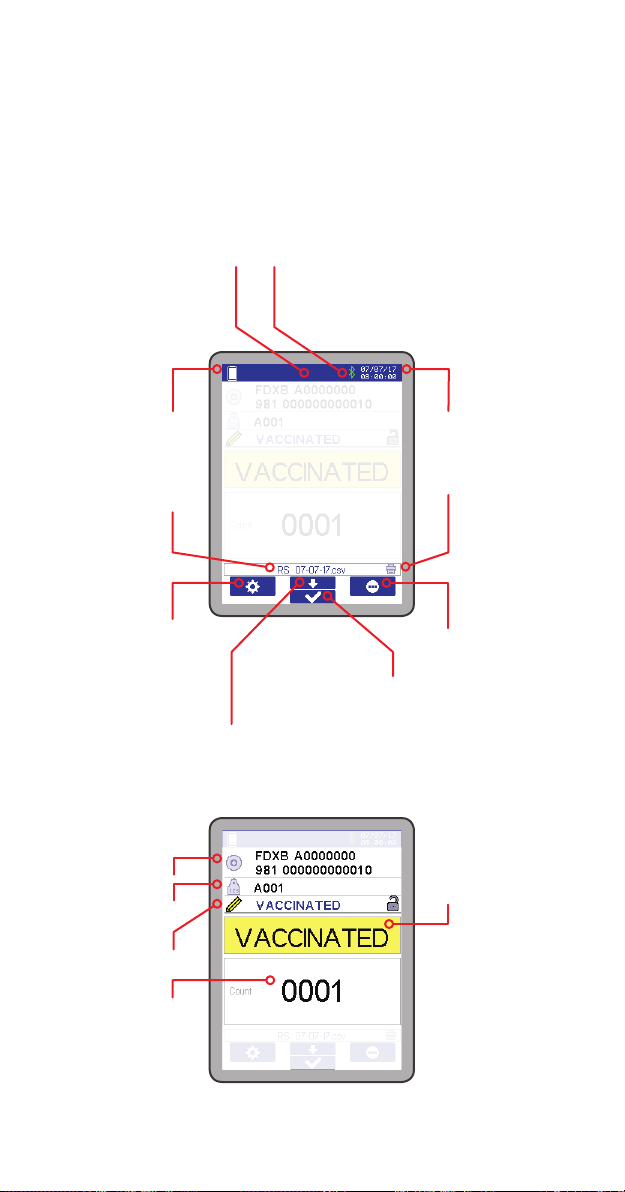
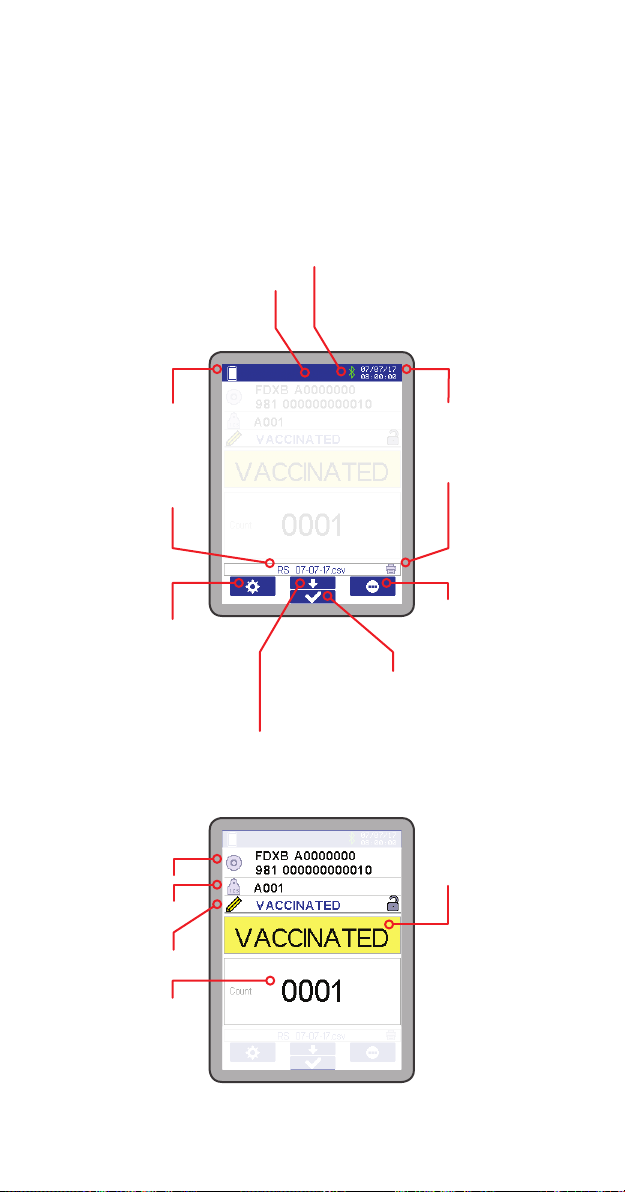
AirSck display
The AirSck’s display can be
populated to suit your requirements.
Bluetooth® icon (green when
connected to a Bluetooth® device)USB icon
Baery
level
Reading
session
Sengs menu
Scroll down to select
the informaon
displayed
in the magnier
EID
VID
Alert
Date
& me
Shortcut to
print session
Applicaon
menu
Selecon
Magnier
Counter
8
Page 9
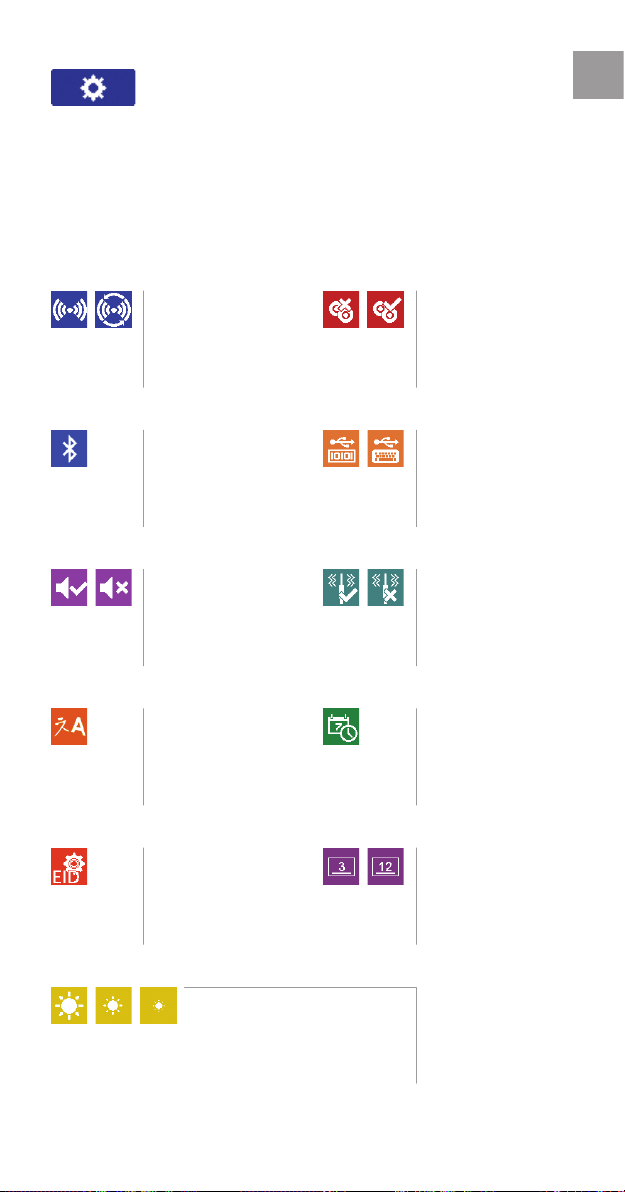
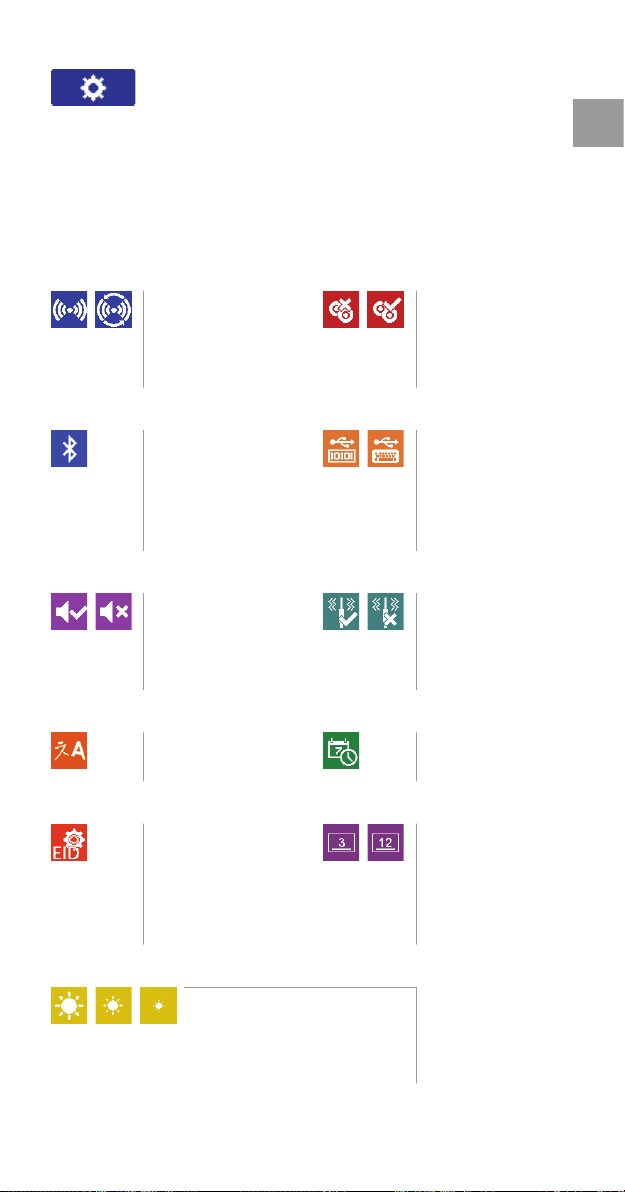
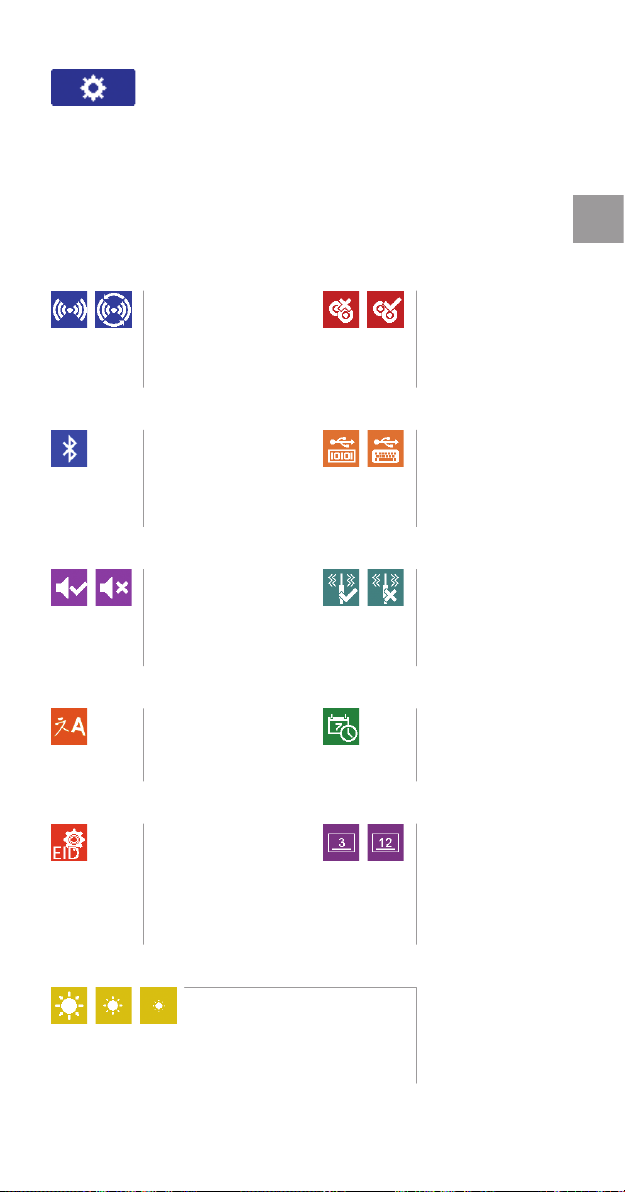
Sengs menu
Use the arrows to navigate the menu, select the desired
setting and press the ON–OFF / Selection button to enter
the desired function.
ENG
A B
Reading modes
A Single
B ContinuousA B
Bluetooth
menu
Audio
A ON
B OFF
Language
selecon
EID format
Desired format to
store and transfer
EIDs
®
A B
A B
Duplicates
A Not allowed
B AllowedA B
USB proles
BA
A Virtual COM Port
B Keyboard wedge
Vibrate
A ON
B OFF
Date & me
seng
Magnier digits
Congurable
from 3 (A)
to 12 (B)
A CB
Brightness
A High
B Middle
C Low
9
Page 10
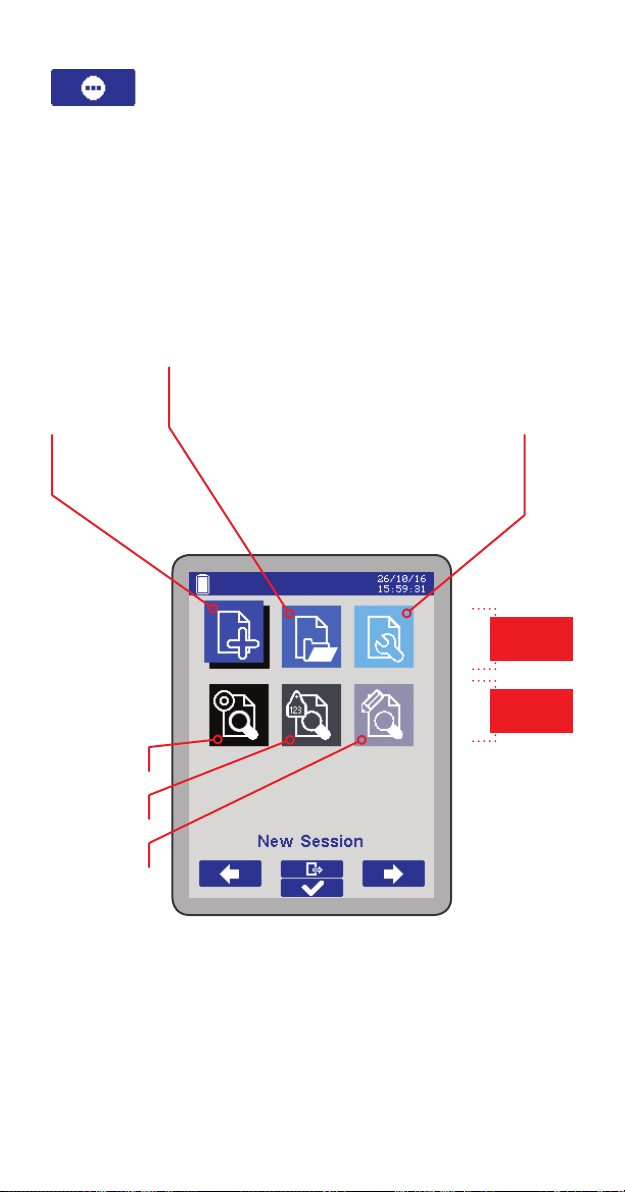
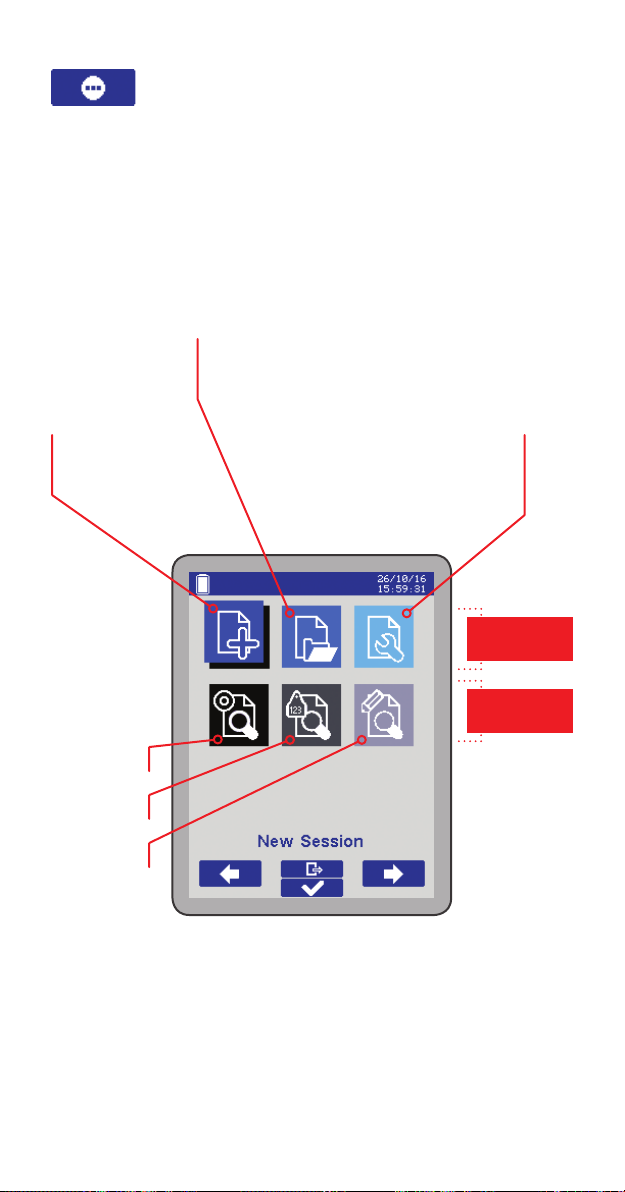
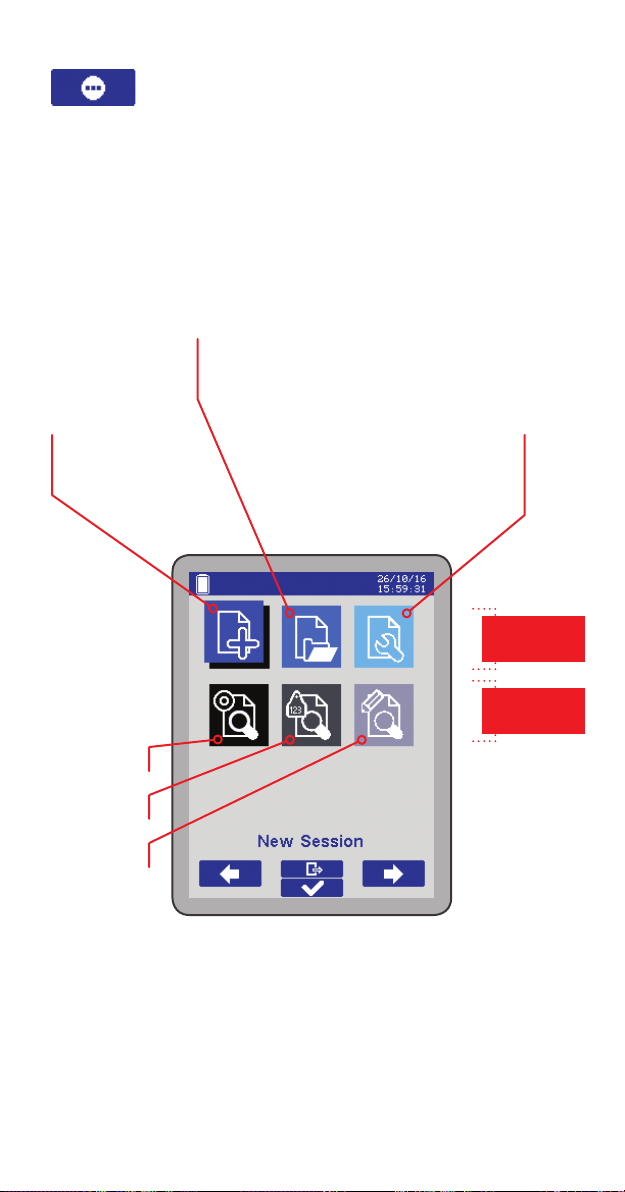
Applicaon menu
Use the arrows to navigate the menu, select the desired
setting and press the ON–OFF / Selection button to enter
the desired function.
Select an already exisng session,
where you can connue saving data
Create a
new session
Search EID
Search VID
Search Alert
Manage sessions
(printing, editing EIDs,
deleting data,
managing duplicates)
SESSION
Funcons
SEARCH
Funcons
10
Page 11
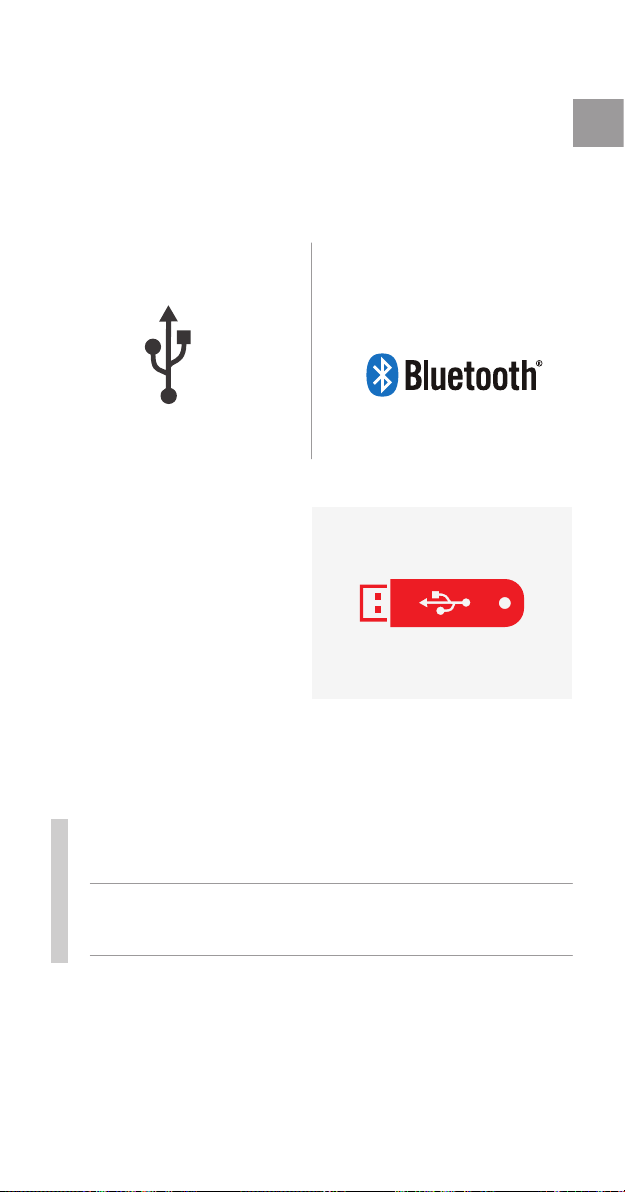
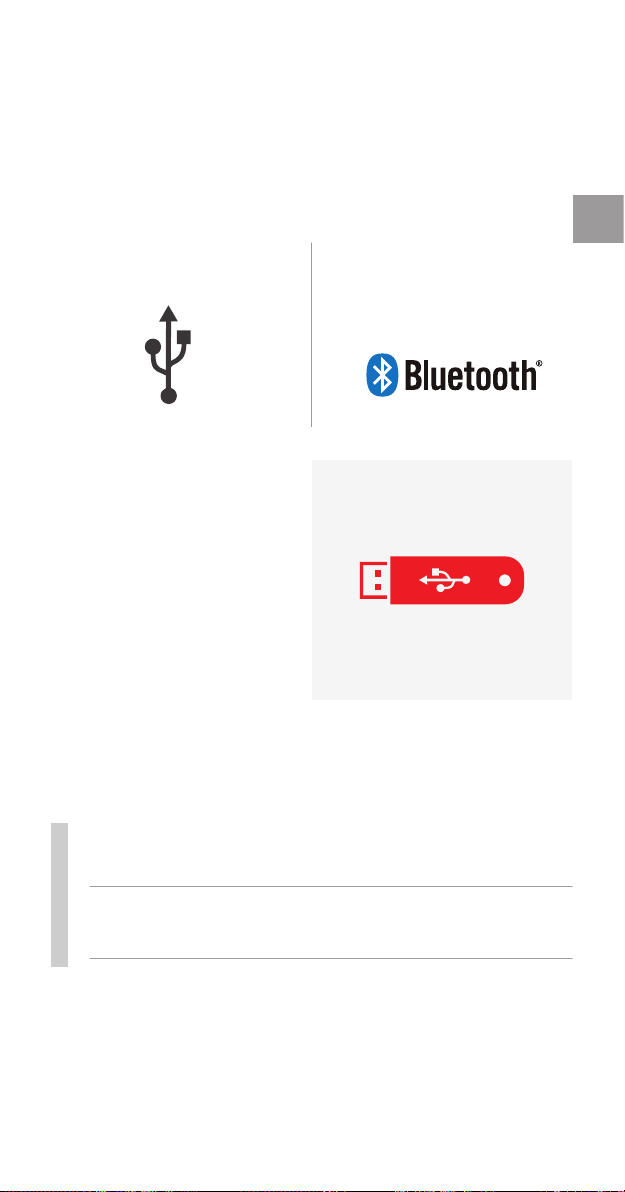
Connecvity
The AirSck can be connected to external devices via:
ENG
USB
(wired)
Both Keyboard wedge
and Virtual COM Port
proles are supported.
Data can be also
transferred from the
AirStick to a PC and
vice versa using a USB
memory stick.
Bluetooth
(wireless)
®
When connected to a device, the AirSck can:
● Send data to this device every me an EID is read
● Print session data by selecng the print funcon
For updated information on AirStick’s functionalities,
technical documentation and AirStick S-ID software, please
visit: www.datamars.com/id-readers.
11
Page 12

12
Page 13

CYM
Portable EID Tags Reader
Quick Start Guide
Canllaw Cychwyn Cyym
Guía de inicio rápido
Guide de démarrage rapide
Kurzanleitung
Guida rapida
13
V. 1.1
Page 14

Cyn cychwyn
Mae’r canllaw hwn yn rhoi cyfarwyddiadau sylfaenol ar gyfer
defnyddio eich AirSck.
Ceir gwybodaeth gyfredol am weithrediadau, dogfennaeth
dechnegol a meddalwedd AirStick S-ID ar y wefan: www.
datamars.com/id-readers.
Argymhellwn ichi ddefnyddio meddalwedd S-ID (sydd yn y cof
bach USB). Bydd hyn yn caniatáu i chi reoli eich data, cael fersiynau
newydd o’r gadarnwedd neu newid y gosodiadau diofyn.
Efallai y bydd angen i chi ffurfweddu eich AirStick cyn ei
defnyddio am y tro cyntaf.
Sylwer: Sicrhewch fod y batri wedi’i wefru’n llawn cyn
defnyddio’r ddyfais am y tro cyntaf. Bydd hyn yn sicrhau oes
hirach i’ch batris.
Geirfa
EID: Electronic IDentier – rhif adnabod trydanol.
VID: Visual IDentier – Cod alffaniwmerig y gellir ei gysylltu ag EID ar y
darllenydd AirStick neu gyda’r feddalwedd S-ID.*
Cofnod: Cod alffaniwmerig y gellir ei gysylltu ag EID i nodi cywr penodol
yr anifail (grwpio, beichiogrwydd, brechiadau...).*
Chwyddwydr: Mae hwn yn dangos yr wybodaeth sydd bwysicaf i chi (EID,
VID neu cofnod) mewn ffont mwy.
Sesiwn darlleniadau: Ffeil cof sy’n cadw gwybodaeth y darlleniad bob tro y
darllenir EID. Yr enw diofyn ar sesiwn yw: RS dd-mm-yy.csv.*
Cownter: Dangos sawl EID sydd wedi’i storio yn y sesiwn presennol.
* Gweithrediadau y gellir eu haddasu gyda’r feddalwedd S-ID
14
Page 15
Cynnwys y pecyn
● Darllenydd AirSck
● 2 fatri
● Gwefrydd batri AC/DC
● Cebl gwefrydd
● Gwefrydd i’r car
● Cebl USB
● Cof bach USB
● Cerdyn dogfennaeth a waran
● Belt ysgwydd
● Cês
CYM
15
Page 16
LED
Antenna
Caead sgriw cefn
Botwm darllen
(ar y cefn)
Plwg DC
Dangosyddion
batri LED
(cysylltydd
gwefrydd)
Porth Mini-USB
(i gysylltu’r darllenydd â chyfriadur)
Botwm
tynnu
batri
Porth USB safonol
(i gysylltu cof bach USB)
16
Batri
amnewidiadwy
Page 17
Ailwefru eich AirSck
Gellir defnyddio’r gwefrydd batri AC/DC neu’r gwefrydd car
i wefru’r darllenydd. Gellir gwneud hynny gyda’r batri wedi’i
ftio yn y darllenydd neu ar ei ben ei hun.
● Gwefrydd batri AC/DC
Cysylltwch yr addasydd AC/DC i’r twll plwg ar y batri,
wedyn plygiwch yr addasydd i mewn i allfa 220 VAC
gyda’r cebl pŵer.
● Gwefrydd i’r car
Plygiwch un pen o’r gwefrydd car i mewn i’r twll plwg ar
y batri, wedyn plygiwch y pen arall i mewn i’r soced yn
y car.
Yn ystod gwefru’r batri,
bydd y dangosydd LED
coch a gwyrdd yn goleuo
â golau cyson. Pan fydd y
batri wedi’i wefru’n llawn,
bydd y dangosydd LED
coch yn diffodd, a bydd
golau cyson ar y
dangosydd LED gwyrdd.
CYM
I dynnu’r batri o’r AirStick,
pwyswch y botwm tynnu
batri a thynnwch y batri
allan.
I roi’r batri yn yr AirStick,
gwthiwch ef i mewn i’r
twll batri; fe glywch glic
clir i gadarnhau fod y
batri wedi’i osod yn gywir.
17
Page 18
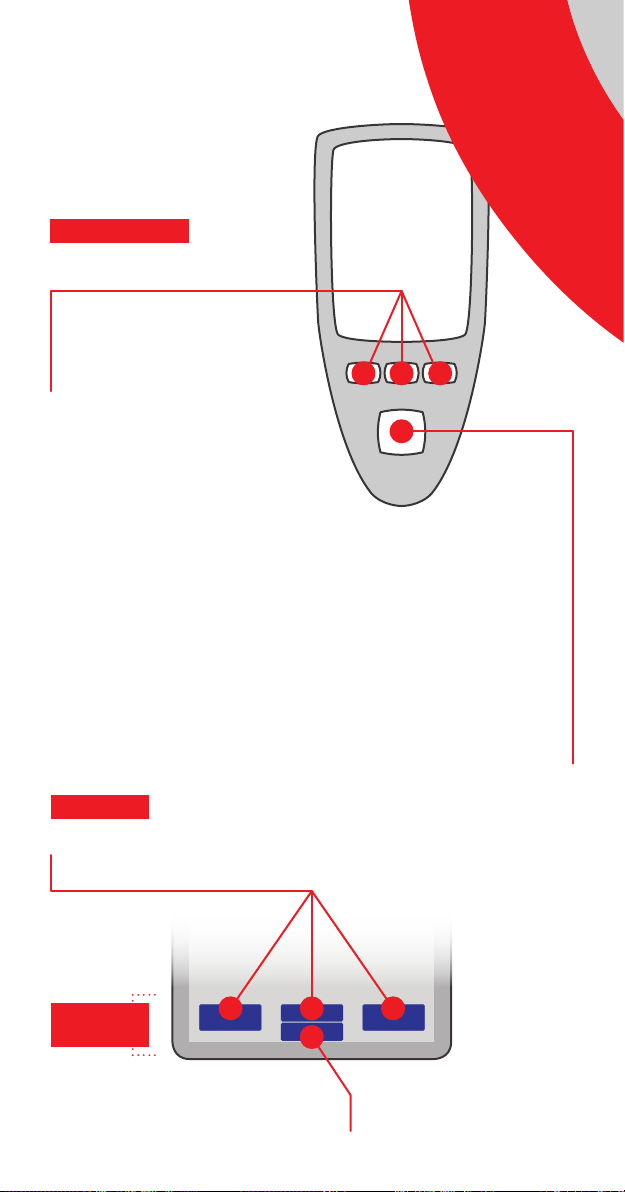
Allweddell yr AirSck
YR ALLWEDDELL
Botymau cyd-destunol
Pwyswch y botwm cyd-destunol i
ddewis y gorchymyn a ddangosir
ar y bar offer gweithredu
Botwm DEFFRO–DIFFODD / Dewis
1
Pwyswch am 2 eiliad, wedyn
3
2
4
DEFFRO
Pwyswch am tua 3 eiliad
DIFFODD
pwyswch eto i gadarnhau
Ar y SGRÎN
Botymau cyd-destunol
Bar oer
Gweithredu
Dewis
Pwyswch i ddewis y gorchymyn a
ddangosir yn y bar offer gweithredu
1
2
4
18
3
Botwm DEFFRO–DIFFODD
/ Dewis
Page 19

Botwm
darllen
Darllen EID
Pwyswch y botwm darllen ar gefn y darllenydd i ddechrau
darllen. Pan fydd yr AirSck yn canfod EID, dangosir data’r
darlleniad ar y sgrin a chaiff ei gofnodi yn y sesiwn darlleniadau.
Mae’r cownter ar y sgrîn yn dangos sawl EID sydd wedi’i storio
yn y sesiwn presennol. Pan gaiff y ddyfais ei defnyddio am y tro
cyntaf, mae sesiwn darlleniadau eisoes ar gael wrth ddeffro’r
AirStick, heb ichi orfod creu un newydd.
CYM
Mae’r AirStick yn dangos darlleniad llwyddiannus trwy grynu,
rhoi hysbysiad sain, a bydd golau gwyrdd yn ymddangos ar yr
antena (mae’r golau yn fachio’n goch yn ystod y darlleniad).
Pan fo’r ddyfais wedi’i gosod i’r modd parhaus, pwyswch y
botwm darllen eto i stopio darllen.
Os na chaniateir ailddarlleniadau, bydd neges ailddarlleniad yn
ymddangos ar sgrîn yr AirStick pan gaiff EID ei ddarllen eilwaith.
Pan mae’r ddyfais wedi’i chysylltu â dyfais allanol, caiff pob
darlleniad EID ei anfon tra byddwch wrthi’n gweithio. Sgroliwch i
lawr i ddewis y llwybr byr i argraffu cynnwys y sesiwn.
19
Page 20

Sgrîn yr AirSck
Gallwch boblogi sgrîn yr AirSck i ateb
eich dibenion.
Eicon Bluetooth® (gwyrdd pan
Eicon USB
mae wedi’i gysylltu â dyfais
Bluetooth®)
Lefel
batri
Sesiwn
darlleniadau
Dewislen
gosodiadau
Sgroliwch i lawr i
ddewis yr wybodaeth
a ddangosir yn y
chwyddwydr
EID
VID
Cofnod
Dyddiad ac
amser
Llwybr byr
i argrau’r
sesiwn
Dewislen
rhaglenni
Dewis
Chwyddwydr
Cownter
20
Page 21
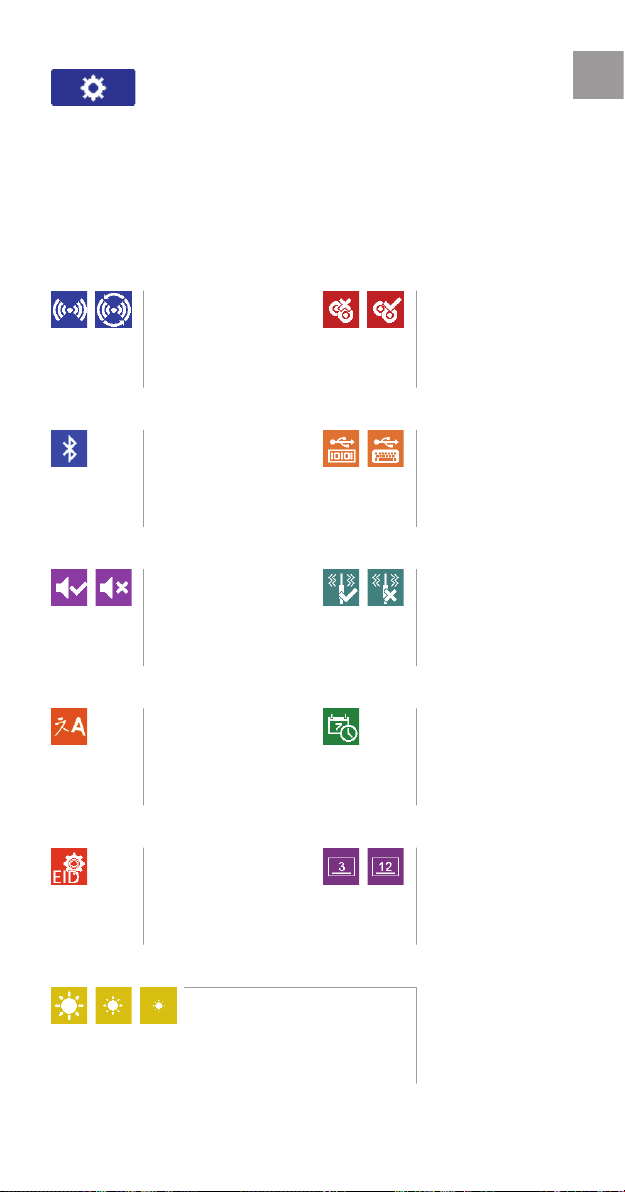
Dewislen gosodiadau
Defnyddiwch y saethau i fynd drwy’r ddewislen,
dewiswch y gosodiad a ddymunwch, a phwyswch y botwm
DEFFRO–DIFFODD / Dewis i ddewis y gweithrediad.
CYM
A B
Moddau darllen
A Unigol
B ParhausA B
Dewislen
Bluetooth
Sain
A DEFFRO
B DIFFODD
Dewis
iaith
Fformat EID
Dewis fformat storio
a throsglwyddo EIDs
®
A B
A B
Ailddarlleniadau
A Ni chaniateir
B CaniatáuA B
Proliau USB
BA
A Virtual COM Port
B Cysylltyn
bysellfwrdd
Crynu
A DEFFRO
B DIFFODD
Gosod dyddiad
ac amser
Digidau’r
chwyddwydr
Gellir eu haddasu o
3 (A) i 12 (B)
A CB
Disgleirdeb
A Uchel
B Canolig
C Isel
21
Page 22
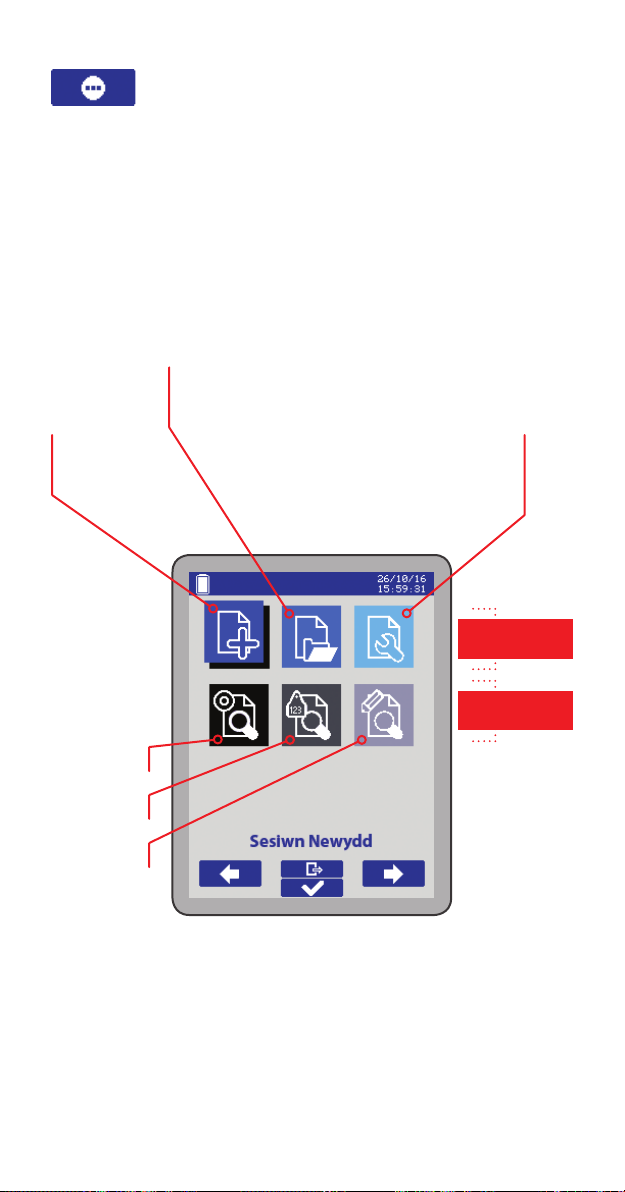
Dewislen rhaglenni
Defnyddiwch y saethau i fynd drwy’r ddewislen, dewiswch
y gosodiad a ddymunwch, a phwyswch y botwm DEFFRO–
DIFFODD / Dewis i ddewis y gweithrediad.
Dewis sesiwn sy’n bodoli eisoes, lle gallwch
barhau i gadw data
Creu sesiwn
newydd
Chwilio EID
Chwilio VID
Chwilio
Cofnod
Rheoli sesiynau
(argraffu, golygu EID, dileu
data, rheoli ailddarlleniadau)
Gweithrediadau
SESIWN
Gweithrediadau
CHWILIO
22
Page 23
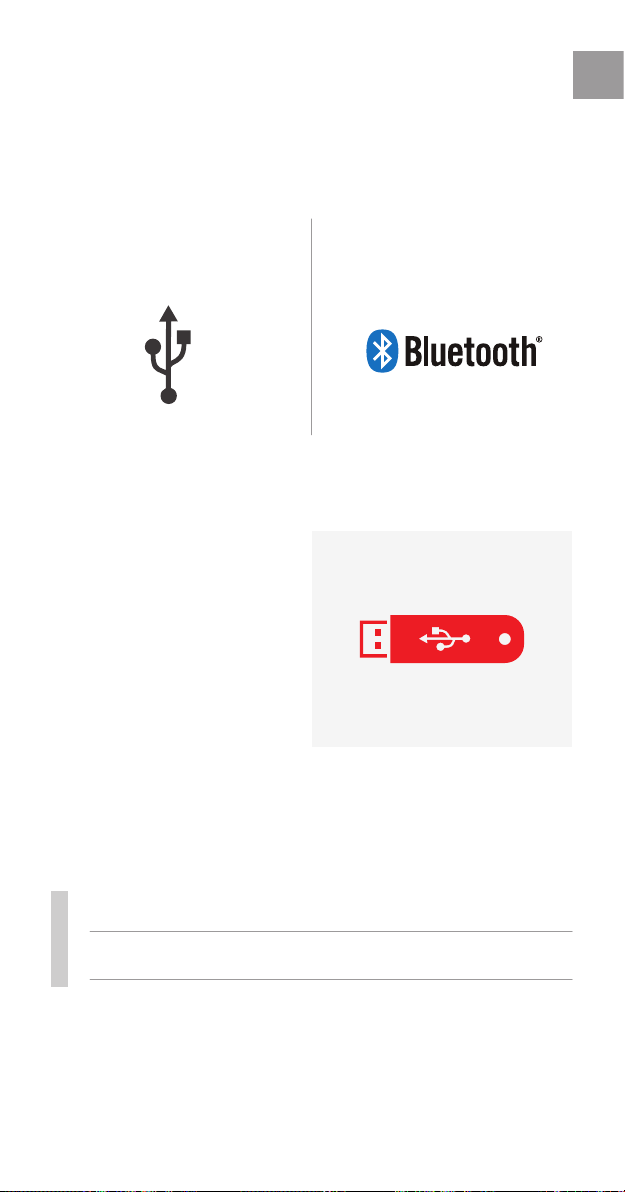
Cysylltedd
Gellir cysylltu’r AirSck â dyfeisiau allanol gyda:
CYM
USB
(gwifren)
Cefnogir profliau
cysylltyn bysellfwrdd a
Virtual COM Port.
Gellir trosglwyddo
data hefyd o’r AirStick
i gyfriadur ac o
gyfriadur i’r AirStick, gan
ddefnyddio cof bach USB.
Bluetooth
(diwifr)
®
Pan mae’r AirSck wedi’i chysylltu â dyfais, gall:
● Anfon data i’r ddyfais bob tro cai EID ei ddarllen
● Argrau data’r sesiwn trwy ddewis y gweithrediad argrau
Ceir gwybodaeth gyfredol am weithrediadau,
dogfennaeth dechnegol a meddalwedd AirStick S-ID
ar y wefan: www.datamars.com/id-readers.
23
Page 24

24
Page 25

ESP
Portable EID Tags Reader
Quick Start Guide
Canllaw Cychwyn Cyym
Guía de inicio rápido
Guide de démarrage rapide
Kurzanleitung
Guida rapida
25
V. 1.1
Page 26

Antes de comenzar
En esta guía se proporcionan instrucciones de cómo
usar su AirSck.
Para obtener información más actualizada acerca de
las funcionalidades, documentación técnica del AirStick
y del software S-ID, por favor visite:
www.datamars.com/id-readers.
Recomendamos el uso del software S-ID (incluido en
la memoria USB), el cual permite el manejo de datos,
comprobar si existen nuevas versiones de rmware y la
modicación de las conguraciónes pre-determinadas.
La conguración del AirStick puede ser requerida antes
de usarlo por primera vez.
Nota: Asegúrese que la batería esté completamente cargada
antes de usar el dispositivo por primera vez.
Ésto garantizará una mayor vida útil de la batería.
Glosario
EID: (Electronic IDentier) Código de Identicación Electrónica.
VID: (Visual IDentier) Código de identicación visual.
Código alfanumérico que puede ser asociado con un EID en el AirStick
o mediante el software S-ID.*
Alerta: Alert. Código alfanumérico que puede ser asociado con el EID
con el objeto de noticar una condición especíca del animal (Agrupación,
embarazo, vacunación...).*
Lupa: Resalta la información que considere más importante (EID, VID
o Alerta) con una fuente de mayor tamaño.
Sesión de Lectura: Reading Session. Archivo que contiene EIDs leídos
por el AirStick. Nombre de sesión por defecto: RS dd-mm-aa.csv.*
Contador: Counter. Cantidad de EIDs almacenados en la sesión de
lectura actual.
* Funcionalidades personalizables mediante el programa S-ID
26
Page 27
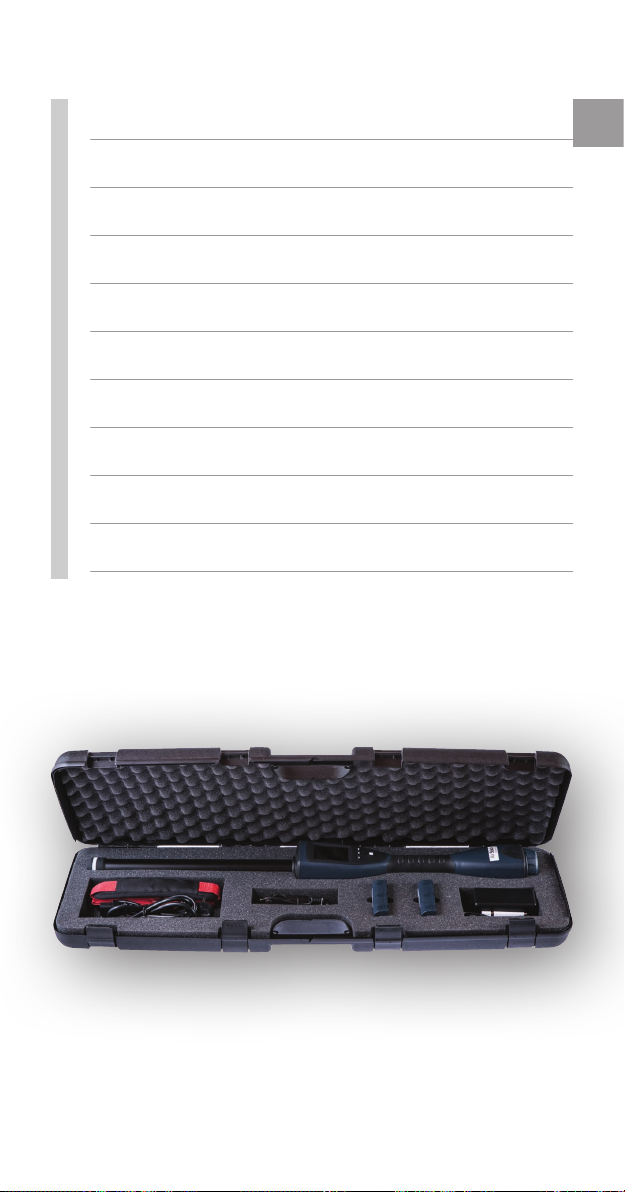
Contenido
● Lector AirSck
● 2 baterías
● Cargador de batería AC/DC
● Cable del cargador
● Cargador para automóvil
● Cable USB
● Memoria USB
● Documentación y tarjeta de garana
● Correa
● Malen
ESP
27
Page 28
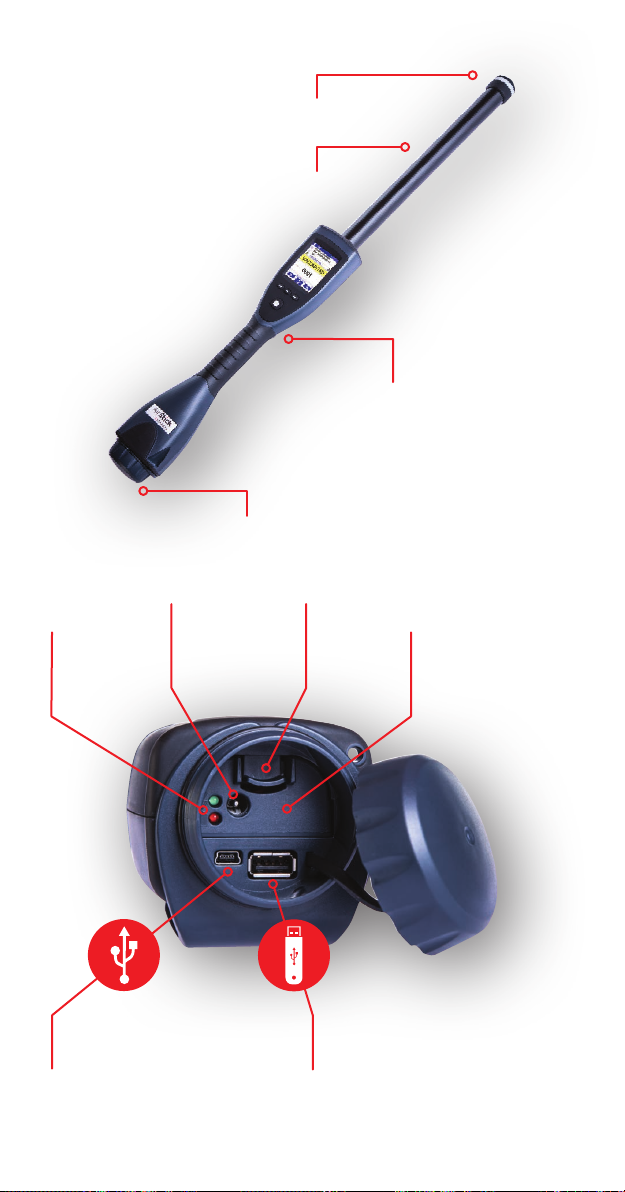
LED
Antena
Tapa trasera
Botón de lectura
(atrás)
Conector DC
Indicadores
LED de
(cargador de
baterías)
batería
Puerto USB Mini
(para conectar el lector a la PC)
Botón para
expulsar
la batería
Batería
extraíble
Puerto USB Estándar
(para conectar la memoria USB)
28
Page 29
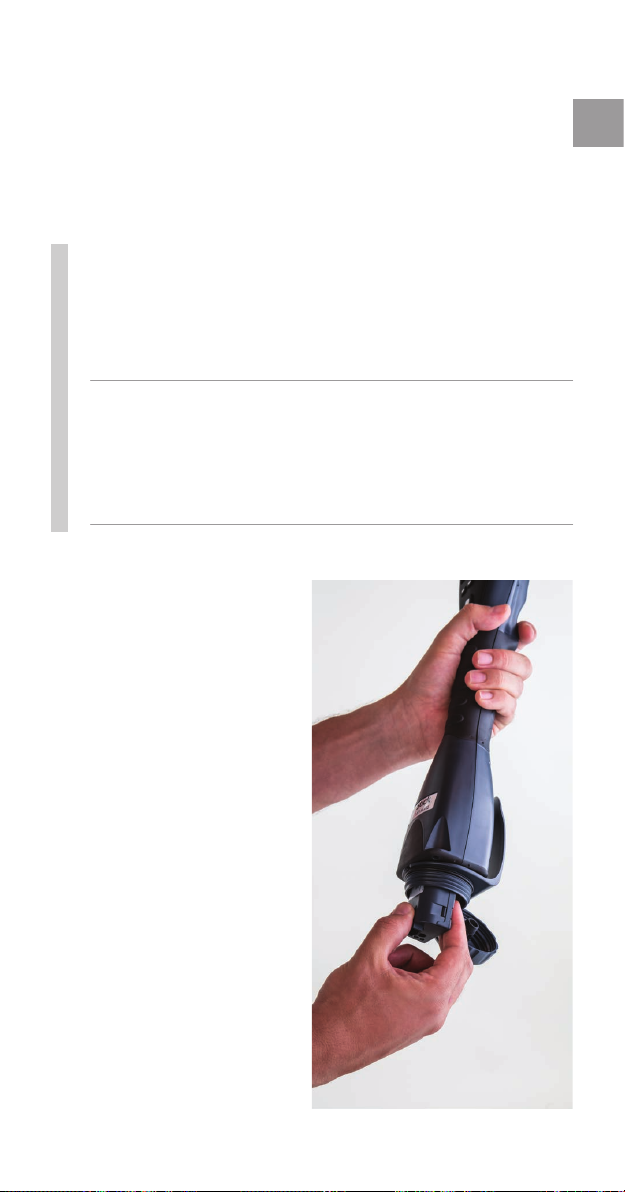
Carga de baterías del AirSck
La batería puede ser cargada mediante el cargador
AC/DC, mediante el cargador para automóvil, cuando
está en el lector o por separado.
● Vía cargador AC/DC
Conecte el cargador AC/DC en el conector de la
batería y luego enchufe el cargador a la red eléctrica
220 V mediante el cable.
● Vía cargador para automóvil
Inserte el extremo del cargador en el conector
de la batería, luego enchufe el otro extremo
en el conector del automóvil.
Mientras las baterías
están cargándose, el
LED rojo y el LED verde
estarán encendidos
en forma permanente.
Cuando la batería está
completamente cargada,
el LED rojo se apagará y
el LED verde permanecerá
encendido.
ESP
Para remover la batería
del AirStick, presione
el botón de expulsión
y extraiga la batería.
Para colocar la batería
en el AirStick, empuje la
misma en el receptáculo:
un click conrmará que la
batería ha sido colocada
correctamente.
29
Page 30
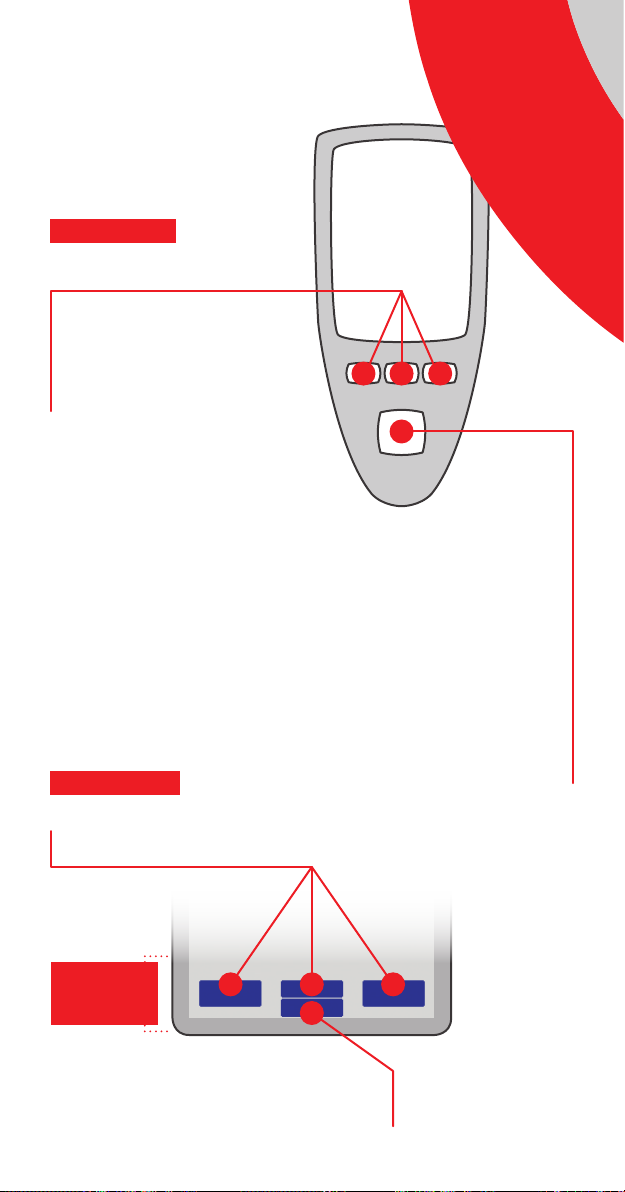
Teclado del AirSck
En el TECLADO
Botones de contexto
Presione un botón de contexto
para seleccionar el comando
mostrado en la barra de
herramientas de acción
Presione por 2 segundos y luego presione
1 3
2
4
Botón de encendido–apagado
/ selección
Para encender – ON
Presione por 3 segundos
Para apagar – OFF
nuevamente para conrmar
En la PANTALLA
Botones de navegación
Barra de
herramientas
de acción
Seleccionar
Presione para conrmar el comando mostrado
en la barra de herramientas de acción
1 3
2
4
Botón de
encendido–apagado /
selección
30
Page 31

Botón
de lectura
Leyendo un EID
Presione el botón de lectura situado en la parte de atrás
del AirSck para comenzar la lectura. Cuando el AirStick
detecta un EID, la información de lectura es mostrada en
la pantalla y almacenada en la sesión. El contador en la
pantalla mostrará el número de EIDs almacenados en la
sesión en curso. En el primer uso, una sesión de lectura ya
está disponible cuando se enciende el AirStick.
ESP
El AirStick indica la lectura exitosa mediante una vibración,
una noticación sonora y también por una luz verde en la
antena (la luz parpadea en rojo al leer). En modo de lectura
continua, presione el botón de lectura para pausar el
escaneo.
Si la duplicación no está permitida, un mensaje de
duplicado será mostrado en la pantalla del AirStick cuando
un EID es leído más de una vez.
Cuando se encuentra conectado a un dispositivo externo,
cada EID leído es enviado al dispositivo. Desplace hacia
abajo para seleccionar el acceso directo para imprimir el
contenido de la sesión.
31
Page 32
Pantalla del AirSck
La pantalla del AirSck puede ser
congurada de acuerdo a su necesidad.
Icono Bluetooth® (verde cuando está
Icono USB
conectado a un dispositivo Bluetooth®)
Nivel de
batería
Sesión
de lectura
Menú de
conguración
Desplazar para
seleccionar
la información
destacada
EID
VID
Alerta
Fecha
y hora
Acceso directo
para imprimir
sesión
Menú de
aplicaciones
Selección
Lupa
Contador
32
Page 33
Menú de conguración
Use las echas para navegar en el menú, seleccione la
conguración deseada y presione el boton de selección
para entrar en la función deseada.
ESP
A B
Modos de lectura
A Simple
B ContinuoA B
Menú
Bluetooth
Audio
A Encendido
B Silencio
Idioma Fecha y hora
Formato EID
Selección del
formato de EID
deseado para
almacenar
y exportar
®
BA
A B
A B
Duplicados
A No permitir
B PermitirA B
Perl USB
A VCP Puerto
COM Virtual
B Emulador
de Teclado
Vibración
A Encendido
B Apagado
Dígitos destacados
Congurable
desde 3 (A)
a 12 (B)
A CB
Brillo
A Alto
B Medio
C Bajo
33
Page 34
Menú de aplicaciones
Use las echas para navegar por el menú, seleccione la
conguración deseada y presione el botón de selección
para entrar en la función.
Seleccionar una sesión existente,
donde puede connuar guardando datos
Crear
nueva sesión
Buscar EID
Buscar VID
Buscar alerta
Administrar sesiones
(imprimir, editar EID,
borrar datos,
administrar duplicados)
Funciones
de SESIÓN
Funciones de
BÚSQUEDA
34
Page 35
Conecvidad
El AirSck puede ser conectado a un dispositivo
externo vía:
ESP
USB
(cable)
Bluetooth
(inalámbrica)
®
Soporta Emulador de
teclado y perles VCP
Puerto COM Virtual.
Los datos pueden
ser transferidos desde
el AirStick a una PC
y viceversa, usando
una memoria USB.
Cuando se conecta a un dispositivo, el AirStick puede:
● Enviar datos hacia el disposivo cada
● vez que se lee un EID
● Imprimir una sesión seleccionando
● la función Imprimir
Para obtener información más actualizada acerca de
las funcionalidades, documentación técnica del AirStick
y del software S-ID, por favor visite:
www.datamars.com/id-readers.
35
Page 36

36
Page 37

Portable EID Tags Reader
Quick Start Guide
Canllaw Cychwyn Cyym
Guía de inicio rápido
Guide de démarrage rapide
Kurzanleitung
Guida rapida
V. 1.1
Page 38

Avant de commencer
Ce guide vous fournit les informations de base pour
commencer à utiliser votre AirSck.
Retrouvez plus d’informations sur l’utilisation du lecteur
AirStick (fonctionnalités, document technique et logiciel
AirStick S-ID) sur: www.datamars.com/id-readers.
Nous vous recommandons d’utiliser le logiciel S-ID
(contenu dans la clé USB fournie) permettant de gérer vos
données, de vérier les nouvelles versions du logiciel ou
encore de modier les paramètres par défaut.
Lors de la première utilisation du lecteur, il est possible de
devoir congurer l’Airstick.
Note: Nous vous recommandons de charger complètement
la batterie avant la première utilisation du lecteur.
Ceci garantiera une longévité optimale des batteries.
Glossaire
EID: (Electronic IDentier) Code d’identication électronique.
VID: (Visual IDentier) Identication visuelle. Le code alphanumérique
peut être associé à un CIE sur le lecteur AirStick ou sur le logiciel S-ID.*
Alert: Signalement. Le code alphanumérique peut être associé à un
CIE pour notier une information spécique sur l’animal (groupe,
gestation, vaccination...).*
Loupe: Mise en évidence d’information considérée comme importante
(CIE, IDV ou alerte) avec une taille de police plus grande.
Reading Session: Session de lecture. Fichier de stockage des données
lorsqu’un CIE est lu. Nom par défaut d’une session: RS dd-mm-yy.csv.*
Counter: Compteur. Nombre de CIE stockés dans la session actuelle.
* Fonconnalités modulables sur le logiciel S-ID
38
Page 39
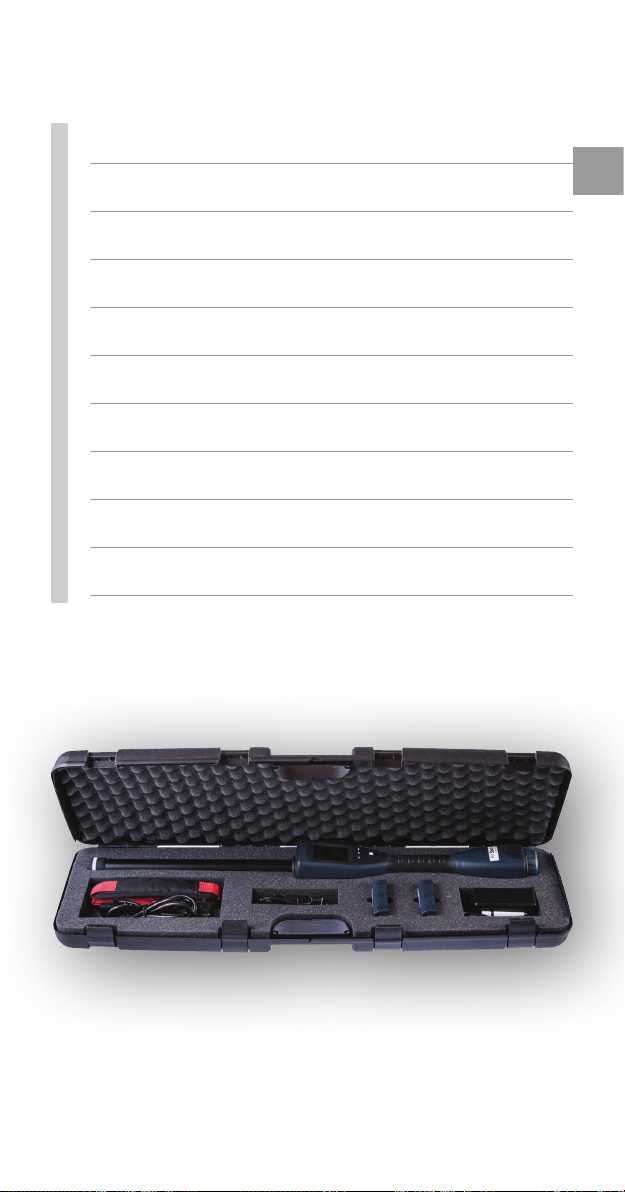
Composion
● Lecteur AirSck
● 2 baeries
● Chargeur de baerie AC/DC
● Câble de chargement
● Chargeur de voiture
● Câble USB
● Clé USB
● Documentaon et carte de garane
● Sangle d’épaule
● Valise de transport
FRA
39
Page 40
LED
Antenne
Socle des connecques
Bouton de lecture
(à l’arrière)
Fiche DC
Indicateurs
LED de la
(connexion
du chargeur)
baerie
Port mini-USB
(pour connecter le lecteur
à un ordinateur)
Bouton
d’éjecon
de la
baerie
Baerie
amovible
Port USB standard
(pour connecter une clé USB)
40
Page 41
Rechargement de l’AirSck
La datterie du lecteur peut être rechargé (inséré ou à
l’extérieur de l’AirSck) en utilisant l’adaptateur AC/DC
ou le chargeur de voiture.
● Par le chargeur AC/DC
Connectez l’adaptateur AC/DC à la prise de la batterie,
puis branchez l’adapteur à une sortie de 220 V avec
le cordon.
● Par le chargeur de voiture
Branchez une extrémité de l’adaptateur dans la prise
de la batterie, puis branchez l’autre extrémité dans
la prise accessoire d’une voiture.
Lorsque la batterie est
en cours de chargement,
les LED d’indication rouge
et verte sont allumées et
xes. Quand la batterie
est totalement rechargée,
la LED d’indication rouge
s’éteint et la LED d’indication verte est allumée et
xe.
FRA
Pour remplacer la batterie de l’AirStick, pressez
le bouton d’éjection de la
batterie et retirez-la.
Pour insérer la batterie
dans l’AirStick, poussez-la
dans son logement ; un
clic vous conrme que la
batterie est correctement
insérée.
41
Page 42
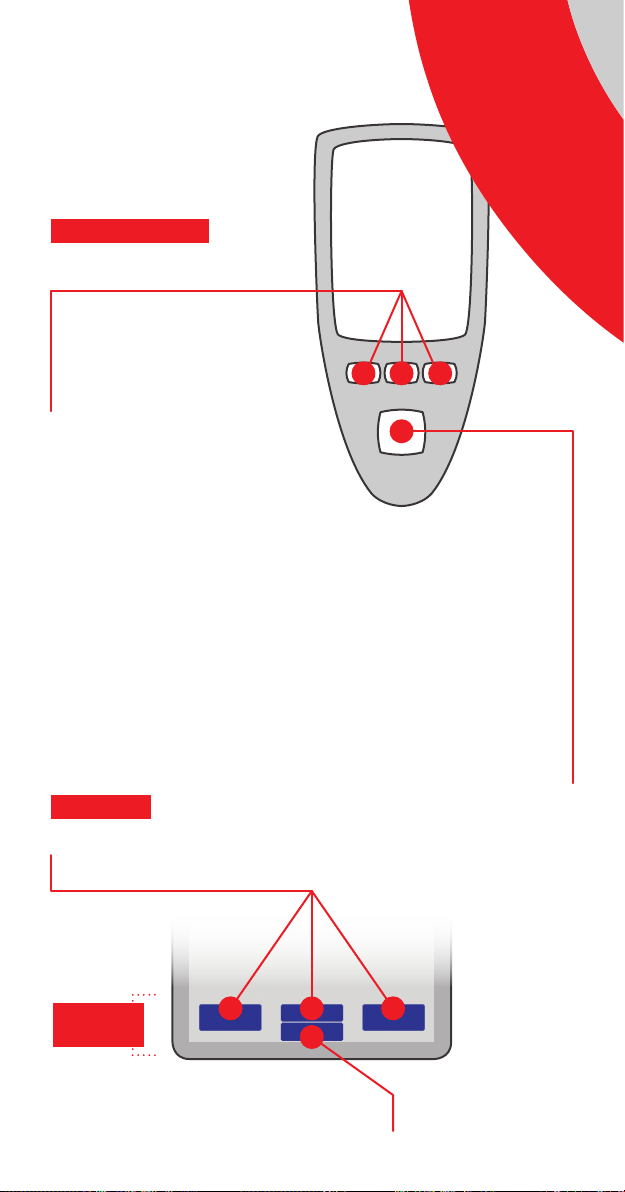
Tableau de bord
de l’AirSck
TABLEAU DE BORD
Curseurs de navigaon
Appuyez sur un curseur de
navigation pour sélectionner
une commande afchée dans
la barre de commande
1 3
2
4
Curseurs ON–OFF / Sélecon
Allumer – ON
Appuyez 3 secondes
Eteindre – OFF
Appuyez 2 secondes et appuyez
une fois encore pour conrmer
Sur l’ECRAN
Curseurs de navigaon
Barre de
commande
Appuyez pour sélectionner
1 3
2
4
42
Séleconner
la commande afchée
dans la barre d’action
Curseur ON–OFF /
Sélecon
Page 43

Bouton
de lecture
Lire un CIE
Appuyez sur le bouton déclencheur à l’arrière du lecteur
pour commencer la lecture. Quand l’AirSck détecte un
CIE, les données de lecture apparaissent sur l’écran et
s’enregistrent dans la session de lecture. Le compteur sur
l’écran montre le numéro du CIE stocké dans la session
actuelle. Lors de la première utilisation, une session de
lecture est déjà disponible lorsque l’AirStick est démarré.
FRA
L’AirStick indique si la lecture a été réalisée avec succès
avec une vibration, une notication audio et avec la
lumière verte sur l’antenne (le voyant clignote rouge lors
de la lecture). En mode continu, appuyez sur le bouton
déclencheur pour arrêter la lecture.
Si le doublon n’est pas permis, un message apparait
sur l’écran de l’AirStick pour indiquer que le CIE est lu
deux fois.
Lorsque le lecteur est connecté à un appareil externe,
chaque CIE lu est envoyé sur celui-ci. Sélectionnez le
raccourci pour imprimer le contenu de la session.
43
Page 44
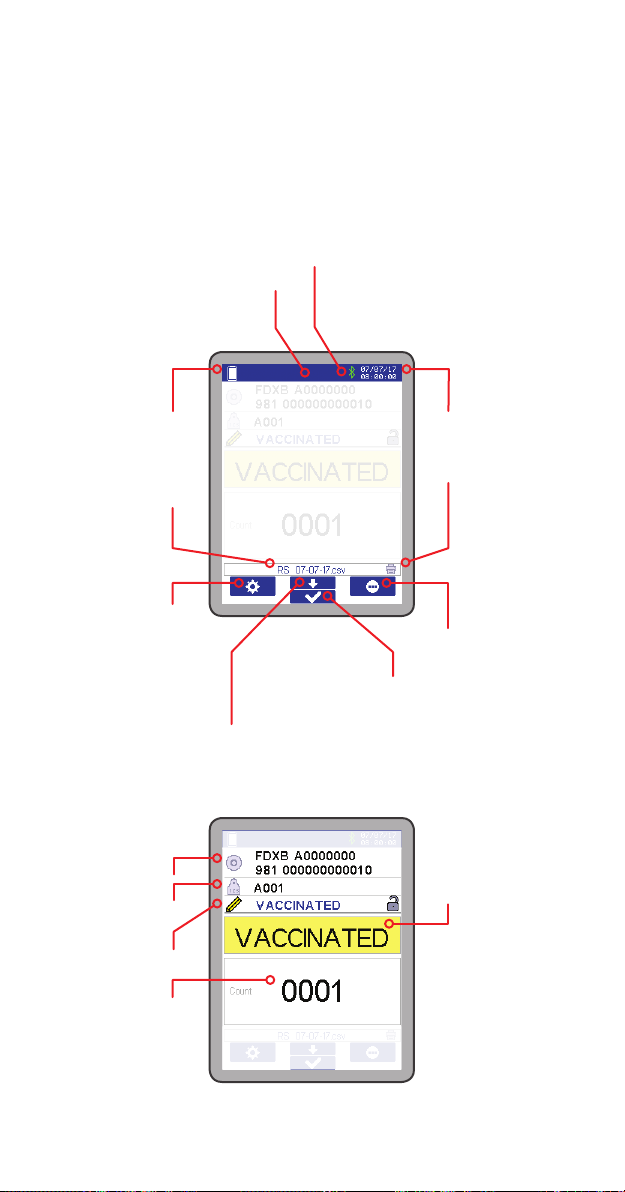
Achage de l’AirSck
L’afchage de l’AirSck peut être
modulé pour convenir à vos exigences.
Icone Bluetooth® (vert quand la
Icone USB
connexion à un autre appareil est
effectuée)
Niveau de
la baerie
Session
de lecture
Paramètres
Faire déler vers le
bas pour séleconner
une informaon
dans la loupe
EID
VID
Alert
Date
et heure
Raccourci pour
imprimer une
session
Menu
principal
Sélecon
Loupe
Compteur
44
Page 45
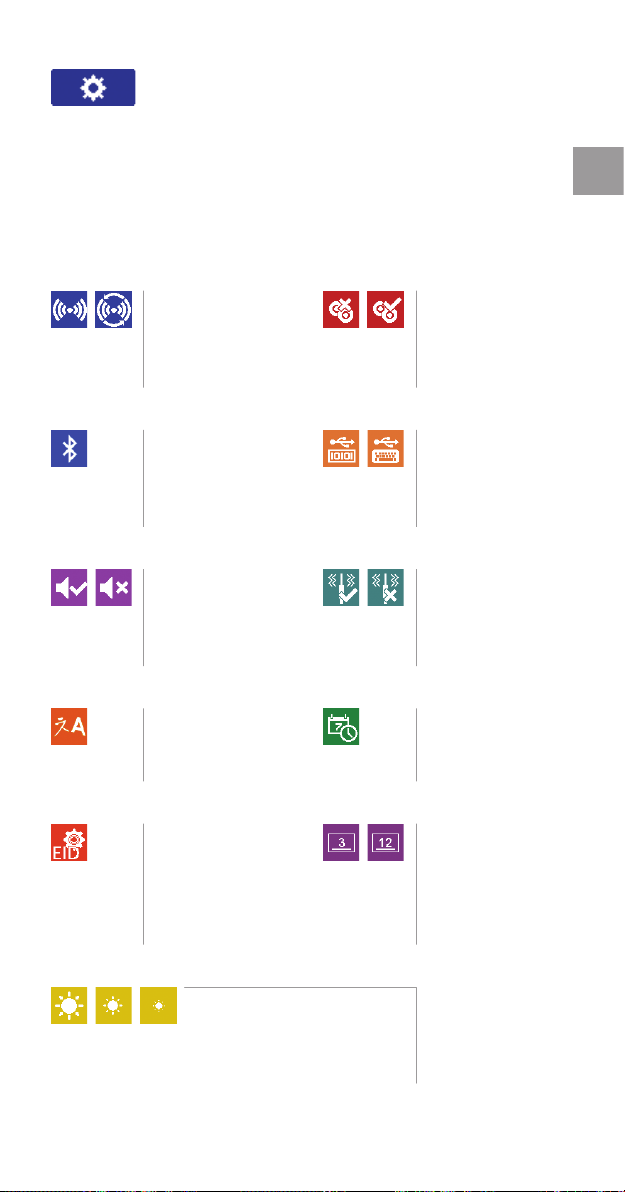
Paramètres
Utilisez les curseurs de navigation pour naviguer dans ce
menu, sélectionnez le paramètre et appuyez sur le curseur
ON–OFF pour entrer dans la fonction souhaitée.
FRA
A B
Modes de lecture
A Simple
B En continueA B
Bluetooth
menu
Audio
A Activé
B Désactivé
Sélecion
de la langue
Format EID
Format désiré pour
le stockage et
transfert des EID
®
A B
A B
Doublons
A Non permis
B PermisA B
Prols USB
BA
A Port série virtuel
B Clavier
Vibraon
A Activé
B Désactivé
Date
et heure
Agrandissement
des caractères
Congurable
de 3 (A) à 12 (B)
A CB
Lumière
A Haute
B Moyenne
C Basse
45
Page 46
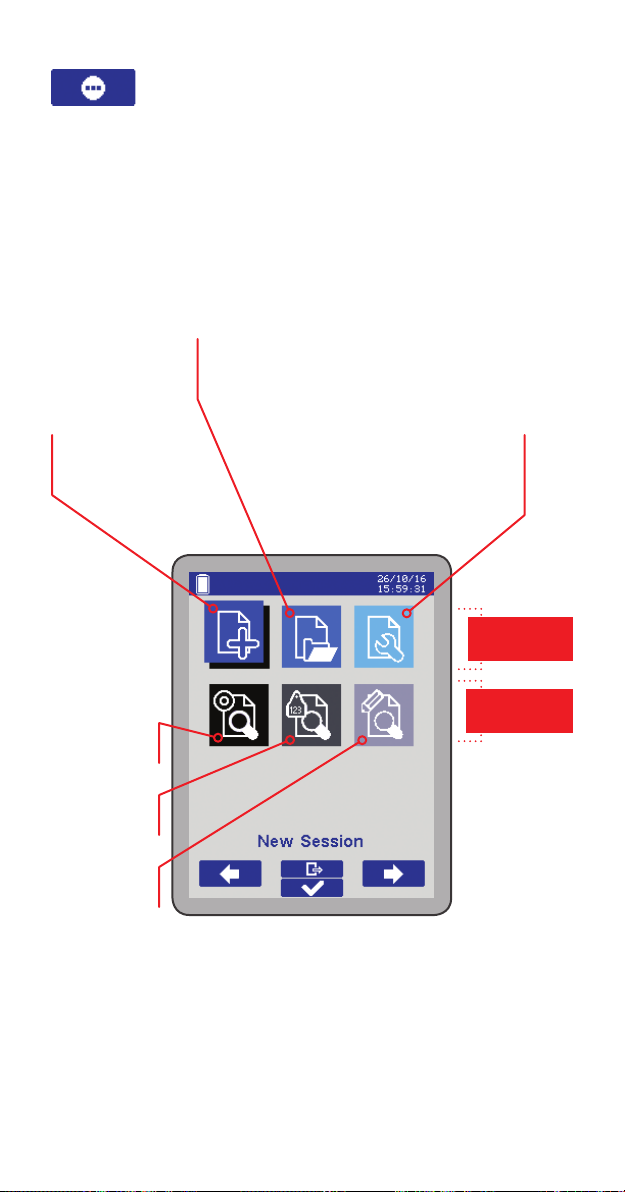
Menu principal
Utilisez les curseurs pour naviguer dans le menu,
sélectionnez la fonction souhaitée et appuyez sur
le curseur ON–OFF pour entrer dans la fonction.
Séleconner une session existante
pour connuer à enregistrer des données
Créer une
nouvelle session
Recherche
de EID
Recherche
de VID
Recherche de
signalement
Gesonnaire des sessions
(impression, édition de EID,
suppression de données,
gestion des doublons)
Foncons de
la SESSION
Foncons de
RECHERCHE
46
Page 47
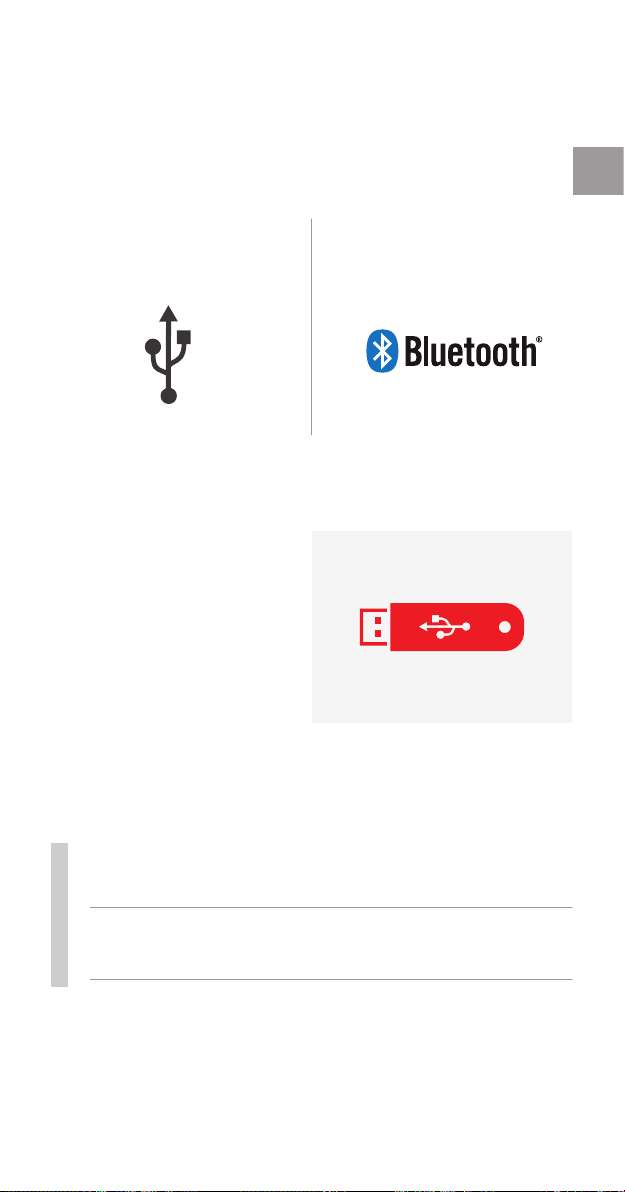
Connecvité
L’ AirSck peut être connecté à des appareils
extérieurs via:
FRA
USB
(laire)
Bluetooth
(sans l)
®
Les prols clavier
et Port série virtuel sont
supportés.
Les données peuvent être
transférées de l’AirStick
vers un ordinateur et vice
versa en utilisant une
clé USB.
Quand l’AirStick est connecté à un appareil, il peut:
● Envoyer des données à cet appareil
● dès que le EID est lu
● Imprimer une session de données
● en séleconnant la foncon d’impression
Retrouvez plus d’informations sur l’utilisation du lecteur
AirStick (fonctionnalités, document technique et logiciel
AirStick S-ID) sur: www.datamars.com/id-readers.
47
Page 48

48
Page 49

Portable EID Tags Reader
Quick Start Guide
Canllaw Cychwyn Cyym
Guía de inicio rápido
Guide de démarrage rapide
Kurzanleitung
Guida rapida
V. 1.1
Page 50

Vor Inbetriebnahme
In diesem Handbuch nden Sie grundlegende Anweisungen
zur Verwendung Ihres AirSck Lesers.
Für weitere aktuelle Informationen zu AirStick Funktionen,
technische Dokumentationen oder zur AirStick S-ID
Software besuchen Sie bitte: www.datamars.com/id-readers.
Wir empfehlen Ihnen die Verwendung unserer S-ID
Software (auf dem mitgelieferten USB-Speicherstick
enthalten), zur Datenverwaltung, Aktualisierung der
neuesten Firmware Version oder zur Erstellung von
Standardeinstellungen.
Bitte kongurieren Sie den AirStick, bei Bedarf, vor der
ersten Nutzung.
Hinweis: Bitte stellen Sie sicher, dass der Akku vollständig
aufgeladen ist, bevor Sie das Gerät zum ersten Mal benutzen.
Dies garantiert eine längere Lebensdauer der Batterien.
Glossar
EID: Elektronischer IDentizierer/Kennzeichnung
VID: Visueller IDentizierer/Kennzeichnung. Alphanumerischer Text, der
mit einer EID verknüpfen werden kann, auf dem AirStick Lesegerät oder
mithilfe der S-ID Software. *
Hinweis: Alphanumerischer Text, der mit einer EID verknüpfen werden
kann um eine bestimmte Bedingung die ein Tier erfüllt hinzuweisen, z.B.
(Gruppierung, Schwangerschaft, Impfung ...). *
Vergrösserung: Markiert die für Sie wichtigsten Informationen (EID, VID
oder Hinweis) in einer grösseren Schriftgrösse.
Lesedatei: Speicherdatei, die bei Lesung einer EID die Informaon
automasch speichert. Standard Dateiname: RS TT-MM-JJ.csv. *
Zähler: Anzahl gespeicherten EIDs die in der aktuellen Lesedatei sind.
* Anpassbare Funkonen mithilfe der S-ID Soware
50
Page 51
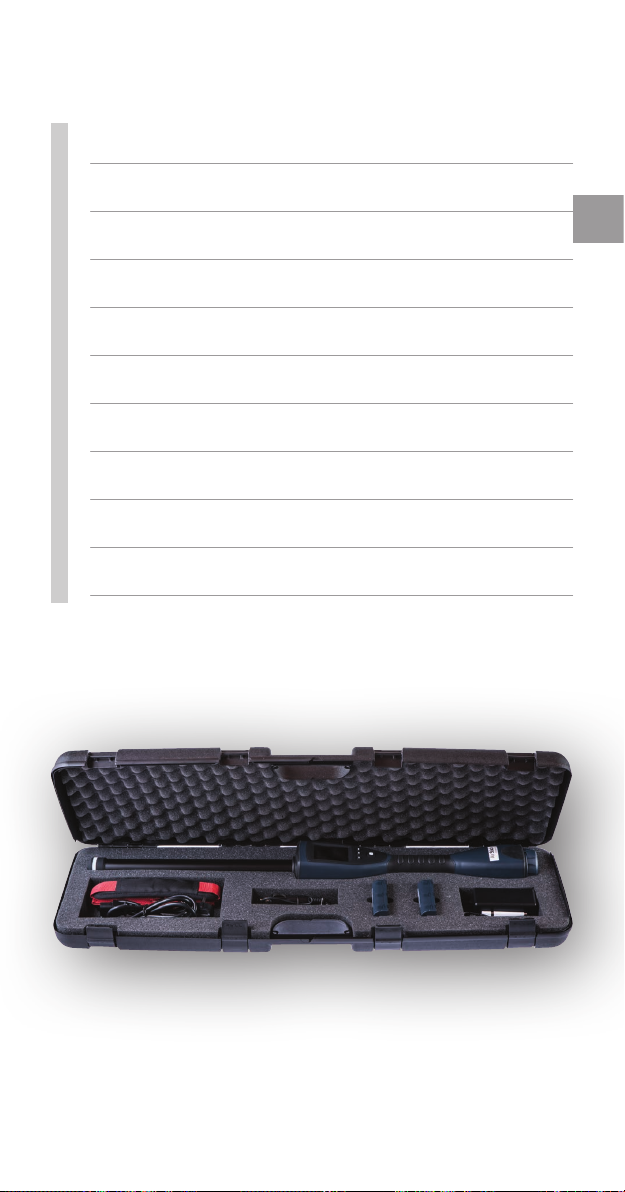
Packungsinhalt
● AirSck Lesegerät
● 2 Baerien
● AC/DC Baerieladegerät
● Ladekabel
● Auto Ladegerät
● USB Kabel
● USB Speichersck
● Dokumentaon und Garanekarte
● Schultergurt
● Koer
DE
51
Page 52
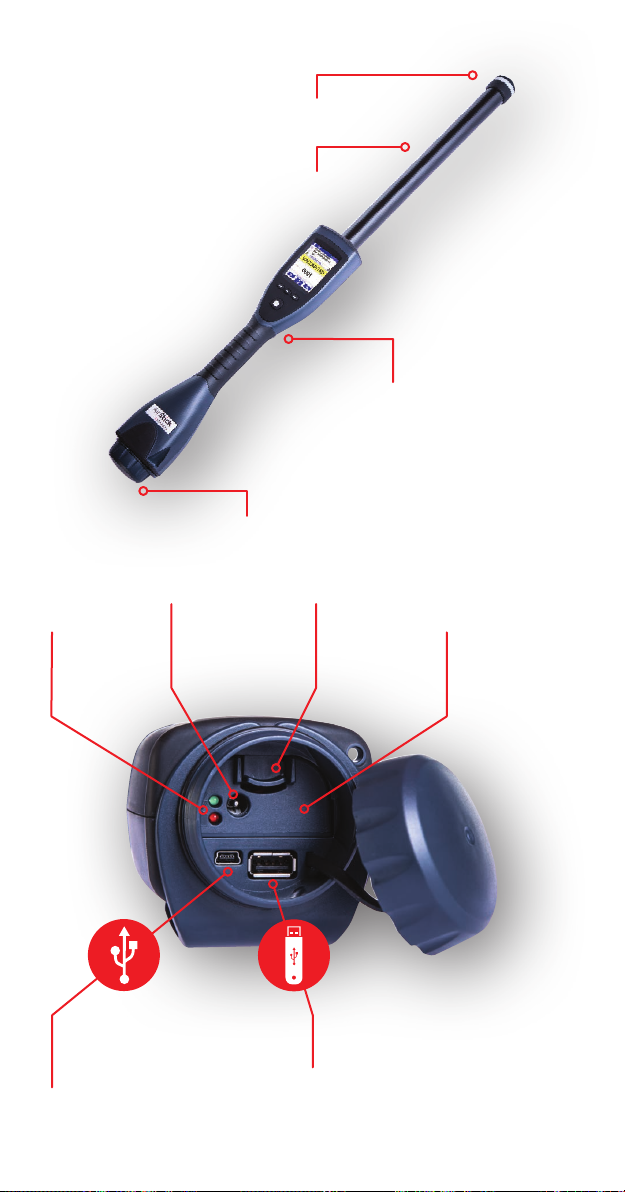
LED
Antenne
Hinterer Schraubverschluss
Lese-Taste
(auf der Rückseite)
DC-Stecker
Baerie
(Ladegerätanschluss)
LED-Anzeigen
Mini-USB-Anschluss
(um das Lesegerät an einen PC
anzuschliessen)
Knopf zum
Enernen der
Baerie
Austauschbare
Baerie
Standard-USB-Anschluss
(um einen USB-Speicherstick
anzuschliessen)
52
Page 53
AirSck auaden
Der Akku vom den Lesegerät kann über das AC / DCLadegerät oder das Auto Ladegerät aufgeladen werden, im
Lesegerät oder auch alleine.
● AC / DC-Baerieladegerät
Schliessen Sie das Ladekabel in die Steckerbuchse an
der Batterie und stecken Sie das Netzkabel vom AC/
DC Adapter in eine 220 VAC-Steckdose.
● Auto Ladegerät
Schliessen Sie das Ladekabel in die Steckerbuchse
an der Batterie und stecken Sie das Ende des Auto
Ladegeräts in die Zubehörsteckdose deines Autos.
Während der Akku geladen
wird, leuchten die rote und
die grüne LED-Anzeige
konstant auf. Wenn der
Akku vollständig geladen ist,
erlischt die rote LED-Anzeige
und die grüne LED-Anzeige
leuchtet konstant.
DE
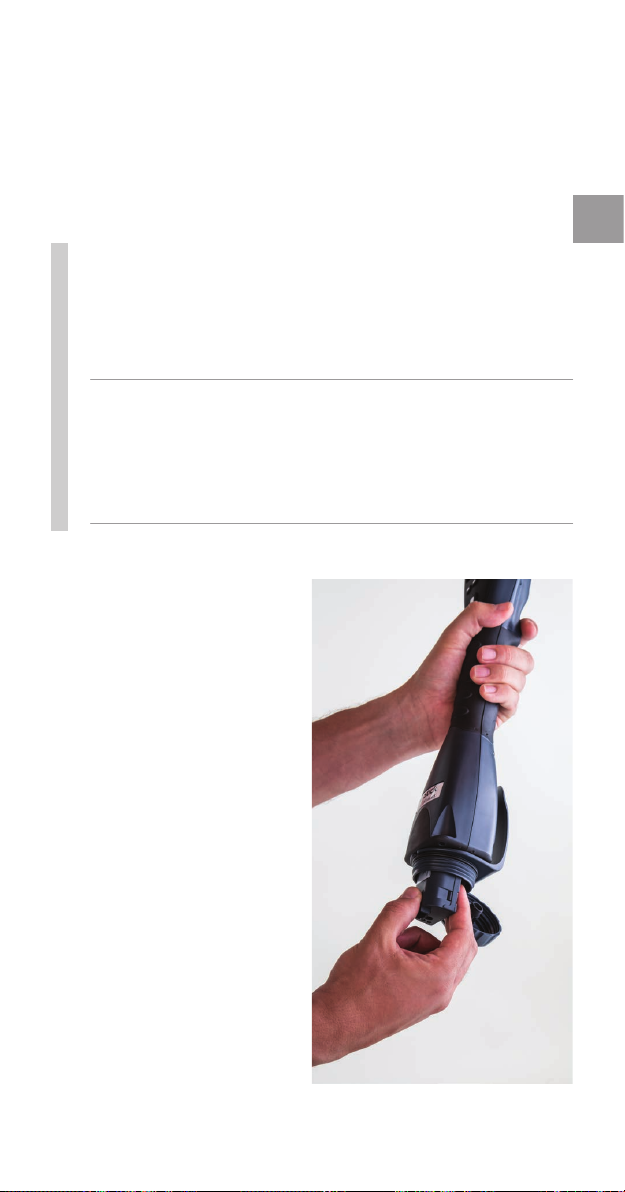
Um die Batterie aus dem
AirStick zu entfernen, drücken
Sie die BatterieentnahmeTaste und ziehen Sie die
Batterie heraus.
Um die Batterie in den
AirStick einzusetzen, drücken
Sie sie in das Batteriefach. ein
hörbares Klicken bestätigt,
dass die Batterie korrekt
eingelegt wurde.
53
Page 54
AirSck Tastatur
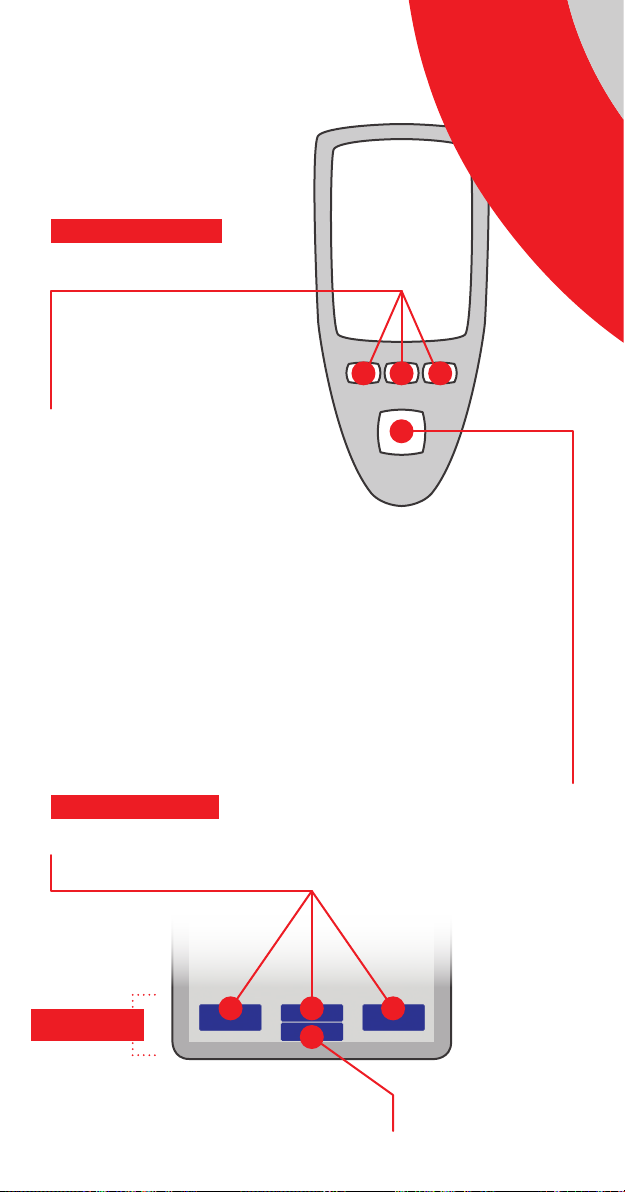
AUF DER TASTATUR
Kontext-Tasten
Drücken Sie eine Kontext
Taste, um den Befehl in der
Aktionssymbolleiste
anzuzeigen
1 3
2
4
EIN AUS / Auswahltaste
Einschalten
Drücken Sie für ca. 3 Sekunden
Ausschalten
Drücken Sie 2 Sekunden lang und
drücken Sie dann erneut zur Bestätigung
AUF DEM DISPLAY
Kontext-Tasten
Akonsleiste
Drücken Sie, um den Befehl
Aktionssymbolleiste angezeigt wird
1 3
2
4
54
Wählen
auszuwählen, der in der
EIN AUS /
Auswahltaste
Page 55

Lese-Taste
Eine EID lesen
Drücken Sie die Lesetaste auf der Rückseite des Lesers, um
mit dem Lesen zu beginnen. Wenn der AirSck eine EID
erkennt, werden die gelesenen Daten auf dem Bildschirm
angezeigt und in der Speicherdatei aufgezeichnet. Der Zähler
auf dem Bildschirm zeigt die Anzahl der in der aktuellen Datei
gespeicherten EIDs. Auch bei der ersten Nutzung ist eine
Speicherdatei bereits verfügbar, ohne dass diese neu erstellt
werden muss.
DE
Der AirStick zeigt das erfolgreiche Lesen mit einer Vibration,
einem Audiosignal und einem grünen Licht an der Antenne
an (das Licht blinkt während des Leseprozesses rot). Um im
kontinuierlichen Modus die Lesung zu stoppen drücken Sie
bitte kurz die Lesetaste. Wenn eine Doppellesung nicht erlaubt
ist, wird eine entsprechende Nachricht auf dem AirStickBildschirm angezeigt, sobald eine EID zweimal gelesen wird.
Während der Verbindung mit einem externen Gerät wird jede
gelesene EID automatisch gesendet. Um den Speicherinhalt
zu drucken, scrollen Sie nach unten und wählen Sie die
entsprechende Funktion.
55
Page 56
AirSck display
Das Display des AirStick kann entsprechend Ihrer
Anforderungen angeordnet werden.
Bluetooth®-Symbol (grün,
USB-Symbol
wenn an ein Bluetooth®-Gerät
angeschlossen)
Baerie
Level
Lesedatei
Einstellungsmenü
Scrollen Sie nach
unten, um die in der
Vergrösserung angezeigte
Info auszuwählen
EID
VID
Hinweis
Datum und
Uhrzeit
Verknüpfung
zum Drucken der
Speicherdatei
Anwendungsmenü
Auswahl
Vergrösserung
Zähler
56
Page 57
Einstellungsmenü
Navigieren Sie mit den Pfeiltasten durch das Menü, wählen
Sie die gewünschte Einstellung und drücken Sie EIN-AUS /
Auswahl Taste, um die gewünschte Funktion einzugeben.
DE
A B
Lesemodus
A Einzeln
B KontinuierlichA B
Bluetooth®-Menü USB Prole
BA
Audio
A EIN
B AUS
Sprachauswahl Datum & Zeit
EID-Format
Gewünschtes
Format zum
Speichern und
Übertragen von
EIDs
A B
A B
Duplikat
A Nicht erlaubt
B ErlaubtA B
A Virtueller Com
Port
B Keyboard Wedge
Vibro
A EIN
B AUS
Vergrösserungsskala
Konf. von 3 (A) bis
12 (B)
A CB
Helligkeit
A Hoch
B Mittel
C Niedrig
57
Page 58
Anwendungsmenü
Navigieren Sie mit den Pfeiltasten durch das Menü, wählen
Sie die gewünschte Einstellung und drücken Sie EIN-AUS /
Auswahl Taste, um die gewünschte Funktion einzugeben.
Wählen Sie eine bereits bestehende Speicherdatei
aus, in der Sie weitere Daten speichern können
Erstellen Sie eine
neue Speicherdatei
EID Suche
VID Suche
Hinweis Suche
Verwalten von Speicherdateien
(Drucken, Bearbeiten von EIDs,
Löschen von Daten, Verwalten von
Duplikaten)
SPEICHERDATEI
Funkonen
SUCHE
Funkonen
58
Page 59
Konnekvität
Der AirStick kann über folgende Verbindungen mit
externen Geräten verbunden werden:
DE
USB
(kabel)
Sowohl die virtuelle
Tastatur (keyboard wedge)
als auch das COM-Port-
Prol werden unterstützt.
Über einen USBSpeicherstick können
Daten vom AirStick auf
einen PC und umgekehrt
übertragen werden.
Bluetooth®
(kabellos)
Sobald der AirStick mit einem Gerät verbunden ist, kann er:
● Daten übertragen beim Lesen einer EID
● Die Speicherdatei drucken, indem Sie die
Druckfunkon auswählen
Für weitere Informationen über AirStick Funktionen,
technische Dokumentationen oder zur AirStick S-ID
Software besuchen Sie bitte: www.datamars.com/id-readers.
59
Page 60

60
Page 61

Portable EID Tags Reader
Quick Start Guide
Canllaw Cychwyn Cyym
Guía de inicio rápido
Guide de démarrage rapide
Kurzanleitung
Guida rapida
V. 1.1
Page 62

Prima di iniziare
In questa guida sono fornite le istruzioni di base per
l’utilizzo del lettore AirSck.
Per informazioni sulle funzionalità, sulla documentazione
tecnica e sul software S-ID del lettore AirStick, si prega
di visitare: www.datamars.com/id-readers.
Consigliamo l’utilizzo del software S-ID (contenuto nella
chiave USB fornita), che consentirà la gestione di dati,
la verica dell’esistenza di aggiornamenti del rmware e
la modica delle impostazioni predenite.
Al primo utilizzo potrebbe essere necessario congurare
l’AirStick.
Nota: Assicurarsi che la batteria sia completamente carica
prima di usare il dispositivo per la prima volta. Questo
garantirà una maggiore durata di vita della batteria.
Glossario
EID: (Electronic IDentier) Codice identicativo elettronico.
VID: (Visual IDentier) Codice identicativo visuale. Codice alfanumerico
che può essere associato a un EID direttamente sul lettore AirStick
o attraverso il software S-ID.*
Alert: Avviso. Codice alfanumerico che può essere associato a un EID
per noticare una specica condizione dell’animale (raggruppamento,
gravidanza, vaccinazione...).*
Barra di ingrandimento: Evidenzia le informazioni più importanti scelte
dall’utente (EID, VID, o Alert) con un carattere di dimensioni maggiori.
Reading Session: Sessione di Leura. File di memoria in cui vengono
registrate ad ogni lettura le informazioni associate all’EID.
Nome predenito della sessione: RS dd-mm-yy.csv.*
Counter: Contatore. Numero di EID memorizzati nella sessione corrente.
* Funzionalità personalizzabili sul soware S-ID
62
Page 63
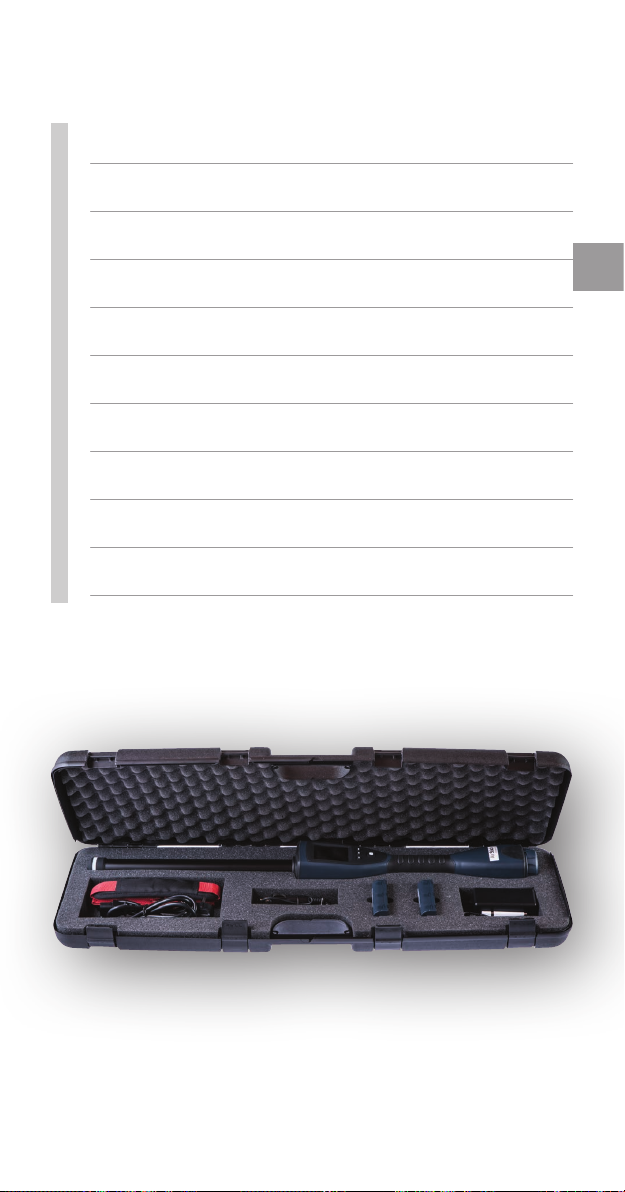
Contenuto
● Leore AirSck
● 2 baerie
● Alimentatore AC/DC
● Cavo di alimentazione
● Caricabaeria per automobili
● Cavo USB
● Chiave USB
● Documentazione e garanzia
● Tracolla
● Valigia
ITA
63
Page 64
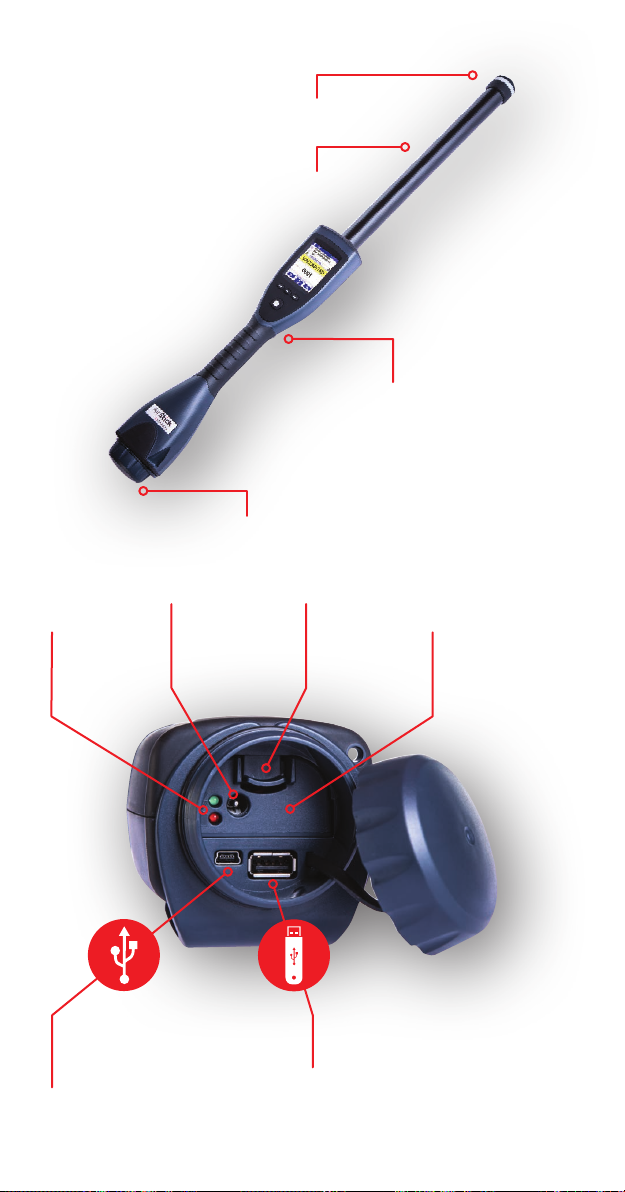
LED
Antenna
Tappo ad avvitamento
Pulsante di leura
(sul retro)
Conneore
Indicatori
per la ricarica
LED della
baeria
Porta mini-USB
(per il collegamento
del lettore al PC)
Pulsante per
la rimozione
della baeria
Baeria
estraibile
Porta USB standard
(per connettere una chiave USB)
64
Page 65
Ricaricare il tuo AirSck
La batteria del lettore può essere ricaricata (sia inserita, sia
all’esterno dell’AirSck) utilizzando l’alimentatore AC/DC
o il caricabatteria per automobili in dotazione.
● Ricaricare con alimentatore AC/DC
Collegare l’alimentatore al connettore per la ricarica
sulla batteria, quindi connetterlo ad una presa di
corrente a 220 V CA con il cavo di alimentazione.
● Ricaricare con il caricabaeria per automobili
Collegare un’estremità del caricabatteria per automobili
alla presa della batteria, quindi collegare l’altra
estremità alla presa dell’automobile.
La carica della batteria
è segnalata dai LED rosso e
verde, entrambi accesi.
Quando la batteria è
completamente carica,
il segnale luminoso rosso
si spegne mentre il segnale
verde rimane acceso.
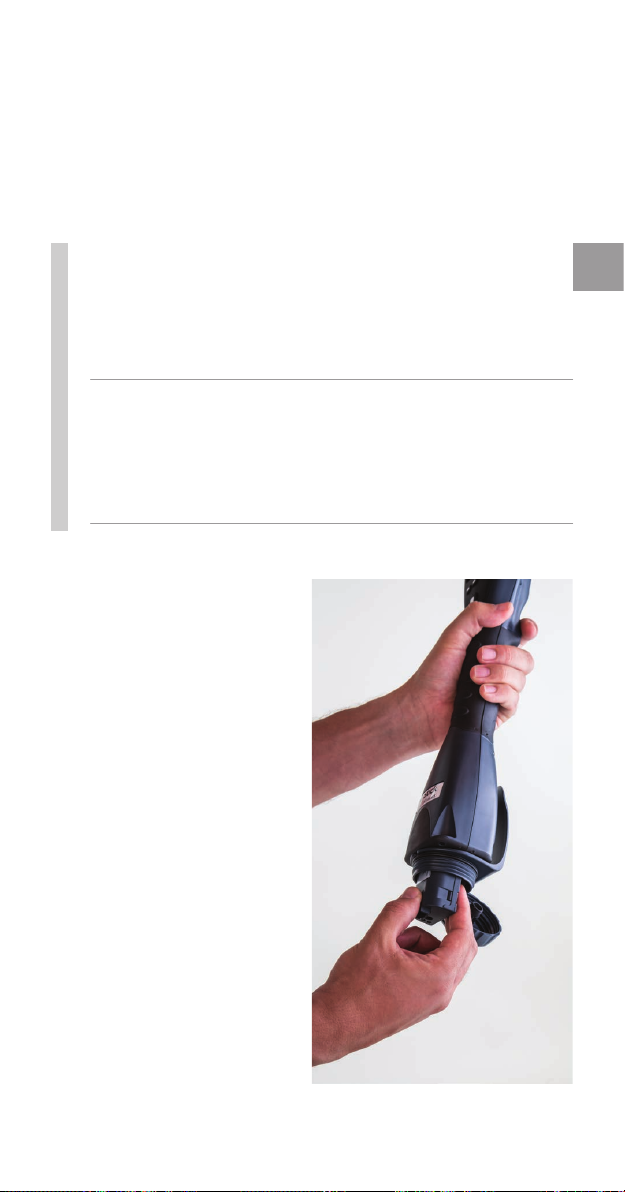
Per rimuovere la batteria
dal lettore AirStick,
premere il pulsante di
rimozione della batteria
ed estrarre la batteria.
ITA
Per inserire la batteria nel
lettore AirStick, spingerla
nell’alloggiamento della
batteria; un click conferma
che la batteria è stata
posizionata correttamente.
65
Page 66
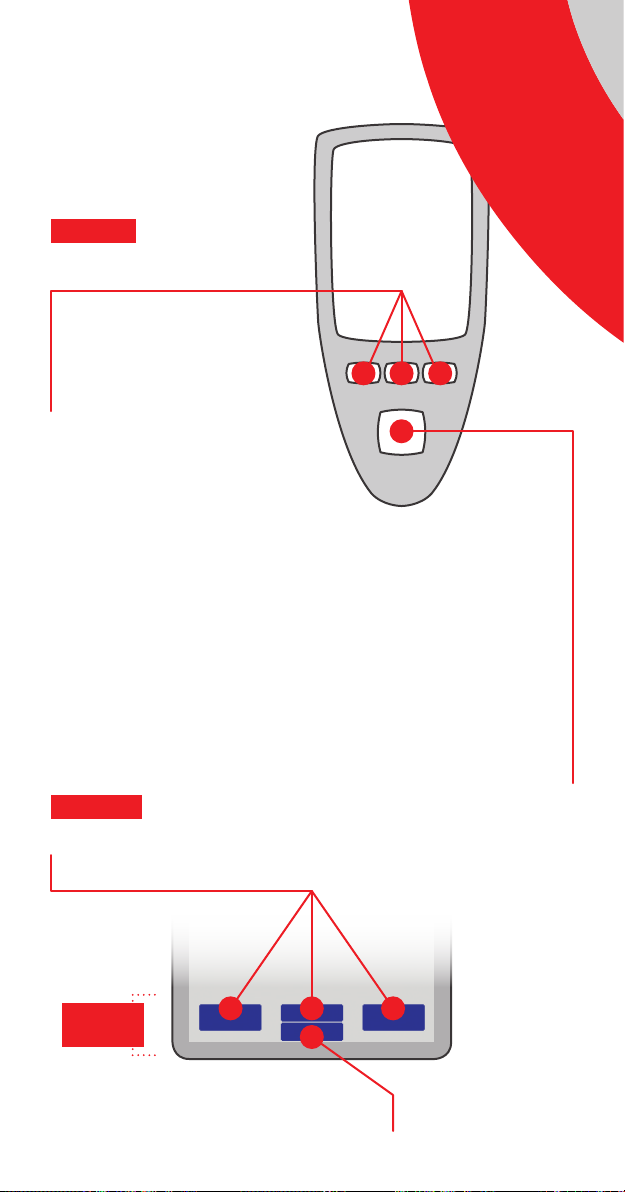
Tasera
TASTIERA
Pulsan di navigazione
Premere un pulsante
per selezionare il comando
corrispondente nella barra
dei comandi
1 3
2
4
Pulsante ON–OFF / Selezione
Accensione – ON
Premere per circa 3 secondi
Spegnimento – OFF
Premere per circa 2 secondi e
premere di nuovo per conferma
SCHERMO
Pulsan di navigazione
Barra dei
comandi
1 3
2
4
66
Selezione
Premere per selezionare
il comando visualizzato
nella barra dei comandi
Pulsante ON–OFF /
Selezione
Page 67

Pulsante
di leura
Leggere un EID
Per iniziare la lettura premere il pulsante sul retro del
lettore. Quando l’AirSck rileva un EID, i dati vengono
visualizzati sullo schermo e registrati nella sessione di
lettura. Sullo schermo viene visualizzato il numero di EID
memorizzati nella sessione corrente. Al primo utilizzo,
una sessione di lettura è già disponibile all’accensione
dell’AirStick, senza la necessità di crearne una nuova.
La corretta lettura di un EID viene noticata tramite
vibrazione e segnale audio e tramite la luce verde
sull’antenna (la luce lampeggia di rosso durante la lettura).
In modalità continua, premere il pulsante di lettura per
interrompere la scansione.
Se i duplicati non sono consentiti e lo stesso EID viene letto
due volte, sullo schermo viene visualizzata una notica di
lettura duplicati.
ITA
Quando è collegato a un dispositivo esterno, via USB o
Bluetooth®, AirStick invia istantanemente a tale dispositivo
ogni EID letto. Per stampare il contenuto della sessione,
scorrere verso il basso e selezionare il comando di stampa.
67
Page 68
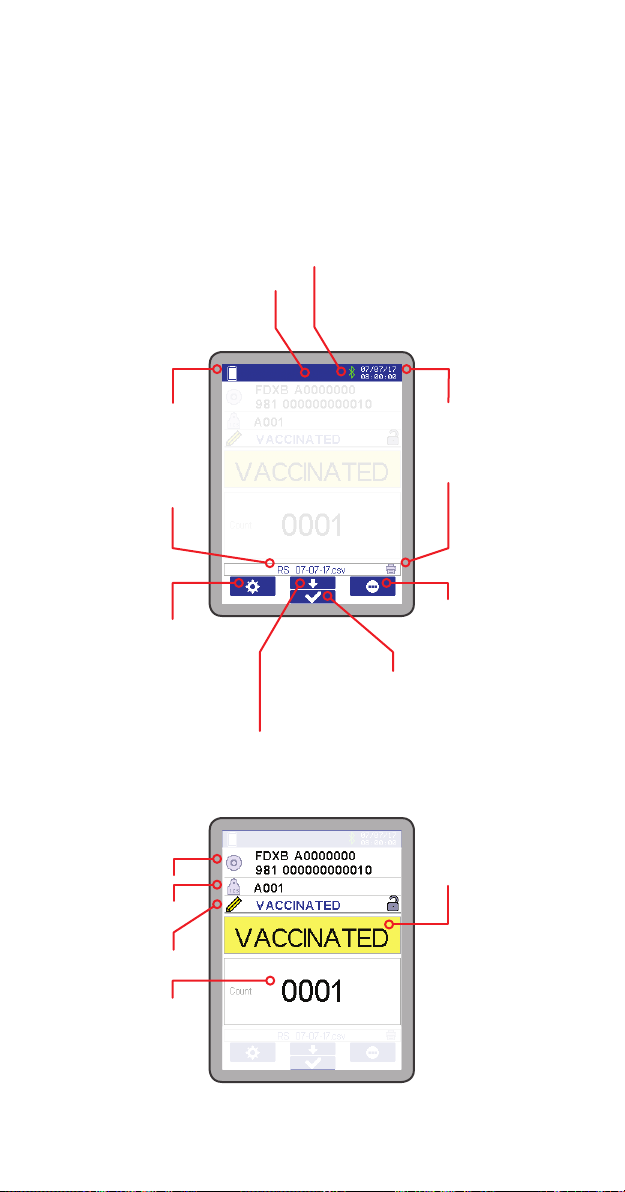
Schermo
Lo schermo del lettore AirSck mostra le informazioni
relative all’EID, in base alle tue esigenze.
Icona Bluetooth® (verde quando
Icona USB
connesso a un dispositivo
Bluetooth®)
Livello
baeria
Sessione
di leura
Menu
impostazioni
Scorrere verso il basso per
selezionare le informazioni
visualizzate sulla barra
di ingrandimento
EID
VID
Alert
Data
e ora
Stampa
della sessione
corrente
Menu funzioni
Selezione
Barra di
ingrandimento
Contatore
68
Page 69
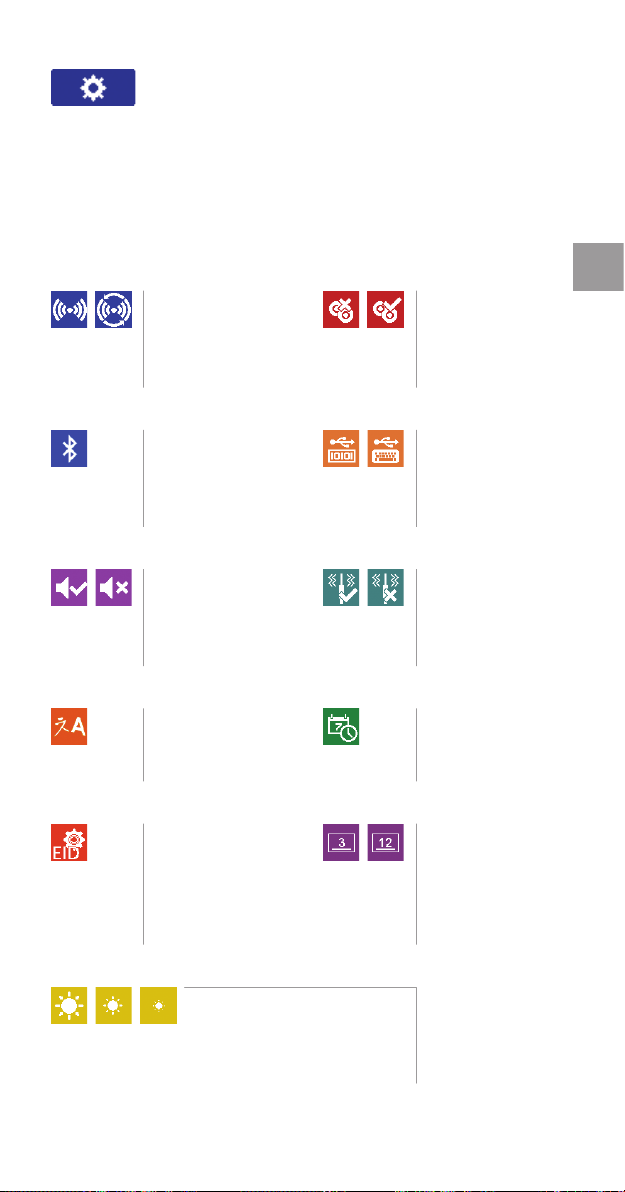
Menu impostazioni
Usare le frecce per navigare nel menu, selezionare
l’impostazione desiderata e premere il pulsante
ON–OFF / Selezione per inserire la funzione desiderata.
ITA
A B
Modalità di leura
A Singola
B ContinuaA B
Menu
Bluetooth
Audio
A ON
B OFF
Lingue Impostazione
Formato EID
Formato desiderato
per la registrazione
e il trasferimento
dell’EID
®
BA
A B
A B
Duplica
A Non permessi
B PermessiA B
Proli USB
A Porta seriale
(COM) virtuale
B Emulatore di
Tastiera
Vibrazione
A ON
B OFF
data e ora
Cifre evidenziate
nella barra di
ingrandimento
Congurabili
da 3 (A) a 12 (B)
A CB
Luminosità
A Alta
B Media
C Bassa
69
Page 70
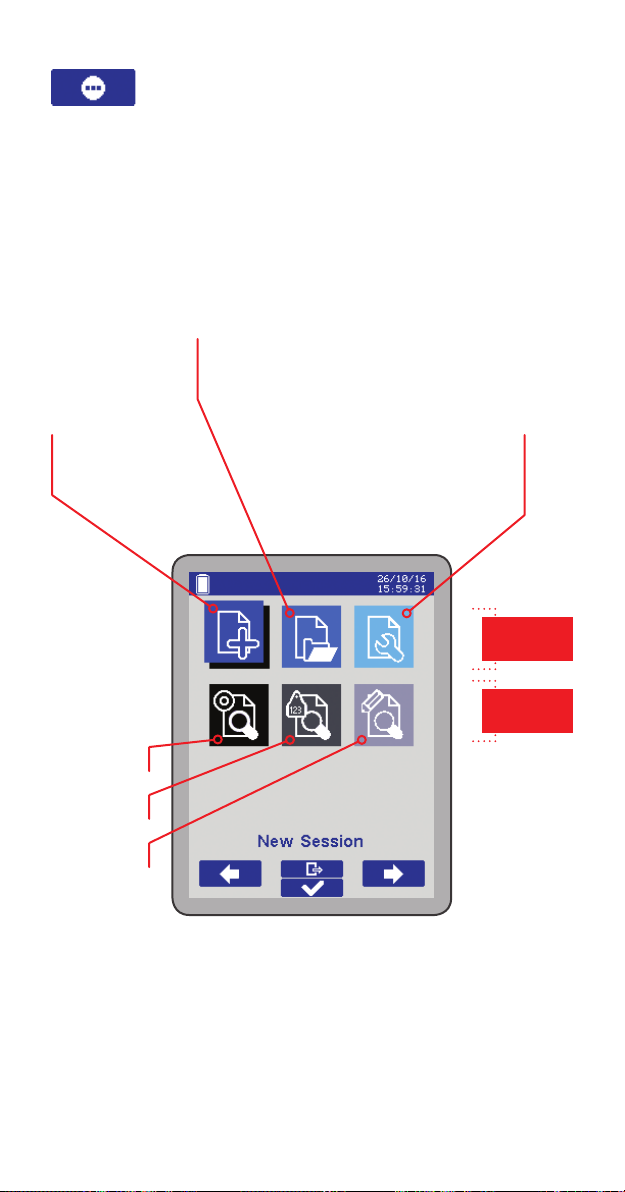
Menu funzioni
Utilizzare le frecce per navigare nel menu,
selezionare l’impostazione desiderata e premere
il pulsante ON–OFF / Selezione per accedere
alla funzione desiderata.
Selezionare una sessione esistente
e connuare a salvare da al suo interno
Creare una
nuova sessione
Ricerca EID
Ricerca VID
Ricerca Alert
Gesone sessioni
(stampa, modica degli EID,
cancellazione dati,
gestione duplicati)
Funzioni di
SESSIONE
Funzioni di
RICERCA
70
Page 71
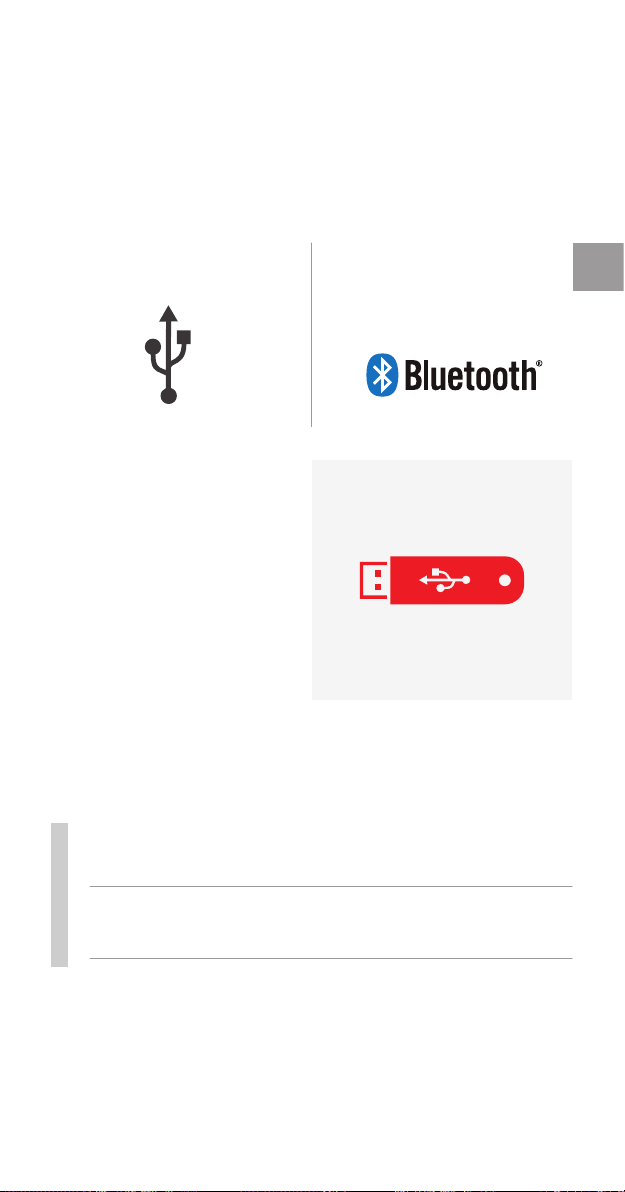
Connevità
È possibile collegare il lettore AirSck a dispositivi
esterni attraverso:
USB
(collegamento cablato)
AirStick supporta
entrambi i proli
Emulatore di tastiera
e Porta seriale (COM)
virtuale.
I dati possono essere
trasferiti dal lettore
AirStick al PC e viceversa
usando una chiave USB.
Quando connesso a un dispositivo, il lettore AirStick può:
● Inviare da al disposivo ogni volta che
● viene leo un EID
Bluetooth®
(collegamento wireless)
ITA
● Stampare i da della sessione selezionando
● la funzione di stampa
Per informazioni sulle funzionalità, sulla documentazione
tecnica e sul software S-ID del lettore AirStick, si prega
di visitare: www.datamars.com/id-readers.
71
Page 72

 Loading...