

Page 1
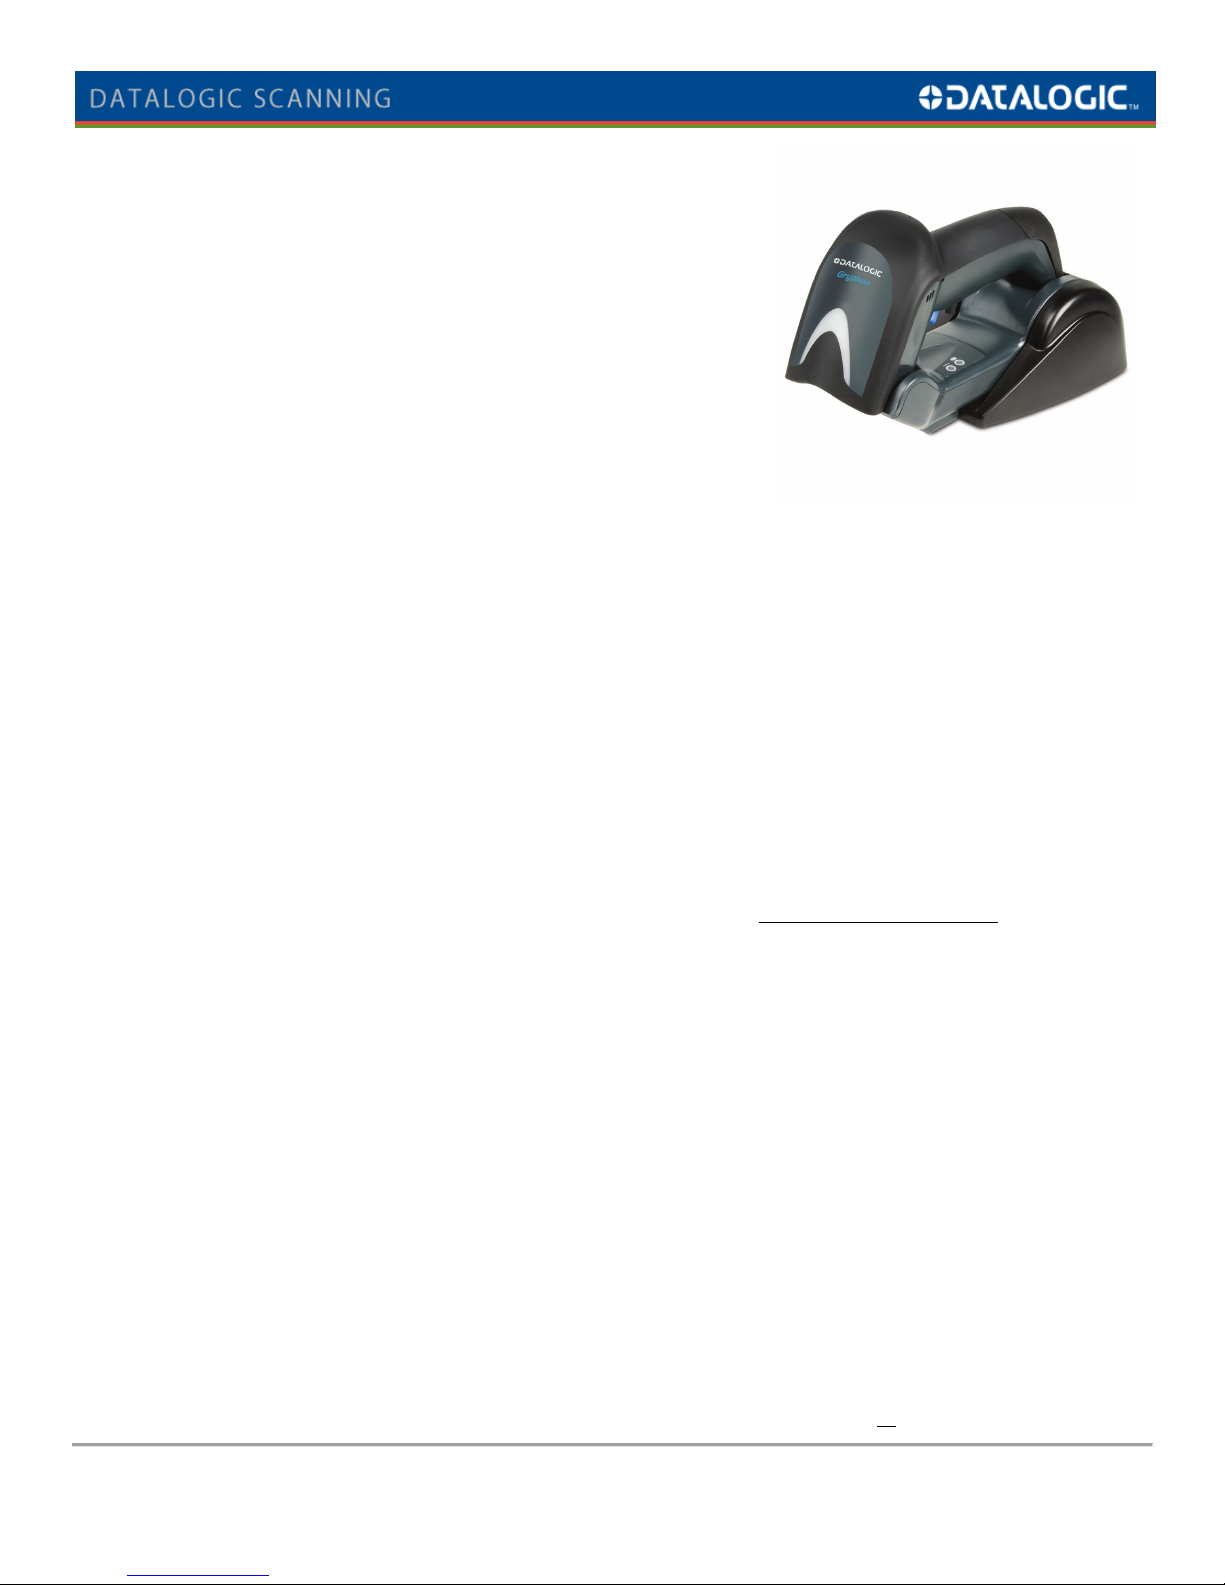
Gryphon™ I GBT4130
General Purpose Handheld Linear Imager Barcode Reader
LUETOOTH
with B
CORDLESS COMMUNICATIONS
DECODING CAPABILITY
BATTERY
As with other types of batteries, Lithium-Ion (LI) batteries will lose capacity over time. Capacity deterioration is noticeable after one
year of service whether the battery is in use or not. It is difficult to precisely predict the finite life of a LI battery, but cell
manufacturers rate them at 500 charge cycles. In other words, the batteries should be expected to take 500 full discharge / charge
cycles before needing replacement. This number is higher if partial discharging / recharging is adhered to rather than full / deep
discharging.
The typical manufacturer advertised useful life of LI batteries is one to three years, depending on usage and number of charges, etc.,
after which they should be removed from service, especially in mission critical applications. Do not continue to use a battery that is
showing excessive loss of capacity, it should be properly recycled / disposed of and replaced. For most applications, batteries should
be replaced after one year of service to maintain customer satisfaction and minimize safety concerns.
CRADLE INDICATOR LEDS
® W
IRELESS TECHNOLOGY
Protocol - Bluetooth 2.0 Certified Class 2
Radio Frequency - 2.4 GHz
Radio Range (Open Air) - 30.0 m / 98.4 ft
1D / LINEAR CODES - Auto discriminates all standard 1D codes including
GS1 DataBar™ linear codes
Battery Type - Lithium-Ion, 2100 mAh
Full Charge Time – up to 22 Hours w/ USB Host Power from full discharge - 4 Hours w/ optional external power adapter
Reads per Full Charge - 33,000
Battery Charging (Red) - Charge Completed (Green) - Power/Data (Yellow)
WARRANTY
3-Year Factory Warranty (Scanner & Base only – battery & cable 90 days) – www.scanning.datalogic.com
DATALOGIC WEBSITE SUPPORT
The Datalogic website is the complete source for technical support and information for Datalogic products. The site offers
product support, registration, warranty information, product manuals, product tech notes, software updates, demos and
instructions for returning products for repair.
TELEPHONE & TECHNICAL SUPPORT
If you do not have internet or email access, you may contact Datalogic technical support at (541)349-8283 or check the back
cover of your manual for more contact information.
UNPACKING
Check carefully to ensure the Reader, Base, Cable, Mounting Accessories and Quick Reference Guide are present and
undamaged. If any damage has occurred in shipment or if items appear to be missing, contact Technical Support
immediately. This unit does not need nor does it ship with a power adapter. The Lithium Ion battery is factory installed.
Should the unit require service, it must be returned in its original shipping container with all
PDS Tech Support 800.286.8929 option 2 Datalogic Tech Support 541.349.8283
Datalogic Scanning, Inc. - USA
959 Terry Street
Eugene, OR 97402
(541) 683-5700
KEEP THE PACKAGING
its original contents.
Page 1 of 8
Page 2
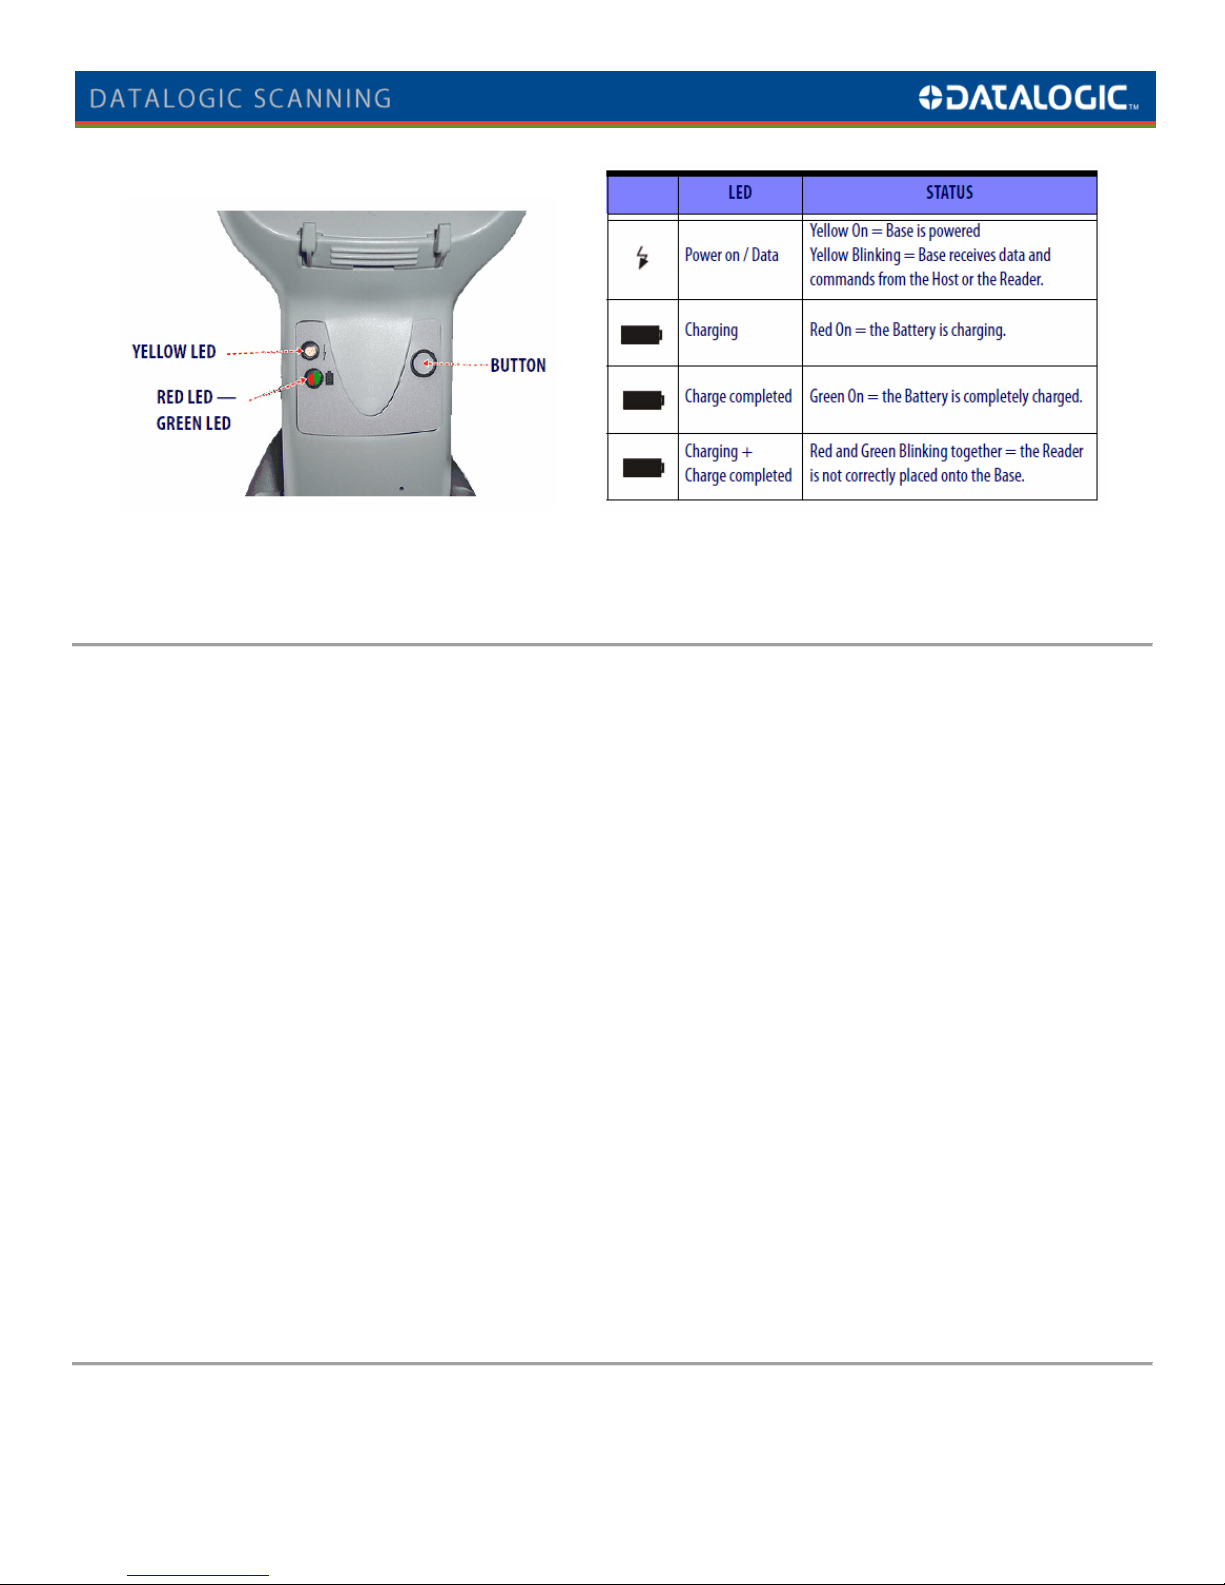
Radio Base LEDs
The Base contains a button which is used primarily to perform a paging function. Pressing the button causes an audible
tone signal to be emitted by the Reader linked to the Base and can be used for locating the scanner when it is active – press
quickly (less than one second) to initiate paging.
Configuration
The Reader is factory-configured with a standard set of default features. After scanning the Interface barcode, you can select other
options to customize your Readers behavior with The Uniform Solution. This will be accomplished through the use of instructions
issued to the Reader through programming barcodes. Some instructions require that only a single barcode be scanned whereas
others required that a sequence of barcodes be scanned by the Reader. For the most part you will be scanning the barcodes that
follow in their order of appearance. Simply read then follow the instructions below. – Note that in the last section, the Unlink
programming barcode is only to be used when attempting to reestablish a connection between a Reader and its Base Station.
Steps for Setting up the Reader
1. Begin by connecting the USB Interface Cable to the Base Station
• Consult the Quick Reference Guide – properly orient and insert the cable firmly
• You can use the Base Station in the horizontal position right out of the box without any adjustments
• Exercise Caution – its heavy plastic, but plastic breaks > exercise some care when manipulating or adjusting the
Base configuration – rough handling is not covered by the warranty
• Connect the Base to your PC using the USB Interface Cable, preferably to a USB port on the back of the computer…
avoid use of the USB ports on the front of the PC for hardware connections
2. Charge the Reader (Scanner) by placing it in the Base Station
• It can take up to 22 hours in the Base Station to charge w/ USB Host Power from a full discharge – no power supply
adapter is needed, but a Datalogic optional power supply is available
• Simply return the Reader to the Base when not in use and you should not experience any difficulty in maintaining a
working charge – see battery notes preceding
3. Set the Interface Selection
• The Interface Type is USB Keyboard with Standard Key Encoding
• You will also want to confirm that the Reader is set to the Standard Product Default Settings for the Interface Type
before further feature customization programming
4. Configure the Reader for use with the USW program
• A single setting governs the Readers behavior when placed in the Base Station
• A number of settings are employed to ensure optimal accuracy of reads when scanning
Page 2 of 8
Page 3
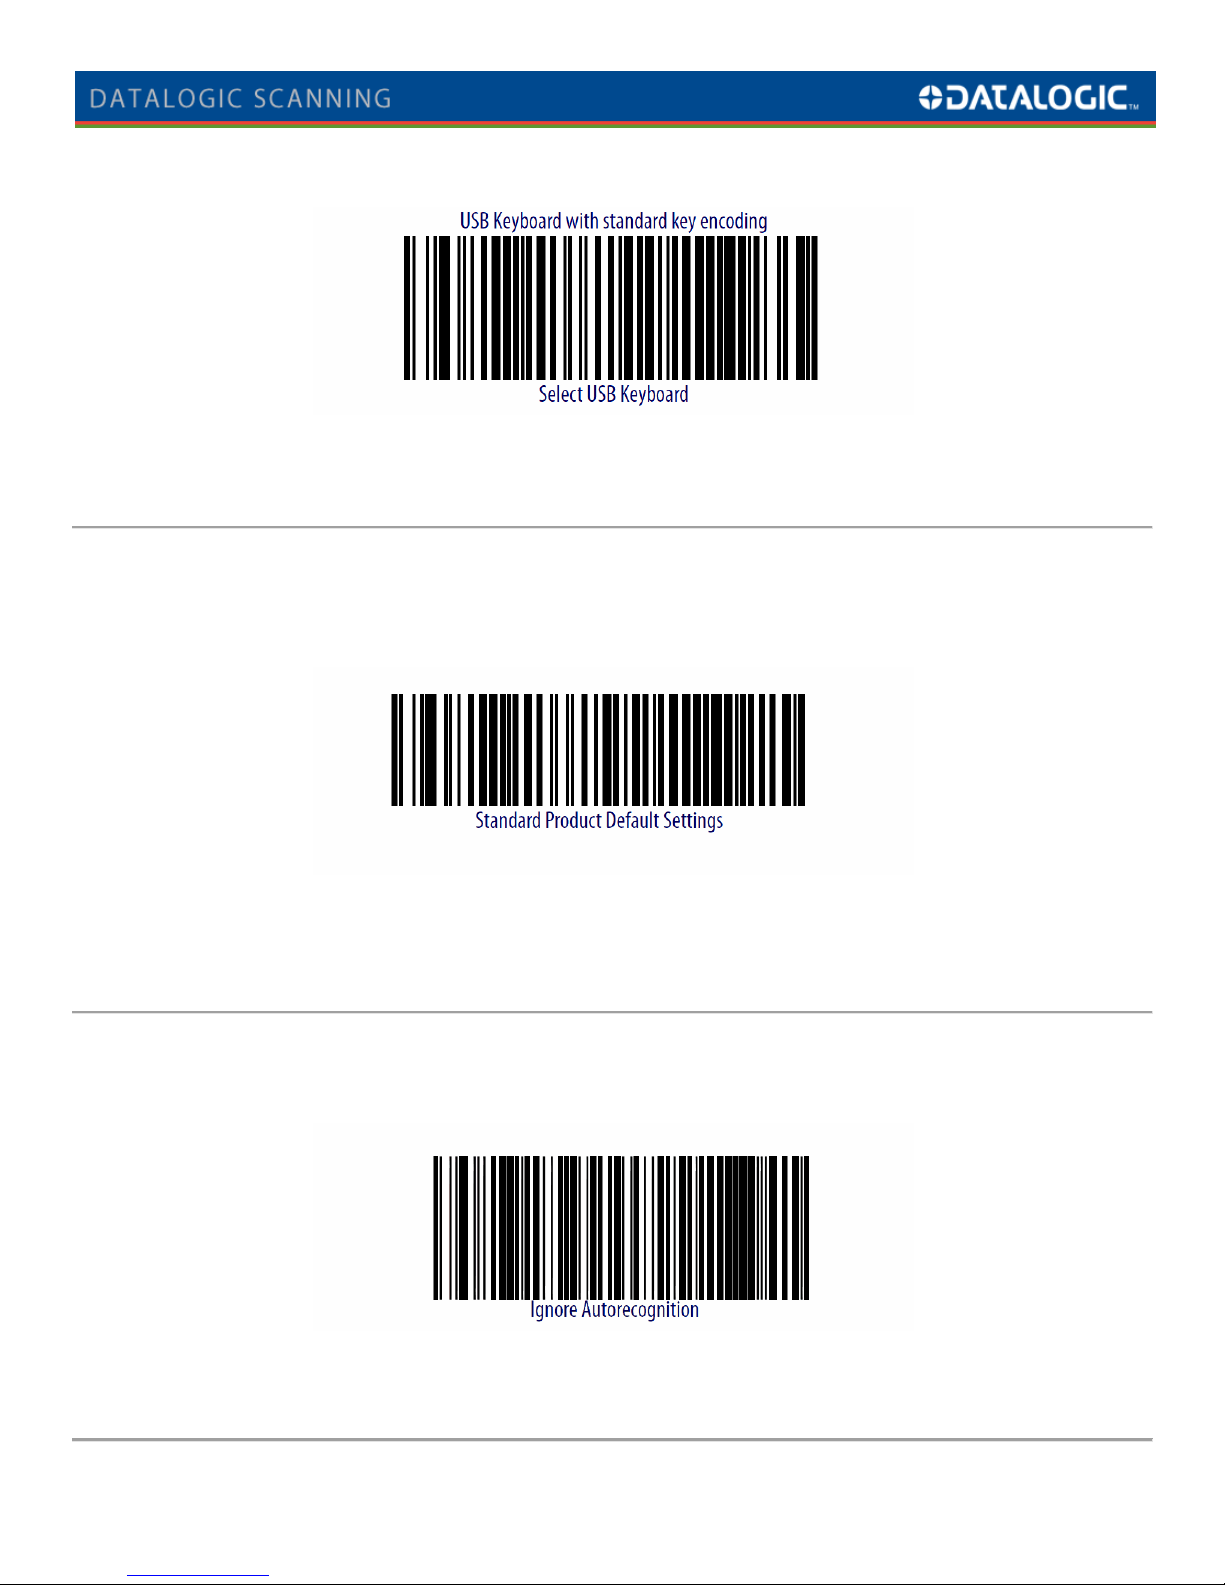
Setting the Interface to USB Keyboard
USB Keyboard with standard key encoding - this Interface selection requires that you scan only one programming barcode.
DO NOT scan the ENTER/EXIT Programming Mode prior to scanning the Select USB Keyboard.
Resetting Standard Product Defaults
If you aren’t sure what programming options are in your Reader, or you’ve changed some options and want the factory
settings restored, the barcode below will restore the factory configuration for the currently active interface.
YOU MUST configure the Reader for the correct Interface before scanning this Label.
DO NOT scan the ENTER/EXIT Programming Mode prior to scanning the Standard Product Default Settings.
Factory defaults are based on the interface type – scan Select USB Keyboard before scanning this Label.
Stand Detection
~ (tone pattern) # # > # # # # > # # # melodic ascending ~
~ (tone pattern) # # > # # # # > # # # melodic ascending ~
The following selection controls how the scanner behaves when it is placed into the Base Station. The setting will disable
mode switching when the scanner is placed in the Base.
~ (tone pattern) # # > # # # # > # # # melodic ascending ~
DO NOT scan the ENTER/EXIT Programming Mode prior to scanning the Ignore Autorecognition.
Page 3 of 8
Page 4

This section provides programming barcodes to configure your Reader for use with the USW program. Scan the barcodes on the
following pages in order of appearance. You will begin and end with the Enter/Exit Programming Mode barcode. When the Reader
is in Programming Mode its top LED blinks continuously and after you scan each barcode the Reader will emit a specific (tone
pattern). It is advisable not to rush through the programming sequence. Allow the Reader time to accept the encoding – listen for
the tones.
Enter Programming Mode
Scan the Enter/Exit Programming Mode barcode to begin Reader setup for the USW program.
~ (tone pattern) # > # # # # ~
Enable Interleaved 2 of 5 Standard
This setting will enable your Scanner to read the Interleaved 2 of 5 Symbology printed by the USW program.
~ (tone pattern) # # ~
I 2 of 5 Minimum Reads
The following specifies the minimum number of consecutive times an Interleaved 2 of 5 Label must be decoded before it is
accepted as a good read.
~ (tone pattern) # # ~
Page 4 of 8
Page 5

I 2 of 5 Length Control
This setting specifies that Fixed Length Decoding will be used for the Interleaved 2 of 5 Symbology.
~ (tone pattern) # # ~
I 2 of 5 Set Length 1
This setting specifies the minimum Fixed Length in Fixed Length Decoding.
~ (tone pattern) # ~
Set the I 2 of 5 Fixed Read Length 1
Scan the following two numeric barcodes one after another to set the Fixed Length 1.
~ (tone pattern) # ~
~ (tone pattern) # # ~
Page 5 of 8
Page 6

Set the I 2 of 5 Fixed Read Length 2
The setting codes that follow instruct the Reader to ignore the Fixed Read Length 2 and provides for one Fixed Length.
~ (tone pattern) # ~
Set the Fixed Read Length 2
Scan the following two numeric barcodes one after another to set the Fixed Length 2.
~ (tone pattern) # ~
Exit Programming Mode
Scan the Enter/Exit Programming Mode barcode to end and save Reader setup.
~ (tone pattern) # > # # # # > # # # # > # # # melodic ascending ~
STOP SCANNING - Your Reader is now setup to work with the USW program.
~ (tone pattern) # # ~
Page 6 of 8
Page 7

Addendum
Linking the Scanner to the Base Station
The handheld Reader should link automatically to the Base Station when placed in the cradle to charge. Follow the procedure below
if it is determined that the Reader and Base have not established a link connection. It is possible that another Bluetooth device has
or is interfering with the establishment of the link.
1. Scan the Unlink barcode below
• the Reader will emit multiple tones and the Base Red/Green LED will blank
2. Press the trigger to wake the Reader and place it in the Base cradle
• the scanner will emit three ascending tones and the Base Red/Green LED will flash multiple times then become solid
indicating that a link has been established – LED color is dependent upon the charging state
3. If the Reader fails to establish a link connection to the Base
• Confirm that all physical connections are properly made
• Look for possible sources of Bluetooth interference and power them off
• Attempt the connection procedure again beginning with step1 above
~ (tone pattern) # extended > # # # melodic descending ~
Do not scan Unlink unless you have confirmed that the Reader and Base are not communicating.
The mandatory conditions for establishing a new linking between a Bluetooth handheld and a Bluetooth base is that the handheld is
unlinked and they share the same security configuration. A successful link is indicated by three ascending tones from the Reader. A
high-low-high-low tone indicates the link attempt was unsuccessful. A single green LED flash after this tone indicates no Base
Station was discovered. Two green LED flashes after this tone indicates that more than one Base Station was discovered and the
Reader did not link. Three LED flashes after this tone indicate a security error.
If you continue to have difficulty with setup, please contact PDS or Datalogic Tech Support for assistance.
There are additional reading parameters, performance and behavior settings that may be of benefit and relevant to your scanning
environment. If you will call PDS Tech Support they will be able to discuss your scanning environment and help you determine if
there are settings that may enhance the use of the Reader in your store environment.
Replacing the Battery
The Lithium-Ion Battery is considered to be field replaceable by Datalogic and they recommend annual replacement of rechargeable
battery packs to ensure maximum performance. They also provide a step by step replacement procedure in their Quick Reference
Guide. In addition, there is a maintenance video demonstrating battery replacement that can be linked to from their website. If you
feel that this is something that you would rather not undertake yourself, you may contact Datalogic for service options.
www.scanning.datalogic.com
Replacement Batteries and the Optional 12V AC adapter are available from PDS for $30 each
Page 7 of 8
Page 8

Leash Alarm
This optional setting enables or disables the Leash Mode Alarm. It specifies the number of seconds to sound the Alarm
(three tones per second) when the Reader goes out of range. This will be of benefit when conducting physical inventory or
in ensuring the Reader returns to the store if inadvertently placed in with a customer’s purchase. If the Reader is asleep or
disconnected from the Base Station, the Alarm will not work. When the Reader returns within range of the Base Station, it
will emit three ascending tones and be ready to resume scanning.
Enter Programming Mode
Scan the Enter/Exit Programming Mode barcode to Enter Reader setup then scan your option then Exit Reader setup.
~ (tone pattern) # > # # # # ~
~ (tone pattern) # # ~
Reader sounds Alarm tones for 2 seconds when it loses communication with the Base Station and sounds three ascending tones
when it returns within communication range – this setting is recommended for Physical Inventory.
~ (tone pattern) # # ~
Reader sounds Alarm tones for 5 seconds when it loses communication with the Base Station and sounds three ascending tones
when it returns within communication range – this setting is recommended to help ensure the Reader stays within the store.
Reader sounds no Alarm tones – Leash Alarm is Disabled. Note – you may only set one Alarm option (either Disable or Enabled).
~ (tone pattern) # # ~
Page 8 of 8
 Loading...