

Page 1
Sentry ONE User Guide
version 6.1
DataLocker Inc.
April, 2018
Standard and Managed
Sentry ONE
1
Page 2

Sentry ONE User Guide
Contents
About This Guide 2
Quick Start 3
About My Device 3
How Is This Different Than A Regular USB Drive? . . . . . . . . . . . . . . . . . . . . . . . . . . . 3
What Systems Can I Use It On? . . . . . . . . . . . . . . . . . . . . . . . . . . . . . . . . . . . . . 4
Product Specifications . . . . . . . . . . . . . . . . . . . . . . . . . . . . . . . . . . . . . . . . . . 4
Recommended Best Practices . . . . . . . . . . . . . . . . . . . . . . . . . . . . . . . . . . . . . 5
Setting Up My Device 5
Device Access (Windows Environment) . . . . . . . . . . . . . . . . . . . . . . . . . . . . . . . 5
Device Access (macOS Environment) . . . . . . . . . . . . . . . . . . . . . . . . . . . . . . . . 6
Standard Device Initialization . . . . . . . . . . . . . . . . . . . . . . . . . . . . . . . . . . . . . . 6
DataLocker Control Panel . . . . . . . . . . . . . . . . . . . . . . . . . . . . . . . . . . . . . . . . 7
Setting Up A Managed Device With SafeConsole . . . . . . . . . . . . . . . . . . . . . . . . . 7
Setting Up A Managed Device With Ironkey EMS . . . . . . . . . . . . . . . . . . . . . . . . . . 8
Using My Device - Standard And Managed Features 9
Accessing My Secure Files . . . . . . . . . . . . . . . . . . . . . . . . . . . . . . . . . . . . . . . 9
Unlocking In Read-Only Mode . . . . . . . . . . . . . . . . . . . . . . . . . . . . . . . . . . . . . 9
Changing The Unlock Message . . . . . . . . . . . . . . . . . . . . . . . . . . . . . . . . . . . . 10
Locking The Device . . . . . . . . . . . . . . . . . . . . . . . . . . . . . . . . . . . . . . . . . . . 10
Typing Passwords With The Virtual Keyboard . . . . . . . . . . . . . . . . . . . . . . . . . . . . . 11
Managing Passwords . . . . . . . . . . . . . . . . . . . . . . . . . . . . . . . . . . . . . . . . . . 11
Formatting My Device . . . . . . . . . . . . . . . . . . . . . . . . . . . . . . . . . . . . . . . . . . 12
Finding Information About My Device . . . . . . . . . . . . . . . . . . . . . . . . . . . . . . . . 12
Editing The Applications List . . . . . . . . . . . . . . . . . . . . . . . . . . . . . . . . . . . . . . . 13
Resetting My Device . . . . . . . . . . . . . . . . . . . . . . . . . . . . . . . . . . . . . . . . . . . 13
Using My Device - Managed Only Features 14
Accessing My Device If I Forget My Password . . . . . . . . . . . . . . . . . . . . . . . . . . . . 14
Scanning My Device For Malware . . . . . . . . . . . . . . . . . . . . . . . . . . . . . . . . . . . 14
Restoring On-Board Applications . . . . . . . . . . . . . . . . . . . . . . . . . . . . . . . . . . . 15
Using ZoneBuilder In SafeConsole . . . . . . . . . . . . . . . . . . . . . . . . . . . . . . . . . . . 15
Using My Device On Linux 15
Using The Unlocker . . . . . . . . . . . . . . . . . . . . . . . . . . . . . . . . . . . . . . . . . . . . 15
Where Can I Get Help? 16
About This Guide
DataLocker®Sentry ONE is available in Standard or Managed versions. The Standard version of the
Sentry ONE does not require a management platform. The Managed version requires a device
license and can be managed by either SafeConsole or IronkeyTMEMS. Both SafeConsole and
Ironkey EMS are secure cloud or on-premises management platforms that allow your organization
to centrally manage compatible USB (Universal Serial Bus) storage devices easily and efficiently.
This guide will explain how to setup and initialize both a Standard and Managed device.
© Copyright DataLocker Inc. 2
Page 3
Sentry ONE User Guide
Quick Start
Windows (7, 8.1, 10) & macOS Setup (v.10.9.x - 10.13.x)
1. Plug the device into your computer’s USB port.
2.
When the Device Setup window appears, follow the on-screen instructions. If this window does
not appear, open it manually:
• Windows: Start > This PC > Unlocker > Unlocker.exe
• macOS: Finder > Unlocker > Unlocker
3.
When Device Setup is complete, you can move your important files to the PRIVATE USB drive
and they will be automatically encrypted.
Some Windows systems prompt to restart after you first plug in your device. You can safely close
that prompt without restarting - no new drivers or software are installed.
About My Device
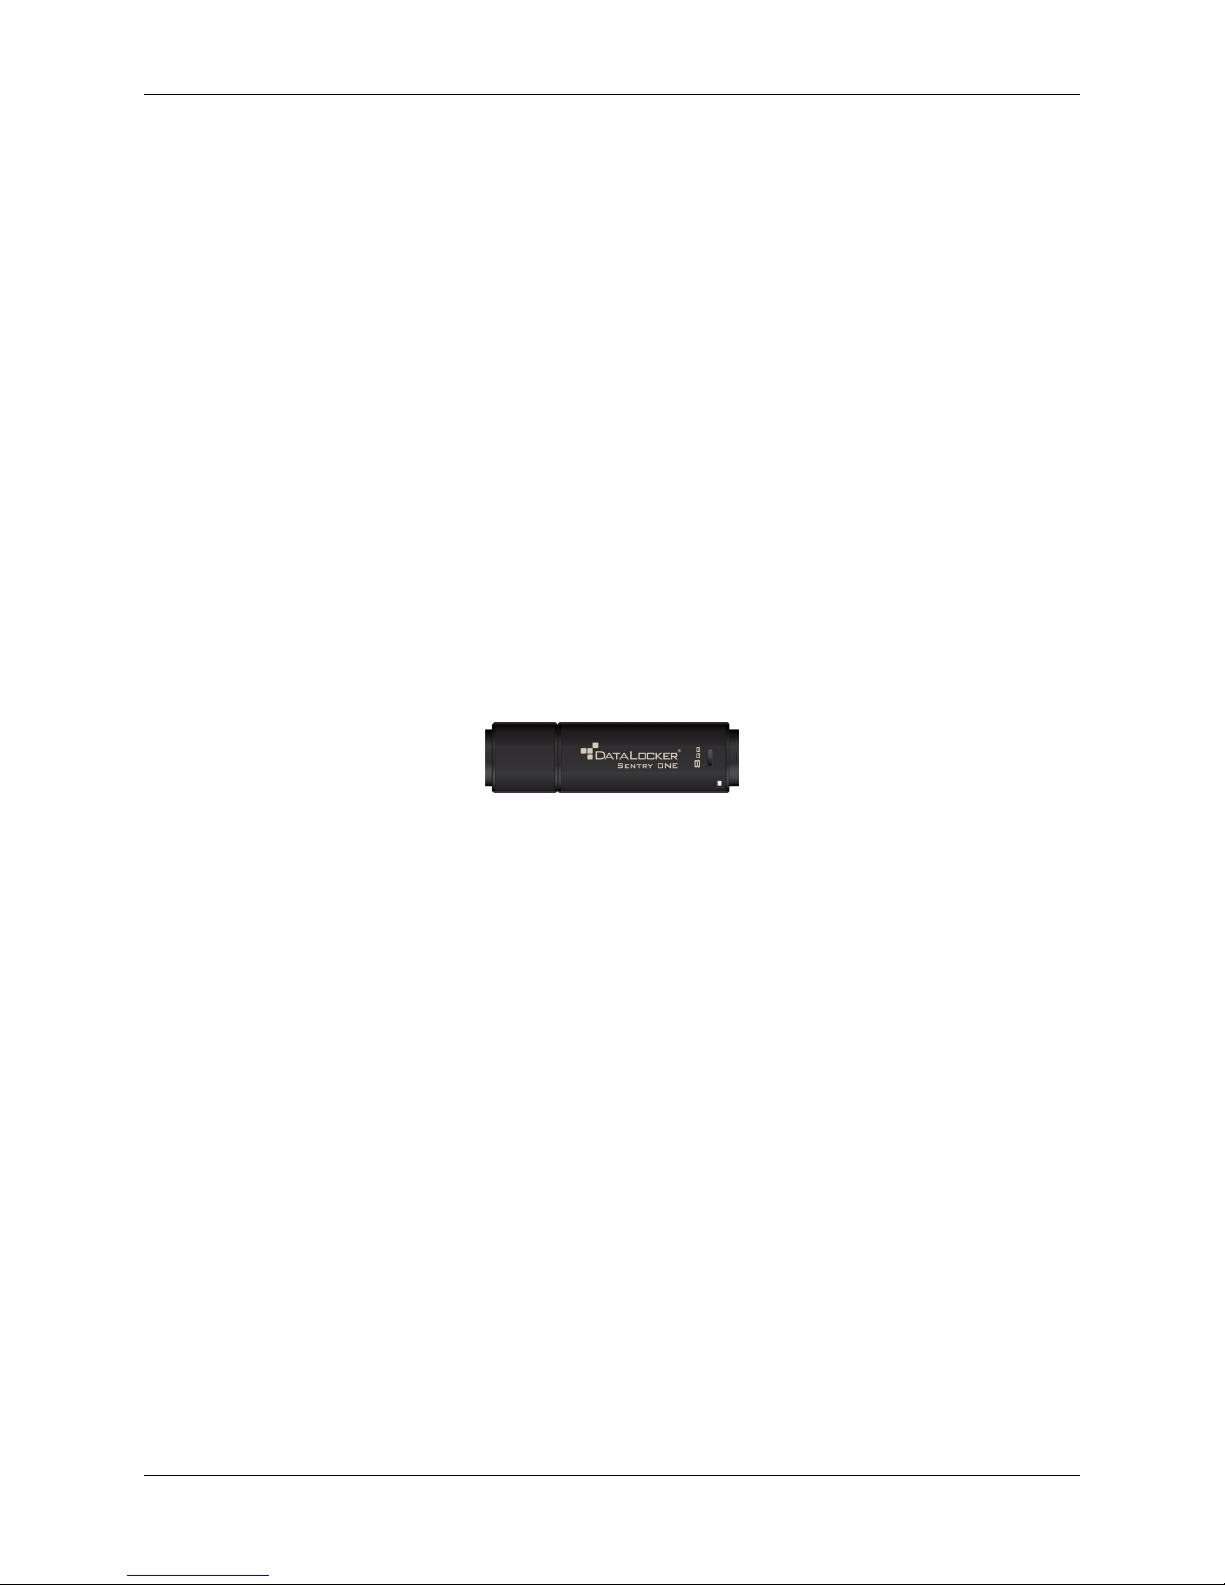
DataLocker®Sentry ONE USB 3.0 is a portable flash drive with built-in password security and data
encryption. It is designed to be the world’s most secure USB flash drive. Now you can safely carry
your files and data with you wherever you go.
Figure 1: DataLocker Sentry ONE
How Is This Different Than A Regular USB Drive?
FIPS 140-2 Level 3 Certification
that you’re complying with regulatory requirements.
Hardware Encryption
protection as highly classified government information. This security technology feature is always on
and cannot be disabled.
Password-Protected
password with anyone so that even if your device is lost or stolen, no one else can access your data.
Device Reset
rect password attempts exceeds 10 attempts, the device will initiate a reset sequence.
When a device is reset, all onboard data will be erased and the device returns to factory settings -
so remember your password.
Anti-Malware Autorun Protection (Managed Only)
many of the latest malware threats targeting USB drives by detecting and preventing autorun
execution of unapproved programs. It can also be unlocked in Read-Only Mode if you suspect the
host computer is infected.
Simple Device Management
accessing your files, managing your device and editing your preferences, changing your device
password, and safely locking your device.
- If the Cryptochip detects physical tampering, or if the number of consecutive incor-
- The Cryptochip in your device protects your data with the same level of
- Device access is secured using password protection. Do not share your
- The Sentry ONE is a FIPS-certified device, so you can feel confident
Important
- Your device is capable of protecting you from
- Your device includes the DataLocker Control Panel, a program for
-
© Copyright DataLocker Inc. 3
Page 4

Sentry ONE User Guide
What Systems Can I Use It On?
• Windows® 10
• Windows® 8.1
• Windows® 7
• macOS® (10.9 - 10.13)
•
Linux (2.6 or higher)
network access, for example, setting up your device or changing your password.
Some applications are only available on specific systems:
Windows Only
• Virtual Keyboard (English only)
• Anti-Malware Scanner
• Device Updates
Note:
The Linux CLI Unlocker does not support any features that require
Product Specifications
For further details about your device, see the Device Info page in the DataLocker Control Panel.
Specification Details
Capacity* 4GB, 8GB, 16GB, 32GB, 64GB, 128GB
Speed** USB 3.0:
- 4GB: 80MB/s read, 12MB/s write
- 8GB & 16GB: 165MB/s read, 22MB/s write
- 32GB: 250MB/s read, 40MB/s write
- 64GB & 128GB: 250MB/s read, 85MB/s write
USB 2.0:
- 4GB: 30MB/s read, 12MB/s write
- 8GB-128GB: 30MB/s read, 20MB/s write
Dimensions 77.9 mm x 22.2 mm x 12.05 mm
Waterproof Up to 4 ft. (1.2m)
Conforms to IEC 60529 IPX8
Product must be clean and dry before use
Temperature Operating: 0°C to 60°C
Storage: -20°C to 85°C
Hardware Encryption 256-bit AES (XTS Mode)
EMI/EMC
Compliance
Certification FIPS 140-2 level 3 certified
Hardware USB 3.0 compliant and USB 2.0 compliant
© Copyright DataLocker Inc. 4
TAA Compliant, FCC, CE, VCCI & KC, RoHS & WEEE
Requires 2 free drive letters
Page 5

Sentry ONE User Guide
Specification Details
OS Compatibility Windows 10, Windows 8.1, Windows 7 (SP1)
macOS v.10.9.x-10.13.x
Linux 2.6.x***
Accessibility DataLocker Control Panel is designed to be Section 508
compliant. Users with disabilities have keyboard navigation
and screen reader support.
Warranty 2 Years Limited
Designed and assembled in the U.S.A., Sentry ONE devices do not require any software or drivers to
be installed.
* Advertised capacity is approximate. Some space is required for onboard software.
** Speed varies with host hardware, software, and usage.
*** Limited Feature Set. No online management features.
Recommended Best Practices
1. Lock the device:
• when not in use
• before unplugging it
• before the system enters sleep mode
2. Never unplug the device when the LED is lit.
3. Never share your device password.
4. Perform a computer anti-virus scan before setting up the device.
Setting Up My Device
To ensure there is ample power provided to the Sentry ONE encrypted USB drive, insert it directly
into a USB 2.0/3.0 port on a notebook or desktop. Avoid connecting it to any peripheral devices
that may feature a USB port, such as a keyboard or USB-powered hub. Initial setup of the device
must be done on a supported Windows or macOS based operating system.
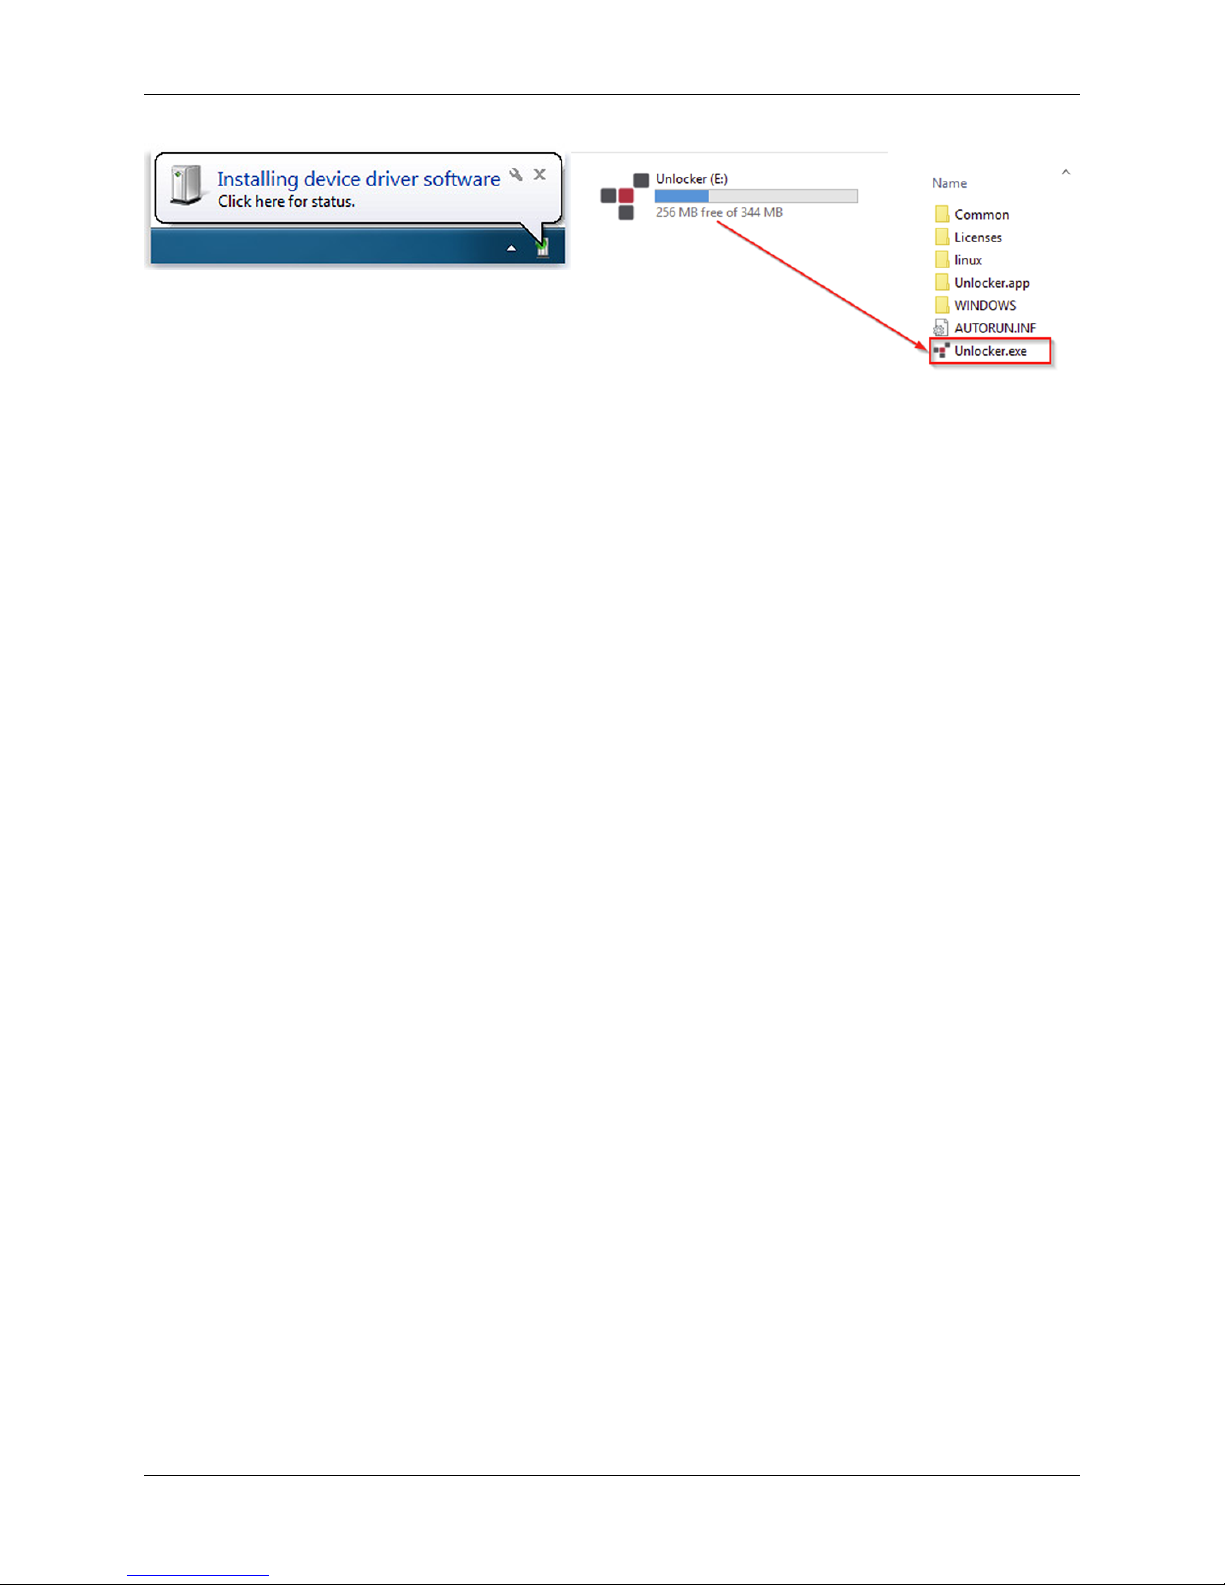
Device Access (Windows Environment)
1.
Plug the Sentry ONE encrypted USB drive into an available USB port on the notebook or
desktop and wait for Windows to detect it.
• Windows 7/8.1/10 users will receive a device driver notification.
•
Once the new hardware detection is complete, Windows will prompt to begin the
initialization process.
2.
Select the option
Please note that the partition letter will vary based on the next free drive letter. The drive letter
may change depending on what devices are connected. In the image below, the drive letter
is E:.
© Copyright DataLocker Inc. 5
Unlocker.exe
inside of the Unlocker partition that can be found in File Explorer.
Page 6
Sentry ONE User Guide
Device Access (macOS Environment)
1.
Plug the Sentry ONE encrypted USB drive into an available USB port on the macOS notebook
or desktop and wait for the operating system to detect it.
2.
Double click the
•
If the Unlocker volume does not appear on the desktop, open Finder and locate the
Unlocker volume on the left side of the Finder window (listed under Devices.) Highlight
the volume and double-click the Unlocker application icon in the Finder window. This will
start the initialization process.
Unlocker
volume that appears on the desktop to start the initialization process.
Standard Device Initialization
Initialization of your Sentry ONE device will depend on if you have the
aged) or (Forced)
Code or Connection Token from your Ironkey EMS or SafeConsole Administrator. Ironkey EMS and
SafeConsole require a device license for activation. License sold separately. For information on how
to initialize a Sentry ONE Managed see: Setting Up A Managed Device.
1.
Select a language preference from the list. By default, device software will use the same
language as your computer’s operating system (if available).
2. Review the license agreement, check the checkbox to accept it, and click Continue.
3.
In the Password text box, type a device password, then re-enter your password in the Confirm
text box. The password protects the data on the secure drive. Passwords are case-sensitive
and must have at least 8 characters (including spaces).
4.
If initializing on Windows, you will be given the option of formatting the PRIVATE USB drive as
either FAT32 or exFAT. For more information, see Formatting My Device.
5.
Click
Continue
will open. Your device is now ready to store and protect your data.
Managed
. The device will finish initializing. Once complete, the DataLocker Control Panel
device. Initializing a Sentry ONE Managed will require an Activation
Standard
(Optionally Man-
© Copyright DataLocker Inc. 6
Page 7
DataLocker Control Panel
Sentry ONE User Guide
Upgrading My Device From Standard To Managed (Windows And macOS Systems Only)
If notified by your System Administrator, you can upgrade your DataLocker Sentry ONE Standard
device to a Managed device. Managed devices are compatible with SafeConsole or IronKey EMS.
When you upgrade your device, you will be required to activate it using a Connection Token or
Activation Code, provided by your administrator. An internet connection is required to complete
this process.
Important:
your device with SafeConsole or IronKey EMS.
To upgrade from Standard to Managed:
1.
2. In the left sidebar, click Tools, then click Manage Device.
3. Paste the Connection Token or Activation Code in the Activation text box.
4. Follow the on-screen instructions.
5.
Only start the upgrade process if your System Administrator has asked you to activate
When you receive the Connection Token or Activation Code from your System Administrator,
start the DataLocker Control Panel and click
Panel for more information.
Additional applications may be installed on your device based on the device policy settings
chosen by your System Administrator. You may also be required to change your password so it
conforms to the password security policy set for managed devices in your organization.
Settings (Gear Icon)
. See the DataLocker Control
Setting Up A Managed Device With SafeConsole
The initialization process will begin by allowing the device to be ready to communicate with the
SafeConsole server. The steps needed to register a Sentry ONE Managed to SafeConsole will
depend on the policies that your administrator is enforcing. Not all dialogs will be shown.
© Copyright DataLocker Inc. 7
Page 8

Sentry ONE User Guide
A SafeConsole Connection Token will be needed. The SafeConsole Connection Token is obtained
by the System Administrator through the Quick Connect Guide, located inside of the SafeConsole
user interface.
Users without access to a Management Server, please contact sales: [email protected] /
(913)310-9088
1.
Enter the SafeConsole Connection Token that is obtained in the steps above. Review the
license agreement, check the checkbox to accept it, and click
left-hand corner.
Activate
in the bottom
• Optionally Enabled Policies
Administrator. They will appear during device registration if they have been enabled.
–
Confirm Ownership of the device: Enter the Windows username and password that is
associated with the login credentials of the computer the device is plugged into.
–
Custom Device Information: Required information about you or your device. The
required fields will vary.
–
Unique User Token: This token is directly associated with the end user’s account and
will be provided by the System Administrator.
–
Administrator Registration Approval: The System Administrator may require their approval to proceed with device registration.
2.
Enter a secure Password and Confirm it. Once the password created meets the requirements
listed to the right side of the input fields, click
depend on the policy selected by your administrator.
3. Choose a Secure Volume File System (see Formatting My Device) and click Continue.
4.
The device will now finalize the setup process and be ready for use. Access the Encrypted
Storage by clicking the
accessed and altered by clicking the
information.
Folder Icon
- These policies may or may not be enabled by your System
Continue
in the top menu. The settings of the device can be
Gear Icon
. The requirements of this password will
. See the DataLocker Control Panel for more
Setting Up A Managed Device With Ironkey EMS
The initialization process will begin by allowing the device to be ready to communicate with the
Ironkey EMS server.
An Ironkey EMS Activation Code will be needed. The Ironkey EMS Activation Code is obtained by
the System Administrator through the Ironkey EMS Console. This code can also be emailed to the
end user.
Users without access to a Management Server, please contact sales: [email protected] /
(913)310-9088
1.
Enter the Ironkey EMS Activation Code that is obtained in the steps above. Review the license
agreement, check the checkbox to accept it, and click
corner.
2.
Enter a secure Password and Confirm it. Once the password created meets the requirements
listed to the right side of the input fields, click Continue.
3.
Depending on the policy created by your System Administrator, you may be required to create
an Online Account. An email will be provided to the end user with the instructions on how to
create an online account. After the account has been confirmed, click OK.
© Copyright DataLocker Inc. 8
Activate
in the bottom left-hand
Page 9

Sentry ONE User Guide
•
The user will receive an Online Account Error message if the online account has not been
created or there was an issue while attempting to verify the account.
4. Choose a Secure Volume File System (see Formatting My Device) and click Continue.
5.
The device will now finalize the setup process and be ready for use. Access the encrypted
storage by clicking the
accessed and altered by clicking the
information.
Folder Icon
in the top menu. The settings of the device can be
Gear Icon
. See the DataLocker Control Panel for more
Using My Device - Standard And Managed Features
Accessing My Secure Files
After unlocking the device, you can access your secure files. Files are automatically encrypted and
decrypted when you save or open them on the drive. This technology gives you the convenience
of working as you normally would with a regular drive, while providing strong, “always-on” security.
To access your secure files:
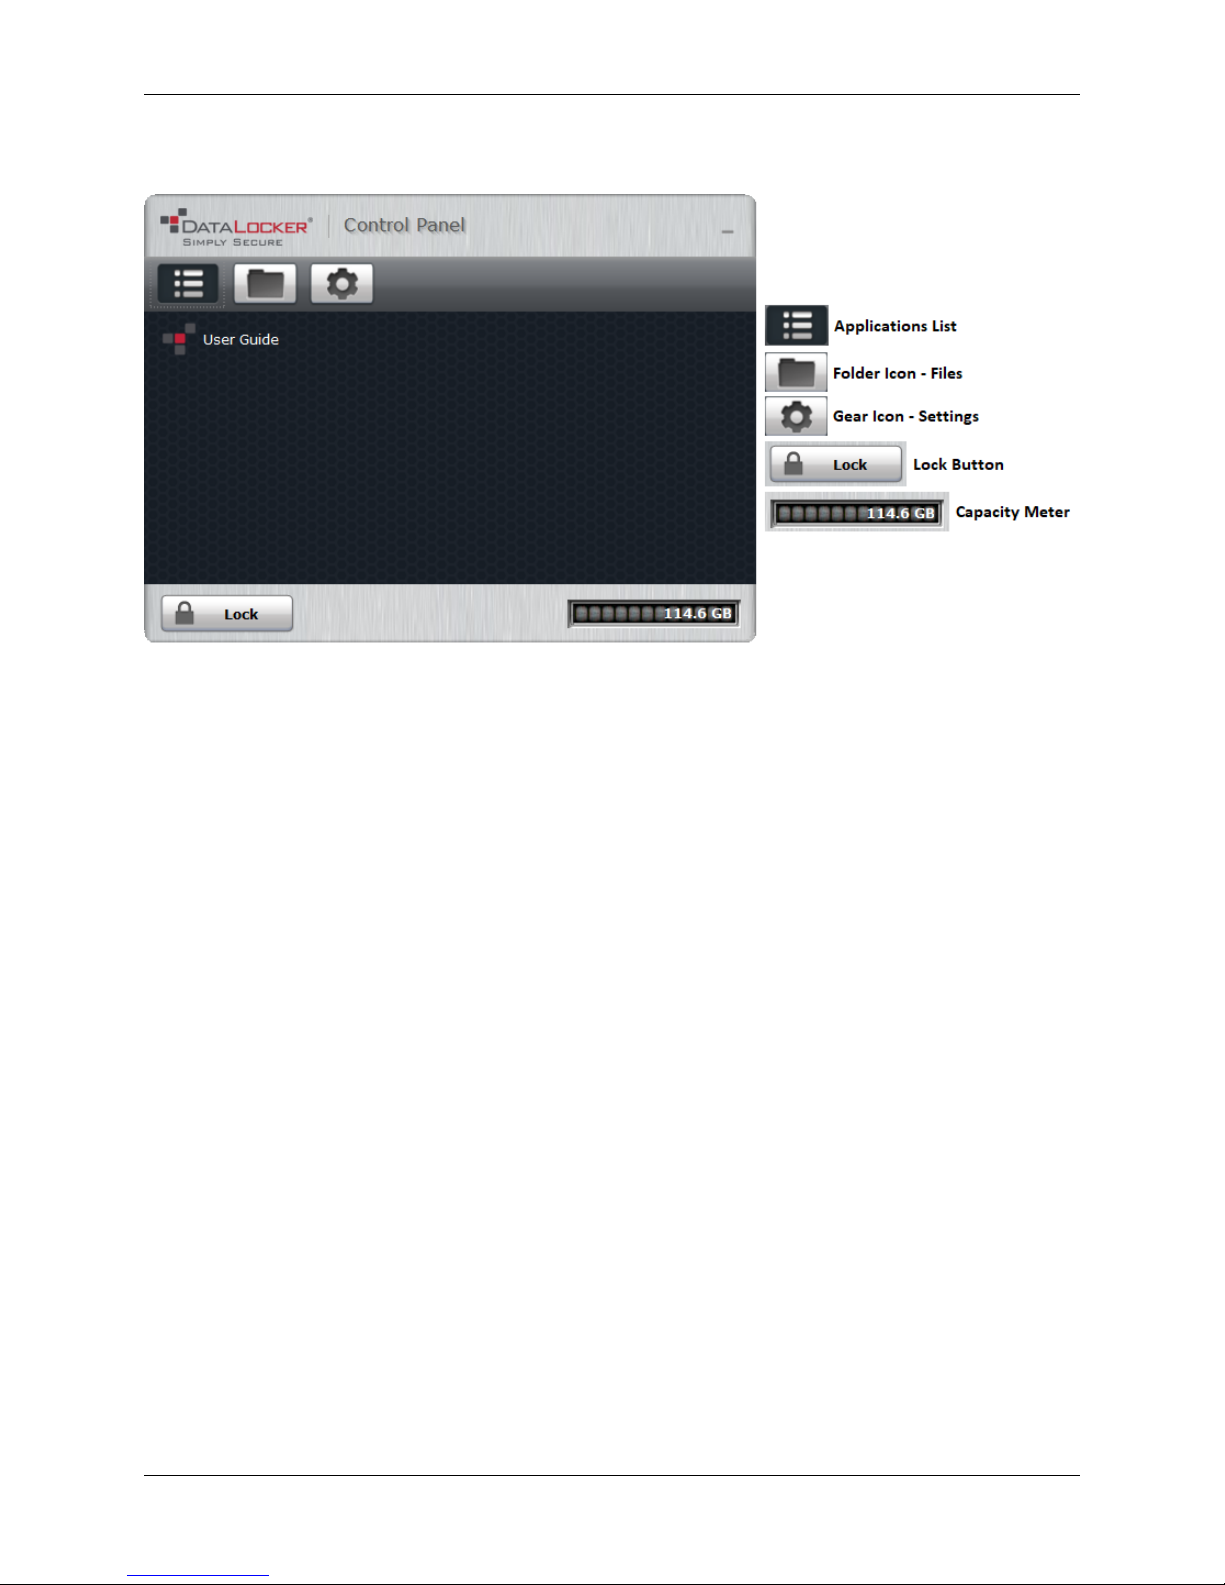
1. Click Files on menu bar of the DataLocker Control Panel.
• Windows: Opens Windows Explorer to the PRIVATE USB drive.
• macOS: Opens Finder to the PRIVATE USB drive.
2. Do one of the following:
• To open a file, double-click the file on the PRIVATE USB drive.
• To save a file, drag the file from your computer to the PRIVATE USB drive.
Hint:
You can also access your files by right-clicking the
and clicking Secure Files.
DataLocker Icon
in the Windows taskbar
Unlocking In Read-Only Mode
You can unlock your device in a read-only state so that files cannot be altered on your secure drive.
For example, when using an untrusted or unknown computer, unlocking your device in Read-Only
Mode will prevent any malware on that computer from infecting your device or modifying your files.
Managed devices can be forced to unlock in a read-only state by an administrator.
When working in this mode, the DataLocker Control Panel will display the text Read-Only Mode.
In this mode, you cannot perform any operations that involve modifying files on the device. For
example, you cannot reformat the device, restore applications or edit the Applications List, or edit
files on the drive.
To unlock the device in Read-Only Mode:
1. Insert the device into the USB port of the host computer and run the Unlocker.exe.
2. Check the Read-Only Checkbox below the password entry box.
3.
Type your device password and click
the text Read-Only Mode at the bottom.
Unlock
. The DataLocker Control Panel will appear with
© Copyright DataLocker Inc. 9
Page 10

Sentry ONE User Guide
Changing The Unlock Message
The Unlock Message is custom text that displays in the Unlocker window when you unlock the
device. This feature allows you to customize the message that displays. For example, adding
contact information will display information on how a lost drive can be returned to you. For
Managed devices, this feature may or may not be enabled by your System Administrator.
To change the Unlock Message:
1. In the DataLocker Control Panel, click Settings on the menu bar.
2. Click Preferences in the left sidebar.
3.
Type the message text in the Unlock Message field. The text must fit in the space provided
(approximately 7 lines and 200 characters).
Locking The Device
Lock your device when you are not using it to prevent unwanted access to your secure files on the
drive. You can manually lock the device or you can set the device to automatically lock after a
specified period of inactivity. For Managed devices, this feature may or may not be enabled by
your System Administrator.
Caution:
force the application or file to close. Although you can configure the auto-lock setting to force the
device to lock, doing so can result in loss of data to any open and unsaved files.
If your files have become corrupt from a forced lock procedure or from unplugging the device
before locking, you might be able to recover the files by running CHKDSK and using data recovery
software (Windows only).
To manually lock the device:
1.
Note:
the device. You will not be able to unlock the device until the System Administrator re-enables the
device.
To set a device to automatically lock:
1. Unlock your device and click Settings on the menu bar in the DataLocker Control Panel.
2. Click Preferences in the left sidebar.
3.
To run CHKDSK (Windows only):
By default, if a file or application is open when the device tries to auto-lock, it will not
Click
Lock
in the bottom left-hand corner of the DataLocker Control Panel to safely lock your
device.
•
You can also use the keyboard shortcut:
DataLocker Icon in the system tray and click Lock Device.
Managed devices will automatically lock during use if an administrator remotely disables
Click the
time intervals: 5, 15, 30, 60, 120, or 180 minutes.
Checkbox
for auto-locking the device and set the time-out to one of the following
CTRL + L
(Windows only), or right-click the
1. Unlock the device.
2. Press the WINDOWS LOGO KEY + R to open the Run prompt:
3. Type CMD and press ENTER.
4.
From the command prompt, type CHKDSK, the PRIVATE USB drive letter, then “/F /R”. For
example, if the PRIVATE USB drive letter is G, you would type: CHKDSK G: /F /R
© Copyright DataLocker Inc. 10
Page 11

Sentry ONE User Guide
5. Use data recovery software if necessary in order to recover your files.
Typing Passwords With The Virtual Keyboard
If you are unlocking your device on an unfamiliar computer and are concerned about keylogging
and screen logging spyware, use the Virtual Keyboard. It helps protect your device password by
letting you click out letters and numbers. The underlying techniques in the Virtual Keyboard will
bypass many trojans, keyloggers, and screen loggers.
Note:
This feature uses a standard QWERTY key set. It is available on Windows only and the language
preference for the device must be set to English.
To type a password using the Virtual Keyboard (Windows only):
1. Open the Virtual Keyboard by doing one of the following actions:
• In the password field, click the Virtual Keyboard Icon.
• When the keyboard focus is in a password field, press CTRL+ALT+ V.
2. Click the keys to type your password, and then click Enter.
You can also use the Virtual Keyboard in conjunction with the actual keyboard, so that you type
some characters and click some characters.
Hint:
Click
Randomize
loggers.
Note:
When you click a key in the Virtual Keyboard, all of the keys briefly go blank. This feature
prevents screen loggers from capturing what you clicked. To disable this feature, click the icon
(beside the Exit button) and choose Disable Screen Logger Protection.
to arrange the keys in a random order. This helps protect against screen
Managing Passwords
You can change your password on your device by accessing the Password tab in the DataLocker
Control Panel.
For Managed devices, password policy settings are determined by your System Administrator.
Sometimes, you may be required to change your password to comply with new corporate password
policies. When a change is required, the Password Change screen will appear the next time you
unlock the device. If the device is in use, it will lock and you will have to change the password
before you can unlock it.
Note:
When a password is required, for example, when logging into the device or during a manual
password change operation, you can use the Virtual Keyboard instead of the actual keyboard to
type the password.
To change your password:
1. Unlock your device and click Settings on the menu bar.
2. Click Password in the left sidebar
3. Enter your current password in the field provided.
4. Enter your new password and confirm it in the fields provided.
5. Click Change Password.
© Copyright DataLocker Inc. 11
Page 12

Sentry ONE User Guide
Formatting My Device
Your device will need to be formatted during initialization, before it can be used to store files.
If initalizing on Windows, you will be given the option of formatting the PRIVATE USB drive as either
FAT32 or exFAT.
Options are for Windows operating systems only - macOS will automatically format to FAT32
• FAT32
– Pros: Cross-platform compatible (Windows, macOS, and Linux)
– Cons: Limited individual file size of 4GB
• exFAT
– Pros: No file size limitations
– Cons: Microsoft restricts usage by license obligations
After initialization, reformatting the PRIVATE USB drive will erase all your files and your Application List,
but will not erase your device password and settings.
Important:
for example, to cloud storage or your computer.
To reformat a device:
1. Unlock your device and click Settings on the menu bar of the DataLocker Control Panel.
2. Click Tools on the left sidebar.
3. Under Device Health, select the file format and click Reformat Secure Volume.
Before you reformat the device, back up your PRIVATE USB drive to a separate location,
Finding Information About My Device
Use the Capacity Meter, located at the bottom right of the DataLocker Control Panel, to see how
much storage space is still available on your device. The green bar graph represents how full the
device is. For example, the meter will be totally green when the device is full. The white text on the
Capacity Meter displays how much free space remains.
For general information about your device, see the Device Info page.
To view device information:
1. Unlock your device and click Settings on the menu bar of the DataLocker Control Panel.
2. Click Device Info in the left sidebar.
The About This Device section includes the following details about your device:
• Model Number
• Serial Number
• Software and Firmware Version
• Release Date
• Management Console
• Secure Files Drive Letter
• Unlocker Drive Letter
• Operating System and System Administrative Privileges
Note:
To visit the DataLocker website or access more information about legal notices or certifications
for DataLocker products, click one of the information buttons on the Device Info page.
© Copyright DataLocker Inc. 12
Page 13

Sentry ONE User Guide
Hint:
Click
Copy
to copy the device information to the clipboard so that you can paste it in an
email or support request.
Editing The Applications List
The Applications List, located in the DataLocker Control Panel, is the area where you can quickly
launch on-board applications and files. Items that appear in the list are shortcuts to the actual files.
Managing the list items does not alter the actual file.
To edit the Applications List:
1.
Unlock your device. The DataLocker Control Panel will appear with the Applications List
selected by default.
2.
If the DataLocker Control Panel is already open, click
the Applications List. Do one of the following:
•
To add a file or application shortcut: Drag a file from the desktop to the Applications List
area to add it to the list. You can also right-click the Applications List area and click
Application.
•
To rename or delete list items: Right-click the application or file and choose the action
from the menu.
•
To sort or change the way icons appear in the list: Right-click anywhere in the Application
list and choose Large Icons, List, Tile, or Sort Alphabetically.
Applications
on the menu bar to view
Add
Functions of the Applications List:
• You can add any file to the list, including documents, images, and batch files.
For items that are not applications, the operating system opens the item with the default
•
program associated with that file type.
•
Items that are Windows executables will be hidden from view on macOS. Similarly, macOS
application files will be hidden from view on Windows computers.
Resetting My Device
Your device can be reverted back to factory settings. This will securely wipe all data from the
device and a new security key will be created for the next use.
For Managed devices, your System Administrator may have this option disabled. Contact your
administrator if you need to reset your device.
Resetting your device:
1. Unlock your device.
2. Right-click on the DataLocker Icon in the system tray.
3. Click Reset Device.
Your device will now be reset back to factory settings.
© Copyright DataLocker Inc. 13
Page 14

Sentry ONE User Guide
Using My Device - Managed Only Features
Accessing My Device If I Forget My Password
If you forget your password and an administrator has granted you password reset privileges, you
can reset it. If your administrator has not granted password reset priviledges, you must contact your
administrator for help resetting your password.
To reset your password:
1. Plug in your device and start the Unlocker.
2. Click Password Help.
3.
At the Password Help prompt, click
complete the password reset.
4.
Depending on the management platform, you may receive an email with instructions on
how to obtain your recovery code. Otherwise, you will need to contact your administrator
to obtain the recovery code. You may be required to provide the request code and serial
number.
•
The recovery code will need to be copied and pasted exactly as it is given to you.
Incorrect codes count against the ten unlock attempts before the device is reset.
Reset Password
. Follow the onscreen instructions to
5.
Type your new password (or use the Virtual Keyboard) and confirm it in the fields provided,
then click Change Password.
Scanning My Device For Malware
If enabled by your System Administrator, the Malware Scanner is a self-cleaning technology that
detects and removes malware on your device from an infected file or computer. Powered by the
McAfee®AntiVirus and Anti-Malware signature database, and constantly updated to combat
the latest malware threats, the scanner first checks for the latest updates, scans your device, then
reports and cleans any malware that is found.
Some things to know about scanning your device:
• The scanner runs automatically when you unlock your device.
•
It scans any running system processes and all onboard files (compressed and uncompressed).
• It reports and cleans any malware it finds.
•
The scanner will automatically update itself before each scan to protect you from the latest
malware threats.
• An update requires an internet connection.
•
Ensure a minimum of 135 MB of free space on the device to accommodate the downloaded
malware signature files.
•
Your first update may take a long time to download, depending on your internet connection.
• The date of the last update is displayed onscreen.
•
If the scanner becomes too far out of date, it will need to download a large file to bring it
back up-to-date.
© Copyright DataLocker Inc. 14
Page 15

Sentry ONE User Guide
Restoring On-Board Applications
You can restore on-board applications installed by Ironkey EMS if they are ever erased or become
corrupt (Windows only).
1. Unlock your device and click Settings on the menu bar of the DataLocker Control Panel.
2. Click Tools in the left sidebar. Under Device Health, click Restore Onboard Apps.
Using ZoneBuilder In SafeConsole
If enabled by your System Administrator, ZoneBuilder is a SafeConsole tool used to create a Trusted
Zone of computers. It can be used to restrict device access to computers within the Trusted Zone
and, if enabled, can automatically unlock your device, which eliminates the need to enter your
password.
If your administrator chooses to enable this policy, you may be required to trust the account.
Trusting the account:
1. Unlock your device and click Settings in the DataLocker Control Panel.
2. Click Zone Builder on the left sidebar.
3. Click Trust This Account. Your account will now show up in the Trusted Accounts box.
Your account is now in the Trusted Zone of computers. Depending on the policy set by your System
Administrator, you may have restricted device access outside of the Trusted Zone or when offline.
Your device may also be set to automatically unlock on trusted computers.
To remove a trusted account, simply highlight the account you wish to remove and click Remove.
Using My Device On Linux
You can use your device on several distributions of Linux. There are two executables in the linux
folder, Unlocker_32.exe and Unlocker_64.exe. For this guide, replace Unlocker_xx.exe with the
executable that is compatible with your system.
The device must be previously set up using a Windows or macOS operating system. See Setting Up
My Device for more information. Some Managed device policies, set by the System Administrator,
may restrict usage of the device to systems only running Windows or macOS operating systems.
Using The Unlocker
Use the Unlocker_xx.exe for Linux to access your files. Depending on your Linux distribution, you may
need root privileges to use the program Unlocker_xx.exe found in the Linux folder of the mounted
public volume. By default, most Linux distributions will append the execute bit to .exe files on a fat32
partition. Otherwise the execute bit must be manually set before running by using the following
commands.
• chmod +x Unlocker_32.exe
• chmod +x Unlocker_64.exe
© Copyright DataLocker Inc. 15
Page 16

Sentry ONE User Guide
If you have only one device attached to the system, run the program from a command shell with
no arguments (for example, Unlocker_xx.exe). This will then prompt you for your device password to
unlock the drive. If you have multiple devices, you must specify which one you want to unlock.
Note:
Unlocker_xx.exe only unlocks the PRIVATE USB; it must then be mounted. Many modern Linux
distributions do this automatically. If not, run the mount program from the command line, using the
device name printed by Unlocker_xx.exe.
Simply un-mounting the device does not automatically lock the PRIVATE USB. To lock the device,
you must either unmount and physically remove (unplug) it, or run:
• Unlocker_xx.exe -l
Please note the following important details for using your device on Linux:
1. Kernel Version must be 2.6 or higher
2. Mounting
• Make sure you have permissions to mount external SCSI and USB devices.
•
Some distributions do not mount automatically and require the following command to be
run: mount /dev/[name of the device] /media/[mounted device name]
• The name of the mounted device varies depending on the distribution.
3. Permissions
• You must have permissions to mount external/usb/devices.
•
You must have permissions to run an executable file from the public volume in order to
launch the Unlocker.
• You might need root user permissions.
4. The Unlocker for Linux supports x86 and x86_64 systems.
5. Policies that will block the device
•
If the device is disabled within the policy settings in either SafeConsole or Ironkey EMS,
you will not be able to unlock the device.
Where Can I Get Help?
The following resources provide more information about DataLocker products. Please contact your
Help Desk or System Administrator if you have further questions.
• support.datalocker.com: Information, knowledgebase articles, and video tutorials
• [email protected]: Feedback and feature requests
• datalocker.com: General information
© Copyright DataLocker Inc. 16
Page 17

Sentry ONE User Guide
© 2018 DataLocker Inc. All rights reserved.
NOTE:
DataLocker is not liable for technical or editorial errors and/or omissions contained herein;
nor for incidental or consequential damages resulting from the furnishing or use of this material.
The information provided herein is subject to change without notice. The information contained in
this document represents the current view of DataLocker on the issue discussed as of the date of
publication. DataLocker cannot guarantee the accuracy of any information presented after the
date of publication. This document is for information purposes only. DataLocker makes no warranties,
expressed or implied, in this document. DataLocker, and the DataLocker logo are trademarks of
DataLocker Inc. and its subsidiaries. All other trademarks are the property of their respective owners.
IronkeyTMis a registered trademark of Kingston Technologies, used under permission of Kingston
Technologies. All rights reserved.
FCC Information
This device complies with part 15 of the FCC Rules. Operation is subject to
the following two conditions: (1) This device may not cause harmful interference, and (2) this
device must accept any interference received, including interference that may cause undesired
operation. This equipment has been tested and found to comply with the limits for a Class B digital
device, pursuant to part 15 of the FCC Rules. These limits are designed to provide reasonable
protection against harmful interference in a residential installation. This equipment generates,
uses and can radiate radio frequency energy and, if not installed and used in accordance with
the instructions, may cause harmful interference to radio communications. However, there is no
guarantee that interference will not occur in a particular installation. If this equipment does cause
harmful interference to radio or television reception, which can be determined by turning the
equipment off and on, the user is encouraged to try to correct the interference by one or more of
the following measures:
• Reorient or relocate the receiving antenna.
• Increase the separation between the equipment and receiver.
•
Connect the equipment to an outlet on a circuit different from that to which the receiver is
connected.
• Consult the dealer or an experienced radio/TV technician for help.
Note:
Changes or modifications not expressly approved by the party responsible for compliance
could void the user’s authority to operate the equipment.
© Copyright DataLocker Inc. 17
 Loading...