

Page 1
1
USER MANUAL
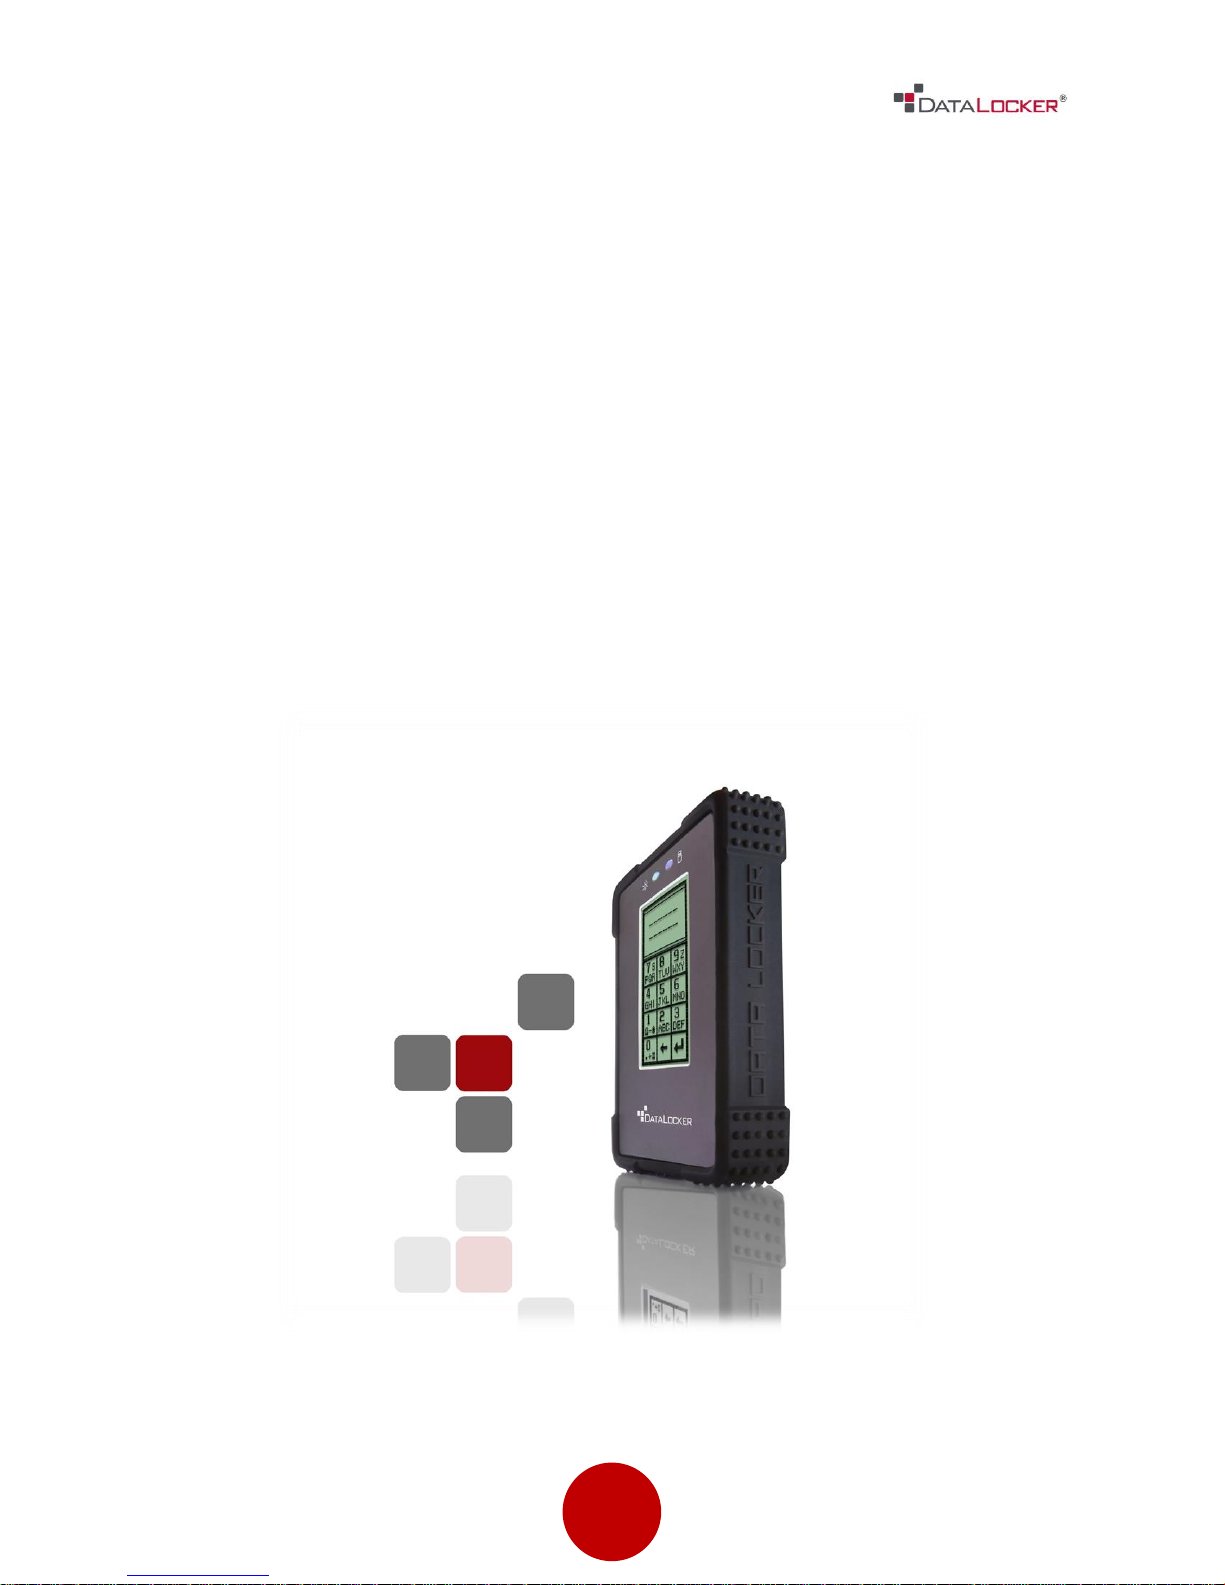
DataLocker DL2
------------------------ March 2014 ------------------------
Page 2

2
At a Glance
Advanced
3
Introduction
17
Special features
5
About the DL2
19
Master admin password
6
Package contents
Troubleshoot
Getting Started
20
Reestablish FIPS key
7
First time setup
20
Initialize & format your drive
10
Main screen description
11
Disconnecting your
DL2
Miscellaneous
25
Frequently asked questions
25
Contact support team
Basics
12
Deleting contents and
redeploying the drive
14
User options
16
Self-destruct mode
Contents
Page 3
3
At a Glance
INTRODUCTION
Congratulations on your purchase of the DataLocker DL2 Encrypted Hard
Drive. This user manual is intended to help you configure your device. Because
we are constantly updating our products, the images and text in this manual
may vary slightly from the images and text displayed by your DataLocker
DL2. These changes are minor and should not affect the ease of setup
adversely.
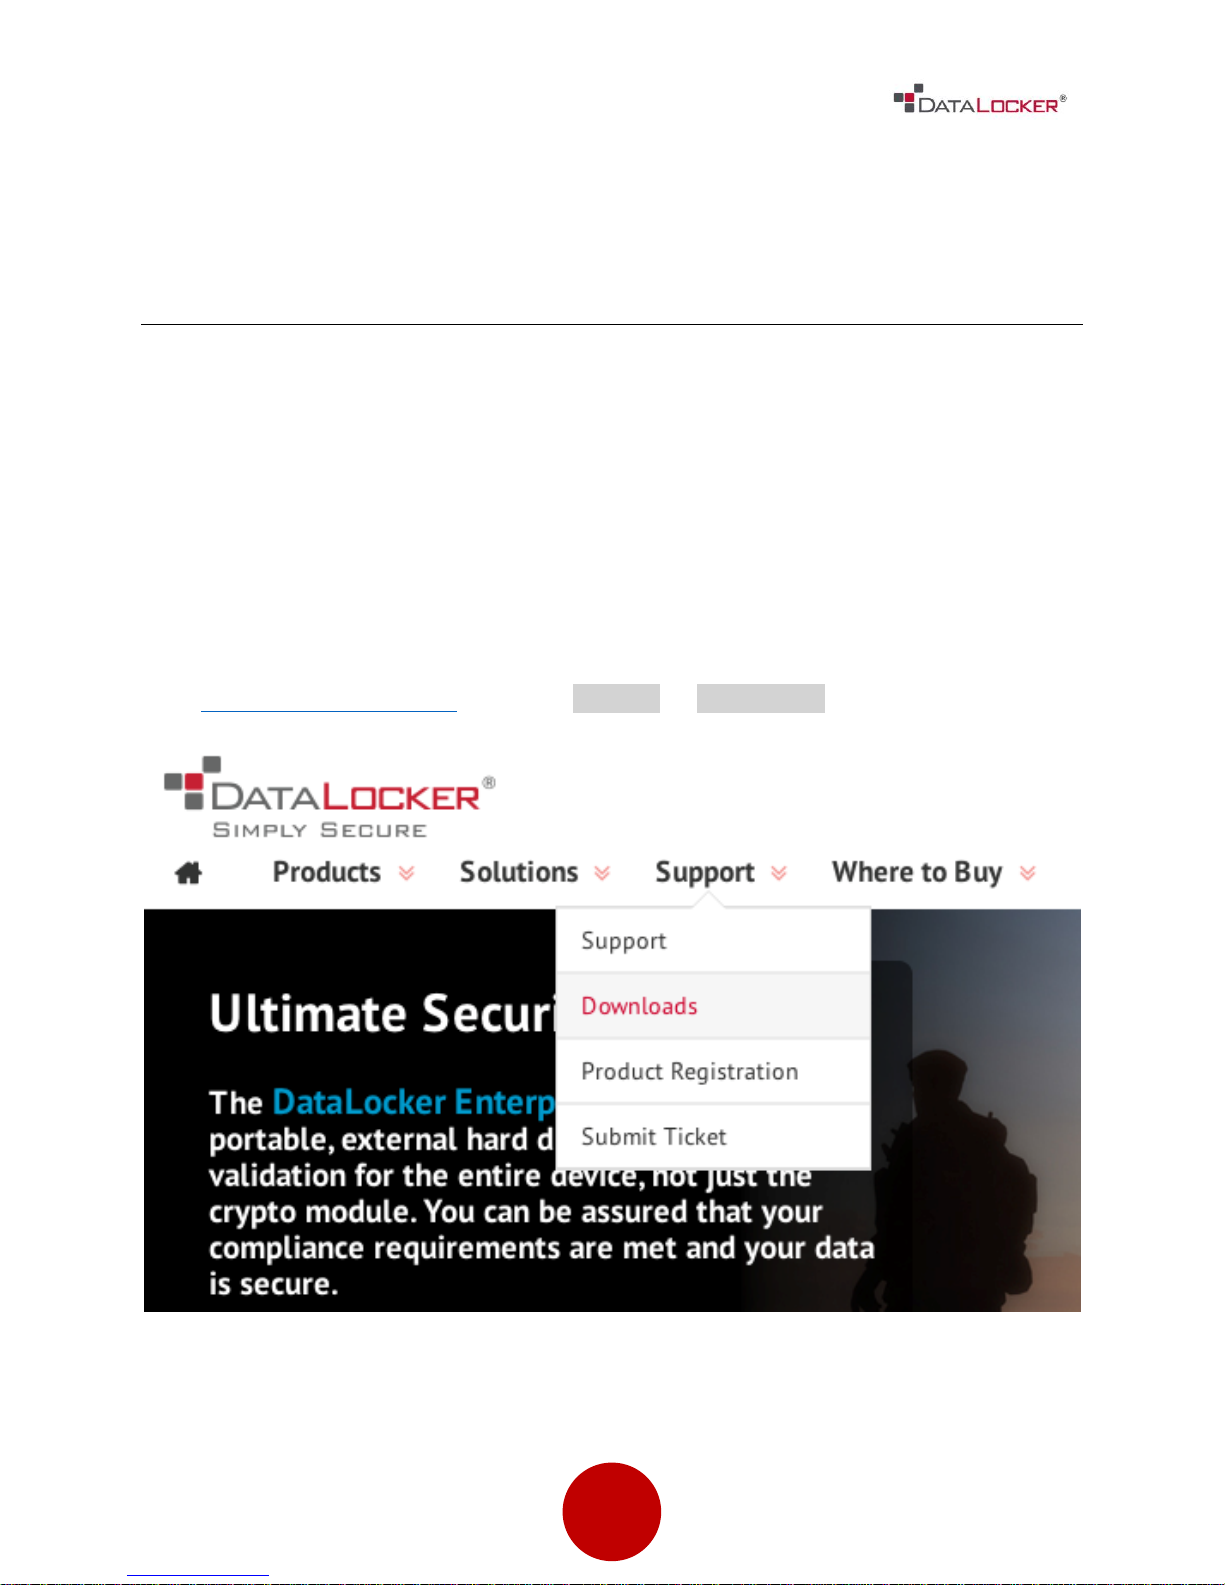
Updated software and documentation are freely available for download at our
website:
Visit www.datalocker.com | Go to support downloads
The DataLocker DL2 has FIPS 140-2 validated AES 256-bit encryption and is one
of the most simple-to-use devices of its kind. Nevertheless, we suggest that you
Page 4
4
review this guide to ensure that you become fully acquainted with the DL2 and
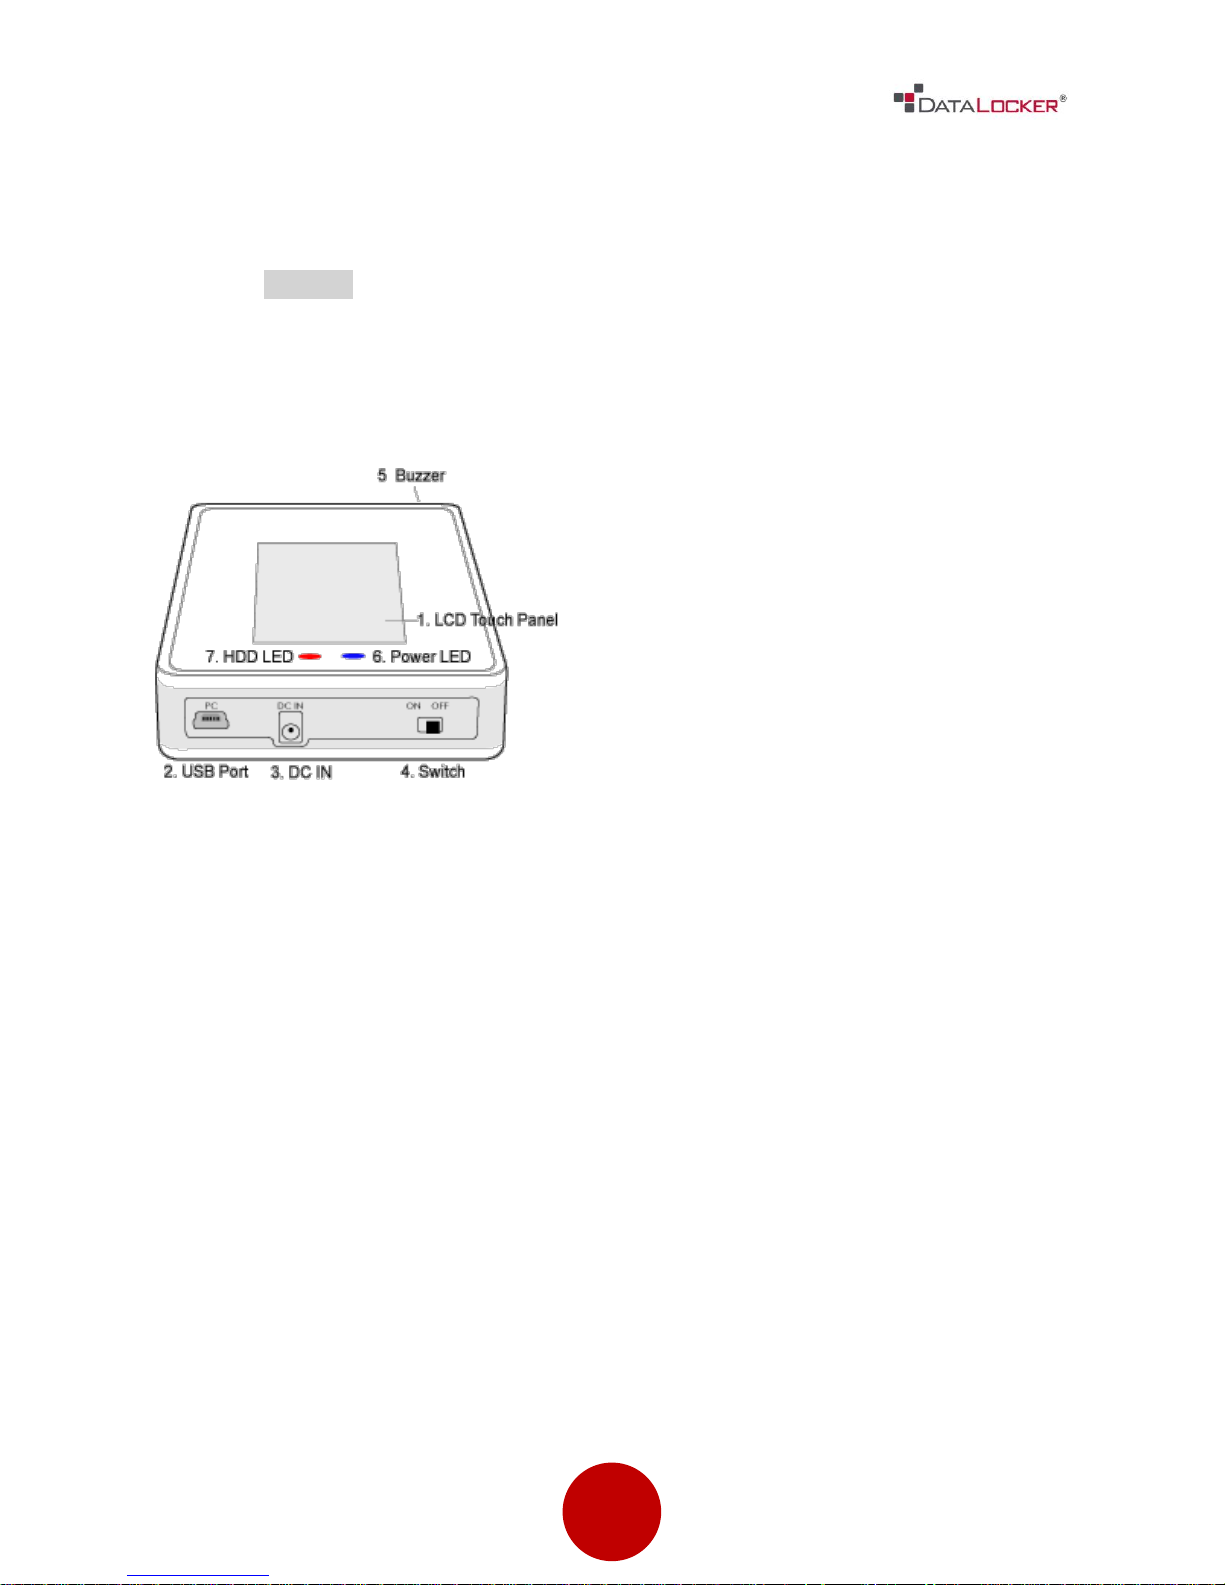
1. LCD Touch panel interface
2. USB Port: Connects the
DataLocker® unit to the host
system via a USB cable
3. DC Input: Is only used with older
computers that may not have a
sufficiently powered USB port
4. Power Switch: Powers the
DataLocker® on and off
5. Buzzer: Provides audio feedback
while connecting to a host system
and navigating the menus
6. Power LED: Indicates power status
7. HDD LED: Indicates hard disk
access
all of its features.
To register your product, please visit our website and fill out the online form
under the Support tab to complete the product registration.
DataLocker® DL2 Physical Description
Page 5
5
ABOUT THE DL2
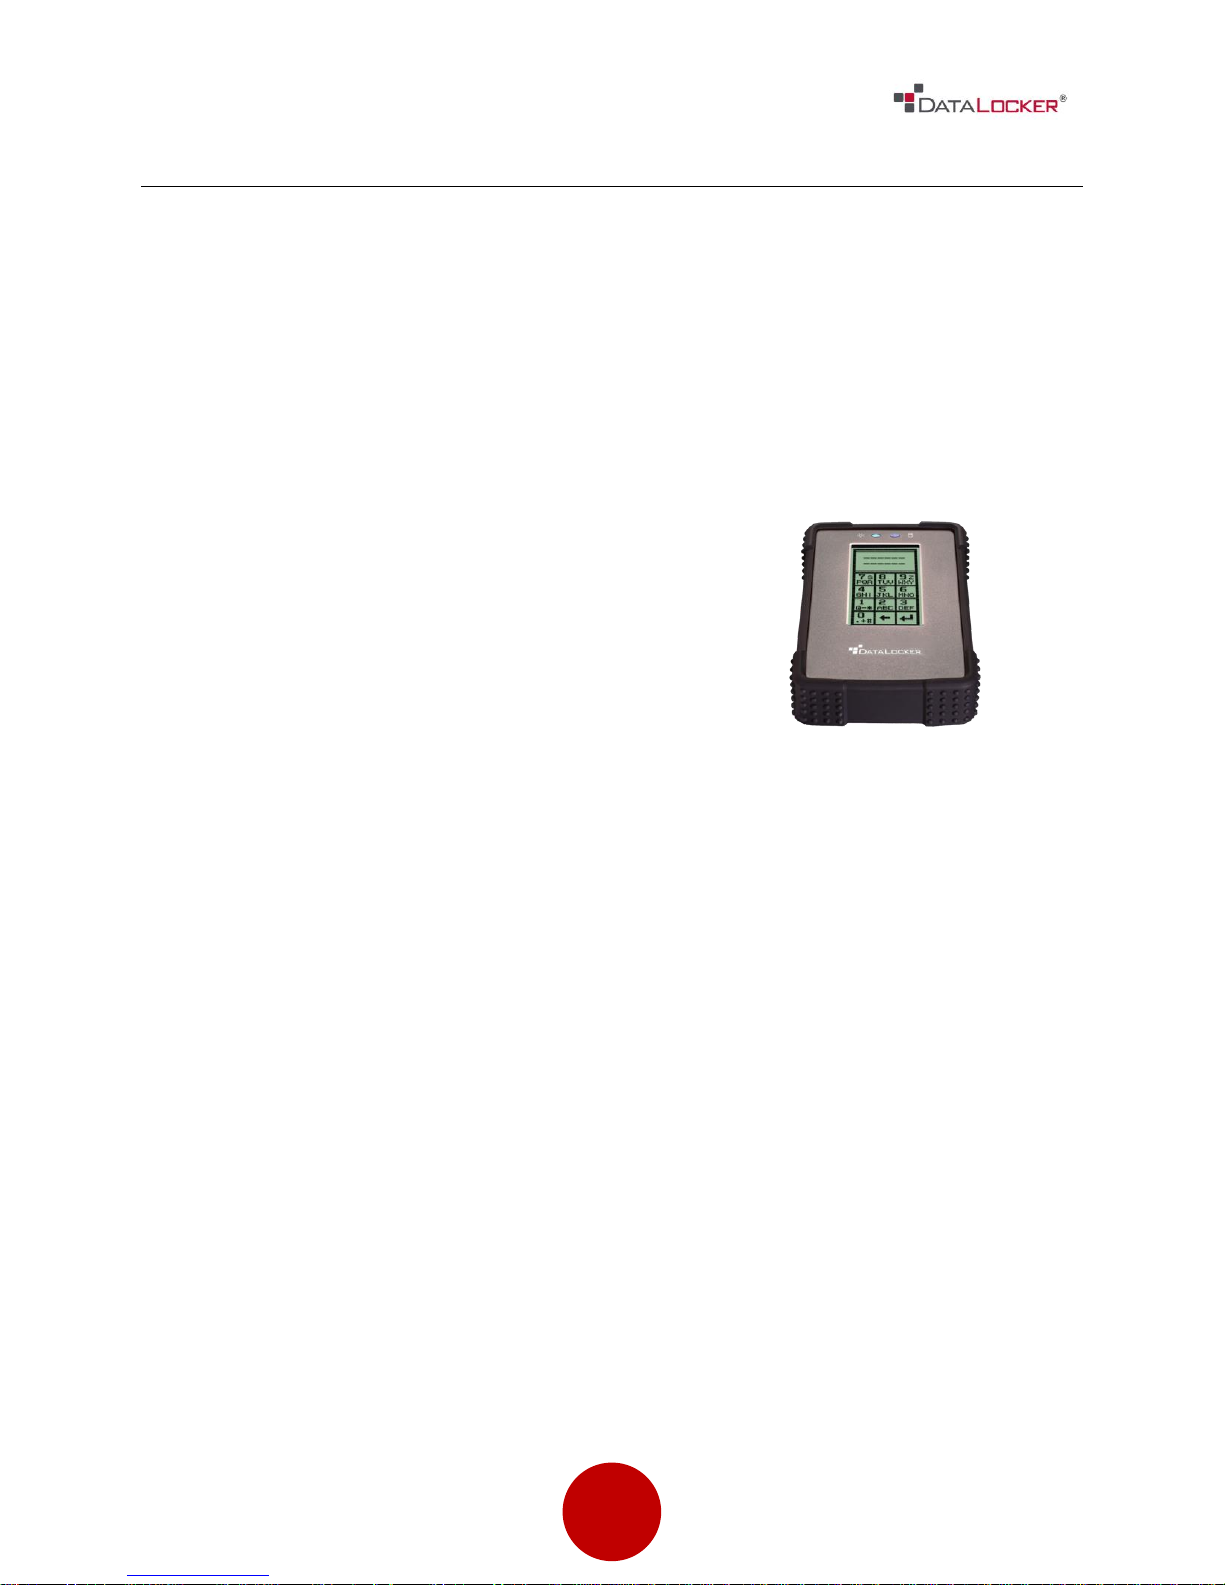
The DataLocker® DL2 comes preformatted
with Windows NFTS file system. All major files
systems are supported (Mac, Linux, FAT32).
If you require a different file system, please
consult your operating system guide on
reformatting instructions.
For more information on how to initialize and
format your DL2, jump to page 20.
The DataLocker® has a minimum power requirement of 5 Volts and 500mA of
current that is drawn from a USB port. Older computers and external USB hubs may
not provide sufficient power to operate an external hard drive. If your computer
cannot deliver adequate power, you may be required to use the “Y” split USB
cable.
Page 6
6
DataLocker® DL2 unit
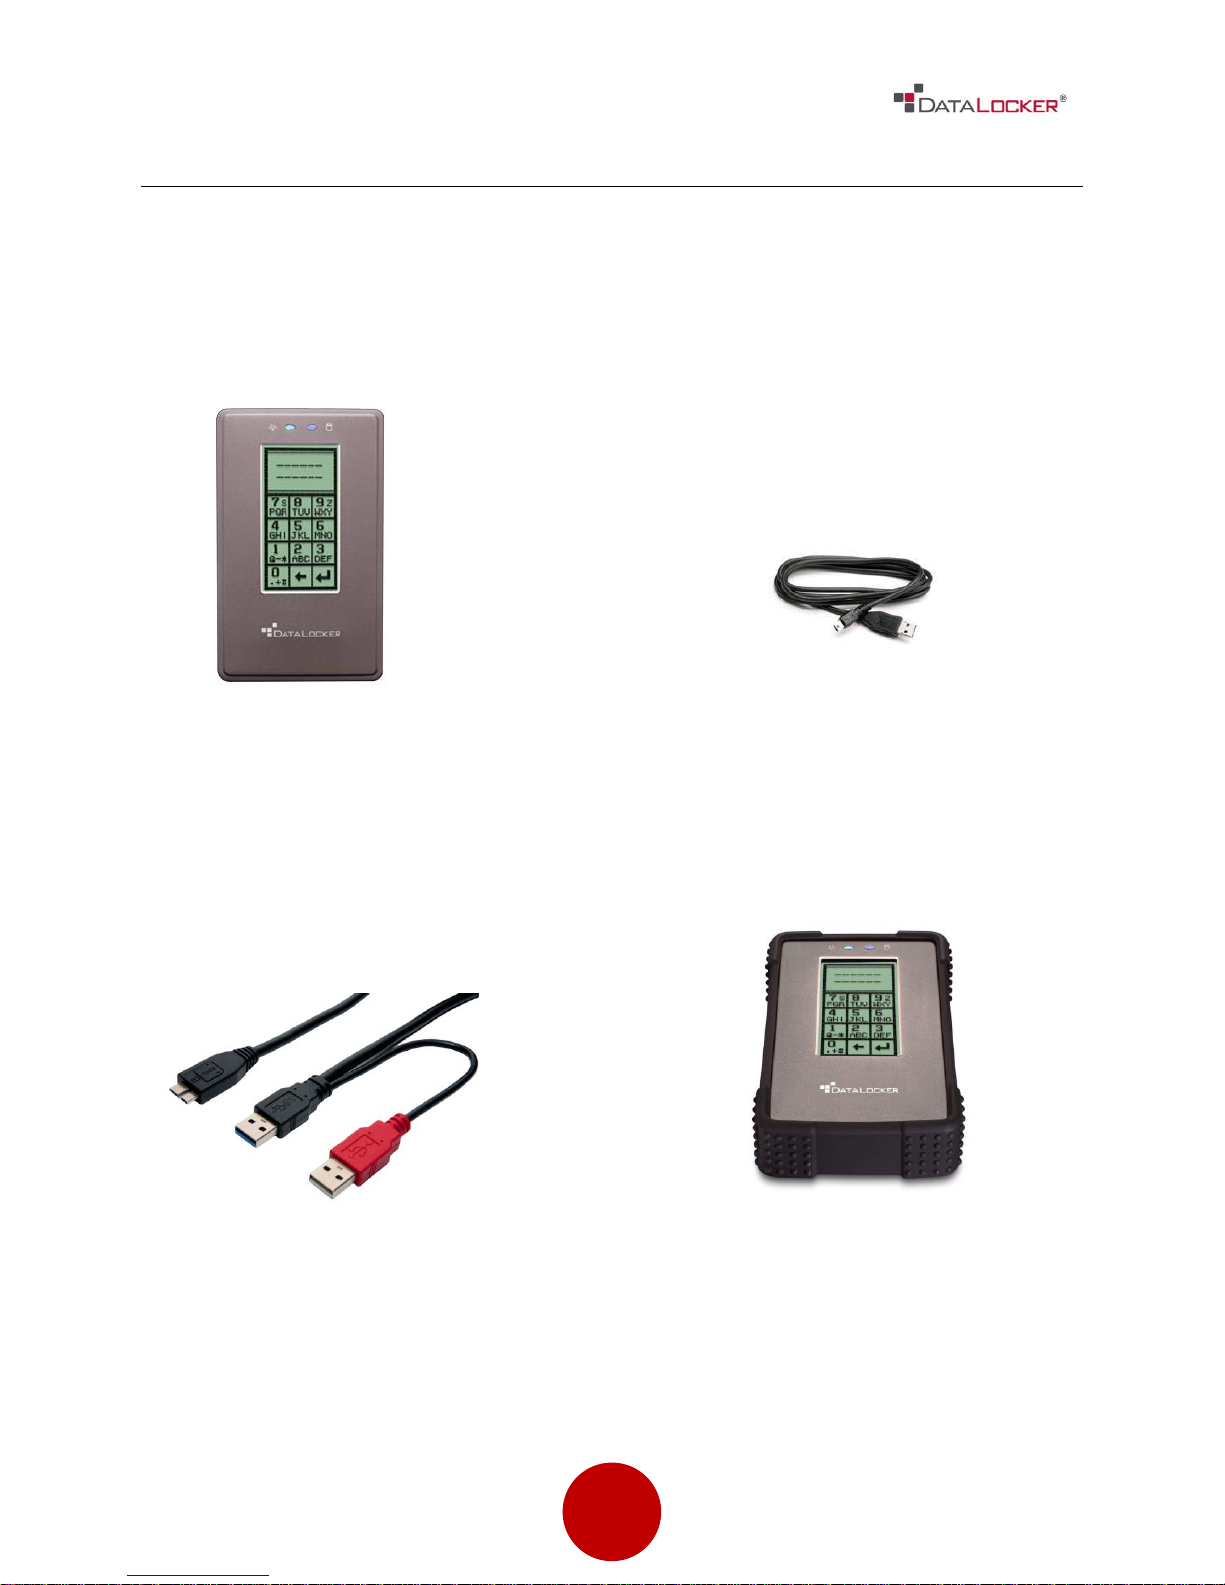
USB Cable: Use the standard cable to
connect the device to a powered
USB port on the host system.
Y Cable: Use this USB cable when a
single USB port does not provide
enough power.
Silicone Band: Optional black band
used for added durability.
PACKAGE CONTENTS
You should find the following pieces when unboxing your new DataLocker® DL2.
Page 7
7
Getting Started
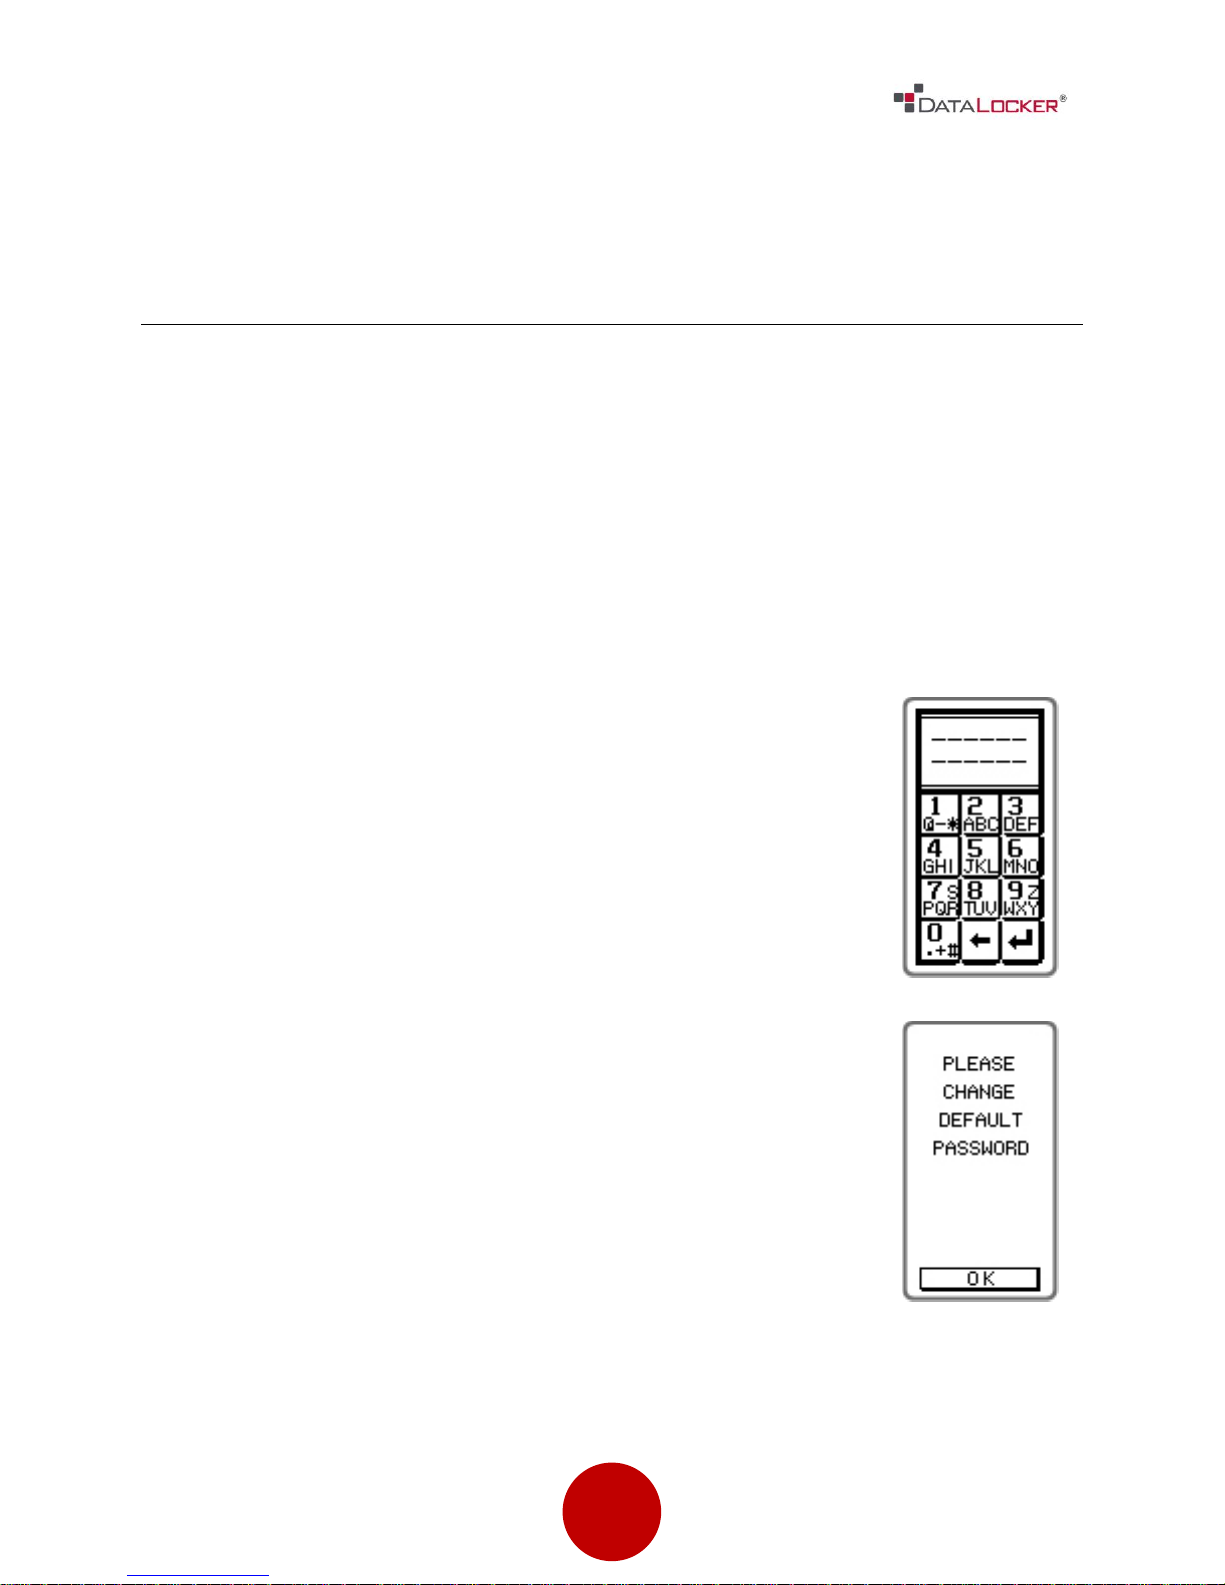
Step 2: Turn the power switch to the On position.
Step 3: Enter the default password 000000 and press the return
key.
Step 4: The next screen will prompt you to change the default
password, press the “OK” button. (Once you have changed
the default password this screen will no longer appear after
logging in).
FIRST TIME SETUP
This section will guide you through the necessary steps to set up the DL2 drive for
the first time around. It is highly recommended that you set a new administrator
password using alphanumeric characters.
Step 1: Connect the included standard USB Cable to the DataLocker®. If your
computer does not generate sufficient power to operate the DataLocker®, use
the “Y” split USB cable, plugging both the “black” and “red” prongs into the host
computer.
Page 8
8
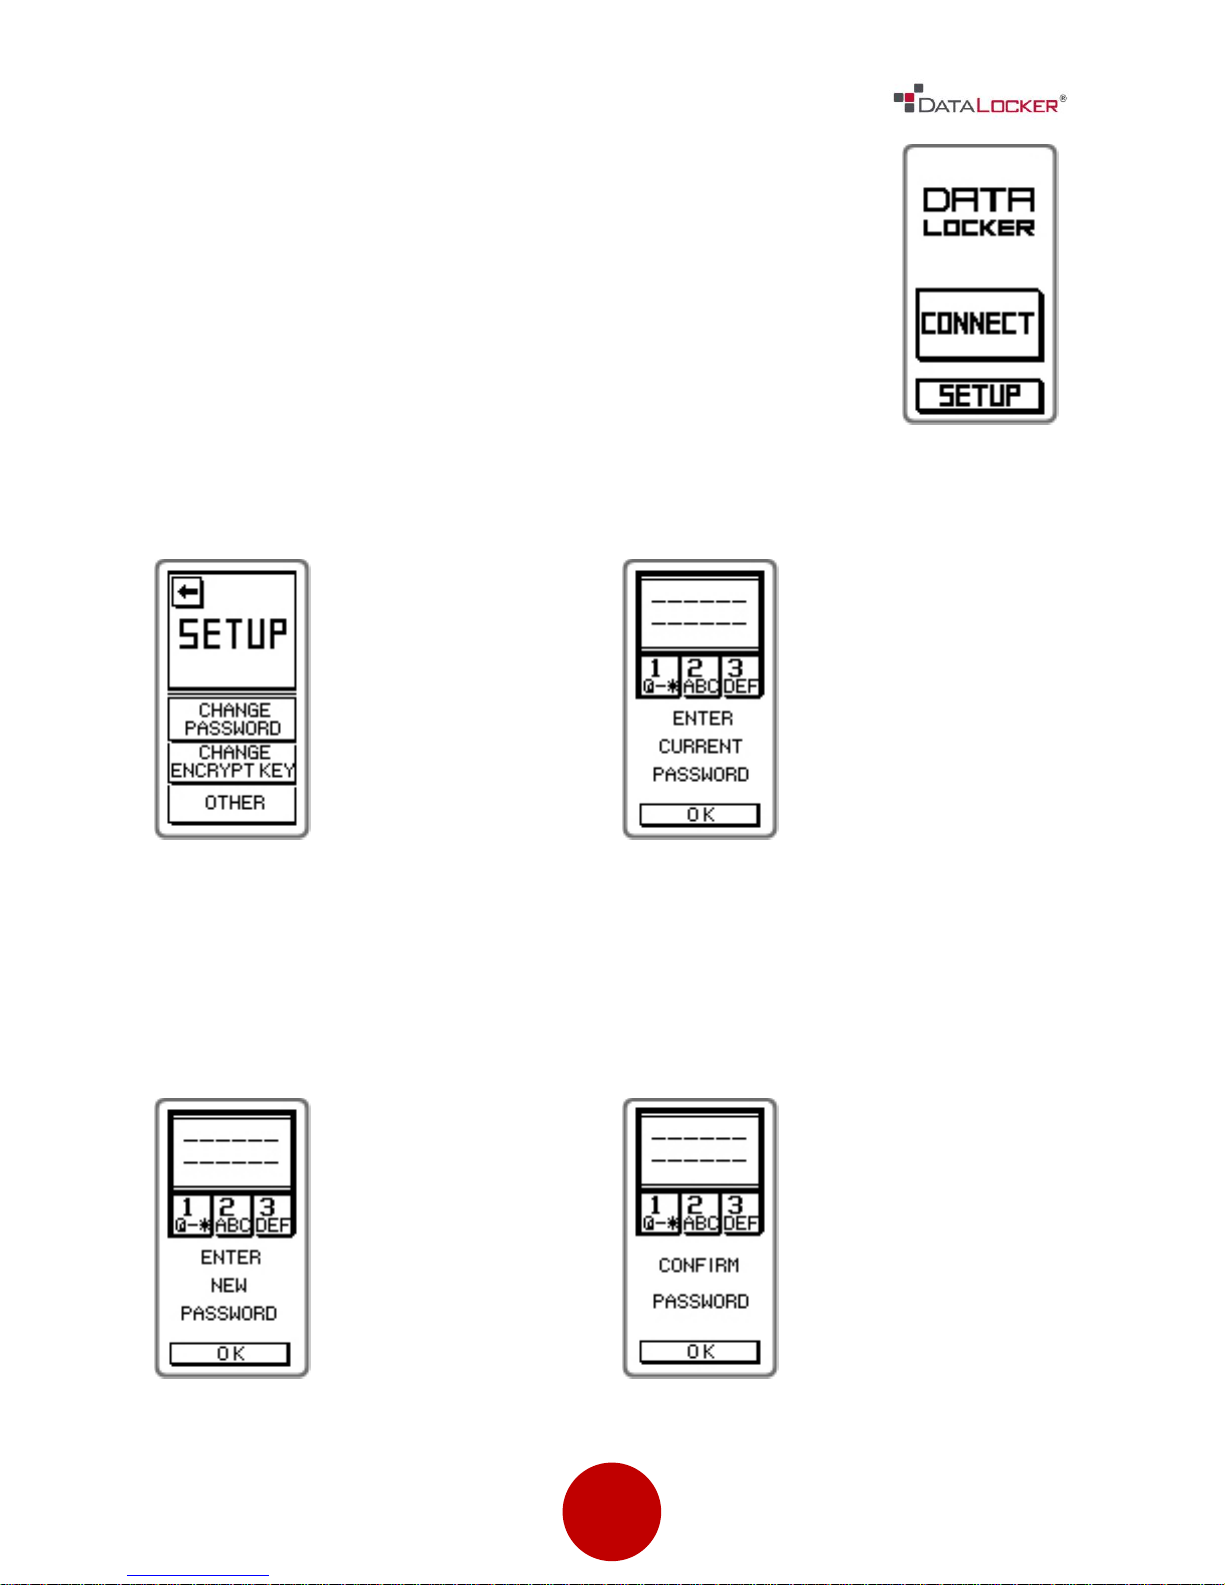
Step 5: IMMEDIATELY press the [SETUP] key on the touch screen.
If the [SETUP] key is not selected within 3 seconds, the
DataLocker® will automatically connect to the host
computer.
Step 6: Press “CHANGE PASSWORD”
on the touch screen.
Step 7: Press OK on the touch screen.
Type 000000 and press the enter key.
Step 8: Press the “OK” button on the
touch screen. Enter a new password 6
to 18 digits long and press the enter
key.
Step 9: Press OK on the touch screen.
Enter the same password you entered
in the previous step to confirm the
new password. Press the enter key.
Page 9
9
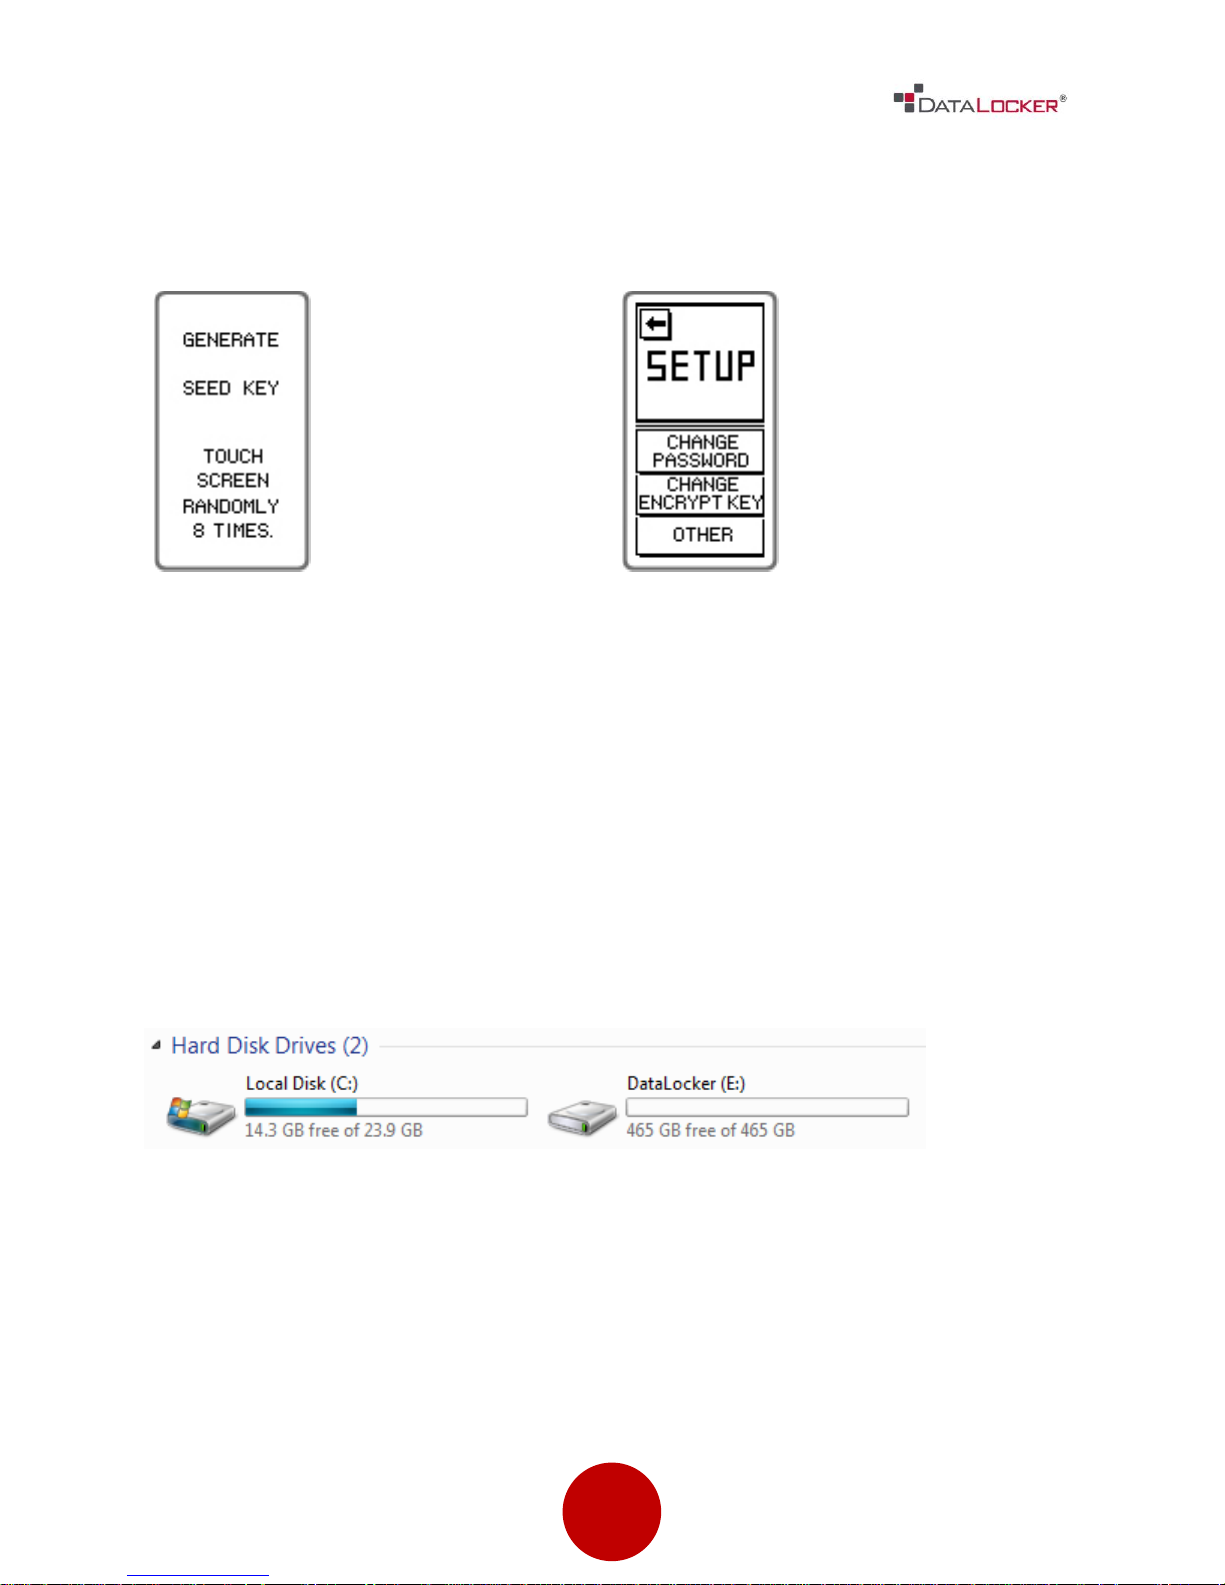
Step 10: Press the touch screen 8 times
randomly to initiate the seed key
generation process. The seed key is
used to make each drive unique.
Step 11: Press the back arrow key to
leave the setup menu and connect
the DataLocker® DL2 to the host
system.
Your DataLocker® is now ready for use with your new password!
WARNING: YOUR PASSWORD CANNOT BE RECOVERED OR RESET WITHOUT
LOSING ALL OF THE DATA STORED ON THE DATALOCKER®!
In Windows Explorer you will now see a new drive called DataLocker listed in the
Hard Disk Drives section.
A new drive letter will be automatically assigned to this drive. This means you are
ready to begin using your new DL2!
Page 10
10
MAIN SCREEN DESCRIPTION
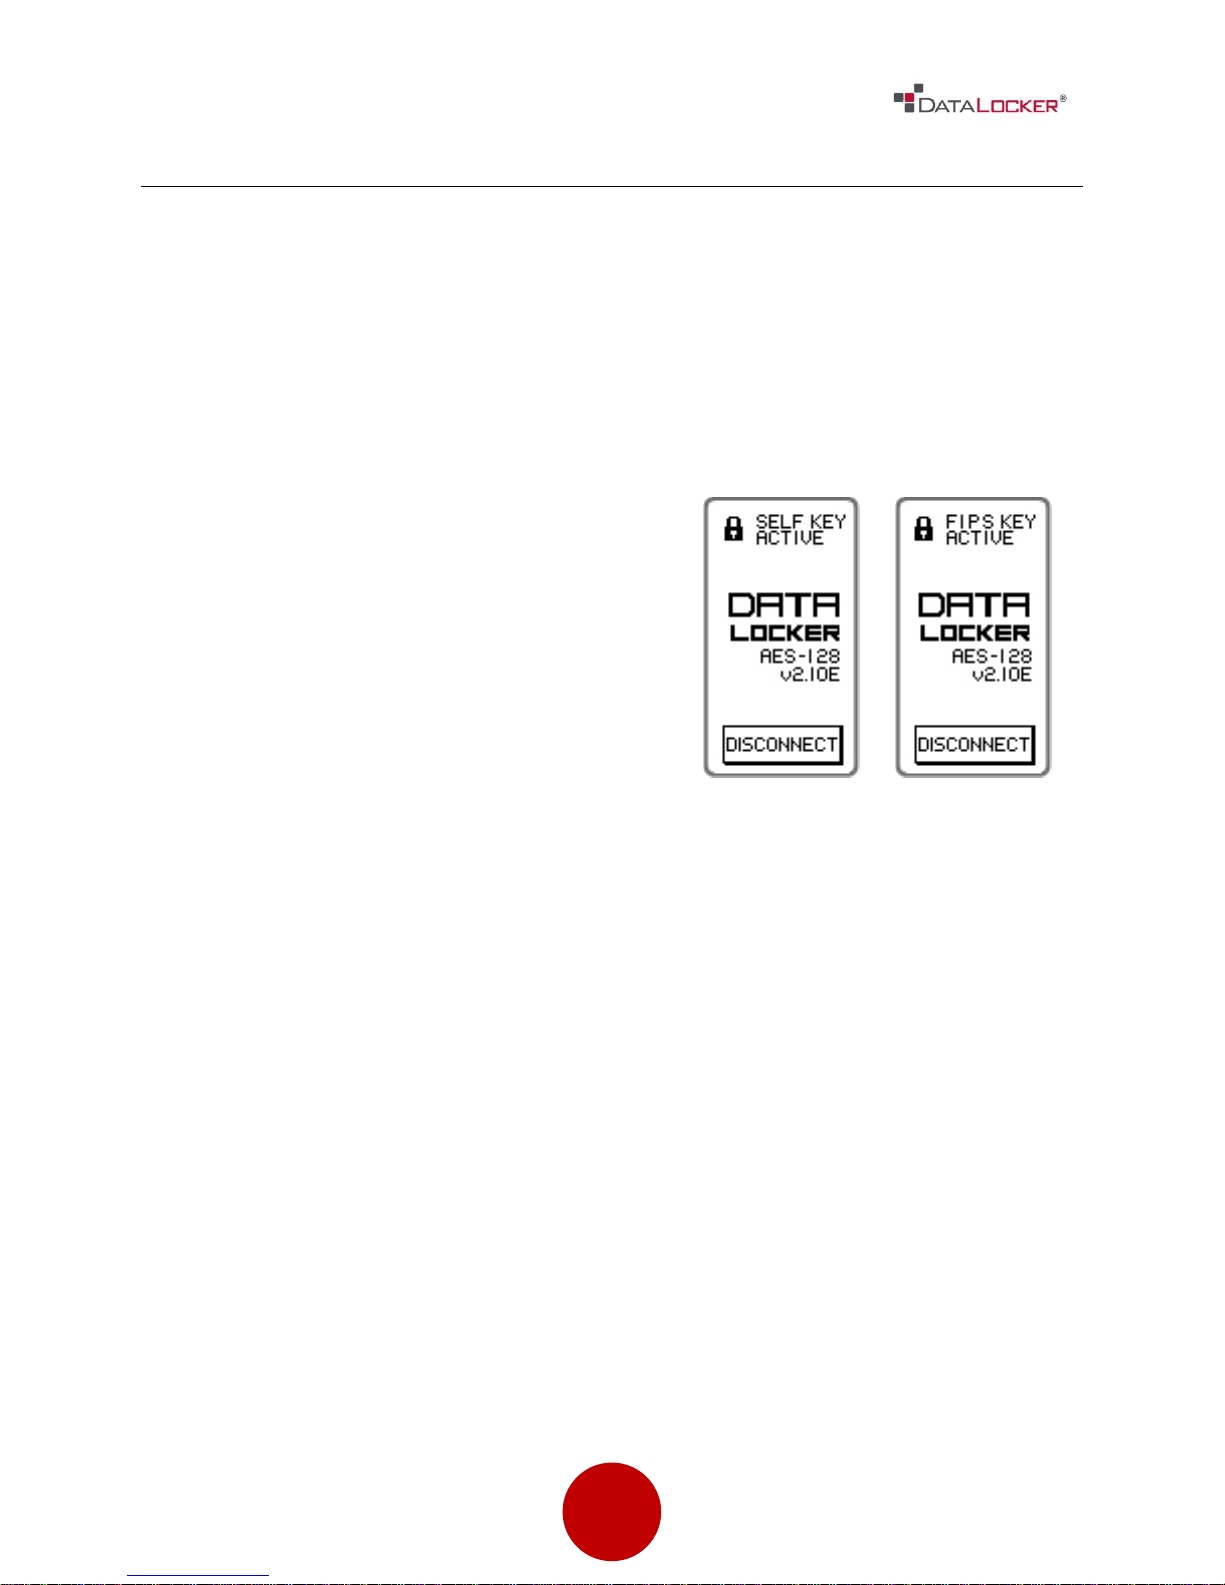
The DataLocker® comes from the factory
operating in FIPS KEY mode. This key was
generated in accordance to FIPS guidelines
and inserted at the factory level.
If you perform the Regenerate Encryption
Key function, the FIPS KEY will be erased. The
DataLocker® will then generate a SELF KEY
in its place. The screen will then display the
words SELF KEY ACTIVE.
No secondary
master PW
Master PW set
Once the DataLocker® is connected to the host system, it will display an info
status screen.
This is an explanation of the information displayed to you on this screen.
FIPS KEY / SELF KEY ACTIVE: This denotes the source of the main AES encryption
key the DataLocker® is currently using.
While your drive is operating with a SELF KEY, your data is still being encrypted with
the same strength and protection as though it were operating in FIPS KEY mode.
The key in the encryption process is generated by the DL2.
To regenerate the factory FIPS KEY, please contact the support team for
instructions.
ADMINSTRATOR /MASTER PASSWORD INDICATOR: If a “Master” or “Administrator”
password has been set, it will be indicated by the double padlock icon on the
following screen.
AES-256: This denotes the length of the AES encryption key.
v2.30E: This denotes the firmware version.
Page 11
11
DISCONNECTING YOUR DL2
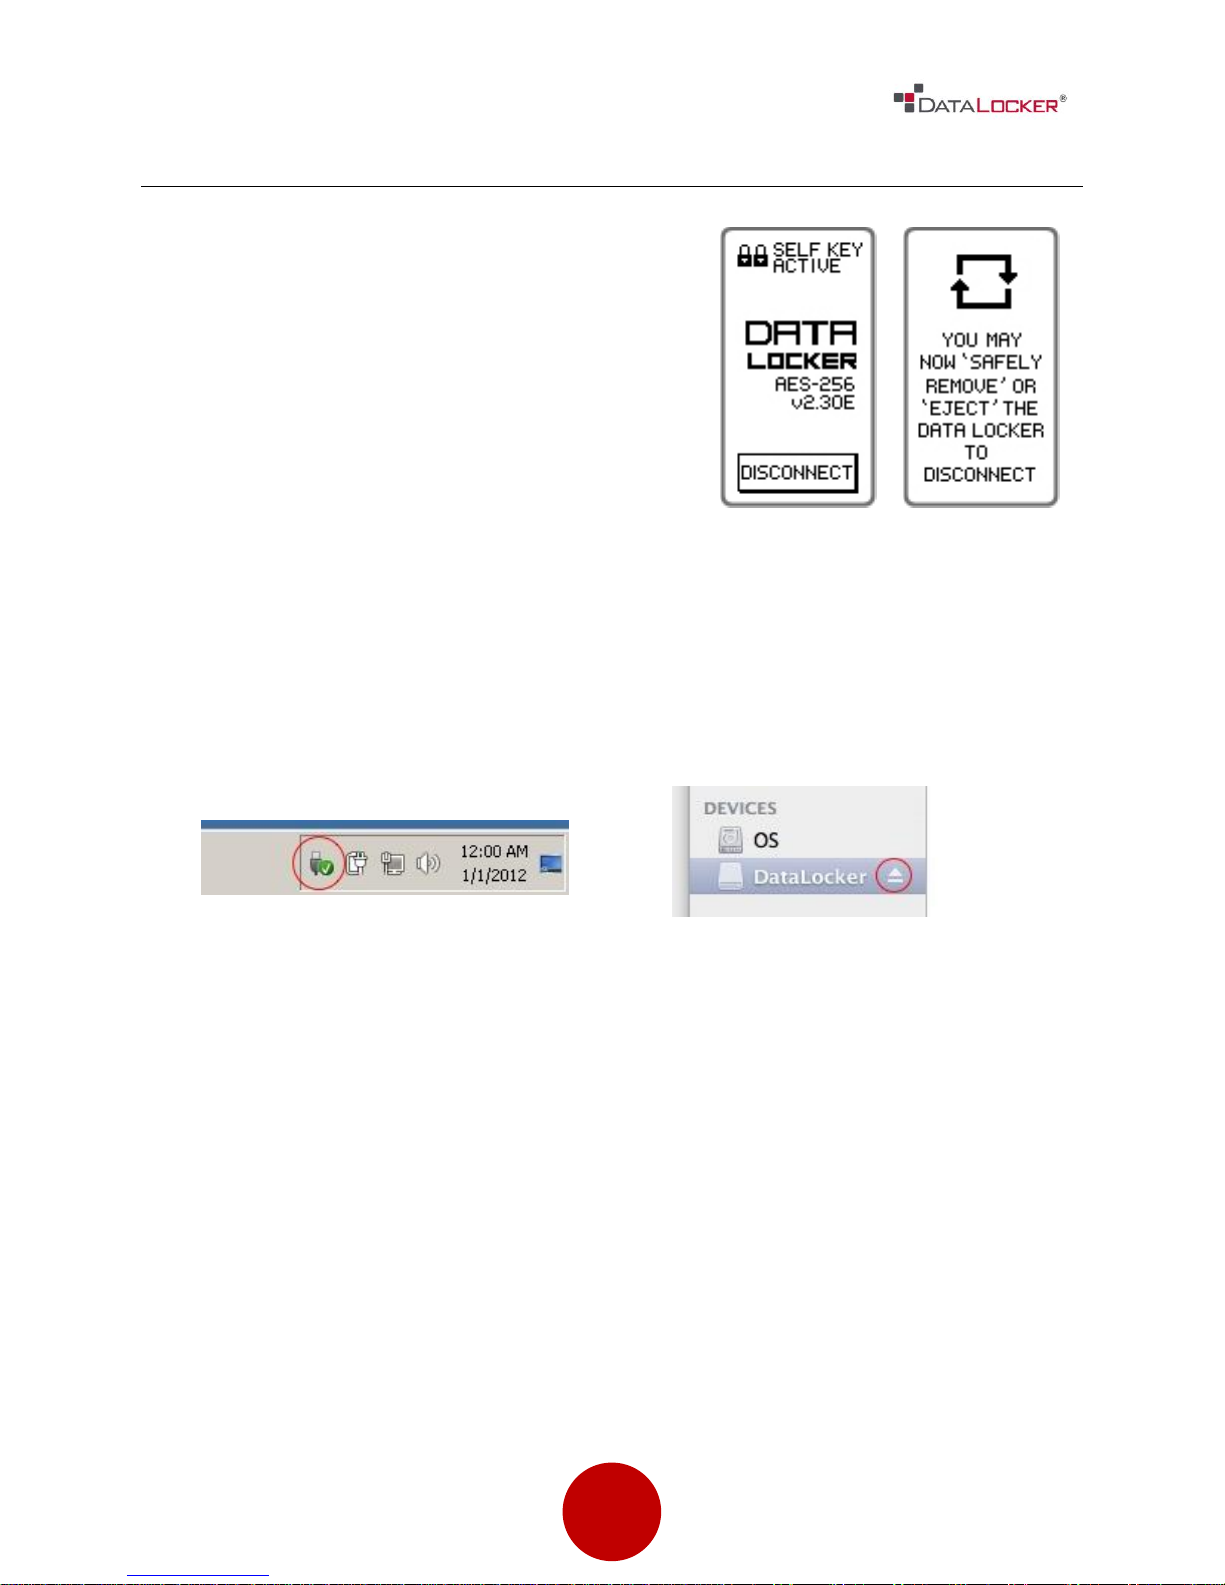
Use your operating system’s Safety Remove
Hardware or Eject function before you power
down or detach the DataLocker® DL2 from
the host system.
Doing this will reduce the chance for lost or
corrupted data. This will also help prevent
damage to the disk.
WINDOWS USERS
MAC USERS
1.
Right click the Safely Remove
Hardware icon located on the
lower right hand corner of the
Windows taskbar.
1.
Click the eject button that
corresponds with the DL2 on your
MAC operating system.
2.
Once the popup menu has
appeared, click the correct drive
to safely eject the DL2 from
Windows.
2.
Once the drive has been ejected
from your MAC operating system,
press [DISCONNECT] on the DL2
drive.
Page 12
12
Basics
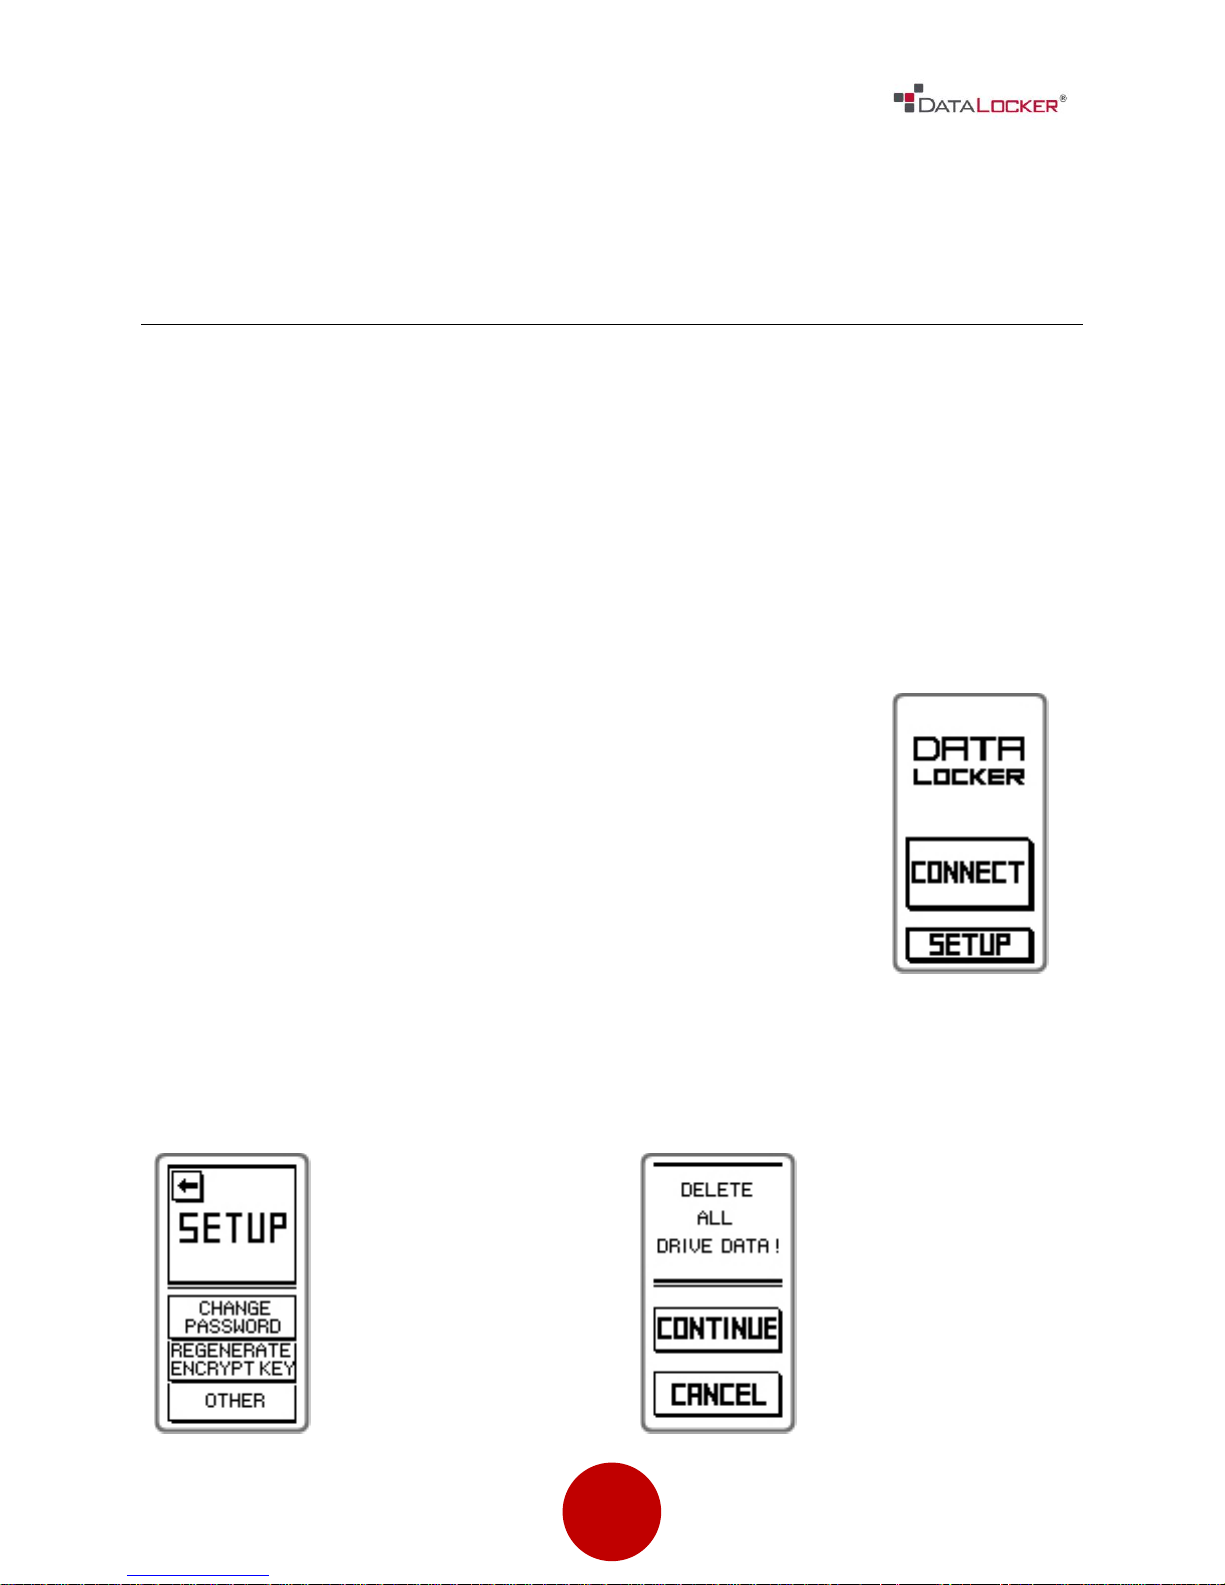
Step 1: Enter the default password 000000 or your user
defined password and press the enter key.
Step 2: IMMEDIATELY press the SETUP key on the touch
screen. If the SETUP key is not selected within 3 seconds, the
DataLocker® will automatically connect to the host
computer.
Step 3: Press Regenerate Encryption
Key on the touch screen.
Step 4: Press Continue if you are
100% certain you want to delete all
drive data and generate a new key.
DELETING CONTENTS & REDEPLOYING THE DRIVE
SPECIAL NOTE: Once a Master Password is set you must login using the Master
Password to change the encryption key. Regenerating the encryption deletes all
data and user password but it does not delete the Master Password.
You can regenerate your AES encryption key. This feature can also be used to
redeploy the DataLocker® to a new user. Once this function is performed, all the
data is IRREVERSIBLY DELETED. Use this feature with extreme caution.
Be aware that the drive will no longer be operating with a FIPS validated key. To
reestablish a FIPS validated key, go to pg 20.
Page 13
13
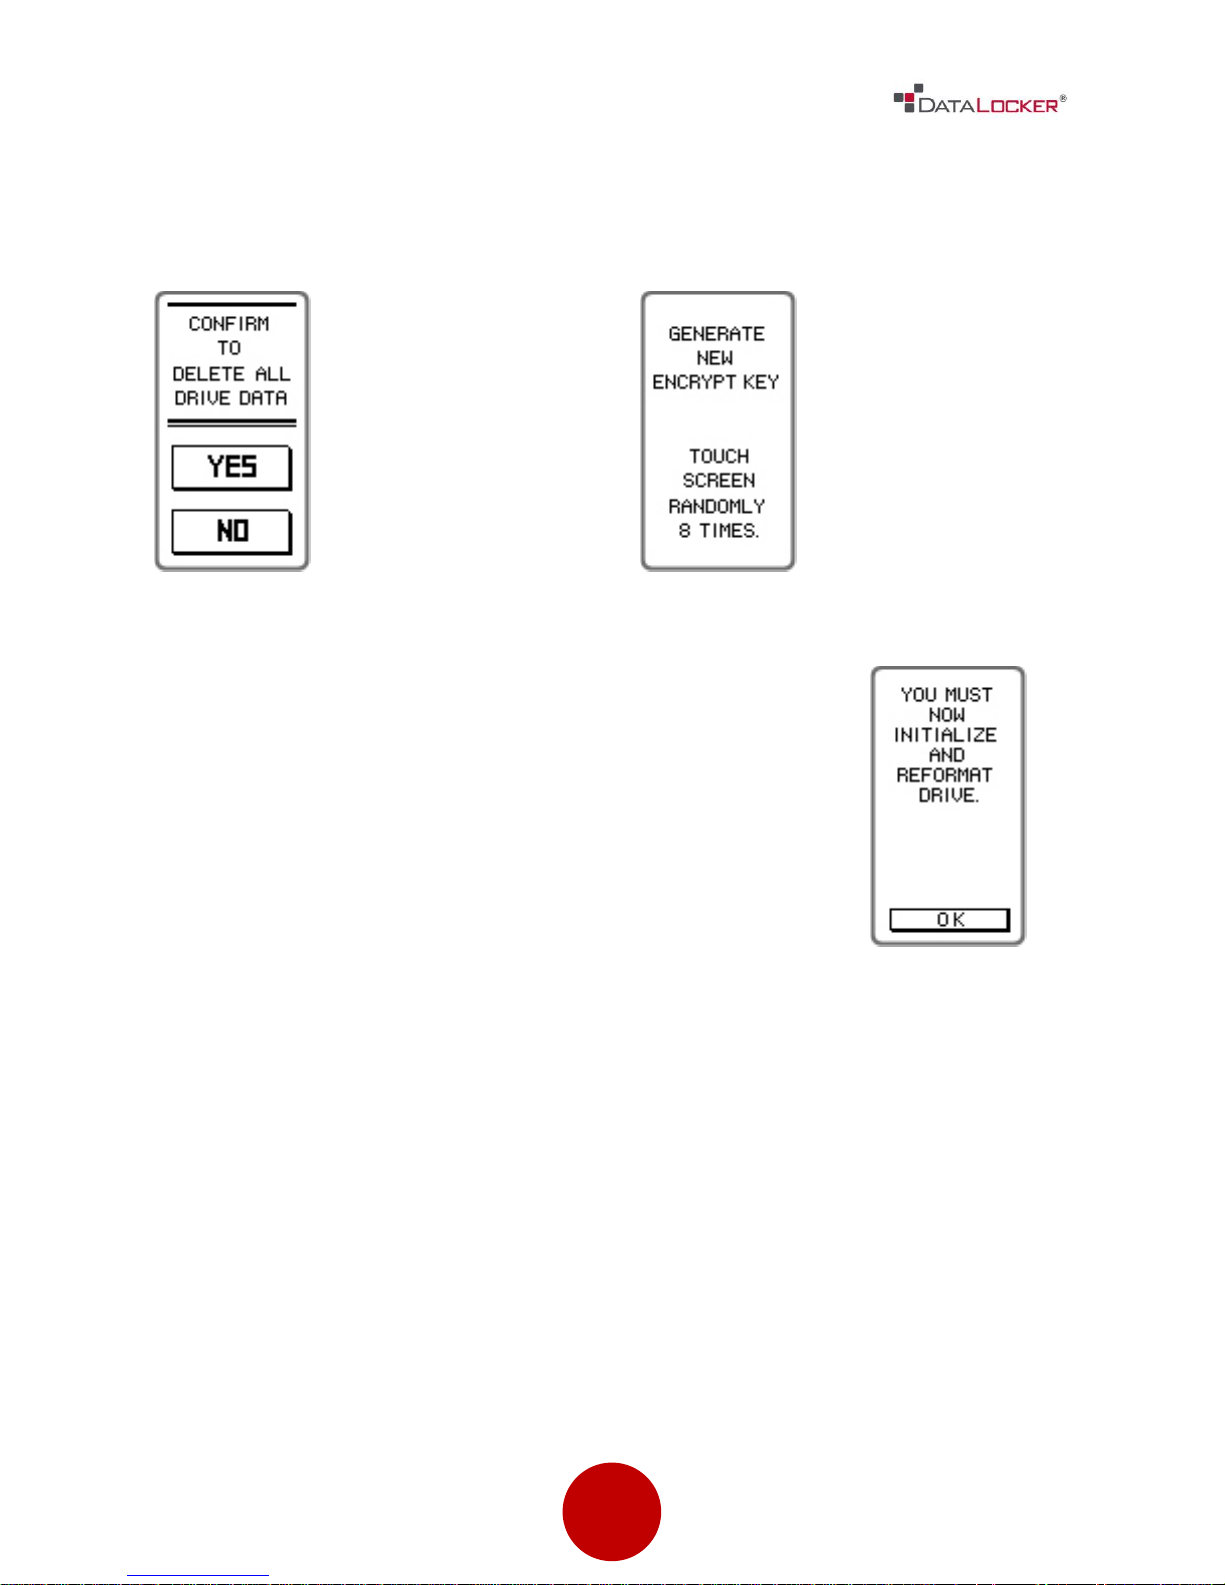
Step 5: Press YES to confirm that you
want to continue.
Step 6: Press the touch screen 8 times
randomly to initiate the key
generation process.
Your new AES encryption key has now been generated.
All data previously stored on the DataLocker® is no
longer accessible and CANNOT be recovered.
Step 7: You MUST now reinitialize and reformat the
DataLocker®. This process is different depending on your
computer’s operating system. Please consult your
operating system for instruction on reinitializing and
formatting the hard drive.
Page 14
14
USER OPTIONS
Step 1: Enter the default password 000000 or
your user defined password and press the
enter key.
Step 2: IMMEDIATELY press the SETUP key on
the touch screen. If the SETUP key is not
selected within 3 seconds, the DataLocker®
will automatically connect to the host
computer.
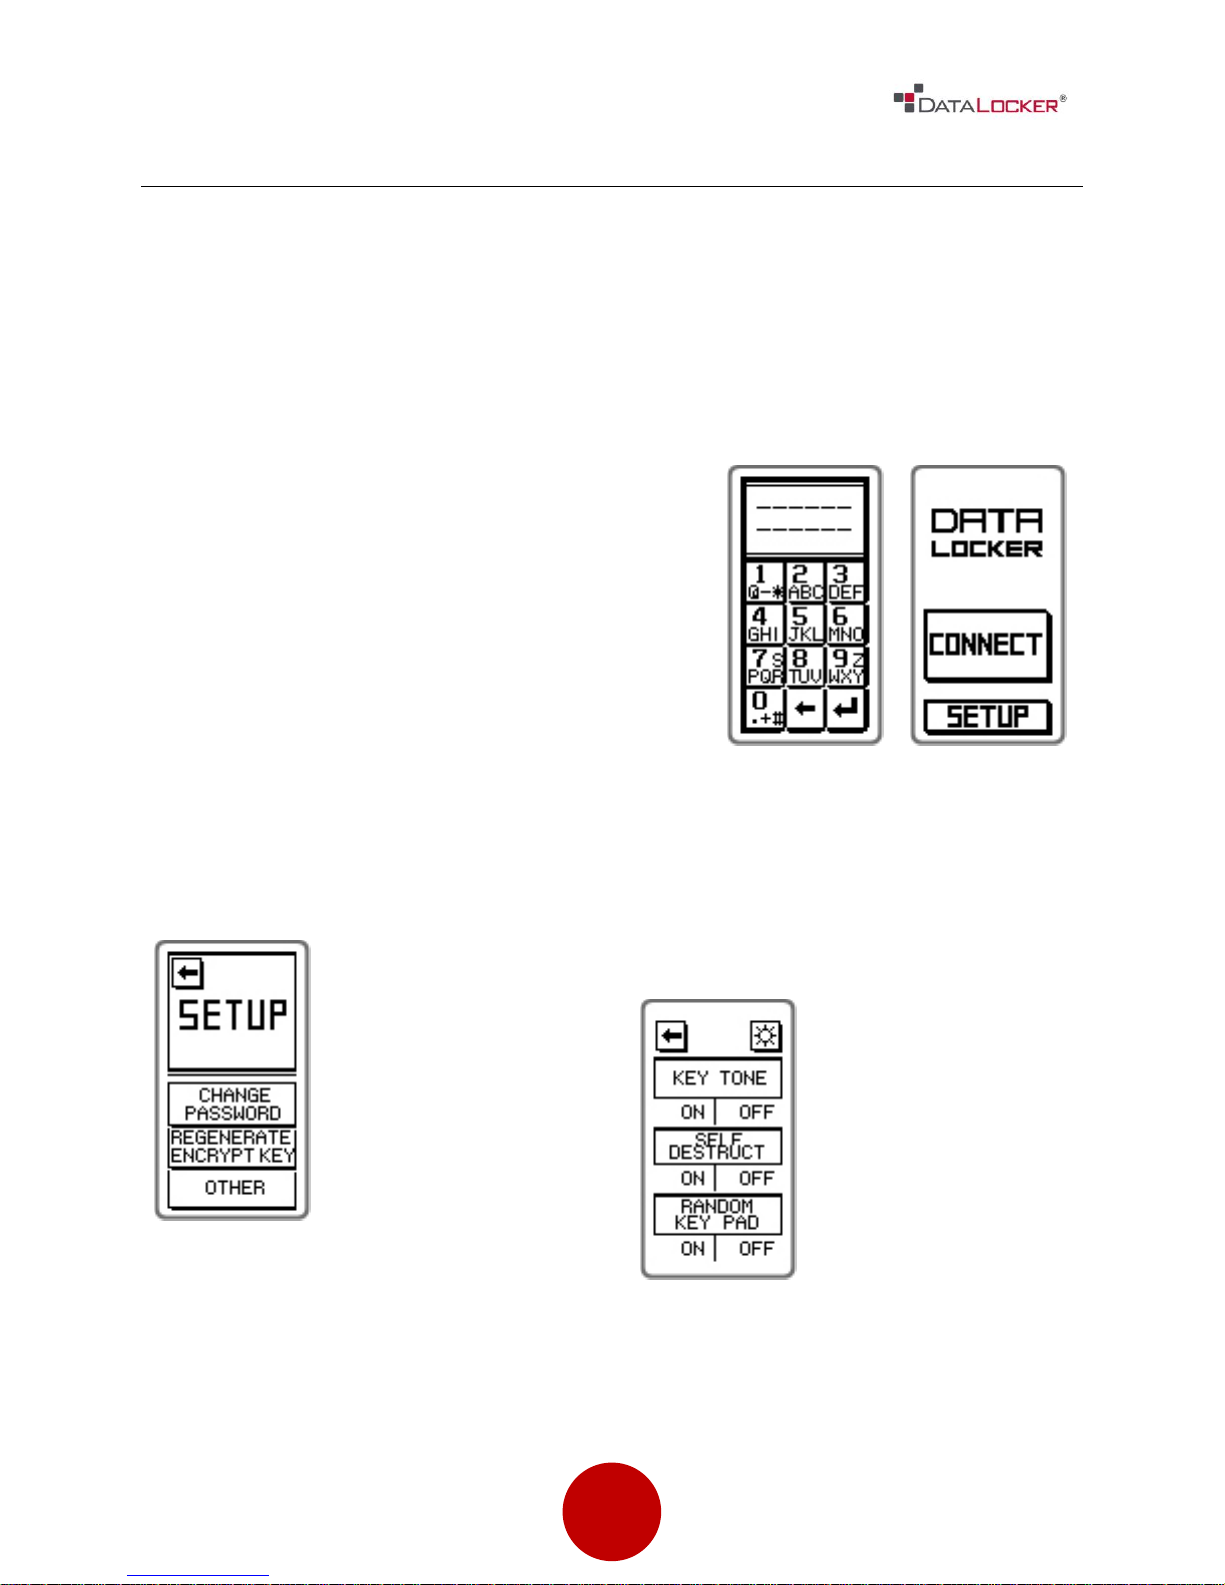
Step 3: Press the “OTHER” key on the
touch screen.
Step 4: On this screen you can
disable or enable the “KEY TONE”,
“SELF DESTRUCT”, and “RANDOM KEY
PAD” mode.
The DataLocker™ has three user options that can be disabled or enabled
through the setup menu. All of these features are enabled with the factory
presets.
ENTERING THE SETUP MENU
Page 15
15
SETUP OPTIONS
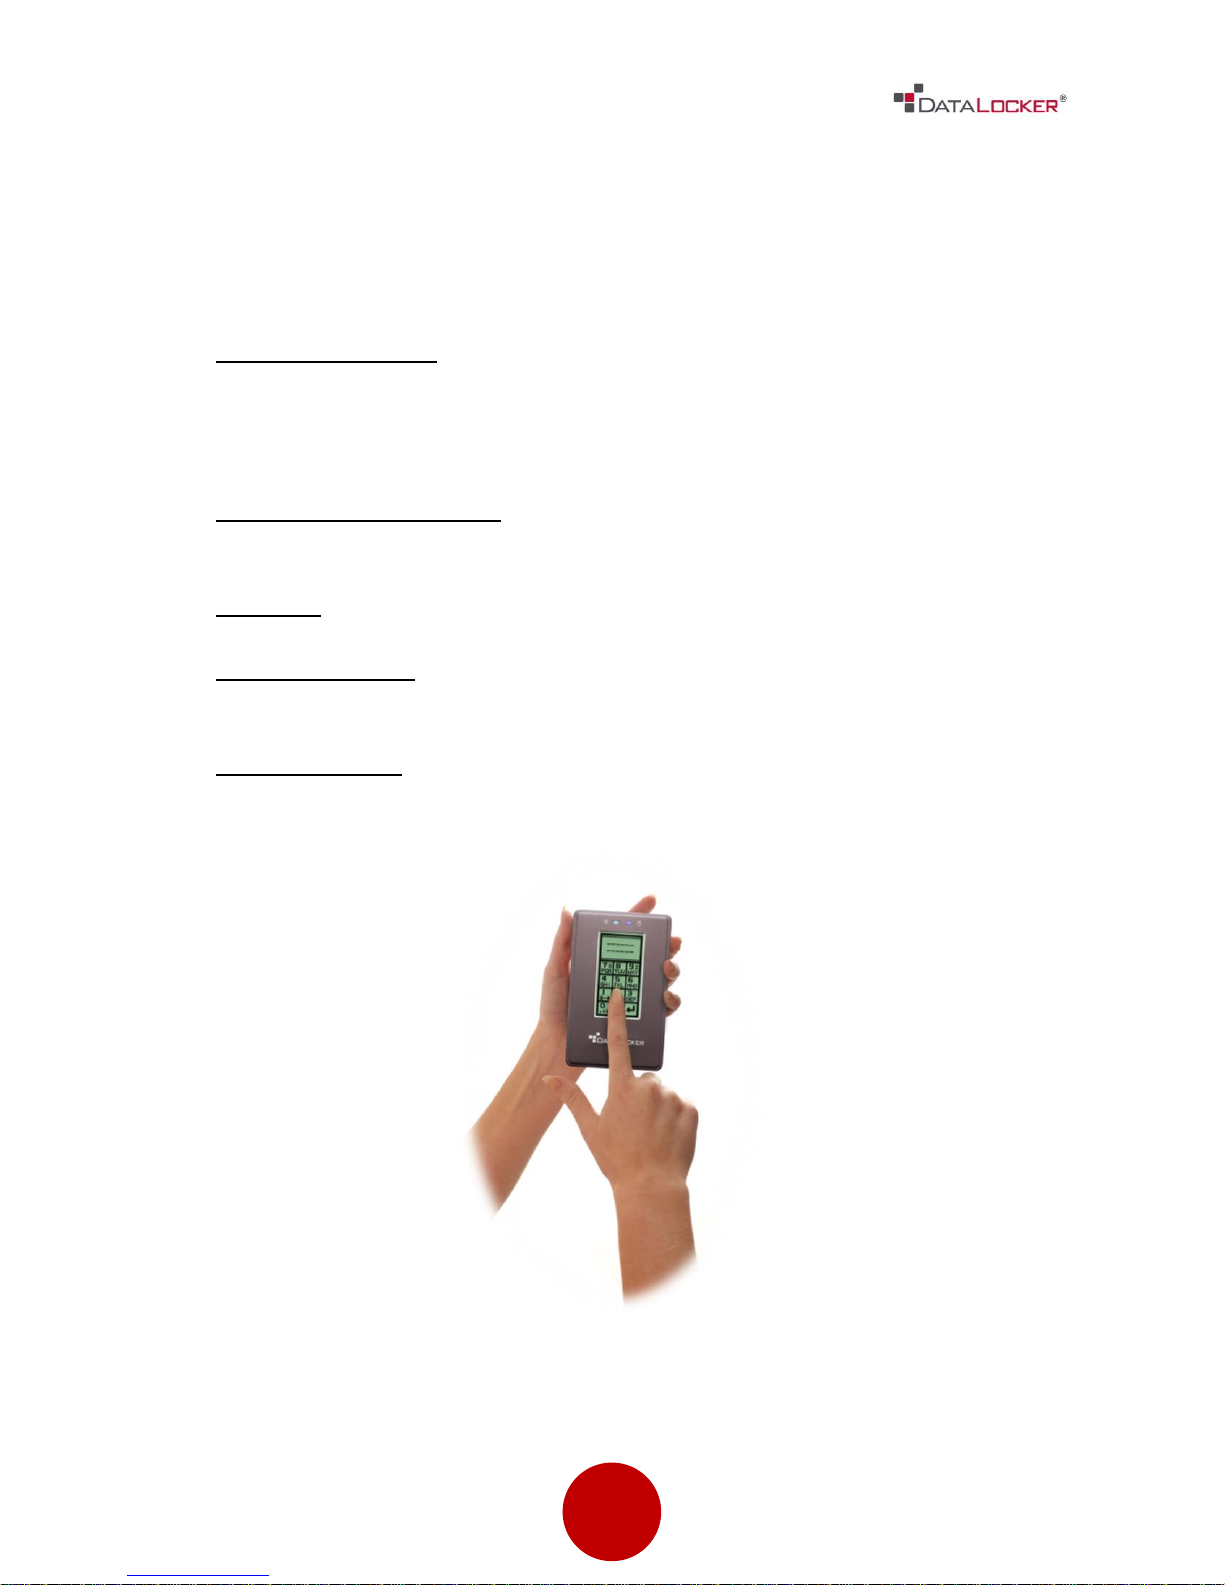
Before making any changes to your DL2 configuration settings, please scan the
descriptions for each feature.
Self-Destruct Mode This is a security measure that will DELETE all data
stored on the DataLocker® after nine unsuccessful password attempts.
Once initiated, this function is IRREVERSIBLE. The password attempt
counter will reset once the correct password is successfully entered.
Note to DL2 Edition Users Once a Master Password is set you must login
using the Master Password to change the encryption key.
Key Tone You may choose to disable the key tones.
Random Keypad In order to prevent finger print reading or “shoulder
hacking,” the DataLocker® has the ability to generate rotating keypads.
Screen Contrast Adjust contrast of the screen
Page 16
16
SELF-DESTRUCT MODE
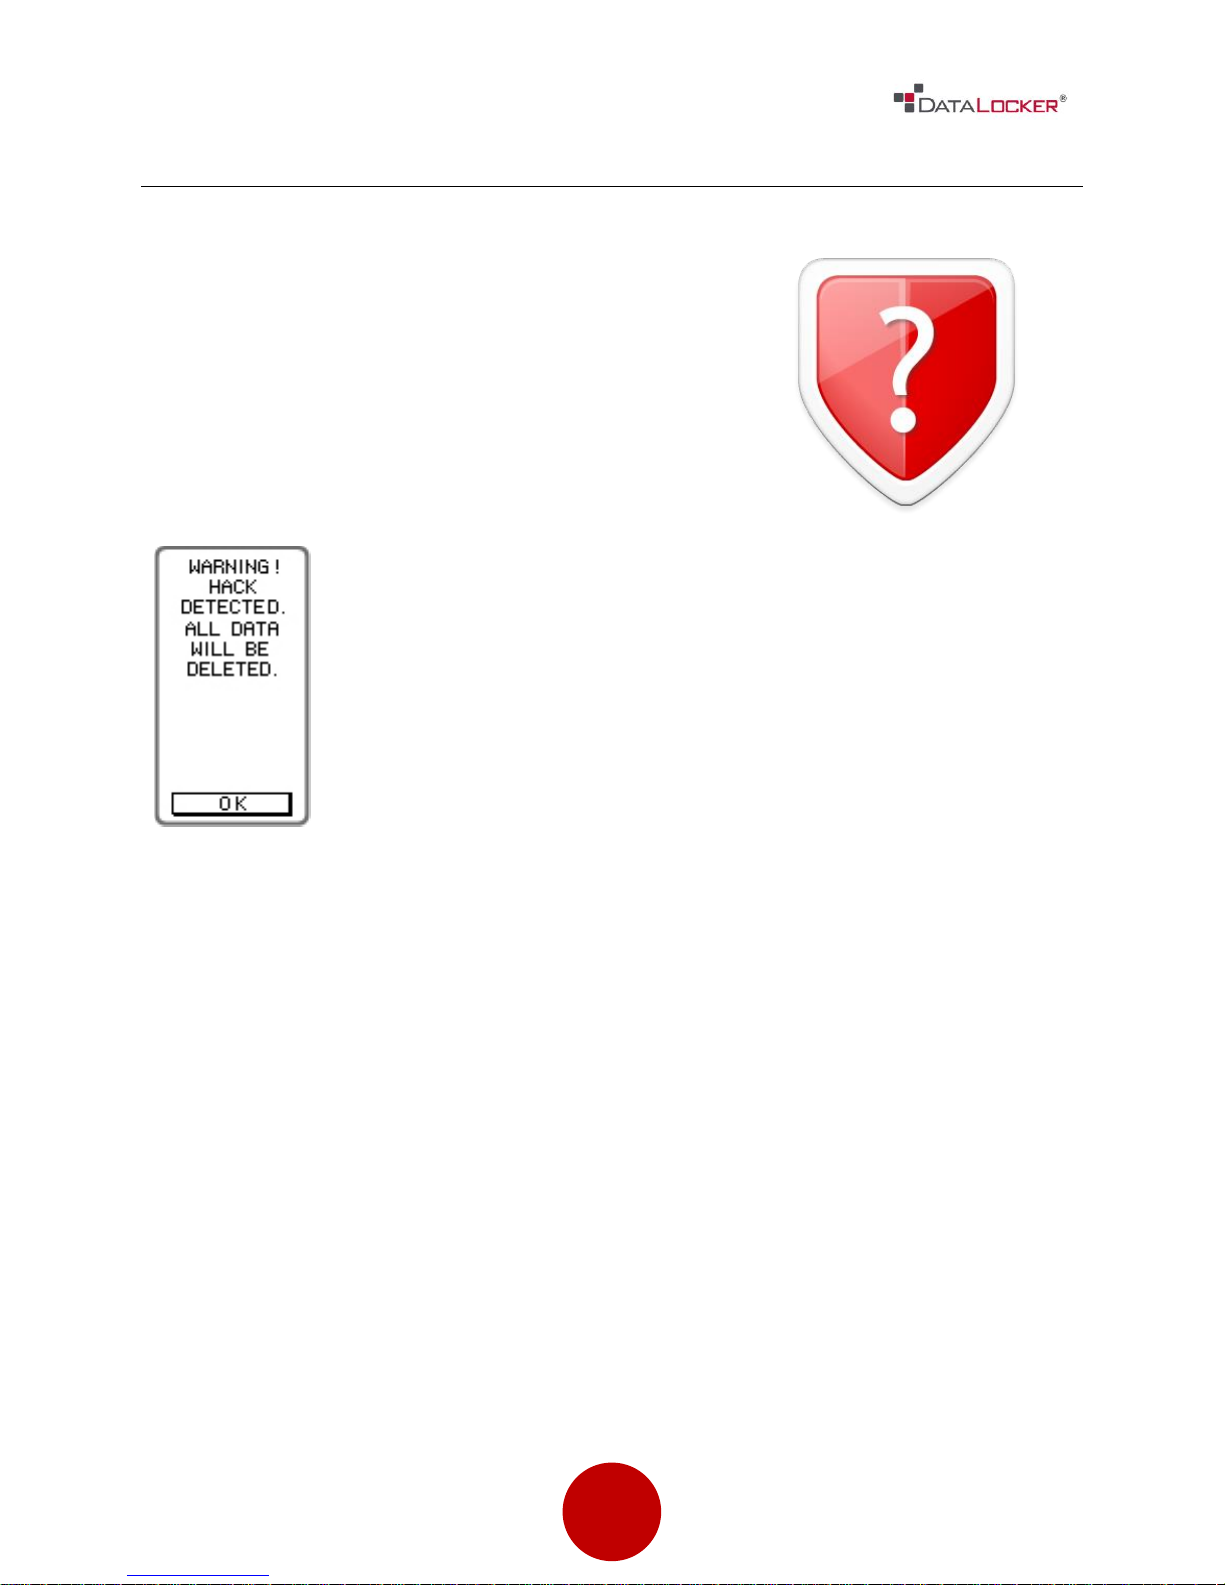
The Self Destruct feature is designed to defend
against brute force password hacks. If you forgot
your passcode, The Self Destruct mode also
allows you to regain access to your device. The
DL2 performs this by zeroizing all of the device’s
encryption keys after 9 failed login attempts.
Your device will shut off every 3 failed login attempts. A
warning sign will appear on the screen after the 7th failed login
attempt.
Once the encryption key is deleted, your data cannot be
recovered. Powering off the unit does NOT reset the
unsuccessful password attempts counter. The password
attempts counter will only reset after a successful password
attempt. Use this feature with caution.
Page 17
17
Advanced
USB Malware / Hack Detection
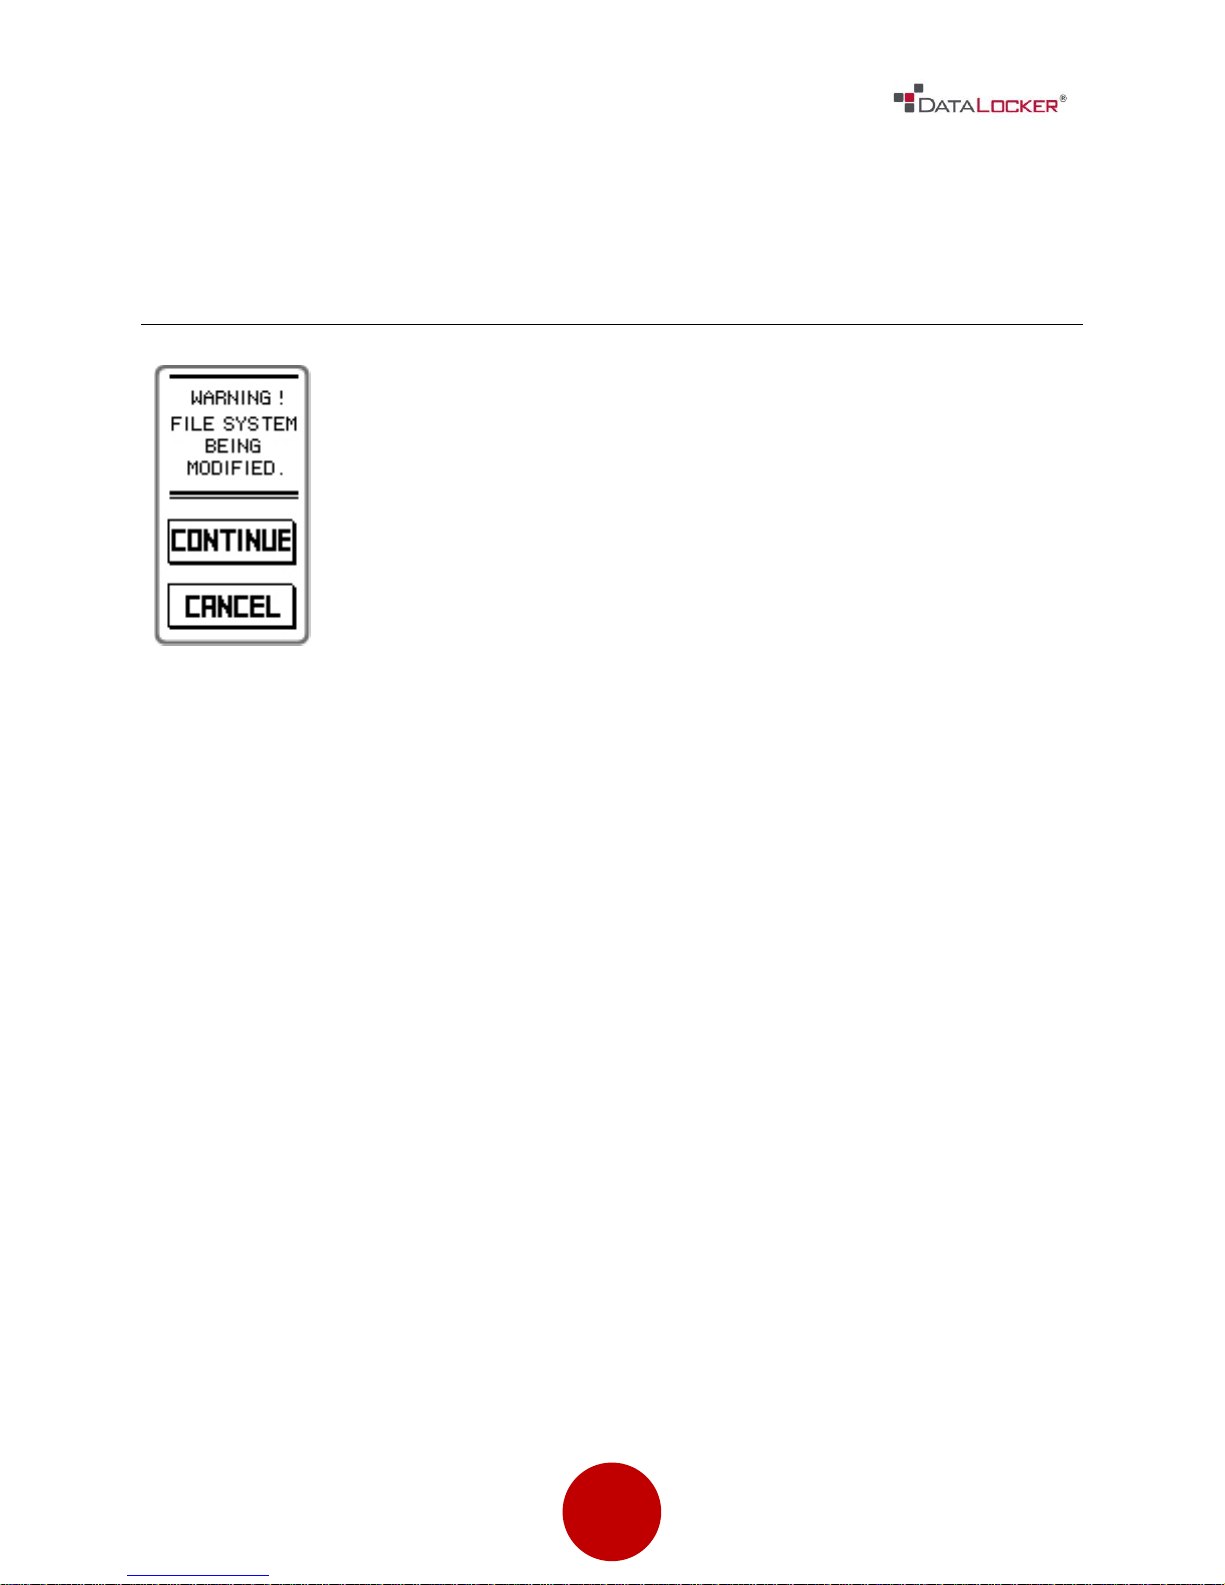
The DataLocker® will detect any process that attempts to alter
the DataLocker® file system or partition. This includes, malware,
viruses, and any attempts to reformat or alter the drive.
WARNING: IF THIS MENU IS DISPLAYED UNEXPECTEDLY,
IMMEDIATELY PRESS THE “CANCEL” KEY AND DISCONNECT THE
DATALOCKER® FROM THE COMPUTER. YOU SHOULD THEN SCAN
YOUR COMPUTER FOR VIRUSES.
SPECIAL FEATURES
This warning is displayed during the initialization process. If you are performing
this operation, disregard this warning.
Page 18
18
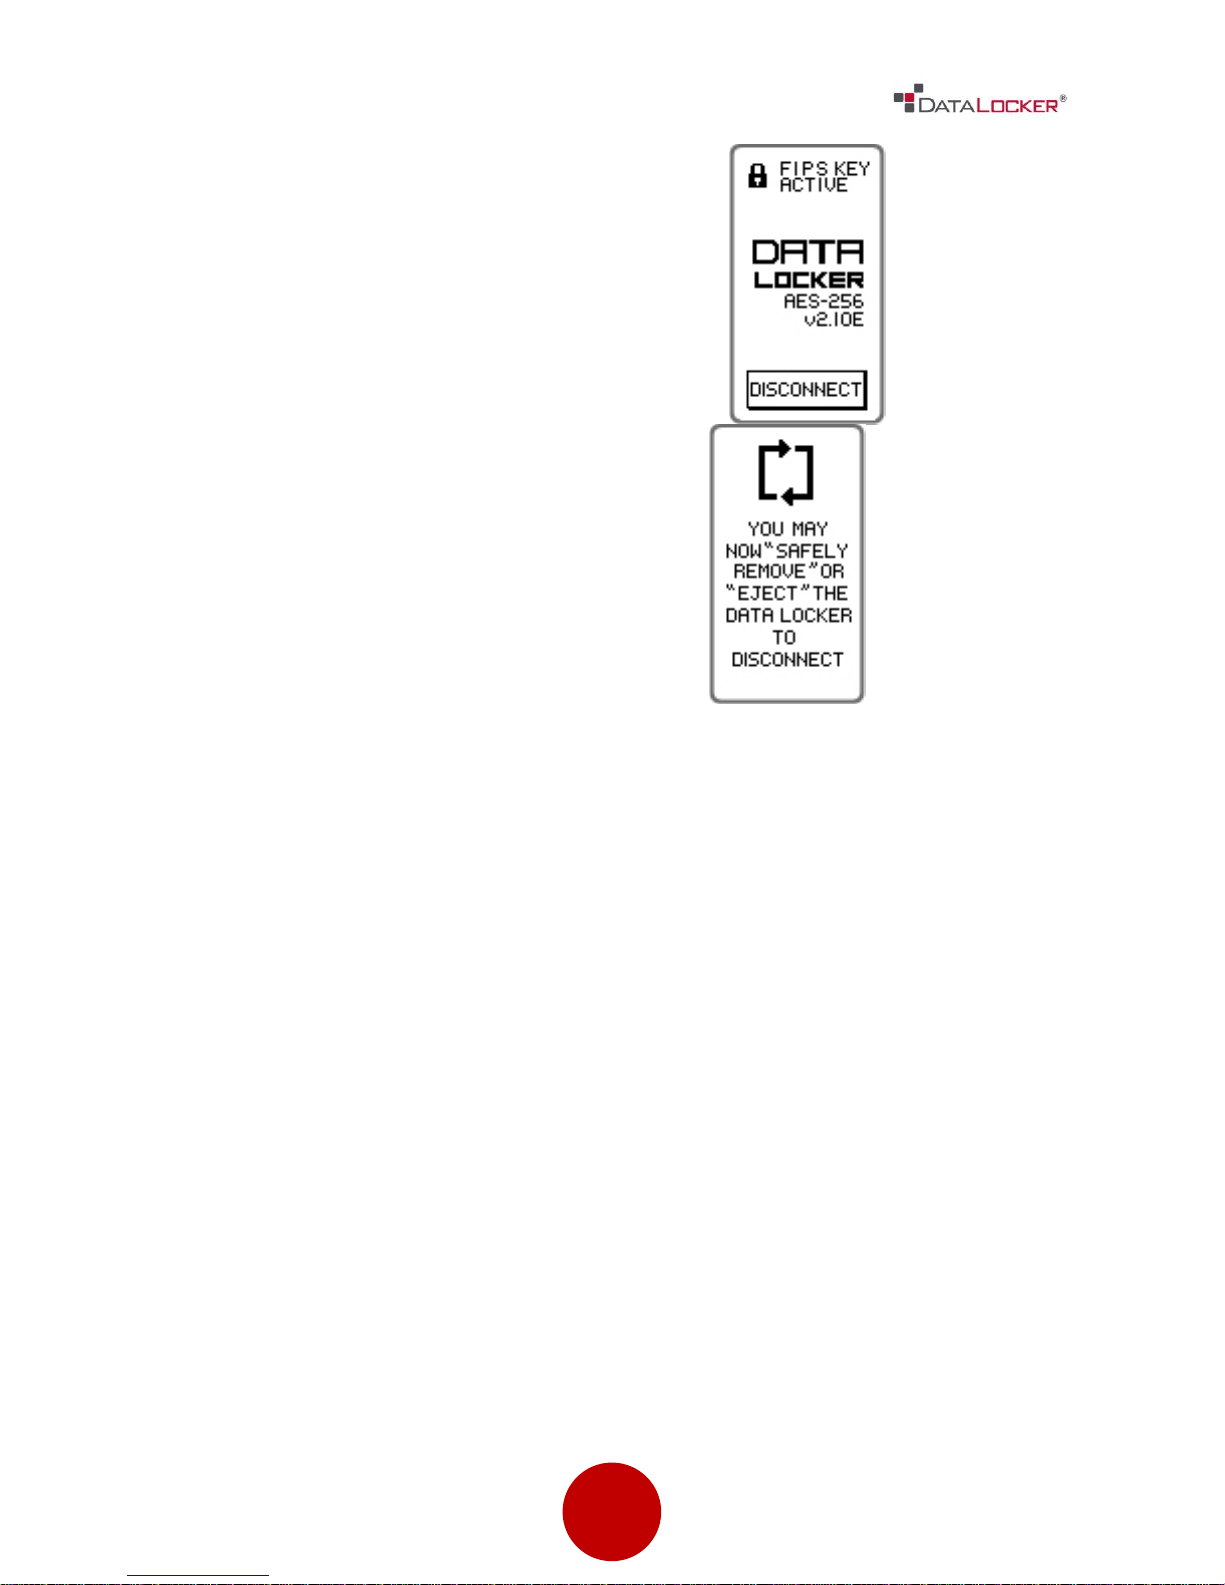
Auto Secure Feature
This feature will allow you to automatically
secure your DataLocker® after performing a
lengthy disk operation (large file transfer or
backup operation). Simply press the
“DISCONNECT” button after starting the
operation and the DataLocker® will secure
itself once the operation has completed.
Use your operating system’s “Safely Remove Hardware” or “Eject” function,
before you power down or detach the DataLocker® from the host system. This
will help prevent damage to the disk.
Self-Tests
The DataLocker® runs a series self-diagnostic check during start up. The
DataLocker® will then give you a series of beeps to inform you of the problem,
each pattern of beeps denotes a different problem.
1. If there is a problem with the hard drive itself, the DataLocker® will beep
once every second until it is turned off.
2. If there is a problem with the AES engine, the DataLocker® will beep twice
every second until it is turned off.
3. If there is a problem with the firmware, the DataLocker® will beep three
times every second until it is turned off.
Page 19

19
Page 20
20
MASTER ADMINISTRATIVE PASSWORD
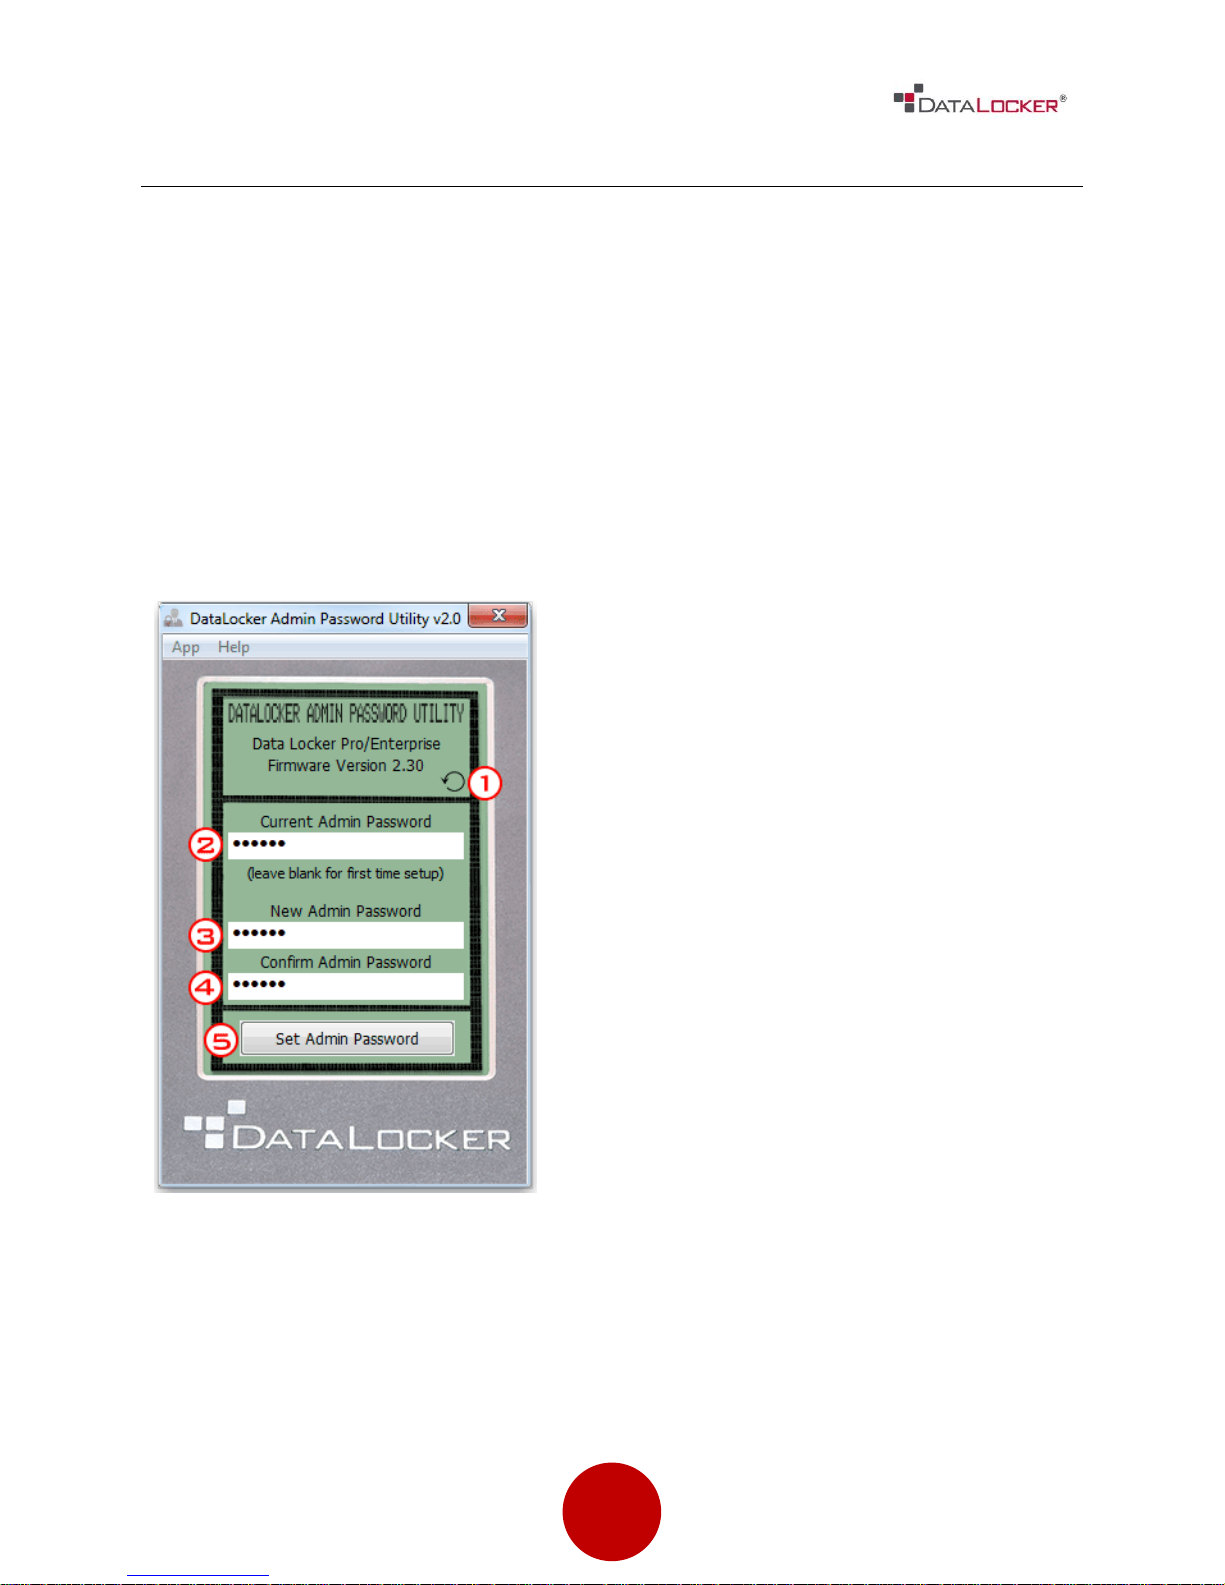
1) Upon opening up the program, the
DataLocker drive will automatically be
detected. Click this button at anytime
to redetect the DataLocker drive.
2) If this is your first time setting up the
admin password, leave this box blank. If
you already have an admin password,
enter it in this box.
3) Enter the new admin password here.
Do NOT enter the current user
password. Doing so will prevent you
from logging in as an admin until you
change the current user password.
4) Confirm the new admin password here.
5) Clicking this button will set the new admin password to the device. Your user
password will be the original password set to the device. Reset your drive for
the new changes to take effect.
DataLocker Admin Password Utility v2.0 allows you to set an administrator
password to the DL2 models. Having an administrator's password set on the
device ensures access to the DataLocker drive in the event that the user forgets
his/her password. It is highly recommended that you set an admin password to
your DataLocker drives. Keep this password safe and do not give out the Admin
password to your users.
Connect the DataLocker® to a MS Windows based PC and download the DL2
Admin Password Utility from the support section. Once downloaded, extract all
files to a new directory. Run the utility within the newly created directory.
Page 21
21
Troubleshoot
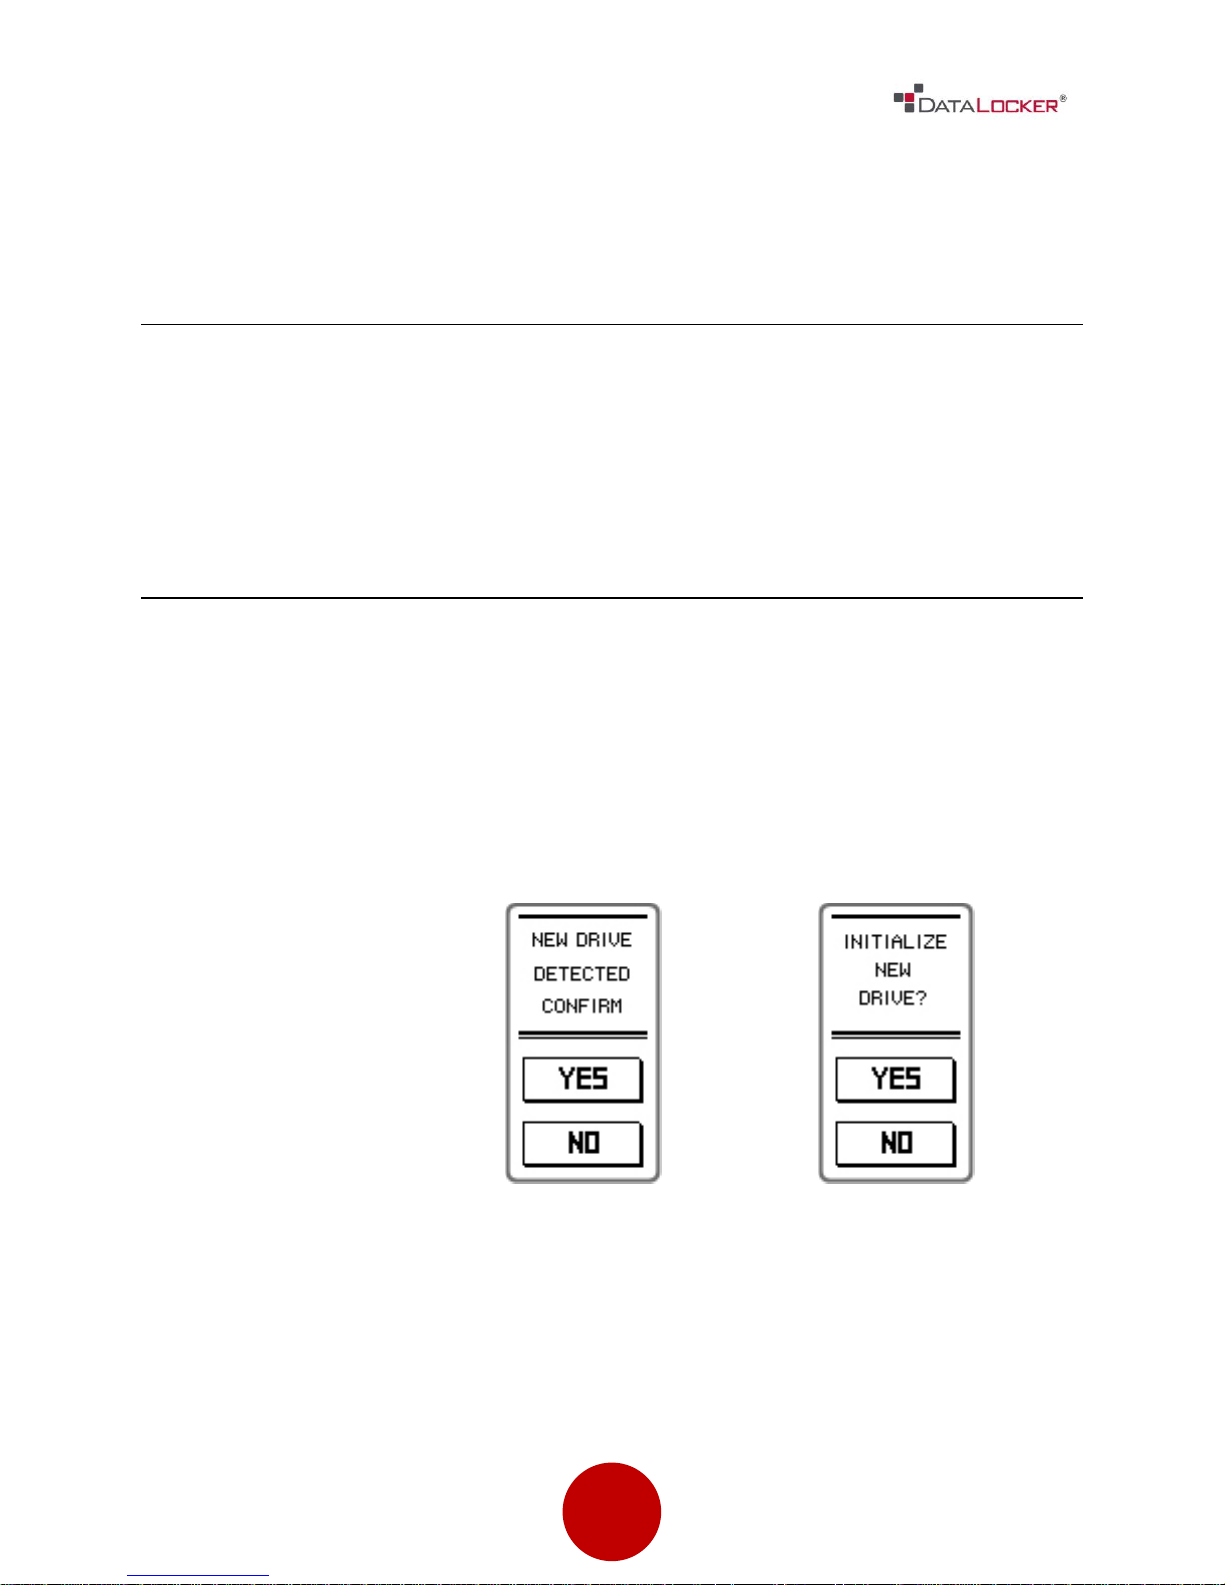
1
Power on your DL2
2.
Press Yes.
3.
Press Yes.
REESTABLISH FIPS KEY
At this time, the only way to reestablish your FIPS key is to send your device back
to Data Locker. If you are in need of this service, please contact the support
team. For contact details, go to pg. 25.
INITIALIZING AND FORMATTING YOUR DL2
On occasion – for example, after self-destructing your DL2 - you will need to
initialize and reformat the drive to make it usable again.
How to Initialize your Drive
Page 22
22
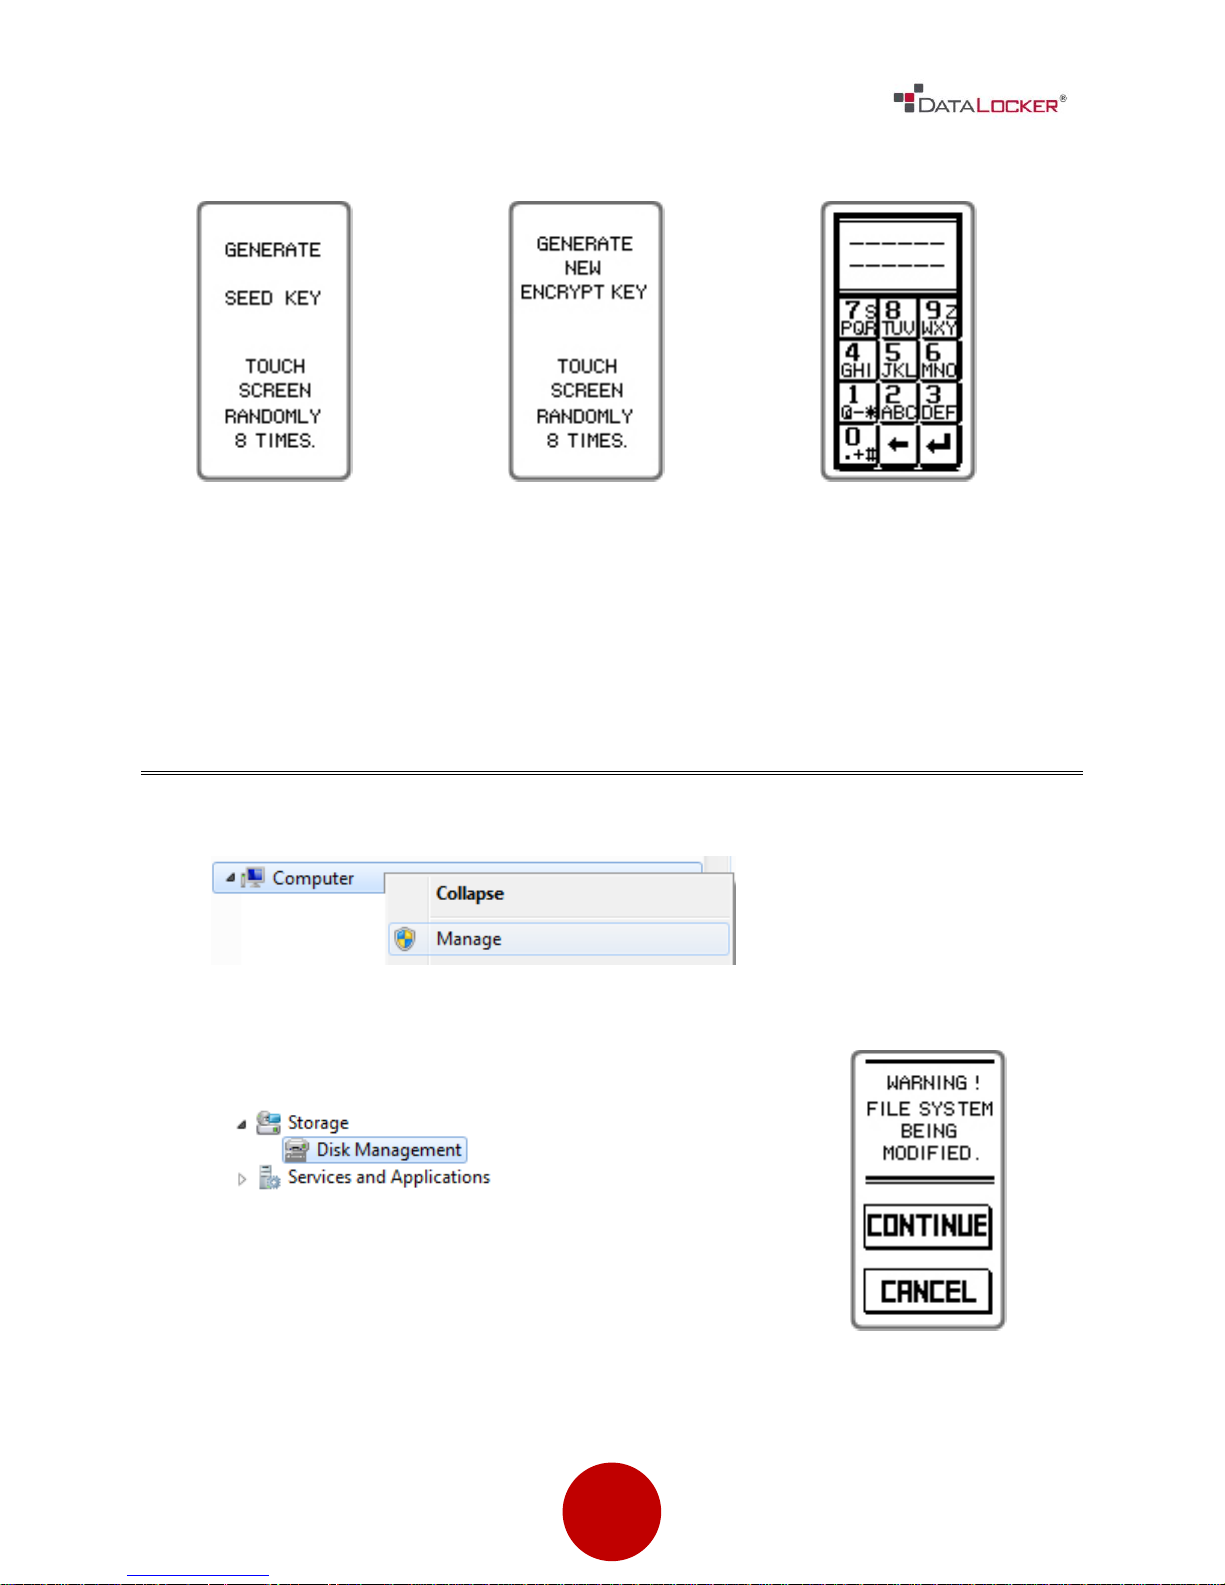
4.
Touch screen 8 times.
5.
Touch screen 8 times.
6.
Enter default: 000000.
1
Right click My Computer and press Manage
2
Then press Disk Management
If your DL2 pops up with the following warning,
press Continue.
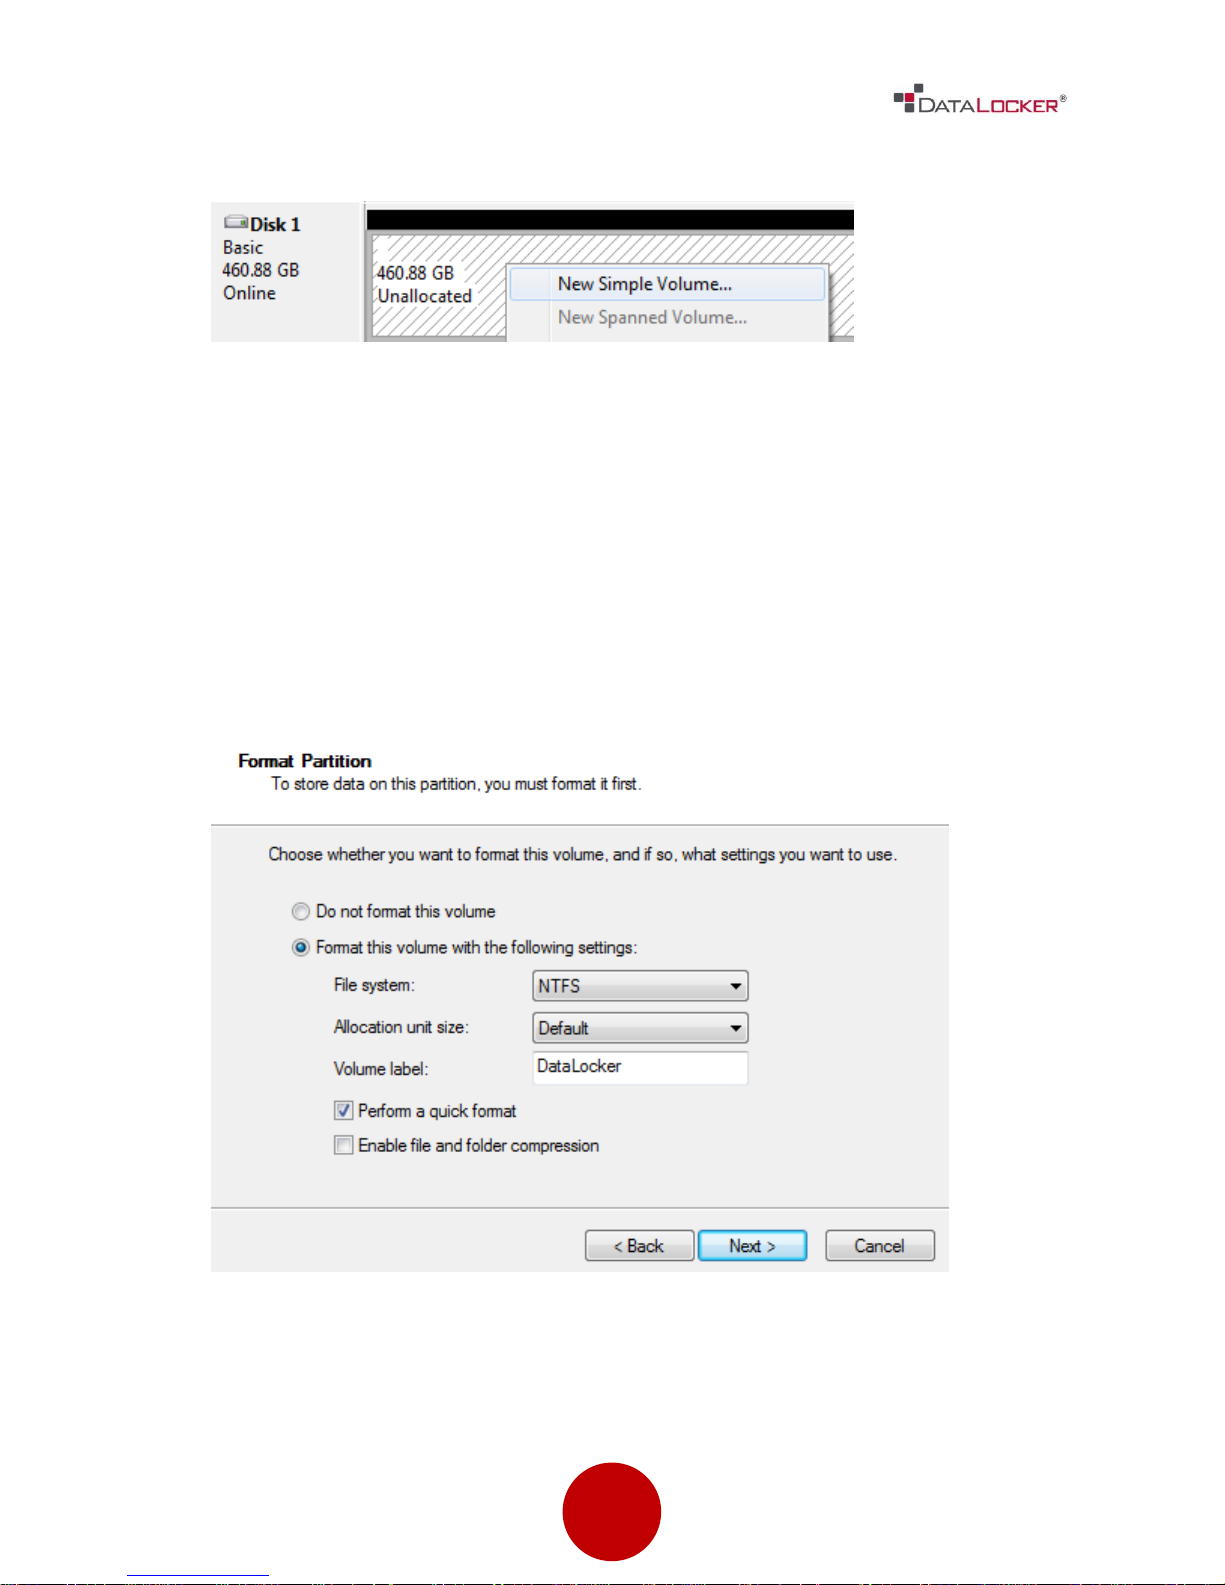
You will now have to format your drive. The instructions to format your drive will
vary depending on your OS.
Windows
Page 23
23
3
Right click the unformatted disk and select New Simple Volume
4
Press Next
5
Press Next
6
Pick a letter, and then click Next
7
Rename the volume label, and then press Next
8
Review, and then press Finish
Page 24
24
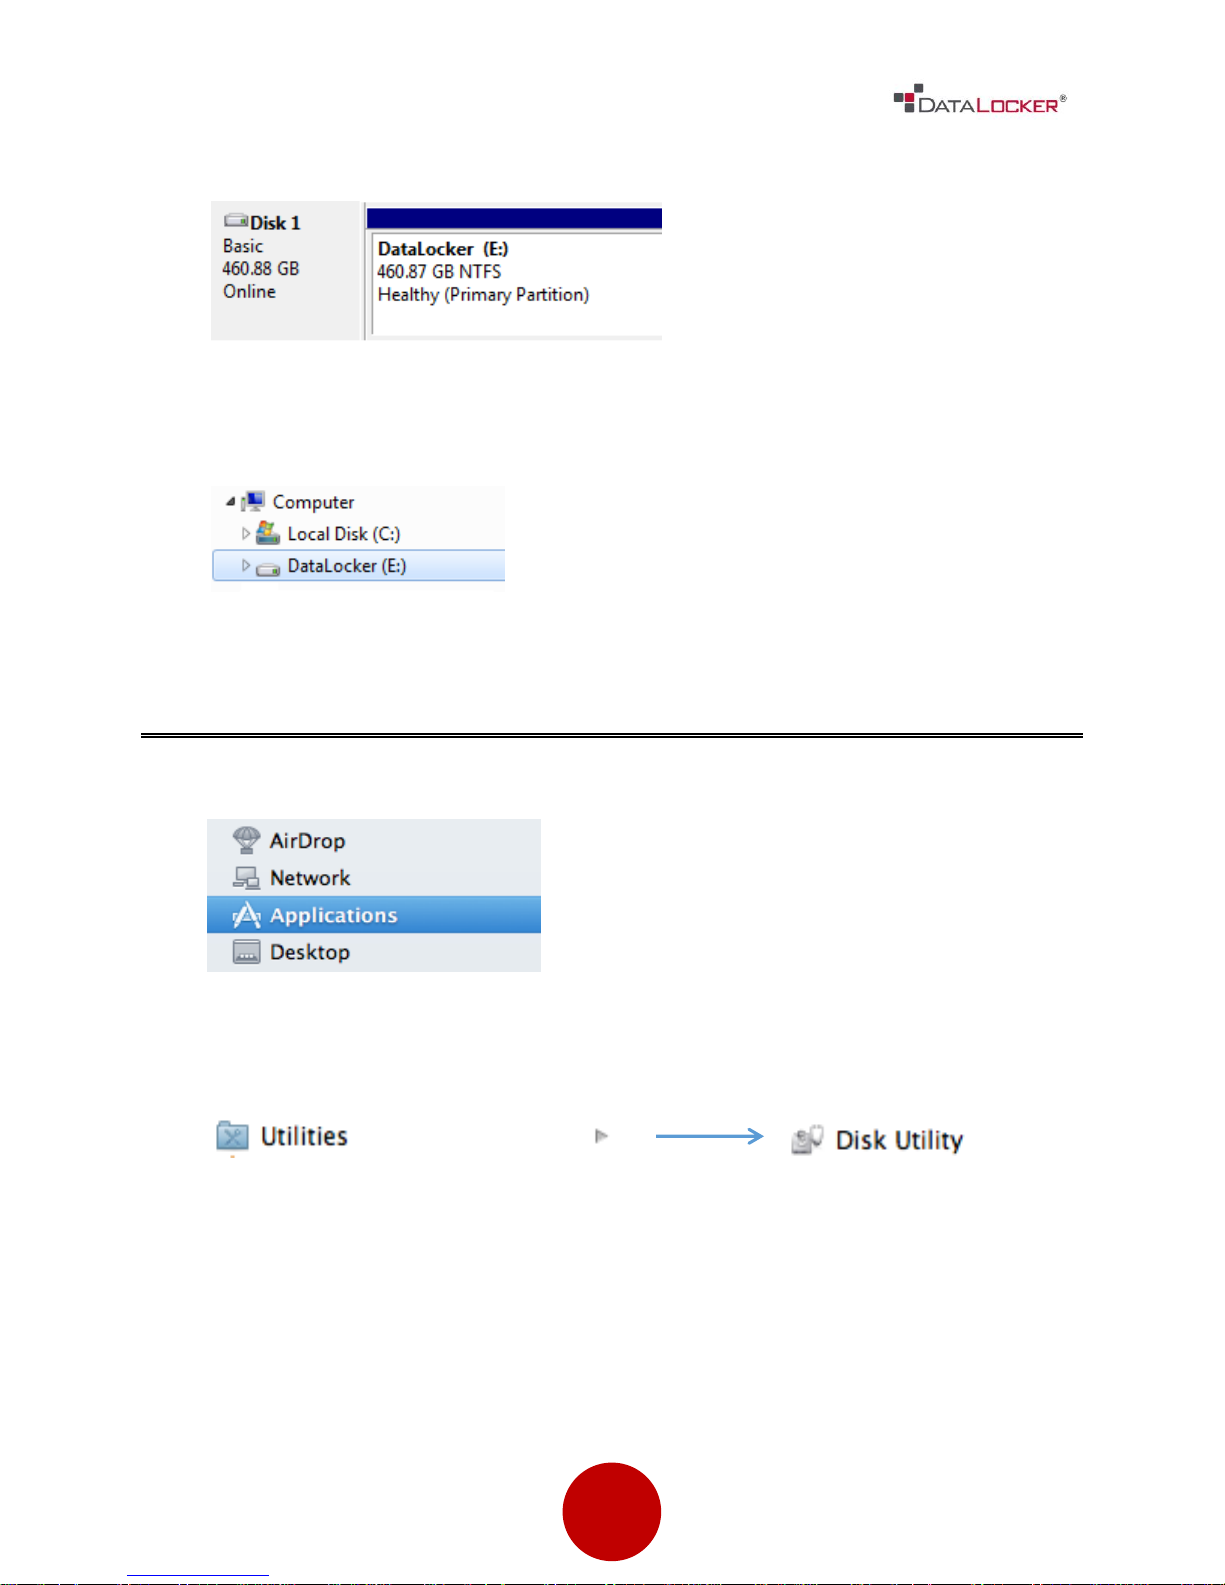
9
The status of your formatted disk should be Healthy (Primary Partition)
10
Your DL2 should now appear under My Computer
1
Go to Applications under your Finder.
2
Go to Utilities and then open Disk Utility.
3
Select your unformatted DL2 disk.
Mac
Page 25
25
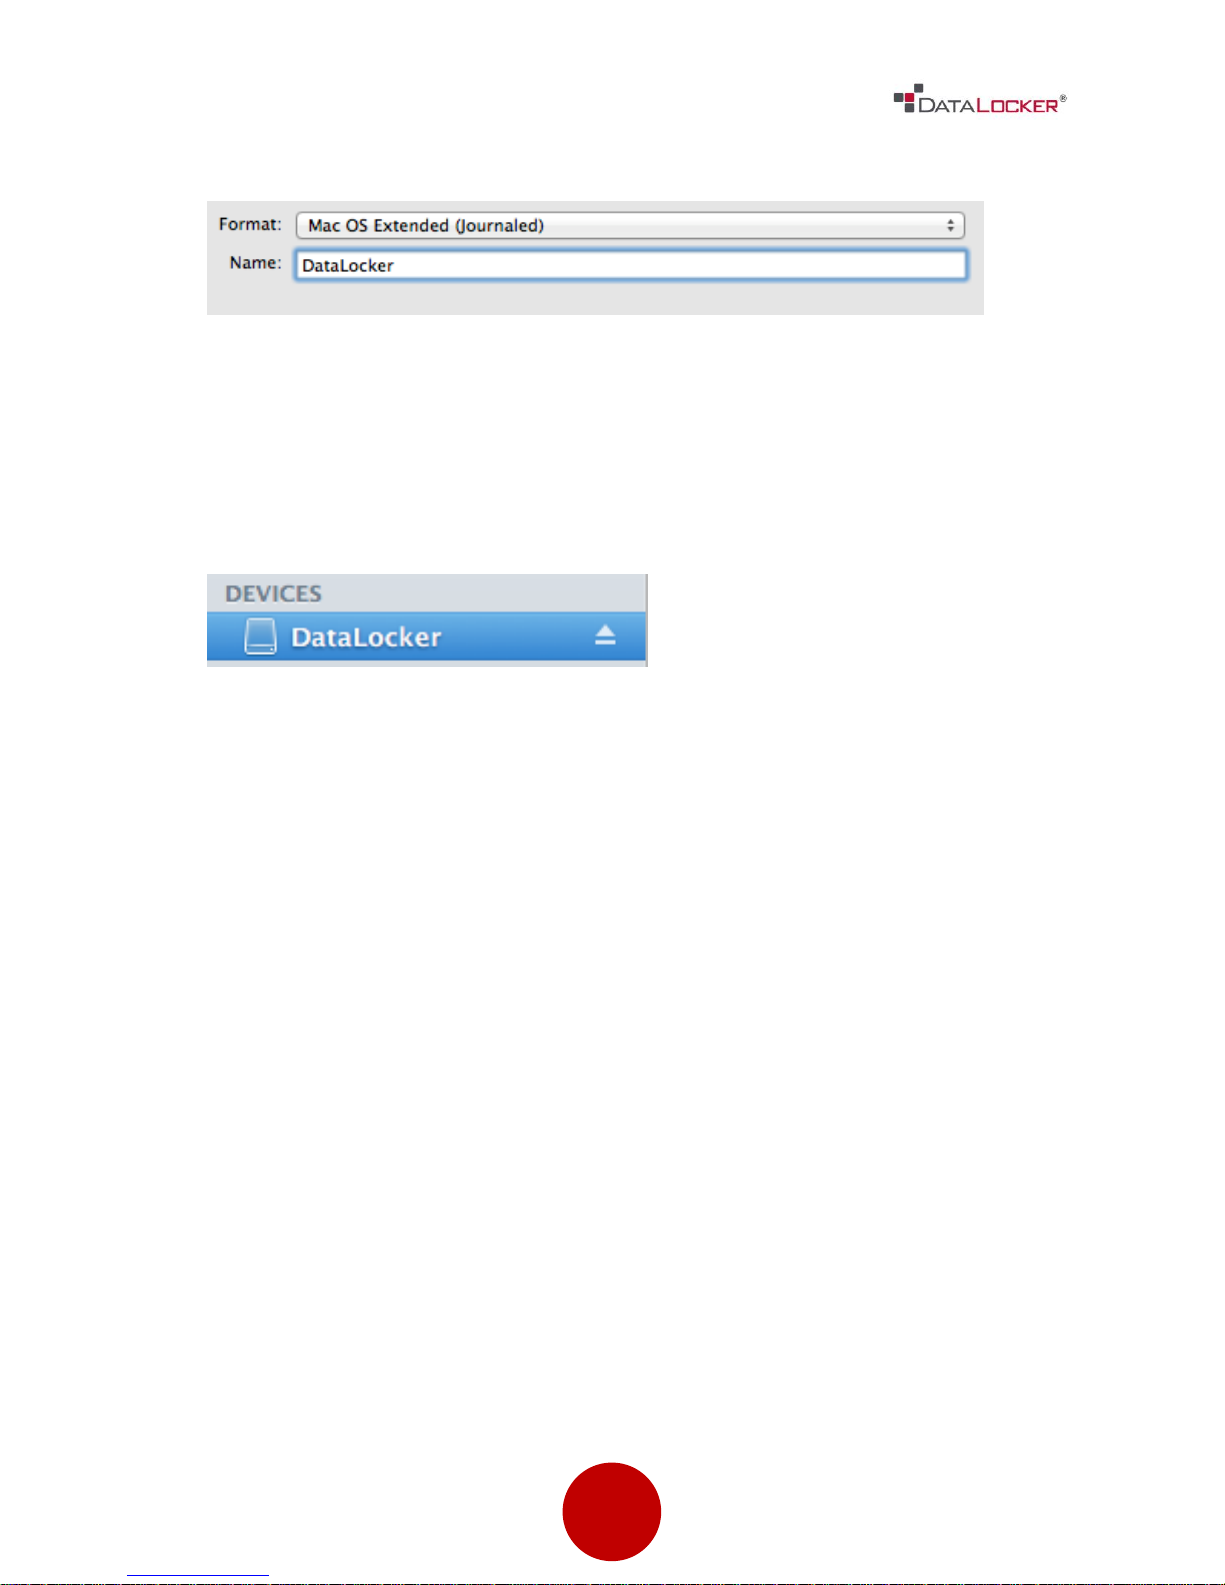
4
Rename your disk label.
5
Press Erase.
6
Your formatted DL2 should now appear under Devices.
Page 26

26
Miscellaneous
FREQUENTLY ASKED QUESTIONS
If you still have questions after reviewing the user guide, please consult our FAQ
page at the DataLocker website.
http://support.datalocker.com/
Contact the Support Team
If you have any unresolved issues with the DL2, give us a call or go to our website
to chat with a real DataLocker representative.
Phone: (913) 310-9088
Web: datalocker.com
If you would like to contact us outside of our business hours (8:30AM – 5:30PM CST),
visit our support page to post your question, and we will get back to you as soon
as possible.
Support Site: support.datalocker.com/
 Loading...