


-1-
Tel: +90-216 466 84 60
Fax: +90-216 364 65 65
datakom@datakom.com.tr
http://www.datakom.com.tr
GSM Configuration Guide for D-500 D-700
PRODUCTS AFFECTED:
D-500 / D-700
WRITTEN BY:
Metin Hekimoglu
DATE:
10-10-2012
Issue
05
Related documents
Rainbow Plus D-500 D-700 Installation Guide
Rainbow Plus D-500 D-700 Usage Guide
Dynamic DNS Account Setting for D-500 D-700
RainbowScada Installation Guide
RainbowScada User Guide
The D-500/700 unit supports different modem configurations:
-internal GSM modem
-external Datakom GSM modem
Through the GSM modem, below features are supported:
-GPRS class 10
-Web client
-SMTP (simple mail transfer protocol)
-SMS
-Central Monitoring
APPLICATION NOTE
Introduction

-2-
The optional internal GSM modem offers the advantage of being internally powered and is
fully compatible with the unit.
The 1800/1900 MHz magnetic antenna is supplied together with the internal modem option.
The antenna cable is 2 meters long. The antenna is intended to be placed outside of the
genset panel for the best signal reception.
Do not power-up the D-500/700 unit before inserting the antenna
and SIM Card.
The module requires a GPRS enabled SIM card for full
functionality.
Voice-only type SIM cards will usually not permit GPRS
functionality.
Modem connections
SIM Card slot
SIM Card extraction tab
Antenna connector
Magnetic antenna

-3-
SIM CARD EXTRACTION
SIM CARD EXTRACTION / INSERTION
SIM CARD PLACEMENT
Internal GSM Modem Technical Specifications
Description:
Quad-band GSM/GPRS 850/900/1800/1900MHz module.
GPRS multi-slot class 10/8
GPRS mobile station class B
Compliant to GSM phase 2/2+.
– Class 4 (2 W @850/ 900 MHz)
– Class 1 (1 W @ 1800/1900MHz)
Operating temp range:
-40°C to +85 °C
Data speed:
max. 85.6 kbps (downlink), max 42.8 kbps (uplink)
SIM card type:
external SIM 3V/ 1.8V, GPRS enabled
Antenna:
Quad band, magnetic, with 2m cable
Module certificates:
CE, FCC, ROHS, PTCRB, GCF, IC, ICASA, REACH
Push the
extraction tab

-4-
The modem setup is performed using the RainbowPlus program.
The RainbowPlus installation and usage is explained in related documents.
Only parameter setting will be referenced in this document.
1) Open the RainbowPlus program
2) Connect to the unit through USB
3) Select Configuration mode
4) Read parameters from device.
5) Select Communication>Basic tab. This page contains communication parameters.
6) Engine Serial Number and Site Id information are used in the header of SMS and e-
mail messages for the identification of the genset sending these messages. Please
enter these fields correctly for your ease of operation.
7) Do not change Web Refresh Rate, Rainbow Refresh Rate and Ping Period
parameters.
Modem setup
Basic tab
Communication tab

-5-
8) On Modem box select Internal or GSM Datakom following your modem
configuration
9) Baud rate selection does not apply to internal modem. Select 57400 baud for
external modem.
10)Select Communication>IP Settings tab. This page contains IP related communication
parameters.
11) User IP Mask parameters are used for restricting the external access to the embedded
web server. Leave these fields unchanged as above for unrestricted access. Please
consult Datakom for more details.
12) Rainbow Server Adresses are used for RainbowScada remote monitoring program. If
RainbowScada program is installed, the IP address (or domain name) of the central
monitoring PC should be entered. If only one center is used, enter both addresses the
same. Set the Rainbow Server Port to the same value set in the RainbowScada
program.

-6-
13) Select Communication>E-mail tab. This page contains E-mail related parameters.
14) SMTP field should be filled appropriately. This is the e-mail address from where the unit
will send e-mail messages. The information is the same as used in a computer.
15) Select E-mail on IP Change parameter as required. If this parameter is enabled, the D-
500/700 device will send an e-mail message each time the IP is changed.
16) Select E-mail on Mains Change parameter as required. If this parameter is enabled, the
D-500/700 device will send an e-mail message each time the mains status is changed.
17) E-mail address 1 (2/3) is the address to where e-mail messages will be sent. If e-mails
are required, enter your e-mail addresses here. If e-mails are not required, then enter
blank fields here. The unit can send up to 3 e-mails at once.
The unit will come with ready to use SMTP parameters.
It is possible to use the unit without any modificaiton to the SMTP field.
The originating e-mail address programmed in the SMTP field must be an
activated address.
Otherwise the unit will fail to open a session in this server and cannot send
e-mail messages.

-7-
18) Select Communication>DNS tab. This page contains dynamic DNS update information.
19) IP Confirmation address field should not be modified and must be left as per above
settings.
20) Ping Address may be set as required. But above address is the most reliable one. It is
advised to leave it unchanged as above. This address is used for the verification of
internet connectivity.

-8-
21) Select Communication>GSM tab. This page contains GSM-GPRS parameters.
22) Enable GPRS Connection Enable parameter. This parameter enables all IP services
(web client, SMTP) after saving to the controller.
23) Enable SMS Enable parameter.
24) Set other parameters in the box as required.
25) If PIN code is used in your SIM card, then enter this code in GSM Sim Card Pin No field.
Usually new SIM cards come without pin code.
26) If Service Center No is not entered, then the controller will use the service center
number recorded in the SIM card. If entered, this number will be used. Usually this
information is not necessary.
27) APN ( access point name) information are necessary to connect to the GPRS network,
and must be entered correctly. Otherwise connection to the GPRS network may not take
place. If APN parameters are faulty, "GPRS unusable/Bad APN " message will appear
on the GSM Modem screen. These information is usually supplied by your GSM operator
company.
28) Telephone numbers for SMS sending are recorded in above fields. A maximum of 6
numbers are available.

-9-
When parameter editing is over, click Write To Device button. A progress bar will open.
24)When the progress bar disappears the write process is done.
Progress bar
Write To Device
button

-10-
The RainbowScada program will allow the central monitoring of a large number of gensets
through internet.
Please read documents on RainbowScada installation and Rainbow Scada Usage for more
details.
A sample Rainbow Scada screen is below.
The program represents each unit as a coloured box on the map. The map is downloaded
from the internet. The colour of the box will indicate the genset status for easy follow_up of the
whole network.
An additional status and address bar at the right side of the screen will show the system
structure and status.
The central monitoring is operational through GPRS with all data
SIM cards, with real or local ip addresses.
Central Monitoring

-11-
COMMAND
DESCRIPTION
ANSWER
GET IP
If GPRS connection is active, the
controller will reply by an SMS message
indicating the IP address of the GSM
modem.
GPRS 1
Activates the GPRS connection
GPRS 0
Stops the GPRS connection
RESET
ALARMS
Clears alarms of the controller. The operating
mode is not modified.
REBOOT
Performs a hard reset on the controller
no answer
MODE STOP
Puts the controller into STOP mode. Alarms
are also cleared.
MODE AUTO
Puts the controller into AUTO mode. Alarms
are also cleared.
Unit forced to AUTO!
Unit forced to STOP!
Alarms cleared!
GPRS disabled!
GPRS enabled!
The display of the message may vary following mobile phone models.
IP: 188.41.10.244
SMS messages should be written
exactly as below, without any
preceeding blanks.
Only UPPERCASE characters
are permitted.
SMS messages are accepted only
from phone numbers recorded in
the Communication>
GSM>Message Numbers tab.
Answers to SMS messages will
be sent to all phone numbers in
the list.
SMS Commands

-12-
COMMAND
DESCRIPTION
ANSWER
MODE MANUAL
Puts the controller into MANUAL (RUN)
mode. Alarms are also cleared.
MODE TEST
Puts the controller into TEST mode. Alarms
are also cleared.
OUT1 ON
Sets remote controlled output #1 to
active state
OUT1 OFF
Sets remote controlled output #1 to
passive state
OUT xx ON
Sets remote controlled output #xx to
active state (xx denotes any number
between 1 and 16).
OUT xx OFF
Sets remote controlled output #xx to
passive state (xx denotes any number
between 1 and 16).
Unit forced to TEST!
Unit forced to RUN!
OUT xx = OFF
OUT xx = ON
OUT 1 = OFF
OUT 1 = ON

-13-
The controller is able to send SMS messages under below non-fault circumstances.
IP Change
Mains Change
These messages are individually enabled or disabled by below program parameters:
Communication>GSM>SMS On IP Change
Communication>GSM>SMS On Mains Change
SMS messages are sent to all telephone numbers programmed in below tab:
Communication>GSM>Message Numbers
Information SMS Messages
-14-
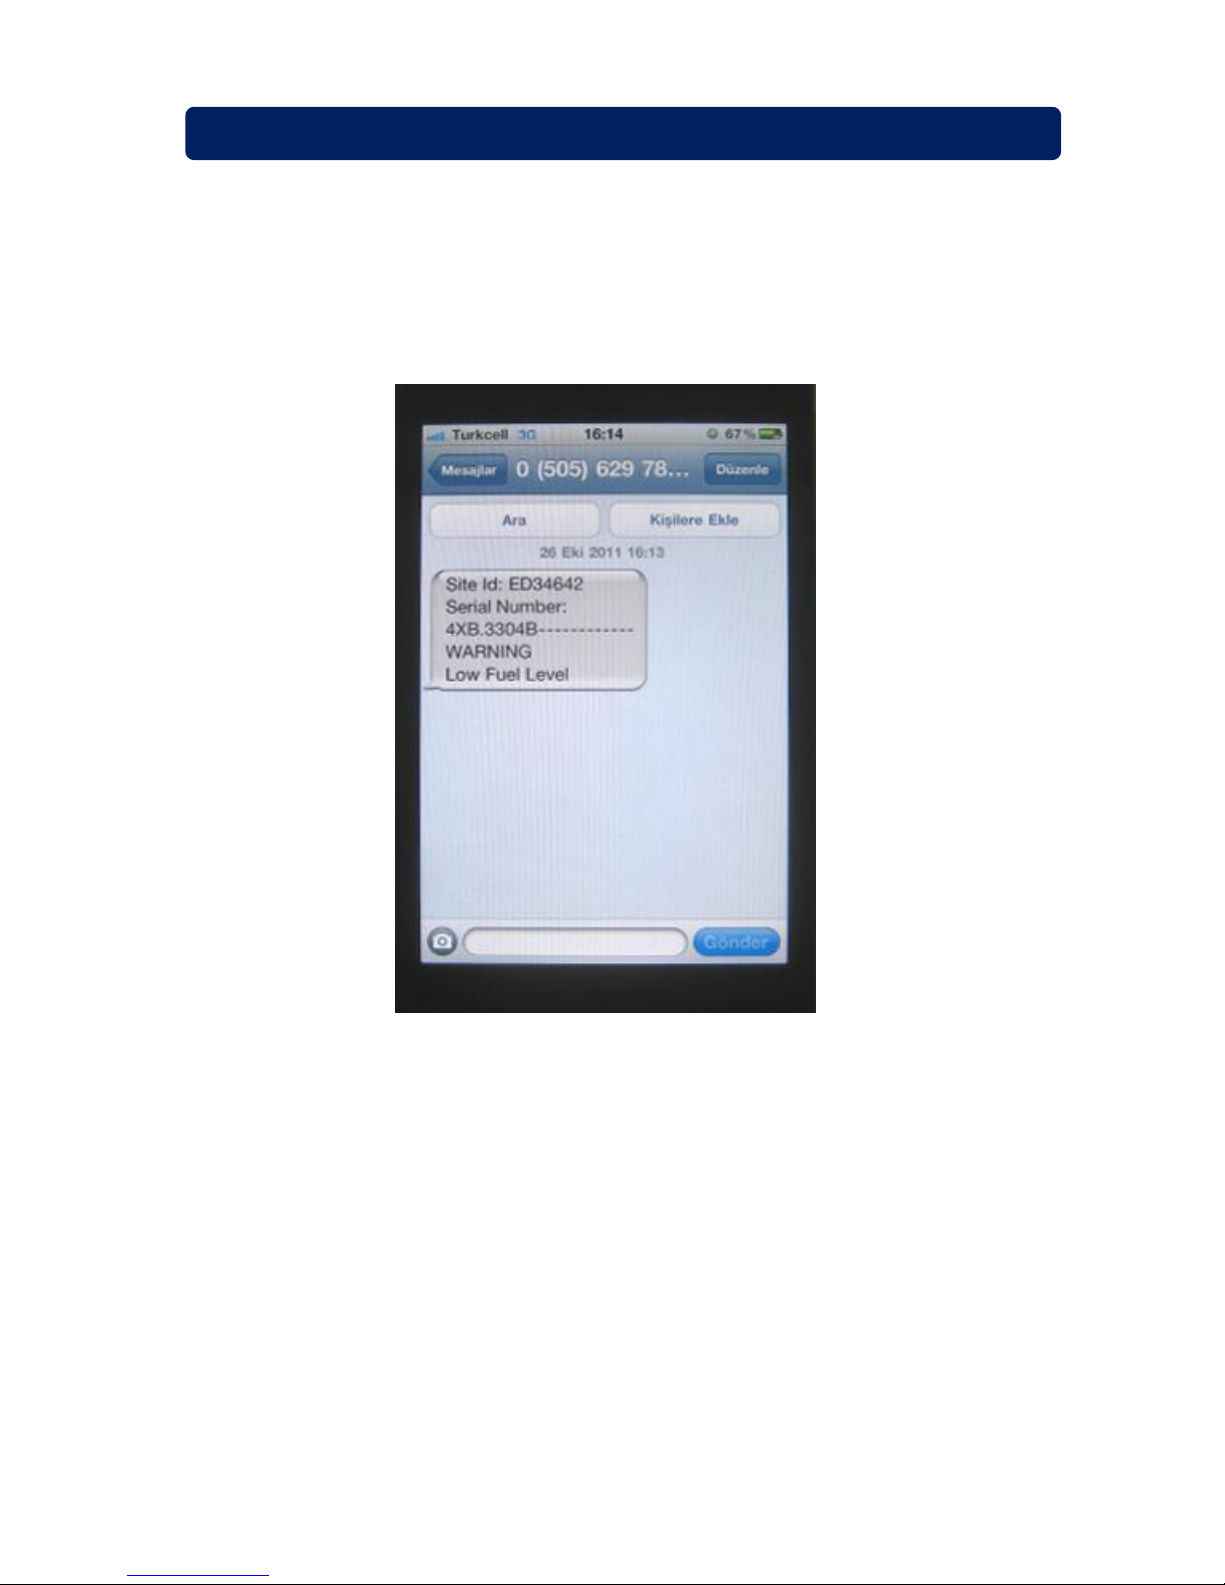
The D-500/700 is able to send SMS messages under all fault conditions.
SMS messages are sent to all telephone numbers programmed in below tab:
Communication>GSM>Message Numbers
A sample message is below:
Alarm SMS Messages

-15-
The D-500/700 is able to send an e-mail message when the GPRS IP number is changed.
This message is enabled or disabled by below program parameters:
Communication>Options-2>E-mail>E-mail on IP Change
A sample message is below:
Last 10 event logs together with measured parameters are always appended to the e-mail
message.
Information E-mail Messages
New IP is indicated here

-16-
The D-500/700 sends an e-mail message when any fault condition occurs.
A sample message is below:
Last 10 event logs together with measured parameters are always appended to the e-mail
message.
Alarm E-mail Messages
Alarm is indicated here
Last event log gives measured values

-17-
The GSM connection status is monitored at GSM screen pages.
In order to display the GSM screen pages press Right or Left Arrow buttons of the D-500/700
device until below screen appears.
Two more modem screens are available. They are accessed by pressing UP-Down Arrow
buttons of the D-500/700 device.
Signal Strenght Indicator:
This field is updated every 120 sec. The signal strength is displayed on a scale of ../7
For a consistent GPRS communication, at least 2/7 level is required.
GSM Operator:
Received from the base station of the GSM operator.
IP Address:
This field is active only if GPRS is enabled through program parameter. Updated as
soon as IP address is granted by the GSM system.
Data Receive and Transmit Indicators:
These indicators flash when data is received (or transmitted) through GPRS network.
Note that data counters are available in the next modem page.
GPRS Status Indicator:
Active only if GPRS is enabled through program parameter. At startup, this indicator
is flashing. When GPRS connection is established, this indicator turns on steadily.
Status line:
This field gives information about the status of GPRS connection and is updated
following various data exchanges between the GSM system and the D-500/700
device.
If the Modem Screen does not open, modem selection is set to “None”.
Select correct modem using the RainbowPlus program,
Communication>Basic>Modem tab.
Troubleshooting
Signal Strenght
Indicator
GSM Operator
Status Line
GPRS Status Indicator
Data Receive and Transmit Indicators
IP address

-18-
Additional modem screen:
Additional modem screen
Client IP address:
This field shows the IP address of the remote web client accessing the web server
through GPRS. Only the last client is displayed.
IMEI Number:
This is the modem’s unique identificaiton number. Each GSM device has a different
IMEI number.
Data Counters:
These counters increment with data received (or transmitted) through the ethernet
port. The ethernet activity is precisely monitored with these counters.
IMEI number of
the modem
IP Address of the
remote web client
Total data
bytes received
Total data bytes
transmitted

-19-
MESSAGE
DESCRIPTION
GPRS Ready
Modem connected to GPRS network successfully.
GPRS Ready on Roaming
Modem connected to GPRS network successfully.
Roaming service is active.
Modem Connected !
A modem is found at D-500/700 initialization phase.
Modem Ready
Modem installation complete. GPRS not active yet.
New SMS received
An SMS is received. The D-500/700 device will execute the
command given by the SMS message.
Sending SMS
SMS message sending is in progress.
SMS preparing
SMS message is about to be sent.
SMS Sent
SMS message was sent successfully. The GSM system
confirmed SMS reception.
The delivery of the SMS message is duty of the GSM system.
The controller has no control on message delivery to the target
phone number.
Remote Server Update
The modem is updating the remote central monitoring
(Rainbow Scada) server.
Normal Status Messages (alphabetical order)

-20-
MESSAGE
DESCRIPTION
REMEDY
Bad Agent/Not permitted
The dyndns service rejects
IP update request.
Check end reenter correct
parameters using the RainbowPlus
program,
Communication>GSM>Dynamic
DNS tab area.
Bad APN info
APN parameters are not
acceptable.
Check end reenter correct APN
parameters using the RainbowPlus
program, Communication>GSM
tab.
Bad Service Ctr. Nr
The GSM system rejects
the SMS service center
number.
Either the service center number of
the Sim card or service center
program parameter is faulty.
Enter the correct Service Center
No parameter using the
RainbowPlus program,
Communication>GSM tab.
Bad Telephone Nr.
The SMS number is not
acceptable for the D500/700 device.
Or the GSM system rejects
the SMS number.
Check end reenter correct
message number parameters
using the RainbowPlus program,
Communication>GSM tab.
Command not
supported.
An unrecognized SMS
command is received.
Send correct SMS command as
explained in the SMS COMMANDS
section of this document.
Connection error
The dyndns service does
not answer IP update
request.
The D-500/700 device will
reattempt IP update.
If the message is not repeated then
do not carry.
Turn the DC power off, wait 10
seconds and turn the power on
again.
Data sending error
Communication errors in
IP network. May occur
when the signal strength is
low or GSM system is
overloaded.
Relocate the antenna to a better
reception place.
Try other GSM operators.
This error is not critical and may
occur momentarily.
DynDNS Failed. Use IP
The central monitoring
(Rainbow Scada) server is
using the dyndns service
and the dns address of the
server cannot be resolved.
Check and correct Rainbow Server
address parameters using the
RainbowPlus program,
Communication>IP Settings tab
area.
Enter PIN Password
Sim card has PIN
protection and correct pin
is not programmed in the
D-500/700 device.
Check end reenter correct GSM
Sim Card PIN No parameter using
the RainbowPlus program,
Communication>GSM tab.
Abnormal Status Messages (alphabetical order)

-21-
MESSAGE
DESCRIPTION
REMEDY
Enter PUK Password
Sim card PIN number is
blocked because of
repeated faulty PIN
number setting.
Remove the Sim card from the D500/700 device. Place Sim card in
your mobile phone and enter
correct PUK number.
GPRS reconnection...
GPRS connection is lost.
The D-500/700 device is
trying to reconnect.
May occur when the signal
strength is low or GSM
system is overloaded.
If prepaid Sim card is used, credit
may be insufficient.
Relocate the antenna to a better
reception place.
Try other GSM operators.
This error is not critical and may
occur momentarily.
GPRS Stopped
GPRS connection is lost.
The D-500/700 device will
try to reconnect.
May occur when the signal
strength is low or GSM
system is overloaded.
If prepaid Sim card is used, credit
may be insufficient.
Relocate the antenna to a better
reception place.
Try other GSM operators.
This error is not critical and may
occur momentarily.
GPRS unusable/Bad
APN
GSM system rejects
GPRS connection because
of faulty APN parameters.
Check end reenter correct APN
parameters using the RainbowPlus
program, Communication>GSM
tab.
Incorrect PIN
Sim card has PIN
protection and correct pin
is not programmed in the
D-500/700 device.
Check end reenter correct GSM
Sim Card PIN No parameter using
the RainbowPlus program,
Communication>GSM tab.
Insert SIM Card !
Sim card not found in
dedicated slot.
Insert Sim card.
IP Error/No GPRS Serv.
The modem cannot be
attached to the GPRS
network.
The GSM system does not
grant IP address to the
modem.
If prepaid Sim card is used, credit
may be insufficient.
Sim card is not data enabled.
GPRS service is unavailable.
Relocate the antenna to a better
reception place.
Try other GSM operators.
Low signal/No network
GSM network is not
available.
GSM operator indication
disappears.
No GSM signal in current location.
Check antenna and antenna
connections.
Relocate the antenna to a better
reception place.
Try other GSM operators.
Place Sim card in your mobile
phone and check signal level.

-22-
MESSAGE
DESCRIPTION
REMEDY
Modem error,resetting
The modem is not
responding to commands
sent from the D-500/700
device. The modem
microprocessor is inactive.
The D-500/700 device is
resetting the modem.
Wait until the modem enters in
service.
If the modem does not enter in
service, then turn the DC power off,
wait 10 seconds and turn the power
on again.
Modem searching
The D-500/700 is
searching for a connected
modem.
Select correct modem using the
RainbowPlus program,
Communication>Option1>Modem
tab.
No Modem Response
The modem is not found,
although defined by
program parameter.
Select correct modem using the
RainbowPlus program,
Communication>Option1>Modem
tab.
If external modem is used, then
check connections.
If internal modem is used then turn
the DC power off, wait 10 seconds
and turn the power on again. If the
same fault condition continues, then
the modem is faulty.
Searching Network
GSM network is not
available.
GSM operator indication
disappears.
No GSM signal in current location.
Check antenna and antenna
connections.
Relocate the antenna to a better
reception place.
Try other GSM operators.
Place Sim card in your mobile
phone and check signal level.
Server Session Error
Modem is not responding
IP commands sent by D500/700 device.
Incorrect modem software version.
Please contact Datakom.
SMS error, trying...
SMS message reception is
not confirmed by the GSM
system. The D-500/700
device will retry SMS
sending 5 times.
The GSM system may be
answering too late. This is not
critical.
If prepaid Sim card is used, credit
may be insufficient.
SMS send/rcv error
SMS message reception is
not confirmed by the GSM
system after 5 SMS
sending attempts.
The GSM system may be
answering too late. This is not
critical.
If prepaid Sim card is used, credit
may be insufficient.
SMS deleting error
SMS messages in the Sim
card cannot be deleted.
Turn the DC power off, wait 10
seconds and turn the power on
again.
The D-500/700 device will erase all
SMS messages in the Sim card at
power-on.

-23-
MESSAGE
DESCRIPTION
REMEDY
Wrong Answer S:xx C:B
The modem returns a
command.
xx denotes command step
and C describes return
type.:
C:B Bad response
C:E Error
These messages are not critical
and does not affect operation. They
are for debugging purposes only.
Please contact Datakom if an
operational problem occurs.
 Loading...