

Page 1
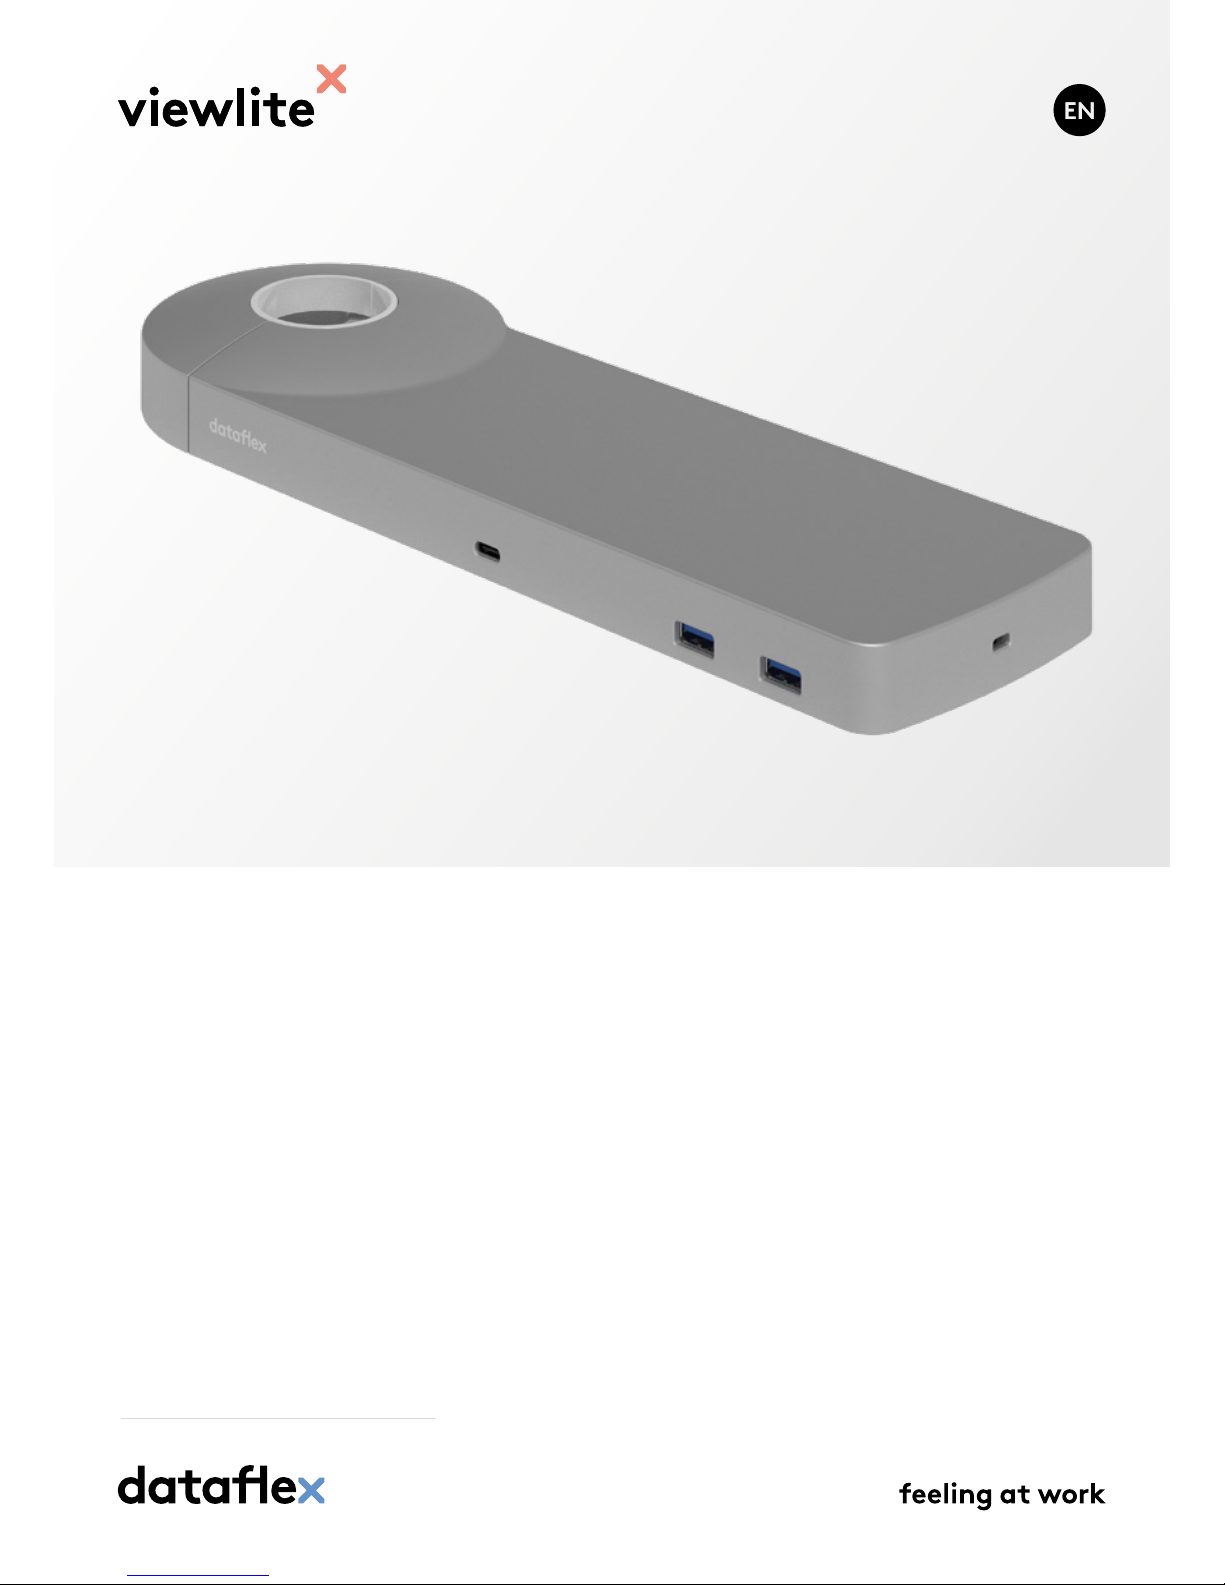
User manual
Viewlite link
v1.0
User manual
Copyright © 2018 – Dataflex International BV
T +31 180 515444
F +31 180 518540
www.dataflex-int.com
Page 2
Table of contents
1. General information 4
1.1 Introduction 4
1.2 General use warnings 4
1.2.1 Safety Instructions 5
1.2.2 Installation and maintenance instructions 6
1.3 Laptop check 6
1.4 Terminology denitions 7
2. Description of ports 8
2.1 Front 8
2.2 Back 8
2.3 Side 8
3.Before use 10
4. Using Link 11
4.1 Selecting the desired mode 11
4.2 Connecting a display device 13
4.3 Connecting to a network 13
4.4 Connecting USB 2.0 peripheral equipment 13
4.5 Connecting USB 3.1 peripheral equipment 14
4.6 Connecting to the power supply 14
4.7 Connecting your device 14
4.8 Connecting security devices 15
4.9 Conguring your display device 15
4.9.1 Windows 15
4.9.2 macOS 16
5. Technical support and guarantee 17
5.1 Troubleshoot 17
5.1.1 Common usage and connection problems 17
5.1.2 Video/audio problems 18
5.2 Specications 19
5.2.1 Dimensions and weight 19
5.2.2 Interface 19
5.2.3 Power 19
5.2.4 Energy consumption 19
5.2.5 System requirements 19
5.2.6 Environment 19
5.2.7 Certication 19
5.3 Guarantee information 20
5.4 Contact 20
Page 3

1. General information
1.1 Introduction
Easily connect your laptop or tablet to any modern workstation. Charge
your devices, connect to any network and two monitors. Link’s USB-C
technology makes it all possible within seconds, with just one cable.
1.2 General use warnings
• Read the separate Link installation manual carefully and familiarise
yourself with the product before use.
• Avoid the use of Link in extremely hot or cold environments. A safe
temperature is between 5 °C - 35 °C.
• Avoid the use of Link in humid environments. Humidity and condensation can accumulate in the product and cause damage to the electric
components.
• Only use the power adaptor provided with Link. Excessive or inadequate power can result in unstable performance or failure of the device.
• For optimal compatibility, use the included Dataex USB-C cable.
1.2.1 Safety Instructions
WARNING! The following instructions related to safety should be read
fully and carefully! Failure to follow these safety instructions can lead to
serious personal injury or material damage.
• Make sure other users of the product also have access to this manual
in order to guarantee the safe use of the product.
• If the product is reinstalled after being previously used, the instructions should always be consulted again.
• You are urgently advised to have the product installed by experienced
technicians.
• If the product is intended for mounting on another product, such as
a monitor, computer or tablet, the installation instructions provided
with that product must also be followed closely.
• If in doubt as to the correct installation method or if there is a contradiction between the installation instructions in this document
and those provided with another product, the product should not be
installed and/or used. In that case, contact the supplier.
• Keep the product and packaging materials out of reach of children!
The product is equipped with small parts, which could be swallowed
and may cause death by suocation.
• It is very important that any of the product’s rotating/moveable parts
can move unimpeded.
• Although the product has been designed and produced with the
utmost care, the risk of body parts such as ngers becoming trapped
can never be fully excluded. Therefore, always install and use the product cautiously and carefully.
Page 4

1.2.2 Installation and maintenance instructions
• These general Installation and Maintenance Instructions are supplementary to the instructions provided with the product, such as installation instructions, and are not intended as a replacement.
• Under no circumstances make any alternations to the product. If the
product does not meet the needs or requirements for which it was
acquired, it should not be used.
• Before installation, the adequacy (conditions) of the surface on, to or
against which the product will be placed must be checked (thickness,
solidity and stability).
• Select the diameter and depth of any mounting holes so that all plugs
and screws can be secured rmly and without any problems. Before
drilling mounting holes, check there are no electricity, water or other
pipes running behind the mounting surface.
• During use, regularly check if the screw connections of the mounted
product are still securely attached to the surface. These connections
can become loose through frequent movement.
• If the condition of the product is such that the product can no longer
be used safely, for example through wear and tear, the product must
be taken out of use and care must be taken that it can no longer be
operated, even inadvertently or unwittingly by others.
• With moveable/adjustable products, take care that the installed product can move unimpeded around its axis.
• Cleaning instructions: do not use corrosive or abrasive substances –
use only a damp cloth.
1.3 Laptop check
Go to the Link product page on our website to read about the Link laptop
check. This easy test lets you check whether your device is 100% suitable
for use with Link.
www.dataex-int.com/en/link
1.4 Terminology denitions
Device: Electronic device, such as a laptop or tablet,
with a USB-C port.
Peripheral equipment: Electronic equipment, such as a keyboard,
mouse or storage medium, that only functions
in combination with your device.
Display device: A monitor or digital projector.
Link: Viewlite USB-C docking station.
Full HD: Display device resolution of 1920 x 1080.
2K: Display device resolution of 2048 × 1080.
4K: Display device resolution of 4096 × 2160.
HighSpeed: Data speed of 480 Mbit/s.
SuperSpeed: Data speed of 5 Gbit/s.
Dual 4K mode: Switch function that sets the resolution of
your display device to a maximum of dual
4096x2160.
SuperSpeed mode: Switch function that sets Link’s data speed to
SuperSpeed mode.
Port: Facility for the connection of cables/devices to
enable the transfer of data, image information
and power.
Page 5
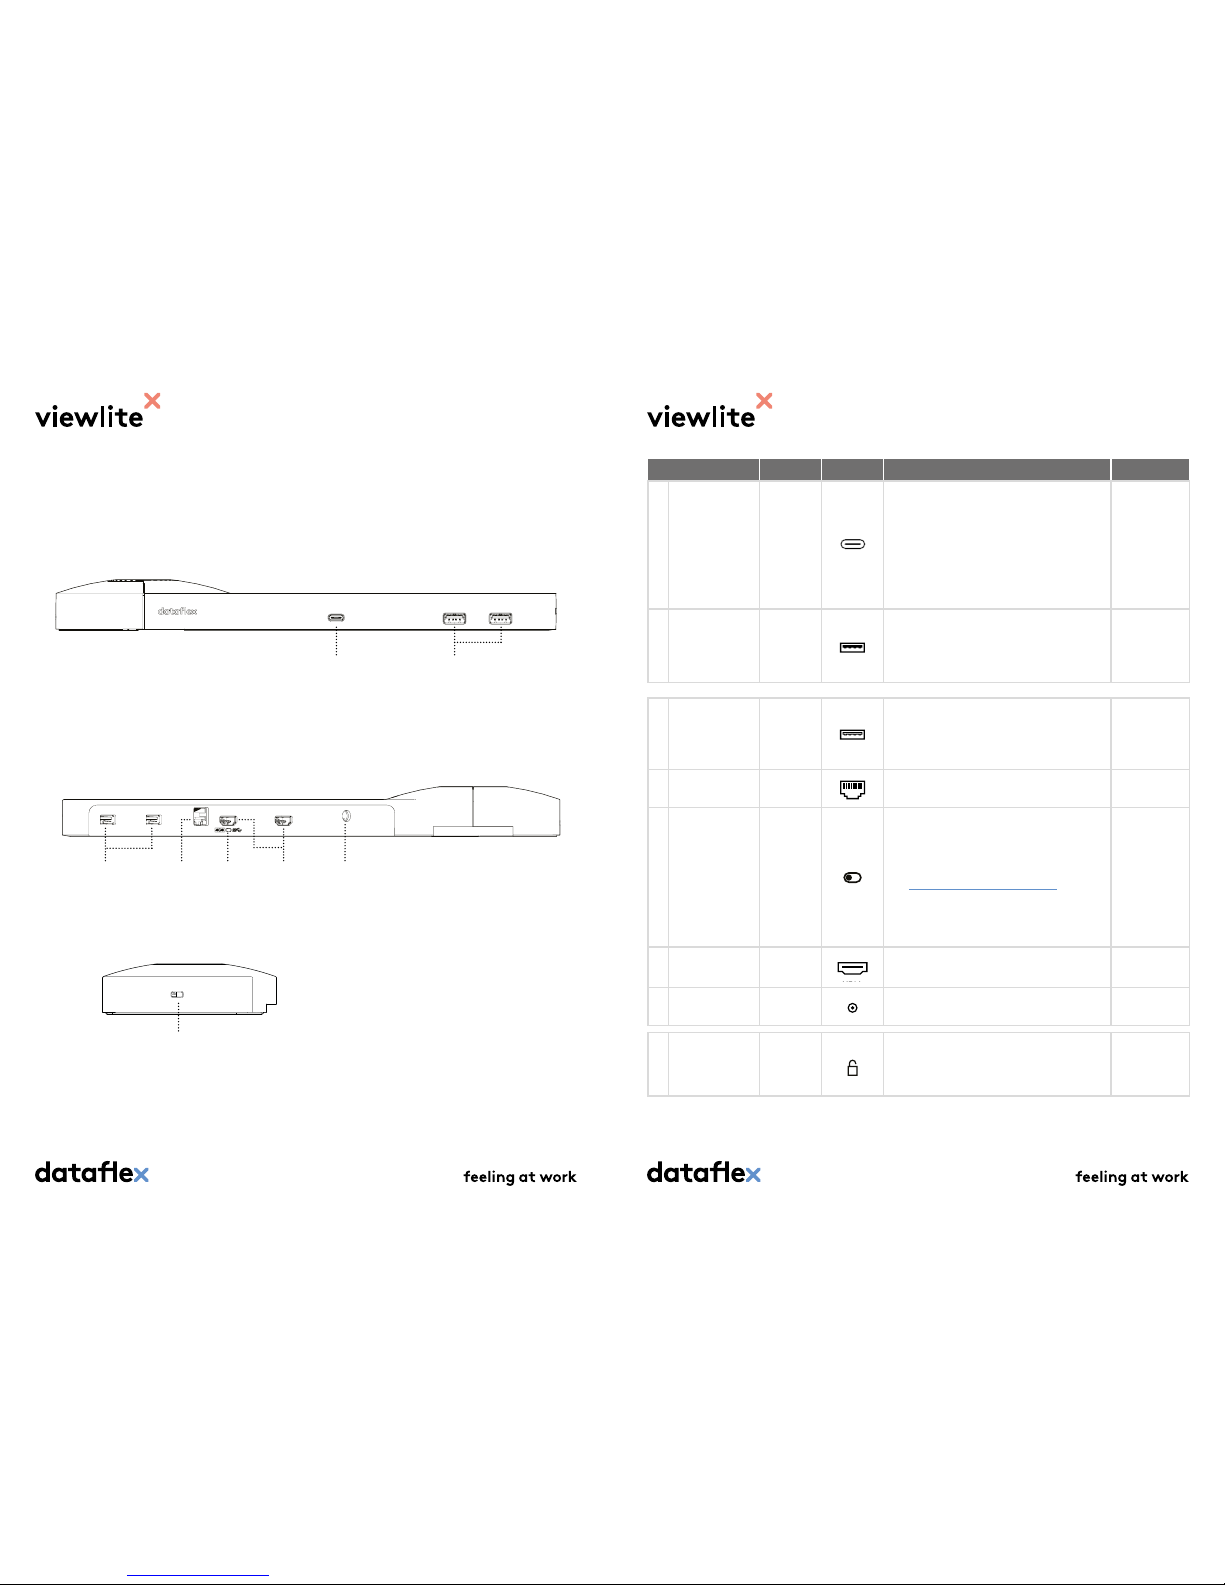
2. Description of Ports
The following overview provides a list of all ports in Link.
2.1 Front
2.2 Back
2.3 Side
Port
Standard
Symbol Description Capacity
1 USB Type C 3.1 Gen 1
Connects your device to Link. This port enables the transfer of data, visual information
and power.
Take note: Dataex recommends using the
included Dataex USB-C cable to connect
your device to Link. This ensures the best
possible use of all the possibilities oered
by Link.
60W
(20V x 3A)
2 USB Type A 3.1 Gen 1
Connects your peripheral equipment to
Link. This port enables the transfer of data
and power.
Oers SuperSpeed support.
10W
(5V x 2.1A)
3 USB Type A 2.0
Connects your peripheral equipment to
Link. This port enables the transfer of data
and power.
Oers HighSpeed support.
2,5W
(5V x 0.5A)
4
Network connector
RJ-45
Connects Link to a network or the Internet
via an Ethernet cable.
5
Dual 4K/Super-
Speed switch
Makes it possible to switch between dierent
modes. This switch aects the maximum
screen resolution, screen refresh rate, USB
and Ethernet speed.
See 4.1 Selecting the desired mode for more
information.
Take note: After switching, it is important to
reconnect the device using the USB-C cable.
6 HDMI 1.4
Connects a maximum of two display devices
to Link.
7 Power DC
Connect Link to the power supply using the
adapter and cable provided.
90W
(24V x 3,75A)
8 Safety
Kensington
Facility for connecting a Kensington lock to
protect Link from theft.
Take note: Lock not included.
2
3 5 6 7
1
8
4
Page 6
3.Before use
Before using Link, check to make sure your device meets the following
conditions at the time of use:
Your device – Processor: For optimal performance, use Link with a
device equipped with an Intel Kaby lake processor, 7th generation or
newer. See the specications for your device for this information.
Your device – USB-C port: Check whether your device is equipped
with a USB Type C port. Without this port, you cannot use the Link
functionalities.
Your device – BIOS: Make sure your device’s BIOS is running with
the latest updates. See the specications for your device for this
information.
Your device – Operating system: Make sure the operating system is
up-to-date. See the specications for your device for this information.
4. Using Link
Link is highly intuitive. To ensure that you make the most of the pos-
sibilities oered by Link, we recommend reading through this chapter
carefully before rst use.
4.1 Selecting the desired mode
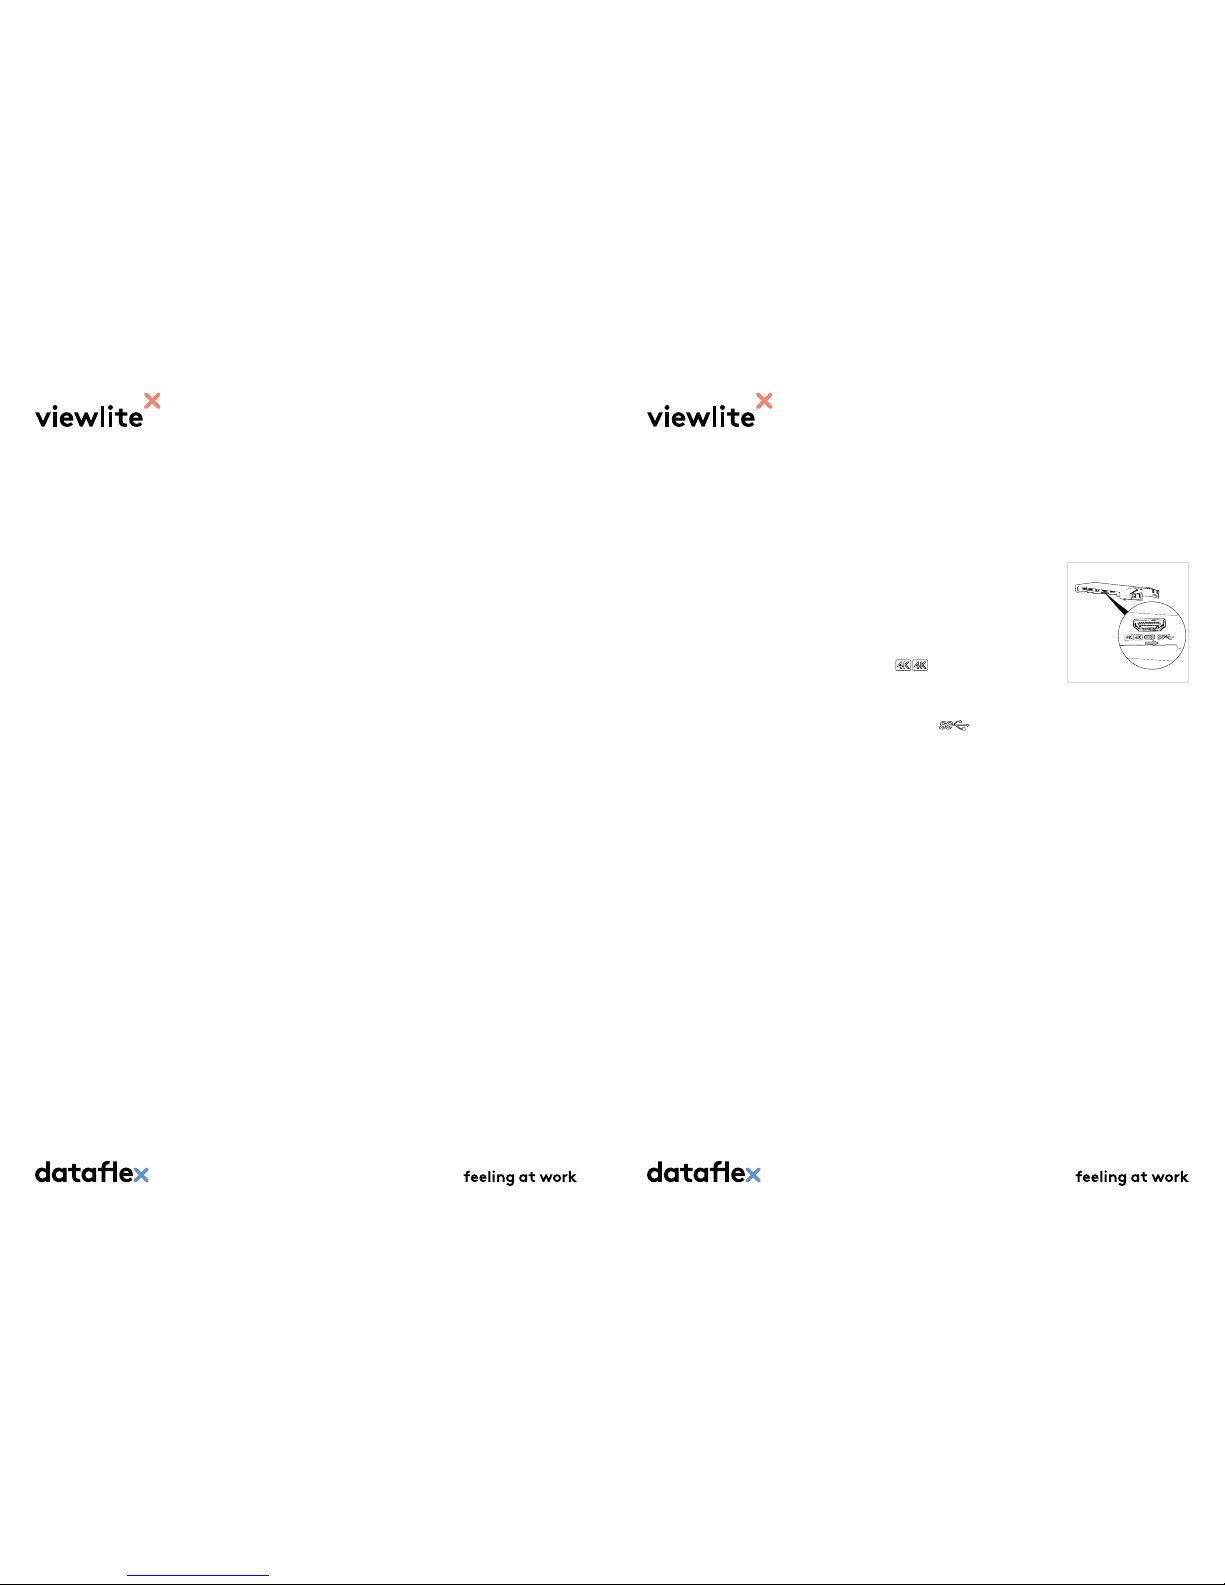
The dual 4K/SuperSpeed switch (see table 2.2) allows Link to oer the
possibility of two dierent modes. You decide whether you want to use
the highest USB and Ethernet speeds or prefer to use the highest screen
resolutions.
Dual 4K mode: If the switch is set to dual 4K , Link supports two
display devices at 4K screen resolution, with a maximum USB speed of
480 Mbit/s.
SuperSpeed mode: If the switch is set to SuperSpeed , Link supports a maximum of one display devices at 4K screen resolution or two
display devices at 2K screen resolution, with a maximum USB speed of 5
Gbit/s.
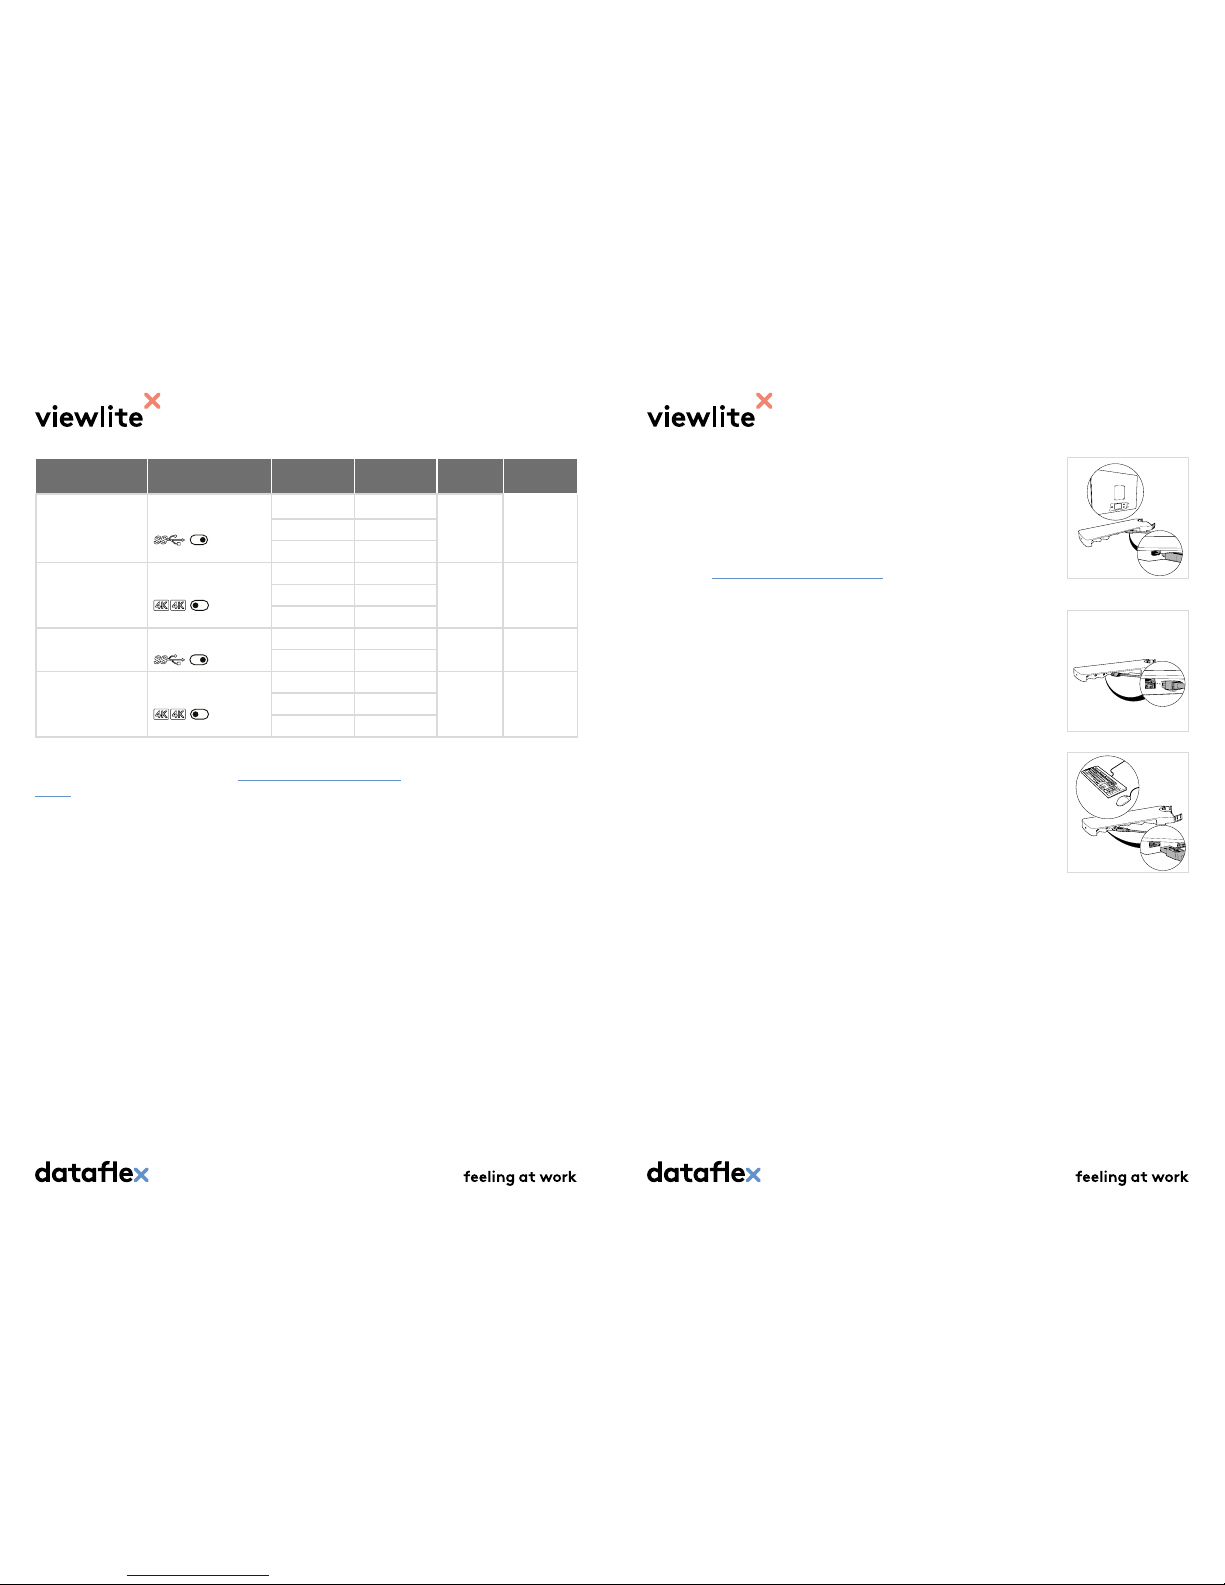
See the table below for an overview of all possible resolutions and the
corresponding speeds.
Page 7
4.2 Connecting a display device
You can connect one or two display devices to Link via the two HDMI
ports (see table 2.2) on the back of Link.
Take note: If your display device does not have an HDMI connection, you
can easily convert your VGA, DVI or display port connection to HDMI.
See section 4.1 Selecting the desired mode for screen resolution options.
4.3 Connecting to a network
You can connect Link to a network or the Internet via the RJ-45 Gigabit
Ethernet port (See table 2.2) on the back of Link.
Take note: Use a CAT5 or newer Ethernet cable with RJ45 connection to
take advantage of all the possibilities oered by Link.
4.4 Connecting USB 2.0 peripheral equipment
You can connect peripheral equipment to Link via the two USB 2.0
ports (see table 2.2) on the back of Link. The USB 2.0 ports support
HighSpeed rates and a power output of 2.5 watts.
Take note: Make sure the peripheral equipment is compatible with the
performance specications of Link.
Number of external
display devices
Mode
Max. resolution
Max. refresh
rate
Max. USB
speed
Max. Ethernet speed
1
SuperSpeed
1920 x 1200 60 Hz
5 Gbit/s 1 Gbit/s2048 x 1536 60 Hz
4096 x 2160 30 Hz
1
Dual 4K
1920 x 1200 60 Hz
480 Mbit/s 100 Mbit/s2048 x 1536 60 Hz
4096 x 2160 60 Hz
2
SuperSpeed
1920 x 1200 60 Hz
5 Gbit/s 1 Gbit/s
2048 x 1536 30 Hz
2
Dual 4K
1920 x 1200 60 Hz
480 Mbit/s 100 Mbit/s2048 x 1536 60 Hz
4096 x 2160 30 Hz
To check the screen resolution of your display device and adapt it via
your device’s operating system (see: 4.9 Conguring your display
device).
Take note: Check the specications of your display devices and your
device. These specications may not exceed the maximum screen reso-
lution and USB/Ethernet speeds.
Take note: If you have two 4K display devices, set Link to the dual 4K
mode and not the SuperSpeed mode. In SuperSpeed mode, the restrictions in your device’s operating system will prevent it from functioning.
This can be remedied by disconnecting the device, switching to dual 4K
mode and reconnecting the device to Link.
Page 8
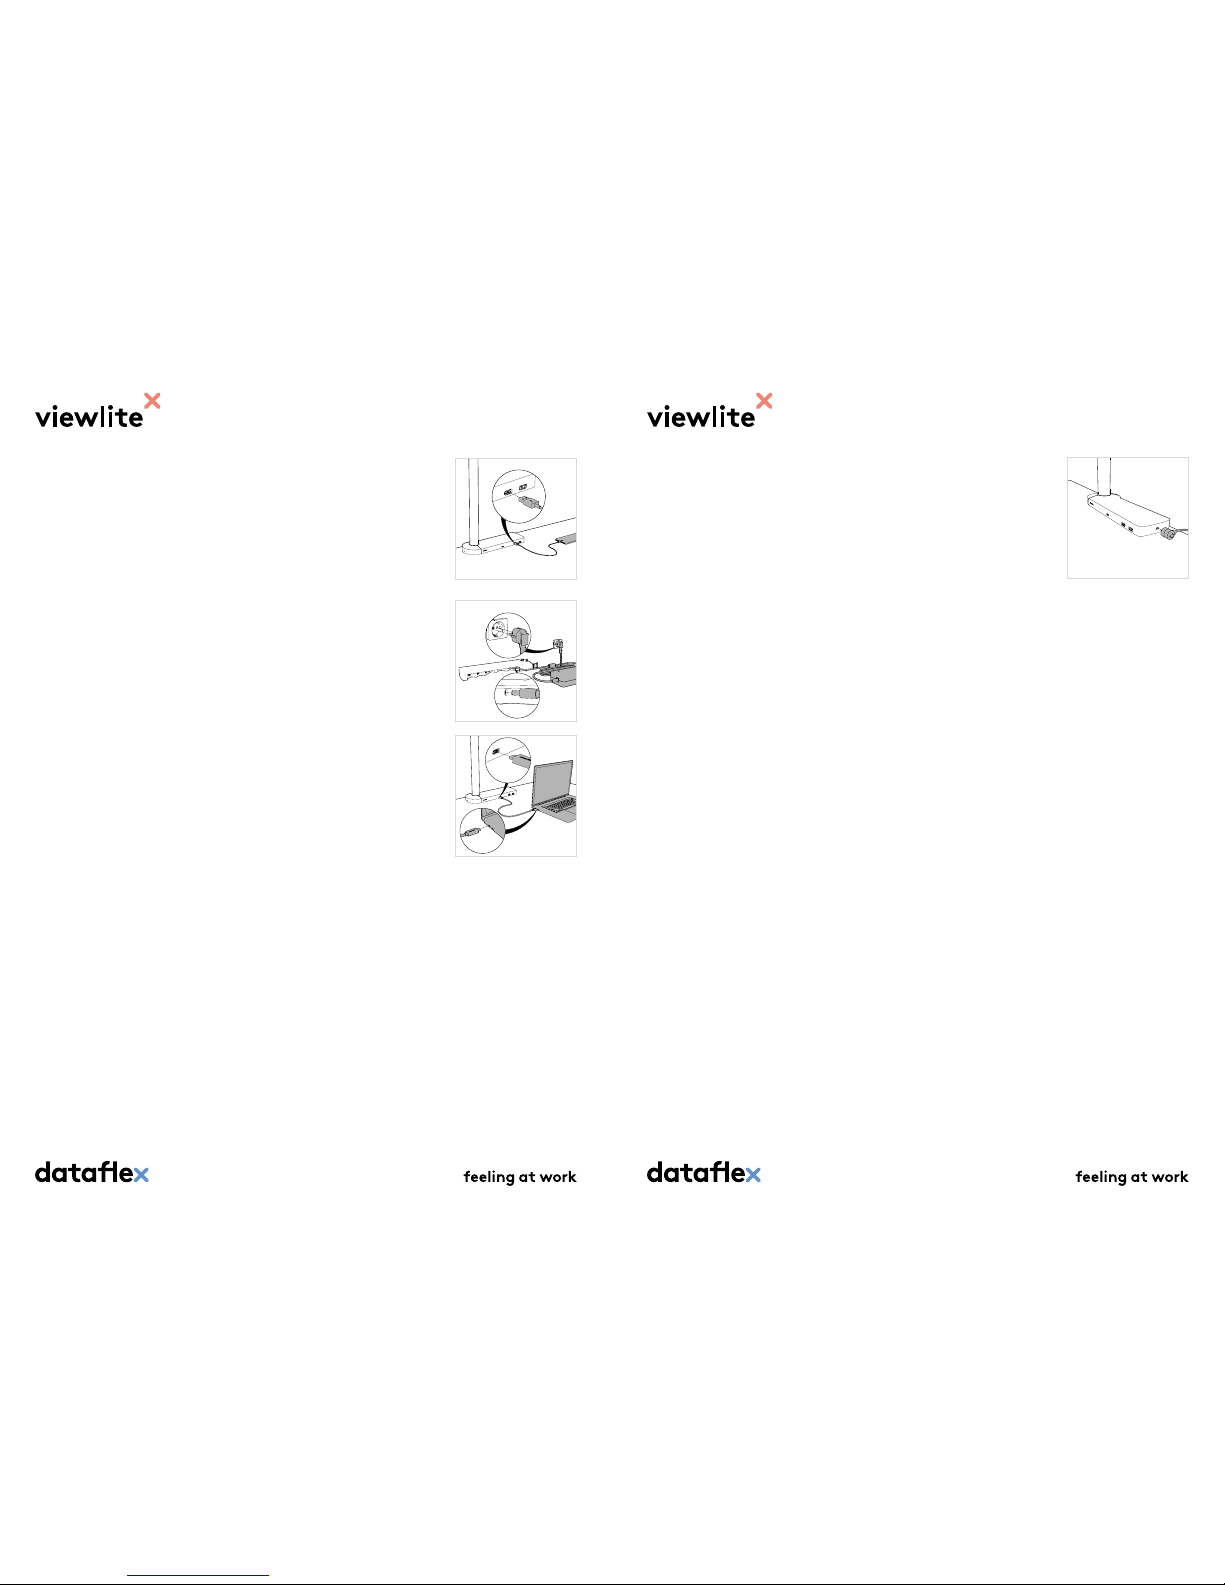
4.8 Connecting security devices
It is possible to attach Link to your desk using a Kensington lock (not
included) (see table 2.3). See the lock manual for more information.
4.9 Conguring your display device
You can congure the display device you have connected in your device’s
operating system. This manual contains general instructions for the two
most common operating systems.
4.9.1 Windows
Use Windows to congure the display on one or two display devices
connected to Link.
Right-click on the desktop and select screen resolution.
In this window, select the desired resolutions.
You have three options for conguring your screens:
1) Setting an external display device as the main screen.
2) Setting external display devices as an extension of the main
screen (expand main screens).
3) Setting external display device as a duplicate of the main
screen (duplicate main screens).
Tip: You can also open the screen settings by holding down Windows+P.
4.5 Connecting USB 3.1 peripheral equipment
You can connect peripheral equipment to Link via the two USB 3.1
ports (see table 2.1) on the front of Link. The USB 3.1 ports support
SuperSpeed rates and a power output of 10 watts.
Take note: Make sure the peripheral equipment is compatible with the
performance specications of Link.
4.6 Connecting to the power supply
Use the adapter and cable provided to connect Link to the power supply
(see table 2.2). When connected to the power supply, Link will automatically switch on (to stand-by). You can switch o Link completely by
disconnecting it from the power supply.
4.7 Connecting your device
You can connect your device to Link via the USB-C port (see table 2.1)
on the front of Link. Your device can now take advantage of all the
possibilities oered by Link.
Connecting and disconnecting: The device can be connected to Link or
disconnected from Link, regardless of whether Link and the device are
switched on or o.
Take note: Not all USB-C cables support the USB 3.1 Gen 1 standard. It
is possible that these cables do not support data, visual information
and power transfer. Dataex therefore recommends using the included
Dataex USB-C cable to connect your device to Link. This ensures the
best possible use of all the possibilities oered by Link in combination
with your device.
Page 9
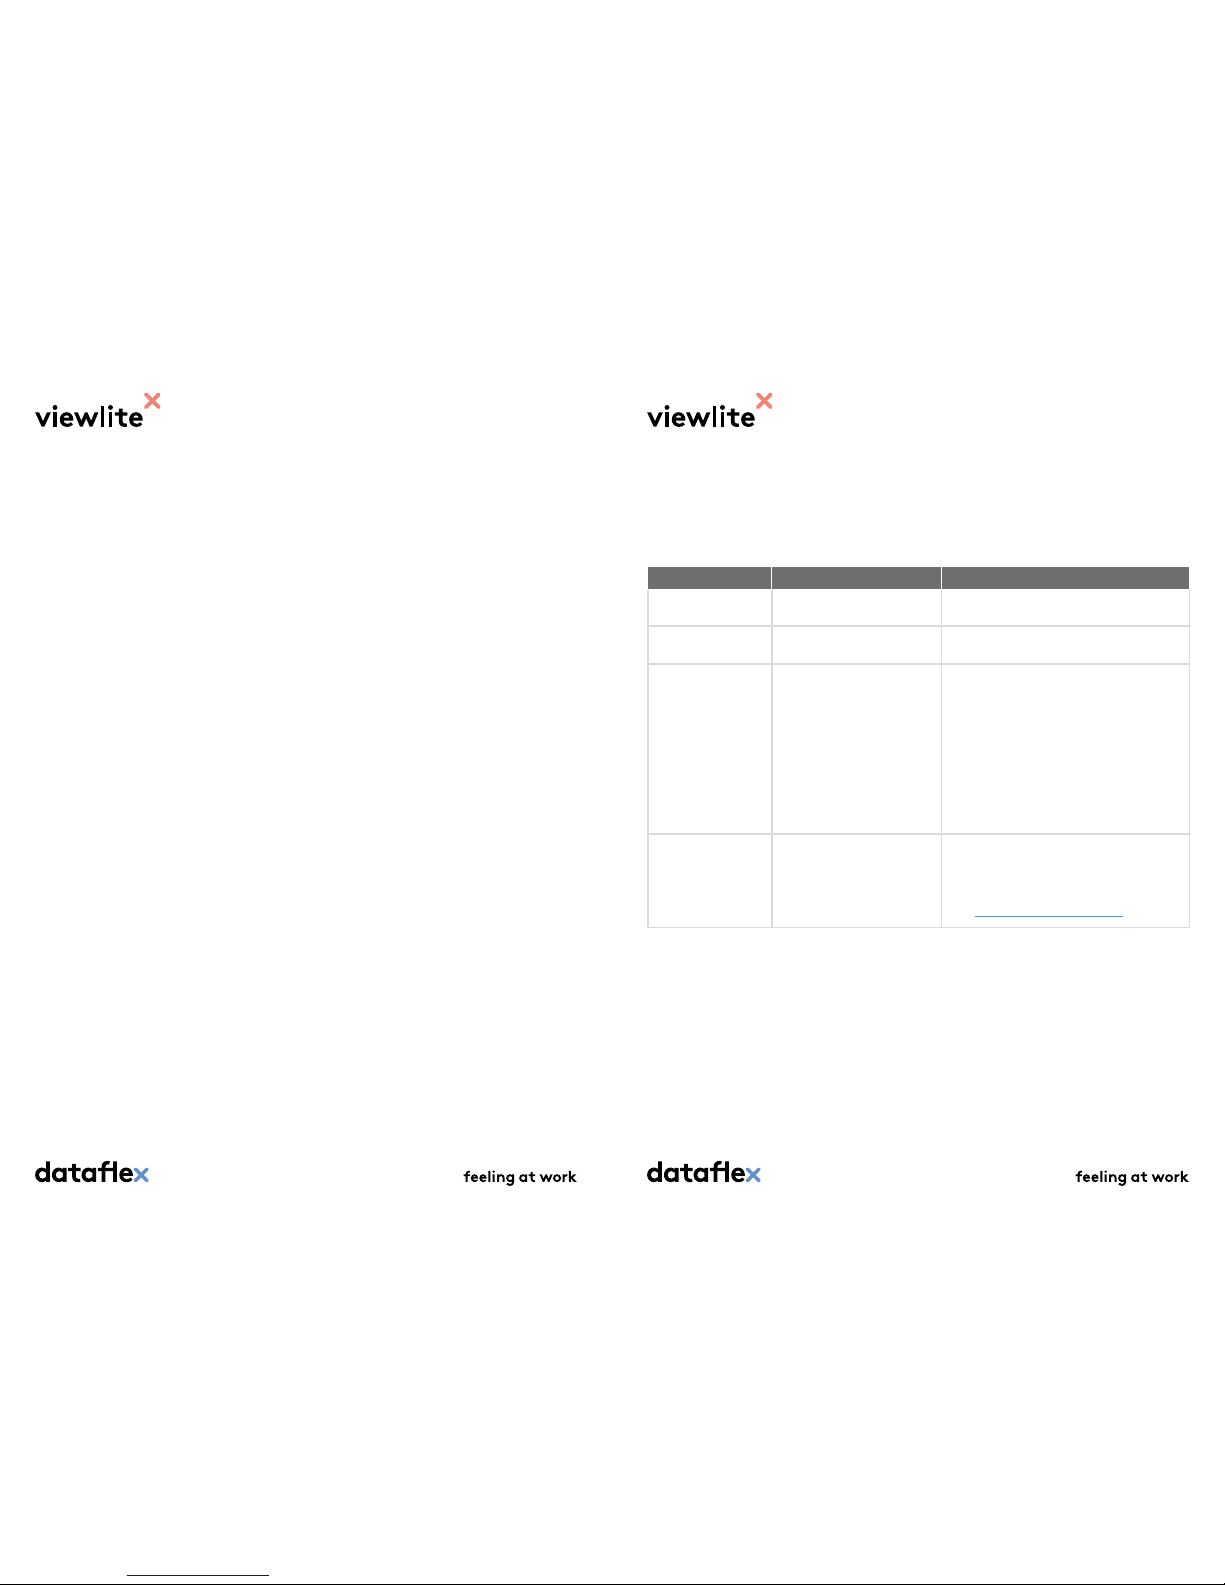
5. Technical support and guarantee
5.1 Troubleshoot
5.1.1 Common usage and connection problems
Problem Possible cause Solution
The Link ports do not
work.
Link is not connected to the
power supply.
Connect the adapter and cord included to Link
and to a power outlet.
Link is not connected properly to
the device.
Disconnect the USB-C cable from the device and
reconnect it.
A USB port on Link is
switched o.
The USB device connected to the
Port may not be compatible to
the performance specications
of Link.
Do the following to switch on the Port again:
Disconnect the adapter and cable from Link and
reconnect it.
- or -
Disconnect the Link USB device and reconnect it.
Use a device that is compatible with Link or se-
lect a dierent Port, one that is compatible with
the performance specications for your device
(see tables 2.1 and 2.2).
The USB-C input has a
slow connection.
The dual 4K/SuperSpeed switch
is not in the right position.
Check whether the switch on the back of Link
(see: table 2.2) is set to dual 4K or SuperSpeed.
If necessary, switch to SuperSpeed for 5Gbit/s
speed.
(See: 4.1 Selecting the desired mode).
4.9.2 macOS
Use macOS to congure the display on one display device connected to
Link.
In the Apple menu, select the option System preferences and then select
the Screens tab. In this window, select the desired resolution for the
display device. Click on the Arrangement tab and make sure that the
Mirror displays checkbox is not selected if you do not want to duplicate
the screen.
A window will appear on the external display device with the corresponding settings.
Page 10
5.2 Specications
5.2.1 Dimensions and weight
Width: 315 mm (12,4 inches)
Depth: 110 mm (4,3 inches)
Height: 32 mm (1.3 inches)
Weight: 0.5 kg ( 1.1 lb)
5.2.2 Interface
1x USB 3.1 Gen 1 Type C
2x USB 3.1 Gen 1 Type A
2x USB 2.0 Type A
2x HDMI
1x Gigabit Ethernet
5.2.3 Power
AC input: 100V-240V
DC output: 24V/3,75A, 90W
5.2.4 Energy consumption
Stand-by: 2W
On: max. 90W
5.2.5 System requirements
Windows 10 and newer
Apple macOS Version 10.12 (Sierra)
and newer
5.2.6 Environment
Operating temperature and humidity level:
• 0°C ... +40°C
• 20 ... 80% Relative humidity
without condensation (standard)
Storage temperature and humidity
level:
• 10... 90% Relative humidity
without condensation
• -15°C ... +50°C
Maximum height:
• In use: 2,000 m
• In storage: 12,000 m (airplane)
5.2.7 Certication
CE
• 2014/35/EU: CE standard for
low-voltage material
• 2014/30/EU: CE standard for
electromagnetic compatibility
USB compliance testing:
• USB Type C
• USB PD (Power delivery)
• USB SuperSpeed HUB
• Displayport Alt Mode for USB
type-C compliance test.
HDMI 1.4 and Ethernet
• HDMI Source PHY Electrical
• Gigabit Ethernet PHY Electrical
(1000Base-T)
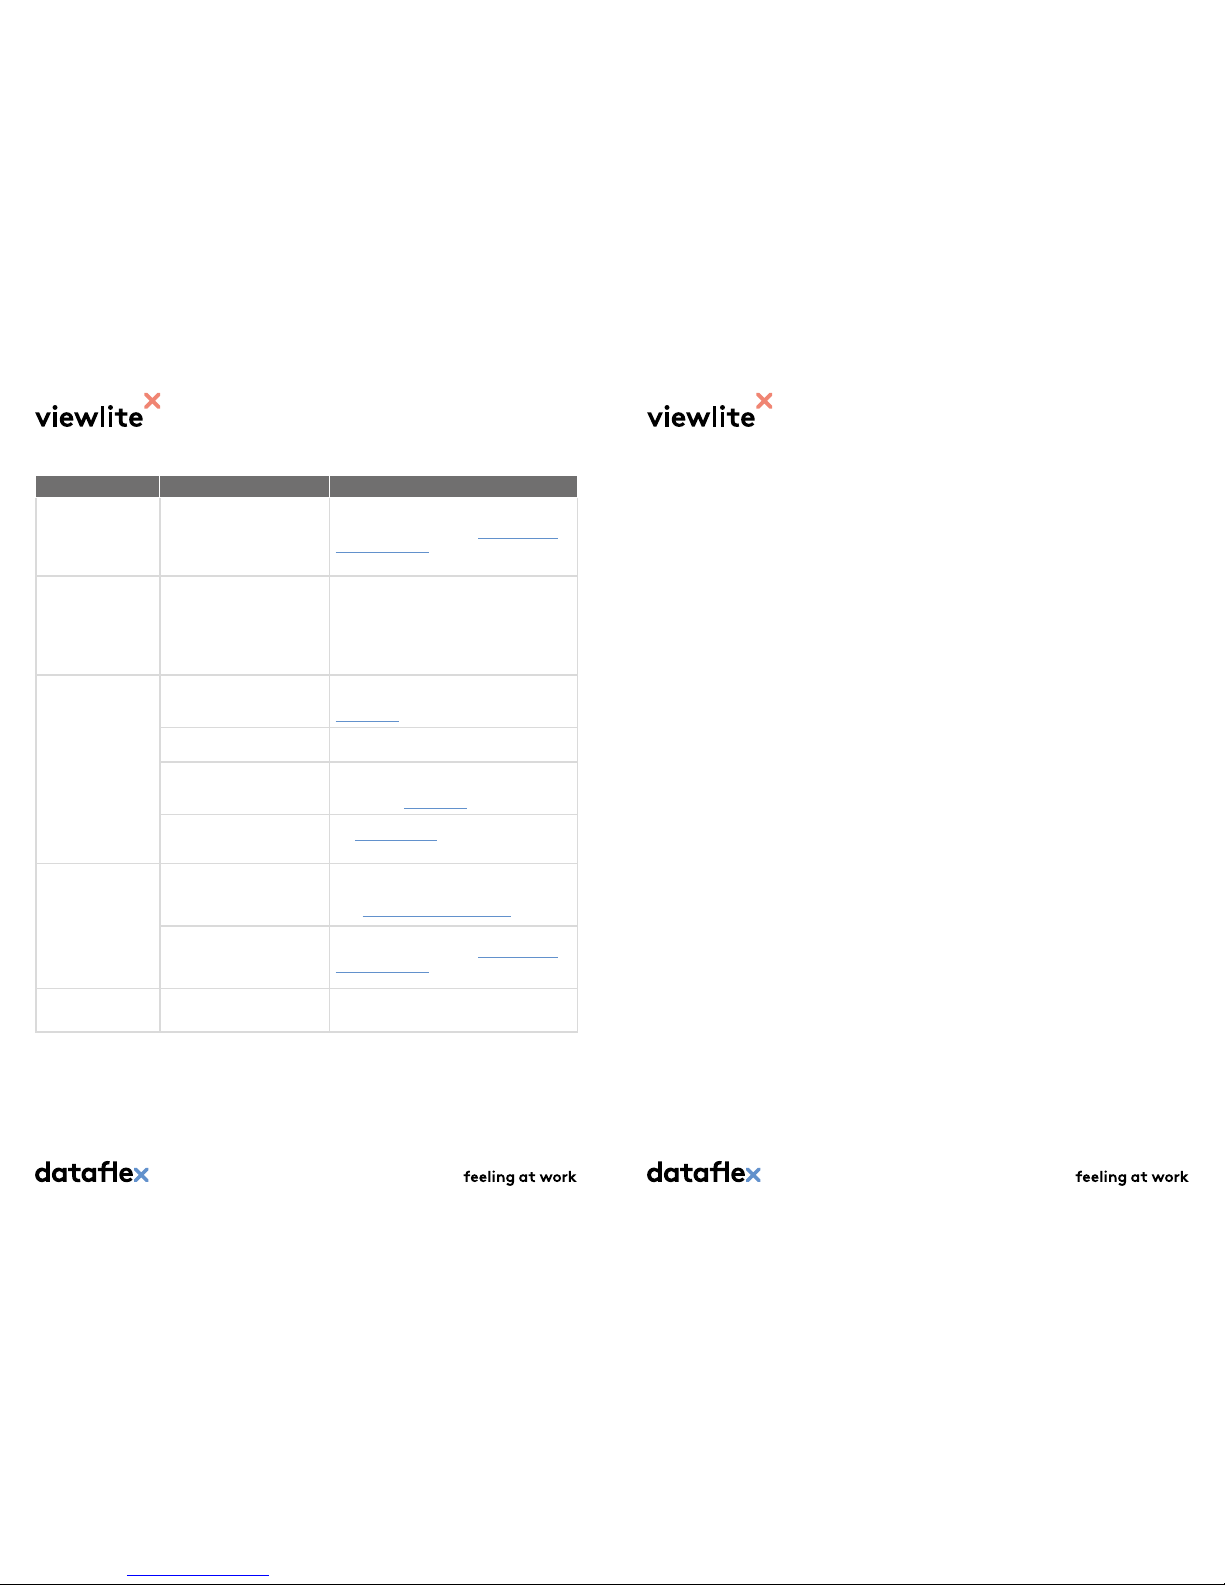
5.1.2 Video/audio problems
Problem Possible cause Solution
Fonts and other
characters are displayed in large size on
the external display
device.
The screen resolution is not
congured properly.
Set the screen resolution to the same or lower
than the maximum limit (see 4.9 Conguring
your display device).
The letters on the
external display device
are too small.
The settings for the operating
system’s screen resolution are
set to 100% by default.
Change the font size on your device.
Windows: Go to the Conguration screen >
Display settings to change the font size.
macOS: Go to the System preferences > Display
screen to change the font size.
The connected display
device shows a black
screen.
The drivers or BIOS are outdated.
Make sure your drives and BIOS are updated with
software from your device’s manufacturer. (See
3. Before use)
The USB-C cable does not support the screen.
Use the included Dataex USB-C cable (58.083).
Screen software does not recognise the external display device.
Make sure your screen software is up-to-date
and runs on software from your device’s manufacturer. (See 3. Before use)
You do not have a Kaby Lake
(generation 7) processor or
higher.
See 1.3 Laptop check.
The external display
device does not display
the desired resolution.
The dual 4K/SuperSpeed switch
is not in the right position.
Check whether the switch on the back of Link
(see table 2.2) is set to dual 4K or SuperSpeed.
(See: 4.1 Selecting the desired mode).
The screen resolution is not
congured properly.
Set the screen resolution to the same or lower
than the maximum limit (see 4.9 Conguring
your display device).
No sound can be heard
via the display device.
Your HDMI cable does not meet
the required standard.
Use certied HDMI 1.4 cables.
Page 11

5.3 Guarantee information
This document contains important information
about the product; it should be read in its
entirety before further unpacking, installing or
using the product. Failure to follow the instructions in this document can lead to serious
personal injury or material damage.
Guarantee Terms and Conditions
The guarantee certies solely that DFX will
replace any product with an equivalent or
repair product at its own cost if it ceases functioning within a two-year period after purchase
(‘the guarantee’).
The guarantee is void if (i) the defect appears
to be due to gross negligence or to the product
not being used for its intended purpose, (ii) no
proof of purchase can be provided by request
of DFX or (iii) it appears that the Guarantee &
Safety, Installation and Operating Instructions
have not been followed.
The guarantee is limited exclusively to the
aforementioned. Specically, the guarantee
should not be interpreted as acceptance of any
liability of DFX which does not exist under the
current laws and regulations.
5.4 Contact
Contact details
support@dataex-int.com
www.dataex-int.com/en/link/FAQ
 Loading...