

DataDirect Networks StorageScaler 2460 Installation And User Manual

StorageScaler 2460
USO RESTRITO
Installation and User Guide
SS2460
Document No.: 96-00290-001
Document Revision: A1

Important Information
USO RESTRITO
Information in this document is subject to change without notice and does not represent a commitment on
the part of DataDirect Networks, Inc. No part of this manual may be reproduced or transmitted in any form
or by any means, electronic or mechanical, including photocopying and recording, for any purpose other
than the purchaser’s personal use without the written permission of DataDirect Networks, Inc.
© 2013 DataDirect Networks, Inc. All rights reserved.
DataDirect Networks, the DataDirect Networks logo, DirectOS, DirectProtect, EXAScaler, GRIDScaler,
Information in Motion, NAS Scaler, NoFS, ObjectAssure, SATAssure, Silicon Storage Appliance, S2A, Storage
Fusion Architecture, SFA, Storage Fusion Fabric, xSTREAMScaler, Web Object Scaler, WOS are registered
trademarks or trademarks of DataDirect Networks, Inc. All other brand and product names are trademarks
of their respective holders.
DataDirect Networks makes no warranties, express or implied, including without limitation the implied
warranties of merchantability and fitness for a particular purpose of any products or software. DataDirect
Networks does not warrant, guarantee or make any representations regarding the use or the results of the
use of any products or software in terms of correctness, accuracy, reliability, or otherwise. The entire risk as
to the results and performance of the product and software are assumed by you. The exclusion of implied
warranties is not permitted by some jurisdictions; this exclusion may not apply to you.
In no event will DataDirect Network, their directors, officers, employees, or agents (collectively DataDirect
Networks) be liable to you for any consequential, incidental, or indirect damages, including damages for loss
of business profits, business interruption, loss of business information, and the like, arising out of the use or
inability to use any DataDirect product or software even if DataDirect Networks has been advised of the
possibility of such damages by you. Because some jurisdictions do not allow the exclusion or limitation of
liability for consequential or incidental damages, these limitations may not apply to you. DataDirect
Networks liability to you for actual damages from any cause whatsoever, and regardless of the form of the
action (whether in contract, tort including negligence, product liability or otherwise), is limited to the sum
you paid for the DataDirect product or software.
Document Number 96-00290-001 Rev. A1
April 2013
96-00290-001 Rev. A1 DataDirect Networks StorageScaler 2460 User Guide | ii
Important Information
USO RESTRITO
STANDARD WARRANTY
Definitions: This two-year limited warranty applies to the following DataDirect Networks network infrastructure and
individual SAN solution components that include: Silicon Storage Appliance Hardware, Drive Modules, RAID Hardware
Components, Storage Hardware Components, and Disk Drive Docking Bays and Enclosures (hereinafter “DataDirect
Networks Products”). Fibre Channel Interface Kits, SCSI Interface Kits, Host Adapters and Networking Products are
limited to a 90-day warranty. Software bundled or included with DataDirect Networks solutions are furnished exclusively
under the terms of the applicable license agreements.
Warranty: DataDirect Networks warrants that the DataDirect Networks Products accompanied by this limited Warranty
are free from defects in material and workmanship for a period of two years from the date of original purchase from
DataDirect Networks or an authorized DataDirect Networks reseller. During the term of this Warranty, DataDirect
Networks will, at its option, repair or replace any defective parts of the DataDirect Networks products purchased under
this Warranty at no additional charge. Repair parts or replacement DataDirect Networks products will be furnished on
an exchange basis, and will be either reconditioned or new. When returning the DataDirect Networks products, the
Purchaser must prepay any shipping charges. In addition, the Purchaser is responsible for insuring the products returned
and assumes the risk of loss during shipment.
Warranty Claim Requirements: Purchaser claims made pursuant to this Warranty must conform to the following
requirements:
1. The DataDirect Networks products must be returned to (a) an Authorized DataDirect Networks Servicing Reseller in
the country of original purchase, or (b) a DataDirect Networks facility which performs Warranty service in the country
of original purchase, or (c) an Authorized DataDirect Networks Third Party Service Provider in the country of original
purchase.
2. The Purchaser must provide proof of purchase and date of purchase from DataDirect Networks or an Authorized
DataDirect Networks Reseller.
3. The Purchaser may request information on how to obtain warranty service by contacting any Authorized DataDirect
Networks Reseller, or by writing to the Warranty Service Department, DataDirect Networks, 9351 Deering Avenue,
Chatsworth, CA 91311.
Disclaimers: THIS LIMITED WARRANTY DOES NOT APPLY TO ANY DATADIRECT NETWORKS PRODUCTS WHICH
HAVE BEEN DAMAGED OR RENDERED DEFECTIVE (a) AS A RESULT OF ACCIDENT, MISUSE, OR ABUSE; (b) BY
THE USE OF PARTS NOT MANUFACTURED OR SOLD BY DATADIRECT NETWORKS; (c) BY MODIFICATION
WITHOUT THE WRITTEN PERMISSION OF DATADIRECT NETWORKS, OR (d) AS A RESULT OF SERVICE BY
ANYONE OTHER THAN DATADIRECT NETWORKS, AN AUTHORIZED DATADIRECT NETWORKS SERVICING
RESELLER, OR AN AUTHORIZED DATADIRECT NETWORKS THIRD PARTY SERVICE PROVIDER.
EXCEPT AS EXPRESSLY SET FORTH ABOVE, DATADIRECT NETWORKS MAKES NO OTHER WARRANTIES,
EXPRESS OR IMPLIED, INCLUDING, BUT NOT LIMITED TO, ANY IMPLIED WARRANTIES OF MERCHANTABILITY
AND FITNESS FOR PURPOSE, AND DATADIRECT NETWORKS EXPRESSLY DISCLAIMS ALL WARRANTIES NOT
STATED HEREIN. IN THE EVENT THE PRODUCTS ARE NOT FREE FROM DEFECTS AS WARRANTED ABOVE, THE
PURCHASER'S SOLE REMEDY SHALL BE REPAIR OR REPLACEMENT AS PROVIDED ABOVE. UNDER NO
CIRCUMSTANCES WILL DATADIRECT NETWORKS BE LIABLE TO THE PURCHASER, OR TO ANY USER, FOR ANY
DAMAGES, EXPENSES, LOST PROFITS, LOST SAVINGS, DAMAGE TO OR REPLACEMENT OF EQUIPMENT AND
PROPERTY, COSTS OF RECOVERING, REPROGRAMMING, OR REPRODUCING ANY PROGRAM OR DATA STORED
IN OR USED WITH THE PRODUCTS, OR OTHER DAMAGES ARISING OUT OF THE USE OR INABILITY TO USE THE
DATADIRECT NETWORKS PRODUCTS.
ANY IMPLIED WARRANTIES ARE LIMITED TO THE TERMS OF THIS EXPRESS LIMITED WARRANTY. SOME
STATES DO NOT ALLOW THE EXCLUSION OR LIMITATION OF INCIDENTAL OR CONSEQUENTIAL DAMAGES FOR
CONSUMER PRODUCTS,
WARRANTY LASTS, SO THE ABOVE LIMITATIONS OR EXCLUSIONS MAY NOT APPLY TO YOU. THIS WARRANTY
GIVES YOU SPECIFIC LEGAL RIGHTS, AND YOU MAY ALSO HAVE OTHER RIGHTS WHICH VARY FROM STATE TO
STATE.
AND SOME STATES DO NOT ALLOW LIMITATIONS ON HOW LONG AN IMPLIED
96-00290-001 Rev. A1 DataDirect Networks StorageScaler 2460 User Guide | iii

About this Guide
USO RESTRITO
This user guide explains how to install, configure, and use the DataDirect Networks
StorageScaler 2460 enclosure.
This user guide assumes that you are familiar with Serial Attached SCSI (SAS), Serial ATA
(SATA) technology, computer hardware, data storage, and network administration
terminology and tasks.
Terminology Used in this Guide
Because this user guide provides information that can be used to manage one or more
SS2460 enclosures in a variety of configurations, the generic term “storage space” is used to
refer to the controller, disk drives, and enclosures being used together for data storage.
Many of the terms and concepts referred to in this user guide are known to computer users
by multiple names. In this user guide, this terminology is used:
• I/O Controller (also known as an I/O module, or controller)
• Disk drive (also known as hard disk, hard drive, or hard disk drive)
• HBA (also known as Host Bus Adapter or SAS/SATA Adapter)
96-00290-001 Rev. A1 DataDirect Networks StorageScaler 2460 User Guide | iv

Chapter 1
USO RESTRITO
Introduction
Table of Contents
1.1 Kit Contents. . . . . . . . . . . . . . . . . . . . . . . . . . . . . . . . . . . . . . . . . . . . . . . . . . . . . . . . . . . . . . . . . . 2
1.2 Disk Drive Specifications . . . . . . . . . . . . . . . . . . . . . . . . . . . . . . . . . . . . . . . . . . . . . . . . . . . . 2
1.3 Cable Specifications . . . . . . . . . . . . . . . . . . . . . . . . . . . . . . . . . . . . . . . . . . . . . . . . . . . . . . . . . 2
1.4 Enclosure Components and Features . . . . . . . . . . . . . . . . . . . . . . . . . . . . . . . . . . . . . . . 3
1.5 SAS I/O Controllers . . . . . . . . . . . . . . . . . . . . . . . . . . . . . . . . . . . . . . . . . . . . . . . . . . . . . . . . . . 3
1.6 Disk Drives and Drive Carriers . . . . . . . . . . . . . . . . . . . . . . . . . . . . . . . . . . . . . . . . . . . . . . . 4
1.7 Advanced Power and Cooling (APC) Units. . . . . . . . . . . . . . . . . . . . . . . . . . . . . . . . . . 5
1.7.1 Maintaining Correct Airflow and Cooling. . . . . . . . . . . . . . . . . . . . . . . . . . . . . . . 6
1.8 Connection and Configuration Options . . . . . . . . . . . . . . . . . . . . . . . . . . . . . . . . . . . . 6
1.8.1 Basic Configuration–Single Controller System. . . . . . . . . . . . . . . . . . . . . . . . . . 6
1.8.2 Basic Configuration – Dual Controller System . . . . . . . . . . . . . . . . . . . . . . . . . . 7
1.8.3 Expansion Configuration – Single Controller System . . . . . . . . . . . . . . . . . . . 7
1.8.4 Expansion Configuration – Dual Controller System . . . . . . . . . . . . . . . . . . . . . 7
1.8.5 Daisy-Chain Configuration – Single Controller System . . . . . . . . . . . . . . . . . . 8
1.8.6 Daisy-Chain Configuration – Dual Controller System . . . . . . . . . . . . . . . . . . . 8
1.8.6.1 Daisy-Chain Limitations . . . . . . . . . . . . . . . . . . . . . . . . . . . . . . . . . . . . . . . . . . . . . . . . . . . . . 8
Chapter 2
Installation 2.1 Installation Checklist. . . . . . . . . . . . . . . . . . . . . . . . . . . . . . . . . . . . . . . . . . . . . . . . . . . . . . . . 11
2.2 Preparing for Installation . . . . . . . . . . . . . . . . . . . . . . . . . . . . . . . . . . . . . . . . . . . . . . . . . . . 11
2.3 Installing the SS2460 into a Rack . . . . . . . . . . . . . . . . . . . . . . . . . . . . . . . . . . . . . . . . . . . 11
2.4 Installing the Disk Drives . . . . . . . . . . . . . . . . . . . . . . . . . . . . . . . . . . . . . . . . . . . . . . . . . . . 14
2.5 Connecting the SS2460 Enclosure . . . . . . . . . . . . . . . . . . . . . . . . . . . . . . . . . . . . . . . . . 15
2.5.1 Connecting to the Host System . . . . . . . . . . . . . . . . . . . . . . . . . . . . . . . . . . . . . . . 15
2.5.2 Connecting Additional SS2460 Enclosures . . . . . . . . . . . . . . . . . . . . . . . . . . . . 15
2.6 Powering On . . . . . . . . . . . . . . . . . . . . . . . . . . . . . . . . . . . . . . . . . . . . . . . . . . . . . . . . . . . . . . . .17
Chapter 3
Monitoring Your
3.1 Monitoring the Enclosure . . . . . . . . . . . . . . . . . . . . . . . . . . . . . . . . . . . . . . . . . . . . . . . . . . 19
SS2460
3.2 Monitoring the Controllers . . . . . . . . . . . . . . . . . . . . . . . . . . . . . . . . . . . . . . . . . . . . . . . . . 20
3.3 Monitoring the Disk Drives . . . . . . . . . . . . . . . . . . . . . . . . . . . . . . . . . . . . . . . . . . . . . . . . . 21
3.4 Monitoring the APC Units . . . . . . . . . . . . . . . . . . . . . . . . . . . . . . . . . . . . . . . . . . . . . . . . . . 22
96-00290-001 Rev. A1 DataDirect Networks StorageScaler 2460 User Guide | v

Table of Contents
USO RESTRITO
Chapter 4
Solving Problems 4.1 General Troubleshooting Tips. . . . . . . . . . . . . . . . . . . . . . . . . . . . . . . . . . . . . . . . . . . . . .24
4.2 Replacing a Controller . . . . . . . . . . . . . . . . . . . . . . . . . . . . . . . . . . . . . . . . . . . . . . . . . . . . . . 24
4.3 Removing a Disk Drive (or Blank Drive Carrier) . . . . . . . . . . . . . . . . . . . . . . . . . . . . 25
4.4 Replacing an APC Unit. . . . . . . . . . . . . . . . . . . . . . . . . . . . . . . . . . . . . . . . . . . . . . . . . . . . . . 27
Appendix A Technical Specifications. . . . . . . . . . . . . . . . . . . . . . . . . . . . . . . . . . . . . . . . . . . . . . . . . . . . . . . . . . . . . 28
A.1 General Specifications. . . . . . . . . . . . . . . . . . . . . . . . . . . . . . . . . . . . . . . . . . . . . . . . .29
A.2 Regulatory Compliance Statements. . . . . . . . . . . . . . . . . . . . . . . . . . . . . . . . . . . .30
A.3 Regulatory Agency Compliance . . . . . . . . . . . . . . . . . . . . . . . . . . . . . . . . . . . . . . .31
Appendix B Zoning . . . . . . . . . . . . . . . . . . . . . . . . . . . . . . . . . . . . . . . . . . . . . . . . . . . . . . . . . . . . . . . . . . . . . . . . . . . . . . . 33
B.1 Zoning . . . . . . . . . . . . . . . . . . . . . . . . . . . . . . . . . . . . . . . . . . . . . . . . . . . . . . . . . . . . . . .34
B.2 Zoning Configuration 1 (Default) . . . . . . . . . . . . . . . . . . . . . . . . . . . . . . . . . . . . . .34
B.3 Zoning Configuration 2 . . . . . . . . . . . . . . . . . . . . . . . . . . . . . . . . . . . . . . . . . . . . . . .35
B.4 Zoning Configuration 3 . . . . . . . . . . . . . . . . . . . . . . . . . . . . . . . . . . . . . . . . . . . . . . .35
B.5 Zoning Configuration 4 . . . . . . . . . . . . . . . . . . . . . . . . . . . . . . . . . . . . . . . . . . . . . . .36
Appendix C Safety Notices . . . . . . . . . . . . . . . . . . . . . . . . . . . . . . . . . . . . . . . . . . . . . . . . . . . . . . . . . . . . . . . . . . . . . . . 37
C.1 General Cautions and Notes . . . . . . . . . . . . . . . . . . . . . . . . . . . . . . . . . . . . . . . . . . .38
C.2 Installation Cautions and Notes. . . . . . . . . . . . . . . . . . . . . . . . . . . . . . . . . . . . . . . .38
Contacting Technical Support & Shipping Instructions. . . . . . . . . . . . . . . . . . . . . . . . . . . . . . . . . . . . . . . . . . . . . . . .40
96-00290-001 Rev. A1 DataDirect Networks StorageScaler 2460 User Guide | vi
Chapter 1
USO RESTRITO
Introduction
96-00290-001 Rev. A1 DataDirect Networks StorageScaler 2460 User Guide | 1
This chapter describes the features of your StorageScaler 2460 enclosure and shows you
USO RESTRITO
how you can upgrade your enclosure as your storage requirements change. It also lists the
contents of the StorageScaler 2460 enclosure kit, and describes additional hardware
requirements.
1.1 Kit Contents
• DataDirect Networks StorageScaler 2460 enclosure
• Two power cords
• Rackmount kit
• 24 Drive Carriers
• User Documentation CD
1.2 Disk Drive Specifications
The StorageScaler 2460 enclosure supports up to 24-2.5" SAS or SATA disk drives (see
Section 1.6).
Introduction
Disk drives must be qualified by DataDirect Networks and meet these specifications:
• 7200, 10,000, or 15,000 rpm
• Hot-swap/hot-plug support
• SATA or SAS device plug connector
• 6 Gb/sec or 3 Gb/sec data rate
• 2.5" form factor
•(SAS disk drives) Upgradable disk drive firmware
1.3 Cable Specifications
To connect your StorageScaler 2460 enclosure, use high-quality SAS cables that meet these
length requirements:
• Minimum length: 0.5 meters
• Maximum length: 3 meters
NOTE :
For updated disk drive information or to purchase approved SAS cables, please contact your
DataDirect Networks sales representative.
96-00290-001 Rev. A1 DataDirect Networks StorageScaler 2460 User Guide | 2
The actual cable length supported is determined by the maximum cable
length supported by the HBA used. Refer to your HBA documentation to
verify the maximum cable length supported.
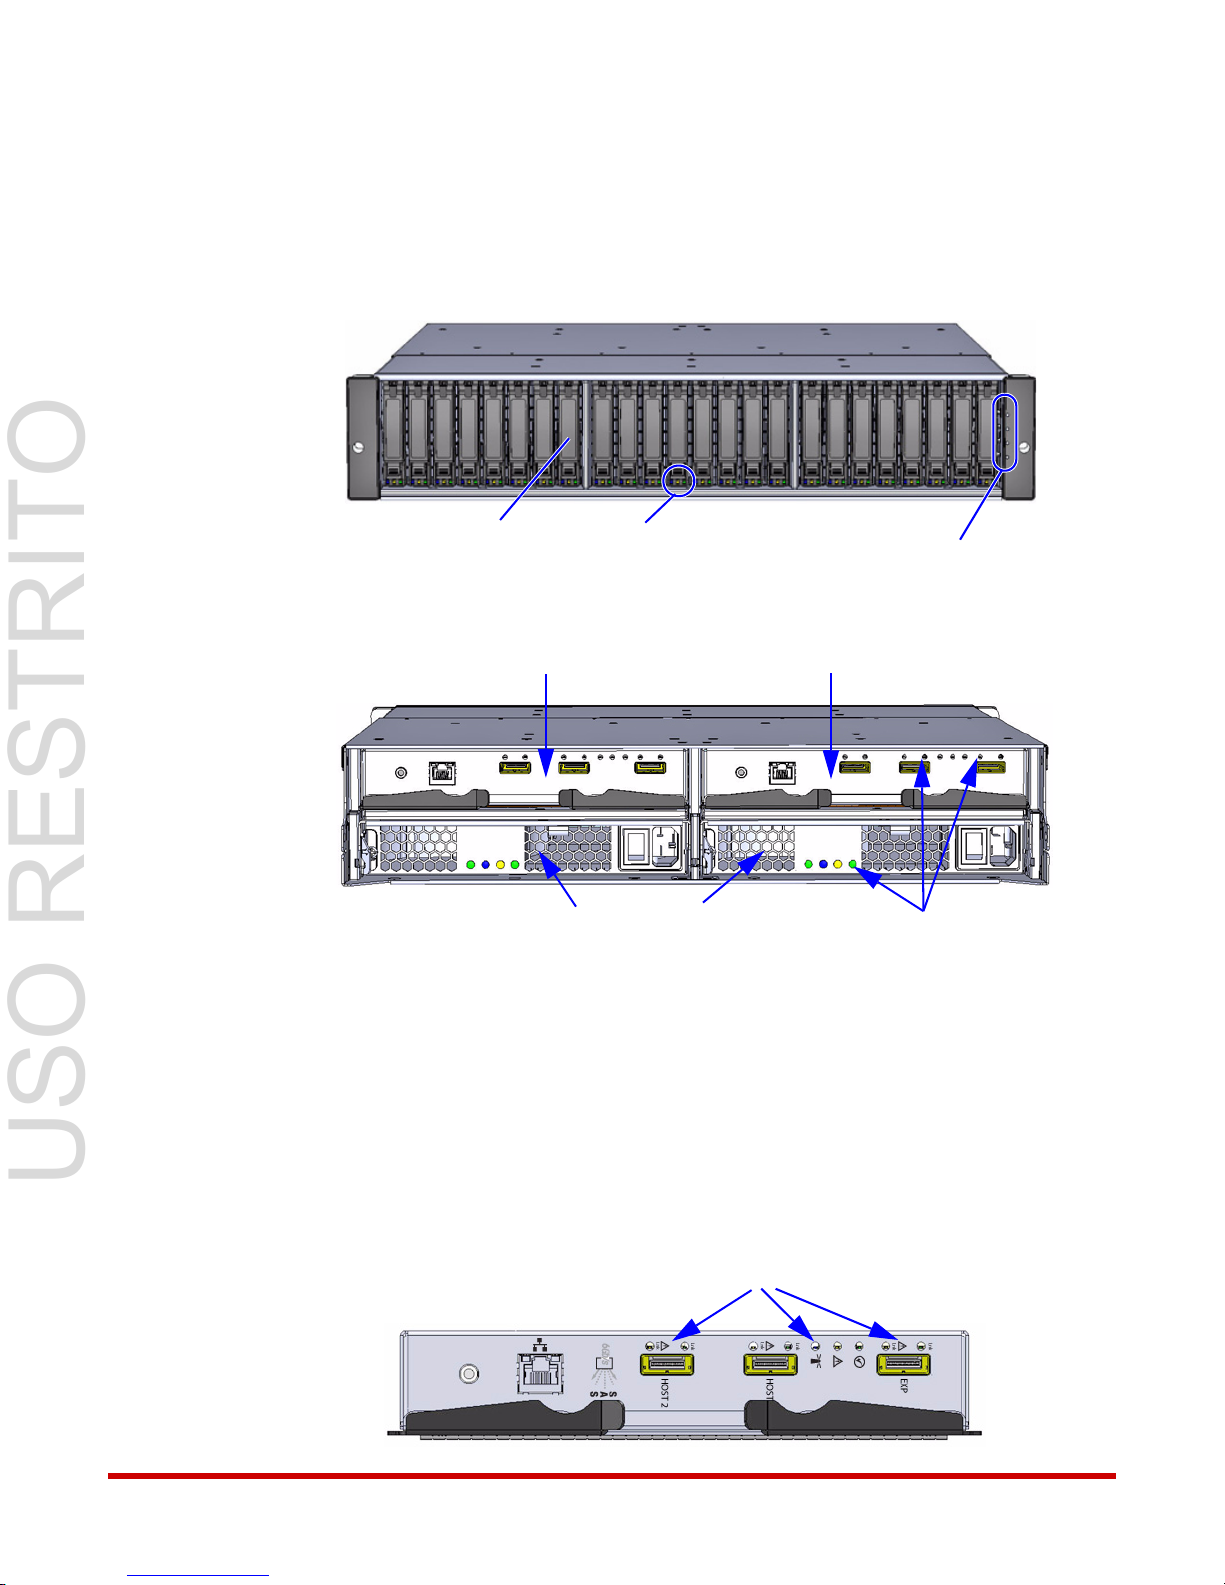
1.4 Enclosure Components and Features
Figure 1. StorageScaler 2460 Front View
Enclosure LEDs
Drive Carrier LEDs
Drive Carrier
Figure 2. StorageScaler 2460 Rear View
Slot A: I/O Controller
Slot B: I/O Controller
LEDs
Advanced Power and Cooling (APC) Units
Figure 3. Rear of I/O Controller, Connections, and LEDs
Controller LEDs
USO RESTRITO
The main features of the enclosure are shown in Figure 1 and Figure 2.
Introduction
1.5 SAS I/O Controllers
The StorageScaler 2460 enclosure contains one or two SAS I/O controllers, which are
installed on the back of the enclosure. In the case of a single I/O controller system, the
controller is installed in Slot A (Figure 2).
Figure 3 shows the rear of the I/O controller, its connections, and LEDs.
96-00290-001 Rev. A1 DataDirect Networks StorageScaler 2460 User Guide | 3
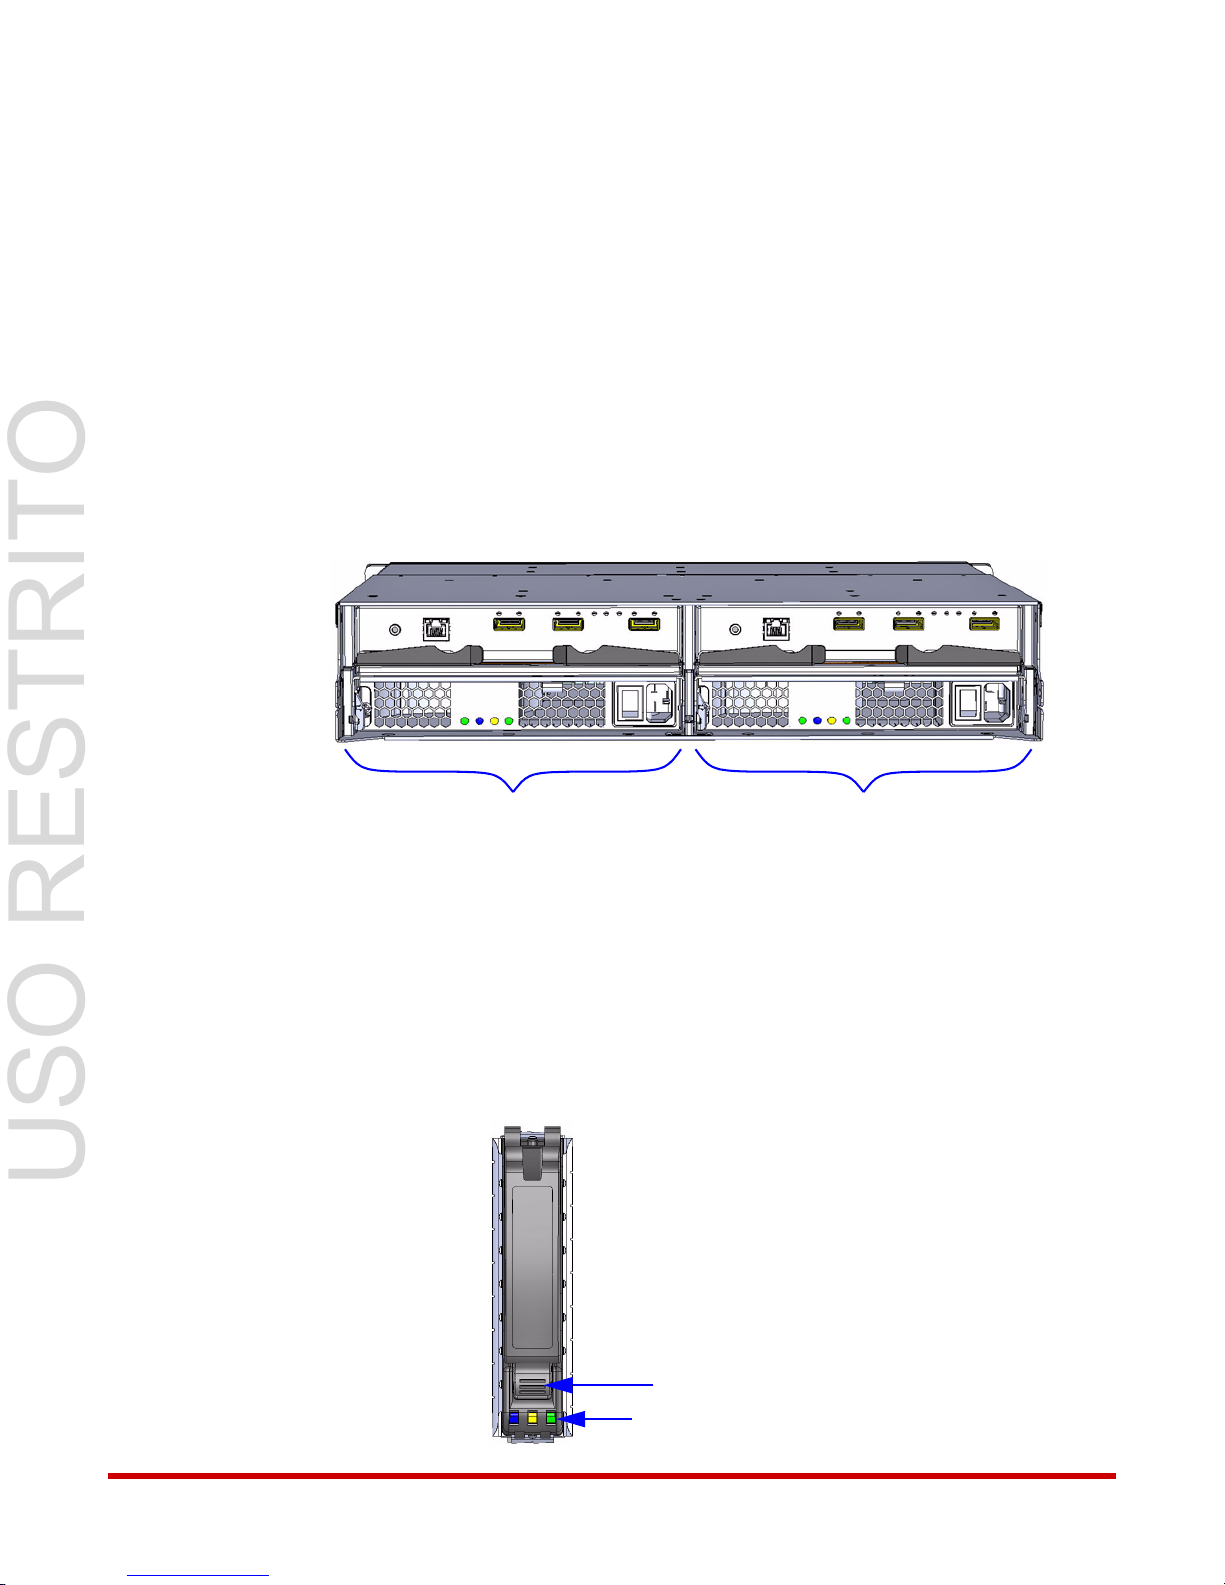
Figure 4. Controller Slot Numbers
Slot A
Slot B
Introduction
Status LEDs
Lever Release Button
Figure 5. Disk Drive in Drive Carrier
USO RESTRITO
Each controller has three SAS ports (Figure 4):
• Use the input ports (HOST 1 and HOST 2) to connect to the host systems.
• Use the expansion port (EXP) to connect to another StorageScaler 2460 enclosure. See
Section 1.8 for more information.
• When using the StorageScaler 2460 in a zoned configuration, the three SAS ports are
assigned drives specifically to separate host computers. Please refer to Appendix B for
supported zoned configurations.
Each controller also has eleven status LEDs, as described in Section 3.2, Monitoring the
Controllers.
To remove a controller from the enclosure, follow the instructions in Section 4.2.
1.6 Disk Drives and Drive Carriers
The StorageScaler 2460 enclosure supports up to 24 SAS or SATA disk drives. For disk drive
requirements, see Section 1.2. Disk drives are hot-swappable.
Each disk drive is mounted in a drive carrier (Figure 5) with a push-button lever for quick
installation and removal.
96-00290-001 Rev. A1 DataDirect Networks StorageScaler 2460 User Guide | 4
Introduction
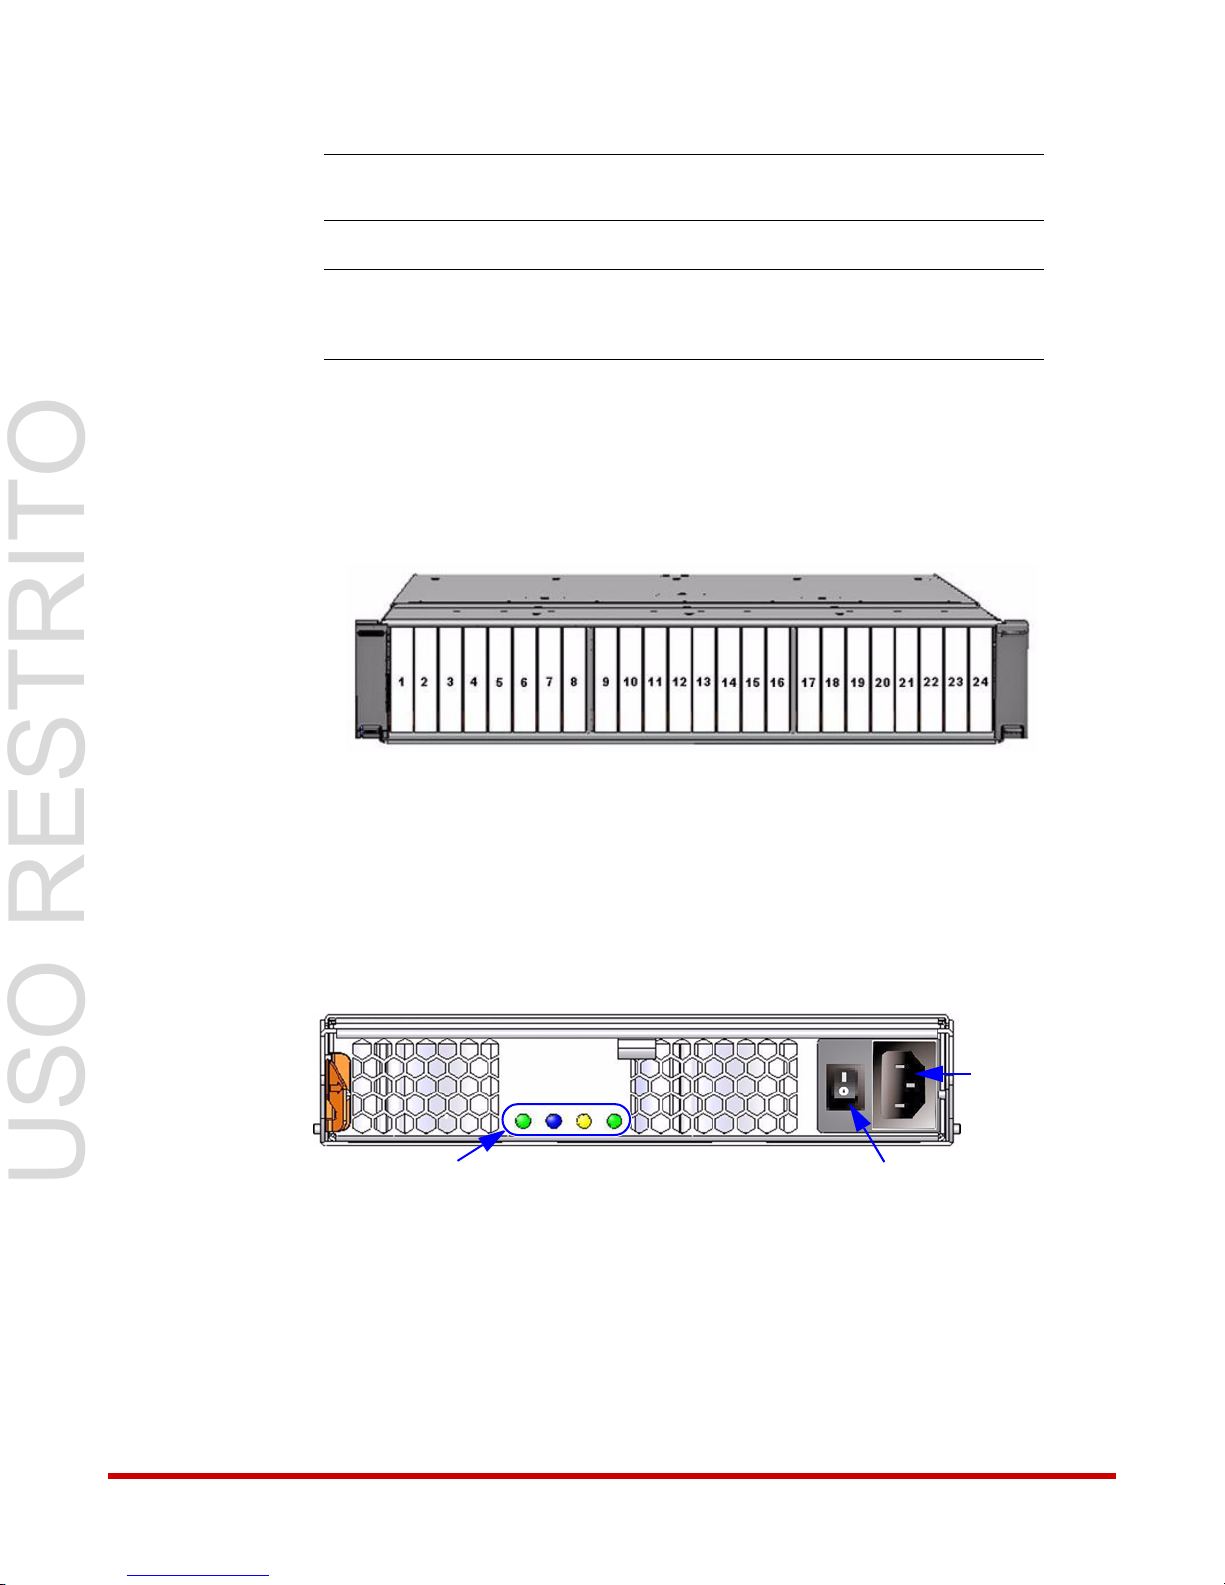
Figure 6. Drive Slot Numbering
Figure 7. APC Unit
LED
Power Switch
Power
Cord
Connector
USO RESTRITO
NOTE :
NOTE :
Each drive carrier has three LEDs, which indicate status as described in Section 3.3,
Monitoring the Disk Drives.
To maintain proper airflow and cooling inside the enclosure, drive slots (Figure 6) cannot be
left empty. Blank drive carriers are available to fill empty drive slots.
A disk drive must not be removed from its drive carrier. A disk drive removed
from its carrier is not covered by the hardware warranty.
All SATA disk drives installed in a dual-controller system require the use of a
2:1 SATA MUX assembly. Please contact your DataDirect Networks sales
representative to obtain the MUX cards.
1.7 Advanced Power and Cooling (APC) Units
Each SS2460 enclosure is equipped with two APC units (Figure 7) located on the back of the
enclosure.
The cooling fans in each APC unit run on separate circuits from the power supply.
Therefore,
unit.
Each APC unit has four LEDs, which indicate status as described in Section 3.4, Monitoring
the APC Units.
APC
if one APC unit fails, its fans continue to run on power supplied by the other APC
units
are hot-swappable. See Section 4.4, Replacing an APC Unit for more information.
96-00290-001 Rev. A1 DataDirect Networks StorageScaler 2460 User Guide | 5
1.7.1 Maintaining Correct Airflow and Cooling
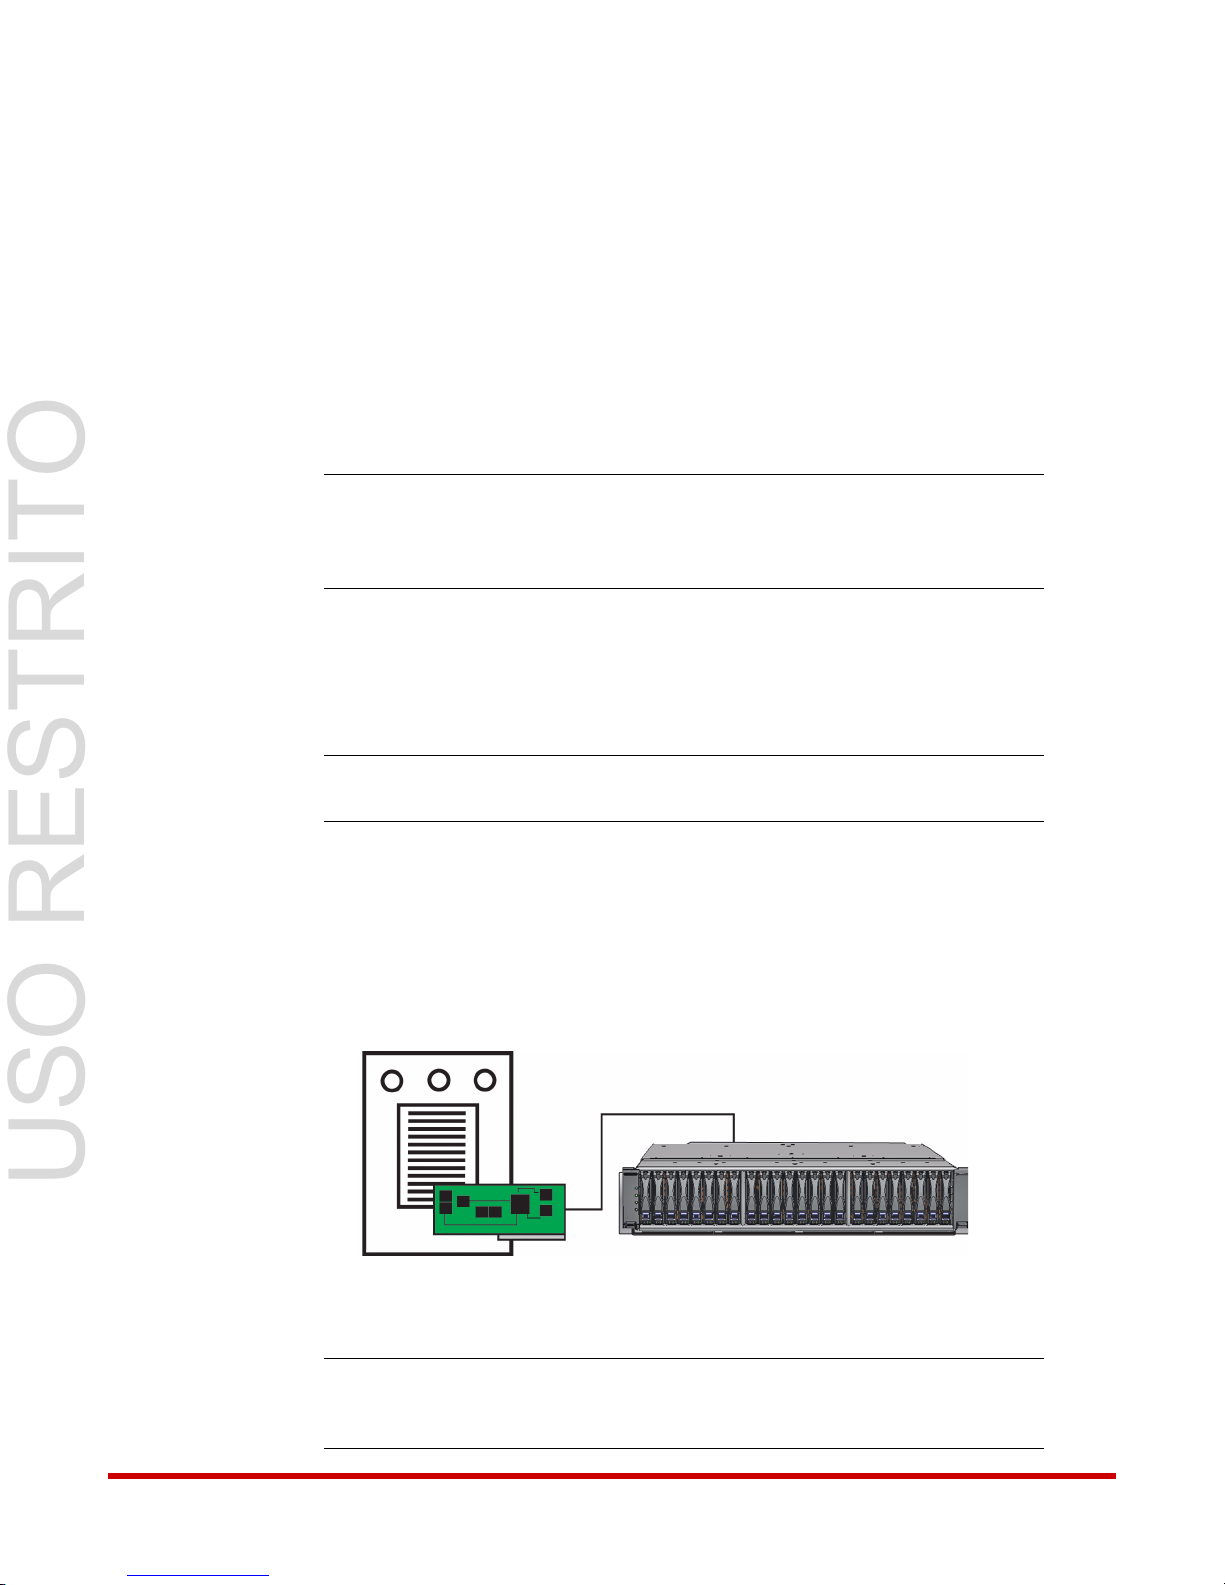
Figure 8. StorageScaler 2460 Single Host System
Host
StorageScaler 2460 Enclosure
USO RESTRITO
In addition to supplying power, the APC units maintain proper airflow and cooling within the
enclosure.
Because there are two APC units, the enclosure can continue to operate even if one APC unit
The cooling fans in each APC unit run on separate circuits from the power supply. If one
fails.
APC unit fails, its fans continue to run on power supplied by the other APC unit.
However, for proper enclosure operation and cooling, two APC units with fully-functional
fans must be installed at all times. The enclosure can run temporarily (for no more than five
minutes) with a single APC unit while you install a new one—you must install a second APC
as quickly as possible
unit
CAUTION ! Once you have removed a failed APC unit, you must replace it within five
minutes or the enclosure may overheat and shut down to prevent
hardware damage. This type of shutdown is immediate—unexpected
loss of data access and permanent data loss may occur.
to maintain correct airflow and cooling.
1.8 Connection and Configuration Options
Introduction
This section describes the different connection options for your SS2460 enclosure.
NOTE :
Unless otherwise noted, the enclosures in all these configurations support
SAS or SATA disk drives, but not a combination of both.
1.8.1 Basic Configuration–Single Controller System
Connect your SS2460 enclosure to a SAS/SATA HBA or SAS/SATA RAID card in a single host
system (Figure 8).
As your storage space requirements change, you can upgrade and expand this basic
96-00290-001 Rev. A1 DataDirect Networks StorageScaler 2460 User Guide | 6
configuration.
NOTE :
In single I/O controller configurations the controller must be installed in Slot
A (on the left side of the enclosure as seen from the back of the enclosure).
To install or remove an I/O controller, see Section4.2.
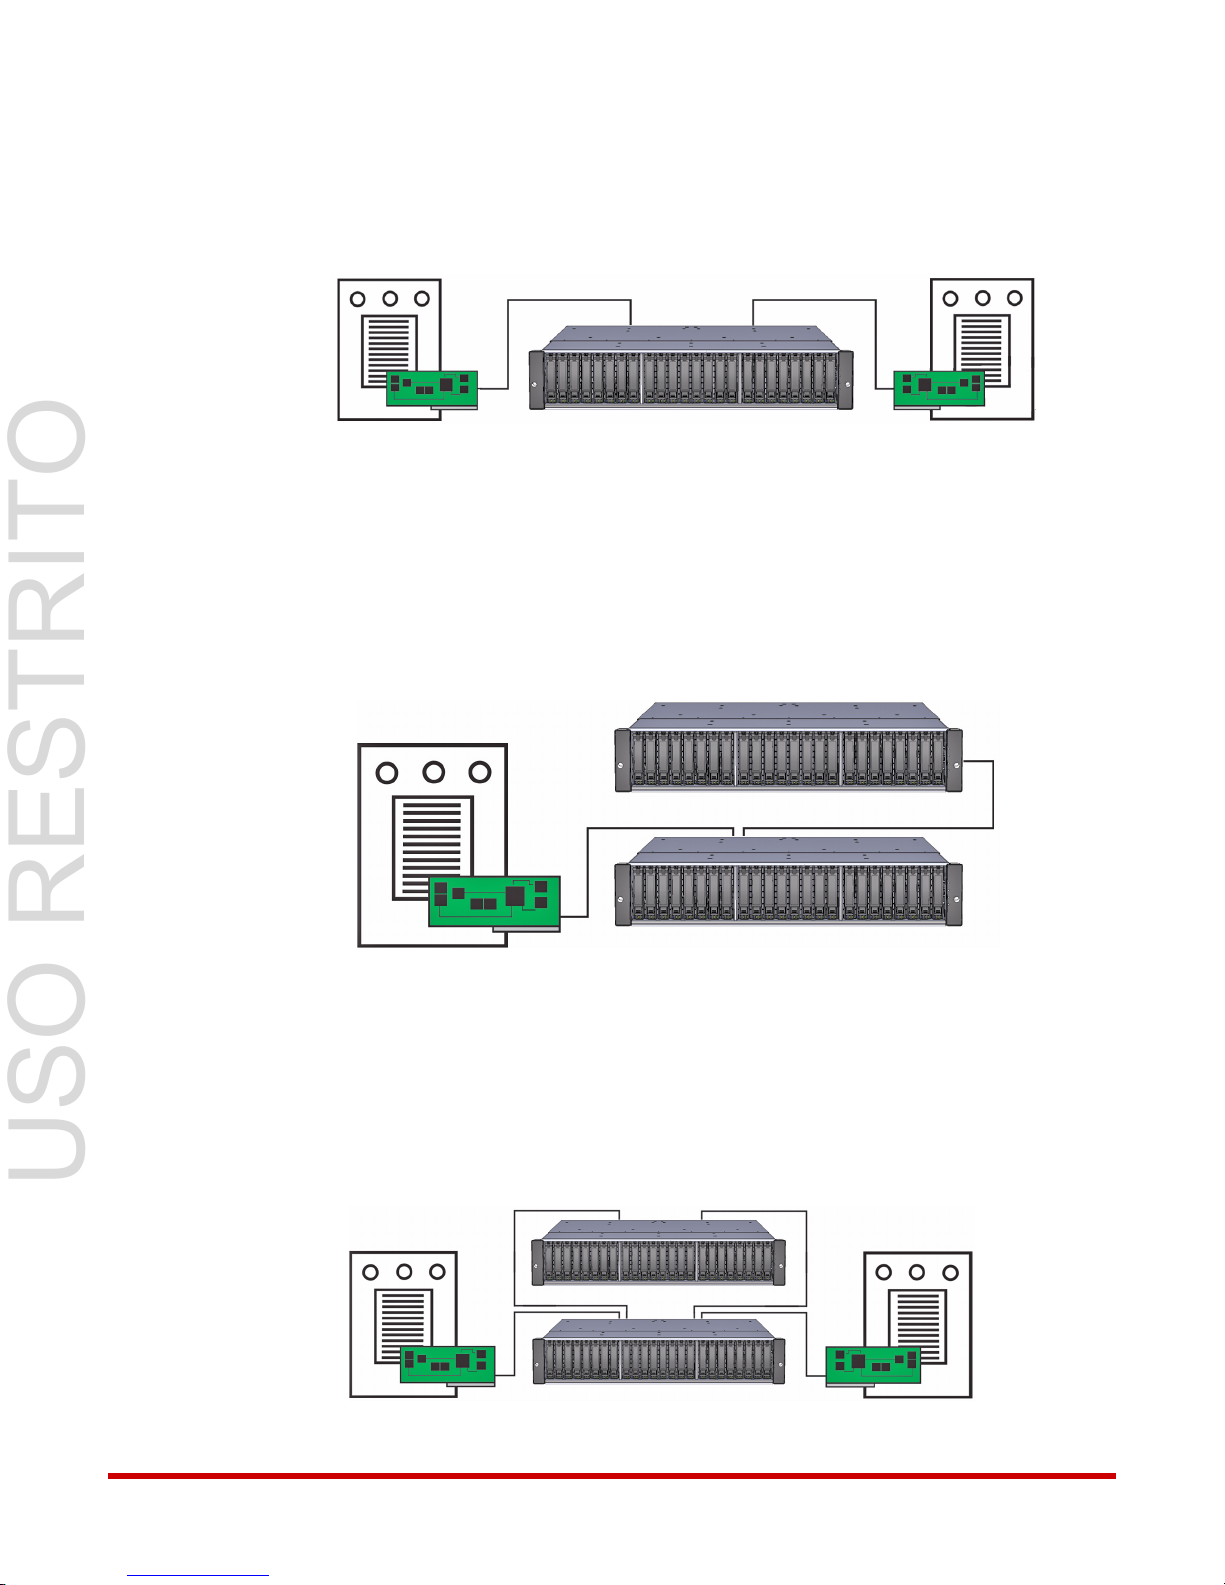
1.8.2 Basic Configuration – Dual Controller System
Figure 9. StorageScaler 2460 Dual Host System
Host
Host
StorageScaler 2460 Enclosure
Figure 10. SS2460 Expansion Configuration - Single Controller System
Host
StorageScaler 2460 Enclosures
Figure 11. SS2460 Expansion Configuration - Dual Controller System
Host
Host
StorageScaler 2460 Enclosures
USO RESTRITO
Connect your SS2460 enclosure to two SAS/SATA HBAs in a dual host system (Figure 9).
1.8.3 Expansion Configuration – Single Controller System
Connect your SS2460 enclosure to a SAS/SATA HBA or SAS/SATA RAID card in a single host
system, then connect a second SS2460 enclosure to the first enclosure using the expansion
port on the I/O controller (Figure 10).
Introduction
1.8.4 Expansion Configuration – Dual Controller System
Connect your SS2460 enclosure to two SAS/SATA HBAs in a dual host system, then connect
a second SS2460 enclosure to the first enclosure (Figure 11).
96-00290-001 Rev. A1 DataDirect Networks StorageScaler 2460 User Guide | 7
1.8.5 Daisy-Chain Configuration – Single Controller System
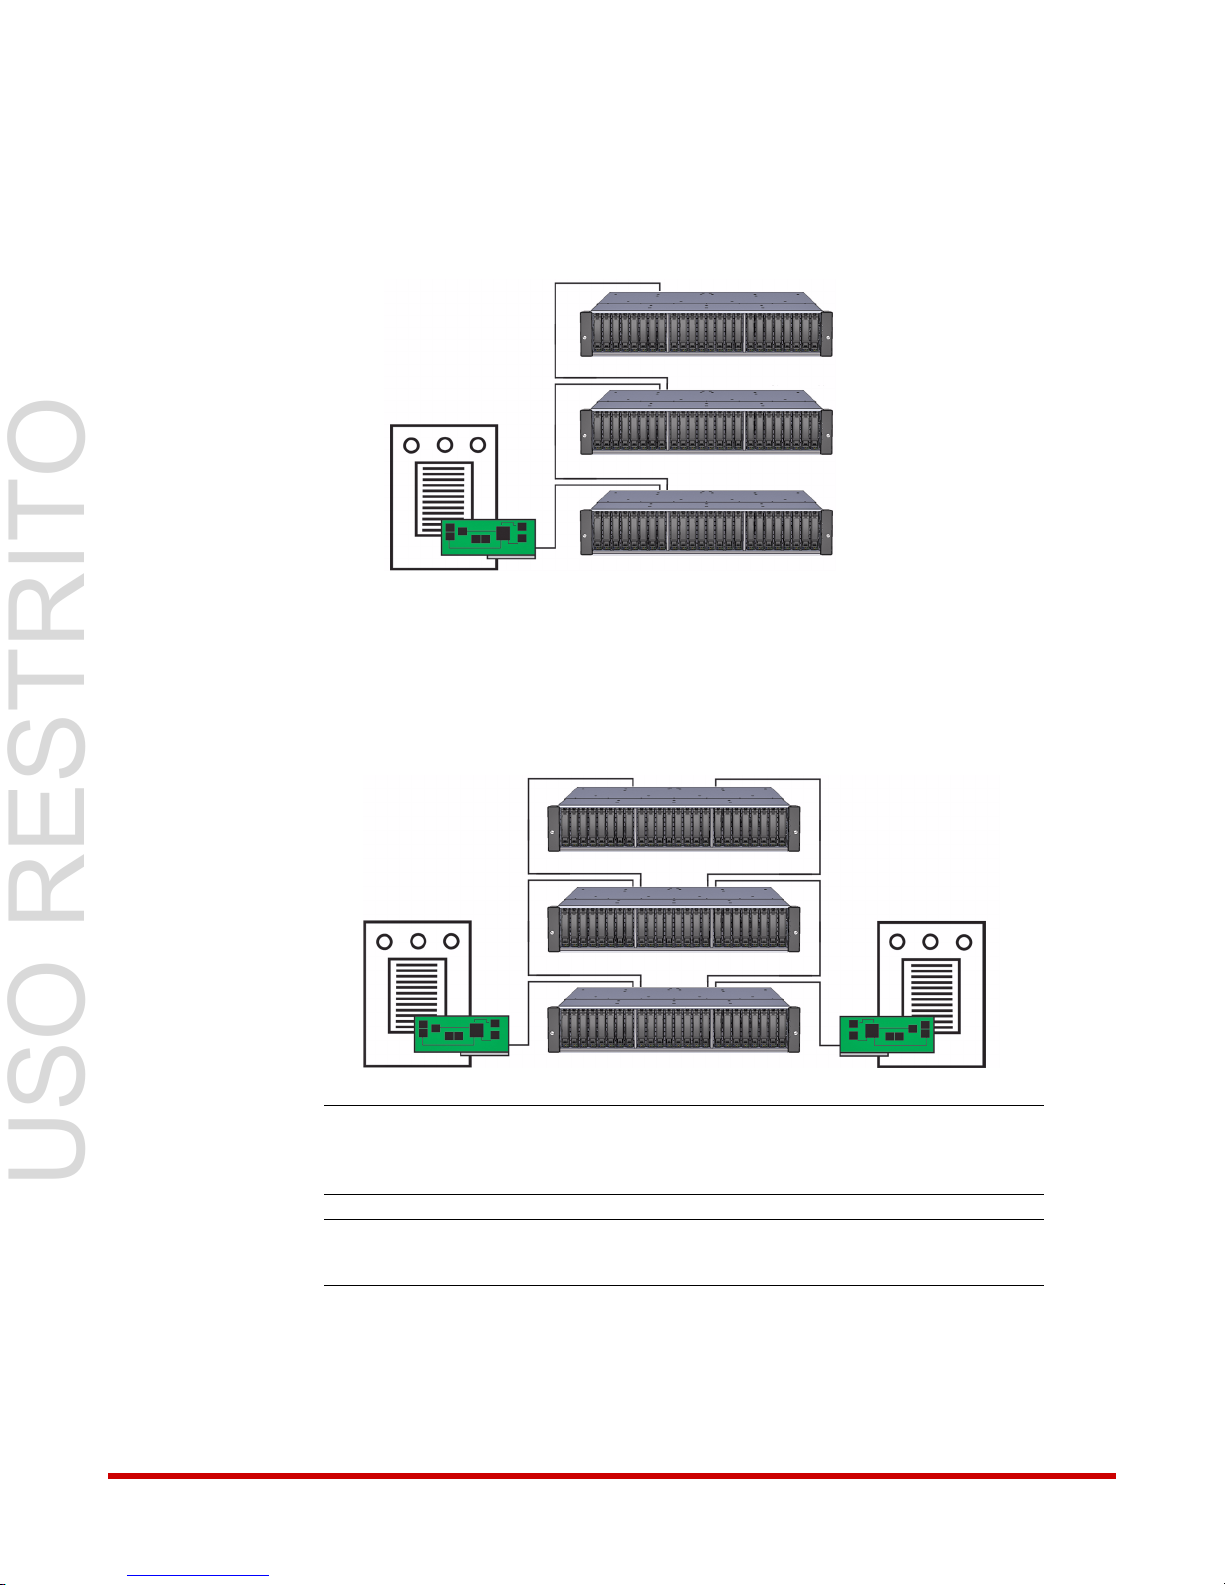
Figure 12. SS2460 Daisy-Chain Configuration (Single Controller)
Host
StorageScaler 2460 Enclosures
Figure 13. SS2460 Daisy-Chain Configuration - Dual Controller System
Host
Host
StorageScaler 2460 Enclosures
USO RESTRITO
Add multiple SS2460 enclosures to the first enclosure (Figure 12).
1.8.6 Daisy-Chain Configuration – Dual Controller System
Introduction
Add multiple SS2460 enclosures to the first enclosure (Figure 13).
NOTE :
NOTE :
When daisy chaining a dual system, ensure that only controllers in Slot A are
daisy chained together, and that only controllers in Slot B are daisy chained
together.
All SATA disk drives installed in a dual-controller system require the use of a
2:1 SATA MUX assembly.
1.8.6.1 Daisy-Chain Limitations
96-00290-001 Rev. A1 DataDirect Networks StorageScaler 2460 User Guide | 8
A single host system can support up to 128 SAS addresses. When fully loaded with disk
drives, each SS2460 enclosure contains 26 SAS addresses (one per disk drive plus two for
the internal expanders).
 Loading...