

Page 1
Instruction / Installation Sheet
DataComm Electronics 45-0031-WH Recessed Low Voltage Media Plate with Duplex Receptacle
DataComm Electronics, Inc.
6349 Peachtree Street
Norcross, GA 30071-1725
888.223.7977
770.662.8205
www.datacommelectronics.com
Parts Included:
1. 45-0031-WH Recessed Low Voltage Media Plate
2. Old Work Electrical Box
3. 15 Amp/125 Volt Tamper Resistant
Duplex Receptacle
4. Four (4) Screws
Use DataComm Electronics’ Recessed Low Voltage Media Plate with Duplex Receptacle to install low voltage cables behind your flat panel TV, your amplifier
or other audio and video devices. This media plate can be installed upright, sideways.
IMPORTANT INSTRUCTIONS:
This product is designed for retrofit work only because the old workbox cannot be attached to a stud.
WARNING:
Before installing this product, be sure the power is off by switching the circuit breaker to off or removing the fuse(s). Test the power to make sure
the power is off. Be sure to install the Media Plate with Duplex Receptacle in accordance with the National Electrical Code (NEC) and local codes.
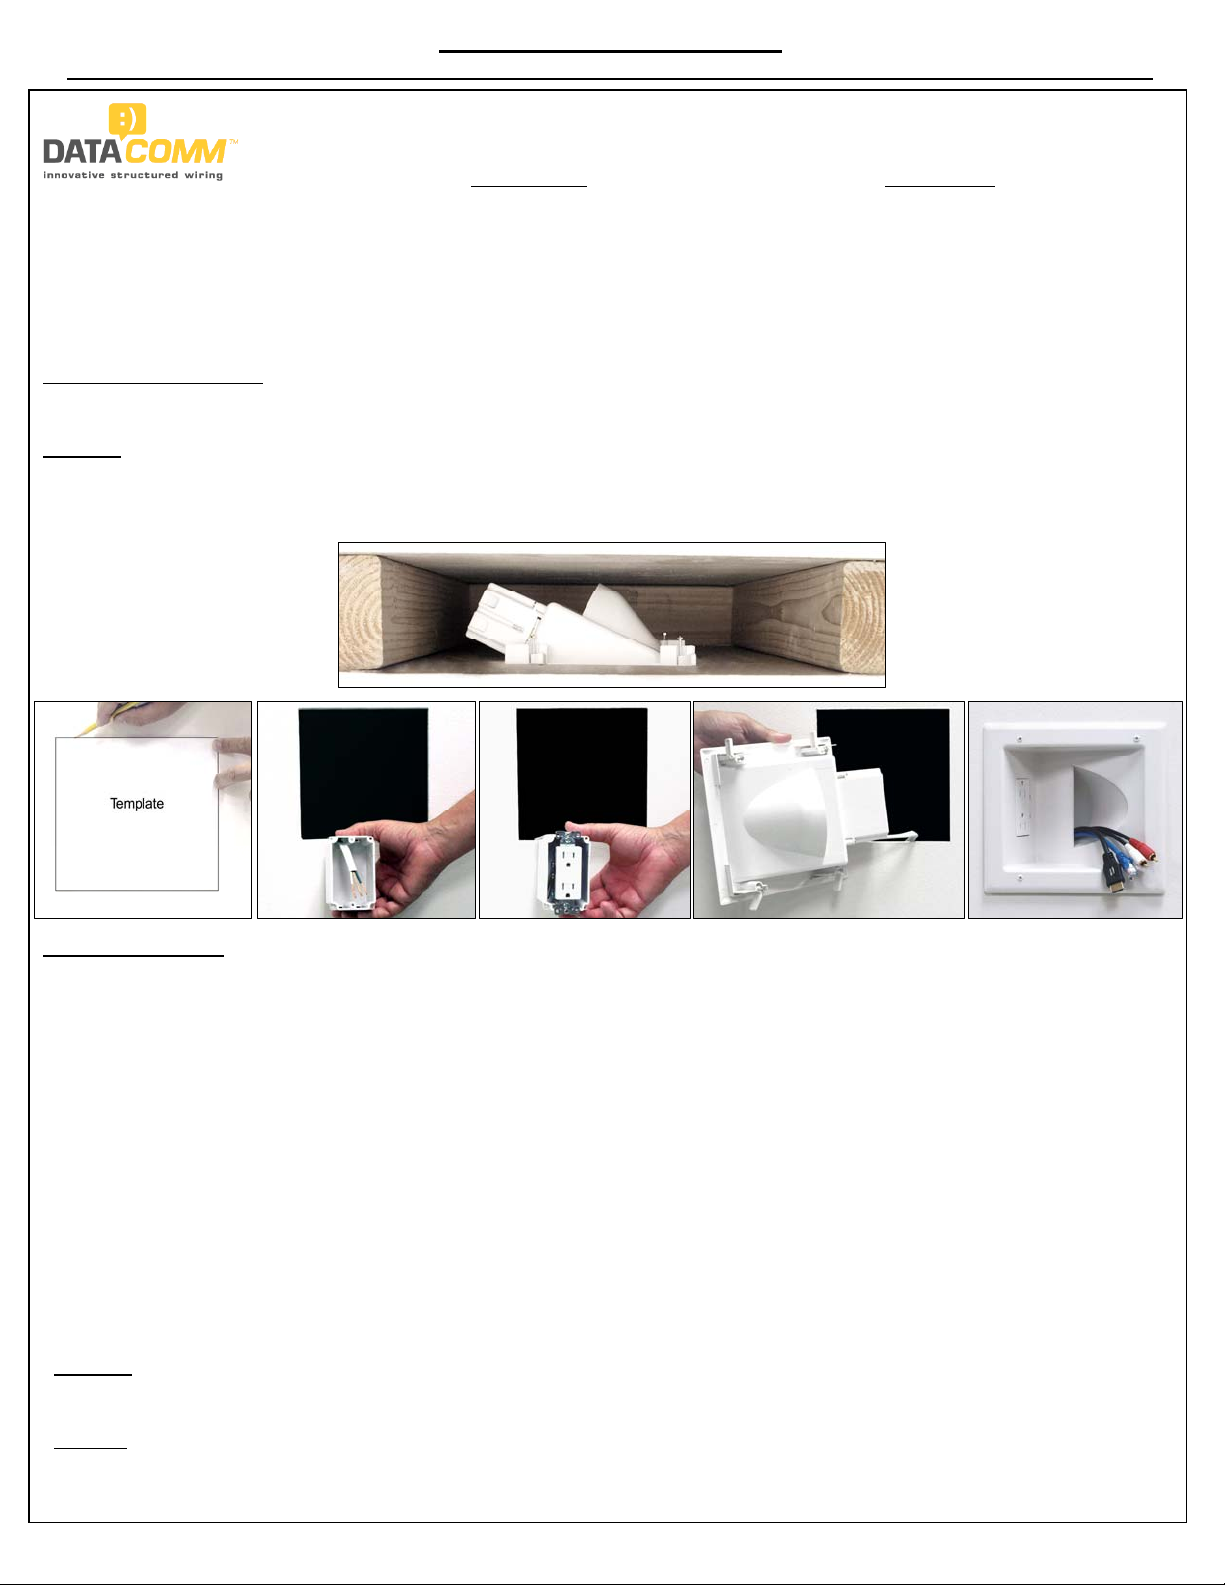
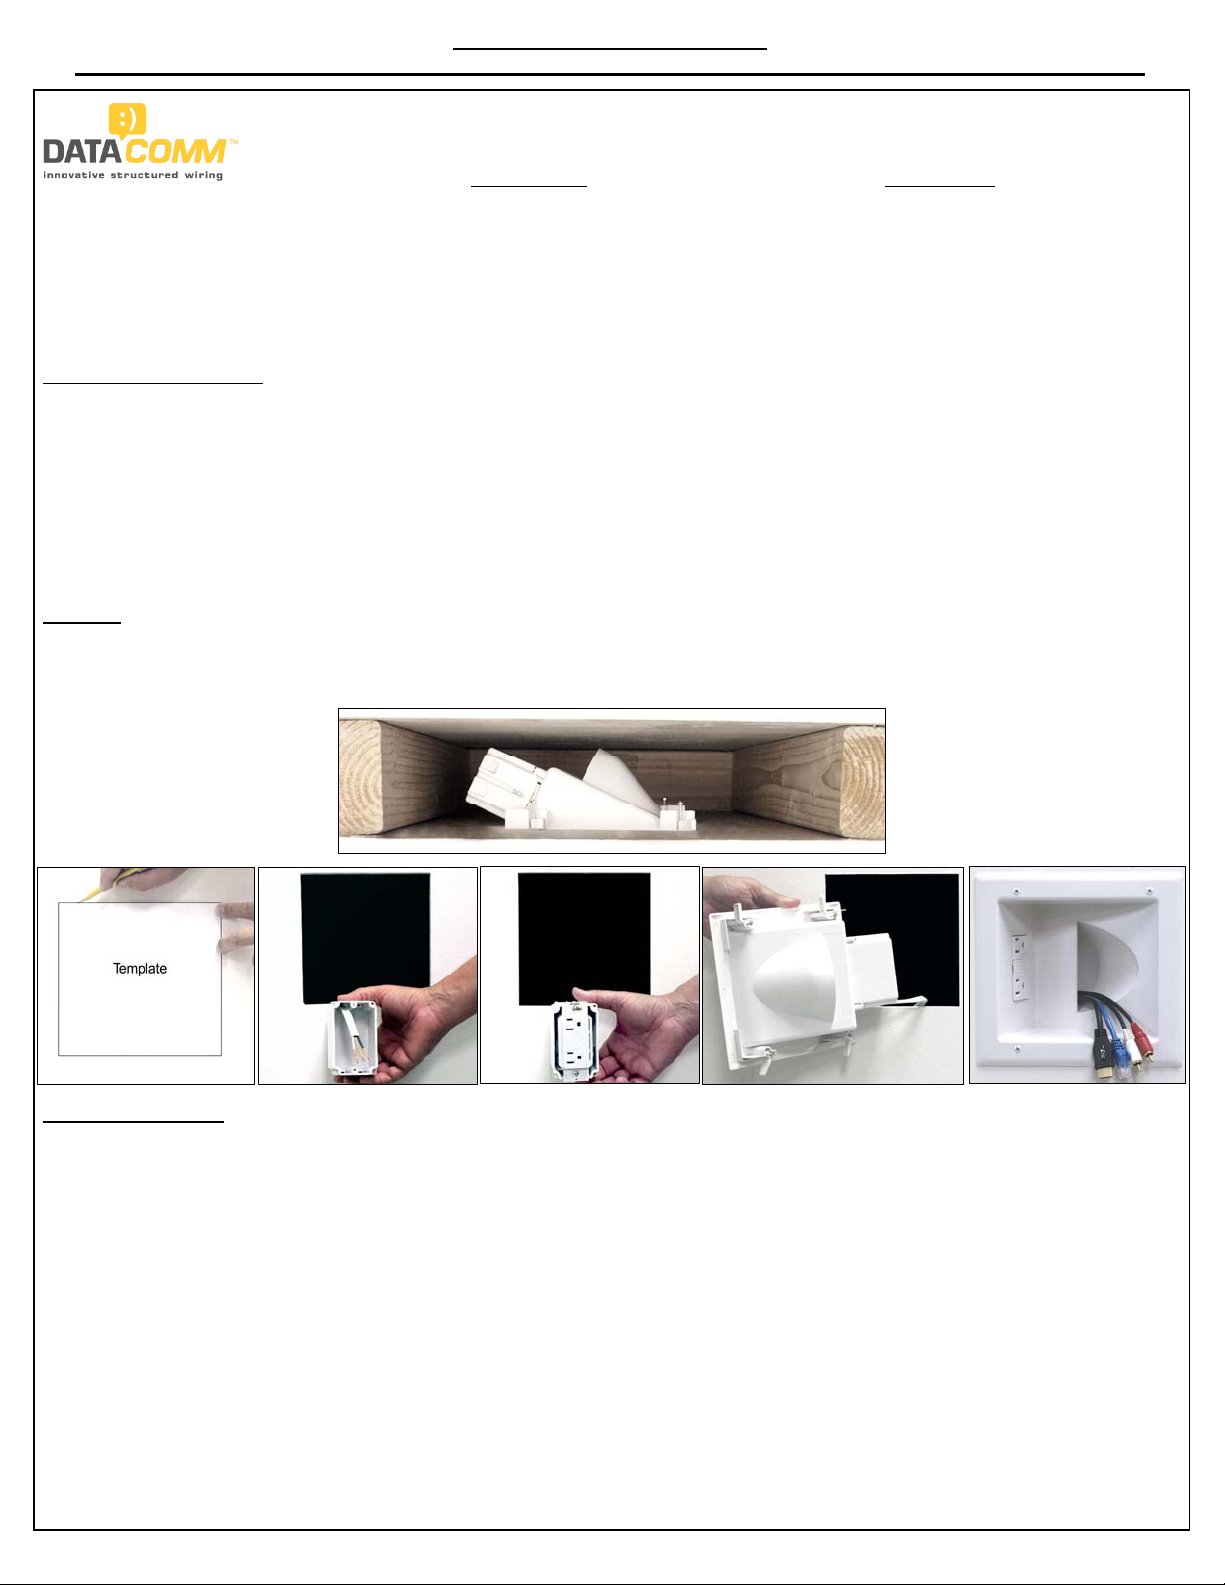
Fig. 2
Fig. 3
Installation Instructions:
Fig. 1 Top view - shows needed space between the drywall and the studs. Receptacle side of the media plate must be 3” from the stud but no more than 5”
Fig. 2 Using the template supplied (see page 2 of instruction sheet), trace the opening needed. Using a drywall knife, cut a hole in the drywall the size of the
Fig. 3 Run the source of power to the included workbox.
Fig. 4 Using the supplied duplex receptacle, connect the hot line (black) wire to the brass colored terminal or screw and the neutral (white) wire to the silver
Fig. 5 Now use the four screws provided to secure the work box to the mounting studs on the backside of the of the media plate.
Fig. 6 Pull all video and audio cords through the recessed opening. Starting with the receptacle side of the media plate, slowing slide the plate into the
WARNING
DataComm Electronics’ products shall be installed and used only as indicated in DataComm Electronics’ product instruction sheets.
Instruction sheets are available online at www.datacommelectronics.com.
CAUTION
For shock protection, this device must be properly grounded.
Use copper wire only with this device.
(review picture carefully).
template. See Figure 1 before tracing your opening.
colored terminal or screw. Be sure to connect the grounding (green) or bare grounding wire to the green colored terminal screw. For shock protection,
this UR, UL recognized component receptacle must be properly grounded. Caution – use copper wire only with this receptacle. Once you have wired
the receptacle, screw the receptacle into the work box until the receptacle is firmly secured.
opening. Swing the opposite side of the plate into position until the entire media box is flush with the wall. Now screw down the screws with wings;
these wings fasten tightly against the back of the drywall. Switch on the circuit breaker to on or insert the fuse(s). Plug all necessary video and audio
cables. Install your flat panel TV mounting bracket per the flat panel TV bracket manufacturer’s instructions.
Tools Needed:
1. Drywall Saw
2. 6 Ft. Tape Measure
3. Pencil
4. Screwdriver
Fig. 1
Fig. 4 Fig. 5 Fig. 6
Page 1 of 2
12/21/10 Rev. 2
Page 2
Installation / Instruction Sheet 45-0031-WH (Continued)
IMPORTANT INSTRUCTIONS
Read and understand all instructions.
Follow all warnings and instructions marked on the product.
Do not use this product near water, for example near a bath tub, wash bowl, kitchen sink, laundry tub, in a wet basement, or near a
swimming pool.
SAVE THESE INSTRUCTIONS.
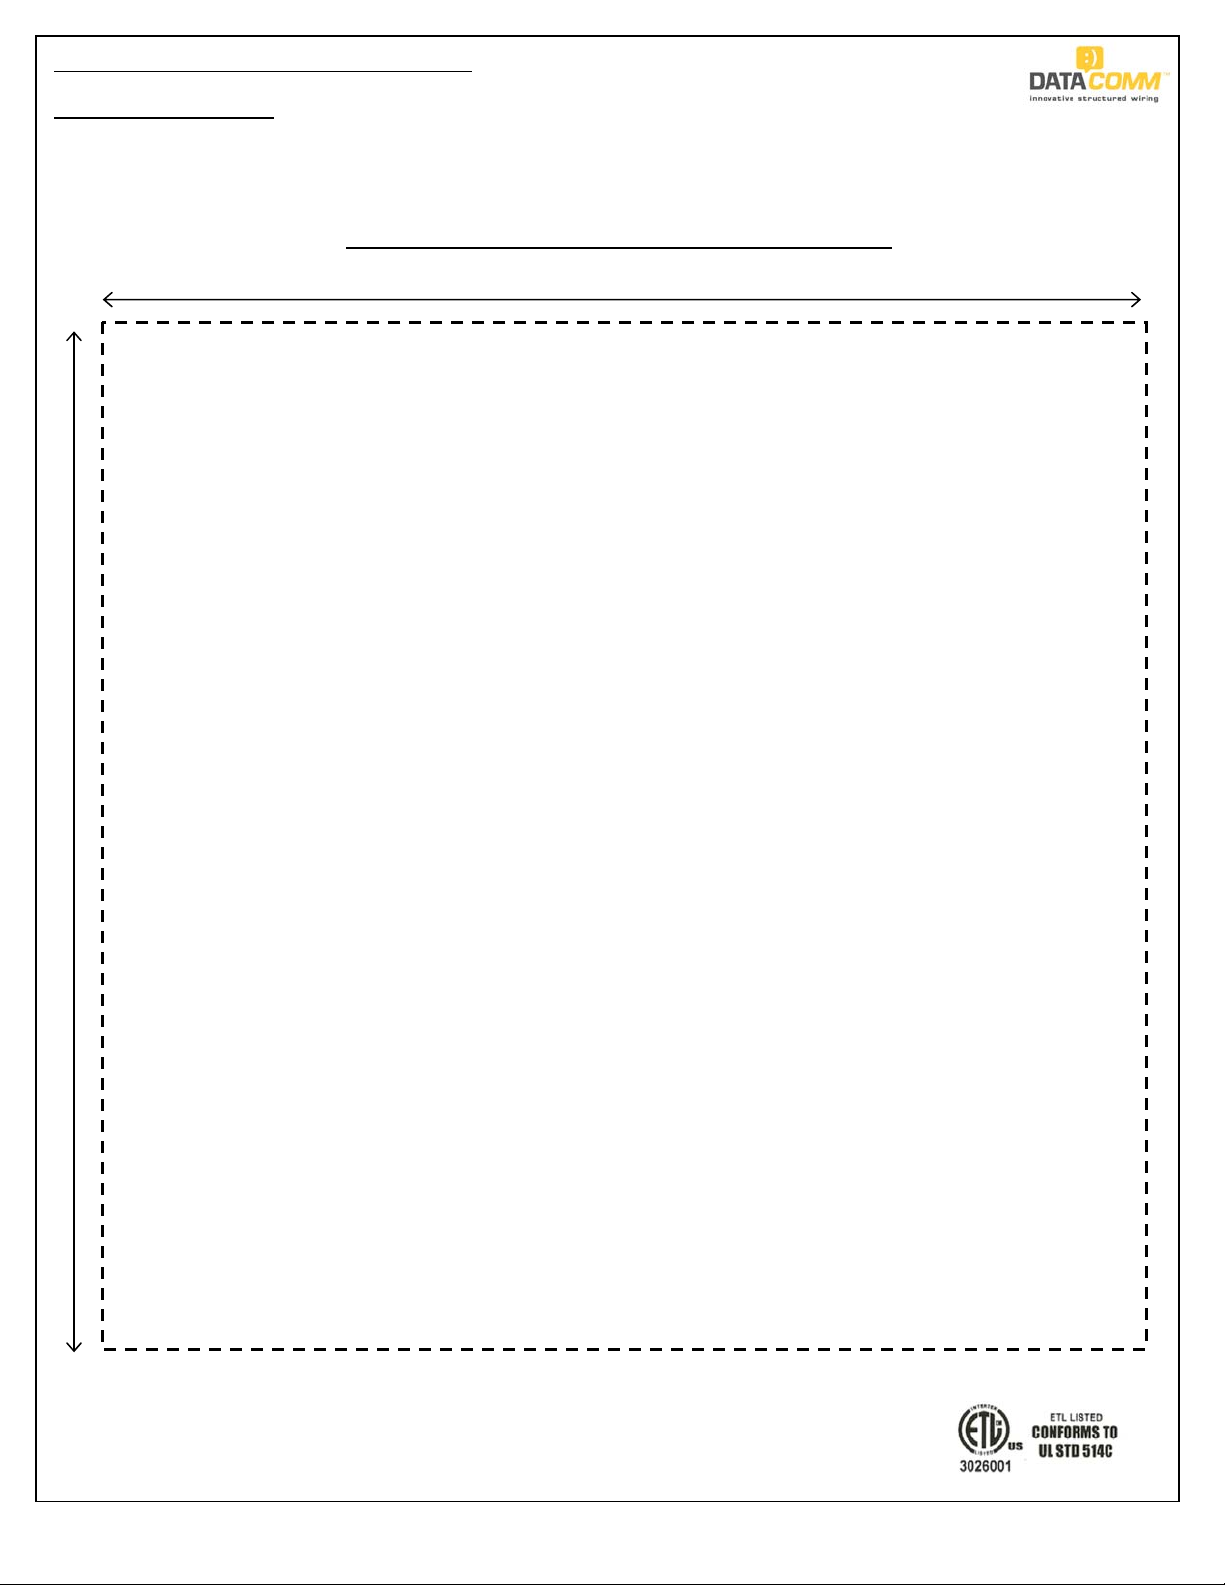
7-1/8”
ONLY LICENSED PROFESSIONALS SHOULD INSTALL THIS PRODUCT
7-1/4”
TEMPLATE
45-0031-WH Recessed Low Voltage
Media Plate with Duplex Receptacle
ACTUAL SIZE
www.datacommelectronics.com
888.223.7977
CUT ALONG DOTTED LINE
This product is patent protected by U.S. Patent numbers D553475, D554475 and 7390964.
RoHS Compliant.
Page 2 of 2
12/21/10 Rev. 2
Page 3
Instruction / Installation Sheet
DataComm Electronics 45-0041-WH Recessed Low Voltage Media Plate with Duplex Surge Suppressor
DataComm Electronics, Inc.
6349 Peachtree Street
Norcross, GA 30071-1725
888.223.7977
770.662.8205
www.datacommelectronics.com
Parts Included:
1. 45-0041-WH Recessed Low Voltage Media Plate
2. Old Work Electrical Box
3. 15 Amp/125 Volt Duplex Surge Suppressor
4. Three (3) Wire Nuts
5. Four (4) Screws
Use DataComm Electronics’ Recessed Low Voltage Media Plate with Duplex Surge Suppressor to install low voltage cables behind your flat panel TV, your
amplifier or other audio and video devices. This media plate can be installed upright, sideways.
IMPORTANT INSTRUCTIONS:
This product is designed for retrofit work only because the old workbox cannot be attached to a stud.
This product is designed to alert you if you ever lose surge protection. The SurgeBloc
(surges) caused by lightning strikes near the line, or the switching of inductive loads on the line (motor loads) as well as from RFI (radio frequency interference).
The SurgeBloc
®
cannot survive, or provide protection in the rare event of a direct lightning strike on the service power line. The SurgeBloc® alerts you to the
failure of the surge protection component by means of an audible signal. If alarm sounds, device has “received” power surges in excess of its capacity and is no
longer functioning as a surge protector. To shut off alarm, simply unplug the surge module and replace with a new SurgeBloc
protection. Note: When alarm sounds and the module is removed, the receptacle still functions as a normal duplex receptacle without surge protection.
WARNING:
Before installing this product, be sure the power is off by switching the circuit breaker to off or removing the fuse(s). Test the power to make sure
the power is off. Be sure to install the Media Plate with Duplex Surge Suppressor in accordance with the National Electrical Code (NEC) and local
codes.
Fig. 2
Fig. 3
Installation Instructions:
Fig. 1 Top view - shows needed space between the drywall and the studs. Receptacle side of the media plate must be 3” from the stud but no more than 5”
Fig. 2 Using the template supplied (see page 2 of instruction sheet), trace the opening needed. Using a drywall knife, cut a hole in the drywall the size of the
Fig. 3 Run the source of power to the included workbox.
Fig. 4 Using the supplied surge suppressor, connect the Recessed Media Plate to the piece of 12/2 or 14/2 with ground UL approved building wire, using the
Fig. 5 Now use the four screws provided to secure the work box to the mounting studs on the backside of the of the media plate.
Fig. 6 Pull all video and audio cords through the recessed opening. Starting with the receptacle side of the media plate, slowing slide the plate into the
(review picture carefully).
template. See Figure 1 before tracing your opening.
supplied three wire nuts. Connect the hot line (black) wire to black wire, neutral (white) wire to white wire and grounding (green) wire to the (green) or
bare grounding wire. For shock protection, this UR, UL recognized component receptacle must be properly grounded. Caution – use copper wire only
with this receptacle. Once you have wired the surge suppressor, screw the suppressor into the work box until the receptacle is firmly secured.
opening. Swing the opposite side of the plate into position until the entire media box is flush with the wall. Now screw down the screws with wings;
these wings fasten tightly against the back of the drywall. Switch on the circuit breaker to on or insert the fuse(s). Plug all necessary video and audio
cables. Install your flat panel TV mounting bracket per the flat panel TV bracket manufacturer’s instructions.
Tools Needed:
1. Drywall Saw
2. 6 Ft. Tape Measure
3. Pencil
4. Screwdriver
®
Protects connected loads from potentially damaging voltage spikes
®
module to restore surge
Fig. 1
Fig. 4 Fig. 6
Fig. 5
Page 1 of 3
1/5/11 Rev. 2
Page 4

Installation / Instruction Sheet 45-0041-WH (Continued)
Surge Suppressor Specifications
Clamping Response Time: 1 Nanosecond
2-Pole 3-Wire
Grounding
60 Hz Receptacle
Total Maximum
Surge Dissipation
1875W
Maximum Surge
Current
Peak Suppression
Voltage
Surge Protection
www.datacommelectronics.com
888.223.7977
Replacement
Module
15A-125V
1875W
340 Joules 12,000 Amps 1,000 Volts
Hot/Neutral,
Hot/Ground,
Neutral/Ground
Remember in the event your surge unit alarm sounds, simply remove the
replaceable SurgeBloc
receptacle without surge protection. The Replacement SurgeBloc
®
. The receptacle still functions as a normal duplex
®
module #1209 made by Cooper Wiring Devices can be ordered through a
DataComm Electronics distributor, your local electrical distributor or
contact Cooper Wiring Devices’ Sales Department at 800.441.3177 or
45-31 Court Square, Long Island, NY 11101.
Removing the SurgeBloc® Module
WARNING
DataComm Electronics’ products shall be installed and used only as indicated in DataComm Electronics’ product instruction
sheets.
Instruction sheets are available online at www.datacommelectronics.com.
CAUTION
For shock protection, this device must be properly grounded.
Use copper wire only with this device.
IMPORTANT INSTRUCTIONS
Read and understand all instructions.
Follow all warnings and instructions marked on the product.
Do not use this product near water, for example near a bath tub, wash bowl, kitchen sink, laundry tub, in a wet basement, or near
a swimming pool.
SAVE THESE INSTRUCTIONS.
# 1209
ONLY LICENSED PROFESSIONALS SHOULD INSTALL THIS PRODUCT
Page 2 of 3
1/5/11 Rev. 2
Page 5

Installation / Instruction Sheet 45-0041-WH (Continued)
7-1/8”
45-0041-WH Recessed Low Voltage
Duplex Surge Suppressor
7-1/4”
TEMPLATE
Media Plate with
ACTUAL SIZE
www.datacommelectronics.com
888.223.7977
CUT ALONG DOTTED LINE
This product is patent protected by U.S. Patent numbers D553475, D554475 and 7390964.
RoHS Compliant.
1/5/11 Rev. 2Page 3 of 3
Page 6

Instruction / Installation Sheet
Recessed Low Voltage Media Plate
with 20 Amp Duplex Receptacle
Part # 45-0032-WH
DataComm Electronics, Inc.
Parts Included:
• Recessed Low Voltage Media Plate
• Steel Electrical Box
• 20 Amp/125 Volt Tamper Resistant Duplex Receptacle
www.DataCommElectronics.com
• Four (4) Electrical Box Mounting Screws
Tools Required:
• Drill with Phillips Bit or Phillips Head Screw Driver
• Pen or Pencil
• Sheetrock Saw or Utility Knife
• 6 Ft. Tape Measure
Use the Recessed Low Voltage Media Plate with 20 Amp Duplex Receptacle to install low voltage cables
behind your HDTV or other display device. The plate can be installed upright or sideways (see Installation
Diagram below).
6349 Peachtree Street
Norcross, GA 30071-1725
888.223.7977
770.662.8205
Features of the Recessed Low Voltage Media Plate with 20 Amp Duplex Receptacle include:
• HDTV/display device plug recesses completely into the wall when plugged into the Media Plate
• 20 Amp Duplex Receptacle and Steel Electrical Box for commercial requirements
• Large low voltage pass through opening for multiple low voltage cables
IMPORTANT INSTRUCTIONS:
This product is designed for retrofit work only
because the electrical outlet box cannot be
attached to a stud.
WARNING:
Before you run your 12/2 w/ ground UL approved
building to the Recessed Low Voltage Media Plate
with 20 Amp Duplex Receptacle, be sure the power
is off by switching the circuit breaker to off or
removing the fuse(s). Test the power to make sure
the power is off. Be sure to install the Media Plate
with Duplex 20 Amp Receptacle in accordance with
the National Electrical Code (NEC) local codes.
WARNING
DataComm Electronics’ products shall be installed and used only as indicated in DataComm Electronics’ product instruction sheet s.
Instruction sheets are available online at www.datacommelectronics.com.
Installation Diagram
CAUTION
For shock protection, this device must be properly grounded.
Use copper wire only with this device.
IMPORTANT INSTRUCTIONS
Read and understand all instructions.
Follow all warnings and instructions marked on the product.
Do not use this product near water, for example near a bath tub, wash bowl, kitchen sink, laundry tub, in a wet basement, or near a
swimming pool.
SAVE THESE INSTRUCTIONS.
Page 1 of 3
11/15/13
Page 7

Instruction / Installation Sheet
Recessed Low Voltage Media Plate
with 20 Amp Duplex Receptacle
Part # 45-0032-WH CONTINUED
Installation Instructions:
Fig. 1
888.223.7977
770.662.8205
www.DataCommElectronics.com
Figure 1:
Top view - shows needed space between the
drywall and the studs. Receptacle side of the Media
Plate should be 3” from the stud but no more than 5”
(review picture carefully).
Fig. 2
Fig. 3
Fig. 4
Fig. 5
Figure 2:
Cut out the supplied template on page 3 of this instruction sheet. Place the template on
the wall in the desired install location. Using your pen or pencial, trace the template on the
wall. Using a drywall saw or utility knife, cut a hole in the drywall the size of the template.
See Figure 1 before tracing your opening. Remember, this wall plate is designed to be
installed between the studs. It cannot be installed on top of a stud.
Figure 3:
Run the source of power to the included steel electrical box. Be sure to follow all local
electrical codes.
Figure 4:
Connect the suplied 20 Amp Duplex Receptacle to a piece of 12/2
/ ground UL
approved electrical building wire that you have pulled from a power source. Strip off
approximately 3 inches of the outer jacket of the wire. Be careful not to cut the jacket of
the inner wires. Connect the hot line (black) wire to the brass colored terminal screw and
neutral (white) wire to the silver colored terminal screw. Be sure to connect the grounding
(green) or bare grounding wire to the green colored terminal screw. Once you have wired
the 20 Amp Duplex Receptacle, screw it into the Steel Electrical Box until the receptacle
is firmly secured.
Figure 5:
Use the four provided screws to secure the Steel Electrical Box and Receptacle to the
mounting studs on the backside of the Recessed Low Voltage Media Plate.
Fig. 6
Fig. 7
Figure 6:
Important: Before installing the Media Plate into the template opening, make sure to pull
your low voltage cables through the low voltage cable opening.
After low voltage pass through: Starting with the receptacle side of the Media Plate
slowly slide it into the opening. Swing the opposite side of the plate into position until the
entire Media Plate is flush with the wall. Now screw down the screws with wings; these
wings fasten tightly against the back of the drywall.
Figure 7:
Your new Recessed Low Voltage Media Plate with 20 Amp Duplex Receptacle is now
installed and ready for the TV mount to be installed. Install your TV mount bracket per the
TV bracket manufacturer’s instructions.
Page 2 of 3
1 /1 /13
Page 8

Instruction / Installation Sheet
Recessed Low Voltage Media Plate
with 20 Amp Duplex Receptacle
Part # 45-0032-WH CONTINUED
ONLY LICENSED PROFESSIONALS SHOULD INSTALL THIS PRODUCT
7-1/4”
888.223.7977
770.662.8205
www.DataCommElectronics.com
TEMPLATE
45-0032-WH Recessed Low Voltage
Media Plate with Duplex 20 Amp Receptacle
7-1/8”
ACTUAL SIZE
CUT ALONG DOTTED LINE
This product is patent protected by U.S. Patent numbers D553475, D554475 and 7390964.
RoHS Compliant.
Page 3 of 3
ETL LISTED
CONFORMS TO
UL STD 514C
11/1
5/13
 Loading...