

D GB
datacask kallisto 3308a
!
datacask kallisto 3308ta
Benutzerhandbuch
Inhalt
I. Einführung
II. Leistungsmerkmale
III. Systemanforderungen
IV. Inhalt
V. Aussenansicht
VI. Treiberinstallation unter Windows 98
VII. Montage
VIII. Festplattenkonfiguration
IX. Service und Gewährleistung
X. English User manual
Jeglicher Datenverlust liegt in der alleinigen Verantwortung des
Benutzers. Für die Wiederherstellung solcher Daten sind wir
unter keinen Umständen haftbar zu machen. Wir empfehlen
daher dringend ZWEI Kopien Ihrer Daten anzufertigen und
aufzubewahren.
datacask ist eine Marke der Fukato GmbH, Berliner Str. 140, 14467 Potsdam,
Deutschland.
1

I. Einführung
Vielen Dank, dass Sie sich für datacask kallisto 3308a entschieden haben.
Lesen Sie bitte dieses Handbuch sorgfältig durch, bevor Sie das Gerät
verwenden. Alle Spezifikationen können ohne vorherige Ankündigung
geändert werden.
Hinweis: Bitte beachten Sie, dass das gesamte Handbuch für beide datacask
kallisto Modelle 3308a und 3308ta gültig ist. datacask kallisto 3308ta
unterscheidet sich durch eine zusätzliche Temperaturanzeige am Gehäuse.
II. Leistungsmerkmale
- Unterstützt Hi-Speed-USB2.0.
- Unterstützt IDE- & SATA II-Laufwerke (3,5 Zoll).
- e-SATA Schnittstelle für schnelleren Datentransfer
- „One Touch-Backup“-Funktion zur einfachen Sicherung Ihrer wichtigsten
Daten.
- Integrierter Lüfter (8 cm) zur Reduzierung der hohen Temperaturen der
Festplatte bei lang andauerndem Betrieb.
- Exklusiv patentiertes, schraubenloses Design: Zum Ein- und Ausbau der
Festplatte werden keinerlei Werkzeuge benötigt.
- Umfasst einen Standfuss für eine reduzierte Standfläche.
III. Systemanforderungen
Hardwareanforderungen: Computer mit Standard-USB-Anschluss.
Softwareanforderungen: Windows 98SE/2000/ME/XP/Vista
IV. Inhalt
Vergewissern Sie sich nach dem Kauf, dass folgende Produktbestandteile
enthalten sind. Sollte eine der Komponenten fehlen, wenden Sie sich bitte
umgehend an Ihren lokalen Händler.
- Externes Festplattengehäuse - USB-Kabel (je nach Version)
- Standfuss - eSATA-Kabel (je nach Version)
- Wechselstromadapter - Treiber-CD
- Kurzinstallationsanleitung
2
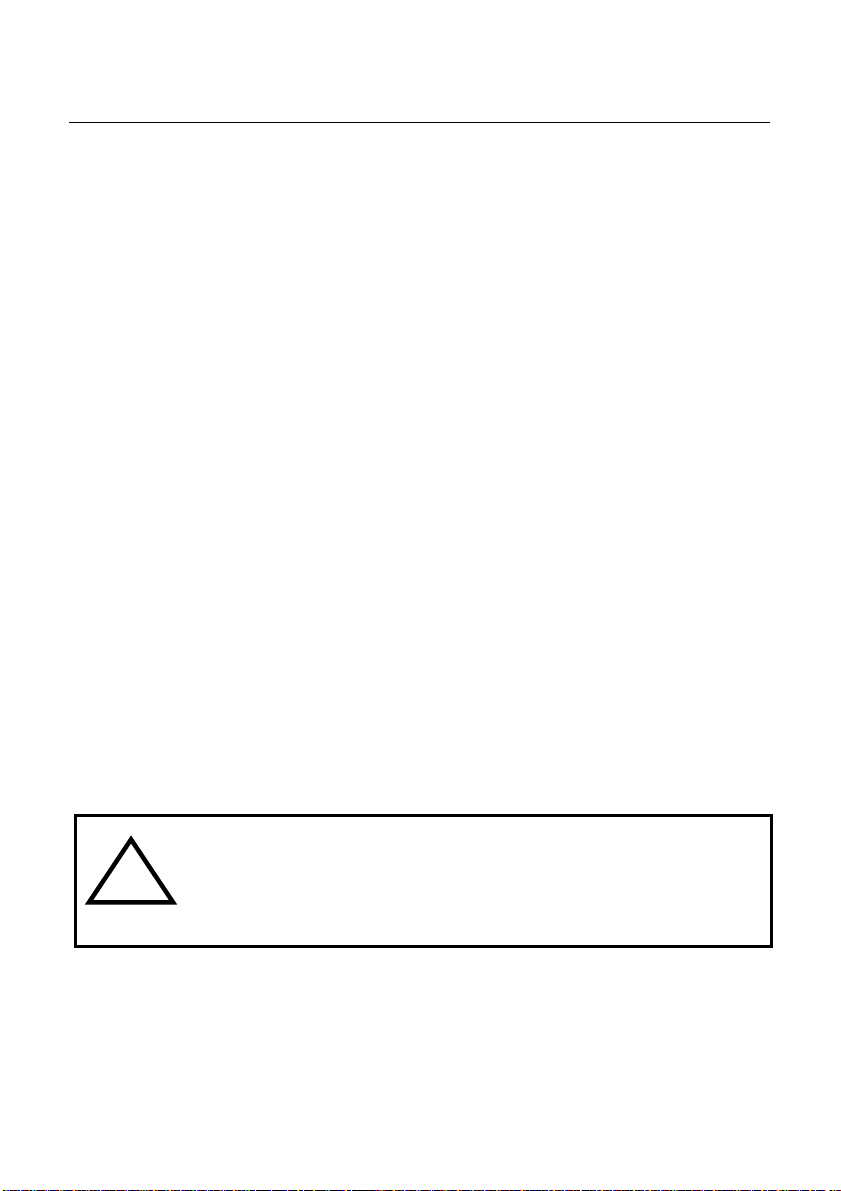
V. Aussenansicht
1. Ein-/Aus-Taste (LED) (je nach Version)
2. Backup-Taste (je nach Version)
3. USB-/eSATA-Anschluss (je nach Version)
4. Gleichstromeingang
5. Freigabetaste der Festplattenhalterung
VI. Treiberinstallation unter Windows 98
Den passenden Treiber sowie das Installationshandbuch für Windows 98
finden Sie auf der CD oder auf unserer Webseite: www.fukato.com, unter
„Service“ > „Downloads“.
VII. Montage
1. Entfernen der Festplattenhalterung
Drücken Sie die Freigabetaste (in Pfeilrichtung), die sich hinten auf der
rechten Seite befindet, um die Festplattenhalterung zu lösen. Drücken Sie
anschliessend die Rückplatte nach vorne. Sie können nun die
Festplattenhalterung entnehmen.
3
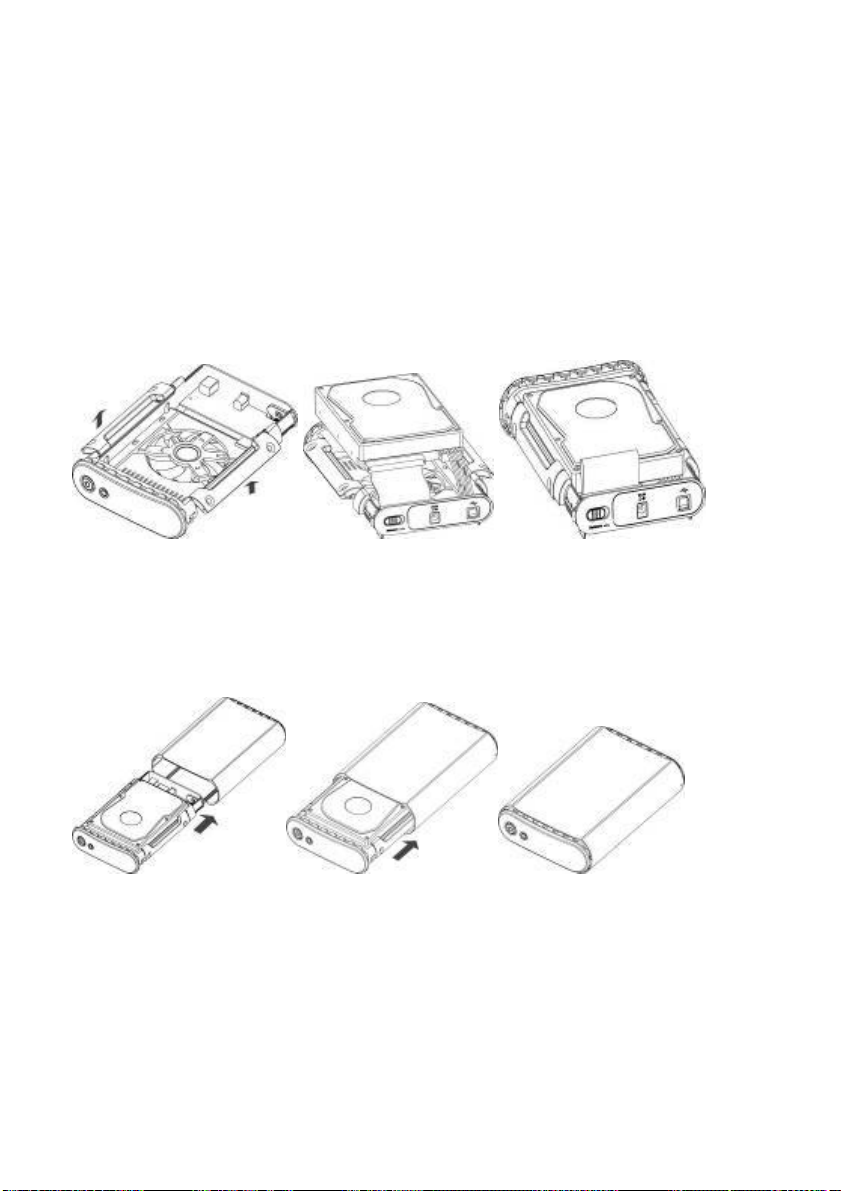
2. Einsetzen der Festplatte (Stellen Sie sicher, dass diese auf MASTER
gesetzt ist)
Achtung: Wenn Sie eine SATA Festplatte, benutzen stellen Sie bitte sicher,
dass das Datenkabel an der korrekten Buchse angeschlossen ist (USB =
CN5, e-SATA = CN6)
Heben Sie die Flügel an beiden Seiten an (1), schliessen Sie die Strom- und
Datenkabel an die Festplatte an (2) und schieben Sie anschliessend die
Festplatte vorsichtig in die Halterung. Richten Sie die Festplatte an der
Halterung aus und drücken Sie die Flügel behutsam nach unten, bis sie
einrasten (3).
3. Wiederzusammenbau des Geräts
Schieben Sie die Festplattenhalterung zurück in das Gehäuse, und
vergewissern Sie sich, dass die Freigabetaste in ihrer ursprünglichen Position
einrastet.
VIII. Festplattenkonfiguration
Festplatten müssen mit einem geeigneten Dateisystem formatiert werden,
bevor sie verwendet werden können. Die gängigsten Dateisysteme sind
FAT32 und NTFS. FAT32 wird von Windows 98/ME/2000/XP/Vista und
Mac OS 9/OS X unterstützt. NTFS wird nur von Windows 2000/XP und Vista
unterstützt.
4
Wenn Ihre Festplatte bereits formatiert ist, können Sie dieses Kapitel
überspringen. Weitere Information zum Formatieren und Partitionieren einer
Festplatte erhalten Sie in diesem Kapitel.
Formatieren/Neuformatieren einer neuen Festplatte
Wenn Sie Windows 2000/XP/Vista verwenden, achten Sie darauf, dass das
neueste Service Pack installiert wurde:
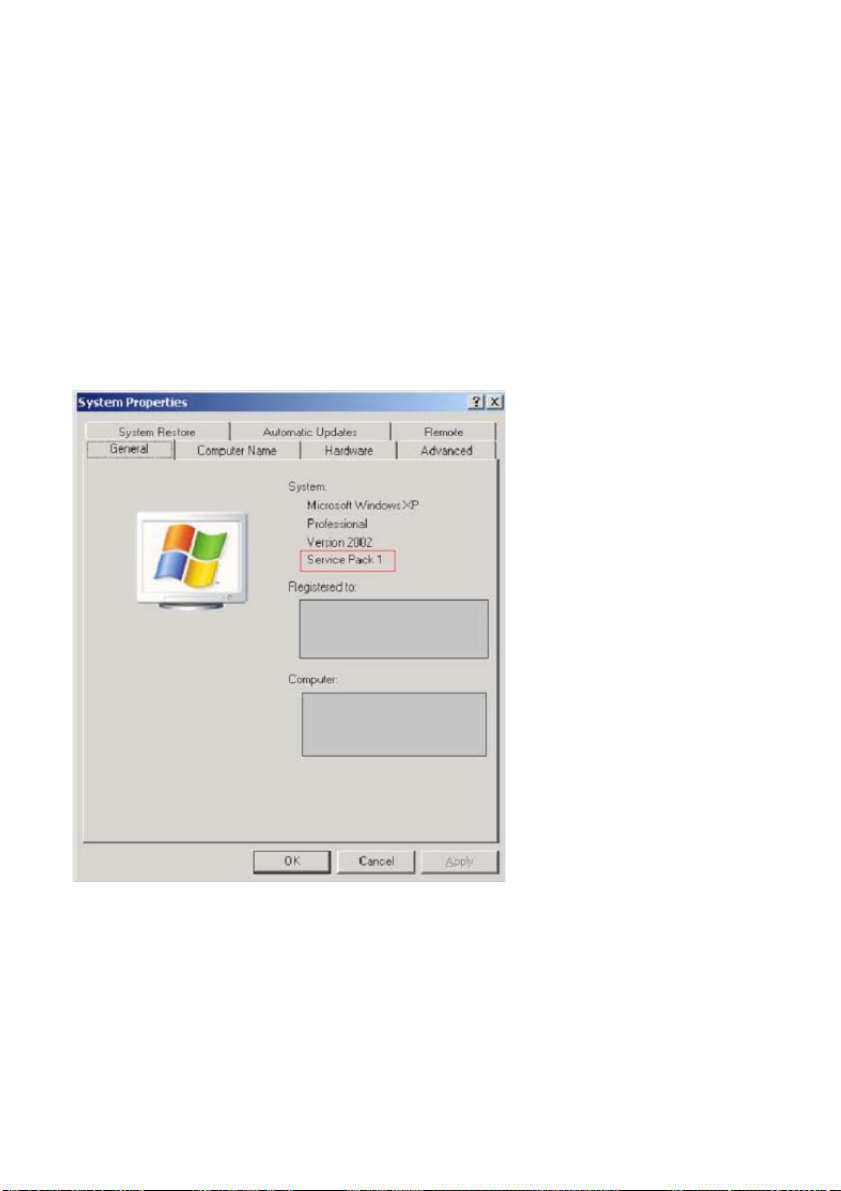
Um den aktuellen Status Ihres Systems zu überprüfen, klicken Sie mit der
rechten Maustaste auf „Arbeitsplatz“, und wählen Sie „Eigenschaften“ aus. Ein
Fenster wird angezeigt, das dem unten abgebildeten ähnlich ist.
5

Windows XP
So initialisieren, partitionieren oder formatieren Sie die Festplatte neu:
1) Schalten Sie Ihr datacask-Gerät ein.
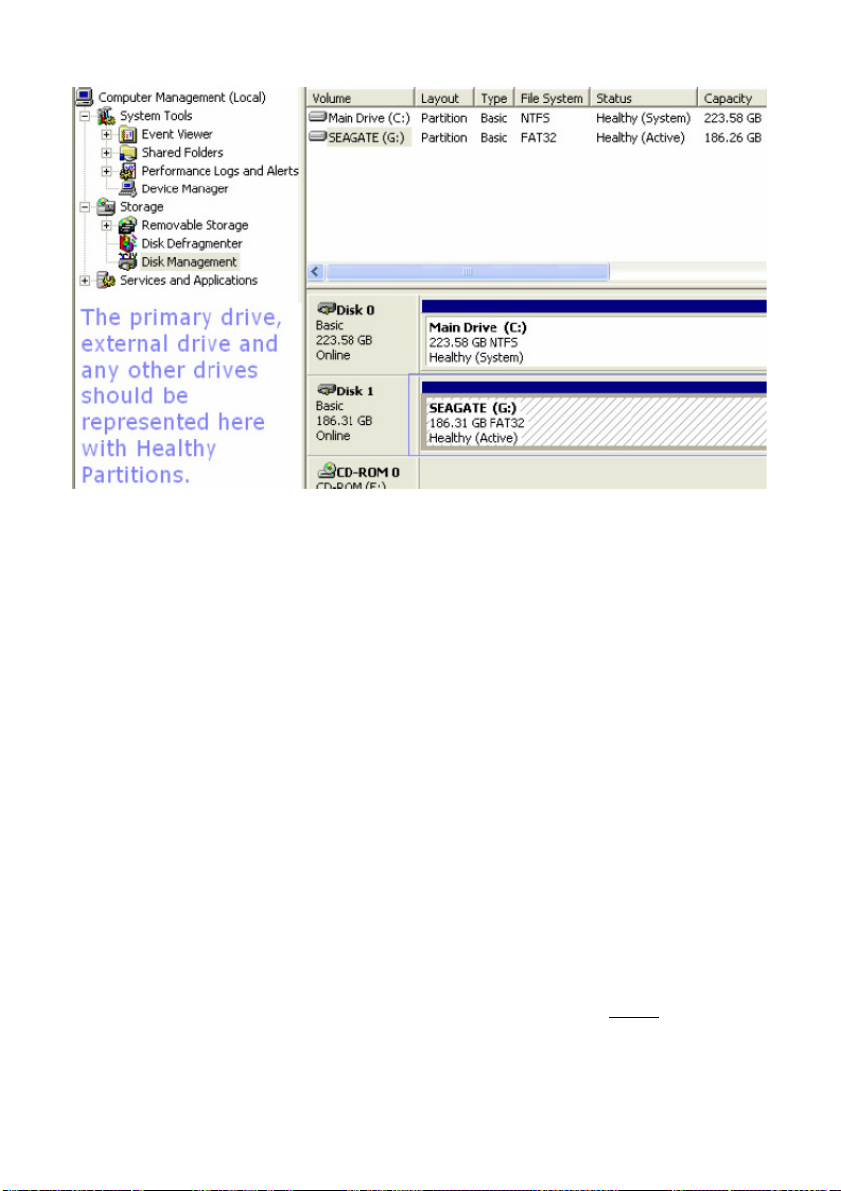
2) Gehen Sie zu > „Start“ > „Systemsteuerung“ > „Verwaltung“ >
„Computerverwaltung“.
3) Gehen Sie unter „Computerverwaltung“ zu > „Datenträgerverwaltung“, und
suchen Sie den Ihrem datacask-Gerät zugewiesenen Laufwerksbuchstaben.
4) Klicken Sie mit der rechten Maustaste auf dieses Laufwerk, und klicken Sie
(falls möglich) auf „Initialisieren“. Nachdem die Initialisierung abgeschlossen
ist, klicken Sie auf „Formatieren…“
Hinweis: Erstellen Sie vor dem Formatieren der Festplatte eine
Sicherungskopie, da beim Formatieren alle Daten gelöscht werden. Wenn Sie
die Festplatte mit einem anderen Dateisystem als NTFS formatieren,
benötigen Sie ein Software-Hilfsprogramm.
Windows 2000
So initialisieren, partitionieren oder formatieren Sie die Festplatte neu:
1) Schalten Sie Ihr datacask-Gerät ein.
2) Gehen Sie zu > „Start“ > „Systemsteuerung“ > „Verwaltung“ >
„Computerverwaltung“.
3) Gehen Sie unter „Computerverwaltung“ zu > „Datenträgerverwaltung“, und
suchen Sie den Ihrem datacask-Gerät zugewiesenen Laufwerksbuchstaben.
4) Klicken Sie mit der rechten Maustaste auf dieses Laufwerk, und klicken Sie
(falls möglich) auf „Initialisieren“. Nachdem die Initialisierung abgeschlossen
ist, klicken Sie auf „Formatieren…“
Hinweis: Erstellen Sie vor dem Formatieren der Festplatte eine
Sicherungskopie, da beim Formatieren alle Daten gelöscht werden. Wenn Sie
die Festplatte mit einem anderen Dateisystem als NTFS formatieren,
benötigen Sie ein Software-Hilfsprogramm.
6
Windows 98SE/ME
Hinweis: Die Betriebssysteme Windows 98SE/ME unterstützen USB 2.0
standardmässig nicht. Um die Unterstützung von USB 2.0 zu aktivieren,
benötigen Sie einen USB 2.0-Treiber, einen PCI-Adapter oder eine PCMIAKarte.
Beachten Sie, dass die Betriebssysteme Windows 98/ME das Dateisystem
NTFS nicht unterstützen. Formatieren Sie Ihre Festplatte mit dem Dateisystem
FAT32.
Windows 98SE
Nur Windows 98 SE (Second Edition, Zweite Edition) unterstützt die USBFunktion. Dazu muss ein USB-Hostcontroller installiert werden, den Sie auf
der Website von Microsoft erhalten.
Bei Windows 98 ist auch die Installation eines bestimmten Gerätetreibers
erforderlich. Den Gerätetreiber für Ihr datacask-Gehäuse finden Sie auf der
mit dem Gehäuse mitgelieferten CD. Öffnen Sie die entsprechende
Treiberdatei, und führen Sie das Installationsprogramm aus, bevor
Gehäuse mit dem Computer verbinden.
Sie das
7
Windows ME
Windows ME lädt die USB-Treiber für dieses Gehäuse automatisch.
Bestimmte OEM-Installationen von Windows ME benötigen beim Versuch, die
Treiber für das externe Laufwerk zu laden, die Datei USBNTMAP.SYS. Diese
Datei finden Sie auf der Installations- oder Recovery-CD von Windows ME.
Mac OS 9/OS X
Nachdem das Laufwerk zum System hinzugefügt und eingeschaltet wurde,
sollte es auf dem Desktop angezeigt werden. Ein Festplattensymbol
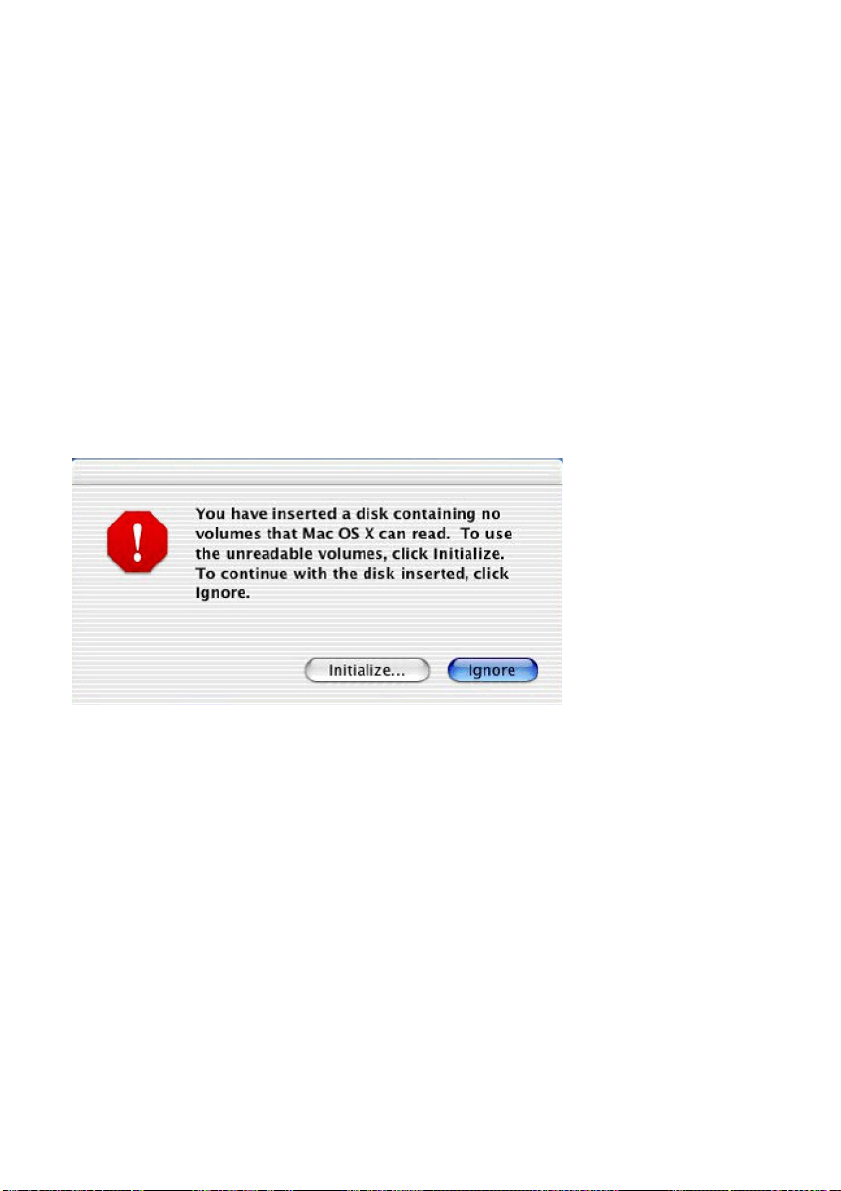
kennzeichnet das externe Laufwerk.
Nach der ersten Verbindung des Geräts mit Ihrem Computer wird
möglicherweise folgende Warnung angezeigt:
Klicken Sie auf die Schaltfläche „Initialisieren…“, um das FestplattenDienstprogramm zu starten.
Sie können das Festplatten-Dienstprogramm verwenden, um zu überprüfen,
ob das Laufwerk von Ihrem System erkannt wurde, und die Festplatte zu
formatieren und partitionieren. Wenn das Laufwerk nicht automatisch erkannt
wird oder ein inkompatibles Dateisystem verwendet wurde, reinitialisieren Sie
das Laufwerk mit einem Format, das mit einem Macintosh-Betriebssystem
kompatibel ist.
Das Festplatten-Dienstprogramm sollte sich im Macintosh-Betriebssystem im
Ordner „Dienstprogramme“ befinden.
8

Das Festplatten-Dienstprogramm zeigt in der linken Spalte alle Laufwerke an.
Klicken Sie auf das im externen Gehäuse installierte Laufwerk, und markieren
Sie es. Dadurch werden die aktuelle Laufwerkformatierung und weitere
Informationen angezeigt.
9

Um das Laufwerk mit einem Format zu initialisieren, das mit einem MacintoshBetriebssystem kompatibel ist, klicken Sie auf die Registerkarte „Löschen“
(siehe unten).
Ändern Sie das „Volume-Format“ von der aktuellen Auswahl zu „Mac OS
Extended“ (1). Geben Sie in das Feld „Name“ den gewünschten
Laufwerksnamen ein (2). Dieser Name wird auf dem Desktop angezeigt, wenn
das Laufwerk angeschlossen ist. Aktivieren Sie ausserdem das
Kontrollkästchen „Mac OS 9 Treiber installieren“ (3). Um den
Initialisierungsvorgang abzuschliessen, klicken Sie auf die Schaltfläche
„Löschen“ (4).
Wenn das externe Laufwerk im Festplatten-Dienstprogramm nicht erkannt
wird, können Sie mit dem Apple System Profiler überprüfen, ob das Laufwerk
mit dem System kommuniziert.
10

Apple System Profiler befindet sich im Ordner „Dienstprogramme“. Der Apple
System Profiler zeigt das Laufwerk nach der Schnittstelle an, mit der es
verbunden ist (siehe nächste Seite).
Mittels USB verbundenes Laufwerk
IX. Service und Gewährleistung
Service
Bei technischen Problemen mit Ihrem datacask- Produkt wenden Sie sich an
die Hotline der Firma Fukato GmbH, Berliner Str. 140, 14467 Potsdam,
Deutschland: 01805- 909200 (0,14 €/Minute bei einem Anruf aus dem
Festnetz der Deutschen Telekom).
Gewährleistung
Vermuten Sie einen Gewährleistungsfall mit Ihrem datacask-Produkt, wenden
Sie sich an die Hotline 01805- 909200 (0,14 € /Minute bei einem Anruf aus
dem Festnetz der Deutschen Telekom). Erfahrene Mitarbeiter beraten Sie und
stimmen mit Ihnen das weitere Vorgehen ab. Schicken Sie bitte keine Ware an
das Fukato-Service Center zurück, ohne sich vorher durch die Hotline eine
RMA Nummer geben zu lassen, da ansonsten die Ware unbearbeitet
retourniert oder verweigert wird. Fukato gewährt Ihnen ab Rechnungsdatum
eine Gewährleistung von 2 Jahren. Dem Käufer steht im Mängelfall zunächst
11

nur das Recht auf Nacherfüllung zu. Die Nacherfüllung beinhaltet entweder
die Nachbesserung oder die Lieferung eines Ersatzproduktes. Ausgetauschte
Geräte oder Teile gehen in das Eigentum von Fukato über. Der Nachweis des
Gewährleistungsanspruchs ist durch eine ordnungsgemäße Kaufbestätigung
(Kaufbeleg, ggf. Rechnung) zu erbringen. Schäden, die durch unsachgemäße
Behandlung, Bedienung, Aufbewahrung sowie durch höhere Gewalt oder
sonstige äußere Einflüsse entstehen, fallen nicht unter die Gewährleistung.
Gleiches gilt für Verschleißteile, wie z. B. wieder aufladbare Akkus (6 Monate).
Bei technischen Fragen gehen Sie auf unsere datacask Homepage unter
www.datacask.com oder schicken Sie uns eine Email an:
service@datacask.com
12

datacask kallisto 3308a
!
datacask kallisto 3308ta
User manual
Content
I. Product introduction
II. Product features
III. System requirements
IV. Contents
V. Exterior layout
VI. Install WIN98 driver
VII. Assembly
VIII. Configure the hard disk
IX. Service and Warranty
Any loss, corruption and/or destruction of data are the sole
responsibility of the user, and under no circumstances will we be
held liable for the recovery or restoration of this data. You are
highly recommended to keep TWO copies of your data.
datacask is a label of Fukato GmbH, Berliner Str. 140, 14467 Potsdam, Germany.
13

I. Product introduction
Thank you for choosing the datacask kallisto 3308a. Please read this manual
carefully before use. Specifications subject to change without notice.
Note: Please note that this manual is valid for both datacask kallisto models
3308a und 3308ta. datacask kallisto 3308ta differs by an additional
temperature indicator on the enclosure.
II. Product features
- Supports USB2.0 Hi-Speed.
- Supports 3.5” IDE & SATA II Hard Drives.
- e-SATA interface for faster transfer rates.
- “One Touch Backup” function, easy to back up your important data.
- Built in 8cm cooling fan, to reduce the hard drive high temperature during
extended use.
- Exclusive patented screwless design for HDD installation, no tools required
when installing or removing the hard drive.
- Includes a stand for saving desk space
III. System requirements
Hardware requirement : Computer with standard USB port.
Software requirement : Windows98SE/2000/ME/XP/Vista
IV. Contents
Upon Purchase please ensure that the following items are included with the
product. Should an item be missing, please contact your local distributor
immediately.
- External HDD enclosure - USB cable (depending on version)
- Stand - ESATA cable (depending on
version)
- AC adapter - Driver CD
- Quick start guide
14

V. Exterior layout
1. Power switch/ led (depending on version)
2. Back up button (depending on version)
3. USB- / ESATA- port (depending on version)
4. DC in port
5. Hard drive holder release button
VI. Install WIN98 driver
Please find a driver and the installation guide for Windows 98 on the CD or our
website: www.fukato.com -> under Service/ Downloads
VII. Assembly
1. To remove the Hard drive holder
Push the release button on the back right-hand side (in direction of the arrow)
of the enclosure to release Hard drive holder, then push rear panel forward.
The Hard drive holder will slide out.
15

2. Fitting the Hard drive (ensure the Hard Drive is set to MASTER)
Attention: When using a SATA Hard disk please ensure that the data cable is
connected to the correct socket. When using the USB interface use CN5,
when using the e-SATA interface use CN6.
Lift the wings on both sides (1), connect power and data cables to Hard drive
(2) then carefully insert the Hard drive into holder. Align the HDD and gently
push wings down until they have clicked into place (3).
3. Reassembling the device
Slide the Hard drive holder back into the case, ensuring that the Hard drive
holder release button clicks back to its original position.
VIII. Configuring the hard disk
Hard drives need to be formatted with an appropriate filing system before they
can be used. The most common filing systems are FAT23 & NTFS. FAT32 is
supported by Windows 98/ME/2000/XP/Vista and Mac OS9/OSX. NTFS is
only supported by Windows 2000/XP and Vista.
16

If your Hard drive is already formatted, then you can skip this chapter. For
further information on how to format and partition a hard drive please read this
chapter carefully.
17

Formatting /reformatting a new Hard Drive
Please ensure that if you are using Windows 2000/XP/Vista that the latest
Service Pack has been installed:
To check the current status on your system, right click on “My Computer” then
choose “Properties” and a window similar to that below will pop up.
18

Windows XP Users
To initialize, partition, or reformat the Hard disk:
1) Turn your datacask device on.
2) Go to > Start > Control Panel > Administrative Tools > Computer
Management.
3) In Computer Management, go to > Storage Disk Management, and locate
the drive letter allocated to your datacask device.
4) Right click on this drive and click on “initialize” (if available). After initializing
is complete click on format.
Note: Before formatting the Hard drive make a back up, as all data will be
deleted. For formatting the Hard drive with file systems other than NTFS, a
utility Software tool will be required.
Windows 2000 Users
To initialize, partition, or reformat the Hard disk:
1) Turn your datacask device on.
2) Go to > Start > Control Panel > Administrative Tools > Computer
Management.
3) In Computer Management, go to > Storage Disk Management, and locate
the drive letter allocated to your datacask device.
4) Right click on this drive and click on “initialize” (if available). After initializing
is complete click on format.
Note: Before formatting the Hard drive make a back up, as all data will be
deleted. For formatting the Hard drive with file systems other than NTFS, a
utility Software tool will be required.
19

Windows 98SE/ME Users
Note: Windows 98SE/ ME do not have native support for USB2.0. To enable
USB2.0 support a USB2.0 Driver, PCI Adapter or PCMIA card is required.
Please keep in mind that Windows 98/ME do not support NTFS filing systems,
please format your Hard drive with the FAT32 filing system.
Windows 98SE
Only Windows 98SE (Second edition) supports USB function, and will require
the installation of a USB Host controller, which can be obtained from the
Microsoft website.
Windows 98 also requires the installation of a specific device driver. The
device driver for your datacask enclosure can be found on the CD included
with this enclosure. Please open the respective driver file and run the install
program before connecting your enclosure to the PC.
20

Windows ME
Windows ME automatically loads the USB drivers for this enclosure. Certain
OEM installations of Windows ME call for the file USBNTMAP.SYS while
attempting to load drivers for the external drive. This file can be located on the
Windows Me installation or recovery CD.
Mac OS9/OSX Users
After the drive has been attached to the system and powered on, the drive
should appear on the desktop. A hard drive icon designates the external drive.
After connecting the device to your system for the first time, the following
warning may appear:
Click on the Initialize button to launch the Disk Utility.
You can use the Disk Utility to verify that the drive is recognised by your
system, and to format and partition the Hard disk. If the drive is not
automatically recognised or an incompatible File system is being used, please
reinitialize the drive with a Mac OS compatible format.
The Disk Utility should be located in the Utilities folder of Mac OS.
21

The Disk Utility displays the all drives in the left hand column. Click on the
drive installed in your external enclosure, highlighting it. This will display the
current drive format and other information.
22

To initialize the drive with a Mac OS compatible format, click the Erase tab.
(See Below)
Change the “volume format” from the current selection to “Mac OS Extended”
(1). Insert the desired drive name in “Name” (2). This is the name that will be
shown on the desktop when the drive is connected. Also, place a tick in the
“Install Mac OS 9 Drivers” box (3). To complete the initialization process, click
the Erase button (4).
If the external drive is not detected in Disk Utility, use the Apple System
Profiler to verify that the drive is communicating with the system.
Apple System Profiler is found in the Utilities folder. The Apple System Profiler
displays the drive by the interface to which it is connected (See Next Page).
23

Drive connected via USB
IX. Service and Warranty
Service
In case of technical problems with your datacask-product, please contact the
Fukato Service-Hotline on 01805-909200 (0,14 €/ minute from German
landlines).
Warranty
If you think that you need to make a claim under the warranty on your
datacask-product, please call the Fukato Service-Hotline on 01805-909200
(0,14 €/minute from German landlines). Experienced staff will advise you and
give details on how you should proceed. Please do not send any goods to the
Fukato-Service-Centre without obtaining an RMA number from the hotline first,
as otherwise the goods will be returned unrepaired or refused. Fukato grants
you a 2-year warranty from the invoice date. In the event of defects, only the
buyer has a right to subsequent service. This service will include either repair
or the delivery of a replacement product. Exchanged units or parts will be the
property of Fukato. Evidence of the warranty must be provided in the form of
proper proof of purchase (sales receipt or invoice). Damage caused by
24

improper handling, operation, storage or by force majeure or other external
influences is not covered by the warranty. The same applies to wearing parts,
e.g. rechargeable batteries (6 months). In the event of technical queries,
please visit the datacask- homepage at www.datacask.com or send an e-mail
to:service@datacask.com
25

 Loading...