

Page 1

Cat-X AV Extender
VGA and Audio
AVE-301T
AVE-301R
AVE-304T
AVE-308T
AVE-316T
AVE-304TR
AVE-308TR
User Manual
◄ V1.0 ►
www.green-box.com.tw
www.data-av.com
Page 2

VGA and Audio Cat-X AV Extender
Contents
1. Product Introduction........................................................................4
2. Product Features..............................................................................5
3. System Devices & Function ..............................................................5
4. Panel Descriptions ...........................................................................6
5. Installation and Operation. ..............................................................9
5.1 AVE-301T Single-Port Transmitter Installation:.........................9
5.2 Receiver AVE-301R installation and UTP Connection ...............10
5.3 AVE-300 Multi-Port Model: Installation and Operation.............11
6. Specifications.................................................................................14
7. Order Information..........................................................................15
8. Remarks.........................................................................................16
9. Notice ............................................................................................16
2 / 16
Page 3

VGA and Audio Cat-X AV Extender
Certifications
FCC
This equipment has been tested and found to comply with Part 15 of the FCC
Rules.
Operation is subject to the following two conditions:
(1) This device may not cause harmful interference
(2) This device must accept any interference received, including interference
that may cause undesired operation.
CE
This equipment is in compliance with the requirements of the following
regulations:
EN 55022: CLASS B
RoHS
All contents of this package, including products, packing materials and
documentation comply with RoHS.
© 2009 by Green-Box
Green-Box Technology Co. Ltd. reserves the right to make changes in the hardware, packaging, and any
accompanying documentation without prior written no tic e.
No part of this document may be reproduced or transmitted in any form or by any means, electronic, mechanical,
photocopying, recording, or otherwise, without prior writ ten permission of Green-Box Technology Co. Ltd.
3 / 16
Page 4

VGA and Audio Cat-X AV Extender
1. Product Introduction
AVE-300 series is a broadcast system to transmit Audio and Video signals over
Cat5/5e/6 cable, it can reach the distance up to 300m and by stacking more
system Transceivers, the whole system can extend AV signals up to 900m. You
can use different cable kit to broadcast VGA, Component, Composite, or
S-video from multimedia output devices. The video quality can be adjusted
very easily from the FOCUS and GAIN Control in the Receiver. It can simplify
the installation by using single Cat5/5e/6 cable and reach a longer distance;
the AV extender is a perfect extension solution for projector, plasma TV, LCD TV,
LCD monitor, HDTV, and CRT, as well as in the area of Digital Signage
broadcasting.
2. Product Features
AVE-300 series can send Audio and Video signals from Transmitter over
Cat5/5e/6 cable, and broadcast in Receiver. The broadcasting distance is
300 meters and by stacking more system transceivers, it can extend AV
signals up to 900 meters.
PC Cable Kit: used to carry VGA Video + Audio, support all VGA format and
with a maximum capacity of 2048x1536@300m
Remote and local monitors and speakers can broadcast simultaneously
Use Cat5 Enhance UTP cable (350MHz bandwidth) for better video quality
Receiver and Transceiver build in video gain and focus control to adjust the
video quality
Software free, pure hardware design, support Plug & Play
Transmitter and Receiver build with LEDs to indicate system status
Stackable capacity to expand the AV broadcasting
Provides magnetic pad and attachable metal plate for single-port unit to
ease the installation
4 / 16
Page 5

VGA and Audio Cat-X AV Extender
3. System Devices & Function
One-Port Transmitter AVE-301T:
(1) Built in one set of AV inputs
(2) Built in one set of AV outputs to monitor the AV signal broadcasted
(3) Built in one RJ-45 port for system output which can be connected by
Cat5/5e/6 cable and send signal to System Receiver
(4) Take the power from USB or power adaptor
4 / 8 / 16-Port Transmitter AVE-304T, AVE-308T, AVE-316T:
(1) Built in one set of AV inputs
(2) Built in one set of AV output to monitor the AV signal broadcasted
(3) Built in 4/8/16 R-J45 ports for system output which can be connected
by Cat5/5e/6 cable and send signal to 4/8/16 sets of System Receiver
or Transceiver
4/8-Port Transceiver AVE-304TR, AVE-308TR:
(4) Built in one Remote system input (RJ45) which can receive the A V
signal and with video and focus control to adjust the video quality
(5) Built in one set of AV output to monitor the AV signal broadcasted
(6) Built in 4/8 RJ-45 ports for system output which can be connected by
Cat5/5e/6 cable and send signal to 4/8 sets of System Receiver or
Transceiver
Receiver AVE-301R:
(1) Receive AV signal through RJ45 port, and with video and focus control,
you can adjust the video quality, the maximum supported extended
VGA resolution and distance up to 2048x1536@300m
(2) Built in one set of AV outputs (VGA + Audio) to display the AV signal
broadcasted
5 / 16
Page 6

VGA and Audio Cat-X AV Extender
4. Panel Descriptions
AVE-301T Single-Port AV Transmitter
Power Indicator Power Jack
VGA + Audio Output VGA + Audio + USB Power Input
RJ-45 AV Output H & V Sync Activity
Magnetic Pad
AVE-301R Single-Port AV Receiver
Power Indicator Power Jack
VGA + Audio Output Video Control
RJ-45 AV Input H & V Sync Activity
Magnetic Pad
6 / 16
Page 7

VGA and Audio Cat-X AV Extender
AVE-304T / AVE-308T / AVE-316T Multi-Port AV
Transmitter
z AVE-304T
z AVE-308T
z AVE-316T
VGA Activity Power Indicator
Power Jack VGA + Audio Input
VGA + Audio Output RJ-45 AV Output
7 / 16
Page 8

VGA and Audio Cat-X AV Extender
T
AVE-304TR / AVE-308TR Multi-Port AV Transceiver
z AVE-304TR
z AVE-308TR
VGA Activity Power Indicator
Video Gain Control Video Focus Control
RJ-45 AV Input Power Jack
VGA + Audio Output RJ-45 AV Output
Cable and Accessories
3-in-1 AVU cable for AVE-301T
VGA cable 1M & Audio cable 1.2M for
AVE-304T, AVE-308T, AVE-316
PC cable kit for VGA Video + Audio
8 / 16
Page 9
VGA and Audio Cat-X AV Extender
5. Installation and Operation
AVE-300 series supports different video format by using different cable kit.
Section 1 will describe how to extend VGA and Audio signals by PC cable kit
and in Section 2 & 3, you should find the description of how to use HDTV and
TV cable kit to extend Component, Composite, and S-Video
Extend VGA Video and Audio by PC Cable Kit
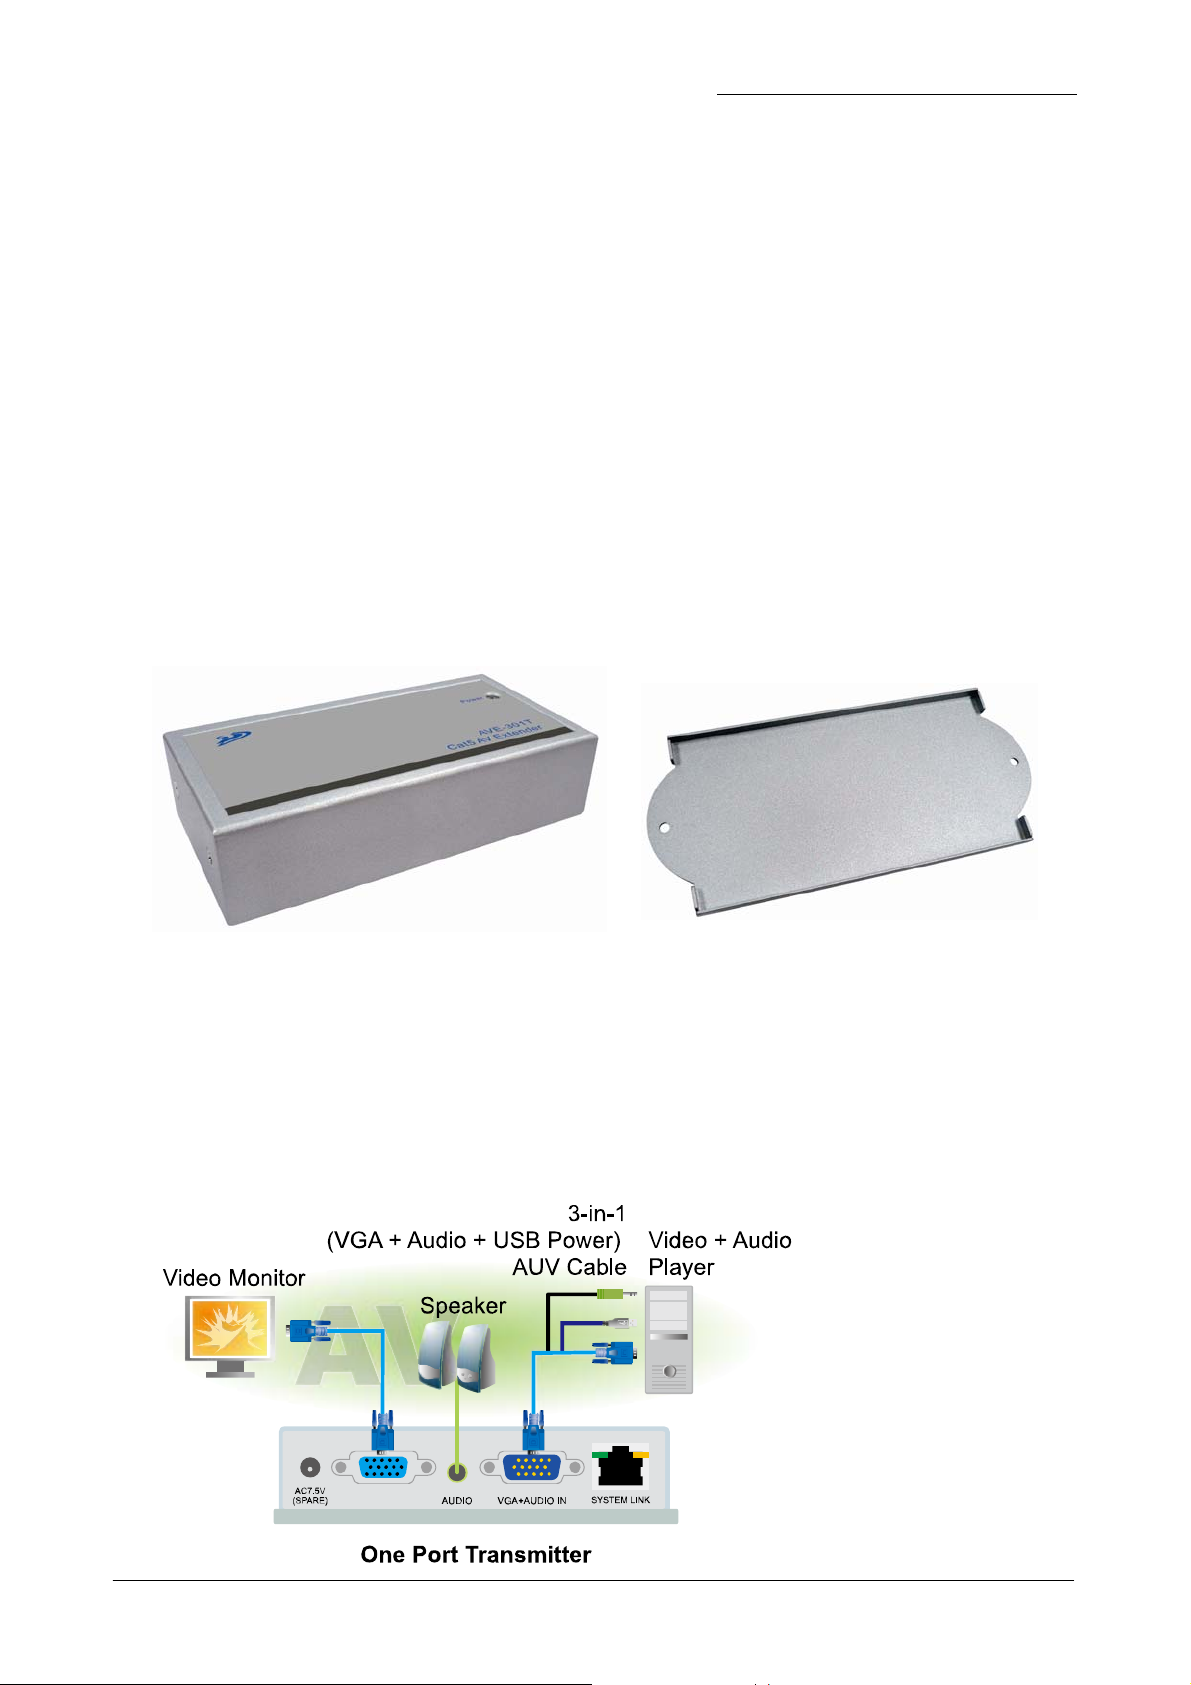
5.1 AVE-301T Single-Port Transmitter Installation:
(1) Site Selection: In your first time installation, place Transmitter near the
PC or AV devices (Audio and Video outputs); you can use magnetic pad to
attach the unit on metal plane (Ex. PC / Server Enclosure) or use
attachable rack mounting kit to fix the unit on selected area by screw or
nail.
Unit attached with Rack Mounting Kit
(2) Connecting Monitor and Speaker: Take a 3-in-1 cable (VGA + Audio
USB Power) to connect the signal from your AV device to the “GA+AUDIO
IN” port of Transmitter box and then connect monitor and peaker to the
“VGA OUT” and “AUDIO” ports. The Transmitter can ake the power through
the USB port or if you are using DVD Player or other devices without USB
port, you can plug optional power adaptor AC7.5V, 1A).
Installation Diagram of
System Transmitter
AVE-301T
9 / 16
Page 10

VGA and Audio Cat-X AV Extender
(3) Function Test: Turn on your AV device, the POWER LED should turn on
green to indicate the Power On status and the LEDs above RJ-45 will blink
before VGA signal is turned On and remain On after VGA signal is turned On.
5.2 Receiver AVE-301R installation and UTP Connection:
(1) Site Selection: Please place Receiver in an appropriate place and have the
UTP cable settled for later connection; you can use magnetic pad to attach
the unit on metal plane or use attachable rack mounting kit to fix the unit
on selected area by screw or nail.
(2) Power Up: Plug power adapter to the Receiver and connect monitor and
speaker to the “VGA OUT” and “AUDIO” port. The POWER LED will turn on
green to indicate the POWER ON status and the LED above RJ-45 port
should blink to indicate the AV signal unconnected status.
(3) Selection of UTP Cable: For best VGA resolution, please use Cat5
Enhanced cable (350MHz bandwidth) for connection, please noted that the
maximum extended length of one section (one pair of Transmitter or
Receiver) should not exceed 300 meters. The connector must be made by
568B/568B type.
PAIR 3
The EIA/TIA definition of 568B in the
PAIR 2 PAIR1 PAIR4
1 2 3 4 5 6 7 8
Jack Position
pin assignment is (1)orange white,
(2)orange, (3)green white, (4)blue,
(5)blue white, (6)green, (7)brown
white, and (8)brown.
(4) Connect UTP Cable:
Installation Diagram of Receiver AVE-301R
10 / 16
Page 11

VGA and Audio Cat-X AV Extender
Plug two ends of UTP cable to Transmitter and Receiver’s RJ45 SYSTEM LINK
ports, the Receiver’s connected monitor and speaker should work now and the
LEDs above RJ-45 port should remain ON. You can adjust the “FOCUS” and
“GAIN” control of Receiver to have the best VGA display.
(5) Function Test: After above installation, you will be able to broadcast the
AV signal to Receiver’s connected monitor and speaker.
(6) Problem and Solving: If you find unstable image or audio problems after
installation, please confirm following list or contact your direct vendor for
further assistance:
a. Check if PC’s VGA resolution and frequency over the limit of monitor
display, if so, please change the VGA configuration from Windows
Control panel.
b. Try to connect Monitor and speaker directly to a PC, and ensure the
basic function of these devices.
c. When using LCD or same type monitor, there might have some image
offset or blinking, please adjust the position, clock or phase of the LCD
monitor, or simply press Auto Adjust / Tune to have a better image
solution.
5.3 AVE-300 Multi-Port Model: Installation and Operation:
(1) Site Selection: In your first time installation, place Transmitter near the
PC or AV devices; you can use rack mounting kit to fix the system box.
Rack Mounting Kit for
Multi-Port Unit
(2) Connecting Monitor and Speaker: Plug power adapter to the Transmitter
and connect monitor and speaker to “VGA/AUDIO OUT” port. The POWER
LED will turn on green to indicate the POWER ON status and ”ACTIVE” LEDs
should turn off to indicate the unconnected status. Then, prepare VGA
and audio cables to connect the signal from your AV device to the
“VGA/AUDIO IN” port of Transmitter box.
11 / 16
Page 12

VGA and Audio Cat-X AV Extender
(3) Local Function Test: Power on your AV device, the “ACTIVE” LEDs of
Transmitter will turn on orange to indicate the video activation, and you
should ready to do AV broadcasting.
Installation Diagram of System Transmitter
(4) Receiver Installation: Please follow previous section for AVE-301R to
install the system Receiver, please note that the maximum extended length
of this section should not exceed 300 meters.
(5) Transceiver Installation: If you wish to expand the AV displays, you can
use system Transceiver, you can use 4/8-Port Transceiver model to expand
one AV signal to 4/8 AV signals. In the other way, you may stack more
system Transmitter through their local AV port to generate more AV RJ-45
outputs l ocally and the maximum local stacking capacity is limited to
layers to ensure good broadcasting quality.
Installation Diagram of System Receiver and Transceiver
12 / 16
Page 13

VGA and Audio Cat-X AV Extender
(6) System Expansion through UTP: This series can stack into maximum
three layers of UTP section to reach more AV outputs and depends on the
display devices, you may reach a lower VGA solution than single layer. The
suggested range of VGA broadcasting is 800x600@900m, 1280x1024@600m,
and 2048x1536@300m. Please be noted that you must use Transceiver for
intermediate expansion.
Stack 3 Layers of AV Extender through Cat-X to Reach more Displays
(7) Local System Expansion: You can also stack up to 3 layers of system
Transceiver to generate more RJ-45 outputs of AV signal locally, please
refer to following diagram.
13 / 16
Page 14

6. Specifications
VGA and Audio Cat-X AV Extender
Model Name
Model No.
AV Output
AV Input
Audio
PC Cable Kit
used to
Deliver VGA
Video + Audio
Video CTRL
LED
Video Quality
Power
Consumption
AV Transmitter AV Transceiver AV
AVE
-301T
AV x 1
RJ45 x1
AVU cable for AVE-301T, VGA and
Audio cable for AVE-304T, AVE-308T,
PC: Support all VGA format and with a maximum capacity of
AC
7.5V, 1A
AVE304T
AV x 1
RJ45 x4
and AVE-316T
-308T
AV x 1
RJ45 x8
AV x 1 RJ45 x1
Stereo Mono
- Video Gain and Focus
DC 9V, 1A AC 9V, 1A DC 7.5V,
AVE
Power and Activity
2048x1536@300m
AVE
-316T
AV x 1
RJ45 x16
AVE
-304TR
RJ45 x4 RJ45 x8 AV x 1
AVE
-308TR
-
Receiver
AVE
-301R
1A
Dimension
(LxWxH)
Environmental
Condition
62 x
113 x
29mm
240 x 130 x 44mm 62 x 113
x 29mm
• Operation Temp.: 0~50˚C
• Storage Temp.: -20~60˚C
• Humidity: 10~90%
14 / 16
Page 15

VGA and Audio Cat-X AV Extender
7. Order Information
Order Details Part Number Remark
One Port AVE-300 AV Transmitter AVE-301T AC7.5V Power Adaptor x 1,
AVU Cable Kit x 1
Rack-mount Kit x 1
4-Port AVE-300 AV Transmitter AVE-304T DC9V Power Adaptor x 1,
Audio Cable Kit x 1
VGA Cable x 1
Rack-mount Kit x 1
8-Port AVE-300 AV Transmitter AVE-308T DC9V Power Adaptor x 1,
Audio Cable Kit x 1
VGA Cable x 1
Rack-mount Kit x 1
16-Port AVE-300 AV Transmitter AVE-316T DC9V Power Adaptor x 1,
Audio Cable Kit x 1
VGA Cable x 1
Rack-mount Kit x 1
4-P o r t AV E - 30 0 T r a nsce i ver AVE-304TR
8-P o r t AV E - 30 0 T r a nsce i ver AVE-308TR
On e Por t AVE-3 0 0 AV R ece ive r AVE-301R AC7.5V Power Adaptor x 1,
PC Cable Kit for VGA a n d A u d i o
For AVE-301T AVU c ab l e x 1
AVE -304T, AVE-3 0 8T, AVE - 316T VG A cab le x 1
For AVE-304TR, AVE-308TR n/a
For AVE-301R n/a
AC9V Power Adaptor x 1,
Rack-mount Kit x 1
Rack-mount Kit x 1
15 / 16
Page 16

VGA and Audio Cat-X AV Extender
8. Remarks
I. Before operating this system, please read operation manual carefully.
II. Please use correct power adapter and use high quality cable for optimum
broadcasting.
III. To prevent potential power damage, please don’t use 2 -wire extension
cord and ensure AC outlets at relative devices on the same electronic
phase and have correct grounding.
IV. Limited Warranty:
(1) In no events shall the vendor’s liability for direct or indirect, special,
incidental or consequential damages, loss of profit, loss of business, or
financial loss which hay be caused by the use of the product exceeds
the price paid for the product.
(2) The vendo r ma kes no wa rran ty o r representation, expressed or implied
with respect to the contents or use of this documentation, and
especially disclaims its quality, performance, merchantability, or fitness
for any particular purpose.
(3) The vendor also reserves the right to revise or update the product or
documentation without obligation to notify any user of such revisions
or updates. For further information please contact your vendor.
9. Notice
1. All other company or product names mentioned herein are trademarks
or registered trademarks of their respective companies.
2. Specifications are subject to change without notice.
3. Please read user manual carefully before operating the device
4. Please use the power adaptor accompanied with this product. Warranty
does not cover for damages caused by pairing other power adaptor
5. Please check all connecting devices are properly grounded to avoid
electric failure
6. This product has limited warranty for one year from defects in material
and workmanship. Items that are physically damaged, misused,
tempered with or altered are void of warranty. For further details please
contact your distributor. In case warranty sticker is damaged or missing,
warranty is void. For further details please contact your distributor.
P/N: CDDMAVE30000A0
16 / 16
 Loading...