

Dashmate DSH-592IR User Manual


CONTENTS
1.0 CAUTION ..................................................................................3
2.0 BATTERY WARNING ...............................................................3
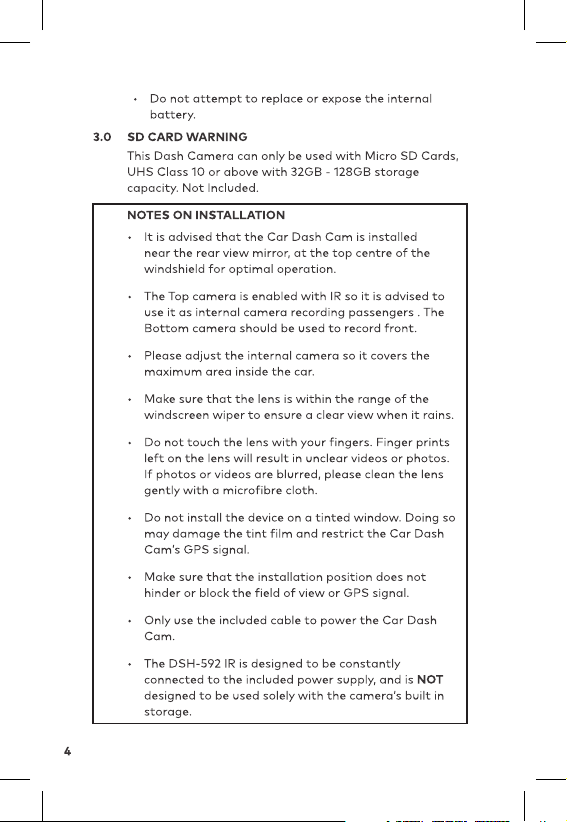
3.0 SD CARD WARNING ...............................................................4
3.1 Product Information .........................................................5
4.0 INTRODUCTION ...................................................................... 5
4.1 Package Contents .............................................................6
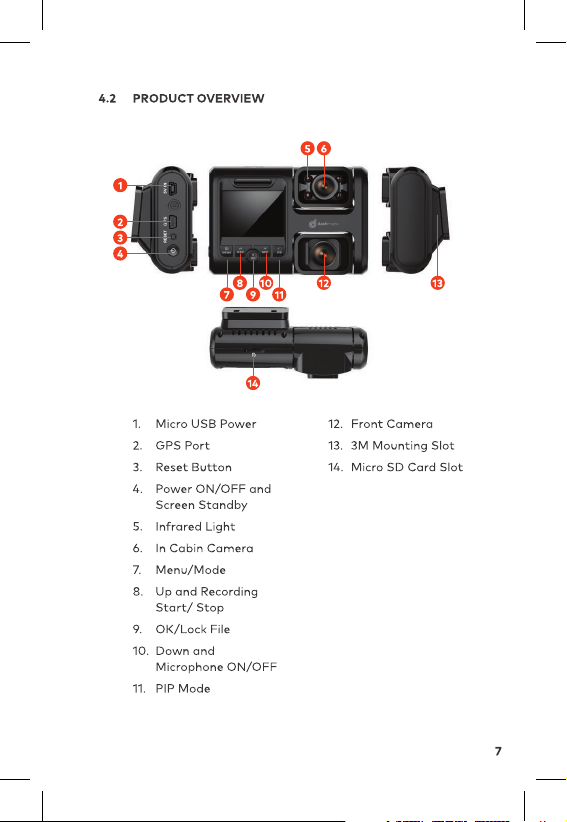
4.2 Product Overview ..............................................................7
5.0 BUTTON FUNCTIONS AND INDICATORS............................8
6.0 GETTING STARTED .................................................................9
6.1 Inserting A Micro SD Card ...............................................9
6.2 Removing A Micro SD Card .............................................9
6.3 Installing The DSH-592IR .................................................9
7.0 CONNECTING TO POWER ................................................... 10
8.0 LED INDICATOR .....................................................................11
9.0 POWERING THE DSH592IR ONOFF.................................11
9.1 Auto Power ON/OFF .......................................................11
9.2 Manual Power ON ............................................................11
9.3 Manual Power OFF ..........................................................11
9.4 Reset The Car DVR ...........................................................11
10.0 INITIAL SETTINGS ..................................................................12
10.1 Formatting a Micro SD Card ........................................12
10.2 Setting The Time And Date ........................................... 12
11.0 INTERFACE .............................................................................13
11.1 Video Mode ....................................................................... 13
11.2 Video Menu ....................................................................... 14
11.3 Setup Menu ...................................................................... 17
11.4 Photo Mode ...................................................................... 19
1

12.0 GPS ..........................................................................................20
13.0 VIDEOPHOTO PLAYBACK ...................................................21
14.0 SOFTWARE PLAYBACK .......................................................22
15.0 INSTALLING APP ON SMART PHONE................................ 22
16.0 WARRANTY TERMS & CONDITIONS .................................23
17.0 NOTES ....................................................................................24
2

1.0 CAUTION
• Ensure you are using your Dash Camera within your
countries’ road laws. Please make sure you are familiar
with your local road legislation before use.
• Please set time and date before you use this device
to record.
• The notiications given by the Dash Camera are
suggestions only, please drive to the actual conditions.
• The system is to be used only for non-commercial use,
within the limits permitted by the relevant laws
• The results of GPS positioning are only for reference.
The Car Dash Cam will lose GPS positioning abilities
when signal is blocked (e.g. driving through tunnels,
enclosed car parks).
• GPS positioning accuracy may vary depending on
weather and surroundings such as dense cities,
tunnels, or forests. GPS satellite signals cannot pass
through most solid materials. Tinted windows may
also affect the GPS signal.
• The values displayed in this system, such as speed,
position, and the distance warning, may be affected
by the surrounding environment.
• Avoid using the Dash Camera in the vicinity of any
devices that emit radio interference (eg. Microwave
Ovens).
• It is considered normal operation for the Dash Camera
to get warm during use.
2.0 BATTERY WARNING
• Always charge the Dash Camera using the provided
charger. Improper charging of the Dash Camera may
result in failure of the internal battery.
• Never dismantle the Dash Camera or expose the
internal battery.
• Do not dispose of the Dash Camera in ire.
• Dispose of the Dash Camera observing local
regulations being mindful of the internal battery.
3

3.1 PRODUCT INFORMATION
For latest manual and product updates please visit our
website at www.dashmate.com.au
4.0 INTRODUCTION
Thank you for purchasing a Dashmate Dash Cam. Please
read through instructions before attempting to install or
use this product.
This User guide is designed to assist with the day to day
operation of the DSH-592IR.
Before attempting to use or install your Dashmate
DSH-592IR, please ensure you have read and understood
all of the safety notes below.
• Do not expose your DSH-592IR to liquids, excessive
dusty conditions or temperatures exceeding 60°C.
• Only use the included cables to power and charge the
DSH-592IR.
• Please do not attempt to adjust the DSH-592IR
position or settings whilst you are operating your
vehicle.
• Please clean the windshield thoroughly removing all
dust and dirt particles before ixing the adhesive
mount.
• Since the mount sticks onto the windshield using a
3M adhesive, please ensure that the position of the
camera is best located to capture the maximum
viewing area.
• We suggest you to power-on the dash camera and
test the playback image on screen irst prior to
removing the 3M tape for installation.
• Only remove the 3M tape when you are satisied with
the dash camera placement and image position are
delivering the best possible image and view of the
road ahead.
• Ensure you are using your DSH-592IR within your
countries’ road laws. Please make sure you are familiar
with your local road legislation before use.
5

4.1 PACKAGE CONTENTS
1 x DSH-592
IR Dash Camera
2 x Electrostatic ilms 1 x 12/24V Power Cable
1 x External GPS 5 x Cable Clamps
1 x User Manual
6
2 x 3M Adhesive Plates
 Loading...