

Dashmate DSH-440 User Manual

1080p Dash Camera
with 3.0” LCD Screen & Motion Detection
DSH-440 | USER MANUAL

CAUTION
• Ensure you are using your Car Dash Cam within your countries’ road laws
Please make sure you are familiar with your local road legislation before use.
• Avoid leaving your Dash Cam in direct sunlight for extended periods of time
in an unventilated space.
• Please set time and date before you use this device to record.
• The notifications given by the Car Dash Cam are suggestions only, please
drive to the actual conditions.
• The system is to be used only for non-commercial use, within the limits
permitted by the relevant laws.
• Avoid using the Car Dash Cam near any devices that emit radio interference
(e.g. Microwave Ovens).
• It is considered normal operation for the Car Dash Cam to get warm during
use.
BATTERY WARNING
• Always charge the Car Dash Cam using the provided charger. Improper
charging of the Car Dash Cam and may result in failure of the internal battery.
• Never dismantle the Car Dash Cam or expose the internal battery.
• Do not dispose of the Car Dash Cam in fire.
• Dispose of the Car Dash Cam observing local regulations being mindful of
the internal battery.
• Do not attempt to replace or expose the internal battery.
NOTES AND INSTALLATION
• It is advised that the Car Dash Cam is installed near the rear view mirror, at
the top centre of the windshield for optimal operation.
• Make sure that the lens is within the range of the windscreen wiper to ensure
a clear view when it rains.
• Do not touch the lens with your fingers. Finger prints left on the lens will result
in unclear videos or photos. If photos or videos are blurred, please clean the
lens gently with a microfibre cloth.
• Only use the included charging cable to power the Car Dash Cam.
2

NOTE:
1. Please abide by the relevant laws in your local area; please do not use
this product for illegal purposes.
2. Please insert your Micro SD memory card before recording video, taking
care to insert it the right way to avoid damage.
3. To avoid losing important footage, it is suggested that you back-up
footage on a weekly basis to your computer.
4. Please ensure the windscreen mounting bracket is installed securely to
avoid damaging the dash cam.
5. Battery charge will diminish over time. If the dash cam is not used for a
long period of time, please ensure the dash cam is charged fully before
use.
6. The working temperature of the dash cam is 0° to 40° degrees Celsius.
7. Please do not leave the dash cam in an excessively humid environment
as it is not water resistant.
8. Please avoid shooting footage directly into the sun so as to avoid
damage to the dash cam.
9. Please avoid using the dash cam in an excessively dusty environment so
as to not obstruct the camera lens.
10. This dash cam is a precision electronic product; please do not expose it
to strong shock, vibration, magnetic fields or heavy current fields.
11. Please do not attempt to disassemble or repair this product, doing so
will void the warranty.
12. Please do not operate and set this product while driving. If interaction
with the product is required, please do so before driving or stop driving.
13. Please charge the battery fully before first use.
14. To clean, please use a soft and dry cloth to get rid of dust. Do not use
solvents to clean the product.
3
1. PRODUCT INFORMATION:
For latest manual and product updates please visit our website.
1.1 INTRODUCTION:
Thank you for purchasing a DSH-440 Dash Cam. Please read through
instructions before attempting to install or use this product.
1.2 FEATURES:
• Recording Full HD 1080P footage
• WiFi Smart Device Connectivity
• 120° field of view
• Motion Detection
• Automatic Emergency recording and collision detection
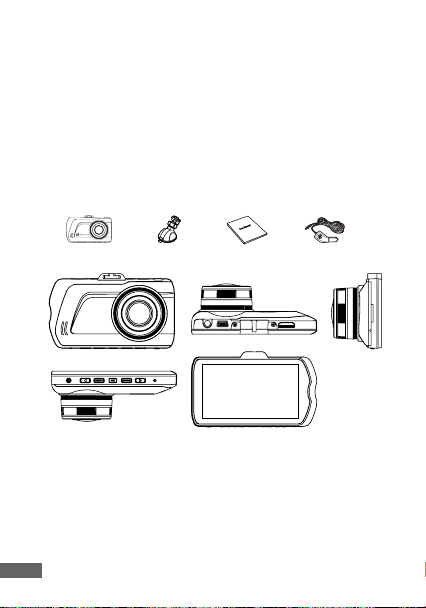
1.3 PACKAGE CONTENTS:
DSH-440 Suction Mount User Manual Car Charger
1.4 PRODUC T DIAGRAM:
1
2
13 12 11 10 9 14
15
1. Wide angle Lens 9. MODE Button
2. Speaker 10. OK/Record Button
3. HDMI Mini Port
(Adapter required for HDMI not included)
4. AV Out Port 12. UP Button
5. Mounting Socket 13. Power Button
6. Mini USB Port 14. DOWN Button
7. Microphone 15. 3” Screen
4
8. Micro SD Card Slot
34 6
5
11. MENU Button
8
7

2. SET UP
2 .1 GENERAL:
• Insert your Micro SD Card (not included) into the Micro SD Card slot
under the protective rubber flap on the underside of the camera.
• The Auto On/Off feature will power the DSH-440 up and begin
recording as soon as it receives power from the USB Mini connection
(eg. when you start your car)
2 .2 INSTALLATION:
• Clean the interior of your windscreen ensuring that the desired point
of installation is free of dust and is not obstructing the drivers’ view.
• Attach the DSH-440 to the included mount by inserting the mount’s
lock peg into the mounting socket on the DSH-440, firmly sliding the
mount from right to left along the mount connection locking the DVR
in place.
• Remove the protective stickers on the suction cup of the mount, the
3.0” LCD Screen and the lens.
• With the mount’s suction mount lock switch in the up position, press
the suction cup onto the desired position on your windscreen.
• Lock the mount in place by pressing the lock switch in the down
position.
• Use the nut to adjust the angle and position of the DSH-440 and
tighten to lock your positioning.
• Finally connect the DSH-440 to power using the included USB Mini
power supply.
3. OPERATION:
• Once the camera is set up with the included Mini USB power supply
and a Micro SD Card (not included) has been installed, the DSH-440
will automatically power on and start recording when the car is
started.
• The DSH-440 is designed to be primarily powered by your car’s DC
power. The on board battery is for short use only and mainly serves
to power the cars Park mode and brief use for documenting external
damage in the case of an incident.
• While recording you will not be able to access the menus or change
modes, to stop a recording push the OK button.
• The DSH-440 is optimised for Micro SD Cards class 4 and above
with a capacity up to 32GB.
• The on board ‘G- Sensor’ registers any activity that could be an
accident and registers the footage as a ‘Locked’ file ensuring
that the footage cannot be accidentally recorded over. To remove
‘Locked’ files you must first unlock them using the ‘Protect’ menu
(navigating to PLAYBACK mode using the MODE key, selecting the
‘Locked’ file, pushing the MENU button and selecting ‘Protect’).
5
 Loading...