

Page 1
INSTRUCTION MANUAL
Quick
blender
MODEL DFSB001
unprocess your food
Page 2

2 3
Dash Go quick blender
Table of Contents
Safety Guidelines ................................................... 4
Parts & Features .................................................... 5
Using and Cleaning Your Toaster ............................. 6
Warranty ................................................................ 7
Page 3

4 5
• Read all instructions.
• Remove all bags and packaging
from appliance before use.
• To reduce the risk of severe injury
or damage, keep hands and
utensils away from moving blades
while appliance is engaged.
• Keep hands and utensils out of the
Blending Pitcher while the motor is
running.
• Do not put ngers, hair, clothing
or other objects into the blender
while appliance is in use. If food
becomes lodged in the blades,
turn off and unplug the Quick
Blender before trying to remove it.
• Do not use Quick Blender without
the Lid in place. Make sure the Lid
is closed tightly prior to blending
to prevent liquid from splashing
out.
• Always make sure the Blending
Pitcher is locked securely in place
before engaging the motor. Do not
remove the jug before blender has
nished blending.
• Do not operate the appliance
when the Blending Pitcher is
empty.
• Caution: blender blades are sharp
and can cause injury! Handle with
care. Do not touch cutting blades
located at the base of the Blending
Pitcher.
• Do not use appliance outdoors or
for commercial purposes.
• Children should be supervised to
ensure that they do not play with
the appliance.
• Turn off and unplug appliance
when not in use.
• To prevent the risk of re, electric
shock, or personal injury, do not
place the cord, plug, or unit near
water or other liquids.
• When cleaning the Quick Blender,
remove the Blending Pitcher from
the Motor Base and wash. Never
immerse the Motor Base in water
or any other liquid; instead, wipe
down with a damp cloth.
• Never leave appliance unattended
when in use.
• This appliance is not intended for
use by persons (including children)
with reduced physical, sensory
or mental capabilities, or lack of
experience and knowledge unless
they are provided with supervision
and instruction concerning use
of the appliance by a person
responsible for their safety.
• Always unplug the appliance
from outlet prior to assembly,
disassembly, cleaning and storage.
• Wait until the blade comes to a
complete stop before removing
Blending Pitcher from Motor Base.
If dismounted while blade is
moving, the Drive Gear may
sustain damage.
• Refrain from using attachments
that are not recommended by the
appliance manufacturer, as this
may result in re, electric shock or
personal injury.
• Do not use the appliance if any of
the parts are damaged.
• If the Motor Base gives off a burnt
smell, immediately turn off and
unplug the Quick Blender. Allow
appliance to cool before resuming
use. If smell persists, discontinue
use until problem is solved.
• Do not operate any appliance with
a damaged cord or plug.
• Do not let the cord touch hot
surfaces or hang over the edge of
tables or counters.
• Improper use of the Quick Blender
can result in property damage or
even in personal injury.
• Do not place appliance on or
near a hot gas burner, hot electric
burner, or in a heated oven.
• Do not place utensils, ngers or
other foreign objects inside the
Quick Blender.
• Do not attempt to blend frozen
ingredients that have formed a
solid mass. Break up into smaller
pieces before placing in Blending
Pitcher.
• Note: The Quick Blender is not
suitable for making crushed ice.
• Always place soft or liquid food in
Blending Pitcher before adding
hard food or ice cubes.
• Extension cords are not
recommended for use with this
appliance. However, if an extension
cord must be used, make sure the
electrical rating of the wire is
compatible with the Quick Blender.
• Do not place hot liquids in Quick
Blender. Allow ingredients to cool
to room temperature prior to
pouring into Blending Pitcher.
• Never blend more than the
maximum ingredient capacity
listed in the “Blender Settings
Guide(see page 7).
• To prolong the life of the motor,
do not use the Quick Blender for
more than 1 minute at a time.
Allow your Quick Blender to cool
for 15 minutes between blending
cycles.
• StoreBound shall not accept
liability for damages caused by
improper use of the appliance.
• This appliance has a polarized plug
(one blade is wider than the other).
To reduce the risk of electric shock,
this plug will t in a polarized outlet only one way. If the plug does
not completely t in the outlet,
reverse the plug. If it still does not
t, contact a qualied electrician.
Do not modify the plug in any way.
Safety guidelines
Page 4
6 7
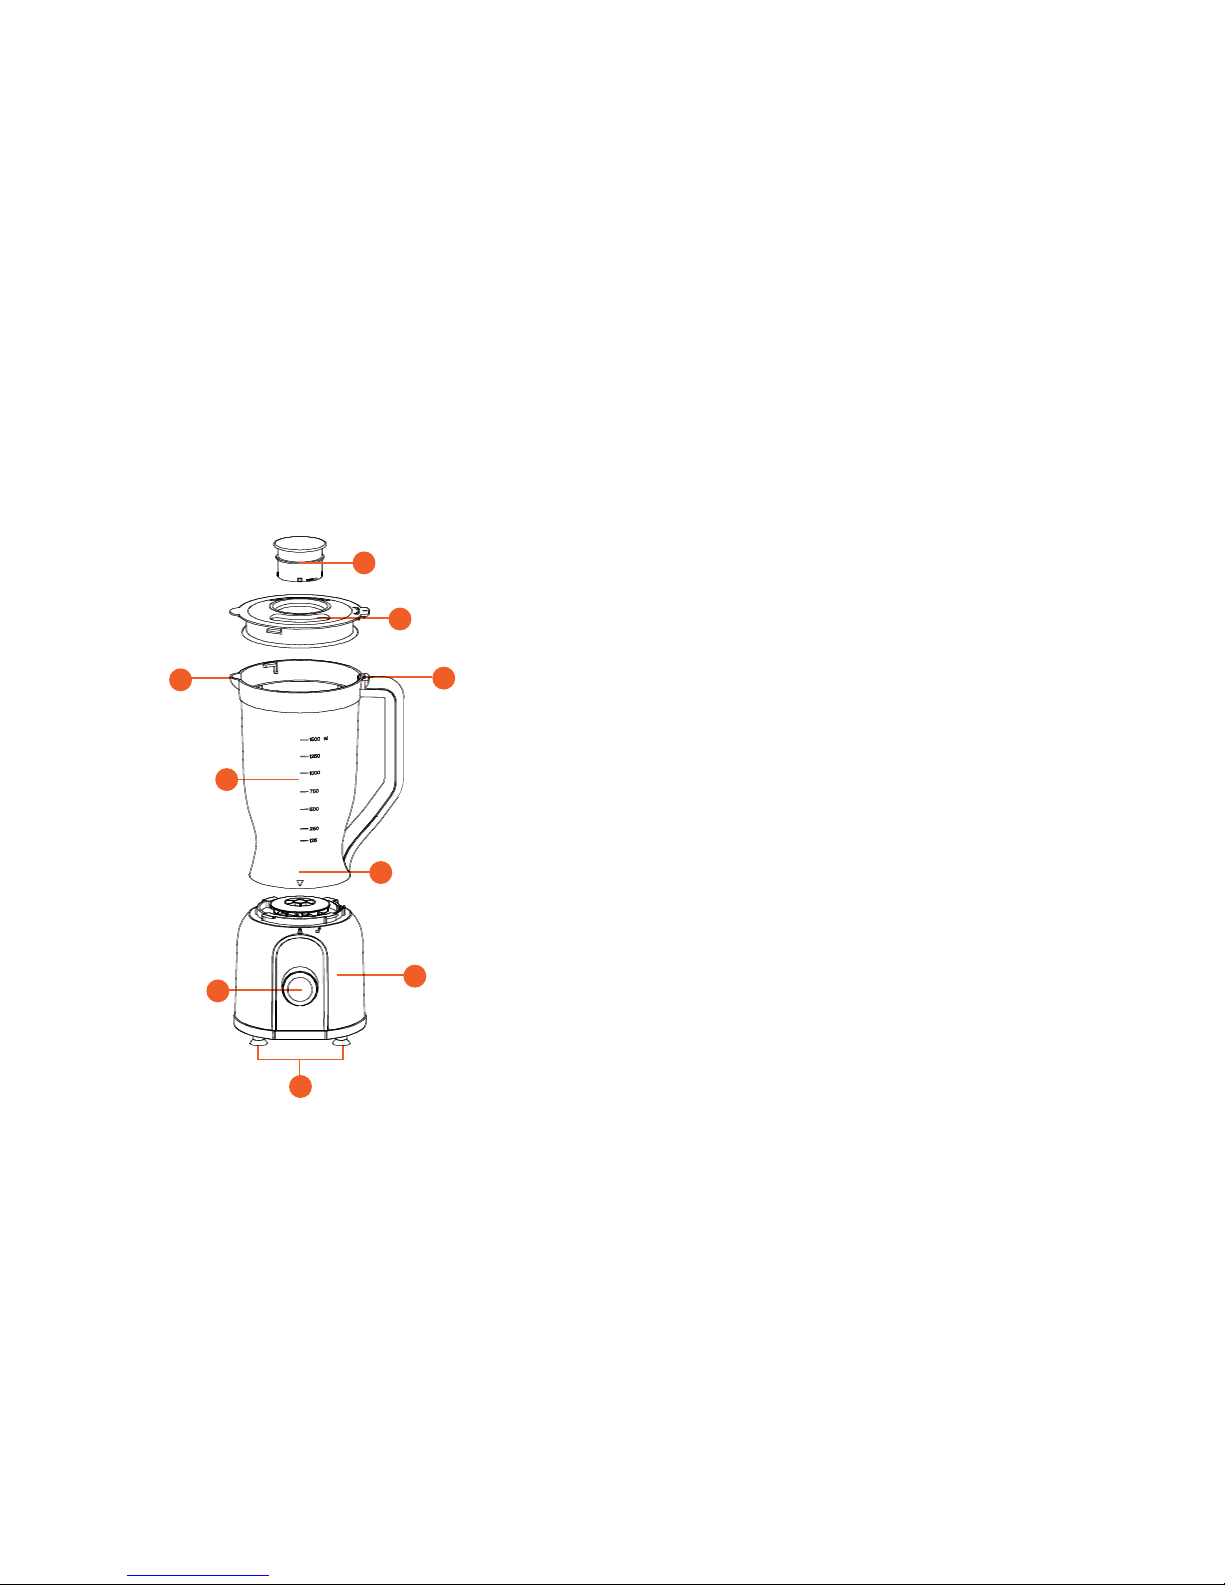
parts and features
Lid
2
No-Drip Spout
3
Blending Pitcher
5
Motor Base
7
Control Dial
8
Safety Lever
4
Blade Unit
6
Non-Slip Feet
9
Measuring Cup
1
Clean your blender and all it’s components prior to its rst use!
WARNING: Do not submerge the main base in water or any liquid.
Make sure the blender is unplugged.
• Read the entire instruction manual and save it for further use.
• Remove any stickers and packaging before use.
• Use a wet cloth to wipe down the Motor Base.
• Wash the Measuring Cup, Lid, and Blending Pitcher with soapy
water and a sponge. Use a dish brush to clean the blades. Do not
use your hands.
BEFORE YOU START
Page 5

8 9
Blender Settings Guide
Setting Function Usage Capacity
0
stops blending and
powers off Motor Base
X X
P
start/stop blending
action for precise
blending control
chops, dices, minces
grinds, grates and mixes
500 mL
1
consistent low
blending power
froths milk, beats eggs
and whips up batters,
milkshakes, sauces,
dips & other light mixes
1 L
2
consistent high
blending power
purées, liquies and
blends fruit smoothies,
thick shakes & dips,
frozen drinks and more
1-1.25 L
Clean the Quick Blender and all of its components prior to assembly
and use.
WARNING: This appliance is NOT designed for blending foods without
liquids.
NOTE: As a safety precaution, the quick blender will not function if the
lid and blending pitcher are not securely locked into place. Never put
hands or metal utensils inside pitcher.
1. Place the Motor Base on a stable surface. Plug the cord into a power
outlet.
2. Place your ingredients in the Pitcher. Make sure to put all liquid
ingredients in rst, then powdered ingredients, and nally any solid
ingredients. Refer to the “Blender Settings Guide” on page 7 to
ensure that you do not exceed the maximum ingredient capacity.
3. Place the Lid on the Blending Pitcher. Turn Lid clockwise so that the
tab on the Lid interlocks with the Safety Lever on the Pitcher.
4. Place the Blending Pitcher on the Motor Base so that the arrow on
the jug aligns with the “Unlock” icon on the Motor Base. Lock the
Pitcher into place by turning it clockwise until the arrow lines up with
the “Lock” icon.
5. To begin blending, turn the Control Dial to the desired speed. Use
the “Blender Settings Guide” to accurately choose the right speed
setting for your recipe.
6. Once you are done blending, return the Control Dial to the “0” (Off)
Position, allow the blade to come to a complete stop and unplug the
Quick Blender and the toast is ready to enjoy!
USING YOUR QUICK BLENDER
Page 6

10 11
SUPPORT
For product support, warranty and maintenance related questions,
please contact StoreBound directly at: 1-800-898-6970 from 7AM - 7PM PST,
Monday - Friday, or by email at [email protected].
STOREBOUND, LLC – 1 YEAR LIMITED WARRANTY
Your StoreBound product is warranted to be free from defects in material and
workmanship for a period of one (1) year from the date of the original purchase
when utilized for normal and intended household use. Should any defect covered
by the terms of the limited warranty be discovered within one (1) year, StoreBound,
LLC will repair or replace the defective part. To process a warranty claim, contact
customer care at 1-800-898-6970 for further assistance and instruction. A customer
care agent will conduct troubleshooting in an attempt to x any minor problems.
If troubleshooting fails to x the problem, a return authorization will be issued.
Proof of purchase indicating date and place of purchase is required and should
accompany the return. You must also include your full name, shipping address,
and telephone number. We are unable to ship returns to a PO Box. StoreBound
will not be responsible for delays or unprocessed claims resulting from a purchaser’s failure to provide any or all of the necessary information. Freight costs must be
prepaid by the purchaser.
Send All Inquiries To: [email protected]
There are no express warranties except as listed above.
REPAIR OR REPLACEMENT AS PROVIDED UNDER THIS WARRANTY IS THE
EXCLUSIVE REMEDY OF THE CUSTOMER. STOREBOUND SHALL NOT BE
LIABLE FOR ANY INCIDENTAL OR CONSEQUENTIAL DAMAGES FOR BREACH
OF ANY EXPRESS OR IMPLIED WARRANTY ON THIS PRODUCT EXCEPT TO THE
EXTENT PROHIBITED BY APPLICABLE LAW. ANY IMPLIED WARRANTY OF MERCHANTABILITY OR FITNESS FOR A PARTICULAR PURPOSE ON THIS PRODUCT
IS LIMITED IN DURATION TO THE DURATION OF THIS WARRANTY.
Some states do not allow the exclusion or limitation of incidental or consequential damages, or limitations on how long an implied warranty lasts. Therefore, the
above exclusions or limitations may not apply to you. This warranty gives you spe-
cic legal rights and you may also have other rights, which vary from state to state.
IMPORTANT NOTE: Appliance is not dishwasher safe. No parts are
dishwasher safe. Do not submerge motor base in water or any other
liquids.
To clean your Blender:
1. Turn off and unplug the appliance. Remove the Blending Pitcher
from the Motor Base.
2. Empty any contents remaining in the Pitcher into the trash.
3. Fill the Pitcher just below half way with warm water and a few drops
of dish soap.
4. Cover Blending Pitcher with Lid and place on Motor Base. Turn the
Control Dial to “P” or Pulse for a few seconds. Remove from Base
and rinse thoroughly with hot or warm water. Dry with dishtowel.
5. Wipe down the Motor Base with a damp cloth. Never submerge the
Motor Base in water or other liquids.
6. When storing the Blending Pitcher for an extended period of time,
it is recommended to store it upside down to allow any residual
moisture to evaporate.
7. If the Blade Unit requires a thorough cleaning, unscrew it from the
Blending Pitcher. Use a dish brush and a little hot soapy water to
clean the Blades and Sealing Ring. Rinse thoroughly, but make sure
not to immerse the Blade Unit in water. Leave out to air dry. Handle
Blades with care as they are sharp and can cause injury.
CLEANING YOUR QUICK BLENDER
Page 7

For more information, please visit bydash.com
Customer Support 1-800-898-6970
 Loading...