

Page 1

Rapid Egg Cooker
welcome booklet
Page 2

2
Table of Contents
welcome booklet
Page 3

3
Safety Information 4-5
What’s Inside 6-7
Cooking Time 8
Using your Egg Cooker 9-10
Cleaning Your Egg Cooker 12
Troubleshooting 13
Specifications 14
Recipes 15-25
Customer Support 22
Warranty 23
Rapid Egg Cooker
Table of Contents
welcome booklet
Page 4

4
Important Safety Guidelines
PLEASE READ AND SAVE THIS
INSTRUCTION AND CARE MANUAL
When using electrical appliances, basic
safety precautions should be followed,
especially the following:
• Read all instructions carefully.
• Remove all packaging and labels from
appliance prior to use.
• To protect against risk of
electrical shock do not put cord, plugs,
or appliance in or near water or other
liquid.
• Keep appliance away from
children when in use.
• Only use approved ingredients with
this product - other food may damage
the appliance.
• Unplug from outlet when not in use,
during assembly, during
disassembly, and before cleaning.
• Avoid contact with heating parts.
• Do not operate this appliance with a
damaged cord, damaged plug, aer the
appliance malfunctions, is dropped, or
damaged in any manner.
• Any maintenance other than cleaning,
please contact StoreBound by phone
at 1-800-898-6970 from 7AM - 7PM PST
Monday - Friday or by email at info@
storebound.com.
• Use only Egg Cooker aachments
recommended or sold by StoreBound.
Others may result in fire, electric
shock, or injury.
• Do not use outdoors.
• Do not let the cord hang over edge of
table, hang over the sink, or touch hot
surfaces.
• Only use the Egg Cooker on a stable
surface.
• Make sure the Egg Cooker is off before
removing eggs.
• Do not put your hands or other
objects into the Egg Cooker while it is
in operation. If food spills on the
welcome booklet
Safety Information
Page 5

5
welcome booklet
Safety Information
heating platform, make sure Egg
Cooker is turned off and cool before
cleaning.
• Keep hands and utensils away from
heating platform while cooking eggs
to reduce the risk of injury or damage
to the Egg Cooker.
• Internal base and contents (water and
eggs) of Egg Cooker are hot when in
use. Let cool before handling and/or
cleaning.
• Do not place on or near a hot gas
burner, hot electric burner, or in a
heated oven.
• Use extreme caution when
handling the Measuring Cup as it
contains a sharp pin on the boom of
the cup which may cause injury.
• When cleaning the body do not
submerge in any liquid. Instead use a
so wet cloth to wipe down.
• Plastic dome Lid gets hot; do not
touch while eggs are cooking. Let cool
before touching.
• Be certain Lid is securely in place
before engaging appliance.
• Do not open Lid when Egg Cooker is
cooking.
• Do not put the appliance in the
refrigerator.
• Do not use expired eggs, expired egg
whites, or expired liquid eggs.
Page 6

welcome booklet
6
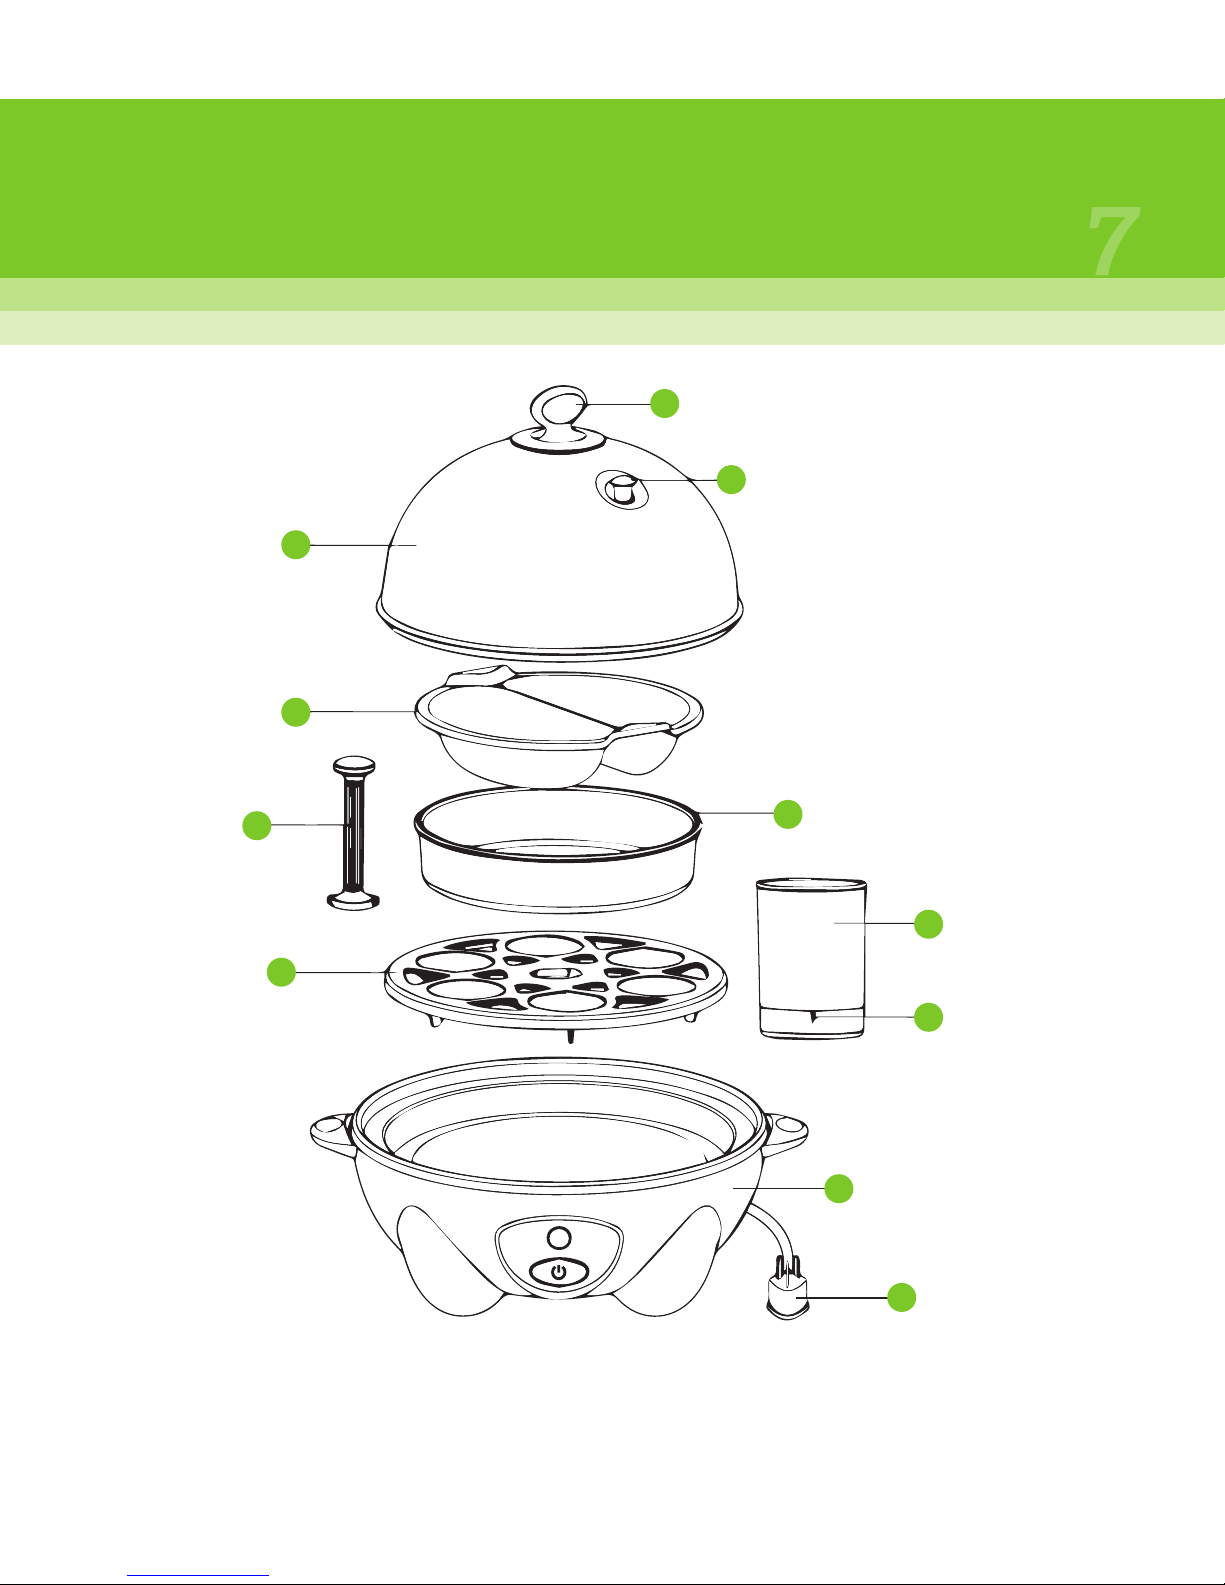
What’s Inside
1. Cover Handle
2. Steamer Hole
3. Lid
4. Egg Poacher
5. Egg Tray Handle
6. Egg Bowl
7. Egg Tray
8. Measuring Cup
9. Pin
10. Body
11. Plug
Parts & Features
Page 7
7
welcome booklet
What’s Inside
1
2
3
4
6
7
8
9
5
10
11
Page 8
welcome booklet
8
Cooking Time
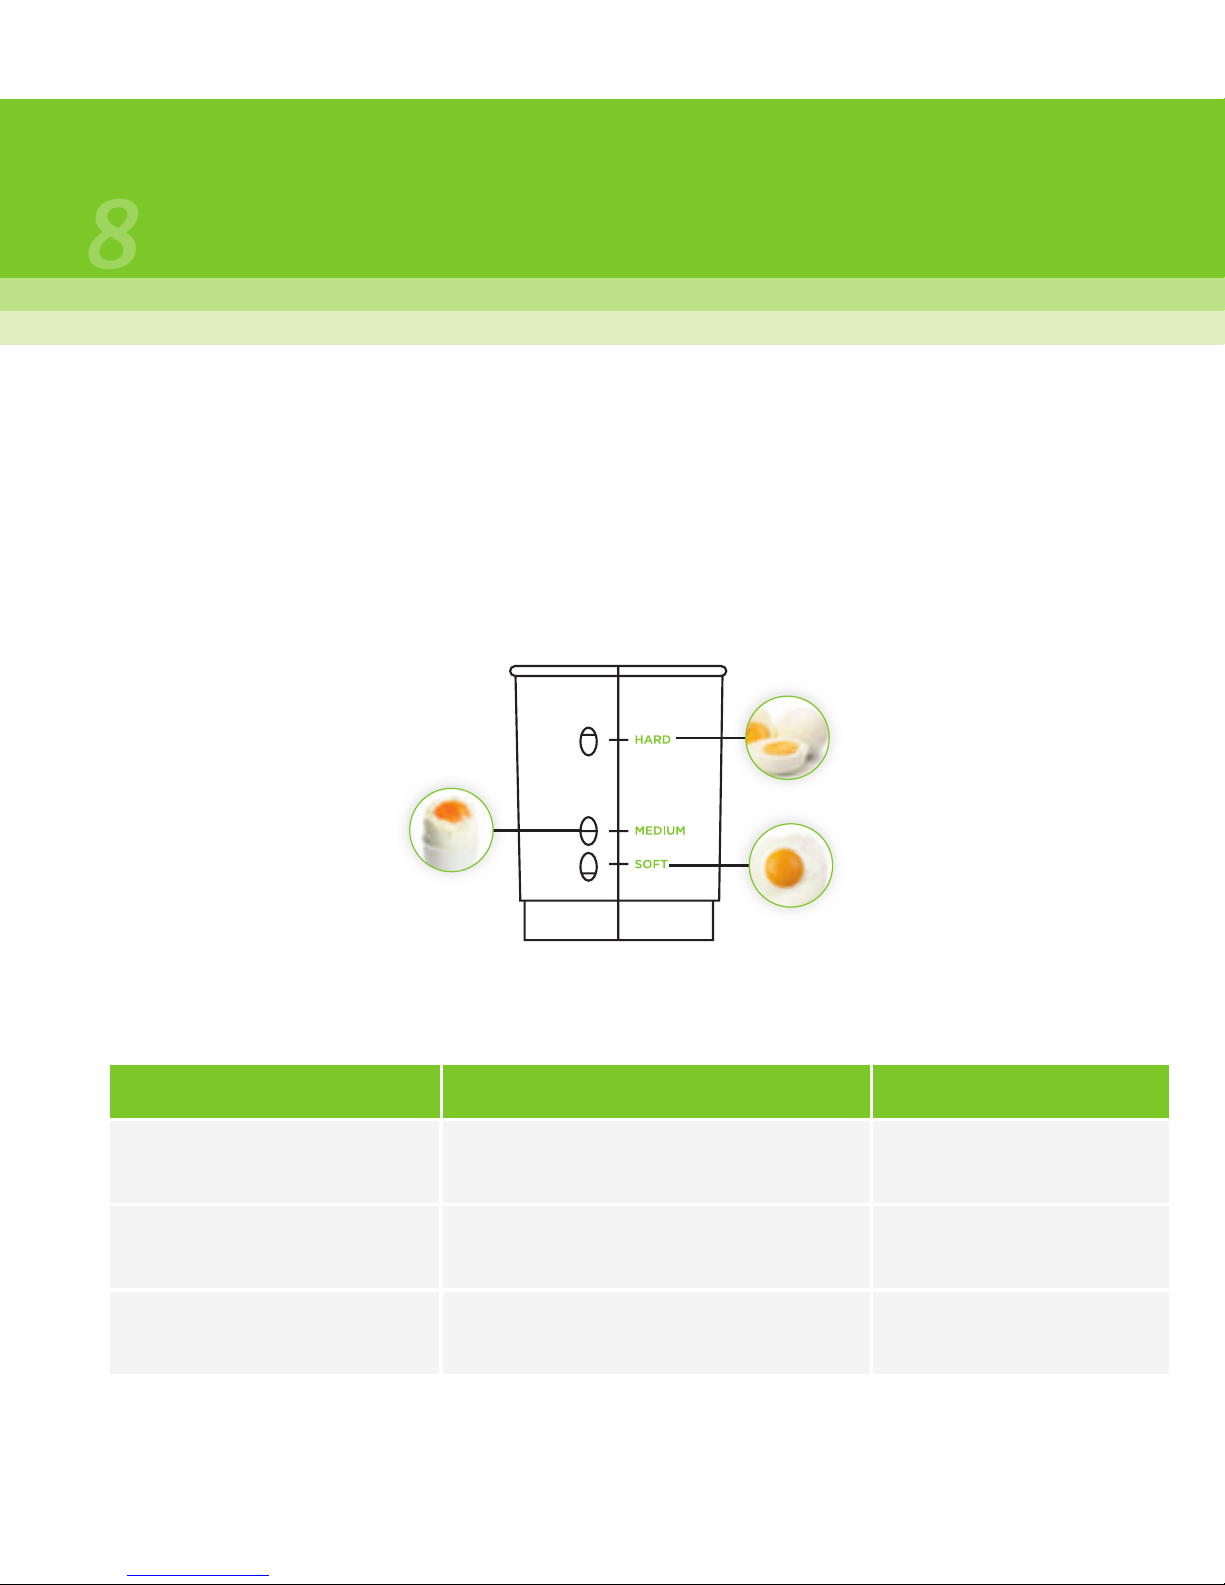
So, medium and hard-boiled eggs
The following time guidelines are for Large eggs. Extra Large or Jumbo eggs
may require additional time in the cooker to achieve the desired results.
Style Quantity Time
So-Boiled 1-6 eggs 6 minutes
Medium Egg 1-6 eggs 7 minutes
Hard-Boiled 1-6 eggs 12 minutes
If you want completely
hard boiled eggs, let them
sit for an extra 5 minutes
aer the automatic shutoff.
If you like your eggs
a lile more firm, let
them sit covered in the
Egg Cooker for a few
minutes more.
Page 9

9
welcome booklet
Using Your Egg Cooker
Directions
The Egg Cooker will automatically turn on when plugged in and will turn off
aer all the water has evaporated from the Heating Plate.
1. Remove the Lid.
2. Use the Measuring Cup to place the appropriate amount of clean water
into the Egg Cooker.
3. Pierce the larger end of each egg with the pin aached to the boom of
the Measuring Cup.
4. Aach the Egg Tray handle to the Egg Tray. Place an egg in each designat-
ed spot in the Egg Tray.
5. Make sure that the holes in the larger end of the eggs are pointed
upwards. Do not let the eggs touch the Heating Plate.
6. Cover with the Lid and plug Egg Cooker in.
7. When the light turns off, the eggs will be cooked. Actual cooking time will
depend on number of eggs and desired consistency (see Cooking Time).
8. Remove eggs aer the automatic shut off.
9. Run cool water over the eggs before eating them.
Enjoy your eggs!
Page 10

welcome booklet
10
Using Your Egg Cooker
Poached eggs:
1. Fill the Measuring Cup with cold water to the Medium line.
2. Pour cold water into the Heating Plate (in the body of the Egg Cooker.)
3. Place Egg Tray on the body and place Egg Poaching Tray on top of the Egg
Tray.
4. Break an egg into each poaching section.
5. Cover the Lid and plug Egg Cooker in.
6. When the light turns off, the eggs will be poached. Remove eggs
immediately.
Omelee:
1. Fill the Measuring Cup with cold water to the Medium Line.
2. Pour cold water into the Heating Plate.
3. Place Egg Tray on the body and place Egg Bowl on top of the Egg Tray.
4. Mix eggs in a bowl before pouring into Egg Bowl.
5. Cover the Lid and plug Egg Cooker in.
6. When the light turns off, the omelee will be cooked. For a dry omelee,
leave the eggs in the cooker for an additional two minutes.
Page 11

Using Your Egg Cooker
welcome booklet
health fact!
Did you know that egg whites are a great source of protein?
It’s true!
Page 12

welcome booklet
12
Cleaning Your Egg Cooker
CAUTION: During and aer use, the Egg Cooker is hot.
Do not aempt to clean your Egg Cooker until the appliance has cooled. Do
not submerge the main body in any liquid.
Your Egg Cooker is not dishwasher safe.
1. Before cleaning or moving the appliance, make sure to unplug the Egg
Cooker.
2. Wipe down the main body and Heating Plate with a wet cloth.
3. Wash the aachments and Lid in the sink with hot, soapy water.
Page 13

13
welcome booklet
Troubleshooting
Although your Egg Cooker is simple to use and durable, please refer to
the following list if problems occur:
1. The power light does not turn on.
• Ensure that the power cord is plugged into the power outlet
• Check to make sure the power outlet is operating correctly.
• Press the power buon (located on the front of your Egg Cooker.)
• Determine if a power failure has occurred in your home, apartment or
building.
2. The eggs are over or under cooked.
• Use the Measuring Cup to place the appropriate amount of water in your
Egg Cooker. Refer to the section, “Using Your Egg Cooker.”
• Refer to the section “Cooking Time” and observe the recommended
cooking times for So/Runny, Medium or Hard Boiled eggs.
If your problem is not resolved in the instructions listed, please contact
StoreBound by phone at 1-800-898-6970 from 7AM - 7PM PST Monday Friday, or by email at [email protected].
Page 14

welcome booklet
14
Specifications
Description
Model
Rated Voltage
Rated Frequency
Rated Power
Egg Capacity
Dimensions
Dash Go Egg Cooker
DEC005 Series
120v ~
60Hz
360Was
6 Eggs
7.36” x 6.29” x 6.29”
Stock#: REC-062013V3
Page 15

15
Specifications
welcome booklet
RECIPES
EGGCELLENT IDEAS
Page 16

16
Recipes
welcome booklet
INGREDIENTS
7 hard-boiled eggs, cooled
3 tbsp mayonnaise
1 tbsp Dijon-style mustard
⅛ tsp salt
3-5 drops hot sauce
dash of paprika, chives and dill
DIRECTIONS
Remove shells from fully cooked eggs. Cut each egg in half. Remove yolks. Put
egg yolks in a large bowl and break up the yolks.
Mix in mayonnaise, mustard, salt, and hot sauce. Spoon the mixture into the
egg whites. Place the eggs into the refrigerator until ready to serve. Just before
serving, sprinkle on a dash of paprika, chives and dill.
Get eggcited for some devilish treats!
DEVILED EGGS
Page 17

Page 18

18
Recipes
welcome booklet
EGGS BENEDICT
INGREDIENTS
4 egg yolks
3½ tbsp lemon juice
1 pinch ground white pepper
⅛ tsp Worcestershire sauce
1 tbsp water
1 cup buer, melted
pinch of salt
4 eggs
fresh asparagus
4 strips Canadian-style bacon
2 english muffins cut in half
2 tbsp buer, soened
chives or cayenne pepper
Page 19

19
Recipes
welcome booklet
DIRECTIONS
HOLLANDAISE SAUCE
On the stovetop, fill the
boom of a double boiler
part-way with water. Make
sure that water does not
touch the boom of the
bowl. Bring water to a gentle
simmer.
In the top of the double
boiler, whisk together egg
yolks, lemon juice, white
pepper, Worcestershire sauce,
and 1 tablespoon water. Add
the melted buer to egg yolk
mixture 1 or 2 tablespoons at
a time while whisking yolks
constantly.
If hollandaise begins to get
too thick, add a teaspoon or
two of hot water. Continue
whisking until incorporated.
Whisk in salt then remove
from heat. Place a Lid on pan
to keep sauce warm.
Page 20

welcome booklet
20
Recipes
DIRECTIONS CONTINUED...
Fill the Measuring Cup with cold water to the Medium 1-3 eggs line. Pour cold
water onto Heating Plate. Place Egg Tray on base and place lightly greased
poaching tray on top of the Egg Tray. Break an egg into each poaching section.
Replace the Lid and turn the Egg Cooker on. When buzzer sounds the eggs
will be poached. Remove eggs immediately to prevent overcooking. Repeat for
desired amount of eggs.
Buer english muffin. Place boom of english muffin half on plate, place
Canadian-style bacon, asparagus, 1 poached egg, a spoonful of hollandaise
sauce then garnish with chives or cayenne pepper (optional).
Page 21

21
welcome booklet
Recipes
Page 22

welcome booklet
22
Recipes
EGG SALAD
INGREDIENTS
7 hard-boiled eggs, cooled
½ stalk celery
⅓ cup mayonnaise
2 tablespoons Dijon-style mustard
¼ tablespoon salt
⅛ teaspoons black pepper
DIRECTIONS
Remove shells from fully cooked eggs. Cut the eggs into quarters. Cut the
celery into a small dice. Mix the eggs and the celery together. Add mayonnaise,
mustard, salt, and pepper. Mix until desired texture is reached.
Enjoy your eggcellent salad!
Page 23

23
Page Title
welcome booklet
chef tip!
For a healthy twist, you can make this egg salad with half
the egg-yolks and light, or olive-oil based mayonnaise.
Page 24

welcome booklet
24
Recipes
HEALTHY OMELETTE
INGREDIENTS
2 egg whites
1 whole egg
cooked green beans or asparagus
¼ cup Parmesan or pecorino cheese
salt & pepper
leuce & tomato to garnish
DIRECTIONS
Beat 2 egg whites and 1 whole egg together. Pour into omelee tray.
Add cooked green beans or asparagus and let cook according to instructions
on page 9. Before serving, sprinkle with Parmesan and season with salt &
pepper to taste.
Page 25

25
Page Title
welcome booklet
chef tip!
Bulking up the volume of the omelee with egg whites is a
great way to cut calories but still make a sizable portion.
Page 26

26
welcome booklet
Customer Support
If your device fails to function as required, please check the troubleshooting
checklist on bydash.com. There may only be a minor problem that you can solve
yourself.
For product support, warranty and maintenance related questions (other than
cleaning) please contact StoreBound directly at: 1-800-898-6970 from 7AM - 7PM
PST, Monday - Friday, or by email at [email protected].
REPAIRS
DANGER! Risk of electric shock! The Dash Go Rapid Egg Cooker is an electrical
appliance. Do not aempt to repair the appliance yourself under any
circumstances.
Contact customer service regarding repairs to the device.
Page 27

27
welcome booklet
Warranty
STOREBOUND, LLC, - 1 YEAR LIMITED WARRANTY
Your Storebound product is warranted to be free from defects in material and workmanship for a period
of one (1) year from the date of the original purchase when utilized for normal and intended household
use. Should any defect covered by the terms if the limited warranty be discovered within one (1) year,
StoreBound LLC will repair or replace or replace the defective part. To process a warranty claim.
Contact customer care agent at 1-800-898-6970 for further assistance and instruction. A customer care
agent will conduct troubleshooting in an aempt to fix any minor problems. If troubleshooting fails
to fix the problem, a return authorization will be issued. Proof of purchase indicating date and place of
purchase is required and should accomany the return. You must also include your full name, shipping
address. and telephone number. We are unable to ship returns to a PO Box. Storebound will be responsible
for delays or unprocessed claims resulting from a purchaser’s failure to provide any or all of the neccessary
information. Freight costs must be prepaid by the purchaser.
Send all Inquires to: [email protected]
There are no express warranties except as listed above
REPAIR OR REPLACEMENT AS PROVIDED UNDER THIS WARRANTY IS THE EXCLUSIVE REMEDY OF
THE CUSTOMER, STOREBOUND SHALL NOT BE LIABLE FOR ANY INCIDENTAL OR CONSEQUENTIAL
DAMAGES FOR BREACH OF ANY EXPRESS OR IMPLIED WARRANTY ON THIS PRODUCT EXCEPT TO
THE EXTENT PROHIBITED BY APPLICABLE LAW. ANY IMPLIED WARRANTY OF MERCHANTABILITY
OR FITNESS FOR A PARTICULAR PURPOSE ON THIS PRODUCT IS LIMITED IN DURATION TO THE
DURATION OF THIS WARRANTY.
Some states do not allow the exclusion or limitation of incidental or consequential damages, or limitations
on how long an implied warranty lasts, so the above exclusions or limitations may not apply to you. This
warranty gives you specific legal rights and you may also have other rights, which vary from state to state.
Evan Dash, CEO
Page 28

Please visit bydash.com
Customer Support 1-800-898-6970
 Loading...