

Page 1
Item No.: 4SK108
User Manual
Thank you for choosing The Original Dash Cam
This manual offers detailed information on how to operate TODC (The
Original Dash Cam) CYCLOPS including: how to operate the device, matters
that need your attention, and technical specifications. Please read carefully
before use.
Page 2
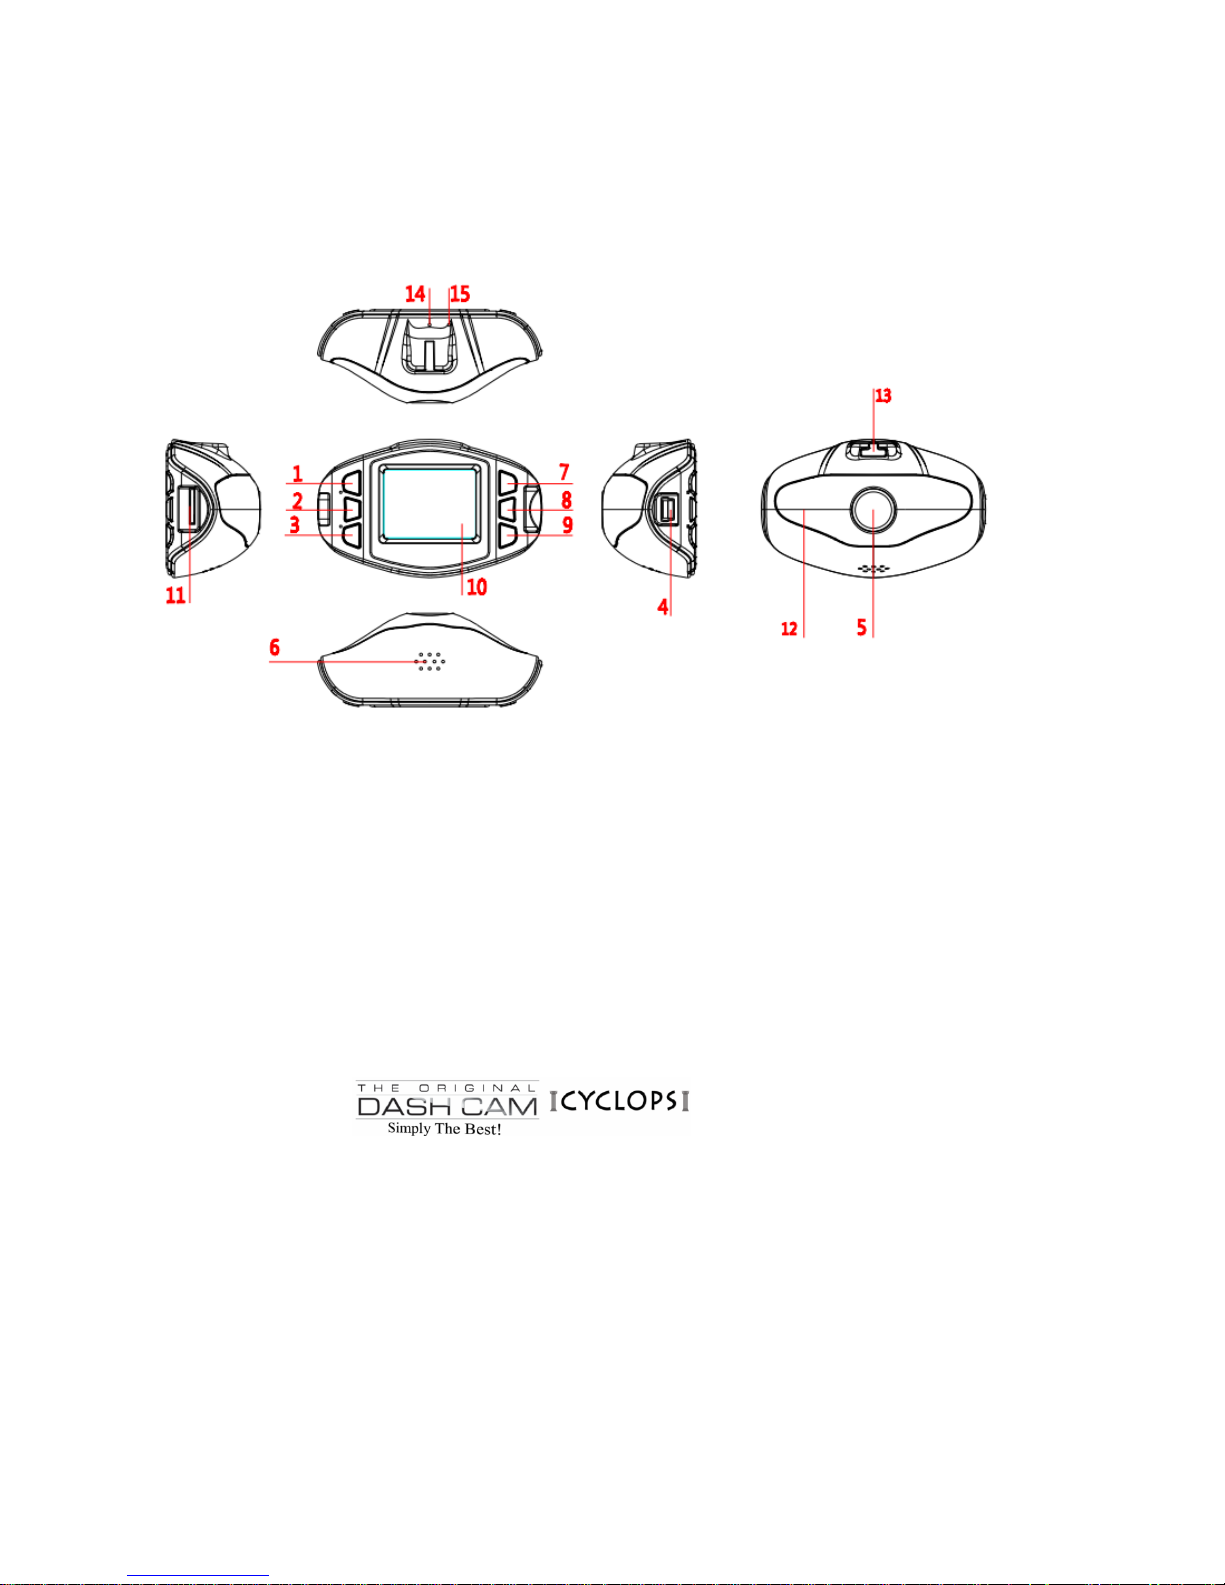
Product description
Product structure
1)UP button 2)MENU 3)DOWN button
4)USB interface 5)Lens 6)Speaker
7)OK button 8)MODE 9)Power button
10)Display screen 11)MicroMemory slot 12)IR Night assist
13)Bracket hole 14)Reset hole 15)MIC
Included with
The Original Dash Cam CYCLOPS
12v Car Charger
Mini-USB Cable
Micro memory card
Suction Cup Windshield Mount
Dash Mounting Disc
Page 3

Operating Your Device:
1) Charging:
A) Using the built-in rechargeable lithium battery
Charging options: 1) Connect TODC CYCLOPS to the car charger; 2) Connect TODC CYCLOPS to
your computer using the USB cable
- When charging through the car charger, the „battery‟ display in the bottom right of the screen
will flash – indicating that the unit is charging
- A red light will illuminate on the left side of TODC CYCLOPS whenever the camera is charging
o (Note: For first charge a minimum of 6 hours is recommended)
B) TODC CYCLOPS connected to the 12v car charger
When the 12v car charger is plugged into your vehicle‟s 12v outlet and TODC CYCLOPS is connected;
after starting the vehicle, the device automatically turns on and enters video mode -- it will begin to
record. The device will continue recording while charging.** When the vehicle is turned off, the device
keeps working and will turn off five seconds later, saving the recorded files automatically (if your
vehicle‟s 12v outlet stays active when the car is turned off, it is recommended to unplug your TODC
CYCLOPS before leaving your car). Alternatively you can choose to turn the camera off using the power
button ; the files will be automatically saved.
** Note: TODC CYCLOPS is designed to be plugged in continually while driving; leaving the unit
plugged in for long periods of time will not harm the camera.
2) Functions introduction
This camera has three modes: Video mode, Still Photo mode, Playback mode
To switch between modes, when the camera is NOT recording, press the MODE button
A) Video mode: (a video camcorder icon will display in the top left of the screen . Memory card
must be inserted)
After pressing and holding the power button, or connecting TODC CYCLOPS to the car charger, the
camera turns on and enters video mode. TODC CYCLOPS will automatically begin recording. To stop
recording, press the OK button . To turn off the device, press and hold the power button . Whether
you stop recording using the OK button or you simply power down TODC CYCLOPS using the power
button, your video will be stored.**
**Note: Pressing the OK button in video mode starts and stops recording.
**Note: Pressing the mode button while TODC CYCLOPS is recording will lock and store the
current video – the top of the screen will display this lock key icon . This video will not be
overwritten until the memory card is formatted.
**Note: A quick press (less than one second) of the power button while recording changes TODC
CYCLOPS from day mode to night mode (the following icon will display on the top of the display screen
when in night mode
Page 4

**Note: Pressing the up button while recording will zoom the camera in up to 4x digital zoom. Press
the down button to zoom out.
**Note: The menu button has no function while the camera is recording
B) Still Photo mode: (A still photo camera icon will appear in the top left of the screen . Memory
card must be inserted)
After the device is powered on, press the OK button to stop recording. Once recording has been stopped,
press the mode button once to enter still photo mode (TODC CYCLOPS cannot change modes while the
camera is recording).**
**Note: To capture a photo in still photo mode, press the OK button
**Note: A quick press (less than one second) of the power button while in still photo mode changes
TODC CYCLOPS from day mode to night mode (the following icon will display on the top of the display
screen when in night mode
**Note: Pressing the up button while in still photo mode will zoom the camera in up to 4x digital
zoom. Press the down button to zoom out.
C)Preview mode: (A film negative icon will display in the top left of the screen. To view video,
memory card must be inserted)
After the device is powered on, press the OK button to stop recording. Press the MODE button
twice to enter into Preview mode. You can scroll through previews by pressing the UP and DOWN
buttons . In the top right of the display screen, the file name is displayed.** When the file you wish to
playback is displayed on screen, press the OK button to begin playing; the OK button will play and
pause the current video. To fast forward a video, use the DOWN button (up to 8x fast forward speed).
To rewind a video, use the UP button (up to 8x rewind speed).
**Note: When playing a video, the video time will display in the top left of the display screen below the
file name.
**Note: Once a video is playing, the menu button becomes inactive. Stop the video playback by
pressing the mode button and the menu button will reactivate.
**Note: If the file displays the lock icon on the top of the screen the current video is locked, it can
only be deleted by formatting the memory card.
3) Settings Menu functions:
Each of TODC CYCLOPS‟s three modes has its own settings menu: Video Settings, Still Settings,
Playback Settings
To access the settings menus from any mode: be sure the camera is NOT recording. To enter Video
settings press the MENU button from video mode. To access Still settings, navigate to Still Photo
mode and press the MENU button . To access Playback settings, navigate to Playback mode and press
the MENU button . Navigate the menus by using the UP and DOWN buttons , choose the
highlighted setting by pressing OK .
Page 5

Video Settings:
Resolution: 1080FHD (1920x1080) / 720P (1280x720) / WVGA (848x480) / VGA (640x480) /
QVGA (320x240) *
Loop Recording: Off / 1 Minute / 2 Minutes / 3 Minutes **
EV Exposure Value: +2.0, +5/3, +4/3, +1, +2/3, +1/3, 0, -1/3, -2/3, -1.0, -4/3, -5/3, -2.0
Motion Detection: On/Off
Audio: On/Off
Date Stamp: On/Off
G Sensor: 2G / 4G / 8G / Off ***
Button Sound: On/Off
*Higher resolution has higher picture quality but also takes more memory to store files.
**When this option is turned on, the camera will record in, for example, 3 minute video clips – when the
memory card is full the camera will then overwrite the oldest video file and store the newest, allowing
you to continue recording while never having to change the memory card.
***TODC CYCLOPS‟s G Sensor (Gravity Sensor) locks and stores video on sudden impact so it will not
be overwritten by the camera‟s loop recording function. This menu setting adjusts the sensitivity of this
sensor with 2G being the most sensitive and 8G being the least.
Still Settings:
Timer: Single / 2s Timer / 5s Timer / 10s Timer
Resolution: 12M (4032x3024) / 10M (3648x2736) / 7.5M (3200x2400) / 5M (2592x1944) / 3M
(2048x1536)
Sequence: On/Off *
Quality: Fine / Normal / Economy
Sharpness: Strong / Normal / Soft
White balance: Auto / Daylight / Cloudy / Tungsten / Fluorescent
Color: Color / B&W / Sepia
ISO: Auto / 100 / 200 / 400
EV Exposure Value: +2.0, +5/3, +4/3, +1.0, +2/3, +1/3, +0.0, -1/3, -2/3, -1.0, -4/3, -5/3, -2.0
Anti-Shaking: On/Off
Page 6

Quick Review: Off / 2 seconds / 5 seconds **
Date Stamp: Off / Date / Date and Time
*Note: When sequence is turned “On,” one press of the OK button will take a sequence of five
pictures
**Note: When turned on, quick review allows you to quickly review the picture you have just taken for
the chosen amount of time
Playback Settings:
Delete: Delete Current? / Delete all? *
Protect: Lock Current / Unlock Current / Lock All / Unlock All **
*Note: Choosing, “Delete Current” will delete the file that was on screen when entering the playback
settings menu. Choosing, “Delete all” will delete all unlocked files on the memory card
**Note: Locked videos cannot be deleted until they are unlocked with one exception; formatting the
memory card will erase all files on the memory card – including locked videos.
Setup Menu:
In addition to the mode settings pages, from any mode you can access the Setup Menu by pressing the
MENU button twice (camera must NOT be recording to access menus).
Set Date/Time: Using the UP and DOWN buttons set the correct time and date. *
Auto Power Off: Off / 2 Minutes / 5 Minutes / 10 Minutes
Language: English / French / German / Italian / Spanish / Simplified Chinese / Traditional Chinese /
Japanese / Russian / Korean
Light Frequency: 50 Hz / 60 Hz (Set to 60 Hz for North America)
Screen Saver: 3 Minute / 5 Minutes / 10 Minutes / Off **
Image Rotate: On/Off (Flips the screen for recording on windshield or dashboard)
Format: Cancel/OK ***
Default Setting: Cancel/OK (Resets your CYCLOPS to factory default settings)
Firmware Version: Displays the software version number.
*Note: Use the OK button to navigate between month, day, year and time. Once the correct time and
date are displayed, press the MENU button to activate.
**Note: When screen saver is on, TODC CYCLOPS‟s display screen will shut off after the chosen time
of inactivity (3, 5, 10 minutes), TODC CYCLOPS will continue recording. To turn the screen back on,
simply press any button.
Page 7

***Note: CAUTION performing a format of the memory card will erase ALL data on the card, included
locked files.
WARNING
THIS DEVICE SHOULD NOT BE ADJUSTED BY THE DRIVER WHILE DRIVING. IN THE
EVENT OF AN ACCIDENT, DEVICE MAY DISLODGE AND BECOME UNSAFE FOR
PASSENGERS.
Notice
1) Please insert memory card before recording
2) TODC CYCLOPS supports memory cards up to 32GB
3) Please attach unit by applying firm pressure to mount before mounting on surface.
4) When the lithium battery is depleted, TODC CYCLOPS screen shows “Batteries depleted.” The
camera will shut down automatically after 20 seconds and save the files automatically.
5) If you need to reset TODC CYCLOPS, press the RESET button for 3 seconds.
6) For questions or technical support, visit 4Sight at www.GetDashCam.com
FCC STATEMENT
FCC declaration of conformity
Responsible party:
4Sight, Inc.
12285 Colony Ave.
Chino, CA 91710
(714) 988-5838 Fax: (714) 285-5828
This device complies with Part 15 of the FCC Rules. Operation is subject to the
following two conditions:
(1) This device may not cause harmful interference, and
(2) This device must accept any interference received, including interference that
may cause undesired operation.
Note:
This equipment has been tested and found to comply with the limits for Class B
digital devices, pursuant to Part 15 of the FCC rules. These limits are designed
to provide reasonable protection against harmful interference in a residential
installation. This equipment generates, uses and can radiate radio frequency
energy and, if not installed and used in accordance with the instructions, may
cause harmful interference to radio communications. However, there is no
guarantee that interference will not occur in a particular installation. If this
equipment does cause harmful interference to radio or television reception,
which can be determined by turning the equipment off and on, the user is
encouraged to try to correct the interference by one or more of the following
measures:
Page 8

Reorient or relocate the receiving antenna
Increase the separation between the equipment and receiver
Connect the equipment into an outlet on a circuit different from that to which
the receiver is connected
Consult the dealer or an experienced radio/TV technician for help2
Use of shielded cable is required to comply with Class B limits in Subpart B of Part
15 of the FCC rules.
Do not make any changes or modifications to the equipment unless otherwise
specified in the manual. If such changes or modifications should be made, you
could be required to stop operation of the equipment.
Canada
Industry Canada (IC)
Unintentional emitter per ICES-003/NMB-003
This digital apparatus does not exceed the Class B limits for radio noise emissions
from digital apparatus as set out in the radio interference regulations of Industry
Canada.
Le present appareil numerique n‟emet pas de bruits radioelectriques depassant les
limites applicables aux appareils numeriques de Classe B prescrites dans le
reglement sur le brouillage radioelectrique edicte par Industrie Canada.
 Loading...