

Page 1

User's Manual
iA
I N S TA L L AT I O N P O W E R A M P L I F I E R
IA-402 / IA-404 / IA-1002 / IA-1004 / IA-1602 / IA-1604
Antes de utilizar el equipo, lea la sección
“Pr ecaucio ne s d e segurid ad” d e e ste
ma nu al. Co ns erv e es te man ua l pa ra
futuras consultas.
Before operating the device, please read
the “Safety precautions” section of this
manual. Retain this man ual for future
reference.
Page 2

CONTENTS
SAFETY PRECAUTIONS
WARRANTY
DECLARATION OF CONFORMITY
INTRODUCTION
FRONT PANEL
REAR PANEL
INSTALLATION
USE
LINE DRAWINGS
CONFIGURATIONS
IA-404 low impedance
IA-404 high impedance
IA-404 hybrid low and high impedances
IA-1004 low impedance
IA-1004 high impedance
IA-1004 hybrid low and high impedances
IA-402 low impedance
IA-402 high impedance
IA-1002 low impedance
IA-1002 high impedance
IA-1602 low impedance
IA-1602 high impedance
IA-1604 low impedance
IA-1604 high impedance
IA-1604 hybrid low and high impedances
3
4
5
6
6
7
8
9
10SPECIFICATIONS
10
11 - 14
15
16
17 - 19
20
21
22 - 23
24
25 - 26
27
28 - 30
31
32
33
34
Manual del Usuario / iA series / User’s Manual
35TROUBLESHOOTING
36ANNEX: Line connections: unbalanced and balanced
Page 3

Precauciones de Seguridad
iA series
Amplificadores de Potencia para sistemas distribuidos / Power Amplifiers for distributed systems
Safety Precautions
Conserve y lea estas instrucciones.
Respete y siga todas las advertencias.
El signo de exclamación en un triángulo equilátero pretende alertar
al usuario de instruccion es o perativas y d e mantenimiento
(reparación) en la literatura que acompaña al aparato.
ADVERTENCIA: Los aparatos de CLASE I se deben conectar a una
toma de corriente eléctrica con conexión a tierra.
El rayo con punta de flecha dentro de un triángulo equilátero
pretende alertar al usuario de la presencia de voltajes peligrosos no
aislados. Para reducir el riesgo de choque eléctrico no retire la
cubierta. No existen partes ajustables en el interior.
ADVERTENCIA: Para evitar lesiones, este aparato debe estar
f irm eme nte suj et o al bast id or, de c onf orm ida d co n las
instrucciones de instalación.
El cableado exterior conectado a estos terminales requiere de su
instalación por una persona instruida y el uso de cables flexibles
preparados.
No exponga este equipo a la lluvia o humedad. No use este aparato
cerca del agua (piscinas y fuentes, por ejemplo). No exponga el
equipo a salpicaduras ni coloque sobre él objetos que contengan
líquidos, tales como vasos y botellas. Equipo IP-20. Limpie con un
paño seco. No use limpiadores con disolventes.
No instale el aparato cerca de fuentes de c alor tales como
radiadores, estufas u otros aparatos que produzcan calor. No
bloquee las aberturas de ventilación, e instalar de acuerdo con las
instrucciones del fabricante. Los ventiladores de refrigeración
toman aire fresco de un lateral y sale caliente por el otro lateral de la
unidad a través de las rejillas de ventilación. Los laterales del
amplificador deben estar expuestos al aire (por ejemplo, en un rack
con rejillas), con cámara de aire de 5 cm a los lados. SI AL AIRE NO SE
LE PERMITE CIRCULAR, SE SOBRECALENTARÁ LA UNIDAD. Tenga
cuidado al montar otro equipo en el mismo rack. Diseñado para
funcionar entre 15ºC y 45ºC, con el 75% de humedad relativa
máxima.
Keep these instructions. Read these instructions.
Heed all warnings. Follow all instructions.
The exclamation point within an equilateral triangle is intended to
alert the user of important operating and maintenance (servicing)
instructions in the literature accompanying the appliance.
WAR NING : A pparatus w ith C LASS I c onstr ucti on shal l be
connected to a MAINS socket outlet with a protective earthing
connection.
The lightning flash with arrowhead symbol within an equilateral
triangle is intended to alert the user to the presence if uninsulated
“dangerous voltage”. To reduce the risk of electric shock do not
remove the cover. No user serviceable parts inside.
WARNING: To prevent injury, this apparatus must be securely
attac hed t o the rack in a ccordance with t he in stal lati on
instructions.
The connected outer wiring to these terminals requires of its
installation by an instructed person and the use of a flexible cable
already prepared.
Do not expose this device to rain or moisture. Do not use this
apparatus near water (for example, swimming pools and fountains).
Do not place any objects containing liquids, such as bottles or
glasses, on the top of the unit. Do not splash liquids on the unit. IP20 equipment. Clean only with a dry cloth. Do not use any solvent
based cleaners.
Do not install near any heat sources such as radiators, stoves or
other apparatus that produce heat. Do not block any ventilation
op en ings, in st all in ac cord ance w ith th e m anu fa ct ur er 's
instructions.
The cooling fans push cool air through one side and blow hot air out
of the other side of the unit through the ventilating grilles.
Do not block the sides of the amplifier (i.e. in a rack with grilles).
Allow an air flow gap of 5cm or more on the sides. IF THE AIR IS NOT
ALLOWED TO CIRCULATE, OVERHEATING WILL OCCUR.
Take care when mounting other equipment in the same rack.
Working temperature ranges f rom 15ºC to 45ºC with a maximum
relative humidity of 75%.
Desconecte este aparato durante tormentas eléctricas, terremotos
o cuando no se vaya a emplear durante largos periodos.
Tenga en cuenta que la tensión nominal de alimentación es el valor
indicado en la etiqueta, con un rango ±10% de ese valor (según IEC
60065:2001).
Proteja el cable de alimentación de ser pisado o aplastado,
especialmente en los enchufes, receptáculos y en el punto en el que
salen del aparato. Confíe las reparaciones a personal cualificado. Se
requiere servicio cuando el aparato ha sido dañado de alguna
manera, como por ejemplo si el cable de alimentación o el enchufe
está dañado, se ha derramado líquido o han caído objetos dentro
del aparato, el aparato ha sido expuesto a la lluvia o la humedad, no
fun ciona con n orm ali dad o se ha c aído. El int err upt or d e
alimentación d eberá permanecer fácilmen te accesible. Pa ra
desconectar completamente este aparato de la red eléctrica,
desconecte el cable de alimentación del interruptor de corriente
principal. Esta unidad está equipada con un cable de alimentación
de 3 hilos. Por razones de seguridad, LA CONEXIÓN A TIERRA NO
DEBE DESCONECTARSE EN NINGUNA CIRCUNSTANCIA.
Cuando la unidad esté montada en un rack y permanentemente
conectada a red debe ser instalada con un conector de fácil acceso
o con un dispositivo de desconexión omnipolar con al menos 3 mm
de di st anc ia en tre su s c ont acto s. E l i nt err upt or d e l os
amplificadores sólo afecta a uno de los polos de la red eléctrica, por
tanto, en las unidades con un cable desmontable el dispositivo de
desconexión de red (por ejemplo, el enchufe o la conexión a red),
debe ser fácilmente accesible para poder estar completamente
desconectado de la red. Sin embargo, en unidades con cable fijo
deberá usar un dispositivo de desconexión externo (antes descrito).
La instalación deberá seguir todas las normas de instalación
vigentes.
Ut ilic e s ól o a cc esor ios (p or e jemp lo, so por tes o ra ck s)
recomendados por el fabricante. Cuando se utiliza un rack o un
carro de transporte, tenga cuidado al mover la combinación carro /
aparato para evitar lesiones causadas por un vuelco.
Este símbolo indica que el presente producto no puede ser tratado
como residuo doméstico normal, sino que debe entregarse en el
corre spondiente punto de recogida de equipos eléctricos y
electrónicos.
Unplug this apparatus during ligtning storms, earthquakes or
when unused for long periods of time.
Take into account that the nominal AC voltage is the value shown in
the equipment ±10% (according to IEC 60065:2001).
Protect t he power cord f rom being walked o n or pinche d
particularly at plugs, convenience receptacles and the point where
they exit from the apparatus.
Refer all servicing to qualified service personnel. Servicing is
required when the apparatus has been damaged in any way, such
as if the power-supply cord or plug is damaged, liquid has been
spilled or objects have fallen into the apparatus, the apparatus has
been exposed to rain or moisture, does not operate normally, or has
been dropped.
The mains circuit breaker shall remain readily accessible.
To completely disconnect this equipment from the AC mains,
disconnect the power cord from the mains circuit breaker.
This unit is fitted with a 3-wire power cord. For safety reasons, THE
EARTH LEAD SHOULD NOT BE DISCONNECTED UNDER ANY
CIRCUMSTANCES.
Where the amplifier is mounted in a rack and permanently
connected to the mains, then the rack should be installed with a
readily accessible connector or an ALL POLE circuit breaker with
3mm breaking distances.
The mains switch on the amplifiers only switches one pole of the
mains supply, therefore for units with a detachable cord to be fully
disconnected from the mains, the mains disconnect device (ie
mains plug or mains coupler) should remain readily operable. For
units with a fixed mains lead the external all pole circuit breaker
with 3mm b reaking distances is the dis connect device a nd
therefore the installation of the amplifier shall be carried out in
accordance with all the applicable installation rules.
Only use attachments/accessories specified by the manufacturer.
Use only with the cart, tripod, bracket or table specified by the
manufacturer, or sold with the apparatus. When a cart is used, use
caution when moving the cart/apparatus combination to avoid
injury from a tip over.
This symbol on the product indicates that this product should not
be treated as household waste. Instead it shall be handed over to
the appicable collection point for the recycling of electrical and
electronic equipment.
Manual del Usuario / iA series / User’s Manual
3
Page 4

GARANTÍA
Todos nuestros productos están garantizados por un
periodo de 24 meses desde la fecha de compra.
Las garantías sólo serán válidas si son por un defecto de
fabricación y en ningún caso por un uso incorrecto del
producto.
Las reparaciones en garantía pueden ser realizadas,
exclusivamente, por el fabricante o el servicio de asistencia
técnica autorizado.
Para solicitar reparación en garantía es imprescindible que
el producto no haya sido previamente manipulado e incluir
una fotocopia de la factura de compra.
Todos los detalles relativos a la garantía (como las garantías
extendidas) los puede encontrar en la sección SOPORTE en
nuestra web: www.dasaudio.com
WARRANTY
All our products are warrantied against any manufacturing
defect for a period of 24 months from date of purchase.
The warranty excludes damage from incorrect use of the
product.
All warranty repairs must be exclusively undertaken by the
factory or any of its authorised service centers.
To claim a warranty repair, do not open or intend to repair
the product.
All the details related to the warranty (such as extended
warranties) can be found in the SUPPORT section on our
website: www.dasaudio.com
4
Manual del Usuario / iA series / User’s Manual
Page 5

DECLARACIÓN DE CONFORMIDAD
DECLARATION OF CONFORMITY
DAS Audio Group, S.L.
C/ Islas Baleares, 24 - 46988 - Pol. Fuente del Jarro - Valencia. España
(Spain).
Declara que la serie iA:
Declares that iA series:
Cumple con los objetivos esenciales de las Directivas:
Abide by essential objectives relating Directives:
l Directiva de Baja Tensión (Low Voltage Directive) 2014/35/UE
l Directiva de Compatibilidad Electromagnética (EMC)
2014/30/UE
l Directiva RoHS 2011/65/UE
l Directiva RAEE (WEEE) 2012/19/UE
Y es conforme a las siguientes Normas Armonizadas Europeas:
In accordance with Harmonized European Norms:
l EN 60065:2014.- Audio, video and similar electronic apparatus. Safety
requirements.
l EN 55032:2012.- Electromagnetic compatibility of multimedia
equipment. Emission requirements.
l EN 55103-2:2009.- Electromagnetic compatibility. Product family
standard for audio, video, audio-visual and entertainment lighting
control apparatus for professional use. Part 2:Immunity.
l EN 50581:2012.- Technical documentation for the assessment of
electrical and electronic products with respect to the restriction of
hazardous substances.
Manual del Usuario / iA series / User’s Manual
5
Page 6

INTRODUCTION
General
If a consistent DC voltage is present at the output of the
unit, the amplif ier will enter a latching shutdown. Only a
re-cycle of the mains voltage will restart the amplifier.
Thank you for purchasing DAS iA series power amplifiers.
They have been designed with the lastest and most
advanced Class D technology. As a result, a family of multi
channel high efficiency, universal mains, amplifiers has
been created for small/medium sized applications.
Features
- 2 or 4 channel models
- Class D, switching power supply
- Universal Mains regulated power supply
- Selectable Low or High Impedance operation
- Integrated limiter to prevent amplifier clip
- Integrated optional High Pass Filter at 80Hz
- Independent Volume controls per channel
- Power On led and dual color Signal/Clip leds per ouput
channel
- Thermal protection
- Over current protection
- Built in DC protection
- Short Circuit protection
- Stereo (low impedance) and Bridge (high impedance)
modes
- Ultra light weight
- Terminal block input&output connectors
FRONT PANEL
If the DC voltage on the amplifier output is due to an
excessively high DC voltage pulse on the input of the
amplifier the unit will attempt 3 times re-activate before
latching shutdown.
- The iA series has a built-in current limitation to protect
against overloading of the amplifier power stage. The
current limitation will allow maximal current of typically
30Apeak during audio peaks without disabling the
amplif ier. If an external clip-limi ter h as no t been
implemented or if an external clip-limiter is not capable of
limiting the output current enough, (e.g. if a permanent
short is loading the amplifier), the amplifier will disable to
protect itself.
The current limit is depending on the temperature of the
amplifier power stage. The higher the temperature – the
lower the current limit for optimal protection of the
amplifier.
- The iA series monitors their internal rail voltages to
prevent overloading of internal components, and to
ensure proper operation of the onboard amplifiers.
iA-404
A
INS TAL LAT IO N P OW ER AM PL IF IE R
A) Power Switch
Turns the amplifier on (“I” position) and off (“0” position).
When the amplifier is turned on the “power” LED will
illuminate.
B) Power / Standby / Protection LED
A green color LED shows that the amplif ier is ON.
A red color LED shows that the amplifier is in standby
mode.
An orange color LED shows protection mode.
Protection mode may be triggered by:
- Overheating: Temperature protection will be enabled if
either the internal power supply, transformer or one of the
tw o amp lif ie r cha nne ls be com e too h ot d ue to
inadequate cooling. When the amplifier has cooled down
the channel´s output will be activated and operation will
continue.
- The iA series has a built-in DC protection feature. The DC
protection will help to protect the loudspeaker f rom
excess damage in case of an attempt to deliver a DC
voltage out of the amplifier. This could happen either
because the DC voltage on the input of the amplifier is too
high or if the unit has an internal defect.
LEV EL A LEV EL B LE VE L C LE VE L D
B
SIG N AL / C LI PONSIG N AL / C LI P SI GN AL / C LI P S IG NA L / CL IP
Overvoltage
In case voltage is too high on the internal rail
voltages, the unit will Disable/Mute the amplifiers and
temporarily shut down, to prevent damage of the internal
components.
Undervoltage
In case that the amplifier internal rails drop to a very
low level, the unit will Disable/Mute the two amplifier
channels, to ensure correct operation of
the amplifiers. Once the internal rail voltages rises to a
normal level again, the amplif ier channels will be reenabled.
C) Output channels Volume Controls
Volume levels for each channel can be adjusted by using
the knobs on the front panel. Gain is maximum when the
level of the rotary potentiometer is rotated fully clockwise.
D) Signal / Clip LED
These LEDs show the presence of signal at the amplif ier´s
inputs and is dependent on the position of the level
control. In the event that the signal input level exceeds the
amplifier´s input sensitivity the clip LEDs will light in
organe (soft clip) or red (hard clip).
C
D
6
Manual del Usuario / iA series / User’s Manual
Page 7

REAR PANEL
1U models: iA-402 / iA-404
CH A+ B
IN PU T
A
C
A
IN PU T
OFF
STERE O
LINE/
BRIDG E
70V
B
100V
MODE
80Hz HP
LINE
D
CH A+ B CH C+ D
OFF
STERE O
LINE/
BRIDG E
70V
B
100V
MODE MODE
80Hz HP 80Hz HP
LINE LINE
OFF
STERE O
iA-402
LIN E
BRG
CH A
MODEL: IA-402
115V-230V 50Hz/60Hz 200W
OUTPUT PWR 200W x 2Channel
S/N
DA S Au di o G r ou p, S. L. (Va le nc ia )
www.dasaudio.com
CAUTION ATTENTION
DANGER D’ELECTROCUTION
RISK OF ELECTRIC SHOCK
DO NOT OPEN
Ma de in SPA IN
NE PAS OUVRIR
CH B
OU TP UT
SP EA KE R
iA-404
LIN E
CAUTION ATTENTION
DANGER D’ELECTROCUTION
RISK OF ELECTRIC SHOCK
NE PAS OUVRIR
DO NOT OPEN
LINE/
BRIDG E
70V
100V
DA S Au di o G r ou p, S. L. (Va le nc ia )
www.dasaudio.com
Ma de in SPA IN
CH D CH C
OU TP UT
SP EA KE R
BRG
LIN E
BRG
CH B CH A
MODEL: IA-404
115V-230V 50Hz/60Hz 350W
OUTPUT PWR 100W x 4Channel
S/N
2U models: iA-1002 / iA-1004 / iA-1602 / iA-1604
CAUTION ATTENTION
DANGER D’ELECTROCUTION
CH A+ B
IN PU T
A
C
IN PU T
A
OFF
STERE O
LINE/
BRIDG E
70V
B
100V
MODE
80Hz HP
LINE
D
CH A+ B CH C+ D
OFF
STERE O
LINE/
BRIDG E
70V
B
100V
MODE MODE
80Hz HP 80Hz HP
LINE LINE
www.dasaudio.com
OFF
STERE O
LINE/
BRIDG E
70V
100V
www.dasaudio.com
A) Speaker outputs
Terminal Block (pitch 5,08mm) connectors with 4 pins are
provided with the unit. Both stereo and bridge (100/70V)
connections are available.
LI NE
C H B
BR G
C H A
Stereo mode
O U TPUT
S P EAKER
RISK OF ELECTRIC SHOCK
NE PAS OUVRIR
DO NOT OPEN
DA S Au di o G r ou p, S. L. (Va le nc ia )
Ma de in SPA IN
CAUTION ATTENTION
DANGER D’ELECTROCUTION
RISK OF ELECTRIC SHOCK
NE PAS OUVRIR
DO NOT OPEN
DA S Au di o G r ou p, S. L. (Va le nc ia )
Ma de in SPA IN
iA-1002 / iA-1602
LIN E
BRG
CH B CH A
OU TP UT
SP EA KE R
MODEL: IA-1002
115V-230V 50Hz/60Hz 250W
OUTPUT PWR 500W x 2Channel
S/N
iA-1004 / iA-1604
LIN E
BRG
CH D CH C
OU TP UT
SP EA KE R
C) Mode Switch
This sw itch allow s t he s e lectio n f or t h e i n put
configuration mode: stereo or bridge (100/70V line).
LIN E
BRG
CH B CH A
D
C H A+ B C H C +D
OFF
B
80H z HP 80H z HP
MODEL: IA-1004
115V-230V 50Hz/60Hz 400W
OUTPUT PWR 250W x 4Channel
S/N
STE REO
LIN E/
BRI DGE
70V
100V
MOD E MOD E
LIN E LIN E
OFF
STE REO
LIN E/
BRI DGE
70V
100V
LI NE
C H B
BR G
C H A
Bridge or line mode
O U TPUT
S P EAKER
B) Inputs
Terminal Block (pitch 3,5mm) connectors with 5 pins are
provided with the unit.
I NP UT
A
B
Manual del Usuario / iA series / User’s Manual
Typically the amplifiers are used in stereo mode, where
the input A feeds channel A and the input B feeds channel
B.
Use the Bridge mode to use the power of two channels for
one single output. Use Bridge mode to connect cabinets
with 100/70V transformers directly to the amplifier´s
output.
In bridge mode inputs B and D are disabled, use inputs A
and C:
LI NE
BR G
C
IN PU T
A
D
B
80Hz HP
OFF
STER EO
LINE /
BRID GE
MODE
C H D CH C
OU TP UT
SP EA KE R
C H B C H A
input A
input C
LI NE
BR G
channels A+Bchannels C+D
7
Page 8

INSTALLATION
Racking
There are two 1U DIN high models (IA-402/404) and four
2U DIN high models (IA-1002/1004/1602/1604). All units are
of a standard 19-inch rack mount width.
Four front panel mounting holes are provided for use with
M5 or M6 screws.
Ampl if ier dimensions c an be f ou nd on t he “Li ne
Drawings” section in this manual.
Cooling
The amplifiers use a fan located on one of their side panels
to maintain the unit under stable conditions.
The fans are inteligentlly managed by a micro controller
varying their speed according to the needs.
Air inlets are located on one side of the amplif ier. Do not
block them at any time.
The side walls of the rack should be a minimum of 2 inches
(5 cm) from the amplifier sides. The back of the rack
should be open.
Input cable connections
DAS Audio recommends using prebuilt or professionally
wi re d ba lan ce d li ne (t wo -co ndu ct or p lus shi eld )
2x0.22mm or 22-24 AWG cables to connect the amplifier
balanced input by using the included 3.5mm pitch
terminal block connectors.
Custom wiring should only be performed by qualif ied
personnel.
Speaker cable connections
5.08mm pitch,4 pin, terminal block connectors are used to
connect the speakers:
C H D CH C
OU TP UT
SP EA KE R
The iA series amplifiers can work in stereo mode or bridge
mode. If 2 channels are bridged, the unit can be used for
100/70V lines (high impedance).
C H D
O U T P U T
S P E A K ER
LI NE
BR G
LI NE
BR G
2
C H C
LI NE
BR G
C H B C H A
LI NE
C H B
BR G
C H A
C H D CH C
OU TP UT
SP EA KE R
LI NE
BR G
LI NE
BR G
C H B C H A
Select transformer tap position (10/20/30W)
Bridge mode - two 100/70V channels
DAS Audio recommends using prebuilt or professionally
wired, high-quality, two-conductor,
heavy gauge speaker wire. Speakers wires should be
twisted cable, if possible. To prevent the possibility of
short-circuits, the wires should be stripped back no
greater than 6 mm (1/4 inch).
The maximum cable length of the line (100/70V) will be
determined by the gauge (section) of the cable and the
total power of the line.
A cable loss of less than 10% (around 1dB) would be a very
good limit.
For the most common cable sizes we can find these
values as a reference (copper cables):
Cable loss in dB 100V line
L(m)
AWG
10
16
10
14
10
12
25
16
25
14
25
12
50
16
50
14
50
12
75
16
75
14
75
12
Cable loss in dB 70V line
L(m)
AWG
10
16
10
14
10
12
25
16
25
14
25
12
50
16
50
14
50
12
75
16
75
14
75
12
S(mm )
1,3
2,1
3,3
1,3
2,1
3,3
1,3
2,1
3,3
1,3
2,1
3,3
S(mm )
1,3
2,1
3,3
1,3
2,1
3,3
1,3
2,1
3,3
1,3
2,1
3,3
2
2
200W
-0,05
-0,03
-0,018
-0,12
-0,075
-0,05
-0,24
-0,18
-0,1
-0,35
-0,22
-0,14
200W
-0,1
-0,06
-0,036
-0,24
-0,15
-0,1
-0,48
-0,36
-0,2
-0,7
-0,44
-0,28
400W
-0,1
-0,06
-0,037
-0,24
-0,14
-0,1
-0,47
-0,3
-0,18
-0,7
-0,43
-0,28
400W
-0,2
-0,12
-0,074
-0,48
-0,28
-0,2
-0,94
-0,6
-0,36
-1,4
-0,86
-0,56
500W
-0,12
-0,075
-0,047
-0,3
-0,18
-0,12
-0,6
-0,36
-0,23
-0,85
-0,54
-0,34
500W
-0,24
-0,15
-0,094
-0,6
-0,36
-0,24
-1,2
-0,72
-0,46
-1,7
-1,08
-0,68
1000W
-0,24
-0,15
-0,1
-0,6
-0,36
-0,23
-1,12
-0,7
-0,46
-1,7
-1,05
-0,68
1000W
-0,48
-0,3
-0,2
-1,2
-0,72
-0,46
-2,24
-1,4
-0,92
-3,4
-2,1
-1,36
Connection to mains
Nominal AC voltage is 230V. Export versions may operate
at 115V. keep in mind that the power supplies used are
universal mains.
Connect your amplifier to the AC mains power source
(power outlet) with the supplied AC power cord. First,
connect the IEC end of the cord set to the IEC connector
on the amplifier; then, plug the other end of the cord set to
the AC mains.
Select 8 ohm impedance position
Stereo mode - four channels
WARNING: The third prong of this connector (ground) is
an important safety feature.
Do not attempt to disable this ground connection by
using an adapter or other methods.
8
Manual del Usuario / iA series / User’s Manual
Page 9

Current draw
The measured consumption at 1/3 of the power rating
represents the worst case scenario in order to dimension
the installation.
At 230V these are the values:
IA-402/404: 1.52A (3A at 115V)
IA-1002/1004: 1.75A (3.5A at 115V)
IA-1602/1604: 3A (6A at 115V)
USE
Switch ON/OFF
Switch your sound system on from back to f ront. Thus,
switch on the amplifiers last on your sound system. Switch
sound sources (Cds, turntables) first, then your mixer, then
your processors and finally the amplifiers. If you have
more than one amplifier switch them sequentially, one at
a time.
Follow the reverse order when switching off and switch off
the amplifiers before any other element in your sound
system.
Clip Led (also signal led)
The clip led should never be on continuously (red). The
amplifiers integrate their own limiters to avoid sever
amplifier clipping and reduce distortion, but the dynamic
nature of music signals could make the amplifiers clip.
Thus at most, the clip light could be lit occasionally.
Level controls
The level rotary potentiometer is used for changing the
input gain. With the levels at maximum the amplifier Gain
is 30dB.
Although related to output power, it is not a direct
representation of it. Thus, we can have the maximum
output power with the level control at mid position and
with a higher input signal level. Similarly, we may have the
gain controls at maximum and not have maximum
output if the input signal level is below amplifier´s input
sensitivity.
Standby mode
To save energy, the unit is designed to go into standby
mode after approximately 10minutes with no signal at any
of the inputs. Return of signal to any input will reactivate
the unit again.
Manual del Usuario / iA series / User’s Manual
9
Page 10

SPECIFICATIONS
Model
IA-402
IA-404 IA-1002 IA-1602IA-1004 IA-1604
Output power Stereo Mode
4 ohm
8 ohm
2 x 200W
4 x 100W 2 x 500W 2 x 800W
2 x 100W 4 x 50W
2 x 250W 2 x 400W4 x 125W 4 x 200W
4 x 250W 4 x 400W
Output power Bridge Mode
8 ohm
100/70V
THD+N(%) 4ohm 1kHz full power
Amplifier Gain dB
Frequency response - 20Hz to 30kHz (dB)
Input Impedance - Active balanced (k ohms)
Input Sensitivity (V/dBu)
AC power requirements
Dimensions (H x W x D)
Weight
1 x 400W
1 x 400W
0.08
30 (31.2x)
0 / -0.5
20
1.38/5
2 x 200W
2 x 200W
0.08
30 (31.2x) 30 (31.2x) 32 (40x)30 (31.2x) 32 (40x)
0 / -0.5
20
1.38/5
1.52A @ 230V (3.04 @ 115V)
44.2 x 483 x 208mm (1.74 x 19 x 8.2 in) 88.4 x 483 x 208mm (3.48 x 19 x 8.2 in) 88.4 x 483 x 208mm (3.48 x 19 x 8.2 in)
2.7 kg (5.9 lb)
2.9 kg (6.4 lb)
1 x 1000W 1 x 1600W
1 x 1000W 1 x 1600W
0.08 0.08
0 / -0.5 0 / -0.5
20 20
1.38/5 1.38/5
1.75A @ 230V (3.5 @ 115V) 3A @ 230V (6 @ 115V)
3.5 kg (7.7 lb)
2 x 500W 2 x 800W
2 x 500W 2 x 800W
0.08 0.08
0 / -0.5 0 / -0.5
20 20
1.38/5 1.38/5
3.7 kg (8.2 lb)
3.4 kg (7.5 lb) 3.8 kg (8.4 lb)
DAS Audio Group, S.L. continuously strives to enhance its products through investigation and development.
All specifications are subject to change without prior notice.
LINE DRAWINGS
483
465
483
465
IA-1002 / IA-1004 / IA-1602 / IA-1604 IA-402 / IA-404
205
208
483 483
465 465
205
208
205
208
205
208
10
Manual del Usuario / iA series / User’s Manual
Page 11

iA-404
Low Impedance Configuration
ARCO-4-T + ARCO-12SUB
All Amplifier Channels in Stereo Mode for low impedance operation
Select 8 ohm position
iA-404
iA-404
INSTAL LAT IO N P OW ER AM PL IF IE R
ARCO-24-T + ARCO-12SUB
All Amplifier Channels in Stereo Mode for low impedance operation
Select 8 ohm position
iA-404
iA-404
INSTAL LAT IO N P OW ER AM PL IF IE R
LEVEL A LEVEL B LEVEL C LEVE L D
SIGNA L / CL IPONSIGNA L / CL IP SIGNAL / C LI P SIGNAL / C LI P
LEVEL A LEVEL B LEVEL C LEVE L D
SIGNA L / CL IPONSIGNA L / CL IP SIGNAL / C LI P SIGNAL / C LI P
ARTEC-306/ARTEC-308 + Q-10
All Amplifier Channels in Stereo Mode for low impedance operation
iA-404
iA-404
INSTAL LAT IO N P OW ER AM PL IF IE R
Manual del Usuario / iA series / User’s Manual
LEVEL A LEVEL B LEVEL C LEVE L D
SIGNA L / CL IPONSIGNA L / CL IP SIGNAL / C LI P SIGNAL / C LI P
11
Page 12
iA-404
Low Impedance Configuration (cont'd)
Quantum Q-3-T + Q-10
All Amplifier Channels in Stereo Mode for low impedance operation
Select 8 ohm position
iA-404
iA-404
INSTAL LAT IO N P OW ER AM PL IF IE R
Quantum Q-23-T + Q-10
All Amplifier Channels in Stereo Mode for low impedance operation
Select 8 ohm position
iA-404
iA-404
INSTAL LAT IO N P OW ER AM PL IF IE R
Quantum Q-43-T
All Amplifier Channels in Stereo Mode for low impedance operation
LEVEL A LEVEL B LEVEL C LEVE L D
SIGNA L / CL IPONSIGNA L / CL IP SIGNAL / C LI P SIGNAL / C LI P
LEVEL A LEVEL B LEVEL C LEVE L D
SIGNA L / CL IPONSIGNA L / CL IP SIGNAL / C LI P SIGNAL / C LI P
iA-404
iA-404
INSTAL LAT IO N P OW ER AM PL IF IE R
Select 4 ohm position
Quantum Q-43-T + Q-10
All Amplifier Channels in Stereo Mode for low impedance operation
iA-404
iA-404
INSTAL LAT IO N P OW ER AM PL IF IE R
Select 4 ohm position
12
Manual del Usuario / iA series / User’s Manual
LEVEL A LEVEL B LEVEL C LEVE L D
SIGNA L / CL IPONSIGNA L / CL IP SIGNAL / C LI P SIGNAL / C LI P
LEVEL A LEVEL B LEVEL C LEVE L D
SIGNA L / CL IPONSIGNA L / CL IP SIGNAL / C LI P SIGNAL / C LI P
Page 13

iA-404
Low Impedance Configuration (cont'd)
Quantum Q-23-T + Q-10A
All Amplif ier Channels in Stereo Mode for low impedance operation
Select 8 ohm position
iA-404
iA-404
INSTAL LAT IO N P OW ER AM PL IF IE R
Artec-306 + Q-10A
All Amplif ier Channels in Stereo Mode for low impedance operation
LEVEL A LEVEL B LEVEL C LEVE L D
SIGNA L / CL IPONSIGNA L / CL IP SIGNAL / C LI P SIGNAL / C LI P
iA-404
iA-404
INSTAL LAT IO N P OW ER AM PL IF IE R
LEVEL A LEVEL B LEVEL C LEVE L D
SIGNA L / CL IPONSIGNA L / CL IP SIGNAL / C LI P SIGNAL / C LI P
Manual del Usuario / iA series / User’s Manual
13
Page 14

iA-404
Low Impedance Configuration (cont'd)
ARCO-24-T
All Amplif ier Channels in Stereo Mode for low impedance operation
Select 8 ohm position
iA-404
iA-404
INSTAL LAT IO N P OW ER AM PL IF IE R
LEVEL A LEVEL B LEVEL C LEVE L D
SIGNA L / CL IPONSIGNA L / CL IP SIGNAL / C LI P SIGNAL / C LI P
14
Manual del Usuario / iA series / User’s Manual
Page 15

iA-404
High Impedance Configuration
ARCO-4-T
All Amplif ier Channels in Bridge Mode for high impedance operation
Max power available 200W per channel (20 x ARCO-4-T at 10W)
....... .......
iA-404
iA-404
INSTAL LAT IO N P OW ER AM PL IF IE R
LEVEL A LEVEL B LEVEL C LEVE L D
SIGNA L / CL IPONSIGNA L / CL IP SIGNAL / C LI P SIGNAL / C LI P
Select transformer tap position 5W/10W/15W
ARCO-24-T
All Amplif ier Channels in Bridge Mode for high impedance operation
Max power available 200W per channel (10 x ARCO-24-T at 20W)
.......
iA-404
iA-404
INSTAL LAT IO N P OW ER AM PL IF IE R
LEVEL A LEVEL B LEVEL C LEVE L D
SIGNA L / CL IPONSIGNA L / CL IP SIGNAL / C LI P SIGNAL / C LI P
Select transformer tap position 10W/20W/30W
Ceiling series
All Amplif ier Channels in Bridge Mode for high impedance operation
Max power available 200W per channel (6 x CL-8-T at 30W)
.......
.......
iA-404
iA-404
INSTAL LAT IO N P OW ER AM PL IF IE R
LEVEL A LEVEL B LEVEL C LEVE L D
SIGNA L / CL IPONSIGNA L / CL IP SIGNAL / C LI P SIGNAL / C LI P
Select transformer tap position 10W/20W/30W
Quantum Q-23-T
All Amplif ier Channels in Bridge Mode for high impedance operation
Max power available 200W per channel (20 x Q-23-T at 10W)
....... .......
iA-404
iA-404
INSTAL LAT IO N P OW ER AM PL IF IE R
LEVEL A LEVEL B LEVEL C LEVE L D
SIGNA L / CL IPONSIGNA L / CL IP SIGNAL / C LI P SIGNAL / C LI P
Select transformer tap position 5W/10W/15W
.......
Manual del Usuario / iA series / User’s Manual
15
Page 16

iA-404
A&B Channels in Bridge Mode for high impedance operation
C&D Channels in Stereo Mode for low impedance operation
Max power available 200W at high impedance channel (20 x ARCO-4-T at 10W)
Hybrid Low an d High Impedance Configuration
.......
Select transformer tap position 5W/10W/15W
Ceiling series
A&B Channels in Bridge Mode for high impedance operation
C&D Channels in Stereo Mode for low impedance operation
Max power available 200W at high impedance channel (13 x CL-6-TB at 15W)
iA-404
iA-404
INSTAL LAT IO N P OW ER AM PL IF IE R
LEVEL A LEVEL B LEVEL C LEVE L D
SIGNA L / CL IPONSIGNA L / CL IP SIGNAL / C LI P SIGNAL / C LI P
.......
Select transformer tap position 5W/10W/15W
Quantum Q-3-T + Q-23-T
A&B Channels in Bridge Mode for high impedance operation
C&D Channels in Stereo Mode for low impedance operation
Max power available 200W at high impedance channel (10 x Q-3-T at 20W)
iA-404
.......
Select transformer tap position 10W/20W/30W
iA-404
INSTAL LAT IO N P OW ER AM PL IF IE R
iA-404
iA-404
INSTAL LAT IO N P OW ER AM PL IF IE R
LEVEL A LEVEL B LEVEL C LEVE L D
SIGNA L / CL IPONSIGNA L / CL IP SIGNAL / C LI P SIGNAL / C LI P
LEVEL A LEVEL B LEVEL C LEVE L D
SIGNA L / CL IPONSIGNA L / CL IP SIGNAL / C LI P SIGNAL / C LI P
Select 8 ohm position
16
Manual del Usuario / iA series / User’s Manual
Page 17

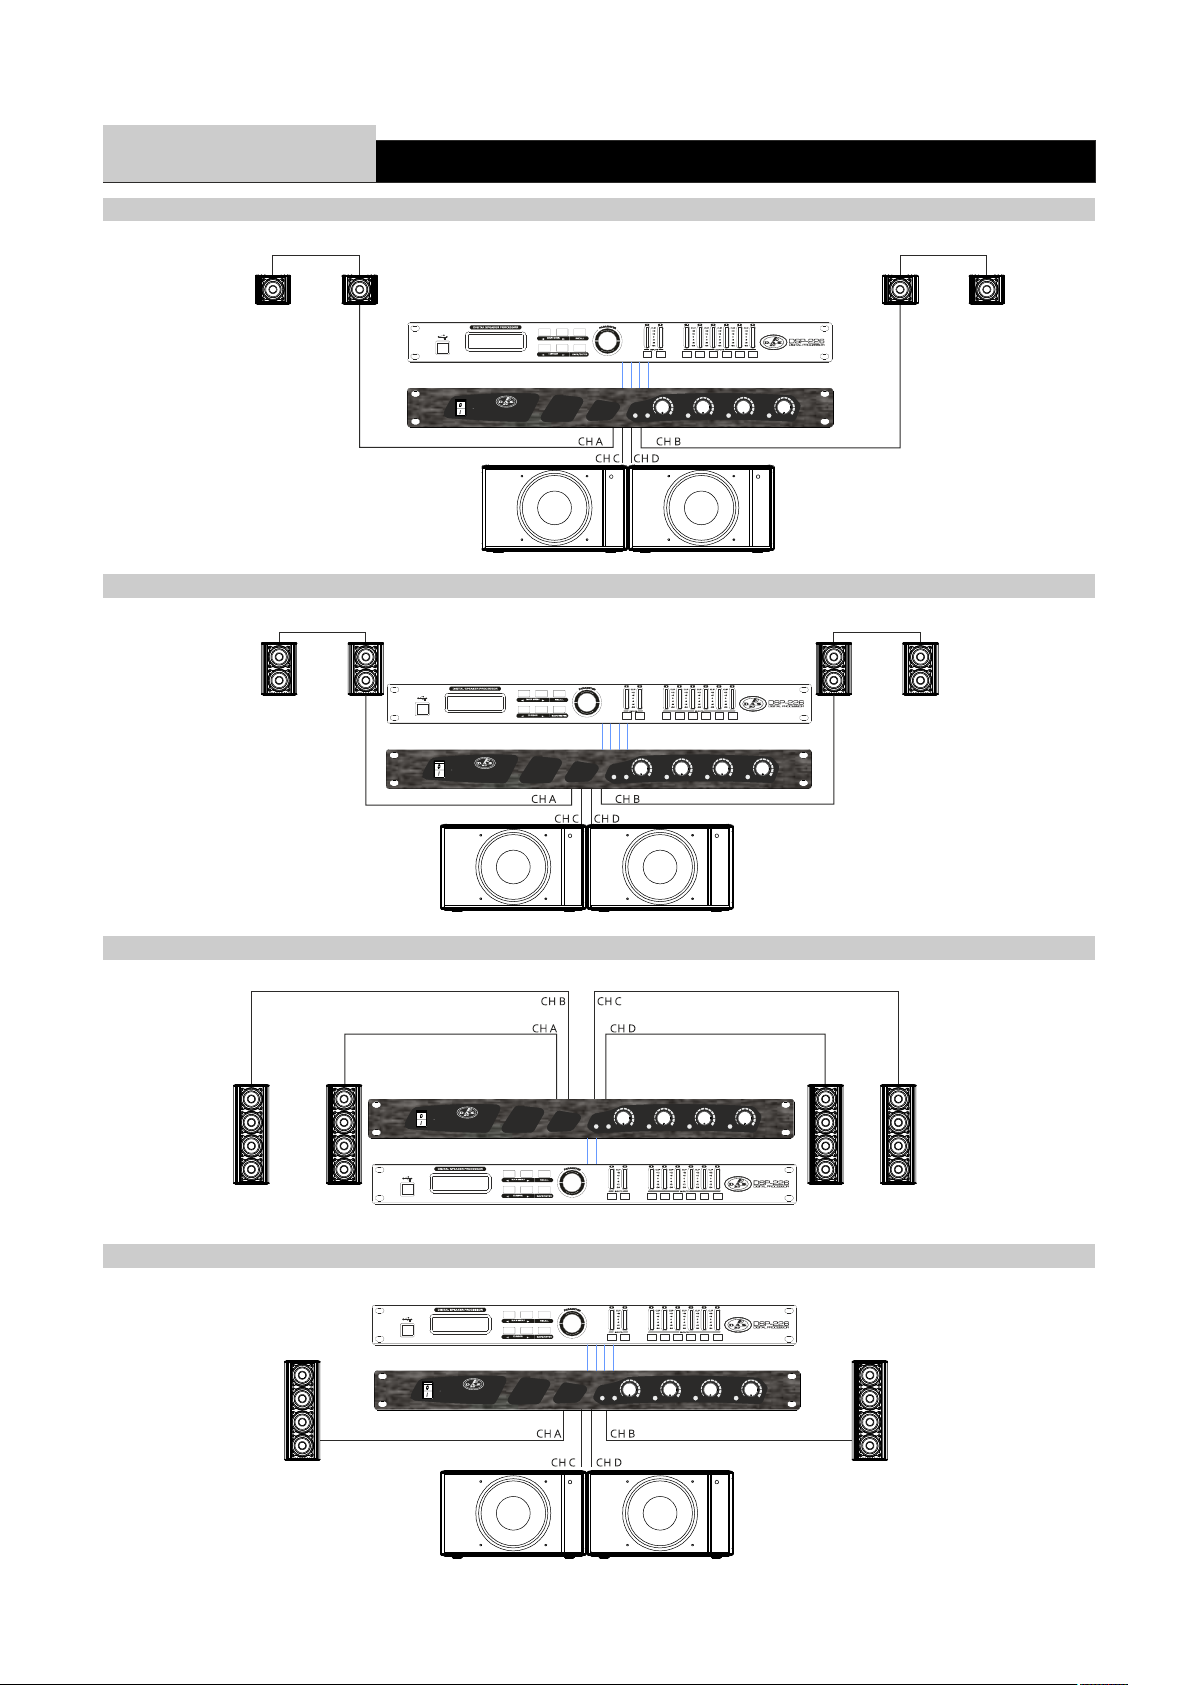
iA-1004
Low Impedance Configuration
All Amplif ier Channels in Stereo Mode for low impedance operation
iA-1004
iA-1004
INSTAL LAT IO N P OW ER AM PL IF IE R
Select 8 ohm position
ARTEC-306/ARTEC-308/ARTEC-310.XX + Q-10
Channels A&B in Stereo Mode
Bridge Channels C&D for subwoofer
iA-1004
iA-1004
INSTAL LAT IO N P OW ER AM PL IF IE R
LEVEL A LEVEL B LEVEL C LEVE L D
SIGNA L / CL IPONSIGNA L / CL IP SIGNA L / CL IP SIGNAL / C LI P
LEVEL A LEVEL B LEVEL C LEVE L D
SIGNA L / CL IPONSIGNA L / CL IP SIGNA L / CL IP SIGNAL / C LI P
Channels A&B in Stereo Mode
Bridge Channels C&D for subwoofer
iA-1004
iA-1004
INSTAL LAT IO N P OW ER AM PL IF IE R
Quantum Q-43-T + Q-10
All Amplif ier Channels in Stereo Mode for low impedance operation
iA-1004
iA-1004
INSTAL LAT IO N P OW ER AM PL IF IE R
LEVEL A LEVEL B LEVEL C LEVE L D
SIGNA L / CL IPONSIGNA L / CL IP SIGNA L / CL IP SIGNAL / C LI P
LEVEL A LEVEL B LEVEL C LEVE L D
SIGNA L / CL IPONSIGNA L / CL IP SIGNA L / CL IP SIGNAL / C LI P
Select 4 ohm position
CH DCH C
Manual del Usuario / iA series / User’s Manual
17
Page 18

iA-1004
Low Impedance Configuration (cont'd)
Quantum Q-43-T + Q-10A
All Amplif ier Channels in Stereo Mode for low impedance operation
Select 4 ohm position
iA-1004
iA-1004
INSTAL LAT IO N P OW ER AM PL IF IE R
LEVEL A LEVEL B LEVEL C LEVE L D
SIGNA L / CL IPONSIGNA L / CL IP SIGNA L / CL IP SIGNAL / C LI P
ARTEC-308 /A RTEC-310 + Q-10A
All Amplif ier Channels in Stereo Mode for low impedance operation
iA-1004
iA-1004
INSTAL LAT IO N P OW ER AM PL IF IE R
LEVEL A LEVEL B LEVEL C LEVE L D
SIGNA L / CL IPONSIGNA L / CL IP SIGNA L / CL IP SIGNAL / C LI P
18
Manual del Usuario / iA series / User’s Manual
Page 19

iA-1004
Low Impedance Configuration (cont'd)
All amplif ier Channels in Stereo Mode for low impedance operation
iA-1004
iA-1004
INSTAL LAT IO N P OW ER AM PL IF IE R
LEVEL A LEVEL B LEVEL C LEVE L D
SIGNA L / CL IPONSIGNA L / CL IP SIGNA L / CL IP SIGNAL / C LI P
OVI-12
All amplif ier Channels in Stereo Mode for low impedance operation
iA-1004
iA-1004
INSTAL LAT IO N P OW ER AM PL IF IE R
LEVEL A LEVEL B LEVEL C LEVE L D
SIGNA L / CL IPONSIGNA L / CL IP SIGNA L / CL IP SIGNAL / C LI P
Manual del Usuario / iA series / User’s Manual
19
Page 20

iA-1004
High Impedance Configuration
ARCO-24-T
All Amplif ier Channels in Bridge Mode for high impedance operation
Max power available 500W per channel (16 x ARCO-24-T at 30W)
iA-1004
.......
Select transformer tap position 10W/20W/30W
iA-1004
INSTAL LAT IO N P OW ER AM PL IF IE R
LEVEL A LEVEL B LEVEL C LEVE L D
SIGNA L / CL IPONSIGNA L / CL IP SIGNA L / CLI P SIGNAL / C LI P
Quantum Q-23-T
All Amplif ier Channels in Bridge Mode for high impedance operation
Max power available 500W per channel (16 x Q-23-T at 30W)
iA-1004
iA-1004
....... .......
Select transformer tap position 10W/20W/30W
INSTAL LAT IO N P OW ER AM PL IF IE R
LEVEL A LEVEL B LEVEL C LEVE L D
SIGNA L / CL IPONSIGNA L / CL IP SIGNA L / C L IP SIGNAL / C LI P
WR-8826-T
All Amplif ier Channels in Bridge Mode for high impedance operation
Max power available 500W per channel (10 x WR-8826-T at 50W)
CH A+B CH C+D
iA-1004
.......
iA-1004
....... .......
INSTAL LAT IO N P OW ER AM PL IF IE R
LEVEL A LEVEL B LEVEL C LEVE L D
SIGNA L / CL IPONSIGNA L / CL IP SIGNA L / C L IP SIGNAL / C LI P
OVI-12-T
All Amplif ier Channels in Bridge Mode for high impedance operation
Max power available 500W per channel (3 x OVI-12-T at 150W or 5 x OVI-12-T at 100W)
iA-1004
iA-1004
INSTAL LAT IO N P OW ER AM PL IF IE R
LEVEL A LEVEL B LEVEL C LEVE L D
SIGNA L / CL IPONSIGNA L / CL IP SIGNA L / CL IP SIGNAL / C LI P
20
Manual del Usuario / iA series / User’s Manual
Page 21

iA-1004
Hybrid Low an d High Impedance Configuration
Quantum Q-43-T + Q-10
A&B Channels in Bridge Mode for high impedance operation
C&D Channels in Stereo Mode for low impedance operation
Max power available 500W at high impedance channel (10 x Q-43-T at 50W)
.......
Select transformer tap position 15W/30W/50W
A&B Channels in Bridge Mode for high impedance operation
C&D Channels in Stereo Mode for low impedance operation
Max power available 500W at high impedance channel (16 x CL-8-T at 30W)
iA-1004
iA-1004
INSTAL LAT IO N P OW ER AM PL IF IE R
LEVEL A LEVEL B LEVEL C LEVE L D
SIGNA L / CL IPONSIGNA L / CL IP SIGNA L / C L IP SIGNAL / C LI P
.......
Select transformer tap position 10W/20W/30W
iA-1004
iA-1004
INSTAL LAT IO N P OW ER AM PL IF IE R
CHC
CHA+B
LEVEL A LEVEL B LEVEL C LEVE L D
SIGNA L / CL IPONSIGNA L / CL IP SIGNA L / C LI P SIGNAL / C LI P
CHD
Manual del Usuario / iA series / User’s Manual
21
Page 22

iA-402
Low Impedance Configuration
ARCO-4-T
All Amplif ier Channels in Stereo Mode for low impedance operation
iA-402
iA-402
INSTAL LAT IO N P OW ER AM PL IF IE R
Select 8 ohm position
ARCO-24-T
All Amplif ier Channels in Stereo Mode for low impedance operation
iA-402
iA-402
INSTAL LAT IO N P OW ER AM PL IF IE R
Select 8 ohm position
All Amplif ier Channels in Stereo Mode for low impedance operation
CHA CHB
iA-402
iA-402
INSTAL LAT IO N P OW ER AM PL IF IE R
Select 8 ohm position
Quantum Q-3-T / Q-23-T
All Amplif ier Channels in Stereo Mode for low impedance operation
LEVEL A LEVEL B
SIGNA L / CL IPONSIGNA L / CL IP
LEVEL A LEVEL B
SIGNA L / CL IPONSIGNA L / CL IP
LEVEL A LEVEL B
SIGNA L / CL IPONSIGNA L / CL IP
Select 8 ohm position
iA-402
iA-402
INSTAL LAT IO N P OW ER AM PL IF IE R
All Amplif ier Channels in Stereo Mode for low impedance operation
iA-402
iA-402
INSTAL LAT IO N P OW ER AM PL IF IE R
ARTEC-306/ARTEC-308 + Q-10
All Amplif ier Channels in Stereo Mode for low impedance operation
iA-402
iA-402
INSTAL LAT IO N P OW ER AM PL IF IE R
LEVEL A LEVEL B
SIGNA L / CL IPONSIGNA L / CL IP
LEVEL A LEVEL B
SIGNA L / CL IPONSIGNA L / CL IP
LEVEL A LEVEL B
SIGNA L / CL IPONSIGNA L / CL IP
22
Manual del Usuario / iA series / User’s Manual
Page 23

iA-402
Low Impedance Configuration (cont'd)
Quantum Q-3-T + Q-10A
All Amplif ier Channels in Stereo Mode for low impedance operation
Select 8 ohm position
iA-402
iA-402
INSTAL LAT IO N P OW ER AM PL IF IE R
Quantum Q-23-T + Q-10A
All Amplif ier Channels in Stereo Mode for low impedance operation
Select 8 ohm position
LEVEL A LEVEL B
SIGNA L / CL IPONSIGNA L / CL IP
iA-402
iA-402
INSTAL LAT IO N P OW ER AM PL IF IE R
LEVEL A LEVEL B
SIGNA L / CL IPONSIGNA L / CL IP
Manual del Usuario / iA series / User’s Manual
23
Page 24

iA-402
All Amplif ier Channels in Bridge Mode for high impedance operation
Max power available 400W (40 x ARCO-4-T at 10W, 20 x ARCO-24-T at 20W)
iA-402
iA-402
INSTAL LAT IO N P OW ER AM PL IF IE R
High Impedance Configuration
LEVEL A LEVEL B
SIGNA L / CL IPONSIGNA L / CL IP
Ceiling series
All Amplif ier Channels in Bridge Mode for high impedance operation
Max power available 400W (40 x CL-5-T / CL-6-T / CL-6-TB / CL-8-T at 10W)
CHA+B
.......
Select transformer tap position 10W/20W/30W
.......
iA-402
iA-402
INSTAL LAT IO N P OW ER AM PL IF IE R
LEVEL A LEVEL B
SIGNA L / CL IPONSIGNA L / CL IP
Channels A&B set HPF at 80Hz
Quantum Q-23-T
All Amplif ier Channels in Bridge Mode for high impedance operation
Max power available 400W per channel (20 x Q-23-T at 20W)
iA-402
iA-402
INSTAL LAT IO N P OW ER AM PL IF IE R
LEVEL A LEVEL B
SIGNA L / CL IPONSIGNA L / CL IP
Select transformer tap position 10W/20W/30W
.......
Select transformer tap position 10W/20W/30W
24
Manual del Usuario / iA series / User’s Manual
Page 25

iA-1002
Low Impedance Configuration
All amplif ier Channels in Stereo Mode for low impedance operation
iA-1002
iA-1002
INSTAL LAT IO N P OW ER AM PL IF IE R
All amplif ier Channels in Stereo Mode for low impedance operation
iA-1002
iA-1002
INSTAL LAT IO N P OW ER AM PL IF IE R
LEVEL A LEVEL B
SIGNA L / CL IPONSIGNA L / CL IP
LEVEL A LEVEL B
SIGNA L / CL IPONSIGNA L / CL IP
OVI-12
All amplif ier Channels in Stereo Mode for low impedance operation
iA-1002iA-1002
iA-1002
INSTAL LAT IO N P OW ER AM PL IF IE R
All amplif ier Channels in Stereo Mode for low impedance operation
iA-1002
iA-1002
INSTAL LAT IO N P OW ER AM PL IF IE R
iA-1002
iA-1002
INSTAL LAT IO N P OW ER AM PL IF IE R
LEVEL A LEVEL B
SIGNA L / CL IPONSIGNA L / CL IP
LEVEL A LEVEL B
SIGNA L / CL IPONSIGNA L / CL IP
LEVEL A LEVEL B
SIGNA L / CL IPONSIGNA L / CL IP
Manual del Usuario / iA series / User’s Manual
25
Page 26

iA-1002
Low Impedance Configuration (cont'd)
Quantum Q-43-T + Q-10
All amplif ier Channels in Stereo Mode for low impedance operation
Select 4 ohm position
iA-1002
iA-1002
INSTAL LAT IO N P OW ER AM PL IF IE R
iA-1002
iA-1002
INSTAL LAT IO N P OW ER AM PL IF IE R
LEVEL A LEVEL B
SIGNA L / CL IPONSIGNA L / CL IP
LEVEL A LEVEL B
SIGNA L / CL IPONSIGNA L / CL IP
Artec 308/310 + Q-10
All Amplif ier Channels in Stereo Mode for low impedance operation
iA-1002
iA-1002
INSTAL LAT IO N P OW ER AM PL IF IE R
iA-1002
iA-1002
INSTAL LAT IO N P OW ER AM PL IF IE R
LEVEL A LEVEL B
SIGNA L / CL IPONSIGNA L / CL IP
LEVEL A LEVEL B
SIGNA L / CL IPONSIGNA L / CL IP
26
Manual del Usuario / iA series / User’s Manual
Page 27

iA-1002
All Amplif ier Channels in Bridge Mode for high impedance operation
Max power available 1000W (up to 6 cabinets with 150W transformer)
High Impedance Configuration
iA-1002
iA-1002
INSTAL LAT IO N P OW ER AM PL IF IE R
LEVEL A LEVEL B
SIGNA L / CL IPONSIGNA L / CL IP
Quantum Q-43-T
All Amplif ier Channels in Bridge Mode for high impedance operation
Max power available 1000W (up to 20 cabinets with 50W tap position)
iA-1002
iA-1002
INSTAL LAT IO N P OW ER AM PL IF IE R
LEVEL A LEVEL B
SIGNA L / CL IPONSIGNA L / CL IP
.......
Select transformer tap position 15W/30W/50W
OVI-12-T
All Amplif ier Channels in Bridge Mode for high impedance operation
Max power available 1000W (up to 6 cabinets with 150W transformer)
iA-1002
iA-1002
INSTAL LAT IO N P OW ER AM PL IF IE R
LEVEL A LEVEL B
SIGNA L / CL IPONSIGNA L / CL IP
.......
Manual del Usuario / iA series / User’s Manual
27
Page 28

iA-1602
Low Impedance Configuration
ARTEC-312/ARTEC-315 + Q-10
All Amplif ier Channels in Stereo Mode for low impedance operation
iA-1602
iA-1602
INSTAL LAT IO N P OW ER AM PL IF IE R
iA-1602
iA-1602
INSTAL LAT IO N P OW ER AM PL IF IE R
LEVEL A LEVEL B
SIGNA L / CL IPONSIGNA L / CL IP
LEVEL A LEVEL B
SIGNA L / CL IPONSIGNA L / CL IP
ARTEC-508 /A RTEC-510 + Q-10
All Amplif ier Channels in Stereo Mode for low impedance operation
iA-1602
iA-1602
INSTAL LAT IO N P OW ER AM PL IF IE R
iA-1602
iA-1602
INSTAL LAT IO N P OW ER AM PL IF IE R
LEVEL A LEVEL B
SIGNA L / CL IPONSIGNA L / CL IP
LEVEL A LEVEL B
SIGNA L / CL IPONSIGNA L / CL IP
28
Manual del Usuario / iA series / User’s Manual
Page 29

iA-1602
Low Impedance Configuration (cont'd)
ARTEC-312/ARTEC-315 +A RTEC-322S
All Amplif ier Channels in Stereo Mode for low impedance operation
iA-1602
iA-1602
INSTAL LAT IO N P OW ER AM PL IF IE R
iA-1602
iA-1602
INSTAL LAT IO N P OW ER AM PL IF IE R
LEVEL A LEVEL B
SIGNA L / CL IPONSIGNA L / CL IP
LEVEL A LEVEL B
SIGNA L / CL IPONSIGNA L / CL IP
ARTEC-508 /A RTEC-510 + ARTEC-322S
All Amplif ier Channels in Stereo Mode for low impedance operation
iA-1602
iA-1602
INSTAL LAT IO N P OW ER AM PL IF IE R
iA-1602
iA-1602
INSTAL LAT IO N P OW ER AM PL IF IE R
LEVEL A LEVEL B
SIGNA L / CL IPONSIGNA L / CL IP
LEVEL A LEVEL B
SIGNA L / CL IPONSIGNA L / CL IP
Manual del Usuario / iA series / User’s Manual
29
Page 30

iA-1602
Low Impedance Configuration (cont'd)
VANTEC-12/VANTEC-15+VANTEC-18
All Amplif ier Channels in Stereo Mode for low impedance operation
iA-1602
iA-1602
INSTAL LAT IO N P OW ER AM PL IF IE R
iA-1602
iA-1602
INSTAL LAT IO N P OW ER AM PL IF IE R
LEVEL A LEVEL B
SIGNA L / CL IPONSIGNA L / CL IP
LEVEL A LEVEL B
SIGNA L / CL IPONSIGNA L / CL IP
WR-6412/WR-6415+WR-121S/WR-151S
All Amplif ier Channels in Stereo Mode for low impedance operation
iA-1602
iA-1602
INSTAL LAT IO N P OW ER AM PL IF IE R
iA-1602
iA-1602
INSTAL LAT IO N P OW ER AM PL IF IE R
LEVEL A LEVEL B
SIGNA L / CL IPONSIGNA L / CL IP
LEVEL A LEVEL B
SIGNA L / CL IPONSIGNA L / CL IP
30
Manual del Usuario / iA series / User’s Manual
Page 31

iA-1602
High I mpedance Configuration
OVI-12-T
All Amplif ier Channels in Bridge Mode for high impedance operation
Max power available 1600W (up to 10 x OVI-12-T at 150W)
iA-1602
iA-1602
INSTAL LAT IO N P OW ER AM PL IF IE R
All Amplif ier Channels in Bridge Mode for high impedance operation
Max power available 1600W (up to 10 cabinets with 150W transformer)
LEVEL A LEVEL B
SIGNA L / CL IPONSIGNA L / CL IP
.......
iA-1602
iA-1602
INSTAL LAT IO N P OW ER AM PL IF IE R
LEVEL A LEVEL B
SIGNA L / CL IPONSIGNA L / CL IP
.......
Manual del Usuario / iA series / User’s Manual
31
Page 32

iA-1604
Low Impedance Configuration
ARTEC-306/ARTEC- 308/ARTEC-310 + Q-10
All Amplif ier Channels in Stereo Mode for low impedance operation
iA-1604
iA-1604
INSTAL LAT IO N P OW ER AM PL IF IE R
LEVEL A LEVEL B LEVEL C LEVE L D
SIGNA L / CL IPONSIGNA L / CL IP SIGNA L / CL IP SIGNAL / C LI P
CH C CH D
ARTEC-506 + Q-10
All Amplif ier Channels in Stereo Mode for low impedance operation
iA-1604
iA-1604
INSTAL LAT IO N P OW ER AM PL IF IE R
LEVEL A LEVEL B LEVEL C LEVE L D
SIGNA L / CL IPONSIGNA L / CL IP SIGNA L / CL IP SIGNAL / C LI P
CH C CH D
32
Manual del Usuario / iA series / User’s Manual
Page 33

iA-1604
High I mpedance Configuration
OVI-12-T
All Amplif ier Channels in Bridge Mode for high impedance operation
Max power available 800W per channel (5 x OVI-12-T at 150W per channel)
iA-1604
iA-1604
INSTAL LAT IO N P OW ER AM PL IF IE R
WR-8826-T
All Amplif ier Channels in Bridge Mode for high impedance operation
Max power available 800W per channel (16 x WR-8826-T at 50W per channel)
....... .......
LEVEL A LEVEL B LEVEL C LEVE L D
SIGNA L / CL IPONSIGNA L / CL IP SIGNA L / CL IP SIGNAL / C LI P
CH A+B CH C+D
iA-1604
iA-1604
....... .......
INSTAL LAT IO N P OW ER AM PL IF IE R
LEVEL A LEVEL B LEVEL C LEVE L D
SIGNA L / CL IPONSIGNA L / CL IP SIGNA L / CL IP SIGNAL / C LI P
Quantum Q-43-T
All Amplif ier Channels in Bridge Mode for high impedance operation
Max power available 800W per channel (up to 16 cabinets with 50W tap p osition)
CH A+B
iA-1604
.......
iA-1604
INSTAL LAT IO N P OW ER AM PL IF IE R
LEVEL A LEVEL B LEVEL C LEVE L D
SIGNA L / CL IPONSIGNA L / CL IP SIGNA L / CL IP SIGNAL / C LI P
Select transformer tap position 15W/30W/50W
CH C+D
.......
Select transformer tap position 15W/30W/50W
Manual del Usuario / iA series / User’s Manual
33
Page 34

iA-1604
Hybrid Low an d High Impedance Configuration
OVI-12-T + Q-10
A&B Channels in Bridge Mode for high impedance operation
C&D Channels in Stereo Mode for low impedance operation
Max power available 800W at high impedance channel (5 x OVI-12_T at 150W)
.......
WR-8826-T + ARTEC-306/ARTEC-308
A&B Channels in Bridge Mode for high impedance operation
C&D Channels in Stereo Mode for low impedance operation
Max power available 800W at high impedance channel (16 x WR-8826T at 50W)
iA-1604
iA-1604
INSTAL LAT IO N P OW ER AM PL IF IE R
LEVEL A LEVEL B LEVEL C LEVE L D
SIGNA L / CL IPONSIGNA L / CL IP SIGNA L / CL IP SIGNAL / C LI P
.......
iA-1604
iA-1604
INSTAL LAT IO N P OW ER AM PL IF IE R
CHC
CHA+B
LEVEL A LEVEL B LEVEL C LEVE L D
SIGNA L / CL IPONSIGNA L / CL IP SIGNA L / CL IP SIGNAL / C LI P
CHD
34
Manual del Usuario / iA series / User’s Manual
Page 35

TROUBLESHOOTING
PROBLEM CAUSE SOLUTION
No sound f rom the unit
1 - The signal source is sending no signal.
2 - Inp ut gain c ont rols a re at m inimu m
position.
3 - Defective signal cables.
4 - Amplif ier not plugged.
1 - Check that the source is not muted and is
sending signal to the unit.
2 - Check input gain controls. Put them at
maximum level.
3 - Check that the cable from the source to the
unit is connected correctly. Replace the cable if
defective.
4 - Check the connections.
Full power cannot be obtained.
Sound is distorted.
Hum or buzz when a mixer is connected to the
unit.
Hum or buzz when using lighting controls in
the same building.
Low sound.
1 - The signal source does not have enough
ouput level.
2 - Input gain controls are at very low volume.
1-The mixer or signal source is distorting.
2 - The output level from the mixer is too high.
3 - Amplif ier clip shown in the channel.
1-T he conso le pro babl y h as u nbal anced
outputs. You may be using a n incorrect
unbalanced to balanced cable.
2 - The mixer and the powered speaker are not
plugged into the same mains outlet.
3 - The audio signal cable is too long or too
close to an AC cable.
1-The audio signal cable is too long or too close
to the lighting cable.
2 - On a sound system with three phase AC, the
li gh ting eq uipm en t a nd th e u ni t a re
connected to the same phase.
1 -The audio signal cable is defective.
2-The Level controls are not at maximum
position.
3 - Low input signal level.
4 - Using speakers with transformer in stero
mode.
1 - Use balanced outputs of a mixer.
Rise master ouput volume of the source.
2 - Set up level controls at higher positions.
1-Turn down the mixer´s output and check no
channels are distorting.
2 -Turn down the mixer´s output.
3 - Turn down input gain controls or lower
input signal level.
1-Read the appendix of this manual to make a
correct unbalanced to balanced cable.
2 - Connect the mixer and the unit to the same
mains outlet.
3 - Use a cable that is as short as possible
and/or move the audio signal cable away from
mains cables.
1- Move the audio signal cable away from
lighting cables.Try to f ind out at what point
the noise is leaking into the system.
2 - Connect the sound system to a different
phase than the lights. You may need the help
of an electrician.
1- Check cabling and replace them.
2 - T urn u p le vel contr ols of t he outpu t
channles.
3 - Turn up the level from the source.
4 - Change the amplifier´s mode from Stereo
to Bridge (100/70V).
The ON led is indicating protection (Orange).
1 - The un it h as a ct ivate d th e th ermal
protection.
2 - Short-Circuit.
3. Defective unit.
Manual del Usuario / iA series / User’s Manual
1 - Lower the input level and make sure the
amplifier is being cooled correctly. Check that
the fan is working and be sure that all the air
inlets/outlets are not blocked.
2 - Check the cables, connectors and speakers
connected.
3 - Contact an authorized dealer for service.
35
Page 36

ANNEX : Line connections: unbalanced and balanced
There are two basic ways to transport an audio signal with microphone or line level:
Unbalanced line: Utilising a two conductor cable, it transports the signal as the voltage between them.
Electromagnetic interference can get added to the signal as undesired noise. Connectors that carry
unbalanced signals have two pins, such as RCA (Phono) and ¼” (6.35mm, often referred to as jack) mono. 3 pin
connector such as XLR (Cannon) may also carry unbalanced signals if one of the pins is unused.
Balanced line: Utilising a three conductor cable, one of them acts as a shield against electromagnetic
noise and is the ground conductor. The other two have the same voltage with respect to the ground
conductor but with opposite signs. The noise that cannot be rejected by the shield affects both signal
conductors in the same way. At the device’s input the two signals get summed with opposite sign, so that
noise is cancelled out while the programme signal doubles in level. Most professional audio devices use
balanced inputs and outputs. Connectors that can carry balanced signal have three pins, such as XLR
(Cannon) and ¼” (6.35mm) stereo.
The graphs that follow show the recommended connection with different types of connectors to
balanced processor or amplif ier inputs. The connectors on the left-hand side come f rom a signal source, and
the ones on the right hand side go to the inputs of the processor or amplifier. Note that on the unbalanced
connectors on the left-hand side, two terminals are joined inside the connector. If hum occurs with balanced
to balanced connections, try disconnecting the sleeve (ground) on the input connector. Note that the
illustrations show what should be connected to what, but that pin locations on an actual XLR connector are
different. Also, pin 2 hot is assumed on XLR connectors.
36
Manual del Usuario / iA series / User’s Manual
Page 37

www.dasaudio.com
UM_IA_05_EN
DAS Audio Group, S.L. C/. Islas Baleares, 24. 46988 Fuente del Jarro. Paterna. Valencia. España. Tel.: +34 96 134 0860
 Loading...