


OWNER’S MANUAL

2018 ended up as the most important year in Darkglass history. With groundbreaking new
products, renewed classic releases, and limited-edition pedals, our product catalog grew
stronger than ever and we took more steps in the direction we’ve always strive for: making
Developing new products is often a long and challenging process, full of surprises and
hard-learned lessons. We have learned and improved tremendously since the release of
our first amplifier, and now we have the pleasure of starting 2019 with a completely
redesigned version of our Microtubes 900. Boasting of enhanced durability, more flexible
equalizer, studio-grade compression, impulse response cabinet emulation, and even MIDI
control, the Microtubes 900 v2 features all the features and power the modern,
professional bassist needs in the same compact, gorgeous format.
the best gear for musicians all over the world.

DESCRIPTION
The Microtubes 900™ V2 is a 900W amplifier equipped
with an all analog preamplifier, Class D Power Module
and a digital impulse response cabinet emulator for DI
outputs or headphones.
Probably the first thing you will notice from the
Microtubes 900 is its unusual control layout: On the
right side you’ll find the clean section which is the
foundation of your sound.
It features Gain and Master volumes and active 6 band
EQ. Along with the mandatory Low and Treble controls
you will find 250Hz, 500Hz, 1.5KHz, 3KHz sliders.
Character is all in the midrange, by having 4 dedicated
Mid controls allow you to cover the whole mid range
(250Hz to 3kHz) you have total control and flexibility
over the amplifier’s character.
On the left side, by the Input jack you will find the
Microtubes® Engine which acts as an extra channel
that can bring your crisp clean sound to the next level
by helping you cut through any mix while adding
anything from subtle tube break up, harmonics and
natural compression to obliterating distortion.
The Microtubes Engine can be engaged via the front
panel or via our own digitally controlled ™ (jack on rear
panel). Besides engaging the Microtubes circuitry you
can hold the actuator to Mute the amplifier.
The Intelligent Footswitch is housed in an elegant,
laser engraved unibody chassis and requires a
standard ¼” mono cable (not included) for it’s full
operation.
Besides this incredible versatile preamplifier, we
equipped the power module with some unique control
over the power output and minimum speaker loads:
The standard mode will deliver 900W RMS at 4Ω/500W
at 8Ω. If you select the 2Ω Mode via the rear panel
switch the amplifier will deliver 900W at 2Ω/500W at 4
Ω and 350W at 8Ω .
This deceivingly simple feature allows for maximum
power adaptability: It doesn’t matter the cabinet
configuration or power requirements, the Microtubes
900 will deliver accordingly.
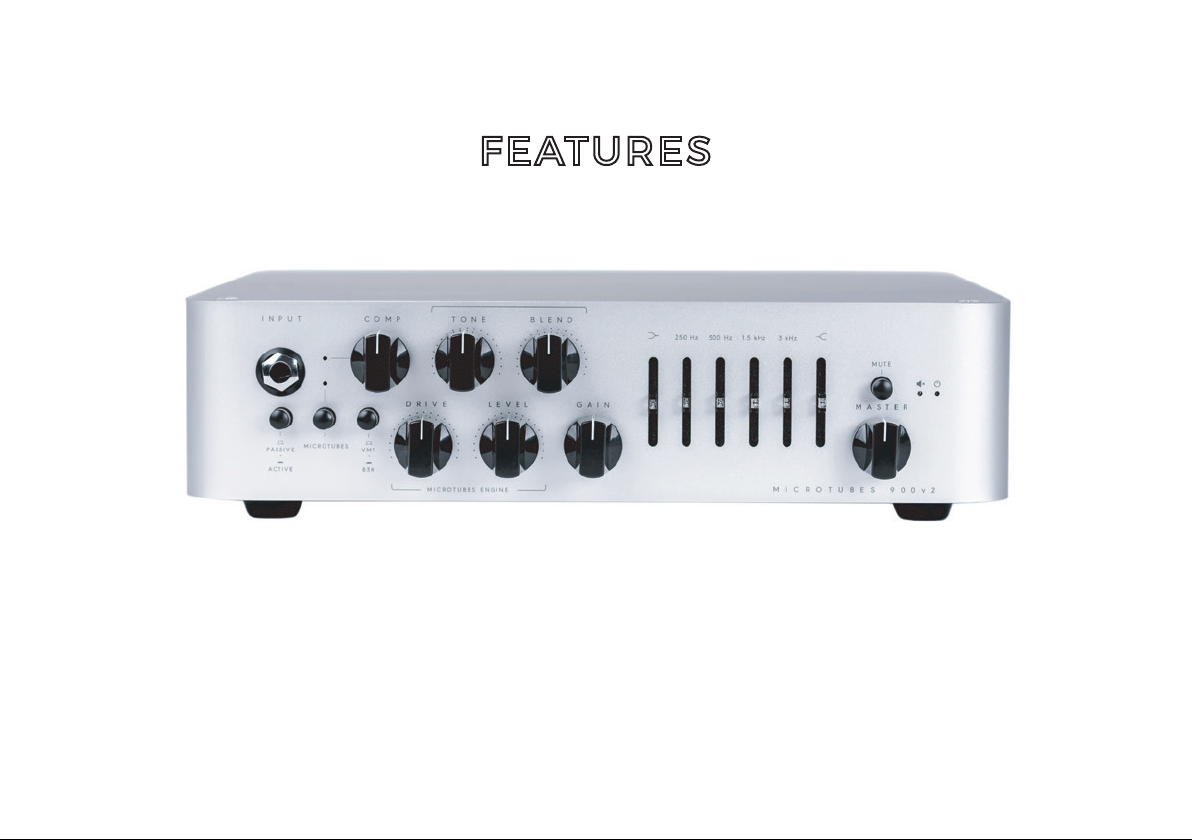
FEATURES
FRONT PANEL
INPUT : Use this jack to connect your instrument via a
standard ¼” mono cable.
PASSIVE/ACTIVE : Use this push-button switch to change
from passive to active mode. If your bass is active it can
have a hotter signal making the amp to distort early (feel
free to use if such additional distortion is desired).
MICROTUBES: Use this push button to turn on or off the
Microtubes Engine to add natural compression, organic
harmonic enhancement, and saturation ranging from
mild overdrive to high gain bass rage.
The Microtubes Engine operates before the clean section
(you can therefore use the 4 Band Active EQ for additional
tone shaping in addition to the Tone knob described below).

COMPRESSION: This knob controls the amount of
dynamic compression added to the Microtubes Engine.
percussive sound while the VMT will bring up the mids
for a warmer, more neutral character.
The make up gain is adjusted automatically. The
compression can be turn off or assigned using the
Darkglass Suite.
DRIVE : This knob controls the amount of distortion that
the Microtubes Engine will deliver. It will change from a
soft warm overdrive to a massive modern distortion
sound.
TONE : This knob controls the high harmonic content of
the Microtubes Engine via a variable low pass filter:
crank it up for additional attack and definition or dim it
down for a smoother sound, especially handy if already
running bright clean EQ setting or cabinets with
tweeters.
LEVEL : Use this knob to control Microtubes Engine’s
output volume.
BLEND : Use this knob to mix between the Clean signal
and the DIstortion signal (Microtubes Engine).
B3K/VMT : This push-button switch selects between two
overdrive voicings: B3K mode will deliver an aggressive,
GAIN : Use this knob to change the volume of the signal
before the Active 4 Band EQ. You can set it low for
ensuring the cleanest operation possible or set it higher
for more aggressive growl.
BASS : +-12dB at 80Hz. Use this knob to change the low
content of the signal.
MIDS: +-12dB at 250, 500,1.5K and 3Khz. This graphic eq
control the mid content of the signal.
TREBLE : +-12dB at 5kHz. Use this knob to change the
high content of the signal.
MASTER : Use this knob to control the overall volume of
the amplifier.
MUTE : Use this push button to mute the amplifier.

FEATURES
REAR PANEL

SPEAKER OUTPUT : Use this connector to connect the
amplifier to your cabinet. This Speakon combo jack
allows for either Speakon or ¼” speaker cable
operation. The outputs are connected in parallel.
WARNING: Do not use an instrument cable with this
jack. Using an instrument cable can damage your
amplifier.
MIN - LOAD : Press this switch when using a 2Ω load.
You can use this control to lower the output if your 4Ω
cabinet is not able handle more than 500W (you can
also get 350W with an 8Ω cabinet in this
configuration).
PRE AMP OUT : You can use this output to connect the
preamp to a different power amp.
POWER AMP IN : You can use this input to connect a
different preamp in the power amp. (master volume
will be disabled)
GROUND LIFT : Use this control to lift the ground of the
DI XLR output. If you are experiencing ground noise in
your DI signal try changing the setting of this control.
PRE DI OUTPUT: Use this connector to send a balanced
copy of your clean signal to the console, mic preamp,
interface, etc.
POST DI OUTPUT: Use this connector to connect the
Microtubes 900 preamplifier to balanced equipment
(mic preamp, console, recorder, compressor, audio
interface, etc.) via a standard XLR jack. Using this
connection you have a signal processed by the preamp
of the amp (gain, distortion, eq, master, etc.)
USB: The USB connector allows you to use the
Darkglass Suite to load different cabinet impulses or
change different parameters on your amp (midi,
compressor, etc)
HEADPHONE OUTPUT: Connect your Headphones and
enjoy the impulse based cabinet emulation.
HEADPHONE VOLUME: This knob controls the volume
of the headphone output.

AUX IN: Use this connector to provide to the
Headphone output music from your laptop, cellphone,
mp3 player, etc.
CABINET SELECT: Use this switch to navigate between
the 3 different cabinet impulses or the raw sound of
your amp.
MIDI: The midi input allow you to control the channels
of the amp via a midi standard controller.
FOOTSWITCH : The Intelligent Footswitch is
proprietary digitally controlled device that allows you
to remotely engage and disengage the Microtubes
Engine. You can also hold the footswitch to Mute the
amplifier. The VMT/B3K push button will remain
operational with the Intelligent Footswitch plugged in.
· You can use a regular mono instrument cable to
connect the amplifier to the footswitch.
· You must remove the cable from the footswitch jack
in the rear panel if you want to control the amp from
the front panel.
FAN : The fan forces air inside the amp to help the
heatsink system cool the amp. The fan will speed up
when the temperature rise to help cooling the system
more efficiently while keeping the noise at minimum.
Be sure to never cover the vent holes.
AC SOCKET : Use this connector to feed electric power
to the amplifier. 100 - 230 VAC, 50Hz-60.
AC POWER ON/OFF : Use this Switch to release the
audio energy from your bass.

BLOCK DIAGRAM
PASSIVE
ACTIVE
DRIVE
IN
CLEAN
VMT
B3K
VMT
B3K
TONE
LEVEL
BLEND
MICROTUBES/
CLEAN
COMPRESSOR
GAIN
BASS TREBLE
GRAPHIC EQ
MUTE
PRE
OUT
POWER
IN
AUX
INPUT
DIGITAL
BOARD
2Ω
POWER
CLEAN DI
POST DI
HEADPHONE
AMPLIFIER
SPEAKER
OUTPUTS

WARRANTY AND SPECS
WARRANTY
Please register for your warranty at
http://mypedal.darkglass.com. The Microtubes 900 is
under warranty to the original owner for a period of three
years against manufacturing defects in the country where
the product was originally purchased.
If you experience a problem with the unit, please contact
support@darkglass.com to receive a Return Authorization
number or for information on the nearest authorized
repair center. A copy of your original receipt must be
included with all warranty repairs. You are responsible for
all shipping charges. The unit must be shipped to us
freight prepaid. We will return the unit freight collect.
Darkglass Electronics Oy is not responsible for shipping
damage either to or from our service center. Claims must
be filed with the carrier. For repairs please contact your
local dealer or distributor for your country’s specific
warranty period and repair procedures. Darkglass,
Microtubes, and Microtubes Engine are registered
trademarks of Darkglass Electronics OY.
SPECIFICATIONS
Input Impedance: 1MΩ
Minimum Load Impedance: 4Ω (2Ω in 2Ω mode)
Maximum Power Output: 900 Watts RMS @ 4Ω (1khz
full blast 2 min max) 20%THD
450 Watts RMS @ 8Ω
Power Amp Input Impedance: 1MΩ
Power Amp Input Level: 1500 mV RMS 1200MV RMS
at 2Ωmode
Pre-Amp Output Impedance: 1kΩ
Pre-Amp Output Level: 1200 mV
Maximum Power Consumption: approx. 700VA
Forced-air cooled
AC Input Power: 100-250 VAC (Via selector switch on
left side panel).
Cycles: 50/60 Hz
Dimensions: 26.7cm l x 7cm h 25.5 w (10.5”l x 2.75”h
x 10”w)
Weight: 2.9Kg (6.39Lbs)
Built and Engineered in Helsinki, Finland.

WARNING
· No user serviceable parts inside the amplifier. Do not
open the amp.
· Never use the amp at a high moisture environment or
near liquids.
· The Microtubes 900 can deliver more than 115 dB of
power. Exposure to this level of sound can damage
your hearing. Use proper hearing protection if you will
be exposed.
· The Microtubes 900 can deliver more than 900 Watts.
Be sure that your speaker cabinet is able to deliver that
power. You can reduce the output of the amp by
selecting the 2Ω mode on the rear panel (by the
SpeakON output jack).
· Do not cover the vent holes. The Fan and vent holes
are part of the cooling system of the amp. Covering the
vent holes can damage the power amp by overheating
it.
· Don’t use an instrument cable as speaker cable. An
instrument cable is not designed to deliver the type of
power signals sent from the amplifier to the speaker.
TROUBLESHOOTING
· The button controls do not react: check if the
footswitch is connected. If you do not want to use the
footswitch, you have to unplug the cable from the rear
back of the amp.
· The amp does not turn on: check if the power cable is
connected and if you have power on the wall.
· The sound is low: check your speaker cable. Never use
instrument cable.
· The sound is distorted or too high: check if the passive
active switch match your bass.

 Loading...