

Page 1

BenQ N338 Wireless Ultra Portable Optical Mouse
User’s Guide
Important Health Information
Certain repetitive strain injuries, including pain, numbness and weakness to hands,
wrists, arms, neck and/or back have been identified by some experts as being
associated with the prolonged use of the mouse. If you are experiencing injury
symptoms, consult a medical professional. A person's susceptibility to these injuries
may be affected by many factors, including body posture, repetitive physical activities
and general physical health. For more information, please visit
Uhttp://www.BenQ.com/products/comfortU.
Package Contents
1. BenQ P600 Wireless Ultra Portable Optical Mouse
2. BenQ Wireless USB Mini Receiver
3. 2 x AAA Alkaline Batteries
4. User’s Guide
System Requirements
®
‧IBMP
‧Microsoft WindowsP
P
Compatible System
®
P
98SE, 2000, Me, XP or MacP
®
P
OS X v10.4
‧An Available USB Port
Battery Installation
Step 1: Remove the battery cover.
Step 2: Place 2 AAA alkaline batteries into the battery
compartment as indicated.
Step 3: Lock the battery cover back into its place.
NOTE:
1. You will find 2 AAA alkaline batteries for the mouse included in this package. If
you need to replace the batteries in the future, make sure that you use new batteries
and that you change all of the batteries at the same time.
2. Please follow the diagram for battery installation direction. It is recommended to
use 2 AAA alkaline batteries. Ensure battery polarity matches the polarity markings
on the battery compartment.
Page 2
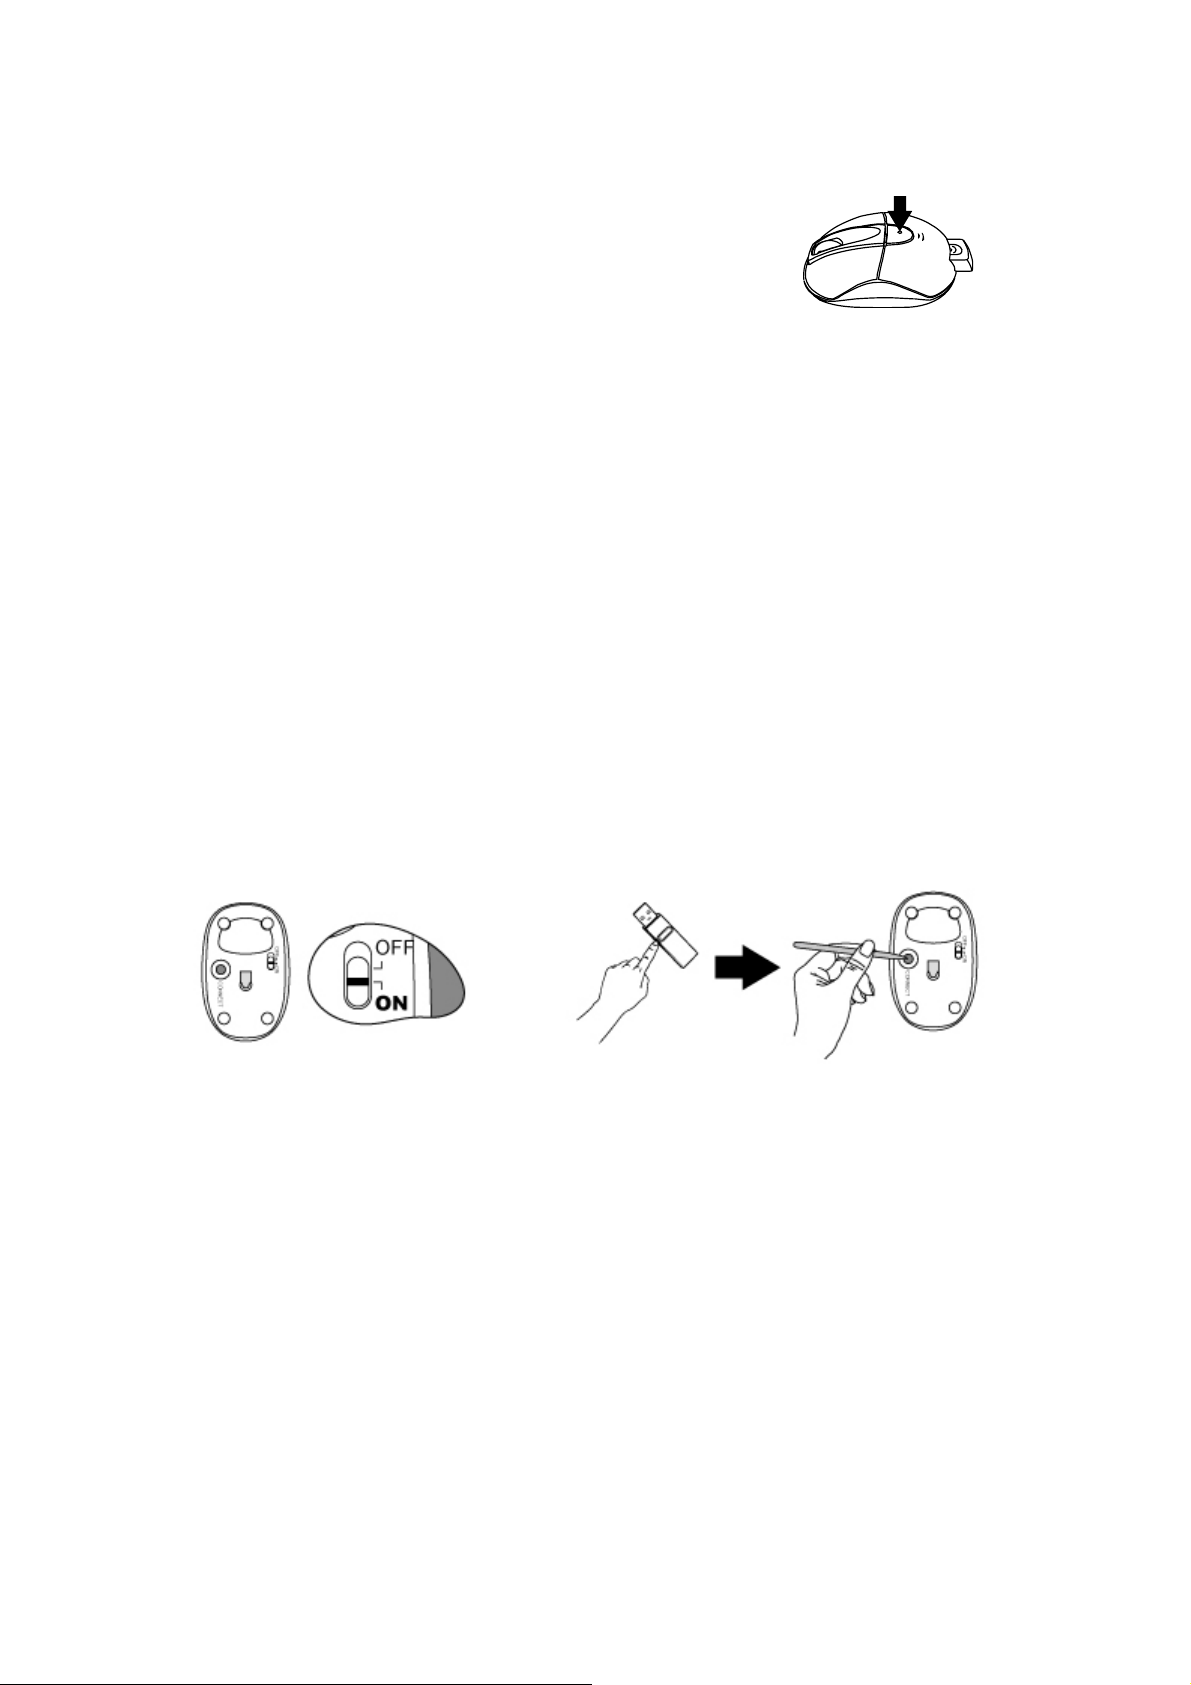
Hardware Installation
Step 1: Press the front wireless USB mini receiver eject button
located on the battery cover as indicated, then pull out
and remove the wireless USB mini receiver from the
mouse.
Step 2: With your computer turned on, plug the wireless USB mini receiver into an
available USB port on your computer.
Step 3: The system will automatically detect the new hardware and install the device
ready for use.
Step 4: Proceed to 'Establishing a Wireless Connection' to complete the installation.
Establishing a Wireless Connection
Once the wireless USB mini receiver is connected to your PC, a wireless connection
will need to be established between it and the mouse. Please perform the following
steps in order to establish a proper wireless connection:
Step 1: Be sure to power on the power switch of mouse base.
Step 2: Ensure the mouse and wireless USB mini receiver are set up as described in
‘Battery Installation’ and ‘Hardware Installation’.
Step 3: Press the CONNECT button on the wireless USB mini receiver, then press
the CONNECT button on the mouse base.
NOTE:
1. To ensure correct operation, please make sure that the wireless USB mini receiver
is properly installed at least 20 cm (8 inches) away from electromagnetic devices
such as monitors or speakers. Also please make sure that the wireless USB mini
receiver is installed at least no more than 1 meter away from the mouse.
2. If the mouse does not activate, please repeat Step 2 and 3.
3. It is also necessary to repeat Step 2 and 3 after any loss of power from battery
replacement.
Multiple Power-Saving Modes
‧The mouse can be manually set to sleep mode by simultaneously pressing all three
buttons (both the Left and Right mouse buttons and the Scroll Wheel button at the
Page 3

same time). Press any mouse button to resume normal mouse operation.
‧This mouse will go into an automatic sleep mode after it has not been used for a
period of time. Also press any button to go back to its working mode.
‧When the wireless USB mini receiver is stored in the smart receiver storage
compartment, the mouse will go into an automatic sleep mode.
‧Simply power off the power switch on mouse bottom.
Warranty Information
‧One year parts/labor from the date of purchase.
‧Please refer to the Warranty Terms and Conditions for your local region for further
warranty details.
‧ For more information, please visit:
HTUwww.BenQ.comUTH.
Page 4

FCC Statement
This equipment has been tested and found to comply with the limits for a Class B
digital device, pursuant to part 15 of the FCC Rules. These limits are designed to
provide reasonable protection against harmful interference in a residential installation.
This equipment generates uses and can radiate radio frequency energy and, if not
installed and used in accordance with the instructions, may cause harmful interference
to radio communications. However, there is no guarantee that interference will not
occur in a particular installation. If this equipment does cause harmful interference to
radio or television reception, which can be determined by turning the equipment off
and on, the user is encouraged to try to correct the interference by on or more of the
following measures:
-Reorient or relocate the receiving antenna.
-Increase the separation between the equipment and receiver.
-Connect the equipment into an outlet on a circuit different from that to which the
receiver is connected.
-Consult the dealer or an experienced radio/TV technician for help.
This device complies with part 15 of the FCC Rules. Operation is subject to the
following two conditions:
1. This device may not cause harmful interference, and
2. This device must accept any interference received, including interference that may
cause undesired operation.
CAUTION:
Any changes or modifications not expressly approved by the party responsible for
compliance could void the user's authority to operate the equipment.
 Loading...