

Page 1

BenQ M306 Wireless Optical Mouse
Quick Setup Guide
FCC Statement
FCC Warning!
This equipment has been tested and found to comply with the limits for a Class B
digital device, pursuant to part 15 of the FCC Rules. These limits are designed to
provide reasonable protection against harmful interference in a residential
installation. This equipment generates uses and can radiate radio frequency
energy and, if not installed and used in accordance with the instructions, may
cause harmful interference to radio communications. However, there is no
guarantee that interference will not occur in a particular installation. If this
equipment does cause harmful interference to radio or television reception, which
can be determined by turning the equipment off and on, the user is encouraged to
try to correct the interference by on or more of the following measures:
-Reorient or relocate the receiving antenna.
-Increase the separation between the equipment and receiver.
-Connect the equipment into an outlet on a circuit different from that to which the
receiver is connected.
-Consult the dealer or an experienced radio/TV technician for help.
This device complies with Part 15 of the FCC Rules.
Operation is subject to the following two conditions:
(1) this device may not cause harmful interference and (2) this device must
accept any interference received, including interference that may cause
undesired operation.
This equipment complies with FCC RF radiation exposure limits set forth for an
uncontrolled environment. This equipment should be installed and operated with a
minimum distance of 20cm between the radiator and your body.
2.Package Contents
BenQ wireless optical mouse
BenQ receiver
USB to PS/2 mouse adaptor
2 AA alkaline batteries
CD Software with Q-Type Pro driver
Quick Setup Guide
Page 2

3.System Requirements:
− IBM® compatible system.
− Microsoft Windows® 98, 2000, Me, XP.
− Available USB port or PS/2 mouse port.
− CD-ROM or DVD-ROM drive.
− At least 32MB of RAM and 20MB of available hard-drive space.
4.Hardware Installation
− Turn off your computer
− Load Batteries
Step 1. Load the AA batteries (included) in the wireless optical mouse.
Step 2. Follow the polarity indicators to load the batteries.
− Connecting the receiver
For USB Interface (If no PS/2 Port)
Step 1. Connect the USB connector on receiver cable to your computer or to the Hub
connected to your computer.
Page 3
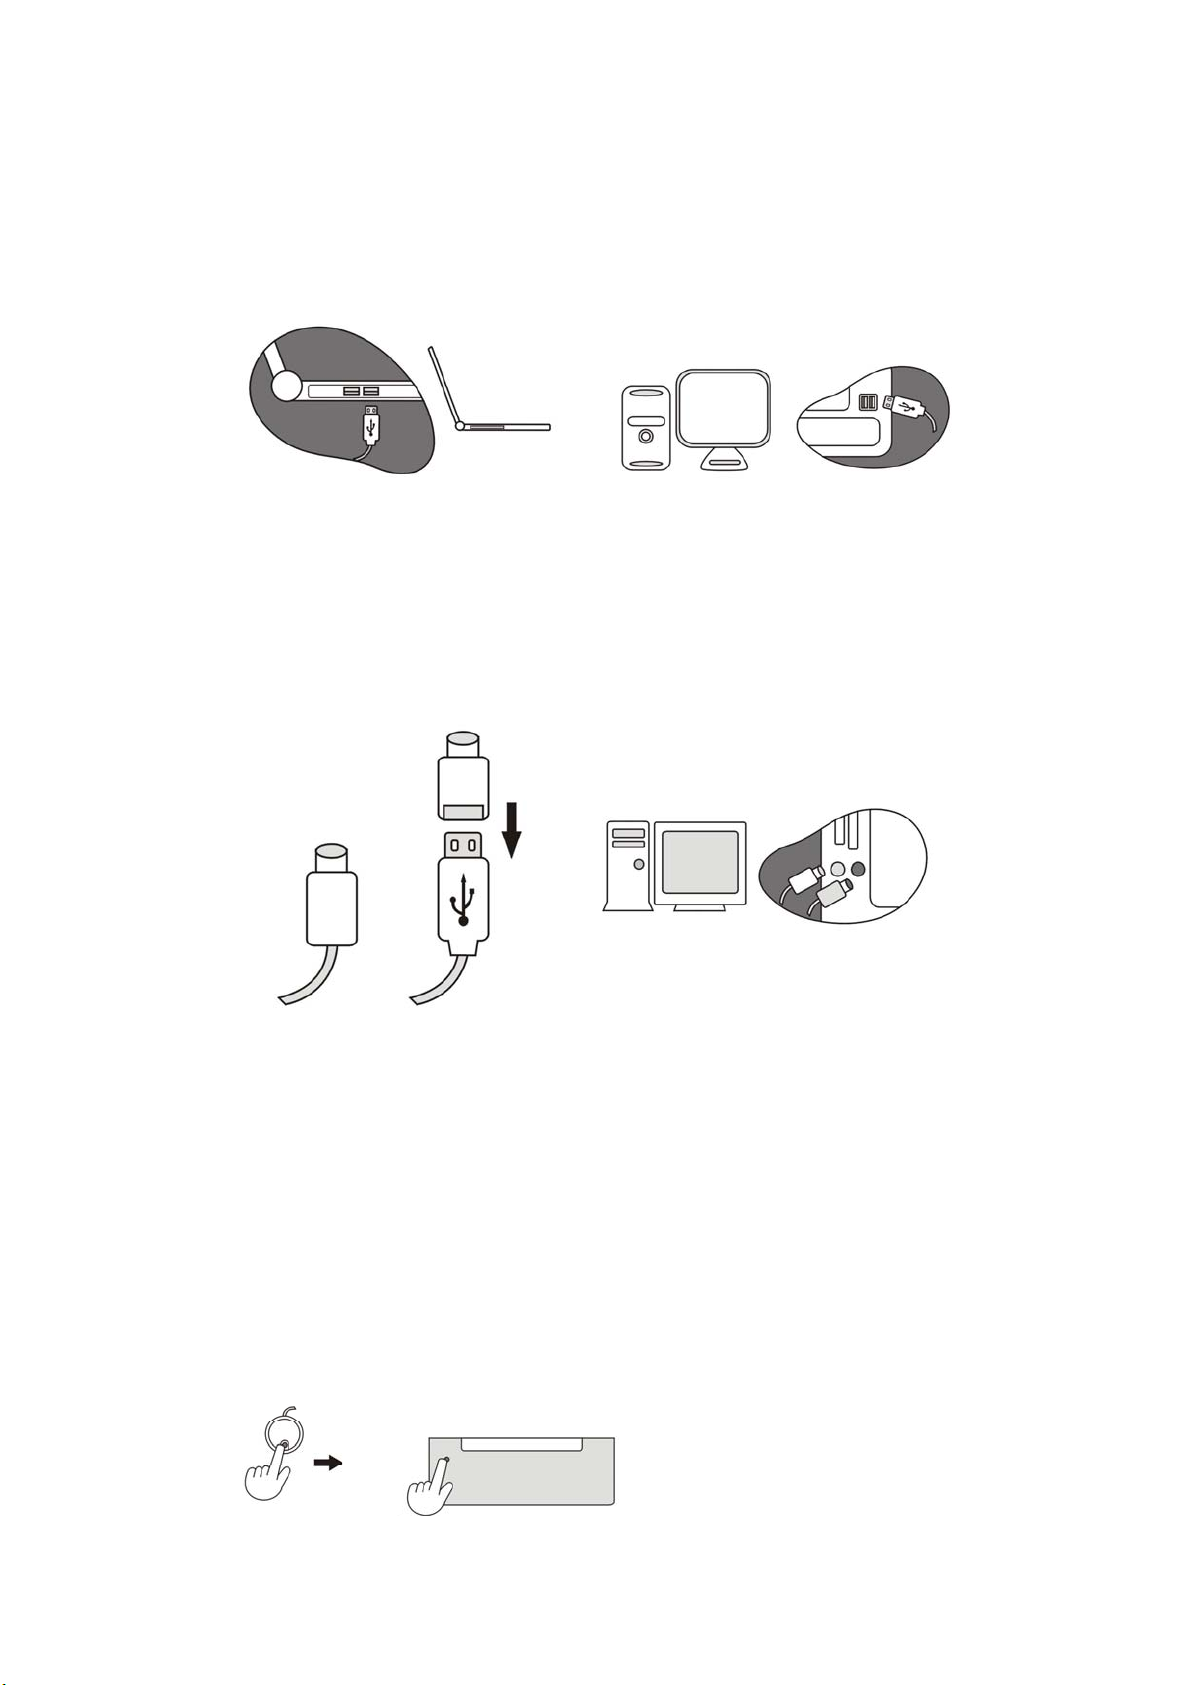
Step 2. Restart the computer.
Step 3. System will automatically detect for new hardware.
Step 4. Follow system’s setup instruction.
For PS/2 (If no USB port)
Step 1. Plug the green PS/2 adapter into PS/2 Mouse port on computer
Step 2. Plug the purple PS/2 connector into PS/2 keyboard port on computer.
Step 3. Restart your computer.
− Synchronizing the receiver with wireless keyboard and mouse
Step 1. Press the connect button on top of the receiver (The LED on receiver will start
to blink once the button is pressed.), then use a pointy object (e.g. the ink
point of a pen) to press the connect button on the bottom side of the mouse
within 10 seconds.
Step 3. If the mouse does not connect, please repeat the steps above.
−
Page 4

− Software Installation (for hotkey functions)
Step 1. Insert driver CD into CD-ROM or DVD drive.
Step 2. The installation program should run automatically. If not, double click
“setup.exe”
Step 3. The onscreen setup will guide you through rest of the installation process.
Step 4. After the software installation is completed, you will be prompted to restart your
computer.
Mouse Hotkeys
Function Description
Switches applications.
Closes a document or file of the active program.
7.Trouble Shooting
When mouse does not work:
− Please make sure the receiver’s connectors are plugged correctly into your computer.
Before you plug the PS/2 connector on receiver cable into PS/2 port, please do make
Page 5

sure your PC is Power Off.
− Please make sure the batteries are loaded correctly in the mouse.
− Please check battery life
− Please press the connect button on top of the receiver, then use a sharp point (e.g.
the point head of your pen) object to press the connect button on the bottom of the
mouse within 10 seconds.
− Reload batteries and repeat wireless connect again.
− When you find your mouse are experiencing interferences by other wireless input
devices, please reset the mouse again and place the receiver at least 8 inches (20 cm)
away from any electronic devices (ex. computer, monitor, etc.) to avoid interference.
− Do not place receiver on metal surface.
− After installing the driver, Num/Caps/Scroll Lock function indicators will be showed on
the screen.
− The mouse uses a fast and sensitive 800 DPI optical sensor. It moves faster than
normal optical mouse. You can change the moving speed from the mouse setting
control inside the control panel.
9.Warranty
Warranty:
− One year parts/labor from purchase date
− BenQ America Corp. (“BenQ”) warrants BenQ keyboard with accompanying mouse
cables and adapters (collectively “keyboard”) you have purchased from BenQ or
from a BenQ authorized reseller/retailer to be free from defects in materials or
workmanship under normal use during the warranty period. Please visit
http://www.benq.com/warranty/index.html#benq_warranty for more details.
Registration:
− Please go to http://www.benq.com/warranty/warrantyreg.cfm to register your product.
Contact Information
For warranty & technical support, please call 1-866-600-2367 or visit us at
http://www.benq.com
Hours: M-F 6:00am - 6:00pm PST
For further product information or rebate questions, please call 1-866-700-2367.
Hours: M-F 8:30am - 5:30pm PST
You may also request information by mailing to the following address:
BenQ America Corp.
Customer Service Dept.
P.O.Box 1757
Walnut, CA 91788-1757
 Loading...