

Page 1
666967-B21
Replace this box with PI statement as per spec.
Replace this box with PI statement as per spec.
Replace this box with PI statement as per spec.
Replace this box with PI statement as per spec.
Replace this box with PI statement as per spec.
de l’étui.
la partie informatique
8
7
6
5
4
3
2
8
7
6
5
4
3
2
1
1
computador do fólio.
na parte traseira de
de visita ca localizado
*O suporte para cartão
8
Porta mini USB
emparelhamento
7
Botão de
Liga/Desliga
alimentação
6
Interruptor de
e de bateria fraca
emparelhamento
5
LED de
carregamento
4
LED de
cartão de visita*
3
Suporte para
2
Suporte da caneta
do fólio
1
Fita de fechamento
visite est situé derrière
*Le support de carte de
8
Mini-port USB
couplage
7
Bouton de
d’alimentation
6
Commutateur
bas de batterie
ge et de niveau
5
Voyant de couplacharge en cours
4
Voyant de
carte de visite*
3
Support de
2
Porte-stylet
fermeture de l’étui
1
Bande de
equipo del folio.
detrás de la parte del
de visita está ubicado
*El soporte para tarjetas
8
Puerto mini USB
emparejamiento
7
Botón de
apagado
de encendido/
alimentación
6
Interruptor de
y de batería baja
emparejamiento
5
LED de
4
Carga del LED
tarjeta de visita*
3
Soporte para
para el lápiz
2
Soporte
cierre para folio
1
Banda de
Mini-USB-Anschluss
Koppelungstaste
Ein-/Ausschalter
Akkuladestand
und niedrigen
LED für Koppelung
Lade-LED
Visitenkarten*
Fach für
Stifthalter
Verschlussband
Elastisches Folio-
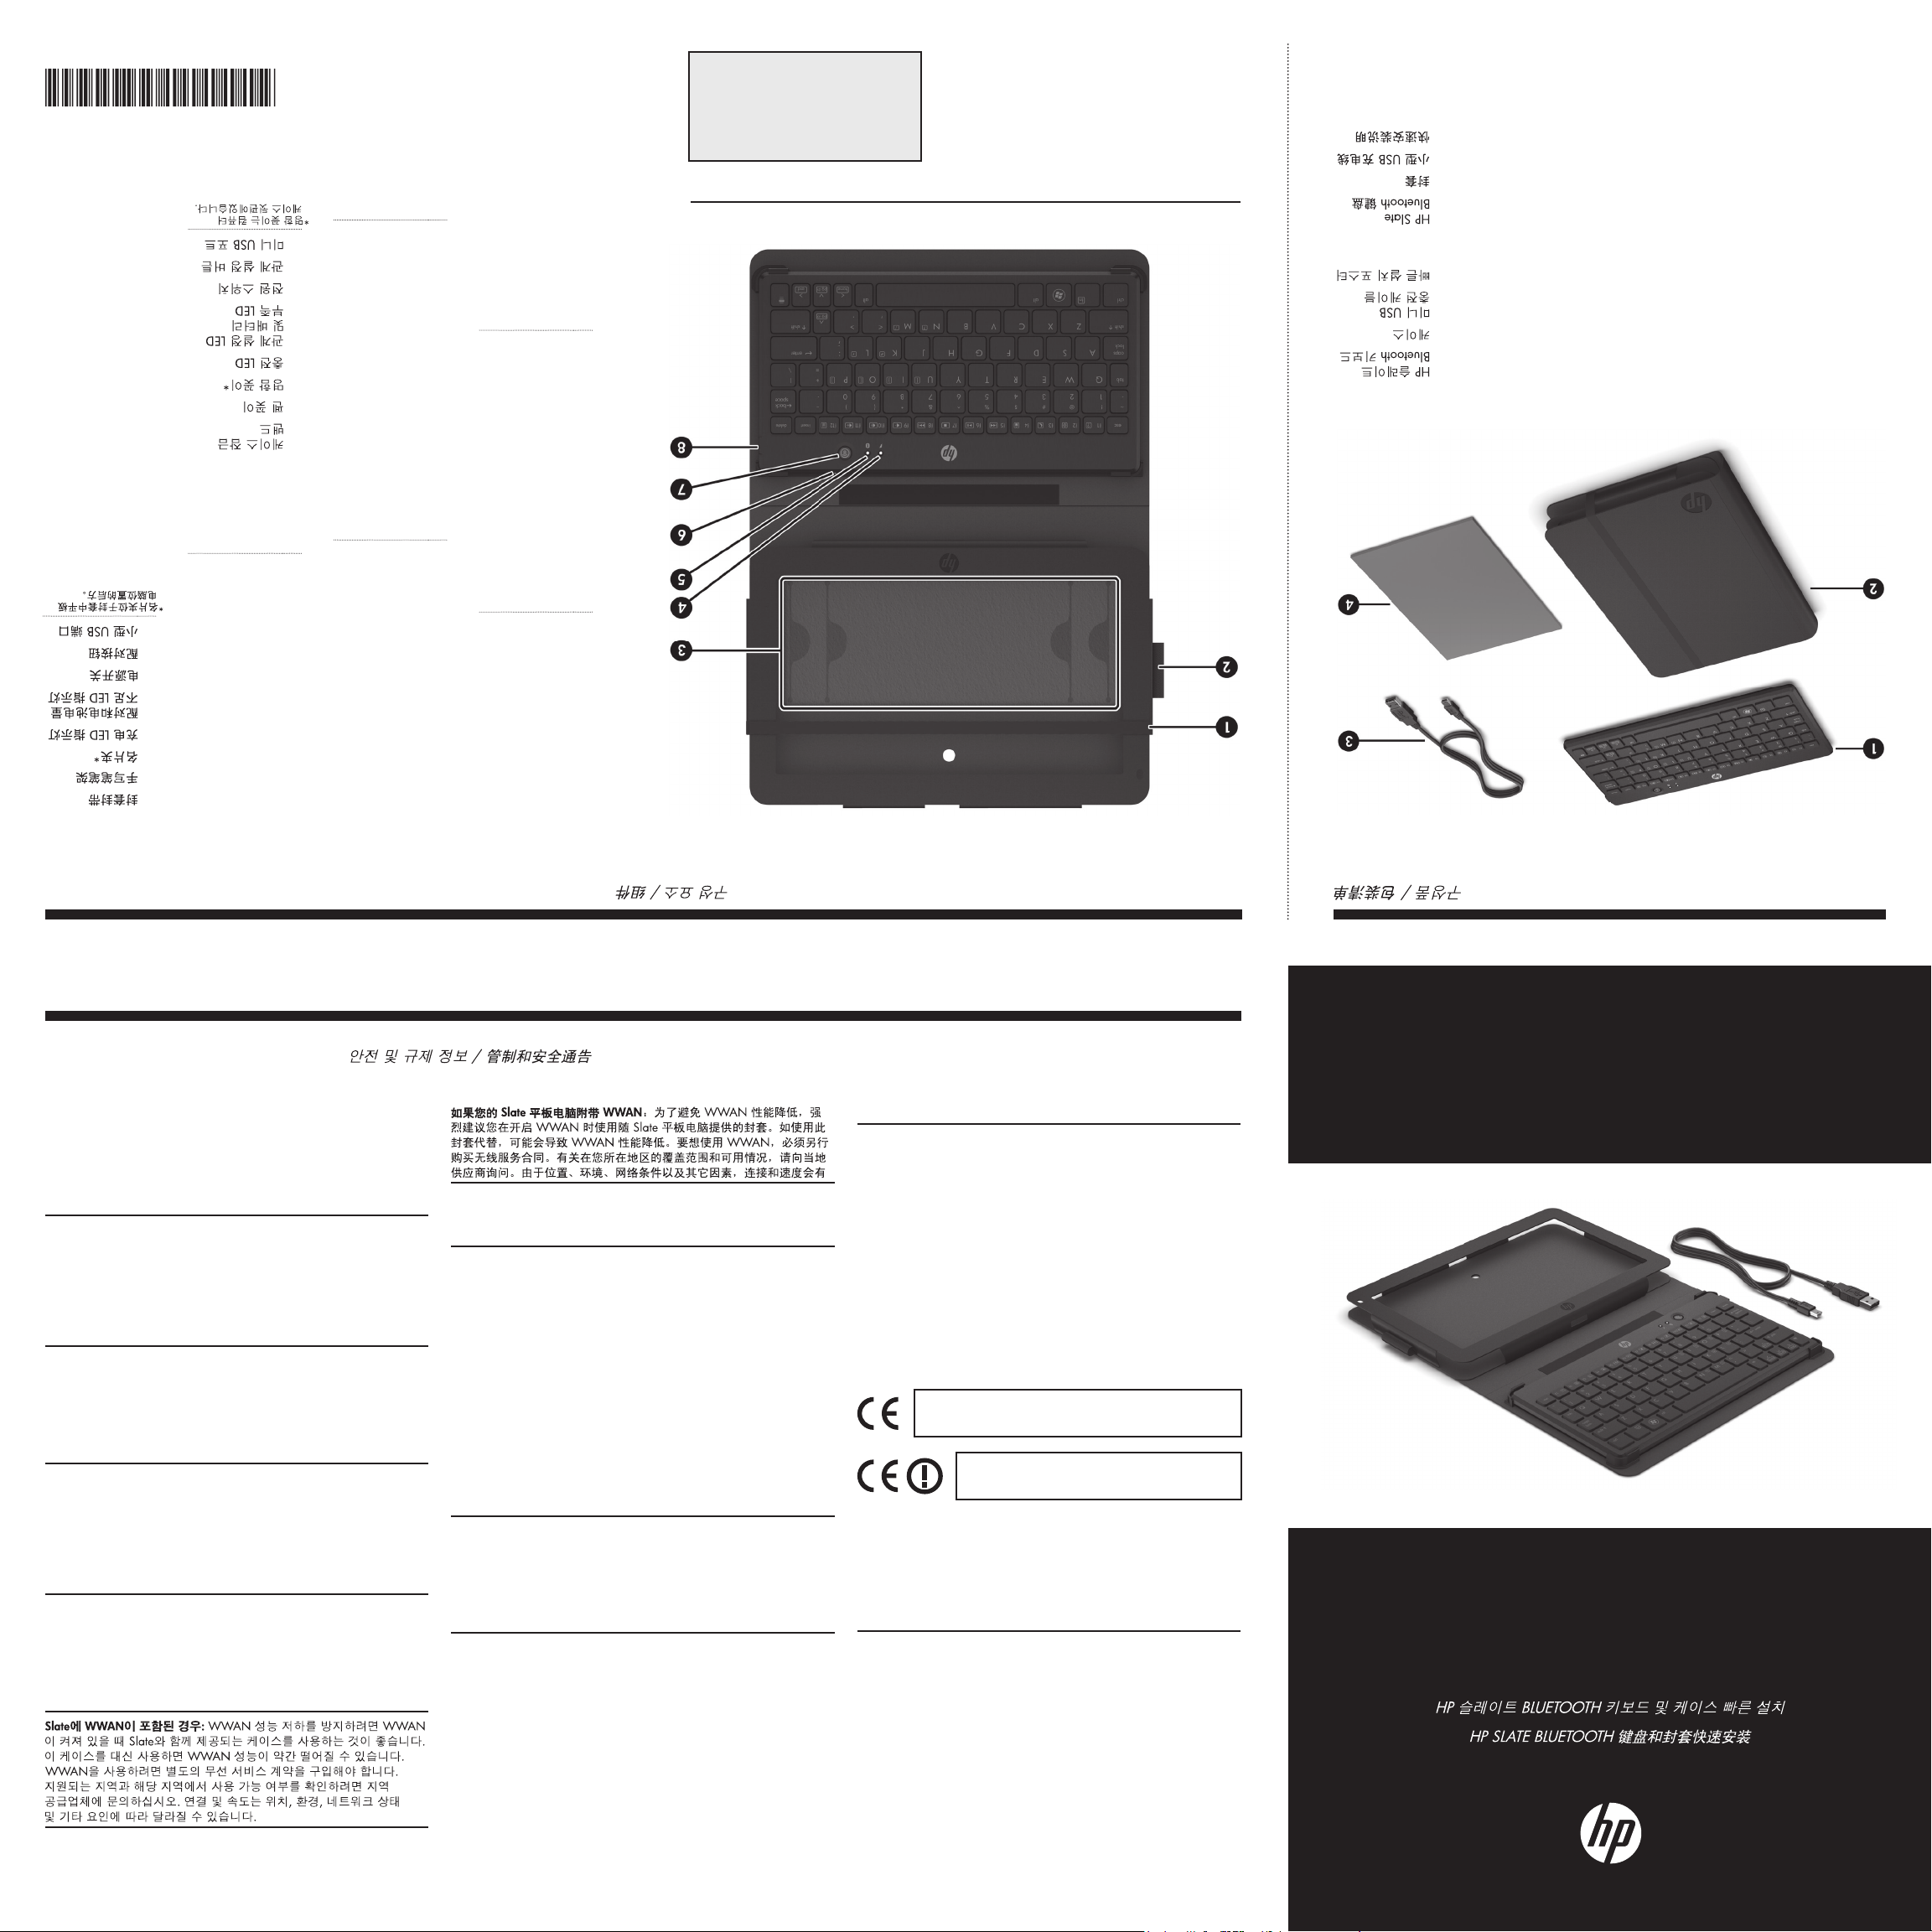
Mini USB port
Pairing button
switch
On/Off power
battery LED
Pairing and low
Charging LED
holder*
Business card
Pen holder
Folio closure band
Computer im Folio.
bendet sich hinter dem
*Das Visitenkartenfach
8
7
6
5
4
3
2
1
part of the folio.
behind the computer
holder is located
*The business card
8
7
*
6
5
4
3
2
1
First Edition: October 2011
errors or omissions contained herein.
ditional warranty. HP shall not be liable for technical and editorial
services. Nothing herein should be construed as constituting an adthe express warranty statements accompanying such products and
The only warranties for HP products and services are set forth in
The information contained herein is subject to change without notice.
4
3
Windows is a U.S. registered trademark of Microsoft Corporation.
© Copyright 2011 Hewlett-Packard Development Company, L.P.
2
1
4
3
2
1
Rápida
Conguração
Pôster de
Mini USB
carregamento
Cabo de
Fólio
HP Slate
Teclado Bluetooth
rapide
Poster Installation
charge USB
Mini-câble de
Étui
HP Slate
Clavier Bluetooth
4
conguración rápida
4
3
2
1
4
3
2
1
Póster de
carga mini USB
3
Cable de
2
Folio
tipo pizarra HP
1
Teclado Bluetooth
zur Installation
4
Poster Kurzanleitung
3
Mini-USB-Ladekabel
2
Folio
Tastatur
1
HP Slate Bluetooth
4
Quick Setup poster
charging cable
3
Mini USB
2
Folio
Keyboard
1
HP Slate Bluetooth
Regulatory and Safety Notices / Sicherheits- und Zulassungshinweise / Avisos normativos y de seguridad / Informations sur la sécurité et les réglementations /
Informações regulamentares e de segurança /
If your Slate includes WWAN: To avoid degradation of WWAN
performance, it is highly recommended that you use the folio that came
with your Slate when the WWAN is turned on. Using this folio instead
may result in decreased WWAN performance. WWAN use requires a
separately purchased wireless service contract. Check with your local
vendor for coverage area and availability in your area. Connection and
speeds will vary due to location, environment, network conditions, and
other factors.
Wenn Ihr Slate über WWAN verfügt:
zu vermeiden, wird dringend empfohlen, das im Lieferumfang des Slate
enthaltene Folio zu verwenden, wenn das WWAN eingeschaltet ist. Wenn
stattdessen das vorliegende Folio verwendet wird, kann dies eine verringerte
WWAN-Leistung zur Folge haben. Für die WWAN-Nutzung ist ein separat
zu erwerbender Wireless-Service-Vertrag erforderlich. Erkundigen Sie sich
bei Ihrem Anbieter vor Ort nach dem Netzabdeckungsbereich und der
Verfügbarkeit in Ihrer Region. Verbindung und Geschwindigkeit sind abhängig
von Ort, Umgebung, Netzwerkbedingungen und anderen Faktoren.
Si su pizarra incluye WWAN: Para evitar la degradación de rendimiento
de la WWAN, se recomienda encarecidamente utilizar el folio incluido
con su pizarra cuando la WWAN esté activada. Utilizar este folio de otro
modo puede disminuir el rendimiento de la WWAN. El uso de la WWAN
requiere el contrato de servicio inalámbrico que se compra por separado.
Consulte con su proveedor local para conocer el área de cobertura y la
disponibilidad de su zona. La conexión y las velocidades pueden variar
según la ubicación, el entorno, las condiciones de red y otros factores.
Si votre Slate inclut une fonction WWAN : Pour éviter les dégradations
des performances WWAN, il est fortement recommandé d’utiliser l’étui
livré avec votre Slate lorsque la fonction WWAN est activée. L’utilisation
de cet étui à la place peut engendrer des performances WWAN réduites.
L’utilisation de la fonction WWAN nécessite l’achat d’un contrat de service
sans l distinct. Vériez auprès de votre fournisseur local pour connaître
la zone de couverture et la disponibilité dans votre région. La connexion
et la vitesse varient en fonction de l’emplacement, de l’environnement,
des conditions du réseau et d’autres facteurs.
Se seu Slate incluir WWAN: Para evitar problemas de desempenho de
WWAN, é extremamente recomendado que a capa de proteção fornecida
com o Slate seja utilizada quando a WWAN estiver ligada. Usar outra
capa de proteção pode afetar o desempenho da WWAN. A utilização
da WWAN exige a aquisição de um contrato de serviço sem o separado.
Verique a área de cobertura e a disponibilidade na sua área com
o fornecedor local. A conexão e a velocidade podem variar de acordo
com o local, com as condições da rede e com outros fatores.
Um eine schlechtere WWAN-Leistung
Federal Communications Commission notice
To identify this product, refer to the part, series, or model number found on
the product.
Modications
The FCC requires the user to be notied that any changes or modications
made to this device that are not expressly approved by Hewlett-Packard
Company may void the user’s authority to operate the equipment.
Cables
Connections to this device must be made with shielded cables with metallic
RFI/EMI connector hoods in order to maintain compliance with FCC Rules
and Regulations.
Wireless keyboard certication markings are located on the bottom of the
keyboard.
Brazilian notice
Este equipamento opera em carater secundario, isto e, nao tem direito a
protecao contra interferencia prejudicial, mesmo de estacoes do mesmo
tipo, a nao pode causar interferencia a sistemas operando em carater
primario.
Canadian notice
Canada, Industry Canada (IC) Notices
This Class B digital apparatus complies with Canadian ICES-003 and RSS-
210. Operation is subject to the following two conditions:
1. this device may not cause interference, and
2. this device must accept any interference, including interference that may
cause undesired operation of the device.
Canada, avis d’Industry Canada (IC)
Cet appareil numérique de classe B est conforme aux normes canadiennes
ICES-003 et RSS-210. Son fonctionnement est soumis aux deux conditions
suivantes :
1. cet appareil ne doit pas causer d’interférence et
2. cet appareil doit accepter toute interférence, notamment les interférences
qui peuvent affecter son fonctionnement.
European Union Regulatory Notice
R&TTE Directive 1999/5/EC: This product may be used in all European
Union countries.
Products bearing the CE marking comply with the following EU Directives:
• Low Voltage Directive 2006/95/EC
• EMC Directive 2004/108/EC
• Ecodesign Directive 2009/125/EC, where applicable
Compliance with these directives implies conformity to applicable
harmonized European standards (European Norms) that are listed in the EU
Declaration of Conformity issued by HP for this product or product family
and available (in English only) either within the product documentation or at
the following web site: www.hp.eu/certicates (type the product number
in the search eld).
The compliance is indicated by one of the following conformity markings
placed on the product:
For non-telecommunications products and for EU harmonized
telecommunications products, such as Bluetooth® within power class
Please refer to the regulatory label provided on the product.
The point of contact for regulatory matters is:
Hewlett-Packard GmbH, Dept./MS: HQ-TRE, Herrenberger Strasse 140,
71034 Boeblingen, GERMANY.
below 10mW.
For EU non-harmonized telecommunications products (If
applicable, a 4-digit notied body number is inserted
between CE and !).
Mexican notice
La operacion de este equipo esta sujeta a las siguientes dos condiciones:
(1) este equipo puede que no cause interferencia y, (2) este equipo debe
aceptar cualquier interferencia, incluyendo interferencia que pueda ser
causada por la operacion no deseada.
Components / Komponenten / Componentes / Composants / Componentes /
Contents / Inhalt / Contenido / Table des matières / Conteúdo /
HP SLATE BLUETOOTH KEYBOARD & FOLIO
Quick Setup
HP SLATE BLUETOOTH TASTATUR & FOLIO Kurzanleitung zur Installation
Conguración rápida de TECLADO BLUETOOTH TIPO PIZARRA HP
Installation rapide du CLAVIER BLUETOOTH HP SLATE ET DE L’ÉTUI
Instalação rápida do TECLADO E FÓLIO BLUETOOTH HP SLATE
Page 2
3
41
Power on the computer and HP Slate Bluetooth
Keyboard by sliding both power switches to their
power-on positions.
Schalten Sie den Computer und die HP Slate
Bluetooth Tastatur ein, indem Sie beide
Betriebsschalter in die Einschaltposition bringen.
Encienda el equipo y el teclado bluetooth para
pizarra HP deslizando los interruptores de
alimentación a sus posiciones de encendido.
Allumez l‘ordinateur et le clavier Bluetooth HP
Slate en faisant glissant les deux commutateurs
d‘alimentation sur leur position de mise sous tension.
2
Your computer has HP Connection Manager
installed. To use HP Connection Manager to turn
Bluetooth on:
1. Use the digital pen, included with the computer,
to right-click the HP Connection Manager icon
in the Quick launch bar on the left side of the
taskbar.
2. Click the power button next to Bluetooth to turn it
on, if it is not already turned on.
Vergewissern Sie sich vor der Koppelung der Slate
Bluetooth Tastatur mit Ihrem Computer, dass Bluetooth
auf dem Computer eingeschaltet ist.
Auf Ihrem Computer ist HP Connection Manager
installiert. So schalten Sie Bluetooth mit
HP Connection Manager ein:
1. Verwenden Sie den digitalen Stift, der mit
dem Computer mitgeliefert wurde, um einen
Rechtsklick auf das HP Connection Manager
Symbol in der Quick Launch-Leiste links neben
der Taskleiste durchzuführen.
2. Klicken Sie auf die Netzschalter-Schaltäche
neben Bluetooth, um Bluetooth einzuschalten,
falls dies nicht bereits der Fall ist.
Antes de emparejar el teclado Bluetooth tipo
pizarra con su equipo, asegúrese de que éste
tenga activado el sistema Bluetooth.
Su equipo tiene instalado HP Connection Manager.
Para usar HP Connection Manager para activar
el sistema bluetooth:
1. Use el lápiz digital, que viene con el
equipo, para hacer clic derecho en el icono
HP Connection Manager en la barra de inicio
del lado izquierdo de la barra de tareas.
2. Haga clic en el botón de alimentación que
está junto a Bluetooth si es que aún no está
encendido.
Avant de coupler le clavier Bluetooth Slate avec votre
ordinateur, assurez-vous que la fonction Bluetooth est
activée sur ce dernier.
Votre ordinateur dispose de HP Connection
Manager installé. Pour utiliser HP Connection
Manager pour activer la fonction Bluetooth :
1. Utilisez le stylet numérique, inclus avec
l’ordinateur, pour cliquer avec le bouton droit sur
l’icône HP Connection Manager dans la barre
de lancement rapide sur le côté droit de la barre
des tâches.
2. Le cas échéant, cliquez sur le bouton
d’alimentation en regard de la fonction
Bluetooth pour l’activer.
Before pairing the Slate Bluetooth
Keyboard with your computer,
ensure that your computer has
Bluetooth turned on.
Ligue o computador e o HP Slate Bluetooth
Keyboard deslizando os botões Liga/Desliga
para as posições ligado.
Antes de emparelhar o Teclado Bluetooth Slate com
seu computador, certique-se de que o computador
esteja com a função Bluetooth ativada.
Seu computador tem o HP Connection Manager
instalado. Para usar o HP Connection Manager
para ativar o Bluetooth:
1. Use a caneta digital, fornecida com o
computador, para clicar com o botão direito
no ícone do HP Connection Manager na barra
de Inicialização rápida do lado direito da barra
de tarefas.
2. Clique no botão Liga/Desliga ao lado de
Bluetooth para ativá-lo, se ele não estiver
ativado.
To pair the Slate Bluetooth Keyboard with the compute
using Windows® 7:
1.
Press and hold the pairing button (1) for two seconds.
The pairing LED (2) slowly blinks blue.
2. Use the digital pen to right-click the Bluetooth
icon in the notication area, at the far right
of the taskbar, and then click Add a Device.
You can also click the Start button, click Control
Panel, and then click Add a device.
3. Select HP Slate Bluetooth Keyboard from the list
of devices displayed in the Add a device window
on the computer screen, and then click Next.
4. Use the Slate Bluetooth Keyboard to type
the variable PIN code displayed on the next
window, and then press Enter.
This device has been successfully added to this
computer will display on the screen at this time.
NOTE: The pairing LED (2) blinks fast if the pairing
is successful.
So koppeln Sie die Slate Bluetooth Tastatur mit
dem Computer unter Windows® 7:
1. Halten Sie die Koppelungstaste (1) 2 Sekunden
lang gedrückt. Die Koppelungs-LED (2) blinkt
langsam blau.
2. Führen Sie mit dem digitalen Stift einen
Rechtsklick auf das Bluetooth Symbol im
Infobereich außen rechts in der Taskleiste aus,
und klicken Sie dann auf Gerät hinzufügen.
Sie können auch auf die Schaltäche Start klicken,
dann auf Systemsteuerung und anschließend auf
Gerät hinzufügen.
3. Wählen Sie HP Slate Bluetooth Tastatur aus der
Liste der Geräte, die im Fenster „Gerät hinzufügen“
auf dem Computerbildschirm angezeigt wird,
und klicken Sie auf Weiter.
4. Geben Sie über die Slate Bluetooth Tastatur den
variablen PIN-Code ein, der im nächsten Fenster
angezeigt wird, und drücken Sie die Eingabetaste.
Die Meldung Das Gerät wurde diesem Computer
erfolgreich hinzugefügt wird auf dem Bildschirm
angezeigt.
HINWEIS: Die Koppelungs-LED (2) blinkt schnell,
wenn die Koppelung erfolgreich ist.
Para emparejar el teclado Bluetooth tipo
pizarra con el equipo utilizando Windows® 7:
1. Mantenga presionado el botón de
emparejamiento (1) por dos segundos.
El LED de emparejamiento (2) parpadea
lentamente de color azul.
2. Utilice el lápiz digital para hacer clic derecho en
el icono Bluetooth en el área de noticación,
en el lado derecho de la barra de tareas,
y luego haga clic en Añadir un dispositivo.
También puede hacer clic en el botón Inicio,
haga clic en Panel de control y luego en
Agregar un dispositivo.
3. Seleccione Teclado Bluetooth tipo pizarra HP
de la lista de dispositivos que aparece en la
ventana Agregar un dispositivo de la pantalla
del equipo y luego haga clic en Siguiente.
4. Use el teclado Bluetooth tipo pizarra para
escribir el código PIN variable que se muestra
en la siguiente ventana y presione Intro.
En este momento se mostrará en la pantalla
Este dispositivo se ha agregado correctamente
a este equipo.
NOTA: El LED de emparejamiento (2) parpadea
rápidamente si el emparejamiento es correcto.
Pour coupler le clavier Bluetooth Slate avec
l’ordinateur sous Windows® 7:
1.
Appuyez sur le bouton de couplage (1) et maintenezle enfoncé pendant deux secondes. Le voyant
de couplage (2) clignote lentement en bleu.
2. Utilisez le stylet numérique pour cliquer avec
le bouton droit sur l’icône Bluetooth dans
la zone de notication, à l’extrémité droite de
la barre des tâches, puis cliquez sur Ajouter
un périphérique.
Vous pouvez également cliquer sur le bouton
Démarrer, cliquer sur Panneau de conguration,
puis cliquer sur Ajouter un périphérique.
3.
Sélectionnez Clavier Bluetooth HP Slate dans la
liste des périphériques afchée dans la fenêtre
d’ajout d’un périphérique sur l’ordinateur de
l’écran, puis cliquez sur Suivant.
4. Utilisez le clavier Bluetooth Slate pour entrer
le code PIN variable afché dans la fenêtre
suivante, puis appuyez sur Entrée.
Ce périphérique a été ajouté avec succès
à cet ordinateur s’afche alors à l’écran.
REMARQUE : Le voyant de couplage (2) clignote
rapidement en cas de réussite du couplage.
r
Para emparelhar o Teclado Bluetooth Slate
com o computador usando o Windows® 7:
1.
Pressione e segure o botão de emparelhamento (1)
por dois segundos. O LED de emparelhamento (2)
piscará lentamente na cor azul.
2. Use a caneta digital para clicar com o botão direito
no ícone do Bluetooth na área de noticação,
à extrema direita da barra de tarefas e clique em
Adicionar um dispositivo.
Você também pode clicar no botão Iniciar, clicar
em Painel de controle e, em seguida, clicar em
Adicionar um dispositivo.
3. Selecione Teclado Bluetooth HP Slate na lista de
dispositivos exibida na janela Adicionar um dispositivo
na tela do computador e clique em Avançar.
4.
Use o Teclado Bluetooth Slate para digitar o código
PIN variável exibido na janela seguinte e pressione
Enter.
A mensagem Este dispositivo foi adicionado
corretamente ao computador será exibida na tela.
OBSERVAÇÃO: O LED de emparelhamento (2)
piscará rapidamente se o emparelhamento for
concluído com êxito.
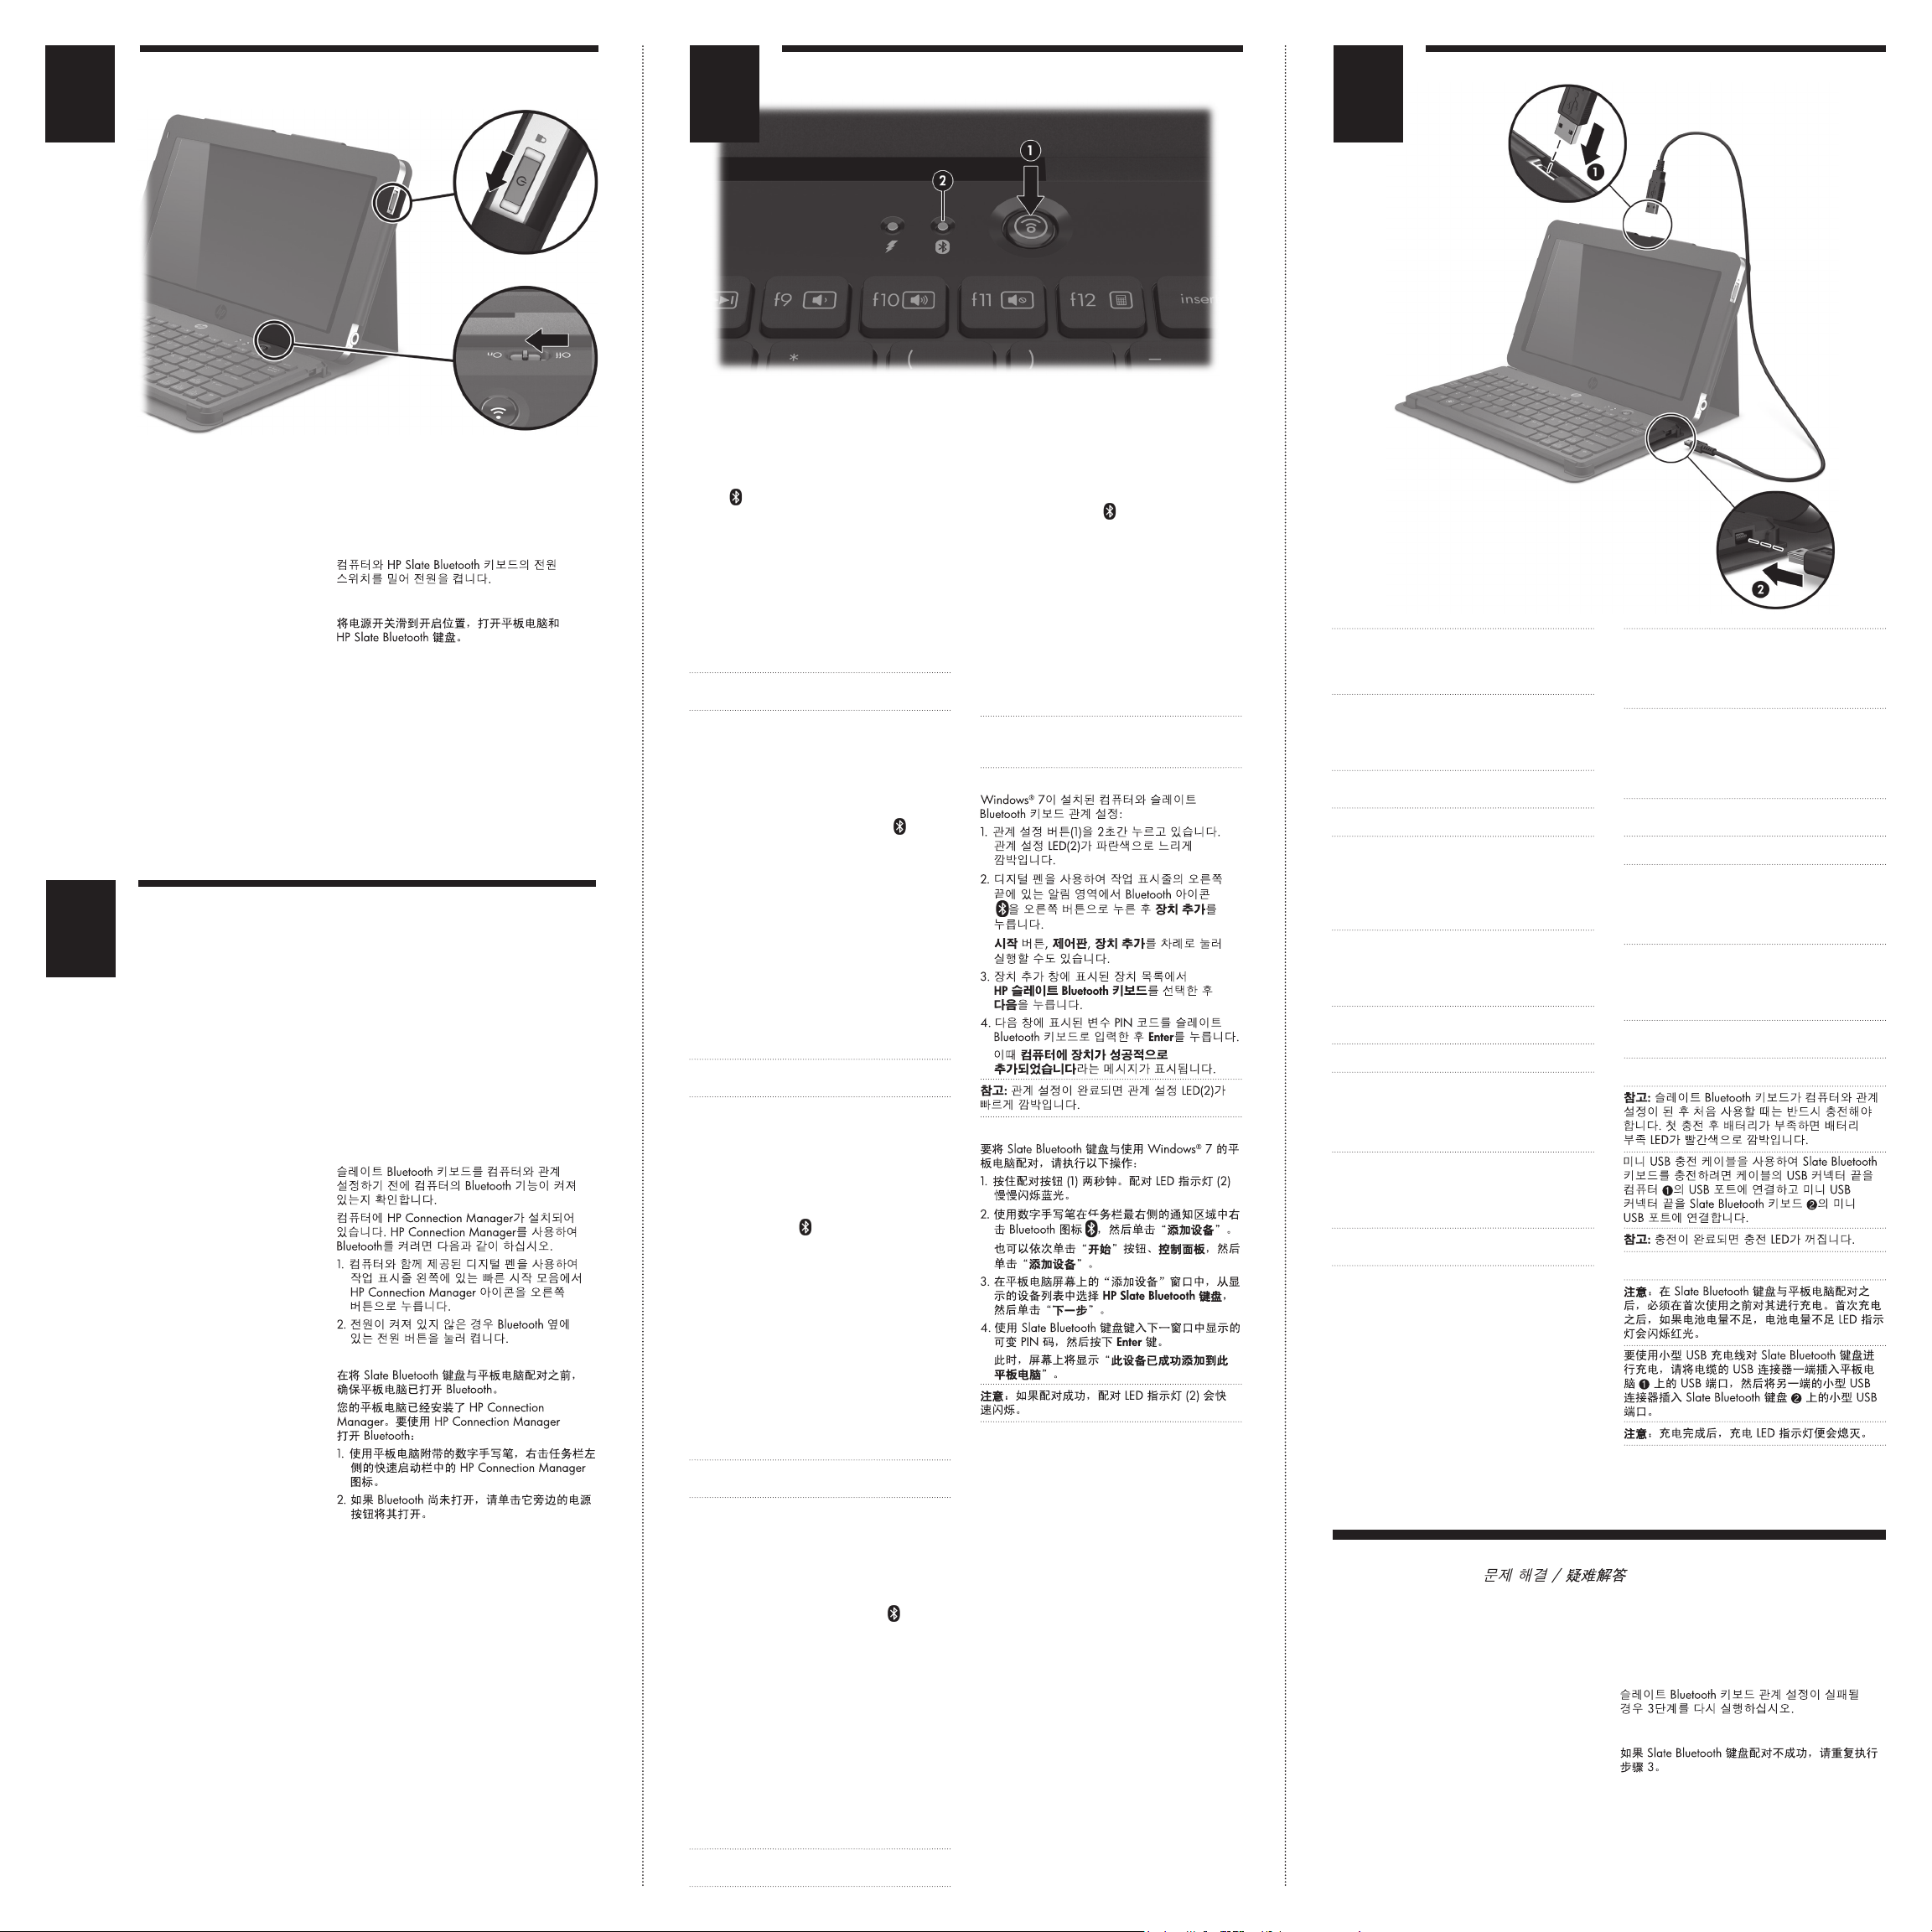
NOTE: After the Slate Bluetooth Keyboard has been
paired with the computer, it must be charged before
using it for the rst time. After the rst charging, the
low battery LED blinks red when the battery is low.
To charge the Slate Bluetooth Keyboard using the
Mini USB charging cable, insert the USB connector
end of the cable into the USB port on the computer
, and insert the mini USB connector end into the
1
mini USB port on the Slate Bluetooth Keyboard 2.
NOTE: When charging is complete, the charging
LED turns off.
HINWEIS: Sobald die Slate Bluetooth Tastatur
mit dem Computer gekoppelt ist, muss sie vor
der ersten Verwendung aufgeladen werden.
Nach dem ersten Ladevorgang blinkt die LED für
niedrigen Akkuladestand rot, wenn ein niedriger
Akkuladestand erreicht wird.
Schließen Sie zum Auaden der Slate Bluetooth
Tastatur mit dem Mini-USB-Ladekabel das USB-Ende
des Kabels an den USB-Anschluss am Computer 1
und das Mini-USB-Ende an den Mini-USB-Anschluss
an der Slate Bluetooth Tastatur an 2.
HINWEIS:
Wenn der Ladevorgang abgeschlossen ist,
hört die Lade-LED auf zu leuchten.
NOTA: Luego de emparejar el teclado Bluetooth
tipo pizarra con el equipo, éste se debe cargar
antes de usarlo por primera vez. Luego de la primera
carga, el LED de batería baja parpadea de color
rojo cuando la batería está baja.
Para cargar el teclado bluetooth de la pizarra con
el cable de carga Mini USB, inserte el extremo del
conector USB en el puerto USB del equipo 1 e inserte
el extremo del conector Mini USB en el puerto Mini
USB del teclado bluetooth de la pizarra 2.
NOTA:
Cuando naliza la carga, el LED de carga
se apaga.
REMARQUE : Une fois le clavier Bluetooth Slate
couplé avec l’ordinateur, il doit être chargé avant
de pouvoir l’utiliser pour la première fois. Après la
première charge, le voyant de niveau bas de batterie
clignote en rouge en cas de niveau faible de batterie.
Pour charger le clavier Bluetooth Slate à l‘aide
du mini-câble de charge USB, insérez l‘extrémité
du connecteur USB du câble dans le port USB de
l‘ordinateur 1, puis insérez l‘extrémité du miniconnecteur USB dans le mini-port USB du clavier
Bluetooth Slate 2.
REMARQUE : Une fois la charge terminée,
le voyant de charge s’éteint.
OBSERVAÇÃO: Depois que o Teclado Bluetooth
Slate tiver sido emparelhado com o computador,
carregue-o antes de usá-lo pela primeira vez. Após
a primeira carga, o LED de bateria fraca piscará
na cor vermelha quando a bateria car fraca.
Para carregar o Slate Bluetooth Keyboard
usando o cabo de carregamento mini USB, insira
a extremidade do conector USB na porta USB do
computador 1 e a extremidade do conector mini USB
na porta mini USB do Slate Bluetooth Keyboard 2.
OBSERVAÇÃO: Quando o carregamento está
concluído, o LED de carregamento apaga.
Troubleshooting / Fehlerbeseitigung / Solución de problemas / Résolution des problèmes /
Solução de problemas /
If the Slate Bluetooth Keyboard pairing is
not successful, repeat step 3.
Wenn die Koppelung der Slate Bluetooth
Tastatur mit dem Computer nicht erfolgreich ist,
wiederholen Sie Schritt 3.
Si el emparejamiento del teclado Bluetooth
tipo pizarra no es exitoso, repita el paso 3.
Si le couplage du clavier Bluetooth Slate
échoue, répétez l’étape 3.
Se o emparelhamento do Teclado Bluetooth
Slate não ocorrer, repita a etapa 3.
 Loading...