

Page 1

SCXI™-1102/B/C
User Manual
32-Channel Thermocouple Amplifier Modules
SCXI-1102/B/C User Manual
August 1997 Edition
Part Number 320975B-01
© Copyright 1995, 1997 National Instruments Corporation. All rights reserved.
Page 2

Internet Support
support@natinst.com
E-mail: info@natinst.com
FTP Site: ftp.natinst.com
Web Address: http://www.natinst.com
Bulletin Board Support
BBS United States: (512) 794-5422
BBS United Kingdom: 01635 551422
BBS France: 01 48 65 15 59
Fax-on-Demand Support
(512) 418-1111
Telephone Support (U.S.)
Tel: (512) 795-8248
Fax: (512) 794-5678
International Offices
Australia 03 9879 5166, Austria 0662 45 79 90 0, Belgium 02 757 00 20,
Canada (Ontario) 905 785 0085, Canada (Québec) 514 694 8521, Denmark 45 76 26 00,
Finland0972572511, France0148142424, Germany0897413130,
Hong Kong 2645 3186, Israel 03 5734815, Italy 02 413091, Japan 03 5472 2970,
Korea 02 596 7456, Mexico 5 520 2635, Netherlands 0348 433466, Norway 32 84 84 00,
Singapore 2265886, Spain 91 640 0085, Sweden 08 730 49 70, Switzerland 056 200 51 51,
Taiwan 02 377 1200, United Kingdom 01635 523545
National Instruments Corporate Headquarters
6504 Bridge Point Parkway Austin, TX 78730-5039 Tel: (512) 794-0100
Page 3

Important Information
Warranty
The SCXI-1102, SCXI-1102B, and SCXI-1102C modules are warranted against defects in materials and workmanship
for a period of one year from the date of shipment, as evidenced by receipts or other documentation. National
Instruments will, at its option, repair or replace equipment that proves to be defective during the warranty period. This
warranty includes parts and labor.
The media on which you receive National Instruments software are warranted not to fail to execute programming
instructions, due to defects in materials an d work manship, f or a p eriod of 90 days f rom date of ship ment, as evidenced
by receipts or other documentation. National Instruments will, at its option, repair or replace software media that do
not execute programming instructions if National Instruments receives notice of such defects during the warranty
period. National Instruments does not warrant that the operation of the software shall be uninterrupted or error free.
A Return Material Authorization (RMA) number must be obtained from the factory and clearly marked on the outside
of the package before any equipment will be accepted for warranty work. National Instruments will pay the shipping
costs of returning to the owner parts which are covered by warranty.
National Instruments believes that the information in this manual is accurate. The document has been carefully
reviewed for technical accuracy. In the event that technical or typographical errors exist, National Instruments reserves
the right to make changes to subseq uent editio ns of th is do cum ent wi thout prio r not ice to ho lders of this edit ion. Th e
reader should consult National Instruments if errors are suspected. In no event shall National Instruments be liable for
any damages arising out of or related to this document or the information contained in it.
XCEPT AS SPECIFIED HEREIN
E
SPECIFICALLY DISCLAIMS ANY WARRANTY OF MERCHANTABILITY OR FITNESS FOR A PARTICULAR PURPOSE
USTOMER’S RIGHT TO RECOVER DAMAGES CAUSED BY FAULT OR NEGLIGENCE ON THE PART OF NATIONAL
C
NSTRUMENTS SHALL BE LIMITED TO THE AMOUNT THERETOFORE PAID BY THE CUSTOMER
I
WILL NOT BE LIABLE FOR DAMAGES RESULTING FROM LOSS OF DATA, PROFITS, USE OF PRODUCTS, OR INCIDENTAL OR
CONSEQUENTIAL DAMAGES, EVEN IF ADVISED OF THE POSSIBILITY THEREOF
Instruments will apply regardless of the form of action, whether in contract or tort, including negligence. Any action
against National Instruments must be brought within one year after the cause of action accrues. National Instruments
shall not be liable for any delay in performance due to causes beyond its reasonable control. The warranty provided
herein does not cover damages, defects, malfunctions, or service failures caused by owner’s failure to follow the
National Instruments installation, operation, or maintenance instructions; owner’s modification of the product;
owner’s abuse, misuse, or negligent acts; and power failure or surges, fire, flood, accident, actions of third parties, or
other events outside reasonable control.
ATIONAL INSTRUMENTS MAKES NO WARRANTIES, EXPRESS OR IMPLIED, AND
, N
.
ATIONAL INSTRUMENTS
. N
. This limitation of the liability of National
Copyright
Under the copyright laws, this publication may not be reproduced or transmitted in any form, electronic or mechanical,
including photocopying, recording, storing in an information retrieval system, or translating, in whole or in part,
without the prior written consent of National Instruments Corporation.
Trademarks
LabVIEW®, NI-DAQ®, RTSI®, ComponentWorks™, CVI™, DAQCard™, DAQPad™, Measure™, SCXI™, and
VirtualBench
Product and company names listed are trademarks or trade names of their respective companies.
™
are trademarks of National Instruments Corporation.
WARNING REGARDING MEDICAL AND CLINICAL USE OF NATIONAL INSTRUMENTS PRODUCTS
National Instruments products are not designed with components and testing intended to ensure a level of reliability
suitable for use in treatment and diagnosis of humans. Applications of National Instruments products involving
medical or clinical treatment can create a potential for accidental injury caused by product failure, or by errors on the
part of the user or application designer. Any use or application of National Instruments products for or involving
medical or clinical treatment must be performed by properly trained and qualified medical perso nnel, and all traditi onal
medical safeguards, equipment, and procedures that are appropriate in the particular situation to prevent serious injury
or death should always continue to be used when National Instruments products are being used. National Instruments
products are NOT intended to be a substitute for any form of established process, procedure, or equipment used to
monitor or safeguard human health and safety in medical or clinical treatment.
Page 4

About This Manual
Organization of This Manual...........................................................................................ix
Conventions Used in This Manual...................................................................................x
National Instruments Documentation..............................................................................xi
Customer Communication...............................................................................................xii
Chapter 1
Introduction
About the SCXI-1102/B/C Modules................................................................................1-1
What You Need to Get Started ........................................................................................1-2
Software Programming Choices......................................................................................1-3
National Instruments Application Software......................................................1-3
NI-DAQ Driver Software.................................................................................. 1-4
Register-Level Programming ............................................................................1-5
Optional Equipment...................................................................... .................................. .1-5
Custom Cables.................................................................................................................1-6
Unpacking........................................................................................................................1-6
Table
of
Contents
Chapter 2
Configuration and Installation
Module Configuration......................................................................................................2-1
Digital Configuration.........................................................................................2-3
Analog Configuration........................................................................................2-4
Current-Loop Receivers......................................................................2-4
Hardware Installation.......................................................................................................2-6
Chapter 3
Signal Connections
Front Connector.............................................................. .................................................3-1
Front Connector Signal Descriptions................................................................3-3
Analog Input Signal Connections.......................................................3-3
Ground-Referencing Your Signals.......................................3-4
Cold-Junction Sensor Connection.....................................................................3-6
©
National Instruments Corporation v SCXI-1102/B/C User Manual
Page 5

Table of Contents
Rear Signal Connector..................................................................................................... 3-7
Rear Signal Connector Descriptions................................................................. 3-8
Chapter 4
Theory of Operation
Functional Overview.......................................................................................................4-1
Rear Signal Connector, SCXIbus Connector, and SCXIbus Interface............. 4-2
Digital Control Circuitry...................................................................................4-2
Analog Circuitry ...............................................................................................4-3
Chapter 5
Calibration
Overview .........................................................................................................................5-1
Calibration Procedure......................................................................................................5-1
Calibration Equipment Requirements...............................................................5-1
Gain and Offset Calibration..............................................................................5-2
Analog Output Signal Connections....................................................3-9
Digital I/O Signal Connections...........................................................3-9
Digital Timing Signal Connection......................................................3-10
Digital Signal Specifications ..............................................................3-10
Analog Input Channels.......................................................................4-3
Analog Bus Switch.............................................................................4-4
Appendix A
Specifications
Appendix B
Calibration Sample Program
Appendix C
Customer Communication
Glossary
Index
SCXI-1102/B/C User Manual vi
©
National Instruments Corporation
Page 6

Figures
Tables
Table of Contents
Figure 1-1. The Relationship between the Programming Environment,
NI-DAQ, and Your Hardware................................. ................................1-4
Figure 2-1. SCXI-1102/B/C Module Parts Locator Diagram (1102 shown).............2-2
Figure 2-2. Removing the SCXI Module Cover........................................................2-4
Figure 2-3. Bent and Trimmed Resistor.....................................................................2-5
Figure 3-1. SCXI-1102/B/C Module Front Connector Pin Assignments ..................3-2
Figure 3-2. Ground-Referenced Signal Connection...................................................3-5
Figure 3-3. Floating Signal Connection Referenced to Chassis Ground...................3-6
Figure 3-4. SCXI-1102/B/C Module Rear Signal Connector Pin Assignments........3-7
Figure 4-1. SCXI-1102/B/C Module Block Diagram................................................4-1
Table 2-1. Jumper Settings for Digital Signal Connection.......................................2-3
Table 3-1. SCXIbus to SCXI-1102/B/C Module Rear Signal Connector
to DAQ Device Pin Equivalencies..........................................................3-10
©
National Instruments Corporation vii SCXI-1102/B/C User Manual
Page 7

About
This
Manual
This manual describes the electrical and mechanical aspects of the
SCXI-1102 family of modules and contains information concerning
their installation and operation.
The SCXI-1102 family consists of the following modules:
• SCXI-1102
• SCXI-1102B
• SCXI-1102C
Unless otherwise noted, SCXI-1102/B/C will hereafter refer to all three
modules in the SCXI-1102 family.
The SCXI-1102/B/C modules are members of the National Instruments
Signal Conditioning eXtensions for Instrumentation (SCXI) Series for
the National Instruments data acquisition (DAQ) plug-in devices. Th ese
modules are designed for signal conditioning thermocouples, volt and
millivolt sources, and 4–20 mA sources or 0–20 mA process-current
sources. The SCXI-1102/B/C modules have 32 differential analog input
channels and one cold-junction sensor channel.
Organization of This Manual
The SCXI-1102/B/C User Manual is organized as follows:
• Chapter 1, Introduction, describes the SCXI-1102/B/C modules;
lists what you need to get started with your SCXI-1102/B/C
module, the optional software, optional equipment, and custom
cables; and explains how to unpack the SCXI-1102/B/C modules.
• Chapter 2, Configuration and Installation, describes how to
configure the SCXI-1102/B/C jumper, how to install current-loop
receivers, and how to install the SCXI-1102/B/C module into the
SCXI chassis.
• Chapter 3, Signal Connections, describes the input and output
signal connections to the SCXI-1102/B/C module via the module
front connector and rear signal connector. This chapter also
©
National Instruments Corporation ix SCXI-1102/B/C User Manual
Page 8

About This Manual
includes specifications and connection instructions for the signals
on the SCXI-1102/B/C connectors.
• Chapter 4, Theory of Operatio n , contains a functional overview of
the SCXI-1102/B/C module and explains the operation of each
functional unit making up the SCXI-1102/B/C module.
• Chapter 5, Calibration, discusses the calibration procedures for the
SCXI-1102/B/C modules.
• Appendix A, Specifications, lists the specifications for the
SCXI-1102/B/C modules.
• Appendix B, Calibration Sample Program, contains a sample
program to help you calibrate your submodule.
• Appendix C, Customer Communication, contains forms you can
use to request help from National Instruments or to comment on our
products.
•The Glossary contains an alphabetical list and description of terms
used in this manual, including abbreviations, acronyms, metric
prefixes, mnemonics, symbols, and terms.
•The Index contains an alphabetical list of key terms and topics in
this manual, including the page where you can find each one.
Conventions Used in This Manual
The following conventions are used in this manual.
♦ The ♦ symbol indicates that the text following it applies only to specific
SCXI-1102 modules.
< > Angle brackets containing numbers separated by an ellipsis represent a
range of values associated with a port, b it, or signal name (f or example,
ACH<0..7> stands for the signals ACH0 through ACH7).
This icon to the left of bold italicized text denotes a note, which alerts
you to important information.
!
bold italic Bold italic text denotes a note, caution, or warning.
italic Italic text denotes emphasis, a cross reference, or an introduction to a
Lab board Refers to the boards that have Lab in their names, such as the Lab-LC
SCXI-1102/B/C User Manual x
This icon to the left of bold italicized text denotes a caution, which
advises you of precautions to take to avoid injury, data loss, or a
system crash.
key concept.
and the Lab-PC+.
©
National Instruments Corporation
Page 9

About This Manual
MIO board Refers to the multichannel I/O DAQ boards that have MIO in their
names, such as the AT-MIO-16 and the NEC-MIO-16E-4.
monospace Denotes text or characters that are to be literally input from the
keyboard, sections of code, programming examples, and syntax
examples. This font is also used for the proper names of disk drives,
paths, directories, programs, subprograms, subroutines, device names,
functions, variables, filenames, and extensions, and for statements and
comments taken from program code.
PC Refers to the IBM PC/XT, the IBM PC AT, and compatible computers.
SCXIbus Refers to the backplane in the chassis. A signal on the backplane is
referred to as the SCXIbus <signal name> line (or signal). The SCXIbus
descriptor may be omitted when the meaning is clear. Descriptions of
all SCXIbus signals are in Chapter 3, Signal Connections.
SCXI-1102/B/C Refers to all modules in the SCXI-1102 family unless otherwise noted.
modules
Slot 0 Refers to the power supply and control circuitry in the SCXI chassis.
Abbreviations, acronyms, metric prefixes, mnemonics, symbols, and
terms are listed in the Glossary.
National Instruments Documentation
The SCXI™-1102/B/C User Manual is one piece of the documentation
set for your data acquisition system. You could have any of several
types of manuals, depending on the hardware and s oftware in you r
system. Use the manuals you have as follows:
• Getting Started with SCXI—This is the first manual you should read.
It gives an overview of the SCXI system and contains the most
commonly needed information for the modules, chassis, and
software.
• Your SCXI hardware user manuals—Read these manuals next for
detailed information about signal connections and module
configuration. They also explain in greater detail how the module
works and contain application hints.
• Your DAQ hardware user manuals—These manuals have detailed
information about the DAQ hardware that plugs into or is
connected to your computer. Use these manuals for hardware
installation and configuration instructions, specification
information about your DAQ hardware, and application hints.
©
National Instruments Corporation xi SCXI-1102/B/C User Manual
Page 10

About This Manual
• Software documentation—Examples of software documentation
you may have are the LabVIEW and LabWindows
sets and the NI-DAQ documentation. After you set up your
hardware system, use either the application software
documentation or the NI-DAQ documentation to help you write
your application. If you have a large and complicated system, it is
worthwhile to look through the so ftware documentation b efore you
configure your hardware.
• Accessory installation guides or manuals—If you are using
accessory products, read the terminal block and cable assembly
installation guides. They explain how to physically connect the
relevant pieces of the system. Consult these guides when you are
making your connections.
• SCXI Chassis Manual—Read this manual for maintenance
information on the chassis and installation instructions.
Customer Communication
National Instruments wants to receive your comments on our products
and manuals. We are interested in the applications you develop with our
products, and we want to help if you have problems with them. To make
it easy for you to contact us, this manual contains comment and
configuration forms for you to complete. These forms are in
Appendix C, Customer Communication, at the end of this manual.
®
/CVI manual
SCXI-1102/B/C User Manual xii
©
National Instruments Corporation
Page 11

Chapter
Introduction
This chapter describes the SCXI-1102/B/C modules; lists what you
need to get started with your SCXI-1102/B/C module, the optional
software, optional equipment, and custom cables; and explains how to
unpack the SCXI-1102/B/C modules.
About the SCXI-1102/B/C Modules
♦ SCXI-1102
This module is for signal conditioning of thermocouples,
low-bandwidth volt and millivolt sources, 4 to 20 mA current sources,
and 0 to 20 mA process-current sources. The SCXI-1102 has
32 differential analog input channels and one cold-junction sensor
channel. On each channel, the SCXI-1102 has a three-pole lowpass
filter with a 2 Hz cutoff frequency to reject 60 Hz noise. Each channel
also has an amplifier with a selectable gain of 1 or 100. You can
multiplex the SCXI-1102 inputs to a single output, which drives a single
DAQ device channel.
♦ SCXI-1102B
This module is for the signal conditioning of thermocouples,
medium-bandwidth volt and millivolt sources, 4 to 20 mA current
sources, and 0 to 20 mA process-current sources. The SCXI-1102B has
32 different analog input channels and one cold-junction sensor
channel. On each channel, the SCXI-1102B has a three-pole lowpass
filter with a 200 Hz cutoff frequency. Each channel also has an
amplifier with a selectable gain of 1 or 100. You can multiplex the
SCXI-1102B inputs to a single output, which drives a single DAQ
device channel.
1
♦ SCXI-1102C
This module is for the signal conditioning of thermocouples,
high-bandwidth volt and millivolt sources, 4 to 20 mA current sources,
and 0 to 20 mA process-current sources. The SCXI-1102C has 32
different analog input channels and one cold-junction sensor channel.
On each channel, the SCXI-1102C has a three-pole lowpass filter with
a 10 kHz cutoff frequency. Each channel also has an amplifier with a
©
National Instruments Corporation 1-1 SCXI-1102/B/C User Manual
Page 12

Chapter 1 Introduction
selectable gain of 1 or 100. You can multiplex the SCXI-1102C inputs
to a single output, which drives a single DAQ device channel.
The SCXI-1102/B/C modules operate with full functionality with the
National Instruments MIO, Lab-PC+, PCI-1200, DAQCard-1200, and
SCXI-1200 modules. You can use the PC-LPM-16 board and the
DAQCard-700 with the SCXI-1102/B/C, but these devices cannot scan
the module; they can only perform single-channel reads. You can
multiplex several SCXI-1102/B/C modules and other SCXI modules
into a single channel on the DAQ device, greatly increasing the number
of analog input signals that you can digitize.
Detailed specifications of the SC XI-1102/B/ C modul es are listed in
Appendix A, Specifications.
What You Need to Get Started
To set up and use your SCXI-1102/B/C module, you will need the
following items:
❑ One of the following modules:
SCXI-1102
SCXI-1102B
SCXI-1102C
❑ SCXI-1102/B/C User Manual
❑ One of the following software packages and documentation:
ComponentWorks
LabVIEW for Macintosh
LabVIEW for Windows
LabWindows/CVI for Windows
Measure
NI-DAQ for Macintosh
NI-DAQ for PC Compatibles
VirtualBench
❑ Your computer
SCXI-1102/B/C User Manual 1-2
©
National Instruments Corporation
Page 13

Software Programming Choices
You have several options to choose from when programming your
National Instruments DAQ and SCXI hardware. You can use National
Instruments application software, NI-DAQ, or register-level
programming.
National Instruments Application Software
ComponentWorks contains tools for data acquisition and instrument
control built on NI-DAQ driver software. ComponentWorks provides
a higher-level programming interface for building virtual instruments
through standard OLE controls and DLLs. With ComponentWork s, you
can use all of the configuration tools, resource management utilities,
and interactive control utilities included with NI-DAQ.
LabVIEW features interactive graphics, a state-of-the-art user
interface, and a powerful graphical programming language. The
LabVIEW Data Acquisition VI Library, a series of VIs for using
LabVIEW with National Instruments DAQ hardware, is included with
LabVIEW. The LabVIEW Data Acquisition VI Library is functionally
equivalent to NI-DAQ software.
Chapter 1 Introduction
LabWindows/CVI features interactive graphics, state-of-the-art user
interface, and uses the ANSI standard C programming language. The
LabWindows/CVI Data Acquisition Library, a series of functions for
using LabWindows/CVI with National Instruments DAQ hardware, is
included with the NI-DAQ software kit. The LabWindows/CVI Data
Acquisition Library is functionally equivalent to the NI-DAQ so ftware.
VirtualBench features virtual instruments that combine DAQ products,
software, and your computer to create a stand-alone instrument with the
added benefit of the processing, display, and storage capabilities of
your computer. VirtualBench instruments load and save waveform data
to disk in the same forms that can be used in popular spreadsheet
programs and word processors.
Using ComponentWorks, LabVIEW, LabWindows/CVI, or
VirtualBench software will greatly reduce the development time
for your data acquisition and control application.
©
National Instruments Corporation 1-3 SCXI-1102/B/C User Manual
Page 14
Chapter 1 Introduction
NI-DAQ Driver Software
The NI-DAQ driver software is included at no charge with all National
Instruments DAQ hardware. NI-DAQ has an extensive library of
functions that you can call from your application programming
environment. These functions include routines for analog input
(A/D conversion), buffered data acquisition (high-speed A/D
conversion), analog output (D/A conversion), waveform generation,
digital I/O, counter/timer operations, SCXI, RTSI, self-calibration,
messaging, and acquiring data to extended memory.
NI-DAQ also internally addresses many of the complex issues between
the computer and the plug-in device, such as programming interrupts
and DMA controllers. NI-DAQ maintains a consistent software
interface among its different versions so that you can change platforms
with minimal modifications to your code. Figure 1-1 illustrates the
relationship between NI-DAQ and your National Instruments
application software.
Conventional
Programming Environment
DAQ or
SCXI Hardware
Figure 1-1.
The Relationship between the Programming Environment,
NI-DAQ, and Your Hardware
ComponentWorks,
LabVIEW,
LabWindows/CVI, or
VirtualBench
NI-DAQ
Driver Software
Personal
Computer or
Workstation
SCXI-1102/B/C User Manual 1-4
©
National Instruments Corporation
Page 15

Register-Level Programming
The final option for programming any National Instruments DAQ
hardware is to write register-level software. Writing register-level
programming software can be very time-consuming and inefficient
and is not recommended.
Even if you are an experienced register-level programmer, consider
using NI-DAQ or other National Instruments application software to
program your National Instruments DAQ hardware. Using the
application software is easier than and as flexible as register-level
programming and can save weeks of development time.
Optional Equipment
National Instruments offers a variety of products to use with your
SCXI-1102/B/C module, as follows:
• Terminal blocks and 96-pin cables that allow you to attach input
signals to your module.
• SCXI process-current resistor kit
• Cables and cable assemblies, shielded and ribbon
Chapter 1 Introduction
For more specific information about these products, refer to your
National Instruments catalogue or call the office nearest you.
©
National Instruments Corporation 1-5 SCXI-1102/B/C User Manual
Page 16

Chapter 1 Introduction
Custom Cables
The following table summarizes the custom cable information.
Signal
Connector
Rear AMP Inc. (1-103310-0)
Front Harting Electronik Inc.
SCXI–1102/B/C
Connector
50-pin male ribbon
cable header
(09-03-396-6921)
96-pin DIN C male
connector
Unpacking
Your SCXI-1102/B/C module is shipped in an antistatic package to
prevent electrostatic damage to the module. Electrostatic discharge can
damage several components on the module. To avoid such damage in
handling the module, take the following precautions:
• Ground yourself via a grounding strap or by holding a grounded
object.
• Touch the antistatic package to a metal part of your SCXI chassis
before removing the module from the package.
• Remove the module from the package and inspect the module for
loose components or any other sign of damage. Notify National
Instruments if the module appears damaged in any w ay. Do not
install a damaged module into your SCXI chassis.
• Never touch the exposed pins of connectors.
Mating
Connector
Electronic Products
Division/3M (3425-7650)
or T&B/Ansley Corp.
(609-5041CE) 50-position
polarized ribbon-socket
connector
AMP Inc. (535020;
right-angle pins) or Panduit
Corp. (100-096-434
straight-solder pins) 96-pin,
polarized, DIN C female
connector
Cable
Electronic Products
Division/3M (3365/50)
or T&B/Ansley Corp.
(171-50) 50-conductor,
28 AWG stranded
ribbon cable
N/A
SCXI-1102/B/C User Manual 1-6
©
National Instruments Corporation
Page 17

Configuration and
Chapter
Installation
This chapter describes how to configure your SCXI-1102/B/C jumper,
how to install current-loop receivers, and how to install your
SCXI-1102/B/C module into the SCXI chassis.
Module Configuration
The SCXI-1102/B/C contains one jumper, shown in Figure 2-1. Jumper
W1 connects a pullup resistor to the SERDATOUT signal on the rear
signal connector.
The remainder of the module configuration (gain, output signal
referencing, and so on) is software-programmable.
2
©
National Instruments Corporation 2-1 SCXI-1102/B/C User Manual
Page 18

Chapter 2 Configuration and Installation
1
2
3
4
5
6
7
1 RCL24-RCL31
2 RCL14-RCL23
3 RCL8-RCL13
4 Assembly Number
Figure 2-1. SCXI-1102/B/C Module Parts Locator Diagram (1102 shown)
SCXI-1102/B/C User Manual 2-2
5 RCL0-RCL7
6 Serial Number
7W1
©
National Instruments Corporation
Page 19

Digital Configuration
W1
PULLUP NO PULLUP
W1
PULLUP NO PULLUP
If you have a one-chassis system, you do not have to read this section.
You can skip to the next section, Analog Configuration.
Note: If nothing is cabled to the SCXI-1102/B/C module rear signal connector,
the position of jumper W1 is irrelevant.
The SCXI-1102/B/C modules have only one jumper—jumper W1—f or
communication between the DAQ device and the SCXIbus, shown in
Table 2-1.
Chapter 2 Configuration and Installation
Table 2-1.
Jumper Settings for Digital Signal Connection
Jumper Description Configuration
Position PULLUP—Use this
setting for a single-chassis system
and for one cabled module in a
multi-chassis system. Connects a
2.2 kΩ pullup resistor to the
SERDATOUT line. (factory
setting)
Position NO PULLUP—Use this
W1
setting for additional chassis in a
multi-chassis system. No pullup
resistor is connected to the
SERDATOUT line.
All SCXI modules have a jumper that corresponds to jumper W1 on the
SCXI-1102/B/C module. Refer to the user manuals of the other SCXI
modules in your system to determine the designator and settings of this
jumper. In the pullup position, this jumper connects a pullup resistor to
the SERDATOUT line. This pullup resistor pulls the SERDATOUT
line high when its open-collector driver goes to a high-impedance state.
The SERDATOUT line on the SCXI-1102/B/C module reads the
Module ID Register, the Status Register, and the EEPROM.
©
When using a single-chassis system, set the jumper in the pullup
position on the SCXI module cabled to the DAQ device. When using
multiple chassis, set the jumper to the pullup position on only one of the
SCXI modules cabled to the DAQ device.
National Instruments Corporation 2-3 SCXI-1102/B/C User Manual
Page 20

Chapter 2 Configuration and Installation
If you want to change the W1 jumper setting, refer to Figure 2-2 as you
perform the following steps:
1. Ground yourself via a grounding strap or via a ground connected to
your SCXI chassis. Properly grounding yourself prevents damage
to your SCXI module from electrostatic discharge.
2. Remove the grounding screw of the top cover.
3. Snap out the top cover of the shield by placing a screwd river in the
groove at the bottom of the module and pushing down on the
screwdriver.
4. Change the W1 jumper setting.
5. Reinstall the top cover and grounding screw.
Removable Cover
Grounding
Screw
Figure 2-2. Removing the SCXI Module Cover
Analog Configuration
Current-Loop Receivers
The SCXI-1102/B/C modules have pads for transforming individual
channels to current-to-voltage converters. National Instruments offers
an SCXI process-current pack of four 249 Ω, 0.1%, 5 ppm, 1/4 W
resistors. The reference designators for the current loop resistors have
SCXI-1102/B/C User Manual 2-4
Front Connector
©
Top of Module
National Instruments Corporation
Page 21

Chapter 2 Configuration and Installation
the format: for input channel x, the resistor is RCLx. For example, the
resistor for channel 28 is RCL28.
Caution: Before installing the resistors in your module, make sure that there are no
!
signals connected to your module front connector.
Before installing your module in the SCXI chassis, you must install the
resistors by performing the following steps:
1. Ground yourself via a grounding strap or via a ground connected to
your SCXI chassis. Properly grounding yourself prevents damage
to your SCXI module from electrostatic discharge.
2. Remove the grounding screw of the top cover.
3. Snap out the top cover of the shield by placing a screwd river in the
groove at the bottom of the module and pushing down.
4. Remove the rear panel by unscrewing the two remaining screws.
5. Slide the module out of its enclosure.
6. Bend and trim the resistor lead as shown in Figure 2-3. Be sure that
the resistor does not extend more than 0.65 in. above the surface of
the circuit board.
Figure 2-3. Bent and Trimmed Resistor
7. Insert the resistor into the appropriate pa d, labeled RCLx.
8. Solder the leads to the pad on the bottom side of the module.
9. Slide the module back into its enclosure.
10. Reinstall the rear panel.
11. Reinstall the top cover and grounding screw.
©
National Instruments Corporation 2-5 SCXI-1102/B/C User Manual
Page 22

Chapter 2 Configuration and Installation
Hardware Installation
You can install the SCXI-1102/B/C module in any available SCXI
chassis slot. After you have made any necessary changes and have
verified and recorded the jumper setting on the form in Appendix C,
Customer Communication, you are ready to install the SCXI-1102/B/C
module. The following are general installation instructions; consult the
user manual or technical reference manual of your SCXI chassis for
specific instructions and warnings:
1. Turn off the computer that contains the DAQ device or disconnect
it from your SCXI chassis.
2. Turn off the SCXI chassis. Do not insert the SCXI-1102/B/C
module into a chassis that is turned on.
3. Insert the SCXI-1102/B/C module into the module guides. Gently
guide the module into the back of the slot until the connectors make
good contact. If a cable assembly has already been installed in the
rear of the chassis, the module and cable assembly must be firmly
engaged; however, do not force the module into place.
4. Screw the front mounting panel of the SCXI-1102/B/C module to
the top and bottom threaded strips of your SCXI chassis.
5. If this module is to be connected to an MIO-16 DAQ device, attach
the connector at the metal end of the SCXI-1340 cable assembly to
the rear signal connector on the SCXI-1102/B/C module. Screw the
rear panel to the rear threaded strip. Attach the loose end of the
cable to the MIO-16 device.
Note: For installation procedures with other SCXI accessories and DAQ devices,
consult your cable installation guide.
6. Check the installation.
7. Turn on the SCXI chassis.
8. Turn on the computer or reconnect it to your chassis.
The SCXI-1102/B/C module is installed. You are now ready to install
and configure your software.
If you are using NI-DAQ or other National Instruments application
software, refer to the installation instructions in your documentation to
install and configure your software.
SCXI-1102/B/C User Manual 2-6
©
National Instruments Corporation
Page 23

Chapter
Signal Connections
This chapter describes the input and output signal connections to the
SCXI-1102/B/C module via the module front connector an d rear signal
connector. This chapter also includes specifications and connection
instructions for the signals on the SCXI-1102/B/C module connectors.
Caution:
!
Front Connector
Static electricity is a major cause of component failure. To prevent damage
to the electrical components in the module, observe antistatic techniques
whenever removing a module from the chassis or whenever working on a
module.
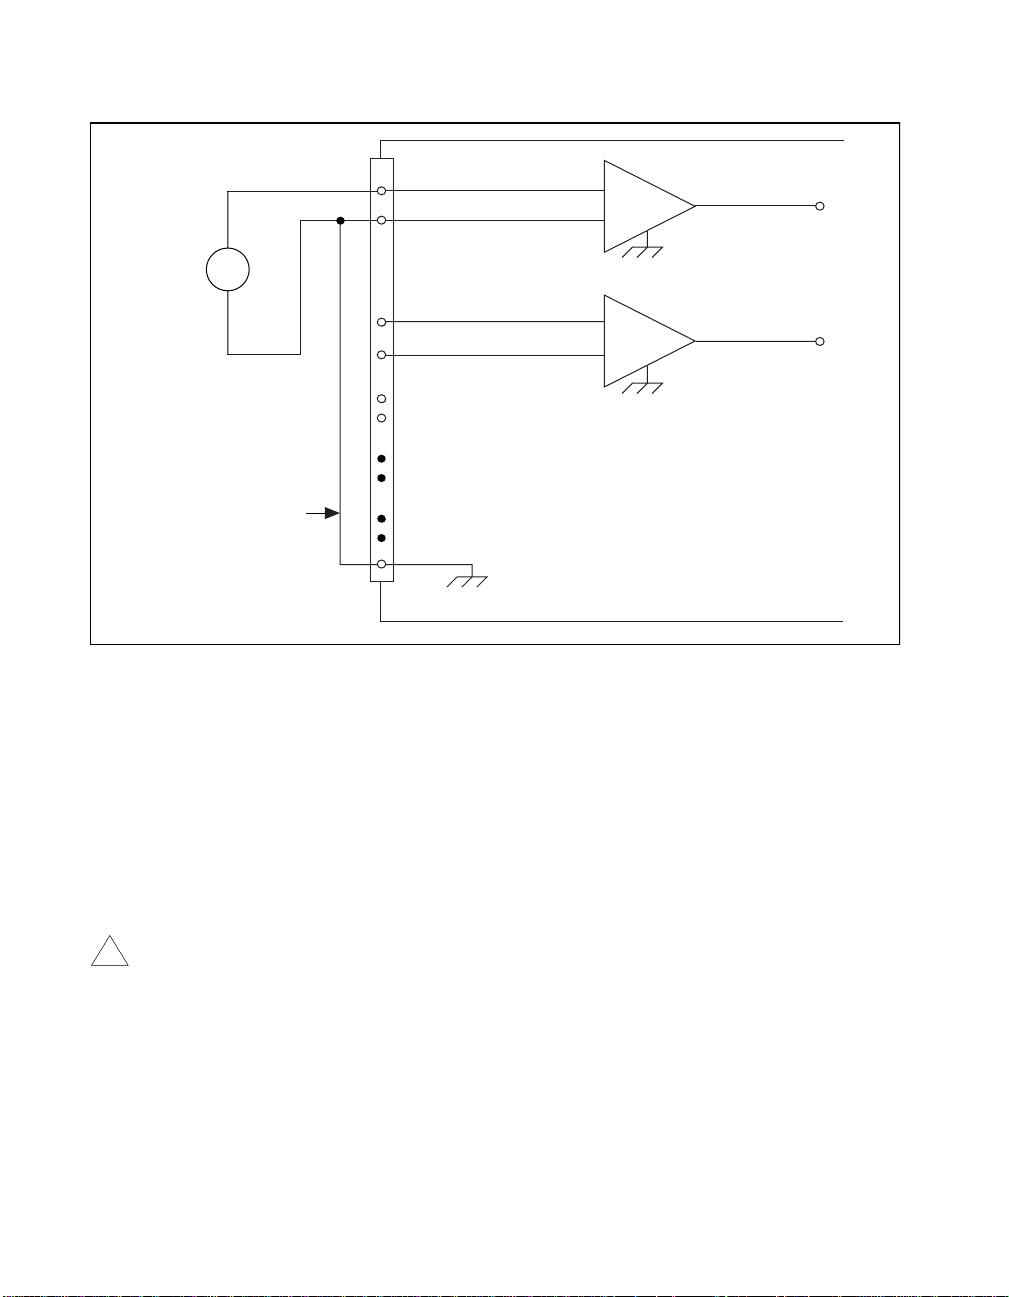
Figure 3-1 shows the pin assignments for the SCXI-1102/B/C module
front connector.
3
©
National Instruments Corporation 3-1 SCXI-1102/B/C User Manual
Page 24

Chapter 3 Signal Connections
CGND
NC
NC
NC
NC
NC
NC
NC
CGND
NC
NC
NC
NC
NC
NC
NC
CGND
NC
NC
NC
NC
NC
NC
NC
NC
NC
NC
CGND
CJSENSOR
CJSENSOR
CGND
+5 V
32
31
30
29
28
27
26
25
24
23
22
21
20
19
18
17
16
15
14
13
12
11
10
A
CH0CH1CH2CH3CH4CH5CH6CH7CH8-
CH9CH10CH11CH12CH13CH14-
CH15-
CH16CH17CH18CH19CH20CH21CH22-
9
8
7
6
5
4
3
2
1
CH23CH24CH25CH26CH27CH28CH29CH30CH31-
64
63
62
61
60
59
58
57
56
55
54
53
52
51
50
49
48
47
46
45
44
43
42
41
40
39
38
37
36
35
34
33
B
CH0+
CH1+
CH2+
CH3+
CH4+
CH5+
CH6+
CH7+
CH8+
CH9+
CH10+
CH11+
CH12+
CH13+
CH14+
CH15+
CH16+
CH17+
CH18+
CH19+
CH20+
CH21+
CH22+
CH23+
CH24+
CH25+
CH26+
CH27+
CH28+
CH29+
CH30+
CH31+
C
96
95
94
93
92
91
90
89
88
87
86
85
84
83
82
81
80
79
78
77
76
75
74
73
72
71
70
69
68
67
66
65
Figure 3-1. SCXI-1102/B/C Module Front Connector Pin Assignments
SCXI-1102/B/C User Manual 3-2
©
National Instruments Corporation
Page 25

Front Connector Signal Descriptions
Pin Signal Name Description
A1 +5 V +5 VDC Source—Used to
Chapter 3 Signal Connections
power the temperature sensor
on the terminal block. 0.2 mA
of source not protected.
A2, A5, A16,
A24, A32
A3, A4 CJSENSOR Cold-junction Temperature
B1–B32 CH31- through CH0– Negative Input Channels —
C1–C32 CH31+ through CH0+ Positive Input Channels 31
All other pins are not connected.
CGND Chassis Ground—Tied to the
SCXI chassis.
Sensor Input—Connects to
the temperature sensor of the
terminal block.
Negative side of differential
input channels.
through 0—Positive side of
differential input channels.
Analog Input Signal Connections
The signal terminals for the positive input channel are located in
column B of the connector. The signal terminal for each corresponding
negative input channel is located in column C of the connector. Each
input goes to a separate filter and amplifier that is multiplexed to the
module output buffer. The terminal block temperature sensor output—
connected to pins A3 and A4 (CJSENSOR)—is also filtered and
multiplexed to the module output buffer.
The differential input signal range of an SCXI-1102/B/C module input
channel is ±10 V/G, where G is the gain selected on the SCXI-1102/B/C
module input channel. This differential input range is the maximum
measurable voltage difference between the positive and negative
channel inputs. The common-mode input signal range of an
SCXI-1102/B/C module input channel is ±11 V. This common-mode
©
National Instruments Corporation 3-3 SCXI-1102/B/C User Manual
Page 26

Chapter 3 Signal Connections
Caution: Exceeding the input damage level (±42 VAC peak or VDC between input
!
channels and chassis ground) can damage the SCXI-1102/B/C module, the
SCXIbus, and the DAQ device. National Instruments is
injuries resulting from such signal connections.
Applying a voltage greater than ±42 VAC peak or VDC to the
SCXI-1102/B/C is an electrical shock hazard. National Instruments is
liable for any damages or injuries resulting from such voltage application.
Note: Exceeding the differential or common-mode input channel ranges results
in a distorted signal measurement.
input range for either positive or negative channel input is the maximum
input voltage which will result in a valid measurement. Each channel
includes input protection circuitry to withstand the accidental
application of voltages up to ±42 VAC peak or VDC.
liable for any
NOT
NOT
Ground-Referencing Your Signals
Your input signals can be either ground-referenced, as shown in
Figure 3-2, or floating, as shown in Figure 3-3. Before you connect
your thermocouple or any other signal, determine whether it is
floating or ground-referenced. If it is a floating signal, you must
ground-reference the signal in one of two ways. You can connect the
negative channel input to chassis ground as shown in Figure 3-3 or you
can use the clamping resistors on the SCXI-1303 terminal block. The
SCXI-1303 also has a resistor pack for pulling up the positive input s for
open-thermocouple detection. Consult the SCXI-1303 32-Channel
Isothermal Block Installation Guide for details.
Do not ground signals which are already ground-referenced; doing so
will result in a ground loop, which adversely affects your measurement
accuracy.
SCXI-1102/B/C User Manual 3-4
©
National Instruments Corporation
Page 27

Chapter 3 Signal Connections
CH0+
CH0-
+
-
+
V
s
CH1+
+
CH1-
+
-
V
cm
-
Connector
Front Signal
SCXI - 1102/B/C
Figure 3-2. Ground-Referenced Signal Connection
©
National Instruments Corporation 3-5 SCXI-1102/B/C User Manual
Page 28
Chapter 3 Signal Connections
CH0+
CH0-
Floating
Signal
Make This Connection
to Ground Reference
+
V
s
-
the Signal
Referenced to
Chassis Ground
CH1+
CH1-
Connector
Front Signal
CGND
Figure 3-3. Floating Signal Connection Referenced to Chassis Ground
Cold-Junction Sensor Connection
Pins A3 and A4 (CJSENSOR) connect the temperature sensor located
on the SCXI-1300 or SCXI-1303 terminal blocks to the SCXI- 1102/B/C
module. The CJSENSOR signal is measured relative to CGND. Pins A3
and A4 are connected within the SCXI-1102/B/C module so the
position of the MTEMP/DTEMP jumper on the SCXI-1300 or
SCXI-1303 does not matter. The input is overvoltage-protected to
15 VDC with power on and off.
+
-
+
-
SCXI - 1102/B/C
Caution: Exceeding the overvoltage protection on the CJSENSOR input can damage
!
the SCXI-1102/B/C module, the SCXIbus, and the DAQ device. National
Instruments is
liable for any damages or injuries resulting from such
NOT
signal connections.
SCXI-1102/B/C User Manual 3-6
©
National Instruments Corporation
Page 29

Rear Signal Connector
Note: If you are using the SCXI-1102/B/C module with a National Instruments
DAQ device and cable assembly, you do not need to read the remainder of
this chapter. If you are using the SCXI-1180 feedthrough panel, the
SCXI-1343 rear screw terminal adapter, or the SCXI-1351 one-slot cable
extender with the SCXI-1102/B/C module, read this section.
Figure 3-4 shows the SCXI-1102/B/C module rear signal connector pin
assignments.
Chapter 3 Signal Connections
AOGND
MCH0+
NC
NC
NC
NC
NC
NC
NC
OUTREF
NC
NC
SERDATIN
DAQD*/A
SLOT0SEL*
DGND
NC
NC
SERCLK
NC
NC
RSVD
NC
NC
NC
12
34
56
78
910
11 12
13 14
15 16
17 18
19 20
21 22
23 24
25 26
27 28
29 30
31 32
33 34
35 36
37 38
39 40
41 42
43 44
45 46
47 48
49 50
AOGND
MCH0NC
NC
NC
NC
NC
NC
NC
NC
NC
DGND
SERDATOUT
NC
NC
NC
NC
SCANCLK
NC
NC
NC
NC
RSVD
NC
NC
Figure 3-4.
©
National Instruments Corporation 3-7 SCXI-1102/B/C User Manual
SCXI-1102/B/C Module Rear Signal Connector Pin Assignments
Page 30

Chapter 3 Signal Connections
Rear Signal Connector Descriptions
The rear signal connector on the cabled module is the interface between
the DAQ device and all modules in the SCXI chassis.
Pin Signal Name Direction Description
1, 2 AOGND Output Negative Module Analog Output—With software, you
can configure these pins to connect to the analog
reference.
3 MCH0+ Output Positive Module Analog Output—This pin connects to
the positive side of the differential analog input channel
0 of the DAQ device.
4 MCH0- Output Negative Module Analog Output—In the reset state of
the module, this pin is configured to connect to the
analog reference.
19 OUTREF Output Negative Module Analog Output—With software, you
can configure this pin to connect to the analog reference.
24, 33 DGND — Digital Ground—These pins supply the reference for
DAQ device digital signals and are tied to the module
digital ground.
25 SERDATIN Input Serial Data In—The DAQ device uses this signal to
program modules in all slots.
26 SERDATOUT Output Serial Data Out—A cabled module uses this signal to
return data from any module to the DAQ device.
27 DAQD*/A Input DAQ Device Data/Address Line—The DAQ device
asserts this signal to indicate to the module whether the
incoming serial stream is data or address information.
29 SLOT0SEL* Input Slot 0 Select—The DAQ device asserts this signal low
to indicate that the SERDATIN line information is going
to the Slot 0 controller instead of a module.
36
SCANCLK Input Scan Clock—A rising edge indicates to the scanned
SCXI module that the DAQ device has taken a sample
and causes the module to advance channels.
SCXI-1102/B/C User Manual 3-8
©
National Instruments Corporation
Page 31

Chapter 3 Signal Connections
Pin Signal Name Direction Description
37
43, 46
All other pins are not connected.
SERCLK Input Serial Clock—This signal clocks the data on the SER-
DATIN and SERDATOUT lines.
RSVD Input Reserved
The signals on the rear signal connector are analog output signals,
digital I/O signals, or digital timing signals. The following section
contains signal connection guidelines for each of these groups.
Analog Output Signal Connections
Pins 1 through 4 and pin 19 of the rear signal connector are analog
output signal pins. Pins 1 and 2 are AOGND signal pins, pin 4 is the
MCH0- pin, and pin 19 is the OUTREF pin. With software, you can
configure pin 1, 2, 4 or 19 to connect to the module’s analog ground
(AGND). You can use the pin that is connected to AGND as a general
analog power ground tie point to the SCXI-1102/B/C module, if
necessary.
Caution: The SCXI-1102/B/C module analog outputs are not overvolta ge-protected.
!
Applying external voltages to these outputs can damage the
SCXI-1102/B/C module. National Instruments is
damages resulting from such signal connections.
liable for any
NOT
Note: The SCXI-1102/B/C module analog outputs are short-circuit protected.
Digital I/O Signal Connections
Pins 24 through 27, 29, 33, 36, 37, 43, and 46 constitute the digital I/O
lines of the rear signal connector.
The SCXI-1102/B/C module digital input and output signals match the
digital I/O lines of the MIO-16 boards. When used with an SCXI-1341,
SCXI-1342, or SCXI-1344 cable assembly, the SCXI-1102/B/C module
signals match the digital lines of the Lab-NB/PC+, the PC-LPM-16, and
©
National Instruments Corporation 3-9 SCXI-1102/B/C User Manual
Page 32

Chapter 3 Signal Connections
the Lab-LC boards, respectively. Table 3-1 l ists th e equi vale nc ies . For
more detailed information, consult your cable installation guide.
Table 3-1.
SCXIbus
Line
SCXIbus to SCXI-1102/B/C Module Rear Signal Connector to DAQ Device Pin Equivalencies
SCXI-1102/B/C
MIO-16 Lab Boards PC-LPM-16
Rear Signal
Connector
MOSI SERDATIN ADIO0 PB4 DOUT4
D*/A DAQD*/A ADIO1 PB5 DOUT5
INTR* SLOT0SEL* ADIO2 PB6 DO UT6
SPICLK SERCLK EXTSTROBE* PB7 DOUT7
MISO SERDATOUT BDIO0 PC1 DIN6
Digital Timing Signal Connection
The SCXI-1102/B/C module uses pin 36, SCANCLK, to increment to
the next channel after each DAQ device conversion during scanning.
Digital Signal Specifications
The following specifications and ratings apply to the digital signals:
• Absolute max voltage input rating 5.5 V with respect
to DGND
• Digital input specifications (referenced to DGND)
–V
–V
–I
• Digital output specifications (referenced to DGND)
–V
–V
input logic high voltage 2 V min
IH
input logic low voltage 0.8 V max
IL
input current leakage ±1 µA max
I
output logic high voltage 3.7 V min at 4 mA max
OH
output logic low voltage 0.4 V max at 4 mA max
OL
SCXI-1102/B/C User Manual 3-10
©
National Instruments Corporation
Page 33

Chapter
Theory of Operation
This chapter contains a functional overview of the SCXI-1102/B/C
module and explains the operation of each fun ctional unit making up the
SCXI-1102/B/C module.
Functional Overview
The block diagram in Figure 4-1 illustrates the key functional
components of the SCXI-1102/B/C module.
CH 0 +
CH 0 –
+
Inst.
Amp
–
Input Protection
and Lowpass Filter
Gain 0
Lowpass
Filter
Buffer
32-to-1 Mux
Mux
Buffer
Switch
Switch
Switch
4
Mux
MCH0+
MCH0-
AOGND
OUTREF
Rear Signal Connector
CH 31+
CH 31 –
Front Signal Connector
CJSENSOR
©
National Instruments Corporation 4-1 SCXI-1102/B/C User Manual
+
Inst.
Amp
–
Input Protection
and Lowpass Filter
Input Protection
and Lowpass Filter
Lowpass
Gain 31
Lowpass
Filter
Filter
Buffer
Buffer
Figure 4-1.
SCXIbus
Interface
Gain
Register
Calibration EEPROM
Digital
Control
SCXI-1102/B/C Module Block Diagram
AB0+
AB0-
SCXIbus Connector
Page 34

Chapter 4 Theory of Operation
The major components of the SCXI-1102/B/C modules are as follows:
• Rear signal connector
• SCXIbus connector
• SCXIbus interface
• Digital control circuitry
• Analog circuitry
The SCXI-1102/B/C modules consist of 32 multiplexed input channels,
each with a software-programmable gain of 1 or 100. Each input
channel has its own lowpass filter. The SCXI-1102/B/C modules also
have a digital section for automatic control of channel scan ning,
temperature sensor selection, and gain selection.
Rear Signal Connector, SCXIbus Connector, and SCXIbus Interface
The SCXIbus controls the SCXI-1102/B/C module. The SCXIbus
interface connects the rear signal connector to the SCXIbus, allowing a
DAQ device to control the SCXI-1102/B/C module and the rest of the
chassis.
Digital Control Circuitry
The digital control circuitry consists of the Address Handler and the
following registers: Module ID, Configuration, Status, EEPROM, Gain,
and Channel. The Address Handler controls which register is being
addressed. The Module ID Register contains a code unique to each type
of SCXI-1102 module:
♦ SCXI-1102—The Module ID is 30 decimal.
♦ SCXI-1102B—The Module ID is 31 decimal.
♦ SCXI-1102C—The Module ID is 62 decimal.
The Configuration Register configures t he SCXI-1102/B/C modules for
the desired scanning mode and connection to the rear signal connector.
The Status Register indicates whether the input channels have settled
after a change in the gains. The EEPROM Register is the address for
interfacing with the module EEPROM, which contains calibration
information. The Gain Register selects between gains of 1 or 100 for
each of the 32 channels. The Channel Register selects a channel for a
single measurement or a start channel for a scan. Refer to
SCXI-1102/B/C User Manual 4-2
©
National Instruments Corporation
Page 35

Analog Circuitry
Note: Because of the 2 Hz bandwidth of the SCXI-1102 module input channels,
Chapter 4 Theory of Operation
Software Programming Choices in Chapter 1, Introduction, to learn
about options for programming the control circuitry.
The analog circuitry per channel consists of a lowpass filter and an
amplifier with a software selectable gain of 1 or 100. The CJSENSOR
channel also has a buffered lowpass filter but has no amplifier. The
channels and CJSENSOR are multiplexed to a single output buffer.
Analog Input Channels
Each of the 32 analog input channels feeds to a separate amplifier with
a programmable gain of 1 or 100. Then the signal passes through a
three-pole lowpass filter.
you must wait approximately 3 s after changing the gains before the
channels settle and you can take an accurate measurement. NI-DAQ
automatically reads the Status Register to determine when the module
output has settled. For the SCXI-1102B and SCXI-1102C modules, this
time is approximately 100 ms and 1 ms, respectively.
The temperature sensor consists of a thermistor located on the
SCXI-1300 or SCXI-1303 terminal block. The temperature sensor is for
cold-junction compensation of the SCXI-1102/B/C thermocouples. The
CJSENSOR channel also passes through a 2 Hz lowpass filter to reject
unwanted noise on the SCXI-1102/B/C. Along with the other 32 input
channels, the CJSENSOR is multiplexed to the output buffer, where it
can be read by the DAQ device.
For measurement accuracy of 0.012% of full scale, the minimum scan
interval is 3 µs. This is the smallest interval in which you can switch
between analog channels on the module and still measure accurate
voltages. The 3 µs scan interval gives you a maximum sampling rate of
333 kHz. Because this rate is higher than the bandwidth of a single
SCXI-1102/B/C channel, you can sample multiple channels on mu ltiple
SCXI modules without undersampling one of the SCXI-1102/B/C
channels.
©
National Instruments Corporation 4-3 SCXI-1102/B/C User Manual
Page 36

Chapter 4 Theory of Operation
Analog Bus Switch
The SCXI-1102/B/C modules contain switches to place their analog
output on the SCXIbus to pass the output to the SCXI module cabled to
the DAQ device. The SCXI-1102/B/C modules also contain switches to
receive a signal placed on the SCXIbus by another SCXI module. The
output buffer of the cabled module drives a received signal onto the
MCH0+ line of the rear signal connector so that the DAQ device can
read it. When a signal passes on the SCXIbus from the scanned SCXI
module to the cabled SCXI module, the measurement is known as
indirect scanning.
SCXI-1102/B/C User Manual 4-4
©
National Instruments Corporation
Page 37

Chapter
Calibration
Overview
5
This chapter discusses the calibration procedures for the
SCXI-1102/B/C modules.
Using the procedure described in this chapter, you will be able to
calculate the gain error and voltage offset on a per channel per gain
basis. You can store these constants in the onboard EEPROM for future
use and for automatic calibration when you are us ing National
Instruments software. The module comes from the factory with
factory-determined calibration constants in the EEPROM. However, it
is recommended that you recalibrate a module at least once per year or
when you operate the module outside of the 20° to 30° C temperature
range.
In order to calibrate the SCXI-1102/B/C modules, you will need to
apply precision voltages to the channel inputs and/or ground the
channel inputs.
Calibration Procedure
Calibration Equipment Requirements
According to standard practice, the equipment you use to calibrate the
SCXI-1102/B/C module should be 10 times as accurate as the
SCXI-1102/B/C module. Calibration equipment with four times the
accuracy of the SCXI-1102/B/C is generally considered acceptable.
©
National Instruments Corporation 5-1 SCXI-1102/B/C User Manual
Page 38

Chapter 5 Calibration
To calibrate the SCXI-1102/B/C module, you need a voltmeter with the
following specifications:
• Accuracy ±6 ppm standard reading
±15 ppm sufficient reading
• Range –10 to +10 V
• Resolution 8.5 digits
A multiranging 8.5-digit digital multimeter (DMM) can perform the
necessary calibrations.
To make sure that the DMM does not introdu ce an additional offset, you
can determine the offset error of the DMM by shorting its leads together
and reading the measured value. This value, the DMM offset, must be
subtracted from all subsequent measurements.
You will need to measure the module’s output between MCH0+ and
MCH0–. To access these pins, connect a 50-pin ribbon cable from the
CB-50 I/O connector block to the module rear signal connector or to the
rear signal adapter. Then connect to MCH0+ and MCH0– on the CB-50
pins 3 and 4, respectively.
Gain and Offset Calibration
To determine the offset and gain calibration factors of the
SCXI-1102/B/C module for a given gain, perform the following steps
for a two-point calibration. For two-point calibration, it is best to use
input voltages that correspond to the signal range of interest. For
example, if you are planning to measure bipolar voltages over the
module’s full input range, choose –9.9 V/G (negative full-scale) and
+9.9 V/G (positive full-scale) as your two input voltages.
1. Select the desired channel. Set the channel gain to the desired gain.
2. Apply the input for the first calibration point. To select negative
full scale as the calibration point, apply –9.9 V/G for an input
voltage.
a. Apply the input voltage to the channel selected in step 1.
Note: To make one of your calibration points the zero poi nt, connect the positive
and negative channel leads to one of the chassis ground pins on the front
connector or terminal block.
b. Measure the input voltage with the DMM. Call the measured
voltage
SCXI-1102/B/C User Manual 5-2
input1.
©
National Instruments Corporation
Page 39

Chapter 5 Calibration
Note: If you are using a calibrator that supplies accurate voltages, you can simply
use the known applied voltage for
input1 instead of measuring.
c. Measure the module output between MCH0+ and MCH0–
with the DMM. Call the measured voltage
output1
.
3. Repeat step 2, applying the input for the second calibration point.
Call the measured voltages
input2 and output2. To select
positive full scale as the calibration point, repeat step 2 and apply
+9.9 V/G.
4. You now have two pairs of voltages (
(
input2, output2
). Each pair consists of an input voltage and an
input1, output1
) and
output voltage.
5. Convert the output voltages from volt units to your DAQ device
binary unit. You must take into consideration the polarity of your
DAQ device, its resolution (12 bits or 16 bits), and gain. For
example, if you are using the 12-bit AT-MIO-16E-2 in bipolar
mode with the gain set to G
, your output voltages for the
MIO
autozeroing option will be represented in binary units as given by
the following formula:
Binary
=
Output
----------------- 5 V
12
2
•
•
G
MIO
For other DAQ devices, refer to your DAQ device user manual to
determine the appropriate formula.
6. You now have a new set of pairs referred to as voltage binary pairs
input1, bin_output1) and (input2, bin_output2). Pass these
(
pairs to the
SCXI_Cal_Constants function or VI as described in
your software documentation.
Note: When you use 0 V and positive full-scale for your two calibration points,
you eliminate the error at 0 V and at positive full-scale voltage. However,
because of nonlinearity, the error at the negative full-scale voltage will be
two times the nonlinearity error. This is also true for the positive full-scale
voltage if you use the negative full-scale voltage and 0 V as your two
calibration points.
When you make a measurement using National Instruments software, the
driver automatically uses the calibration constants to correct the measured
voltages.
For an example of how to calibrate your module, refer to Appendix B,
Calibration Sample Program.
©
National Instruments Corporation 5-3 SCXI-1102/B/C User Manual
Page 40

Appendix
Specifications
This appendix lists the specifications for the SCXI-1102/B/C modules.
These specifications are typical at 25° C unless otherwise noted.
SCXI-1102/B/C
Analog Input
Input Characteristics
Number of channels............................32 differential
Input signal ranges................................±100 mV (gain = 100) or
Max working voltage
(signal + common mode) ....................Each input should remain
A
±10 V (gain = 1)
within ±10 V of CGND
Input damage level ...............................±42 VAC peak or VDC
Inputs protected............................CH<0..31>, CJSENSOR
Transfer Characteristics
Nonlinearity........................................0.005% FSR
Offset error
Gain = 1
After calibration .................... 300 µV max
Before calibration..................600 µV
Gain = 100
After calibration .................... 15 µV max
Before calibration..................100 µV
©
National Instruments Corporation A-1 SCXI-1102/B/C User Manual
Page 41

Appendix A Specifications
Gain error (relative to calibration reference)
Gain = 1
After calibration.................... 0.015% of reading max
Before calibration ................. 0.04% of reading
Gain = 100
After calibration.................... 0.020% of reading max
Before calibration ................. 0.1% of reading
Amplifier Characteristics
Input impedance
Normal powered on ..................... >1 GΩ
Powered off................................. 10 kΩ
Overload ...................................... 10 kΩ
Input bias current...................................±0.5 nA
Input offset current................................±1.0 nA
CMRR
50 to 60 Hz, either gain 110 dB 90 dB 90 dB
DC, gain 1 75 dB min 75 dB min 75 dB min
DC, gain 100 100 dB min 100 dB min 100 dB min
Output range ..........................................±10 V
Output impedance ..............................91 Ω
Dynamic Characteristics
Bandwidth.......................................... 2 Hz (1102)
Scan interval (per channel, any gain)
0.012% ........................................ 3 µs
0.0061% ......................................10 µs
SCXI-1102/B/C User Manual A-2
1102 1102B 1102C
200 Hz (1102B)
10 kHz (1102C)
©
National Instruments Corporation
Page 42

Filters
Appendix A Specifications
System noise (related to input)
1102 1102B 1102C
Gain = 1 50 µVrms 50 µVrms 70 µVrms
Gain = 100 5 µVrms 5 µVrms 10 µVrms
Cutoff frequency (–3 dB)....................2 Hz (1102)
200 Hz (1102B)
10 KHz (1102C)
NMR (60 Hz)......................................40 dB (1102)
Step response (either gain)
1102 1102B 1102C
To 0.1% 1 s 10 ms 200 µs
To 0.01% 10 s 100 ms 1 ms
Stability
Recommended warm-up time..............20 min.
Offset temperature coefficient
Gain = 1 .......................................20 µV/°C
Gain = 100 ...................................1 µV/°C
Gain temperature coefficient ............... 10 ppm/ °C
Physical
Dimensions.........................................115 by 273 mm
(4.54 by 10.75 in.)
I/O connector......................................50-pin male ribbon cable
rear connector
96-pin male DIN C front
connector
©
National Instruments Corporation A-3 SCXI-1102/B/C User Manual
Page 43

Appendix A Specifications
Environment
Operating temperature ........................ 0° to 50° C
Storage temperature ........................... –55° to 150° C
Relative humidity............................... 5% to 90% noncondensing
Power Requirements
5 V supply .......................................... 15 mA max
±15 V supply (regulated
from ±24 V supply)............................ 150 mA max
SCXI-1102/B/C User Manual A-4
©
National Instruments Corporation
Page 44

Appendix
Calibration Sample Program
This appendix contains a sample program to help you calibrate your
submodule.
B
Sample Program for Calibration
The following is a sample C program that implements the procedure
discussed in the Gain and Offset Calibration section and
SCXI_Cal_Constants in Chapter 5, Calibration:
/* This sample program assists the user in calibrating the SCXI-1102. The
calibration constants are stored only in NI-DAQ memory. The (input, output)
voltage pairs read by a DMM must be entered by hand. Before running this
programed must run the NI-DAQ Configuration Utility to set up the DAQ board
that will communicate with the SCXI-1102.
This program is written for the four-slot SCXI-1000 chassis. The program
prompts for all required configurati on information a bout the SCXI c hassis. */
#include <ansi_c.h>
#include <dataacq.h>
#define SCXI1102 30 /* the SCXI-1102 module ID */
#define TWOPOINT 2
#define NIDAQMEM 0
void main()
{
char entry[4];
int SCXI_Chassis_ID,
moduleSlot, /* chassis slot of module
moduleChan;
long modulesPresent[] = {-1, -1, -1, -1};
short operatingModes[] = {0, 0, 0, 0},
connectionMap[] = {0, 0, 0, 0},
commPath, /* DAQ board that communicates with
dummyRangeCode = 0,
dummyDAQboard,
dummyDAQchan = 0,
dummyDAQgain = 1,
to calibrate */
SCXI chassis */
©
National Instruments Corporation B-1 SCXI-1102/B/C User Manual
Page 45

Appendix B Calibration Sample Program
dummyDAQrange, /* These dummy variables would be used
if the measurement actually came
from a DAQ board and not an external
DMM. */
ret;
double scale,
gain,
vinput1,
voutput1,
vinput2,
voutput2,
bin_output1,
bin_output2,
bin_offset,
gainerr,
offset;
do
{
printf("Enter the slot of the SCXI-1102: ");
fflush(stdin);
ret = scanf("%d", &moduleSlot);
} while (!ret || moduleSlot < 1 || moduleSlot > 4);
modulesPresent[moduleSlot - 1] = SCXI1102;
do
{
printf("Enter the chassis ID of the chassi s containing the SCXI-1102: ");
fflush(stdin);
ret = scanf("%d", &SCXI_Chassis_ID);
} while (!ret);
commPath = SCXI_Chassis_ID;
do
{
printf("Enter the device number of the DAQ board communicating \n");
printf("with the chassis (default %d): ", SCXI_Chassis_ID);
fflush(stdin);
fgets(entry, 3, stdin);
if (strlen(entry) - 1) commPath = atof(entry);
} while (!commPath);
dummyDAQboard = connectionMap[moduleSlot - 1] = commPath;
/* Since the DAQ board is not
used to acquire data, the
connectionMap does not need to
dummyDAQrange = 5.0 / dummyDAQgain;
scale = pow(2.0, 12.0) * dummyDAQgain / 5; /* factor for converting to
SCXI_Set_Config(SCXI_Chassis_ID, 0, 0, 1, commPath, 4,
modulesPresent, operatingModes, connectionMap);
be accurate. */
format of 12-bit bipolar DAQ
board with 5 V full scale*/
/* Set up communication path to
module. */
SCXI-1102/B/C User Manual B-2
©
National Instruments Corporation
Page 46

Appendix B Calibration Sample Program
SCXI_Reset(SCXI_Chassis_ID, moduleSlot);
/* In reset state, the module
SCXI_Single_Chan_Setup(SCXI_Chassis_ID, moduleSlot, 0, dummyDAQboard);
for (moduleChan = 0; moduleChan < 31; moduleChan++)
{
for (gain = 1; gain <= 100; gain = gain + 99)
{
SCXI_Change_Chan(SCXI_Chassis_ID, moduleSlot, moduleChan);
SCXI_Set_Gain(SCXI_Chassis_ID, moduleSlot, moduleChan, gain);
printf("Apply input voltage for point 1, channel %d, gain %.0f.\n",
moduleChan, gain);
do
{
printf("Enter SCXI-1102 input voltage: ");
fflush(stdin);
ret = scanf("%lf", &vinput1);/* User enters vinput1. */
} while (!ret);
do
{
printf("Enter SCXI-1102 output voltage: ");
fflush(stdin);
ret = scanf("%lf", &voutput1);/* User enters voutput1. */
} while (!ret);
will drive the MCH0+ output */
/* This is necessary only so that
SCXI_Change_Chan won't return
an error. */
/* Select the channel and gain. */
printf("Apply input voltage for point 2, channel %d,
gain %.0f.\n", moduleChan, gain);
do
{
printf("Enter SCXI-1102 input voltage: ");
fflush(stdin);
ret = scanf("%lf", &vinput2);/* User enters vinput2. */
} while (!ret);
do
{
printf("Enter SCXI-1102 output voltage: ");
fflush(stdin);
ret = scanf("%lf", &voutput2);/* User enters voutput2. */
} while (!ret);
bin_output1 = voutput1 * scale;
bin_output2 = voutput2 * scale; /* Convert to format of DAQ
board. */
©
National Instruments Corporation B-3 SCXI-1102/B/C User Manual
Page 47

Appendix B Calibration Sample Program
SCXI_Cal_Constants(SCXI_Chassis_ID, moduleSlot, moduleChan,
offset = bin_offset / scale; /* Convert from DAQ board
printf("Calculated offset %f V, gain error %f%% ", offset,
gainerr);
printf("and stored in NI-DAQ memory.\n\n");
}
}
}
TWOPOINT, NIDAQMEM, dummyRangeCode, gain,
dummyDAQboard, dummyDAQchan, dummyDAQgain, 1,
vinput1, bin_output1, vinput2, bin_output2,
&bin_offset, &gainerr);
/* Calculate offset and gain
error. */
format. */
SCXI-1102/B/C User Manual B-4
©
National Instruments Corporation
Page 48

Appendix
Customer Communication
For your convenience, this appendix contains forms to help you gather the information necessary to
help us solve your technical problems and a form you can use to comment on the product
documentation. When you contact us, we need the information on the Technical Support Form and the
configuration form, if your manual contains one, about your system configuration to answer your
questions as quickly as possible.
National Instruments has technical assistance through electronic, fax, and telephone systems to
quickly provide the information you need. Our electronic services include a bulletin board service,
an FTP site, a fax-on-demand system, and e-mail support. If you have a hardware or software
problem, first try the electronic support systems. If the information available on these systems
does not answer your questions, we offer fax and telephon e support through our technical sup port
centers, which are staffed by applications engineers.
C
Electronic Services
Bulletin Board Support
National Instruments has BBS and FTP sites dedicated for 24-hour support with a collection of files
and documents to answer most common customer questions. From these sites, you can also download
the latest instrument drivers, updates, and example programs. For recorded instructions on how to use
the bulletin board and FTP services and for BBS automated information, call (512) 795-6990. You can
access these services at:
United States: (512) 794-5422
Up to 14,400 baud, 8 data bits, 1 stop bit, no parity
United Kingdom: 01635 551422
Up to 9,600 baud, 8 data bits, 1 stop bit, no parity
France: 01 48 65 15 59
Up to 9,600 baud, 8 data bits, 1 stop bit, no parity
FTP Support
To access our FTP site, log on to our Internet host,
Internet address, such as
documents are located in the /support directories.
©
National Instruments Corporation C-1 SCXI-1102/B/C User Manual
joesmith@anywhere.com, as your password. The support files and
ftp.natinst.com, as anonymous and use your
Page 49

Fax-on-Demand Support
Fax-on-Demand is a 24-hour information retrieval system containing a library of documents on a wide
range of technical information. You can access Fax-on-Demand from a touch-tone telephone at
(512) 418-1111.
E-Mail Support (currently U.S. only
You can submit technical support questions to the applications engineering team through e-mail at the
Internet address listed below. Remember to include your name, address, and phone number so we can
contact you with solutions and suggestions.
support@natinst.com
)
Telephone and Fax Support
National Instruments has branch offices all over the world. Use the list below to find the technical
support number for your country. If there is no National Instruments office in your country, contact the
source from which you purchased your software to obtain support.
Telephone Fax
Australia 03 9879 5166 02 9874 4455
Austria 0662 45 79 90 0 0662 45 79 90 19
Belgium 02 757 00 20 02 757 03 11
Canada (Ontario) 905 785 0085 905 785 0086
Canada (Quebec) 514 694 8521 514 694 4399
Denmark 45 76 26 00 45 76 26 02
Finland 09 725 725 11 09 725 725 55
France 01 48 14 24 24 01 48 14 24 14
Germany 089 741 31 30 089 714 60 35
Hong Kong 2645 3186 2686 8505
Israel 03 5734815 03 5734816
Italy 02 413091 06 57284309
Japan 03 5472 2970 03 5472 2977
Korea 02 596 7456 02 596 7455
Mexico 5 520 2635 5 520 3282
Netherlands 0348 433466 0348 430673
Norway 32 84 84 00 32 84 86 00
Singapore 2265886 2265887
Spain 91 640 0085 91 640 0533
Sweden 08 730 49 70 08 730 43 70
Switzerland 056 200 51 51 056 200 51 55
Taiwan 02 377 1200 02 737 4644
United States 512 794 0100 512 794 8411
United Kingdom 01635 523545 01635 523154
Page 50

Technical Support Form
Photocopy this form and update it each time you make changes to your software or hardware, and use
the completed copy of this form as a reference for your current configuration. Completing this form
accurately before contacting National Instruments for technical support helps our applications
engineers answer your questions more efficiently.
If you are using any National Instruments hardware or software products related to this problem,
include the configuration forms from their user manuals. Include additional pages if necessary.
Name ____________________________________________________________ ______________
Company _______________________________________________________________________
Address ________________________________________________________________________
_______________________________________________________________________________
Fax (___)___________________ Phone (___) _________________________________________
Computer brand ________________ Model ________________ Processor___________________
Operating system (include version number) ____________________________________________
Clock speed ______MHz RAM _____MB Display adapter __________________________
Mouse ___yes ___no Other adapters installed _________________________ ___ ___________
Hard disk capacity _____MB Brand _____________________________________________
Instruments used _________________________________________________________________
_______________________________________________________________________________
National Instruments hardware product model __________ Revisio n ______________________
Configuration _______________________________________ ____________________________
National Instruments software product ____________________________ Version ____________
Configuration ___________________________________________________________________
The problem is: __________________________________________________________________
_______________________________________________________________________________
_______________________________________________________________________________
_______________________________________________________________________________
_______________________________________________________________________________
List any error messages: ___________________________________________________________
_______________________________________________________________________________
_______________________________________________________________________________
The following steps reproduce the problem:____________________________________________
_______________________________________________________________________________
_______________________________________________________________________________
_______________________________________________________________________________
_______________________________________________________________________________
_______________________________________________________________________________
Page 51

SCXI-1102/B/C Hardware and Software
Configuration Form
Record the settings and revisions of your hardware and software on the line to the right of each item.
Complete a new copy of this form each time you revise your software or hardware configuration, and
use this form as a reference for your current configuration. Completing this form accurately before
contacting National Instruments for technical support helps our applications engineers answer your
questions more efficiently.
National Instruments Products
DAQ hardware ___________ _______________________________________________________ _
Interrupt level of hardware __________________________________________________________
DMA channels of hardware _______ __________________________________________________
Base I/O address of hardware ________________________________________________________
Programming choice _______________________________________________________________
National Instruments application software version _______________________________________
Other boards in system ____________________________________ _________________________
Base I/O address of other boards _____________________________________________________
DMA channels of other boards ______________________________________________________
Interrupt level of other boards _______________________________________________________
Other Products
Computer make and model _________________________________________________________
Microprocessor ___________________________________ ________________________________
Clock frequency or speed ___________________________________________________________
Type of video board installed ________________________________________________ ________
Operating system version ___________________________________________________________
Operating system mode ____________________________________________________________
Programming language ____________________________________________________________
Programming language version ______________________________________________________
Other boards in system ____________________________________ _________________________
Base I/O address of other boards _____________________________________________________
DMA channels of other boards ______________________________________________________
Interrupt level of other boards _______________________________________________________
Page 52

Documentation Comment Form
National Instruments encourages you to comment on the documentation supplied with our products.
This information helps us provide quality products to meet your needs.
Title: SCXI
Edition Date: August 1997
Part Number: 320975B-01
Please comment on the completeness, clarity, and organization of the manual.
_______________________________________________________________________________
_______________________________________________________________________________
_______________________________________________________________________________
_______________________________________________________________________________
_______________________________________________________________________________
_______________________________________________________________________________
_______________________________________________________________________________
If you find errors in the manual, please record the page numbers and describe the errors.
_______________________________________________________________________________
_______________________________________________________________________________
_______________________________________________________________________________
_______________________________________________________________________________
_______________________________________________________________________________
_______________________________________________________________________________
_______________________________________________________________________________
™
-1102/B/C User Manual
Thank you for your help.
Name _________________________________________________________________________
Title __________________________________________________________________________
Company _______________________________________________________________________
Address _________________________________________ _______________________________
_________________________________________ ______________________________________
Phone (___)__________________________ Fax (___)___________________________________
Mail to: Technical Publications Fax to: Technical Publications
National Instruments Corporation National Instruments Corporation
6504 Bridge Point Parkway (512) 794-5678
Austin, TX 78730-5039
Page 53

Prefix Meanings Value
Glossary
p- pico- 10
n- nano- 10
µ- micro- 10
m- milli- 10
k- kilo- 10
M- mega- 10
G- giga- 10
Numbers/Symbols
+5 V +5 volt signal
° degrees
Ω ohms
% percent
± plus or minus
–12
–9
–6
–3
3
6
12
A
A amperes
AC alternating current
ACH analog input channel signal
©
National Instruments Corporation G-1 SCXI-1102/B/C User Manual
Page 54

Glossary
A/D analog-to-digital
ADC analog-to-digital converter–an electronic device, often an integrated
circuit, that converts an analog voltage to a digital number
AIGND analog input ground signal
AOGND analog output ground signal
AWG American Wire Gauge
B
BCD binary-coded decimal
bus the group of conductors that interconnect individual circuitry in a
computer. Typically, a bus is the expansion vehicle to which I/O or
other devices are connected. Examples of PC buses are the AT bus,
NuBus, Micro Channel, and EISA bus.
C
C Celsius
CE card enable signal
CGND chassis ground signal
channel pin or wire lead to which you apply or from which you read the analog
or digital signal. Analog signals can be single-ended or differential. For
digital signals, you group channels to form ports. Ports usually consist
of either four or eight digital channels.
CJSENSOR cold-junction sensor
CLK clock input signal
CMOS complementary metallic oxide semiconductor
CMRR common-mode rejection ratio
©
SCXI-1102/B/C User Manual G-2
National Instruments Corporation
Page 55

Glossary
D
D/A digital-to-analog
DAQ data acquisition—(1) collecting and measuring electrical signals from
sensors, transducers, and test probes or fixtures and inputting them to a
computer for processing; (2) collecting and measuring the same kinds
of electrical signals with A/D and/or DIO boards plugged into a
computer, and possibly generating control signals with D/ A and/or DIO
boards in the same computer
DAQD*/A data acquisition digital to analog signal
dB decibel—the unit for expressing a logarithmic measure of the ratio of
two signal levels: dB=20log10 V1/V2, for signals in volts
DC direct current
device a plug-in data acquisition board, card, or pad that can contain multiple
channels and conversion devices. Plug-in boards, PC cards, and devices
such as the DAQPad-1200, which connects to your computer parallel
port, are all examples of DAQ devices. SCXI modules are distinct from
devices, with the exception of the SCXI-1200, which is a hybrid.
DGND digital ground signal
DIFF differential configuration
differential input an analog input consisting of two terminals, both of which are isolated
from computer ground, whose difference is measured
DIN Deutsche Industrie Norme
DMA direct memory access—a method by which data can be transferred to/
from computer memory from/to a device or memory on the bus while
the processor does something else. DMA is the fastest method of
transferring data to/from computer memory.
DMM digital millimeter
DNL differential nonlinearity—a measure in LSB of the worst-case deviation
of code widths from their ideal value of 1 LSB
©
National Instruments Corporation G-3 SCXI-1102/B/C User Manual
Page 56

Glossary
DOUT digital output signal
drivers/driver software software that controls a specific hardware device such as a DAQ device
E
EISA Extended Industry Standard Architecture
ESP Engineering Software Package
EXTCONV external control signal to trigger A/D conversions
EXTINT external interrupt signal
F
Ffarads
FIFO first-in first-out memory buffer—the first data stored is the first data
sent to the acceptor. FIFOs are often used on DAQ devices to
temporarily store incoming or outgoing data until that data can be
retrieved or output. For example, an analog input FIFO stores the results
of A/D conversions until the data can be retrieved into system memory,
a process that requires the servicing of interrupts and often the
programming of the DMA controller. This process can take several
milliseconds in some cases. During this time, data accumulates in the
FIFO for future retrieval. With a larger FIFO, longer latencies can be
tolerated. In the case of analog output, a FIFO permits faster update
rates, because the waveform data can be stored on the FIFO ahead of
time. This again reduces the effect of latencies associated with getting
the data from system memory to the DAQ device.
ft feet
G
Ggain
GATE gate input signal
SCXI-1102/B/C User Manual G-4
©
National Instruments Corporation
Page 57

Glossary
H
hex hexadecimal
Hz he rtz—the number of sca ns read or u pdates written per sec ond
I
in. inches
indirect scanning The measurement that occurs when a signal passes on the SCXIbus
from the scanned SCXI module to the cabled SCXI module
I/O input/output—the transfer of data to/from a computer sy stem involving
communications channels, operator interface devices, and/or data
acquisition and control interfaces
ISA Industry Standard Architecture
L
LED light-emitting diode
LSB least significant bit
M
MB megabytes of memory
MSB most significant bit
N
NC not connected (signal)
NRSE nonreferenced single-ended mode—all measurements are made with
respect to a common (NRSE) measurement system reference, but the
voltage at this reference can vary with respect to the measurement
system ground
©
National Instruments Corporation G-5 SCXI-1102/B/C User Manual
Page 58

Glossary
O
OUT output signal
OUTREF output reference signal
P
PCMCIA an expansion bus architecture that has found widespread acceptance as
a de facto standard in notebook-size computers. It originated as a
specification for add-on memory cards written by the Personal
Computer Memory Card International Association.
R
RAM random-access memory
RMA Return Mate rial Authorization
rms root mean square—the square root of the average value of the square of
the instantaneous signal amplitude; a measure of signal amplitude
RSVD reserved bit
RTSI bus real-time system integration bus—the National Instruments timing bus
that connects DAQ devices directly, by means of connectors on top of
the boards, for precise synchronization of functions
S
Ssamples
s seconds
SCANCLK scan clock s ignal
SCXI Signal Conditioning eXtensions for Instrumentation—the National
Instruments product line for conditioning low-level signals within an
external chassis near sensors so only high-level signals are sent to DAQ
devices in the noisy PC environment
SERCLK serial clock signal
©
SCXI-1102/B/C User Manual G-6
National Instruments Corporation
Page 59

Glossary
SERDATIN serial data input signal
SERDATOUT serial data output signal
signal conditioning the manipulation of signals to prepare them for digitizing
SLOT0SEL* Slot 0 select signal
T
TTL transistor-transistor logic
V
Vvolts
VCC positive supply voltage from the PCMCIA bus (usually +5V)
VDC volts, direct current
VI virtual instrument—(1) a combination of hardware and/or software
elements, typically used with a PC, that has the functionality of a classic
stand-alone instrument (2) a LabVIEW software module (VI), which
consists of a front panel user interface and a block diagram program
V
IH
V
IL
V
in
V
OH
V
OL
©
National Instruments Corporation G-7 SCXI-1102/B/C User Manual
volts, input high
volts, input low
volts in
volts, output high
volts, output low
Page 60

Index
Numbers
+5 V signal (table), 3-3
A
analog circuitry, 4-3 to 4-4
analog bus switch, 4-4
analog input channels, 4-3
analog configuration, 2-4 to 2-5
bent and trimmed resistor (figure), 2-5
current-loop receivers, 2-4 to 2-5
analog input signal connections, 3-3 to 3-6
differential input signal range, 3-3 to 3-4
exceeding input level or range (caution), 3-4
ground-referencing of signals, 3-4 to 3-6
floating signal connections
referenced to chassis ground
(figure), 3-6
ground-referenced signal connections
(figure), 3-5
signal terminals, 3-3
analog input specifications, A-1 to A-3
amplifier characteristics, A-2
dynamic characteristics, A-2 to A-3
input characteristics, A-1
transfer characteristics, A-1 to A-2
analog output signal connections, 3-9
AOGND signal (table), 3-8
B
bent and trimmed resistor (figure), 2-5
bulletin board support, C-1
C
cables, custom, 1-6
calibration, 5-1 to 5-3
equipment requirements, 5-1 to 5-2
gain and offset calibration, 5-2 to 5-3
overview, 5-1
sample program, B-1 to B-4
CGND signal (table), 3-3
CH31+ through CH0+ signals (table), 3-3
CH31- through CH0- signals (table), 3-3
CJSENSOR signal (table), 3-3
cold-junction sensor connections, 3-6
ComponentWorks software, 1-3
configuration, 2-1 to 2-5
analog configuration, 2-4 to 2-5
bent and trimmed resistor (figure), 2-5
current-loop receivers, 2-4 to 2-5
digital configuration, 2-3 to 2-4
hardware installation, 2-6
parts locator diagram, 2-2
removing SCXI module cover (figure), 2-4
current-loop receivers, 2-4 to 2-5
custom cables, 1-6
customer communication, xii, C-1 to C-2
D
DAQD*/A signal
description (table), 3-8
SCXIbus to SCXI-1102/B/C to DAQ board
pin equivalencies (table), 3-10
DGND signal (table), 3-8
digital configuration, 2-3 to 2-4
©
National Instruments Corporation I-1 SCXI-1102/B/C User Manual
Page 61

Index
digital control circuitry, 4-2 to 4-3
digital I/O signal connections, 3-9 to 3-10
digital signal specifications, 3-10
digital timing signal connection, 3-10
documentation
conventions used in manual, x to xi
National Instruments documentation,
xi to xii
organization of manual, ix to x
E
electronic support services, C-1 to C-2
e-mail support, C-2
environment specifications, A-4
equipment, optional, 1-5
F
fax and telephone support, C-2
Fax-on-Demand support, C-2
filter specifications, A-3
floating signal connection
referenced to chassis ground (figure), 3-6
front connector, 3-1 to 3-6
analog signal connections, 3-3 to 3-6
cold-junction sensor connections, 3-6
ground-referencing of signals, 3-4 to 3-6
floating signal connection
referenced to chassis ground
(figure), 3-6
ground-referenced signal connection
(figure), 3-5
pin assignments (figure), 3-2
signal descriptions (table), 3-3
FTP support, C-1
G
gain and offset calibration, 5-2 to 5-3
ground-referencing of signals, 3-4 to 3-6
floating signal connections
referenced to chassis ground
(figure), 3-6
ground-referenced signal connections
(figure), 3-5
I
installation. See also configuration.
hardware installation, 2-6
unpacking the SCXI-1102/B/C, 1-6
J
jumpers
digital configuration, 2-3 to 2-4
parts locator diagram, 2-2
L
LabVIEW software, 1-3
LabWindows/CVI software, 1-3
M
manual. See documentation.
MCH0+ signal (table), 3-8
MCH0- signal (table), 3-8
module configuration. See configuration.
N
National Instruments application software, 1-3
NI-DAQ driver software, 1-4
O
operation of SCXI-1102/B/C. See theory of
operation.
OUTREF signal (table), 3-8
SCXI-1102/B/C User Manual I-2
©
National Instruments Corporation
Page 62

Index
P
parts locator diagram, 2-2
physical specifications, A-3
pin assignments
front connector (figure), 3-2
rear connector (figure), 3-7
power requirements, A-4
R
rear signal connector, 3-8 to 3-10
analog output signal connections, 3-9
digital I/O signal connections, 3-9 to 3-10
digital signal specifications, 3-10
digital timing signal connections, 3-10
pin assignments (figure), 3-7
SCXIbus interface connection, 4-2
SCXIbus to SCXI-1102/B/C to DAQ
board pin equivalencies (table), 3-10
signal descriptions (table), 3-8 to 3-9
register-level programming, 1-5
requirements for getting started, 1-2
S
SCANCLK signal (table), 3-8
SCXI-1102/B/C. See also theory of operation.
block diagram, 4-1
custom cables, 1-6
features and overview, 1-1 to 1-2
optional equipment, 1-5
requirements for getting started, 1-2
software programming choices, 1-3 to 1-5
National Instruments application
software, 1-3
NI-DAQ driver software, 1-4
register-level programming, 1-5
unpacking, 1-6
SCXIbus connector, 4-2
SCXIbus interface, 4-2
SCXIbus to SCXI-1102/B/C to DAQ board
pin equivalencies (table), 3-10
SERCLK signal
description (table), 3-9
SCXIbus to SCXI-1102/B/C to DAQ
board pin equivalencies (table), 3-10
SERDATIN signal
description (table), 3-8
SCXIbus to SCXI-1102/B/C to DAQ
board pin equivalencies (table), 3-10
SERDATOUT signal
description (table), 3-8
SCXIbus to SCXI-1102/B/C to DAQ
board pin equivalencies (table), 3-10
settling time for channels (note), 4-3
signal connections, 3-1 to 3-10
front connector, 3-1 to 3-6
analog input signal connections,
3-3 to 3-6
cold-junction sensor connections, 3-6
ground-referencing of signals,
3-4 to 3-6
pin assignments (figure), 3-2
signal descriptions (table), 3-3
rear connector, 3-7 to 3-10
analog output signal connections, 3-9
digital I/O signal connections,
3-9 to 3-10
digital signal specifications, 3-10
digital timing signal
connections, 3-10
pin assignments (figure), 3-7
SCXIbus to SCXI-1102/B/C to DA
Q board pin equivalencies
(table), 3-10
signal descriptions (table), 3-8 to 3-9
SLOT0SEL* signal
description (table), 3-8
SCXIbus to SCXI-1102/B/C to DAQ
board pin equivalencies (table), 3-10
software programming choices, 1-3 to 1-5
©
National Instruments Corporation I-3 SCXI-1102/B/C User Manual
Page 63

Index
National Instruments application
software, 1-3
NI-DAQ driver software, 1-4
register-level programming, 1-5
specifications, A-1 to A-4
amplifier characteristics, A-2
analog input, A-1 to A-3
digital signal specifications, 3-10
dynamic characteristics, A-2 to A-3
environment, A-4
filters, A-3
input characteristics, A-1
physical, A-3
power requirements, A-4
stability, A-3
transfer characteristics, A-1 to A-2
stability specifications, A-3
system requirements, 1-2
T
technical support, C-1 to C-2
telephone and fax support, C-2
temperature sensor, 4-3
theory of operation, 4-1 to 4-4
analog circuitry, 4-3 to 4-4
analog bus switch, 4-4
analog input channels, 4-3
block diagram of SCXI-1102/B/C, 4-1
digital control circuitry, 4-2 to 4-3
functional overview, 4-1 to 4-4
rear signal connector, 4-2
SCXIbus connector, 4-2
SCXIbus interface, 4-2
W
W1 jumper, configuration, 2-3 to 2-4
V
VirtualBench software, 1-3
SCXI-1102/B/C User Manual I-4
©
National Instruments Corporation
 Loading...