

Page 1

Page 2

A WORD FROM OUR ENGINEERS AND DESIGN TEAM
Our ch allenge was tO blend the art Of metal sculptur e with mast erful
elec trOnics in a package that symbOlize s stren gth, pOw er, and dexterity.
built with passiOn, the dp fx was unleashed.
CONGRATULATIONS ON OWNING THE MOST
ADVANCED PAINTBALL MARKER ON THE PLANET.
Page 3
WARNING
IMPORTANT SAFETY INSTRUCTIONS AND GUIDELINES!
WARNING
IMPORTANT SAFETY INSTRUCTIONS AND GUIDELINES!
1. The DP G4 is NOT A TOY. Treat it with the same
respect and care you would a rearm.
2. Carelessness, Misuse, and failure to adhere
to the warning and guidelines printed in this
Owner’s Manual may result in property damage,
injury, or death. User assumes all risks
associated with use of the DP G4.
3. Always ensure that proper safety gear - eyes,
face, ear, and head protection - conforming to
ASTM standard F1776 (USA) or CE (Europe)
are worn at all times when paintballs are within
range.
4. Persons under the age of 18 must have adult
supervision at all times during use of the G4, or
any paintball ring device.
5. Observe all local and national laws regarding
rules and regulations.
6. The G4 should only be used on a permitted and
regulated paintball eld where safety rules and
guidelines are strictly enforced.
02 03
W W W . D A N G E R O U S P O W E R . C O M
7. Only use compressed air or nitrogen. DO NOT
USE CO2!
8. Only use high quality, .68 caliber paintballs.
9. Never point your G4 at an unintended target.
10. Always treat your G4 as if it were loaded.
11. Keep your G4 turned OFF until ready to use.
12. Always measure the velocity of paintballs from
your G4 with a suitable chronograph device
before play.
13. Never look down the barrel or breech area of
the G4 without rst ensuring that the marker is
switched to the OFF position, with NO AIR in the
marker.
NOTE- SEE NOTE ON PAGE 3 FOR DIRECTIONS ON
REMOVING RESIDUAL AIR FROM A POWERED ‘OFF”
MARKER.
14. Never put any body parts or foreign objects into
the breech or feed tube.
15. Always use the supplied barrel cover when your
G4 is not in use at the eld. Doing so will help
secure the safety of yourself and those around
you.
16. Never allow pressurized gas to come into
contact with your body. Serious harm, injury, or
death may occur.
17. When not in use, always turn your G4 to the
OFF position.
18. Promptly remove any paintballs from your G4
when not in use.
19. Always remember to remove residual air from
your G4 before attempting maintenance or
service.
20. Always remember to remove residual air from
your G4 before storage or transportation.
NOTE- POWERING ‘ OFF’ THE MARKER WILL NOT
AUTOMATICALLY REMOVE RESIDUAL AIR. TO
SAFELY REMOVE RESIDUAL AIR, PLEASE DO THE
FOLLOWING:
A. Remove loader and paintballs from marker.
B. Turn Eye Sensors to the OFF position.
C. Point marker in a safe direction.
D. Fire marker until all residual gas is removed.
21. Always store your G4 in a safe place.
22. Do not discard the Owner’s Manual. In the event
of transfer or resale, this guide must accompany
the marker.
23. When in doubt, ALWAYS seek expert advice
by contacting a reputable airsmith familiar with
paintball markers, or by contacting
DP Engineering’s Customer Service Staff.
Page 4
CONTENTS
07 FEATURES
08 KNOW YOUR G4
09 G4 PARTS LIST
10 INLINE REGULATOR
11 OPR PARTS LIST
12 G4 BOLT SYSTEM
13 EVERYTHING YOU NEED TO GET
STARTED
13 BARREL COVER
14 INSTALLING THE BATTERY
15 ATTACHING A PAINTBALL LOADER
16 CONNECTING MACRO-LINE TO HIGH
PRESSURE REGULATOR AND QUICK
RELEASE FLIP LEVER ASA (RAPSTM)
17 ATTACHING AIR TANK TO RAPSTM FLIP
LEVER ASA
18 VELOCITY ADJUSTMENT
19 TRIGGER ADJUSTMENT
21 BOARD
22 PROGRAMMING YOUR G4
22 1.POWER
23 2.TOURNAMENT LOCK
23 3.CONFIGURATION MODE
26 4.EXAMPLE SETTING FROM SEMI TO
MILLENNIUM
27 CARE AND MAINTENANCE
27 DEGAS SING THE G4
29 CLEANING THE EYE-SENSOR BREAK
31 CLEANING THE BALL DETENTS
33 OPERATING PRESSURE REGULATOR
(OPR) DISASSEMBLY AND
MAINTENANCE
36 DISASSEMBLY AND MAINTENANCE
OF DUMP VALVE BOLT AND DUMP
VALVE PLUG
38 SEPARATING G4 BODY
FROM TRIGGER FRAME
40 SOLENOID MAINTENANCE
42 REMOVING SWITCHBLADE™ TRIGGER
FROM FRAME
43 RAPS™ FLIP LEVER ASA
REMOVAL AND MAINTENANCE
46 TROUBLESHOOTING
48 PARTS DIAGRAM AND TABLE
50 STATEMENT OF LIABILITY
50 DISCLAIMER
51 LIMITED LIFETIME WARRANTY
04 05
W W W . D A N G E R O U S P O W E R . C O M
Page 5
FEATURES
1. Innovative and highly efcient o-ring-less bolt system.
2. Extremely light weight body (1.79lbs with barrel, patented RAPS ASA, clamping feedneck and battery).
3. Increased air efciency.
4. High precision light weight 3-D milled aluminum alloy body and accents.
5. Stocked fully programmable micro-switch board.
6. 4 way adjustable magnetic trigger.
7. Patented low prole clamping feedneck.
8. Patented ip lever Rapid Air Pressurizing System (RAPS) ASA.
07
Page 6
KNOW YOUR G4
G4 PARTS LIST
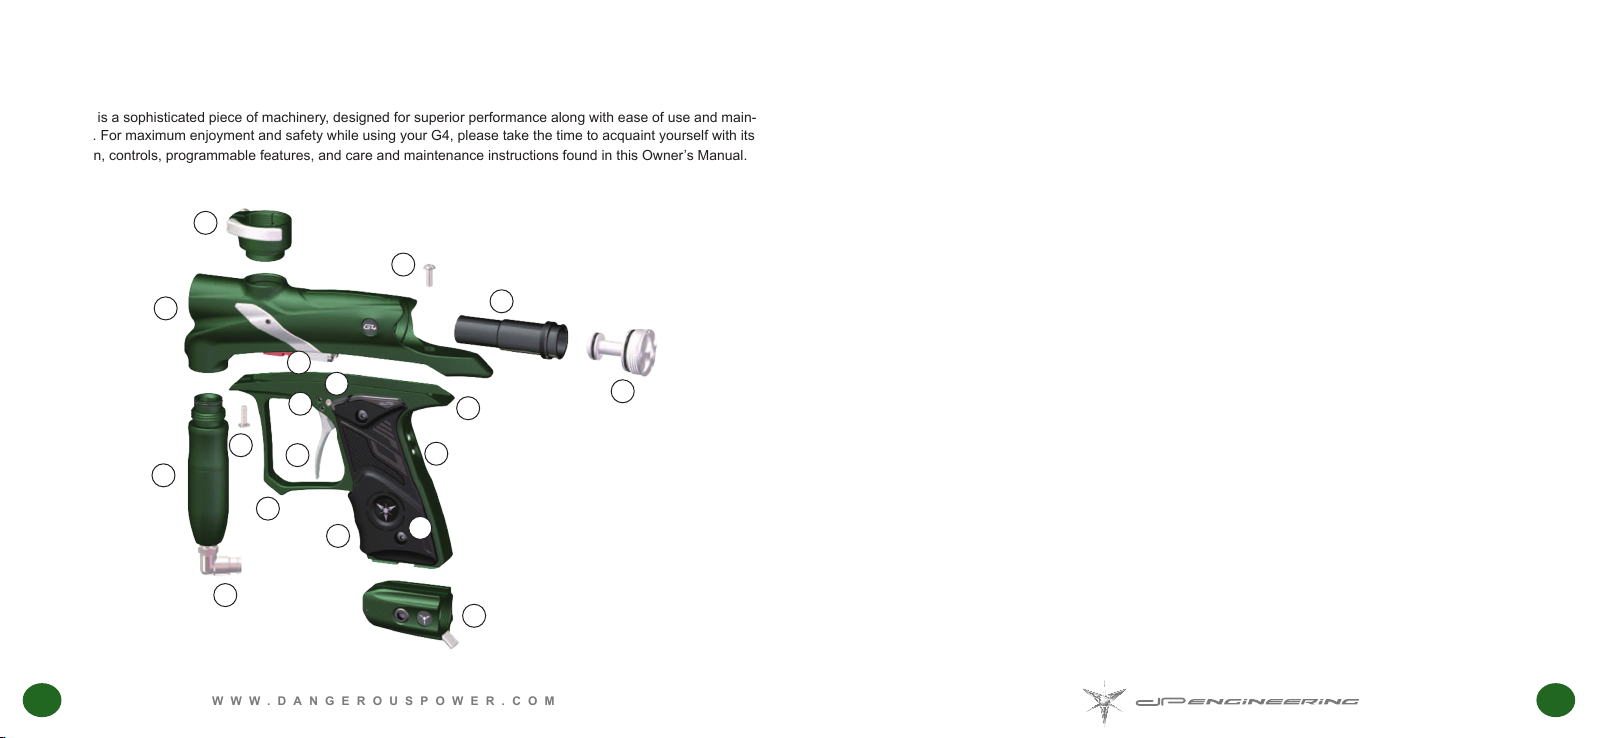
Your G4 is a sophisticated piece of machinery, designed for superior performance along with ease of use and main-
tenance. For maximum enjoyment and safety while using your G4, please take the time to acquaint yourself with its
operation, controls, programmable features, and care and maintenance instructions found in this Owner’s Manual.
A
Q
B
C
E
I
J
R
K
H
M
D
F
L
N
O
G
P
A. Low-Rise Clamping Feedneck
B. G4 Body
C. Dump Valve Bolt
D. Dump Valve Plug
E. Two-Way Solenoid
F. OPR (Operating Pressure Regulator)
G. Macro-line Elbow Fitting
H. G4 Trigger Frame
I. Trigger Removal Screw
J. Trigger Adjustment Screws
K. Trigger
L. Trigger Guard
M. Power Button
N. Buttery Grip Panel
O. Grip Screws
P. RAPS
Q. Body / Frame Connector Screw #1
R. Body / Frame Connector Screw #2
TM
(Rapid Air Pressurizing System) ASA
08 09
W W W . D A N G E R O U S P O W E R . C O M
Page 7
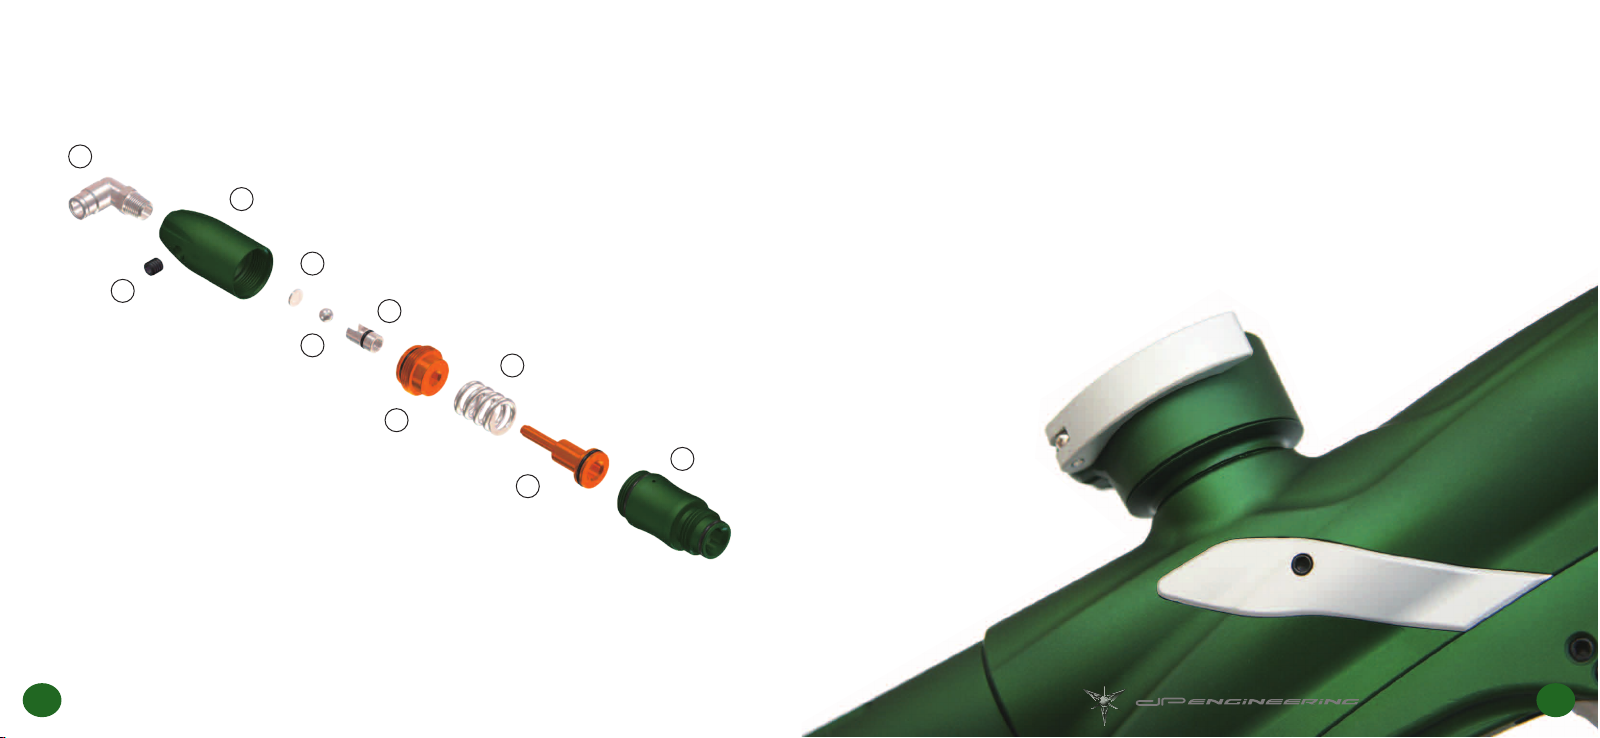
INLINE REGULATOR
OPR PARTS LIST
A. Macro-line Elbow Fitting
A
B
D
C
F
E
H
G
J
I
B. OPR Bottom Housing
C. Regulator Adjustment Screw
D. Ball Gasket
E. Steel Ball
F. Pressure Seal
G. Piston Seal
H. Regulator Spring
I. Regulator Piston
J. Operating Pressure Regulator Body
10 11
W W W . D A N G E R O U S P O W E R . C O M
Page 8
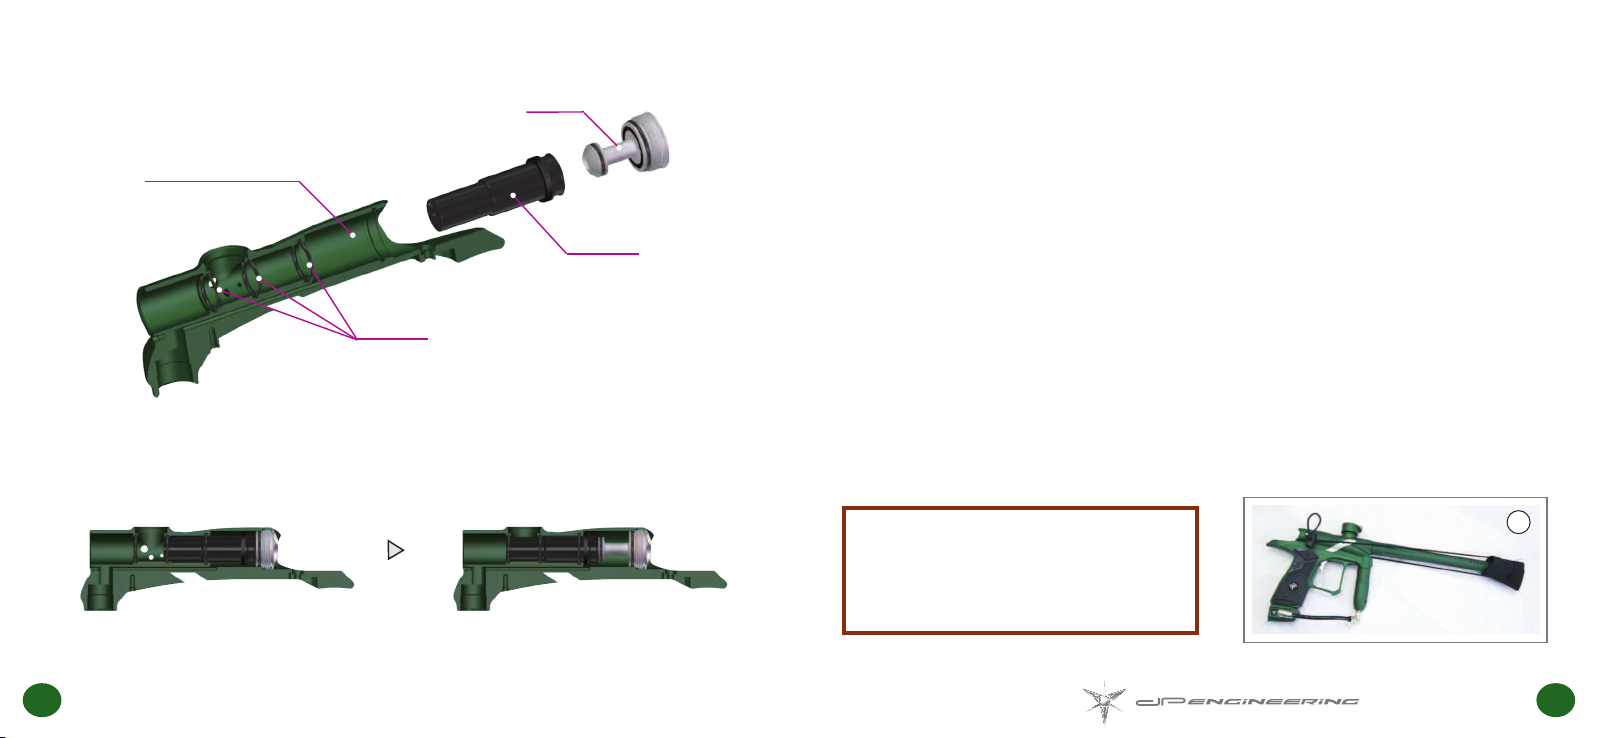
G4 BOLT SYSTEM
EVERYTHING YOU NEED TO GET STARTED
CAP
G4 BODY
BOLT
O-RING
DVB (DUMP VALVE BOLT)
BACK POSITION FORWARD POSITION
Prepare the following items in order to begin using your G4:
• One 9V battery. Be sure that the battery is fresh and from a reputable manufacturer.
• Paintball loading device. (Recommended minimum load rate of 25 BPS)
• .68 caliber paintballs. Always use fresh, high-quality paint with proper bore size for best results.
• Approved air tank utilizing COMPRESSED AIR or NITROGEN ONLY.
BARREL COVER
• Place the barrel cover over the tip of the barrel and pull the elastic band over the feedneck or back of marker
before attaching paintball loader. (SEE PIC A)
WARNING
ALWAYS USE THE SUPPLIED BARREL COVER
BEFORE AIR UP YOUR G4 WHEN IT IS NOT IN
USE AT THE FIELD. DOING SO WILL HELP
SECURE THE SAFETY OF YOURSELF AND
THOSE AROUND YOU.
A
12 13
W W W . D A N G E R O U S P O W E R . C O M
Page 9
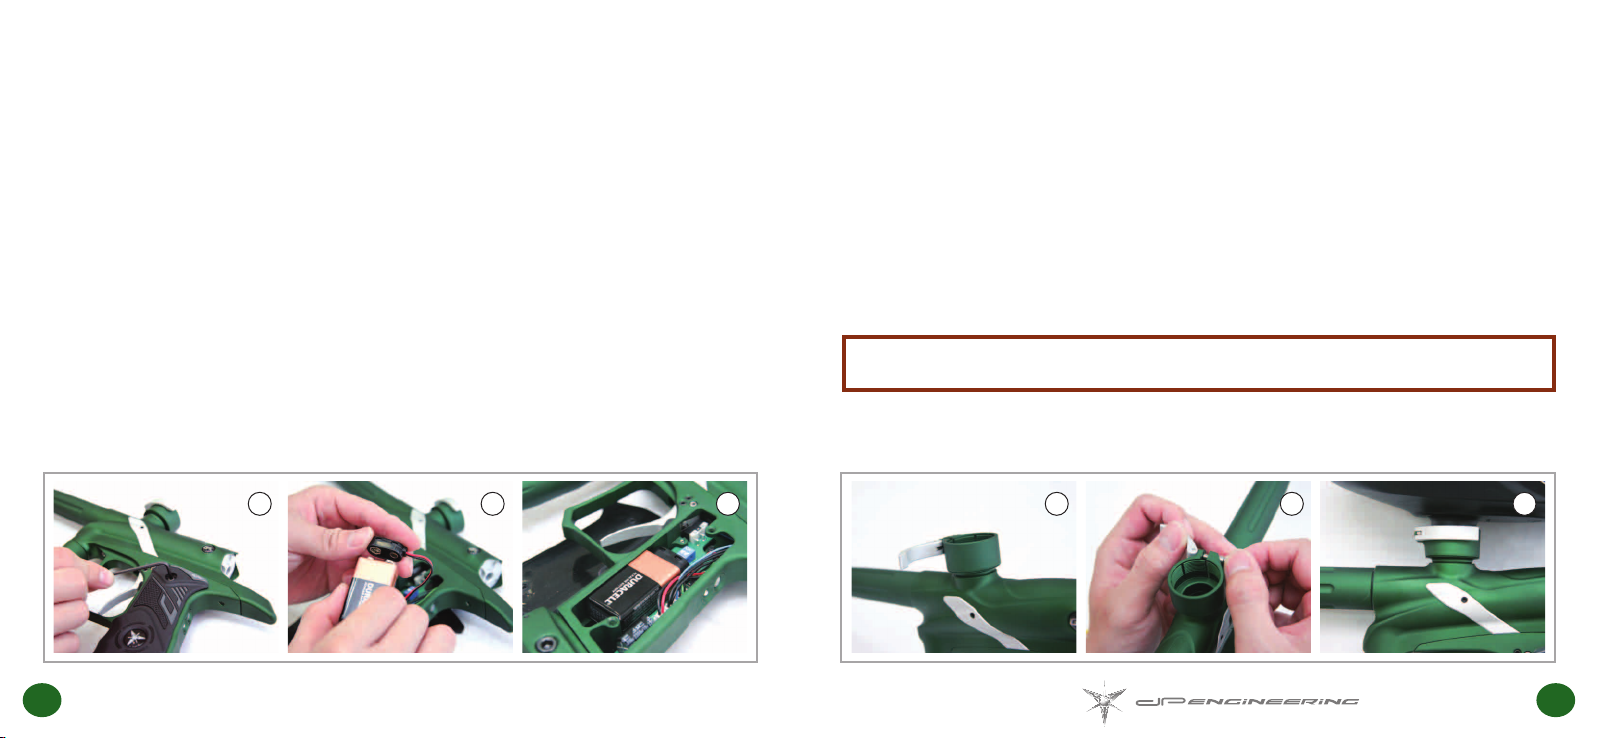
INSTALLING THE BATTERY
ATTACHING A PAINTBALL LOADER
• Carefully remove the 2 hexagonal screws (3/32”) holding the left panel in place. (SEE PIC A)
• Locate battery harness and attach 9V battery to the connector pad. Do not use force! (SEE PIC B)
• Replace battery in grip frame as shown in illustration C.
• Replace grip frame and screws. Do not over tighten screws!
• Release clamp on feedneck. (SEE PIC A)
• Loosen thumbscrew counterclockwise by hand. (SEE PIC B)
• Insert feed tube of loader unit.
• Close clamp securely. Loader should t snug within feedneck. (SEE PIC C)
• If loader is loose, remove and adjust thumbscrew clockwise.
WARNING
EXCESSIVE FORCE MAY CAUSE DAMAGE TO LOADER OR THE G4!
A B CA B C
14 15
W W W . D A N G E R O U S P O W E R . C O M
Page 10

CONNECTING MACRO-LINE TO HIGH PRESSURE
REGULATOR AND QUICK RELEASE FLIP LEVER ASA
(RAPSTM)
• Pull back the collet section of the macro-line elbow located on your RAPSTM ASA. (SEE PIC A)
• Keeping the collet back, insert macro-line hose rmly into the tting and release the collet. Be sure that the
hose is seated all the way into the end of elbow tting. (SEE PIC B . C)
• Repeat the same process on the macro-line elbow located on your OPR to connect the RAPS
TM
ASA.
ATTACHING AIR TANK TO RAPSTM FLIP LEVER ASA
• Swing ip lever to the ‘release’ position. (SEE PIC A)
TM
• Attach air tank by carefully screwing it into the threaded portion of the RAPS
tight and all the way in. (SEE PIC B)
• Return ip lever of the RAPS
• A brief sound of air entering the system is normal. The G4 is now pressurized. (SEE PIC D)
TM
ASA to the ‘close’ position. (SEE PIC C)
ASA. Make sure tank tment is
WARNING
IMPROPER FITMENT WILL CAUSE PHYSICAL INJURY. ALWAYS INSPECT MACRO-LINE HOSE SEATED
ALL THE WAY INTO THE END OF THE ELBOW.
A B C A B C D
16 17
W W W . D A N G E R O U S P O W E R . C O M
WARNING
NITROGEN OR COMPRESSED AIR TANKS ONLY! NEVER USE CO2.
Page 11

VELOCITY ADJUSTMENT
TRIGGER ADJUSTMENT
• Locate the (1/8”) allen key wrench included with your G4.
• Adjust screw located at the side of the Operating Pressure Regulator (OPR) to increase or decrease velocity.
• Turn screw counterclockwise to increase velocity.
• Turn screw clockwise to decrease velocity.
WARNING
DP ENGINEERING RECOMMENDS THAT THE VELOCITY NEVER EXCEED 300 FPS. FAILURE TO
FOLLOW REGULATIONS REGARDING MAXIMUM ALLOWABLE VELOCITY, CALCULATED IN FEET PER
SECOND (FPS), MAY RESULT IN DAMAGE OF PAINTBALL MARKER, SERIOUS INJURY OR DEATH. BE
RESPONSIBLE AND ALWAYS USE A CHRONOGRAPH TO DETERMINE ACCURATE VELOCITY BEFORE
PLAY.
-
+
• There are four adjustment screws (marked A, B, C and D) to adjust the trigger on the G4.
• Screw A (5/64”) adjusts the amount of trigger travel prior to the marker ring. Turning this screw clockwise will
reduce the amount of trigger travel. Turning this screw counterclockwise will increase the amount of trigger
travel. (SEE PIC A)
• Screw B (5/64”) sets the amount of trigger travel after the marker has been red. Turning the screw clockwise
will reduce the amount of trigger travel. Turning the screw counterclockwise will increase the amount of trigger
travel. (SEE PIC B)
A B
18 19
W W W . D A N G E R O U S P O W E R . C O M
Page 12

TRIGGER ADJUSTMENT (CONTINUED)
• Screw C (3/32”) adjusts the strength of the trigger’s return to rest by either reducing or increasing the
magnetic pull. Turning this screw counterclockwise will decrease the strength. Turning this screw clockwise
will increase the strength. Do not turn the screw too far - doing so may weaken the magnetic pull and prevent
the trigger from being able to fully return to rest. (SEE PIC C)
• Screw D (5/64”) adjusts the length of the trigger’s touch the micro switch. Turning this screw counterclockwise
will decrease the length. Turning this screw clockwise will increase the length. Do not turn the screw too far –
because can be damage the micro switch. (SEE PIC D)
BOARD
TRIGGER
Fires the marker.
FIRING MODE OPERATION
Firing mode Invokes program-
ming mode at power up.
LED
POWER ON
Green light indicate battery level
ok, Red light indicate battery
level low.
NOTE
BE CAREFUL NOT TO TURN THE SCREW TOO FAR IN EITHER DIRECTION, AS DOING SO MAY PUSH
THE TRIGGER PAST THE FIRING POINT AND CAUSE OPERATIONAL FAILURE.
C D
PROGRAMING MODE
OPERATION
Programming mode cycles
through setpoints and enters
setpoint values via pulls.
POWER BUTTON
POWER ON
Press and hold until illuminates.
Release and marker is ready to
re.
POWER OFF
Press and hold 2 seconds until
board tur ns off. Release and
marker is off.
EYE CONTROL
Tap to toggle eye sensor on/off.
20 21
Page 13

PROGRAMMING YOUR G4
PROGRAMMING YOUR G4 (CONTINUED)
1. POWER
POWER ON
• Press and hold down Button A to turn on the marker with
eye sensors on.
• When battery voltage is lower than 7.2V, the indicator
light will ash red. When battery voltage is over 7.2V
then the indicator light will ash green.
• When the G4 eye sensors are on the indicator will blink
a slow green light (1 blink/0.5 seconds). The indicator light will remain solid green when paintball is in the
breech.
• To turn the eye sensors off, press and release Button A.
When the G4 eye sensors are off the indicator light will
blink a quick green light (1 blink/0.2 seconds)
POWER OFF
• Press and hold down Button A for 2 seconds before indicator light turns off.
• The marker will shut down automatically after being idle for 20 minutes. The marker will retain the last
adjusted set points whether it shutdown automatically, manually or by removing the battery.
22 23
W W W . D A N G E R O U S P O W E R . C O M
LIGHT WINDOW
BUTTON A
2. TOURNAMENT LOCK
• Dip Switch 1 set to “ON”. Modes cannot be set without
unlocking tournament lock.
• Dip Switch 2 is non functional.
3. CONFIGURATION MODE
• To enter programming mode, marker must rst be turned off and
dip Switch 1 must be set to OFF position.
• Pull and hold down trigger then press Button A for 2 seconds.
Release Button A and then trigger and the indicator light will
ash multiple colors and stop at solid red which indicates
programming mode.
ON
1 2
ON
1 2
Page 14

PROGRAMMING YOUR G4 (CONTINUED)
PROGRAMMING YOUR G4 (CONTINUED)
3. CONFIGURATION MODE
• Setting Options as below:
▌ FIRING MODE
Mode Description
Functionality
Mode
Rate Of Fire
Firing Mode
Ramp Point
Trigger Debounce
Solenoid Dwell
ABS Dwell
24 25
W W W . D A N G E R O U S P O W E R . C O M
LED
Red 13 5/35
Green 1 1/4
Yellow 3 1/10
Red Flash 10 1/20
Green Flash 12 5/25
Yellow Flash 4 1/4
Factory
Default
Min/Max
Semi
PSP3
NXL
Millennium
▌ SOLENOID DWELL
This value controls the allotted time (in milliseconds) the solenoid is open. If too low, the marker will not cycle. If
the value is too high, the solenoid with remain open too long therefore wasting decreasing battery and air efciency.
▌ ABS DWELL
Adds an additional 1-3 milliseconds of dwell time to the programmed solenoid dwell setpoint on the rst shot of any
string of shots after a xed 20 seconds of shooting inactivity. A value of 4 disables the ABS Dwell feature.
Fire 1 shot per trigger pull.
Three semi shots then transitions to 3 Rounds Burst. Returns to semi mode after 1 second of no activity.
Semi for the rst 3 shots, then full automatic on the 4th pull and hold. Rests to semi after 1
second of no activity.
When triggering pull speed up to 7.5 BPS ramping will turn on at the 6
trigger pull speed lower than 7.5 BPS then the re mode will be back to semi re mode.
th
trigger pull, when
Page 15

PROGRAMMING YOUR G4 (CONTINUED)
CARE AND MAINTENANCE
RESET
To reset the marker to manufacturing default settings, press and hold down the trigger then press and hold down
the on/off button. Release the on/off button and hold on to the trigger for 10 seconds until yellow light appears.
4. EXAMPLE SETTING FROM SEMI TO MILLENNIUM
1. Turn off the marker before entering the setting mode and switch dip 1 to the OFF position
2. Pull and hold the trigger then press power button to turn on the marker. Release the power button then
trigger, the LED will be Red which indicates the Rate of Fire setpoint.
3. Pull trigger once to proceed to the next function selection mode, when the LED turns green then the functional
model will be at the Firing Mode. Press the POWER button once to enter the observation model which will
display the last setting. The LED will be ash the value that previous set.
• If pull the trigger at the observation mode then will be skip to the next function.
• If the original setting is at 4 then green LED 4 times, so on and so forth.
4. Follow-up to Step (3), then press POWER button once (LED will blink red green and yellow in a second
indicating of access to adjustable settings mode.
5. Following steps (4), in accordance with pulling the trigger 4 times (it will set the value to 4 [Millennium Mode].
Press the power button one time to indicate the set and to leave the adjustment mode back to Step 3
observation mode. The last settings well be reected in the blinking of the indicator light.
6. Then look at the other function whether or not to continue to choose or turned off board to leave the set mode.
Routine care and maintenance for your Dangerous Power G4 will ensure many years of high performance and
enjoyment. When in doubt, always seek the assistance of a certied technician from a reputable pro shop, or
contact Dangerous Power Customer Service.
DEGASSING the G4
Always be sure to completely de-gas your marker before performing maintenance or service repair. Carefully follow
the instructions below in sequence to ensure that all remaining air has been removed from the entire marker:
1. Flip the RAPS
2. Remove the paintball loading device and check to make sure there are no paintballs within the breech.
3. Unscrew the air system from the RAPS
4. Point the marker in a safe direction, and then re 1-2 shots to remove air from the OPR. Be aware that the
marker may still re without any an air system attached.
5. Power OFF the marker.
TM
ASA to the ‘Off’ position. This disconnects the air system from the marker.
TM
ASA.
26 27
W W W . D A N G E R O U S P O W E R . C O M
Page 16

IMPORTANT NOTES BEFORE SERVICING YOUR MARKER :
• DP ENGINEER SUGGEST YOU ALWAYS USE DP-40 LUBE TO SERVICE YOUR MARKER.
• DO NOT APPLY EXCESSIVE LUBRICANT.
• ALWAYS INSPECT AND CLEAN YOUR MARKER AFTER EACH USE.
• NEVER APPLY EXCESSIVE FORCE WHEN REMOVING OR REPLACING SCREWS. DOING SO MAY
STRIP THE SCREW HEADS OR DAMAGE THREADS.
• ALWAYS USE THE CORRECT SIZE AND THE APPROPRIATE TOOLS.
• REFRAIN FROM SUBMERSING ENTIRE MARKER IN LIQUID. KEEP SENSITIVE ELECTRONICS
SUCH AS SOLENOID AND CIRCUIT BOARD FREE FROM MOISTURE.
• NEVER ALLOW SOMEONE WHO IS UNFAMILIAR WITH YOUR MARKER TO PERFORM
MAINTENANCE OR REPAIR WORK. WHEN IN DOUBT, CONTACT DP ENGINEERING CUSTOMER
SERVICE.
CLEANING THE EYE-SENSOR BREAK BEAM SYSTEM
The function of the break beam sensor eyes is to allow the ring circuit to ‘time’ the activation of the solenoid. This
prevents ‘chopping’ of paint, which is caused by the bolt cycling within the breech without the paintball being
actually seated in the proper ring position. When the eye sensors are ON, the gun will not re if the beam does
not sense a paintball. To ensure proper function, the eye sensors should be cleaned after every other use, or when
paintballs have been broken within the marker. More frequent cleaning may be necessary when using paintballs
that have ‘oily residue’ on the surface of the shell. To avoid malfunction, always use fresh and clean paint from a
reliable manufacturer.
To clean the eyes:
1. Locate the eye cover plates on either side of your G4 body. (SEE PIC A)
2. Using provided allen key wrench (5/64”), carefully remove the eye cover screw on one side by inserting ball
point tip and turning wrench handle counterclockwise. (SEE PIC B)
3. Lift eye cover plate, exposing eye wires, spring, and ball detent. (SEE PIC C)
A
B C
28 29
W W W . D A N G E R O U S P O W E R . C O M
Page 17

CLEANING THE EYE-SENSOR BREAK BEAM SYSTEM
(CONTINUED)
4. Carefully lift eye wires and pull out the eye sensors from the socket. Be careful not to lose the spring and the
ball detent. (SEE PIC D)
5. With a cotton swab, gently wipe the back and front side of the eye sensor and the eye socket to remove any
debris or residue. (SEE PIC E)
6. Replace eye sensors back to original position. Be sure the eyes are aligned correctly and facing the direction
of the breech.
7. Replace eye cover plate in original position and gently tighten eye cover screws clockwise. DO NOT OVERTIGHTEN! (SEE PIC F)
8. Repeat the same procedure on the other side.
HELPFUL HINT
DO NOT PULL ON THE EYE WIRES. USE A SMALL PICK OR SCREW DRIVER TO GENTLY LIFT THE
WIRES UP. THIS WILL LIFT THE EYE SENSORS OUT OF THE EYE SOCKET.
CLEANING THE BALL DETENTS
The ball detents and spring should be inspected during the cleaning of the eye sensors. Replace these parts
should you notice any damage, no matter how slight.
1. Locate the eye cover plates on either side of your G4 body.
2. Using provided allen key wrench (5/64”), carefully remove the eye cover screw on one side by inserting ball
point tip and turning wrench handle counterclockwise. (SEE PIC A)
3. Lift eye cover plate, exposing eye wires, spring, and ball detent. (SEE PIC B)
4. Remove spring by carefully lifting it up by hand or with the aid of small tweezers. (SEE PIC C)
ED F
30 31
W W W . D A N G E R O U S P O W E R . C O M
B CA
Page 18

CLEANING THE BALL DETENTS (CONTINUED)
5. Place nger within breech, and gently push on the detent from the inside of marker body. Remove ball detent.
(SEE PIC D)
6. Check the spring for proper tension and the ball detent for any damage. Replace with new part(s) if
necessary.
OPERATING PRESSURE REGULATOR (OPR)
DISASSEMBLY AND MAINTENANCE
The OPR regulates the amount of air-ow, which determines paintball velocity. Regular inspection and cleaning of
your OPR is an essential part of keeping your G4 running in top condition. Follow the easy steps outlined below to
ensure that your OPR remains trouble-free.
7. With a cotton swab, clean the spring, ball detent, and detent groove. (SEE PIC E)
8. Replace detent back to original position, with the circular side down towards the breech.
9. Replace spring over the detent in the original position.
10. Replace eye cover plate in original position and gently tighten eye cover screws clockwise. DO NOT OVERTIGHTEN! (SEE PIC F)
11. Repeat the same procedure on the other side.
ED F
32 33
W W W . D A N G E R O U S P O W E R . C O M
1. Before disassembly of your regulator, be sure to disconnect the macro-line hose from the elbow tting
attached to your regulator. This is accomplished by pulling back on the collet of the elbow tment, while
simultaneously pulling the macro-line out to remove.
2. With a rm hold on the OPR body, unscrew by hand the entire unit in a counterclockwise direction. If the OPR
unit is difcult to turn by hand, a rubber strap wrench available in most hardware stores may be used.
(SEE PIC A)
A
NOTE
DO NOT UNSCREW BY USING WRENCH OR
PLIERS, AS DOING SO MAY SCRATCH AND
DAMAGE THE ANODIZED SURFACE.
Page 19

OPERATING PRESSURE REGULATOR (OPR)
DISASSEMBLY AND MAINTENANCE (CONTINUED)
OPERATING PRESSURE REGULATOR (OPR)
DISASSEMBLY AND MAINTENANCE (CONTINUED)
3. By hand or with the assistance of a strap wrench, unscrew the Operating Pressure Regulator Body from the
OPR Bottom Housing. (SEE PIC B)
4. Take out Regulator Piston and remove Regulator Spring . (SEE PIC C)
5. Remove all visible debris and dirt with a lightly dampened and clean cotton cloth. Take care not to scratch the
surface of any regulator parts.
6. Lightly apply a small amount of DP-40 lubricant to the tip of a cotton swab. (SEE PIC D)
B C D
34 35
W W W . D A N G E R O U S P O W E R . C O M
7. Apply lubricant to the o-ring located on the base of the OPR Piston. (SEE PIC E)
8. Apply lubricant on the stem of OPR Piston. (SEE PIC F)
9. Apply lubricant to the 2 o-rings located on the OPR Top Housing Ring. (SEE PIC G . H)
Be careful not to apply excess pressure, as doing so may damage sensitive parts and/or strip delicate threads.
NOTE
CAREFULLY INSPECT O-RING PRIOR TO APPLYING LUBRICANT. REPLACE IF O-RING APPEARS
WORN, CRACKED, TORN, OR DAMAGED.
E GF
H
Page 20

DISASSEMBLY AND MAINTENANCE OF DUMP
VALVE BOLT AND DUMP VALVE PLUG
DISASSEMBLY AND MAINTENANCE OF DUMP
VALVE BOLT AND DUMP VALVE PLUG (CONTINUED)
1. Unscrew front of barrel from G4 body.
2. Use supplied allen key wrench (1/4”) on the back of marker and unscrew back cap. (SEE PIC A)
3. Remove Dump Valve Plug from marker body. (SEE PIC B)
4. Remove Dump Valve Bolt from marker body. It may be necessary to use your nger to pull it or push it out, as
illustrated. (SEE PIC C)
5. Wipe off all visible debris and grime from the Dump Valve Bolt, Dump Valve Plug and internal of G4 body with
a soft dampened cotton cloth and cotton swab.
B CA
36 37
W W W . D A N G E R O U S P O W E R . C O M
4. Lightly apply DP-40 lubricant to the tip of a cotton swab.
5. Apply lubricant directly onto the Dump Valve Bolt. (SEE PIC D)
6. Apply lubricant to the two o-rings located on the Dump Valve Plug. (SEE PIC E . F)
NOTE
THE ABOVE STEPS ARE ALL THAT ARE REQUIRED FOR NORMAL BOLT MAINTENANCE. PROCEED
FURTHER TO ACCESS SOLENOID AND TRIGGER.
WARNING
NEVER USE FORCE DURING DISASSEMBLY OR REASSEMBLY. ALWAYS SEEK ASSISTANCE FROM A
QUALIFIED AIRSMITH OR CONTACT DP ENGINEERING CUSTOMER SERVICE IF YOU ARE UNCERTAIN
OF ANY INSTRUCTIONS DESCRIBED IN THIS MANUAL.
ED F
Page 21

SEPARATING G4 BODY FROM TRIGGER FRAME
1. Remove macro-line from RAPSTM ASA. (SEE PIC A)
2. Carefully remove the 2 hexagonal screws (3/32”) holding the left panel in place. (SEE PIC B)
3. Gently secure the base of the connectors and pull up to remove the plugs. DO SO ONE AT A TIME. It may be
helpful to use needle nose pliers. Note the location and direction of the connectors on the circuit boar for
reassembly. (SEE PIC C . D)
SEPARATING G4 BODY FROM TRIGGER FRAME
(CONTINUED)
4. Locate screw #1 underneath G4 body between OPR and Trigger Guard and screw #2 behind the trigger
frame. Using (3/32”) allen key wrench, loosen Connector Screw by turning it counterclockwise.
(SEE PIC E . F)
5. Separate the G4 body from the trigger frame. (SEE PIC G)
A CB
38 39
W W W . D A N G E R O U S P O W E R . C O M
D
F GE
Page 22

SOLENOID MAINTENANCE
SOLENOID MAINTENANCE (CONTINUED)
The G4 solenoid is a delicate electronic component that requires minimal maintenance or service. DP Engineering
does not recommend frequent cleaning of this part, or its internals. The following instructions are provided for
reference and for expert airsmiths only.
1. Follow Page 38 continued operation next step.
2. Using (5/64”) allen wrench key, locate and remove both screws securing the solenoid to the marker body.
(SEE PIC A . B)
3. Once both screws are removed, gently lift and remove the solenoid. (SEE PIC C)
4. Place solenoid on a at surface, with the wiring harness side facing down and solenoid disassembly screw
facing up.
5. Secure base of solenoid casing with an adjustable wrench (not provided). Using a slotted (athead)
screwdriver, remove screw carefully by turning it counterclockwise. Be extremely careful not to strip the
screw. (SEE PIC D)
DBA C
6. Remove solenoid spring. (SEE PIC E)
7. With thin tweezers or needle nose pliers, carefully remove the solenoid piston by gently securing the tip and
pulling it out. (SEE PIC F)
8. Carefully inspect and clean solenoid piston o-rings. Make sure the o-rings are not cracked, broken, or show
signs of wear. Replace parts if necessary.
9. With a cotton swab, lightly apply a small amount of DP-40 lube to the solenoid piston assembly. (SEE PIC G)
10. Replace in reverse order.
WARNING
NEVER USE FORCE WHEN REMOVING OR REINSTALLING THE SOLENOID AND ITS SENSITIVE
INTERNALS. BE CAREFUL NOT TO BEND, TWIST, OR BREAK DELICATE WIRES, AS DOING SO MAY
RENDER THE UNIT INOPERATIVE OR CAUSE IT TO MALFUNCTION.
E GF
40 41
W W W . D A N G E R O U S P O W E R . C O M
Page 23

REMOVING TRIGGER FROM FRAME
1. Locate the two trigger adjustment screws. Use (5/64”) allen key wrench to loosen and remove both screws by
turning them counterclockwise. Be careful not to misplace the screws. (SEE PIC A . B)
2. Locate trigger removal screw. Use (3/32”) allen key wrench to loosen and remove screw by turning it
counterclockwise. Carefully pull out screw. Note that the latter part of the screw is a bolt, which the trigger
hinges upon. (SEE PIC C)
3. Remove trigger assembly by lifting it up and out of G4 trigger frame. (SEE PIC D)
RAPS™ FLIP LEVER ASA
REMOVAL AND MAINTENANCE
The RAPSTM ASA was designed to be virtually maintenance free. However, it may be necessary to occasionally
clean and inspect for debris or damage, as either may cause malfunction or leaking of air.
TM
1. Remove macro-line from RAPS
2. Remove buttery grip panels from trigger frame. (SEE PIC B)
3. Disconnect solenoid wiring harness and eye wiring harness from circuit board. (SEE PIC C)
4. Locate the three screws securing circuit board to trigger frame and unscrew using a crosshead (Phillips)
screwdriver. Carefully remove the circuit board from the trigger frame. (SEE PIC D)
ASA. (SEE PIC A)
B C DA
42 43
W W W . D A N G E R O U S P O W E R . C O M
B C DA
Page 24

RAPS™ FLIP LEVER ASA
REMOVAL AND MAINTENANCE (CONTINUED)
5. Locate front and back screws within grip frame as illustrated, and unscrew with (3/32”) allen key wrench.
(SEE PIC E . F)
6. Slide RAPS
7. Locate hex screw on RAPS
8. Using (5/64”) allen key wrench, loosen and remove screw by turning it counterclockwise. (SEE PIC H)
9. Remove RAPS
10. Check spring for proper tension. Replace if worn or damaged.
TM
ASA forward on rail to remove from frame. (SEE PIC G)
TM
ASA casing.
TM
lever and piston from RAPSTM casing as shown.
RAPS™ FLIP LEVER ASA
REMOVAL AND MAINTENANCE (CONTINUED)
TM
11. Use a lightly dampened cloth and/or cotton swab to remove debris or grime from all RAPS
compenents, including the piston, spring, lever, and casing. (SEE PIC I)
12. Clean and inspect o-ring located on the base of the piston. Replace o-ring if it appears worn, cracked, or
damaged. Using a cotton swab, apply a small amount of DP-40 lubricant on the o-ring. (SEE PIC J)
13. Make sure the spring is properly seated on the piston, then reassemble the RAPS
of assembly. (SEE PIC K)
WARNING
REMEMBER TO DE-GAS THE G4 BEFORE SERVICING THE RAPS
PREVIOUSLY OUTLINED ON PAGE 27 TO SAFELY AND PROPERLY REMOVE EXCESS AIR FROM THE
MARKER.
TM
ASA. FOLLOW INSTRUCTIONS
TM
ASA
ASA in the reverse order
G HE F
44 45
W W W . D A N G E R O U S P O W E R . C O M
I KJ
Page 25

TROUBLESHOOTING
PROBLEM POSSIBLE CAUSE SOLUTION
Hold down operating button for more than 4
seconds
Check to see if the battery cable is connected
correctly to the terminal
G4 will not turn on
G4 will not re
Not activated
Low battery power Replace with fresh battery
Battery is connected incorrectly to
the PC board
Low battery power Replace with fresh battery
Low air pressure Rell the air system
Solenoid may be out of place Open grip and press solenoid forward
OPR pressure is too low Adjust OPR pressure without paintball present
PROBLEM POSSIBLE CAUSE SOLUTION
Air leaking from
barrel area
Paintball breaking
out of the barrel
Paintball chopping
internally
Bolt cap o-ring is worn Change o-ring
Internal o-ring is worn or damaged Change o-ring
Barrel size does not match paintball’s
Ball detent is worn Change ball detent
Sensor system is not on Switch it to ON
Low battery power Replace with fresh battery
The stock barrel size is 0.690,change if
necessary
PROBLEM POSSIBLE CAUSE SOLUTION
No paintball present Turn on the loader
G4 will not re with
sensor system on
G4 will not cycle
completely
46 47
Sensor system is unclean Remove and clean sensor eye
Broken paintball inside Refer to bolt maintenance
Ball detent is damaged Change ball detent
Air pressure is too low Adjust the operating pressure to 150 to 200 psi
Dwell time is too short See“dwell adjust system”
Low battery power Change battery
Bolt o-ring is worn Change o-ring
Bolt o-ring lubricant is exhaust Lubricate the o-ring with Dow-55 lubricant
W W W . D A N G E R O U S P O W E R . C O M
Page 26

PARTS DIAGRAM AND TABLE
NO ITEM NUMBER O’ty NOTE
1 20-B01285-401-PG400B 1
2 20-F01730-000-PTHR7A 2 Ø17.17 ٭ Ø1.78
3 20-F01800-000-PSPE0B 1 Ø19 ٭ Ø2
4 20-A40130-301-PSPE0B 1
5 20-B10332-301-PSPE0B 1
6 20-F05050-000-PSPE0B 1
7 20-A40160-400-PG400B 1
8 20-B10423-400-PG400B 1
9 20-E10170-000-PT00 1
10 20-F01810-000-PSPE0B 1 Ø13 ٭ Ø2
11 20-F01550-000-PFUS0A 2 Ø21.95 ٭ Ø1.78
12 20-B25642-401-PG300B 1
13 20-B16133-401-PG300B 1
14 20-H03150-000-PG300B 1
15 20-H05560-000-PFUS0A 1
16 20-C25030-104-PG300B 1
17 20-B30674-401-PG300B 1
18 20-W10790-000-PFUS0A 2 #3-56UNF-13.3L
19 20-A06192-305-PIQ00L 1
20 20-W10780-000-PFUS0A 4 #3-56UNF-19.8L
21 20-C20040-104-PFUS0A 1
22 20-F01780-000-PG300B 3 Ø2 ٭ Ø1
23 20-A06170-000-PSPI0B 1
24 20-F01480-000-PFUS0A 1 Ø6 ٭ Ø1
25 20-C01042-104-PFUS0A 1
26 20-F01470-000-PFUS0A 1 Ø7.5 ٭ Ø1
27 20-C20053-104-PTHR7A 1
28 20-G10230-000-PFUS0A 1
29 20-B20242-305-PTHR7A 1
30 20-F01700-000-PFUS0A 4 Ø2 ٭ Ø1
31 20-H05480-000-PTHR7A 1
32 20-G10220-000-PFUS0A 1
33 20-H03110-000-PFUS0A 1
34 20-W10930-000-PTHR7A 2 #5-40UNC-3/16”L
35 20-H03190-000-PREV0B 2 #8-32UNC-12L
36 20-E01150-000-PSPI0B 2
37 20-G10300-000-PSPI0B 2
38 20-W23600-000-PSPI0B 1
39 20-B30914-101-PG400B 1
40 20-B30924-101-PG400B 1
41 20-W11020-000-PSPI0B 2 #3-56UNF-4L
42 20-B05305-401-PG400B 1
43 20-A60290-101-PG400B 1
NO ITEM NUMBER O’ty NOTE
44 20-B30934-101-PG400B 1
45 20-W63020-000-PREV0B 1 Ø3 ٭ T3
46 20-W11042-000-PREV0B 1 #10-32UNF-6L
47 20-H03210-000-PSPE0B 1 #3-56UNF-15L
48 20-W11012-000-PFUS8A 2 #8-32UNC
49 20-W23670-000-PSPE0B 1
50 20-W10840-000-PFUS0A 3 #3-56UNF-5/32”L
51 20-W23510-000-PFUS0A 1
52 20-B10392-300-PFX00B 1
53 20-F10170-000-PG400B 1
54 20-W11040-000-PSPI0B 2 #10-32UNF-5/16”L
55 20-A01290-401-PG300B 1
56 20-E01130-000-PFUS0A 1
57 20-H05540-000-PG300B 1
58 20-F01590-000-PFUS0A 1 Ø3.69 ٭ Ø1.78
59 20-G10250-000-PFUS0A 1
60 20-B25635-401-PG300B 1
61 20-W10810-000-PFUS0A 1 #3-56UNF-17.3L
62 20-W10560-000-PM31 1 1/8”-27NPT-6.5L
63 20-B30684-400-PG300B 1
64 20-A01130-104-PT00 2 1/8”NPT
65 20-A13890-610-PSPE0B 1
66 20-C10122-000-PG300B 2
67 20-E05250-610-PSPE0B 1
68 20-W10730-000-PFUS0A 4 #8-32UNC-5/16”L
69 20-A20310-371-PG400B 1
70 20-B25703-401-PG400B 1
71 20-F01510-000-PFUS0A 2 Ø14 ٭ Ø1.78
72 20-F01870-000-PG400B 1 Ø20.35 ٭ Ø1.78
73 20-G10330-000-PFX00B 1
74 20-B10382-307-PFX00B 1
75 20-B20282-307-PG400B 1
76 20-F01760-000-PTHR7A 1 Ø15.6 ٭ Ø1.78
77 20-H03233-000-PG400B 1
78 20-F01520-000-PFUS0A 2 Ø5.29 ٭ Ø1.78
79 20-W01050-000-PXMT0A 1 Ø1/4”
80 20-H01040-000-PG400B 1
81 20-B16283-401-PG400B 1
82 20-W10870-000-PG400B 1 1/4”-28UNF-6.35L
83 20-F01820-000-PSPE0B 1 Ø12.42 ٭ Ø1.78
84 20-B16292-401-PG400B 1
85 20-E02092-000-P031 1 Ø1/4” ٭ 130L
86 20-W11010-000-PFUS8A 1 #8-32UNC-3/8”L
48 49
Page 27

STATEMENT OF LIABILITY
LIMITED WARRANTY
The manufacturer assumes no responsibility for this product’s safe operation upon sale or distribution. PROPERTY
DAMAGE, BODILIY INJURY, OR DEATH could occur due to misuse, abuse or failure to follow the manufacturer’s
instructions stated in this manual. The manufacturer will assume no responsibility for physical injury or property
damage resulting from the use of this marker. The information in this document is subject to change without prior
notice. The manufacturer assumes no responsibility for any errors that may appear in this document.
DISCLAIMER
Notice is hereby given that this owner’s manual is part of the article owned in whole by the manufacturer, known
as indicated by this disclaimer and all illustrations within the manual. All rights for manufacturing and reproducing
of such articles or any part thereof are reserved by the manufacturer. Neither said article nor any part thereof may
be manufactured or reproduced in any way except by the written authorization of the manufacturer. All proprietary
truths and information are the sole property of the manufacturer.
DANGEROUS POWERTM warrants this G4 paintball marker, to the initial retail purchaser, to be free from defect in
original materials and/or workmanship for twelve (12) months from the original date of purchase, with the following
exceptions:
1. Disposable parts (batteries, o-rings, seals, micro switch, air pressure hose, rubber and/or plastic material
parts, etc.) are not included in this limited lifetime warranty.
2. Electronic parts on this marker are fully warranted for 30 days from the original date of purchase.
3. Bolt and striker systems of this marker are fully warranted for 6 months from the original date of purchase.
4. Surface damages (scratches and nicks) or operation failure due to accident, neglect, modication, normal
wear, operator error, maintenance by anyone other than an authorized dealer or agent, misuse, improper
disassembly and reassembly, are expressly not covered under this warranty.
PURCHASER IS RESPONSIBLE FOR ALL RENDERED SERVICES NOT COVERED UNDER THIS LIMITED
WARRANTY, INCLUDING ANY APPLICABLE SHIPPING COSTS, LABOR, AND/OR INSTALLATION.
TM
DANGEROUS POWER
their eligibility for coverage under the terms of this warranty. DANGEROUS POWER
afliates, and/or agents, will not be held liable under this warranty, state, federal, or common law for any product
failure, personal injury, or property damage resulting from improper use and/or alteration of this product. Any
attempt to alter the trigger assembly will instantly void your warranty and may result in serious injury. Any attempt
to alter basic marker parts without prior written consent from the manufacturer will result in automatic default of all
expressed warranties.
This limited warranty is non-transferable and is valid only upon presentation of a completed warranty registration
card and original proof of purchase. There are no other warranties or guarantees, expressed or implied, made by
the manufacturer on this paintball marker.
PAINTBALL MARKERS ARE NON-REFUNDABLE AND ARE NOT SUBJECT TO EXCHANGE FROM
MANUFACTURER.
reserves the right to determine the legitimacy of claimed defective original parts and
TM
, its authorized dealers,
50 51
W W W . D A N G E R O U S P O W E R . C O M
Page 28

P r o d u c t R e g i s t r a t i o n C a r d
Fill out all of the information below completely. To activate your warranty, visit www.dangerouspower.com
and click on “SUPPORT” to register your product within 7 days of purchase. Keep this card and your receipt
or proof of purchase - you will be asked to include both when sending in your product for warranty service.
Name ___________________________________________________________________
Address __________________________________________ Apt/Suite #______________
City _________________________ State _________ Province _____________________
Zip/Postal Code _________ County ______________ Country ______________________
Phone (_____) ________________ Fax (_____) _______________________________
Email ___________________________________________________________________
Name of Product Purchased _________________________________________________
Date of Purchase __________ (dd/mm/yy) Product Color _________________________
Place of Purchase_________________________________________________________
Product Serial Number (if applicable) __________________________________________
I guarantee all of the information completed above to be true and correct to the best of my
knowledge.
Signature ________________________________________________________________
Date ______________
Visit www.dangerouspower.com for more information on how to claim warranty.
DANGEROUS POWER™ 9/09
Page 29

NOTES:
W W W . D A N G E R O U S P O W E R . C O M
Page 30

 Loading...