

Page 1
USER MANUAL
Page 2

TABLE OF CONTENT
Table of Content.........................................................................................................2
Warning.....................................................................................................................3
Pending No................................................................................................................3
Statement of Liability.................................................................................................3
Disclaimer.................................................................................................................4
Limited Warranty........................................................................................................4
Features.....................................................................................................................5
Inside the Package......................................................................................................5
Power Source.............................................................................................................5
Air Source.................................................................................................................6
2
N and Compressed Air...............................................................................................6
Disconnecting Air System..........................................................................................6
Pressure Adjustment..................................................................................................7
OPR Adjustment........................................................................................................7
LPR Adjustment.........................................................................................................7
Trigger Adjustment....................................................................................................8
LED Interface Operation.............................................................................................8
Activation..................................................................................................................8
Deactivation...............................................................................................................9
Board Adjustment.......................................................................................................9
External Maintenance..................................................................................................9
Sensor System Maintenance.......................................................................................10
Bolt Maintenance......................................................................................................10
Striker Maintenance..................................................................................................10
Firing Valve Maintenance..........................................................................................11
Storage and Transportation........................................................................................11
Troubleshooting.......................................................................................................12
Version 1.0 5/2006
2
Page 3
WARNING
Eye prot ection must be worn at all times by the user and any person loca ted in the rang e of an
act ively used paint ball mar ker . The eye prot ection gea r must be app roved and desi gned for paint ball
use.
The Fusi on marker is no t a toy!
Misuse or carel ess use can cau se ser ious inj ury or dea th.
Please read the operation manu al and warranty card before usi ng.
Always use a barr el blocking dev ice.
Always ensu re the marker is not pointed at any on e when it is being handled ou tside the
con fines of an act ual paint ball gam e and where prop er eye prot ect ion and equ ipm ent ar e no t
being used .
Thi s prod uct is reco mmend ed for use for adu lts 18 yea rs or older. Per son un der 18 must hav e
adu lt sup er vi si on or use on ly on paint ball fields meet ing ASTM st and ard F1777-97 .
PENDING NO
Operat ion Pressur e Regu lator Patent No. :7045726B1
Rapid Feed nec k Pend ing No.: 11/028640
Inv isible Scr ew Pend ing No.: 11/256392
Ref lect ing Trigg er Senso r Pend ing No.: 11/354808
Qui ck Rel ease Beari ng Lock Pend ing No.:11/ 25 58 22
STATEMENT OF LIABILITY
The manu fact urer assum es no respo nsi bi lity for thi s prod uct' s resal e or saf e operation upon
distribution. PROPERTY DAMAGE, BODILIY INJURY OR DEATH cou ld occ ur due to misuse,
abu se or failure to fol low the manu fact urer 's inst ructi ons stated in thi s manu al . The manu fact urer
will assum e no respo nsi bi lity for physi cal injury or prop erty dam age resul ting from the use of this
mar ker .
The inform at ion in thi s do cum ent is sub ject to cha ng e without pri or no tice. The manufacturer
assum es no respo nsi bi lity for any errors that app ear in thi s do cum ent.
3
Page 4
DISCLAIMER
Not ice is hereby given that this owner' s manual is part of the article owned in whole by the
manu fact urer , known as ind icat ed by this discl ai mer and al l illust ration s within the manu al. All
rights for manu fact uri ng and reprod ucing of such articles or any part thereof are reser ved by the
manu fact urer . Neither sai d article nor any part thereof may be manu fact ured or reprod uce d in any
way exc ept by the written authori zat ion from the manu facturer . All prop rietary rights and
inform at ion ar e the sol e prop erty of the manu fact urer .
LIMITED WARRANTY
DANGEROUS POWER war rants this Fusi on paint ball marker, to the initial retai l pu rcha ser , to be
TM
free from defect in ori ginal material s and /or workm ansh ip for twel ve (12 ) months from the ori gi nal
date of purcha se with the follow ing exc epti ons: (a) Dispo sabl e part s (batt eries, o-r ings, seal s, micr o
switch, air press ure hose, rub ber and /or plast ic material part s, et c. ) ar e no t included in thi s limited
war ranty . (b) Elect ron ic part s on thi s marker are ful ly war ranted for 30 days from the ori ginal date of
purcha se. (c) Bolt and striker syst ems of this marker are fully warranted for 6 mon ths from the ori gi nal
date of purcha se. (d) Surf ace dam age s (scr atche s and nicks) or operation fai lure due to acci den t, neg lect,
mod ificat ion, normal wear, operator er ror, maintena nce by any on e ot her than an authori zed dea ler or
age nt , misuse, improp er disass embly and reassem bly, and attem pt s made to dri ll ho les or rem ov e metal
from the exter nal surf aces which cou ld redu ce the saf ety and /or perf orm anc e of thi s marker are not
cov er ed under thi s limited warranty . Purchaser is respo nsi bl e for al l rend er ed ser vi ces no t cov ered un der
thi s limited warranty , includi ng any app licab le shi pp ing cost s, labo r, and /or inst al lation . DANGEROUS
POWER reser ves the right to deter mine the legit imacy of cl ai med defect ive ori gi nal part s and their
TM
eligi bi lity for cov er age un der the terms of thi s warranty .
DANGEROUS POWER , its authori zed dea lers, affi liates, and /or age nts, will not be held liable
TM
under thi s warranty , state, fede ral, or com mon law for any prod uct failure, personal injury, or
prop erty dam age resul ting from improp er use and /or alter at ion of thi s prod uct. Any attem pt to alter
the trigg er assem bly will inst antl y void yo ur war ranty and may resul t in ser ious inj ury . Any attem pt
to al ter basi c mar ker part s witho ut pri or written con sent from the manu fact urer will resul t in
autom atic defaul t of al l exp ressed warranti es. Pai nt ball markers are non-r efundab le and are not
sub ject to exc hange from manu facturer .
Thi s limited warranty is non-transfer able and is vali d only up on present ation of a com pleted warranty
regis tration card and ori gi nal proo f of purchase. There are no other warranti es or gu ar antees , exp ressed
or impl ied, made by the manu facturer on this paint ball marker.
4
Page 5
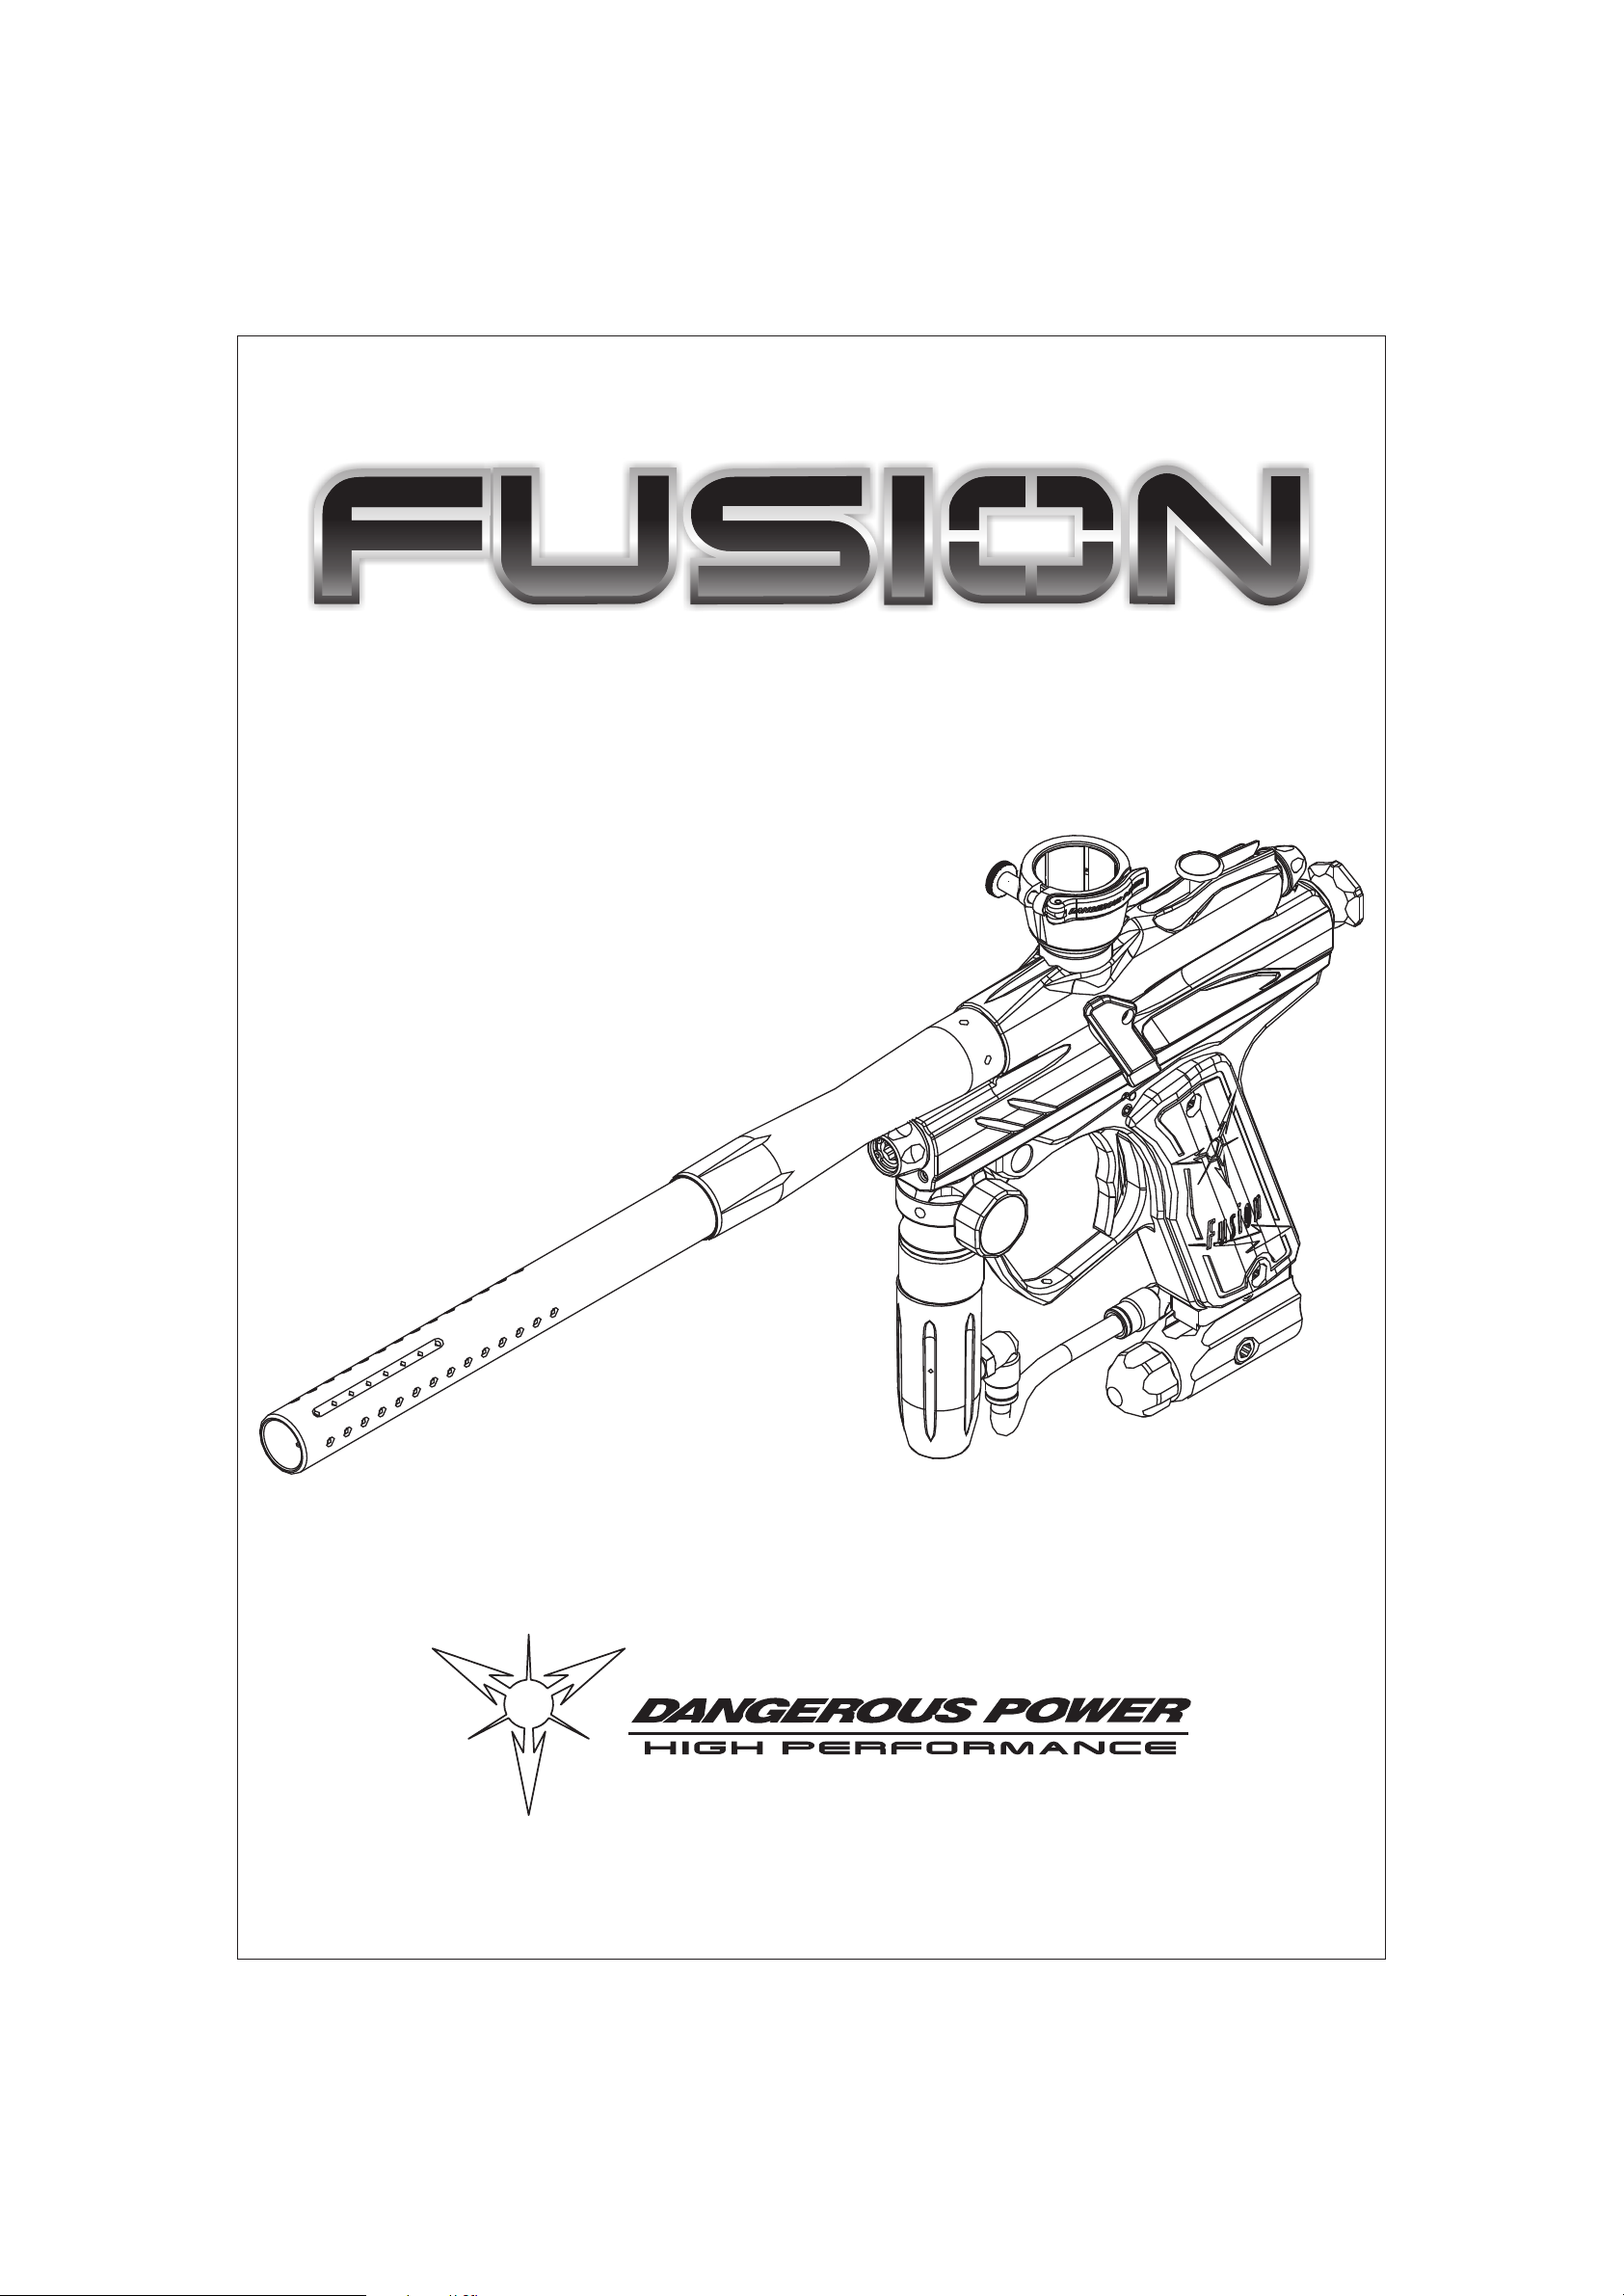
FEATURES
250 to 30 0 psi op er at ing press ure
Uses N2 or com press ed air for air sou rce
Air-r am elect ronic desi gn
Cock er com pati ble barr el thread
ACS (anti -cho p syst em ) Delrin sel f-lubricat ing fiel d-st rip bolt
Qui ck-st rip bo lt / striker syst em
Senso r trigg er with 2-st ep adjust ing
LED user interface (Sem i / ramping)
BPS (cap at 20) Senso r
Bou nce -bea m sensor syst em
Blade style trigg er for lighter pull
Low -rise feed nec k
3-D mach ined body milling
Dual regu lator syst em
ASA (ai r syst em ada pter ) syst em and op er at ing press ure gau ge
INSIDE THE PACKAGE
One Fusi on mar ker
14-inch Cock er thread 0.685 barr el
ASA style bottom fron t han dle regu lator
One low press ure regu lator (LPR)
One barr el block ing con do m
User manu al
Warranty card
Tool pac k
POWER SOURCE
One single 9V batt ery as po wer sou rce.
Rem ov e the batt ery from Fusi on after each use.
Use of a long life al kali ne 9V batt ery is reco mmend ed. To replace batt ery:
1.Remove the 2 scr ew s loca ted on the right side of gri p usi ng the sup plied HEX tool and lift
the gri p up .
2.Find the batt ery terminal and inst all the batt ery insi de the gri p fram e.
3.Replace the 2 scr ew s to rei nst al l the gri p.
Make sure there that no wires ar e pi nch ed when putting the gri p bac k.
Do no t force the wire int o cr evices ; wires sho ul d fit easi ly into allow ed space.
5
Page 6

AIR SOURCE
Fusi on will work with N and com press ed air.
2
Bef ore at tach ing the ai r syst em on to Fusi on, ensu re the bottom line dev ice is in pl ace.
Always use the fron t han dl e regulator for ensu ring the operating press ure is at 250 to 30 0 psi .
Bef ore at tach ing the ai r syst em, put lub ricat ion on the o-r ing of the air tank .
If there is an on /off switch present ed on the ai r syst em, shu t the ai r syst em off before
con nec ting it on to Fusi on .
It is reco mmend ed to maintain the fact ory stock dual regu lator syst em for op timum
perf ormanc e of Fusi on.
2
N and com press ed air can be extr emely dan gerou s if not han dl e prop erly or misused. Onl y use
prop erly cert ified cyli nders.
Keep ai r syst ems away from open flam es or any ot her po tenti al fire haz ar ds.
Always remove the tank from Fusi on when not in use.
2
N AND COMPRESSED AIR
2
N and com press ed air are reco mmend ed for best resul ts with Fusi on.
The OPR syst em cou ld be used to utilize the press ure.
Pin valve type air syst em is reco mmend ed with the OPR.
DISCONNECTING AIR SYSTEM
Becau se there migh t be air lef t insi de of Fusi on after usi ng , follow the inst ructi ons below to rel ease
the press ure withi n.
1. Discon nec t the load er and ensu re there are no paint ball s insi de of Fusion.
2. If there is an on /off switch present on the ai r syst em, shu t the ai r syst em off.
3. Turn of f the sensor syst em.
4. OPR: Turni ng the adjust ment screw clockwise, or in, will low er the OPR's outpu t press ure.
Turni ng the adjust ment scr ew cou nt er cl ock wise, or ou t, will raise the OPR's ou tput press ure.
LPR: Turni ng the adjust ment scr ew clock wise, or in, will lower the LPR's outpu t press ure.
Turni ng the adjust ment scr ew cou nt er cl ock wise, or ou t, will raise the LPR's ou tput press ure.
5. Dry fire Fusi on until there is no ai r left insi de of it.
6. Discon nec t the ai r syst em.
6
Page 7

PRESSURE ADJUSTMENT
Bef ore at tach ing the ai r syst em, ensu re the air syst em ada pt er is in place.
OPR: Turni ng the adjust ment scr ew clock wise, or in, will lower the OPR's ou tput press ure.
Turni ng the adjust ment scr ew cou nterclock wise, or ou t, will raise the OPR's ou tput press ure.
LPR: Turni ng the adjust ment scr ew clock wise, or in, will lower the LPR's outpu t press ure.
Turni ng the adjust ment scr ew cou nterclock wise, or ou t, will raise the LPR's ou tput press ure.
The ini tial adjust ment sho ul d be made with no paint ball s load ed.
When adjust ing or op er at ing with low press ure, al ways che ck the veloci ty usi ng chron ograph
dev ices.
LPR con trol s the press ure sup pl ied to the soleno id valve when Fusi on is fired.
Use cau tion when adjust ing , as int er nal dam age may occ ur to the com po nen ts or the regu lator
syst ems and may vo id the war ranty .
OPR ADJUSTMENT
Operat ing press ure can be adjust ed by usi ng the ASA style bottom-line regu lat or.
DO NOT ADJUST YOUR OPERATING PRESSURE OVER 350 PSI - INTERNAL
DAMAGE MAY OCCUR TO THE REGULATOR SYSTEM, SOLENOID VALVE AND
MARKER ITSELF.
The sug gest ed op er at ing press ure is betw een 250 to 300 psi.
Turni ng the adjust ment scr ew cl ock wise, or in, will low er the OPR's outpu t press ure.
Turni ng the adjust ment scr ew cou nterclock wise, or ou t, will raise the OPR's ou tput
press ure.
Immediat el y shu t off OPR if any leak age is detect ed.
LPR ADJUSTMENT
LPR can be found on the front of Fusi on .
LPR does no t use a press ure gau ge to monitor its press ure adjust ment.
Turni ng the adjust ment scr ew cl ock wise, or in, will low er the LPR's outpu t press ure.
Turni ng the adjust ment scr ew cou nterclock wise, or ou t, will raise the LPR's ou tput
press ure.
Once the sou nd of firing seem s righ t, place a couple of paint ball s in Fusi on to test the
veloci ty usi ng a chron ograph dev ice.
Immediat el y shu t off LPR if any leak age is detect ed.
7
Page 8

TRIGGER ADJUSTMENT
1 2
ON
1 2
ON
1 2
ON
1 2
ON
BPS:20
Ramping:OFF
BPS:15
Ramping:OFF
BPS:20
Ramping:ON
BPS:15
Ramping:ON
The two adjust ment scr ew s ar e loca ted on the lef t si de of the fram e abo ve the trigger
guard.
The scr ew on the top con trol s the over-trave l. By turni ng this scr ew you can adjust how far
the trigg er will trave l af ter it reach es the firing po int.
The scr ew below controls the forw ar d trave l. Screwing it in will sho rten the trigger's
leng th of pu ll.
LED INTERFACE OPERATION
Bef ore op er at ing the PC board of Fusi on , ensu re the barr el bl ock ing dev ice is in pl ace.
There are 2 operating buttons loca ted on the back.
Fol low act ivati on inst ructi ons for ho w to read the LED interface:
ACTIVATION
1. To act ivate Fusion, hold do wn button“A”for 1. 5 secon ds. When the red light turns int o a
blink ing bl ue light, the sensor has bee n act ivated.
2. Fusi on is read y to be fired on ce the mar ker has bee n load ed and the blue ligh t remains on .
3. Press the bu tton“B”to sw itch sensor syst ems.
4. BPS and Ramping Syst em :
Adjust the BPS and Ram pi ng Syst ems as follow s:
5. Fusi on will turn off autom atical ly af ter 20 minutes of no n-use.
6. Press “A”to manu ally shu t of f Fusi on .
Quick Ref er en ce Guide:
Red light flashi ng eve ry 3 secon ds Battery power low
8
Page 9

Red light flashi ng eve ry 5 secon ds Stand by mode (autom at ic after 30 secon ds of no n-use)
Blue ligh t bl inking rapidl y Senso r syst em OFF
Blue ligh t bl inking slowly Senso r syst em ON and marker NOT load ed
Blue ligh t st ead y Senso r syst em ON and marker load ed
DEACTIVATION
Press and hold the po wer bu tton“A”for 4 secon ds.
LED turn of f af ter releasi ng the han d.
BOARD ADJUSTMENT
Usi ng a HEX too l, rem ov e the 2 scr ews located on the top and bu tton of gri p with the Fusi on is
point ing to the lef t.
The 2 adjust ing fing er switche s ar e loca ted on the top of the PC board.
EXTERNAL MAINTENANCE
Most con taminates fou nd on exter nal surf aces can easi ly be rem ov ed with water and a dry
clean dump cl ot h or a few drop s of cleaning oil.
Other useful sup pl ies for maintaining Fusi on are clean rags, Q-tips, and wat er / rub bi ng
alcoh ol mix.
9
Page 10

SENSOR SYSTEM MAINTENANCE
The sensor syst em must be kep t cl ean for op timal perf orm anc e. Please fol low the inst ructi ons below
for clean ing and maintena nce :
1. Remove the two scr ew s loca ted on the top and bottom of gri p usi ng a HEX tool.
2. Clean the ar ea tho roughly with cott on swab.
3. Replace the sensor syst em and the cov er.
4. Replace the scr ew s bac k on to the sensor syst em cov er.
BOLT MAINTENANCE
Fusi on is equ ipped with a Del rin fiel dst rip bolt for durabil ity and redu ci ng frict ion.
The bolt must be kep t cl ean for optimal perf ormanc e.
If the surf ace of the bo lt bec om es sticky , pl ease use the fol lowing clean ing inst ructi ons:
1.Make sure the ai r syst em is not attach ed to Fusion and there is no paint ball insi de.
2.Lift up the lock ing pi n on the bolt and remove the bolt from the rear .
3.Clean the bo lt with a cl ean dam p cloth. Soap and war m water may be used to rem ov e any resi du e.
4.Lubricat e the bo lt and the o-r ing on it very lightly.
5.The pi n lock ing syst em sho ul d be gen tly oiled to ensu re prop er function ing.
Oil very ligh tly and mini mize oil resi due on the bo lt itsel f.
6.Clean the bo re of Fusi on with a squ eeg ee and ensu re there ar e no rem ai ni ng con taminan ts.
Replace the bo lt bac k to Fusi on and check for movement - it sho uld no w move freel y in the bore.
STRIKER MAINTENANCE
Fol low the inst ructi on s below to caref ul ly remove the striker assem bly for clean ing and
mai nt ena nce:
1.Discon nec t the ai r syst em and load er and ensu re there is no paint ball insi de of Fusi on .
2.Lift up the lock ing pi n and turn the cyli nder 90 deg rees cou nt er cl ock wise, then pull the st riker
and mai n spri ng.
3.Place each componen t caref ul ly and pay attenti on to their set ting s.
4.Pull the striker out from the ram cap and loca te the two o-r ings on the rear end of st icker.
Lub ricat e o-ring s with gel- type lubrican t if nec essar y.
Replace the o-r ings after exc essi ve wear.
5.Clean the bo re of Fusi on with a squ eeg ee and ensu re there ar e no rem ai ni ng con taminan ts.
6.Reassem bl e the com ponen ts and slip them bac k in their respect ive cha mbers.
Scr ew the hose con nector bac k to ram cap and rei nst all the striker lock ing pi n in the rear of bolt
10
Page 11

FIRING VALVE MAINTENANCE
Fol low the below inst ructi on to remove the firing valve assem bly caref ully for cl ean ing and
mai nt ena nce:
1. Remove the ASA (ai r syst em ada pter ) ho ses.
2. Remove the two scr ew s loca ted on the top and bottom of gri p usi ng a HEX tool.
3. Disass emble the sol eno id line and sensor eye syst em.
4. Remove the two inv isible scr ew s usi ng a HEX tool.
5. Sepa rate the body and gri p frame.
6. Turn the firing valve scr ew (fou nd under the body) cou nt er cl ock wise.
7. Take out the firing valve by usi ng plast ic stick (un der ∮17 .5mm).
STORAGE AND TRANSPORTATION
Clean and dea ct ivate Fusi on . Detach air syst ems when no t in use.
Make sure the barr el bl ock ing dev ice is in pl ace when not in use.
Keep Fusi on away from any unauthori zed users .
Duri ng transp ortation , Fusi on must be detached from ai r sou rces.
Do no t carr y Fusi on uncased when not on a pl aying field. Non-pl aying public and law
enforcem ent personn el may mistake the mar ker for a firearm .
Always carr y Fusi on in its fact ory case or a sui table marker case.
Neve r transp ort Char ged N / com press ed air or CO ai r syst ems.
2 2
11
Page 12

TROUBLESHOOTING
PROBLEM POSSIBLE CASUE SOLUTION
Pressure gauge will not move
Fusion will not turn on
Fusion will not fire
Fusion will not fire with sensor
system on
The pressure used was too hi
Not activated
Low battery power
Battery is connected
incorrectly to the PC board
Low battery power
Low pressure air
Solenoid may be out of place
LPR pressure is too low
No paintball present
Sensor system is unclean
Ball detent is damaged
Replace the gauge
Hold down operating button
for more than 4 seconds
Change battery
Check to see if the battery
cable were connected correctly
to the terminal
Change battery
Refill the air system
Open grip and press solenoid
forward
Adjust LPR pressure without
paintball present
Turn on the loader
See“Sensor System
Maintenance”
Call the authorized dealers for
replacement
Air leak from Barrel area
Fusion will not cycle
completely
Breaking paintball when
shooting out of the barrel
Chopping paintball internally
Paintball broke inside
Valve pin is at incorrect
position
Valve pin is worn
Air pressure is too low
Low battery power
O-ring of striker is worn
Striker is worn
Barrel size does not match
paintball's
Ball detent is worn
Sensor system is not on
Low battery power
See“Bolt and Sensor System
Maintenance”
Remove the LPR. Grease the
spring and valve pin
Replace them
Adjust the operating pressure
to 250 to 300 psi
Change battery
Replace the o-ring
Call the authorized dealers for
replacement
The stock barrel size is 0693,
change it if necessary
Call the authorized dealers for
replacement
Switch it to ON
Change battery
12
Page 13

13
Page 14

14
Page 15

 Loading...