

Page 1
WebGPI
Communication
Software
User Manual
Page 2
WebGPI Communication Software
User Manual
About this Manual
Organization
and Headings
To help you quickly find information in this manual, the material is divided into sections,
topics, subtopics, and details, with descriptive headings set in
appear at the top
In the PDF version of this document, clicking an item
you to the referenced page in the document.
Special Text Formatting
Controls and indicators are set in bold black type.
Table of Contents
A Table of Contents (TOC) appears on the next page. In the PDF version of this document,
the TOC entries are hyperlinked.
©
Sauer
Sauer
ordered provided that such alterations can be made without affecting agreed specifications.
All trademarks in this material are properties of their respective o
WebGPI, WebGPI
Danfoss logotype
is a
red type. Section titles
of every page in large red type.
underlined in blue italic type jumps
Revision history
Revision Date Comment
Rev. EA December 2009 WebGPI Rev. 3.1.x
Rev. FA July 2010 WebGPI Rev. 3.2.x
Rev. FB November 2012 WebGPI Rev. 4.0.x
2012 Sauer-Danfoss. All rights reserved.
-Danfoss accepts no responsibility for possible errors in catalogs, brochures and other printed material.
-Danfoss reserves the right to alter its products without prior notice. This also applies to products already
-Log, and Sauer-Danfoss are trademarks of the Sauer-Danfoss Group. The Sauer-
2
trademark of the Sauer-Danfoss Group.
K28601 · FB · November 2012
wners.
Page 3

WebGPI Communication Software
User Manual
Contents
Introduction ........................................................................................................................................................... 5
About this Manual ....................................................................................................................................... 6
About the WebGPI and Web-GPI-Log Applications ....................................................................... 6
WebGPI Application ............................................................................................................................................ 7
WebGPI Window .......................................................................................................................................... 8
Menu Bar................................................................................................................................................. 9
Toolbar .................................................................................................................................................. 11
About the View Menu .............................................................................................................................. 13
Normal View ........................................................................................................................................ 13
Main View ............................................................................................................................................. 14
Data Logging View ........................................................................................................................... 15
Main 50% View ................................................................................................................................... 16
File Creation Window ............................................................................................................................... 17
Downloader Pane ...................................................................................................................................... 19
About File Names ...................................................................................................................................... 21
Application File Names ................................................................................................................... 21
Default File Names ............................................................................................................................ 21
Kernel File Names .............................................................................................................................. 21
Configuration Pane ................................................................................................................................... 22
Offline Window........................................................................................................................................... 23
Offline Window Chart Menu Bar ................................................................................................. 24
Offline Window Chart Toolbar ..................................................................................................... 26
Information Window ................................................................................................................................ 28
Debug Mode Pane .................................................................................................................................... 29
Data Logging Pane ................................................................................................................................... 30
Data Logging Pane Toolbar .......................................................................................................... 31
Data Logging Pane Chart Menu Bar .......................................................................................... 32
Data Logging Pane Chart Toolbar .............................................................................................. 34
WebGPI-Log Application ................................................................................................................................ 37
How to Use the WebGPI Application ......................................................................................................... 47
K28601 · Rev FB · November 2012
WebGPI-Log Window ............................................................................................................................... 38
WebGPI-Log Window Toolbar...................................................................................................... 39
Data Logging Pane ........................................................................................................................... 42
How to Connect Your PC to a Microcontroller ............................................................................... 48
How to Start Communication between the WebGPI Application and a Microcontroller
.......................................................................................................................................................................... 49
How to Change a Parameter Value ..................................................................................................... 50
How to Restore Defaults ......................................................................................................................... 52
How to Log Run-Time Data ................................................................................................................... 53
About Selecting Values for Logging .......................................................................................... 56
How to Create an XML Data Log File for Use in the WebGPI-Log Application .................. 57
How to Download a Defaults or Application File to an HC08 or HC08A Processor ......... 59
3
Page 4

WebGPI Communication Software
User Manual
Contents
How to Force Download an Application File to an HC08 or HC08A Processor .................61
How to Download a Kernel to an HCO8 or an HC08A Processor ............................................64
How to Force Download a Kernel to an HCO8 or HC08A Processor ......................................68
How to Download an Application File to a 196 Processor ........................................................72
How to Force Download an Application File to a 196 Processor ............................................75
How to Download a Kernel to a 196 Processor ..............................................................................78
How to Force Download a Kernel to a 196 Processor .................................................................82
How to Download an Application or Defaults File to a 167 Processor .................................86
How to Force Download an Application File to a 167 Processor ............................................88
How to Download a Kernel to a 167 Processor ..............................................................................91
How to Force Download a Kernel to a 167 Processor .................................................................94
How to Download an Application File to an HC12 Processor ..................................................98
How to Download a Kernel to an HC12 Processor .................................................................... 102
How to Force Download a Kernel to an HC12 Processor ........................................................ 105
How to Create a File with Microcontroller Data ......................................................................... 108
How to Download an Application File to a TI Processor ......................................................... 110
How to Use the WebGPI-Log Application ............................................................................................. 113
How to Log and Save Data .................................................................................................................. 114
How to Create a Chart Collection ..................................................................................................... 117
PC and Cabling Requirements ................................................................................................................... 121
PC Requirements .................................................................................................................................... 121
Cabling Requirements .......................................................................................................................... 121
Index .................................................................................................................................................................... 123
4
K28601 · Rev FB · November 2012
Page 5

WebGPI Communication Software
User Manual
Introduction
This manual documents the WebGPI™ application and the supplemental WebGPI-Log™
application.
This chapter introduces the WebGPI and the WebGPI-Log applications.
T If you are updating your WebGPI application, first uninstall any older versions from your
PC.
K28601 · Rev FB · November 2012
5
Page 6

WebGPI Communication Software
User Manual
Introduction
About this Manual
This manual contains the following chapters:
• Introduction (this chapter)—Introduces the WebGPI and WebGPI-Log applications.
• WebGPI Application describes this application’s windows and their controls and
indicators.
• WebGPI-Log Application describes this application’s windows and their controls and
indicators.
• How to Use the WebGPI Application has step-by-step instructions for performing
common WebGPI application tasks.
• How to Use the WebGPI-Log Application has step-by-step instructions to log data at
higher rates than can be achieved using the WebGPI application’s logging function.
• PC and Cabling Requirements details PC and cabling requirements.
About the WebGPI and Web-GPI-Log Applications
The WebGPI application is a browser-based (Web), general-purpose interface (GPI)
software tool for servicing Sauer-Danfoss microcontrollers.
You can use the WebGPI application to:
• Download default tuning values, applications, and kernels (operating systems) to
microcontrollers.
• Upload tuning values from microcontroller applications and create default tuning
value files containing these values.
• View and change microcontroller application values.
• Log and plot microcontroller application values.
• Troubleshoot and debug microcontroller applications.
The WebGPI-Log application is a high-speed data-logging tool. The WebGPI-Log
application data acquisition rates are typically twice as fast as the WebGPI application
rates The WebGPI-Log application installs along with the WebGPI application.
6
K28601 · Rev FB · November 2012
Page 7

WebGPI Communication Software
User Manual
Chapter contents
WebGPI Application
This chapter describes the windows, controls, and indicators in the WebGPI application.
T The screen captures shown in this chapter may differ slightly from the screens in your
version of the WebGPI application.
WebGPI Window .......................................................................................................................................... 8
About the View Menu .............................................................................................................................. 13
File Creation Window ............................................................................................................................... 17
Downloader Pane ...................................................................................................................................... 19
About File Names ...................................................................................................................................... 21
Configuration Pane ................................................................................................................................... 22
Offline Window........................................................................................................................................... 23
Information Window ................................................................................................................................ 28
Debug Mode Pane .................................................................................................................................... 29
Data Logging Pane ................................................................................................................................... 30
K28601 · Rev FB · November 2012
7
Page 8
WebGPI Communication Software
User Manual
WebGPI Application
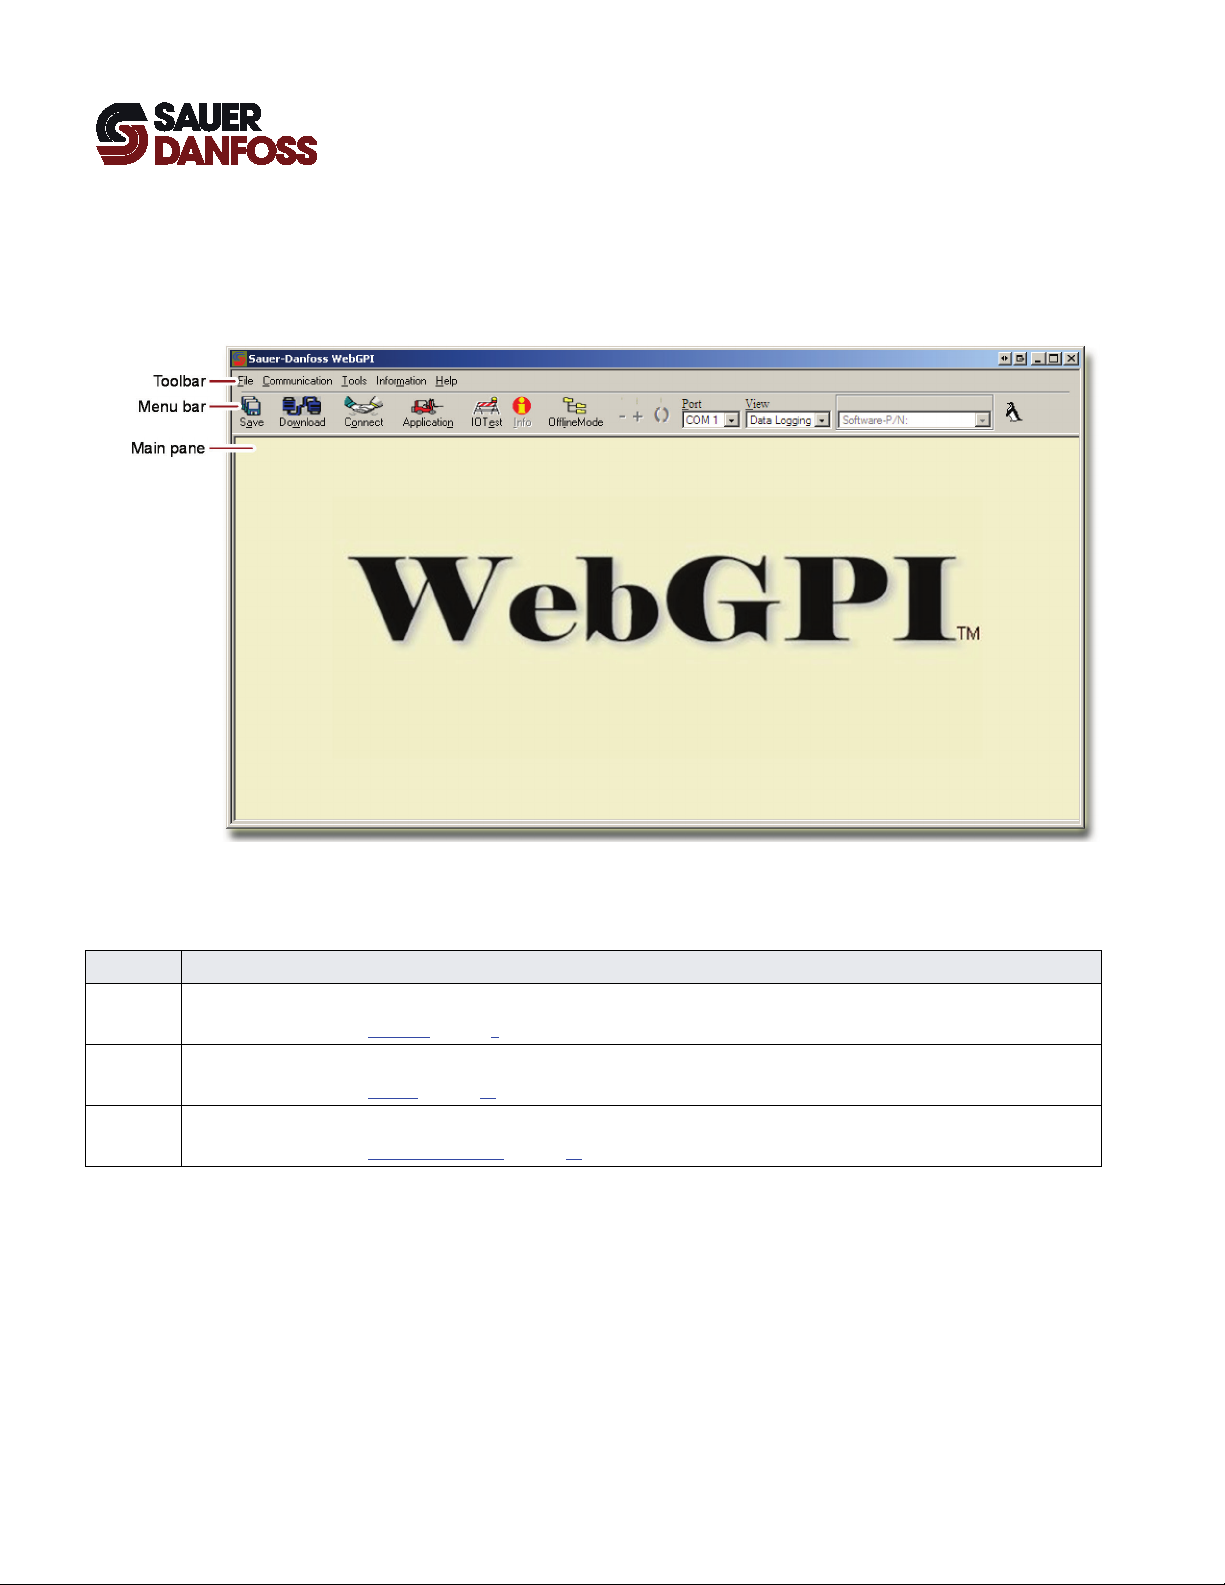
WebGPI Window
WebGPI Window
Path: Start menu > Programs >WebGPI > WebGPI
The Sauer-Danfoss WebGPI window displays when you start the WebGPI application. The
controls in this window access application functions and display application information.
Item Description
Menu bar Accesses WebGPI application functions and displays application information.
For more information, see Menu Bar on page 9
Toolbar Provides quick access to major WebGPI application functions and display important application information.
For more information, see Toolbar on page 11
Main pane The panes that display here enable you to view, change, and log microcontroller application values.
For more information, see About the View Menu on page 13
.
.
.
8
K28601 · Rev FB · November 2012
Page 9
WebGPI Communication Software
User Manual
WebGPI Application
Menu Bar
Menu Bar
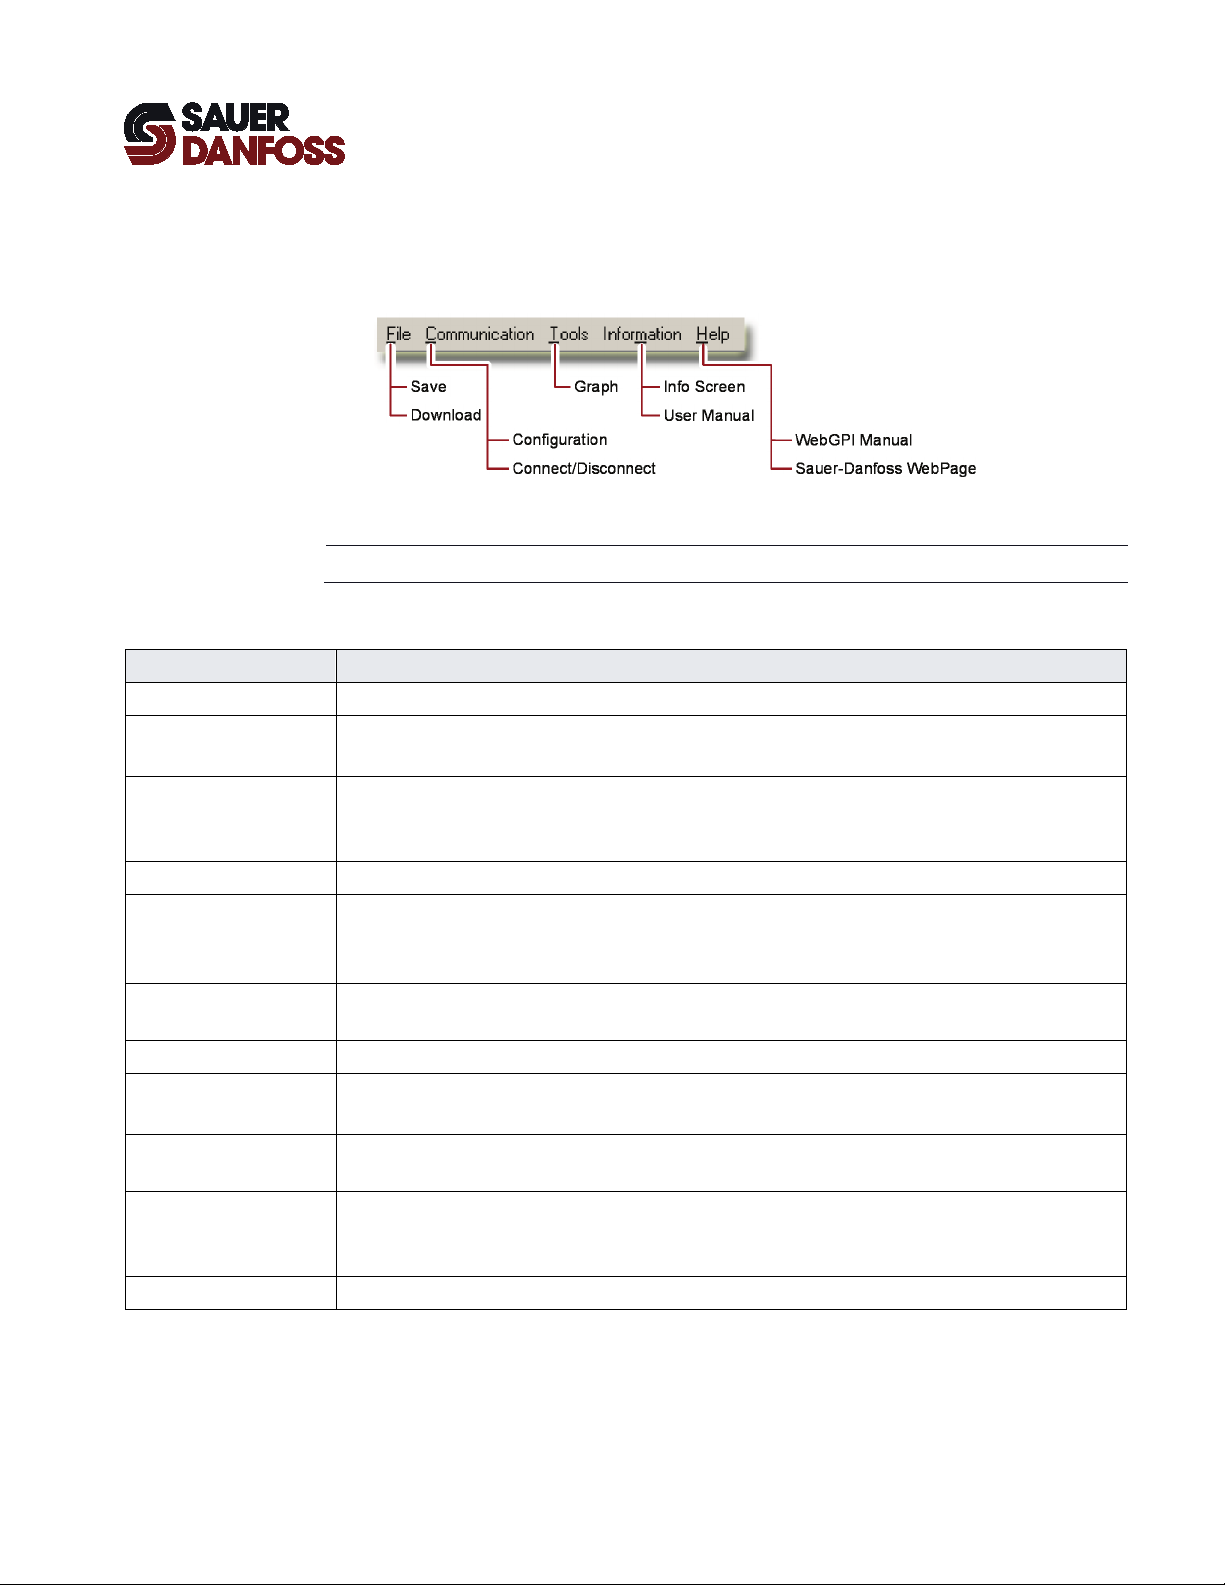
The Menu bar accesses WebGPI application functions and information.
T The Toolbar duplicates many Menu bar selections.
Item Description
File Commands in this menu create and download microcontroller files.
Save Displays the File Creation window.
This window creates default tuning value files and data logging files for the WebGPI-Log application.
Download Displays the Downloader pane.
This pane downloads application files, default tuning values files, and kernel (operating system) files to
microcontrollers.
Communication The commands in this menu control communication between the WebGPI application and the microcontroller.
Configuration Displays the Configuration pane.
Use this pane to configure the COM port on your PC that communicates with the microcontroller.
Clicking Disconnect and closing communication with the microcontroller makes this command available.
Connect/
Disconnect
Tools This menu’s command plots data that you have logged and saved.
Graph Displays the Open Real Time Performance window.
Information The commands in this menu display information about the microcontroller application and open an Adobe®
Info Screen Displays the Settings and System Info window.
User Manual Opens a PDF version of the microcontroller application manual. Not all applications have a manual.
Opens and closes communication between the WebGPI application and the microcontroller.
Use this window to chart (plot) data that you have logged and saved.
Acrobat® portable document format (PDF) version of the microcontroller application manual.
This window displays information specific to the microcontroller hardware and application. Not all applications
have this window.
K28601 · Rev FB · November 2012
9
Page 10
WebGPI Communication Software
User Manual
WebGPI Application
Menu Bar
Item Description
Help
WebGPI Manual Opens a PDF version of this WebGPI User Manual.
Sauer-Danfoss
WebPage
The commands in this menu open the WebGPI manual and access the Sauer-Danfoss home page.
Opens the Sauer-Danfoss home page if you have an active internet connection.
10
K28601 · Rev FB · November 2012
Page 11
WebGPI Communication Software
User Manual
WebGPI Application
Toolbar
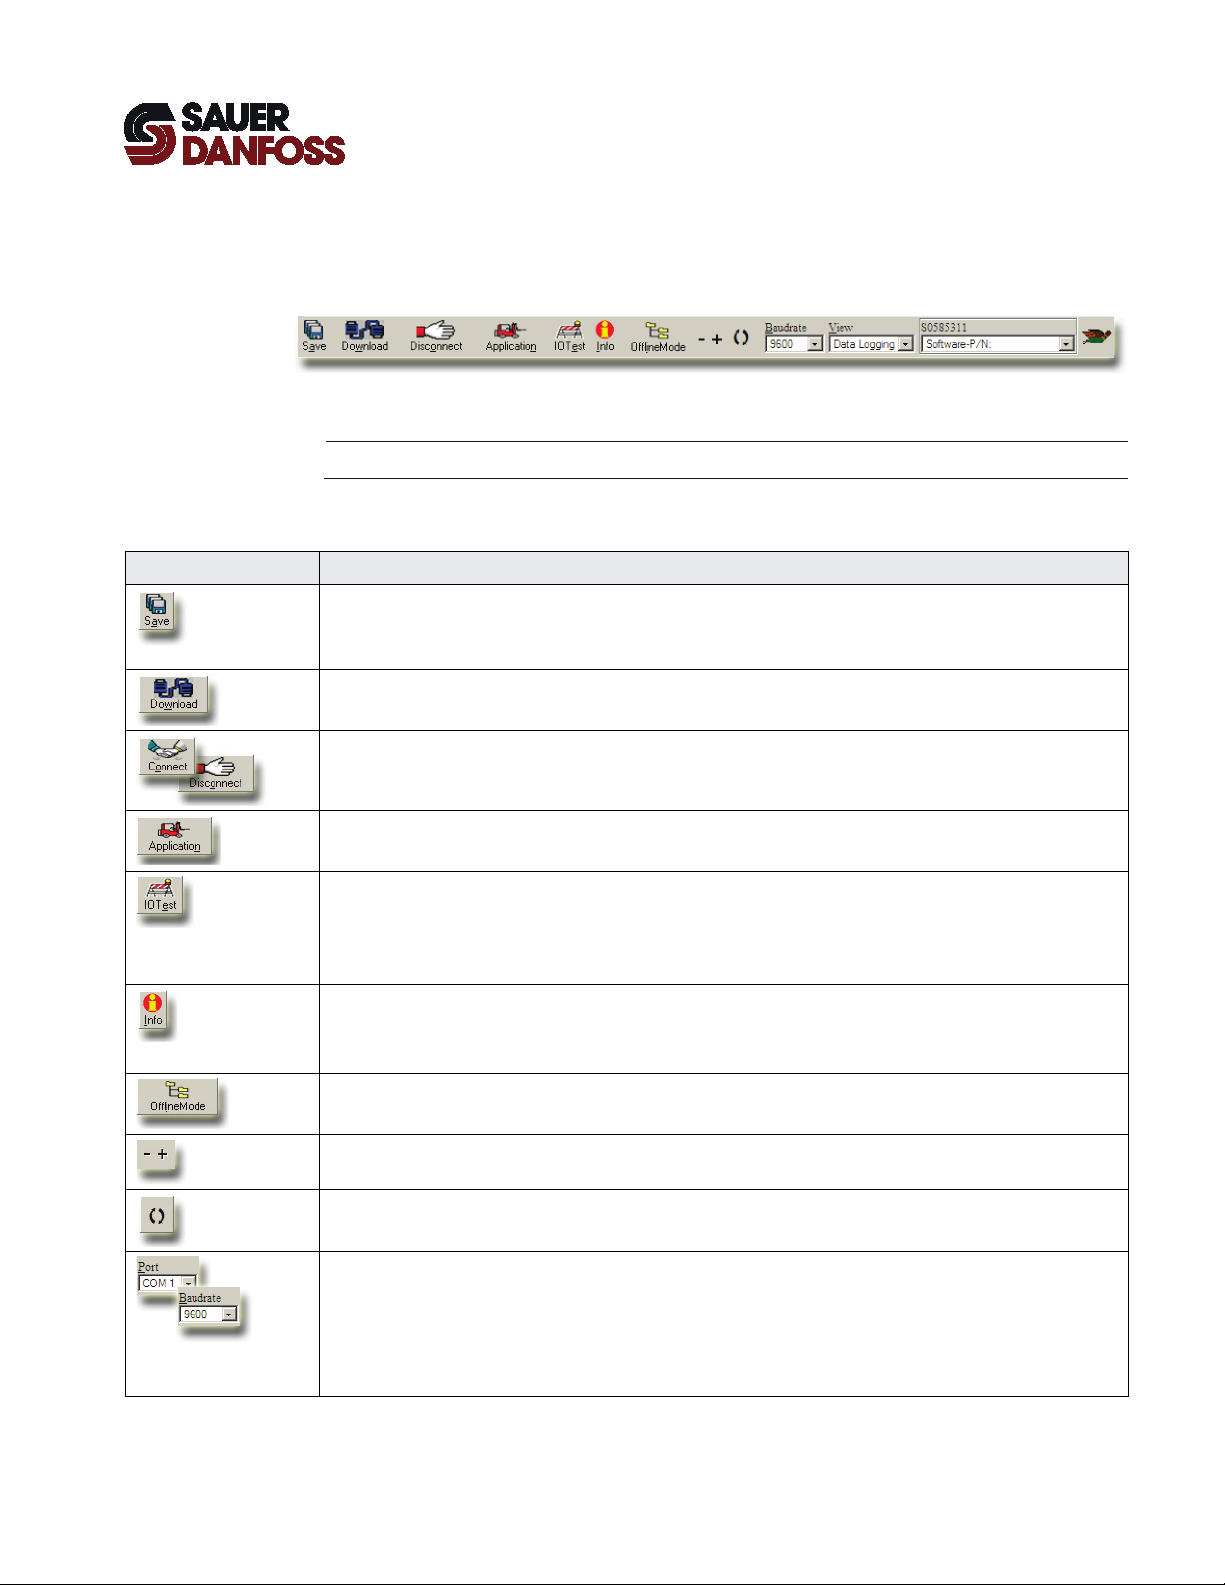
Toolbar
Toolbar buttons and controls provide quick access to WebGPI application functions.
T The Menu bar duplicates many Toolbar selections.
Item Description
Displays the File Creation window.
This window creates default tuning value files. It also creates files that define the data to be logged in the WebGPI-Log
application.
Displays the Downloader pane.
This pane manages downloads to microcontrollers.
Connect—opens communication between the WebGPI application and the microcontroller.
Disconnect—closes communication between the WebGPI application and the microcontroller.
Starts communication between the WebGPI application and the microcontroller.
The WebGPI application automatically loads the microcontroller application interface once communication begins.
Displays Debug Mode pane.
This pane directly sets microcontroller inputs and output values. It allows you to bypass the microcontroller
application for troubleshooting purposes.
Not all microcontroller applications have a debug mode.
Displays the Settings and System Info window.
This window displays information that is specific to the microcontroller hardware and application.
Not all microcontroller applications have this window.
Selects an application for review when you are not connected to a microcontroller.
Disconnecting from a microcontroller makes this button available.
Decreases or increases text and graphic sizes in selected panes.
Toggles the view between the current view and the previous view.
Port—selects the RS 232-C port that the WebGPI application uses to communicate with the microcontroller.
Baudrate—selects the data transmission rate between the WebGPI application and the microcontroller.
– Microcontrollers that use Motorola 68HC08 and 68HC08A processors automatically connect at 9600 baud.
– Microcontrollers that use Infineon 167 and Intel 196 processors automatically connect at 19200 baud.
Baudrate replaces Port when you connect to the microcontroller.
K28601 · Rev FB · November 2012
11
Page 12
WebGPI Communication Software
User Manual
WebGPI Application
Toolbar
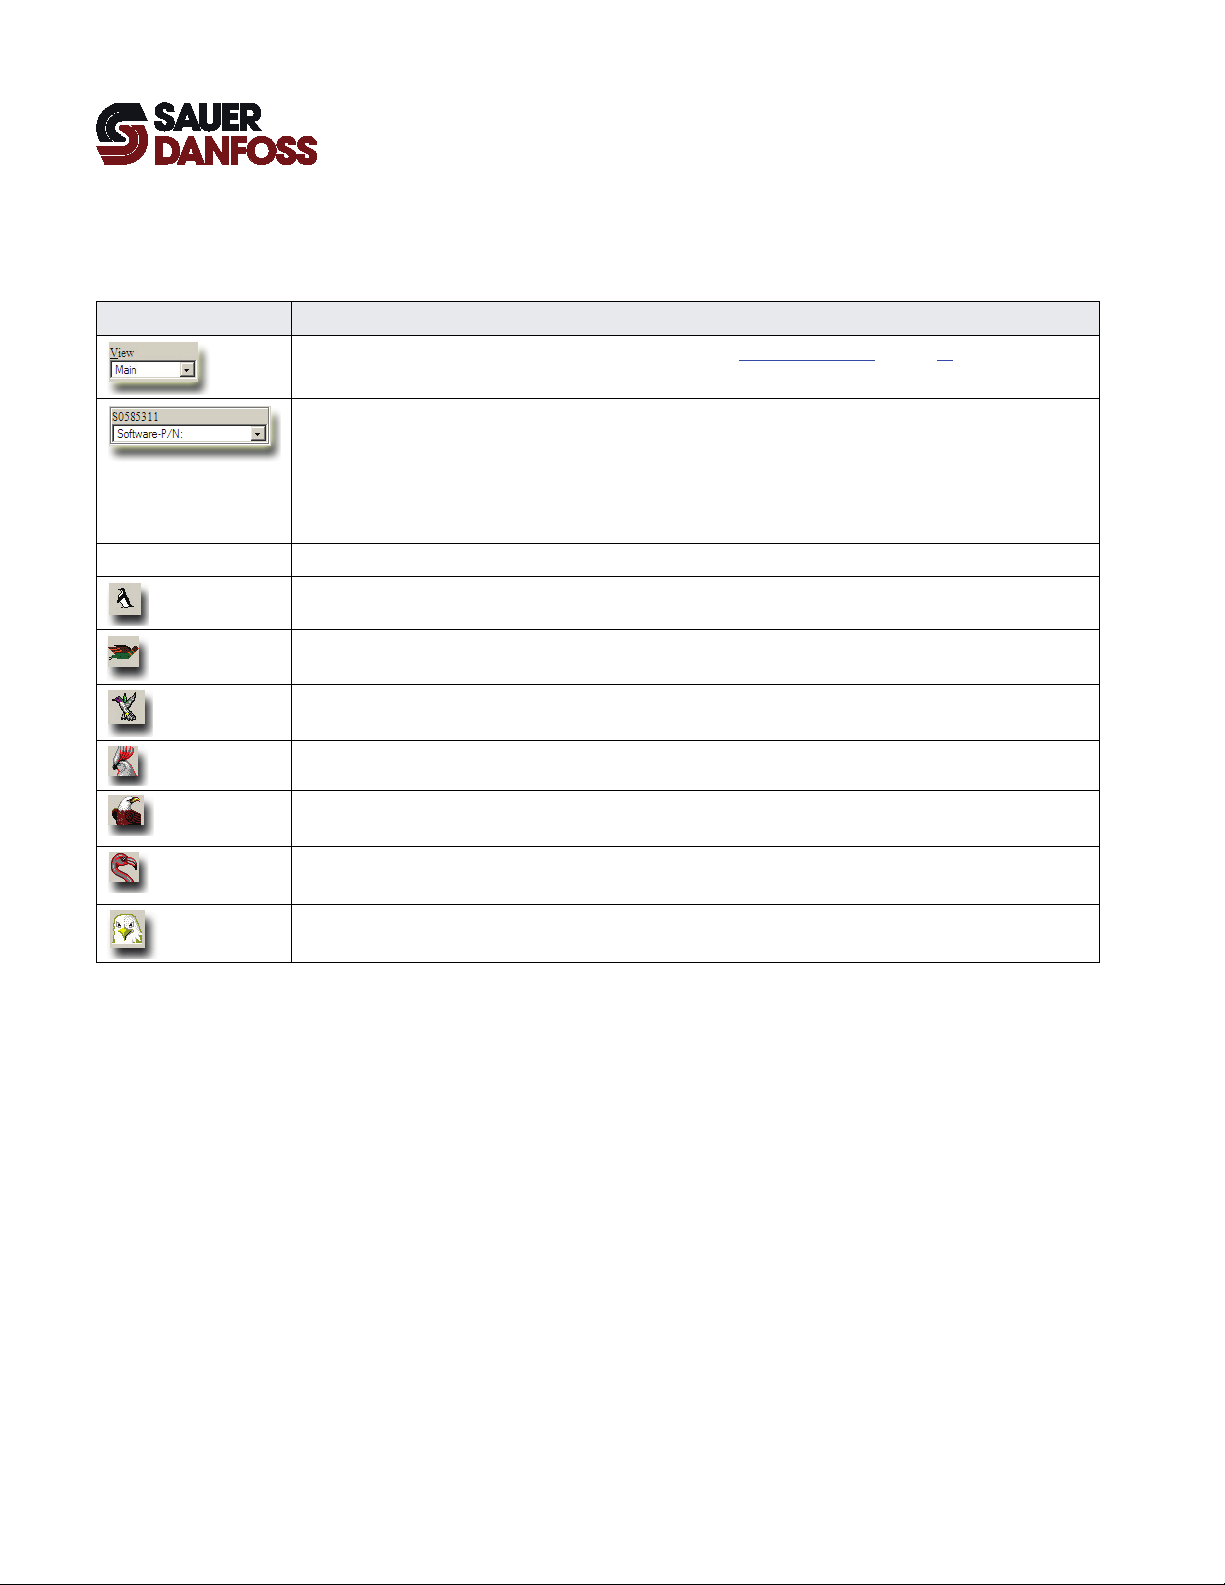
Item Description
Changes views in the WebGPI window. For more information, see About the View Menu on page 13.
Displays the following information when you connect to the microcontroller:
Software-P/N—displays the microcontroller application software part number.
Hardware-ID—displays the microcontroller hardware identification number.
Machine Default ID-Number—displays the default tuning value set identification number.
OS Version—displays the version of the kernel used in the microcontroller processor.
Status indicators Show the current WebGPI application status.
The WebGPI application is not connected to the microcontroller.
The WebGPI application is connected to the microcontroller.
The microcontroller application interface is open.
The WebGPI application is creating a hexadecimal format file (*.hex) containing current microcontroller tuning values.
The WebGPI application is creating a C format header file (*.h) with the current microcontroller application tuning
values.
The WebGPI application is creating an extensible markup language file that contains the current microcontroller
tuning values (*.xml).
The WebGPI application is downloading a file to the microcontroller.
12
K28601 · Rev FB · November 2012
Page 13
WebGPI Communication Software
User Manual
WebGPI Application
About the View Menu
The pull-down View menu lets you select between Normal, Main, Data Logging, and
Main 50% views.
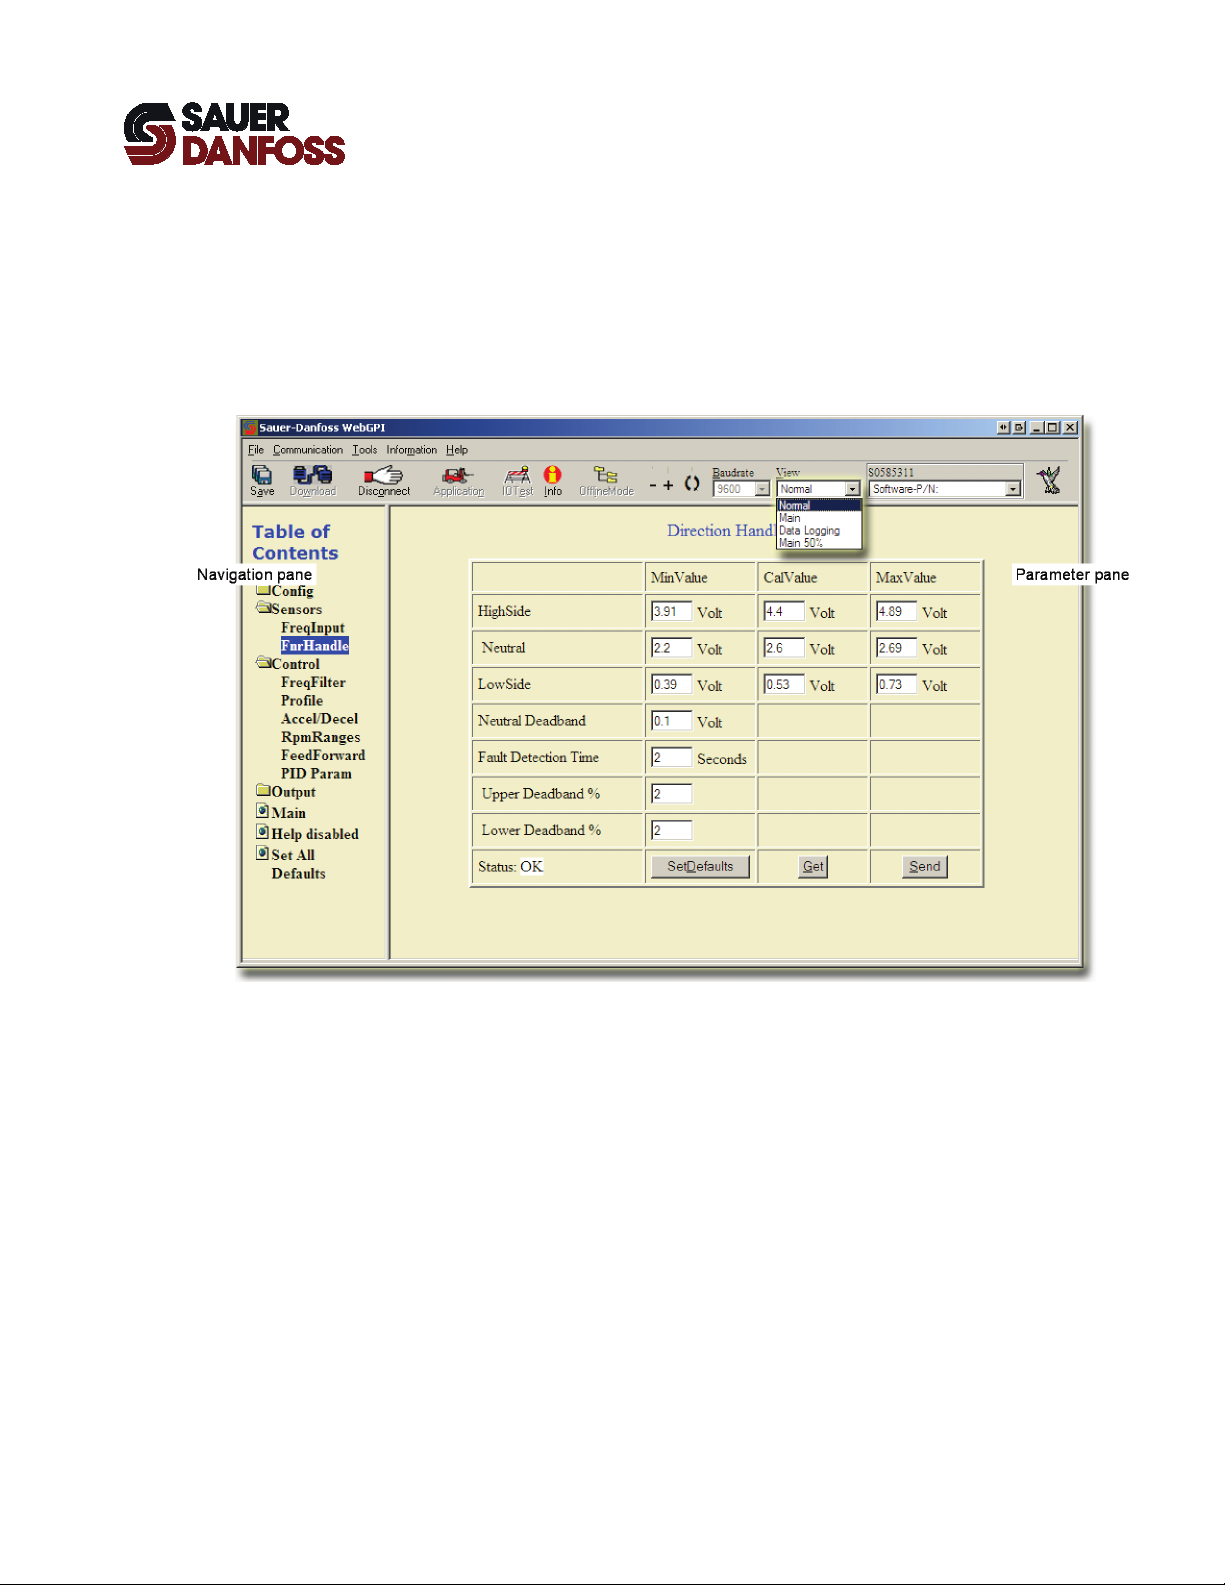
Normal View
The Normal view splits the WebGPI window into a Navigation pane and a Parameter pane.
• The Navigation pane lists all the parameter sets used in the microcontroller
• The Parameter pane displays parameter sets. Click in the Navigation pane to select a
• Use these panes to view and change parameter values when you are connected to a
• Use these panes to review parameters when you are not connected to a
K28601 · Rev FB · November 2012
application. Folders organize similar parameter sets.
parameter set for display.
microcontroller.
microcontroller. You can view a sample set of parameters but not change their values.
13
Page 14

WebGPI Communication Software
User Manual
WebGPI Application
Main View
The Main view displays a single Main pane, typically used to view block diagrams.
14
K28601 · Rev FB · November 2012
Page 15

WebGPI Communication Software
User Manual
WebGPI Application
Data Logging View
The Data Logging view displays the Data Logging pane.
• Use this pane to log and plot application values in real time.
• Use the controls in this pane to start and stop data logging, save data for offline
viewing, and change the appearance of data logging charts.
K28601 · Rev FB · November 2012
15
Page 16
WebGPI Communication Software
User Manual
WebGPI Application
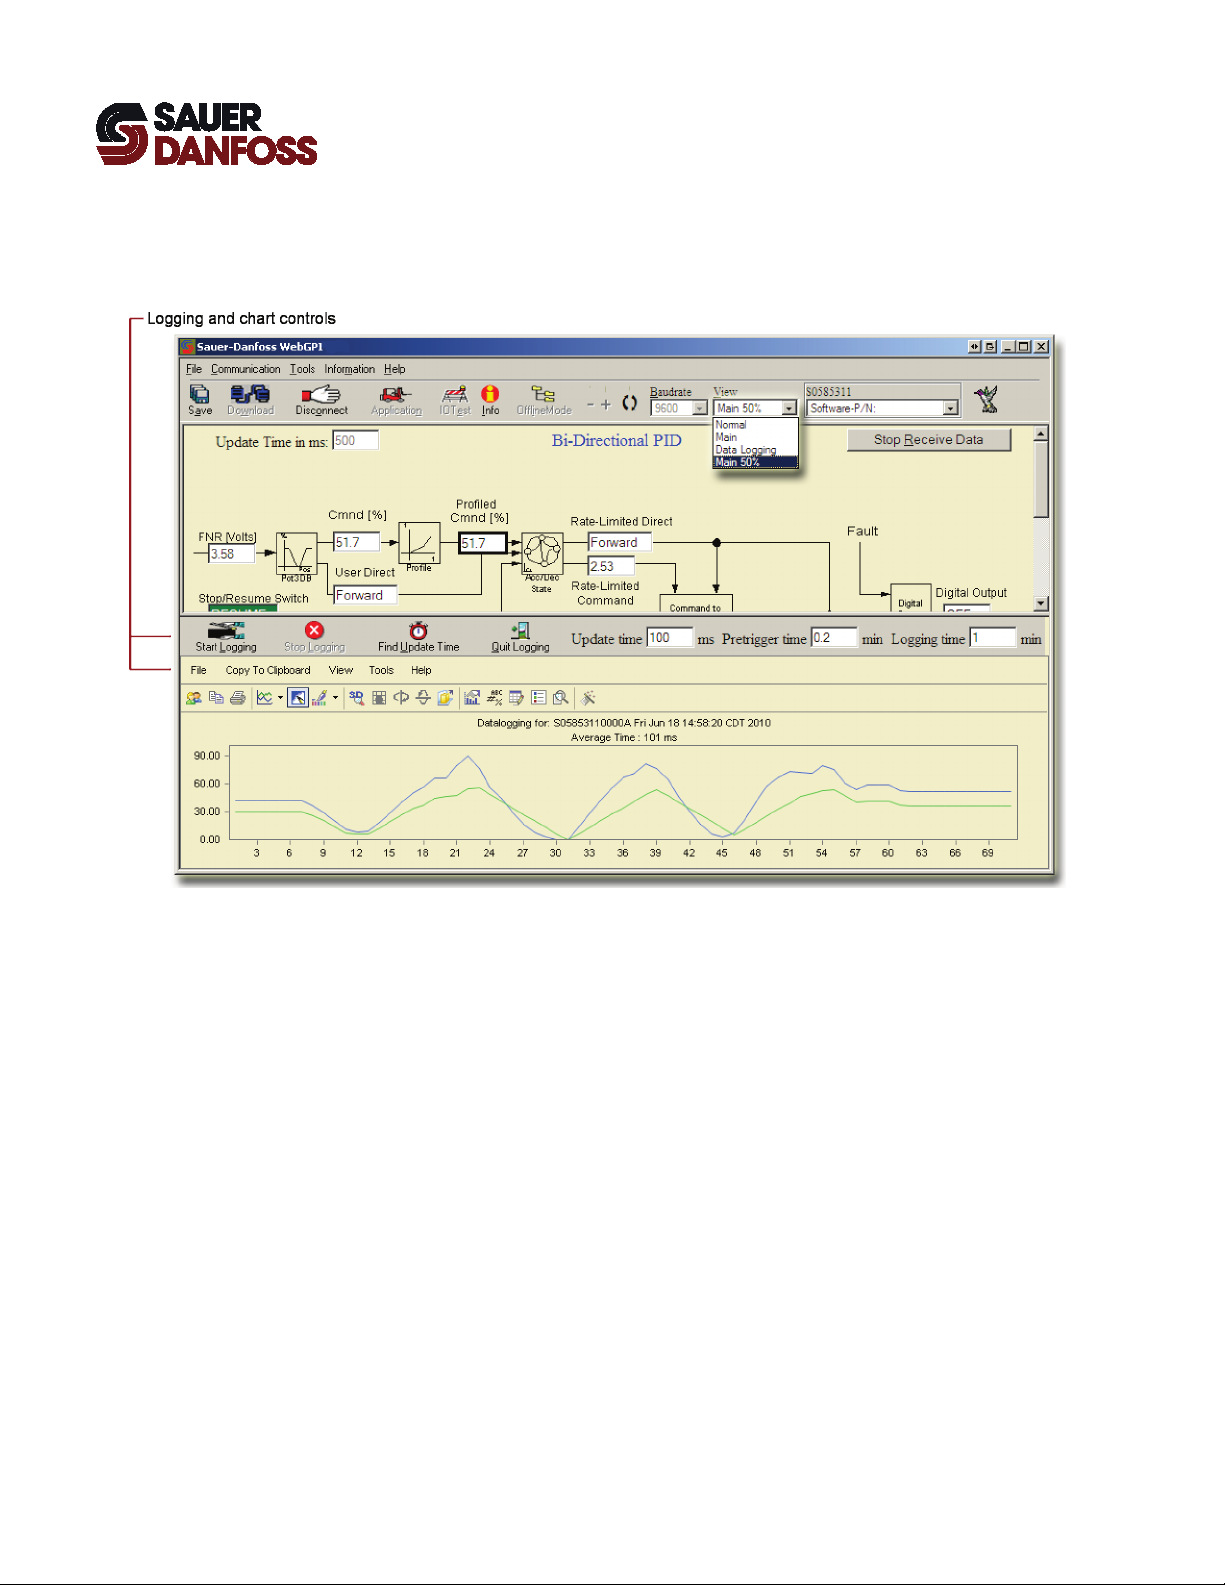
Main 50% View
The Main 50% view splits the WebGPI window horizontally, with the Data Logging pane
initially taking up the lower 50% of the window.
16
K28601 · Rev FB · November 2012
Page 17
WebGPI Communication Software
User Manual
WebGPI Application
File Creation Window
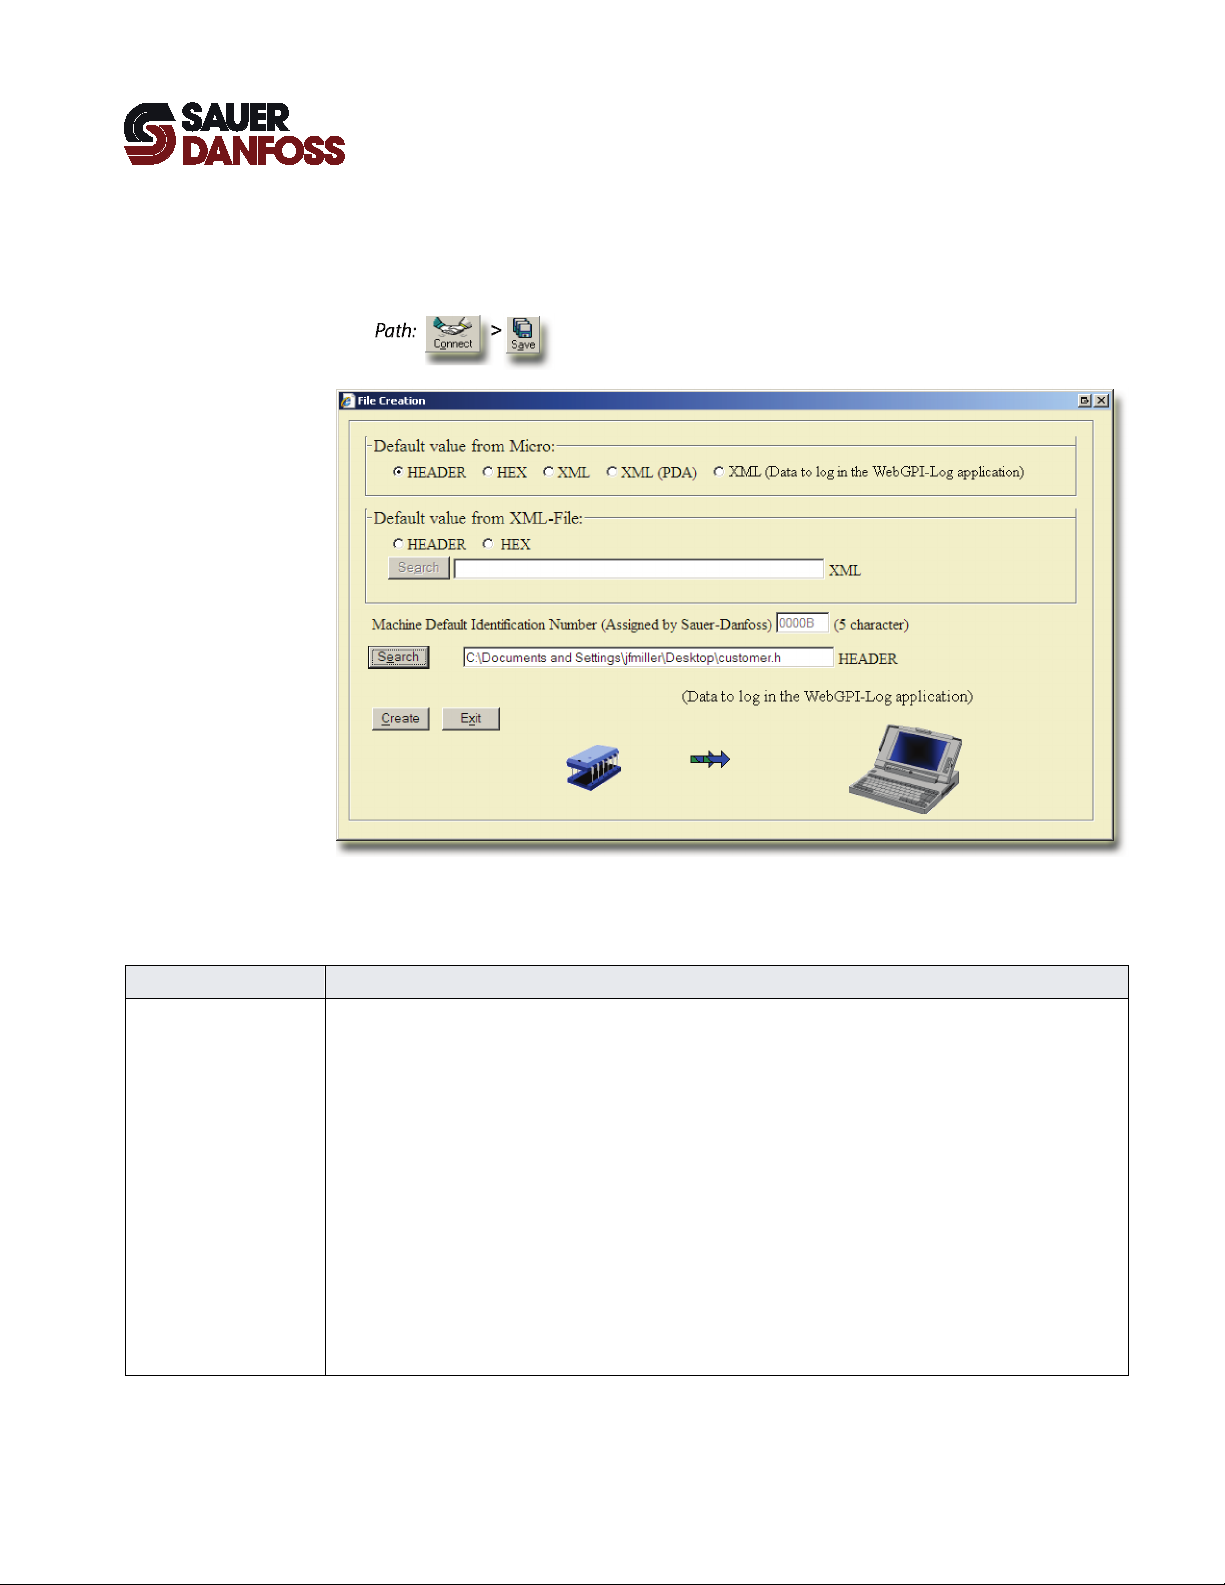
File Creation Window
Item Description
Default value from Micro The HEADER, HEX, and XML selections become available when the WebGPI application connects to the
This window creates default tuning value files. It also creates files that define the data to
be logged in the WebGPI-Log application.
microcontroller application.
HEADER—select to create a C header file (*.h) with the current microcontroller application tuning values.
Sauer-Danfoss can use this file as the source for default tuning values when it compiles a new version of the
microcontroller application.
HEX—select to create a hexadecimal file (*.hex) with the current microcontroller application tuning values.
The values in this file become the default tuning values when you download this file to a microcontroller application.
This selection makes the Machine Default Identification Number available.
XML—select to create an extensible markup language file (*.xml) with the current microcontroller application tuning
values.
Use this file format to store tuning values. You can use these files to create HEADER and HEX files without a
connection to the microcontroller application.
XML (Datalogging)—select to create an xml data log file (*.xml). An xml data log file identifies values to be logged in
the WebGPI-Log application.
K28601 · Rev FB · November 2012
17
Page 18
WebGPI Communication Software
User Manual
WebGPI Application
File Creation Window
Item Description
Default value from XML-
File
Search Displays a Select File window.
Machine Default
Identification Number
Search Displays a Select File window.
Create Creates the file.
Creates C header files (*.h) and hexadecimal files (*.hex) containing tuning values from a selected xml source file.
HEADER—select to create a C header file from a selected xml format source file.
HEX—select to create a hexadecimal file from a selected xml format source file.
The values in this hexadecimal file become the default tuning values when you download this file to a microcontroller
application.
The HEX selection makes the Machine Default Identification Number available.
Use this window to select the xml file that contains the tuning values for the HEADER or HEX file that you are
creating.
Enters the suffix appended to the microcontroller application file name that identifies the default tuning value set.
Use this window to name the file you are saving or to overwrite an existing file.
18
K28601 · Rev FB · November 2012
Page 19
WebGPI Communication Software
User Manual
WebGPI Application
Downloader Pane
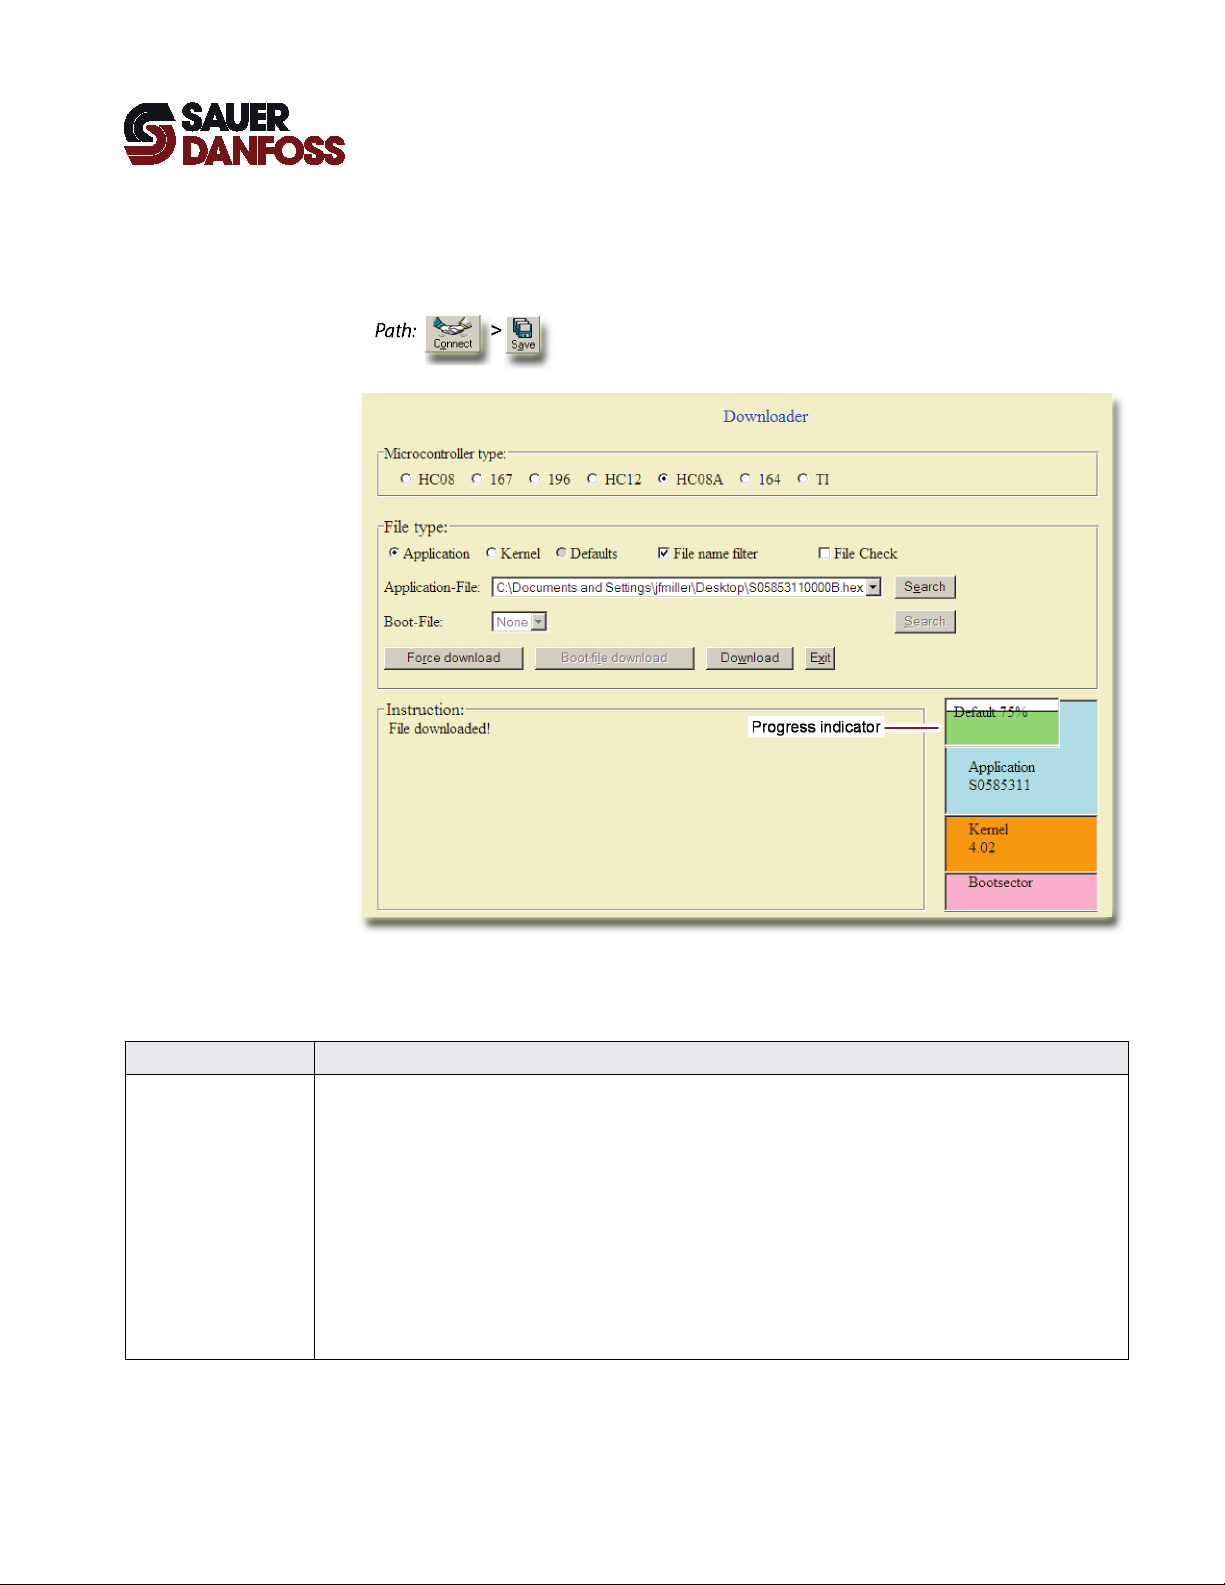
Downloader Pane
Item Description
Microcontroller type Selects the download protocol appropriate for the processor used in the microcontroller.
This pane downloads application files, default tuning values files, and kernel files to
microcontrollers.
The WebGPI application automatically selects the correct processor type when it connects to the microcontroller.
You must select the correct type of processor if the WebGPI application fails to connect to the microcontroller.
HC08—selects the Motorola 68HC08 processor download protocol.
167—selects the Infineon 167 processor download protocol.
196—selects the Intel 196 processor download protocol.
HC12—selects the Motorola 68HC12 processor download protocol.
HC08A—selects the Motorola 68HC08A processor download protocol.
164—selects the Infineon 164 processor download protocol.
TI—selects the Texas Instruments (TI) processor download protocol.
K28601 · Rev FB · November 2012
19
Page 20
WebGPI Communication Software
User Manual
WebGPI Application
Downloader Pane
Item Description
File type Application—displays the controls needed to download a microcontroller application.
Kernel—displays the controls needed to download a kernel (the core of a microcontroller operating system).
Defaults—displays the controls needed to download a tuning parameter defaults file.
File name filter—applies a filter in the Select File window that displays only files appropriate for your File type
download selection and Microcontroller type selection
This filter works with file names that conform to the Sauer-Danfoss naming convention. For more information, see
About File Names on page 21
File Check—check to have the WebGPI application verify that the file is suitable for the microcontroller processor type
before downloading it.
Empty Security byte—check when downloading a kernel to a 68HC08 or 68HC08A processor that has never been
programmed. Typically, this is not used.
Search
(for application, kernel,
and defaults files)
Search
(for boot files)
Force download/
Stop forcing download
Boot-file download Starts the download of a boot file.
Download Starts a download of an application or kernel file.
Instruction Displays instructions to help you download files.
Progress indicator Identifies the defaults, application, and kernel used in the microcontroller.
Displays a Select File window.
Use this window to select an application, kernel, or defaults file to download.
The text box to the left of Search identifies the name and location of the file.
Displays a Select File window.
Use this window to select the boot file required to download a kernel.
The text box to the left of Search identifies file type, file location, and name of the selected file.
Selecting Kernel and a Microcontroller type of HC08, 167, HC08A, or 164 makes this button available.
Forces a connection to the microcontroller.
The button becomes available when the WebGPI application cannot normally connect to the microcontroller.
Selecting Kernel and a Microcontroller type of HC08, 167, HC08A, or 164 makes this button available.
During a download, it indicates the progress of the download.
.
20
K28601 · Rev FB · November 2012
Page 21
WebGPI Communication Software
User Manual
WebGPI Application
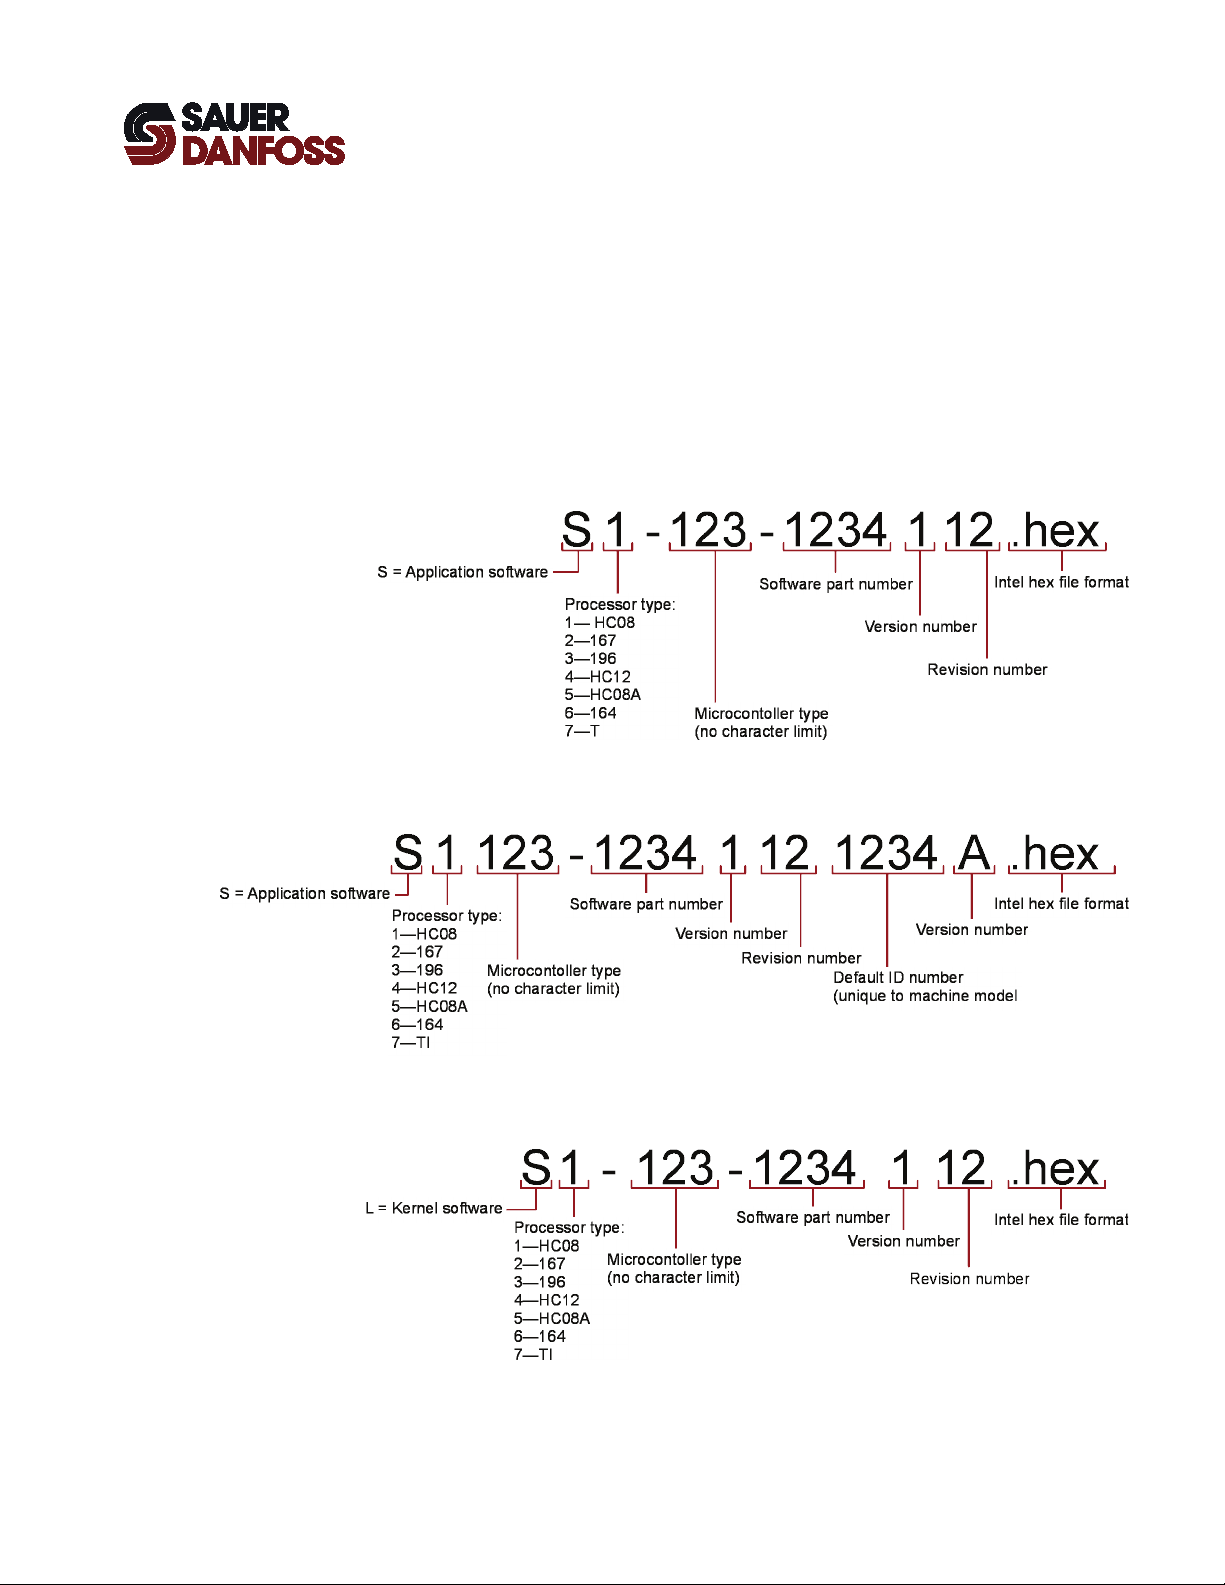
About File Names
Sauer-Danfoss adopted the following format in March 2002 for application, default, and
kernel file names.
The Downloader pane’s File name filter works with file names that follow this format.
With File name filter checked, the Select File window displays only files appropriate for
your download selection and processor type.
Application File Names
Microcontroller application file names use the format shown above.
Default File Names
Microcontroller application default tuning file names use the format shown above.
Kernel File Names
Kernel file names use the format shown above.
K28601 · Rev FB · November 2012
21
Page 22
WebGPI Communication Software
User Manual
WebGPI Application
Configuration Pane
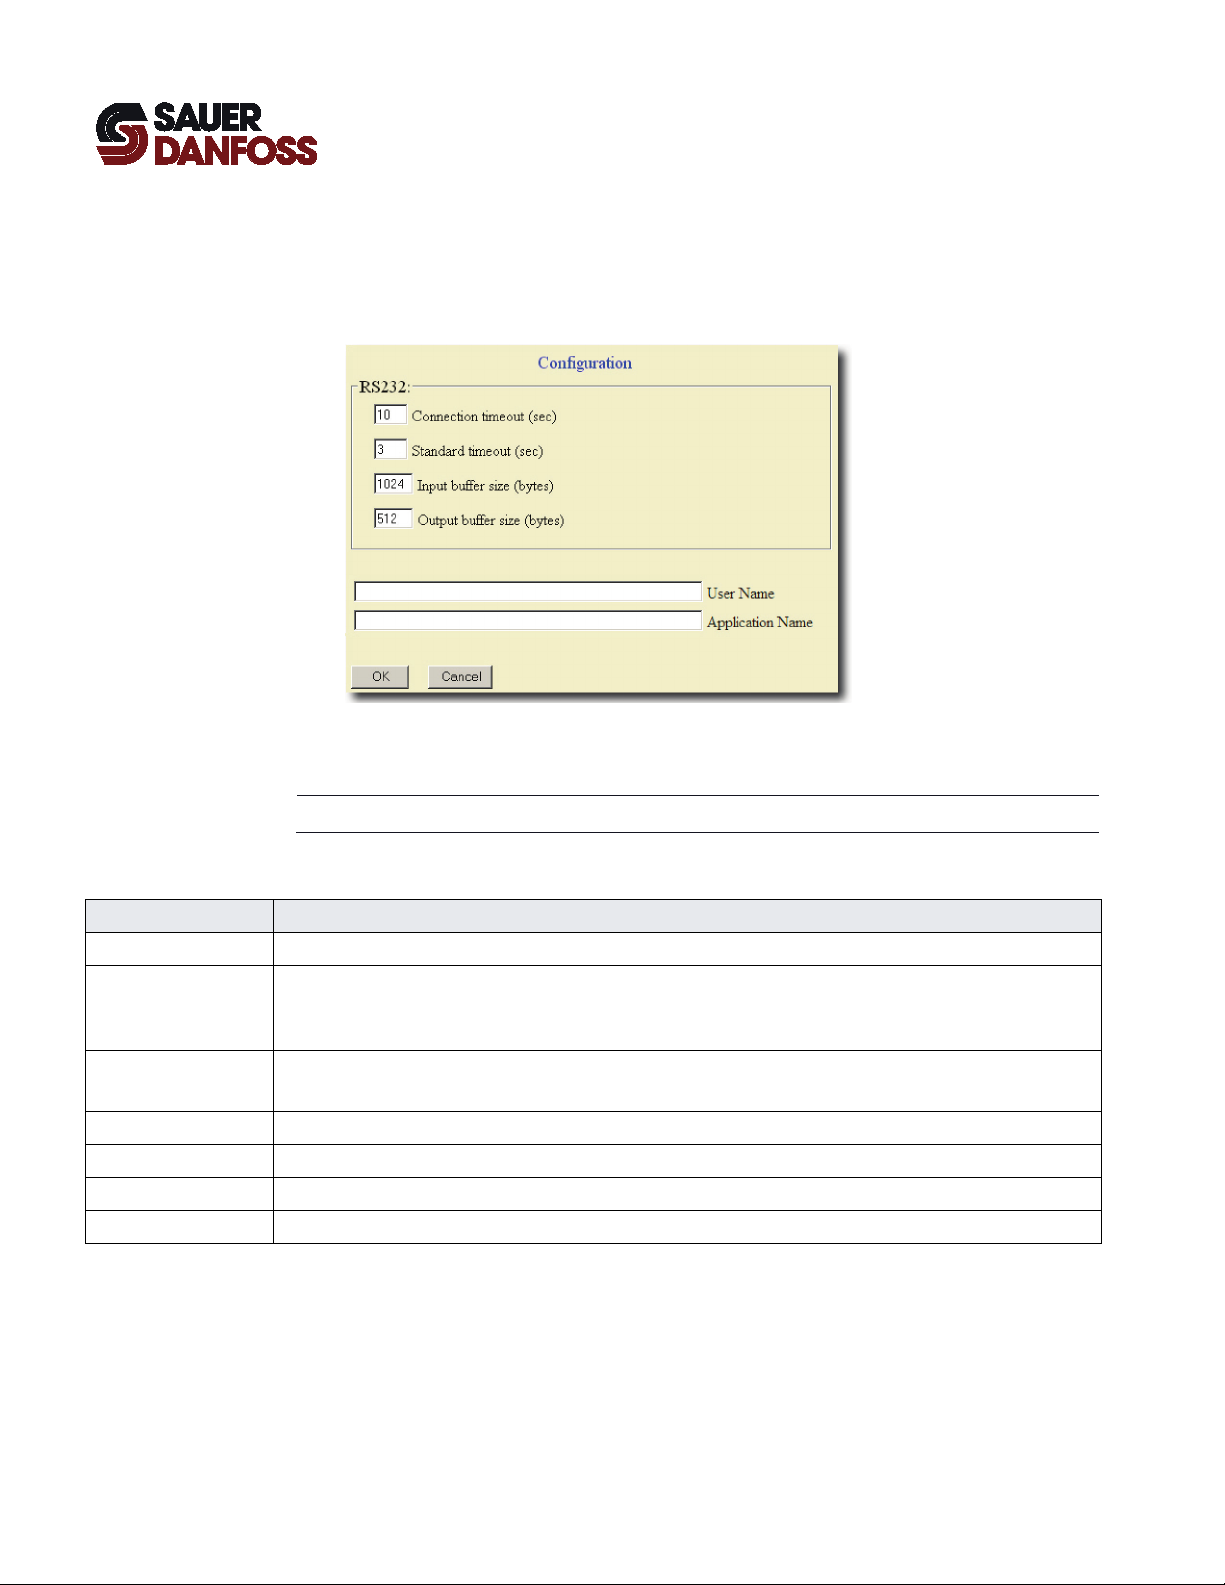
Configuration Pane
Path: Communication menu > Configuration
This pane configures the COM port that WebGPI application uses to communicate with
the microcontroller.
T To display this pane, first disconnect the WebGPI application from the microcontroller.
Item Description
RS232 Configures the RS-232-C COM port that the WebGPI application uses to communicate with the microcontroller.
Connection timeout Sets the time that the WebGPI application waits for a response indicating a successful initial connection before trying
another baud rate.
The WebGPI application displays an alert message if all connection attempts fail.
Standard timeout Sets the time that the WebGPI application waits for a response during normal operation before trying another baud rate.
The WebGPI application displays an alert message if all connection attempts fail.
Input buffer size Sets the input buffer size.
Output buffer size Sets the output buffer size.
User Name Not implemented in this release.
Application Name Not implemented in this release.
22
K28601 · Rev FB · November 2012
Page 23
WebGPI Communication Software
User Manual
WebGPI Application
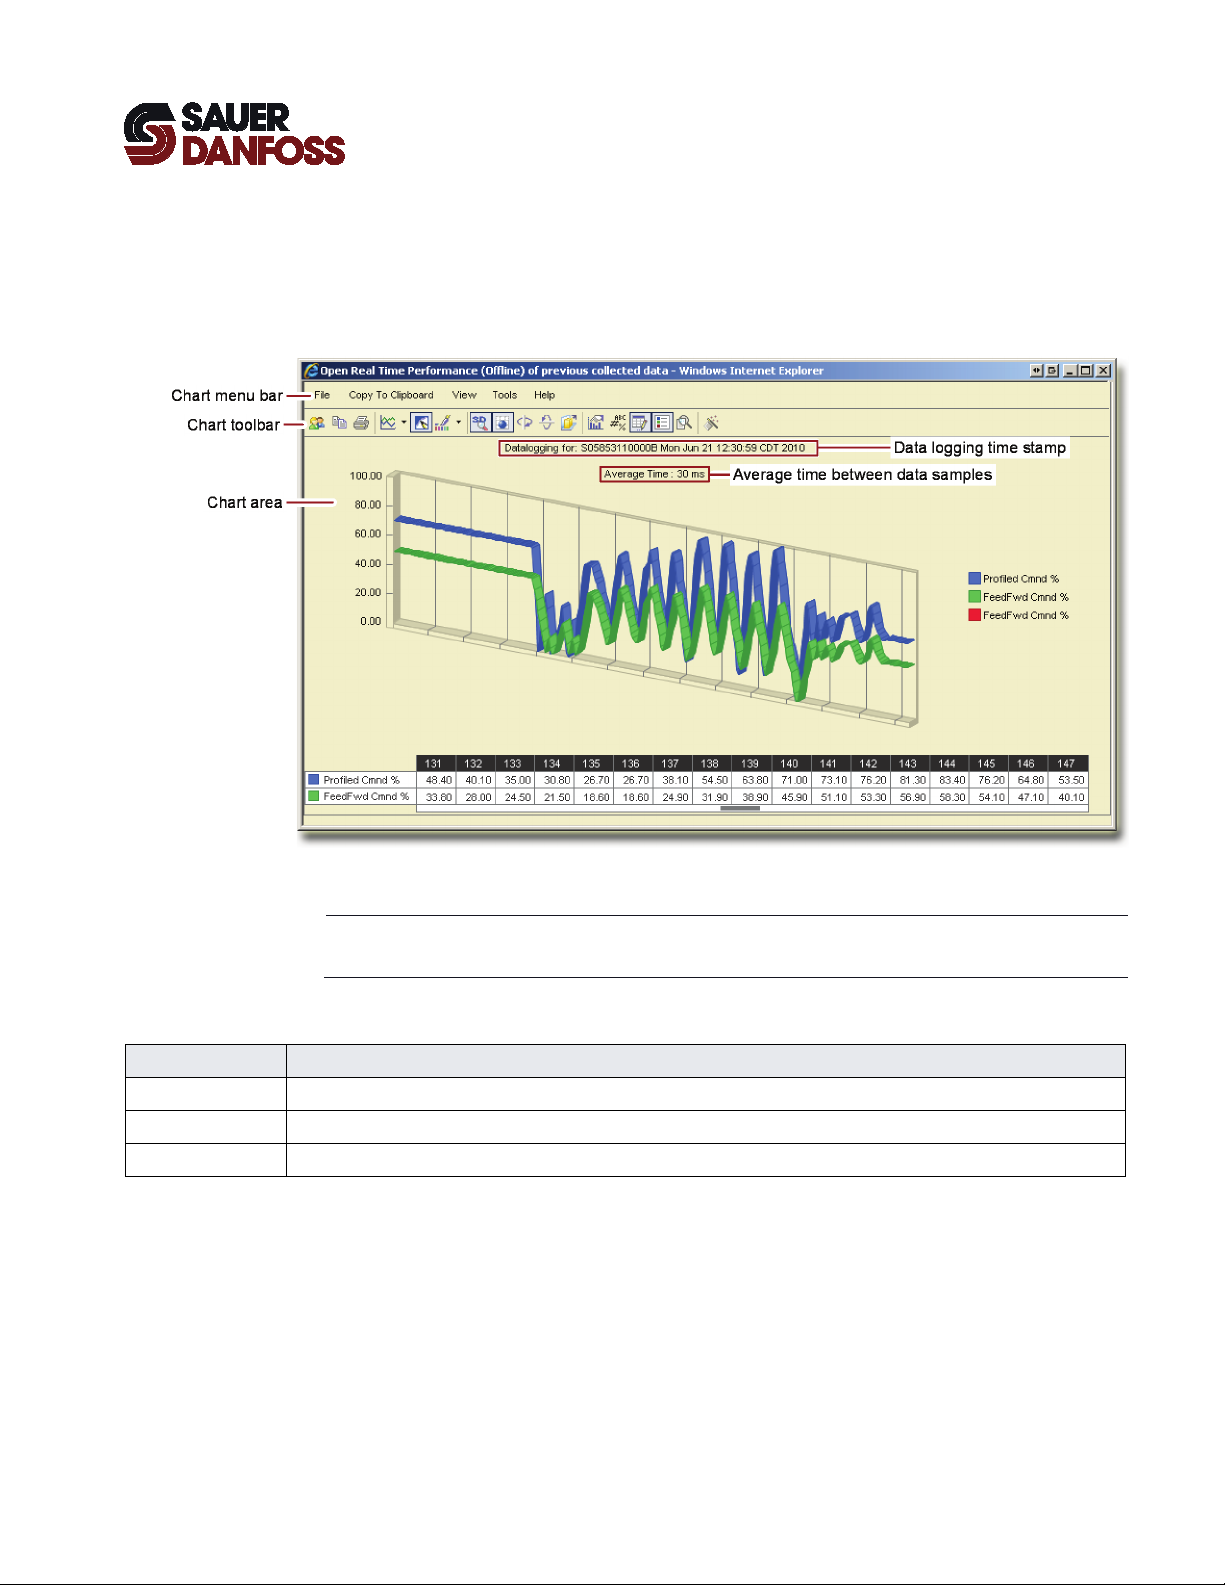
Offline Window
Offline Window
Path: Tools menu > Graph
This window displays charts of data that you have logged and saved.
T Use the Data Logging pane (page 30) to log data when you are connected to a
microcontroller.
Item Description
Chart menu bar Commands in this menu bar format charts.
Chart toolbar Buttons in this toolbar format charts.
Chart area Displays charts of data that you have logged and saved.
K28601 · Rev FB · November 2012
23
Page 24
WebGPI Communication Software
User Manual
WebGPI Application
Offline Window Chart Menu Bar
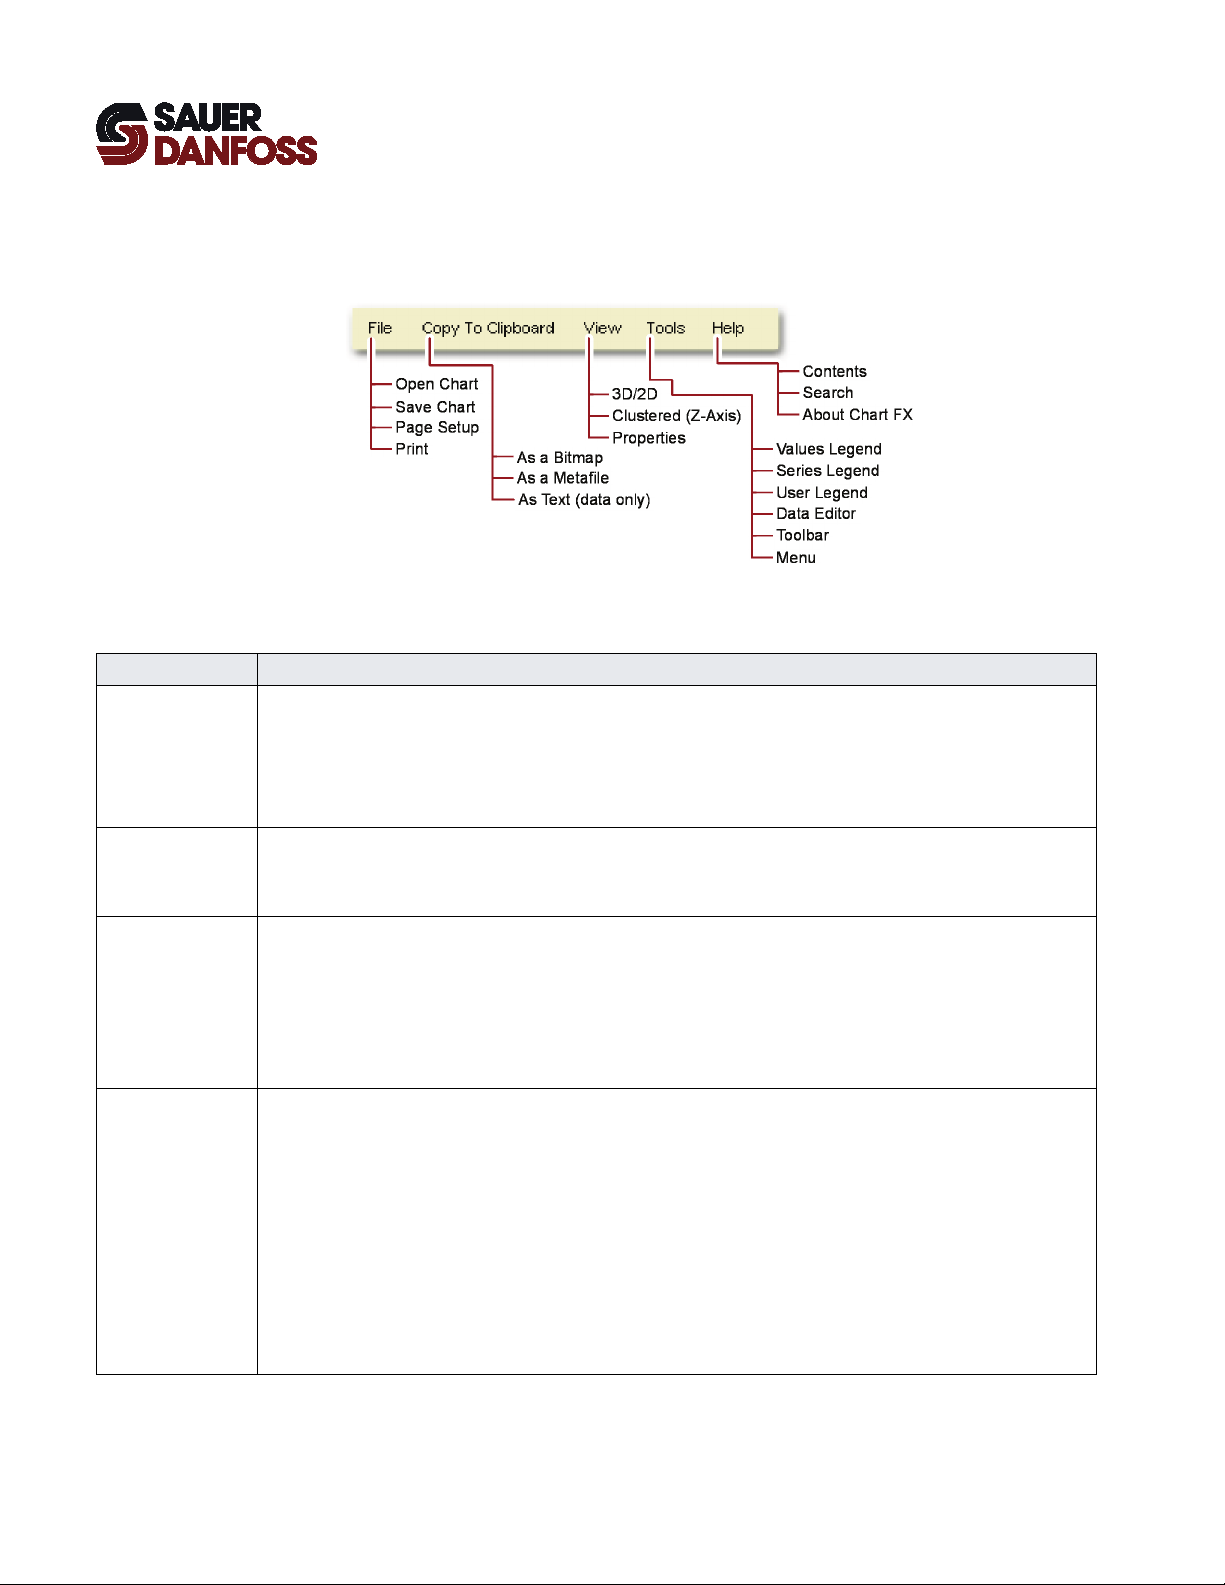
Offline Window Chart Menu Bar
Commands in this menu bar format charts.
Menu Description
File Open Chart command—displays the Open window. Use this window to select and open a ChartFX *cfx format file.
Save Chart command—displays the Save As window. Use this window to save a chart in the ChartFX *cfx file format.
Page Setup command—displays the Page Setup window. Use this window to set the chart’s print margins and paper
orientation.
Print command—displays the Print window. Use this window to print out the chart.
Copy to Clipboard As a Bitmap command—copies a bitmap image of the chart to the clipboard.
As a Metafile command—copies a Windows Metafile image of the chart to the clipboard.
As Text (data only) command—copies tab-delimited chart data points to the clipboard.
View 3D/2D command—switches between two-dimensional and three-dimensional chart views.
Clustered (Z Axis) command—clusters the chart along its z axis.
Properties command—Displays a Properties window with the following tabs:
– Y Axis tab—sets labeling, tick marks, and gridlines for the y axis.
– Series tab—defines the display and formatting of series.
– General tab—sets general properties such as the screen title and screen background colors.
Tools Values Legend command—Displays a values legend.
Series Legend command—Displays a series legend.
User Legend command—Displays a user legend.
Data Editor command—displays a table at the bottom of the chart.
This table shows the value and acquisition time of each data point in the chart.
Use the slider bar to access data points in the chart and in the table.
Changing a data point value in the table also changes the data point in the chart.
Toolbar command—hides the toolbar.
To restore the toolbar, right-click the chart. In the pop-up menu that displays, click Toolbar.
Menu command—hides the menu bar. To restore the menu bar, close and reopen the chart.
24
K28601 · Rev FB · November 2012
Page 25

WebGPI Communication Software
User Manual
WebGPI Application
Offline Window Chart Menu Bar
Menu Description
Help Contents command—displays the contents of the help file.
Search command—searches the help file.
About ChartFX command—displays information about ChartFX software.
K28601 · Rev FB · November 2012
25
Page 26
WebGPI Communication Software
User Manual
WebGPI Application
Offline Window Chart Toolbar Buttons
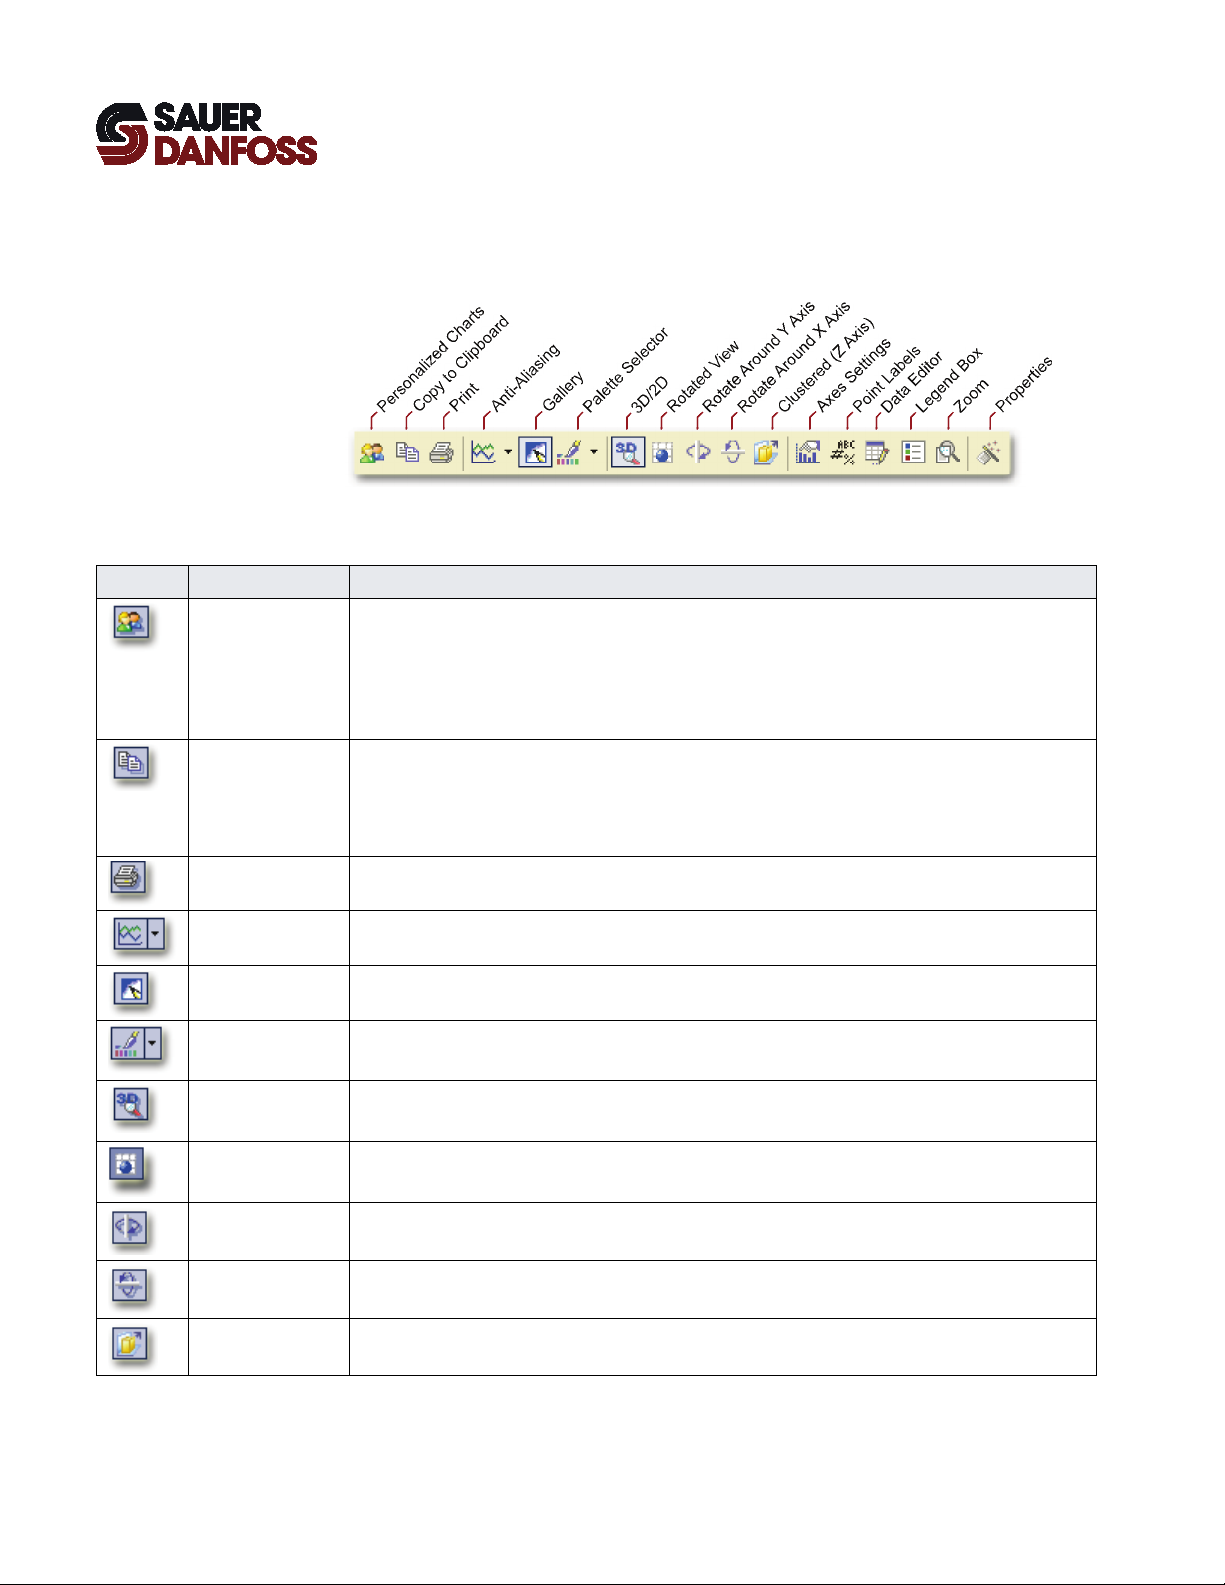
Offline Window Chart Toolbar
Buttons in this toolbar format charts.
Button Name Description
Personalized Charts Displays a menu with commands that save and apply chart settings.
Copy to Clipboard Displays a menu with copy commands.
Print Displays a Print window. Use this window to print the chart.
Load My Chart command—applies the chart settings that have been saved through the Save My Chart
command to the currently displayed chart.
Save My Chart command—saves the chart settings that are applied to the current chart.
Restore Defaults command—applies the default settings to the currently displayed chart.
As a Bitmap command—copies a bitmap image of the chart to the clipboard.
As a Metafile command—copies a Windows Metafile image of the chart to the clipboard.
As Text (data only) command—copies tab-delimited chart data points to the clipboard.
Gallery Displays a palette with line, bar, and other chart types. Click a selection to change the way data displays.
Anti-Aliasing Applies anti-aliasing to smooth the display of chart lines.
Palette Selector Displays a palette with color schemes that can be applied to charts.
3D/2D Switches between two-dimensional and three-dimensional chart views.
Rotated View Rotates the chart along its z axis.
Rotate Around Y
Axis
Rotate Around X
Axis
Clustered (Z Axis) Clusters the chart along its z axis.
Click a color scheme to apply the scheme to the chart.
Selecting a three-dimensional chart view enables the Rotated View button.
Selecting a rotated chart view enables the Rotate Around Y Axis and Rotate Around X Axis buttons.
Rotates the chart around its y axis.
Rotates the chart around its x axis.
26
K28601 · Rev FB · November 2012
Page 27
WebGPI Communication Software
User Manual
WebGPI Application
Offline Window Chart Toolbar Buttons
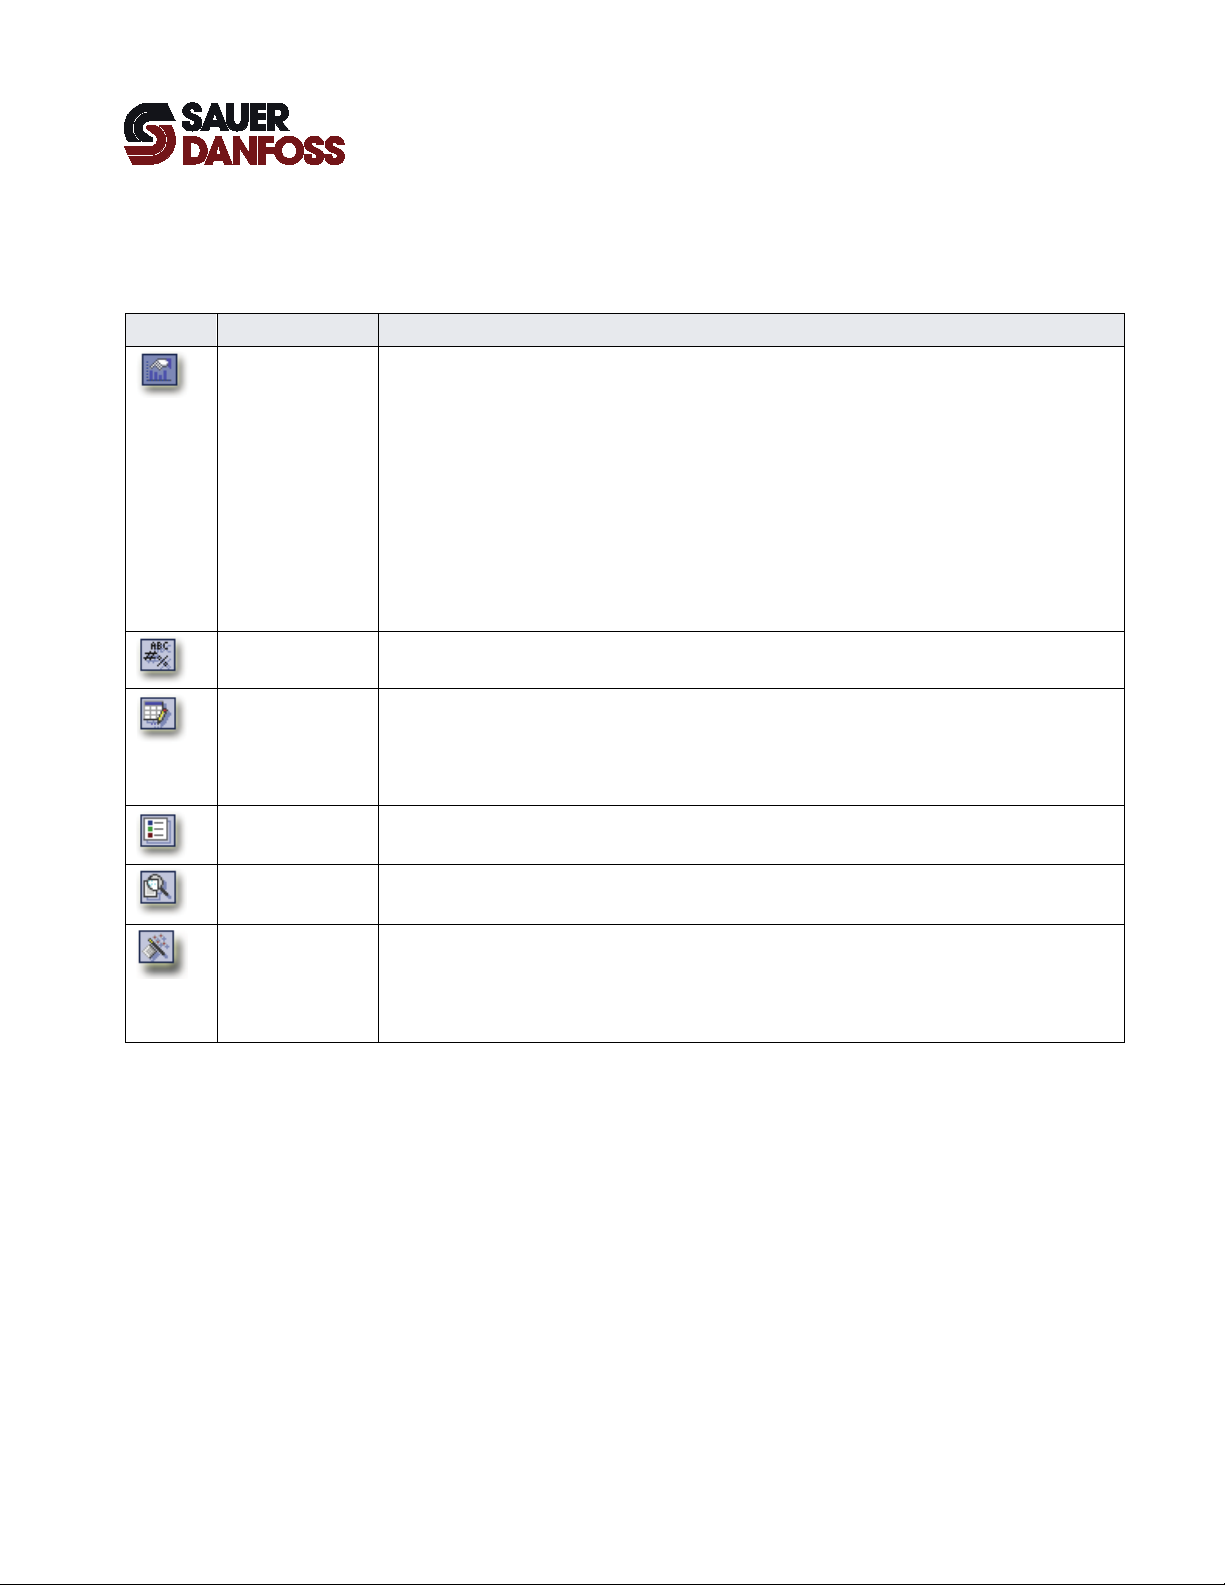
Button Name Description
Axes Settings Displays a menu with commands that change how the x axis and y axis display.
Point Labels Applies labels to each data point in the chart.
Data Editor Displays a table at the bottom of the chart.
Legend Box Displays legends that identify the chart data.
Grid commands—turns on and off tick mark grid lines.
Interlaced command—applies alternate light and dark (interlaced) backgrounds between y-axis tick marks.
Show Labels command—labels x-axis tick marks.
Staggered command—staggers the labels applied to the x-axis tick marks.
Vertical labels command—rotates by 90° the labels applied to the x-axis tick marks.
Options command—displays a Properties window with the following tabs:
– Y Axis tab—sets labeling, tick marks, and gridlines for the y axis.
– Series tab—defines the display and formatting of series.
– General tab—sets general properties such as the screen title and screen background colors.
This table shows the value and acquisition time of each data point in the chart.
Use the slider bar to access data points in the chart and in the table.
Changing a data point value in the table also changes the data point in the chart.
Zoom Enables a zoom tool.
Click and drag in the chart to zoom in on specific areas. Click on the button to zoom out.
Properties Displays a Properties window with the following tabs:
– Y Axis tab—sets labeling, tick marks, and gridlines for the y axis.
– Series tab—defines the display and formatting of series.
– General tab—sets general properties such as the screen title and screen background colors.
K28601 · Rev FB · November 2012
27
Page 28
WebGPI Communication Software
User Manual
WebGPI Application
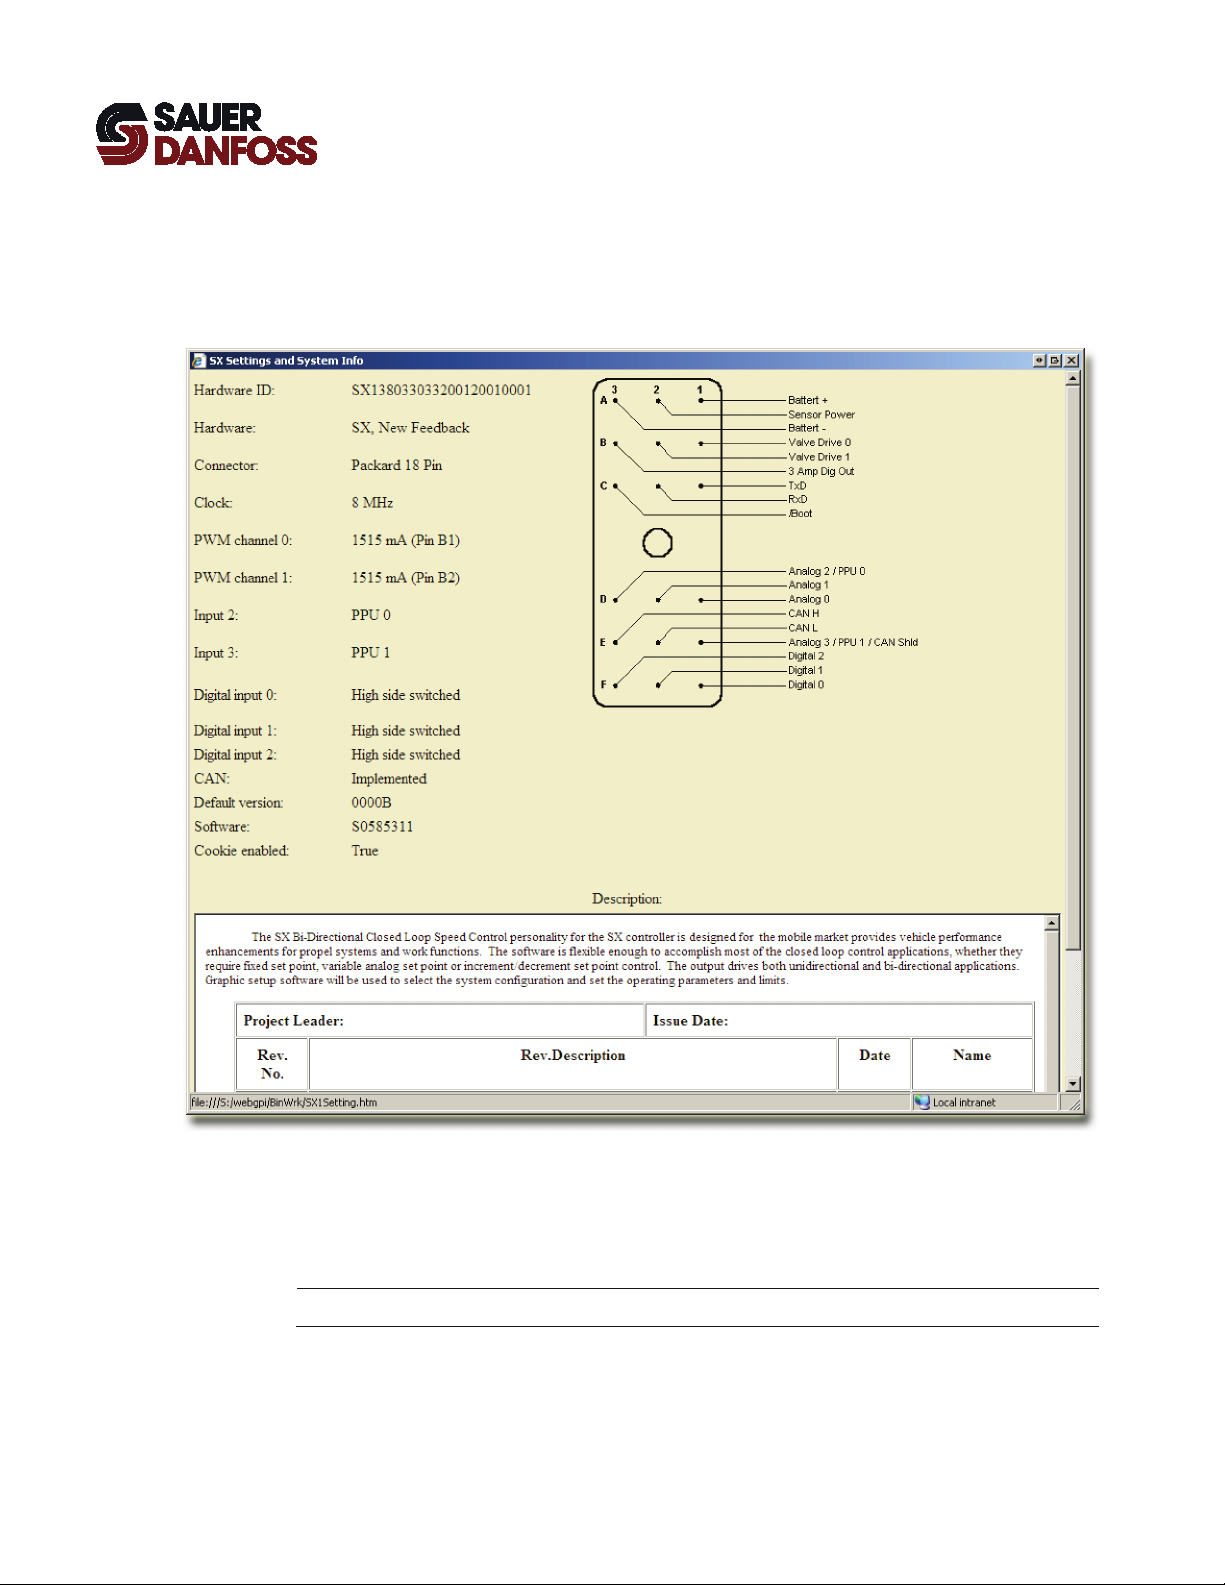
Information Window
Path: Information menu > Info Screen
Use this window to view information about the microcontroller application and its
hardware.
The type of microcontroller application determines the type of information displayed. Not
all applications have this window.
T You must connect to the microcontroller to view hardware information.
28
K28601 · Rev FB · November 2012
Page 29
WebGPI Communication Software
User Manual
WebGPI Application
Warning
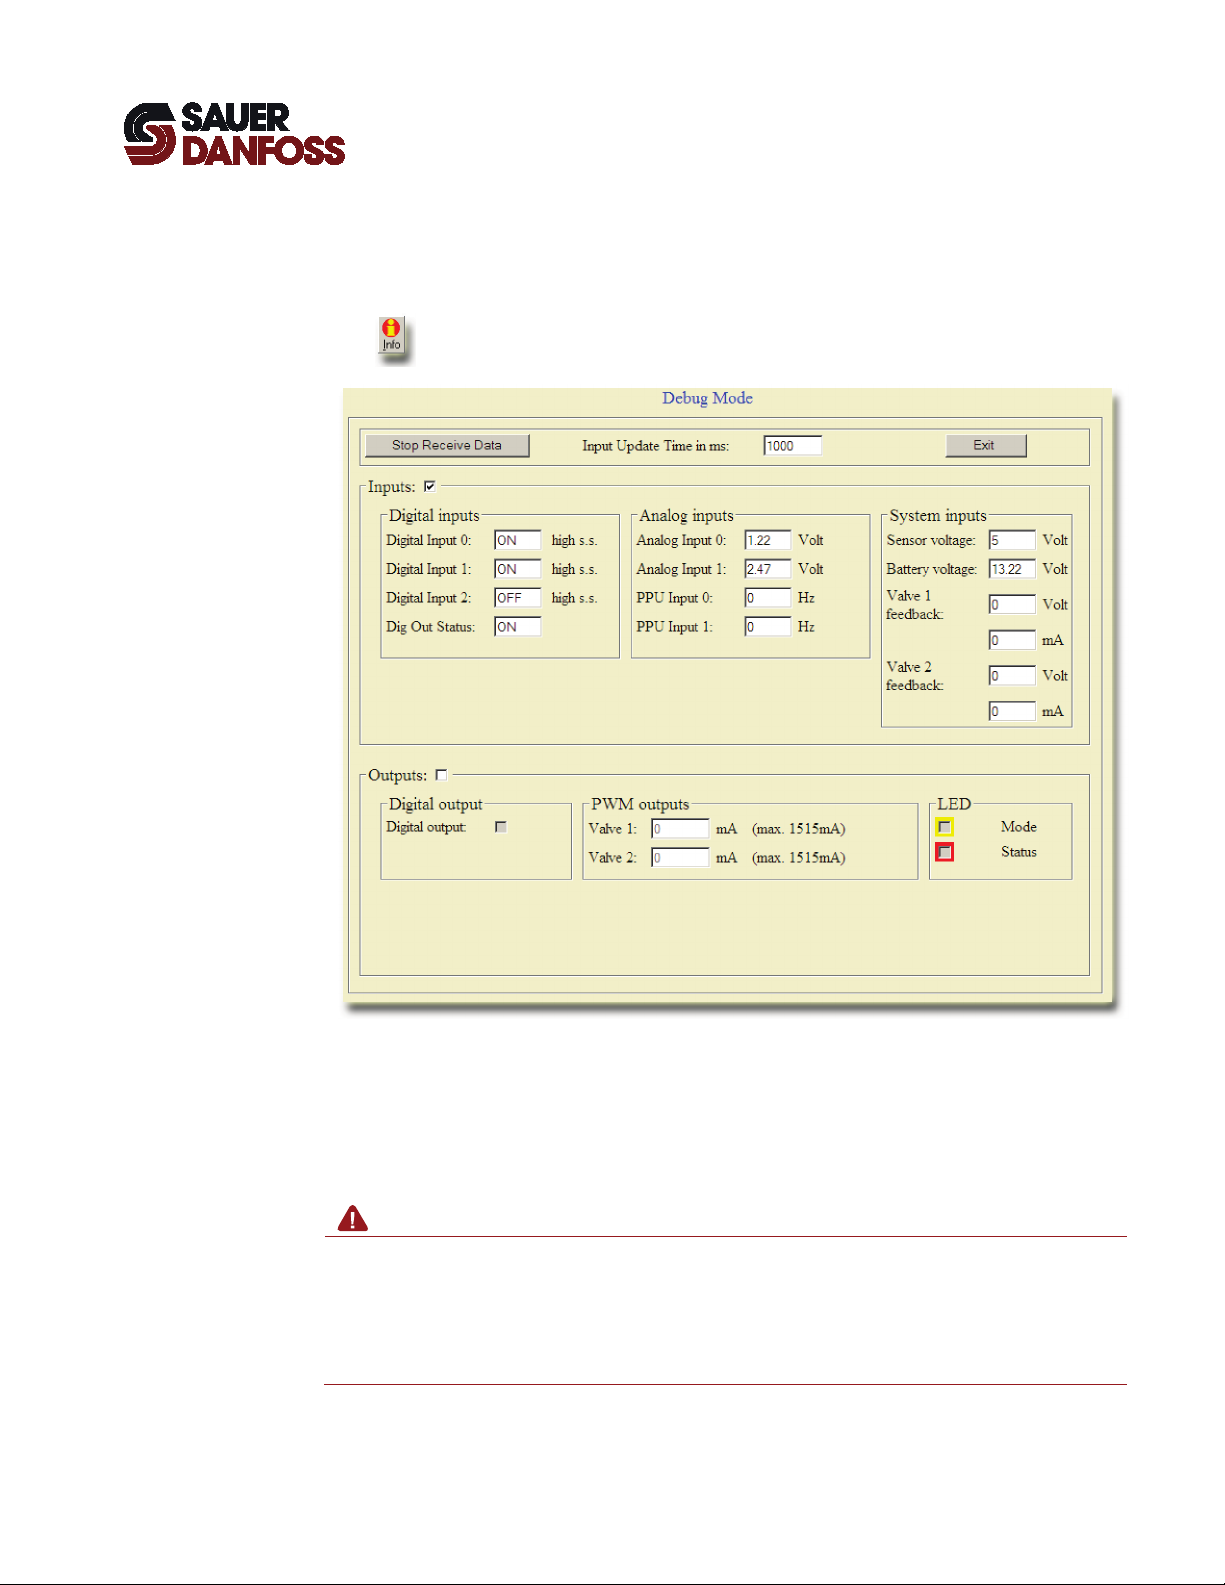
Debug Mode Pane
This pane allows you to view microcontroller inputs and directly set microcontroller
outputs when the WebGPI application is in the debug mode.
Clicking IO Test puts the WebGPI application in a troubleshooting debug mode that
bypasses the microcontroller application. To enter the debug mode, you must connect to
the microcontroller without opening the microcontroller application interface.
The debug mode directly applies output values. It bypasses fault and limit protections.
Changing outputs can cause sudden and unexpected machinery movements that can
result in personal injury and equipment damage.
Understand the consequences of changing microcontroller outputs. Be prepared for sudden
vehicle and machinery movements.
K28601 · Rev FB · November 2012
29
Page 30
WebGPI Communication Software
User Manual
WebGPI Application
Data Logging Pane
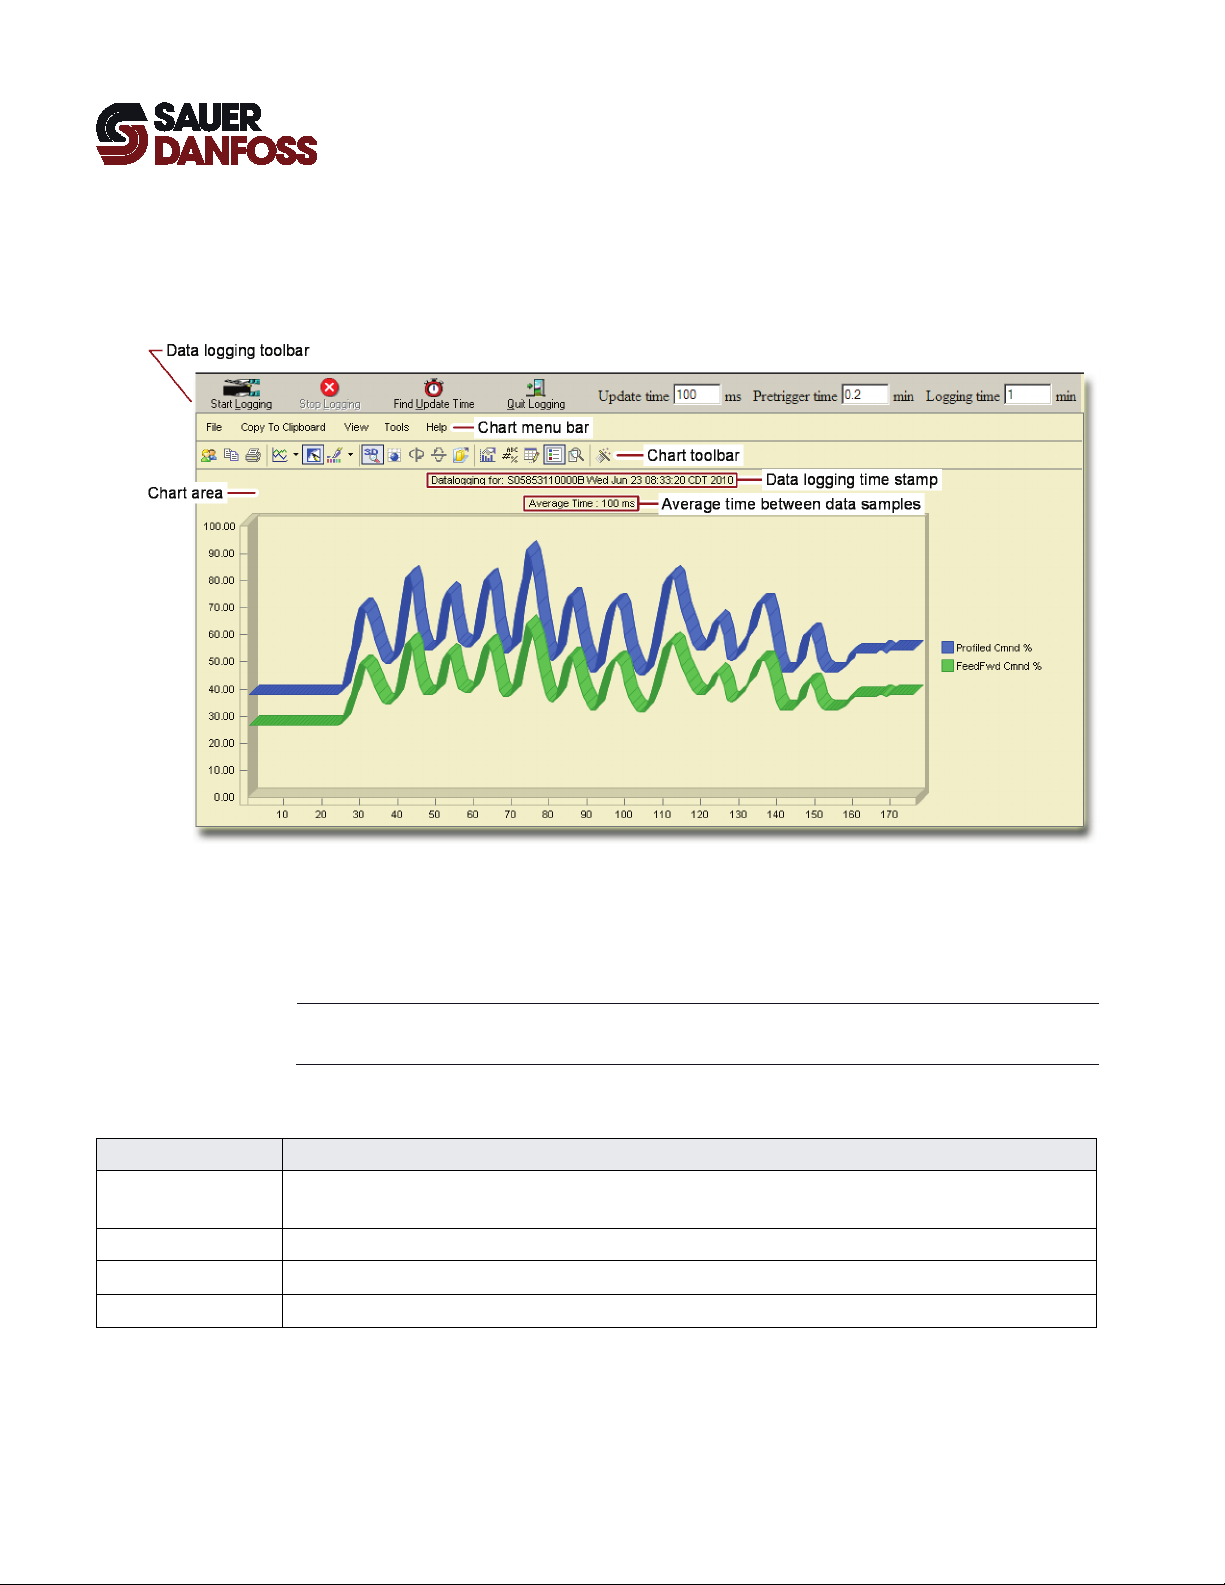
Data Logging Pane
View menu > Data Logging or Main 50%
Use this pane to plot and save run-time data when you are connected to a microcontroller
application.
Data Logging controls are the same whether your View menu selection is Main or Main
50%.
T The WebGPI-Log application can log data at much higher acquisition rates than the
logging function described here.
Item Description
Data logging toolbar Controls in this toolbar start and stop data logging and set data acquisition parameters such as the update time and
the logging time.
Chart menu bar Commands in this menu bar format charts.
Chart toolbar Buttons in this toolbar format charts.
Chart area Displays a chart of the data that you are logging.
30
K28601 · Rev FB · November 2012
Page 31

WebGPI Communication Software
User Manual
WebGPI Application
Data Logging Pane Toolbar
Data Logging Pane Toolbar
Controls in this toolbar:
• Start and stop data logging.
• Set data acquisition parameters such as the update time and the logging time.
Item Description
Starts data logging.
You must select data to log to make this button available.
Stops data logging.
Clicking Start Logging makes this button available.
Automatically finds the optimum update time based on your data logging selections.
This button becomes available when you select data to log.
Stops data logging, clears data log selections, empties the data buffer, and closes the Data Logging pane.
Sets the data acquisition rate.
Sets how many minutes of pre-trigger data are logged when a trigger event occurs.
Sets how many minutes of data are written to a buffer.
The buffer is circular. When the buffer fills, the newest data overwrites the oldest data. Data logging continues until
you click Stop Logging.
When a data trigger occurs, logging continues until new data (including any Pretrigger time data) fills the data
buffer. Then data logging stops.
K28601 · Rev FB · November 2012
31
Page 32

WebGPI Communication Software
User Manual
WebGPI Application
Data Logging Pane Chart Menu Bar
Data Logging Pane Chart Menu Bar
Commands in this menu bar format charts.
Menu Description
File Open Chart command—displays the Open window. Use this window to select and open a ChartFX *cfx format file.
Save Chart command—displays the Save As window. Use this window to save a chart in the ChartFX *cfx format file.
Page Setup command—displays the Page Setup window. Use this window to set the chart’s print margins and paper
orientation.
Print command—displays the Print window. Use this window to print out the chart.
Copy to Clipboard As a Bitmap command—copies a bitmap image of the chart to the clipboard.
As a Metafile command—copies a Windows Metafile image of the chart to the clipboard.
As Text (data only) command—copies tab-delimited data points from the chart to the clipboard.
View 3D/2D command—switches between two-dimensional and three-dimensional chart views.
Clustered (Z Axis) command—clusters the chart along its z axis.
Properties command—displays a Properties window with the following tabs:
– Y Axis tab—sets labeling, tick marks, and gridlines for the y axis.
– Series tab—defines the display and formatting of series.
– General tab—sets general properties such as the screen title and screen background colors.
Tools Values Legend command—Displays a values legend.
Series Legend command—Displays a series legend.
User Legend command—Displays a user legend.
Data Editor command—displays a table at the bottom of the chart.
This table shows the value and acquisition time of each data point in the chart.
Use the slider bar to access data points in the chart and in the table.
Changing a data point value in the table also changes the data point in the chart.
Toolbar command—hides the toolbar. To restore the toolbar, right-click the chart. In the pop-up menu that displays, click
Toolbar.
Menu command—hides the menu bar. To restore the menu bar, close and reopen the chart.
32
K28601 · Rev FB · November 2012
Page 33

WebGPI Communication Software
User Manual
WebGPI Application
Data Logging Pane Chart Menu Bar
Menu Description
Help Contents command—displays the contents of the help file.
Search command—searches the help file.
About ChartFX command—displays information about ChartFX software.
K28601 · Rev FB · November 2012
33
Page 34

WebGPI Communication Software
User Manual
WebGPI Application
Data Logging Pane Chart Toolbar Buttons
Data Logging Pane Chart Toolbar
Buttons in this toolbar format charts.
Button Name Description
Personalized Charts Displays a menu with commands that save and apply chart settings.
Copy to Clipboard Displays a menu with copy commands.
Print Displays a Print window. Use this window to print the chart.
Load My Chart command—applies the chart settings that have been saved through the Save My Chart
command to the currently displayed chart.
Save My Chart command—saves the chart settings that are applied to the current chart.
Restore Defaults command—applies the default settings to the currently displayed chart.
As a Bitmap command—copies a bitmap image of the chart to the clipboard.
As a Metafile command—copies a Windows Metafile image of the chart to the clipboard.
As Text (data only) command—copies tab-delimited chart data points to the clipboard.
Gallery Displays a palette with line, bar, and other chart types. Click a selection to change the chart type.
Anti-Aliasing Applies anti-aliasing to smooth the display of chart lines.
Palette Selector Displays a palette with color schemes that can be applied to charts.
3D/2D Switches between two-dimensional and three-dimensional chart views.
Rotated View Rotates the chart along its z axis.
Rotate Around Y
Axis
Rotate Around X
Axis
Clustered (Z Axis) Clusters the chart along its z axis.
Click a color scheme to apply the scheme to the chart.
Selecting a three-dimensional chart view enables the Rotated View button.
Selecting a rotated chart view enables the Rotate Around Y Axis and Rotate Around X Axis buttons.
Rotates the chart around its y axis.
Rotates the chart around its x axis.
34
K28601 · Rev FB · November 2012
Page 35

WebGPI Communication Software
User Manual
WebGPI Application
Data Logging Pane Chart Toolbar Buttons
Button Name Description
Axes Settings Displays a menu with commands that change how the x axis and y axis display.
Point Labels Applies labels to each data point in the chart.
Data Editor Data Editor command—displays a table at the bottom of the chart.
Legend Box Displays legends that identify the chart data.
Grid commands—turns on and off tick mark grid lines.
Interlaced command—applies alternate light and dark (interlaced) backgrounds between y-axis tick marks.
Show Labels command—labels x-axis tick marks.
Staggered command—staggers the labels applied to the x-axis tick marks.
Vertical labels command—rotates by 90° the labels applied to the x-axis tick marks.
Options command—displays a Properties window with the following tabs:
– Y Axis tab—sets labeling, tick marks, and gridlines for the y axis.
– Series tab—defines the display and formatting of series.
– General tab—sets general properties such as the screen title and screen background colors.
This table shows the value and acquisition time of each data point in the chart.
Use the slider bar to access data points in the chart and in the table.
Changing a data point value in the table also changes the data point in the chart.
Zoom Enables a zoom tool.
Click and drag in the chart to zoom in on specific areas. Click on the button to zoom out.
Properties Displays a Properties window with the following tabs:
– Y Axis tab—sets labeling, tick marks, and gridlines for the y axis.
– Series tab—defines the display and formatting of series.
– General tab—sets general properties such as the screen title and screen background colors.
K28601 · Rev FB · November 2012
35
Page 36

WebGPI Communication Software
User Manual
WebGPI Application
(This page is intentionally blank.)
36
K28601 · Rev FB · November 2012
Page 37

WebGPI Communication Software
User Manual
Chapter contents
WebGPI-Log Application
This chapter describes the WebGPI-Log application’s windows and their controls and
indicators.
The WebGPI-Log application data acquisition rates are typically twice as fast as the
WebGPI application rates.
T The screen captures shown in this chapter may differ slightly from the screens in your
version of the WebGPI-Log application.
WebGPI-Log Window ....................................................................................................................................... 38
WebGPI-Log Window Toolbar ...................................................................................................................... 39
Data Logging Pane ............................................................................................................................................ 42
K28601 · Rev FB · November 2012
37
Page 38

WebGPI Communication Software
User Manual
WebGPI-Log Application
WebGPI-Log Window
WebGPI-Log Window
Path: Start menu > Programs > WebGPI > WebGPI-Log
This window opens when you start the WebGPI-Log application. Use the controls in this
window to access application functions.
Item Description
Data Logging pane Once you select data to log, this pane displays a chart of the data and Chart menu and a Chart toolbar to format the data.
Toolbar Buttons and controls provide quick access to WebGPI-Log application functions.
38
K28601 · Rev FB · November 2012
Page 39

WebGPI Communication Software
User Manual
WebGPI-Log Application
WebGPI-Log Toolbar
WebGPI-Log Window Toolbar
Toolbar buttons and controls provide quick access to WebGPI-Log application functions.
Item Description
Connect button—opens communication between the WebGPI-Log application and the microcontroller.
Disconnect button—closes communication between the WebGPI-Log application and the microcontroller.
Starts communication between the microcontroller and the WebGPI application on the selected RS 232-C port.
Click the Disconnect button to make this control available.
Selects the data transmission rate between the WebGPI-Log application and the microcontroller.
The WebGPI-Log application automatically selects the optimum rate.
After you connect to the microcontroller, items in this pull-down menu can display the following information:
– Software-P/N—display the microcontroller application software part number.
– Hardware-ID—display the microcontroller hardware identification number.
– Machine Default ID-Number—display the default tuning value set identification number.
– OS Version—display the version of the kernel (operating system) used in the microcontroller.
– EC-Processor type—display the processor type used in the microcontroller.
Shows the name of the currently selected screen collection.
Start Logging button—starts the data logging process.
To make the Start Logging button available, you must connect to the microcontroller and select a screen file
(data logging file) to write data to.
Stop Logging button—stops the data logging process.
Shows the data acquisition rate.
Sets how many minutes of pre-trigger data log when a trigger event occurs.
K28601 · Rev FB · November 2012
39
Page 40

WebGPI Communication Software
User Manual
WebGPI-Log Application
WebGPI-Log Toolbar
Item Description
Sets how many minutes of data are written to a buffer.
The buffer is circular. When the buffer fills, the newest data overwrites the oldest data. Data logging continues
until you click Stop Logging.
When a data trigger occurs, logging continues until new data (including any Pretrigger time data) fills the data
buffer. Then data logging stops.
File menu > Save Chart writes the contents of the buffer to a ChartFX *.chd format file.
Click to display two additional buttons:
– Edit Collection button—opens the Edit Chart Collection List window. This window lists the xml data log
files in the currently selected chart collection. Use this window to add and remove xml data log files from the
chart collection.
You create xml data log files in the WebGPI application’s File Creation windowAdd Chart button—opens the
Add Chart to Collection window. Use this window to add xml data log files to the currently selected chart
collection.
Click to display the:
– New button—opens the Create New Chart Collection window. Use this window to name a new chart
collection.
– Open button—opens the Open Chart Collection button. Use this window to select and open a chart
collection.
– Save button—displays the Save Chart Collection button. Use this window to save a chart collection
Click this button to save changes made in the Edit Chart List Collection window.
Displays information about the WebGPI-Log application and Sauer-Danfoss.
About XML Data Log Files, Chart Collections, and ChartFX Files
• XML data log files are extensible mark-up language files (*.xml) that:
− You create in the WebGPI application’s File Creation window.
− Define the data to be logged, but do not contain data.
• Chart collections:
− Contain sets of xml data log files.
− Have *.gpi extensions.
• ChartFX (*.chd) files:
− Define the formatting of the logged data.
− Store the data that has been logged.
40
K28601 · Rev FB · November 2012
Page 41

WebGPI Communication Software
User Manual
WebGPI-Log Application
Edit Chart Collection List Window
Edit Chart Collection List Window
This window lists the xml data log files in the currently selected chart collection. Use this
window to add and remove xml data log files from the chart collection.
T The Close button temporarily applies the changes made in this window to the chart
collection displayed in the WebGPI-Log window. Click the Collection button > Save
button in the WebGPI-Log window to make changes permanent.
Item Description
Chart collection list Lists the xml data log files in the chart collection.
You create these xml data log files in the WebGPI application’s File Creation window. They define the data to be
logged.
Add Chart button Opens the Add Chart to Collection window.
Use this window to select xml data log file to the chart collection.
Remove Chart button Temporarily removes an xml data log file from the chart collection.
Close button Closes the Edit Chart Collection window and applies the changes made in this window to the chart displayed in the
data logging pane.
Click the Collection > Save buttons to save any changes made in the Edit Chart Collection window.
K28601 · Rev FB · November 2012
41
Page 42

WebGPI Communication Software
User Manual
WebGPI-Log Application
Data Logging Pane
Data Logging Pane
This pane displays a chart of the data you selected to log, along with a Chart menu and
toolbar to format the display of data.
T The Chart menu, Chart toolbar, and Data chart display after you select an xml data log
file that identifies the data to be logged.
Item Description
Chart menu Accesses all charting functions.
Chart toolbar Quickly accesses major charting functions.
Chart Displays a chart.
42
K28601 · Rev FB · November 2012
Page 43

WebGPI Communication Software
User Manual
WebGPI-Log Application
Chart Menu
Chart Menu
This menu accesses all charting functions.
T This menu displays after you select an xml data log that identifies data to be logged.
Item Description
File Commands in this menu save, open, and print charts.
Save Chart Opens the Save As window.
Open Chart Opens the Open window.
Save Template Opens the Save As window.
Open Template Opens the Open window.
Print Preview Opens the Page setup window.
Print Opens the Print window.
Edit Commands in this menu copy charts to the clipboard and change the appearance of text in the chart.
Copy to
clipboard
Fonts Changes the font, size, and style of text elements in the chart.
Use this window to save a chart with logged data to a ChartFX *.chd file. The ChartFX *.chd file also saves the formatting
applied to the screen.
Use this window to open ChartFX *.chd files and ChartFX *.chd template files.
Use this window to save chart formatting selections to a ChartFX *.chd template file. A chart template file has no data.
Use this window to apply the formatting in a ChartFX *.chd template file to a chart. Applying a formatting selection to a chart
deletes all the data in the chart.
Use this window to set up the chart for printing.
Each printed page contains approximately 18 data collection points.
Copies the chart to the clipboard in these formats:
– As a Bitmap command—copies a bitmap image of the chart to the clipboard.
– As a Metafile command—copies a Windows Metafile image of the chart to the clipboard.
– As Text (data only) command—copies tab-delimited data points to the clipboard.
– As OLE Object command—copies an object linking and embedding (OLE) image of the chart to the clipboard.
K28601 · Rev FB · November 2012
43
Page 44

WebGPI Communication Software
User Manual
WebGPI-Log Application
Chart Menu
Item Description
Tools
Values legend Labels values in the chart.
Series legend Labels the data series in the chart.
Data Editor Displays a table at the bottom of the chart.
Toolbar Opens a toolbar with buttons that quickly access common chart commands.
PaletteBar Opens a palette with colors that you can drag and apply to chart elements.
PatternBar Opens a palette with patterns that you can drag and apply to chart elements.
View Commands in this menu change how the chart formats its data.
3D/2D Switches between two-dimensional and three-dimensional chart views.
Rotate Select a three-dimensional view of screen data to make this command available.
Z-Clustered Displays data clustered along the chart’s z-axis. Not available for all charts.
Properties Opens a ChartFX Properties window with the following tabs:
Zoom Zooms on the chart.
Gallery Opens a palette with line, bar, and other chart types. Click a selection to change the chart type.
Help Commands in this menu access information about ChartFX software.
Contents Opens the contents of Help.
Search Searches the Help index.
About ChartFX Displays information about ChartFX software.
Commands in this menu label chart data and display toolbars that change chart colors and patterns.
This table shows the value and acquisition time of each data point in the chart.
Use the slider bars to access data points in the chart and in the table.
Changing a data point value in the table also changes the data point in the chart.
Opens a ChartFX Properties window with the following tabs:
– 3D tab—defines three-dimensional views of chart data.
– Axes tab—sets labeling, tick marks, and gridlines for axes.
– Series tab—defines the display and formatting of series.
– General tab—sets general properties such as the screen title and screen background colors.
Click this window’s Help button for more information.
– To zoom in, click the Zoom command. Click and drag in the chart to enlarge a selected area.
– To zoom out, click the Zoom command.
44
K28601 · Rev FB · November 2012
Page 45

WebGPI Communication Software
User Manual
WebGPI-Log Application
Chart Toolbar
Chart Toolbar
This toolbar accesses major charting functions.
T A chart must be selected to display this toolbar.
Button Name Description
Open Chart Opens the Open window.
Use this window to open ChartFX *.chd files and ChartFX *.chd template files.
Save Chart Opens the Save As window.
Copy to
Clipboard
Gallery Opens a palette with line, bar, and other chart types. Click a selection to change the chart type.
Color Applies colors to elements in the chart.
Vertical
Grid
Horizontal
Grid
Legend
Box
Data Editor Displays a table at the bottom of the chart.
Use this window to save a chart or a chart template in the ChartFX CHD file format.
A chart file has data and chart display selections. A chart template file has chart display selections but no data.
Copies the chart to the clipboard in these formats:
– As a Bitmap command—copies a bitmap image of the chart to the clipboard.
– As a Metafile command—copies a Windows Metafile image of the chart to the clipboard.
– As Text (data only) command—copies tab-delimited data points to the clipboard.
– As OLE Object command—copies an object linking and embedding (OLE) image of the chart to the clipboard.
To apply a color, select a color in this tool’s palette, and drag the paint bottle to the element.
Applies a vertical grid to the chart.
Applies a horizontal grid to the chart.
Displays legends that identify the data series in the chart.
This table shows the value and acquisition time of each data point in the chart.
Use the slider bars to access data points in the chart and in the table.
Changing a data point value in the table also changes the data point in the chart.
K28601 · Rev FB · November 2012
45
Page 46

WebGPI Communication Software
User Manual
WebGPI-Log Application
Chart Toolbar
Button Name Description
Properties Opens a ChartFX Properties window with the following tabs:
2D/3D Switches between two-dimensional and three-dimensional chart views.
Rotate Select a three-dimensional view of chart data to enable this button.
Z-Clustered Displays data clustered along the chart’s z-axis. Not available for all charts.
– 3D tab—defines three-dimensional views of chart data.
– Axes tab—sets labeling, tick marks, and gridlines for axes.
– Series tab—defines the display and formatting of series.
– General tab—sets general properties such as the chart title and chart background colors.
Click this window’s Help button for more information.
Opens a ChartFX Properties window with the following tabs:
– 3D tab—defines three-dimensional views of chart data.
– Axes tab—sets labeling, tick marks, and gridlines for axes.
– Series tab—defines the display and formatting of series.
– General tab—sets general properties such as the chart title and chart background colors.
Click this window’s Help button for more information.
Zoom Zooms in and out on the data chart.
Print
Preview
Print Prints the chart to the selected printer.
Tools Opens a menu with the following commands:
To zoom in, click this button. Click and drag in the chart to enlarge a selected area. To zoom out, click again on this
button.
Opens the Page setup window.
Use this window to set up the chart for printing.
Series legend command—labels the data series in the chart.
Data Editor command—displays a table at the bottom of the chart.
This table shows the value and acquisition time of each data point in the chart.
Use the slider bars to access data points in the chart and in the table.
Changing a data point value in the table also changes the data point in the chart.
Toolbar command—opens the Chart toolbar.
PaletteBar command—opens a palette with colors that you can drag and apply to chart elements.
PatternBar command—opens a palette with patterns that you can drag and apply to chart elements.
46
K28601 · Rev FB · November 2012
Page 47

WebGPI Communication Software
User Manual
Chapter contents
How to Use the WebGPI Application
This chapter contains step-by-step instructions for performing common WebGPI tasks.
T The screen captures shown in this chapter may differ slightly from the screens in your
version of the WebGPI application.
How to Connect Your PC to a Microcontroller ....................................................................................... 48
How to Start Communication Between the WebGPI Application and a Microcontroller ..... 49
How to Change a Parameter Value ............................................................................................................. 50
How to Restore Defaults ................................................................................................................................. 52
How to Log Run-Time Data ............................................................................................................................ 53
About Selecting Values for Logging ........................................................................................................... 56
How to Create an XML Data Log File for Use in the WebGPI-Log Application .......................... 57
How to Download a Defaults or Application File to an HC08 or HC08A Processor ................. 59
How to Force Download an Application File to an HC08 or HC08A Processor ......................... 61
How to Download a Kernel to an HCO8 or an HC08A Processor .................................................... 64
How to Force Download a Kernel to an HCO8 or HC08A Processor .............................................. 68
How to Download an Application File to a 196 Processor................................................................. 72
How to Force Download an Application File to a 196 Processor .................................................... 75
How to Download a Kernel to a 196 Processor ...................................................................................... 78
How to Force Download a Kernel to a 196 Processor .......................................................................... 82
How to Download an Application or Defaults File to a 167 Processor ......................................... 86
How to Force Download an Application File to a 167 Processor .................................................... 88
How to Download a Kernel to a 167 Processor ...................................................................................... 91
How to Force Download a Kernel to a 167 Processor .......................................................................... 94
How to Download an Application File to an HC12 Processor .......................................................... 98
How to Download a Kernel to an HC12 Processor ............................................................................. 102
How to Force Download a Kernel to an HC12 Processor ................................................................ 105
How to Create a File with Microcontroller Data .................................................................................. 108
How to Download an Application File to TI Processor ..................................................................... 110
K28601 · Rev FB · November 2012
47
Page 48

WebGPI Communication Software
User Manual
How to Use the WebGPI Application
Cabling Requirements
How to Connect Your PC to a Microcontroller
The WebGPI application uses an RS-232-C COM port on your PC to communicate with
Sauer-Danfoss microcontrollers.
The table below lists the cables needed for communication with Sauer-Danfoss
microcontrollers through this COM port.
Sauer-Danfoss Microcontroller Sauer-Danfoss Cable Part Number
MC200 PN 1090740
MC400 PN 1090740
S2X PN KW02027* or PN KW02012†
MC300 PN KW02027* or PN KW02012†
* Recommended cable.
† This cable has a Prog/Read switch. Leave this switch set to Read.
Connectors—Sauer-Danfoss Cable PN 1090740
Connectors—Sauer-Danfoss Cable PN KW02027
48
K28601 · Rev FB · November 2012
Page 49

WebGPI Communication Software
User Manual
How to Use the WebGPI Application
How to Start Communication between the WebGPI Application and a Microcontroller
1. Connect an appropriate RS-232-C cable between a COM port on your PC and the
Sauer-Danfoss microcontroller.
2. Connect to the microcontroller and open its application interface.
A. On your PC, start the WebGPI application.
B. As needed, use Port to select the correct COM port.
C. Click Connect to connect to the microcontroller.
D. Click Application to open the microcontroller application interface.
K28601 · Rev FB · November 2012
– Baudrate replaces Port and shows the current rate.
– The Software P/N displays the application software part number.
– The Navigation pane lists the microcontroller application parameters.
– The Parameter pane identifies the microcontroller application.
49
Page 50

WebGPI Communication Software
User Manual
How to Use the WebGPI Application
How to Change a Parameter Value
1. Connect an appropriate cable between a COM port on your PC and the Sauer-Danfoss
microcontroller.
2. Start communication with the microcontroller (see page 49).
3. Navigate to the parameter set and select the value to be changed.
A. In the Navigation pane, click a parameter.
B. In the Navigation pane, click the value you want to change.
50
K28601 · Rev FB · November 2012
The Parameter pane displays the parameter you select.
Page 51

WebGPI Communication Software
User Manual
How to Use the WebGPI Application
4. Change the selected value.
A. Enter the new value.
B. As required, enter the Password and set the PWLevel needed to change the
value.
C. Click Send.
K28601 · Rev FB · November 2012
51
Page 52

WebGPI Communication Software
User Manual
How to Use the WebGPI Application
How to Restore Defaults
To restore defaults, click SetDefaults.
52
K28601 · Rev FB · November 2012
Page 53

WebGPI Communication Software
User Manual
How to Use the WebGPI Application
How to Log Run-Time Data
T WebGPI-Log application data acquisition rates are typically twice as fast as the WebGPI
application rates. To log data in the WebGPI-Log application, you must first use the
WebGPI application to create an xml data log file that defines the values that you want
to log. For more information, see How to Create an XML Data Log File for Use in the
WebGPI-Log Application on page 57.
1. Connect an appropriate cable between a COM port on your PC and the Sauer-Danfoss
microcontroller.
2. Start communication with the microcontroller (see page 49).
3. Select the data to be plotted.
A. In the Navigation pane, click to open the block diagram with the data to be
B. In the block diagram, click the data to be plotted.
K28601 · Rev FB · November 2012
plotted.
Left-click to select data to log, without setting a data trigger.
Right-click to select data to log and set a data trigger in the DataLogging
window.
– Until a data trigger occurs, new data overwrites the oldest data when the
buffer fills. Data logging continues until you click Stop Logging.
– When a data trigger occurs, logging continues until new data (including any
Pretrigger time data) fills the data buffer and then stops.
53
Page 54

WebGPI Communication Software
User Manual
How to Use the WebGPI Application
4. Open the data logging pane and start logging data.
A. In View, select Data Logging to display a full Data Logging pane.
B. Click on Find Update Time to automatically find the optimum update rate.
C. As needed, use selections in the Chart menu to set the appearance of the data.
D. As needed, enter a Pretrigger time and a Logging time.
E. Click on Start Logging to start logging data.
54
K28601 · Rev FB · November 2012
– When you have defined a data trigger event, use the Pretrigger time to set
the amount of pretrigger data collected when the event occurs.
– The Logging time sets the size of the data buffer.
Page 55

WebGPI Communication Software
User Manual
How to Use the WebGPI Application
5. Stop the data logging and save the data.
A. Click Stop Logging to stop data logging.
B. In the Chart menu, click the Save Chart button to open the Save As window. Use
C. Click Quit Logging to return to the previous pane and cancel all data logging
K28601 · Rev FB · November 2012
this window to save a file of the logged data (*.CHD) for future viewing.
selections.
55
Page 56

WebGPI Communication Software
User Manual
How to Use the WebGPI Application
About Selecting Values for Logging
Values can be selected for immediate logging in the WebGPI application.
Values can also be selected for logging in the WebGPI-Log application.
The procedure for selecting the values that you want to log is the same for both
applications.
• A left-click in a block diagram field selects values that get logged as soon as your click
the Start Logging button.
• A right-click in a block diagram field:
− Selects values that only log after a trigger event.
− Displays a Data Logging window.
– This window defines the trigger condition and the trigger value for a trigger
event.
– Data logging starts when the value being logged meets both the trigger
condition and value.
− Select a trigger condition of none to cancel a trigger event.
56
K28601 · Rev FB · November 2012
Page 57

WebGPI Communication Software
User Manual
How to Use the WebGPI Application
How to Create an XML Data Log File for Use in the WebGPI-Log Application
1. Open the WebGPI application.
2. Connect the WebGPI application to the microcontroller application.
3. Display the Main pane for the application.
4. In the WebGPI window’s Main pane, select the values that you want to log in the
WebGPI-Log application. For more information, see About Selecting Values for Logging
on page 56.
5. Open the File Creation window to create an xml data log file with the values that you
want to log in the WebGPI-Log application.
A. Click the Save button in the WebGPI window to open the File Creation window.
B. Select the XML option in the File Creation window.
C. Click the Search button in the File Creation window to open the Select File
D. In the Select File window, name the xml data log file.
E. Click the Save button in the Select File window to close this window.
K28601 · Rev FB · November 2012
window.
57
Page 58

WebGPI Communication Software
User Manual
How to Use the WebGPI Application
6. Create the xml data log file.
A. Click the Create button in File Creation window.
B. Click OK to close the window with the Save completed message.
58
K28601 · Rev FB · November 2012
Page 59

WebGPI Communication Software
User Manual
How to Use the WebGPI Application
How to Download a Defaults or Application File to an HC08 or HC08A Processor
1. Connect an appropriate cable between a PC COM port and the microcontroller.
2. Apply power to the microcontroller.
(When applying power to the microcontroller, do not start your vehicle’s engine.)
3. Start the WebGPI application, connect to the microcontroller, and display the
Downloader pane.
A. Start the WebGPI application.
B. As needed, change the Port to match the PC COM port that you are using.
C. Click Connect to connect to the microcontroller.
D. Click Download to display the Downloader pane.
K28601 · Rev FB · November 2012
If you get a Device is not responding message, click OK to close this message.
Click Download to display the Downloader pane and then perform a force
download procedure, starting with step 4 on page 62.
59
Page 60

WebGPI Communication Software
User Manual
How to Use the WebGPI Application
4. Download an application or defaults file.
A. Click a File type of either Application or Defaults.
B. Check the Application-File or the Default-File selection.
The WebGPI application will download this file to the microcontroller.
If this is not the right file, click Search to display the Select File window. Use this
window to browse to and select the right file.
If you still cannot find the right file, uncheck the File name filter in the
Downloader pane and continue your search.
C. Click Download to start the download of the file.
5. When the download finishes, check the Downloader Progress Indicator to make sure
60
that your download has been successful.
K28601 · Rev FB · November 2012
Page 61

WebGPI Communication Software
User Manual
How to Use the WebGPI Application
How to Force Download an Application File to an HC08 or HC08A Processor
1. Connect an appropriate cable between a PC COM port and the microcontroller.
2. Apply power to the microcontroller.
(When applying power to the microcontroller, do not start your vehicle’s engine.)
3. Start the WebGPI application and display the Downloader pane.
A. Start the WebGPI application.
B. As needed, change the Port to match the PC COM port that you are using.
C. Click Download to display the Downloader pane.
K28601 · Rev FB · November 2012
61
Page 62

WebGPI Communication Software
User Manual
How to Use the WebGPI Application
4. Select an application file to download.
A. Click OK to close the No micro selected message.
B. Click a Microcontroller type of either HC08 or HC08A, depending on the type of
C. Click a File type of Application.
D. Note the Application-File selection.
62
K28601 · Rev FB · November 2012
processor used by your microcontroller.
The WebGPI application will download this file to the microcontroller.
If this is not the right file, click Search to display the Select File window. Use this
window to browse to and select the right file.
If you still cannot find the right file, uncheck the File name filter in the
Downloader pane and continue your search.
Page 63

WebGPI Communication Software
User Manual
How to Use the WebGPI Application
5. Download the application file.
A. Click Force download to start the download.
B. Remove and then reapply microcontroller power.
C. Click Download to continue the download.
6. When the download finishes, check the Downloader Progress Indicator to make sure
that your download has been successful.
K28601 · Rev FB · November 2012
63
Page 64

WebGPI Communication Software
User Manual
How to Use the WebGPI Application
How to Download a Kernel to an HCO8 or an HC08A Processor
1. Connect an appropriate cable between a PC COM port and the microcontroller.
2. Apply power to the microcontroller.
(When applying power to the microcontroller, do not start your vehicle’s engine.)
3. Start the WebGPI application, connect to the microcontroller, and display the
Downloader pane.
A. Start the WebGPI application.
B. As needed, change the Port to match the PC COM port that you are using.
C. Click Connect to connect to the microcontroller.
D. Click Download to display the Downloader pane.
64
K28601 · Rev FB · November 2012
If you get a Device is not responding message, click OK to close this message.
Click Download to display the Downloader pane and then perform a force
download procedure, starting with 5 on page 69.
Page 65

WebGPI Communication Software
User Manual
How to Use the WebGPI Application
4. Connect the microcontroller boot pin to 0 V.
A. Remove power from the microcontroller.
B. Connect the boot pin to 0 V.
C. Apply power to the microcontroller.
5. Select and download a boot file.
A. Click a File type of Kernel.
B. Check the Boot-File selection.
C. Click Boot-file download to download the file.
D. Remove and then reapply microcontroller power.
E. Click OK in the message window to continue the download.
K28601 · Rev FB · November 2012
The WebGPI application will download this file to the microcontroller.
If this is not the right file, click Search to display the Select File window. Use this
window to browse to and select the right file.
If you still cannot find the right file, uncheck the File name filter in the
Downloader pane and continue your search.
As soon as you click this button, the WebGPI application displays a window with a
Return code error… Please repower… message.
65
Page 66

WebGPI Communication Software
User Manual
How to Use the WebGPI Application
6. When the boot file download finishes, disconnect the boot pin from 0 V.
Do not remove power from the microcontroller in this step.
7. Download a kernel file.
A. Check the Operating System File selection.
B. Click Download to download the file.
C. When the download finishes, remove and then reapply microcontroller power.
66
K28601 · Rev FB · November 2012
The WebGPI application will download this file to the microcontroller.
As needed, use the Search File window to browse to and select the right file.
If you still cannot find the right file, uncheck the File name filter in the
Downloader pane and continue your search.
Page 67

WebGPI Communication Software
User Manual
How to Use the WebGPI Application
8. Check that you have successfully downloaded a new file.
A. In the Downloader pane, click Exit to return to the WebGPI window.
B. In the WebGPI window, click Connect to reconnect to the microcontroller.
C. In the WebGPI window, click Download to display the Downloader pane.
D. Check the Downloader Progress Indicator to make sure that your download has
been successful.
K28601 · Rev FB · November 2012
67
Page 68

WebGPI Communication Software
User Manual
How to Use the WebGPI Application
How to Force Download a Kernel to an HCO8 or HC08A Processor
1. Connect an appropriate cable between a PC COM port and the microcontroller.
2. Apply power to the microcontroller.
(When applying power to the microcontroller, do not start your vehicle’s engine.)
3. Start the WebGPI application and display the Downloader pane.
A. Start the WebGPI application.
B. As needed, change the Port to match the PC COM port that you are using.
C. Click Download to display the Downloader pane.
4. Connect the microcontroller boot pin to 0 V.
A. Remove power from the microcontroller.
B. Connect the boot pin to 0 V.
C. Apply power to the microcontroller.
68
K28601 · Rev FB · November 2012
Page 69

WebGPI Communication Software
User Manual
How to Use the WebGPI Application
5. Select and download the boot file.
A. Click OK to close the No micro selected message.
B. Click a Microcontroller type of either HC08 or HC08A, depending on the type of
C. Click a File type of Kernel.
D. Check the Boot-File selection.
E. Click Boot-file download to download the file.
F. Remove and then reapply microcontroller power.
G. Click OK in the message window to continue the download.
K28601 · Rev FB · November 2012
processor used in your microcontroller.
The WebGPI application will download this file to the microcontroller.
If this is not the right file, click Search to display the Select File window. Use this
window to select the right file. If you still cannot find the right file, uncheck the
File name filter in the Downloader pane and continue your search.
As soon as you click this button, the WebGPI application displays a window with a
Return code error… Please repower… message.
69
Page 70

WebGPI Communication Software
User Manual
How to Use the WebGPI Application
6. When the download finishes, disconnect the boot pin from 0 V.
Do not remove power from the microcontroller in this step.
7. Download a kernel file.
A. Check the Operating System File selection.
B. Click Download to download the file.
C. When the download finishes, remove and then reapply microcontroller power.
70
K28601 · Rev FB · November 2012
The WebGPI application will download this file to the microcontroller.
As needed, use the Search File window to browse to and select the right file.
If you still cannot find the right file, uncheck the File name filter in the
Downloader pane and continue your search.
Page 71

WebGPI Communication Software
User Manual
How to Use the WebGPI Application
8. Check that your download has been successful.
A. In the Downloader pane, click Exit to return to the WebGPI window.
B. In the WebGPI window, click Connect to reconnect to the microcontroller.
C. In the WebGPI window, click Download to display the Downloader pane.
D. Check the Downloader Progress Indicator to make sure that your download has
been successful.
K28601 · Rev FB · November 2012
71
Page 72

WebGPI Communication Software
User Manual
How to Use the WebGPI Application
How to Download an Application File to a 196 Processor
T 196 microcontrollers do not have separate defaults files. To change default values, you
must download a new application file with new default values.
1. Connect an appropriate cable between a PC COM port and the microcontroller.
2. Apply power to the microcontroller.
(When applying power to the microcontroller, do not start your vehicle’s engine.)
3. Start the WebGPI application, connect to the microcontroller, and display the
Downloader pane.
A. Start the WebGPI application.
B. As needed, change the Port to match the PC COM port that you are using.
C. Click Connect to connect to the microcontroller.
72
D. Click Download to display the Downloader pane.
K28601 · Rev FB · November 2012
Page 73

WebGPI Communication Software
User Manual
How to Use the WebGPI Application
If you get a Device is not responding message, click OK to close this message.
Click Download to display the Downloader pane and then perform a force
download procedure, starting with step 4 on page 76.
4. Download an application file.
A. Check the Application-File selection.
B. Click Download to start the download.
K28601 · Rev FB · November 2012
The WebGPI application will download this file to the microcontroller.
If this is not the right file, click Search to display the Select File window. Use this
window to browse to and select the right file.
If you still cannot find the right file, uncheck the File name filter in the
Downloader pane and continue your search.
73
Page 74

WebGPI Communication Software
User Manual
How to Use the WebGPI Application
5. When the download finishes, check the Downloader Progress Indicator to make sure
that your download has been successful.
74
K28601 · Rev FB · November 2012
Page 75

WebGPI Communication Software
User Manual
How to Use the WebGPI Application
How to Force Download an Application File to a 196 Processor
1. Connect an appropriate cable between a PC COM port and the microcontroller.
2. Apply power to the microcontroller.
(When applying power to the microcontroller, do not start your vehicle’s engine.)
3. Start the WebGPI application and display the Downloader pane.
A. Start the WebGPI application.
B. As needed, change the Port to match the COM port that you are using on your PC
C. Click Download to display the Downloader pane.
K28601 · Rev FB · November 2012
to communicate with the microcontroller.
75
Page 76

WebGPI Communication Software
User Manual
How to Use the WebGPI Application
4. Select an application file to download.
A. Click OK to close the No micro selected message.
B. Click a Microcontroller type of 196.
C. Click a File type of Application.
D. Note the Application-File selection.
76
K28601 · Rev FB · November 2012
The WebGPI application will download this file to the microcontroller.
If this is not the right file, click Search to display the Select File window. Use this
window to browse to and select the right file.
If you still cannot find the right file, uncheck the File name filter in the
Downloader pane and continue your search.
Page 77

WebGPI Communication Software
User Manual
How to Use the WebGPI Application
5. Download the application file.
A. Click Force download to start the download.
B. Remove and then reapply microcontroller power.
C. Click Download to continue the download.
6. When the download finishes, check the Downloader Progress Indicator to make sure
that your download has been successful.
K28601 · Rev FB · November 2012
77
Page 78

WebGPI Communication Software
User Manual
How to Use the WebGPI Application
How to Download a Kernel to a 196 Processor
T Downloading a 196 kernel deletes the application file in the 196 processor. After
downloading the kernel, you will have to reinstall the application file.
1. Connect an appropriate cable between a PC COM port and the microcontroller.
2. Apply power to the microcontroller.
(When applying power to the microcontroller, do not start your vehicle’s engine.)
3. Start the WebGPI application, connect to the microcontroller, and display the
Downloader pane.
A. Start the WebGPI application.
B. As needed, change the Port to match the PC COM port that you are using.
C. Click Connect to connect to the microcontroller.
78
D. Click Download to display the Downloader pane.
K28601 · Rev FB · November 2012
Page 79

WebGPI Communication Software
User Manual
How to Use the WebGPI Application
If you get a Device is not responding message, click OK to close this message.
Click Download to display the Downloader pane and then perform a force
download procedure, starting with step 4 on page 83.
4. Select and download a boot file.
A. Click a File type of Kernel.
B. Check the Boot-File selection.
C. Click Boot-file download to download the file.
K28601 · Rev FB · November 2012
The WebGPI application will download this file to the microcontroller.
If this is not the right file, click Search to display the Select File window. Use this
window to browse to and select the right file.
If you still cannot find the right file, uncheck the File name filter in the
Downloader pane and continue your search.
79
Page 80

WebGPI Communication Software
User Manual
How to Use the WebGPI Application
5. Download a kernel file.
A. Check the Operating System File selection.
B. Click Download to download the file.
80
K28601 · Rev FB · November 2012
The WebGPI application will download this file to the microcontroller.
As needed, use the Search File window to browse to and select the right file.
If you still cannot find the right file, uncheck the File name filter in the
Downloader pane and continue your search.
Once you download the boot and kernel files, you must also download the
application file to successfully complete this procedure.
Page 81

WebGPI Communication Software
User Manual
How to Use the WebGPI Application
6. Download an application file.
A. Click a File type of Application.
B. Check the Application-File selection.
The WebGPI application will download this file to the microcontroller.
As needed, use the Search File window to browse to and select the right file.
If you still cannot find the right file, uncheck the File name filter in the
Downloader pane and continue your search.
C. Click Download to download the file.
7. When the download finishes, check the Downloader Progress Indicator to make sure
that you have successfully downloaded the kernel and application files.
K28601 · Rev FB · November 2012
81
Page 82

WebGPI Communication Software
User Manual
How to Use the WebGPI Application
How to Force Download a Kernel to a 196 Processor
T Downloading a 196 kernel deletes the application file in the 196 processor. After
downloading the kernel, you will have to reinstall the application file.
1. Connect an appropriate cable between a PC COM port and the microcontroller.
2. Apply power to the microcontroller.
(When applying power to the microcontroller, do not start your vehicle’s engine.)
3. Start the WebGPI application and display the Downloader pane.
A. Start the WebGPI application.
B. As needed, change the Port to match the PC COM port that you are using.
C. Click Download to display the Downloader pane.
82
K28601 · Rev FB · November 2012
Page 83

WebGPI Communication Software
User Manual
How to Use the WebGPI Application
4. Select and download the boot file.
A. Click OK to close the No micro selected message.
B. Click a Microcontroller type of 196.
C. Click a File type of Kernel.
D. Check the Boot-File selection.
E. Click Force download to download the file.
F. Remove and then reapply microcontroller power.
G. Click Boot-file download to continue the download.
K28601 · Rev FB · November 2012
The WebGPI application will download this file to the microcontroller.
If this is not the right file, click Search to display the Select File window. Use this
window to select the file you want.
If you still cannot find the right file, uncheck the File name filter in the
Downloader pane and continue your search.
83
Page 84

WebGPI Communication Software
User Manual
How to Use the WebGPI Application
5. Download a kernel file.
A. Check the Operating System File selection.
B. Click Download to download the file.
84
K28601 · Rev FB · November 2012
The WebGPI application will download this file to the microcontroller.
As needed, use the Search File window to browse to and select the right file. If
you still cannot find the right file, uncheck the File name filter in the Downloader
pane and continue your search.
Once you download the boot and kernel files, you must also download the
application file to successfully complete this procedure.
Page 85

WebGPI Communication Software
User Manual
How to Use the WebGPI Application
6. Download an application file.
A. Click a File type of Application.
B. Check the Application-File selection.
C. Click Download to download the file.
7. When the download finishes, check the Downloader Progress Indicator to make sure
that you have successfully downloaded the kernel and application files.
K28601 · Rev FB · November 2012
The WebGPI application will download this file to the microcontroller.
As needed, use the Search File window to browse to and select the right file. If
you still cannot find the right file, uncheck the File name filter in the Downloader
pane and continue your search.
85
Page 86

WebGPI Communication Software
User Manual
How to Use the WebGPI Application
How to Download an Application or Defaults File to a 167 Processor
1. Connect an appropriate cable between a PC COM port and the microcontroller.
If you are using a Sauer-Danfoss KW02012 cable with a Prog/Read switch, set this
switch to Read.
2. Apply power to the microcontroller. (When applying power to the microcontroller, do
not start your vehicle’s engine.)
3. Start the WebGPI application, connect to the microcontroller, and display the
Downloader pane.
A. Start the WebGPI application.
B. As needed, change the Port to match the PC COM port that you are using.
C. Click Connect to connect to the microcontroller.
D. Click Download to display the Downloader pane.
86
K28601 · Rev FB · November 2012
If you get a Device is not responding message, click OK to close this message.
Click Download to display the Downloader pane and then perform a force
download procedure, starting with step 4 on page 89.
Page 87

WebGPI Communication Software
User Manual
How to Use the WebGPI Application
4. Download an application or defaults file.
A. Click a File type of either Application or Defaults.
B. Check the Application-File selection.
C. Click Download to start the download.
5. When the download finishes, check the Downloader Progress Indicator to make sure
that your download has been successful.
K28601 · Rev FB · November 2012
The WebGPI application will download this file to the microcontroller.
If this is not the right file, click Search to display the Select File window. Use this
window to browse to and select the right file. If you still cannot find the right file,
uncheck the File name filter in the Downloader pane and continue your search.
87
Page 88

WebGPI Communication Software
User Manual
How to Use the WebGPI Application
How to Force Download an Application File to a 167 Processor
1. Connect an appropriate cable between a PC COM port and the microcontroller.
If you are using a Sauer-Danfoss KW02012 cable with a Prog/Read switch, set this
switch to Read.
2. Apply power to the microcontroller.
(When applying power to the microcontroller, do not start your vehicle’s engine.)
3. Start the WebGPI application and display the Downloader pane.
A. Start the WebGPI application.
B. As needed, change the Port to match the COM port that you are using on your PC
C. Click Download to display the Downloader pane.
88
K28601 · Rev FB · November 2012
to communicate with the microcontroller.
Page 89

WebGPI Communication Software
User Manual
How to Use the WebGPI Application
4. Select an application file to download.
A. Click OK to close the No micro selected message.
B. Click a Microcontroller type of 167.
C. Click a File type of Application.
D. Note the Application-File selection.
K28601 · Rev FB · November 2012
The WebGPI application will download this file to the microcontroller.
If this is not the right file, click Search to display the Select File window. Use this
window to browse to and select the right file.
If you still cannot find the right file, uncheck the File name filter in the
Downloader pane and continue your search.
89
Page 90

WebGPI Communication Software
User Manual
How to Use the WebGPI Application
5. Download the application file.
A. Click Force download to start the download.
B. Remove and then reapply microcontroller power.
C. Click Download to continue the download.
6. When the download finishes, check the Downloader Progress Indicator to make sure
that your download has been successful.
90
K28601 · Rev FB · November 2012
Page 91

WebGPI Communication Software
User Manual
How to Use the WebGPI Application
How to Download a Kernel to a 167 Processor
1. Connect an appropriate cable between a PC COM port and the microcontroller.
If you are using a Sauer-Danfoss KW02012 cable with a Prog/Read switch, set this
switch to Read.
2. Apply power to the microcontroller.
(When applying power to the microcontroller, do not start your vehicle’s engine.)
3. Start the WebGPI application, connect to the microcontroller, and display the
Downloader pane.
A. Start the WebGPI application.
B. As needed, change the Port to match the PC COM port that you are using.
C. Click Connect to connect to the microcontroller.
D. Click Download to display the Downloader pane.
K28601 · Rev FB · November 2012
91
Page 92

WebGPI Communication Software
User Manual
How to Use the WebGPI Application
If you get a Device is not responding message, Click OK to close this message.
Click Download to display the Downloader pane and then perform a force
download procedure, starting with step 5 on page 95.
4. Select and download a kernel file.
A. Click a File type of Kernel.
B. Check the Operating System File selection.
C. Click Download to download the file.
D. When the download finishes, remove and then reapply microcontroller power.
92
K28601 · Rev FB · November 2012
The WebGPI application will download this file to the microcontroller.
If this is not the right file, click Search to display the Select File window. Use this
window to browse to and select the right file.
If you still cannot find the right file, uncheck the File name filter in the
Downloader pane and continue your search.
Page 93

WebGPI Communication Software
User Manual
How to Use the WebGPI Application
5. Check that your download has been successful.
A. In the Downloader pane, click Exit to return to the WebGPI window.
B. In the WebGPI window, click Connect to reconnect to the microcontroller.
C. In the WebGPI window, click Download to display the Downloader pane.
D. Check the Downloader Progress Indicator to make sure that your download has
been successful.
K28601 · Rev FB · November 2012
93
Page 94

WebGPI Communication Software
User Manual
How to Use the WebGPI Application
How to Force Download a Kernel to a 167 Processor
1. Connect an appropriate cable between a PC COM port and the microcontroller.
If you are using a Sauer-Danfoss KW02012 cable, set this cable’s Prog/Read switch to
Prog and skip ahead to step 3.
2. Prepare the microcontroller for a boot file download.
A. Remove power from the microcontroller.
B. Connect the “bootstrap pin high” with 5 V.
C. Connect the “bootstrap pin low” with 0 V.
3. Apply power to the microcontroller.
(When applying power to the microcontroller, do not start your vehicle’s engine.)
4. Start the WebGPI application and display the Downloader pane.
A. Start the WebGPI application.
B. As needed, change the Port to match the PC COM port that you are using.
C. Click Download to display the Downloader pane.
94
K28601 · Rev FB · November 2012
Page 95

WebGPI Communication Software
User Manual
How to Use the WebGPI Application
5. Select and download the boot file.
A. Click OK to close the No micro selected message.
B. Click a Microcontroller type of 167.
C. Click a File type of Kernel.
D. Check the Boot-File selection.
E. Click Boot-file download to download the boot file.
K28601 · Rev FB · November 2012
The WebGPI application will download this file to the microcontroller.
If this is not the right file, click Search to display the Select File window. Use this
window to select the right file.
If you still cannot find the right file, uncheck the File name filter in the
Downloader pane and continue your search.
95
Page 96

WebGPI Communication Software
User Manual
How to Use the WebGPI Application
6. Download a kernel file.
A. Check the Operating System File selection.
B. Click Download to download the file.
7. When the download finishes, change the microcontroller cabling.
A. Remove power from the microcontroller.
B. If you are using the Sauer-Danfoss KW02012 cable, set this cable’s Prog/Read
C. Disconnect the “bootstrap pin high” from 5 V.
D. Disconnect the “bootstrap pin low” from 0 V.
E. Apply power to the microcontroller.
96
K28601 · Rev FB · November 2012
The WebGPI application will download this file to the microcontroller.
As needed, use the Search File window to browse to and select the right file.
If you still cannot find the right file, uncheck the File name filter in the
Downloader pane and continue your search.
switch back to Read and skip lettered steps C and D.
Page 97

WebGPI Communication Software
User Manual
How to Use the WebGPI Application
8. Check that you have successfully downloaded a new file.
A. In the Downloader pane, click Exit to return to the WebGPI window.
B. In the WebGPI window, click Connect to reconnect to the microcontroller.
C. In the WebGPI window, click Download to display the Downloader pane.
D. Check the Downloader Progress Indicator to make sure that your download has
been successful.
K28601 · Rev FB · November 2012
97
Page 98

WebGPI Communication Software
User Manual
How to Use the WebGPI Application
How to Download an Application File to an HC12 Processor
T HC12 processors do not have separate application and defaults files. To change defaults
values, you must download an application file that contains the new defaults values.
1. Connect an appropriate cable between a PC COM port and the microcontroller.
2. Apply power to the microcontroller.
(When applying power to the microcontroller, do not start your vehicle’s engine.)
3. Start the WebGPI application and display the Downloader pane.
A. Start the WebGPI application.
B. As needed, change the Port to match the PC COM port that you are using.
C. Click Download to display the Downloader pane.
98
K28601 · Rev FB · November 2012
Page 99

WebGPI Communication Software
User Manual
How to Use the WebGPI Application
4. Select an application file to download.
A. Click OK to close the No micro selected message.
B. Click a Microcontroller type of HC12.
C. Click a File type of Application.
D. Note the Application-File selection.
K28601 · Rev FB · November 2012
The WebGPI application will download this file to the microcontroller.
If this is not the right file, click Search to display the Select File window. Use this
window to browse to and select the file that you want to download.
If you still cannot find the right file, uncheck the File name filter in the
Downloader pane and continue your search.
99
Page 100

WebGPI Communication Software
User Manual
How to Use the WebGPI Application
5. Download the application file.
A. Click Force download to start the download.
B. Remove and then reapply microcontroller power.
C. Click Download to continue the download.
D. When the download completes, click OK to close the Device is not responding
message.
6. Remove and then reapply microcontroller power.
100
K28601 · Rev FB · November 2012
 Loading...