

Page 1
Service guide
Energy Recovery Device
iSave 21 Plus
Disassembling and assembling
hpp.danfoss.com
Page 2
Service guide | Disassembling and assembling iSave 21 Plus
Table of Contents
Contents
1. General Introduction........................................................................2
2. Disassembling the iSave ................................................................3
3. Disassembling the pressure exchanger ..................................................4
4. Assembling the pressure exchanger .....................................................7
5. Disassembling the vane pump .........................................................12
6. Assembling the vane pump ............................................................14
7. Assembling the iSave...................................................................17
8. Exploded view vane pump.............................................................18
9. Exploded view pressure exchanger ...............................................19
10. Exploded view iSave ...................................................................20
1. General Introduction
This document covers the instructions for
disassembling and assembling the iSave 21 Plus.
Important: It is essential that the iSave is
serviced in conditions of absolute cleanliness.
For a better understanding of the iSave, please see
the exploded views in the sections 8, 9 and 10.
The weight of the iSave is 47 kg / 103 lb
and it must be lifted with suitable lifting
equipment.
The weight of the pressure exchanger alone is
28 kg / 62 lb.
To prevent cold welding, lubricate threads of
screws with grease screw them into the component and tighten them by the hand. Use PTFE
lubrication type.
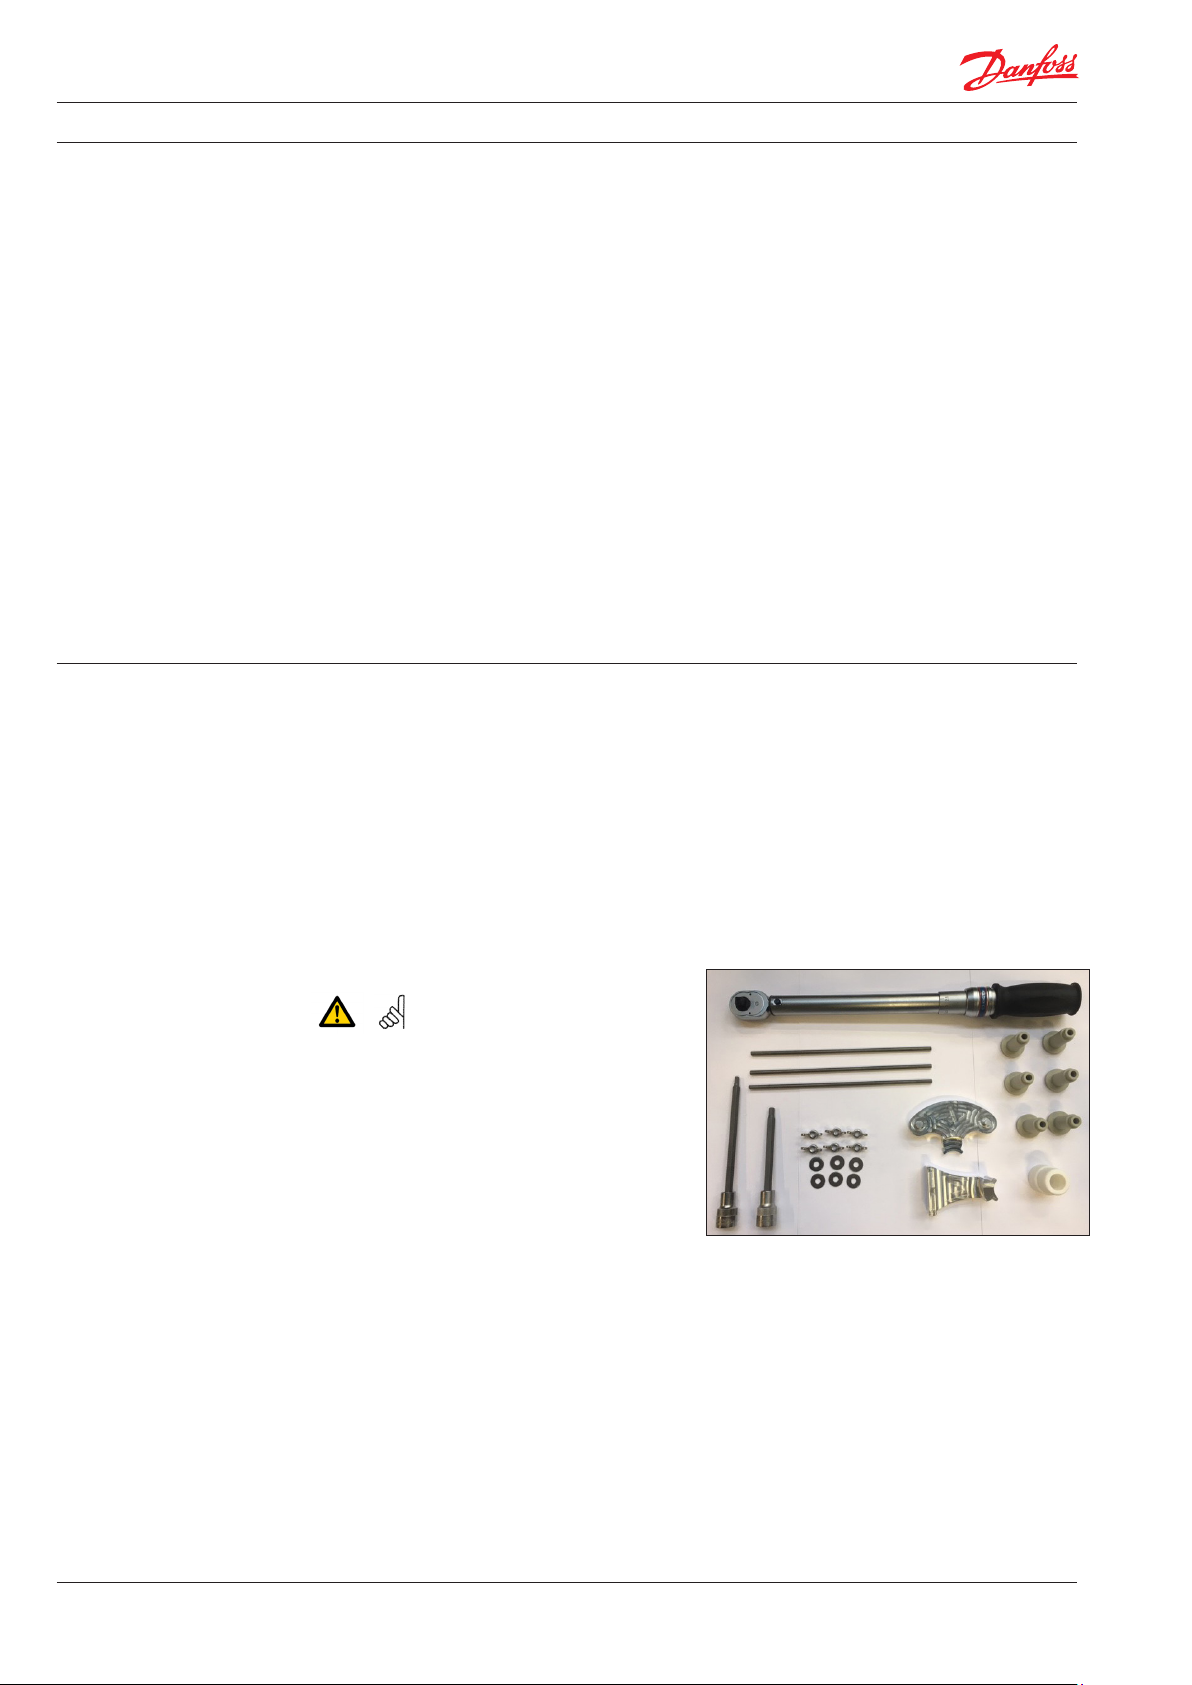
Tools needed for disassembling the iSave:
- iSave 21 Plus tool kit (180F4160)
- 2 screwdrivers
- Lock ring plier
2 |
180R9400 | AX243586503155en-000301
Page 3
Service guide | Disassembling and assembling iSave 21 Plus
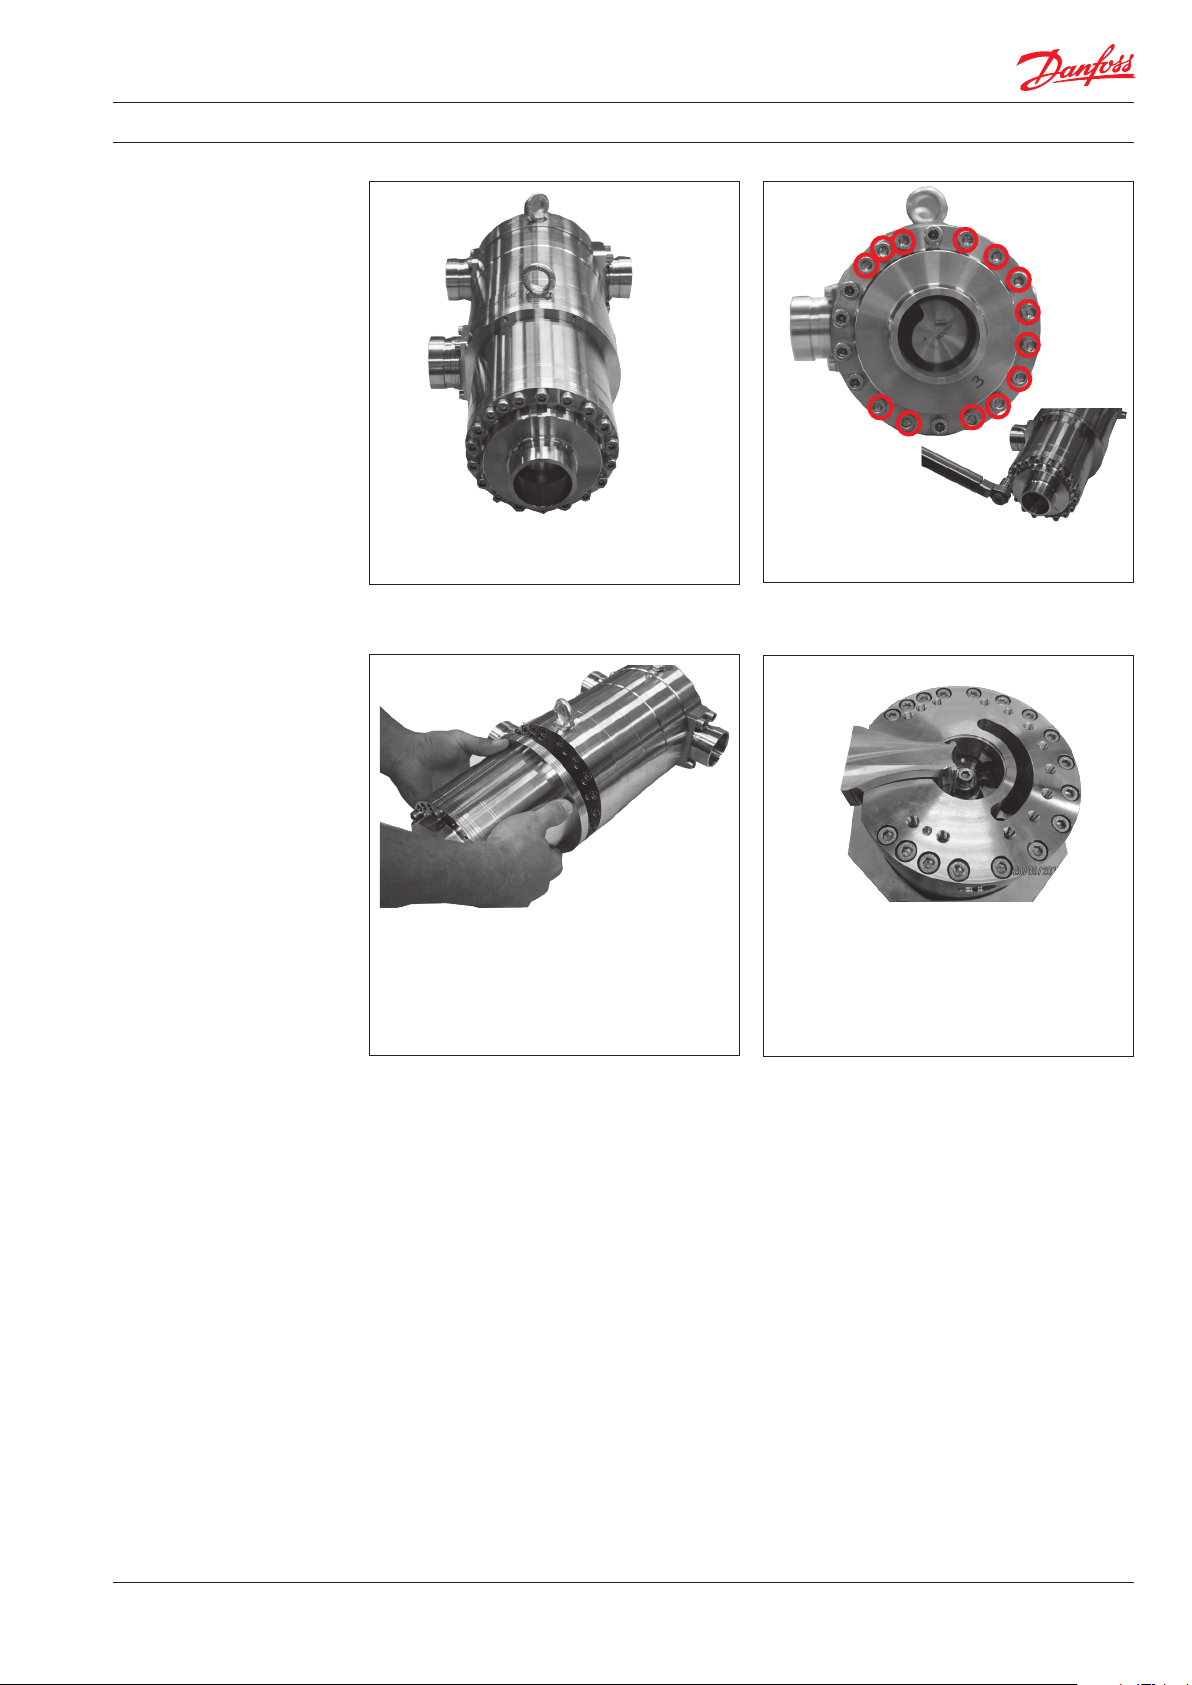
2. Disassembling the
iSave
1. Place the iSave on a clean table.
3. Remove the vane pump.
2. Unscrew the bolts on the frontange.
(See above - bolts marked in red)
4. Use special tool to x the coupling in
place while loosing the coupling.
180R9400 | AX243586503155en-000301 |
3
Page 4

Service guide | Disassembling and assembling iSave 21 Plus
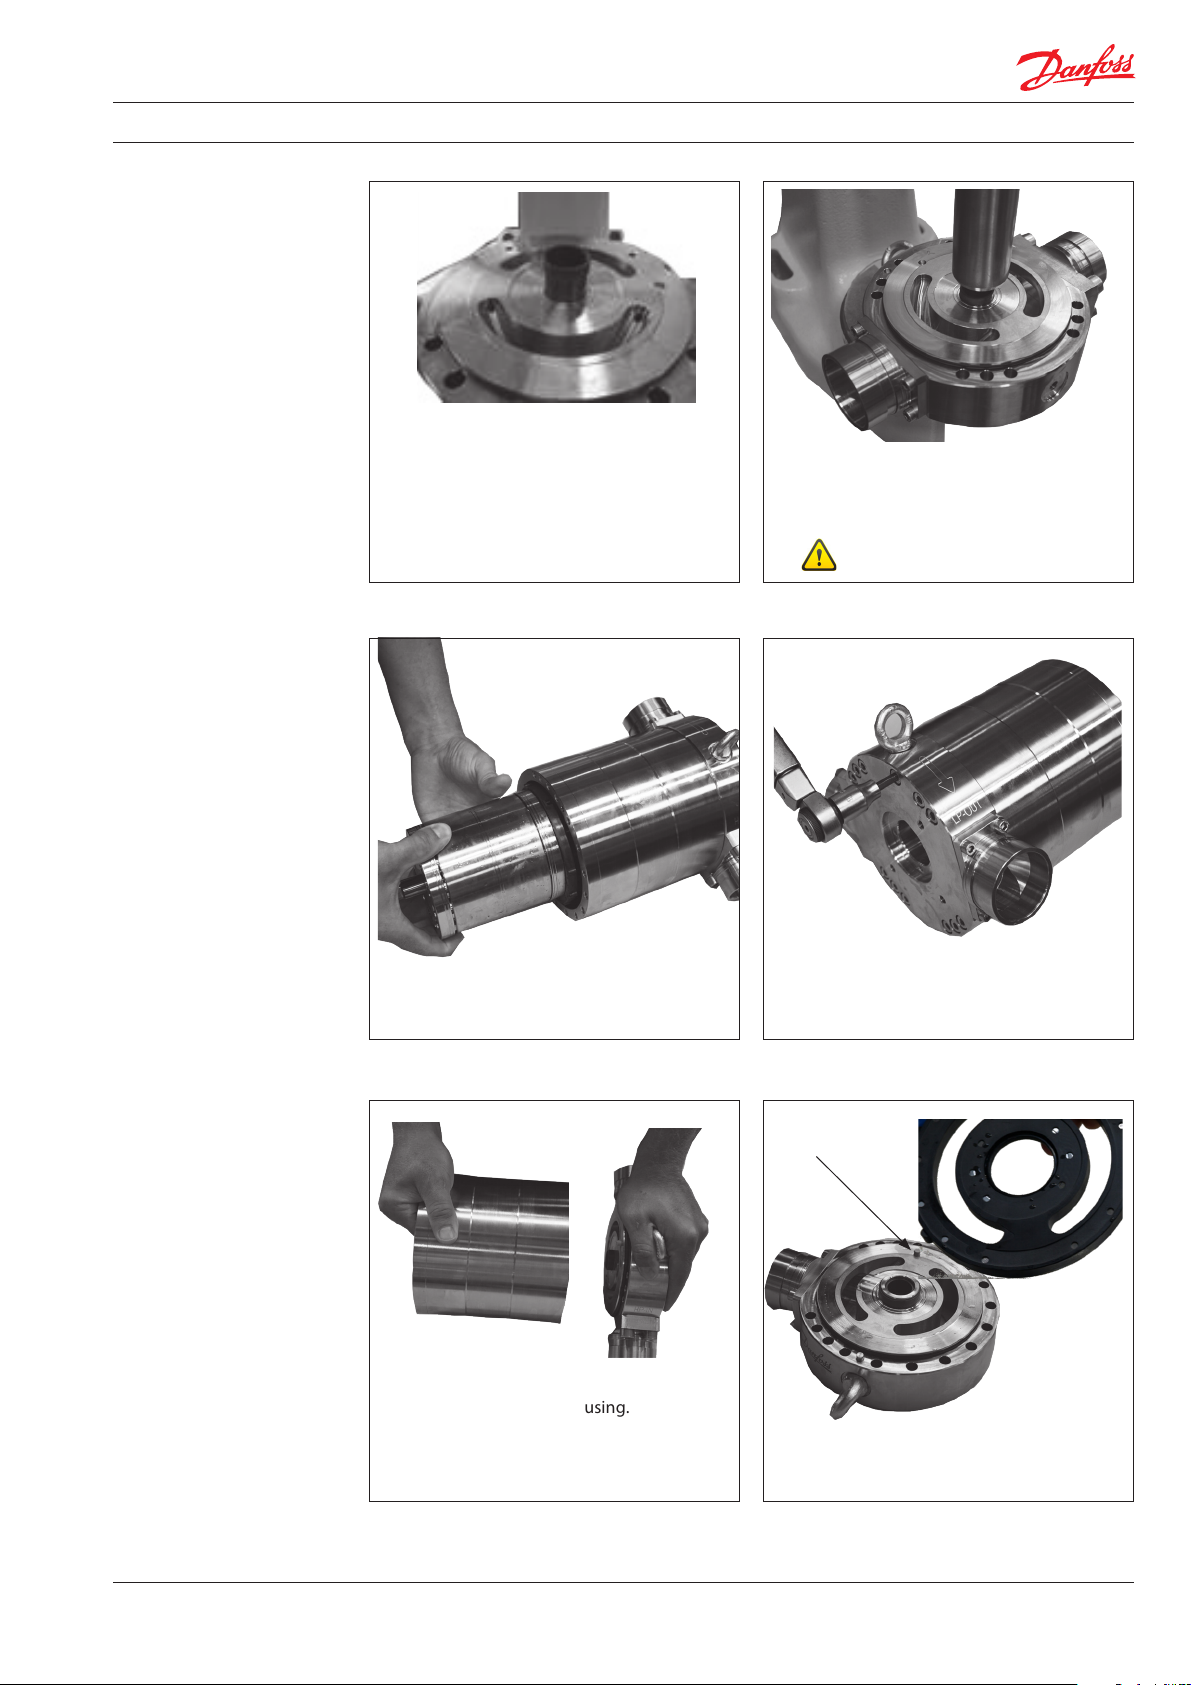
3. Disassembling the
pressure exchanger
1. Unscrew the bolts in the ange.
3. Gently push out the ange.
2. Screw in the two M8 bolts.
4. Wet the shaft and shaft seal with clean
ltered water. Gently lever the shaft
assembly free using 2 screwdrivers/allen
keys..
4 |
180R9400 | AX243586503155en-000301
5. Unscrew the bolts in the ange. 6. Gently remove the ange.
Note: Loose parts on the inside of the ange.
Page 5
Service guide | Disassembling and assembling iSave 21 Plus
7. If bearing in ange need to be changed
gently press the bearing out from the
back side with a tube or a drift.
Place the new bearing in the hole in the
ange.
9. Gently remove the cylinder barrel.
8. Lubricate the new bearing with clean
ltered water. With use of a hand press
gently press the new bearing in place
until it is in line with the ange surface.
Do not use a hammer!
10. Unscrew the bolts in the ange.
11. Gently remove the housing.
Note: Loose parts on the inside of the
ange.
Pin
12. Remove port plate and pin.
180R9400 | AX243586503155en-000301 |
5
Page 6
Service guide | Disassembling and assembling iSave 21 Plus
13. Remove the high-pressure bearing using
a lock ring plier.
15. Gently lift the valve plate assembly free
with the aid of the screwdrivers.
14. Remove the high-pressure bearing.
16. Gently remove both valve plates.
6 |
180R9400 | AX243586503155en-000301
17. Replace the O-rings and the back-up rings
on the valve plate.
Page 7

Service guide | Disassembling and assembling iSave 21 Plus
4. Assembling the
pressure exchanger
IMPORTANT:
It is essential that the iSave is serviced in
conditions of absolute cleanliness.
All Parts must be absolute clean before
mounting.
Lubrication
- To prevent seizing-up, lubricate threads on
screws.
- O-rings inside iSave may be lubricated only
with clean ltered water.
WARNING:
Do not use silicone when assembling the
iSave. Do not reuse dismantled O-rings: they
might be damaged. Always use new O-rings.
- O-rings for port ange, mounting ange may
be lubricated with a small amount of grease.
- It is important to lubricate ALL parts to be
assembled with clean ltered water (Especially
all PEEK parts).
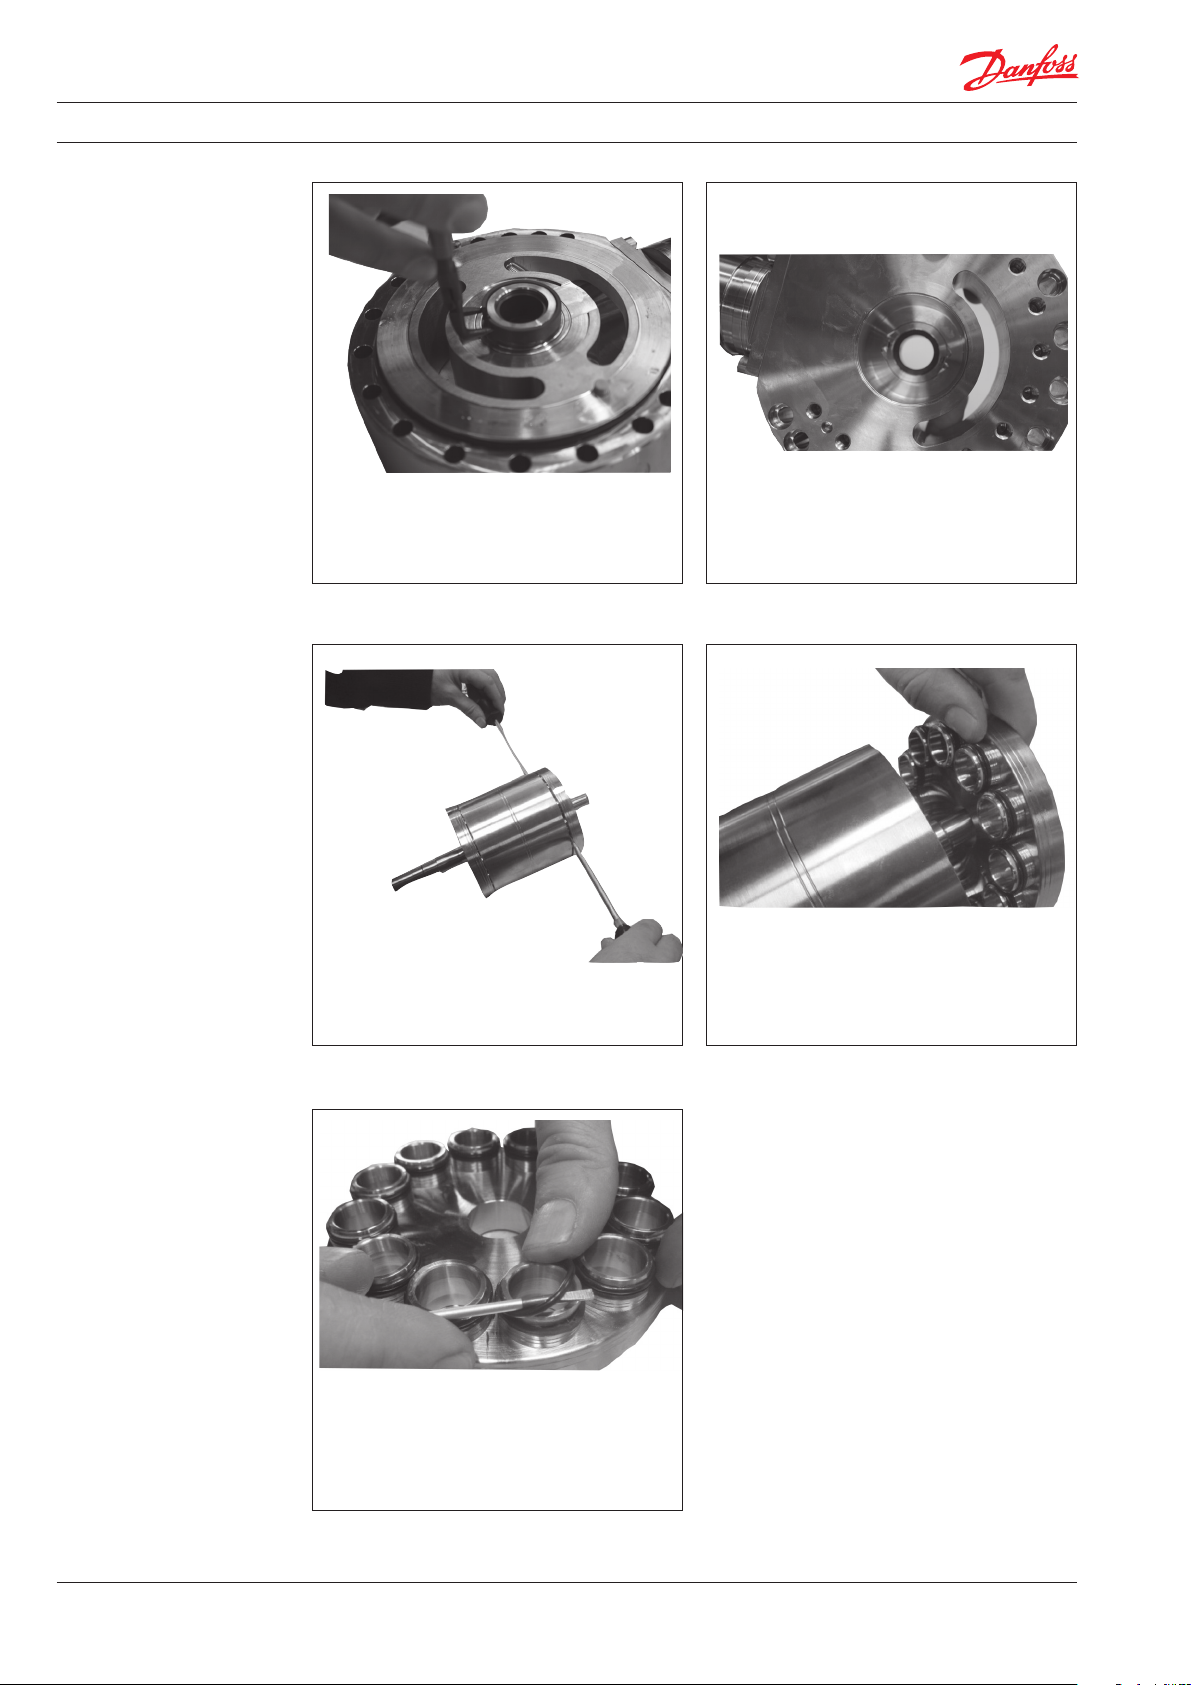
1. Mount the new back-up rings on the
valve plate rst and then the new O-rings.
3. Lubricate all the O-rings and back up
rings with clean ltered water and gently
by help of the 3 compression tools in
every fourth hole mount both valve plate
on the cylinder barrel.
2. Lubricate all the bores in the cylinder
barrel with clean ltered water.
4. Adjust the distance between the cylinder
barrel and valve plate at the short
shaft end. Distance 4-6 mm.
180R9400 | AX243586503155en-000301 |
7
Page 8

Service guide | Disassembling and assembling iSave 21 Plus
5. Mount the high-pressure bearing
7. Replace old O-ring with a new one
6. Lock the high-pressure bearing in place
with the lock ring.
8. Position the housing over the guide pin
8 |
180R9400 | AX243586503155en-000301
9. Mount all bolts in the ange and tighten
them all with 30Nm±3
10. Fit the guide pin in the ange.
Page 9

Service guide | Disassembling and assembling iSave 21 Plus
11. Location hole in port plate.
There are two dierent port plates in the iSave. One of them can be mounted on both anges in
the pressure exchanger. Make sure that they are assembled on the right ange.
12. Position the port plate over the guide pin.
Note: Make sure that the guide pin is
located in the locating hole in the port
plate.
14. Change the O-ring in the ange and
position the port plate over the guide
pin.
13. Gently guide the cylinder barrel into the
bearing in the ange.
15. Check that the port plate ts the center
bearing and the guide pin.
180R9400 | AX243586503155en-000301 |
9
Page 10

Service guide | Disassembling and assembling iSave 21 Plus
17. Position the port ange over the guide
pin and shaft. Make sure the guide pin is in
lign wih the ange..
18. Wet the shaft seal with clean ltered
water.
Do not use silicone grease.
Fit the shaft seal with the carbon surface
upward.
17. Mount all bolts in the ange and tighten
them to a torque according to exploded
view.
19. Shaft seal NOT mounted correct.
The rubber seal face must turn into the ange.
10 |
180R9400 | AX243586503155en-000301
20. Using the plastic assembly tool provided,
large diameter rst, press the seal home
against the shoulder, by hand.
Be careful not to damage the carbon seal face
on the shaft seal.
21. Shaft seal in right position:
Page 11

Service guide | Disassembling and assembling iSave 21 Plus
22. Remove the old ceramic ring from the
ange. Position the new O-ring on the seal
ange.
23. Push the new ceramic ring into the ange
using plastic tool provided (small diameter).
Make sure the face with the rubber seal is
positioned against the shoulder in the
ange.
Before assembly wet the parts with clean
ltered water.
24. Position the seal ange and the bolts.
Tighten the 4 bolts with a torque according
to exploded view.
180R9400 | AX243586503155en-000301 |
11
Page 12

Service guide | Disassembling and assembling iSave 21 Plus
5. Disassembling the
vane pump
1. Install the special tool for locking the
shaft.
3. Remove all bolts in the int. ange.
2. Unscrew the bolt in the middle of the
coupling and remove the coupling.
4. Gently remove the ange, the side plate
may stick to the ange. - make sure that it
do not drop.
12 |
180R9400 | AX243586503155en-000301
5. Remove side plate and pin
6. Side plate removed.
Page 13

Service guide | Disassembling and assembling iSave 21 Plus
7. Gently remove the rotor.
Note: Loose parts inside the rotor.
9. Rotate the housing to access the
connection ange.
8. Remove vanes.
10. Remove the screws in connection
ange.
11. Remove connection ange and port
ange.
12. Remove side plate and remove pin in
side plate.
180R9400 | AX243586503155en-000301 |
13
Page 14

Service guide | Disassembling and assembling iSave 21 Plus
6. Assembling the
vane pump
1. Place the connection ange with the
nozzle downward.
3. Place the port ange on top of the
connection ange. Note the pin.
2. Place the side plate on the port plate.
Note the pin.
4. Side plate mounted correct.
14 |
180R9400 | AX243586503155en-000301
5. Note the pin. Place the new stator rin
on the port ange.
6. Turn the anges and stator while
pushing the parts together.
Page 15

Service guide | Disassembling and assembling iSave 21 Plus
7. Fasten screws with a torque according
to exploded view.
9. Lubricate with water and gently place the
rotor in the bearing.
8. Place the 4 pins in the rotor.
10 Position the 8 vanes in the rotor. The
pins may be moved by using a
screwdriver.
11. Lubricate and check that all vanes are
positioned correctly.
12. Replace the O-ring on the int. ange and
wet the ange properly with clean
ltered water.
180R9400 | AX243586503155en-000301 |
15
Page 16

Service guide | Disassembling and assembling iSave 21 Plus
13. Position the side plate over the guide pin. 14. Fit the int. ange into both the bearing in
the ange and the location pin in the
stator.
15. Lift the shaft while carefully pushing the
int. ange incl. side plate on to the stator.
17. Install coupling. Lock the shaft with speciall
tool, tighten the screws to a torque
according to exploded view.
16. Rotate the assembly and install the six
screws. Tighten according to exploded
view.
18. Install O-rings on ange.
16 |
180R9400 | AX243586503155en-000301
Page 17

Service guide | Disassembling and assembling iSave 21 Plus
7. Assembling the
iSave
1. Place the exchanger vertical on the HP
connector, and install the coupling spider.
3. Ensure O-rings are in place.
2. Fit the polymer coupling insert on the
steel coupling. Note correct position of
the hole in the insert. Install pin on
exchanger.
4. Orient the steel coupling and place the
vane pump on the pressure exchanger.
5. Install the remaining bolts and tighten
them according to a torque speciec on
the exploded view.
6. When assembled it should be possible to
rotate the shaft at a torque between 10 and
15 N m.
180R9400 | AX243586503155en-000301 |
17
Page 18

Service guide | Disassembling and assembling iSave 21 Plus
8. Exploded view
vane pump
18 |
180R9400 | AX243586503155en-000301
Page 19

Service guide | Disassembling and assembling iSave 21 Plus
9. Exploded view
pressure exchanger
180R9400 | AX243586503155en-000301 |
19
Page 20

10. Exploded view iSave
Danfoss A/S
High Pressure Pump
Nordborgvej 81
DK-6430 Nordborg
Denmark
© Danfoss | DCS (im) | 2020.08
180R9400 | AX243586503155en-000301 | 20
 Loading...