

Intelligent Heating
Connection kits for joining all types of DEVI
self-limiting heating cables to cold tails
Fitting set (art. no. 19805761)
Cold tail tting set:
• 1 crimp tube type 12/3, L =20 mm
• 2 crimp tubes, type 3/1, L = 15 mm
• 3 squeeze connection tubes, type tcrimp 1
• 1 crimp tube, type ESP 18/6, L = 125 mm
Sealing set for cable-end:
• 1 crimp tube, type ESP 12/4, L = 60 mm
• 1 crimp tube, type ESP 12/4, L = 25 mm
• 1 crimp tube, type KYNAR 3/4, L = 100 mm
• 1 piece of adhesive tape, L = 100 mm
• 1 piece of assembly wire
Practical tting instructions
It is very essential to follow this instruction
very carefully that when nished no connections are missing or wrong with the risk of
the cable not working or being overheated.
Therefore, read the entire instruction to the
end before you start.
A temperature of 150°C ± 30° is necessary to
skrink the crimp tubes. A hot air gun with a
temperature regulator is the most appropriate
tool.
However, a blow torch with a moderate ame
or a gas lighter can also be used.
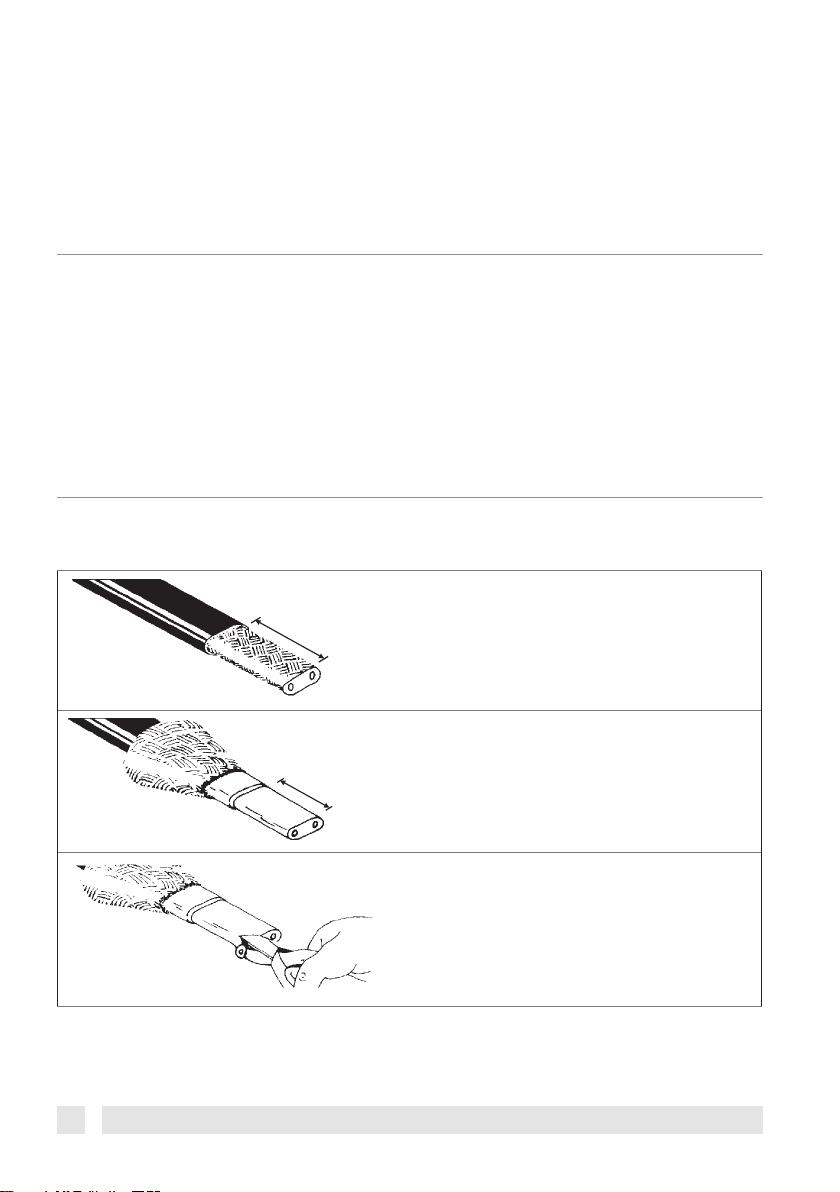
Preparation of the heating cable
1. Remove the outer sheath from the cable
with a wire stripper.
Min. 50 mm
2. Pull the screen back over the cable and
cut away, (with a knife) the conductor
insulation.
Min. 35 mm
3. Using side-cutting pliers, carefully cut the
inner layer of the material between the
two conductors away, making sure not to
damage them when doing so.
2 08090517 VIDST502 01/2014
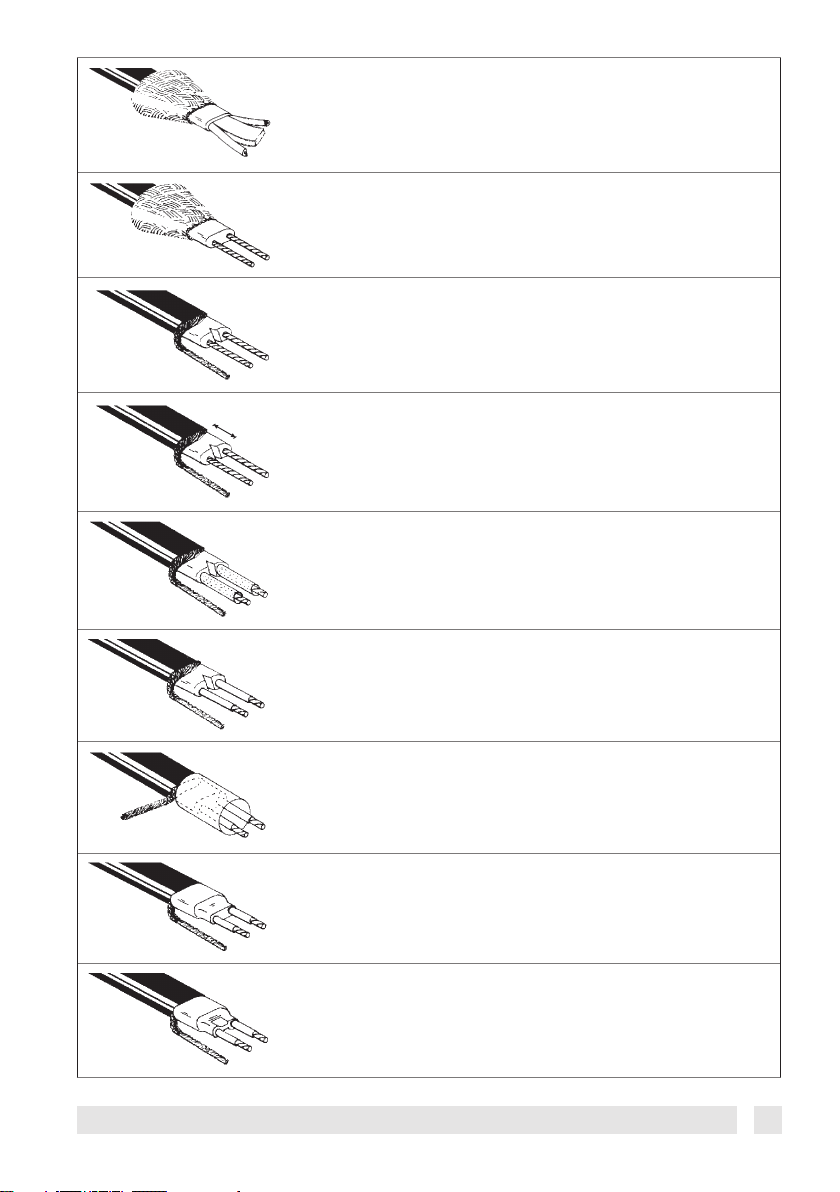
4. Pull the conductors to the side and cut the inner layer
away so that it is ush with the rst layer of insulation.
5. Twist the conductors so that the remaining material
loosens.
6. Carefully cut away any remaning material and trim the
tips of the conductors. Cut a small triangle in the inner
material as shown in the diagram.
Min. 10 mm
7. Untangle the screen and then twist it together. Position it as shown in the diagram.Make sure that none of
the earth wires are in contact with the conductors.
8. Mount the crimp tube, type 3/1, L=15 mm, onto the
conductors.
9. Crimp the tubes
10. Pull the crimp tube, type 12/3, L = 20 mm over the
cable so that it meets the outer sheath at the one
end and protrudes at least 5 mm out over the inner
layer of material at the other end.
11. Crimp the tube.
12. Press the tube with at bit pliers between the con-
ductors until glue is visible.
01/2014 VIDST502 08090517
3

Preparation of the cold tail
All authorised electrical heating cables with
an earth wire can be used.
1. Remove 50 mm of the outer sheath of the
cable.
2. Free the conductors from the ller.
Assembling
3. Cut away 25 mm from each conductor and
remove 7 mm of the sheath from each of
them.
4. Pull the crimp tube 19/6, L= 125 mm over
the cold tail.
1. The conductors are joined together with
the help of squeeze connection tubes.
Warm the squeeze connection tubes until
the tubes crimp and the glue ows.
2. Join the two earth wires together with the
remaining squeeze connection tube.
3. Place the crimp tube, type 19/6 L = 125 mm
over the joint in a central position.
4. Crimp the tube from the middle to the
edges so that the glue is clearly visible.
5. Allow the join to cool down to body temperature before measuring the cable for
its ohmic value.
Sealing the end of the heating cable
1. Cut the cable to the desired length for installation.
2. Remove the outer sheath from the cable.
Min. 50 mm
3. Pull the screen back over the cable.
4 08090517 VIDST502 01/2014

Min. 25 mm
Min. 10 mm
4. Cut away 25 mm from the inner part of cable.
5. Pull the crimp tube, type 12/3, L=25 mm over the
remaining inner part of the cable.
6. Crimp the tube down and atten the end with at bit
pliers so that the glue is visible.
7. Pull the screen back over the cable and secure with the
provided assembly wire.
8. Pull the crimp, type 12/3 L= 60 mm over the cable and
allow 10 mm to protrude over the end of the cable.
9. Crimp the tube down and pinch the end with at bit
pliers so that the glue is clearly visible.
Min. 10 mm
10. Sealing the end of the heating cable for damp and
100 mm
particulary aggressive conditions, e.g roof gutters,
chemical plants, etc. requires that the owing is
mounted over the seal:
a. Wrap 8 cm of adhesive tape around the outside
sheath of the cable so that it overlaps the crimped
tube. Pull the crimp tube, type KYNAR over the cable
and place 20 mm of adhesive tape inside the end of
the KYNAR crimp tube.
b. Crimp the tube. Make sure that the glue ows prop-
erly out on the outer sheath of the cable. Crimp the
tube down and pinch the end with at bit pliers so
that the glue is clearly visible.
01/2014 VIDST502 08090517
5

6 08090517 VIDST502 01/2014

01/2014 VIDST502 08090517
7

08090517
DEVI A/S
Ulvehavevej 61
DK-7100 Vejle
Tel: +45 7642 4700
Fax: +45 7642 4701
www.DEVI.com
8 08090517 VIDST502 01/2014
 Loading...