

Page 1
GB/DAS/LV
Fitting instructions
Connection kits for joining
all types of DEVI self
limiting heating cables
to terminal boxes
Art. no. 19805753
Montāžas instrukcija
Savienošanas komplekts
DEVI pašregulējošā
kabeļa
iceguard un pipeguard
savienošanai sadales
kārbā
Art. Nr. 19805753
Page 2

Page 3
Art. No
Fitting set: 19805753
Terminal box tting set:
1 crimp tube
type 12/3, L = 20 mm
2 crimp tubes,
type 3/1, L = 35 mm
1 chloropren rubber,
TYPE pg 16
Sealing set for cable-end
1 crimp tube,
type ESP 12/3, L = 60 mm
1 crimp tube,
type ESP 12/3, L = 25 mm
1 crimp tube, type KYNAR
3/4, L = 100 mm
1 piece of adhesive tape,
L = 100 mm
1 piece of assembly wire
Practical tting instructions:
It is very essential to follow this instruction very carefully that when nished no connections are missing or wrong with the risk of the cable not working or being overheated. Therefore read the entire instruction to the end before you start.
A temperature of 150ºC +/-30º is necessary to skrink the crimp tubes. A hot air gun
with a temperature regulator is the most appropriate tool.
However, a blow torch with a moderate ame or a gas lighter can also be used.
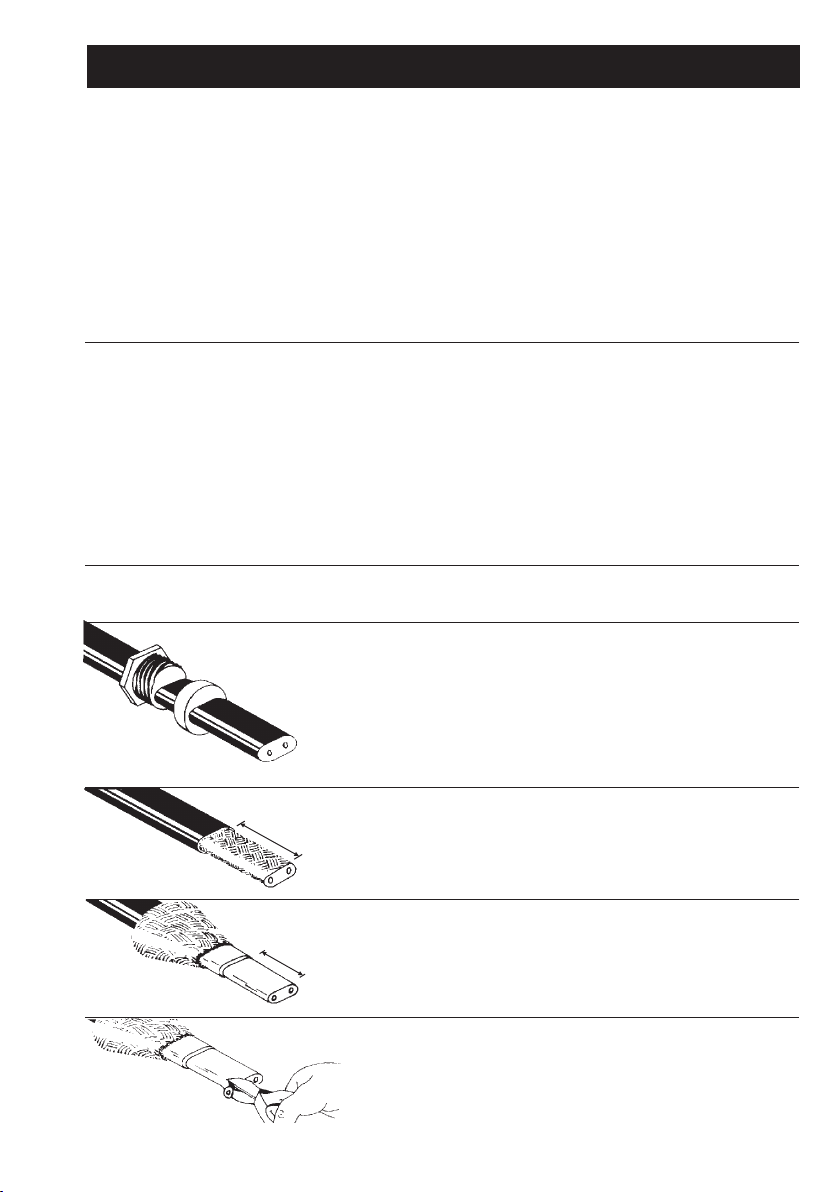
Preparation of the heating cable
Pull the PG screw joint over the cable.
Min. 50 mm
Min. 35 mm
1.
Remove the outer sheath from the
cable with a wire stripper.
Pull the screen back over the cable and
2.
cut away, (with a knife) the conductor
insulation.
3.
Using side-cutting pliers, carefully cut
the inner layer of the material between
the two conductors away, making sure
not to damage them when doing so.
Page 4
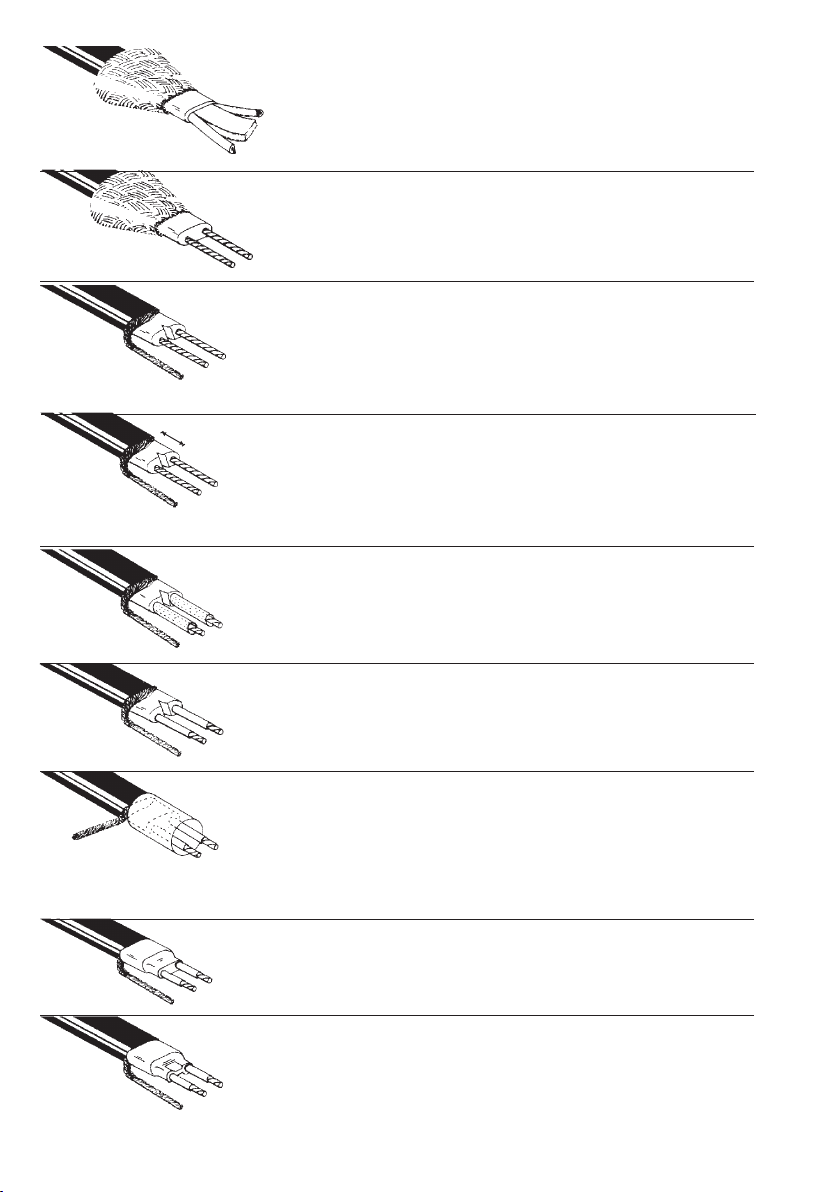
4.
Pull the conductors to the side and cut
the inner layer away so that it is ush with
the rst layer of insulation.
5.
Twist the conductors so that the remaining material loosens.
6.
Carefully cut away any remaning material
and trim the tips of the conductors. Cut
a small triangle in the inner material as
shown in the diagram.
Min. 10 mm
7.
Untangle the screen and then twist it
together. Position it as shown in the
diagram.Make sure that none of the earth
wires are in contact with the conductors.
8.
Mount the crimp tube, type 3/1, L=15mm,
onto the conductors.
9.
Crimp the tubes.
Pull the crimp tube, type 12/3,
10.
L = 20 mm over the cable so that it meets
the outer sheath at the one end and
protudes at least 5 mm out over the inner
layer of material at the other end.
11.
Crimp the tube.
12.
Press the tube with at bit pliers between
the conductors until glue is visible.
Page 5
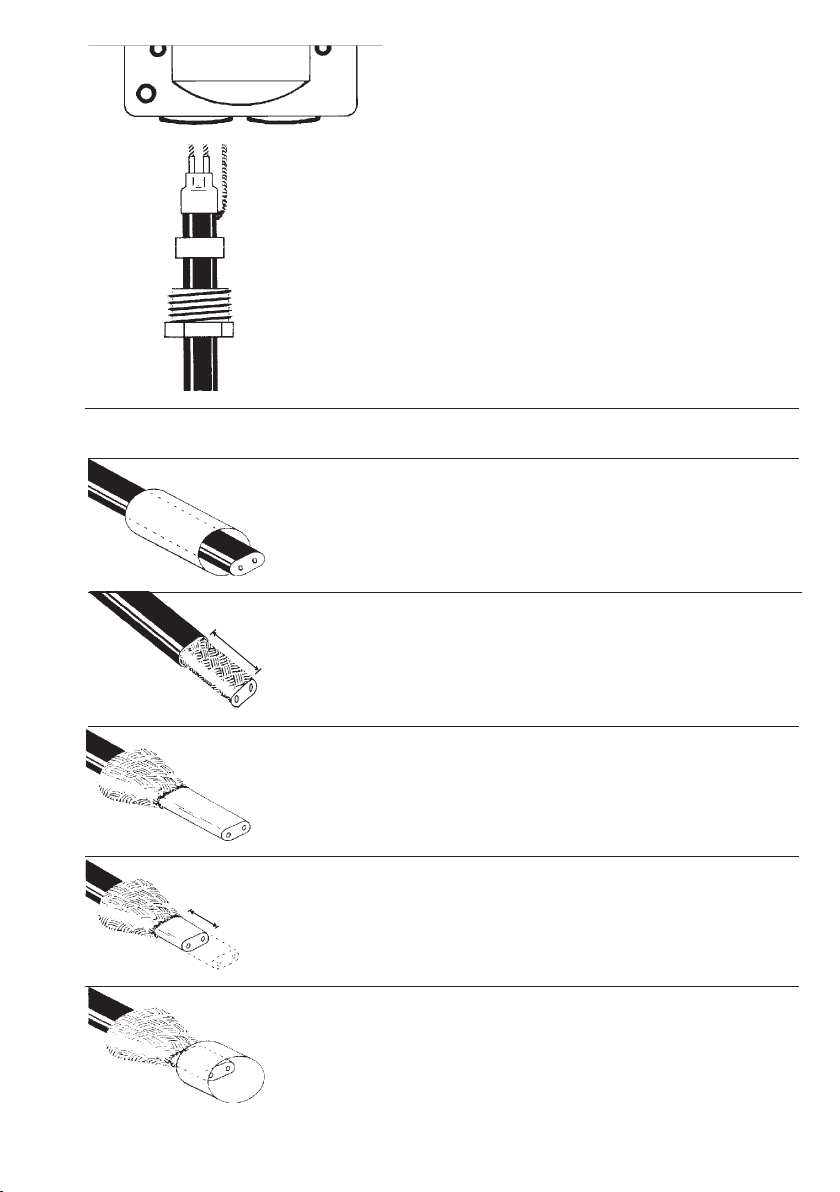
Sealing the end of the heating cable
Min. 50 mm
The heating cable can now be con-
13.
nected directly into the points in the
terminal box.
Cut the cable to the desired length for
1.
installation.
2.
Remove the outer sheath from the
cable.
Min. 25 mm
Pull the screen back over the cable.
3.
4.
Cut away 25 mm from the inner part of
cable.
5.
Pull the crimp tube, type 12/3, L=25
mm over the remaining inner part of
the cable.
Page 6

Min. 10 mm
Min. 10 mm
100 mm
6.
Crimp the tube down and atten the end
with at bit pliers so that the glue is visible.
Pull the screen back over the cable and
7.
secure with the provided assembly wire.
Pull the crimp, type 12/3 L= 60 mm over
8.
the cable and allow 10 mm to protude
over the end of the cable.
Crimp the tube down and pinch the
end with at bit pliers so that the glue is
clearly visible.
9.
10.
Sealing the of the heating cable for damp
and particulary aggressive conditions, e.g
roof gutters, chemical plants, etc. requires
that the owing is mounted over the seal:
11.
Wrap 8 cm of adhesive tape around the
outside sheath of the cable so that it
overlaps the crimped tube. Pull the crimp
tube, type KYNAR over the cable and
place 20 mm of adhesive tape inside the
end of the KYNAR crimp tube.
Crimp the tube. Make sure that the glue
ows properly out on the outer sheath of
the cable. Crimp the tube down and pinch
the end with at bit pliers so that the glue
is clearly visible.
Page 7

Art. No 19805754
Montāžas komplekts:
Pašregulējošā apsildes kabeļa savienošanai
kārbā:
1 termorūkošā caurulīte tips 12/3, L=20 mm
2 termorūkošās caurulītes tips 3/1, L=15 mm
1 hloroprēna blīvgumija tips PG 16
Pašregulējošā apsildes kabeļa gala apdare:
1 termorūkošā caurulīte tips ESP 12/3,
L=60 mm
1 termorūkošā caurulīte tips ESP 12/3,
L=25 mm
1 termorūkošā caurulīte tips KYNAR 3/4,
L=100 mm
1 līmlente L=100 mm
1 montāžas vads
Montāžas instrukcija
Lai izvairītos no kabeļa nepareizas vai kļūdainas savienošanas, ir svarīgi sekot
instrukcijai, sākot montāžu tikai pēc rūpīgas instrukcijas izlasīšanas.
Termorūkošo caurulīšu montāžai nepieciešama 150°C - 200°C temperatūra.
Piemērotākais instruments ir karstā gaisa fēns ar temoregulatoru. Iespējams lietot
arī lodlampu vai gāzes degli ar liesmas regulatoru.
Lai starp vadiem un savienošanas presčaulu panāktu iespējami labāku kontaktu,
lietojamas piemērotas presstangas piemēram DKB 0325 vai RQ0560.
Pašregulējošā apsildes kabeļa sagatavošana
Uzvelciet PG skrūves savienojumu uz
kabeļa.
Min. 50 mm
Min. 35 mm
1.
Noņemiet 50 mm ārējo apvalku.
Atvelciet pīto ekrānu atpakaļ pāri
2.
kabelim un noņemiet vada izolāciju.
3.
Lietojot asknaibles, izkniebiet iekšējo
slāni starp abiem vadiem, nebojājot
vadus.
Page 8

4.
Nogrieziet iekšējo slāni līdz izolācijai.
5.
Rūpīgi atbrīvojiet vadus no atlikušā
materiāla un savērpiet.
6.
Nogrieziet vadu galus un izgrieziet
mazu trīsstūrīti iekšpusē kā parādīts
zīmējumā.
Min. 10 mm
7.
Atpiniet ekrānu un savijiet to kopā,
izvietojot no kabeļa sāna kā parādīts
zīmējumā. Pārliecinieties, ka neviens no
ekrāna vadiem nav kontaktā ar vadītāju.
Uzvelciet termorūkošās caurulītes,
8.
tips 3/1, L=15 mm uz vadiem.
9.
Nosildiet caurulītes ar fēnu.
Uzvelciet termorūkošo caurulīti tips
10.
12/3, L=20 mm uz kabeļa līdz tā ar vienu
galu saskaras ar ārējo apvalku un ar otru
galu pārklāj iekšējo slāni par vismaz 5
mm.
11.
Nosildiet caurulīti ar fēnu.
12.
Saspiediet caurulīti starp vadiem ar
plakangalu knaiblēm, līdz parādās līme.
Page 9

Pašregulējošā apsildes kabeļa gala apdare
Min. 50 mm
Apsildes kabelis ir gatavs
13.
pievienošanai pie nozarkārbas
spailēm.
Nogrieziet kabeli vēlamajā garumā.
1.
2.
Noņemiet kabeļa ārējo apvalku.
Min. 25 mm
Atvelciet ekrānu atpakaļ pāri kabelim.
3.
4.
Nogrieziet 25 mm no kabeļa iekšējās
daļas.
5.
Uzvelciet termorūkošo caurulīti
tips ESP 12/3, L=25 mm uz atlikušās
kabeļa iekšējās daļas.
Page 10

Min. 10 mm
Min. 10 mm
100 mm
6.
Nosildiet caurulīti un galu saspiediet ar
plakangalu knaiblēm, līdz parādās līme.
Novelciet ekrānu atpakaļ pāri kabelim
7.
un nostipriniet to ar montāžas vadu.
8.
Uzvelciet termorūkošo caurulīti tips ESP
12/3, L=60 mm atstājot pārlaidumu 10
mm pāri kabeļa galam.
Nosildiet caurulīti un galu saspiediet
9.
ar plakangalu knaiblēm, līdz skaidri
redzama līme. Apsildes kabeļa gala apdare mitrām un daļēji agresīvām vidēm
(notekcauruļu, jumtu apsilde, ķīmiskajā
rūpniecībā utt.):
10.
Uztiniet 8 cm līmlentu ap kabeļa ārējo
apvalku tā, lai tas pārklātu gala apdari. Uzvelciet termorūkošo caurulīti
tips KYNAR 3/4, L= 100 mm uz kabeļa
un ievietojiet 20 mm garu līmlentas
gabaliņu KYNAR caurulītes galā.
11.
Nosildiet caurulīti līdz skaidri redzama
līme un saspiediet ar plakangalu
knaiblēm.
Page 11

Page 12

DEVI SIA
Bauskas iela 58, Rīga, Latvija
LV–1004
Tel. +371 7602011
Fakss +371 7602012
www.devi.lv
mail@devi.lv
DEVI A/S
DK · 7100 Vejle
Phone +45 76 42 47 00
Fax +45 76 42 47 03
www.devi.com
08090509 · 01.02
 Loading...