

Page 1

USER
GUIDE
1
Page 2

Thank you for purchasing a Danew product. Your Surnaturel R500 has been designed to oer you a unique gaming experience
on a smartphone. Before using the device, read carefully the operation instructions presented in this manual. It aims at familiarizing
you with the technical features of your R500 in order to make operation easier.
NOTE : All information presented in this manual and on the box were current at the time of printing. However, as we are permanently enhancing our products through software updates, this manual and the box might not present all the functions of your
actual product.
Pictures are for illustration purpose only and are not contract-binding.
2
Page 3

3
Page 4

CONTENTS
INTRODUCTION
P.6
Features
P. 6
Buttons & Device parts
P. 7
GETTING STARTED
P.8
Insert SIM card
P. 8
Charge the battery
P.9
Make or answer a call
P.1 0
Send SMS & MMS
P.1 1
P.1 2
Keys
4
Memory Card
P.1 3
Switch-on
P.14
Switch-o
P.1 4
Lock screen & Power saving mode
P.1 4
Home screen and settings
P.1 7
Using the home screen
P. 22
Sections of the home screen
P. 27
USB connection
P. 29
Using the touch screen
P. 29
Storage & file management
P.32
Configuring your GoogleTM account
P.33
P.35
Fingerprint reader
Page 5

NETWORKING
P.36
Wifi
P.36
Bluetooth
P.37
Dual SIM
P.37
SUPPORT WARRANTY
P.38
SAFETY INSTRUCTIONS
P.39
5
Page 6

INTRODUCTION
1
FEATURES
Screen
Resolution
Processor
RAM
Internal memory
Network
Camera / Webcam
Battery
Speaker
G-sensor
Connectors
Dimensions
Weight
6
IPS 2.5D Gorilla Glass 4, 5’’
Full HD 1920 x 1080 px
64 bits MT6753 OctaCore 1.5Ghz
3 Go
32 Go
Wifi 802.11 b/g/n, Bluetooth 4.0
13 Mpx Sony IMX214 - f/2.0 / 8 Mpx Samsung
2700 mAh
1W / 103dB
G-sensor / Light-sensor / Proximity Sensor / Geomagnetic sensor
3.5 mm audio jack / Micro USB type C
141.4 x 69.3 x 7.4 mm
142 g
Page 7
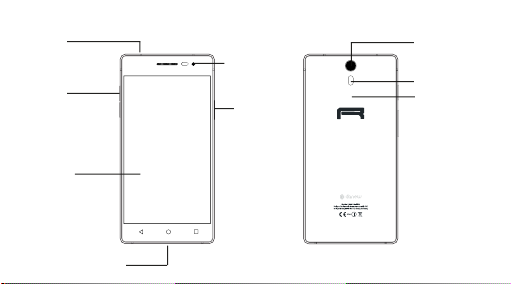
3,5 mm
audio jack
Volume
keys
Touch
screen
Back
USB Connector TypeC
(charge & PC connection)
BUTTONS DEVICE PARTS
Webcam
Power
ON/OFF
Menu
principal
Overview
Camera lens
Flash Led
Fingerprint reader
7
Page 8
GETTING STARTED
2
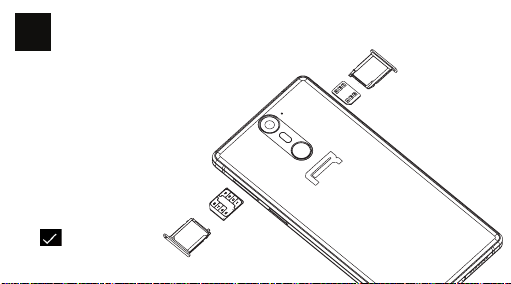
INSERT THE SIM CARD
The phone can operate two SIM cards (not supplied)
simultaneously or independently.
Insert the SIM card(s),
Note : the right slot enables to insert
either a memory card or a Nano SIM
card.
Note : If your SIM is configured with
a PIN code, enter it at start up
then confirm by clicking on :
Micro SIM
8
Nano SIM
Page 9

CHARGE THE BATTERY
To power or charge the phone, use only the universal charger supplied in the box (5 V 2A model). The
use of unapproved charger presents the risk of electric shock or burns. if the device is damaged due to
improper use, the warranty will be void.
We recommend that you fully charge the battery for the first three charge times.
The battery should never be allowed to discharge fully, full discharges (under 10%) cause damage to the
battery and wears is o prematurely. Since the battery is lithium-ion, you can charge it partially without
a risk of damage.
Note: To avoid electrical damage, use only the universal charger supplied or a genuine Danew charger
to cahrge the device.
9
Page 10
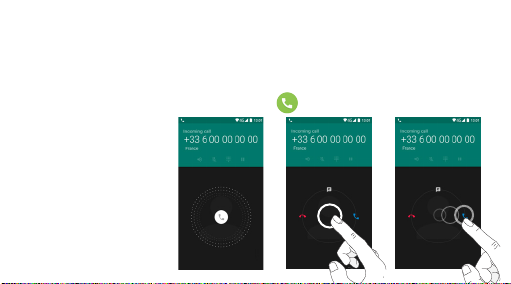
MAKE OR ANSWER A CALL
The phone enables you to make or answer a call, use options during a call and customize these functions
to better fit your needs.
MAKE A CALL
Open the dial screen, dial a telephone number and press .
ANSWER A CALL
When you receive a call, drag
the telephone icon to the right.
> >
10
Page 11

SEND SMS AND MMS
You can create and send text (SMS) or multimedia (MMS) messages.
This feature may not be available depending on your service provider. Sending or receiving
messages outside your service provider’s coverage area may result in additional fees depending on
the plan you have subscribed to.
For more information, contact your service provider.
1. Open the messaging application.
2. Create a new message by adding recipients and type the text of your message (for SMS,
go to step4).
3. To add an item to your message, select the corresponding option, then select the element.
4. Send the message.
11
Page 12

KEYS
BACK
Opens the previous home screen, even it is of a dierent application. Once returned to the home screen, you will not be able to go any further in the history.
HOME
PREVIEW
12
Opens the main home screen. To open Google Now, press the button for 2
seconds.
Long press : Open the list of thumbnails of the recently visited screens. To open
one, click on it for a few seconds. To delete a screen from the list, slide your finger
to the left or the right, or click on X.
Short press : Open the multi-desktop menu and access quick customizations (settings, wallpapers, Widgets).
Page 13
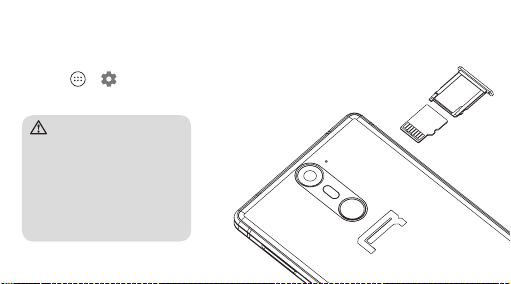
MEMORY CARD*
UNINSTALLING THE MEMORY CARD
To remove the memory card securely, disable it first.
1 Click on > > Device > Storage > Uninstall SD card tab.
2 Use the key to extract the right slot and remove the memory card.
Warning
Do not remove the memory card while a
data transfer or use is in progress. It may
result in data loss or corruption, or cause
damage to the device and memory card.
DANEW is not responsible for any
losses relating to improper operation
of corrupted memory cards, including
data losses.
*Not supplied
13
Page 14

SWITCHON
A long press on the ON/OFF button (for 5 seconds) switches the device on. The screen plays an
animation of the Danew’s logo before loading the interface.
SWITCHOFF
Press the ON/OFF button (for about 2 seconds), a window suggesting to
either switch-o or restart the phone is displayed. When the battery is low,
the device will shutdown automatically in order to save power.
LOCK SCREEN POWER SAVING MODE
a) Lock screen
When the device is switched on, pressing the ON/OFF button shortly will switch o the screen and
enable the power saving mode or lock (after a period of inactivity, the screen switches o automatically).
When this mode is enabled, the applications in use will not be closed.
14
Page 15

To unlock the device, press the ON/OFF button, tap the screen and slide your finger in any direction.
15
Page 16

b) Power saving
To optimize the battery life, follow the instructions below :
SCREEN
Do not use a 100% luminosity. The screen of your phone ’écran de votre appareil is a part that uses the
most energy (when switched on).
In most cases, a luminosity set to 50% ensures a suciently comfortable operation.
To optimize the battery life, it is recommended to set an automatic standby period (in the case of
inactivity). The shorter this period is, the better is your battery life. To set the standby period:
Click on > > Device > Display > Standby tab.
WIFI BLUETOOTH
Wi-Fi and Bluetooth connections are features that use energy. To optimize your battery life, it is
recommended to disable the Wi-Fi / Bluetooth when not in use. For example, when you watch
a video or play music on your phone, you should disable Wi-Fi, you will then save up to 30%
of batterie life.
16
Page 17

HOME SCREEN SETTINGS
Back Button
Home Button
Short press - Settings/Wallpapers/Widgets
Long press - Open application
Application Button
17
Page 18

Configure Wifi settings
Configure Bluetooth settings
Define preferences for SIM cards associated
services
View your Wifi data consumption
18
Page 19

Setting luminosity/standby/wallpaper/rotation
Volume and sound environment settings
Storage device management and memory status
View the battery consumption
Application management
19
Page 20

Enable or disable Geolocalization services
Configuring fingerprint unlock
Manage security options of the smartphone
Accounts Management (Gmail, Facebook ...)
Setting Language/Keyboard/ Voice research
20
Page 21

Setting Date/Time/Timezones
Information on the firmware version
21
Page 22

USING THE HOME SCREEN
By default, AndroidTM suggests four home screens. To navigate to each one, slide your finger
horizontally on the screen. Each screen may contain several rows of applications (Shortcuts, Widgets…).
INSTALL SHORTCUTS :
1/Drag/ Drop
«applications» icons to the
main interface page.
To do so, press The Applications page
22
appears.
Page 23

Then press and hold your
fingerpoint on the icon
and place it by sliding
your finger to the home
screen
23
Page 24

2/Drag/drop « Widgets » icons to the main interface.
To do so, short press .
Click on Widgets
icon.
24
Select and hold the
desired Widget
Place it on the home
screen.
Page 25

DELETE A SHORTCUT FROM THE HOME SCREEN
Click and hold the
icon
Then move it to
« X Delete ».
25
Page 26

CLOSE RUNNING APPLICATIONS :
A short press on the button for 2 seconds displays the list of running applications.
Glissez votre doigt
vers la droite ou vers
la gauche pour fermer
les applications.
26
Page 27

SECTIONS OF THE HOME SCREEN
The clock is located in the upper right corner of the screen. Tap and hold the clock while sliding downwards to
view 2 sections.
Slide downwards
Sliding downwards
for the first time
will display the
notifications section.
again to view the
quick settings section
(Wifi ; Luminosity ;
Rotation ; Settings
; Battery level ;
Airplane mode...).
27
Page 28

To hide a notification, slide it to the right or the left.
28
Page 29

USB CONNECTION
When the smartphone is switched on and connected to a computer, a USB icon appears on the notifications
bar. Connecting to a computer enables you to synchronize content between your smartphone and your
computer. You can also view the contents of the internal memory and the memory card.
USING THE TOUCH SCREEN
Your device is equipped with a fully touch interface. The basic movements are explained below.
SELECT
Click once on an application, menu or option to
run or select them.
29
Page 30

HOLD
Maintain your finger pressing a selected item on
the screen for more than 2 seconds.
Move a selected item on the screen.
MOVE
Click twice and quickly on an item on the screen.
DOUBLECLICK
30
Page 31

SCROLL
Move the finger quickly in the direction of the
desired movement.
ZOOM
Place your thumb and forefinger on the screen.
Separate to zoom in and bring closer to zoom
out.
31
Page 32

STORAGE FILE MANAGEMENT
There are many applications called « File Browsers » that enable you to manage your files (audio, video,
documents and photos).
Android supports dierent storage methods like memory cards and internal memory. Applications are
installed to the internal memory by default. You can use this space to create folders and organize your
personal files.
The file manager also enables you to manage contents located on a memory card (microSD).
Besides the internal memory, you can also create folders to organize your files.
To move applications from the internal memory to the memory card, go to settings, then click on
«applications». Select the desired application and click on «move to SD».
32
Page 33

CONFIGURING YOUR GOOGLE ACCOUNT
The first time you open the Google application on your device, you will need to sign in with
your existing Google account. If you don’t have a Google account, you will be prompted
to sign up.
CREATING A GOOGLE ACCOUNT
1 Click on > > Personal tab > Accounts.
2 Click on «Add an account» > Google > Create an account.
3 Enter your first and last name, then click NEXT.
4 Enter a username and click NEXT. Your phone connects to Google servers and checks the username
availability
5 Enter your password and click NEXT.
6 Follow the instructions and enter required and optional information relating to your account
Wait for your account to be set up on the servers.
33
Page 34

CONNECTING TO YOUR GOOGLE ACCOUNT
1 Click on > > Personal tab > Accounts.
2 Click on «Add an account» > Google.
3 Enter your email address and click NEXT.
4 Once the connection established, you can use GmailTM and Google services on your device.
5 Once your Google account is configured, your device will automatically sync with your
Web Google account (if a data connection is available).
When a connection is established, your device synchronizes with your Google services, like GmailTM,
Contacts and Google Calendar. You can also use Maps, donwload applications from Play Store, save
your settings to Google servers and benefit of other Google services on your device.
34
Page 35

FINGERPRINT READER
To enable fingerprint recognition, your fingerprints should be recorded and stored in the device. After
registration, you can set the device to use your fingerprints for the following actions:
• Unlocking the screen
• The ngerprint recognition relies on the unique caracter of each ngerprint to enhance the security
of your device. It is unlikely that two dierent fingerpoints can be mistaken by the fingerprint recognition sensor. However, in cases where the fingerpoints are very similar, the sensor might consider them
identical.
For a better fingerprint recognition
Make sure the fingerprint reader is not scratched and that the fingerprint recognition area and your fingers
are clean and dry. Fingerpoints with wrinkles, scars or small and thin fingers may not be recognized.
To record your fingerpoints
Follow the guide on your device, in the settings / Personal tab / Fingerprint reader.
35
Page 36

NETWORKING
3
WIFI
Your device can connect to Wi-Fi b/g/n networks.
To view WIFI settings, click on > > Wireless and networks tab > Wi-Fi
Enable the Wi-Fi to view available networks. The list of nearby detected networks is displayed. Select the Wi-Fi
network corresponding to your router by clicking on its name, an icon indicates the power of the signal.
Once the network name selected, a new window is displayed and prompts for a manual entry of the password.
Next, click on «Connect».
Once the connection established, the Wi-Fi icon appears in the task bar.
36
Page 37

BLUETOOTH
To configure Bluetooth.
Click on > > Wireless and networks tab > Bluetooth
Enable Bluetooth to view the list of enabled and detected devices, the bluetooth icon will appear
in the task bar.
Select the desired device to start Bluetooth pairing.
DUAL SIM
Your device can operate 2 SIM cards. You can now be reached at two numbers at once! You may choose
your favorite SIM for calls, outgoing SMS and MMS, and even internet access.
You can configure and modify services associated to each SIM through the «Double Sim Settings» menu..
To do so, click on > > Wireless and networks tab > SIM cards.
37
Page 38

SUPPORT WARRANTY
4
For firmware updates, please visit our website www.danew.
com and the Support and Drivers & Manuals section.
Visit the website www.danew.com the Product registration
section.
For customer service requests, you should first contact the
technical support in order to get the Return Merchandise
Authorization RMA number. Returns without RMA number
previously obtained will not be accepted. Danew reserves
the right to verify that device malfunction is not a result of
improper use or manipulation by the user.
Product with 1 year warranty and
accessories with 1 month warranty starting
from the purchase date.
38
TECHNICAL SUPPORT
(from France)
Our technical support team will
answer your questions from :
- Monday to Thursday,
from 9h00 to 13h00, from 14h00
to 18h
- Friday from 9h00 to 13h00,
from 14h00 to 17h.
Page 39

SAFETY INSTRUCTIONS
5
The following safety instructions apply to all mobile devices. They may not be all applicable to your
device. Before using this device, read the safety instructions in order to protect yourself and others from
injury hazards, and prevent the damage to the device.
Warning : prevent electrical shocks, fire and explosion.
Do not use damaged plugs or electrical cords or loose electrical outlets. Do not touch the power cord
with wet hands, and do not disconnect the charger by pulling the cord o. Do not bend or damage
the power cord. Do not use the device with wet hands or during the charge. Avoid short-circuiting the
charger or the device. Do not drop the charger or the device and prevent them from shocks. Do not
use an unapproved charger to charge the device. Do not use the device during an electrical storm.
The device might show malfunction and the risks of electrical discharges might get
increased. Do not use the Lithium Ion (Li-Ion) battery in the event of leakage or damage.
For safe disposal of the Li-Ion battery, contact your nearest customer service center.
39
Page 40

Manipulate and dispose of the device carefully.
Only use a battery and charger approved by Danew and specially designed for your device.
Using unapproved battery or charger may result in serious injury or damage to your device.
Caution : follow all security warnings and applicable regulations when using your device in
places where its use is regulated.
The device should not be used nearby other electronic devices. Do not use the device near to a cardiac
pacemaker. Do not use your device in hospitals or in close proximity to medical equipment to prevent
the interferences that may occur. If you are using medical equipment, contact its manufacturer before
using your device in order to ensure that it will not be aected by the radiofrequencies emitted by
the device. Do not throw the device or the battery into a fire. Follow the applicable local regulations
regarding the disposal of batteries or used devices. If you are wearing a hearing aid, contact its
manufacturer to obtain more information on the risk of interferences. Switch o the device in places
with potential explosion risk. Switch o your device when on board an aircraft.
For service and proper operation: Store the device in a dry place. This device should not be
used or stored in areas with high atmospheric concentration of dust or micro-paticles. Always
place your device on flat surfaces. Do not store your device in extremely hot or cold places.
It is recommeded to use this device at temperatures ranging from 5 °C to 35 °C.
40
Page 41

Do not store your device in close proximity to metallic objects, such as parts, keys or necklaces. Do
not store your device in close proximity to an electromagnetic field. Do not store your device in close
proximity or inside radiators, microwave, heating kitchen appliances or high pressure containers. Do not
drop or expose your device to impact. In the event of overheating, do not use the device or applications
for some time. If your device camera is equipped with a flash, do not use it in close proximity to people or
animals eyes. Take reasonable precautions when you are exposed to artificial lights.
Prevent the risk of muscle injury resulting from repetitive movements.
When performing repetitive actions, such as hitting keys, drawing caracters on a touch screen or playing
a game, you may experience discomfort at hands, neck, shoulders, or any other part of your body.
In the case of extended usage, hold the device without pressure, lightly click on the buttons and take
frequent breaks. If the discomfort remains, stop using the device and consult a doctor.
Extend the battery and charger life.
•Do not leave the device in charge for more than one week. Overcharging might decrease the battery
life.
•When not in use for an extended period, your device will progressively discharge and should be
recharged before use.
41
Page 42

•Unplug the charger from the electrical outlet when not in use.
•Use the battery only for the purpose it is designed for.
Use approved batteries, chargers, accessories and furnitures. Do not bite or bring near to your mouth the
device or the battery. Do not insert your device or its accessories into your eyes, your ears or your mouth.
Be careful when using the device when you are walking or moving.
Do not place the device inside your back pockets or belt. Do not disassemble, alter or repare the
device yourself.
•Any modification or change to your device might result in a void warranty. If your device needs to be
repared, contact Danew’s customer service.
•Do not disassemble or puncture the battery, this may result in explosion or fire.
Do not paint your device or put stickers on. To clean your device :
•Wipe your device or charger with a cloth or a rubber.
•Clean the battery terminals using a cloth.
•Do not use chemical products or detergents.
Do not use the device if the screen is cracked or broken. Use your device only for its intended use.
Do not disturb your surroundings when using your device in a public area. Keep children away
from your device.
42
Page 43

Listening at full power might damage the ear of the user and result in hearing loss (temporary
or definitive, à forte puissance peut endommager l’oreille de l’utilisateur et entraîner
des troubles auditifs (surdité temporaire ou définitive, ringing in the ears, tinnitus, hyperacusis). In order to
preserve your audition, do not use the music player at full volume for more than an hour daily (at average
volume). Use headsets and headphones supplied with the device.
Install the device and accessories carefully
•Make sure your mobile device and accessories are well fixed inside your vehicle.
•Do not place your device or its accessories in close proximity to airbags system location. If the mobile
device is not properly installed, triggering the airbags might cause serious injury.
The device should be serviced by a qualified technician.
Take care when manipulating SIM and memory cards. Make sure emergency services can be accessed.
Protect your sensitive data. Do not transmit copyrighted material.
43
Page 44

44
Page 45

Page 46

46
Android, Google, Google Play and other marks are trademarks of Google Inc.
 Loading...