

Page 1

USER
GUIDE
1
Page 2

Thank you for purchasing a Danew product. Before using the device, read carefully the operation instructions presented in this
manual. It aims at familiarizing you with the technical features of your KONNECT 201 in order to make operation easier.
NOTE : All information presented in this manual and on the box were current at the time of printing. However, as we are permanently enhancing our products through software updates, this manual and the box might not present all the functions of your
actual product.
Pictures are for illustration purpose only and are not contract-binding.
2
Page 3

KONNECT 201
3
Page 4

CONTENTS
INTRODUCTION
P.6
Features
P. 6
Buttons & Device parts
P. 7
MESSAGING
P.8
Writting message
P. 8
Message setting
P.9
SMS setting
P.1 0
CALL HISTORY
P.10
SIM 1 & SIM 2 call history
P.1 1
4
P.1 2
P.1 3
P.1 3
P.1 4
P.1 4
P.12
P.13
PHONEBOOK
Setting
SETTING
SIM setting
Network setup
Security setup
Call setting
Page 5

P.16
P.1 6
P.1 6
P.1 6
P.1 7
P.1 8
P.18
P.18
P.1 8
MULTIMEDIA
Camera
Audio Player
Video Player
Image viewer
FM Radio
FILE MANAGER
SERVICE
WAP
LEGAL INFORMATION
P.20
5
Page 6

INTRODUCTION
1
FEATURES
Screen
Resolution
Processor
Network
Bluetooth
Camera
Battery
Speaker
Connectors
Micro SD slot
Dimensions
Weight
6
1.77’’ TFT
128 x 160 px
Spreadtrum 6531
GSM 850/900/1800/1900 Mhz
2.0
0.08Mpx
1000 mAh
1W
3.5 mm line out/ Micro USB
Up to 16GB
47.5 x 109.9 x 14.3 mm
68 g
Page 7
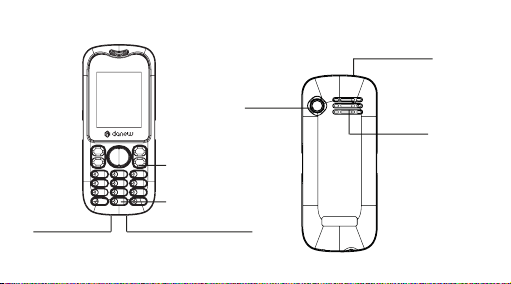
BUTTONS DEVICE PARTS
Camera
Torch LED
Line out
3,5 mm
Power
ON/OFF
Torch function
press long « 0 »
(charge & PC conection)
USB plug
Speaker
7
Page 8

MESSAGING
2
You can receive and send message,and can also use broadcast message. Message make it possible
for you to exchange message With other wireless phone users. Select Message to perform operation.
. WRITTING MESSAGE
You can write a new text message send to others, and also can insert template in the message.
Select the Option after editing a text message
Send send the message only
Save and Send send the message while sending
Save save the message
Send to many send the message to many
Send by group send the message to all the link of the selected group
8
Page 9

. MESSAGE SETTING
You can setup your MMS through the menu by your need as following:
Server Profile Start or edit the service, when you fail to send the MMS,please change
Send Include life, send return, read return, priority etc.
Retrieve Include main network, roaming network, Send return, allow to sending
Memory status View the storage of the MMS
Note : If you fail to send MMS, please change the online-pattern to WAP in the server setting.
online-pattern of the server to WAP.
reports etc.
9
Page 10

. SMS SETTING
You can setup the message from the menu, as following:
SIM Setting Oer you four profiles and you can edit their names, set SC Address
Common Setting Set delivery report on or o
Memory Status Check the capacity of message storage
Preferred Storage Set the default message storage location, including phone storage and
Note : You need support from the service provider to receiver delivery reports.
CALL HISTORY
3
Enter the main menu Log, select SIM1 or SIM2 to view the dialed calls and answered calls, can also
examine the call time, cost and the use of the message.
10
and Valid Period etc.
SIM card.
Page 11

. SIM CALL HISTORY
You phone keeps lists of incoming and outgoing calls, even for calls that didn’t connect .The most
recent calls are listed first.
The phone keeps the only latest call of the same number .To view detail information or
TIP :
performs other operation: Find the lists of Dialed Calls, Received Calls, Missed Calls .Press
ok key to view the detail information: times etc.
Press Option key to perform following operation:
Delete Delete this record
Save Save the number of this record to phone book
Calll Call the number of this record
Send SMS Send message to the number of the item
Edit Enter the number edit screen, you can modify, save or dial the number
11
Page 12

PHONEBOOK
4
Select contacts to open phone book. It is consisting of phone storage and SIM card storage
Phone Storage With a name, default number, family number, company name, email
Stockage sur la SIM The capacity depends your SIM card type and there is only a name and
Tip : Delete the selected names one by one.
. SETTING
You can perform bellowing operations on the phonebook :
Memory Status Check the capacity of the phonebook, Including SIM card memory and
Preferred Storage Select SIM card memory or phone Memory as the default storage
12
address, company number, fax number, birthday date, etc.
one business number in each item .
phone memory.
location when adding a new name.
Page 13

SETTING
5
You can set your favorite wallpaper, ring or some other function.
. SIM SETTING
Enter this menu; you can set the mode to be Dual SIM, only SIM1, only SIM2, flight mode.
. NETWORK SETUP
When dual SIM mode is activated, you can perform network setup for SIM1 and SIM2 separately.
Enter Network Settings, select Network Setup and then you can perform following operations:
Network New search, Select Network
Selection Selection Mode
Preferences Set the preferred network during searching
Band selection Set the way how GPRS is connected
13
Page 14

. SECURITY SETUP
Enter Security Settings, select Security Setup and then you can perform foIIowing operation:
SIM Lock Set a password for your SlM card-open/close
Phone Lock Set a password for phone lock. (default 1234)
Keypad Lock auto keypad lock on or o and a time after which the keypad is Locked
Change Password Change the Pin Password, Pin2 Password and Phone Lock Password
Note : For Pin Password, please contact your service provider.
. CALL SETTING
Enter call Setting form main menu, select Call Setup and then you can perform some operations
as following:
14
Page 15

Call Waiting Setup the call waiting function
Call Divert Setup the call diverts function
Call Limit Setup the call limit function
Line switch Switch your current line and there are 2lines available
Call time reminder Set the call time reminder on or o and its type and period
Call time Display Set if call time shows during calls or not
Auto Redial Set Auto Dial on or o. While it is on, the phone automatically redials
Backlist Set 5 numbers, while it is on, the phone automatically shields the
lP Dial Set IP dial on or o, edit IP number
10 times in occasion that the line is busy or cannot be answered and you
can press Abort to cancel redialing.
incoming calls from the members in blacklist.
15
Page 16

MULTIMEDIA
6
Your phone oers multimedia applications and you can select Media from main menu to open it.
. CAMERA
Your phone has a hi-Mega pixeI camera that you can take photos whenever and wherever you like.
After taking photos, store them in the phone memory or memory card (if any).
Camera Setting Press left soft key to open Option in viewfinder display and make detail setting.
. AUDIO PLAYER
You can use the audio player to broadcast music. Press OK key to play the current music, and press
it again to pause the current music Press the Left direction key to switch to the before, and right
direction key to switch to the next. You can ad just the volume of the MP3 player through the upper
direction key and down direction key.
. VIDEO PLAYER
Tap Video Player to open it and view all video files. Press the Options and perform following
operations on the selected video(play forward, details, rename, delete, delete all files or sort. During
16
Page 17

playing, press the 4-way navigation key up-’and down to adjust the speed, press the left or right key to
contrib. playing rate, press « 0 » to full screen, press « # »to control volume.
. IMAGE VIEWER
You can perform the following operations:
View View photos
Forward Send the current photo to wallpaper list, screen saver list and power on/
Rename Change name of the photo
Delete Delete the photo
Delete All Delete all photos
Files Sort Arrange the photos by name, type, time,. size or random
Storage Choose photos in the phone memory or memory card
o display list
17
Page 18

. FM RADIO
Choose Radio menu to turn the radio function.
Note : While tuning the radio in, you can dial or hear the call normally. When on the phone, the volume
of the radio will become silence automatically
FILE MANAGER
7
Tap from the main menu to open it and you can find the storage devices and the capacity of total
space and free space. On dierent objects, there are dierent operations.
SERVICES
8
. WAP
Your phone supports service subject to WAP .You can access the service provided by network service
operator. You can acquire the information about news, weather forecast, flight, etc.
18
Page 19

Notice : GPRS service needs the support of network. You can enjoy it in the coverage areas of GPRS
network.
Homepage Access the Home page. Home page is your preset website of WAP
Favorites View the bookmarks. You can select one of them to access the website.
Recent Visits The option will record the web addresses you viewed before
Oine page The option will view the web addresses oine.
Input URL This function for the input you want to connect the web site
Settings Some settings of surfing the Internet
lf you do not set the Home Page, your phone will access the default
website.
19
Page 20

LEGAL INFORMATION
9
EUROPEAN UNION DIRECTIVES CONFORMANCE STATEMENT
Hereby, Danew declares that this product is in compliance with:
The essential requirements and other relevant provisions of Directive 1999/5/EC
2200
20
Page 21

SUPPORT WARRANTY*
For firmware updates, please visit our website www.danew.com and the Support and Drivers & Manuals section. Visit
the website www.danew.com the Product registration section.
For customer service requests, you should first contact the technical support in order to get the Return Merchandise Authorization RMA number. Returns without RMA number previously obtained will not be accepted. Danew
reserves the right to verify that device malfunction is not a result of improper use or manipulation by the user.
TECHNICAL SUPPORT
Our technical support team will answer your questions from :
- Monday to Thursday, from 9h00 to 13h00, from 14h00 to 18h
0899 782 278 (France),
- Friday from 9h00 to 13h00, from 14h00 to 17h.
*Product with 1 year warranty and accessories with 1 month warranty starting from the purchase date.
21
Page 22

SAR
YOUR MOBILE DEVICE MEETS FCC AND IC LIMITS FOR EXPOSURE TO RADIO WAVES.
Your mobile device is a radio transmitter and receiver. It is designed not to exceed the limits for exposure to radio
waves (radio frequency electromagnetic fields) adopted by the Federal Communications Commission (FCC)
and Industry Canada (IC). These limits include a substantial safety margin designed to assure the safety of all
persons, regardless of age and health.
The radio wave exposure guidelines use a unit of measurement known as the Specific Absorption Rate, or SAR.
The SAR limit for mobile devices is 2 W/kg. Tests for SAR are conducted using standard operating positions with
the device transmitting at its highest certified power level in all tested frequency bands. The highest SAR values
under the FCC and IC guidelines for your device model are listed below:
22
Page 23

Highest SAR values for this device
Head SAR 0,117 W/kg
Body SAR 0,313 W/ kg
During use, the actual SAR values for your device are usually well below the values stated. This is because, for
purposes of system eciency and to minimize interference on the network, the operating power of your mobile
device is automatically decreased when full power is not needed for the call. The lower the power output of the
device, the lower its SAR value.
If you are interested in further reducing your RF exposure then you can easily do so by limiting your usage or simply
using a hands-free kit to keep the device away from the head and body.
23
Page 24

Copyright & trademarks
Certain features, services and applications are network-dependent and may not be available in all areas; additional
terms, conditions and/or charges may apply. Contact your service provider for details.
All features, functionality and other product specifications, as well as the information contained in this guide, are
based upon the latest available information and believed to be accurate at the time of printing. Danew reserves the
right to change or modify any information or specifications without notice or obligation.
Note: The images in this guide are examples only.
© 2016 DN Electronics. All rights reserved.
Caution: Danew does not take responsibility for changes/modification to the transceiver.
24
Page 25

Page 26

26
 Loading...