

Page 1

Guide de l'utilisateur
GPS GS270
Page 2

Page 3
Précautions d'usage
Nous vous remercions pour l’achat de ce produit Danew. Veuillez lire
attentivement ce manuel pour vous familiariser avec ses caractéristiques
Toutes les informations décrites dans ce manuel étaient exactes au moment
de la publication. Cependant, nous améliorons en permanence nos produits
par le biais de mise à jour software, il est donc possible que ce manuel
ne mentionne pas toutes les fonctions présentes sur votre GPS
Pour votre propre sécurité, ne manipulez pas le produit en conduisant.
Ce produit est uniquement destiné à l’aide à la conduite, il ne peut donc pas
être utilisé pour d’autre besoins tels que la mesure précise de directions,
de distances, de lieu et de topographie.
Le calcul de la route est seulement une indication. Il est de la responsabilité
de l’utilisateur de suivre les panneaux de signalisations ainsi que les règles
de circulations en vigueurs.
Lorsque vous quittez votre véhicule, ne laissez pas votre appareil sur le tableau
de bord, au risque de l’exposer aux rayons du soleil.
Les signaux GPS des satellites ne traversant pas les matériaux solides
(exception faite du verre) lorsque vous vous trouvez à l’intérieur d’un tunnel
ou d’un bâtiment, le positionnement du GPS n’est pas disponible voire imprécis.
Pour une utilisation en voiture, veuillez placer le GPS de façon à ne pas gêner
la vision du conducteur ou le déploiement des airbags.
Les dommages accidentels sur le GPS sont de la responsabilité de l’utilisateur.
1
Page 4

Sommaire
Chapite 1- Fonctionnalités
1.1 Menu principal------------------------------------------------------------------------------------------------------------------------------- 3
1.2 Menu système ------------------------------------------------------------------------------------------------------------------------------- 3
Chapitre 2 - Bat terie
2.1 Statut de la batterie --------------------------------------------------------------------------------------------------------------------- 4
2.2 Recharger ------------------------------------------------------------------------------------------------------------------------------------- 4
Chapitre 3 - Démarrage
3.1 Allumer l' appareil -------------------------------------------------------------------------------------------------------------------------- 5
3.2 Mise en veille et extinction --------------------------------------------------------------------------------------------------------------- 5
Cha pitre 4 - Réglag es
4.1 Conguration -------------------------------------------------------------------------------------------------------------------------------- 6
4.2 Eclairage --------------------------------------------------------------------------------------------------------------------------------------- 7
4.3 Gestion de l'énergie -------------------------------------------------------------------------------------------------------------------------- 7
Cha pitre 5 - Ecran
5. 1 Calilbration de l’écran tactile ------------------------------------------------------------------------------------------------------------ 8
Cha pitre 6 - Fonction USB
6. 1 Branchement en USB ---------------------------------------------------------------------------------------------------------------------- 9
Guide de dépannage
Dépannage -------------------------------------------------------------------------------------------------------------------------10
2
Page 5
Chapite 1 - Fonctionnalités
1.1 Me nu P rinc ipal
I
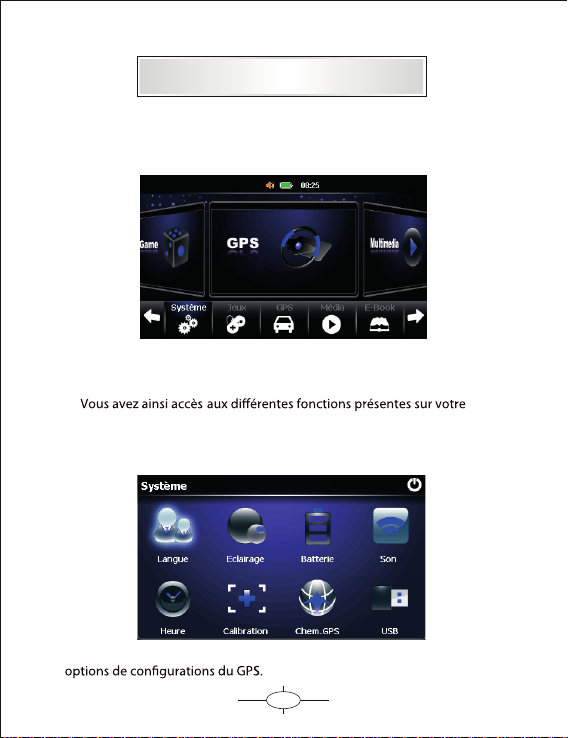
Le menu principal donne un accès direct aux fonctions principales
à l’aide de son interface intuitive.
appareil.
1.2 Menu système
Pour accéder à ce menu, veuillez cliquer sur «Système» pour avoir accès aux
3
3
Page 6
Chapite 2 - Batterie
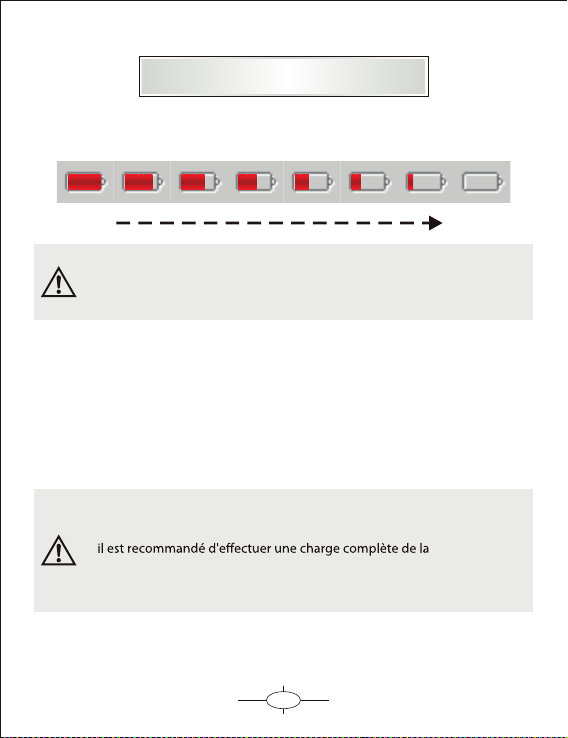
2.1 Statut de la batterie
Pleine Déchargée
Lorsque le niveau de charge de la batterie est faible,
veuillez brancher votre appareil pour la recharger.
2.2 Recharger Charging:
2.2.1 Il est recommandé de charger pendant 8h lors des 3 premiers cycles
de charges
2.2.2 En utilisation normale, un temps de recharge de 3h permet de
recharger entièrement la batterie.
Si l'appareil n'est pas utilisé pendant une longue période,
batterie tous les 2 ou 3 mois.
4
Page 7
Chapite 3 - Démarrage
3.1 Allumer l'appareil
Lorsque l’appareil est éteint, veuillez maintenir le bouton ON/OFF enfoncé
pendant 3 secondes pour allumer votre appareil.
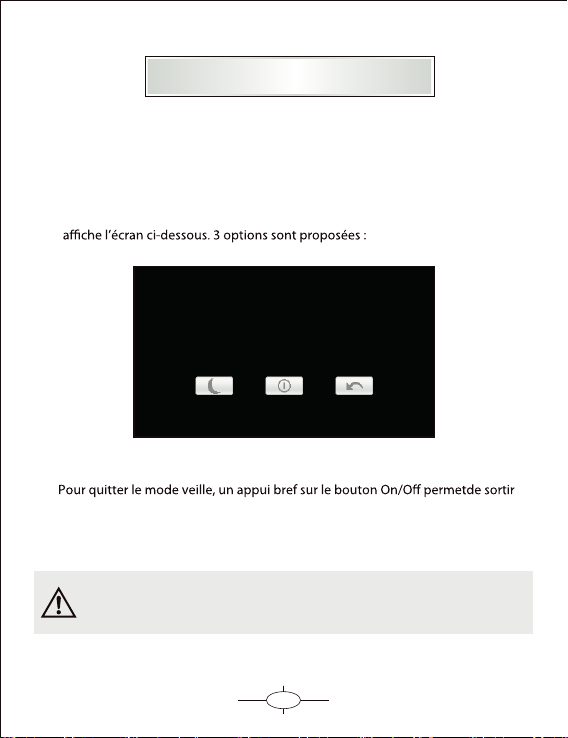
3.2 Mise en veille et extinction
Lorsque l’appareil est sous tension, un appui bref sur le bouton ON/OFF
du mode veille. Le GPS est de nouveau opérationnel.
Lors de la mise en veille, toutes les opérations en cours
d'utilisation seront mises en pause.
L'appareil s'éteindra dans
s
20
5
Page 8
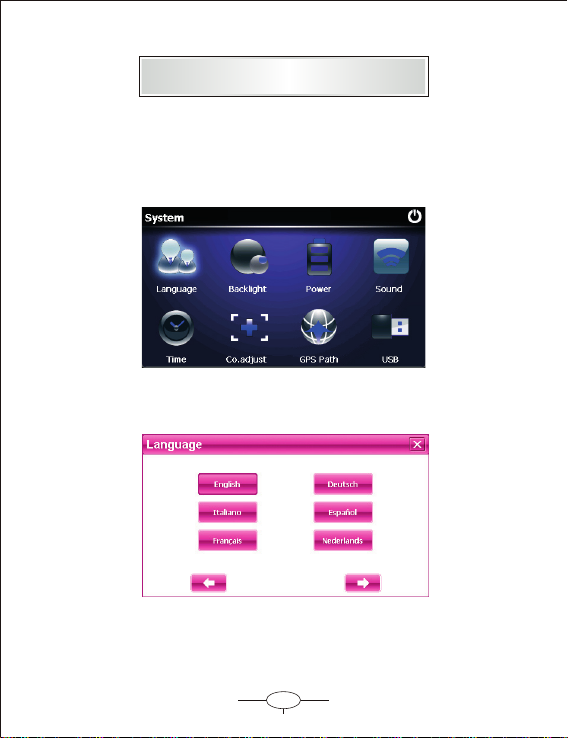
Chapite 4 - Réglages
4.1 ConfigurationSystem S et ting
Vous pouvez personnaliser votre GPS à partir de ce menu.
Cliquez sur «Système» sur l’écran principal an d’acher le menu suivant :
Cliquez sur «Langue» an d’accéder au menu de conguratin ci-dessous :
6
Page 9

(FODLUDJH
Vous pouvez ajuster la luminosité de l'écran à l'aide de la barre de contrôle
comme illustré ci-dessous.
*HVWLRQGHOpQHUJLH
A partir de ce menu, vous pouvez activer ou désactiver le mode économie
d'énergie en fonction de votre utilisation de l'appareil.
7
Page 10

Chapitre 5 - Ecran
5.1 Calibration de l'écran tactile
Appuyez sur l'ic ône " Cali bration" po ur co n
Appuyez 5 fois brièvement sur la croix jusqu'à ce qu'elle disparaisse.
Vous pouvez maintenant appuyer sur l'écran pour quitter la calibration
gurer l' écra n tac tile.
8
Page 11

Chapitre 6 - USB
6.1 Branchement en USB
lors du branchement à votre ordinateur à l'aide du câble USB.
Clé USB : Sélectionner ce choix pour utiliser le gps comme un disque
pour stocker des photos, vidéos ou fichiers audio.
ACTIVESYNC : Sélectionner ce choix pour synchroniser les données
contenues dans votre appareil gps avec votre pc ou inversement.
9
Page 12

Guide de dépannage
241
3
Troubleshoot ing
No. Pannes C auses Solu tion s
Ne s'allume pas
Ecran gé
Aucun son
Imposs ible de
recharger
Batte rie déchargée.
has n o furth er disp lay after a
bli nk when pres sing po wer on
button. )
Le logiciel ne répond plus.
the s creen for l ong tim e
wit hout changin g.
Batterie faible.
dis play on screen is f rozen as
any but ton is pressed .
Dea d or frozen duri ng
Le volume est au minimum.
screen is f rozen and no
butto n works.
L'appareil n'est pas alimenté.
LED i ndica tor of the device
Le cordon d 'alimentat ion est
H.S. sign disp layed o n the scr een.
Veuillez brancher votre appareil à une
source d' énergie.
enclo sed charger to charg e the devic e.
Veuillez ret irer le câble U SB qui relie vot re
ordinateur à votre appareil puis rebranchez.
Appuyez sur le bouton ON /OFF pendant
5 sec.
Appuyez sur le bouton R ESET an de
redémarrer l' appareil.
Veuillez augmenter le volume sonore
dans les options de l'appareil.
Veuillez vérier les branchements entre le GPS
et la source d'alimentation en énergie.
Démarrer votre véhicule.
La batterie est endommagée.
Veuillez contacter votre revendeur ou le service
technique an d'obtenir une assistance.
10
Page 13

Quick start guide
GPS GS270
Page 14

Page 15

Please read this manual before you start using this device
Than ks f or purc ha sing ou r pr oduct . Pl ea se re ad t hi s man ua l ca reful ly
befo re s tarti ng t o us e thi s de vi ce. W he n yo u use t hi s de vice, y ou a re
supp os ed to lea rn w ell of th is p roduc t.
The in fo rmati on i n th is ma nu al h as be en v er ified f or i ts accu ra cy. But
no lia bi lity wi ll b e appli ed f or t he co rr ec tne ss o f ma ppi ng d at a of
navi ga tion, t ec hnica l an d/or ed it or ial i nt er pre ta ti on or i ll us trati on , or
the pr in ting an d tr an sla ti on o f thi s ma nu al, n or l ia ble for a ny
cons eq uence o r in ciden ta l damag es c au sed b y us in g thi s ma nu al.
This d ev ice is a co mp li cat ed t ec hni ca l pr odu ct c on sis ti ng o f OS and
thir d pa rty sof tw ar e. The manu fa cture r ha s paid su ff ic ie nt at te nt ion to
and fu lf ill its d ut y in i ts ha rd wa re manu fa cture p ro cessi ng a nd in
deve lo pment a nd /o r app li ca tio n of t he s oft wa re s o as to ens ur e the
devi ce w ork pro pe rly. If t her e is a ny m alfun ct ion or de fe ctive o f th e
devi ce , the man uf ac tur er w il l pro vi de a w arr an ty f or th e co ng eni ta l
qual it y probl em , bu t not c ov er ing f or a ny l oss o r da ma ge of p ro pe rty,
or any c on seque nc e cause d by o r re lat ed t o us ing t hi s de vic e.
The na vi gatio n so ft war e an d ma ppi ng d at a is pr ov id ed by a t hi rd p art y.
Its co py ri ght i s pr ot ect ed b y la ws. A Use r ca n on ly us e on t hi s dev ic e,
any co py ing or ap pl icati on o f th e sof tw ar e for o th er p urpos e is n ot
allo we d.
No exp li cit and /o r impli ci t gu ara nt ee o r ass ur an ce wi ll b e ap pli ca bl e
for th e va lidit y, inte gr ity, co rre ct ne ss, a cc ur acy o f ma pp ing d at a fo r
navi ga tion us ed o n this de vi ce, nor l ia bi lit y fo r an y los s, d am age ,
and/ or a ny cons eq uence c au se d by or r el at ed to d ef ec tiv e ma pp ing
data o r so ft war e us ed o n thi s de vi ce.
The co py right o f th is m anu al i s ow ned b y th e co mpa ny a nd p rotec te d
by law s. An y copy or t ra ns lat io n of w hol e or p ar t of its co nt ent,
incl ud ing wor ds , figur es , signs , ph on eti c in de x, et c. , is o nly all ow ed
for th e in divid ua l cu sto me r' s ref er en ce, b ut n ot f or publ ic c ircul at ion,
or oth er l eg al an d/ or c omm er ci al pu rp os e. The comp an y reser ve s the
righ t fo r final i nt er pre ta ti on of t hi s ma nua l.
1
Page 16

Catalog
Function Description
Illus trati ons on screen di splay---------- --------------- ------------ ------------- ------------------------- --
Batte ry
Battery S tatus I con
Cha rging-------- ------------- ------------------------ -------------- --------------- ---------------- --------------- ---- 4
Power On/OFF the d evice
Power On th e device 5
Sleepin g mode 5
Power Off------------- ----------------------- --------------- ------------------------- ------------------------------ -- 5
Function & Opera tion
Sys tem Setti ng----- ---------------
Languag e Setting----- ---------------- ----------------- ----------- ----------- ---------------------------- ------ 6
Ba cklight setting---- --------------------- ---------- ------------- -------------------------- ------------- -------- 7
Po wer Management-- ------------- --------------------------- ----------------- ----------- --------------------- 7
Coo rdinates Calibrat ion---- ----- --------------- ------------- --------------------- ---------------------- ------ 8
USB--------- --------------- ---------------------- --------------- --------------- --------------- ------
Servi ces
------------ ---------------------- -------------------------- ------------- ----------------------- 4
------ ------------------ ----------- --------------- -------------------------------------- -------
------------------ -------------------- -------------------- -------------------- ------------------------
------- --------- -------------------- --------------- --------------- ------------- -- 6
--------- ----- 9
-------------Troubleshooting --------------------------- ----------------------------------------------------------------------------------10
----- 3
2
Page 17

Function Description
Illustr at ions o n scree n di sp lay:
System U I
On this menu click on «Settings» button to enter the function settings page.
Click on «GPS» to launch the navigation software.
Click on «Multimedia» to enter on the multimedia menu .
Second ar y UI
In this in terface , click the icon s on th e scr ee n to enter the correspondi ng
fun ctions
3
3
Page 18

Battery
Batt er y Statu s Ic on :
Full Dra in ed
When t he b at ter y is a t lo w power l ev el, ple as e charg e it
imme di at ely t o en su re the de vi ce work n or mally
Char gi ng :
War ni ngs for c ha rg ing :
1. A new bat te ry may be e mp ty a nd no t ch ar ged b ef or e you g et t he
devi ce .
2. To ach iev e th e be st pe rf or man ce o f th e batte ry, i t is b et ter t o ch ar ge
it up to 8 h ou rs i n the f ir st t hre e ti me s, but no t ov er 16 hou rs .
3. In no rm al char gi ng with D C ch ar ger, p le as e mak e su re t o cha rg e it
for 2 – 2. 5 ho urs to ge t it f ul ly ch ar ge d.
A new b at tery wi ll r each it s be st p erf or ma nce a ft er a n umber
cycl es o f charg in g an d disch ar ging.
If the d ev ic e is no t us ed f or long t im e, it is be tt er t o cha rg e
it to fu ll c ap aci ty e ve ry 2 or 3 mon th s durin g st or age .
If not u si ng t he devi ce f or a long t im e, it is wi se t o ta ke out
the ba tt ery.
4
Page 19

Function & Operation
Powe r On t he d evi ce
In pow er o ff s ta tus, sl id e the pow er s witch t o "O N" p osi ti on t o tur n on
the de vi ce, the n th e OS D wil l be d is pla ye d on s cre en .
Slee pi ng & P owe r –o ff
In power-on mode , pre ss th e pow er bu tton on th e dev ice for 3- 5 second s
then the sleepin g mod e or confi rmati on fo r power- off scre en wi ll di splay
as follows:
The cl ev ice wil l be p ower off in
s
In this UI c lick th e butto n will be in sle ep ing mod e, clic k the but ton
will pow er off ; cli ck the bu tt on to e xit the UI and b ack to
nor mal ope ra tion.
Wak in g -up fro m th e sl eep in g
When i n sl eepin g mo de, a sho rt p re ss on t he p ow er- on b ut ton o f th e
devi ce w ill wak e up t he syst em .
When i n sl ee pin g mo de , all the p ro ce dur e in o pe rat io n wi ll
paus e bu t wi ll ba ck t o no rmal st at us afte r wa king up .
20
5
Page 20

Function & Operation
Syst em S ettin g
This i s fo r sy ste m se tt ing to ch an ge defa ul t setti ng o f the sys te m to
your p er sonal p re feren ce .
Oper at io n:
On sys te m ma in me nu , cl ick i co n to e nter in to s ystem s et ting.
Scre en d ispla y is s hown as t he i llust ra ti on be lo w:
In sys te m se tti ng , th ere 8 i te ms f or sett in g, clic k di rectl y ea ch item t o
chan ge s ettin g fo r it . Det ai ls w ill be de sc ribed b el ow.
Lang ua ge S ett in g
This i s fo r se tti ng o f sy ste m la ng uag e, s cr een dis pl ay is sho wn a s the
illu st ratio n be low:
Clic k th e icons o f th e
corr es pondi ng l angua ge
in thi s in te rfa ce o r
choo se t he inte rf ac e
proj ec t, the sy st em w ill
save t he s etup
auto ma ti cal ly w he n the
setu p is c losed , an d re tur n to t he p rev io us m enu . (T he s ystem w il l be
requ ir ed to res ta rt afte r th e in ter fa ce p roj ec t is c hange d. )
6
Page 21

Function & Operation
Back li gh t set ti ng
This i s fo r ch ang in g ba ckl ig ht b rig ht ne ss of t he d ev ice s cr ee n dis pl ay,
and ti me t o st art s cr ee n sav er w he n no op er at ion o n th e de vice.
Scre en d ispla y is s hown as t he i ll ust ra ti on be lo w:
Then, drag the slide blo ck to set. Select No Screen Saver, the n the screen
saver will be disable d. After setting, clos e the current window to save.
Powe r Ma na gem en t
Thi s is f or setting au to p ower off an d/or power sa vi ng mode, and ti me t o
sta rt p ow er off an d/ or power sa vi ng w he n no oper at io n on the devi ce .
In dra g me nu to sel ec t ti me, s el ec t “No ” fo r di sab li ng t his fea tu re. Afte r
sett in g, clos e th e cu rre nt w in dow t o sa ve .
7
Page 22

Function & Operation
Coordinates Ca libration
This i s fo r ca librating th e styl us c oordinate s on t ouch screen. After
entering i nt o th is UI, screen d ispl ay is shown a s th e illustrat ion below:
On thi s UI , us e stylu s to t ap a t the cente r of t he c ross, then tap on
other cros ses wh ic h will move after each tappin g unti l finis h and
“Touch Screen Calibrat io n Compl eted” i s show n.
8
Page 23

Function & Operation
USB
This is to set t
to the com put er, in which “MASS STORAGE” is to set the device as a
memo ry, and “ACTIVESYNC” is to use the device for pr ogram debug.
Pict ure s are shown as below:
Clic k t he desi r ed connectio n mod e a nd cl o se th e w i ndow to sa ve the
chose n mode .
he mode when the USB int erface of the device is connected
9
Page 24

Services
Troubleshooting
No. F ault P ossible C au se S olutions
No powe r on
Dead Un it
Error in upgrade
Impossib le to
recharge
Battery drai ned (The screen
has no furt her display a fter a
blink w hen pressing power o n
button.)
The s tart interface st ays on
the screen f or long time
without changi ng.
No di splay of th e screen, or
displ ay on screen is frozen a s
any button is pressed.
Dead or f rozen during
upgrade, displ ay on the
screen is frozen and n o
button works.
Durin g charging, the green
LED i ndicator of t he devi ce
has no light or n o charging
sig n displayed on t he screen.
Please refer t o the descript ion of ba ttery
charging i n this manual , only use th e
enclosed charger to charge t he device.
Take out the battery,
the devi c
Press and hold t he power on butto n for 5
seconds, then release i t to power on.
Take out the battery, then put i t back, start
the devi ce again.
Thi s fault can onl y be fixed by t he
manufacturer. Please ret urn for repair.
If th e charger is connected properl y and
powered.
Charger is damaged.
Battery i s damaged or full charged.
It is normal w hen the green LED i s lit on but
the chargi ng sign i s not on the screen at t he
same tim e during charging.
e again.
then put it b ack, start
10
 Loading...