

Page 1

USER
GUIDE
Page 2

Thank you for purchasing a Danew product. Your DSlide Has been
designed to oer you a unique game experience on a touch tablet.
Before using your device, read carefully the use instructions exposed
throughout this manual. It aims at familiarizing you with the technical
features of your DSlide in order to make its use easier.
NOTE : All information presented in this manual and on the box were
current at the time of printing. However, as we are permanently enhancing our products through software updates, this manual and the box
might not present all the functions of your actual product.
Pictures are for illustration purpose only and are not contract-binding.
Page 3

DSLIDE 815 PICO
3
Page 4

CONTENTS
INTRODUCTION
P.
Features
P.6
Buttons and device parts
P.7
GETTING STARTED
P.
Switch-on / Switch-o
P.8
Lock screen and power saving mode
P.9
P.1 1
Home screen and settings
P.1 3
Using the home screen
P.1 5
Sections and shortcuts on the home screen
P.1 6
USB connection
P.1 7
Reset
P.1 7
Using the touch screen
P.1 9
Storage and file management
INTERNET
P.
Network connections
P. 20
Wi-Fi configuration
P. 21
4
Page 5

P. 21
Ethernet connection
Internet research
P. 21
Internet navigation
TROUBLESHOOTING
P.
SUPPORT WARRANTY
P.
5
Page 6

INTRODUCTION
FEATURES
Screen
Resolution
Processor
RAM / Internal memory
Network
Camera / Webcam
Battery
Multimedia
Speaker
G-sensor
Connectors
Dimensions
Weight
PROJECTOR
Display technology
Project light source
Projector resolution
Lens focal length
Focus mode
Throw ratio
Projection screen size
Brightness
Contrast
LED life
6
8’’ IPS Touch capacitive
1280 x 800 px, 16:9 format
RK 3188 Quadcore 1.4GHz
2 GB DDR / 32 GB Flash
Wifi 802.11 b/g /n, Bluetooth
5 Mpx / 2 Mpx
8000m Ah Li-polymer
Formats supported by Android™ / FM radio tuner
1 Watt
360 degrees
Micro USB OTG function / Micro SDHC card port
/ 3.5 mm audio output jack
215 x 138 x 13 mm
521 g
DLP 0.3EM’’ DMD panel by Texas Instruments
LED ( R/G/ B )
854 x 480 px ( 16/9 format )
8 mm
Manual
1.19:1 ( distance/width )
20-100 inches ( diagonal )
50 Lumens
1000:1
> 20000 H
Page 7

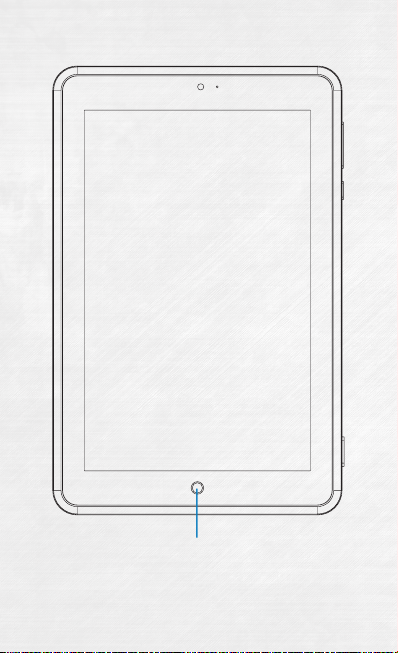
BUTTONS PARTS OF THE DEVICE
Micro USB
Charger pin
Microphone
3.5 Audio Jack
Speaker
Camera
Micro SD
Slot
MODEL : 815 Cinepix
INPUT : DC 5V 3A
A pleine puissance, l’écoute prolongée du baladeur
peut endommager l’oreille de l’utilisateur
Prolonged listening at full volume may damage your hearing
USB
OTG
Volume
+ / -
ON/ OFF
Reset
Manual
Focus
815 Cinepix
Made in
PRC
Projector
Lens
Speaker
7
Page 8
Press the button 5 seconds to
switch to Projector mode
8
Page 9
GETTING STARTED
Switch-on
Long pressing the ON/OFF button (3 seconds) will start your
1
DSlide. The screen plays an animation of Danew’s logo before
loading the Android interface.
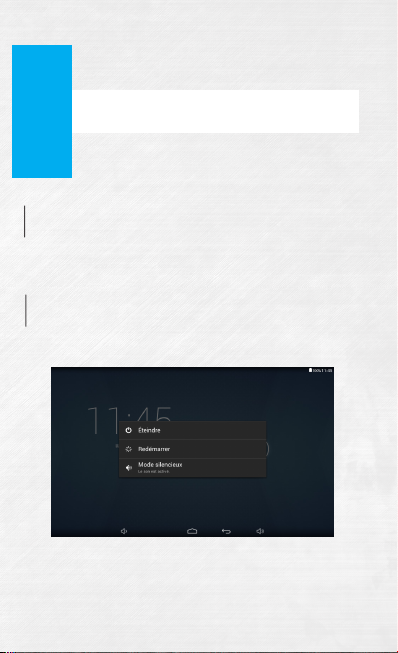
Switch-o
To switch o your DSlide, press the ON/OFF button (for
2
approximately 3 seconds), screen switched on, the following
screen (Fig 1) will appear :
When the battery is low, the device will automatically shutdown to
save power.
9
Page 10

Lock screen & power saving mode
3
A) Lock screen
When the device is on, short pressing the ON/OFF button will
switch-o the screen and enable the power saving mode or lock
(after a period of inactivity, the screen will automatically shutdown).
When this mode is enabled, the applications in use will not be
closed.
The Wifi connection is automatically stopped in standby mode. It
will automatically be restored when you leave the screen saver.
Pressing again the ON/OFF button will display the lock screen. To
unlock the DSlide, slide your finger upwards.
10
Page 11

B) Power saving
To optimize your tablet’s battery life, we recommend to follow the
following tips :
•Screen
Do not use a 100% luminosity. The screen of your tablet is an energy
consuming part (when it is switched on).
In most cases, a 50% luminosity allows a suciently comfortable
operation. To change the luminosity, go to the point 6 of this manual.
To optimize the battery, it is also recommended to set the automatic
standby mode (in the case of inactivity). The shorter this period is, the
better your battery life. To set the standby period, go to the « Settings/
Display/Sleep » menu.
•WiFi
The wifi connection is also an energy consuming part of your device.
To optimize your battery life, it is recommended to disable the Wifi
connection when it is not being used. For example, when your are
watching a video of playing sound on your tablet, you should disable
the Wifi connection, you will then save up to 30% of your battery life.
Click here to enable/
disable the Wifi
connection
11
Page 12

Home screen & Settings
4
Back Button
Home Button
Open application
Volume - Button
Volume + Button
12
Application Button
Page 13

Enables to configure Wifi settings
Volume & sound environment settings
Brightness/Sleep/ Wallpaper
Turn On/O Projector
Storage devices management &
memory status
Applications management
Enable or disable Geolocalisation
services
Configure security settings of your tablet
Configure Language/Keyboards/
Voice research
Accounts management
(Gmail, Facebook ...)
Date/Time/Timezone settings
13
Page 14

Using the home screen
5
a) When you are in the home screen, you can rotate your DSlide 90°.
The display will automatically adjust by switching from Landscape
to Portrait and vice-versa. You can display applications (shortcuts,
Widgets…) on the home screen.
b) Clicking on the “applications menu” button will display the
list of applications installed on the tablet.
14
Page 15

c) Install shortcuts / Widgets on the main interface screens.
A. To install shortcuts :
Drag & drop icons from the « applications » section to the main
interface screen. To do so, open the applications menu, then click
and hold the icon pressed with your finger.
B. To install Widgets :
Drag & drop icons from the « Widgets » section to the main interface
screen. To do so, on the main screen, click and hold your fingertip
until the Widget menu (see below) appears, then select the Widget
with your fingertip holding down.
To delete an item from the desktop, click on the icon (or Widget)
to select then move the icon to the icon of the «Cross» format as
shown below.
15
Page 16

d) To close running applications
Click on the “Open application(s) ” to view the list of running
applications. To close the application(s), hold your fingertip and slide the
small application window (to the right or the left).
Sections & shortcuts on the home screen
6
The home screen « Home » allows you to operate your tablet in
dierent ways.
1) Note at the bottom of the screen an area with virtual shortcuts
(Volume -/+ ; Open application(s) ; Home ; Back)
2) A fixed dock where you can place your favorite applications for
quick access.
3) The clock on the upper right corner of the screen. Press and hold
the clock, and slide downwards to view the quick settings section (Wifi
; Brightness ; Rotation ; Settings ; Battery level ; Airplane mode...).
16
Page 17

Sliding downwards from the left-top corner will display the
notifications bar section.
To delete a notification, slide it to the right or the left.
USB Connection
7
enables you to synchronize content between your device and
your computer. You can also view the contents of the internal
memory and the memory card.
Reset
When the DSlide is not responding to your commands, it is likely
8
that the system encountered a problem. A system reset is then
necessary. Using a thin object, press the Reset button until the
device restarts (your data will not be deleted).
Using the touch screen
Your DSlide is equipped with a fully touch interface. The basic
9
movements are explained below.
When the DSlide is switched
on and connected to a
computer, a USB icon
appears on the notifications
bar in the upper right corner.
Connecting to a computer
17
Page 18

Select
Click once on an application, menu or option to run
or select them.
Hold
Maintain your finger pressing a selected item on the
screen for more than 2 seconds.
Move
Move a selected item on the screen.
Double-click
Click twice and quickly on an item on the screen.
Scroll
Move the finger quickly in the direction of the
desired movement.
Zoom
Place your thumb and forefinger on the screen.
Separate to zoom in and bring closer to zoom out.
18
Page 19

Storage & File management
10
There are many applications called « File Browsers » that
enable you to manage your files (audio, video, documents
and photos).
Internal Memory
SD memory card
Android supports dierent storage methods like memory cards,
internal memory as well as USB devices.
Applications are installed to the internal memory by default
which provides the biggest storage capacity.
You can use this space to create folders and organize your
personal files.
The file manager also enables you to manage contents located
on a memory card (microSD) as well as a USB device.
Besides the internal memory, you can also create folders to
organize your files.
19
Page 20

INTERNET
Network Connections
Your DSlide can connect to Wi-Fi b/g/n networks as well as Ethernet
1
networks (option : needs a Usb Ethernet adapter sold separately)
To view the settings, click on the « Application menu » button
then select “Settings”
On the new screen, click on “Wireless and networks” to access the
connection menu.
20
Page 21

Wi-Fi Configuration
Click on «Wi-Fi» to access the Wi-Fi interface of the DSlide.
2
On this new interface, the Wi-Fi module starts a scan to reasearch
available Wi-Fi networks.
The list of nearby detected networks is displayed on the right,
select the Wi-Fi network corresponding to your router by clicking
on its name. An icon indicating the power of the signal is displayed
on the right of the network name.
Once the network name selected, a new window is displayed and
prompts for a manual entry of the password.
Click on «Login»
Once the connection established,
the Wi-Fi icon appears in the task
bar.
Ethernet Connection
Your DSlide can also connect to Internet through a Ethernet cable.
3
You need a Usb Ethernet adapter to connect to the USB port of
your tablet (sold separately). Once connected to Ethernet, the
configuration will be performed automatically.
Internet
Once the connection established, you can surf the internet. To do
4
that, return to the main interface. Click on “Google Search” to
enable the virtual keyboard.
21
Page 22

Internet Navigation
5
1
2
43 5 7
1 - Open a new tab
2 - Close the tab
3 - Return to the previous page or go to the next page
4 - Reload the web page. To abort reloading the page, click on
5 - Address bar. Click on this area to view the virtual keyboard
and start an internet research.
6 - To view the browser menu, click on the icon located at
the upper right corner.
7 - Save to favorites the web page displayed.
6
22
Page 23

TROUBLESHOOTING
1 Charging problem
(does not hold
charge, does not
charge, charging
blocked at X %...)
2 Wifi connection pro-
blem
3 No sound ; Speaker
problem ; Headset
problem
4 Touch screen not
responding; some
areas do not function
on the touch screen,
click on the wrong
place
Try another charger (with the same
connector and voltage and current
as the original). If you don’t have another charger, try charging through the
USB cord of your computer. Keep the
tablet in charge for at least 4h on a wall
socket and more than 6h on the USB
port of the computer.
Enable the Wifi in the «settings»
menu of the tablet. If the Wifi does
not start ... restart the tablet then retry
(Reset the tablet). If the problem persists, proceed to System recovery (1).
if no sound is emitted throught the
speaker, connect your headset to
check the sound. If no sound, proceed to System recovery (1).
Check all the touch screen areas
for operation. If the screen does not
respond or malfunctions, proceed to
System recovery (1).
23
Page 24

5 Tablet blocked at
the start screen ; OS
problem
If the tablet is held at start up on the
Danew or DSlide screen, proceed to
System recovery (1).
6 Black screen - The
tablet can’t start.
(1)To recover the tablet, go to the section Support and Drivers & Manuals
of the website www.danew.com.
24
Do a « Reset » of the device. Otherwise,
connect the tablet to the wall socket and
charge it. Make sure the charge indicator
lights (depending on the model). Allow
to charge for at least 2 hours on a wall
socket and more than 4h on a USB
port. If the problem persists, proceed to
System recovery (1).
Page 25

SUPPORT WAR
For firmware updates, please visit our website www.danew.com, then
go to the Support and Drivers & Manuals section.
To take advantage of the manufacturer warranty and the dedicated
technical support, please register the product(s) purchased during the
month following the purchase date : Go to www.danew.com, then to
the Support & Product registration section
For customer service requests, you should first contact the technical
support in order to get the Return Merchandise Authorization
RMA number. Returns without RMA number previously obtained
will not be accepted. Danew reserves the right to verify that device
malfunction is not a result of improper use or manipulation by the
user.
Product with 1 year warranty and accessories with 1 month warranty starting from
the purchase date.
Declaration of Conformity
Danew hereby declare, that the product above is in compliance with the essential requirements of the R&TTE Directive (1999/5/EC )
RANTY
Our technical support team will answer your questions from :
- Monday to Thursday, from 9h00 to 13h00, from 14h00 to 18h
- Friday from 9h00 to 13h00, from 14h00 to 17h.
TECHNICAL SUPPORT 0899 782 728 (from France)
25
Page 26

26
Page 27

Page 28

 Loading...