


Destinator User Manual

Copyright
1. Limited Product Warranty Destinator Technologies, warrants to the Client that t h e Products shall substantially conform
to Destinator Technologies' specification for a period of one (1) year from the date of the original purchase by the end
user (the "Warranty Period"). As Destinator Technologies' so le obligation and Client's exclusive remedy for any breach of
warranty, Destinator Technologies agrees, at its sole option, to (i) use reasonab le efforts to repair the Product with new
or refurbished replacement parts; (ii) replace the Product with a new or refurbished unit; or (iii) refund the purchase
price, provided Client returns the defective Products to Destinator Technologies with proof of purchase and Destinator
Technologies' authorization.
Destinator Technologies' warranty hereunder does not apply in case of any damage caused by accident, abuse, misuse,
misapplication or alteration of any kind performed by anyone other than Destinator Technologies. The Products are not
designed or licensed for use in mission-critical applications, or in hazardous environments, requiring fail-safe controls,
including without limitation operation o f nuclear fac ilities, air craft navigation or communication systems, air traffic control,
or life support or weapons systems. Without limiting the generality of the foregoing, Destinator Te chnologies specifically
disclaims any express or implied warranty or condition of fitness for such purposes. Destinator Technologies' warrant y
does not, in any event, apply to physical damage to the surface of the Product or replacement. Destin ator Techno log ies
shall have no obligation with respect to any data stored in the Product.
Except as expressly stated in this section, Destinator Technologies make s no warranties or includes any conditions with
respect to the products, express or implied, including, but not limited to, the im plied warranties or conditions of
merchantability, fitness for a particular purpose and no infringement.
2. Liability Limitation. In no event shall Destinator Technologies, be liable to Client, (and Client hereby waives any
indirect, special, incidental, or consequential damages in connection with) for the transactions contemplated by this
agreement, whether or not such damages were foreseen or their likelihood disclosed. Destinator Technologies shall not
be liable to Client or any third party claiming through Client, for any damages of any kind in excess of the amounts paid
by Client under the terms of this agreement with respect to the products giving rise to such damages. Some jurisdictions
do not allow the exclusion of or limitation on implied conditions, warranties or damages, thus some of the foregoing may
not apply to Client.
3. Intellectual Property Rights. Hardware and Software are proprietary to Destinator Technologies or its suppliers and are
subject to copyright and other intellectual property laws. Client's only rights with re spect to any Destinator Technologies
software included with the Products shall be provided, under the terms of Destinator Tec hnologies' software licence. The
title to all Destinator Technologies Software remains with Destinator Technologies. Client agrees that Destinator
Technologies retains ownership of all rights, title and interest in all intelle ctual property, works of authorship, trade
secrets and the like in all aspects of the Product(s). Client and its affiliates and subcontractors agree not to reverse
engineer any aspect of the Software and/or Products supplied under this agreement and further agree to pay assessed
damages should such action take place.
4. Copyright and Copies. The Software (including any copy thereof) is owned by Destinator Technologies or its suppliers
and is protected by United States, Canadian, European, Brazilian and Australian copyright and patent laws and
international treaty provisions. The Software copy is licensed to you the client, not sold to you, and you (the c lient) are
not an owner of any copy thereof. You may make one copy of the software for backup or archival purposes. You may not
otherwise copy the software, except as authorised by applicable law, nor the written materials accompanying the
Software. Destinator Technologies hereby reserves all rights not explicitly granted in this license agreement.
Copyright © 2008, Destinator Technologies
Destinator User Manual
11danew_70_UK

Contents
1. Getting Started 2
Configuration Wizard.......................................................................................................................... 2
Demo..................................................................................................................................................2
Main Map............................................................................................................................................ 3
Map Views..........................................................................................................................................4
Route Overview.................................................................................................................................. 5
Cancel Route...................................................................................................................................... 5
2. Select Location and Generate Route 6
Go to an Address................................................................................................................................ 6
Points of Interest (POI)..................................................................................................................... 10
QuickNav..........................................................................................................................................12
Recent Locations.............................................................................................................................. 12
Favourite Locations.......................................................................................................................... 13
3. Additional Destinator Features 16
Driving Directions .............................................................................................................................16
Multiple Stops...................................................................................................................................17
Avoid Roads..................................................................................................................................... 18
Detour............................................................................................................................................... 20
Map Browsing................................................................................................................................... 20
Pedestrian Mode .............................................................................................................................. 21
Map Selection................................................................................................................................... 21
4. Destinator Configurations 23
Settings Menus................................................................................................................................. 23
Prompts ............................................................................................................................................ 23
Language settings............................................................................................................................24
Look & Feel Settings ........................................................................................................................24
Units of Measure ..............................................................................................................................25
Time Settings.................................................................................................................................... 25
Map Settings..................................................................................................................................... 26
Start Demo .......................................................................................................................................27
About ................................................................................................................................................ 27
Help .................................................................................................................................................. 27
5. Destinator PC Portal 28
Destinator PC Portal Installation ......................................................................................................28
PC System Requirements................................................................................................................ 28
Destinator PC Portal Wizard ............................................................................................................29
Destinator PC Portal Main Screen ...................................................................................................30
Map Installation ................................................................................................................................32
Google™ Earth Placemarks............................................................................................................. 33
Favourite Locations - Import............................................................................................................. 35
Favourite Locations - Export ............................................................................................................36
General Warning Messages............................................................................................................. 36
Index 38
Destinator User Manual
i

1. Getting Started
Welcome to the world of mobile navigation! Simple operation, clear maps in 2D or 3D mode as well as
numerous innovative features and functions have made Destinator the essential guide for every traveller
- whether in the car, on foot or by bike.
Configuration Wizard
This wizard, which automatically starts the first time you use Destinator, lets you easily configure the
system settings by providing a step-by-step setup process. You can also configure these system settings
by going to these system options from the Settings menu.
• Language Settings - Set text and voice language preferences.
• End User Licence Agreement (EULA) - Please review the licence information and tap the Agree
button. The EULA screen appears each time you use a new map.
• Time settings - Set to display time settings.
• Units of Measure - Specify the system measurement units.
• Prompts - Configure the general navigation prompts and notifications and how these are displayed
(for example, Text or Symbol).
• QuickNav Settings - Specify an Address or Point of Interest (POI) that Destinator navigates to
when you tap the QuickNav button on the Main Map screen.
• Driver Warning - When you start Destinator, the Driver Warning screen appears. Please take a
moment to review the information provided before selecting the "Do not display this warning again"
checkbox to skip this message in the future.
Figure 1 - Map Warning Screen
Demo
The Start Demo button lets Destinator display a simulated route. Many of the Destinator navigation
features are disabled when the demo is running. You can end the demo by tapping the Stop Demo button
from the Settings menu.
Destinator User Manual 2
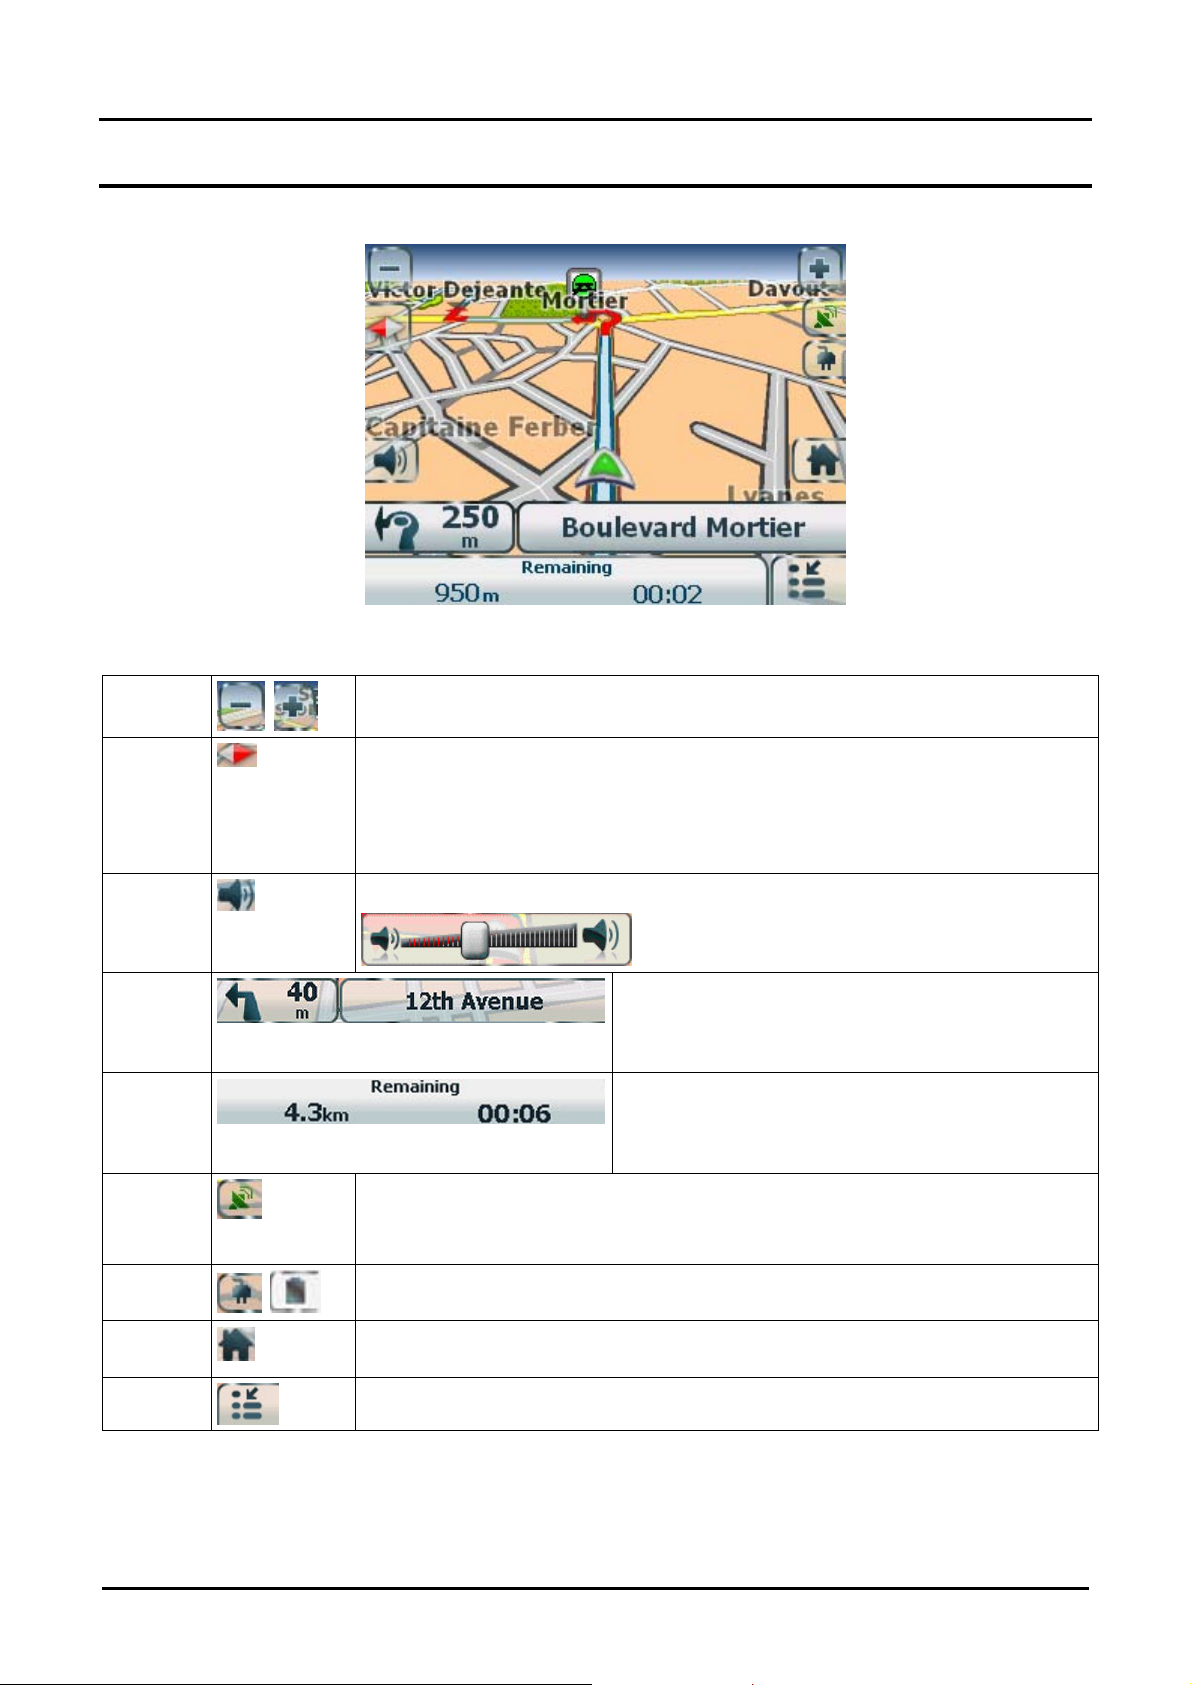
Main Map
You can use the icons displayed on this screen to plan and view your route.
1 6
Getting Started
Figure 2 - Map Screen
Main Map Icons
1, 6
2
2 7
8
3
9
4
5
10
Zoom in or out of the map to view a larger less detailed area or a smaller area
in greater detail
Tap the compass to change the map view display as follows:
2D map view with the forward direction at the top.
3D map view with the forward direction at the top.
2D map view with North at the top.
3
4
5
7
8
9
10
Tap this icon to adjust or mute the volume.
When you have calculated a route, the Directions
bar displays information about your next turn. Tap
this bar for a complete list of turn-by-turn
directions.
The GPS bar is a toggle button that displays the
remaining travel distance and travel time,
estimated time of arrival, street name and address
number, speed and altitude.
The red GPS receiver means that a reliable GPS signal is not yet located.
The green GPS receiver means that a reliable GPS signal is located and that you
are ready to navigate.
These icons display your power source. The battery appears as green, yellow or
red depending on the strength of the battery charge.
Tap this icon to set your QuickNav location. When set, you can tap this button
to automatically calculate a route to this location.
Tap this icon to display the Main Menu.
Destinator User Manual 3
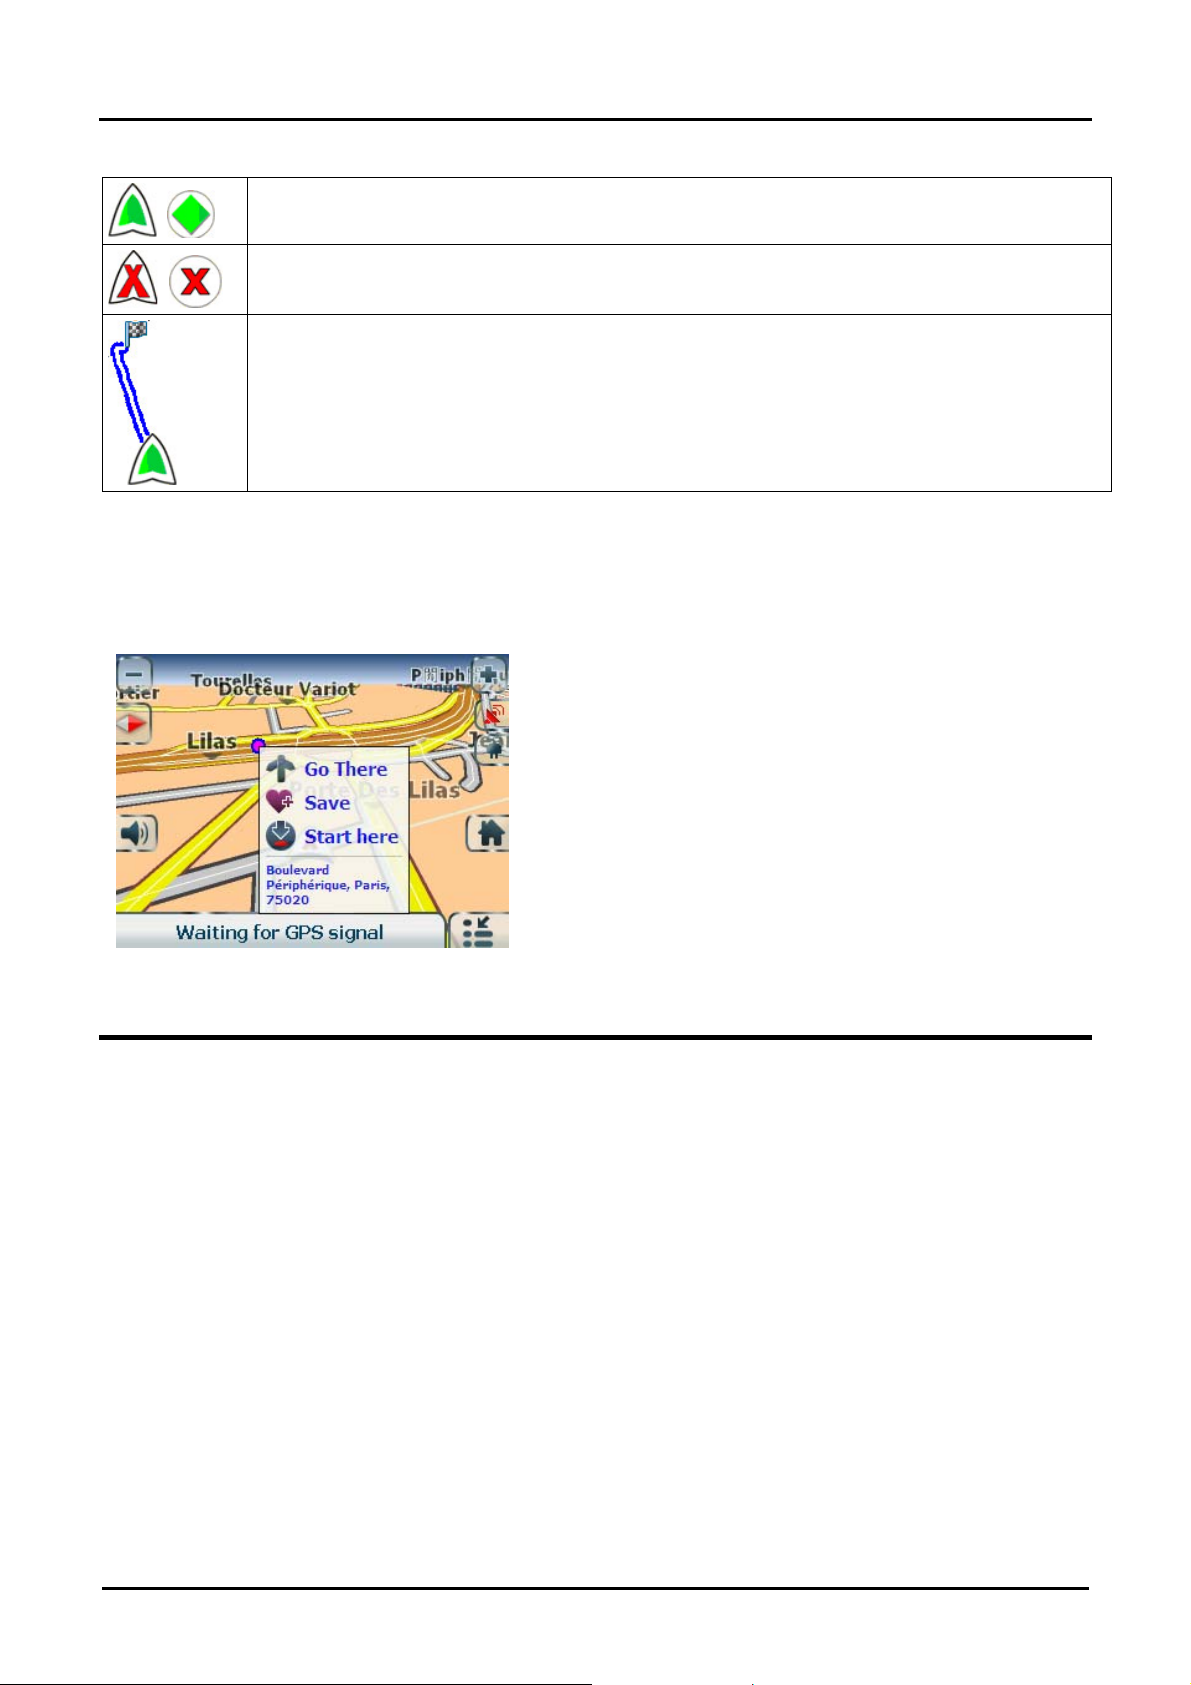
Location Icons
Current location in Vehicle Mode or Pedestrian Mode.
Last known location when GPS signal is unreliable.
Generated route
Getting Started
Location Point on Main Map
You can drag the map to a specific point and tap the desired location directly on the Main Map screen in
both 2D and 3D map view. This feature is useful when you want to navigate to a specific point on the map,
rather than by the street address. When you tap on the map, the pop-up menu appears with the following
options:
Go There - Navigate to the selected point on the map.
Save - Save a point on the map as a favourite destination for
future use.
Start Here - Designate the selected point as the starting point
instead of your current location.
Figure 3 - Point on the Map Options
Map Views
You can choose to see a two-dimensional or three-dimensional map adjusted specifically for daylight or
night time conditions.
From the Options menu, tap the Day/Night Mode toggle button to view the map for day or night time
driving and the 2D/3D Mode toggle button to display the map view in 2-dimensional or 3-dimensional
views for day or night driving.
Destinator User Manual 4

Route Overview
• From the Route menu, tap the Route Overview button.
An overview of your complete route, the total driving distance to your destination, the
estimated travel time and the complete destination address, are displayed on the Map
Manager screen.
Cancel Route
• From the Route menu, tap the Cancel Route button.
The current navigation stops and Destinator clears the route. You can only cancel a route
after a destination has been set.
Getting Started
Destinator User Manual 5
2. Select Location and Generate Route
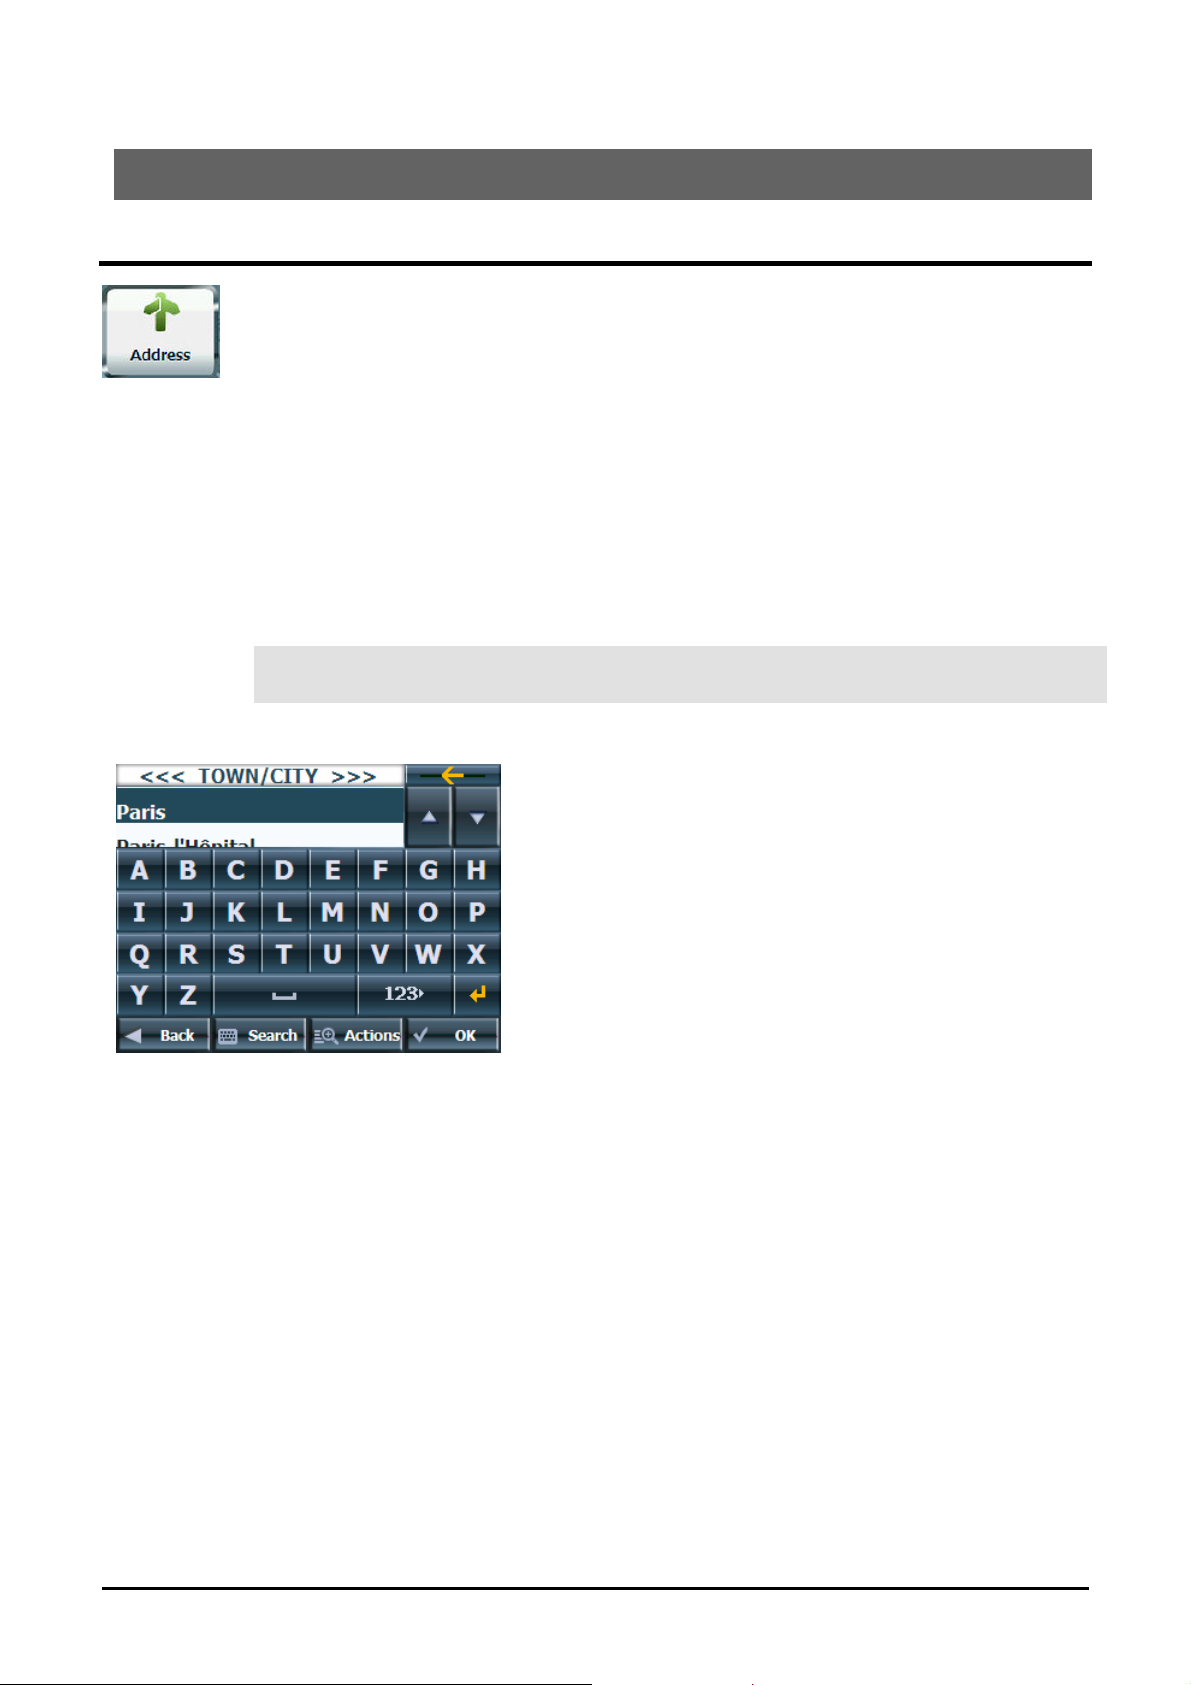
Go to an Address
From the Go To menu, tap the Address button. The Address Search Mode screen
appears, allowing you to choose how you want to enter address information. For example, if
you select City First, the first address screen lets you select from a list of cities, the second
screen a list of streets, and the third screen lets you enter an address number.
Select from the following address entry options:
• Town/City First - Town/City > Street > Address Number
• In All Cities - Street > Town/City > Address Number - You enter a street name
without having to first select a town or city. This is useful when searching for an
address in a metropolitan area where there are many cities and towns.
• Intersections- Town/City> Street > Street 2
• Postcode - Postcode, Street, Address Number - You can locate a street address by
entering the post code, without entering a town name, which is useful when you
have no information about the town.
Note: When the United Kingdom map is selected, the first address screen is always Select
County.
Tap from one of the Address Search Mode options to display the first address screen.
Figure 4 - Selecting an Address
When entering an address, you can use the keyboard to enter the characters. The characters appear in
the Address field. Destinator automatically searches the Address list for the first occurrence of the
characters entered. After you have selected a town or city, Destinator displays the next address field,
such as street and address number.
Instead of specifying a street, you have the option of selecting the Town/City Centre. If you don't know
the address number, you can select the Street Midpoint.
Tap the OK button to move through the sequence of address screens.
Destinator User Manual 6
Select Location and Generate Route
Go to Another Country
From the Address Search Mode screen, you can tap In Other Countries to select another country that
you can travel to by vehicle.
This feature is available only when you have the following maps installed:
• Map of the country where you are currently located.
• Map of the country where you want to travel.
• The map of the major roads for that continent that connect one map to another (for example, the
major roads in Europe)
For example, if you are in Paris and you want to travel to Munich, select the map of Germany and
designate Munich Town Centre as your destination. Destinator automatically displays the map of France
when travelling on local roads in France, a map of Major Roads in Europe when travelling on a European
motorway, and the map of Germany when travelling on local roads in Germany.
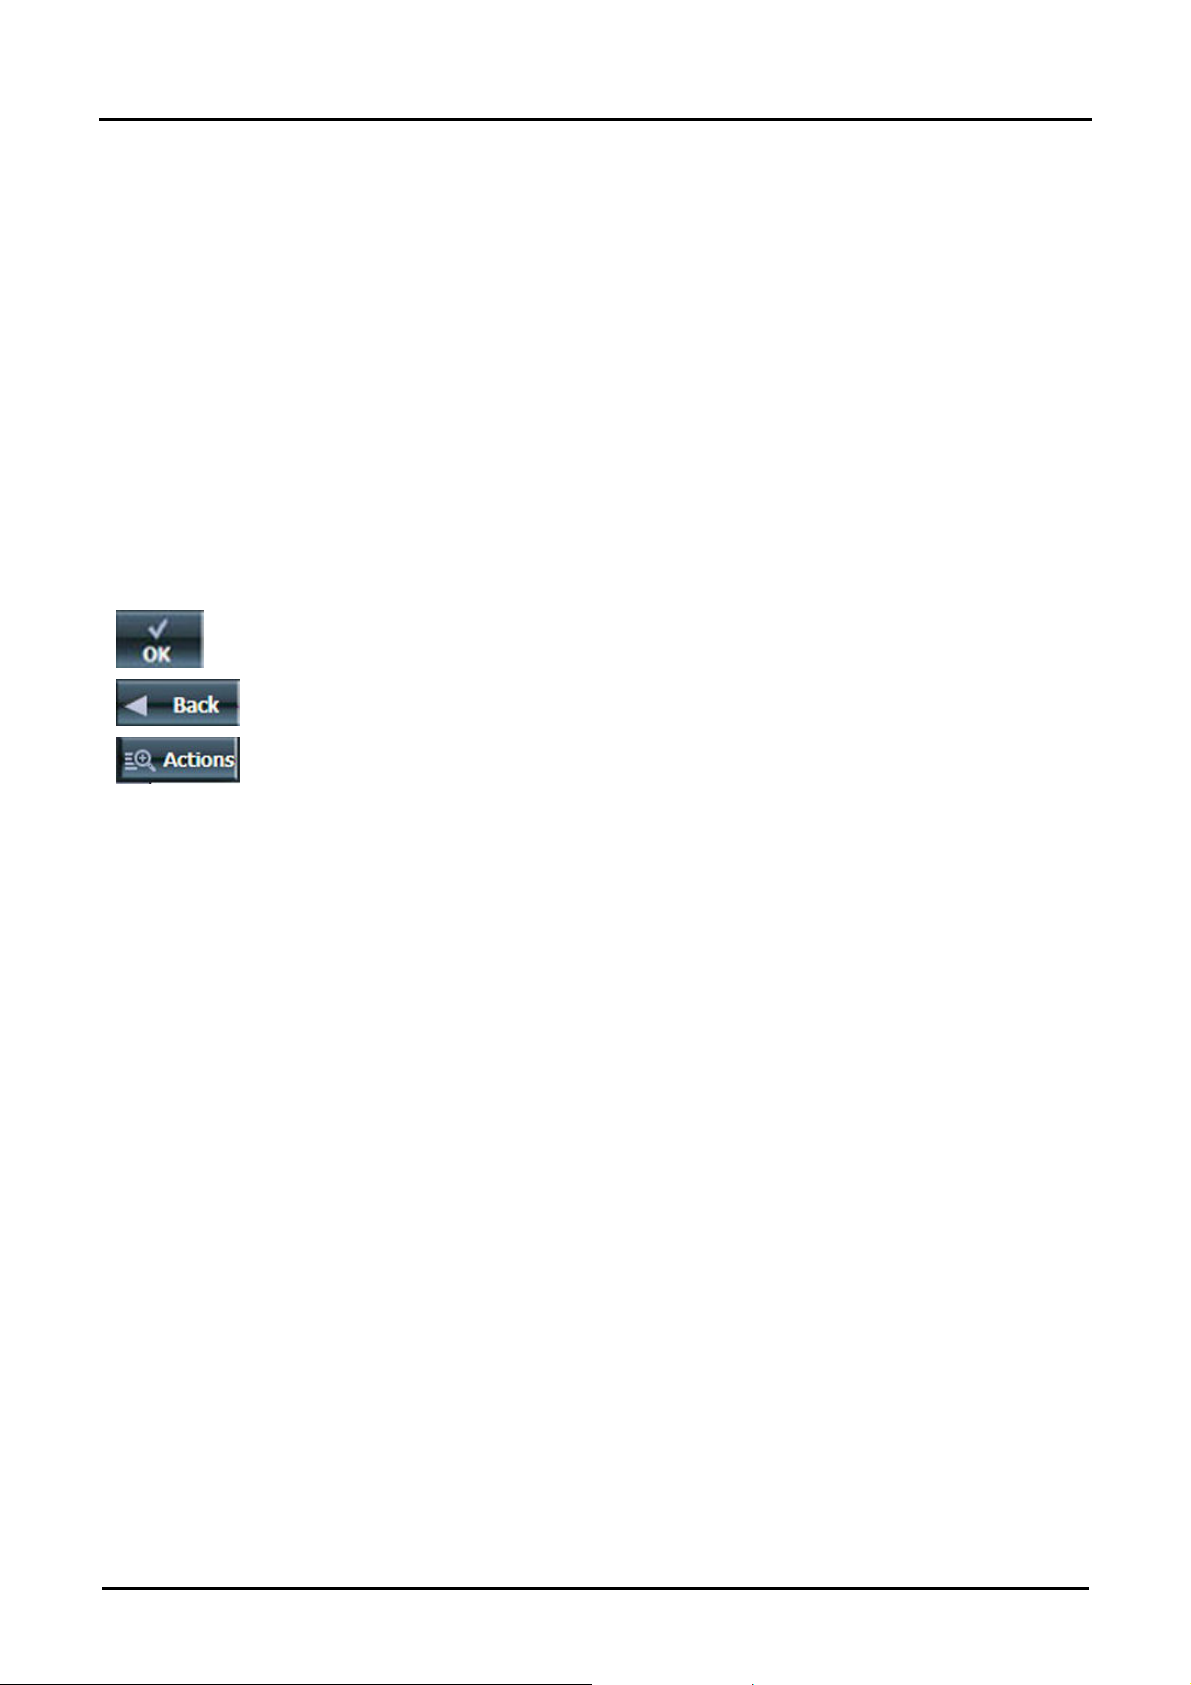
Destinator Screen Buttons
The following buttons appear on many of the navigation screens.
When you tap this button for a selected address, group or place,
Destinator automatically opens the next screen in the sequence.
When you tap this button, Destinator returns you to the previous screen.
This button provides a list of command options available for the selected
address or place.
Destinator User Manual 7
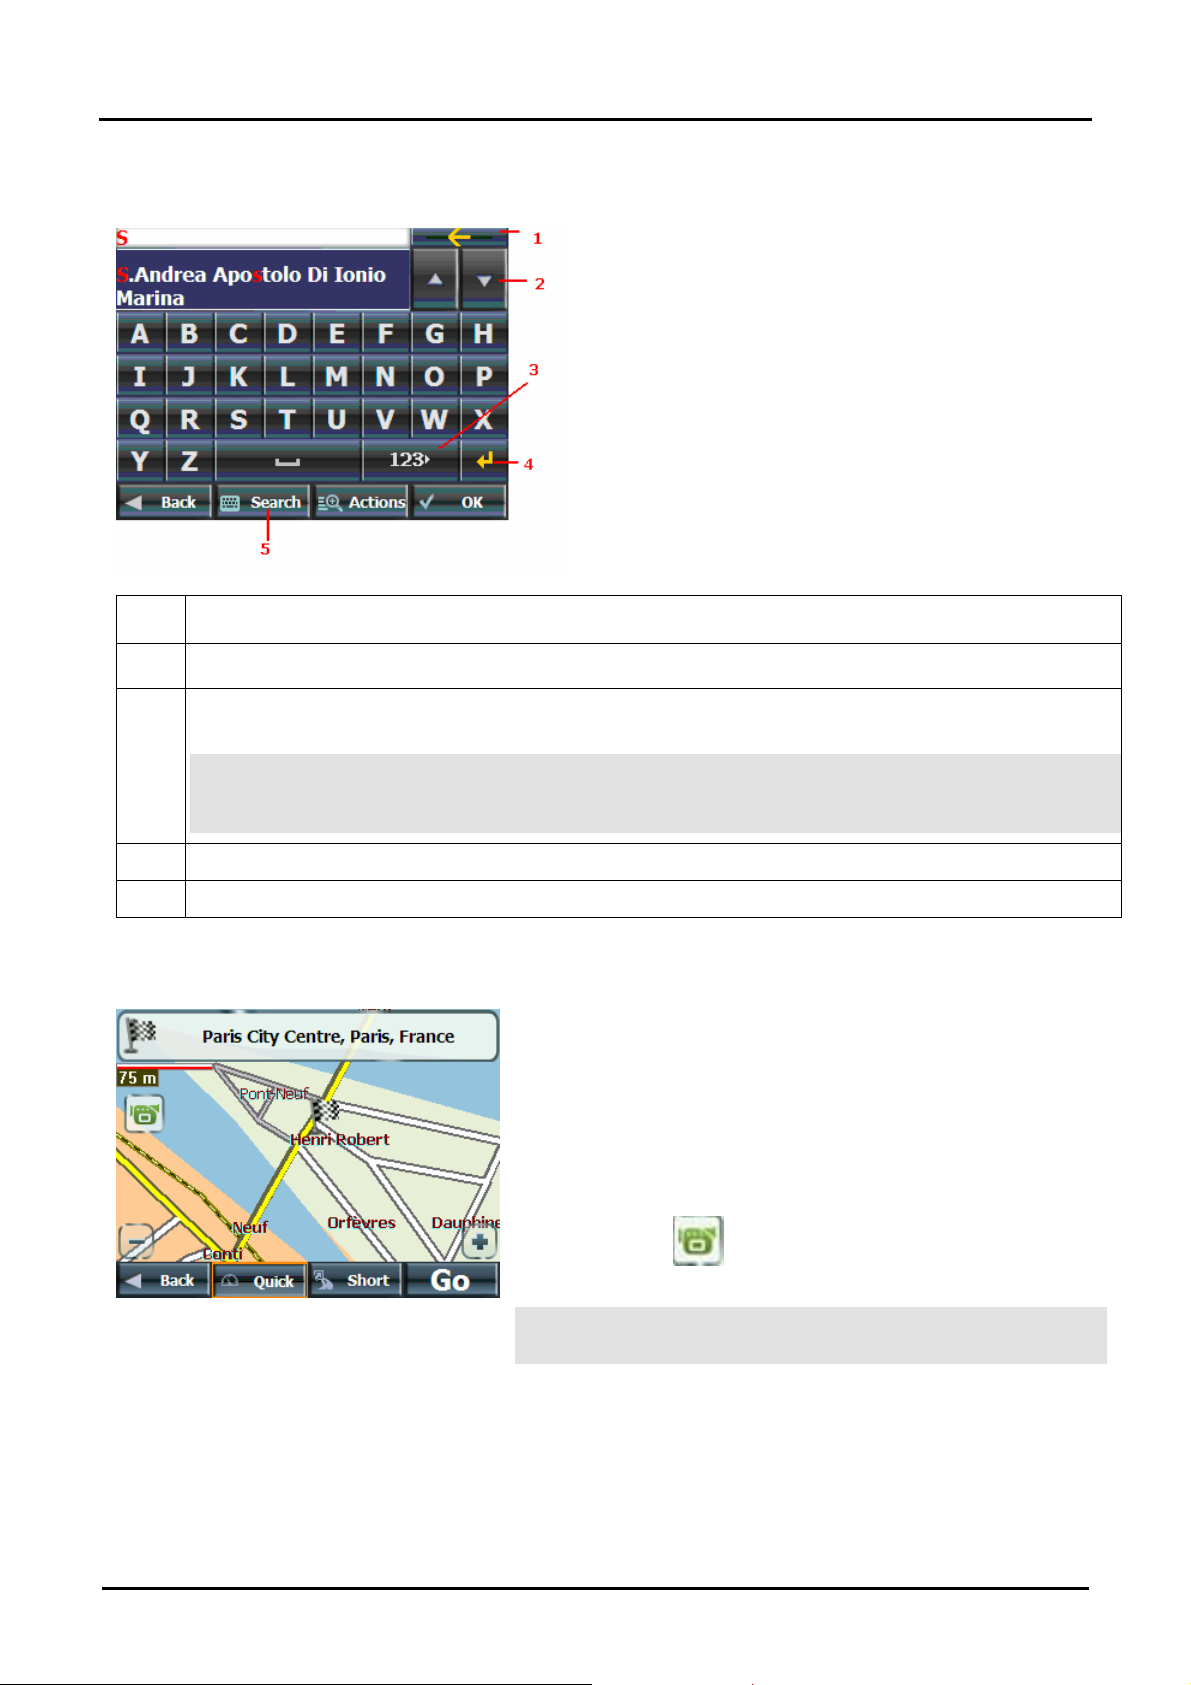
Keyboard Command Keys
The following buttons are available to enhance your search process.
Select Location and Generate Route
Figure 5 - Search and Keyboard Buttons
1 Lets you remove a character that you have entered.
2 Lets you scroll up or down the list of town/city or street names.
3 Lets you display different keyboards, including special characters (for example, Greek) and numbers.
The operating system installed on the device must be able to support these characters.
Note: Destinator lets you search for town/city and street names without having special
characters, such as umlauts or accent marks, which are used in many European languages.
For example, you can enter Munchen for München
4 Lets you extend the address list by hiding the keyboard.
5 Lets you hide or display the keyboard.
Navigate to an Address
You can select from the following route types:
Quick - This option selects the route that takes the least
amount of time. Quick is the default setting.
Short - This option selects the route that is shorter in distance.
Note: The shorter route may not always be the quickest.
Go - When you tap the Go button, Destinator calculates the
route to your selected destination.
Demo - Tap the
route.
icon to start navigating a simulated
Figure 6 - Show on Map
Destinator User Manual 8
Note: Route generation excludes any detours, stops or delays
along the route.

Select Location and Generate Route
Actions
Tap the Actions button to:
• Set an Address as the point of origin - Tap the Start Here button to designate the selected
address as the route origin.
• Show on map - Tap to see the selected address on the map.
• Save - Tap to add an address to your list of favourite locations. For more information about
favourites, see Favourite Locations on page 13.
• Information - Tap to display additional address information and phone number.
Destinator User Manual 9
Select Location and Generate Route
Points of Interest (POI)
The Points of Interest (POI) list is a collection of hundreds of interesting or useful places
organised by easy-to-find categories. For example, you can use Destinator to guide you to
a shopping centre, hotel, restaurant or petrol station.
Many categories have subcategories to provide for an even greater list of choices. For
example, petrol station, may have many subcategories each representing a particular brand
name. The same is also true for hotels. Restaurants have subcategories that represent
Search for a Location Near You
You can determine the area where you want to search for a specific place, such as a petrol station, hotel
or restaurant. My Current Location is automatically selected.
different types of food, such as Indian, Italian and French.
Tap to search near your current location.
Tap to search near your specified destination. If a destination has not been
selected and a route generated (by tapping the Go button), this button is
disabled.
Tap to search for a POI in another location. This button opens the Address
Search Mode screen, which is described in Go to an Address
on page 6.
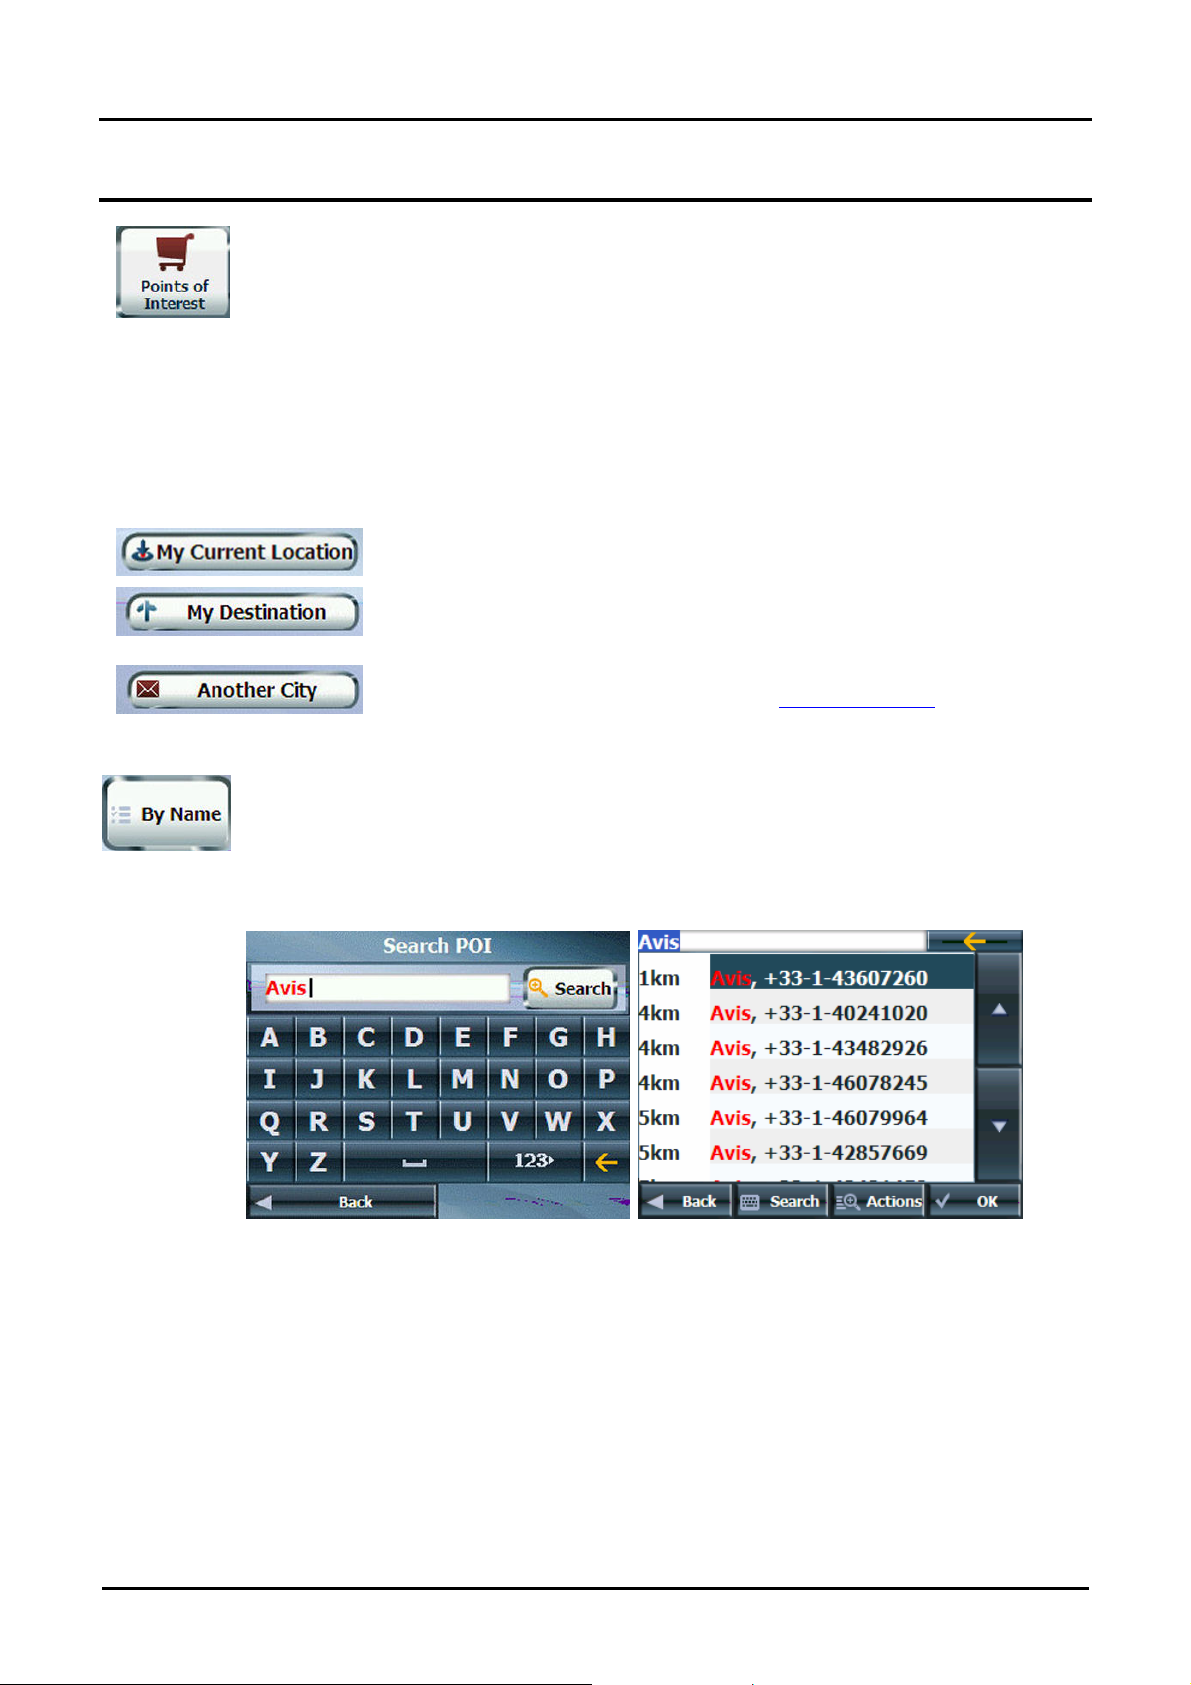
Search for a POI Name
Tap this button to display the Search POI keyboard screen, where you can search by
entering text in the POI Name field. The Smart Search System automatically displays the
POI names that match the characters entered. Destinator automatically displays the POI
entries and the distance each entry is from your current location.
For example, if I enter “Avis” and tap the Search button. Destinator displays all Avis entries
in my selected location, as shown in the figure below.
Figure 7 - Search by POI Name
Destinator User Manual 10

Select Location and Generate Route
Search for a POI Category
Tap this button to display the most common POI categories.
Figure 8 - Most Common POI Categories
Tap More to display the Point of Interest screen, where you can search through the entire
list of POI categories.
Show or Hide Symbol on Map
You can select or clear the ticks next to a POI entry to show or hide the POI symbol on the Main Map
screen.
Figure 9 - Showing a POI Symbol on the Map
Actions
Tap the Actions button to:
• Start Here – Tap button to designate the selected address as the route origin.
• Show on map – Tap to see the selected address on the map.
• Save – Tap to add an address to your list of favourite locations.
• Sort by ABC - Tap the button to display the category entries in alphabetical order.
• Information – Tap to display additional address information and phone number (where available).
Destinator User Manual 11

QuickNav
Select Location and Generate Route
You can set a QuickNav destination so that every time you tap the
Map screen, Destinator automatically calculates the route to this destination for you. When
you tap the QuickNav button for the first time, you must select a predefined address or a
POI category.
Figure 10 - Setting the Quick Nav Location
You can change the QuickNav settings by tapping the QuickNav button located on the
Settings menu.
Recent Locations
From the Go To menu, tap this button to select an existing destination from a list of
destinations that you have previously travelled to.
icon on the Main
Figure 11 -Travelling to a Recent Location
Destinator automatically stores the last 64 destinations in memory. After 64 destinations
have been saved, the older destination entries are erased.
Actions
Tap the Actions button to:
• Set an Address as the point of origin - Tap the Start Here button to designate the selected
address as the route origin.
• Save - Tap to add an address to your list of favourite locations.
• Delete an item - Tap the Actions button. Tap the Delete Item button to delete an entry on the
Recent Locations screen.
• Clear the recent location list - Tap the Actions button. Tap the Clear List button to clear all
locations in the Recent Locations screen.
• Information - Tap to display additional address information and phone number.
Destinator User Manual 12

Select Location and Generate Route
Favourite Locations
A Favourite is a destination that you have stored for easy retrieval. Save favourite destinations to your
favourites groups and later you can easily travel to these destinations.
Note: You can also add a favourite destination from the Address, POI, and Recent Locations screens.
Save a Favourite Location
From the Actions screen, tap this button. Select the group to which you want
to add your favourite destination.
Figure 12 - Adding a Destination to Your Favourites
The My Favourites folder is the default folder where all favourites are stored if
not assigned to a group. This folder cannot be deleted.
Going to a Favourite Location
From the Go To menu, tap this button to display the screen containing your favourite groups.
Select a group, for example Restaurants. Destinator automatically displays a list of stored
locations for the selected group.
Figure 13 - Going to a Favourite Destination
You can add or clear the tick next to a Favourites entry to show or hide the Favourites
symbol on the Main Map screen.
Destinator User Manual 13

Creating a Favourite Group
From the Favourites screen, tap this button to add, edit or delete groups. Enter a group
name and select a group icon.
Figure 14 - Adding a Favourites Group
To add favourite destinations to your favourite groups, see Save a Favourite Location
"Save a Favourite Location" on page 13.
Setting an Alert for a Favourites Group
Alerts let you know that you are within a certain distance of an item in a Favourites group.
Select Location and Generate Route
see
Figure 15 - Setting Your Favourite Alerts
Use the right and left scroll arrows to set the distances for the 1st and 2nd Alerts.
st
In the Set Alert Distances screen, you can disable an alert by setting the 1
Alert to Off or
by clearing the checkbox next to the selected group.
Notes:
• Favourite Alert settings affect all Favourites groups.
• The 2nd Alert must be set to sound at a closer distance than the 1st Alert.
• Alerts can be set for a group but not for individual locations. Of course, you can
always create a group that has just one location.
Destinator User Manual 14

Select Location and Generate Route
Actions
Tap the Actions button to:
• Set an address as the point of origin - Tap the Start Here button to designate the selected
address as the route origin.
• Show on map - Tap to see the selected address on the map.
• Edit a favourite location - Tap the Actions button. Tap the Edit Favourite Location button to
change the name, comment or group location for the selected location.
• Delete a favourite location - Tap the Delete Favourite Location button to remove the selected
location.
• Information - Tap to display additional address information.
Destinator User Manual 15

3. Additional Destinator Features
Driving Directions
From the Route menu, tap this button to display a complete turn-by-turn list of directions
from your current location to the selected destination. Destinator continuously updates the
Turn-by-Turn screen to display the most current instructions as you navigate the route.
Figure 16 - Turn-by-Turn Display
Note: The first turn is at the top of the list and the final turn is at the bottom, identified by
a chequered flag.
The following options are available:
Route Tap to display your entire route on the Main Map screen, plus the travel distance and the
Estimated Travel Time Remaining (ETR).
Turn Tap to display the next turn on the Main Map screen, including the street name, the distance to
the turn and the turn direction.
Avoid Tap to avoid the selected turn in the Turn-by-Turn list. Destinator recalculates the route
automatically. Note that when you exclude a turn, the recalculated route may take longer.
Destinator User Manual 16

Multiple Stops
From the Extras menu, tap this button to create a trip with multiple (up to 12) stops.
Figure 17 - Travelling to Multiple Stops in a Single Trip
When you tap the Go button, the route is calculated in stages, from the departure point to
the first stop. When you reach the first stop, the route recalculates to the second stop and
so on. If you select a stop in the middle of your list, Destinator will calculate your route to
that stop and will recalculate to the next stop on the list and so on.
Additional Destinator Features
Creating a Group
Tap the Actions button and select Add Group. From the Add Group screen, enter the group name and
tap Save. The Actions screen also lets you edit or delete a selected group.
Adding Stops
Select a group and tap Next to add locations. Tap Actions to add an Address, POI, Favourites or
Recent Locations. The location appears on the Multistop screen. You can move the location up or down
on the stops list, change the location name, enter a comment or designate a different group.
Figure 18 - Specifying a Stop
Organising Y our Itinerary
There are two different ways to organise your itinerary, by manually rearranging your stops or by
automatically optimising your route.
Tap the Up and Down buttons to move the selected stop up or down the list of stops.
Alternatively, you can automatically optimise your route for the most efficient travel experience. This
feature is most useful when you are planning stops that are far apart and it is unclear how to order the
stops to create the most efficient travel itinerary.
Tap the Optimise Route button. The list of stops is automatically rearranged to provide the most efficient
travel route.
Destinator User Manual 17

Additional Destinator Features
Actions
Tap the Actions button to:
• Start Here - Tap to designate the selected address as the route origin. You would use this option
when calculating a route from a point other than your current location.
• Add Stop - Tap to add a location by specifying an address from recent locations, favourite locations
or predefined POIs, such as fuel, food, or lodging.
• Rename Stop - Tap to change the stop information, such as name, comments or route group.
• Delete Stop - Tap to remove a selected stop.
• Information - This button displays the location's address information.
Avoid Roads
You can specify that certain roads be permanently excluded from your route calculations.
Use this feature when you want to avoid congested roads, toll roads or unsafe streets.
From the Route menu, tap the Avoid Roads button. The Avoid Roads screen appears,
displaying predefined road groups.
Destinator provides the following predefined road groups:
Figure 19 - Predefined Road Groups
• Ferries - The default value is to avoid
• Gated Communities - The default value is to allow
• Motorways - Roads that allow for high volume,
maximum speed traffic movement between and through
major metropolitan areas. The default value is to allow
• My Roads to Avoid - This is a default folder that lets
you store roads to avoid. You can display the items in
this folder and allow or avoid specific roads.
The default value is to avoid
To allow or avoid a predefined road group:
• Select a predefined group and tap the Allow/Avoid
toggle button. The next time you calculate a route,
Destinator calculates a route based on your avoid or
allow selections.
Note: predefined road groups are allowed or avoided as an
entire group. You cannot allow or avoid individual toll
roads, motorways or ferries.
Destinator User Manual 18

Creating a Group
Tap this button and select Add Group. From the Add Group screen, enter the group
name and tap OK
Figure 20 - Add a Road Group
The Actions screen also lets you edit or delete a selected group.
Additional Destinator Features
Adding a Road to A void
When you tap My Roads to Avoid or a road group, Destinator displays the group screen, which lets you
designate roads to avoid. From this screen, you can use the Allow or Avoid buttons to include or exclude
individual roads when calculating a route.
Figure 21 - Storing Road Locations
Tap Actions and then the Add Road button. Select the town/city and street. The road is displayed on the
Show on Map screen. Tap the Avoid button.
Figure 22 - Adding a Road to Avoid
Destinator User Manual 19

Additional Destinator Features
Actions
Tap the Actions button to:
• Edit Road - Tap to rename the road and/or select a different group. When you have made your
changes, tap Save.
• Delete Road - Select a road and tap this button to remove the road from your group. Destinator
no longer avoids the removed road.
• Show on Map - Tap to show the map with the displayed destination for you to review before
creating a route.
• Information - Tap to display the location's address information.
Detour
From the Route menu, tap the Detour button. The Detour screen lets you instruct
Destinator to create a detour to avoid a road event, such as an accident.
Figure 23 - Avoiding a Road Event by Performing a Detour
Select the Detour option that you want to generate a detour for the distance specified. For example, if you
are travelling on a major motorway and you are alerted by the news that there is traffic for the next 2 miles,
you can have Destinator calculate a detour that takes you off the motorway and then returns you to the
motorway after a distance of 2 miles.
Map Browsing
You can browse the map without a GPS signal. From the Options menu, tap
the Free Map Browsing button to disconnect from the GPS receiver.
Figure 24 - Explore the Map
Destinator User Manual 20

Additional Destinator Features
The icon identifies your current position. You can use the arrow cursor to move the map. When you
have located the street destination, you can tap that point on the map. A pop-up menu appears. Tap Go
There to navigate to the selected point.
You can reconnect to GPS, by going to the Options menu and tapping the GPS Navigation button.
Pedestrian Mode
Pedestrian Mode lets you travel as a pedestrian, generating a route up to ten
kilometres, which is not limited by vehicle constraints, such as one way streets. When creating a
pedestrian route, Destinator avoids motorways or other roads where pedestrians would not travel. Voice
prompts are deactivated in this mode.
From the Options menu, tap the Pedestrian button. You can switch back to Vehicle Mode by tapping
the Vehicle Mode button.
Figure 25 - Pedestrian Mode
Note: When Pedestrian Mode is selected, the Turn-by-Turn, Route Summary, Avoid Roads and
Multistop Planner features are disabled.
Map Selection
From the Options menu, tap the Select Map button to change the selected map to another
map saved on your SD memory card.
Figure 26 - Select a Map
Destinator User Manual 21

Additional Destinator Features
Destinator immediately implements the selected map for all navigation features. If you are using a map
for the first time, an End-User Licence Agreement (EULA) screen appears. Read it and then select the
Agree checkbox to continue working with Destinator.
Figure 27 - Map's End-User Licence Agreement
You can also choose from the following Select Map commands:
• Refresh - Tap to refresh the screen when a new memory card is inserted into the device.
• Delete - Tap to permanently remove a selected map. Note: You cannot delete the map you are
currently using.
Destinator User Manual 22

4. Destinator Configurations
Settings Menus
From the Options menu, tap the Settings button to configure Destinator system settings
and utilise travel playback and demonstration features.
Prompts
From the Settings menu, tap the Prompts button to select the types of voice and road
name and number notifications that you would like to use while navigating.
Road Prompts
Speed Warning Warns you when your car exceeds the speed limit. This prompt is not active by
default.
Route Recalculation Notifies you when Destinator recalculates your route. For example, when you
miss a turn. This prompt is not active by default.
Unreliable GPS Signal Warns that the GPS signal is too low and unreliable for navigation. This prompt
is automatically active by default.
GPS not found Alerts you if the GPS signal is lost or if the power source has been removed from
the GPS receiver.
GPS Signal
From the Settings menu, tap the GPS Signal button to display GPS information and to
configure the GPS connection settings.
Destinator receives data from a built-in GPS receiver or an external GPS receiver,
connected to your navigation device through Bluetooth
your location. Your vehicle's location and position are constantly updated unless you are
working in the Free Browse Map mode or you tap the GPS Off button. The GPS receiver
may take a few minutes to find its initial location. For best results, ensure that the GPS
receiver has a clear view of the sky.
The GPS Signal screen displays the following information:
• Longitude
• Latitude
• Speed
• Altitude
• Number of Satellites
If you are working in the Free Browse Map mode, Destinator automatically disconnects from the GPS
receiver.
®
Wireless Technology, to pinpoint
Destinator User Manual 23

Language settings
From the Settings menu, tap the Language button to display the Language Settings
screen.
Figure 28 - Language Settings
You can select from:
• Display Language - Address and map information, and screen and menu labels
Destinator Configurations
Look & Feel Settings
From the Settings menu, tap the Look & Feel button to select from a list of preinstalled
skins. A skin determines the visual effects such as colours and icons displayed.
• Prefer QWERTY Keyboard - When this option is selected, the navigation keyboard
is displayed as a computer keyboard (QWERTY style) on the screens.
• Auto Day-Night Adjustment - When this option is selected, Destinator
automatically switches between day and night view according to the GPS time and
date information provided. If this option is selected, but you manually switch the
day/night view, it will remain in the mode you selected until the next time
Destinator automatically switches the day/night view.
Destinator User Manual 24

Units of Measure
From the Settings menu, tap this button to specify the measurement system you would
like to use.
You can select:
• Miles, Yards
• Miles, 10th of a Mile
• Kilometres, Metres
Time Settings
From the Settings menu, tap this button to display time settings.
Destinator Configurations
Figure 29 - Time Zone
You can select the Adjust to Daylight Savings checkbox to
automatically adjust for daylight savings.
Destinator User Manual 25

Map Settings
From the Settings menu, tap the Map Settings button to select from the map interface
options listed below.
You can choose the following options for the main map:
Destinator Configurations
Rotate Map to Driving
Direction
Orients the map so that the direction you are travelling in is always at the top of
the screen.
Larger Labels Increases the size of street names to make the map easier to read.
Allow Screen Tap Displays the navigation popup menu when tapping on a map location.
Automatic Map Zoom When selected, the zoom is speed dependent. The map zooms out at higher
speeds, displaying a larger map area, and zooms in at slower speeds, displaying
a smaller map area.
Manoeuvre Diagram Displays a large image that indicates your next manoeuvre, such as left turn or
right exit.
Display upcoming
Displays the next street name.
street name
Allow Zoom Control Displays zoom in and zoom out buttons.
Display Compass Displays the compass, which lets you change the map view display:
• 2D map view with the forward direction at the top.
• 3D map view with the forward direction at the top.
• 2D map view with North at the top.
Display QuickNav
Button
Display Volume
Displays the QuickNav button, which you tap to navigate to a pre-selected
location
Displays the Volume Control bar.
Control
Display GPS Status Displays whether a reliable GPS signal has been located.
Display Power
Displays if your device is plugged in or running on battery power.
Indicator
Display Information
Displays estimated time of arrival.
Bar
Display Menu Button Displays the Menu button, which opens the Main menu.
Destinator User Manual 26

Start Demo
From the Settings menu, tap this button to display a simulated route. Many of the
Destinator navigation features are disabled when the Demo is running. You can end the
Demo by tapping the Stop Demo button.
About
From the Settings menu, tap this button to display version and copyright information.
Destinator Configurations
Help
From the Settings menu, tap this button to display technical support information.
Destinator User Manual 27

5. Destinator PC Portal
Destinator PC Portal Installation
To install the Destinator PC Portal:
1. Insert the Destinator CD into the PC's CD drive. The Destinator PC Portal Installation wizard
prompts you to select the language used for the installation process. When you have selected a
language, click OK.
2. Read the Welcome message and click Next.
3. From the Select Directory screen, either accept the recommended default directory or browse to a
different directory to install the Destinator PC Portal. Click Next.
4. If you want to change the language selection or the directory location before installing, click Back
and change the language selection. When you are ready to install the Destinator PC Portal, click
Next. The Installation Status box displays the progress of the installation process.
5. When the installation is complete, click the Finish button. The Select Language dialogue box
appears.
6. From the Select Language dialogue box, you can select the display language for the Destinator
PC Portal. Select the Launch PC Portal checkbox for Destinator PC Portal to start immediately.
Alternatively, you can start the Destinator PC Portal from the Microsoft
menu.
®
Windows® Programs
Note: You can uninstall the Destinator PC Portal by opening the Microsoft® Windows Programs
menu, selecting Destinator>Uninstall Destinator PC Portal.
PC System Requirements
Please review the following system requirements before installing Destinator PC Portal:
• CPU: AMD/Intel® Processor 300 MHz or faster
• Operating system: Windows® 2000/XP/Vista
• Memory: 128 MB RAM (minimum)
• Hard drive free space: 500 MB (minimum)
• CD-ROM: 4x drive or higher
• ActiveSync Version 3.8 to 4.2 supported under Windows 2000 and XP
• USB Version 1.1 or 2.0 connection
Destinator User Manual 28

Destinator PC Portal Wizard
Destinator PC Portal
The first time you start the Destinator PC Portal, the
PC Portal Wizard automatically starts, letting you install
Destinator software, supported languages voice
guidance options and maps. For a complete description
of the Destinator PC Portal, see Destinator PC Portal
Main Screen on page 30.
To open the Destinator PC Portal Wizard:
1. Click the Microsoft® Windows Start button.
2. Click Programs > Destinator > Destinator PC
Portal. The Destinator PC Portal will start.
3. If this is your first time using Destinator PC
Portal, the Destinator PC Portal Wizard
automatically starts and displays the Welcome
screen.
4. Make sure that your device is connected by USB
cable to a port on your PC. You will see
Connected on the Destinator PC Portal screen.
5. Click the buttons
to move to the previous or next screen.
6. Select software components, languages and voice
to install to your device.
Notes:
• If you want to start the wizard, click
Figure 30 -Destinator PC Portal Wizard Options
from the Destinator PC
Portal Main menu.
• If you want to stop the wizard, click
This will open the
Destinator PC Portal Main screen.
• If after you have adjusted the components,
software and voice options, you want to return
to the original selections, click
.
Destinator User Manual 29

Destinator PC Portal Main Screen
Destinator PC Portal
Figure 31 - Destinator PC Portal Main Screen
Destinator PC Portal Options
Install Software Click Install Software and select from the following components to
install to your device:
• Destinator - GPS navigation s oftware
• TMC - Real time traffic information channel used by
Destinator.
• Slide Player - A tutorial that displays Destinator features.
To install Destinator components:
1. From the Install Software screen, select from the list of
components, as described above.
2. Click the Install button.
3. Destinator PC Portal installs the selected components to the
device's main memory.
Manage Maps Click Manage Maps to install or remove a map. For more information,
see Map Installation
Install Languages Click Install Languages to install a language on your device.
To install languages:
on page 32.
1. From the Install Languages screen, select the languages to be
installed on the device.
2. Click the Install button.
3. Destinator PC Portal installs the selected languages to the
device's main memory.
Destinator User Manual 30

Destinator PC Portal
Import Google™ Earth
Placemarks
Click to import favourite locations designated as Google™ Earth
Placemarks from your PC to the selected Favourites group on the
device. For more information, see Google
Placemarks" on page 33™ Earth Placemarks
see "Google™ Earth
see "Google™ Earth
Placemarks" on page 33.
Import Favourites Click to import favourite locations from your PC to the selected
Favourites group on the device. For more information, see Favourite
Locations see "Favourite Locations - Import" on page 35.
Export Favourites Click to export favourite locations from your device to a selected
location on your PC. For more information, see Favourite Locations.
Backup Destinator Data Click the Backup/Restore button to backup the following Destinator
items:
• Favourites - All locations that are displayed in Destinator's
Favourites screens.
• Multistops - All locations that appear in Destinator's
Multistops screens.
• My Destinator - Setting configurations, such as map views
(2D/3D and Day/Night), prompts, units of measurement, as
well as map and route setting preferences.
When you select Backup, Destinator PC Portal makes a copy and
stores the information to your computer.
To backup Destinator data to your PC:
1. From the Backup/Restore screen, select Backup.
2. Select the Destinator items that you want to make a copy of
and save to your computer.
3. Click the Backup button.
4. Destinator PC Portal saves the selected Destinator items to
your computer.
Restore Destinator Data Click the Backup/Restore button to restore Favourites, Multistops
and My Destinator data to a navigation device. When you select
Restore, Destinator PC Portal recovers the backup information
stored on your computer.
To restore stored Destinator data to a navigation device:
1. From the Backup/Restore screen, select Restore.
2. Select the Destinator items that you want to restore.
3. Click the Restore button.
4. Destinator PC Portal restores the selected Destinator items.
Select Language Click the Select Language button to show a list of languages available
for viewing the Destinator PC Portal.
Select Device Click the Select Device button to select from up to four connected
devices. The Select Device screen lets you quickly install, import or
export, backup or restore Destinator components and data for multiple
devices.
Destinator User Manual 31

Map Installation
Destinator PC Portal
Figure 32 - Installing a Map on the Device
After you have installed Destinator on your navigation device, you must install at least one map.
To install a map:
1. From the Maps pane, select a map.
2. From the Memory Status pane select a Target option, such as Storage Card, Main Memory or
Removable Disk.
3. When you select a Target option, the Destinator PC Portal displays the following information:
Required - The amount of free space necessary to install the map on the selected Target option.
Available - The amount of free space available for the selected Target option.
Note: If the free space required is equal to or greater than the free space available, Destinator PC
Portal will not install the selected map.
4. Click the OK button.
5. The selected map is installed and displayed in the Device Maps pane.
Notes:
• Click the Refresh Target button to update the target options.
• Click the Restore Defaults button to display the original map options.
Removing Maps
You can remove a map by selecting a map in the Device Maps pane and clicking the Add/Remove
button.
Destinator User Manual 32

Destinator PC Portal
Google™ Earth Placemarks
Import Placemarks lets you import Google™ Earth Placemarks into the device, which are displayed in
Destinator under Favourites. Google™ Earth Placemarks are locations that you have designated on
Google™ Earth as saved locations.
From a Web browser, go to http://earth.google.com/download-earth.html and download the free
version of Google™ Earth and install as described in the Google™ Earth instructions.
T o set Google™ Earth Placemarks:
1. From the Microsoft© Windows Programs list, click to start the program.
2. On the globe, locate the country and then zoom in to display towns, streets and buildings.
Figure 33 - Enter the Activation Number
3. You can use the Layer pane to display street names, tourist information and more.
4. From the toolbar, click
place you want to mark.
5. The Placemark dialogue box appears. You must enter a placemark name. You can also add other
descriptive information. When done, click OK.
6. Select the Placemark icon and right-click to display a context-sensitive menu. In this menu, click
Save As.
7. The Save As dialogue box appears. Browse to the folder where you want to store the placemark file
and save the file as .kml.
for the Placemark icon to appear. Drag the Placemark icon to the
Importing Google™ Earth Placemarks into your navigation device:
1. From the Destinator PC Portal Main Menu, click to open the Import
Placemarks screen.
Destinator User Manual 33

Destinator PC Portal
Figure 34 - Import Placemark Screen
2. Click the Load Placemarks button to display the placemark .kml files and select a file. The
placemark appears in the Loaded Placemarks box. Select the checkbox to import the
corresponding placemark to the device.
3. Select the group name for the selected placemarks. The default group name is Favourite
Placemarks.
4. When you are ready to import the placemark files, click Import. These files are displayed in the
selected group name under Favourites in Destinator.
Destinator User Manual 34

Destinator PC Portal
Favourite Locations - Import
Import Favourites lets you import content created externally as a new Favourites category.
You can download a category of favourite destinations from your PC to your device. Destination data must
be contained in a comma-separated values (.csv) file. You can import favourites into your device by
following the procedure as displayed on the Import Favourites screen.
Figure 35 - Importing Favourite Locations to Destinator
To import a .csv file into the device:
1. Connect the device to the PC with a USB cord.
2. From the Destinator PC Portal Main menu, click the Import Favourites button.
3. From the Import Favourites screen, click the button to browse for the .csv files stored on
your PC.
4. Select a .csv file and click the Import button. A message appears letting you know that the category
has been successfully exported from the device.
Note: From the Import Favourites screen, you can rename the category when importing the .csv file
into your device.
The .csv file contains the following fields:
Name Comment Longitude
Camera 1 Active 54.2345 23.345 34423 Munich Hunche 7
McDonalds +4954467892 34.234 12.456 45678 Berlin Mark 23
Mikes +4978343899 22.567 34.234 23412 London Victoria 234
Notes:
Latitude Postcode Town/City Street Address
Number
• The name, longitude and latitude fields are mandatory.
• The longitude and latitude are numerical values. All other fields contain string values.
• Even if the .csv file does not contain all values, the separating commas must still be included.
• The .csv file contains the values in a table as a series of ASCII text lines, organised so that each
column value is separated by a comma from the next column's value and each row starts a new line.
• If a string contains a comma, the entire string must be enclosed in (( )) (double parentheses).
Destinator User Manual 35

Destinator PC Portal
Favourite Locations - Export
You can export a list of favourite locations from a navigation device to your PC. The list is stored on your
PC in a .csv file. Exporting favourites is achieved by following the procedure displayed on the Export
Favourites screen.
Figure 36 - Exporting favourite locations
To export a .dat file from the device:
1. Connect the device to the PC with a USB cord.
2. From the Destinator PC Portal Main menu, click the Export Favourites button.
3. From the Export Favourites screen, click the button to display the favourites categories
stored on the device.
4. Select a category and click the Export button. A message appears letting you know that the
category has been successfully exported from the device.
Note: From the Export Favourites screen, you can rename the category when exporting your .dat file.
General W arning Messages
The following warning messages may appear when you're working with Destinator PC Portal.
Lost connection transfer If at any point during the installation or data transfer, the
connection to the device is lost, the following message is displayed:
"Connection to the device has been lost. Please check your
connection."
Uninstalling Destinator Console When a version of Destinator Console (versions prior to the
Destinator PC Portal) is located on your computer, the following
message is displayed:
"A previous version of Destinator Console was found. Do you wish
to uninstall?"
It is recommended that the previous Destinator Console be
uninstalled before installing Destinator PC Portal.
Destinator User Manual 36

Destinator PC Portal
Uninstalling Destinator PC
Portal
When an earlier version of Destinator PC Portal is located on your
computer, the following message is displayed:
"A previous version of Destinator PC Portal was found. Do you
wish to uninstall? "
It is recommended that a previous version of Destinator PC Portal
be uninstalled before installing the current version.
Updates to Destinator PC Portal If there are updates in My Destinator, you are prompted to
download them in the following message:
"There are updates to Destinator PC Portal, do you wish to
download and install them?"
Previous maps If maps from a previous Destinator version are located on your
computer, the following message is displayed:
"Existing map data found. Do you want to keep it? "
Clicking Yes lets you install maps from previous Destinator
Console or Destinator PC Portal versions.
Remove maps The following message appears when you have selected an installed
map and clicked the Actions button:
"Selected maps will be removed from your device. Are you sure you
wish to continue?"
Data Transfer If you close the Destinator PC Portal while install Destinator
software or a map, importing or exporting a Favourite location, or
backing up Destinator
data, the following message appears: "If you
close the Destinator PC Portal now, the [Process] will not be
completed. Are you sure you wish to close?"
Backup Data If stored Destinator data is located on your computer, the following
message appears:
"Destinator Backup data found. Do you want to keep it?"
It is recommended that backup data be kept."
Destinator User Manual 37

Index
A
About • 27
Actions • 9, 12, 15
Add to My Favourites • 14
Adding a Road to Avoid • 19
Adding Stops • 17
Additional Destinator Features • 16
Alerts for a Favourite Group • 14
Avoid Roads • 18
C
Cancel Route • 5
Configuration Wizard • 2
Creating Group • 19
D
Demo • 2, 27
Destinator Configurations • 23
Destinator PC Portal Installation • 28
Destinator PC Portal Main Screen • 30
Destinator PC Portal Wizard • 29
Destinator Screen Buttons • 7
Detour • 20
Driving Directions • 16
E
Exporting Favourite Locations • 36
F
Favourite Locations • 13
G
Go to an Address • 6
Go to Another Country • 7
Going to a Favourite Destination • 13
Groups • 14
H
Map Browsing • 20
Map Installation • 32
Map Selection • 21
Map Settings • 26
Map Views • 4
Multiple Stops • 17
N
Navigate to an Address • 8
O
Organising Your Itinerary • 17
P
Pedestrian Mode • 21
POI category • 11
POI Name • 10
Points of Interest (POI) • 10
Prompts • 23
Q
QuickNav • 12
R
Recent Locations • 12
Removing Maps • 32
Road Prompts • 23
Route Overview • 5
S
Save a Favourite Location • 13
Search for a Location Near You • 10
Search for a POI Category • 11
Search for a POI Name • 10
Select Location and Generate Route • 6
Show or Hide Symbol on Map • 11
Start Demo • 27
U
Units of Measure • 25
Help • 27
I
Import Favourite Location • 30
Importing Favourite Location • 35
Installing Maps • 30
Introduction • 2
L
Language settings • 24
Location Icons • 4
Location Point on Main Map • 4
Look & Feel Settings • 24
M
Main Map • 3
Main Map Icons • 3
 Loading...