

Page 1

Version 2.0
Page 2

ii
Zpen User’s Guide
Preface
Welcome to the Zpen User’s Guide. This guide describes the
operation and usage of the Zpen.
The guide includes the following chapters:
• Chapter 1, Introducing the Zpen, page 1, introduces the
Zpen and describes its basic features and components.
• Chapter 2, Using the Zpen , page 6, describes the basic
operation of the Zpen, as well as how to maintain them. It
also presents a simple tutorial for getting started with the
Zpen .
• Chapter 3, Using the Pen&Ink Editor Viewer
Application, page 19, describes how to use the Zpen with the
Pen&Ink Viewer application, which comes preinstalled on the
Receiver’s USB Flash Drive.
• Chapter 4, Configuring Device Properties, page 39,
describes how to customize Receiver settings to control
various aspects of its operation.
• Appendix A, Troubleshooting, page 44, describes the
most common issues or problems that you may encounter
when working with your Zpen and how to resolve them.
Page 3

Table of Contents
Zpen User’s Guide
iii
Table of Contents
Preface........................................................................................................................ii
Table of Contents......................................................................................................iii
Conventions Used in this Guide..............................................................................vi
Chapter 1................................................................................................ 1
Introducing the Zpen.................................................................................................1
Overview.....................................................................................................................2
Zpen.........................................................................................................................2
Receiver...................................................................................................................3
Working with the Zpen ..............................................................................................4
Package Contents......................................................................................................5
System Requirements...............................................................................................5
Chapter 2................................................................................................ 6
Page 4

iv
Zpen User’s Guide
Using the Zpen ...........................................................................................................6
Getting Started ...........................................................................................................7
Step 1: Familiarize Yourself with the Zpen ..............................................................8
Step 2: Clip the Receiver to a Sheet of Paper.........................................................8
Step 3: Turn On the Receiver..................................................................................9
Step 4: Begin Writing ! .......................................................................................... 10
Step 5: View Your Files on the Computer............................................................. 12
Maintaining the Zpen .............................................................................................. 17
Inserting the Zpen’s Batteries............................................................................... 17
Inserting the Pen Tip............................................................................................. 18
Chapter 3..............................................................................................19
Using the Pen&Ink Viewer Application................................................................. 19
Pen&Ink Viewer Main Window............................................................................... 21
Menu Bar............................................................................................................... 22
Toolbars................................................................................................................ 24
Pages Pane........................................................................................................... 26
Writing Area .......................................................................................................... 26
Navigating................................................................................................................ 29
Moving from page to page within a document...................................................... 29
Saving....................................................................................................................... 31
Printing..................................................................................................................... 32
Emailing ................................................................................................................... 34
Rotating the Ink....................................................................................................... 37
Chapter 4..............................................................................................39
Page 5

Table of Contents
Zpen User’s Guide
Configuring Device Properties...............................................................................39
Configuring Receiver Settings ...............................................................................40
Setting the Clock......................................................................................................42
Appendix A ..........................................................................................44
Troubleshooting.......................................................................................................44
Zpen Operation.........................................................................................................45
v
Page 6
vi
Zpen User’s Guide
Conventions Used in
this Guide
NOTE:
This is a note
IMPORTANT:
!
Important Information
TIP:
This is a tip providing useful suggestions and information.
Page 7

Introducing the Zpen
Zpen User’s Guide
3Chapter 1
Introducing the Zpen
This chapter introduces the Zpen and describes its basic features
and components. It contains the following sections:
1
• Overview, page 2, introduces the Zpen and provides an
overview of their key components.
• Working with the Zpen, page 4, describes how the Zpen
can be used.
Page 8

2
Zpen User’s Guide
Overview
The Zpen is the ultimate wireless PC peripheral tool. You can use
it to write and sketch on any paper and then store this
information in the system’s flash memory fo r later retrieval and
downloading to a PC. The Zpen can be used by anyone of any
age, in any environment – at home, school or in the office. It is
ideal for those on the go, as you can write your documents and
then view them on any computer – all without having to install
special software.
The system comes with two main components – the pen itself and
a receiver.
Zpen
Take a moment to familiarize yourself with the various parts of
the pen, especially the rocker switch.
The Zpen works by transmitting its position to the Receiver.
Information written or drawn with the pen is stored on the
Receiver’s flash memory, where it can later be retrieved via a
standard USB connection. Written information can also be
converted to text using standard handwriting recognit ion
software.
The pen works with any standard mini-ballpoint pen ink cartridge.
Its rubber grip ensures that the pen is easy to hold and handle.
Page 9
Introducing the Zpen
Zpen User’s Guide
Receiver
The Receiver interprets the pen’s live actions and stores them in
files on its flash memory. It can be attached to any paper, with a
coverage area up to an A4 size page. The Receiver easily
connects to any PC via a standard USB connector.
The Receiver contains a rechargeable battery, which
automatically charges when connected to a USB connector on
your PC.
IMPORTANT:
!
You should charge the Receiver’s battery for 16 hours before using the
Zpen for the first time.
Image resolution with the Receiver is between 300-900 dpi.
Up to eight registered Zpen can be used with a single Receiver,
one at a time.
3
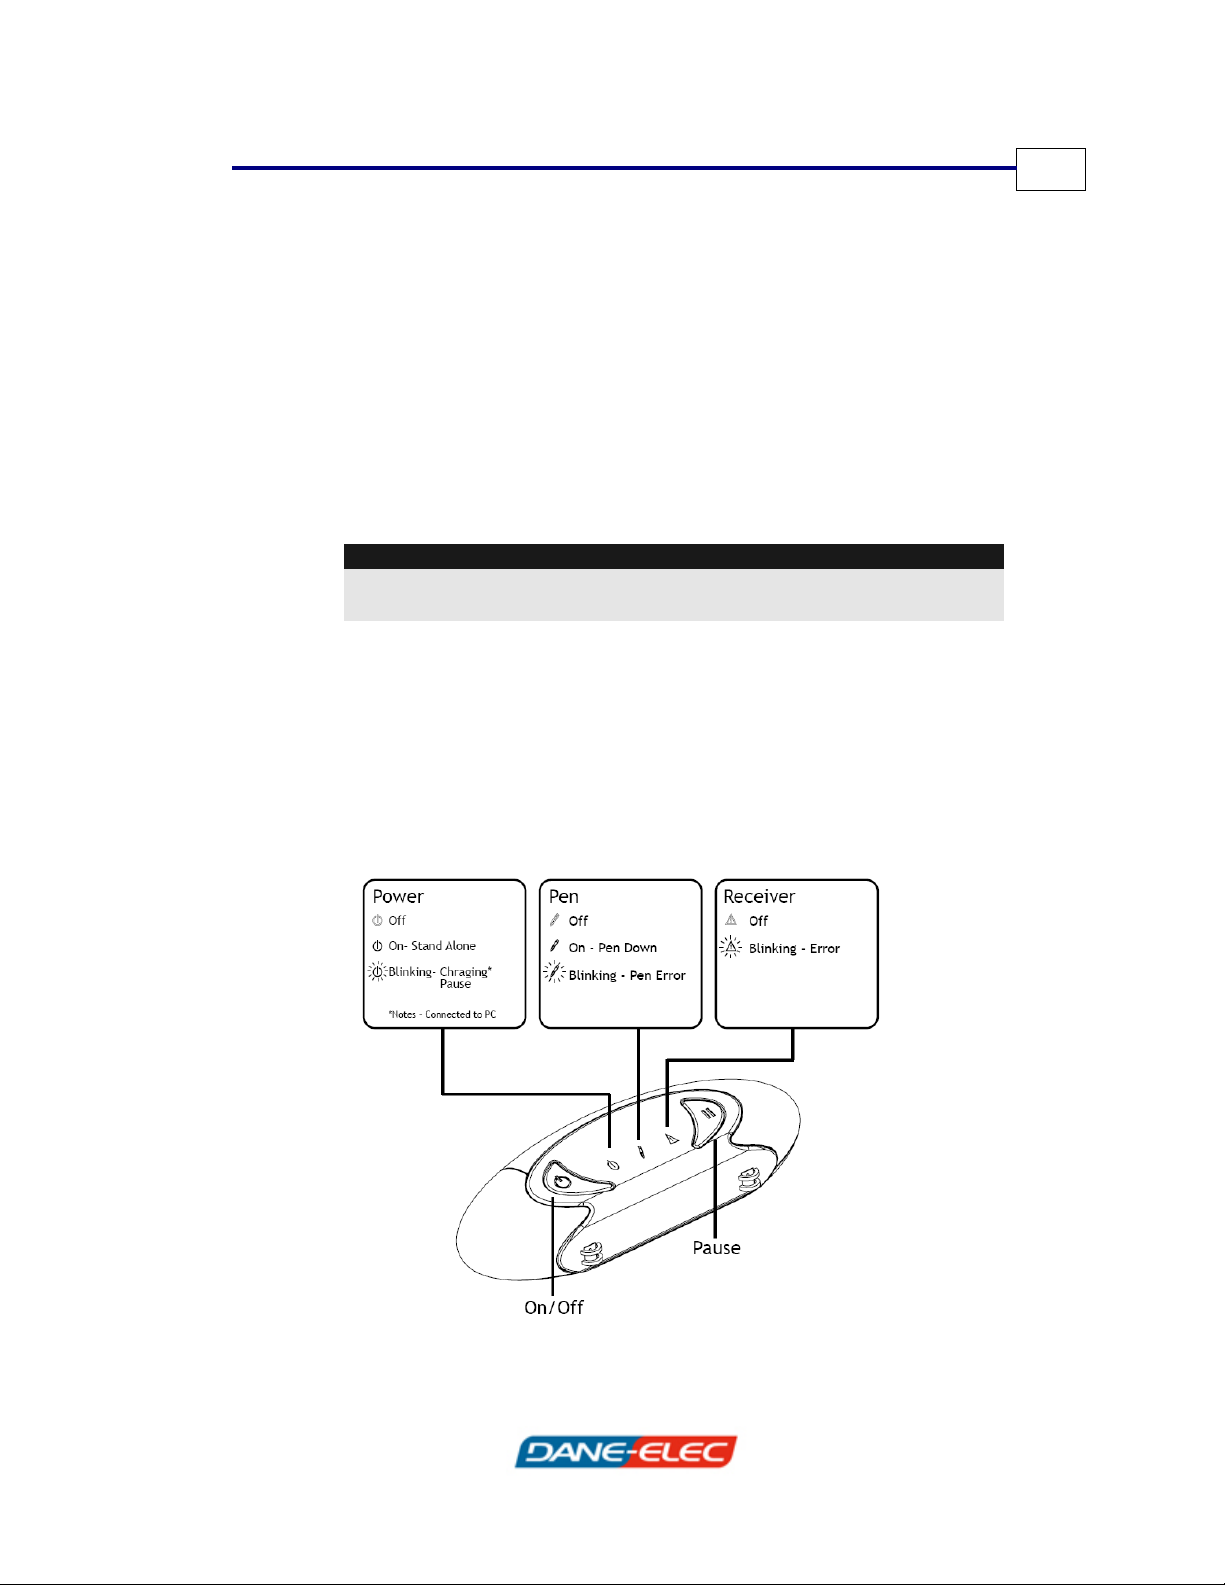
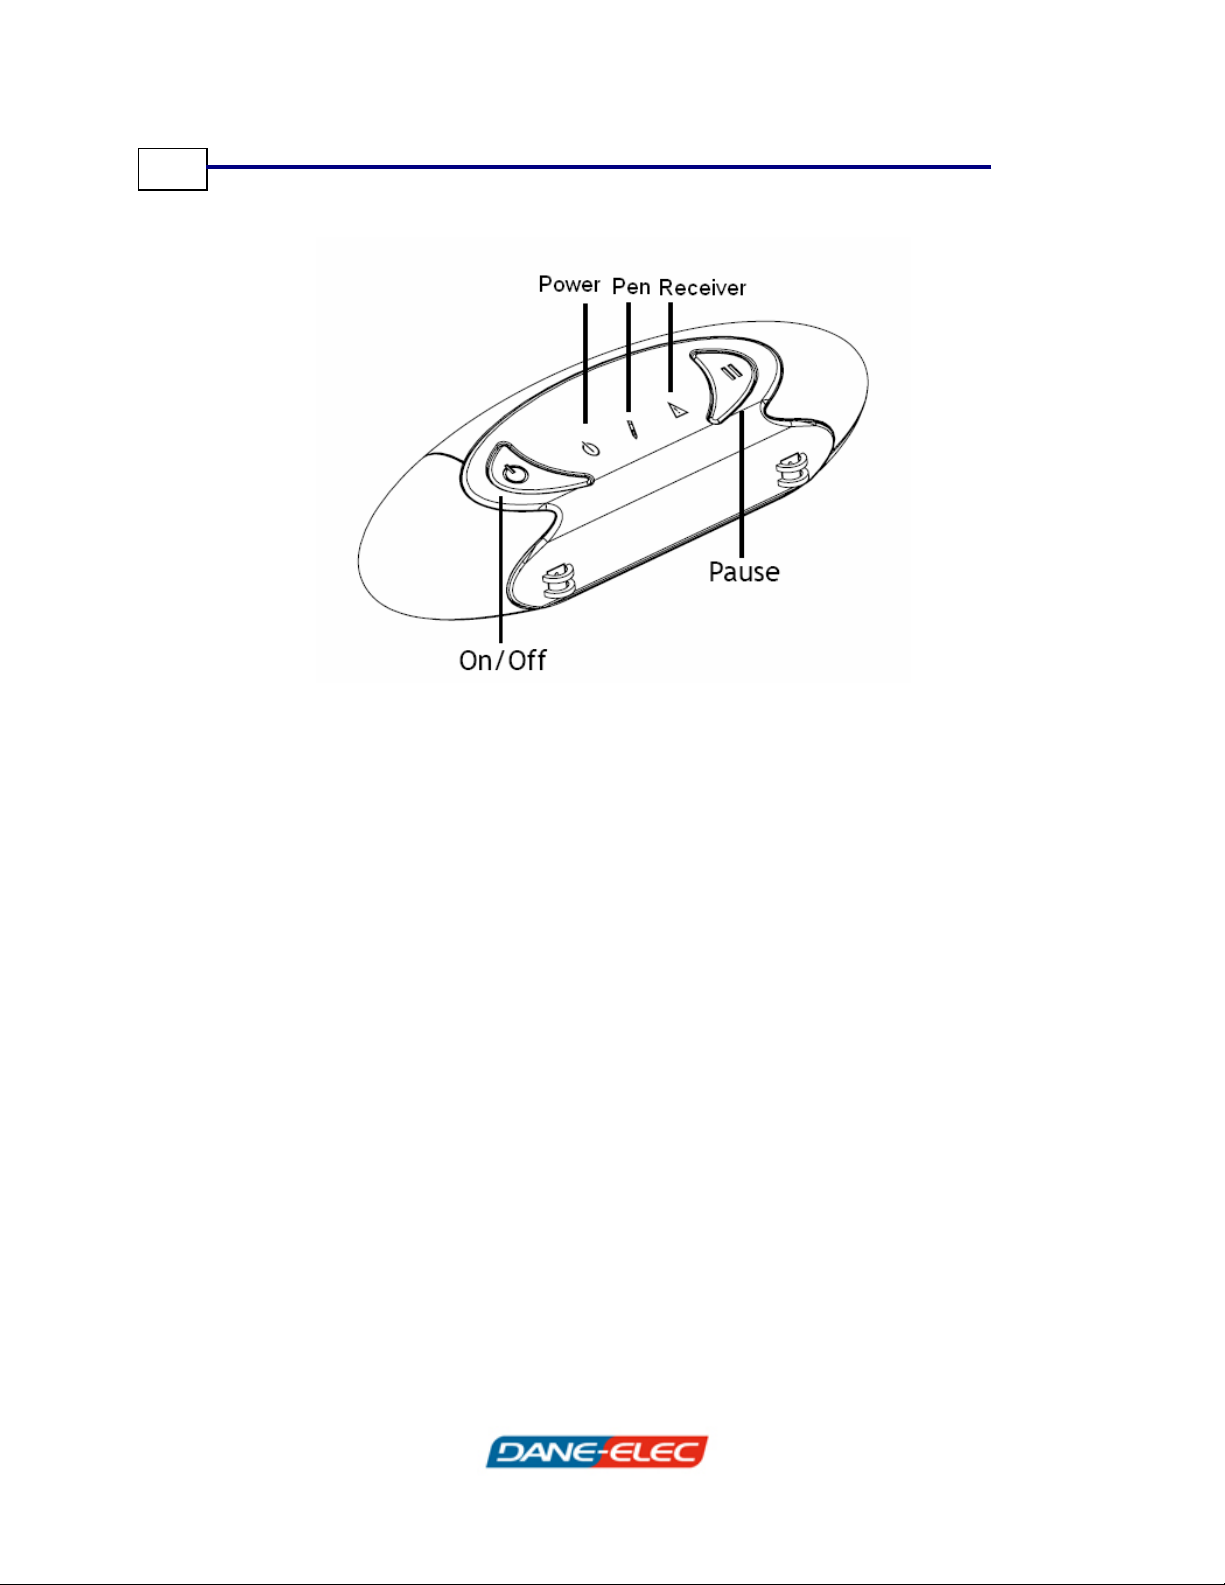
The Receiver has several indicator lights that communicate the
device’s status and report any errors that may occur (as outlined
below).
Page 10

4
Zpen User’s Guide
The Receiver also features a Pause button to help reduce battery
consumption. Pressing the Pause button places the Receiver in
Pause mode for 10 minutes, which helps to conserve the battery.
Once in Pause mode, when you start writing again, the Receiver
begins operating again in its normal manner. The Receiver’s
battery will typically suffice for an entire day’s use. It is
recommended that you charge the battery overnight so that it is
fully charged for its next use. The battery automatically charges
when the Receiver is plugged into a USB port.
Working with the Zpen
Zpen features enable you to:
• Write and sketch on any paper.
• Store hundreds of pages of information on the flash
memory.
• View and edit pages with supplied software.
• Transfer notes and sketches to a computer.
• Use the Receiver’s USB flash memory as a standard flash
drive to store music, images, video files and the like.
• Transform written notes into text.
The Zpen enables you to view and edit your files using the
following applications:
• Pen&Ink Viewer (see Chapter3, Using the Pen&Ink Viewer
Application)
• MyScriptNotes (see MyScriptNotes external manual). The
manual is named MyScriptNotes_Help_English.pdf.
For instructions on getting started with your Zpen, see Getting
Started, page 7.
Page 11

Introducing the Zpen
Zpen User’s Guide
Package Contents
Before you begin the installation process, take a moment to verify
that all of the following components are included in the package
contents:
• Zpen
• Receiver
• USB Cable
System Requirements
The Zpen have the following system requirements:
• Operating system: Windows 2000, Windows XP, Windows
Vista
5
• Processor: 1GHz processor and above
• Available hard disk space: 200 MB
• RAM: 256 MB (recommended 512 MB)
• USB connector: USB 1.1/2.0 to connect to the Receiver
Page 12

6
Zpen User’s Guide
4Chapter 2
Using the Zpen
This chapter describes the how to get started and how to use the
Zpen, as well as how to maintain it. It contains the f o llowing
sections:
• Getting Started, page 7, walks you through a typical
example of getting started using the Zpen .
• Maintaining the Zpen, page 17, describes basic
procedures for maintaining your Zpen, such as how to install
its batteries and pen tip.
Page 13
Using the Zpen
Zpen User’s Guide
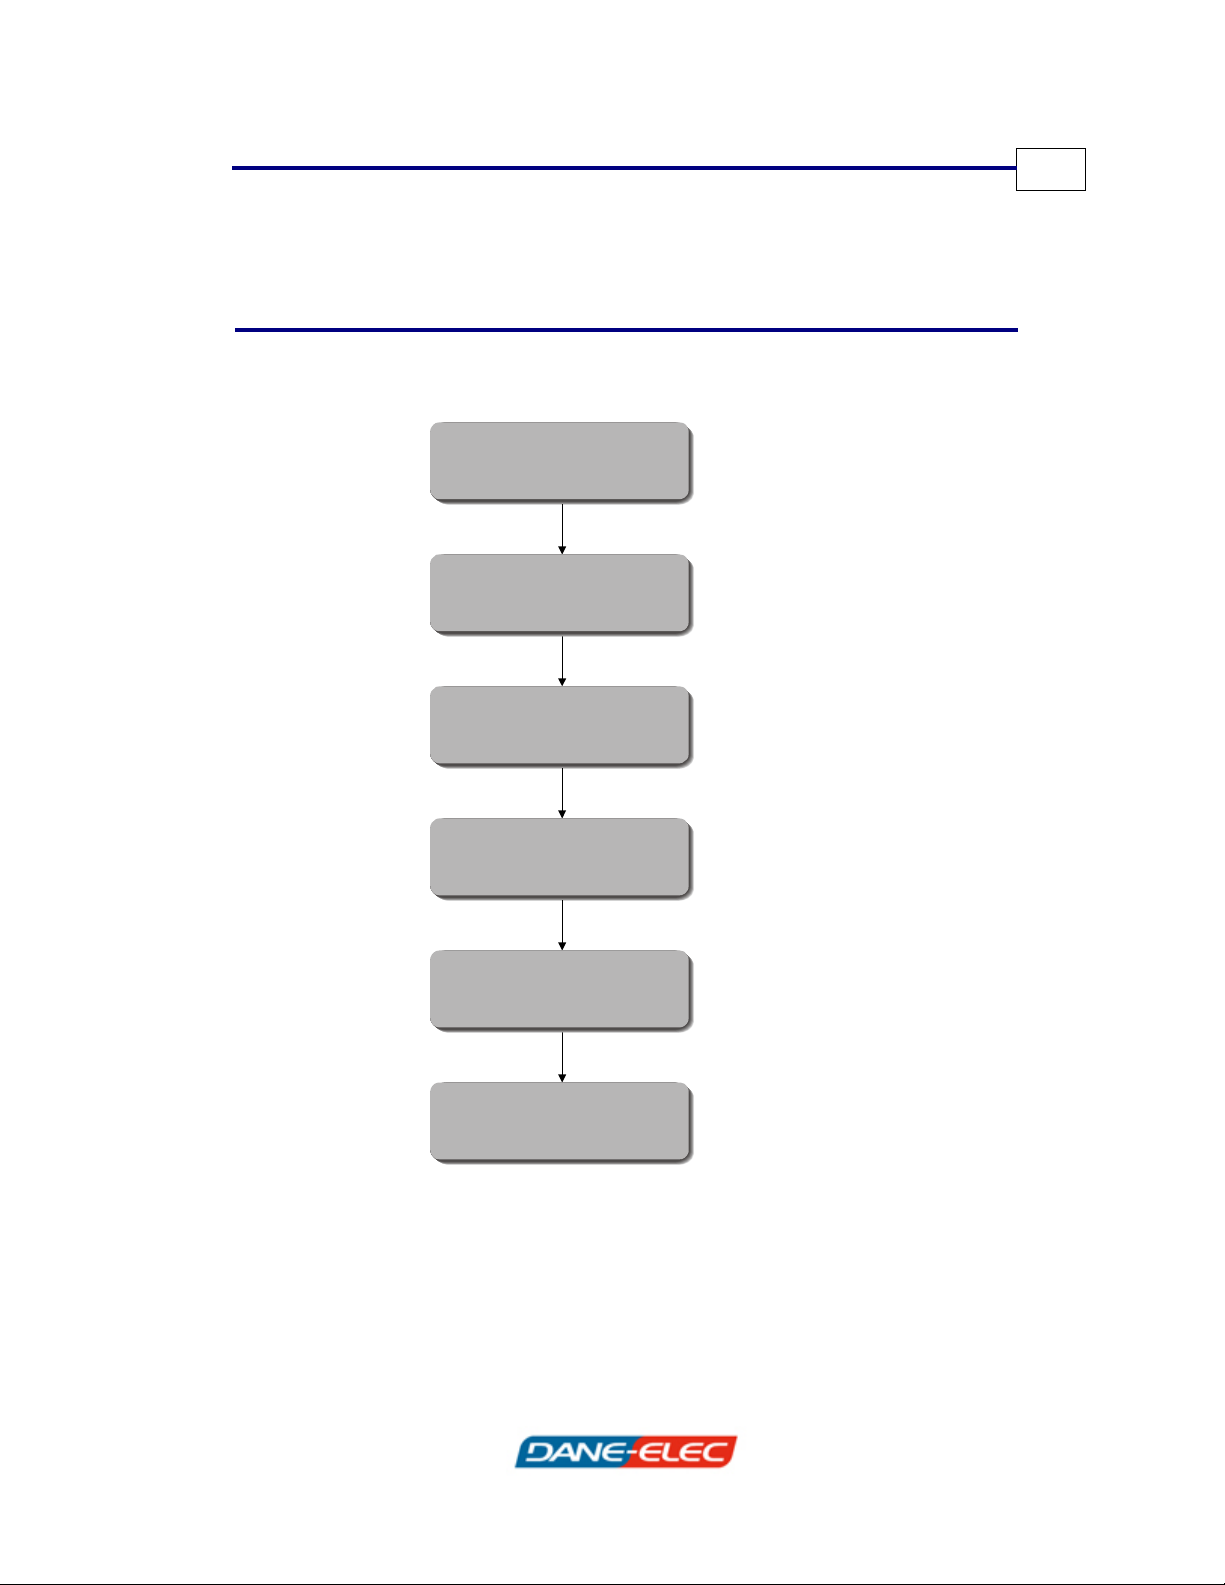
Getting Started
To illustrate the ease of use and flexibility of the Zpen , this
section presents a typical example of how to get started using it.
7
Step 1
Step 2
Step 3
Familiarize Yourself with
the Digital Pen
Install the Software
Clip the Receiver to a Sheet
of Paper
Turn On the ReceiverStep 4
Begin WritingStep 5
Step 6
View Your Files on the
Computer
Page 14

8
Zpen User’s Guide
Step 1: Familiarize Yourself with the Zpen
Before you start working with the Zpen, you should familiarize
yourself with the pen and its components. See Zpen, page 2, for
a complete description of the pen.
If the batteries are not already installed, install the pen’s
batteries, as described in the Inserting the Zpen’s Batteries
section on page 17. .
Step 2: Clip the Receiver to a Sheet of
Step 2: Clip the Receiver to a Sheet of Paper
Paper
The Receiver’s default position is on the top middle of an A4, legal
The Receiver’s default position is on the top middle of an A4, legal
or letter-sized piece of paper (or smaller) in portrait position. You
or letter-sized piece of paper (or smaller) in portrait position. You
can use any paper size (letter or legal) and either orientation
can use any paper size (letter or legal) and either orientation
(portrait or landscape). The Zpen’s range is approximately the
(portrait or landscape). The Zpen’s range is approximately the
dimensions of an A4 page.
dimensions of an A4 page.
NOTE:
If you want to position the clip in a different location on the page, you must
modify the device properties for the Receiver. See Configuring Receiver
Settings, page 40, for more details about how to do this.
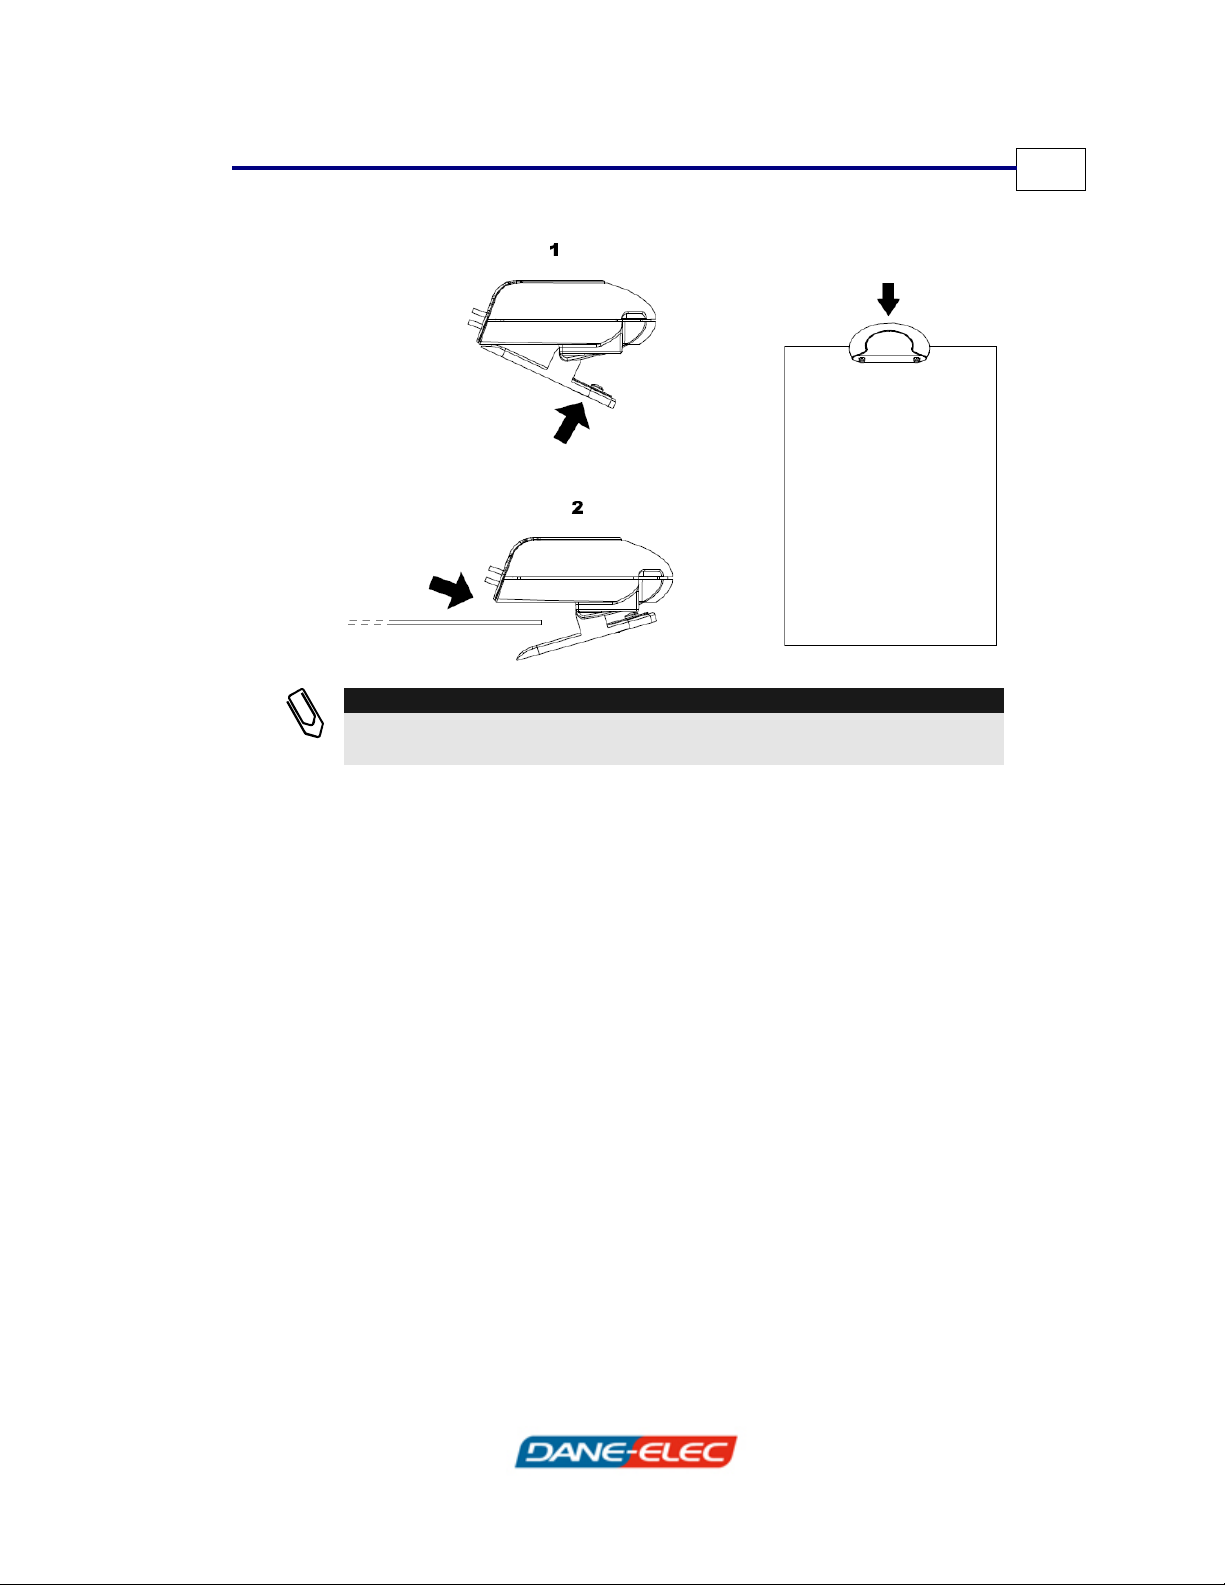
Attach the Receiver to a sheet of paper with the clamp located
under the receiver. Be sure to position the Receiver at the top of
the page.
Page 15
Using the Zpen
Zpen User’s Guide
NOTE:
If you are a lef handed writer, you may clip the receiver at the bottom of the
page to improve reception quality. See Configuration section.
9
Step 3: Turn On the Receiver
Press on the On/off button on the Receiver to turn it on. The Pen
and Error LEDs light. Wait until the Power LED turns red and
ceases to blink. This indicates that the Receiver is now ready to
record the actions of the Zpen.
Page 16
10
Zpen User’s Guide
Step 4: Begin Writing !
Now you are ready to write anywhere. As you write with the
Zpen, the data is stored as you write in a file on the Receiver. A
new file is started each time you start a new session using the
Receiver.
The Pen indicator LED on the Receiver lights whenever you write
with the Zpen.
Page 17

Using the Zpen
Zpen User’s Guide
To add a new page, simply press the clip button and attach the
Receiver to a new page. The software automatically adds a new
virtual page to your document.
11
Continue writing until you complete your document. In you want
to take a break during your writing, press the Pause button on
the Receiver, which gives an additional 10 minutes to the
Receiver before it enters Standby mode. This conserves the
battery for longer use.
TIP:
To draw straight lines, keep the pen at the same angle and move your h an d.
Be sure not to block the line of sight to the Receiver.
When you finish writing, press and hold the On/off button on the
Receiver until all LEDs stop blinking an d turn off (around three
seconds), and then remove the Receiver from the sheet of paper.
Page 18

12
Zpen User’s Guide
Step 5: View Your Files on the Computer
The Zpen system provides two methods for viewing your files:
Using the Pen&Ink Viewer application: This method is
•
ideal for travelers, students and those on the go, as it enables
you to view, email and print your files from any computer, all
without having to install any special software.
For example, if you are a student, you can take notes during
class using the Zpen and Receiver, and then plug in the
Receiver to a USB port on any computer to view your files,
such as at the library. All required software is already installed
on the Receiver.
The Pen&Ink Viewer application provides simple, intuitive
viewing options. See Chapter 3, Using the Pen&Ink Viewer
Application (page 21), for more details about this application.
Using MyScriptNotes: This method requires that supplied
•
software be installed on the computer. The application
provides advanced viewing and editing and handwriting
recognition. See MyScriptNotes manual, for more details
about this application.
Examples for viewing your files using both of these methods are
presented below.
Page 19

Using the Zpen
Zpen User’s Guide
Viewing Files Using Pen&Ink Viewer
Connect the Receiver to any free USB slot on a computer. The
Receiver is automatically recognized as a mass storage device
once it is connected, and displays the following window once the
connection is established:
13
Page 20

14
Zpen User’s Guide
Select the Launch Pen&Ink Viewer option in the list and click
OK. This action opens the Pen&Ink Viewer application, in wh ich
you can view *.eli files.
Page 21

Using the Zpen
Zpen User’s Guide
To open one of your files, click the Open icon in the Pen&Ink
Viewer main window and then navigate in the window that opens
to the My Notes folder on the USB Flash Drive. Then, select the
relevant file with a *.eli extension.
15
Page 22

16
Zpen User’s Guide
Your file is automatically displayed in the P en&Ink Viewer main
window.
See Chapter 3, Using the Pen&Ink Viewer Application (page 21),
for more details about how to use this application.
Page 23

Using the Zpen
Zpen User’s Guide
Maintaining the Zpen
At some point, you may need to install or replace the Zpen’s
batteries or pen tip. The subsections that follow describe how to
do so when necessary.
Inserting the Zpen’s Batteries
The Zpen comes complete with two regular v393 watch batteries.
The batteries must be inserted in the pen before you can use it.
¾ To insert the Zpen batteries:
1 Unscrew the top of the pen.
17
2 Insert the batteries.
3 Screw the pen top back on.
NOTES:
Do not disassemble the Zpen in any way not described in this guide.
Improper use may damage the pen and cause it to cease functioning.
The Zpen enters power-save mode automatically after 30 seconds.
Page 24

18
Zpen User’s Guide
Inserting the Pen Tip
The Zpen comes with a standard mini-ballpoint tip for writing.
NOTES:
If the ink supply runs out, you can replace the pen tip with any standard
writing tip.
You can purchase extra refills from the pen’s vendor.
¾ To replace the pen tip:
1 Pull the pen tip out of the Zpen.
2 Insert the replacement pen tip into the Zpen.
Page 25

Using the Pen&Ink Viewer Application
Zpen User’s Guide
5Chapter 3
Using the Pen&Ink
Viewer Application
This chapter describes how to use the Zpen with the Pen&Ink
Viewer application. Pen&Ink Viewer software is stored on the
Receiver, and provides simple viewing capabilities, without the
need to install any special software.
19
The Pen&Ink Viewer application is ideal for students, as it enables
you to take notes during class using the Zpen and Receiver, and
then plug in the Receiver to a USB port on any computer to view
your files, such as at the library. All required software is already
installed on the Receiver.
This chapter contains the following sections:
•
Pen&Ink Viewer Main Window, page 21, describes the
application’s main window and its components.
Navigating, page 29, describes the several navigation
•
methods used to maneuver within the Pen&Ink Viewer
application.
Saving, page 31, describes the multiple options available
•
for saving Pen&Ink Viewer information.
Printing, page 32, describes how to print the current
•
document.
Page 26

20
Zpen User’s Guide
• Emailing, page 34, describes the multiple options available
for emailing Pen&Ink Viewer information.
Rotating the Ink, page 37, describes how to rotate the
•
text and drawings within a document.
Page 27

Using the Pen&Ink Viewer Application
Zpen User’s Guide
Pen&Ink Viewer Main Window
The Pen&Ink Viewer main window, shown below, is comprised of
several areas, including the:
Menu bar (see page 22)
•
Toolbars (see page 24)
•
Pages pane (see page 26)
•
Writing area (see page 26)
•
Menu bar
Menu bar
Toolbar
Toolbar
Pages pane
Pages pane
21
Writing area
Writing area
Page 28

22
Zpen User’s Guide
Menu Bar
The main menu provides easy access to Pen&Ink Viewer
application functionality.
TIP:
Most application options are accessible from both the menu bar and th e
toolbars. See the Toolbars section on page 24 for more details about
available application options.
The following menu options are available:
File
Edit
The File menu has the following options:
▪ Open: Opens a *.eli document
▪ Close: Closes the document currently
open
▪ Save As Html: Saves the current
document as an HTML file
▪ Email as Pictures: Emails the
current document as one or more
JPEG images
▪ Print: Prints the current document
▪ Recent Files: Shows a list of the five
most recent files opened in the
application
▪ Exit: Closes the application
The Edit menu has the following options:
▪ Undo: Cancels/removes the last
action performed
▪ Redo: Repeats the last action
performed
▪ Copy Bitmap To Clipboard: Copies
the current page to the clipboard
▪ Rotate Ink: Rotates text and
drawings in the document
Page 29

Using the Pen&Ink Viewer Application
Zpen User’s Guide
Page
The Page menu has the following
options:
▪ Next: Moves to the next page
▪ Previous: Moves to the previous
page
▪ Email Current Page: Emails the
current page as a JPEG image
▪ Save Current Page To Picture:
Saves the current page as a JPEG
image
View
The View menu has the following
options:
▪ Zoom: Resizes the view to the
specified percentage
▪ Grid: Adds grid lines to the
document
▪ Margin: Adds a margin guide to
the document
▪ Toolbars: Enables you to
show/hide the application’s four
toolbars
▪ Pages Thumbnails: Toggles to
show/hide thumbnails in the Pages
pane
Tools
The Tools menu has the following
option:
▪ Preferences: Opens the
Preferences window in which you
define the print quality
Help
The Help menu has the following
option:
▪ About: Displays version
information about the Pen&Ink
Viewer application
23
Page 30

24
Zpen User’s Guide
Toolbars
The Pen&Ink Viewer application contains several toolbars for
quick access to application functionality.
File toolbar Edit toolbar Pages toolbar Zoom toolbarFile toolbar Edit toolbar Pages toolbar Zoom toolbar
TIP:
Most application options are accessible from both the menu bar and th e
toolbars.
Toolbars include the:
File toolbar (below)
•
Edit toolbar (page 24)
•
Pages toolbar (page 24)
•
Zoom toolbar (see page 25)
•
NOTE:
You can hide/show a toolbar by selecting View ÄToolbars, and then
selecting the required toolbar in the dropdown list.
File Toolbar
The File toolbar contains the following icons:
Icon Name Shortcut Function
Open Ctrl+O Opens a file.
Print Ctrl+P Prints the file.
Send
E-mail
Ctrl+M
Emails the document
through your default email
program. Each document
page is attached as a
separate JPEG image.
Page 31

Using the Pen&Ink Viewer Application
Zpen User’s Guide
Edit Toolbar
The Edit toolbar contains the following icons:
Icon Name Shortcut Function
Undo Ctrl+Z
Cancels/removes the last
action performed
25
Redo Shift+Ctrl+Z
Repeats the last action
performed
Pages Toolbar
The Pages toolbar contains the following icons:
Icon Name Shortcut Function
Previous Page
Next Page Page Down Moves to the next page
Page Up
Moves to the previous
page
Zoom Toolbar
The Zoom toolbar contains the following icons:
Icon Name Shortcut Function
Zoom Out
Zoom
Decreases the zoom
factor. Click the icon
successively to decrease
the zoom factor in
decrements of 25%.
Specifies the zoom
percentage.
Zoom In
Increases the zoom
factor. Click the icon
successively to increase
the zoom factor in
increments of 25%.
Page 32

26
Zpen User’s Guide
Pages Pane
The left side of the Pen&Ink Viewer main window contains a
Pages pane. This area is used to manage the pages in the file and
to display thumbnails for each page.
Writing Area
The Writing Area displays the contents of your written page.
You can add or remove grid lines and a margin guide to this area
to meet your personal needs.
Margins and Grids
Like a physical sheet of paper, you can set up the Pen&Ink Viewer
page to have both grids (or lines) and margins.
Page 33

Using the Pen&Ink Viewer Application
Zpen User’s Guide
¾ To set up the page grid:
1 In the menu bar, select View Ä Grid.
2 Select the required grid setting. You can select from the
following options:
None (the default). No grid lines are displayed.
Legal: Displays only a horizontal grid on the page.
27
5 x 5: Displays both a horizontal and vertical grid on
the page.
Page 34

28
Zpen User’s Guide
¾ To set up a page margin:
1 In the menu bar, select View Ä Margin.
2 Select the required margin setting. You can select from the
following options:
None (the default): No margin guide is displayed.
Left: Displays a margin guide on the left margin of the
page.
Right: Displays a margin guide on the right margin of
the page.
Page 35

Using the Pen&Ink Viewer Application
Zpen User’s Guide
Navigating
There are several levels of navigation within Pen&Ink Viewer:
Within the document
•
Between documents
•
Each of these levels is described in the sections that follow .
Moving from page to page within a document
There are two ways to jump from one page to another within a
document:
29
Previous Page and Next Page buttons: Use these
•
buttons in the toolbar to jump to the previous and next pages
in the document, respectively.
Thumbnails in Pages pane: The Pages pane contains a
•
thumbnail for each page in the document. Simply click a
thumbnail to jump to the corresponding page in the
document.
Page 36

30
Zpen User’s Guide
Opening a Document
When you open Pen&Ink Viewer, the application opens displaying
an empty main window. You must open a document within the
application to view its contents.
¾ To open a document:
1 Click the Open
button in the toolbar or select File Ä
Open in the menu bar. The Open window opens:
2 Browse to select the file you want to open and click Open.
The document you selected now appears in the Writing Area
in the window.
Page 37

Using the Pen&Ink Viewer Application
Zpen User’s Guide
Saving
You can save Pen&Ink Viewer documents using the following
methods:
Save as Html: Saving in this manner saves the entire
•
document as a single HTML file, and also creates a subfolder
that contains separate JPEG image files for each page in the
document.
Save Current Page To Picture: This option only saves the
•
current page as an image file (either JPEG or BMP). If you
have a multi-page document and you want to save each page
as a picture, you must repeat the relevant procedure for each
page.
31
¾ To save the document as an HTML file:
•
In the menu bar, select File Ä Save As Html. In the
window that opens, specify a filename and location for the file
and click Save.
Page 38

32
Zpen User’s Guide
¾ To save the current page as a picture:
1 In the menu bar, select Page Ä Save Current Page To
Picture. The Save As window opens:
2 In the File name field, enter a name for the picture.
3 In the Save as type field, select the file type for the file. You
can select one of the following options:
4 Click Save.
Printing
You can print a hard copy of a Pen&Ink Viewer file when needed.
¾ To print a file:
1 Click the Print
Print in the menu bar. The Print window opens.
JPEG Image File: Saves the file as a JPEG image
(*.jpg). This is the default.
BMP Image File: Saves the file as a bitmap image
(*.bmp).
button in the toolbar or select File Ä
Page 39

Using the Pen&Ink Viewer Application
Zpen User’s Guide
2 Set up the print job as needed and click OK.
NOTES:
Printing large files at a high quality requires more time. You can change the
quality in the Preferences window, which is accessed by selecting Tools Ä
Preferences in the menu bar.
Before printing a landscape page, be sure to change the page orientation in
the Print windo w.
¾ To modify the print quality:
1 Select Tools Ä Preferences in the menu bar. The
Preferences window opens:
33
2 Set the required print quality in the Quality field and click
OK. In general, the higher the print quality, the lon ger it
takes to print the file.
Page 40

34
Zpen User’s Guide
Emailing
Pen&Ink Viewer simplifies the process of emailing a document by
automatically attaching it to an email message as an image file.
Emailed documents are always sent in JPEG format.
You can email Pen&Ink Viewer documents using the following
methods:
•
Email as Pictures: Emailing in this manner emails the
entire document as one or more JPEG image files. Each
Pen&Ink Viewer document page is automatically attached as a
separate JPEG image.
Email Current Page: This option only emails the current
•
page as a JPEG image file. If you have a multi-page document
and you want to email each page separately, you must repeat
the relevant procedure for each page.
Page 41

Using the Pen&Ink Viewer Application
Zpen User’s Guide
¾ To email an entire document:
35
1 Click the Send E-mail
button in the toolbar or select File
Ä Email As Pictures in the menu bar. This automatically
opens an email window from your default email program.
Each Pen&Ink Viewer document page is automatically
attached as a separate JPEG image.
2 Select or enter the intended recipients. You can add a subject
and message as you would when sending a regular email
message.
3 Click Send. Your email program automatically sends the
message.
Page 42

36
Zpen User’s Guide
¾ To email the current page:
1 Select Page Ä Email Current Page in the menu bar. This
automatically opens an email window from your default email
program. The current Pen&Ink Viewer document page is
automatically attached as a JPEG image.
2 Select or enter the intended recipients. You can add a subject
and message as you would when sending a regular email
message.
3 Click Send. Your email program automatically sends the
message.
Page 43

Using the Pen&Ink Viewer Application
Zpen User’s Guide
Rotating the Ink
Pen&Ink Viewer enables you to rotate the drawings and text
contained in the current document. For example, the figures
below show a page’s original content (text only, in this case) and
that same text after rotating it 45
Original Text Text After
Rotating 45°
° degrees:
37
NOTES:
You cannot undo or redo the Rotate Ink operation.
The Rotate Ink option rotates all information on a given page, including
both text and drawings.
Page 44

38
Zpen User’s Guide
¾ To rotate drawings and text in the current document:
1 In the menu bar, select Edit Ä Rotate Ink. The Rotate Ink
window opens:
2 In the Rotation Angle area, specify the value for the number
of degrees for rotating the drawings/text.
3 In the Page Range area, select one of the following radio
buttons:
All: Rotates the drawings/text in all pages of the document.
Current Page: Rotates drawings/text only on the current
page in the document.
Pages: Rotates drawings/text only on the specific pages you
designate. Be sure to separate page numbers and page
ranges by commas.
4 Click OK. Information is rotated as specified.
Page 45

Configuring Device Properties
Zpen User’s Guide
Chapter 4
Configuring Device
39
Properties
This chapter describes how to customize Receiver settings to
control various aspects of its operation. It contains the following
sections:
Configuring Receiver Settings, page 40, describes how to
•
modify the Receiver’s positioning setting.
Setting the Clock, page 42, describes how to set the date
•
and time on the Receiver’s clock.
.
NOTES:
The Zpen configuration programs are named Digital Pen & USB Flash Drive
in the operating system
Page 46

40
Zpen User’s Guide
Configuring Receiver Settings
By default, your Zpen and Receiver are configured such that the
Receiver is clipped to the top of an A4 page.
The area on the right side of the window shows the Receiver’s
current positioning. You can change this configuration by clicking
one of the placement markers. When User opens the Editor for
the first time the screen appears.
Page 47

Configuring Device Properties
Zpen User’s Guide
For example, if you click the middle-left marker, as shown below,
then the system configures the Zpen’s range with the
understanding that the Receiver is attached to the right side of
the page:
41
The Set Receiver Position window contains the following buttons
at the bottom of the window:
OK
Accepts your changes and closes the Set
Receiver Position window
Cancel
Closes the Set Receiver Position window
without accepting your changes
Apply
Applies your changes and keeps the Set
Receiver Position window open
Reset to
Resets all settings to their defaults
Defaults
Page 48

42
Zpen User’s Guide
¾ To modify the Receiver position:
1 In the menu bar, select Tools Ä Set Receiver Position. The
Set Receiver Position window opens (see page 40).
2 Select the marker corresponding to the location on the page
where you want to position the Receiver.
3 Click OK to save your settings.
Setting the Clock
The Zpen provides a timestamp feature that enables you to
readily see when you saved a file that you wrote using the Zpen.
The Receiver contains a clock, which is used to determine the
timestamp for a Zpen file. You should set the clock on the
Receiver for a file’s timestamp to be accurate.
¾ To set the clock on the Receiver:
1 Access the Zpen Properties window by selecting Start Ä
Programs Ä Digital Pen & USB Flash Drive Ä Device
Properties.
Page 49

Configuring Device Properties
Zpen User’s Guide
The Zpen Properties window opens:
43
2 Connect the Receiver to your computer.
3 In the date and time dropdown list, select the time zone for
the clock on the Receiver and click Set Clock. The Device
Properties window opens:
4 Click OK to close the window. The Zpen Properties window is
redisplayed.
5 Disconnect the Receiver from your computer and turn it off.
6 Click OK in the Zpen Properties window to save your settings.
Page 50

44
Zpen User’s Guide
Appendix A
Troubleshooting
This appendix describes the most common issues or problems you
may encounter when working with your Zpen and how to resolve
them. It contains the following section:
Zpen Operation, page 45, describes problems associated
•
with the operation of the Zpen and how to solve them.
Page 51

Troubleshooting
Zpen User’s Guide
Zpen Operation
This section describes problems associated with the operation of
the Zpen and how to resolve them.
The Receiver does not "see" my Zpen. What can I do?
•
There are several factors that affect the reception and signal
between the Receiver and the Zpen. Firstly, there must be a
clear line of sight between the two devices. This means that
there cannot be any object in between the Receiver and the
Zpen that blocks the infrared signal.
If you hold the pen with your fingers curled around it in such a
way that it blocks the line of sight, then the Receiver cannot
detect the Zpen. Loud noises can also affect reception.
45
How do I replace the Zpen's batteries?
•
See Inserting the Zpen’s Batteries, page 17, for instructions
describing how to replace the pen’s batteries.
The written pages have distortion
•
Check if you are near strong acoustic noise (as PC fan,
engine) or IR noise, it can cause distortion to the writing
New page button is not active.
•
For the New Page button to be active, the pen should be
within range of the Receiver.
Some of the data in the beginning was not saved.
•
Start writing only when the Receiver’s left LED (Power) stops
blinking and is red.
Page 52

46
Zpen User’s Guide
CE and FCC COMPLIANCE NOTICE
This equipment has been tested and fou nd to comply with the limits for a Class B digital
device, pursuant to Part 15 of the FCC rules and complied with the requirements set out in
the Council Directive on the Approximation of the Laws of the Member States relating to
Electromagnetic Compatibility Directive (89/336/EEC, Amended b y 92/31/EEC, 93/698/EEC
& 98/13/EC).
These limits are designed to provide reasonable protection agai nst harmful interference in a
residential installation. This equipment generates, uses and can radiate radio frequency
energy and, if not installed and used in accordance with the instructions, may cause har mful
interference to radio communications.
However, there is no guarantee that interference will not occur in a particular installation. If
this equipment does cause harmful interference to radio or television reception, which can
be determined by turning the equipment off and on, t he user is encouraged to tr y to correct
the interference by one or more of the following measures:
a) Reorient or relocate the receiving antenna.
b) Increase the separation between the equipment and receiver.
c) Connect the equipment to an outlet on a circuit different from that to which the
receiver is connected.
d) Consult the dealer or an experienced radio/TV technician.
CE and FCC Warning
Modifications not expressly approved by the manufacturer
could void the user authority to operate the equipment under
CE and FCC Rules.
Tested To Comply With CE and FCC Standards
 Loading...