

Page 1
1
Zpen User’s Guide
Version 4.0
Page 2
2
Table of Contents
Zpen User’s Guide
Table of Contents ....................................................................................................................2
Preface......................................................................................................................................4
Table of Contents
Chapter 1...................................................................................................5
Introduction to the Zpen.........................................................................................................5
Digital Pen............................................................................................................................6
Receiver................................................................................................................................6
Zpen capabilities and features ...............................................................................................7
System Requirements..............................................................................................................8
Chapter 2................................................................................................... 9
Operating the USB Flash Drive .............................................................................................9
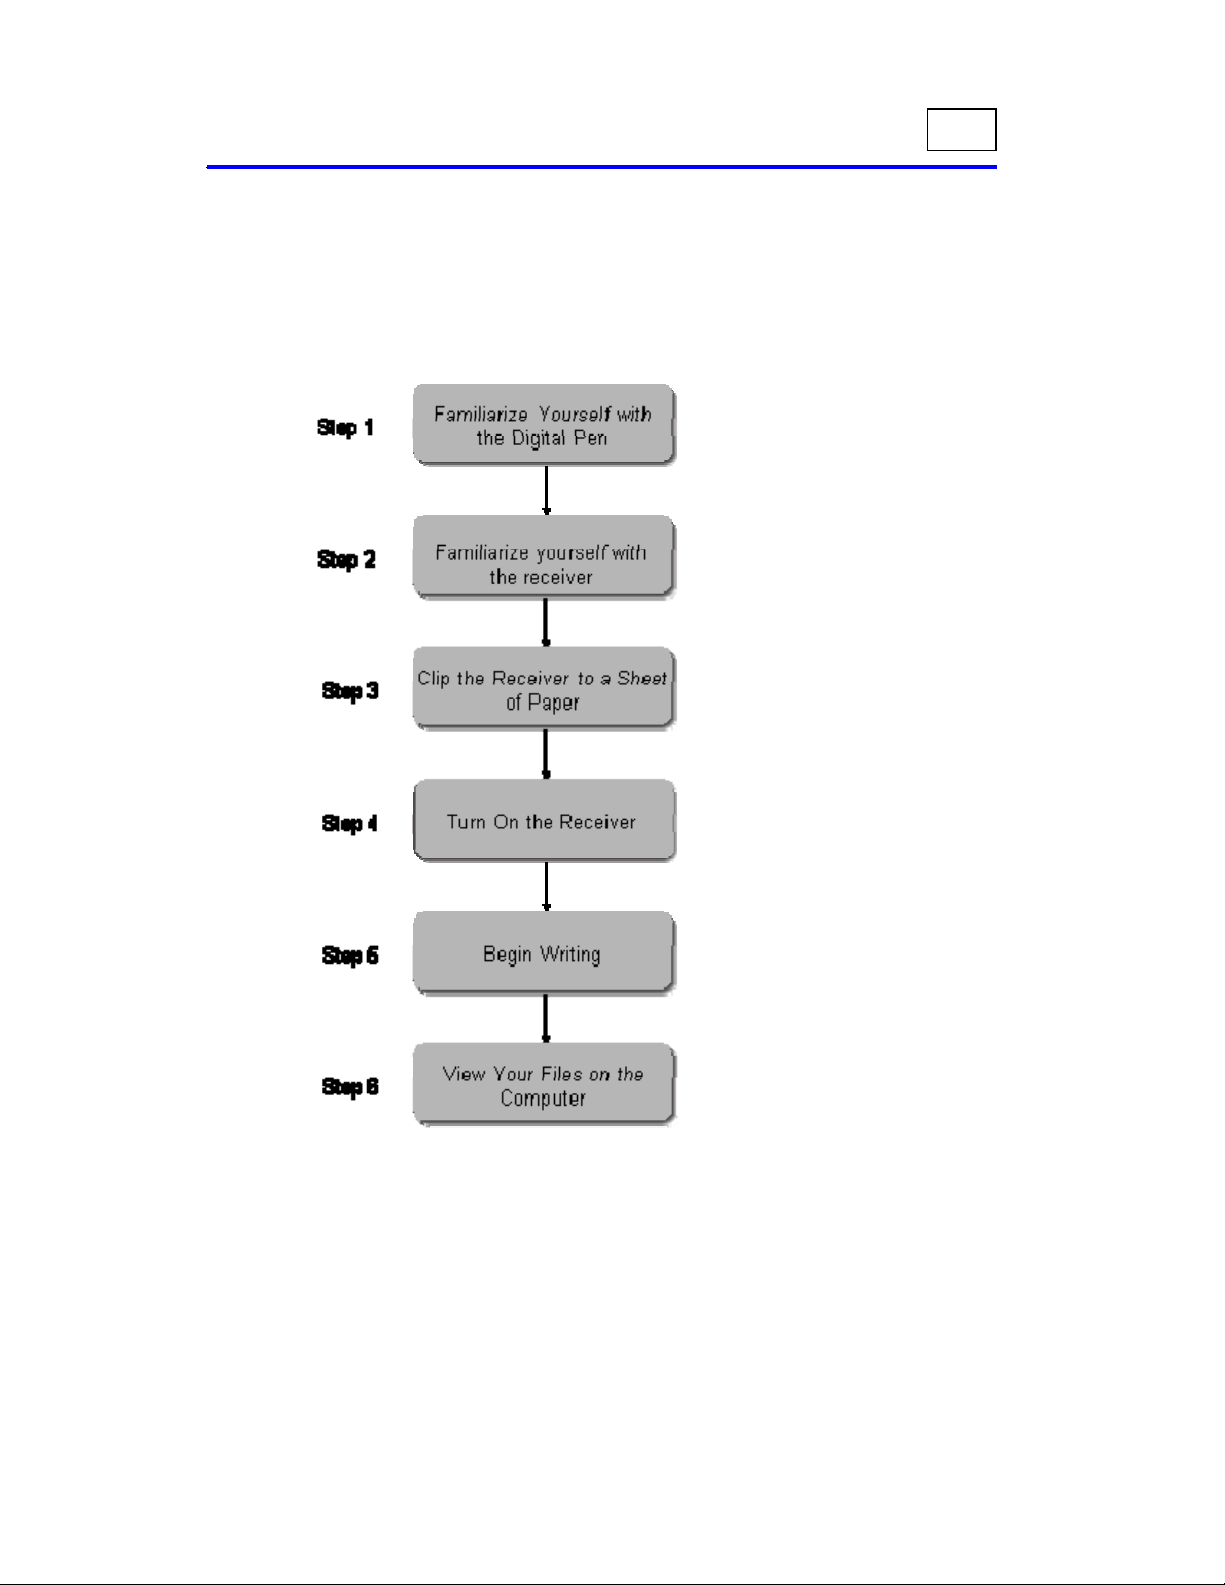
Getting Started......................................................................................................................10
Step 1: Familiarize Yourself with the Digital Pen..............................................................11
Replacing the ink refill.......................................................................................................13
Inserting the pen’s Batteries ...............................................................................................14
Step 2: Familiarize Yourself with the Receiver..................................................................15
Step 3: Clip the Receiver to a Sheet of Paper.....................................................................16
Step 4: Turn On the Receiver.............................................................................................16
Step 5: Begin Writing.........................................................................................................17
Step 6: View Your Files on the Computer..........................................................................19
Tips – Important Facts to Know.........................................................................................24
Page 3

3
LED Functionality Index
Zpen User’s Guide
Chapter 3..................................................................................................26
Using the Multiplatform Viewer Application .................................................................... 26
Multiplatform Viewer Main Window................................................................................. 28
Menu Bar ........................................................................................................................... 29
Toolbars............................................................................................................................. 32
Pages Pane......................................................................................................................... 33
Writing Area...................................................................................................................... 33
Navigating .............................................................................................................................37
Moving from Page to Page within a Document.................................................................37
Saving ....................................................................................................................................39
Printing.................................................................................................................................. 40
Emailing ................................................................................................................................41
Set Clock................................................................................................................................42
Select Receiver Position ....................................................................................................... 43
Appendix A..............................................................................................44
FAQ ....................................................................................................................................... 44
Appendix B ..............................................................................................48
Troubleshooting guide..........................................................................................................48
Appendix C..............................................................................................49
LED Functionality Index ....................................................................................................49
Page 4
4
Preface
Zpen User’s Guide
Welcome to the Zpen User’s Guide. This guide describes the operation and usage of the
Zpen.
The guide includes the following chapters:
Chapter 1, Introduction to the Zpen,
introduces the Zpen, describing its basic features, components and system
requirements
Chapter 2, Operating the Zpen, provides a step by step guidance for operating
and handling Zpen.
Chapter 3, Using the Multiplatform Viewer, introduces the Multi Platform
Viewer application and provides usage guidance.
Appendix A, FAQ, presents a list of frequently asked questions and their
respective detailed answers, related to the Zpen hardware and software.
Appendix B, Troubleshooting guide, depicts a table with the recent product’s
known issues along with their workarounds and/or solutions related to the Zpen.
Appendix C, LED functionality index
Preface
Page 5
5
LED Functionality Index
Zpen User’s Guide
3Chapter 1
Introduction to
the Zpen
Overview
The Zpen provides all the benefits of a Digital Pen with the addition of full Flash
memory capabilities. Completely portable, users can write, sketch and draw freely
anywhere, using regular paper, while the device simultaneously captures and stores all
written text and drawings in real-time to the Flash memory.
A multi-functional tool, stored data can be later uploaded to a PC via a standard USB
port. Once uploaded, handwritten information can be transformed to digital text using
standard handwriting recognition software, and notes as well as drawings can be edited
and shared via email and messaging applications.
Small, compact and completely wireless, the Zpen can be used at home, school and at
work. The perfect alternative to carrying a heavy laptop, it is ideal for taking notes and
jotting down diagrams in both the meeting room and the classroom.
The product consists of two main hardware components – the Zpen and the Receiver.
Page 6
6
Introduction to the Zpen
Zpen User’s Guide
Digital Pen
The pen constantly transmits its position to the receiver, whenever the pen tip is
pressed.
The pen uses two standard 393 watch batteries and can fit any standard mini-ballpoint
pen ink refill.
Receiver
Page 7

7
LED Functionality Index
Zpen User’s Guide
Information written or drawn using the pen is stored in the Receiver’s flash memory,
where it can later be retrieved via a standard USB connection. Written information can
also be converted to text using standard handwriting recognition software.
The receiver captures the pen’s position transmissions and stores them into files in the
flash memor y.
The receiver can be attached to any paper, with a coverage area up to an A4/letter page
size and on any side of the paper.
The receiver can be easily connected to any PC via a standard USB connector. The
Receiver contains a rechargeable battery, which gets automatically charged once being
connected to a USB port.
IMPORTANT:
!
You MUST charge the Receiver for 6 hours before using it for the first time.
While charging, make sure the on/off led is blinking
Zpen capabilities and features
By using the Zpen you are able to:
Write and sketch on any paper (up to size of A4/letter).
Store thousands of pages of information on the flash memory.
View, Edit and Organize digital captured pages using the Multi-platform Viewer and
other applications
Use the Receiver’s USB flash memory as a standard flash drive to store music,
images, video files, etc.
Convert handwritten notes into computer text format
Page 8

8
Introduction to the Zpen
Zpen User’s Guide
System Requirements
Before installing the Zpen Software, make sure your computer complies with the
following system requirements:
Operating system: Windows 2000, Windows XP, Windows Vista
Processor: 1GHz processor and above
Minimum available hard disk space: 200 MB
RAM: 256 MB (recommended 512 MB)
USB connector: available standard USB 1.1/2.0 port
Page 9
9
LED Functionality Index
Zpen User’s Guide
4Chapter 2
Operating the
Zpen
This chapter describes how to get started and how to use the Zpen and USB
Drive, as well as how to maintain it. It contains the following section:
The “Getting Started” section walks you through a typical example of
how to handle and operate the Zpen.
Page 10
10
Operating the Zpen
Zpen User’s Guide
Getting Started
Page 11
11
LED Functionality Index
Zpen User’s Guide
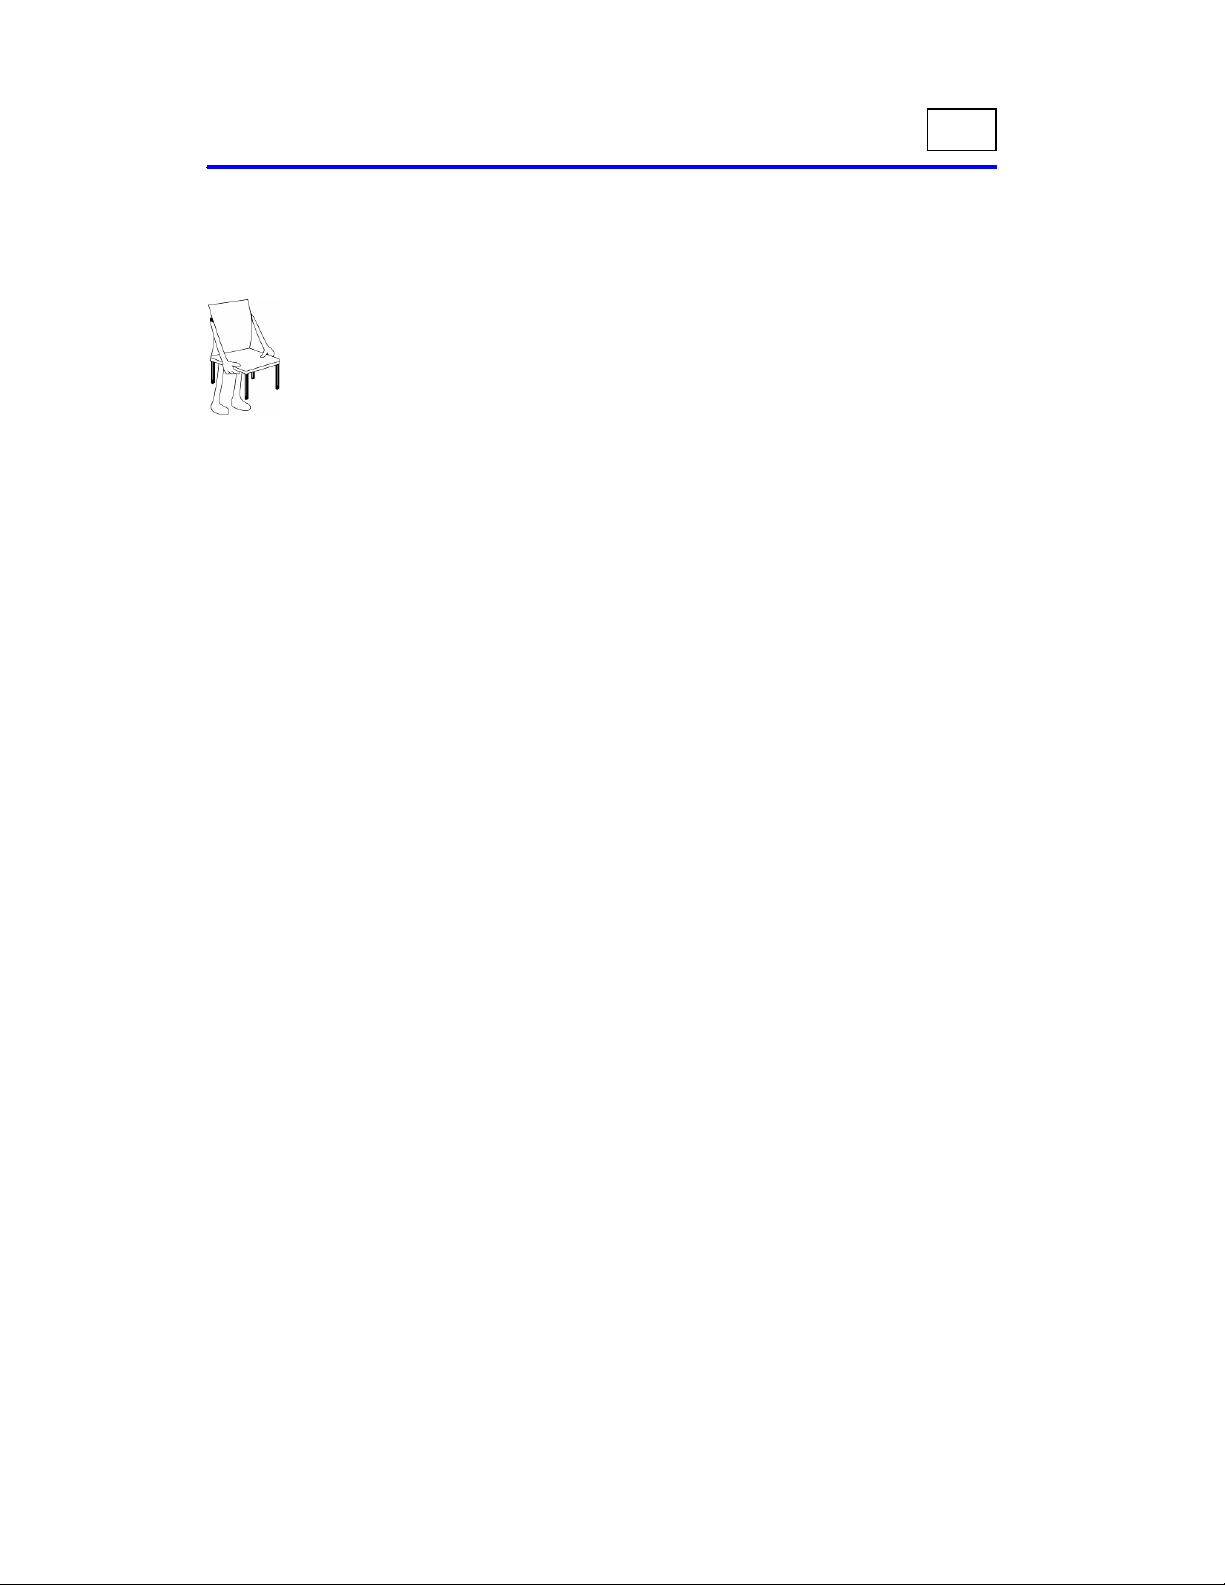
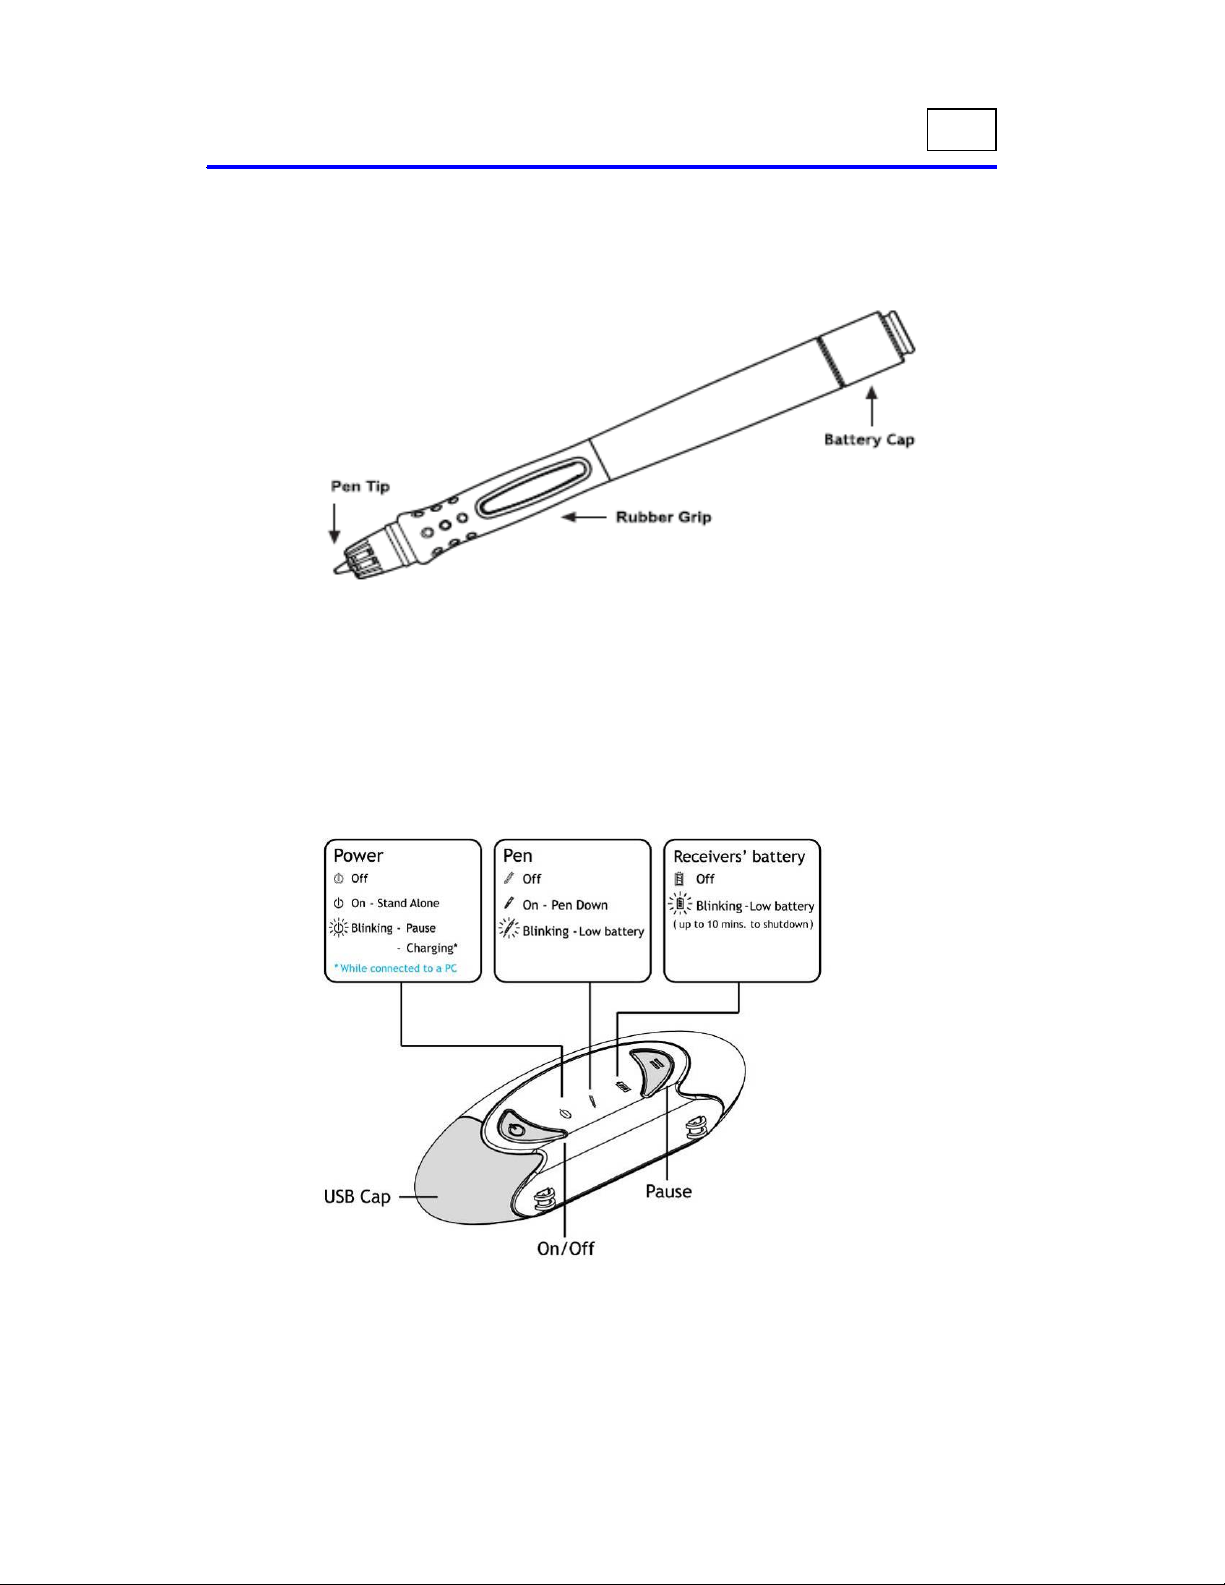
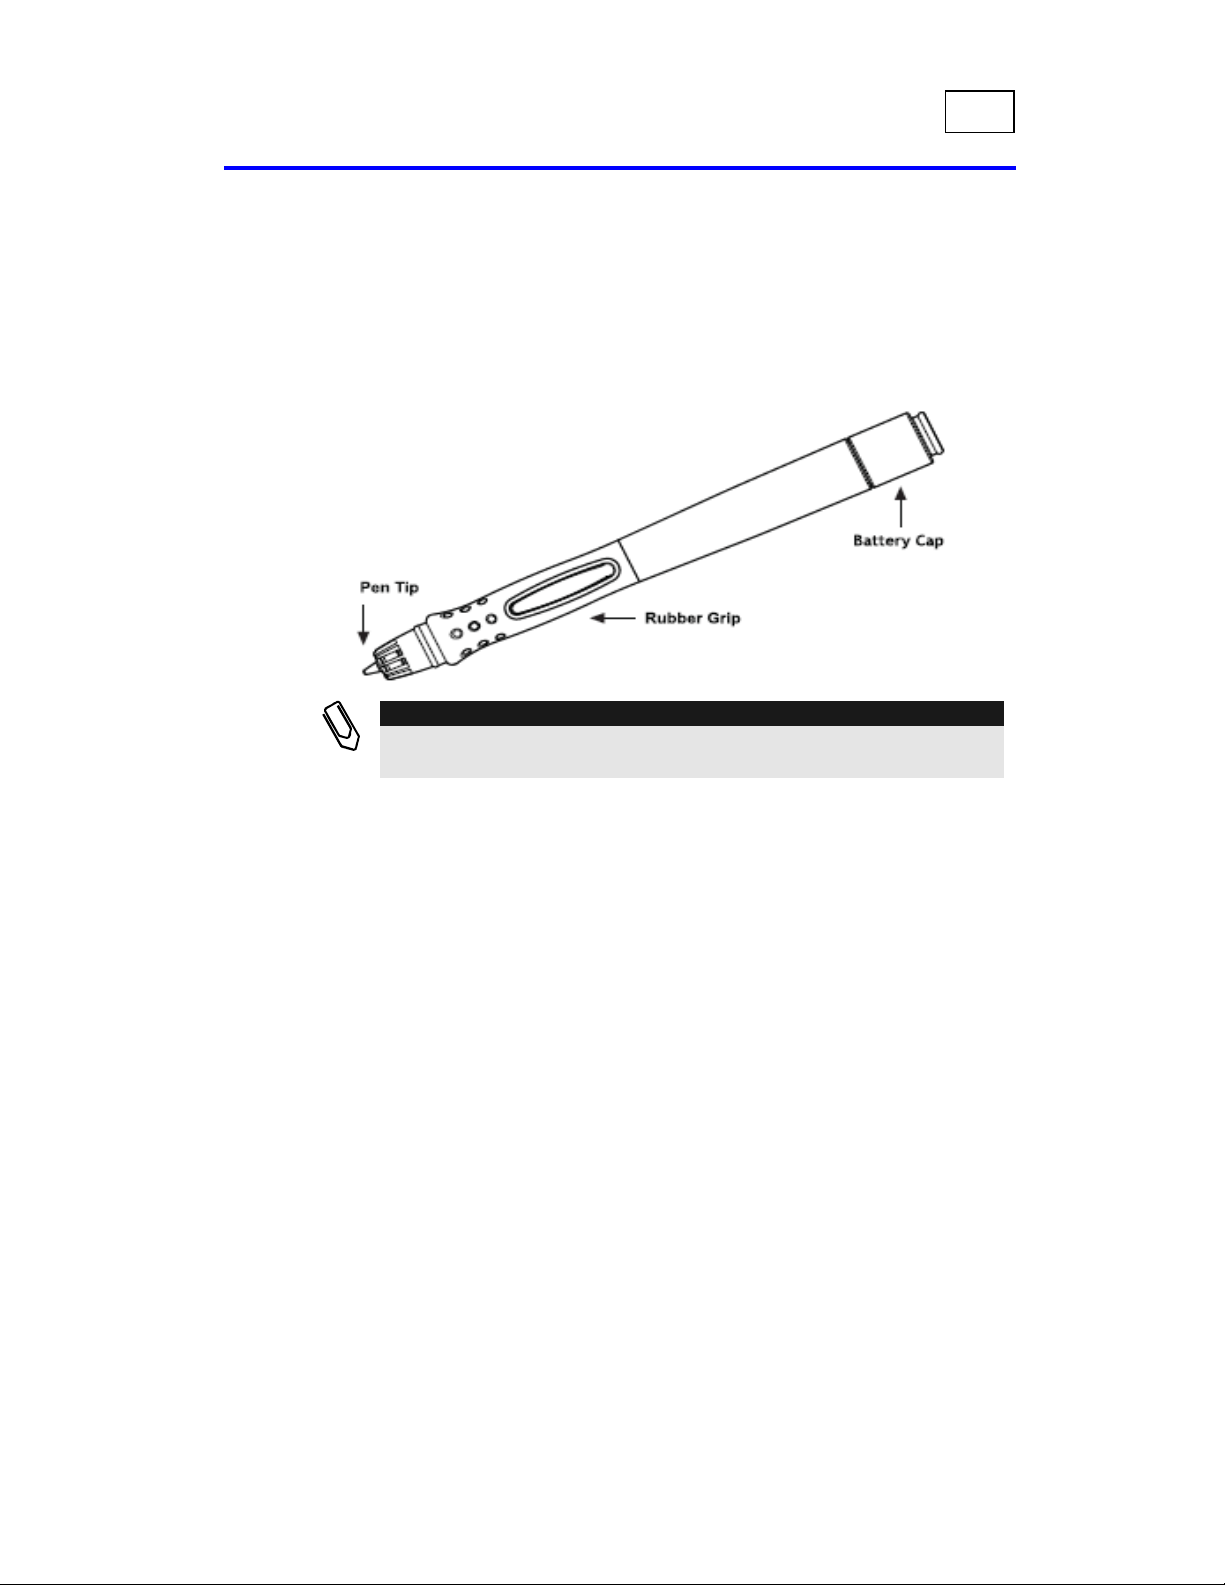
Step 1: Familiarize Yourself with the Digital Pen
The following picture depicts the Pen’s various parts:
NOTES:
Do not dismantle the Zpen in any way not described in this guide.
Improper use may damage the pen and cause it to cease functioning.
Page 12
12
Operating the Zpen
Zpen User’s Guide
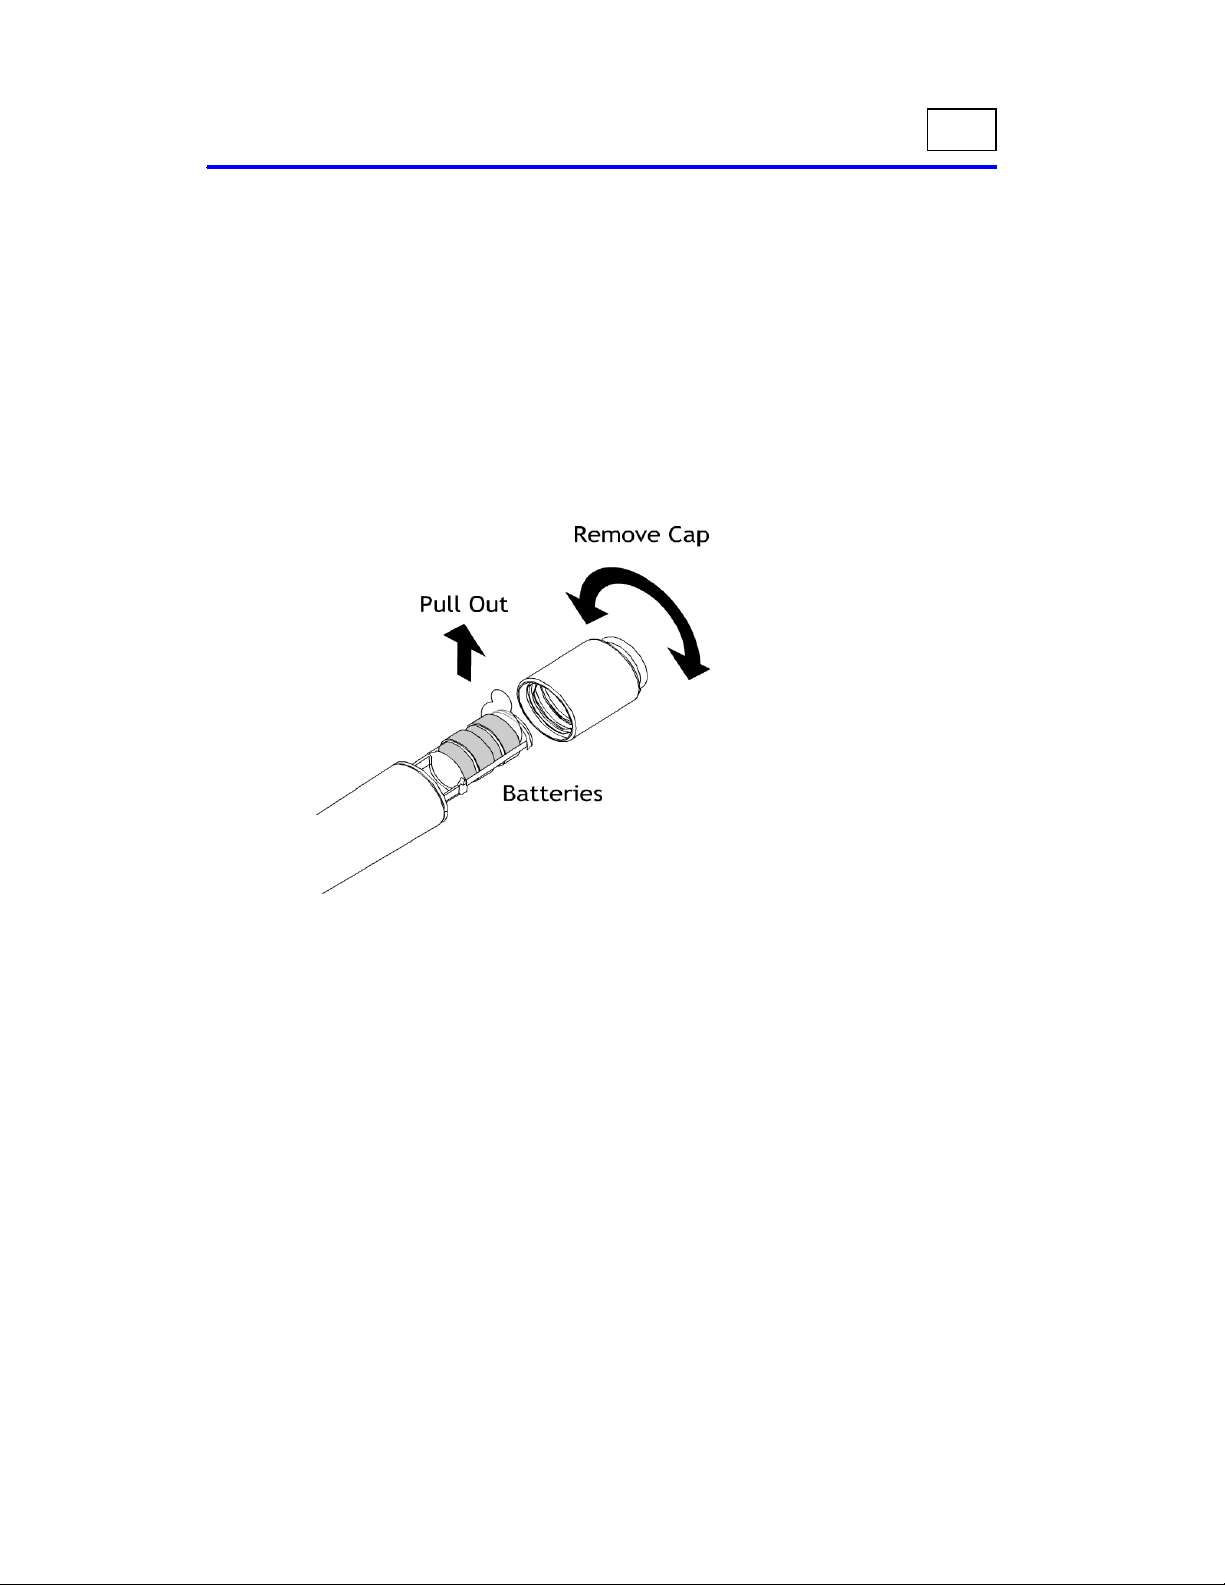
The Zpen comes with two already inserted batteries. All you need to do is
to remove the small isolator strip from the battery compartment (see picture
below):
- Unscrew the top of the pen.
- Pull the isolator strip out
- Screw the Battery Cap back on
At some point, you may need to replace the Zpen’s batteries or pen tip. The
subsections that follow describe how to do so when necessary.
Page 13
13
LED Functionality Index
Zpen User’s Guide
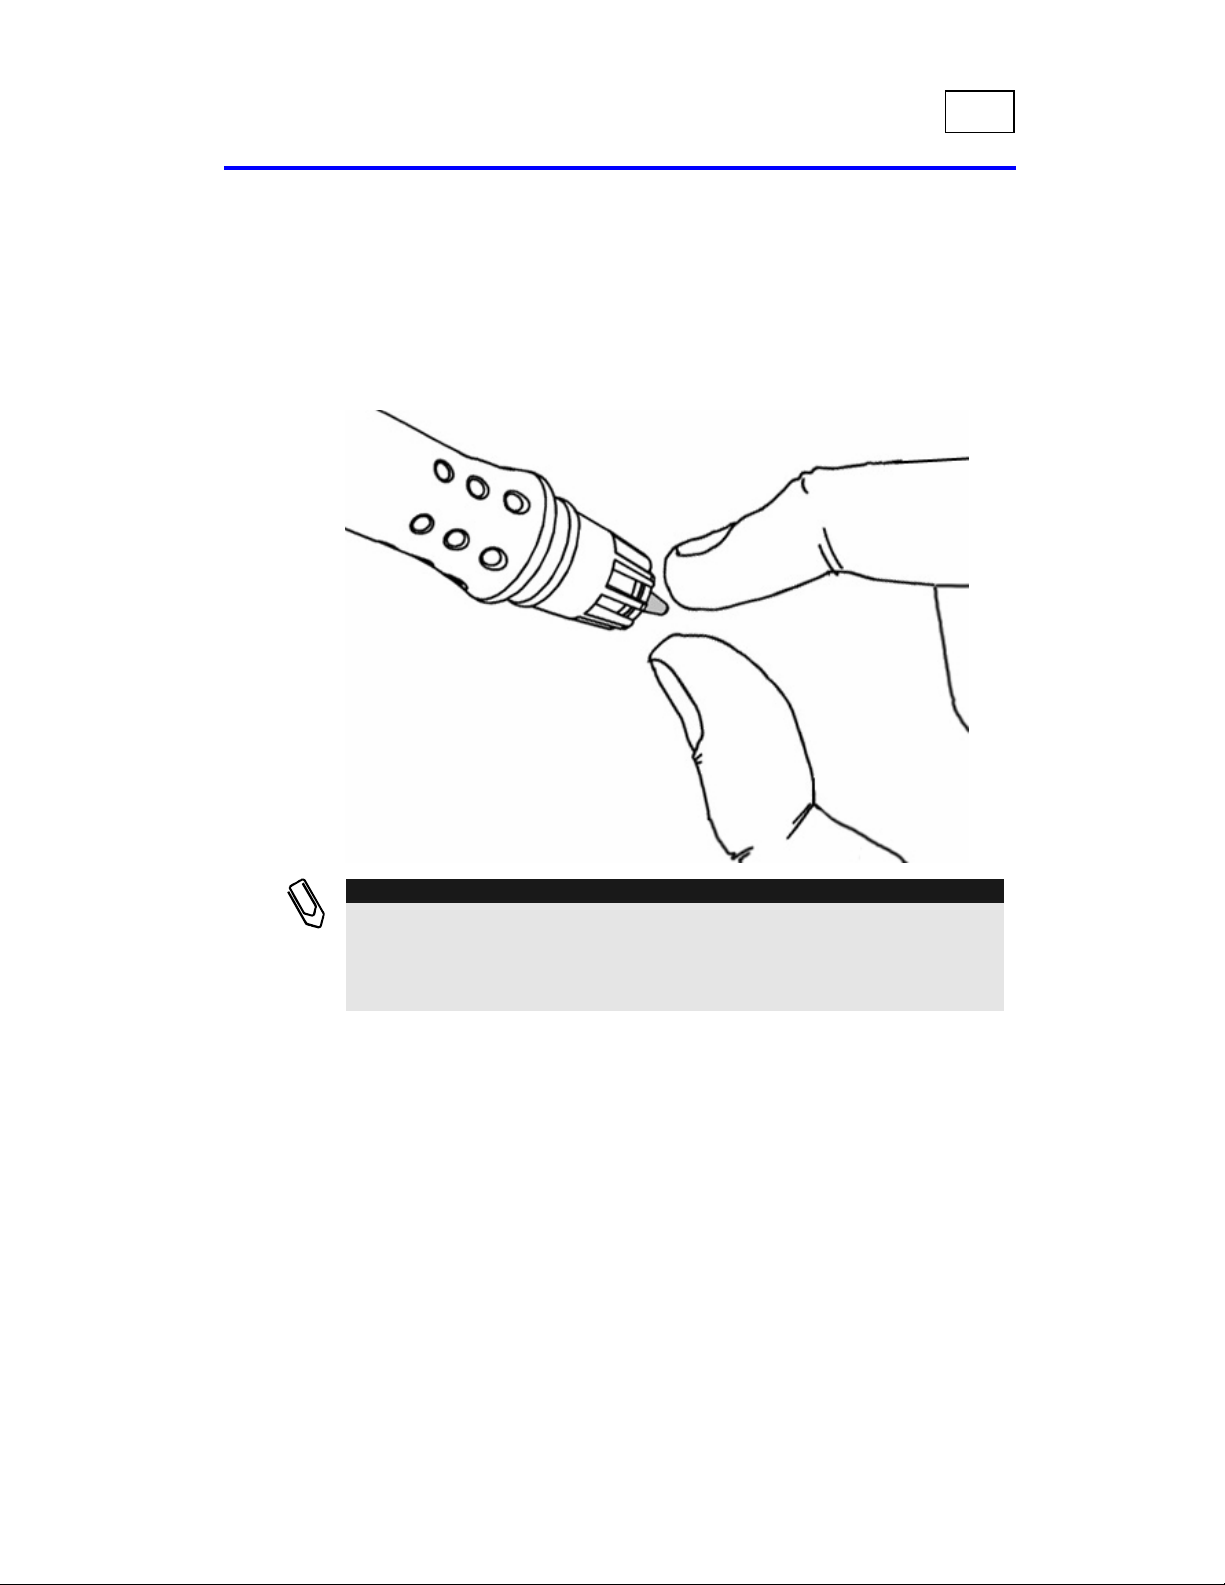
Replacing the ink refill
When replacement of the pen ink refill is needed, simply follow the
drawing for extracting the ink refill (inserting a new standard mini-ballpoint
ink refill is done in the same way).
NOTES:
If the ink supply runs out, you can replace the pen tip with any standard
mini-ballpoint writing tip.
Extra refills are optional and are not included with the pen by default. You
can purchase them from the pen’s vendor.
Page 14
14
Operating the Zpen
Zpen User’s Guide
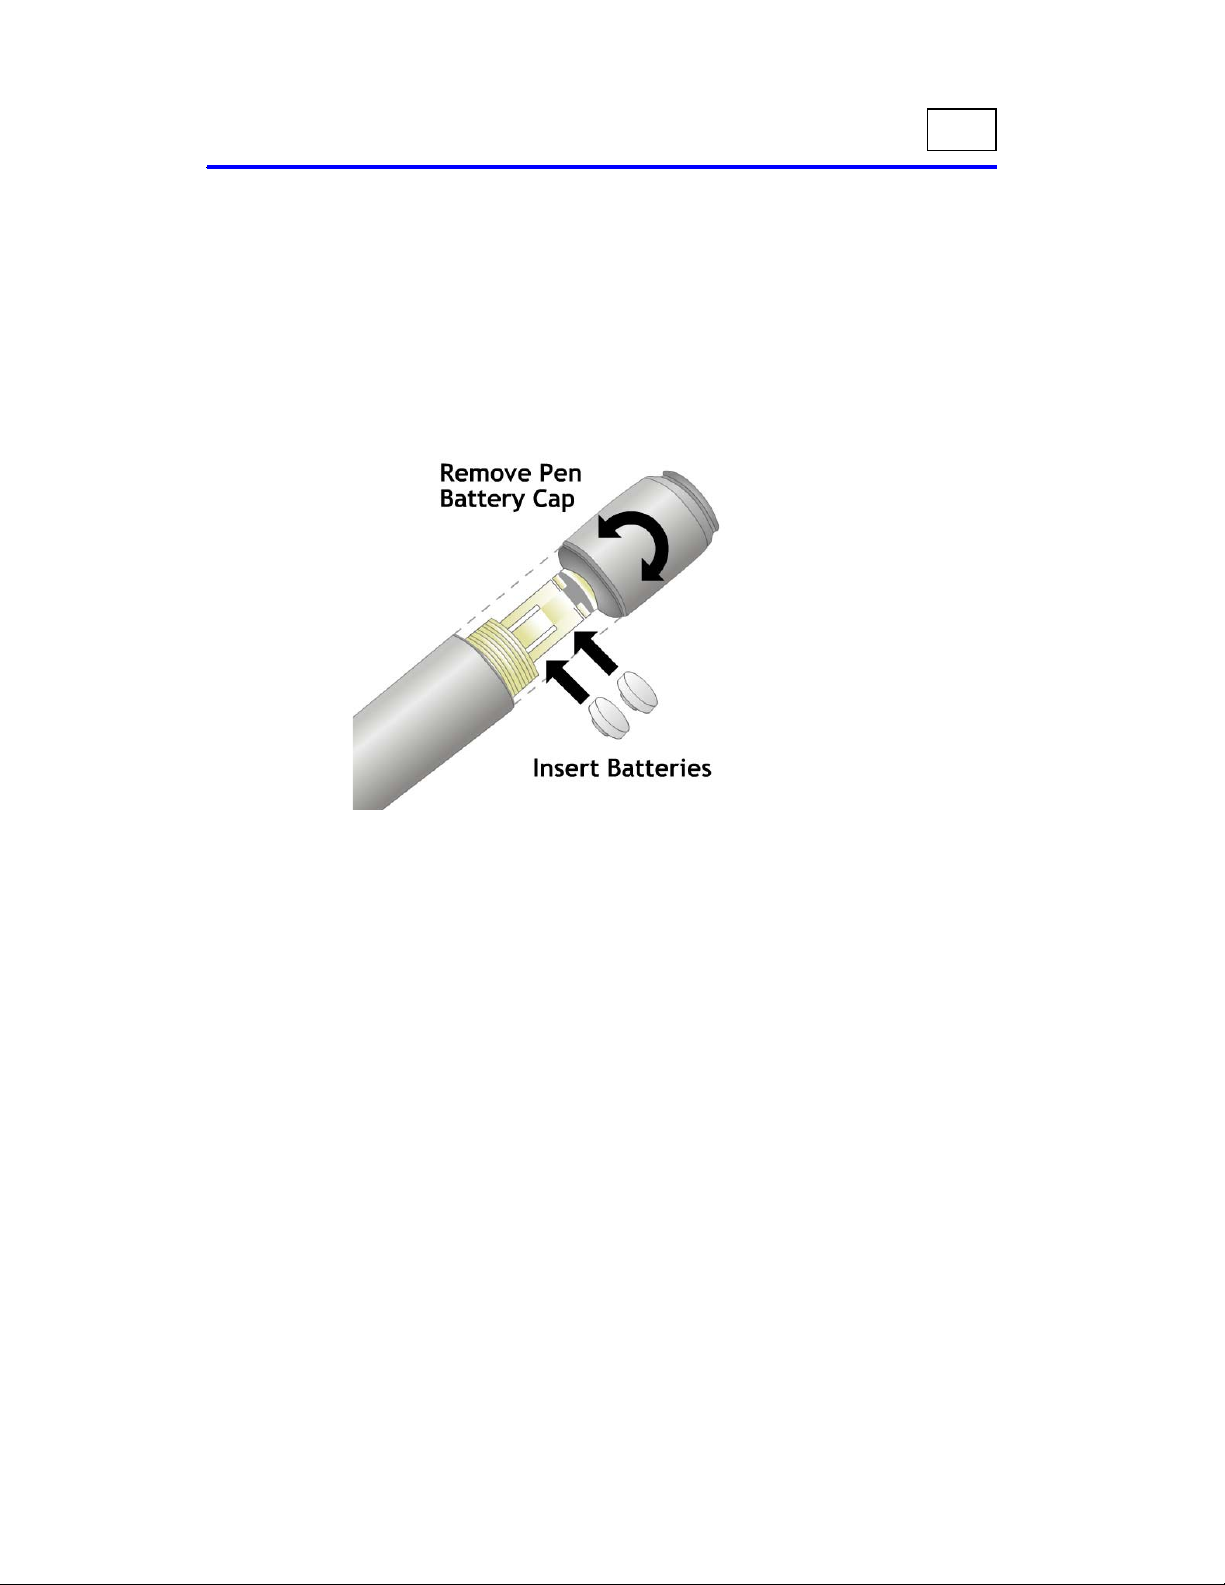
Inserting the pen’s Batteries
The Zpen requires two regular 393 watch batteries.
To insert the Zpen batteries:
1 Unscrew the top of the pen.
2 Insert the batteries.
3 Screw the pen top back on.
Page 15
15
LED Functionality Index
Zpen User’s Guide
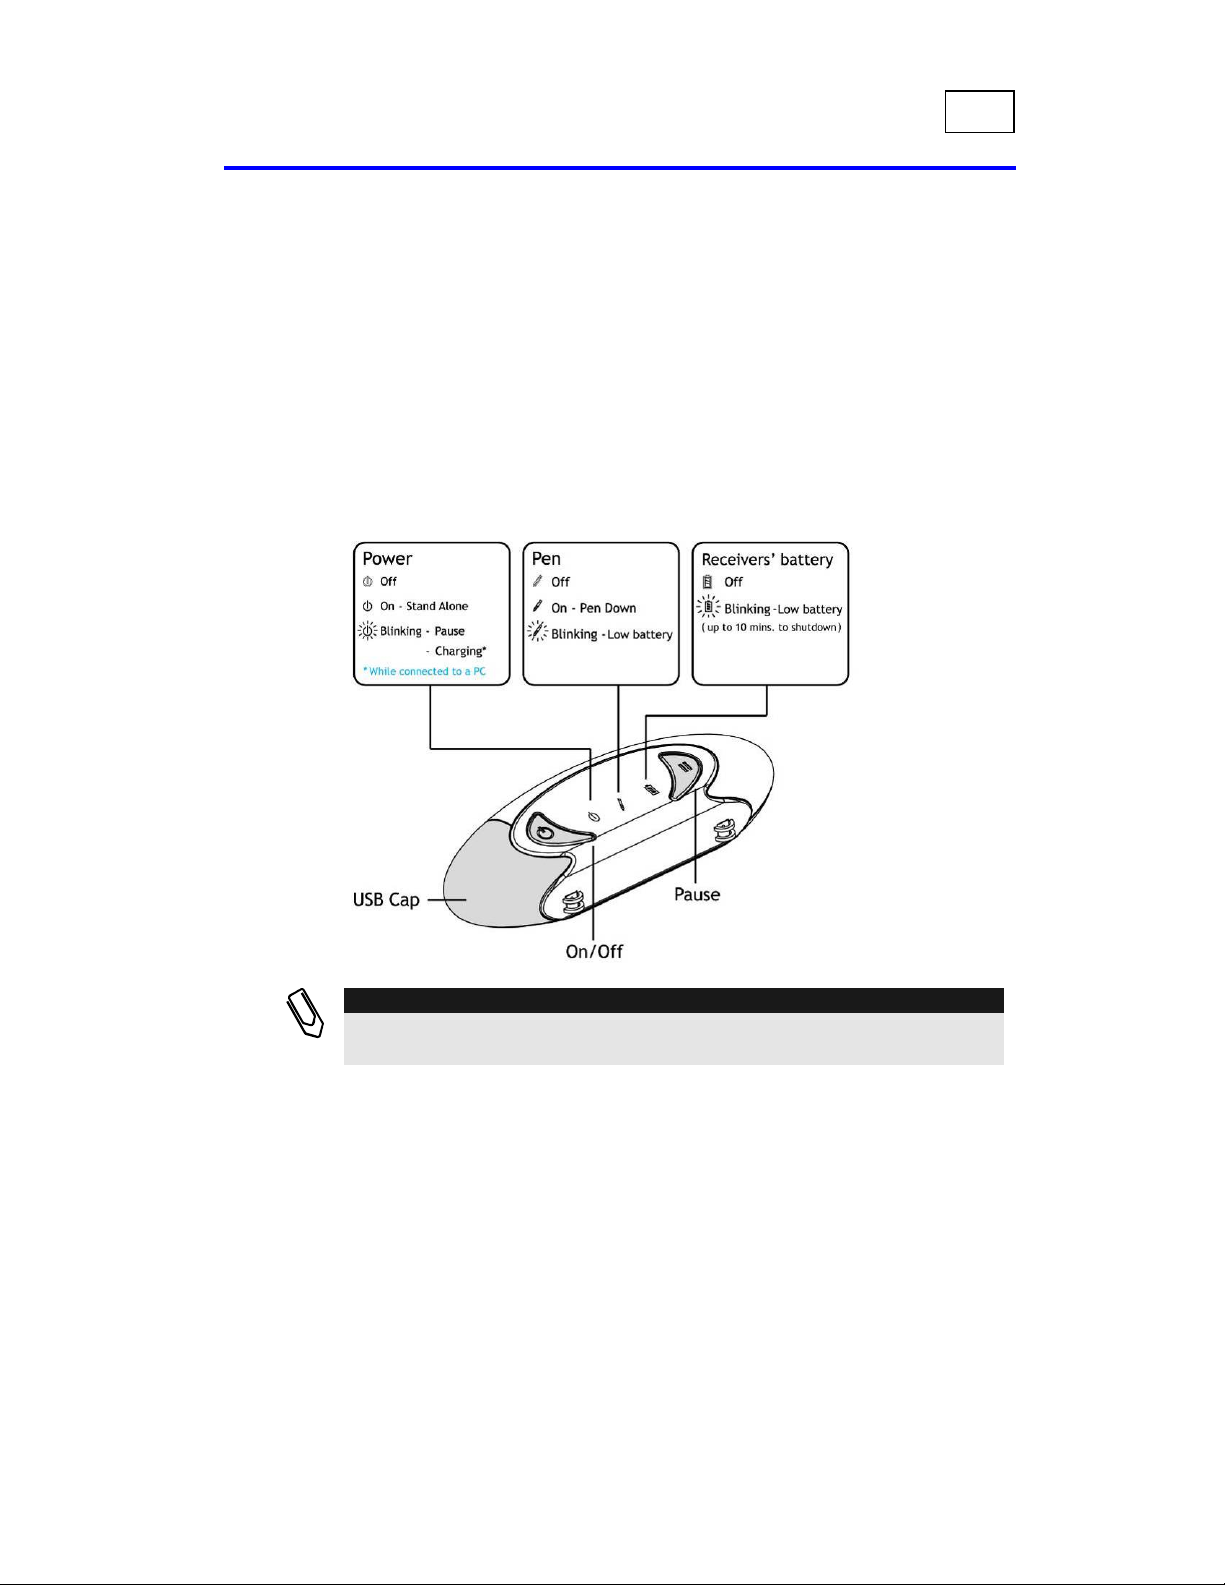
Step 2: Familiarize Yourself with the Receiver
The following drawing depicts the LEDs and buttons of the Receiver. For a
detailed LED functionality index, refer to Appendix C in the user guide
NOTE:
You must charge the receiver for 6 hours before using it for the first time.
While charging, make sure the on/off led is blinking
Page 16

16
Operating the Zpen
Zpen User’s Guide
Step 3: Clip the Receiver to a Sheet of Paper
The Receiver’s default position is on the top middle of an A4 or letter-sized
paper (or smaller) in portrait position. You can use any orientation (portrait
or landscape).
NOTE:
If you want to position the clip in a different location on the page, you must
modify the receiver’s position in the Multiplatform Viewer application
(ToolsÆSet receiver position) or in any other application
Attach the Receiver to a sheet of paper by pressing the white button (clip)
on the underside of the Receiver, and then insert a sheet of paper, a
notebook or a paper block.
Be sure to position the Receiver at the center of the chosen page edge (see
following drawing).
Step 4: Turn On the Receiver
To turn the Receiver on, press the On/Off button (the far left button on the
Receiver's front panel). The left and right LEDs will light up. Wait until the
power light turns red and stops blinking. This signals that the Receiver is
now ready to work with the Zpen.
Page 17

17
LED Functionality Index
Zpen User’s Guide
Step 5: Begin Writing
You are now ready to write anywhere! As you write, the data is stored in
real time as files on the Receiver.
NOTE:
While writing, make sure the line of sight between the pen and the recei ver
remains clear.
In addition, keep your fingers away from the crystal cone at the bottom part
of the pen (see drawings below)
Right way Wrong way
Page 18

18
Operating the Zpen
Zpen User’s Guide
To add a new page, simply press the clip button and attach the Receiver to a
new page. The software automatically adds a new virtual page to your
document.
Continue writing until you complete your document. If you want to take a
break during your writing, press the Pause button on the Receiver, which
gives an additional 30 minutes before the receiver will shut itself down.
This conserves the battery for longer use. When you resume writing (pen
down), the receiver will exit Pause mode and the Power LED will stop
blinking
TIP:
To draw straight lines, keep the pen at the same angle and move your h an d.
Be sure not to block the line of sight to the Receiver.
Page 19

19
LED Functionality Index
Zpen User’s Guide
When you finish writing, press and hold the On/Off button on the Receiver
until all LEDs stop blinking and turn off (around two seconds), and then
remove the Receiver from the sheet of paper.
Step 6: View Your Files on the Computer
Several software applications are available for viewing, editing and text
converting of your handwritten captured files; the Multiplatform Viewer is
one of them.
The Multiplatform Viewer is an application that can be used without full
software installation for simplified viewing capabilities.
The Viewer can be accessed either via a direct launch when plugging the
receiver to the PC or via the PenInkViewer folder located on the flash drive
itself.
A simple walk through usage of the Viewer is presented below.
Page 20

20
Operating the Zpen
Zpen User’s Guide
Viewing Files Using Pen&Ink Viewer
Connect the Receiver to any free USB slot on a computer. The Receiver is
automatically recognized as a mass storage device once it is connected, and
displays the following window once the connection is established:
Page 21

21
LED Functionality Index
Zpen User’s Guide
Select the Launch Pen&Ink Viewer option in the list and click OK. This
action opens the Viewer application, in which you can view *.eli files.
Page 22

22
Operating the Zpen
Zpen User’s Guide
To open one of your files, click the Open icon in the Pen&Ink
Viewer main window and then navigate in the window that opens to the
My Notes folder on the USB Flash Drive. Then, select the relevant file
with a *.eli extension.
Page 23

23
LED Functionality Index
Zpen User’s Guide
Your file is automatically displayed in the Pen&Ink Viewer main window.
See Chapter3, Using the Multiplatform Viewer Application, for more
details about how to use this application.
Page 24

24
Operating the Zpen
Zpen User’s Guide
Tips – Important Facts to Know
Please make sure to charge the device for 6 hours before using for
the first time. While charging, make sure the on/off LED is
blinking
Please take care NOT to dismantle the pen’s crystal cone or
receiver
To add a New Virtual Page, press the receiver’s clip button (at least
0.5 seconds). The pen LED indicator (middle light on the receiver)
will turn on for 0.5 seconds, indicating the creation of a New
Virtual Page
The receiver will turn itself off automatically after being idle for 10
minutes
When the receiver battery LED (far right LED) starts blinking, one
has up to 10 working minutes until the receiver will shut down.
Only after charging the receiver, will you be able to turn it on again
Make sure the receiver is centralized on one of the paper’s edges
The RESET button (small hole in the back of the receiver) should
be pressed in the following cases:
o Whenever the receiver is stuck (all LEDs are constantly on
or blinking)
o When the receiver is charged, the receiver turns off after
turning it on, or alternatively, the receiver doesn’t turn on
at all.
Page 25

25
LED Functionality Index
Zpen User’s Guide
The Pause button extends the automatic turn-off of the receiver to
30 minutes (the Power LED will start blinking when entering
power saving mode). When you resume writing (pen down), the
receiver will exit Pause mode and the Power LED will stop
blinking
Low Quality Zone – Directly in front of the receiver, there is a one
inch (2.5 cm) area that may result in lower handwriting capture
quality. For best results, begin writing further than one inch
(2.5cm) away from the front of the receiver
Avoid writing on n v
If you want to set the date and time of your files, ope
n surfaces
u e e
n the Viewer
application and go to Tools > Set Clock
Page 26

26
Using the Multiplatform Viewer Application
Zpen User’s Guide
5Chapter 3
Using the
Multiplatform
Viewer
Application
This chapter describes how to use the Zpen with the Multiplatform Viewer
application. The Viewer software is stored on the Receiver, and provides
simple viewing capabilities, without the need to install any special
software.
The Multiplatform Viewer application is suitable for Windows users as
well as MAC OS X and several Linux OS’
The Multiplatform Viewer application is ideal for students, as it enables
you to take notes during class using the Zpen and Receiver, and then plug
in the Receiver to a USB port on any computer to view your files, such as
at the library. All required software is already installed on the Receiver.
This chapter contains the following sections:
Multiplatform Viewer Main Window, describes the application’s
main window and its components.
Page 27

27
LED Functionality Index
Zpen User’s Guide
Navigating, describes the several navigation methods used to
maneuver within the Viewer application.
Saving, describes the multiple options available for saving Viewer
information.
Printing, describes how to print the current document.
Emailing, describes the multiple options available for emailing Viewer
information.
Page 28

28
Using the Multiplatform Viewer Application
Zpen User’s Guide
Multiplatform Viewer Main Window
The Multiplatform Viewer main window, shown below, is comprised of
several areas, including the:
Menu bar
Toolbars
Pages pane
Writing area
Page 29

29
LED Functionality Index
Zpen User’s Guide
Menu Bar
The main menu provides easy access to Multiplatform Viewer application
functionality.
TIP:
Most application options are accessible from both the menu bar and th e
toolbars. See the Toolbars section for more details about available
application options.
The following menu options are available:
File
The File menu has the following options:
▪ Open: Opens a *.eli document
▪ Close File: Closes the document
currently open
▪ Save As PDF: Saves the current
document as a PDF file
▪ Email as PDF: Emails the current
document as PDF file
▪ Print: Prints the current document
▪ Recent Files: Shows a list of the five
most recent files opened in the
application
▪ Exit: Closes the application
Page 30

30
Using the Multiplatform Viewer Application
Zpen User’s Guide
View
The View menu has the following options:
▪ Zoom: Resizes the view to the specified
percentage
▪ Grid: Adds grid lines to the document
▪ Margin: Adds a margin guide to the
document
▪ Toolbars: Enables you to show/hide the
application’s three toolbars
▪ Pages Thumbnails: Toggles to
show/hide thumbnails in the Pages pane
Page 31

31
LED Functionality Index
Zpen User’s Guide
Page
The Page menu has the following options:
▪ Previous Page: Moves to the
previous page
▪ Next Page: Moves to the next page
▪ Save Page As: Saves the current
page as graphical file-GIF, PNG,
BMP or JPEG image
Tools
The Tools menu has the following option:
▪ Set Clock - Sets Clock and Date to
the local time
▪ Select Receiver Position - Selects
desired receiver position on the page
▪ Select Language: Selects the Viewer
language to the desired language
Help
▪ Page Size: Selects page size, A4 is
default size
The Help menu has the following option:
▪ About: Displays version information
about the Pen&Ink Viewer
application
Page 32

32
Using the Multiplatform Viewer Application
Zpen User’s Guide
Toolbars
The Multiplatform Viewer application contains several toolbars for quick
access to application functionality.
TIP:
Most application options are accessible from both the menu bar and th e
toolbars.
Toolbars include the:
File toolbar
Pages toolbar
Zoom toolbar
NOTE:
You can hide/show the toolbar by selecting View ÄToolbar
File Toolbar
The File toolbar contains the following icons:
Icon Name Shortcut Function
Open
Print
E-mail as
PDF
Ctrl+O Opens a file.
Ctrl+P Prints the file.
Ctrl+M Emails the document through
your default email program,
as PDF file
Page 33

33
LED Functionality Index
Zpen User’s Guide
Pages Toolbar
The Pages toolbar contains the following icons:
Icon Name Shortcut Function
Previous Page
Page Up Moves to the previous page
Next Page
Page Down Moves to the next page
Zoom Toolbar
The Zoom toolbar contains the following icons:
Icon Name Shortcut Function
Zoom
Specifies the zoom
percentage.
Pages Pane
The left side of the Multiplatform Viewer main window contains a Pages
pane. This area is used to manage the pages in the file and to display
thumbnail for each page.
Writing Area
The Writing Area displays the contents of your written page.
Page 34

34
Using the Multiplatform Viewer Application
Zpen User’s Guide
You can add or remove grid lines and a margin guide to this area to meet
your personal needs.
Margins and Grids
Like a physical sheet of paper, you can set up the Multiplatform Viewer
page to have both grids (or lines) and margins.
Page 35

35
LED Functionality Index
Zpen User’s Guide
¾ To set up the page grid:
In the menu bar, select View Ä Grid.
Select the required grid setting. You can select from the following options:
None (the default). No grid lines are displayed.
Legal: Displays only a horizontal grid on the page.
5 x 5: Displays both a horizontal and vertical grid on the page.
Page 36

36
Using the Multiplatform Viewer Application
Zpen User’s Guide
¾ To set up a page margin:
In the menu bar, select View Ä Margin.
Select the required margin setting. You can select from the following
options:
None (the default): No margin guide is displayed.
Left: Displays a margin guide on the left margin of the page.
Right: Displays a margin guide on the right margin of the page.
Page 37

37
LED Functionality Index
Zpen User’s Guide
Navigating
There are several levels of navigation within Multiplatform Viewer:
Within the document
Between documents
Each of these levels is described in the sections that follow.
Moving from Page to Page within a Document
There are two ways to jump from one page to another within a document:
Previous Page and Next Page buttons: Use these buttons in
the toolbar to jump to the previous and next pages in the document,
respectively.
Thumbnails in Pages pane: The Pages pane contains a thumbnail for
each page in the document. Simply click a thumbnail to jump to the
corresponding page in the document.
Page 38

38
Using the Multiplatform Viewer Application
Zpen User’s Guide
Opening a Document
When you open Multiplatform Viewer, the application opens displaying an
empty main window. You must open a document within the application to
view its contents.
¾ To open a document:
Click the Open
button in the toolbar or select File Ä Open in the
menu bar. The Open window opens:
Browse to select the file you want to open and click Open. The
document you selected now appears in the Writing Area in the window.
Page 39

39
LED Functionality Index
Zpen User’s Guide
Saving
You can save Multiplatform Viewer documents using the following
methods:
Save Current Page To Picture: This option only saves the current
page as an image file (either JPEG, BMP, GIF or PNG). If you have a
multi-page document and you want to save each page as a picture, you
must repeat the relevant procedure for each page.
¾ To save the document as a PDF file:
In the menu bar, select File Ä Save As PDF. In the window that
opens, specify a filename and location for the file and click Save.
¾ To save the current page as a picture:
In the menu bar, select Page Ä Save Page As. The Save Page As
window opens:
Page 40

40
Using the Multiplatform Viewer Application
Zpen User’s Guide
In the File name field, enter a name for the picture.
In the Save as File type field, select the file type for the file. You can
select one of the following options:
JPEG Image File: Saves the file as a JPEG image (*.jpeg).
PNG Image File: Saves the file as a PNG image (*.png).
GIF Image File: Saves the file as a GIF image (*.gif).
BMP Image File: Saves the file as a bitmap image (*.bmp).
Click Save.
Printing
You can print a hard copy of a Multiplatform Viewer file when needed.
¾ To print a file:
Click the Print
button in the toolbar or select File Ä Print in the
menu bar. The Print window opens.
Set up the print job as needed and click OK.
Page 41

41
LED Functionality Index
Zpen User’s Guide
Emailing
Multiplatform Viewer simplifies the process of emailing a document by
automatically attaching it to an email message as a PDF file. Emailed
documents are always sent in PDF format.
You can email Pen&Ink Viewer documents using the following method:
Email as PDF: Emailing in this manner emails the entire document as
PDF file.
¾ To email an entire document:
Click the E-mail
button in the toolbar or select File Ä Email As
PDF in the menu bar. This automatically opens an email window from
your default email program.
Select or enter the intended recipients. You can add a subject and
message as you would when sending a regular email message.
Click Send. Your email program automatically sends the message.
Page 42

42
Using the Multiplatform Viewer Application
Zpen User’s Guide
Set Clock
Multiplatform Viewer enables the user to set the local time and date. The
written files in the receiver will be saved with the local date and time when
file was created.
In the menu bar, select Tools Ä Set Clock
1. Select the drive on your computer where the receiver is located
2. Set the desired date and time and press the set clock button.
3. Disconnect the receiver from the computer, wait for the power LED to
stop blinking and turn the receiver off.
4. Press OK to complete the process
Page 43

43
LED Functionality Index
Zpen User’s Guide
Select Receiver Position
Multiplatform Viewer enables the user to set the receiver on the preferred
location, such as top of page, right, left and bottom of page, with the default
location being the top of the page.
Regardless of preferred receiver positioning, user must keep a clear line of
sight between Zpen and receiver.
In the menu bar, select Tools Ä Select Receiver Position
Page 44

44
FAQ
Zpen User’s Guide
Appendix A
FAQ
Overview
This section consists of questions and their respective detailed answers, addressing
the following topics:
a. General product-related issues
b. Getting started (installation and first use of the product)
c. Receiver
d. Zpen
e. Multi-platform Viewer
General
- Can I use the Zpen on any surface? Can I take notes on my lap?
o A: Yes. As long as the writing is done on a relatively smooth surface
and a clear line-of-sight is maintained between the pen and receiver
- Does the product work in a noisy environment?
o A: Generally speaking, yes, it does; Zpen technology knows how to
ignore out-of-band noises (generated below 25Khz and above 80Khz)
and implements “smart” algorithms to deal with in-band noises (2580Khz).
- Can two or more people use a Zpen next to each other at the same time?
Page 45

45
LED Functionality Index
Zpen User’s Guide
o A: Yes. The current version allows two or more users to sit next to each
other and work without worrying for interferences
- Is it compatible with MAC and Linux operating systems?
o A: All digital files captured by the Zpen’s receiver can be viewed in
MAC OS X and several Linux operating systems using the
Multiplatform Viewer stored on the receiver itself
Getting started
- The PC does not recognize the receiver after plugging it in.
o A: Change the USB port and USB cable and try again. If it still does
not recognize the receiver, restart the receiver by pressing the Reset
button on the back of the receiver (small hole near one of the edges).
- The receiver’s error LED (right most LED) blinks when operating the device
for the first time.
o A: The receiver’s battery arrives uncharged. Charge the device for 6
hours (the power LED should blink while charging) before first use.
- How do I use the receiver when writing on a thick pad of paper?
o A: Clip the receiver to the side of one of the pages (or to the bottom, as
long as you maintain a clear line-of-sight) and start writing.
Receiver
- How many digital pages can the receiver store?
o A: Several thousand pages (an average page size is approximately
300KB).
- How do I know when to charge the receiver?
o A: When the receiver’s battery LED (right most one) starts blinking,
this signals that the receiver battery is running low and should be
recharged (in this case you will have several more minutes before the
receiver shuts itself down automatically).
- When plugging the receiver in to my computer, I do not see the power LED
blinking; what’s wrong?
Page 46

46
FAQ
Zpen User’s Guide
o A: The receiver is not being charged; the computer may not be
providing enough current to charge the receiver. Therefore, replace the
USB port (or the USB extension cable) on your computer or try to
recharge it on a different computer.
- Part of the text I wrote was not saved.
o A: The receiver turned off due to a low battery level. Recharge the
battery.
- How long do I need to charge the receiver’s battery?
o A: Recharging an empty battery until it is full may take 5-6 hours.
- How do I know when the receiver has finished charging?
o A: While charging, the power on LED (left most LED) blinks. When it
stops blinking (turned on), the receiver is fully charged.
- Is there an indication for “flash memory full”?
o A: The right most LED starts blinking rapidly.
- Do I need to replace the receiver’s battery?
o A: No. The receiver’s battery is a rechargeable and capable of running
hundreds of charging cycles.
- How do I know that I turned a page on the receiver?
o A: Upon releasing the receiver’s clip, you will notice the pen LED
(middle LED) turning on for 0.5 seconds, indicating that a new page
has been opened.
- Can I plug in the receiver into the computer without turning it off first?
o A: Yes; however we recommend turning it off first.
- All lights are on, and the receiver does not respond.
o A: This might happen due to problems in the USB power or with the
connector’s contacts. Restart the receiver by pressing the reset button
on the back (small hole near one of the edges).
Pen
- How do I know that the pen is transmitting?
o A: When you start writing, the pen down LED (middle one) turns on
every time the pen tip touches the writing surface.
- When writing, the pen down LED (middle LED) does not turn on.
Page 47

47
LED Functionality Index
Zpen User’s Guide
o A: Several factors might affect the reception of the pen’s transmission: (i)
there must be a clear line-of-sight between the pen and receiver. (ii) also,
look to see how you write; do not block the crystal cone (the transmission
component) at the bottom part of the pen. (iii) low pen batteries.
- What is the indication for “pen batteries running low”?
o A: The pen LED (middle one) starts blinking rapidly.
- How do I replace the Zpen's batteries?
o A: Refer to the relevant section in the User Guide.
- What type of batteries should be used with the Zpen?
o A: The common batteries are standard 393 (watch) ones.
- What type of ink refill is used with the Zpen?
o A: Standard mini-ballpoint refill.
- How do I change the ink refill?
o A: Simply pull the pen tip out of the Zpen and insert the replacement pen
refill into the Zpen
Multiplatform Viewer
- How do I set the date and time of my created files?
o A: open the Multi-platform Viewer application and go to ToolsÆSet Clock
Page 48

48
Troubleshooting guide
Zpen User’s Guide
Appendix B
Troubleshooting
TYPE PROBLEM DESCRIPTION WORKAROUND
started
Receiver
Pen
The PC does not recognize the receiver after
plugging it in
Receiver’s error LED (right most LED) is blinking
Receiver’s error LED (right most LED) is blinking
After plugging in the receiver to the computer,
the power LED is off (and not blinki ng, as it
should be)
All lights are on and the receiver does not
respond
Receiver turns off immediately after turning it on Charger the receiver for at least one hour and
Receiver does not turn on Charger the receiver for at least one hour and
When writing, pen down LED (middle LED) does
not turn on
Pen LED (middle one) starts blinking rapidly Pen batteries are running low
i) Change USB port and retry
ii) Restart the receiver by pressing the reset
button (back of the receiver) Getting
Recharge the receiver for the first time (about
6 hours)
i) Low battery – recharge the receiver
ii) The receiver’s memory is full
Replace the USB port on your computer or try
to recharge it on a different computer
Restart the receiver by pressing the reset
button (back of the receiver)
try again; if the problem persists, press the
reset button (back of the receiver)
try again; if the problem persists, press the
reset button (back of the receiver)
i) Clear line-of-sight between the pen and
receiver
ii) Do not block the crystal cone
iii) Replace pen batteries
guide
Page 49

49
LED Functionality Index
Zpen User’s Guide
Appendix C
F
UNCTIONALITY
Normal Operation
Charging
Receiver errors
Pen error
L
LED
ED OPERATION
Power Pen Receiver
Power Pen Receiver
Power Pen
Power Pen
Power Pen Receiver
Power Pen Receiver
Power Pen Receiver
Power Pen Receiver
Power Pen Receiver
Power Pen Receiver
Functionality
Index
D
ESCRIPTION
Off
On
On – Pen down
On – New Page indication
(after pressing the clip for
at least 0.5 second)
Charging
Finished charging
No charging – Computer
does not provide enough
current to charge the
receiver
1) Low receiver battery –
charge it
2) Flash memory full
Receiver stuck (rarely) –
restart the receiver
Low pen batteries –
replace them
 Loading...