

Page 1
Wifi 802.11 b/g or MIMO
Quickstart Guide
PC/MAC
1
Download User Manual on www.danedigital.com
Page 2
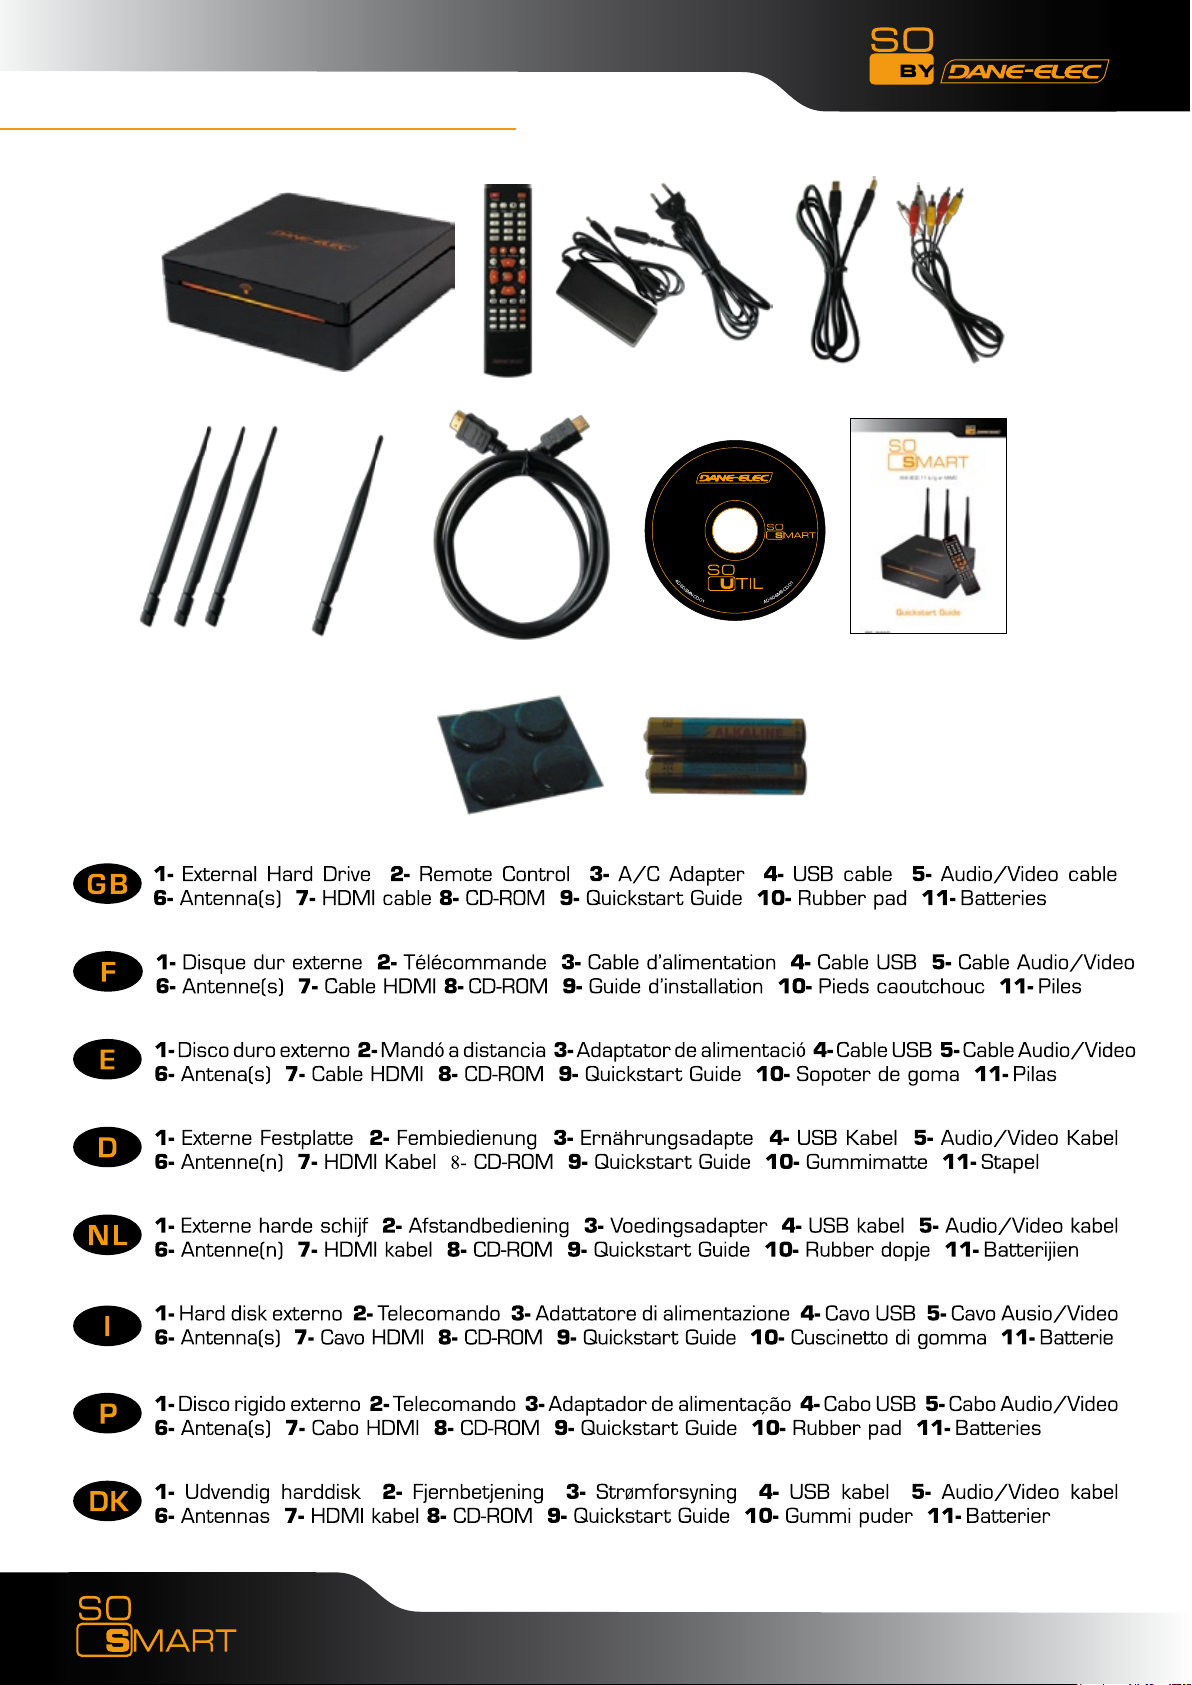
Packaging Content
1
OR
6 7
2 3 4 5
10
8
11
9
2
Download User Manual on www.danedigital.com
Page 3

Technical Specifications
Product Name So Smart HDMI Wireless Hi-Definition Media Player
Processor SEM8621L (By Sigma Designs)
Memory 64MB (RAM), 8MB (Flash)
Operating System ucLinux
Video
Supported Files
& Formate
Video Output Composite, S-Video, Component, and HDMI.
Audio Output Analog Stereo RCA
TV System NTSC, PAL, or AUTO
Hi-Def Decoding
Audio Decoding
Networking
Audio
Image
Digital Coaxial, Optical
HD COMPONENT YPbPr (576p, 720p,1080i) / HDMI (576p, 720p,1080i
1080p)
WMV, ASF, AVI and MP4 formats
MPEG-1 and MPEG-2 Layers I, II and III (MP3), MPEG-2 BC multi-channel
layers I, II and III, MPEG-2 and MPEG-4 AAC-LC,WMA9 and WMA9 Pro
decoding
Wire Ethernet (10/100) LAN via RJ-45 Port
Wireless Wireless LAN : 802.11 b/g or N (MIMO)
DivX® (3/4/5/6), AVI, Xvid, MPEG, MPG, VCD(DAT), (VOB,
IFO), WMV(WMV-9), ASF(WMV-9), TP, TS, TRP
MP3, WMA, AAC, OGG, PCM, AC3, DTS™ decoding including
down-mixing, DTS™ pass through
BMP and PNG (< or = at 1024 x 768), JPEG/JPG, not compatible GIF
Network Security Wireless: WEP, WPA and MAC-address Filtering
Wireless : IEEE802.11b/g, 5dBi antenna (SMA type) or N
Network Protocol
Hard-Disk Type 3.5” Internal SATA
USB Interface USB2.0 host, USB2.0 Slave
Power AC-DC Adapter 12V, 3A
Dimension 187mm(W) X 193mm(H) X 58mm(D) or 7.4”(W) x 7.6”(H) x 2.3”(D)
3
Wire : 10/100Mbps Fast Ethernet (RJ45)
TCP/IP (DHCP client mode, Manual IP mode
Download User Manual on www.danedigital.com
Page 4
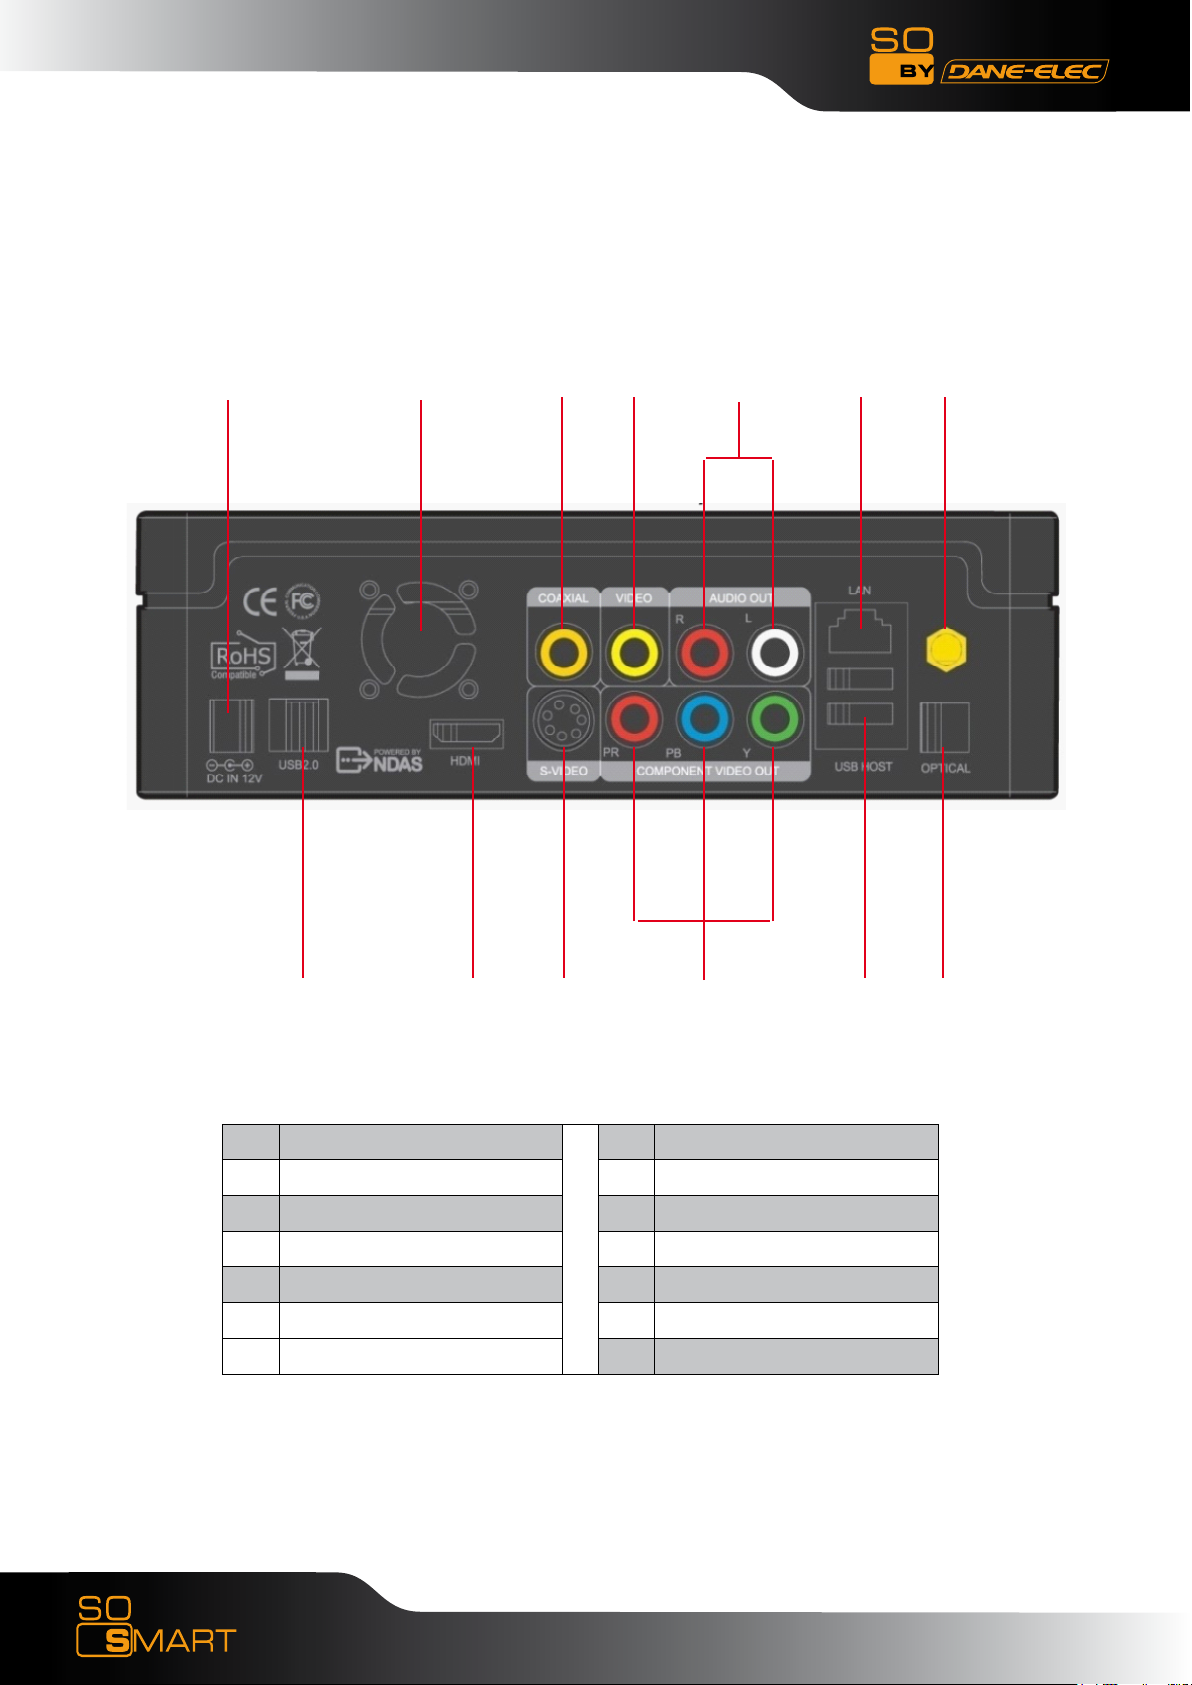
Rear View
13 11 8
7 5 3 1
12 10 9 6 4 2
Wireless Antenna Jack
1
optical (Audio) Port
2
10/100 Mbps (RJ45) LAN
3
USB 2.0 Host A-Type 2
4
Video Composite Port
5
Video Component Port
6
Composite Port
7
Coaxial Cable Jack
8
S-video Port
9
HDMI Port
10
High Velocity Fan
11
USB 2.0 Slot
12
Power
13
4
Download User Manual on www.danedigital.com
Page 5
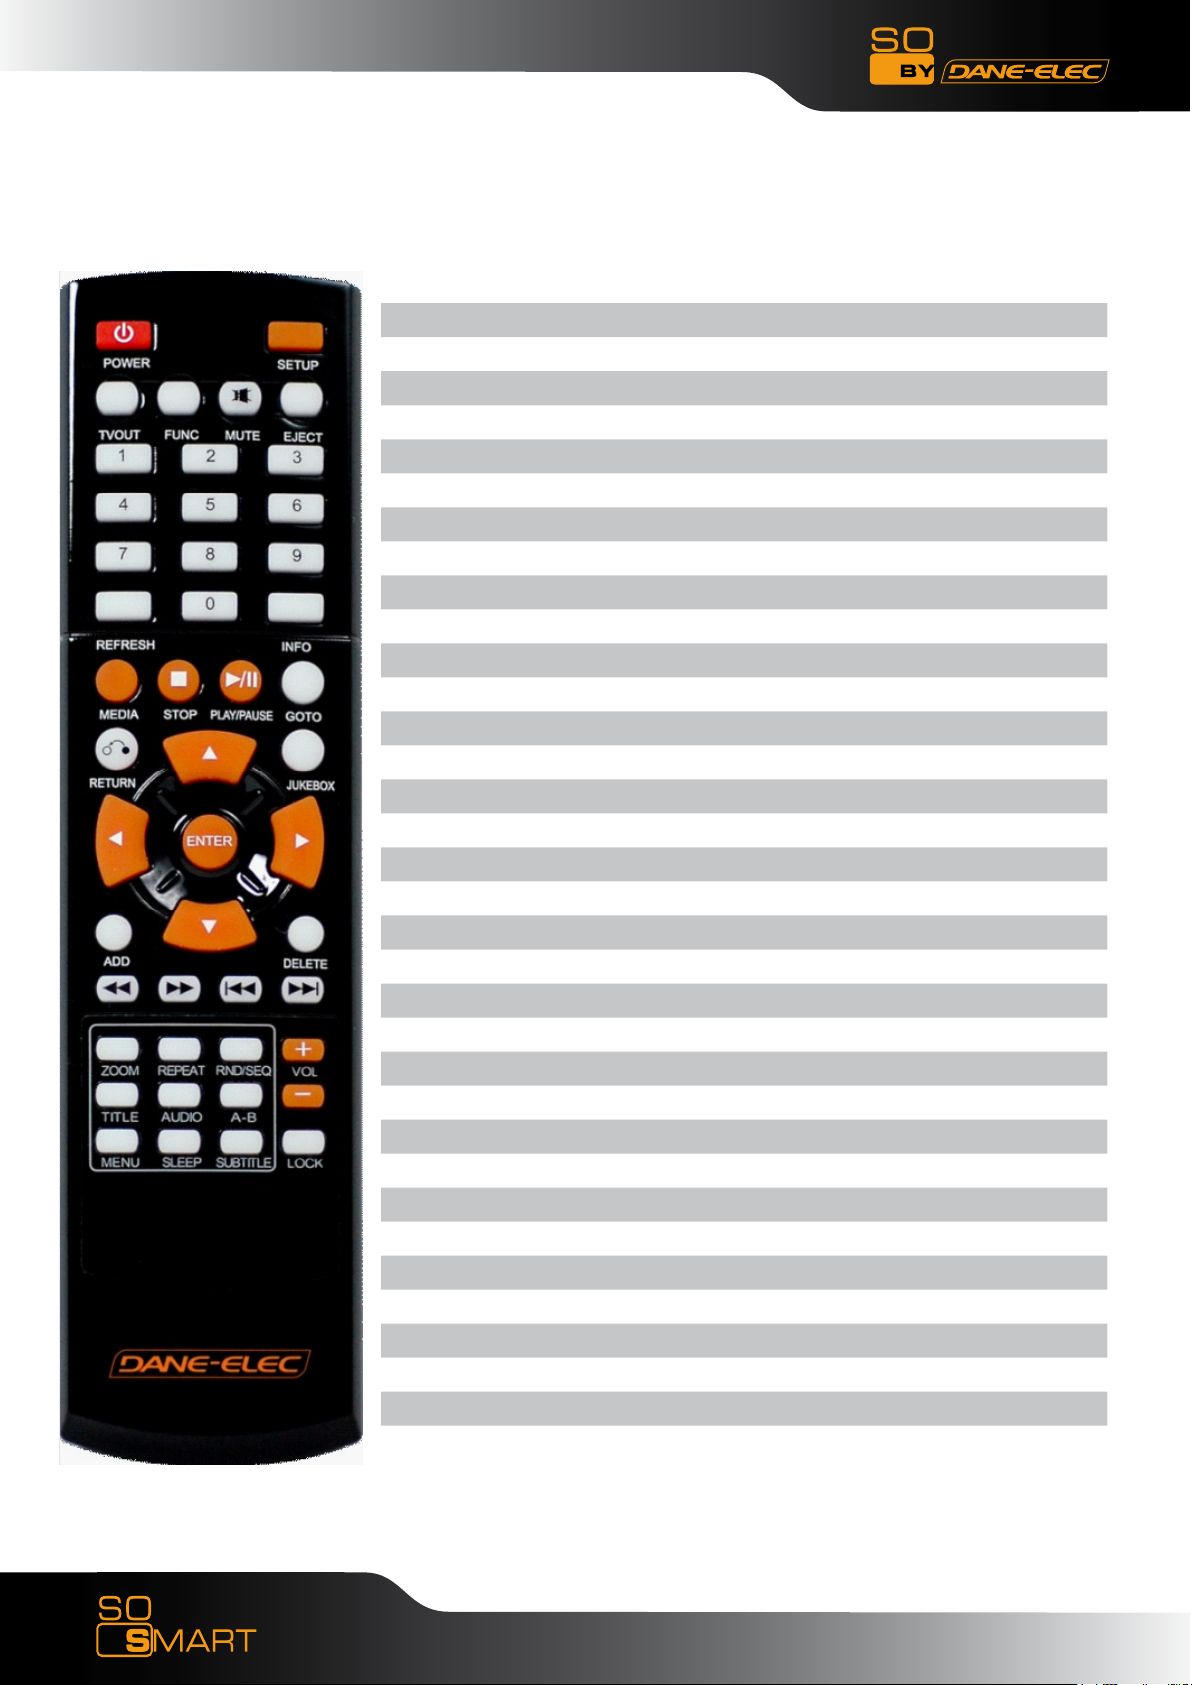
So Smart Remote Control
POWER Toggle Unit Power (ON / OFF)
SETUP Enter Setup Menu, Apply/Confirm Setup Settings
TV OUT Toggle Video Output Modes
FUNC Display Control Options (Vol, Contrast, Subtitle etc..)
MUTE Stop Audio Output from the Player
(ARROW) Cursor Navigation Arrow Buttons
REFRESH Refresh Shared-Folder / Directory Contents
INFO Display Media File Information
RETURN Return to Previous Screen / Folder
JUKEBOX Toggle Jukebox Display Options (Audio Only)
ENTER Enter / Play (Individual file) / Select the Highlighted Selection
ADD Add the file to MY LIST
DELETE Delete file from MY LIST
MEDIA Toggle Media List (Video / Audio / Photo / Mixed)
STOP Stop Playback
PLAY / PAUSE Play (Continuous-Sequential Play) / Pause Playback
VOL + / - Volume (Increase / Decrease)
FF / End Fast Forward Playback. Scroll to end of File List.
FB / Home Fast Backwards / Rewind Playback. Scroll to beginning of File List.
PREV / PGUP Previous Chapter / File / Page Up on List
NEXT / PGDN Next Chapter / File / Page Down on List
LOCK Set Folder Password (Folder access Control)
SUBTITLE Subtitle ON / OFF, Change Settings
GOTO Time-Stamp based Search and FF/FR.
ZOOM Zoom Video Playback
REPEAT Repeat Media file(s) Playback
RND / SEQ Switch between Random – Sequential Playback.
TITLE Display DVD / VCD Title Screen on Main Menu Screen
AUDIO Display a list of AUDIO files & start JUKEBOX
A-B Repeat one Small Segment of a Media File
MENU DVD / VCD Menu Screen (Chapters, Extras etc.)
SLEEP Set Sleep Timer
EJECT Eject CD or DVD ROM drive (USB host)
5
Download User Manual on www.danedigital.com
Page 6
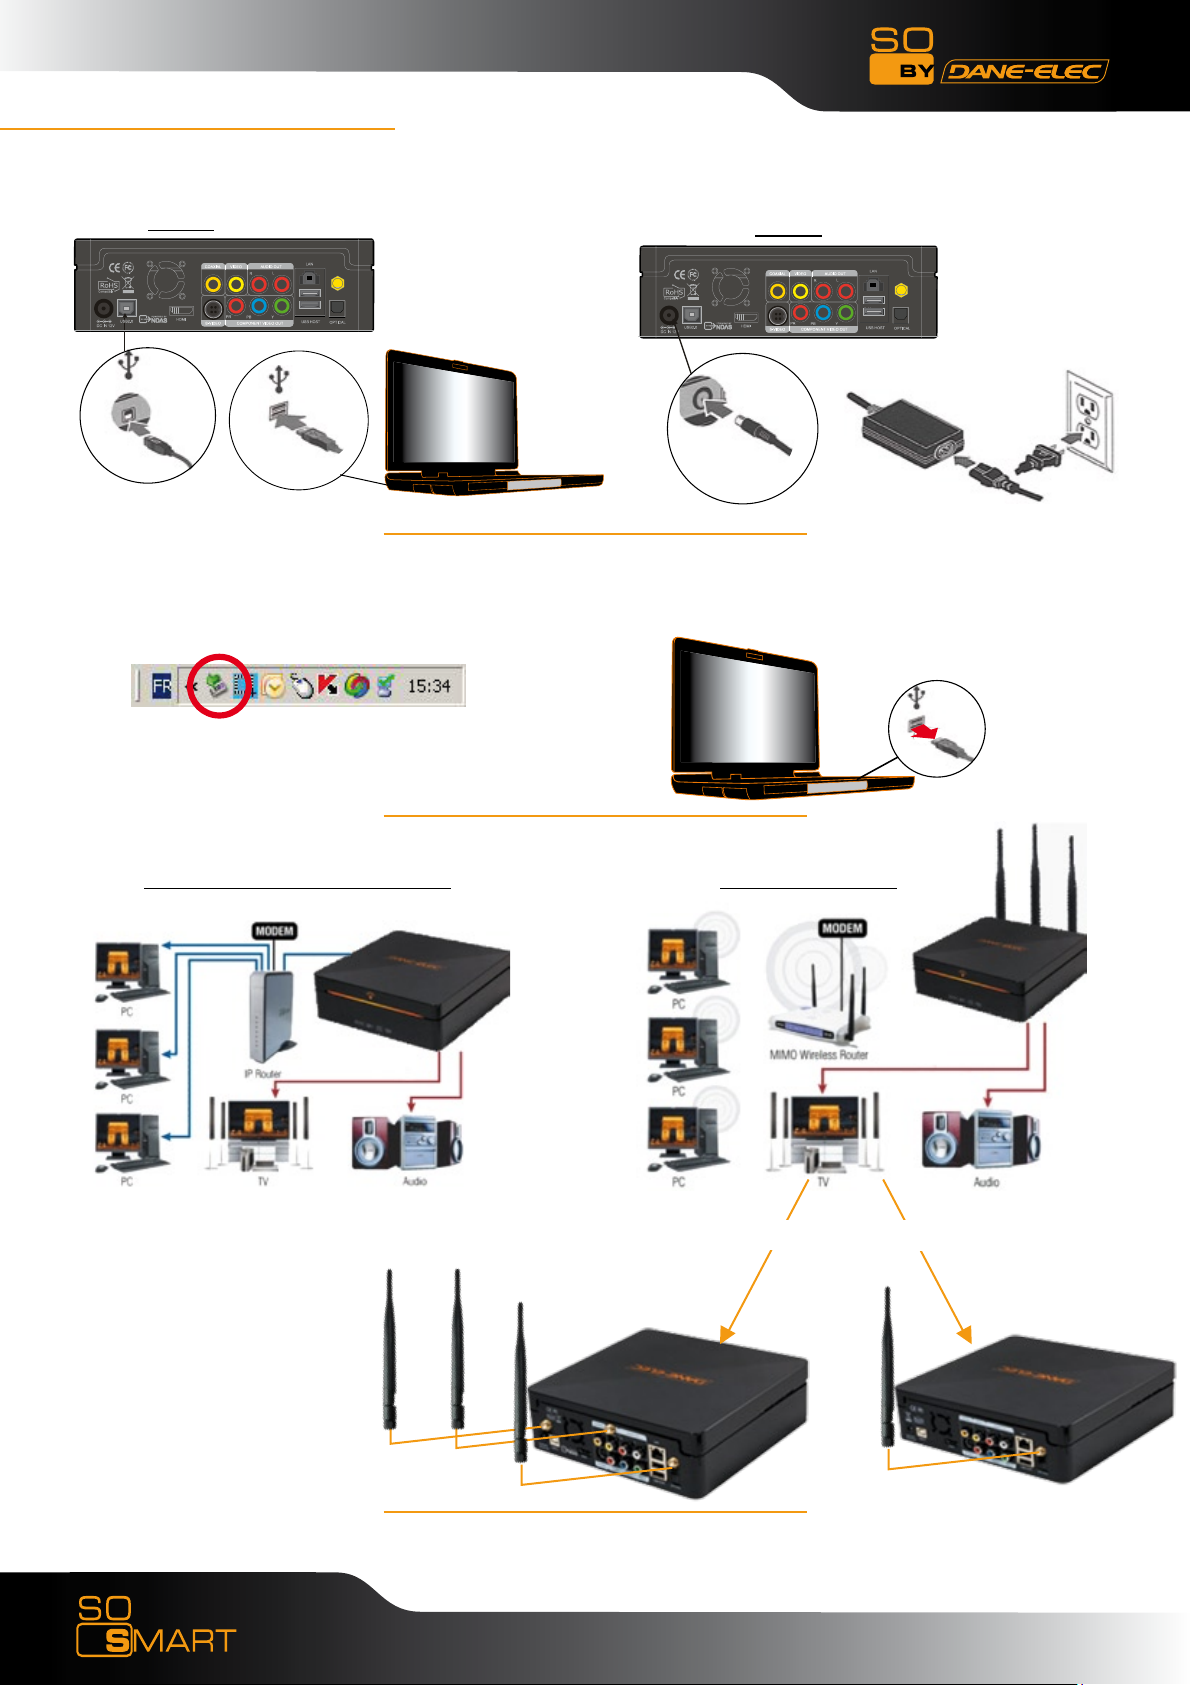
Power Supply
Connect the So Smart :•
Disconnect the So Smart :•
USB :
1: Click on 2 : Disconnect
A/C :
Connect to the network•
Wired : via RJ45, 10/100 LAN Wireless : via WIFI
MIMO WIFI 802.11 b/g
For NDAS function, please see User Manual.•
6
Download User Manual on www.danedigital.com
Page 7

Inputs/Outputs
HDMI :•
YPbPr (cable not included) :•
Audio/Video :•
Change video mode : Press TV OUT•
On / Off
HDMI
YPbPr
Audio/Video
7
Download User Manual on www.danedigital.com
Page 8

Getting started
TVOUT
POWER
SETUP
Navigator
1- Allumez le disque dur externe
2- Presser "TVOUT" pour obtenir le mode video
1- Switch on the external hard disk
2- Press "TVOUT" to obtain the video mode
1- Starten Sie die externe Festplatte
2- Drücken Sie “TVOUT” um in den Video Modus zu gelangen
1- Encender el disco duro externo
2- Presionar “TVOUT” para accede a la modo video
1- Acendam o disco duro externo
2- Presser "TVOUT" pour obtenir le mode video
1- Accendere il disco esterno
2- Premere “TVOUT” per la modalità video
1- Zet de externe schijf aan
2- Druk op “TVOUT” om naar de videostand te gaan.
1- Tryk på ”power” knappen
2- Tryk på ”TVOUT” for at modtage videosignal på TV’et
No image on screen:
!
If you don’t see any picture on screen while your
player is connected to your TV, please pres several
times the "TV OUT" buton on the top left of the
remote control. Please wait a few seconds between
each push on the button; Image should appear after
some pushes (location of the right connection).
Pas d’image à l’écran :
Si vous ne voyez pas d’image à l’écran pendant que
votre écran est connecté à votre TV, merci d’appuyer
plusieurs fois sur le bouton «TV OUT» situé en haut
à gauche de la télécommande. Merci d’attendre
quelques secondes avant chaque appui sur le bouton.
Une image apparaîtra après quelques appuis (une
fois que la bonne connexion sera trouvée).
8
Download User Manual on www.danedigital.com
www.danedigital.com
Page 9

Reset
Paramètres d’usine
Un redémarrage du produit peut être nécessaire si le lecteur
ne fonctionne pas correctement. Cela peut également être
utile si le mot de passe de l’administrateur a été oublié,
perdu ou mal rangé
1. Eteignez complètement le lecteur So Smart
2. Appuyez sur le bouton « SETUP » et juste après sur le
bouton « 1 », situés sur la télécommande
3. La LED située au centre s’allumera alors
4. Appuyez sur le bouton « POWER » de la télécommande
5. L’unité redémarre et retourne aux paramètres de sortie
d’usine (attention ! il n’y aura pas de lumière au centre)
6. Attendez 30 secondes avant d’appuyer sur le bouton
« TVOUT » de la télécommande, afin d’obtenir la vidéo sur
votre TV (merci d’attendre quelques secondes entre chaque
appui sur le bouton).
Factory Reset
A Hardware Reboot may be required if the player fails to
perform reliably. Hardware Reboot may also be needed if
the admin Password is forgotten, lost or misplaced.
1. Power off the So Smart Player completely
2. Press the “SETUP” button and right after the “1” button
on the remote control
3. Then LED light on center turn on
4. Press the “POWER” button on remote control
5. The unit Reboots and returns to Factory Default condition
(Warning! no light on center)
6. Wait for 30 seconds before press on “TVOUT” button on
remote control to obtain the video on your TV (waiting some
seconds for each push on the button).
Zurücksetzen auf Werkseinstellungen
Ein Rücksetzen auf Werkseinstellungen kann nötig sein,
wenn die Hardware nicht mehr zuverlässig reagiert. Dies
gilt auch für den Fall, dass das Administrator Password
nicht mehr vorliegt.
1. Schalten Sie den SoSmart Player komplett aus
2. Drücken Sie den Knopf “SETUP” und gleich danach den
Knopf “1” auf der Fernbedienung
3. Die LED Anzeigen leuchten auf
4. Drücken Sie den Knopf “POWER” auf der
Fernbedienung
5. Die Einheit startet neu und geht auf “Factory Default
“ (Werkseinstellungen) (Achtung: keine Leuchtanzeigen an
der Einheit
6. Warten Sie 30 Sekunden, bevor Sie den Knopf “TVOUT”
auf der Fernbedienung drücken, um Video auf Ihrem TV
wiedergeben zu können.
Restablecer los parámetros iníciales
Si el sistema no funciona correctamente puede ser
necesario reinicializarlo. Si se pierde u olvida la clave de
acceso también se tendrá que reinicializar el aparato.
1. Apagar completamente el So Smart
2. Presionar la tecla “SETUP” y inmediatamente después la
tecla “1” del mando a distancia.
3. Presionar la tecla “POWER” del mando a distancia
4. El aparato se reinicia con las impostaciones de fabrica
Default condition (Warning! no light on center)
6. Esperar 30 segundos antes de presiona la tecla “TVOUT”
en el mando a distancia para visualizar el video en la
televisión (esperar algunos segundos después de presionar
una tecla)
Factory Reset
Potrebbe essere necessario un Riavvio dell’Hardware, se ci
sono stati degli errori che hanno compromesso le prestazioni
del lettore. Un Riavvio dell’Hardware potrebbe servire anche
quando la Password dell’amministratore viene smarrita,
dimenticata o cambiata.
1. Spegnere completamente il lettore So Smart
2. Premere il tasto di “SETUP” e subito dopo il tasto “1” del
controllo remoto.
3. Accendere la luce LED centrale
4. Premere il tasto “POWER” del controllo remoto
5. L’unità si riavvia e ritorna alla condizione di Factory
Default (Attenzione! Nessuna luce centrale)
6. Attendere per 30 secondi prima di premere il tasto
“TVOUT” del controllo remoto per ottenere il video sulla
TV (attendere qualche secondo ogni volta che si preme il
tasto).
Speler resetten
Als de speler niet goed functioneert, kan het nodig zijn
de hardware te resetten. Dit kan ook nodig zijn als u het
wachtwoord bent vergeten.
1. Zet de So Smart-speler helemaal uit.
2. Druk op de toets “SETUP” en direct daarna op toets “1”
van de afstandsbediening.
3. Het LED-lampje in het midden gaat aan.
4. Druk op de toets “POWER” van de afstandsbediening.
5. De speler wordt opnieuw gestart en de standaard
fabrieksinstellingen worden teruggezet. (Let op! Lampje in
het midden is uit.)
6. Druk pas na 30 seconden op de toets “TVOUT” van de
afstandsbediening om de video op uw tv weer te geven
(wacht steeds enkele seconden voordat u op een andere
toets drukt).
Parâmetros de fábrica
Um «Hard Reboot» do produto pode ser necessário se o
leitor não funciona correctamente. Pode igualmente ser útil
se a senha do administrador for esquecida, perdida ou mal
arrumada.
1. apagar completamente o leitor So Smart
2. apoiar sobre o botão «SETUP» e depois sobre o botão
«1», situados sobre o telecomando.
3. a LED situada no centro acender-se-á então
4. apoiar sobre o botão «POWER» do telecomando
5. a unidade começa a funcionar novamente e volta aos
parâmetros iniciais de fábrica (atenção! não haverá luz ao
centro)
6. esperar 30 segundos antes de apoiar sobre o botão
«TVOUT» do telecomando, a fim de obter a vídeo sobre a
vossa TV (por favor esperar alguns segundos entre cada
apoio sobre o botão)
Genskab fabriksindstillinger
Hardware genstart af afspilleren kan blive nødvendig
hvis funktionaliteten bliver ustabil. Hardware genstart af
afspilleren er ligeledes nødvendig hvis password glemmes
eller forlægges.
1. Sluk for So Smart afspilleren
2. bPå fjernbetjeningen trykkes på ”setup” knappen og
umiddelbart herefter på knap ”1”
3. Den midterste diode vil lyse
4.På fjernbetjeningen trykkes på ”power” knappen
5. Afspilleren genstarter og er sat tilbage til fabriksindstillingen
(BEMÆRK dioden i midten lyser ikke)
6. Vendt i 30 sekunder inden der trykkes på fjernbetjeningens
”TVOUT” knappen for at modtage videosignal på dit TV
9
Download User Manual on www.danedigital.com
Page 10

Change the language
1 4
2
3
5
10
Step by step :
1) Press the button SETUP then choose SETUP in the menu
2) Click on "Language"
3) Choose your language (French in this example)
4) The language appears
5) Press SETUP
Download User Manual on www.danedigital.com
Page 11

Software Installation
+
+
OR
11
+
Download User Manual on www.danedigital.com
Page 12

Software Installation
Easy Archive : Choisissez les données que vous voulez sauvegarder
Back Up My PC : Copiez une image de votre disque pour tout retrouver
PC Tools Antivirus avec mise à jour antivirus offerte pendant 3 mois
PC Tools Antispyware : Logiciel anti-espion avec mise à jour offerte pendant 3 mois
Easy Archive: Choose the data that you want to save
Back Up My PC: Make an image of your hard drive
PC Tools Antivirus with free updates for 3 months
PC Tools Antispyware : Anti-spyware with free updates for 3 months
Easy Archive : Zur Auswahl der zu speichernden Daten
Back Up My PC : Zum Erstellen eines Festplattenabbildes, um alle Daten einfach wiederzufinden
PC Tools Antivirus inklusive drei Monaten kostenloser Aktualisierungen
PC Tools Antispyware : Anti-spyware-Programm inklusive drei Monaten kostenloser Aktualisieren
Easy Archive : Vælg de data, du ønsker at gemme
Back Up My PC : Et virtuelt billede af din disk, for at være i stand til finde alle dine data
PC Tools Antivirus med gratis antivirus opdatering i 3 måneder
PC Tools Antispyware : antispion program med gratis opdatering i 3 måneder
Easy Archive : Seleccione los datos que desea guardar
Back Up My PC : Copie una imagen de su disco duro parapoder recuperar todo en caso de problemas
PC Tools Antivirus con actualización del antivirus gratuita durante 3 meses
PC Tools Antispyware : software Anti-Spy con actualización gratuita durante 3 meses
Easy Archive : Escolha os dados que quer salvaguardar
Back Up My PC : Copie uma imagem do seu disco para encontrar tudo novamente
PC Tools Antivirus com oferta da actualização antivirus durante 3 meses
PC Tools Antispyware : software Anti-Spy com oferta da actualização durante 3 meses
Easy Archive : Kies de gegevens die u wenst te bewaren
Back Up My PC : Kopieer een afbeelding van uw schijf om alles terug te vinden
PC Tools Antivirus met gratis actualisering antivirus gedurende 3 maanden
PC Tools Antispyware : antispy-software met gratis actualisering gedurende 3 maanden
Easy Archive : Scegli i dati che desideri salvare
Back Up My PC : Copia un’immagine del tuo disco per ritrovarla
PC Tools Antivirus con aggiornamento antivirus gratuito per 3 mesi
PC Tools Antispyware : software antispyware con aggiornamento antivirus gratuito per 3 mesiz
12
Download User Manual on www.danedigital.com
Page 13

Software Installation
1) Driver (CD):
2) Backup My PC: (1/2)
11
Download User Manual on www.danedigital.com
Page 14

Software Installation
2) Backup My PC: > Setup (2/2)
3) Easy Archive (1/2) :
3) Easy Archive: > Setup (2/2)
12
Download User Manual on www.danedigital.com
Page 15

Software Installation
4) PC Tools Antivirus & Antispyware (1/2)
4) PC Tools Antivirus & Antispyware > PC Tools (2/2)
11
Download User Manual on www.danedigital.com
Page 16

12
Download User Manual on www.danedigital.com
Page 17

Copyright© 2008 Dane-Elec Memory. All rights reserved, Dane-Elec, So Smart and logo Dane-Elec and So Smart are either registered
trademarks or trademarks of Dane-Elec Memory in Europe, USA or other countries.Roxio®, Easy Archive®, Back Up My PC® are
registered trademark or trademarks of PC Tools®. Microsoft® and Windows® are either registered trademarks or trademarks of
Microsoft® Corporation in the United States and/or other countries. Mac, Mac OS, Firewire are trademarks of Apple© Computer, Inc.
registered in United States and countries. certain other product names, brand names and company names may be trademarks or
designations of their respective owners.
11
Download User Manual on www.danedigital.com
Page 18

R&TTE Certification
Česky [Czech] : Dane-Elec tímto prohlašuje, že tento So Smart je ve shodě se základními
požadavky a dalšími příslušnými ustanoveními směrnice 1999/5/ES.
Dansk [Danish] : Undertegnede Dane-Elec erklærer herved, at følgende udstyr So Smart
overholder de væsentlige krav og øvrige relevante krav i direktiv 1999/5/EF.
Deutsch [German] : Hiermit erklärt Dane-Elec dass sich das Gerät So Smart in
Übereinstimmung mit den grundlegenden Anforderungen und den übrigen einschlägigen
Bestimmungen der Richtlinie 1999/5/EG bendet.
Eesti [Estonian] : Käesolevaga kinnitab Dane-Elec seadme So Smart vastavust direktiivi
1999/5/EÜ põhinõuetele ja nimetatud direktiivist tulenevatele teistele asjakohastele sätetele.
English : Hereby, Dane-Elec, declares that this So Smart is in compliance with the essential
requirements and other relevant provisions of Directive 1999/5/EC.
Español [Spanish] : Por medio de la presente Dane-Elec declara que el So Smart cumple
con los requisitos esenciales y cualesquiera otras disposiciones aplicables o exigibles de la
Directiva 1999/5/CE.
Ελληνική [Greek] : ΜΕ ΤΗΝ ΠΑΡΟΥΣΑ Dane-Elec ΔΗΛΩΝΕΙ ΟΤΙ So Smart
ΣΥΜΜΟΡΦΩΝΕΤΑΙ ΠΡΟΣ ΤΙΣ ΟΥΣΙΩΔΕΙΣ ΑΠΑΙΤΗΣΕΙΣ ΚΑΙ ΤΙΣ ΛΟΙΠΕΣ ΣΧΕΤΙΚΕΣ
ΔΙΑΤΑΞΕΙΣ ΤΗΣ ΟΔΗΓΙΑΣ 1999/5/ΕΚ.
Français [French] : Par la présente Dane-Elec déclare que l’appareil So Smart est conforme
aux exigences essentielles et aux autres dispositions pertinentes de la directive 1999/5/CE.
Italiano [Italian] : Con la presente Dane-Elec dichiara che questo So Smart è conforme ai
requisiti essenziali ed alle altre disposizioni pertinenti stabilite dalla direttiva 1999/5/CE.
Latviski [Latvian] : Ar šo Dane-Elec deklarē, ka So Smart atbilst Direktīvas 1999/5/EK
būtiskajām prasībām un citiem ar to saistītajiem noteikumiem.
Lietuvių [Lithuanian] : Šiuo Dane-Elec deklaruoja, kad šis So Smart atitinka esminius
reikalavimus ir kitas 1999/5/EB Direktyvos nuostatas.
Nederlands [Dutch] : Hierbij verklaart Dane-Elec dat het toestel So Smart in overeenstemming
is met de essentiële eisen en de andere relevante bepalingen van richtlijn 1999/5/EG.
Malti [Maltese] : Hawnhekk, Dane-Elec, jiddikjara li dan So Smart jikkonforma mal-
ħtiġijiet essenzjali u ma provvedimenti oħrajn relevanti li hemm d-Dirrettiva 1999/5/EC.
Magyar [Hungarian] : Alulírott, Dane-Elec nyilatkozom, hogy a So Smart megfelel a
vonatkozó alapvetõ követelményeknek és az 1999/5/EC irányelv egyéb elõírásainak.
Polski [Polish] : Niniejszym Dane-Elec oświadcza, że So Smart jest zgodny z zasadniczymi
wymogami oraz pozostałymi stosownymi postanowieniami Dyrektywy 1999/5/EC.
Português [Portuguese] : Dane-Elec declara que este So Smart está conforme com os
requisitos essenciais e outras disposições da Directiva 1999/5/CE.
18
Download User Manual on www.danedigital.com
Page 19

Slovensko [Slovenian] : Dane-Elec izjavlja, da je ta So Smart v skladu z bistvenimi zahtevami
in ostalimi relevantnimi določili direktive 1999/5/ES.
Slovensky [Slovak] : Dane-Elec týmto vyhlasuje, že So Smart spĺňa základné požiadavky a
všetky príslušné ustanovenia Smernice 1999/5/ES.
Svenska [Swedish] : Härmed intygar Dane-Elec att denna So Smart står I överensstämmelse
med de väsentliga egenskapskrav och övriga relevanta bestämmelser som framgår av direktiv
1999/5/EG.
Íslenska [Icelandic] : Hér með lýsir Dane-Elec yr því að So Smart er í samræmi við
grunnkröfur og aðrar kröfur, sem gerðar eru í tilskipun 1999/5/EC.
Norsk [Norwegian] : Dane-Elec erklærer herved at utstyret So Smart er i samsvar med de
grunnleggende krav og øvrige relevante krav i direktiv 1999/5/EF.
[Israël] : 1999/5/ CE מתואם לדרישות התקן המחמירות של «So Smart»חברת «דאן-אלק» מצהירה
בזאת שהמוצר
19
Download User Manual on www.danedigital.com
Page 20

www.danedigital.com
www.dane-elec.com
20
Download User Manual on www.danedigital.com
 Loading...